. This link gives you all the details you need to whip up this delightful dish. This blog posts outlines how to make a delicious no-bake cheesecake with cherry filling. We covered essential and optional ingredients, step-by-step instructions, and helpful tips. You learned about variations and how to store leftovers properly. Enjoying this dessert is easy and fun. With your creativity, you can try new flavors and toppings. This cheesecake will impress friends and family. Make it for your next gathering or treat yourself. Happy baking!](https://pureeatsnow.com/wp-content/uploads/2025/05/200d65cc-c046-400d-b944-c826a5bc0b79-768x768.webp)
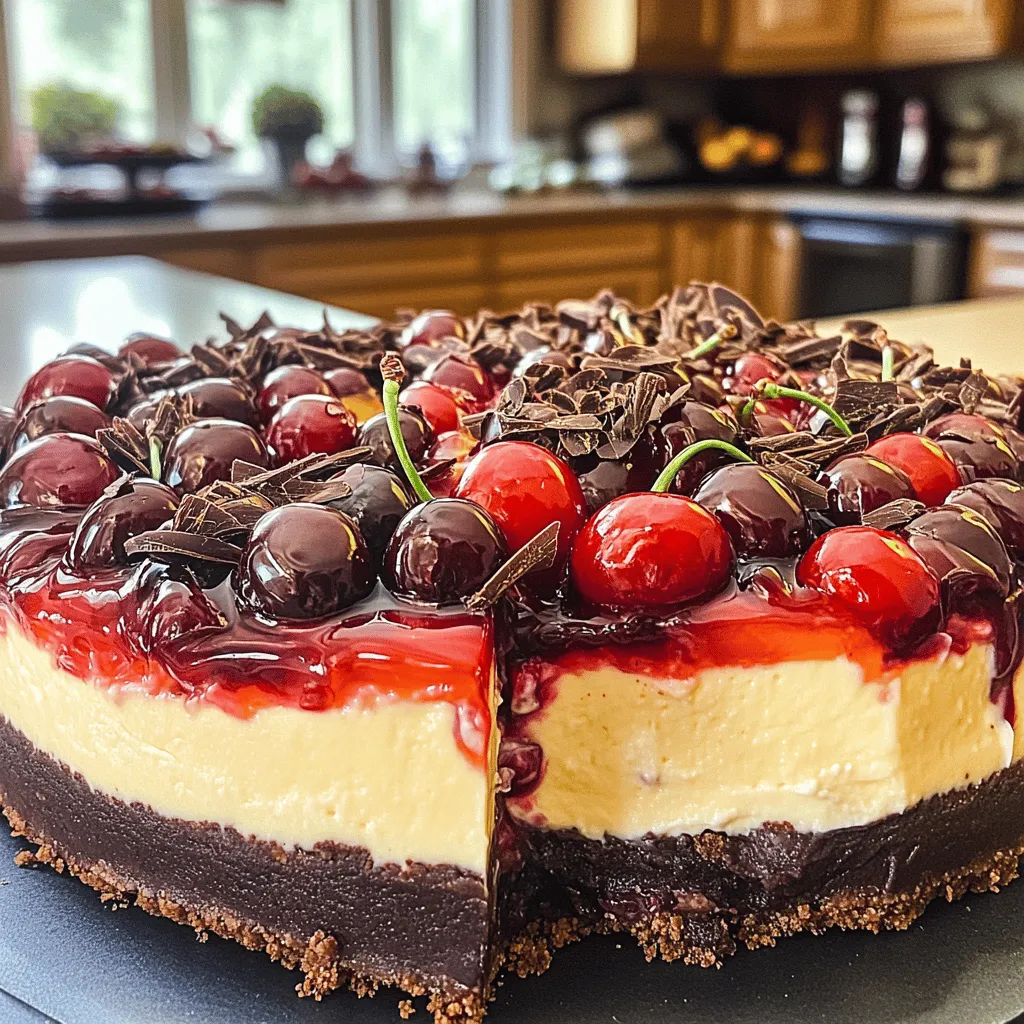
Are you ready to dive into a dessert that’s both easy and delicious? This Black Forest No-Bake Cheesecake combines rich chocolate, creamy cheesecake, and sweet cherries. It’s perfect for any occasion or just a sweet treat at home. In this guide, I’ll walk you through simple steps and share tips to make the best cheesecake ever. Let’s get started on this delightful dessert journey!
Ingredients
Essential Ingredients
– 1 ½ cups chocolate graham cracker crumbs
– ½ cup unsalted butter, melted
– 2 cups cream cheese, softened
– 1 cup powdered sugar
– 1 teaspoon vanilla extract
– 1 ½ cups heavy whipping cream
– 1 cup cherry pie filling
– Dark chocolate shavings for garnish
– Fresh cherries for garnish
To make this cheesecake, you need a few key items. First, the chocolate graham cracker crumbs give the crust a deep, rich flavor. Melted unsalted butter helps bind the crumbs together. For the creamy filling, you’ll need softened cream cheese and sweet powdered sugar. Vanilla extract adds a lovely aroma.
Whipping cream is vital for that light, airy texture. Cherry pie filling is what makes this dessert a true Black Forest treat. You can garnish with fresh cherries and dark chocolate shavings for a special touch.
Optional Ingredients
– Fresh cherries
– Dark chocolate shavings
– Alternative crust options
You might want to add fresh cherries on top for a burst of flavor. Dark chocolate shavings will enhance the look and taste. If you want to try something different, consider using other crust options. You could use an Oreo crust for a twist.Enjoy making this delightful dessert!
Step-by-Step Instructions
Preparing the Crust
To start, mix the chocolate graham cracker crumbs with the melted butter. Use a medium bowl for this. Stir until all crumbs are moist. Next, press this mixture into the bottom of your springform pan. Make sure it is even and firm. Now, chill the crust in the fridge for about 15 minutes. This helps it set before adding the filling.
Making the Cheesecake Filling
In a large bowl, beat the cream cheese with an electric mixer. Keep mixing until it is smooth and creamy. Slowly add the powdered sugar and vanilla extract. Mix until everything combines well. Next, in a separate bowl, whip the heavy cream. You want stiff peaks to form. Gently fold this whipped cream into the cream cheese mixture until no streaks remain. This step adds lightness to your filling.
Assembling the Cheesecake
Now, let’s layer the cheesecake! Pour half of the cheesecake filling over the chilled crust. Spread it evenly. Then, spoon half of the cherry pie filling on top of the cream cheese layer. Pour the rest of the cheesecake filling on top and spread it again. Finally, add the remaining cherry pie filling on top. Make sure it is evenly distributed. Cover the cheesecake with plastic wrap and chill it in the fridge. Let it set for at least 4 hours, or overnight for the best results.
Tips & Tricks
Ensuring a Smooth Texture
To get a smooth texture in your cheesecake, start by beating the cream cheese. Use a hand mixer on medium speed. Beat it for about two minutes until it is creamy. This step is key. If it is not smooth, your cheesecake will have lumps.
Next, fold in the whipped cream gently. Use a spatula and scoop from the bottom. This method keeps the air in the whipped cream. Do not stir too hard, or the cream will lose its fluffiness. Aim for a light and airy mix.
Flavor Enhancements
You can enhance the flavor by adding extra vanilla or almond extract. Just one teaspoon will make a big difference. You can also switch up the toppings. Instead of cherry pie filling, try strawberries or blueberries. Fresh fruit gives a vibrant taste.
Serving Suggestions
For a great presentation, serve with fresh cherries on top. Dark chocolate shavings add a nice touch too. Use a clean knife to slice the cheesecake. For each cut, wipe the knife with a damp cloth. This keeps the slices neat. Pair your cheesecake with coffee or a glass of milk. These drinks complement the rich flavors well.
Variations
Flavor Variations
– Chocolate Cherry Cheesecake: This version adds rich chocolate flavor. Use chocolate cream cheese for a deeper taste. Mix in a bit of melted dark chocolate to enhance the cocoa notes. Top with extra cherry filling for a bold look.
– Vanilla Bean Peach No-Bake Cheesecake: Swap cherries for fresh peaches. Add vanilla bean paste to the cream cheese for a sweet, fragrant taste. This light option is perfect for summer gatherings.
Dietary Substitutions
– Gluten-free options: You can make the crust gluten-free by using gluten-free chocolate graham crackers. This keeps the chocolatey taste while making it safe for those with gluten sensitivities.
– Non-dairy alternatives: Use vegan cream cheese and coconut cream in place of regular cream cheese and heavy cream. This option is great for those who avoid dairy but still want a creamy dessert.
Different Crust Options
– Using Graham cracker vs. Oreo crust: A classic graham cracker crust gives a nice crunch. For a richer taste, try an Oreo crust. Just crush the cookies and mix with melted butter for a sweet base.
– Nut-based crust alternatives: For a healthier twist, use ground almonds or walnuts. Mix them with a bit of coconut oil and press into the pan. This adds a nutty flavor and keeps it gluten-free.
Storage Info
How to Store Leftover Cheesecake
To keep your Black Forest no-bake cheesecake fresh, store it in the fridge. Use an airtight container or cover it tightly with plastic wrap. This helps to keep out air and moisture. Always place it on a flat surface to avoid any spills. If you want to freeze it, slice the cheesecake first. Wrap each piece in plastic wrap and then in foil. This way, you can enjoy a piece anytime. To thaw, place it in the fridge overnight before serving.
Shelf Life
In the fridge, your cheesecake stays fresh for about 3 to 5 days. Always check for signs of spoilage before eating. If the cheesecake starts to smell sour or has an off taste, do not eat it. Look for any mold on the surface. If you see any, it’s best to toss it out. Keeping an eye on your cheesecake will help you enjoy it at its best!
FAQs
How long does it take for No-Bake Cheesecake to set?
A no-bake cheesecake needs time to chill. I recommend chilling it for at least 4 hours. For the best results, leave it overnight. This allows the flavors to blend and the texture to firm up.
Can I use different fruit toppings?
Yes, you can switch up the fruit! Try using strawberries, blueberries, or raspberries. Each fruit adds a unique taste. You can also use pie fillings like peach or apple. Be creative and mix flavors you enjoy.
Is it possible to make this cheesecake ahead of time?
Absolutely! Making this cheesecake a day or two before your event works great. Just store it in the fridge. This way, you save time and still have a tasty dessert ready to serve.This link gives you all the details you need to whip up this delightful dish.
This blog posts outlines how to make a delicious no-bake cheesecake with cherry filling. We covered essential and optional ingredients, step-by-step instructions, and helpful tips. You learned about variations and how to store leftovers properly.
Enjoying this dessert is easy and fun. With your creativity, you can try new flavors and toppings. This cheesecake will impress friends and family. Make it for your next gathering or treat yourself. Happy baking!
. This link gives you all the details you need to whip up this delightful dish. This blog posts outlines how to make a delicious no-bake cheesecake with cherry filling. We covered essential and optional ingredients, step-by-step instructions, and helpful tips. You learned about variations and how to store leftovers properly. Enjoying this dessert is easy and fun. With your creativity, you can try new flavors and toppings. This cheesecake will impress friends and family. Make it for your next gathering or treat yourself. Happy baking!](https://pureeatsnow.com/wp-content/uploads/2025/05/200d65cc-c046-400d-b944-c826a5bc0b79-250x250.webp)
