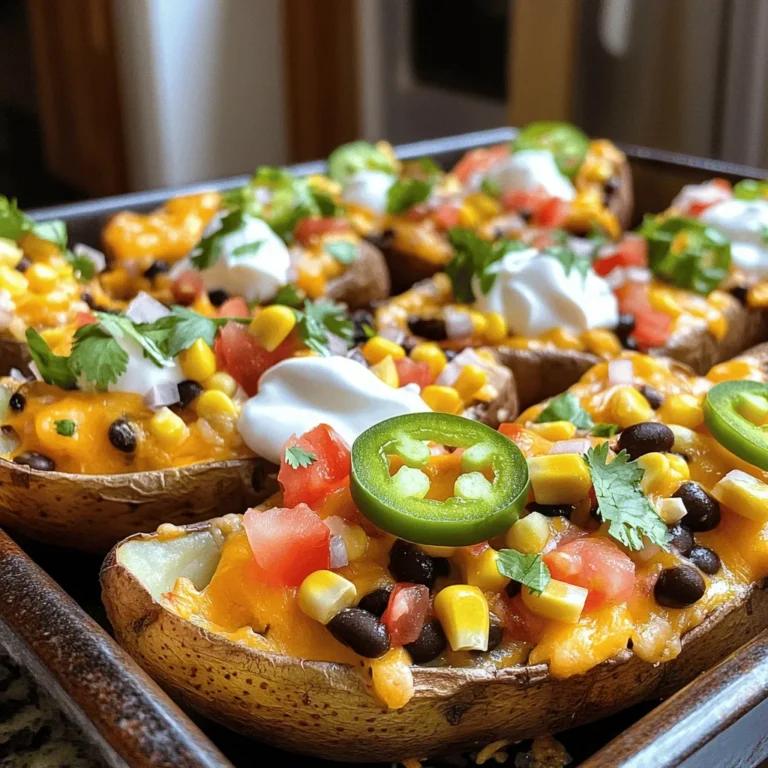
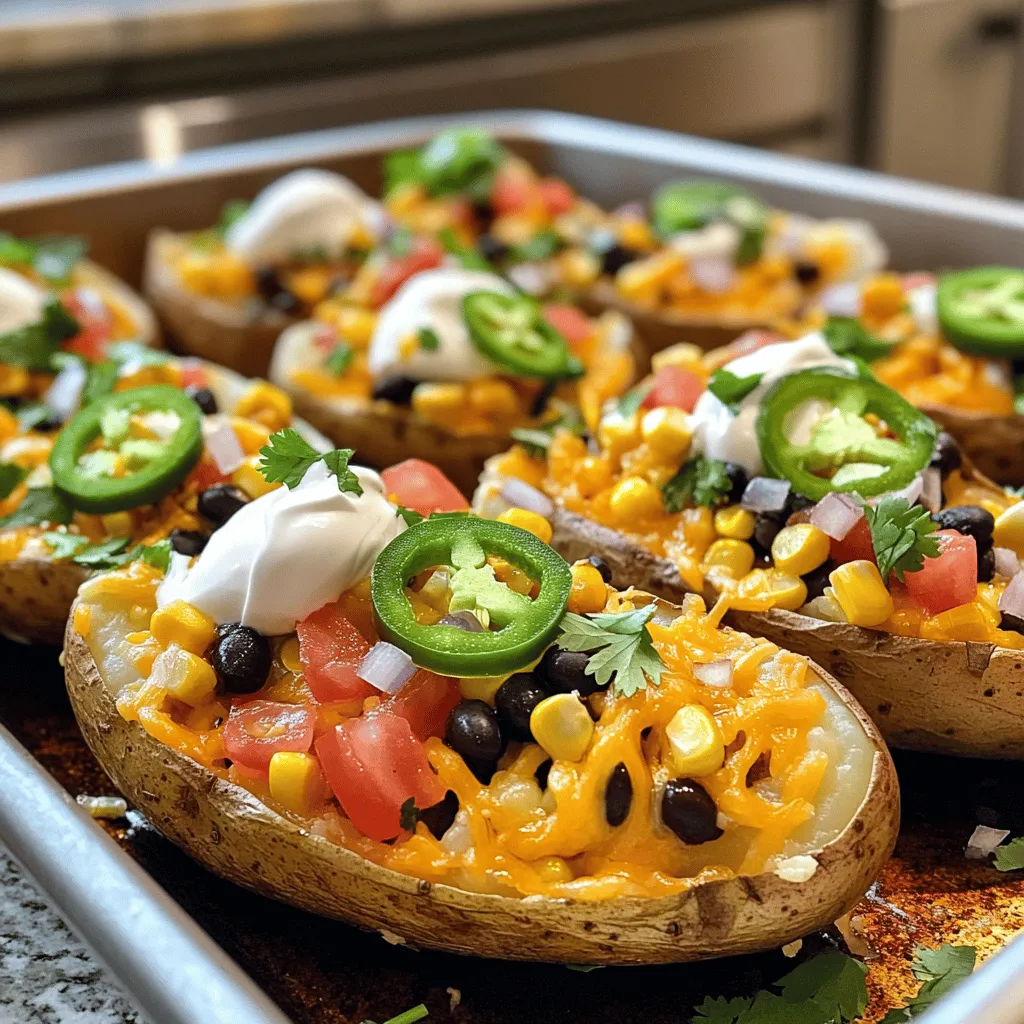
Ready to elevate your snacking game? Our Loaded Nacho Potato Skins recipe combines crispy potato skins with creamy cheese, zesty jalapeños, and hearty black beans. This dish is not just tasty; it’s simple to whip up for any occasion. Whether you’re hosting game night or craving a fun family dinner, these skins will impress everyone. Let’s dive into this easy, flavorful recipe that brings all the nacho goodness you love to the table!
Ingredients
Main Ingredients for Loaded Nacho Potato Skins
– 4 large russet potatoes
– 1 cup shredded cheddar cheese
– 1 cup black beans, drained and rinsed
Additional Ingredients
– 1/2 cup corn kernels (fresh or frozen)
– 1/2 cup diced tomatoes
– 1/4 cup sliced jalapeños (fresh or pickled)
Seasoning and Toppings
– 1/2 cup sour cream
– 1/4 cup chopped green onions
– Olive oil, garlic powder, chili powder, salt, and pepper
When I make loaded nacho potato skins, I always choose large russet potatoes. They have a sturdy texture that holds up well. I bake them until they are just right. For extra flavor, I use sharp cheddar cheese; it melts nicely and adds a rich taste. Black beans offer great protein and a hearty feel.
I also love adding corn. It gives a nice sweetness and crunch. Diced tomatoes add freshness and a splash of color. If you like heat, jalapeños are a must. You can use fresh ones or pickled for a tangy twist.
For seasonings, I stick with simple ingredients. I use garlic powder and chili powder to boost flavor. Salt and pepper enhance all the tastes. The sour cream is a great topping. It adds creaminess and cools down the spice. Chopped green onions give a fresh finish.
This recipe is all about balance. The creamy cheese, crunchy potatoes, and zesty toppings come together in a wonderful way.
Step-by-Step Instructions
Preparation Steps
– Step 1: Preheat the oven to 400°F (200°C). This helps to get the potatoes cooking right away.
– Step 2: Wash and scrub the russet potatoes thoroughly. Remove any dirt, and dry them with a clean towel.
Baking Instructions
– Step 3: Bake the potatoes until tender. This usually takes about 45-60 minutes. You can poke them with a fork to check.
– Step 4: Cut and scoop the potatoes. After they cool, cut each potato in half lengthwise. Leave about 1/4 inch of potato inside.
Final Assembly
– Step 5: Bake the skins and add fillings. Brush the insides with olive oil, and season with garlic powder and chili powder. Bake the skins for 10-15 minutes until they are crispy.
– Step 6: Top and serve your loaded nacho potato skins. Fill each skin with black beans, corn, diced tomatoes, cheese, and jalapeños. Bake again until the cheese melts.
Enjoy making this delicious dish!
Tips & Tricks
Perfecting the Potato Skins
To get crispy potato skins, choose large russet potatoes. They have thick skin that crisps well. Start by washing the potatoes and drying them. Prick each potato with a fork to stop them from bursting. Coat them with olive oil and sprinkle salt on top. Bake at 400°F for 45-60 minutes until tender. After baking, scoop out some flesh, leaving about a quarter inch inside. This helps them stay firm.
Flavor Enhancements
For added flavor, consider spices like cumin and paprika. You can also mix in some minced garlic. Fresh herbs like cilantro or parsley can brighten the dish. When it comes to toppings, homemade options are best. Make your own sauces for freshness. But store-bought toppings can save time and still taste great. Just ensure they complement the dish.
Cooking Time Optimization
Prep time can be cut down by washing and poking the potatoes in advance. You can bake them ahead and store them in the fridge. When ready to serve, just add toppings and reheat. This makes assembly quick and easy. You can also make the toppings ahead of time. Just store them in airtight containers. This way, you have everything ready for a fun gathering.
Variations
Customization Ideas
You can make loaded nacho potato skins your own. For a vegetarian twist, skip the meat. Load them up with extra beans or veggies. If you want a vegan version, use dairy-free cheese and sour cream. You can also add proteins like grilled chicken or beef for heartier skins. This adds flavor and makes them more filling.
Alternative Cheese Options
Cheese makes these potato skins rich and delicious. You can swap cheddar for other cheeses like Monterey Jack or pepper jack. Mixing cheese types can create a fun flavor. Try combining mozzarella for stretchiness and gorgonzola for a sharp bite. This mix can surprise your taste buds and keep things interesting.
Serving Suggestions
Pair your loaded nacho potato skins with tasty dips like guacamole or salsa. These enhance the flavors of the meal. For side dishes, consider a fresh salad or crunchy coleslaw. They add a nice contrast. To drink, enjoy a cold beer or sparkling water. These beverages balance the rich flavors of the skins.
Storage Info
Storing Leftovers
To keep your loaded nacho potato skins fresh, use an airtight container. Store them in the fridge. This helps prevent them from drying out. For best results, eat them within three days. To keep your potato skins crispy, place a paper towel at the bottom of the container. This will absorb any moisture and keep them crunchy.
Reheating Instructions
Reheat your potato skins in the oven for the best texture. Preheat your oven to 350°F (175°C). Place the potato skins on a baking sheet and heat for about 10-15 minutes. This will help them regain their crispiness. You can also use an air fryer for quick reheating. Set it to 350°F (175°C) and heat for 5-7 minutes. If you want to freeze them, wrap each skin in plastic wrap, then place them in a freezer bag. They can last up to three months in the freezer.
Shelf Life
Leftovers can last in the fridge for about three days. If they smell off or look dry, it’s best to toss them. Signs your leftovers are no longer good include a change in color or a slimy texture. Always trust your senses; if it seems wrong, don’t eat it. For the freshest taste, try to eat your loaded nacho potato skins soon after making them.
FAQs
What are some common problems when making nacho potato skins?
One common issue is soggy skins. To avoid this, make sure to bake the potato skins until they are crispy. After baking, let them cool slightly before adding toppings. This helps keep them firm.
Another problem is uneven cooking. To ensure even cooking, use potatoes that are similar in size. Pricking the potatoes before baking also helps them cook evenly.
Can I make loaded nacho potato skins ahead of time?
Yes, you can prep them in advance. Bake the potatoes and scoop them out. Cover the skins and store them in the fridge. This makes assembly quick and easy.
For storage, place the skins in an airtight container. You can store them in the fridge for up to two days. Just remember to bake them before serving.
What are some alternate toppings I can use?
Get creative with your toppings! Try using pulled pork or grilled chicken for a protein boost. You can also add guacamole or pico de gallo for a fresh taste.
If you want healthier options, consider using Greek yogurt instead of sour cream. You can also add more veggies like bell peppers or olives for extra crunch.
Loaded nacho potato skins are an easy and fun dish. They combine simple ingredients like potatoes, cheese, and beans. Following our steps, you can bake them to perfection. Customize with your favorite toppings and spices for extra flavor. Remember, storing leftovers properly ensures they stay delicious. With these tips, you’ll impress your friends and family. Enjoy making this tasty snack, and make it your own with unique twists!

