Craving a quick and tasty treat? These No-Bake Chocolate Oat Bars are your answer! With just a few simple ingredients like oats, nut butter, and honey, you’ll whip up a delicious snack in no time. Plus, they’re easy to customize with your favorite mix-ins. Let’s dive into this simple recipe that promises to satisfy your sweet tooth without the oven. Get ready to enjoy a healthy, no-bake delight!
Ingredients
List of Essential Ingredients
– 2 cups rolled oats
– 1 cup almond butter (or peanut butter)
– 1/2 cup honey (or maple syrup for a vegan option)
Optional Add-Ins
– 1/4 cup unsweetened cocoa powder
– 1/2 cup dark chocolate chips
– 1/4 teaspoon salt
– 1/2 teaspoon vanilla extract
– Optional: 1/4 cup chopped nuts (walnuts or almonds) or seeds (chia or flaxseeds) for added texture
Ingredient Substitutions
You can switch honey with agave nectar or brown rice syrup. For nut-free options, use sunflower seed butter. This recipe is flexible. You can still enjoy tasty bars with these changes. If you want fewer sugars, use mashed bananas or unsweetened applesauce. Each swap keeps the bars yummy while catering to special diets.
For the chocolate lovers, try adding cocoa nibs for a crunchy twist. You can even mix in your favorite dried fruits, like cranberries or apricots, for added flavor. With these simple swaps, your bars can fit any need. Just remember to check the ingredient labels to avoid allergens.Happy cooking!
Step-by-Step Instructions
Preparation Overview
Making No-Bake Chocolate Oat Bars is simple and quick. You will need to gather your ingredients and follow these steps. First, mix your dry items. Then, warm your wet ingredients. Finally, combine everything and set it in a dish.
Mixing Dry Ingredients
Start by taking a large bowl. Add 2 cups of rolled oats. Next, add 1/4 cup of unsweetened cocoa powder. Sprinkle in 1/4 teaspoon of salt. Mix these together well. This blend gives your bars a rich taste.
Making the Wet Mixture
In another bowl, take 1 cup of almond butter and 1/2 cup of honey. Warm this in the microwave for 20 to 30 seconds. When it’s warm, stir in 1/2 teaspoon of vanilla extract. This mixture will bind your bars together.
Combining and Setting the Mixture
Now, pour the wet mixture into the bowl with dry ingredients. Stir until the oats are fully coated. Then, fold in 1/2 cup of dark chocolate chips. If you like, add nuts or seeds for crunch.
Next, line an 8×8 inch baking dish with parchment paper. Press the mixture evenly into the dish. Make sure it is packed tightly. Place it in the fridge for at least 2 hours. This helps the bars set. After they are firm, lift them out using the parchment paper. Cut them into squares or rectangles.Enjoy these delightful treats!
Tips & Tricks
Perfecting the Texture
To get the right texture for your no-bake chocolate oat bars, focus on the mixing. Make sure you blend the rolled oats and cocoa powder well. This ensures even flavor throughout. When you mix in the almond butter and honey, warm them just enough. This makes them easier to stir. If your mix feels too dry, add a touch more almond butter. If it’s too wet, a bit of oats can help. You want a sticky but not runny mix.
How to Store and Cut the Bars
Storing these bars well is key to keeping them fresh. After they set, wrap them tightly in plastic wrap or foil. You can also store them in an airtight container. Keep them in the fridge for up to a week. For cutting, use a sharp knife. Wipe the knife with a damp cloth between cuts. This helps to get clean edges. If the bars feel too soft to cut, let them chill longer.
Enhancing Taste and Presentation
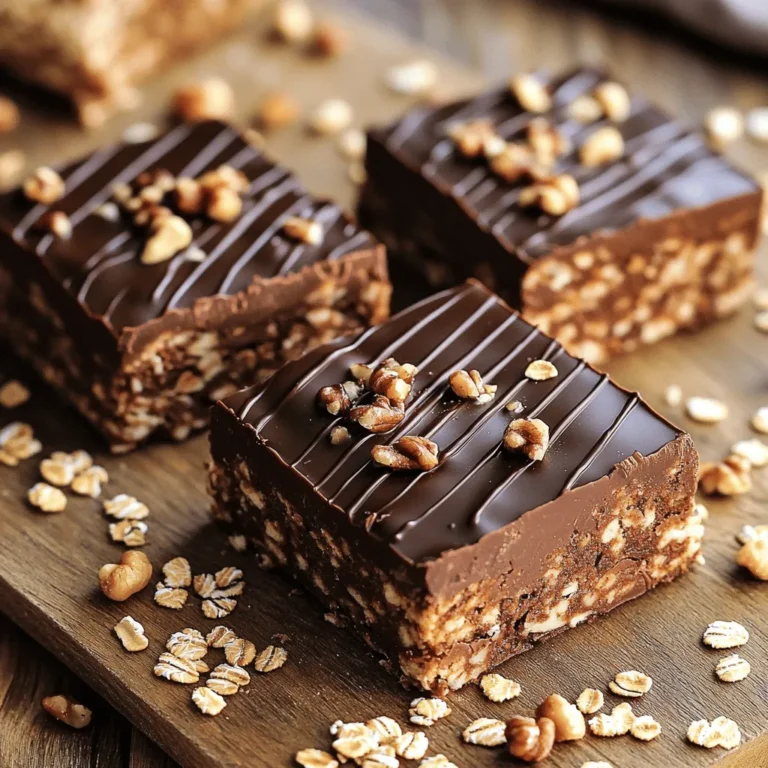
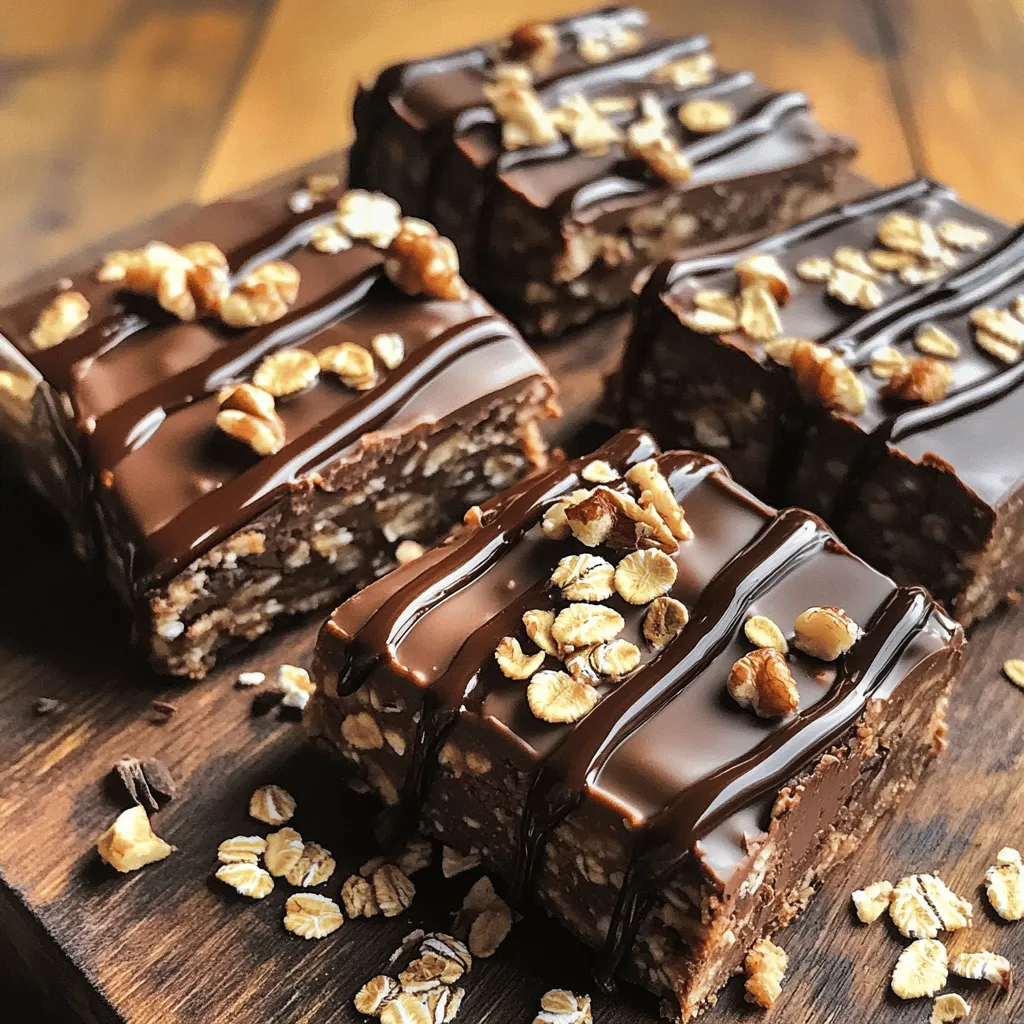
To make your no-bake bars even better, think about presentation. Serve them on a nice cutting board. Drizzle some melted dark chocolate over the top. This adds a fancy touch. You can also sprinkle some extra oats and nuts around. It gives a rustic look that is appealing. For a fun twist, try adding dried fruits or a dash of cinnamon. These small changes can make your bars even tastier and more attractive.
Variations
Vegan No-Bake Chocolate Oat Bars
To make these bars vegan, you can swap honey with maple syrup. Maple syrup gives a great sweetness, and it keeps the bars plant-based. Use almond butter or peanut butter, as both are vegan-friendly. If you want a nut-free option, try sunflower seed butter. This change keeps the taste rich and creamy.
Gluten-Free Options
For gluten-free bars, it’s easy! Just ensure you use certified gluten-free rolled oats. Some brands may mix oats with gluten, so always check the label. The rest of the ingredients, like almond butter and cocoa powder, are naturally gluten-free. Mix them as you would in the standard recipe. You’ll enjoy a tasty gluten-free treat!
Flavor Variations
Want to switch things up? Try adding dried fruits like cranberries or apricots. They add a chewy texture and extra sweetness. You can also sprinkle in some cinnamon or nutmeg for a warm, cozy flavor. Chopped nuts or seeds provide a nice crunch. Experiment with different flavors until you find your favorite combo!
Storage Info
Best Practices for Refrigeration
To keep your no-bake chocolate oat bars fresh, store them in the refrigerator. Wrap each bar in wax paper or plastic wrap. This helps prevent them from drying out. Place wrapped bars in an airtight container. This will keep them safe from odors and moisture. Try to eat the bars within a week for the best taste.
Freezing the Bars
To make your bars last longer, freezing is a great option. First, cut the bars into squares. Then, wrap each piece in plastic wrap. You can also use a freezer-safe bag. Make sure to squeeze out as much air as possible. This helps prevent freezer burn. You can freeze the bars for up to three months. When you’re ready to eat, let them thaw in the fridge overnight.
Shelf Life
These bars stay fresh for about one week in the fridge. If you freeze them, they can last up to three months. Always check for any changes in smell or texture before eating. Proper storage ensures you enjoy every bite of your delicious creation.
FAQs
Can I use different nut butters?
Yes, you can use different nut butters. Peanut butter works great and gives a rich taste. Cashew butter is another option. It has a mild flavor and creamy texture. If you want a nut-free choice, try sunflower seed butter. Each nut butter brings its own unique taste and texture to the bars. Feel free to experiment and find what you love best!
How do I know when the bars are fully set?
To check if the bars are set, gently press on them after two hours in the fridge. If they feel firm and slightly spring back, they are ready. If they still feel soft, give them more time. You can also check the edges; they should pull away from the sides of the dish. Once they are firm, you can cut them into squares or rectangles.
What if I don’t have honey?
If you don’t have honey, you can use maple syrup instead. It is a great vegan option and adds a nice flavor. Use the same amount, 1/2 cup, to replace honey. Agave syrup or brown rice syrup are also good choices. Just remember, each sweetener may change the flavor a bit, so choose one that you like!
Is this recipe kid-friendly?
Absolutely! This recipe is kid-friendly and makes a healthy snack. Kids usually love the taste of chocolate and oats. You can also add fun mix-ins, like mini marshmallows or dried fruits. These bars are easy to make and a great way to get kids involved in the kitchen. Plus, they can help with mixing and pressing the mixture into the dish. Enjoy making this fun treat together!
This article covered how to make delicious no-bake chocolate oat bars. You learned about essential ingredients, optional add-ins, and ingredient substitutions. I also shared step-by-step instructions and tips for perfect texture. Feel free to try fun variations and remember to store your bars properly for freshness. In the end, these bars are tasty, healthy snacks for everyone at home. Try them out and enjoy your homemade treats!

