If you love chocolate and Oreos, prepare for a treat! My Triple Chocolate Oreo Brownies are rich, fudgy, and super easy to make. With layers of chocolate flavor and crunchy Oreo bits, these brownies will wow your friends and satisfy your cravings. Get ready to follow straightforward steps and whip up a dessert that brings smiles. You won’t want to miss this delicious recipe!
Ingredients
To make delicious Triple Chocolate Oreo Brownies, you need the right ingredients. Here’s what you’ll need:
– 1 cup unsalted butter (2 sticks)
– 1 cup granulated sugar
– 1 cup packed brown sugar
– 4 large eggs
– 2 teaspoons vanilla extract
– 1 cup all-purpose flour
– 1 cup cocoa powder (unsweetened)
– 1/2 teaspoon salt
– 1 cup chocolate chips (milk or dark)
– 8-10 Oreo cookies, roughly chopped
– 1/2 cup white chocolate chips (optional)
Each ingredient plays a big role in the final taste and texture. Unsalted butter adds richness. Both sugars create the perfect sweetness. Eggs give structure and moisture. Vanilla adds warmth. The flour and cocoa powder form the base. Salt enhances all flavors. Chocolate chips bring extra chocolatey goodness. Chopped Oreos add a fun crunch. You can even add white chocolate chips for more flavor. Choose your favorite chocolate types to make it personal!
Step-by-Step Instructions
Preheat the Oven
1. First, preheat your oven to 350°F (175°C).
2. Next, grease a 9×13-inch baking dish. I like using butter or cooking spray.
3. For easy removal, line the dish with parchment paper. This helps keep the brownies intact.
Prepare the Batter
1. In a medium saucepan, melt 1 cup of unsalted butter over low heat.
2. Once melted, take it off the heat and let it cool a bit.
3. In a large mixing bowl, mix the melted butter with 1 cup of granulated sugar and 1 cup of packed brown sugar. Stir until everything blends well.
4. Add 4 large eggs one at a time. Mix well after each egg.
5. Then, stir in 2 teaspoons of vanilla extract until the mix is smooth.
6. In another bowl, whisk together 1 cup of all-purpose flour, 1 cup of cocoa powder, and 1/2 teaspoon of salt.
7. Gradually add this dry mix to the wet mix. Stir until just combined.
Add Chocolates and Bake
1. Now, gently fold in 1 cup of chocolate chips and 8-10 roughly chopped Oreo cookies. If you like, add 1/2 cup of white chocolate chips too.
2. Pour the batter into the prepared baking dish. Use a spatula to spread it evenly.
3. Bake in the preheated oven for 25-30 minutes. Check doneness by inserting a toothpick in the center. It should come out with a few moist crumbs.
Tips & Tricks
Perfecting the Brownie Texture
Checking Oven Temperature
Always check your oven’s temperature with an oven thermometer. Ovens can be off by quite a bit. If your oven runs hot, your brownies may bake too fast. If it’s cooler, they may take longer and can end up dry. Aim for a steady 350°F (175°C) for the best results.
Mixing Techniques
When you mix your batter, do not overmix. Stir just enough to combine your wet and dry ingredients. Overmixing adds too much air and can lead to cakey brownies. You want a rich, fudgy texture, so be gentle when folding in the chocolate chips and Oreos.
Presentation Ideas
Serving Suggestions
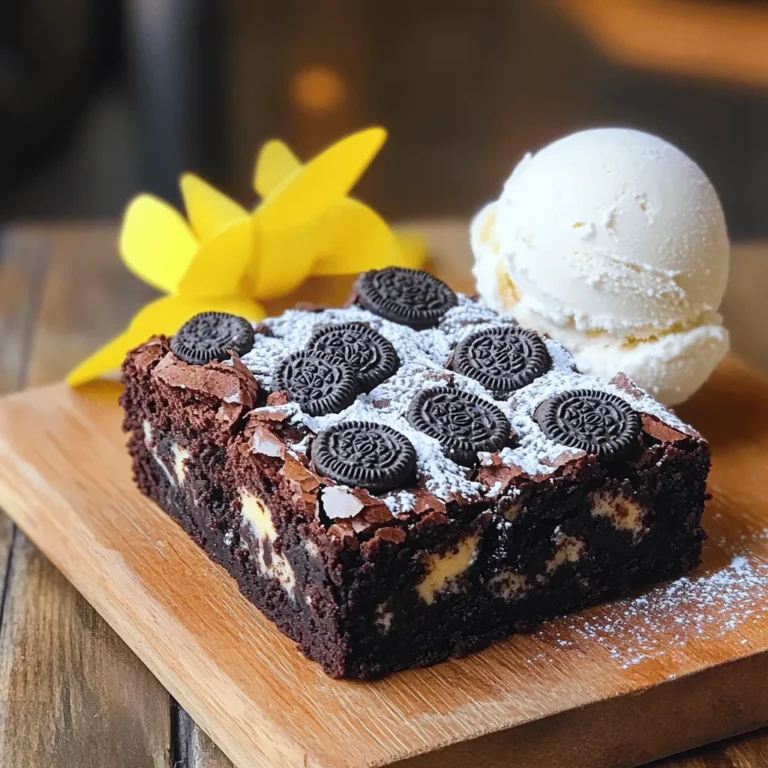
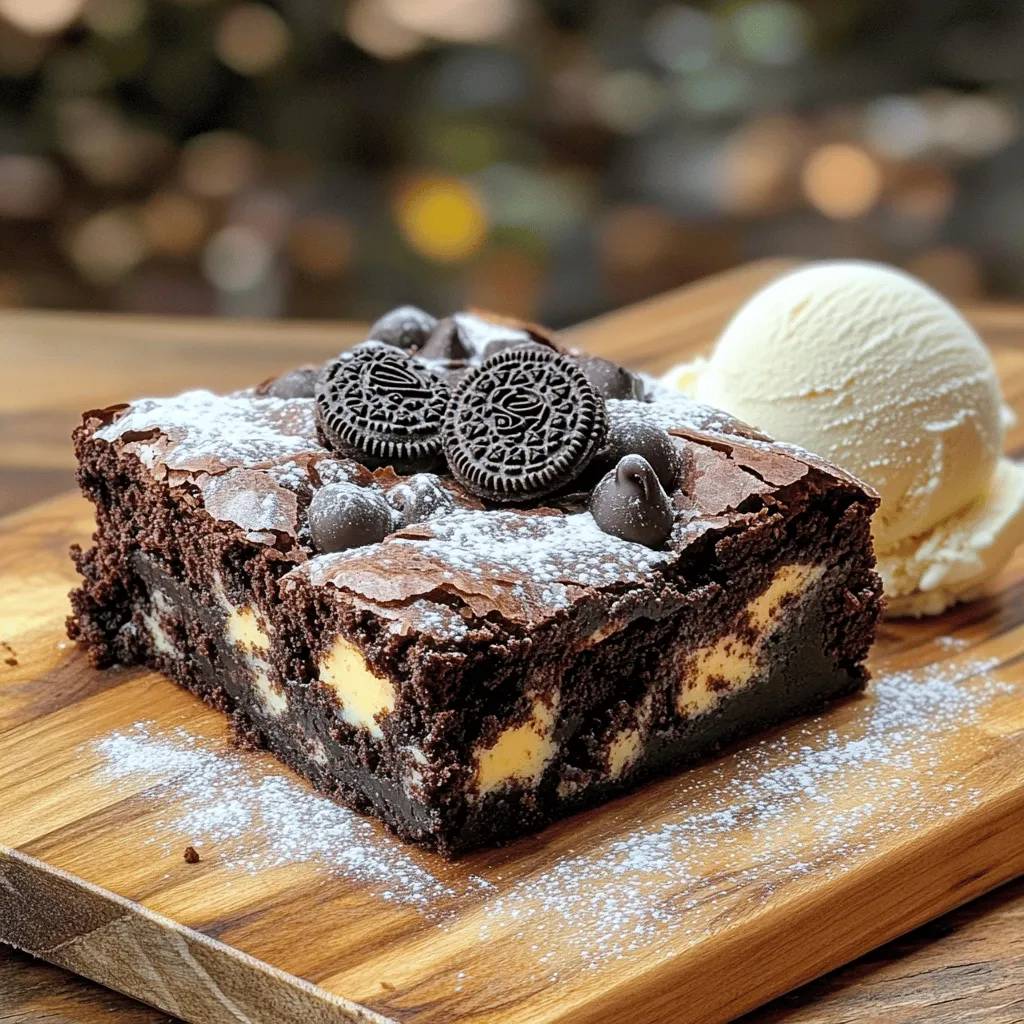
Serve these brownies warm for a gooey treat. Pair them with a scoop of vanilla ice cream or whipped cream. You can also drizzle chocolate sauce on top for extra indulgence. A sprinkle of sea salt on top adds a nice contrast to the sweetness.
Dusting and Pairings
Dust your brownies with powdered sugar for a classy touch. You can also add fresh berries or mint leaves for color and freshness. These simple additions can elevate your brownies for guests or special occasions.
Common Mistakes to Avoid
Overmixing the Batter
As mentioned, overmixing is a common mistake. This can lead to tough brownies. Mix just until everything is combined, and you’re good to go!
Baking Time Misjudgment
Keep an eye on your baking time. Start checking at the 25-minute mark. Insert a toothpick into the center. If it comes out with moist crumbs, your brownies are ready. If it comes out clean, you may have overbaked them. Trust your instincts!
Variations
Adding Different Chocolate Types
You can switch up the chocolate types in these brownies to suit your taste. Dark chocolate gives a rich flavor. It pairs well with the sweetness of Oreos. You can also use milk chocolate for a sweeter treat. It makes the brownies extra gooey. If you want to get fancy, swirl in some white chocolate. This adds a creamy touch and a pop of color.
Oreo Alternatives
If you want to try something new, you can use other cookie brands. Look for cookies with a similar crunch. This will keep the texture right. If you need a gluten-free option, there are gluten-free Oreos available. They taste just as good and work well in this recipe.
Flavor Enhancements
Want to add more flavor to your brownies? Toss in some nuts for a nice crunch. Walnuts or pecans work well. You can also add caramel for a sweet surprise. It gives your brownies a gooey center. Another option is to play with extracts. Try almond or mint extract for a unique taste. Just remember to use a little. A small amount goes a long way.
Storage Info
Best Storage Practices
To keep your Triple Chocolate Oreo Brownies fresh, choose the right container. Use an airtight container to prevent them from drying out. If you do not have one, wrap brownies tightly in plastic wrap. This keeps moisture in and air out.
You can store brownies at room temperature or in the fridge. Room temperature works best for up to four days. If you want them to last longer, refrigerate them for about a week. Just know that they might lose some of their gooey texture in the fridge.
Freezing Brownies
To freeze your brownies, start by cutting them into squares. Wrap each square in plastic wrap. Then, place the wrapped brownies in a freezer-safe bag. This helps prevent freezer burn. They can last up to three months in the freezer.
When you are ready to enjoy them, take them out and let them thaw in the fridge overnight. If you want them warm, microwave them for about 10-15 seconds. This will bring back that fresh-baked taste.
Shelf Life Expectations
The freshness of your brownies can change based on how you store them. If they stay in an airtight container at room temperature, they can last for about four days. In the fridge, they are good for about a week.
Watch for signs of spoilage. If the brownies look dry or have mold, it is time to toss them. A great way to check is to smell them. If they smell off, it’s best to throw them away. Enjoy your brownies while they are at their best!
FAQs
How do I know when the brownies are done?
The toothpick test is simple. Insert a toothpick into the center of the brownies. If it comes out with a few moist crumbs, they are done. If it’s wet with batter, they need more time. I usually bake them for 25 to 30 minutes. Check around the 25-minute mark to be safe. Remember, the brownies will firm up as they cool.
Can I make these brownies ahead of time?
Yes, you can! Make the brownies a day or two in advance. Store them in an airtight container at room temperature. This keeps them fresh and tasty. If you want to store them longer, put them in the fridge. Just remember to bring them to room temperature before serving for the best taste.
What are some topping ideas for Triple Chocolate Oreo Brownies?
There are many fun topping ideas! Here are a few suggestions:
– Drizzle melted chocolate or white chocolate on top for extra sweetness.
– Sprinkle crushed Oreos for a crunchy bite.
– Add nuts like walnuts or pecans for a nice texture.
– Serve with a scoop of vanilla ice cream for a creamy contrast.
– Top with whipped cream and chocolate shavings for a fancy touch.
Feel free to mix and match these toppings to find your favorite combination!
You have all the tools to make delicious Triple Chocolate Oreo Brownies. We covered key ingredients, step-by-step instructions, and helpful tips. Take care when mixing to keep the batter light, and check the oven temperature for perfect baking. Don’t forget to experiment with flavors and toppings.
These brownies are not just a treat; they’re a fun way to bond with family and friends. Enjoy your baking adventure!

