Fall is here, and it’s the perfect time to bake warm, soft Pumpkin Cream Cheese Scones. Imagine sweet, spiced pumpkin goodness with a creamy filling that’ll make your taste buds dance. In this easy guide, I’ll share my secrets for making bakery-style scones that are flaky, flavorful, and sure to impress. Let’s gather our ingredients and get baking!
Ingredients
List of Ingredients
– 2 cups all-purpose flour
– 1/2 cup granulated sugar
– 1 tablespoon baking powder
– 1 teaspoon ground cinnamon
– 1/2 teaspoon ground nutmeg
– 1/4 teaspoon ground ginger
– 1/2 teaspoon salt
– 1/2 cup unsalted butter, chilled and cubed
– 1/2 cup pumpkin puree
– 1/4 cup cream cheese, softened
– 1/4 cup heavy cream
– 1 large egg
– 1 teaspoon vanilla extract
– 1/2 cup chopped walnuts or pecans (optional)
– Egg wash: 1 egg beaten with 1 tablespoon of milk for brushing
– Raw sugar for sprinkling on top
Using fresh ingredients is key to great flavor. You can swap all-purpose flour for a gluten-free blend if needed. For a dairy-free option, try a plant-based cream cheese. If you want more crunch, add in some chopped nuts. These choices let you make the recipe your own while keeping it tasty.
Step-by-Step Instructions
Prepping the Ingredients
1. Preheat the Oven: Heat your oven to 400°F (200°C). This step is key for a great bake.
2. Prepare the Baking Sheet: Line a baking sheet with parchment paper. This keeps the scones from sticking.
3. Prepare the Dry Ingredients: In a big bowl, mix together:
– 2 cups all-purpose flour
– 1/2 cup granulated sugar
– 1 tablespoon baking powder
– 1 teaspoon ground cinnamon
– 1/2 teaspoon ground nutmeg
– 1/4 teaspoon ground ginger
– 1/2 teaspoon salt
4. Mix the Wet Ingredients: In another bowl, whisk together:
– 1/2 cup pumpkin puree
– 1/4 cup cream cheese, softened
– 1/4 cup heavy cream
– 1 large egg
– 1 teaspoon vanilla extract
Combining Mixtures
1. Cut in the Butter: Add 1/2 cup chilled, cubed unsalted butter into the dry mix. Use a pastry cutter or your fingers. Work it in until it looks like coarse crumbs.
2. Combine Wet and Dry Ingredients: Pour the wet mix into the dry mix. Stir gently until just combined. Don’t overmix! If you want, fold in 1/2 cup chopped walnuts or pecans.
Shaping and Baking the Scones
1. Knead and Shape the Dough: Turn the dough onto a floured surface. Knead it gently a few times. Pat it into a rectangle about 1 inch thick. Cut it into triangles or squares.
2. Add Egg Wash and Sprinkle Sugar: Place the scones on the baking sheet. Brush the tops with an egg wash (1 beaten egg mixed with 1 tablespoon milk). Sprinkle raw sugar on top for extra crunch.
3. Bake: Bake in the oven for 15-20 minutes. Check when the tops are golden brown. Insert a toothpick to see if it comes out clean.
Enjoy your delicious pumpkin cream cheese scones warm!
Tips & Tricks
Achieving Bakery-Style Scones
To make perfect scones, focus on texture. You want them to be flaky and soft. Here are some tips:
– Use chilled butter: Cold butter creates steam. This steam helps the scones rise and stay flaky.
– Cut in the butter: Use a pastry cutter or your fingers. Aim for pea-sized pieces. This helps keep a light texture.
Flavor Variations
You can play with flavors in your scones. Here are some ideas:
– Spices: Add more spices like cloves or allspice for a warm kick.
– Mix-ins: Try adding chocolate chips, dried cranberries, or a bit of orange zest for a unique twist.
For toppings, consider:
– Glaze: A simple glaze made from powdered sugar and milk adds sweetness.
– Cream cheese frosting: Pipe it on top for a rich finish.
Serving Suggestions
Pair your scones for a delightful treat. Here are some great options:
– Butter or cream cheese: Serve with a spread for extra creaminess.
– Fruit preserves: Try strawberry or fig preserves for a sweet touch.
For a fun presentation:
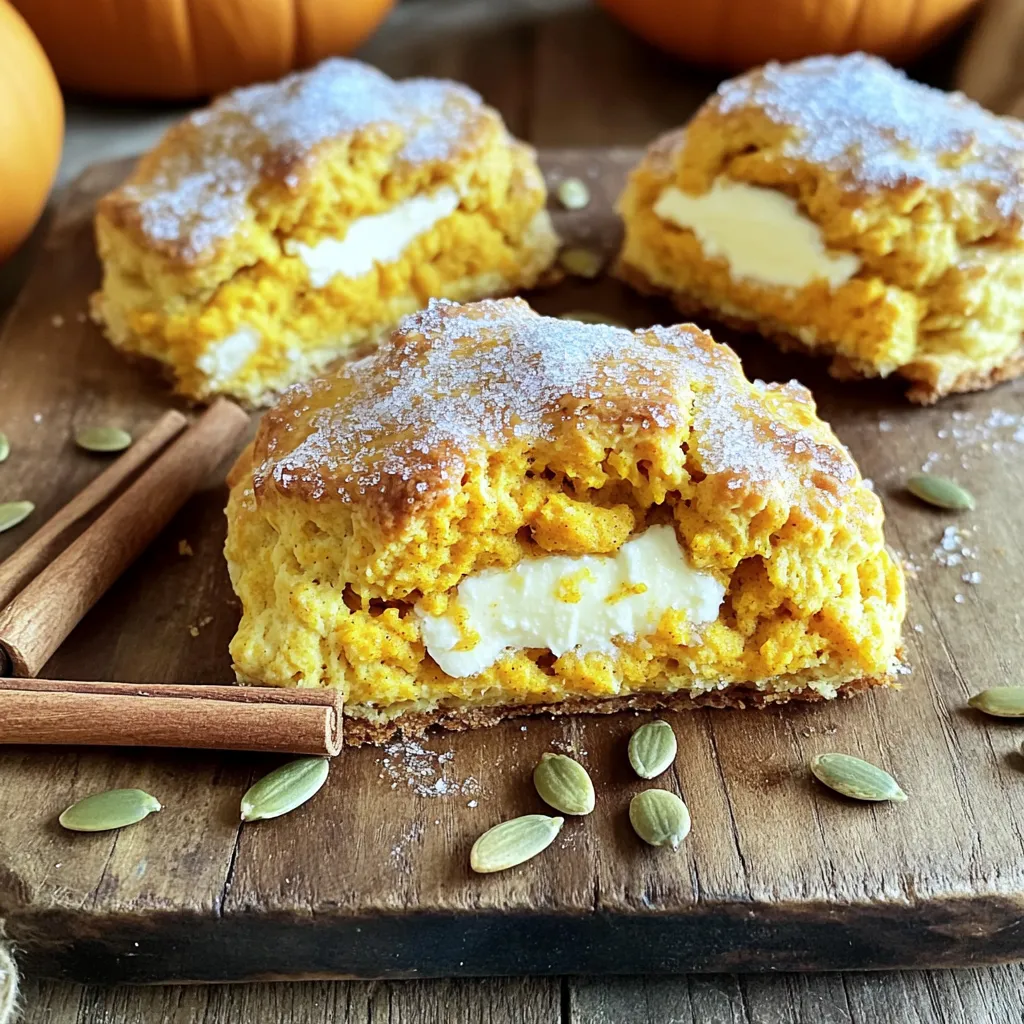
– Rustic board: Arrange scones on a wooden board. Add cinnamon sticks and pumpkin seeds for a cozy look.
– Plates with autumn leaves: Use seasonal décor to enhance your table setting.
Variations
Nut-Free Options
If you want nut-free scones, just leave out the nuts. You can replace them with more pumpkin or add extra spices. Try adding a tablespoon of chocolate chips for a sweet twist. Dried fruits like cranberries or raisins also make a great addition. They will add flavor without altering the texture.
Gluten-Free Adaptation
To make gluten-free scones, use a good gluten-free flour blend. Look for blends that include xanthan gum. This helps the scones hold together. You may want to add a bit more liquid, like heavy cream, to keep the dough moist. Test different blends to find one that suits your taste.
Vegan Versions
If you want to make vegan pumpkin scones, swap out the eggs and cream cheese. Use flaxseed meal mixed with water as an egg substitute. For the cream cheese, try a vegan cream cheese or blend silken tofu with some lemon juice. Use coconut cream in place of heavy cream for a rich flavor. This way, everyone can enjoy these tasty treats!
Storage Info
Short-term Storage
To store your pumpkin cream cheese scones at room temperature, place them in an airtight container. This keeps them fresh for up to two days. Make sure to let the scones cool completely before sealing. This prevents moisture buildup. If you want to keep them crisp, avoid stacking them. Instead, place parchment paper between layers.
Long-term Storage
For long-term storage, freezing is your best option. First, let the scones cool fully. Wrap each scone tightly in plastic wrap. Then, place the wrapped scones in a freezer-safe bag. Label the bag with the date, and they can last up to three months. When you’re ready to enjoy them, just take out as many as you need.
Reheating Tips
To reheat scones and keep them fresh, preheat your oven to 350°F (175°C). Reheat them on a baking sheet for about 10-15 minutes. This restores their warmth and texture. You can also use a microwave. Heat each scone for about 15-20 seconds. However, the oven method works best for a crispy outside. Enjoy your scones warm!
FAQs
Can I use fresh pumpkin instead of puree?
You can use fresh pumpkin, but it needs prep work. First, cook the pumpkin by baking or steaming it until soft. Then, mash it well and strain out extra water. This helps achieve the right texture. Canned pumpkin puree is thicker and smoother, which makes mixing easier. If you use fresh, your scones may be a bit wetter. Adjust flour to balance moisture.
How can I tell when my scones are done?
To check for doneness, insert a toothpick into the center of a scone. If it comes out clean, they are ready. You can also look for golden brown tops. The scones should feel firm to the touch. If they look pale or feel soft, give them a few more minutes.
Can I make the dough ahead of time?
Yes, you can make the dough ahead. Prepare it and shape it into a rectangle. Wrap it tightly in plastic wrap and store it in the fridge for up to 24 hours. When you’re ready to bake, cut the scones and add the egg wash. You can also freeze the dough for up to a month. Just thaw it overnight in the fridge before baking.
In this post, we covered all you need to know to bake perfect scones. We discussed ingredients, detailed steps, and tips for success. Whether you want nut-free, gluten-free, or vegan options, we have you covered. Remember, the right techniques give the best texture. Store your scones properly for lasting freshness. With these guidelines, you can enjoy tasty scones any time. Happy baking and enjoy your delicious treats!