Skip to content
DisclaimerTerms Of UseGDPR PolicyCookie Policy

pureeatsnow

  • Home
  • Drinks
  • Appetizers
  • Dinner
  • Dessert
  • About
  • Contact
  • Privacy Policy
DisclaimerTerms Of UseGDPR PolicyCookie Policy

Rachel

- 4 boneless, skinless chicken breasts - 2 cups fresh spinach, chopped - 1 cup cream cheese, softened - 1/2 cup grated Parmesan cheese - 1 teaspoon garlic powder - 1 teaspoon onion powder - Salt and pepper to taste - 1 tablespoon olive oil - 1/2 cup breadcrumbs - Fresh herbs (like parsley or basil) for garnish This recipe uses simple ingredients that pack a lot of flavor. The chicken breasts are the stars, providing a tasty canvas. The fresh spinach adds nutrition and color. Cream cheese and Parmesan give the filling a rich and creamy texture. Garlic and onion powder round out the taste nicely. The olive oil helps sauté the spinach and keeps the chicken moist as it bakes. Breadcrumbs give a nice crunch on top. Fresh herbs add a lovely finish that brightens the dish. When selecting your ingredients, always pick the freshest spinach and finest cheeses. This choice makes a big difference in taste. You can easily personalize these ingredients. Try using feta cheese instead of Parmesan or add other spices to suit your taste. Every ingredient plays a role, creating a wonderful harmony in each bite. Enjoy making this creamy spinach stuffed chicken breast! {{ingredient_image_1}} 1. Preheat your oven to 375°F (190°C). This helps the chicken cook evenly. 2. In a skillet, add 1 tablespoon of olive oil. Heat it over medium heat. 3. Sauté 2 cups of chopped spinach in the oil for about 2-3 minutes. The spinach should look wilted and bright green. 4. In a bowl, mix the sautéed spinach with 1 cup of softened cream cheese, 1/2 cup of grated Parmesan cheese, 1 teaspoon of garlic powder, 1 teaspoon of onion powder, and a pinch of salt and pepper. Stir until everything blends well. 1. Take 4 boneless, skinless chicken breasts and pat them dry with a paper towel. This helps the filling stick better. 2. Using a sharp knife, make a cut along the side of each chicken breast. This creates a pocket for the filling. 3. Stuff each chicken breast with the creamy spinach mixture. Fill them generously but don’t overstuff. Secure the opening with toothpicks if needed to keep the filling inside. 1. Place the stuffed chicken breasts in a baking dish. Make sure they have enough space. 2. Sprinkle 1/2 cup of breadcrumbs over the top for a crispy finish. This adds great texture. 3. Bake in your preheated oven for 25-30 minutes. Check the chicken’s internal temperature. It should reach 165°F (75°C) to be safe to eat. Enjoy the cooking process! You will love how this dish fills your kitchen with mouthwatering aromas. - Always pat the chicken dry. This step helps the chicken brown better. - To check for doneness, use a meat thermometer. The chicken should reach 165°F. When you check the chicken, insert the thermometer into the thickest part. This ensures the meat is cooked through. If you don’t have a thermometer, you can cut into the chicken. The juices should run clear, not pink. - For side dishes, serve with sautéed vegetables or roasted potatoes. These pair nicely with the creamy chicken. - Garnish the dish with fresh herbs like parsley or basil. It adds color and flavor. You can also drizzle a bit of olive oil over the chicken for an extra touch. This makes the dish look more appealing and adds a nice richness. Serve it on a colorful plate to impress your guests. Pro Tips Choosing the Right Chicken: Opt for chicken breasts that are similar in size to ensure even cooking. Making the Filling Creamier: For an extra creaminess, consider adding a splash of heavy cream or sour cream to the spinach mixture. Perfectly Crispy Topping: For added crunch, mix some grated Parmesan into the breadcrumbs before sprinkling them on top. Resting is Key: Let the chicken rest for a few minutes after baking to help retain the juices for a more tender bite. {{image_2}} You can get creative with your creamy spinach stuffed chicken breast. Here are some easy swaps: - Alternative cheeses or greens: Try using ricotta or feta cheese instead of cream cheese. You can also mix in kale or arugula for a different taste. - Additional spices or flavorings: Add a pinch of red pepper flakes for heat or a squeeze of lemon juice for brightness. A touch of nutmeg can give the filling a warm flavor. Many people have different diets. You can easily adjust this recipe: - Keto or low-carb options: Use zucchini noodles or cauliflower rice as a side. You can skip the breadcrumbs or use almond flour for a crunchy top. - Dairy-free variations: Substitute cream cheese with a dairy-free version, like cashew cream. Nutritional yeast can add a cheesy flavor without dairy. These variations help you fit this dish to your taste and diet. Enjoy the creamy spinach stuffed chicken your way! To keep your creamy spinach stuffed chicken fresh, follow these tips. First, let the chicken cool completely before storing. Place it in an airtight container. This method helps keep the moisture in and prevents bad smells. You can also wrap each piece in plastic wrap for extra protection. In the fridge, this dish lasts about 3 to 4 days. If you want to enjoy it later, consider freezing it for longer storage. Freezing stuffed chicken is simple. First, let the cooked chicken cool down. Wrap each piece in plastic wrap and then in aluminum foil. This double layer keeps the air out and preserves the flavor. You can also use a freezer-safe bag. Make sure to squeeze out any air before sealing. When you're ready to eat, thaw the chicken in the fridge overnight. For reheating, place it in an oven set to 350°F (175°C) until heated through. This method keeps the chicken tender and moist. Enjoy your delicious meal again! Can I use frozen spinach? Yes, you can use frozen spinach. Just make sure to thaw it first. Squeeze out any extra water. This keeps your filling from being too wet. It will still taste great! What temperature should the chicken reach? The chicken needs to reach an internal temperature of 165°F (75°C). This ensures it is safe to eat. Use a meat thermometer for best results. Why is my chicken dry? If your chicken is dry, it could be overcooked. Always check the temperature. Cook it just until it reaches 165°F (75°C). Let it rest for a few minutes before cutting. This helps keep the juices inside. How do I fix a broken sauce? If your sauce is broken, try adding a little cream cheese. This can help bring it back together. Whisk it in slowly over low heat until smooth. This blog post outlined a delicious stuffed chicken recipe. We covered the list of ingredients, preparation steps, baking instructions, and helpful tips. I also shared variations and storage info to make meal prep easy. Remember, you can adjust flavors to suit your taste. Enjoy honing your cooking skills and impressing others with this dish. Happy cooking!

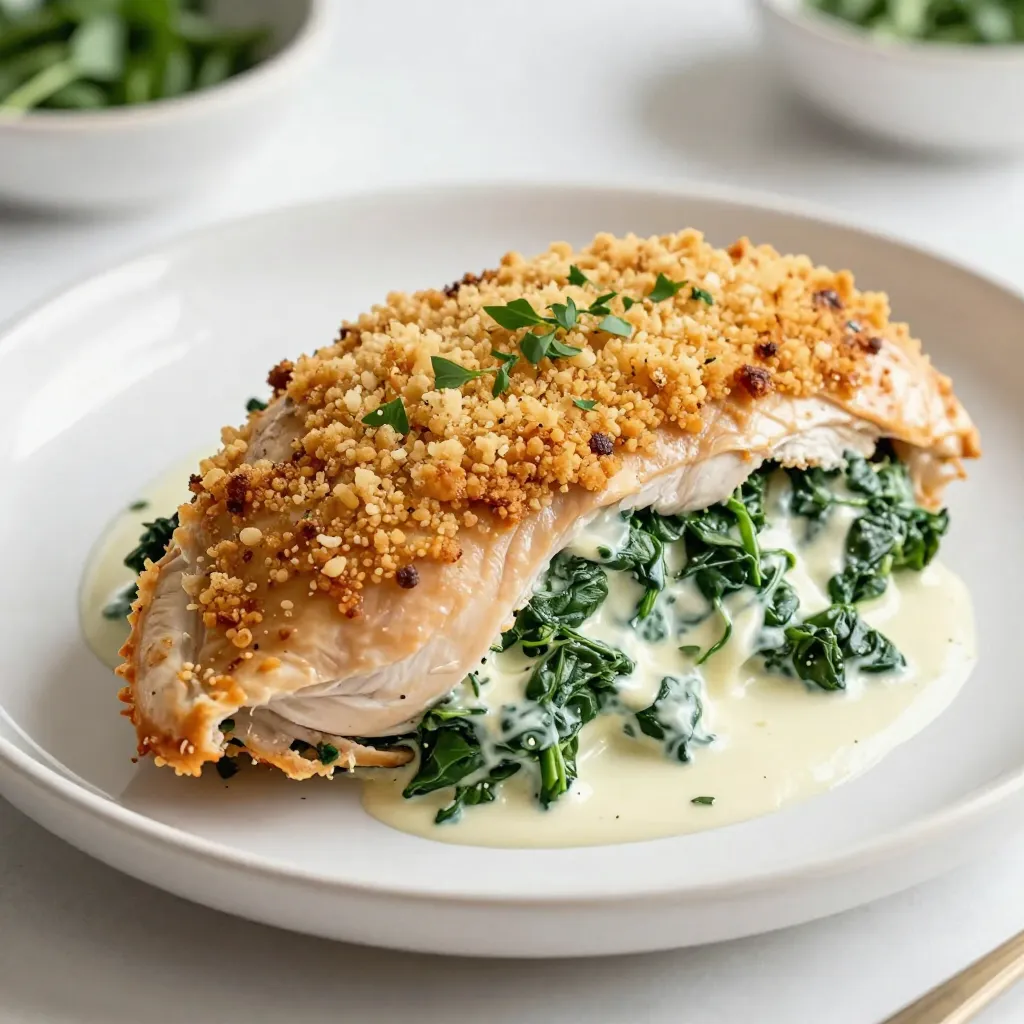
Creamy Spinach Stuffed Chicken Breast Flavorful Delight

Are you ready to impress your family with a dish that screams comfort? This Creamy Spinach Stuffed Chicken Breast is

- 1 cup unsalted butter, melted - 2 cups granulated sugar - 4 large eggs - 1 teaspoon vanilla extract - 1 cup all-purpose flour - 1 cup unsweetened cocoa powder - 1/2 teaspoon baking powder - 1/2 teaspoon salt - 1 cup semi-sweet chocolate chips - 1 cup mini marshmallows - 1 cup graham cracker crumbs - 1/2 cup chocolate sauce (for drizzling on top) - Importance of using unsalted butter: Unsalted butter gives you control over the salt in your recipe. You can adjust salt levels to taste. It also lets the sweet flavors shine more. - Benefits of semi-sweet chocolate chips: Semi-sweet chocolate chips balance the sweetness of the brownie pie. They melt well and add rich chocolate flavor. - Alternative ingredients for dietary preferences: You can use coconut oil instead of butter for a dairy-free option. Almond flour works for a gluten-free version. Dark chocolate chips also add a deeper flavor. {{ingredient_image_1}} - Preheat your oven to 350°F (175°C). - Lightly grease a 9-inch pie dish or round pan with butter. - In a large bowl, mix melted butter with granulated sugar until smooth. - Add four large eggs, one at a time. Mix well after each egg. - Stir in one teaspoon of vanilla extract for flavor. - In a separate bowl, whisk together one cup of flour, one cup of cocoa powder, half a teaspoon of baking powder, and half a teaspoon of salt. - Gradually add this dry mixture into the wet mixture. Stir until just combined. - Fold in one cup of semi-sweet chocolate chips. Make sure they spread evenly. - Pour half of the brownie batter into the greased pie dish. Spread it out evenly. - Sprinkle one cup of graham cracker crumbs over the brownie layer. - Next, add one cup of mini marshmallows on top of the crumbs. - Pour the remaining brownie batter over the marshmallows. Smooth it out with a spatula. - Bake in the oven for 30 to 35 minutes. Use a toothpick to check doneness; it should have moist crumbs. - After baking, remove the pie from the oven. Let it cool for ten minutes. - Drizzle half a cup of chocolate sauce on top while still warm. - Cut into slices and serve warm or at room temperature. Enjoy the gooey marshmallows! - Testing doneness with a toothpick: When baking, insert a toothpick into the center of the pie. If it comes out with moist crumbs, the pie is ready. If it has wet batter on it, give it more time in the oven. - How to avoid overmixing: Mix your ingredients just until they combine. Overmixing can make the pie tough. You want a smooth batter, but lumps are okay. - Best ways to drizzle chocolate sauce: Use a squeeze bottle for easy drizzling. Start from one side and move to the other in quick strokes. This gives a nice, even look. - Ideal serving suggestions: Serve warm for the best gooey experience. Pair with vanilla ice cream or whipped cream for extra delight. - How to store leftovers properly: Wrap the pie tightly in plastic wrap. Store it in an airtight container in your fridge. This keeps it fresh for up to three days. - Reheating suggestions to maintain gooeyness: Reheat slices in the microwave for about 10-15 seconds. This keeps the marshmallows soft and gooey. Enjoy it warm for the best taste. Pro Tips Use Quality Chocolate: Opt for high-quality semi-sweet chocolate chips for a richer flavor that enhances the brownie base. Don't Overbake: Keep a close eye on the baking time; removing the pie when there are moist crumbs on the toothpick ensures a fudgy texture. Layering Tips: For an even distribution of flavors, layer marshmallows and graham crackers evenly to ensure every bite has the classic s'mores experience. Serve Warm: For the ultimate indulgence, serve the pie warm with gooey marshmallows and a drizzle of chocolate sauce on top. {{image_2}} You can make this pie even more fun by adding nuts for crunch. Walnuts or pecans work well. They add texture and flavor. You can also try using flavored chocolate chips. Mint chips or peanut butter chips give a new twist. If you need gluten-free options, use a gluten-free flour blend. It works well in this recipe. For dairy-free alternatives, try coconut oil instead of butter. You can also use dairy-free chocolate chips. They melt nicely and taste great. Seasonal fruits can bring fresh flavors to your dessert. Try adding chopped strawberries or raspberries. They add a nice tartness. You can also create themed variations for holidays. For Halloween, use orange sprinkles. For Christmas, add crushed peppermint on top. To keep your S’mores Brownie Pie fresh, use an airtight container. This helps lock in moisture and flavor. If you store it properly, this pie can stay tasty for about four days at room temperature. If you want it to last longer, consider the freezer. To freeze your S’mores Brownie Pie, cut it into slices first. Wrap each slice tightly in plastic wrap. Then, place them in a freezer-safe bag or container. This way, they stay fresh for about three months. When you want a slice, take it out and thaw it in the fridge overnight. If you're in a hurry, you can leave it at room temp for a few hours. To reheat, just pop it in the microwave for about 20 seconds. Enjoy that warm, gooey goodness! How do I know when the S’mores Brownie Pie is done? You can tell the pie is done when a toothpick comes out with moist crumbs. It should not have wet batter. The edges may look set while the center stays soft. Can I make this dessert in advance? Yes, you can make this dessert in advance. Just cool it and cover it well. Store it at room temperature or in the fridge. What if I don’t have chocolate sauce? If you don't have chocolate sauce, use melted chocolate instead. A simple ganache works well too. You can melt chocolate chips with a bit of cream to make it smooth. Can I use white sugar instead of granulated sugar? Yes, you can use white sugar instead of granulated sugar. They are very similar. Just keep the same amount in the recipe. What can I replace mini marshmallows with? You can replace mini marshmallows with large marshmallows, cut into pieces. You can also use a marshmallow fluff if you want a spreadable option. What goes well with S'mores Brownie Pie? This dessert pairs well with vanilla ice cream or whipped cream. You can also serve it with fresh berries for a fruity touch. Can it be served chilled or only warm? You can serve it warm or at room temperature. Warm slices keep the marshmallows gooey, but it tastes great chilled too. This recipe for S'mores Brownie Pie guides you through each step. You learned the key ingredients, from unsalted butter to chocolate chips. The instructions made mixing and baking easy. I shared helpful tips for perfecting your pie and storing leftovers. You can customize this dessert with flavors and dietary options to suit your taste. Enjoy making this gooey treat and delighting your friends and family! Your baking skills will shine with this delicious pie.

S’mores Brownie Pie Irresistible Dessert Delight

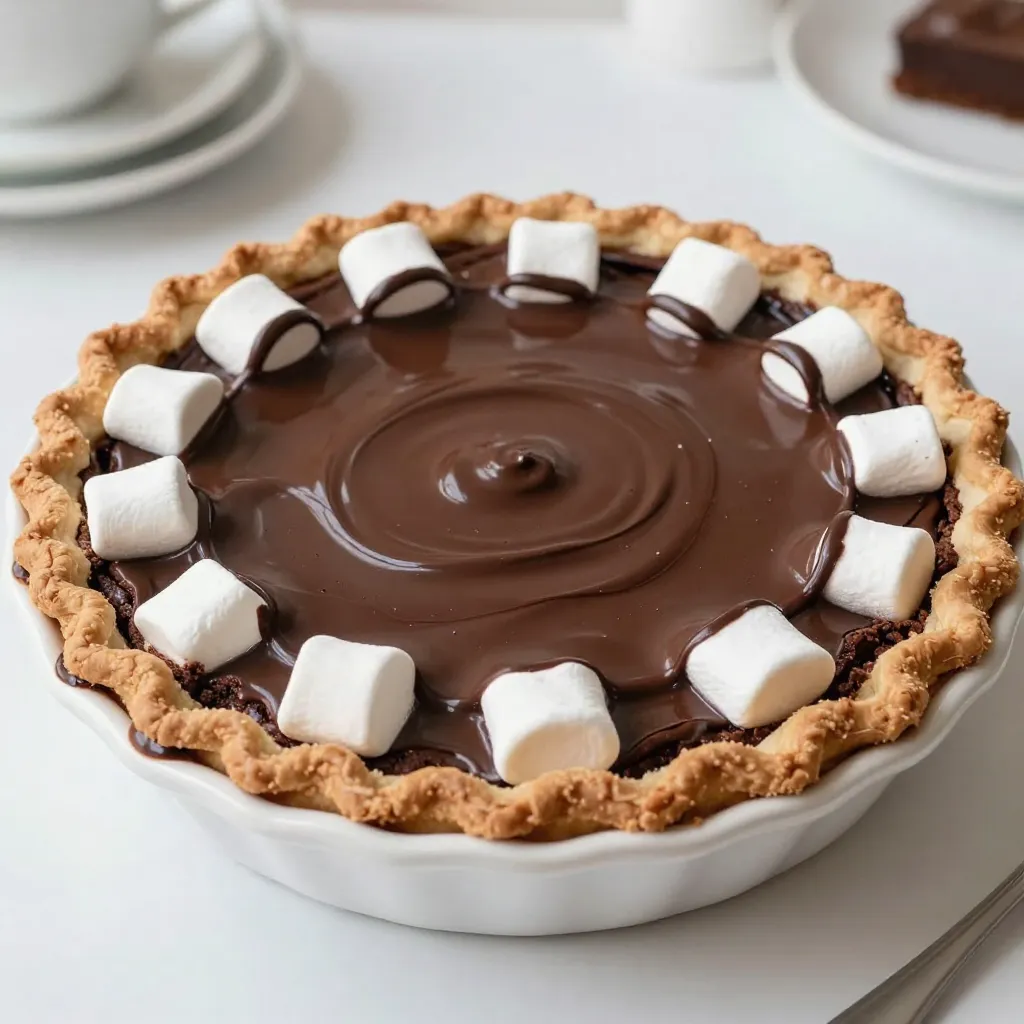
Are you ready for a dessert that combines the best of brownies and s’mores? The S’mores Brownie Pie is an

- 1 cup natural peanut butter (smooth) - 1/2 cup honey or maple syrup - 1/3 cup coconut sugar (or brown sugar) - 1 teaspoon vanilla extract - 1 cup rolled oats - 1/2 cup almond flour (or whole wheat flour) - 1/2 teaspoon baking soda - 1/4 teaspoon salt - 1/2 cup dark chocolate chips (dairy-free if preferred) - 1/4 cup chopped nuts (optional, e.g., walnuts or pecans) - 1/4 cup shredded coconut (optional) When it comes to making Peanut Butter Chocolate Chip Energy Cookies, choosing the right ingredients is key. I love using natural peanut butter because it offers rich flavor and healthy fats. You can use either honey or maple syrup for sweetness. Both work well, but honey gives a nice chewiness. Coconut sugar or brown sugar adds a hint of caramel flavor. I always add a touch of vanilla extract to enhance the taste. For a hearty base, rolled oats are perfect. They provide texture and fiber, making these cookies satisfying. Almond flour is my go-to for a nutty flavor and a gluten-free option. If you prefer whole wheat flour, that works great too. Baking soda helps the cookies rise, while a pinch of salt balances the sweetness. Now, let’s talk about chocolate! Dark chocolate chips are my favorite, and they melt beautifully. If you want a dairy-free option, look for dairy-free chocolate chips. You can also customize your cookies with optional mix-ins. I love adding nuts for crunch, like walnuts or pecans. Shredded coconut gives a tropical twist. These ingredients make each bite exciting. {{ingredient_image_1}} First, preheat your oven to 350°F (175°C). This temperature helps the cookies bake evenly. Next, line your baking sheet with parchment paper. This step keeps the cookies from sticking and makes cleanup easy. In a large bowl, combine 1 cup of natural peanut butter, 1/2 cup of honey or maple syrup, 1/3 cup of coconut sugar, and 1 teaspoon of vanilla extract. Stir these ingredients together until you have a smooth mixture. This mix gives the cookies their rich flavor and sweetness. In another bowl, mix 1 cup of rolled oats, 1/2 cup of almond flour, 1/2 teaspoon of baking soda, and 1/4 teaspoon of salt. This dry mix gives the cookies their structure. Make sure to stir well so everything combines. Now, slowly add the dry mix to your wet ingredients. Stir until everything melds together. Gently fold in 1/2 cup of dark chocolate chips. You can also add any optional ingredients, like 1/4 cup of chopped nuts or 1/4 cup of shredded coconut for extra texture. Once mixed, use a tablespoon or cookie scoop to portion out small balls of dough. Place them on your baking sheet, about 2 inches apart. Flatten each cookie slightly with your palm. This step helps them bake evenly. Bake the cookies in your preheated oven for 10 to 12 minutes. Look for the edges to turn golden brown. This color means they are ready. Once they are done, let the cookies cool on the baking sheet for about 5 minutes. Then, transfer them to a wire rack to cool completely. Enjoy your warm, tasty energy cookies! To get the best texture in your cookies, you may need to adjust the baking time. Every oven runs a bit different. Start checking your cookies after 10 minutes. The edges should be golden, but the center can look soft. This is okay! Flattening your cookies is key. Before you bake, press each ball down slightly. This helps them spread evenly and cook through. Use the back of a fork or your palm. If you need a gluten-free option, swap almond flour for a gluten-free flour blend. This makes your cookies safe for those with gluten allergies. For a vegan version, use maple syrup instead of honey. Choose dairy-free chocolate chips too. This way, everyone can enjoy these tasty treats! To boost the flavor, try adding spices like cinnamon. Just a pinch can make a big difference. Using different nut butters can also change the taste. Almond or cashew butter can add new flavors to your cookies. This keeps your snacks interesting and delicious! Pro Tips Use Natural Peanut Butter: Choose a natural peanut butter without added sugars or oils for the best flavor and texture. Experiment with Sweeteners: Feel free to substitute honey with maple syrup or adjust the amount of coconut sugar to suit your taste preference. Chill the Dough: For thicker cookies, chill the dough for 30 minutes before baking to help them hold their shape. Store Properly: Keep your cookies in an airtight container at room temperature for up to a week, or freeze for longer storage. {{image_2}} If you need a nut-free version of these cookies, try sunflower seed butter. It tastes great and works well in the recipe. You can also use soy nut butter or pumpkin seed butter. These options keep the cookies nut-free while still being tasty and satisfying. You can mix things up with different flavor add-ins. Try using white chocolate chips or butterscotch chips for a sweet twist. You can also add spices like cinnamon or nutmeg to enhance the flavor. A few drops of almond or coconut extract can give your cookies a unique taste that everyone will love. You can make these cookies in different sizes and shapes. For mini cookies, scoop smaller amounts of dough and adjust the baking time to about 8-10 minutes. If you want bars, spread the dough in a lined baking dish. Bake for 15-18 minutes and cut into squares. This way, you can enjoy your cookies just the way you like them! To keep your Peanut Butter Chocolate Chip Energy Cookies fresh, use an airtight container. Store them at room temperature for up to a week. For longer storage, refrigeration is a good choice. This method can keep them fresh for up to two weeks. If you want to store them even longer, freezing is ideal. Just put them in a freezer-safe bag or container. In an airtight container at room temperature, these cookies last about one week. If you refrigerate them, they stay good for about two weeks. When frozen, they can last for up to three months. Just remember to label your containers with the date. This way, you won’t forget how long they’ve been stored. To refresh your cookies, preheat your oven to 350°F (175°C). Place cookies on a baking sheet for about 5 minutes. This step warms them and revives their soft texture. You can also use the microwave. Heat them for just 10-15 seconds. Keep an eye on them to avoid overheating. Enjoy these tasty treats warm for the best flavor! Yes, you can use crunchy peanut butter. It gives the cookies a nice texture. The flavor will stay the same, but you will have bits of nuts in every bite. This change can make your cookies even more fun to eat. To make these cookies vegan, swap honey for maple syrup. Ensure the chocolate chips are dairy-free. Use almond flour or whole wheat flour, as both are vegan. This way, you can enjoy delicious cookies without any animal products. Yes, you can make these cookies gluten-free. Use almond flour instead of whole wheat flour. Check that your oats are certified gluten-free. This way, everyone can enjoy these tasty treats without worry. Each cookie has about 120 calories. It contains healthy fats from peanut butter, protein, and fiber from oats. The dark chocolate adds a bit of sweetness and antioxidants. Always check the labels for exact nutritional values based on your ingredients. Yes, you can freeze the cookie dough. Scoop the dough into balls and place them on a tray. Freeze until solid, then transfer to a freezer bag. When ready to bake, just add a couple of extra minutes to the baking time. We covered how to make Peanut Butter Chocolate Chip Energy Cookies from start to finish. You learned about the key ingredients like peanut butter, honey, and oats. I shared step-by-step instructions, plus tips for perfect texture and flavor. You can customize your cookies with dietary needs and various add-ins. Store them well to keep them fresh. These cookies are simple to make and delicious to enjoy. Dive in and create your own batch for a tasty snack!

Peanut Butter Chocolate Chip Energy Cookies Delight

Looking for a snack that fuels your day? Peanut Butter Chocolate Chip Energy Cookies are here to satisfy your cravings!

To make cinnamon sugar donut holes, gather these simple ingredients: - 1 cup all-purpose flour - 1/2 cup granulated sugar - 2 teaspoons baking powder - 1/2 teaspoon salt - 1/2 teaspoon ground cinnamon - 1/4 teaspoon nutmeg - 1/2 cup milk - 1 large egg - 2 tablespoons melted butter - 1/2 cup granulated sugar (for coating) - 1 tablespoon ground cinnamon (for coating) - Oil for frying You can swap some ingredients if needed: - Use whole wheat flour for a nutty flavor. - Replace sugar with brown sugar for a richer taste. - Almond milk works well in place of regular milk. - For a dairy-free option, use coconut oil instead of butter. Here’s a quick look at the nutrition for one donut hole: - Calories: 80 - Fat: 4g - Carbohydrates: 10g - Protein: 1g - Fiber: 0g - Sugar: 4g These values can change based on ingredient choices and cooking methods. {{ingredient_image_1}} First, grab a large mixing bowl. Add 1 cup of all-purpose flour. Then, mix in 1/2 cup of granulated sugar. Next, add 2 teaspoons of baking powder, 1/2 teaspoon of salt, 1/2 teaspoon of ground cinnamon, and 1/4 teaspoon of nutmeg. Use a whisk to blend these dry ingredients well. This step is key for even flavor in your donut holes. In another bowl, pour in 1/2 cup of milk. Crack in 1 large egg and add 2 tablespoons of melted butter. Stir these wet ingredients together until you see a smooth mix. This mixture brings moisture to your donut holes, making them soft and tasty. Now it’s time to fry! Heat oil in a deep fryer or heavy pan to 350°F (175°C). Make sure there's enough oil to cover the donut holes. Using a small cookie scoop or your hands, take about 1 tablespoon of the batter. Carefully drop it into the hot oil. Fry them in batches to keep them from sticking together. Cook for 2-3 minutes on each side until they turn golden brown. Once fried, lift them out with a slotted spoon and place them on a paper towel-lined plate to drain the oil. While they are warm, roll each donut hole in a mix of 1/2 cup of sugar and 1 tablespoon of ground cinnamon. Enjoy your warm, sweet treat! To get soft and fluffy donut holes, mix your batter gently. Overmixing makes them tough. It's okay if the batter has some lumps. These lumps help keep the donut holes light. Also, use fresh baking powder for the best rise. Old baking powder can make your donut holes dense. Fry the donut holes at 350°F (175°C). This is the perfect heat for golden-brown results. Use enough oil to cover the donut holes completely. This helps them cook evenly. Avoid overcrowding the pan. Fry in small batches to keep the oil temperature steady. This way, they cook nicely and don't soak up too much oil. One big mistake is not checking the oil temperature. If it’s too hot, the outside burns before the inside cooks. If it's too cold, they absorb too much oil and become greasy. Another mistake is rolling them in sugar too late. Roll them in cinnamon sugar while they are still warm for better coating. Lastly, don't skip the nutmeg! It adds a warm flavor that enhances the cinnamon. Pro Tips Achieve the Perfect Fry: Make sure your oil temperature is maintained at 350°F (175°C) for even cooking. A thermometer can help ensure accuracy. Don’t Overmix: When combining wet and dry ingredients, mix just until combined. Overmixing can result in dense donut holes. Coating Tips: For a more intense cinnamon sugar flavor, let the donut holes cool slightly before rolling them in the cinnamon sugar mixture. Serving Suggestions: Pair your donut holes with a dip, like chocolate or caramel sauce, for an extra treat! {{image_2}} You can make these donut holes gluten-free easily. Use a 1:1 gluten-free flour blend instead of regular flour. This blend works well in most recipes. Just check the label to ensure it has xanthan gum. This will help your donut holes stay fluffy and hold together. To make vegan donut holes, swap the egg for a flax egg. Mix 1 tablespoon of ground flaxseed with 3 tablespoons of water. Let it sit until it thickens. Use plant-based milk like almond or oat milk in place of regular milk. You can also replace butter with coconut oil or vegan butter. These changes will keep your treat tasty and cruelty-free. You can get creative with flavors in your donut holes. To make chocolate donut holes, add 1/4 cup of cocoa powder to your dry ingredients. For a fall twist, mix in 1/2 cup of pumpkin puree and a bit of pumpkin spice. You can also add extracts like vanilla or almond for extra flavor. Feel free to mix and match to create your perfect treat! To keep your donut holes fresh, place them in an airtight container. Make sure to cool them first. If they are warm, they can create steam, making them soggy. Store the container in a cool, dry place, or in the fridge for up to three days. For best taste, enjoy them within the first two days. When you want to eat leftover donut holes, reheating is key. Preheat your oven to 350°F (175°C). Place the donut holes on a baking sheet. Heat them for about 5-7 minutes. This method keeps them warm and fresh. Avoid using the microwave, as it can make them chewy. If you want to save donut holes for later, freezing works great. Let them cool completely first. Place them in a single layer on a baking sheet. Freeze for about an hour. Once frozen, transfer them to a freezer bag. They can last up to three months. When you’re ready to eat, thaw them in the fridge overnight, then reheat as mentioned above. Yes, you can bake them! To bake, preheat your oven to 350°F (175°C). Use a mini muffin pan for best results. Fill each cup with batter, about three-quarters full. Bake for 10 to 12 minutes or until golden. Baking gives a lighter texture. However, they won’t be as fluffy or rich as fried ones. You can swap out some ingredients. Use whole wheat flour instead of all-purpose flour. Try reducing sugar by using a sugar substitute. You can also use almond milk or oat milk in place of regular milk. For a lower fat option, replace melted butter with unsweetened applesauce. These swaps keep the flavor while cutting calories. Serve these donut holes warm for the best flavor. Pair with coffee or hot chocolate for a cozy treat. You can also add a drizzle of chocolate or caramel sauce on top. For a fun twist, serve with fresh fruit or whipped cream. Enjoy them at parties, brunches, or as a sweet snack! You learned how to make tasty cinnamon sugar donut holes. We covered key ingredients, substitutes, and nutrition. You now know preparation steps and frying methods. I shared tips for the best texture and common errors to avoid. You also discovered fun variations for gluten-free and vegan options. Finally, I explained how to store your donut holes for later use. Enjoy creating your own delicious treats!

Cinnamon Sugar Donut Holes Delightful Treat Recipe

If you’re craving a sweet treat that’s easy to make, you’re in the right place! My Cinnamon Sugar Donut Holes

The key to making Lemon Blueberry Ricotta Cookies shine lies in the quality of your ingredients. Here’s what you will need: - 1 cup ricotta cheese - 1/2 cup unsalted butter, softened - 1 cup granulated sugar - 1 large egg - Zest of 1 lemon - 2 tablespoons lemon juice - 2 cups all-purpose flour - 1 tsp baking powder - 1/2 tsp baking soda - 1/4 tsp salt - 1 cup fresh blueberries - 1 teaspoon vanilla extract - Optional: powdered sugar for dusting Each ingredient plays a vital role in creating the perfect cookie. The ricotta cheese adds moisture and a rich flavor. The unsalted butter brings creaminess, while sugar adds sweetness. The egg binds everything together. Lemon zest and juice give that bright, fresh taste we love. All-purpose flour provides structure, and the baking powder and baking soda help the cookies rise. Salt balances the sweetness. Fresh blueberries burst with flavor, adding a juicy surprise in every bite. Lastly, vanilla extract enhances the overall taste. Feel free to get creative! You can even dust the cookies with powdered sugar for a lovely finish. Happy baking! {{ingredient_image_1}} - Preheat oven to 350°F (175°C). - Line a baking sheet with parchment paper. First, set your oven to preheat. This helps cookies bake evenly. I always use parchment paper. It keeps cookies from sticking. It also makes for easy cleanup. - Cream butter and sugar until fluffy. - Add ricotta, egg, lemon zest, lemon juice, and vanilla. Next, grab a large bowl. Cream the softened butter and sugar together. Mix until it’s light and fluffy. This gives cookies a nice texture. Then, add in the ricotta cheese, egg, lemon zest, lemon juice, and vanilla. Stir until everything is well combined. - Whisk flour, baking powder, baking soda, and salt. - Gradually incorporate dry mixture into wet ingredients. In a separate bowl, whisk together the flour, baking powder, baking soda, and salt. This step is key for the right rise. Slowly mix the dry ingredients into the wet mix. Stir gently so you don’t overmix. - Gently fold in blueberries without breaking them. Now, it’s time to add the blueberries. Gently fold them into the dough. Take care not to break them. You want to keep those juicy bursts in your cookies! - Drop rounded tablespoons onto baking sheet. - Bake for 12-15 minutes. Using a spoon, drop rounded tablespoons of dough onto the baking sheet. Space them about two inches apart. Bake them in the oven for 12 to 15 minutes. Look for a light golden color around the edges. - Cool on baking sheet for 5 minutes. - Transfer to wire rack. - Optional: Dust with powdered sugar. Once baked, let them cool on the sheet for five minutes. Then, move the cookies to a wire rack. This helps them cool completely. If you want, sprinkle some powdered sugar on top for a sweet touch. Enjoy your delicious Lemon Blueberry Ricotta Cookies! To make soft and tasty cookies, start with butter at room temperature. This helps the butter mix well and creates a nice fluffy dough. When adding flour, mix gently. Overmixing makes cookies tough. You want a light and airy texture. Get creative with your flavors! You can use different citrus zests. Try orange zest for a fun twist. You can also swap out blueberries. Raspberries or strawberries work great too. Each change brings a new taste to enjoy. Store your cookies in an airtight container. This keeps them fresh longer. They stay yummy for about a week at room temperature. If you want them to last longer, freeze them. Just make sure to wrap them well. Pro Tips Use Room Temperature Ingredients: Ensuring your butter and ricotta cheese are at room temperature will help them blend more smoothly, resulting in a lighter cookie texture. Fold Gently: When incorporating the blueberries, fold gently to prevent them from breaking apart and staining the dough, which can affect the appearance of your cookies. Check for Doneness: Since oven temperatures can vary, check your cookies a minute or two before the suggested baking time to ensure they don't overbake. Flavor Variations: For a twist, try adding a teaspoon of almond extract for a different flavor profile or mix in some chopped nuts for added texture. {{image_2}} If you want a gluten-free treat, you can easily swap the all-purpose flour. Use a gluten-free flour blend instead. This way, you still enjoy those tasty lemon blueberry ricotta cookies. Just make sure the blend has a good mix of flours and starches for the best texture. For a sugar-free version, you can use sugar substitutes. Options like stevia or erythritol work well. These substitutes can help cut down on calories while keeping the sweetness you love. Just check the package for the right amount to use. Feel free to add your favorite nuts or dried fruits. Chopped walnuts or pecans give a nice crunch. Dried cranberries or apricots can add more flavor. Mix and match to create your perfect cookie. These small changes can make each batch unique and fun! To keep your Lemon Blueberry Ricotta Cookies fresh, use an airtight container. This prevents air from making them dry. Glass jars work well too, but ensure they seal tight. Store your cookies in the fridge if you want them to last longer. They stay fresh for about a week this way. If you prefer room temperature, they last for about three days. Keep them in a cool, dark place away from sunlight. Freezing your cookies is a great way to enjoy them later. To freeze, place the cookies in a single layer on a tray first. Once they are frozen solid, transfer them to a freezer bag. Make sure to remove as much air as possible. This helps avoid freezer burn. When you want to eat them, take the cookies out and let them thaw at room temperature for about 30 minutes. Enjoy your sweet treat anytime! Ricotta cheese adds moisture and richness to cookies. This soft cheese makes cookies tender and light. It also gives a subtle flavor that works well with lemon and blueberries. Using ricotta can help you cut back on butter while keeping cookies soft. You get a nice balance of texture and flavor with each bite. Yes, you can use frozen blueberries in the recipe. However, fresh blueberries give the best taste and texture. Frozen blueberries may burst more during mixing, which can color the dough. If you use frozen berries, do not thaw them first. Add them directly to the dough for less mess. You can tell the cookies are done when they are lightly golden around the edges. The centers may look a bit soft, but they will firm up as they cool. Bake them for 12 to 15 minutes. Keep an eye on them to avoid overbaking. Yes, you can make the dough ahead of time. Chill the dough for up to 24 hours in the fridge. This will help the flavors meld together. Just scoop the dough onto the baking sheet when you are ready to bake. These cookies pair well with tea or coffee. You can also serve them with a scoop of vanilla ice cream. For a refreshing twist, add a drizzle of lemon glaze on top. Enjoy them as a sweet treat any time of day! In this blog post, we explored how to make delicious blueberry cookies using simple ingredients like ricotta cheese and fresh blueberries. You learned steps for mixing, baking, and cooling your cookies. I shared tips for storage, variations, and answers to common questions. Now, you can create a great treat that impresses everyone. Enjoy baking these cookies and experimenting with flavors! Simple tweaks can lead to exciting results. Happy baking!

Lemon Blueberry Ricotta Cookies Delightful Treats

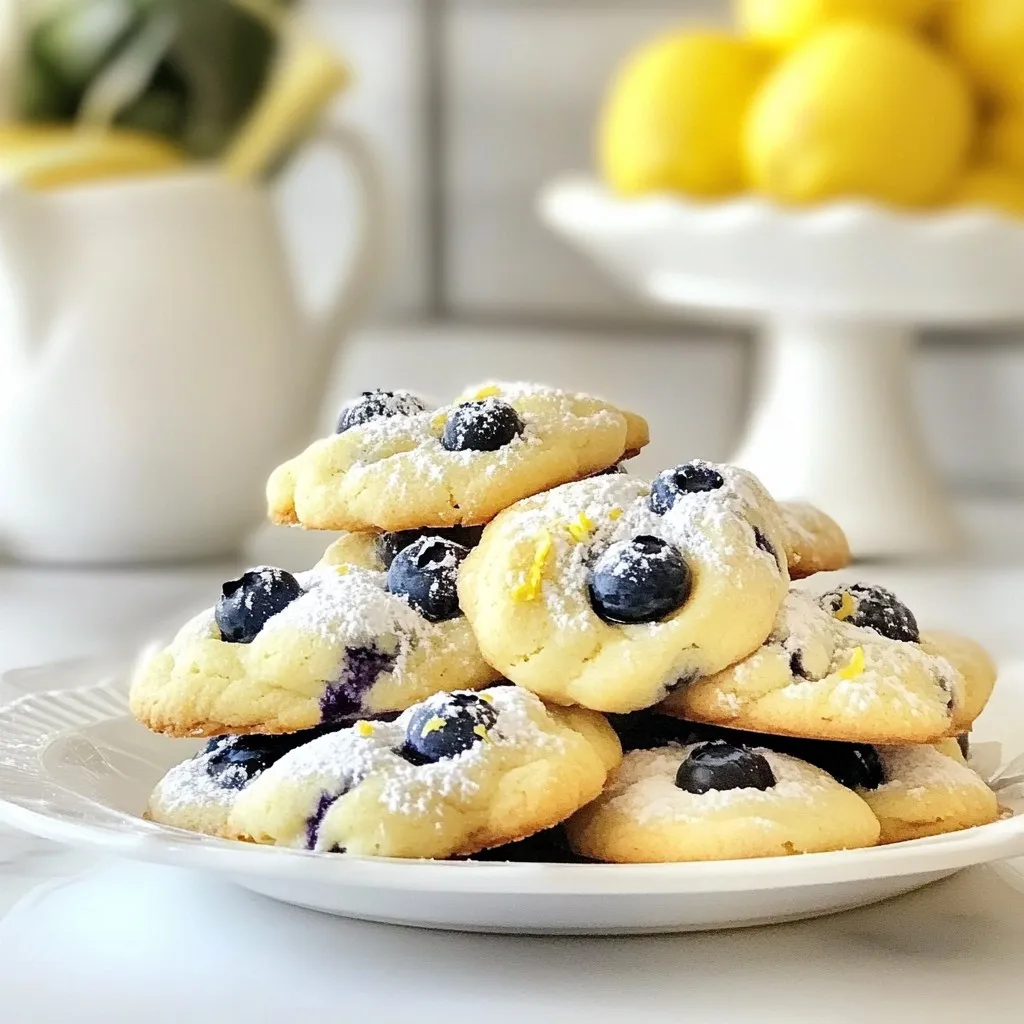
If you’re looking for a sweet treat that bursts with flavor, you’ve come to the right place! Lemon Blueberry Ricotta

- 4 tablespoons all-purpose flour - 4 tablespoons sugar - 2 tablespoons unsweetened cocoa powder - 1/8 teaspoon baking powder - 1/8 teaspoon salt - 3 tablespoons milk (or non-dairy milk) - 2 tablespoons vegetable oil - 1 teaspoon vanilla extract - 2 tablespoons chocolate hazelnut spread (like Nutella) - Handful of chopped hazelnuts (for topping) This mug cake is quick and easy to make. You need just a few simple ingredients. Let’s go over them. You start with all-purpose flour. It gives the cake structure. Then, you add sugar for sweetness. Unsweetened cocoa powder provides that rich chocolate flavor we all love. The baking powder helps your cake rise. A pinch of salt brings all the flavors together. Next, you add milk. It keeps the cake moist. You can use non-dairy milk if you prefer. Vegetable oil adds richness and a soft texture. The vanilla extract gives a lovely aroma and taste. The star of this show is the chocolate hazelnut spread. It creates a gooey, molten center. Finally, sprinkle some chopped hazelnuts on top for crunch. They add a nice texture and flavor contrast. These ingredients come together to make a delicious treat. You can enjoy it in just a few minutes. Perfect for a quick dessert or snack! {{ingredient_image_1}} Start by grabbing a microwave-safe mug. In the mug, combine these dry items: - 4 tablespoons all-purpose flour - 4 tablespoons sugar - 2 tablespoons unsweetened cocoa powder - 1/8 teaspoon baking powder - 1/8 teaspoon salt Stir these well with a fork or spoon. Make sure there are no lumps left. This step helps your cake rise perfectly. Next, pour in the wet ingredients: - 3 tablespoons milk (or non-dairy milk) - 2 tablespoons vegetable oil - 1 teaspoon vanilla extract Mix it all together until the batter is smooth. This ensures all flavors blend nicely. Now comes the fun part! Take 2 tablespoons of chocolate hazelnut spread. Carefully spoon it into the center of your batter. Don’t mix it in; you want that gooey center later. Microwave your mug on high for 40-60 seconds. Start checking at 40 seconds. The cake should rise but remain a bit soft in the middle. It will continue to cook as it cools. Once done, take the mug out carefully. It will be hot! Let it cool for a minute. For extra crunch, top it with chopped hazelnuts. Enjoy your tasty treat! To get the best mug cake, timing is key. Start checking your cake at 40 seconds. The cake should rise but stay soft in the center. If it cooks too long, it may turn dry. Each microwave varies, so adjust the time as needed. Prevent over-mixing to keep the cake light. Mix until the ingredients just combine. Lumps are okay; they will disappear during cooking. A gentle touch makes all the difference. You can add your twist to this mug cake. Try different toppings, like whipped cream, fresh fruit, or chocolate chips. These will add flavor and fun. If you have allergies, substitutions work well. Use gluten-free flour instead of regular flour. Swap the chocolate hazelnut spread for sunbutter or almond butter for a nut-free option. These swaps keep the cake tasty and safe. Pair your mug cake with ice cream or a dollop of whipped cream. The cold and warm mix makes each bite special. Enjoy this treat after dinner or as a quick snack. It’s perfect for a cozy night in or a fun dessert with friends. Pro Tips Use Room Temperature Ingredients: Make sure your milk and oil are at room temperature to help the batter mix smoothly and rise evenly. Don’t Overcook: Microwave times can vary, so start checking your mug cake at 40 seconds to avoid a dry texture. Experiment with Toppings: Feel free to add other toppings like whipped cream or fresh berries for a delicious twist. Try Different Flavors: Swap the chocolate hazelnut spread for peanut butter or almond butter for a unique flavor experience. {{image_2}} You can change the flavor of your mug cake by adding spices. A sprinkle of cinnamon gives it a warm, cozy touch. You can also add a dash of nutmeg for a unique twist. Using different extracts can add depth to your cake. Try almond extract for a nutty flavor or peppermint for a festive touch. These small changes can make a big impact. If you want to cut back on sugar, you can use honey or maple syrup instead. These natural sweeteners add a lovely flavor and moisture to your cake. Just remember, you may need to adjust the other liquids in the recipe a bit. For sugar-free options, look for sugar substitutes. Stevia or erythritol can work well. They keep your cake sweet without the sugar rush. If you want a nut-free mug cake, you can substitute the hazelnut spread. Try using chocolate spread or even peanut butter if you can have peanuts. You can also top your mug cake with different treats. Use crushed cookies, sprinkles, or even fresh fruit for added flavor and texture. These toppings add fun and taste, making your mug cake even more special. To keep your leftover mug cake fresh, cover it with plastic wrap. This helps to keep it moist. You can also use an airtight container. If you have extra cake, you can refrigerate it for up to two days. But be careful! The cake can dry out if left too long. Can you refrigerate or freeze? Yes, you can refrigerate your mug cake. If you want to keep it longer, freeze it. Just wrap it tightly in plastic wrap and put it in a freezer bag. It can last for about a month in the freezer. To warm up the mug cake, use the microwave. Heat it for about 10-15 seconds. If it feels cold, add a few more seconds. Be careful not to overheat it. This can dry out the cake. To maintain texture, cover the cake with a damp paper towel before reheating. This helps keep it soft and moist. Enjoy your warm, gooey chocolate hazelnut mug cake just like fresh! The chocolate hazelnut mug cake is best eaten fresh. If you have leftovers, store it in an airtight container. Keep it at room temperature for one day. You can also refrigerate it for up to three days. Just remember, the longer it sits, the less fluffy it gets. Yes, you can! If you don't have a microwave, bake the mug cake in a regular oven. Preheat your oven to 350°F (175°C). Pour the batter into a small oven-safe dish. Bake for 10-15 minutes. Check for doneness with a toothpick. It should come out clean when the cake is ready. If you want to try something different, there are many options. You can use peanut butter for a nutty taste. Almond butter is also great. For a fruity twist, try a spoonful of raspberry jam. Each choice adds a unique flavor to your cake. To make this mug cake vegan, swap a few ingredients. Use almond milk or oat milk in place of dairy milk. Replace the egg with one tablespoon of applesauce or a flax egg. You can also use a plant-based chocolate hazelnut spread. This way, you can enjoy a tasty treat without animal products. This blog post covered how to make a delicious chocolate hazelnut mug cake. You learned about the right ingredients, from flour to hazelnuts, and followed step-by-step instructions. We explored tips for perfecting your cake and how to customize it to your taste. Plus, we discussed storage and reheating, so you can enjoy leftovers too. This mug cake is quick and easy, perfect for any chocolate lover. Enjoy your sweet treat!

Chocolate Hazelnut Mug Cake Delight in Minutes

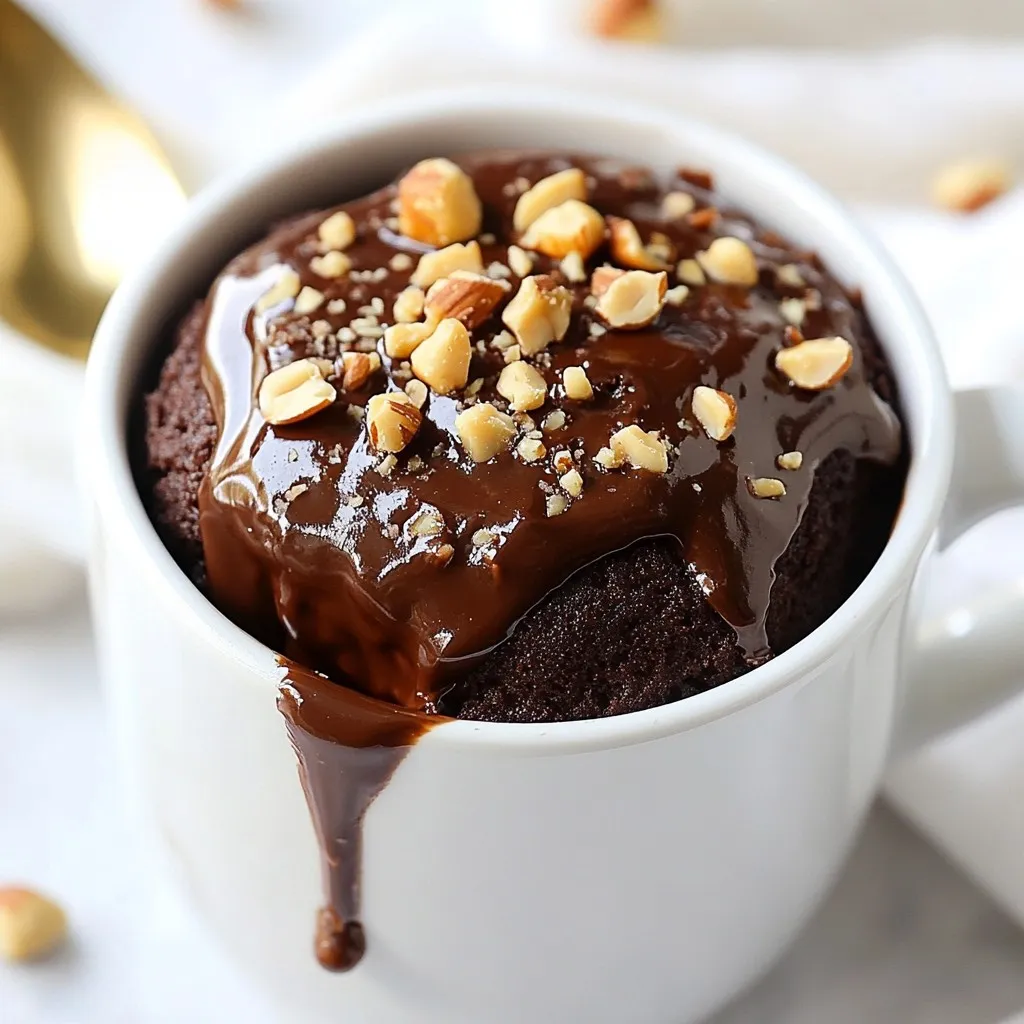
Are you craving something sweet but short on time? This Chocolate Hazelnut Mug Cake is your answer! In just minutes,

- 1 pound chicken tenderloins - 1 cup buttermilk - 1 tablespoon hot sauce (like Tabasco) - 1 cup all-purpose flour - 2 tablespoons Cajun seasoning - 1 teaspoon paprika - 1 teaspoon garlic powder - 1 teaspoon onion powder - 1 teaspoon black pepper - 1/2 teaspoon salt To make spicy Cajun chicken tenders, we start with chicken tenderloins. These pieces are tender and cook quickly. They soak in a mix of buttermilk and hot sauce. This marinade gives the chicken its moist texture and a spicy kick. Next, we mix our seasoning blend. It includes Cajun seasoning, paprika, garlic powder, onion powder, black pepper, and salt. This blend brings flavor and a bit of heat. You can adjust the seasoning to fit your taste. - Vegetable oil for frying - Dipping sauce suggestions (like ranch or spicy aioli) For frying, we need vegetable oil. It helps turn our chicken golden brown and crispy. You can choose your favorite dipping sauces to serve with the tenders. Ranch pairs well, but spicy aioli adds an extra kick. These ingredients come together to create a dish that is not only easy to make but also full of flavor. {{ingredient_image_1}} - Combine Buttermilk and Hot Sauce In a bowl, mix 1 cup of buttermilk with 1 tablespoon of hot sauce. This mix gives the chicken a kick. - Submerge Chicken Tenderloins Add 1 pound of chicken tenderloins into the bowl. Make sure all the chicken is covered. Cover the bowl and place it in the fridge. Let it marinate for at least 1 hour. For more flavor, leave it overnight. - Mix Flour and Seasonings In a large shallow dish, combine 1 cup of all-purpose flour with 2 tablespoons of Cajun seasoning, 1 teaspoon of paprika, 1 teaspoon of garlic powder, 1 teaspoon of onion powder, 1 teaspoon of black pepper, and 1/2 teaspoon of salt. Mix well. - Create a Dredging Station Set up your dredging station. Place the seasoned flour mix next to the bowl of marinated chicken. This will make it easy to coat each piece. - Heat the Oil to the Right Temperature In a deep skillet, pour enough vegetable oil for frying, about 1 inch deep. Heat the oil over medium-high heat until it reaches 350°F (175°C). Use a thermometer for accuracy. - Dredge and Fry the Chicken Take each chicken tender from the buttermilk. Let the extra liquid drip off. Dredge it in the flour mix, coating all sides. Shake off any excess flour. Carefully place the chicken in the hot oil. Fry in batches for about 4-5 minutes on each side. The chicken should be golden brown and reach an internal temperature of 165°F (75°C). Use a meat thermometer to check. To make your chicken tenders crispy, start with marinating them in buttermilk. This adds flavor and moisture. Keep the chicken in the marinade for at least one hour. If you have time, let it sit overnight. This gives the chicken more flavor and keeps it juicy. Next, heat your oil to the right temperature. Aim for 350°F (175°C). If the oil is too cold, the chicken will soak up oil. If it’s too hot, the outside will burn before the inside cooks. Use a thermometer for accuracy. Using a meat thermometer is key. Insert it into the thickest part of a chicken tender. Make sure it reads 165°F (75°C) to ensure safety. This helps you avoid undercooked chicken. Fry the chicken in batches. Overcrowding the pan lowers the oil temperature. This can lead to soggy tenders. Cook in small groups, so each piece gets the right amount of heat. This guarantees a perfect crunch every time. Pro Tips Marination Time Matters: For the best flavor, marinate the chicken tenders overnight. This allows the spices to penetrate the meat, resulting in tender and flavorful chicken. Temperature Check: Always use a meat thermometer to check the internal temperature. Chicken should reach 165°F (75°C) to ensure it is safe to eat. Oil Temperature: Ensure the oil is hot enough before frying. If the oil is too cool, the chicken will absorb more oil and become greasy. Aim for 350°F (175°C). Batch Frying: Fry the chicken in small batches to avoid overcrowding the pan. This helps maintain the oil temperature and ensures even cooking and crispiness. {{image_2}} Mild Option To make these chicken tenders mild, use less Cajun seasoning. Reduce it to 1 tablespoon. You can also skip the hot sauce in the marinade. This will keep the flavor rich without the heat. Extra Spicy Option For heat lovers, add more hot sauce to the marinade. Use 2 tablespoons instead of 1. You can also increase the Cajun seasoning to 3 tablespoons. This will give your tenders a real kick! Panko Crust If you want a crunchier bite, try using panko breadcrumbs. Mix panko with the flour and seasonings. This will add extra texture to your chicken tenders. Just ensure they are well coated before frying. Oven-Baked Version For a healthier option, bake the chicken tenders instead of frying. Preheat your oven to 400°F (200°C). Place the breaded chicken on a baking sheet lined with parchment paper. Bake for about 20-25 minutes. Flip halfway for even cooking. This gives a crispy texture without all the oil. - Refrigeration Guidelines: Store leftover chicken tenders in an airtight container. They will stay fresh for up to 3 days in the fridge. Make sure they cool down to room temperature before sealing. - Freezing Tips: If you want to keep them longer, freeze the chicken tenders. Place them in a single layer on a baking sheet and freeze for 1 hour. Once frozen, transfer them to a freezer bag. They can last up to 3 months in the freezer. - Best Methods for Reheating: To reheat, use an oven for the best results. Preheat your oven to 375°F (190°C). Place the tenders on a baking sheet and bake for about 10-15 minutes. This keeps them crispy. You can also use an air fryer at 350°F (175°C) for about 5-7 minutes. Avoid the microwave, as it can make them soggy. Cajun seasoning is a blend of spices that adds a bold flavor. Common ingredients include: - Paprika - Garlic powder - Onion powder - Black pepper - Cayenne pepper - Oregano - Thyme This mix gives Cajun dishes their distinct taste. You can adjust the spices to suit your taste. Yes, you can bake these chicken tenders for a healthier option. Here’s how: 1. Preheat your oven to 425°F (220°C). 2. Prepare the chicken as you normally would, coating them in the seasoned flour. 3. Place the chicken tenders on a baking sheet lined with parchment paper. 4. Spray or brush them lightly with oil. 5. Bake for about 20-25 minutes, flipping halfway through. Make sure they reach 165°F (75°C) for safety. To make these chicken tenders gluten-free, you can use these substitutions: - Swap all-purpose flour for gluten-free flour or almond flour. - Use gluten-free hot sauce. - Ensure your Cajun seasoning is gluten-free. These changes keep the flavor while making the dish safe for gluten-sensitive eaters. You learned how to make delicious chicken tenders with the right ingredients and steps. Marinating the chicken in buttermilk and hot sauce makes it taste great. Use proper frying techniques for a perfect crunch. You can also adjust spice levels and try different breading methods. Store and reheat your leftovers properly for best taste. Enjoy your chicken tenders, whether you bake or fry them, and get creative with your flavors!

Spicy Cajun Chicken Tenders Crispy and Flavorful Treat

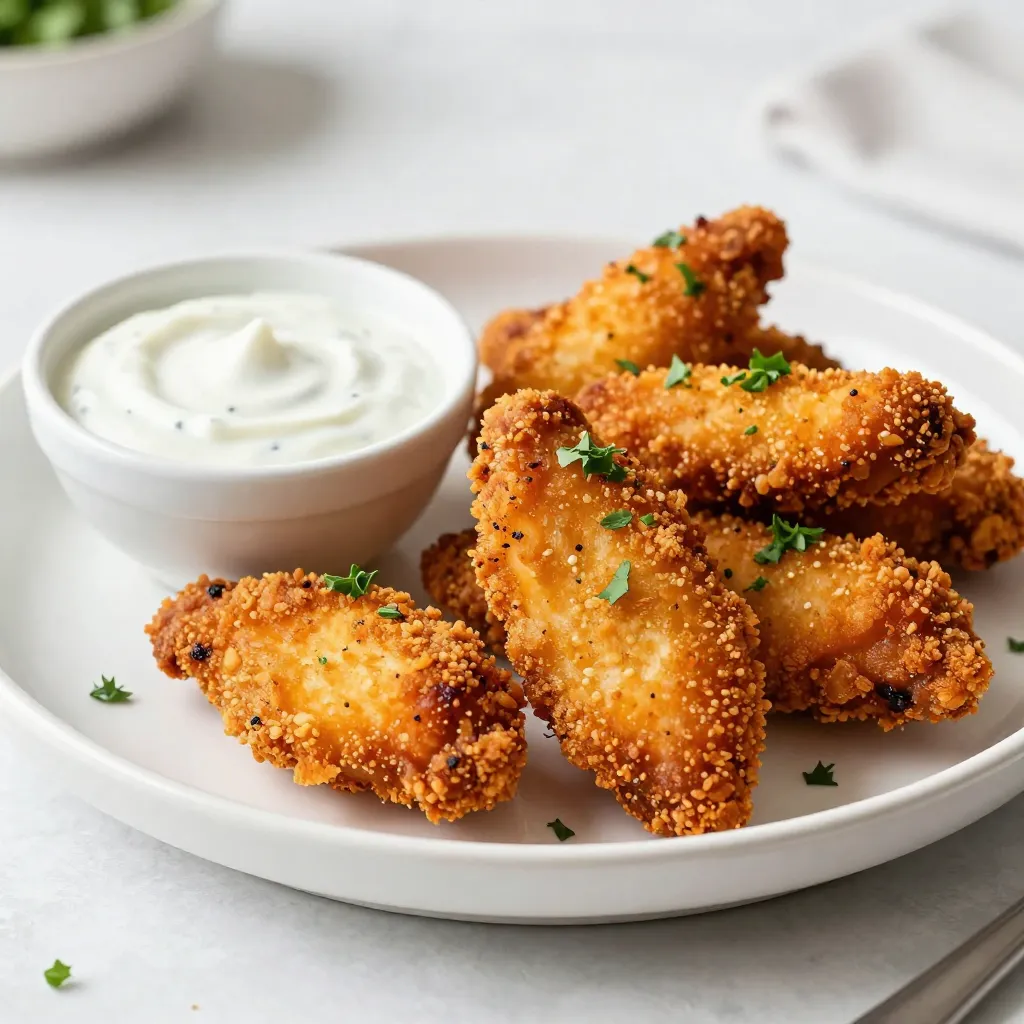
Get ready for a flavor explosion with these Spicy Cajun Chicken Tenders! Crispy, juicy, and packed with heat, these tenders

To make these tasty rosemary garlic roasted potatoes, gather the following: - 2 pounds baby potatoes, halved - 4 cloves garlic, minced - 3 tablespoons fresh rosemary, chopped (or 1 tablespoon dried) - 3 tablespoons olive oil - 1 teaspoon sea salt - ½ teaspoon black pepper - 1 tablespoon lemon juice - Optional: Fresh parsley for garnish If you need to swap some ingredients, here are some ideas: - Potatoes: You can use Yukon Gold or red potatoes. - Garlic: Garlic powder can work in a pinch. Use 1 teaspoon for each clove. - Rosemary: Try thyme or oregano for a different flavor. - Olive oil: Canola or avocado oil are good alternatives. - Lemon juice: Use vinegar for a tangy twist. Choosing the right potatoes is key. Look for firm baby potatoes without blemishes. The skin should feel smooth. If you can, pick potatoes that are similar in size. This helps them cook evenly. When you roast them, they turn soft inside and crispy outside. That's what we want. Always wash potatoes well before using them. This helps remove dirt and any chemicals. {{ingredient_image_1}} Start with 2 pounds of baby potatoes. Halve each potato so they cook evenly. Rinse them under cold water to remove dirt. Pat them dry with a clean towel. This step helps get the skin crisp. In a large bowl, add your halved potatoes. Next, add 4 cloves of minced garlic. Then, toss in 3 tablespoons of chopped fresh rosemary. If you use dried rosemary, 1 tablespoon works well. Pour in 3 tablespoons of olive oil, 1 teaspoon of sea salt, and ½ teaspoon of black pepper. Mix everything together until the potatoes are covered. The oil and spices make them tasty. Finally, drizzle 1 tablespoon of lemon juice over the mix. Stir gently to combine. Preheat your oven to 425°F (220°C). Spread the potato mix on a baking sheet. Use parchment paper to make cleanup easy. Make sure to spread them out so they roast well. Roast for 25-30 minutes. Halfway through, turn the potatoes for even browning. You want them golden brown and crispy. Once done, take them out and let them cool for a few minutes. If you like, sprinkle fresh parsley on top before serving. Enjoy your delicious rosemary garlic roasted potatoes! To boost the flavor of your rosemary garlic roasted potatoes, consider using fresh herbs. Fresh rosemary adds a bright taste. You can also mix in thyme or oregano for more depth. Try adding a sprinkle of grated Parmesan cheese before serving. This adds a salty, savory touch that pairs well with the garlic. A squeeze of fresh lemon juice brightens the dish and enhances all the flavors. You only need a few tools for this recipe. A large mixing bowl helps combine the ingredients well. Use a cutting board and sharp knife to cut the potatoes and mince the garlic easily. A baking sheet lined with parchment paper makes cleanup a breeze and ensures even roasting. For best results, a good-quality oven thermometer can help ensure your oven is at the right temperature. To get crispy potatoes, start by cutting them into even pieces. This ensures they cook at the same rate. Make sure to coat them well in olive oil. This helps create a crispy outer layer. During roasting, turn the potatoes halfway through. This ensures they brown evenly on all sides. Roast until they are deep golden brown and crispy. Let them cool for a few minutes before serving to maintain that nice crunch. Pro Tips Use Fresh Herbs: Fresh rosemary will provide a more vibrant flavor compared to dried, enhancing the overall taste of the dish. Even Sizing: Ensure the baby potatoes are roughly the same size for even cooking and browning, leading to perfectly roasted results. Don’t Skip the Lemon: The lemon juice adds a bright acidity that balances the richness of the potatoes and enhances their flavor. Garnish for Freshness: Adding fresh parsley right before serving not only adds color but also a fresh herbal note to the dish. {{image_2}} You can change the flavor of your roasted potatoes by adding different herbs. Try using thyme or oregano instead of rosemary. Both herbs will give a fresh taste. Mix and match your herbs for fun. This lets you create a new dish each time. Roasted potatoes can be even better with extra veggies. Carrots, bell peppers, or zucchini all work well. Cut them into similar sizes as the potatoes. This helps all the vegetables cook evenly. You can add these to the bowl when mixing the potatoes. This makes a colorful and tasty side dish. If you like heat, try adding red pepper flakes or paprika. These spices bring warmth and depth to your potatoes. Just a pinch can change the whole dish. For a smoky flavor, you can add smoked paprika or even some diced bacon. These additions make your potatoes exciting and full of flavor. To store your leftover rosemary garlic roasted potatoes, let them cool first. Place them in an airtight container. Make sure to keep them in the fridge. They will stay fresh for about 3 to 5 days. If you want to keep them longer, freezing is a great option. To reheat your potatoes, use the oven for the best crisp. Preheat your oven to 400°F (200°C). Spread the potatoes on a baking sheet. Heat them for about 10 to 15 minutes. This method brings back their crunchy texture. You can also use a microwave if you're in a hurry, but they might not be as crispy. Freezing rosemary garlic roasted potatoes is simple. After cooling, place them in a freezer-safe bag. Squeeze out as much air as you can before sealing. They can last for up to 2 months in the freezer. When you’re ready to eat them, thaw in the fridge overnight. Then reheat in the oven for best results. Enjoy your tasty leftovers! For roasting, I recommend using baby potatoes. They cook evenly and have a nice texture. You can also use Yukon Gold or red potatoes. These types have a creamy inside and crisp skin. If you want a firmer texture, try fingerling potatoes. Remember, the size matters. Halving the potatoes helps them crisp up nicely. Yes, you can use dried rosemary. It works well and saves time. Use about one tablespoon of dried rosemary for every three tablespoons of fresh. Dried herbs are more concentrated, so you need less. However, fresh rosemary brings a bright flavor that dried cannot match. If you can, use fresh for the best taste. This recipe is already vegan! All the ingredients are plant-based. You can enjoy these tasty potatoes without any animal products. If you want extra flavor, add a dash of nutritional yeast. It gives a cheesy taste without dairy. Enjoy your crispy, flavorful, vegan dish! In this article, we explored how to make delicious rosemary garlic roasted potatoes. We discussed the best ingredients, how to prep and roast them for crispiness, and shared tips for enhancing flavor. I also covered fun variations to try and the best ways to store leftovers. In closing, these potatoes can be a tasty side for any meal. Enjoy experimenting with flavors and textures. Happy cooking!

Rosemary Garlic Roasted Potatoes Perfectly Crisped

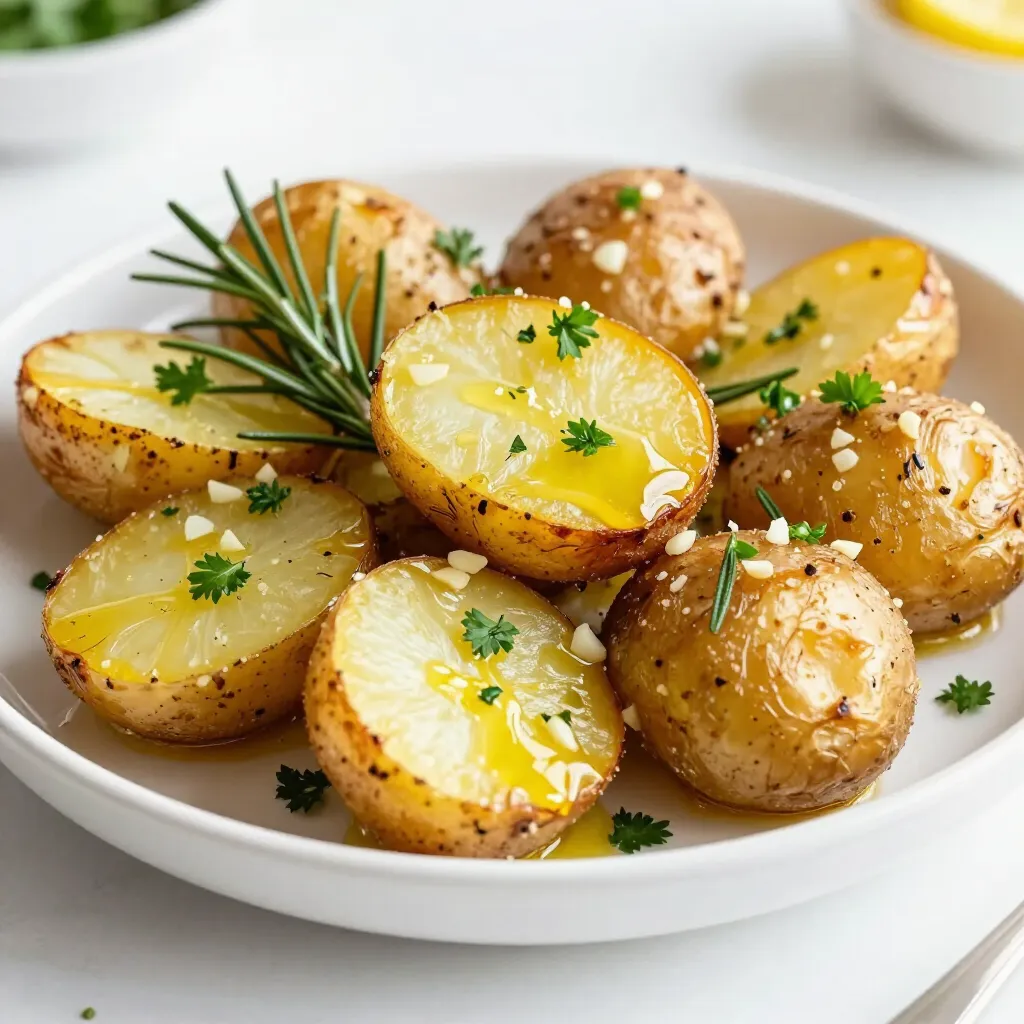
Looking to elevate your dinner with a tasty side dish? These Rosemary Garlic Roasted Potatoes are just the answer! I’ll

- 1 cup sticky rice (glutinous rice) Sticky rice is the base of this dessert. It has a unique texture that gets sticky when cooked. Rinse the rice well under cold water until the water runs clear. This helps remove excess starch. Soak the rice in water for at least four hours, or better yet, overnight. The soaking softens the rice and helps it cook evenly. - 1 ½ cups coconut milk - ½ cup sugar - ½ teaspoon salt The coconut sauce adds creaminess and sweetness. Combine coconut milk, sugar, and salt in a saucepan. Heat this mixture over medium heat, stirring until the sugar dissolves. Avoid boiling it. Save about half a cup of this sauce for drizzling on the finished dish. - 2 ripe mangoes, peeled and sliced - 1 tablespoon sesame seeds (optional, for garnish) - 2 tablespoons chopped fresh mint or cilantro (optional, for garnish) Mangoes are the star of this dessert. Use ripe, sweet mangoes for the best flavor. Slice them thinly and place them next to the sticky rice. You can sprinkle sesame seeds on top for a nice crunch. Fresh mint or cilantro adds a pop of color and flavor. These garnishes make your dish look beautiful and inviting. {{ingredient_image_1}} Start by rinsing 1 cup of sticky rice under cold water. Keep rinsing until the water runs clear. This step removes excess starch. Next, soak the rice in a bowl of water for 4 hours or overnight for best results. After soaking, drain the rice. Place it in a steamer basket lined with cheesecloth or a clean dish towel. Steam the rice over boiling water for 25 to 30 minutes. Cook until it is tender and translucent. While the rice steams, make the coconut sauce. In a saucepan, combine 1 ½ cups of coconut milk, ½ cup of sugar, and ½ teaspoon of salt. Cook this mixture over medium heat. Stir until the sugar dissolves. Be careful not to let it boil. Reserve about ½ cup of this sauce for later. You will drizzle it over the dessert. Once the rice is cooked, transfer it to a large bowl. Pour the remaining coconut sauce over the hot rice. Mix gently until the rice is fully coated. Let it sit for 20 to 30 minutes. This allows the rice to absorb the flavors. To serve, scoop some sticky rice onto plates. Arrange sliced mangoes next to the rice. Drizzle the reserved coconut sauce over both. For a finishing touch, sprinkle sesame seeds on top. You can also add chopped mint or cilantro if you like. Enjoy your delicious Thai Mango Sticky Rice! Soaking the sticky rice is key. Rinse it well under cold water. This helps remove excess starch. Soak the rice for at least four hours, but overnight is best. This gives the rice time to absorb water. When you steam the rice, use a steamer basket lined with cheesecloth. Place the soaked rice in the basket. Steam it over boiling water for 25 to 30 minutes. The rice should be tender and slightly translucent when done. You can change the flavor of your sticky rice! Try adding pandan leaves while steaming. This will give the rice a lovely green color and a unique taste. You can also add a splash of vanilla extract to the coconut sauce. For a more tropical twist, mix in some lime zest. This adds a fresh, zesty flavor that pairs well with mango. Serve your Thai mango sticky rice warm. Plate it with the sliced mangoes beside the rice. Drizzle the reserved coconut sauce on top. For a fun touch, sprinkle sesame seeds over the dish. Fresh mint or cilantro as a garnish adds color and freshness. To make it more festive, serve it in small cups at parties. Each guest can enjoy their own little dessert! Pro Tips Soaking the Rice: For the best texture, soak the sticky rice for at least 4 hours or preferably overnight. This ensures the grains cook evenly and become perfectly sticky. Steaming Method: Make sure to line your steamer basket with cheesecloth or a clean dish towel to prevent the rice from falling through. This will also help maintain steam and moisture. Coconut Sauce Consistency: When preparing the coconut sauce, avoid boiling it. Gentle heating will dissolve the sugar without affecting the creamy texture. Serving Suggestion: For an elegant presentation, arrange the mango slices in a fan shape next to the sticky rice and drizzle the reserved coconut sauce artfully over the dish. {{image_2}} You can make Thai mango sticky rice even more fun by adding tropical fruits. Fruits like pineapple, kiwi, or passion fruit work well. These fruits add color and a sweet twist. To use them, just slice them up and place them next to the mango on your plate. This not only looks great but also tastes amazing! If you want a vegan version, it’s super easy! The main ingredients are already vegan. Just make sure to use a vegan sugar. Some sugar is processed with bone char. You can find vegan sugar at many grocery stores. This way, you can enjoy the dish without any animal products. For those who want to cut down on sugar, try alternative sweeteners. Honey can be a tasty substitute, but it isn’t vegan. Maple syrup works too and adds a nice flavor. You can use agave syrup as well. Adjust the amount to your taste. Just remember, each sweetener gives a unique twist to the coconut sauce. To store leftover Thai mango sticky rice, first let it cool. Place the rice and mango in an airtight container. Seal it tightly to keep the air out. You can store it in the fridge for up to three days. If you have extra coconut sauce, store it in a separate container. When you're ready to enjoy your leftovers, take them out of the fridge. For best results, steam the sticky rice again. Place the rice in a steamer for about 5-10 minutes. This keeps the rice moist and soft. If you prefer, you can microwave it too. Just add a splash of water, cover, and heat for 30 seconds to 1 minute. Thai mango sticky rice is best fresh but can last a bit. In the fridge, it stays good for about three days. If you freeze it, it can last for up to one month. When you're ready to eat frozen rice, thaw it in the fridge overnight before reheating. Enjoy the flavors as if it were fresh! The best rice for this dish is sticky rice, also known as glutinous rice. This rice has a high starch content. This gives it a chewy texture. You can find it in Asian grocery stores. Look for short-grain varieties for the best results. Yes, you can use canned coconut milk. It adds great flavor to the dish. Choose full-fat coconut milk for a rich taste. Light coconut milk works too, but it may not be as creamy. Shake the can well before using to mix the cream. To select ripe mangoes, look for smooth skin. The color should be bright and vibrant. Gently squeeze the mango; it should give slightly. This means it is ripe and juicy. You can also smell the stem; a sweet aroma means it’s ready to eat. In this guide, we explored how to make Thai Mango Sticky Rice. We covered the best sticky rice, components for coconut sauce, and tasty garnishes. I shared step-by-step instructions, handy tips, flavor variations, and storage advice. This delicious dessert is easy to make at home. With fresh ingredients and a little practice, you can impress anyone. Enjoy your sweet treat, and don’t be afraid to try different fruits or flavors!

Thai Mango Sticky Rice Irresistible Dessert Recipe

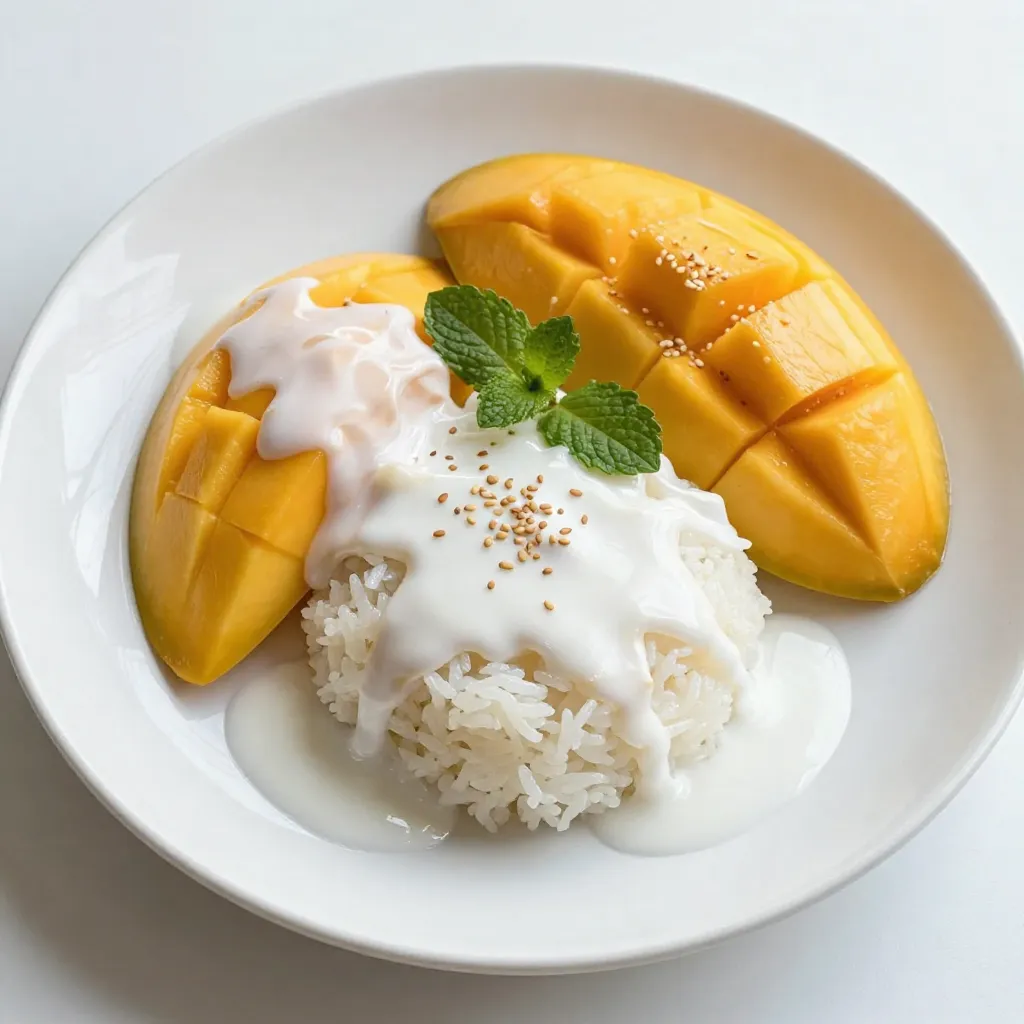
If you love sweet treats, you need to try Thai Mango Sticky Rice! This dessert combines creamy coconut sauce with

- 2 cups all-purpose flour - 1 cup granulated sugar - 1 tablespoon baking powder - 1 teaspoon baking soda - 1 teaspoon ground cinnamon - ½ teaspoon ground nutmeg - ¼ teaspoon salt - 1 cup eggnog (store-bought or homemade) - ½ cup vegetable oil - 2 large eggs - 1 teaspoon vanilla extract - ½ cup chopped pecans (optional) - 1 tablespoon melted butter (for topping) - ¼ cup brown sugar (for topping) - 1 teaspoon ground cinnamon (for topping) The ingredients in Eggnog Cinnamon Coffee Cake Muffins create a rich, festive flavor. You have the base with flour and sugar, which gives the muffins their sweetness and structure. Baking powder and baking soda help them rise. Cinnamon and nutmeg add warmth, making it feel like a cozy holiday treat. The eggnog replaces milk, giving a creamy texture and unique taste. Vegetable oil keeps the muffins moist, while eggs bind everything together and add richness. If you want to add some crunch, toss in chopped pecans. The topping is a mix of butter, brown sugar, and cinnamon, adding a sweet, crumbly layer on top. This combo makes these muffins a delightful treat for any gathering. {{ingredient_image_1}} Start by preheating your oven to 350°F (175°C). This step is key to getting your muffins just right. While your oven heats, you need to prep your muffin tin. You can either line it with paper liners or grease it with cooking spray. Both methods work well, but using liners makes cleanup easier. Next, grab a large mixing bowl. In this bowl, combine the all-purpose flour, granulated sugar, baking powder, baking soda, ground cinnamon, ground nutmeg, and salt. Whisk these dry ingredients together until they blend well. This step ensures even flavor throughout your muffins. In a separate bowl, whisk together the eggnog, vegetable oil, eggs, and vanilla extract. Make sure everything is mixed until smooth. This mixture brings richness to your muffins and adds the festive eggnog flavor. Now, pour the wet ingredients into the bowl of dry ingredients. Gently stir these together until they just combine. It’s important not to overmix. A few lumps are okay, as they help keep the muffins tender. If you’re adding pecans, fold them in at this stage. For the topping, take a small bowl and mix together the melted butter, brown sugar, and ground cinnamon. You want this mixture to be crumbly. Once it’s ready, sprinkle it generously over each muffin before baking. This adds a sweet crunch to the top. Now it’s time to bake! Divide the batter into the prepared muffin tin, filling each cup about two-thirds full. Bake in your preheated oven for 18-20 minutes. To check for doneness, insert a toothpick into the center of a muffin. If it comes out clean, your muffins are ready! After baking, let them cool in the pan for about 5 minutes. Then, transfer them to a wire rack to cool completely. Enjoy the delicious aroma filling your kitchen! To keep your muffins moist, use fresh eggnog. If you want extra richness, add a bit more oil. Mixing the wet and dry ingredients gently helps too. Overmixing can make them dry. Letting the batter rest for a few minutes before baking allows the flour to absorb moisture. This small step makes a big difference! Avoid overmixing your batter. Stir just until the ingredients blend; some lumps are okay. If you mix too much, your muffins can turn out tough. Keep an eye on your baking time. Check muffins at 18 minutes. If a toothpick comes out clean, they are done. Underbaking can lead to gummy centers, so don't skip this step! Serve these muffins warm for the best taste. A dusting of powdered sugar adds a nice touch. For a festive look, sprinkle extra cinnamon on top. Pair your muffins with coffee or tea for a cozy treat. You can even add a dollop of whipped cream for a special twist! These simple ideas enhance both flavor and appearance. Pro Tips Use Fresh Spices: Freshly ground nutmeg and cinnamon will enhance the flavor of your muffins significantly compared to pre-ground spices. Don't Overmix: When combining the wet and dry ingredients, mix until just combined to ensure your muffins stay fluffy and tender. Storage Tips: Store leftover muffins in an airtight container at room temperature for up to 3 days or freeze them for longer storage. Festive Add-ins: Consider adding dried cranberries or chocolate chips to the batter for an extra festive touch! {{image_2}} You can easily change the flavor of your Eggnog Cinnamon Coffee Cake Muffins. Try adding different spices like ginger or cloves for a warm kick. You can swap out eggnog for apple cider to give a fruity twist. If you like chocolate, mix in some mini chocolate chips. This will add a rich flavor that pairs well with the spices. You can also try using different nuts, like walnuts or almonds, instead of pecans. Each option gives your muffins a unique taste that keeps things fun. If you need a gluten-free version, use a gluten-free flour blend. This swap works well and keeps the muffins soft. For a dairy-free option, choose a dairy-free eggnog or use almond milk with a bit of vanilla extract. You can also use flax eggs instead of regular eggs for a vegan choice. This is made by mixing one tablespoon of flaxseed meal with three tablespoons of water. Let it sit for a few minutes to thicken. These alternatives ensure everyone can enjoy these tasty muffins. You can make the topping even more exciting. Instead of just brown sugar and cinnamon, try adding chopped nuts or shredded coconut for extra crunch. You could also use a crumb topping made from oats and flour for a different texture. If you want a sweeter touch, drizzle some icing on top. Just mix powdered sugar with a little milk until it’s smooth. This adds a nice finish to your muffins. Experimenting with toppings makes each batch special and delicious. Store your Eggnog Cinnamon Coffee Cake Muffins at room temperature. Use an airtight container to keep them fresh. They will stay good for up to four days this way. If you choose to refrigerate them, they can last up to a week. However, the cold may change their texture. So, I recommend room temperature for the best taste. To freeze leftovers, first let the muffins cool completely. Wrap each muffin in plastic wrap. Then, place them in a freezer bag or container. This helps avoid freezer burn. You can freeze them for up to three months. When ready to enjoy, just take them out and let them thaw in the fridge overnight. For the best texture, reheat your muffins in the oven. Preheat your oven to 350°F (175°C). Place the muffins on a baking sheet and heat for about 10 minutes. This warms them through and keeps them soft. You can also use a microwave. Heat them for about 15-20 seconds. Just be careful not to overheat, or they might get dry. Enjoy them warm for the best experience! These muffins shine with holiday flavors. Eggnog brings a creamy richness that feels festive. Ground cinnamon and nutmeg add warmth and spice. Together, they create a cozy feeling, perfect for holiday gatherings. You can enjoy these muffins at breakfast or as a snack. Their delightful taste makes them a hit at any celebration. Yes, you can make these muffins ahead of time. Bake them a day or two before your event. Store them in an airtight container. This keeps them fresh and soft. You can also freeze them. Just wrap each muffin in plastic wrap and place them in a freezer bag. When ready to eat, thaw them overnight in the fridge. These muffins pair well with warm drinks. A cup of coffee or tea complements their flavor nicely. For a festive touch, serve with spiced cider or hot chocolate. You can also add a side of whipped cream or a sprinkle of powdered sugar. This adds a fun finishing touch to your treat. You learned about making delicious Eggnog Cinnamon Coffee Cake Muffins. We covered key ingredients, step-by-step instructions, and tips to avoid mistakes. Explore flavor variations and proper storage for long-lasting enjoyment. These muffins are perfect for holidays or cozy mornings. They can impress your guests and brighten your day. Enjoy the warm, sweet flavors, and make them your own! Happy baking!

Eggnog Cinnamon Coffee Cake Muffins Delightful Treat

If you’re looking for a warm, cozy treat this holiday season, you’ve found it! My Eggnog Cinnamon Coffee Cake Muffins

Older posts
Page1 Page2 … Page161 Next →

dsad

© 2026 pureeatsnow • Built with GeneratePress

Our Policies

  • Copyright Policy
  • Cookie Policy
  • GDPR Policy
  • Privacy Policy
  • Disclaimer
  • Terms Of Use

More Information

  • Home
  • About
  • Contact
  • Appetizers
  • Dessert
  • Dinner
  • Drinks
©2026, pureeatsnow About Back To Top