Skip to content
DisclaimerTerms Of UseGDPR PolicyCookie Policy

pureeatsnow

  • Home
  • Drinks
  • Appetizers
  • Dinner
  • Dessert
  • About
  • Contact
  • Privacy Policy
DisclaimerTerms Of UseGDPR PolicyCookie Policy

Rachel

To make Sheet Pan Orange Ginger Chicken, you will need: - 4 boneless, skinless chicken thighs - 2 large oranges (one for juice and zest, one for slicing) - 2 tablespoons fresh ginger, minced - 3 tablespoons soy sauce (or tamari for gluten-free) - 1 tablespoon honey - 1 tablespoon sesame oil - 1 red bell pepper, sliced - 1 cup snap peas - 2 green onions, sliced - 1 tablespoon sesame seeds - Salt and pepper to taste If you lack an ingredient, don’t worry! Here are some easy swaps: - Chicken thighs can be replaced with chicken breasts, but thighs stay juicier. - Use any citrus juice, like lemon or lime, if you don’t have oranges. - Instead of fresh ginger, ground ginger works in a pinch, though the taste differs. - Honey can be replaced with maple syrup for a vegan option. - Tamari is a great gluten-free soy sauce alternative. To ensure your dish turns out great, here are some handy conversions: - 1 tablespoon equals 3 teaspoons. - 1 cup equals 16 tablespoons. - 2 large oranges yield about ½ cup of juice on average. - Remember, 1 ounce equals about 28 grams, helpful for weighing your ingredients. With these ingredients and tips, you're set to make a tasty meal! 1. First, heat your oven to 400°F (200°C). Line a large sheet pan with parchment paper. This makes cleanup easy. 2. Next, take one large orange. Juice it and zest it in a bowl. Add minced ginger, soy sauce, honey, and sesame oil. Whisk this mix well. 3. Season the four chicken thighs with salt and pepper. Place them in the bowl with the marinade. Let them sit for at least 15 minutes. You can also marinate them in the fridge for up to 2 hours for more flavor. 4. While the chicken soaks, slice the other orange into rounds. Prepare the red bell pepper by slicing it and set it aside. Wash the snap peas too. 5. When the chicken is ready, put the marinated thighs on one side of the sheet pan. Arrange the sliced orange, bell pepper, and snap peas on the other side. 6. Pour any leftover marinade over the chicken and veggies in the pan. 7. Roast everything in the oven for 25-30 minutes. Check the chicken to make sure it is cooked through. It should reach an internal temperature of 165°F (75°C). 8. In the last 5 minutes, sprinkle sesame seeds over the chicken and vegetables. This will add a nice crunch. 9. After cooking, take the sheet pan out of the oven. Let it rest for a few minutes. Then, garnish with sliced green onions for a pop of color. Serve the chicken and veggies on a large platter. Add more sesame seeds and orange slices for decoration. This dish goes well with a side of steamed rice or quinoa. Enjoy! Marinating the chicken makes it tasty and tender. Start with the marinade mix of orange juice, zest, ginger, soy sauce, honey, and sesame oil. You can let the chicken sit in this mix for at least 15 minutes. If you have more time, let it rest for up to 2 hours in the fridge. The longer it marinates, the more flavor it will soak up. For the best results, set your oven to 400°F (200°C). Cook the chicken for 25 to 30 minutes. Use a meat thermometer to check its doneness. The chicken should reach an internal temp of 165°F (75°C). If you like your veggies crisp, add them halfway through cooking. This way, they stay bright and fresh. Want to amp up the flavors? Here are some fun ideas: - Add more ginger for a spicier kick. - Use lime juice instead of orange for a tangy twist. - Toss in some garlic for extra depth. - Try different veggies like carrots or broccoli for variety. These simple changes can give your dish a new personality! Enjoy exploring flavors. {{image_2}} You can easily make this dish gluten-free. Just swap soy sauce for tamari. Tamari has a similar taste but is safe for gluten-free diets. Make sure to read labels on any other sauces you use. They may contain gluten. This keeps your meal tasty and safe. Feel free to add more veggies for color and taste. Carrots, broccoli, or zucchini work great. Chop them into bite-sized pieces for even cooking. Spread them on the sheet pan with the chicken. This not only boosts nutrition but also makes the meal more vibrant. Want some heat? Add chili flakes or sriracha to the marinade. Start with a small amount and taste it. You can also use spicy peppers like jalapeños. This adds a nice kick to the orange ginger flavor. It’s a fun twist for those who love spice! To keep your Sheet Pan Orange Ginger Chicken fresh, let it cool first. Place the chicken and veggies in an airtight container. You can store it in the fridge for up to three days. If you want to keep it longer, freezing is a great option. When you're ready to enjoy leftovers, reheating is easy. Preheat your oven to 350°F (175°C). Place the chicken and veggies on a baking sheet. Heat for 15-20 minutes until warm. You can also use the microwave, but the oven keeps the chicken crispier. If you want to freeze the dish, it’s best to do so right after cooking. Allow it to cool completely. Then, place it in a freezer-safe container. It can last for up to three months in the freezer. To thaw, move it to the fridge overnight before reheating. Yes, you can use chicken breasts. They will work well in this recipe. Chicken breasts cook faster than thighs. You should check them after 20 minutes. If they reach 165°F, they are done. Thighs are juicier, but breasts are a great option too. Just make sure to slice them evenly for even cooking. To check if the chicken is done, use a meat thermometer. The internal temperature should reach 165°F. If you don’t have a thermometer, cut into the thickest part. The meat should be white, not pink. Juices should run clear. If it’s still pink, put it back in the oven for a few more minutes. You can serve this dish with many sides. Steamed rice or quinoa is a great choice. They soak up the sauce well. You can also add a fresh salad for crunch. Roasted broccoli or green beans pair nicely too. Feel free to mix and match to suit your taste! In this blog post, we covered all aspects of making sheet pan orange ginger chicken. We explored ingredients, cooking steps, and tips for the best flavor. You can make substitutions and adjust cooking times to fit your needs. Remember to store leftovers properly and reheat them for future meals. Whether you choose to spice things up or add veggies, there’s a way to make this dish yours. Enjoy experimenting and make it a family favorite.

Sheet Pan Orange Ginger Chicken Flavorful Delight

If you’re ready to elevate your dinner game, you’ve landed in the right spot! This Sheet Pan Orange Ginger Chicken

To make this creamy and tasty dip, you need: - 3 large onions, thinly sliced - 2 tablespoons olive oil - 1 teaspoon sugar - 1/2 teaspoon salt - 1 cup Greek yogurt - 1/2 cup mayonnaise - 1 teaspoon garlic powder - 1 tablespoon fresh thyme leaves (or 1 teaspoon dried thyme) - Freshly ground black pepper to taste Each ingredient plays a role. The onions bring sweetness, while the Greek yogurt adds creaminess. The mayonnaise makes it richer, and the garlic powder gives a nice kick. You can make your dip even better with these garnishes: - Chopped chives - Fresh thyme leaves - Extra black pepper These not only look good but also add fresh flavor. You can mix and match based on what you like best. Want to make it lighter? Here are some swaps: - Use low-fat Greek yogurt instead of regular yogurt. - Swap mayonnaise for avocado or hummus for a healthier option. - Use less sugar or try honey for a natural sweetener. These changes keep the flavor while making it a bit lighter. You enjoy great taste and feel good about it! To start, heat 2 tablespoons of olive oil in a large skillet on medium heat. Add 3 large onions that you have thinly sliced. Sprinkle in 1 teaspoon of sugar and 1/2 teaspoon of salt. This combination helps the onions cook evenly. Stir well to coat the onions in the oil. Cook the onions for about 30 to 40 minutes. Stir occasionally to prevent them from sticking. Watch closely as they turn a deep golden brown. If they start to brown too quickly, lower the heat. Once the onions are caramelized, remove them from the heat and let them cool slightly. Caramelizing onions takes patience. Keep stirring them to avoid burning. If you notice they are browning too fast, turn down the heat. You can also add a splash of water if they seem dry. This keeps the onions from burning. Sugar helps with the caramelization process, but don’t add too much. Just 1 teaspoon is enough to enhance their natural sweetness. When they are golden brown, you know they are ready. In a mixing bowl, add 1 cup of Greek yogurt and 1/2 cup of mayonnaise. Next, sprinkle in 1 teaspoon of garlic powder and 1 tablespoon of fresh thyme leaves. If you use dried thyme, 1 teaspoon will work. Stir these ingredients until smooth and well blended. Once the onions have cooled, fold them into the yogurt mixture. Mix until everything is fully incorporated. Season with freshly ground black pepper to taste. Transfer the dip to a serving bowl and garnish with chopped chives. Cover and refrigerate for at least 30 minutes to let the flavors meld. To boost the flavor of your caramelized onion dip, use fresh ingredients. Fresh thyme adds a bright taste to the dip. You can also add a splash of lemon juice for a zing. If you want more depth, try adding some smoked paprika. This will give your dip a smoky twist. Remember, don’t rush the caramelizing process. Slow cooking the onions brings out their natural sweetness. You can prepare the dip a day in advance. This allows the flavors to meld beautifully. Just follow the recipe and store it in an airtight container. When you’re ready to serve, take it out and let it warm slightly. This dip tastes better after sitting for a while. If you make it ahead, you’ll save time on party day! For a casual gathering, serve the dip with pita chips or veggie sticks. It’s perfect for dipping! For a more elegant event, try pairing it with toasted baguette slices. You can also use it as a spread on sandwiches or wraps. This dip is versatile and fits many occasions. Whether it’s a game night or a fancy dinner, it always shines! {{image_2}} You can add more flavor to your dip. Try mixing in some shredded cheese. A blend of cheddar and mozzarella works great. You can also stir in some diced jalapeños for a spicy kick. If you like, add a splash of balsamic vinegar for a touch of sweetness. Fresh herbs like parsley or dill can brighten the dip. Experiment with flavors to find what you love! Greek yogurt is creamy and tangy, but you can swap it. Use regular plain yogurt for a lighter dip. If you want a dairy-free option, try coconut yogurt. It gives a different taste but still works well. For more protein, use a high-protein yogurt brand. Each option will change the flavor, but they all taste good. Switching out ingredients makes this dip fun for any season. In spring, add fresh peas or asparagus for a fresh taste. In fall, mix in roasted pumpkin for a cozy flavor. You can also use caramelized shallots instead of onions for a sweeter touch. Seasonal swaps keep your dip exciting and full of new flavors! After making your caramelized onion dip, allow it to cool. Transfer it to an airtight container. Store it in the fridge for up to five days. This dip tastes better the longer it sits, as the flavors meld. Always cover it to keep it fresh and tasty. You can freeze this dip if you want to save some for later. Place the dip in a freezer-safe container. Make sure to leave some space at the top for expansion. Seal it tight and label it with the date. When ready to eat, thaw it overnight in the fridge. In the fridge, this dip lasts about five days. If frozen, it will keep for about three months. Always check for signs of spoilage, like off smells or changes in texture. When in doubt, it's best to throw it out. Enjoy the flavors of this dip without worry! Yes, you can easily make this dip vegan. To do this, swap out Greek yogurt and mayonnaise for vegan versions. Look for plant-based yogurt and mayonnaise at your local store. You can also add some nutritional yeast for a cheesy flavor. This way, you keep the taste while making it friendly for a vegan diet. You can store leftovers in the fridge for about 3 to 5 days. Make sure to keep the dip in an airtight container. If you notice any changes in smell or color, it’s best to toss it. Enjoy it fresh for the best taste! This dip pairs well with many tasty dippers. Here are some ideas: - Pita chips - Veggie sticks like carrots and celery - Toasted baguette slices - Crackers - Tortilla chips These options make it fun for parties or casual snacking. Yes, you can use store-bought caramelized onions if you're short on time. Just check the label to ensure they contain no unwanted additives. This shortcut can save you time and still give you great flavor in your dip. However, homemade onions offer a fresh taste and deeper flavor. This blog post explored the world of caramelized onion dip. We covered essential ingredients, cooking steps, and tips for perfect flavor. You can enhance your dish with the right garnishes and substitutes. I shared ways to make it ahead and suggested serving ideas for any occasion. Plus, we looked at variations to keep things fresh. In the end, this dip is simple and tasty. You can impress your friends with your skills! Remember, your creativity can make this dip uniquely yours.

Caramelized Onion Dip with Greek Yogurt Delight

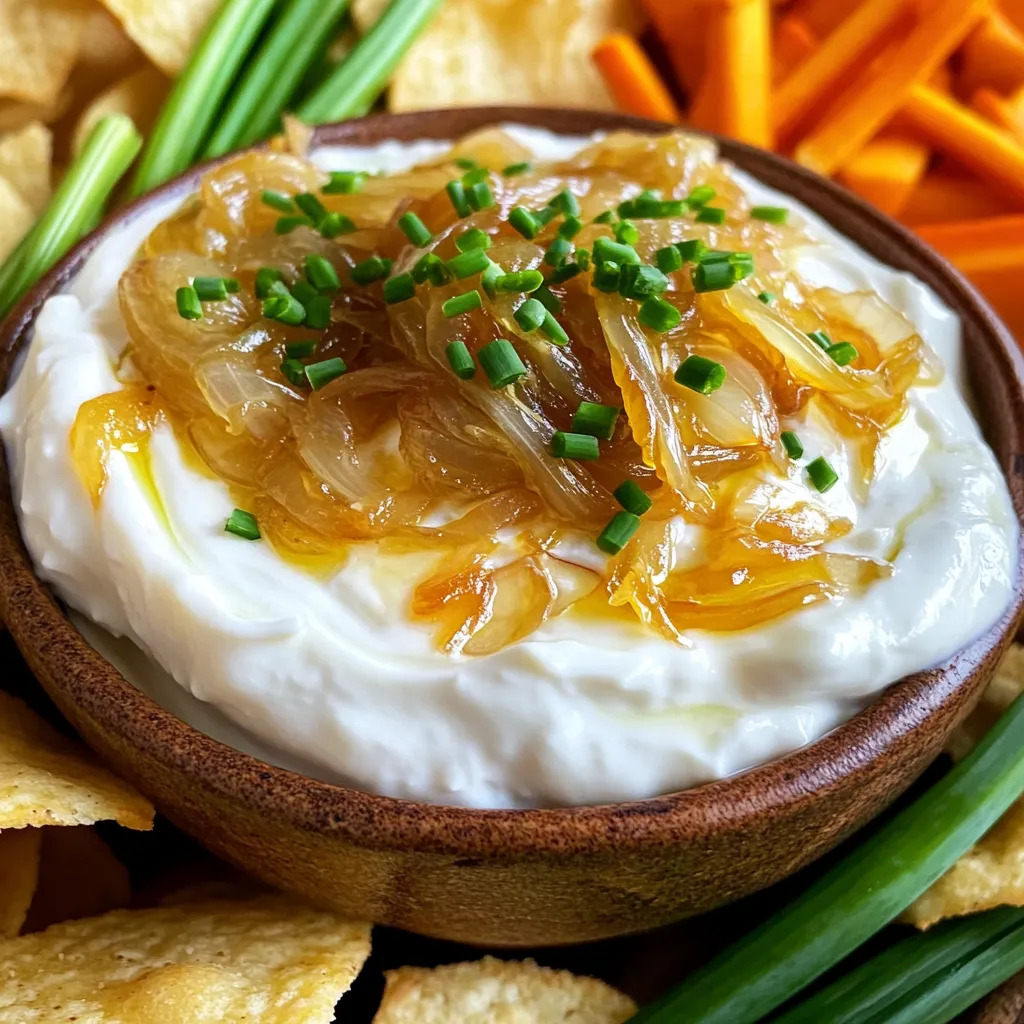
If you’re seeking a dip that delights every palate, you’ve found it! My Caramelized Onion Dip with Greek Yogurt is

- 2 cups cheese tortellini (fresh or frozen) - 2 cups vegetable broth - 1 cup heavy cream - 1/2 cup pesto sauce (store-bought or homemade) - 1/2 cup cherry tomatoes, halved - 1/4 cup grated Parmesan cheese, plus extra for garnish - 1 tablespoon olive oil - 2 cloves garlic, minced - Salt and pepper to taste Gather these fresh ingredients. They are key to making your creamy pesto tortellini shine. The cheese tortellini is the heart of this dish. You can use fresh or frozen tortellini; both work great. The vegetable broth adds flavor and moisture. Heavy cream makes it rich and smooth. Next, you need pesto sauce. You can buy it or make your own if you like. Cherry tomatoes bring a burst of juicy goodness. Parmesan cheese adds a savory depth. Don’t forget the pantry essentials. Olive oil helps cook the garlic and adds flavor. Minced garlic gives a lovely aroma. Season with salt and pepper for taste. With these ingredients ready, you’re set to create a simple and tasty meal. 1. Heating the olive oil and sautéing garlic Start by taking a large pot. Heat 1 tablespoon of olive oil over medium heat. Once the oil is hot, add 2 cloves of minced garlic. Sauté the garlic for about 1 minute. You want it to smell nice but not burn. 2. Cooking the tortellini Next, pour in 2 cups of vegetable broth. Stir well, then add 2 cups of cheese tortellini. Bring the mixture to a gentle boil. Reduce the heat to a simmer. Cook the tortellini for about 5-7 minutes. Stir occasionally until they become tender. 1. Adding cream and pesto When the tortellini is cooked, add 1 cup of heavy cream and 1/2 cup of pesto sauce to the pot. Stir well to mix everything. Let it simmer for 2-3 minutes. This will make your sauce nice and creamy. 2. Mixing in tomatoes and cheese Now, add 1/2 cup of halved cherry tomatoes and 1/4 cup of grated Parmesan cheese. Stir until the tomatoes warm up and the cheese melts. This adds great flavor and texture. 1. Seasoning and adjusting sauce consistency Taste your dish and season it with salt and pepper to your liking. If the sauce seems too thick, add a splash of vegetable broth. This helps reach your desired sauce consistency. 2. Serving the creamy pesto tortellini Once done, remove the pot from the heat. Let it sit for a minute. Serve the creamy pesto tortellini in deep bowls. Top with extra Parmesan cheese and fresh basil leaves if you like. A drizzle of olive oil adds a nice shine. Enjoy your meal! To avoid overcooking tortellini, watch the clock. Cook them just until they are tender. This usually takes 5-7 minutes. Test one to check for doneness. If it feels firm, it needs more time. For seasoning, taste as you cook. Start with salt and pepper. You can always add more, but you can't take it out. Serve creamy pesto tortellini in deep bowls. This keeps the sauce from spilling over. Top with extra Parmesan cheese for a rich touch. Fresh basil leaves add color and flavor. For extra flair, drizzle olive oil on top. This gives a nice sheen and enhances taste. Using frozen tortellini is a great time-saver. You don’t need to thaw them before cooking. Just toss them straight into the pot with the broth. Prepping ingredients in advance can also help. Chop garlic and halve cherry tomatoes ahead of time. This way, when you're ready to cook, you can focus on making the dish delicious. {{image_2}} You can change the pasta type to suit your taste. Try using penne or farfalle instead of cheese tortellini. You might enjoy the different shapes and textures. If you want a new flavor, switch from pesto to sun-dried tomato pesto or roasted red pepper sauce. Both options add a unique twist to your dish. To make this dish vegan, replace heavy cream with coconut cream or cashew cream. Use vegan tortellini made from plant-based ingredients. Your meal will remain rich and tasty. If you need a gluten-free option, look for gluten-free tortellini. Many brands offer great alternatives. Just check the package for cooking instructions. Add veggies to your meal for extra nutrition. Spinach or kale works well and cooks quickly. Just toss them in when you add the cream and pesto. For more protein, consider adding cooked chicken or shrimp. They will blend nicely with the creamy sauce. Just make sure to heat them through before serving. To store leftovers, let the tortellini cool first. Place it in an airtight container. Keep it in the fridge for up to three days. When you’re ready to eat, reheat it on the stove over medium heat. Stir in a bit of broth or cream to keep it creamy. You can also microwave it for one to two minutes. Just add a splash of liquid to avoid drying. For freezing, let the dish cool completely. Portion it into freezer-safe containers. Use it within three months for the best taste. To thaw, move the container to the fridge overnight. Reheat it on the stove over low heat. Stir often, adding a little broth or cream to help with the texture. Consume leftovers within three days for best taste. Check for signs of spoilage, like a sour smell or mold. If the tortellini looks dry or has changed color, it’s time to toss it. Always trust your senses when it comes to food safety. How long does it take to cook tortellini? Cooking tortellini takes about 5 to 7 minutes. You will want to check the package for exact times. Fresh tortellini cooks faster than frozen. Can I use homemade pesto instead of store-bought? Yes, you can use homemade pesto. It adds a personal touch and fresh flavor. Just make sure it's well-blended for the best taste. Is this dish suitable for meal prep? Yes, this dish is great for meal prep. You can make it ahead and store it in the fridge. Just reheat it when you are ready to eat. What can I serve with creamy pesto tortellini? You can serve it with a side salad or garlic bread. Both pair well and add more flavor to the meal. How to make it less creamy? To make the dish less creamy, use less heavy cream. You can also add more vegetable broth to thin it out. Can I add more vegetables to the recipe? Absolutely! You can add spinach, bell peppers, or zucchini. They will enhance the flavor and add nutrients. We covered the key ingredients, from the cheese tortellini to the flavorful pesto. You learned how to prepare and cook this dish step by step. There are tips for cooking, presentation, and even storage. Remember, you can easily customize this recipe to fit your taste. Whether you prefer additional vegetables or different sauces, the options are endless. Enjoy making your creamy pesto tortellini and feel free to experiment. Cooking should be fun and tasty!

One Pot Creamy Pesto Tortellini Simple and Tasty Meal

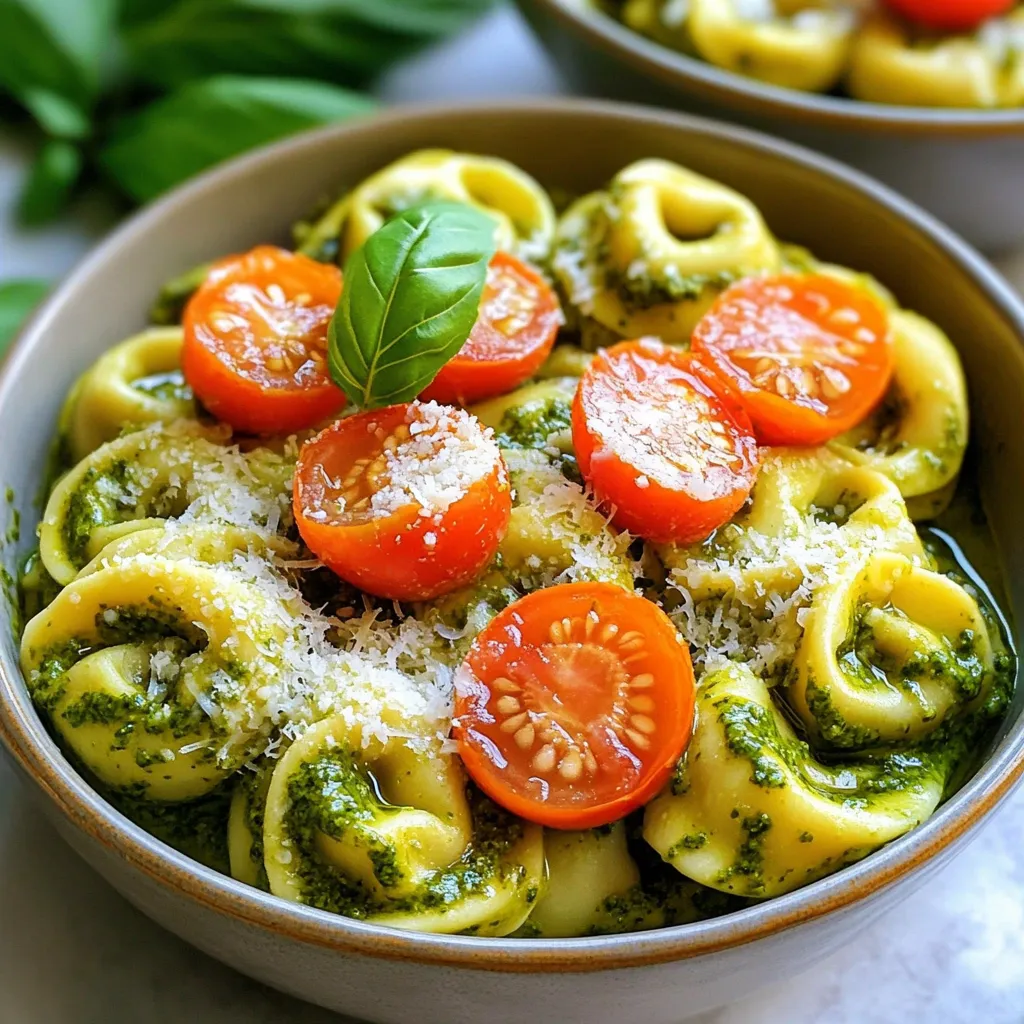
If you’re searching for a quick, tasty meal that’s ready in one pot, you’ve found it! My One Pot Creamy

- 4 salmon fillets (about 6 oz each) - 3 tablespoons soy sauce - 2 tablespoons honey - 1 tablespoon freshly grated ginger - 2 garlic cloves, minced - 1 tablespoon sesame oil - 1 tablespoon rice vinegar - 2 tablespoons sesame seeds (toasted) - 2 green onions, sliced (for garnish) - Salt and pepper to taste A serving has about 350 calories. Each serving offers: - Protein: 30g - Fats: 20g - Carbs: 15g The salmon packs protein that helps build muscles. The fats come from the salmon and sesame oil. Honey adds a bit of sweetness, while soy sauce gives umami flavor. This dish is balanced and filling, making it a great choice for dinner. 1. Start by whisking together the marinade. In a medium bowl, add: - 3 tablespoons soy sauce - 2 tablespoons honey - 1 tablespoon freshly grated ginger - 2 minced garlic cloves - 1 tablespoon sesame oil - 1 tablespoon rice vinegar Mix these ingredients until they blend well. 2. Next, prepare the salmon fillets. Take 4 salmon fillets (about 6 oz each) and season them with salt and pepper. Place them in a shallow dish or a resealable bag. Pour the marinade over the fillets. Make sure they are well coated. Let them marinate for at least 30 minutes. This step brings out the flavors. 1. Preheat your air fryer to 400°F (200°C). This should take about 5 minutes. A hot air fryer ensures even cooking. 2. When the salmon is ready, remove it from the marinade, but keep the marinade. Place the salmon fillets skin-side down in the air fryer basket. This helps the skin get crispy. 1. Air fry the salmon at 400°F for 10-12 minutes. The cooking time depends on the thickness of the fillets. 2. To check for doneness, look for flaky salmon. You can use a fork to test it. If it flakes easily, it is ready. 3. While the salmon cooks, pour the reserved marinade into a small saucepan. Bring it to a boil over medium heat. Let it simmer for about 2-3 minutes until it thickens slightly. 4. Once the salmon is done, take it out of the air fryer. Drizzle the thickened marinade over the top. For a nice touch, garnish with toasted sesame seeds and sliced green onions. Enjoy! Marinate your salmon for at least 30 minutes. This time allows the flavors to soak into the fish. If you want to mix it up, try using maple syrup instead of honey. For a kick, add a dash of Sriracha to the marinade. To avoid common mistakes, make sure not to overcrowd the air fryer. This can lead to uneven cooking. For crispy skin, dry the salmon with a paper towel before cooking. This helps the skin get nice and crunchy. Serve your salmon with a side of steamed rice or sautéed greens like bok choy. For a great look, place the salmon on a colorful plate. Drizzle the thickened sauce on top and sprinkle with green onions. This adds a pop of color for photos! {{image_2}} You can switch up the marinade to change the flavor. One great option is teriyaki glaze. It adds a sweet and savory taste to the salmon. Just use the same amount as the soy sauce in the recipe. Another fun choice is sweet chili sauce. This sauce gives a nice kick and sweetness. Use it in place of honey. Adjust the amount to your taste. If you want a change from salmon, try chicken or tofu. Both work well with the marinade. For chicken, use boneless thighs or breasts. Cook them for about 12-15 minutes at the same temperature. Tofu is an excellent vegetarian option. Use firm tofu and cut it into slabs. Cook it for about 10-12 minutes. It absorbs the flavors well! You can also make this dish with vegetables. Try using eggplant or bell peppers. They soak up the marinade nicely. Slice them into thick pieces. Cook them for about 8-10 minutes in the air fryer. When using veggies, think about flavor profiles. You might want to add some extra spices. Consider garlic powder or chili flakes for more zest. Mix and match to find your favorite! To keep your Air Fryer Sesame Ginger Salmon fresh, follow these tips. Store leftovers in an airtight container. This helps keep the salmon moist and tasty. Place it in the fridge right away. Salmon stays good for about 3 days. If you notice any strong smells or changes in texture, it's best to toss it. To reheat the salmon, use the air fryer or oven. Preheat your air fryer to 350°F. Place the salmon inside for about 5 minutes. This method keeps it juicy. If using the oven, wrap the salmon in foil. Bake it at 350°F for about 10 minutes. This helps retain the flavor and moisture. Avoid using the microwave, as it can dry out the salmon. If you want to freeze your salmon, wrap each fillet tightly in plastic wrap. Then place them in a freezer bag. This prevents freezer burn. Salmon can be frozen for up to 3 months. When you're ready to eat it, thaw it in the fridge overnight. This ensures safe and even thawing for the best taste. You should marinate salmon for at least 30 minutes. This time allows the flavors to soak in. If you have more time, you can marinate it for up to 2 hours. Just remember not to go too long, as the acid in the marinade can change the texture of the fish. The best temperature to cook salmon in an air fryer is 400°F (200°C). Cooking at this high heat ensures the salmon cooks quickly and evenly. It also helps to create a nice, crispy exterior while keeping the inside tender and moist. Yes, you can use fresh ginger instead of powdered ginger. Fresh ginger gives a brighter and more intense flavor. It also adds a nice texture to the dish. If you use fresh ginger, you will need to grate it finely to ensure it blends well into the marinade. You can tell when the salmon is done by checking its color and texture. The salmon should be opaque and flake easily with a fork. If you have a food thermometer, the internal temperature should reach 145°F (63°C). This is the safe temperature for cooked fish. In this blog post, we explored a simple air fryer salmon recipe. We covered essential ingredients, step-by-step instructions, and tips for enhanced flavor. You learned how to marinate and cook the salmon for optimal taste and texture. Plus, we discussed variations and storage methods. Using an air fryer makes healthy meals easy. Experiment with different marinades and proteins to keep meals exciting. Enjoy delicious, homemade salmon that fits your lifestyle and taste.

Air Fryer Sesame Ginger Salmon Easy and Delicious Recipe

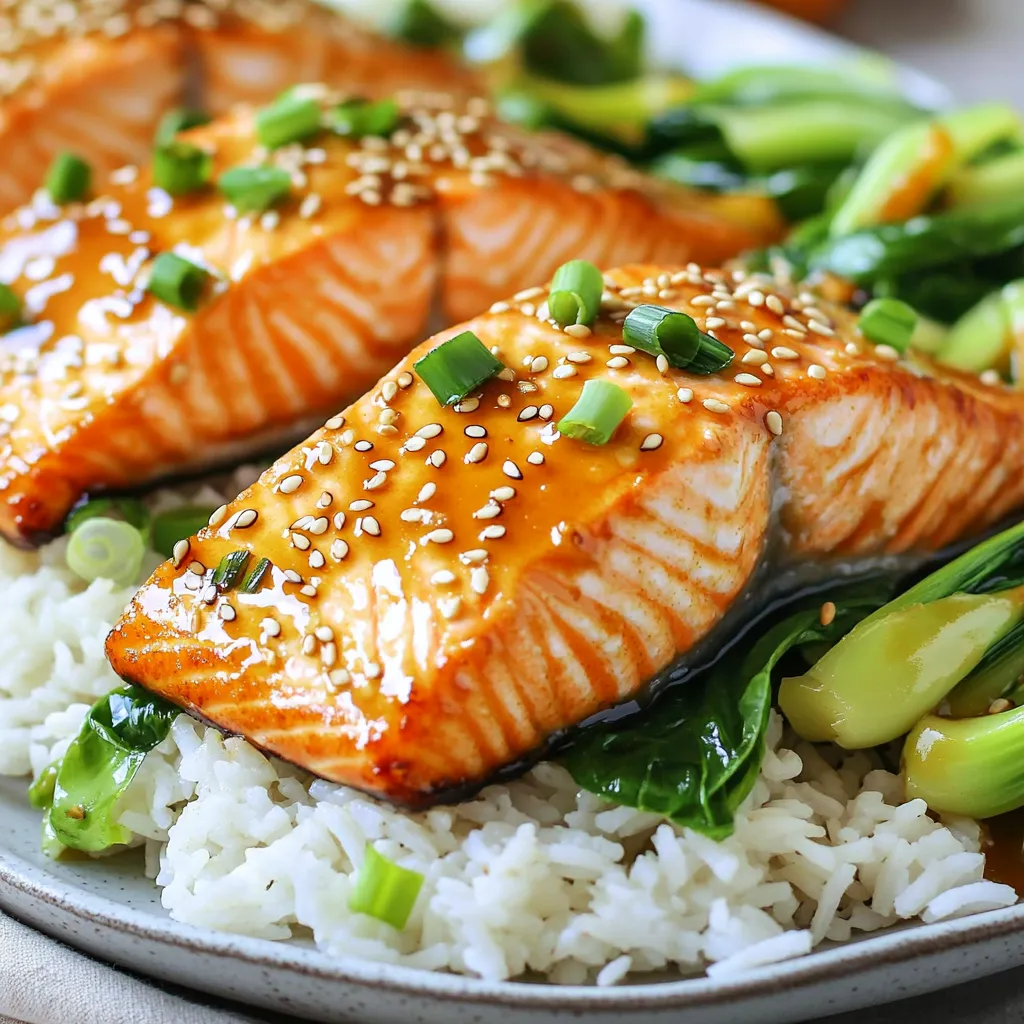
Looking for a quick and tasty dinner? My Air Fryer Sesame Ginger Salmon is your answer! With just a few

To make Crispy Garlic Herb Hasselback Potatoes, you need simple yet tasty ingredients. Here’s what you’ll need: - 4 medium-sized Yukon Gold potatoes - 4 tablespoons unsalted butter, melted - 4 cloves garlic, minced - 2 teaspoons fresh rosemary, chopped - 2 teaspoons fresh thyme, chopped - 1 teaspoon kosher salt - ½ teaspoon black pepper - 1 tablespoon olive oil - Fresh parsley, chopped (for garnish) These ingredients come together to create a flavorful dish. Yukon Gold potatoes are perfect for this recipe. Their creamy texture becomes soft and fluffy inside while getting crispy on the outside. The unsalted butter adds richness. Minced garlic gives a strong aroma and taste, while fresh herbs like rosemary and thyme add a garden-fresh flavor. Kosher salt and black pepper are your basic seasonings, enhancing every bite. Olive oil helps the potatoes crisp up nicely in the oven. Lastly, fresh parsley not only looks good but also adds a touch of freshness when you serve the dish. Gather these ingredients, and let’s get cooking! - Preheating the oven: Start by setting your oven to 425°F (220°C). This high heat helps create a crispy skin. - Preparing the potatoes: Wash and dry four medium Yukon Gold potatoes. Use a towel to get them dry. Next, with a sharp knife, slice thin slits into each potato, stopping about ¼ inch from the bottom. To help you cut evenly, place wooden chopsticks on either side of the potato. - Making the garlic herb butter: In a small bowl, combine 4 tablespoons of melted unsalted butter, 4 cloves of minced garlic, 2 teaspoons of chopped fresh rosemary, and 2 teaspoons of chopped fresh thyme. Add 1 teaspoon of kosher salt and ½ teaspoon of black pepper. Mix it well! - Coating the potatoes: Line a baking sheet with parchment paper. Place the potatoes on it. Use a pastry brush to coat each potato with the garlic herb butter. Make sure the butter seeps into the slits for maximum flavor. - Baking process: Drizzle 1 tablespoon of olive oil over the potatoes. This adds extra crispiness. Bake in the preheated oven for 45 to 55 minutes. You want them tender and crispy. - Basting for extra flavor: Halfway through baking, baste the potatoes with any leftover garlic butter. This helps keep them moist and flavorful. - Recommended garnishing: Once the potatoes are done, take them out and let them cool slightly. Chop fresh parsley and sprinkle it over the top for a pop of color. - Suggested plate presentation: Arrange the potatoes on a serving platter. Their golden skin and green parsley make an inviting dish. Serve hot and watch everyone enjoy! To get your potatoes extra crispy, set your oven to 425°F (220°C). This high heat helps the outsides brown nicely. Basting is key, too. Halfway through baking, use a brush to coat the potatoes with leftover garlic butter. This adds more flavor and crispiness. You can add more flavor by mixing in spices. Try paprika or cayenne for a kick. For herb combinations, mix basil or oregano with rosemary and thyme. Each blend gives a unique taste, so feel free to experiment. Cutting the potatoes can be tricky. To avoid slicing too deep, use chopsticks on each side as guides. This technique helps keep the base intact. Cut thin slits about ¼ inch apart for the best results. You will get crispy edges while keeping the potato whole. {{image_2}} You can make these potatoes even more fun with extra flavors. - Cheese options: Try adding cheese like cheddar or parmesan. Just sprinkle it on top during the last few minutes of baking. The cheese will melt and create a gooey, tasty layer. - Spicy variations: If you like heat, add some red pepper flakes to the garlic herb mix. This will give your potatoes a nice kick. You can also use spicy cheese for an extra boost. These potatoes are great, but you can switch things up with other types. - Sweet potatoes: Sweet potatoes add a hint of sweetness. They cook similarly, but watch the baking time. They may need less time to become tender. - Red or white potatoes: These varieties work well too. They hold their shape nicely and offer a creamy texture. Just slice them like you would with Yukon Gold. You can cook these tasty potatoes in different ways. - Air fryer instructions: For a quicker method, use an air fryer. Preheat it to 375°F (190°C). Slice and season the potatoes as usual. Cook for 25-30 minutes, flipping halfway through for even crispiness. - Grilling options: Grilling adds a smoky flavor. Wrap the seasoned potatoes in foil. Grill over medium heat for about 30-35 minutes. Check for tenderness before serving. Grilling gives them a unique taste that's hard to resist. Store leftover potatoes in an airtight container. This keeps them fresh and moist. You can refrigerate them for up to three days. If you want to keep them longer, consider freezing. Just make sure to wrap them tightly in plastic wrap first. When ready to eat, thaw them in the fridge overnight. For reheating, the oven is best for keeping that crunch. Preheat it to 350°F (175°C). Place the potatoes on a baking sheet and heat for about 15-20 minutes. This method revives their crispy texture. If you're in a hurry, you can use the microwave. Just keep in mind, they may lose some crispiness. To keep them crispy, you can place them in a hot pan for a minute after microwaving. Hasselback potatoes are a fun way to cook potatoes. They look fancy but are easy to make. You slice the potato thinly, but not all the way through. This keeps the potato intact while creating many little spaces. These spaces hold flavor and get crispy when baked. You can add garlic, herbs, and butter for a tasty treat. The final dish is golden brown with a crispy outside and soft inside. Yes, you can prepare Hasselback potatoes ahead of time. Slice them and store them in cold water. This keeps them fresh and prevents browning. You can also make the garlic herb butter in advance. Just mix the butter, garlic, and herbs and store it in the fridge. When you’re ready to bake, just coat the potatoes and pop them in the oven. For best taste, bake them the same day you serve. Crispy Garlic Herb Hasselback Potatoes pair well with many dishes. Here are some ideas: - Grilled chicken - Roasted vegetables - Steak or beef - Fish, like salmon - A fresh salad These sides balance the rich flavor of the potatoes. They add color and variety to your meal. Enjoy mixing and matching! The blog post covered how to make Crispy Garlic Herb Hasselback Potatoes. We discussed key ingredients, step-by-step cooking instructions, and tips for achieving perfect crispiness. I shared variations using different potato types and cooking methods that can add excitement to your dish. To store leftovers, I provided smart practices and reheating tips. Now you can enjoy these tasty potatoes at home. Experiment with flavors and impress your guests! Happy cooking!

Crispy Garlic Herb Hasselback Potatoes Delight

Get ready to impress your taste buds with Crispy Garlic Herb Hasselback Potatoes! These potatoes are a fun twist on

- 2 cups fresh blackberries - 2 cups fresh peaches, sliced - 1 cup granulated sugar (divided) - 1 tablespoon lemon juice - 1 teaspoon vanilla extract - 1 cup all-purpose flour - 1 tablespoon baking powder - ½ teaspoon salt - 1 teaspoon cinnamon - 1 cup whole milk - ½ cup unsalted butter, melted - Vanilla ice cream (for serving) Using fresh fruit makes a big difference in this recipe. The blackberries and peaches give great flavor. I love to slice the peaches thin for even cooking. The sugar adds sweetness, while lemon juice brightens the fruit. Vanilla extract brings out the flavors even more. For the dry mix, flour, baking powder, salt, and cinnamon blend well. The baking powder helps the cobbler rise. The salt balances the sweetness, while cinnamon adds a warm taste. When you mix the wet ingredients, use whole milk for creaminess. Melted butter adds richness. This makes the batter smooth and tasty. To serve, I always suggest vanilla ice cream on top. It melts slightly on the warm cobbler, making it extra delicious. To start, take a large bowl. In it, combine 2 cups of fresh blackberries and 2 cups of sliced peaches. Add ½ cup of granulated sugar, 1 tablespoon of lemon juice, and 1 teaspoon of vanilla extract. Toss the fruit gently. Let this mixture sit for 10 minutes. This helps the fruit release its juices, making it sweet and flavorful. Next, grab another bowl. Whisk together the 1 cup of all-purpose flour, ½ cup of granulated sugar, 1 tablespoon of baking powder, ½ teaspoon of salt, and 1 teaspoon of cinnamon. In a separate bowl, mix 1 cup of whole milk and ½ cup of melted unsalted butter. Slowly pour this mix into the dry ingredients. Stir until just combined. Remember, a few lumps are okay. Do not overmix the batter. Now it's time to layer. In a seasoned cast-iron skillet, pour the fruit mixture evenly on the bottom. Then, spoon the batter on top of the fruit. You do not need to cover all the fruit with batter. Just let it spread out naturally. Preheat your oven to 350°F (175°C). Place the skillet in the oven and bake for 30-35 minutes. Check for doneness by inserting a toothpick into the batter. If it comes out clean, your cobbler is ready. Once baked, remove the skillet. Let it cool slightly before serving. When picking peaches, look for ones that are slightly soft. Their skin should have a nice golden hue. For blackberries, choose plump and shiny ones. They should not be mushy or have any mold. Fresh fruit makes a big difference in taste. Always check for small blemishes. If you find any, skip those fruits. Mixing the batter too much can ruin your cobbler. When you combine the wet and dry ingredients, stir gently. A few lumps are fine. This keeps the texture light and fluffy. If you overmix, the batter can become tough. Remember, less is more when it comes to mixing. Serve your cobbler warm straight from the skillet. It looks great and tastes even better. Add a scoop of vanilla ice cream on top. The cold ice cream melts into the warm cobbler, creating a perfect blend. Drizzle some of the fruit juices from the skillet over the top. This adds flavor and makes it look fancy. You can also sprinkle some cinnamon for an extra touch. {{image_2}} You can switch the fruits in this cobbler. Cherries work well because they are sweet and juicy. Apples are another great choice. They add a nice crunch and a bit of tartness. You can even mix fruits for a unique taste. Just keep the same amount of fruit to ensure good results. To make this cobbler gluten-free, use alternative flours. Almond flour or coconut flour can work well. You can also use a gluten-free all-purpose blend. Just check the blend for a good rise. This way, everyone can enjoy this tasty dessert without worries. Add spices to boost the flavor of your cobbler. Nutmeg gives a warm, sweet taste. Almond extract adds a nice nutty flavor that pairs well with fruit. A dash of cardamom can also bring a new twist. These small changes can make your cobbler even more delightful. After baking your blackberry peach cobbler, let it cool. Place the skillet on a heat-safe surface. Allow it to cool for about 30 minutes. This helps the juices set. Once cooled, cover it with plastic wrap or aluminum foil. This keeps it fresh and moist for later. Store any leftovers in the fridge. Use an airtight container or keep it covered in the skillet. It will stay good for up to 3 days. To keep the fruit fresh, avoid leaving it out at room temperature. Always refrigerate promptly after it cools. To enjoy your cobbler again, reheat it gently. Preheat your oven to 350°F. Warm the cobbler for about 15 minutes. This will help keep the crust crisp. If you're in a hurry, you can use the microwave. Heat individual servings for 30-60 seconds. Just be careful, as it can get hot! Blackberry peach cobbler can last up to four days in the fridge. Store it in an airtight container. If you want it to last longer, you can freeze it. In the freezer, it can last for up to three months. Just make sure it cools completely before you freeze it. Yes, you can use frozen fruit for this cobbler. It works well and saves time. Just remember to thaw the fruit first. Drain any excess liquid before mixing it with sugar and lemon juice. This prevents your cobbler from being too soggy. You can prepare the fruit and batter ahead of time. Keep them in separate bowls in the fridge. Just combine and bake them before serving. If you bake it ahead, let it cool completely. Then, store it in the fridge. You can reheat it in the oven at 350°F for about 15 minutes. Serve the cobbler warm for the best taste. You can scoop it directly from the skillet. Add a scoop of vanilla ice cream on top. The cold ice cream melts into the warm cobbler. It creates a delightful mix of flavors and textures. This blog post covered how to make a delicious blackberry peach cobbler. You learned about the key ingredients, including fresh fruit, sweeteners, and dry and wet components. I shared step-by-step instructions, tips for the best results, and helpful storage advice. As you explore variations, remember to try different fruits or make it gluten-free. Enjoy your cobbler warm, paired with ice cream for a tasty treat. You now have the knowledge for a delightful dessert that will impress anyone. Happy baking!

Blackberry Peach Cobbler Skillet Easy Delicious Dessert

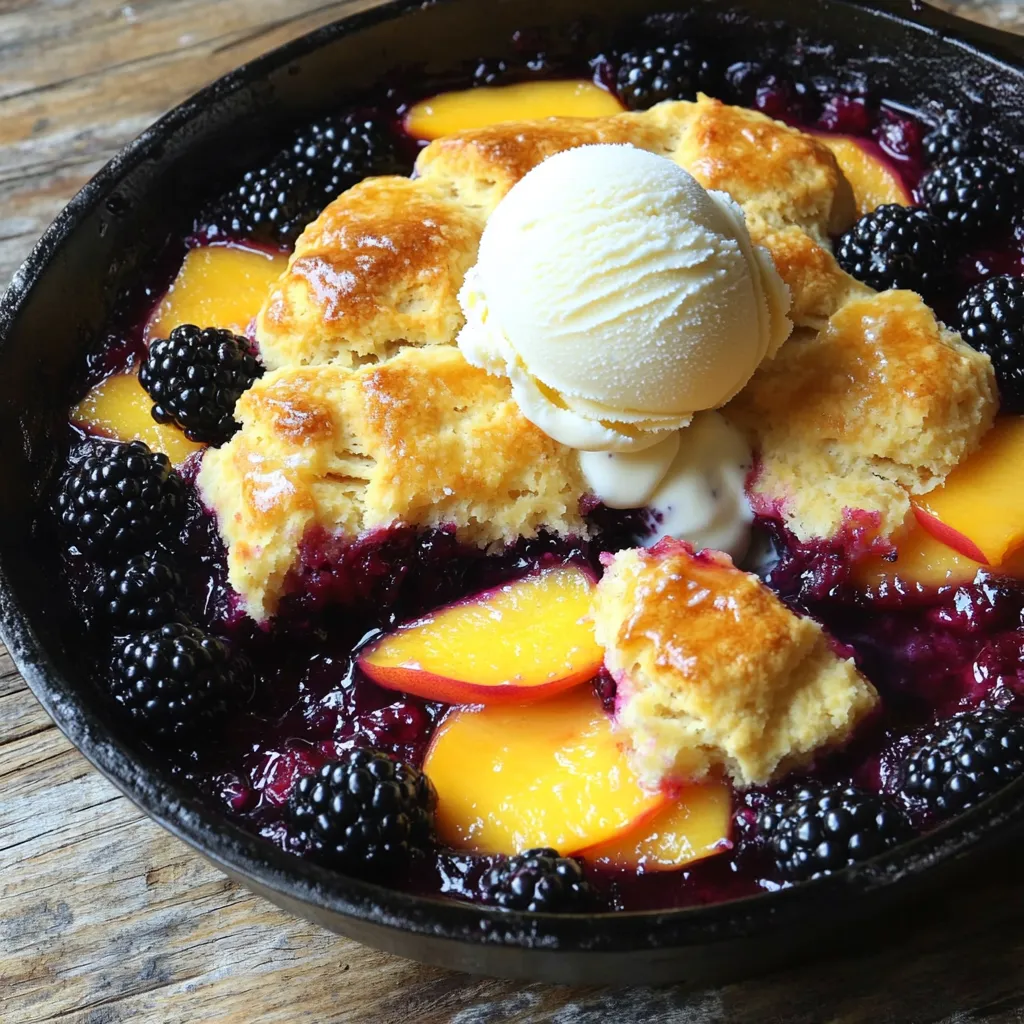
Craving a sweet treat that’s easy to make? Try this Blackberry Peach Cobbler Skillet! Bursting with juicy blackberries and peaches,

To make no bake mango cheesecake cups, gather these items: - 1 cup graham cracker crumbs - 4 tablespoons unsalted butter, melted - 1 (8-ounce) package cream cheese, softened - 1/2 cup powdered sugar - 1 teaspoon vanilla extract - 1 cup heavy whipping cream - 1 cup ripe mango puree (fresh or canned) - 1 tablespoon gelatin powder (optional for firmness) - 2 tablespoons water (to dissolve gelatin) - Fresh mango slices and mint leaves for garnish You can swap some ingredients to suit your taste. Instead of graham crackers, try crushed cookies or nuts for the crust. If you want a dairy-free option, use vegan cream cheese and coconut cream. For sweetness, you can replace powdered sugar with honey or maple syrup. If you don’t have fresh mango, canned mango puree works well too. Using high-quality ingredients makes a big difference in flavor. Fresh, ripe mangoes give the best taste and color. Choose real vanilla extract over artificial for a richer flavor. Good quality cream cheese ensures a smooth, creamy texture. When baking or cooking, always aim for the best ingredients you can find. This choice elevates your dish and impresses your guests. Start by mixing the graham cracker crumbs with melted butter. Use a bowl to combine them well. The crumbs should look wet, not dry. Next, take a tablespoon and spoon about two tablespoons of this mix into each cup. Press down the crumbs firmly to form a solid layer. This crust will hold your cheesecake filling nicely. In a clean bowl, add softened cream cheese, powdered sugar, and vanilla extract. Beat the mixture until it is smooth. Make sure there are no lumps for a nice texture. In another bowl, whip the heavy cream until it forms stiff peaks. This step is key for a fluffy filling. Then, gently fold the whipped cream into the cream cheese mix. Finally, add in the mango puree and mix until it is all combined. If you want a firmer filling, dissolve the gelatin in warm water and fold it in at this stage. Now it's time to fill the cups! Spoon the mango cheesecake filling over the crusts you made earlier. Make sure each cup gets an even amount. After that, place all the cups in the fridge. Chill them for at least four hours. This helps the filling set and makes it easier to eat later. Once they are set, garnish with fresh mango slices and mint leaves for a lovely touch. Enjoy your delicious creation! To get that smooth, creamy texture, always start with softened cream cheese. Cold cream cheese can clump. Beat the cream cheese with powdered sugar and vanilla until it’s smooth. This step is key! When you whip the heavy cream, do not overmix. Stop when stiff peaks form. Gently fold the whipped cream into the cream cheese mix. This keeps it light and airy. Use a chilled bowl for whipping cream. A cold bowl helps the cream whip faster. Start on low speed, then increase to medium. Whip until you see soft peaks. For stiff peaks, keep whipping a bit longer. Be careful not to overwhip, or you might make butter! If you want extra sweetness, add a little sugar while whipping. If you want firmer cheesecake cups, use gelatin. First, dissolve the gelatin in warm water. Stir until it’s fully dissolved. Then, fold it into your mango cream mix slowly. Make sure it’s combined well. If you skip this step, your cheesecake may not set right. For a vegan option, you can use agar-agar instead. Just follow the package instructions for proper use. {{image_2}} You can play with flavors in your cheesecake cups. Try berries, chocolate, or matcha. Each flavor brings a new twist. Blueberry and raspberry work well for a fruity taste. For a chocolate version, add cocoa powder to the filling. You can also mix in crushed cookies for different textures. If you want to swap mango for another fruit, go for it! Pineapple or peach puree makes a great option. Just remember to keep the same amount. You can also use mixed fruit for a fun, colorful treat. Each fruit adds its own sweetness and taste. You can make these cheesecake cups gluten-free. Simply use gluten-free graham crackers. For a vegan version, swap cream cheese with a plant-based alternative. Use coconut cream instead of heavy cream. You can also replace powdered sugar with a vegan-friendly sweetener. These swaps keep the dessert tasty and light. To keep your mango cheesecake cups fresh, store them in the fridge. Use an airtight container to avoid any odors from other foods. If you stack the cups, place a layer of plastic wrap between them. This will help keep the toppings intact. You don’t need to reheat these cheesecake cups. They taste best cold. Just take them out of the fridge before you serve. Let them sit for a few minutes to warm slightly. These cups last up to five days in the fridge. For longer storage, you can freeze them. Just make sure they are in an airtight container. They can stay frozen for about a month. To thaw, move them to the fridge overnight before serving. Yes, you can use many fruits. Some great options include strawberries, blueberries, or peaches. Each fruit brings a unique taste. You can also use fruit purees from your favorite fruits. Just keep the amount similar to the mango puree in the recipe. You can skip the gelatin. The cheesecake will still be creamy and tasty. Just make sure to whip the cream well. This helps it stay fluffy. If you want a firmer texture, chill the cups longer. You can use coconut cream as a dairy-free option. It adds a lovely flavor too. If you want a lighter choice, use Greek yogurt. It won’t be as fluffy, but it will still taste good. You learned about the key ingredients and how their quality matters. I shared step-by-step instructions to make cheesecake cups. You now have tips for great texture and flavor options. Simple storage methods keep your cups fresh. In closing, enjoy trying out these ideas. You can make this recipe your own. Cheesecake cups are fun and easy, perfect for sharing. Happy baking!

No Bake Mango Cheesecake Cups Easy and Delicious Treat

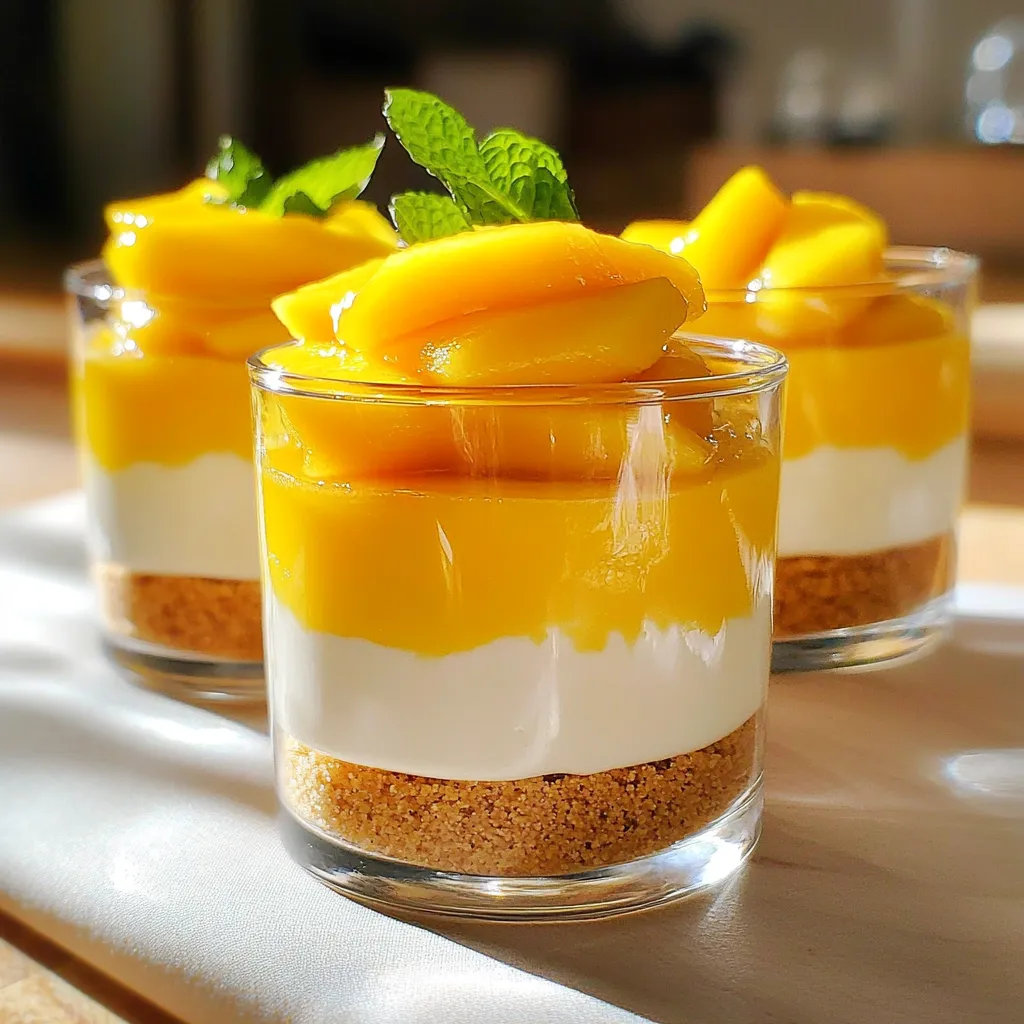
If you’re craving a sweet and easy dessert, these No Bake Mango Cheesecake Cups are for you! They are simple,

To make these banana bread protein pancakes, you need a few key items: - 1 ripe banana, mashed - 2 eggs - 1/2 cup rolled oats - 1/2 cup vanilla protein powder - 1 teaspoon baking powder - 1/2 teaspoon ground cinnamon - 1/4 teaspoon salt - 1/2 cup almond milk (or any milk of choice) These ingredients give the pancakes their sweet taste and fluffy texture. You can add some extra flavor with these optional items: - 1 tablespoon honey or maple syrup - Cooking spray or coconut oil for frying Using honey or maple syrup adds a nice touch of sweetness. If you don’t have some ingredients, here are good swaps: - Use any ripe fruit instead of banana for a different flavor. - Swap eggs with flaxseed meal mixed with water for a vegan option. - Replace rolled oats with almond flour for a gluten-free pancake. These substitutes keep the pancakes tasty while meeting your needs. 1. Start by taking a ripe banana. Mash it in a large bowl until it is smooth. 2. Crack two eggs into the bowl with the banana. Whisk them together well. 3. In another bowl, mix the rolled oats, protein powder, baking powder, ground cinnamon, and salt. Stir until it’s all even. 4. Slowly add the dry mix into the banana and egg blend. Stir it all together. 5. Now pour in 1/2 cup of almond milk. If you like, add honey or maple syrup for sweetness. Mix until you have a smooth batter. 6. Let the batter sit for about five minutes. This helps it thicken slightly. 1. Heat a non-stick skillet on medium heat. Lightly grease it with cooking spray or coconut oil. 2. Pour about 1/4 cup of batter onto the skillet for each pancake. 3. Cook until you see bubbles on the top, which takes about 2-3 minutes. 4. Flip the pancake and cook for another 2-3 minutes until it is golden brown. 5. Remove from the skillet and repeat with the rest of the batter. 1. Stack your pancakes on a nice plate. 2. Drizzle with maple syrup or honey for added flavor. 3. Top with sliced bananas and a sprinkle of chopped walnuts for a tasty finish. 4. Enjoy them hot, and don’t forget to share! To make fluffy pancakes, the key is to mix the batter gently. Overmixing can lead to tough pancakes. Combine wet and dry ingredients until just blended. Let the batter sit for five minutes. This resting time helps the oats absorb liquid and makes the pancakes rise better. Use a non-stick skillet or griddle for cooking. Preheat your skillet over medium heat. Grease it lightly with cooking spray or coconut oil. Pour about 1/4 cup of batter for each pancake. Cook until bubbles form on the surface, about 2-3 minutes. Flip gently and cook for another 2-3 minutes until golden brown. Avoid using unripe bananas. They do not mash well and lack flavor. Also, do not skip the baking powder; it helps the pancakes rise. Make sure the skillet is hot enough. If it’s too cold, the pancakes will cook unevenly. Lastly, do not overcrowd the skillet; cook in batches for best results. {{image_2}} These pancakes pack a protein punch. Each serving has about 20 grams of protein. The protein comes mainly from eggs and protein powder. This helps keep you full and satisfied. A serving of these pancakes has around 300 calories. They contain about 30 grams of carbs and 10 grams of fat. This makes them a balanced meal. They are great for breakfast or a snack. Let’s look at the ingredients. Bananas add potassium and fiber. Eggs provide high-quality protein and healthy fats. Oats are full of fiber and help with digestion. Protein powder boosts your muscle recovery. Honey or maple syrup adds touch sweetness but can be skipped. Almond milk is low in calories and good for dairy-free diets. Each ingredient adds health benefits to your meal. You can change the flavor of your pancakes easily. Try adding peanut butter for a nutty taste. You can also mix in cocoa powder for chocolate banana pancakes. If you love fruity flavors, add blueberries or chopped strawberries. Each option adds a unique twist to your dish. You can make these pancakes vegan by swapping eggs for a flax egg. To do this, mix one tablespoon of ground flaxseed with three tablespoons of water. Let it sit for about five minutes. For a gluten-free option, use gluten-free oats and protein powder. Both modifications keep the taste great while meeting your dietary needs. Add-ins can make your pancakes even better. Consider chopped nuts for crunch or shredded coconut for a tropical touch. For toppings, drizzle with maple syrup or honey. You can also top with fresh banana slices or a dollop of Greek yogurt. Sprinkling chopped walnuts adds more texture and flavor. Each add-in and topping creates a new experience. Yes, you can use other protein powders. Try whey, casein, or plant-based. Each type may change the flavor and texture a little. For best results, choose a powder that mixes well. If you use flavored powder, cut back on added sweeteners. Store leftover pancakes in an airtight container. Let them cool first. You can keep them in the fridge for up to three days. For longer storage, freeze them. Use wax paper between the pancakes to avoid sticking. When ready to eat, just reheat in a toaster or microwave. Yes, you can make these pancakes ahead of time. Prepare the batter the night before and store it in the fridge. Just give it a quick stir before cooking. If you make the pancakes ahead, store them as mentioned above. They are perfect for busy mornings! In this blog post, we explored key ingredients for delicious pancakes, including both essential and optional ones. We moved through step-by-step instructions, cooking methods, and tips for fluffy results. I shared valuable nutritional info and satisfying variations to fit different diets. Remember, modifying recipes can lead to tasty new creations. Enjoy experimenting with different flavors and toppings while avoiding common mistakes. With these insights, you're ready to make pancakes that fit your taste and needs. Happy cooking!

Banana Bread Protein Pancakes Simple and Tasty Meal

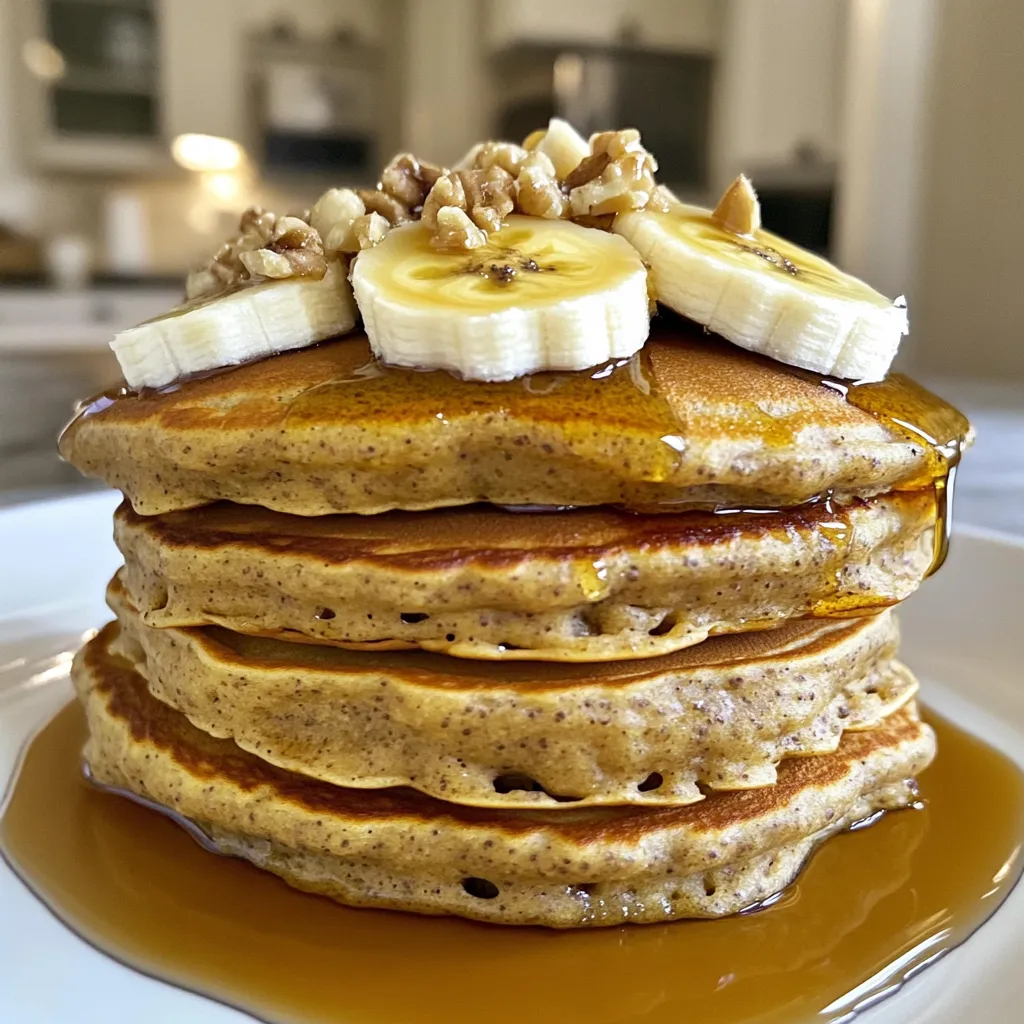
Are you ready to elevate your breakfast game? These Banana Bread Protein Pancakes are both simple and tasty! Packed with

- 1 cup orzo pasta - 2 tablespoons olive oil - 1 small onion, diced - 3 cloves garlic, minced - 1 cup sun dried tomatoes, chopped (packed in oil) - 4 cups vegetable broth - 1 cup heavy cream (or coconut cream for a dairy-free option) - 1 teaspoon dried basil - 1 teaspoon dried oregano - Salt and pepper to taste - 1 cup fresh spinach - 1/2 cup grated Parmesan cheese (or nutritional yeast for dairy-free) - Fresh basil leaves for garnish In this dish, orzo pasta serves as the base. It cooks up soft and creamy. Olive oil adds a rich flavor and helps with sautéing. The diced onion and minced garlic bring a sweet, savory taste. Sun dried tomatoes pack a punch of flavor and color. Vegetable broth gives depth and a warm touch. Heavy cream (or coconut cream) makes it rich and smooth. Dried basil and oregano add herby notes. You can adjust salt and pepper to fit your taste. Fresh spinach gives a nice pop of green and nutrition. Finally, Parmesan cheese makes it cheesy and adds a savory kick. If you're dairy-free, just use nutritional yeast instead. Each ingredient plays a key role in making this dish a creamy delight! 1. Heat olive oil in a large pot over medium heat. 2. Add the diced onion and sauté for 3-4 minutes. The onion should look soft and clear. 3. Next, stir in the minced garlic and sun dried tomatoes. Cook for 1-2 minutes. This adds a rich flavor. 4. Add the orzo pasta to the pot. Stir it well to coat it in the oil and flavors. 5. Slowly pour in 4 cups of vegetable broth. Stir to mix everything together. Bring the pot to a gentle boil. 6. Once boiling, reduce the heat and cover. Let it simmer for 10-12 minutes. Stir occasionally. This helps the orzo cook evenly. 1. After the orzo is cooked, stir in 1 cup of heavy cream. Add 1 teaspoon of dried basil and 1 teaspoon of dried oregano. This makes the dish creamy and flavorful. 2. Season with salt and pepper to taste. Adjust these to fit your liking. 3. Gently fold in 1 cup of fresh spinach. Let it wilt in the warm mixture, adding a nice color and freshness. 4. Finally, stir in 1/2 cup of grated Parmesan cheese. Mix until it melts and blends well. Serve this dish right away. Garnish with fresh basil leaves for a lovely touch! To keep your orzo from sticking, use plenty of liquid. The broth helps each piece stay separate. Stir the orzo often while it cooks. This keeps it moving and prevents clumping. You can also add a splash of olive oil to help. To check if your orzo is done, taste a piece. It should be soft but still firm inside. If it’s too chewy, give it another minute. Once it absorbs most of the broth, it’s ready for cream and spices. Pair your creamy orzo with a fresh salad. A simple green salad with lemon dressing works well. You can also serve it with garlic bread for a hearty meal. If you have leftovers, reheat them on the stove. Add a splash of broth to keep it creamy. You can also use a microwave, but it may dry out. Cover the dish to keep moisture in. Enjoy your meal again with ease! {{image_2}} You can easily modify this recipe to fit your diet. If you want a dairy-free option, use coconut cream instead of heavy cream. Coconut cream adds a rich texture and a hint of sweetness. It works well with sun dried tomatoes, making the dish creamy and delicious. For a vegan twist, swap the Parmesan cheese for nutritional yeast. Nutritional yeast adds a cheesy flavor without any animal products. It’s a great way to keep the dish tasty and plant-based. Feel free to get creative with your ingredients. You can use different types of pasta instead of orzo. Penne or fusilli can be great alternatives. Just adjust the cooking time based on the pasta you choose. You can add proteins or vegetables to make the dish heartier. Grilled chicken or shrimp pairs well with the creamy sauce. If you want more veggies, try adding bell peppers, zucchini, or mushrooms. These additions can boost the flavor and nutrition of your meal. To keep your One Pot Creamy Sun Dried Tomato Orzo fresh, use a good container. I suggest a glass or plastic container with a tight lid. Let the dish cool before sealing. Store it in the fridge for up to three days. For longer storage, you can freeze it. Transfer the cooled orzo into a freezer-safe container or bag. Make sure to remove as much air as possible. This will help prevent freezer burn. You can freeze it for up to three months. When you’re ready to eat, just thaw it overnight in the fridge. Reheating your orzo is easy. You can use the microwave or stovetop. If you choose the microwave, place the orzo in a safe bowl. Add a splash of water or broth to keep it moist. Cover the bowl with a microwave-safe lid. Heat it in short bursts, stirring in between, until hot. For stovetop reheating, place the orzo in a pan over low heat. Add a bit of cream or broth to help loosen it up. Stir often until heated through. Both methods work well, so pick the one you like! Can I make this dish ahead of time? Yes, you can make this dish ahead of time. Cook it fully and let it cool. Store it in an airtight container in the fridge. It will stay fresh for up to three days. When you are ready to eat, just reheat it on the stove. Add a splash of broth or cream to loosen it up. How do I adjust the recipe for larger servings? To make more servings, you can easily double the recipe. Use two cups of orzo and double the other ingredients. Make sure your pot is big enough to hold it all. Keep the cooking times the same, but check for doneness. Taste test to get it just right. What can I serve with sun dried tomato orzo? Sun dried tomato orzo pairs well with many sides. A simple green salad works great. You can also serve it with garlic bread or roasted vegetables. If you want more protein, add grilled chicken or shrimp on top. This adds a nice touch to your meal. This blog post shared a simple and tasty one-pot creamy sun-dried tomato orzo recipe. You learned about the key ingredients, from orzo to sun-dried tomatoes. I walked you through easy cooking steps, tips for avoiding sticky pasta, and serving ideas. You also explored variations for different diets and the best ways to store leftovers. My final thought is this dish is flexible. You can make it your own. Enjoy your cooking and let each bite surprise you!

One Pot Creamy Sun Dried Tomato Orzo Delight

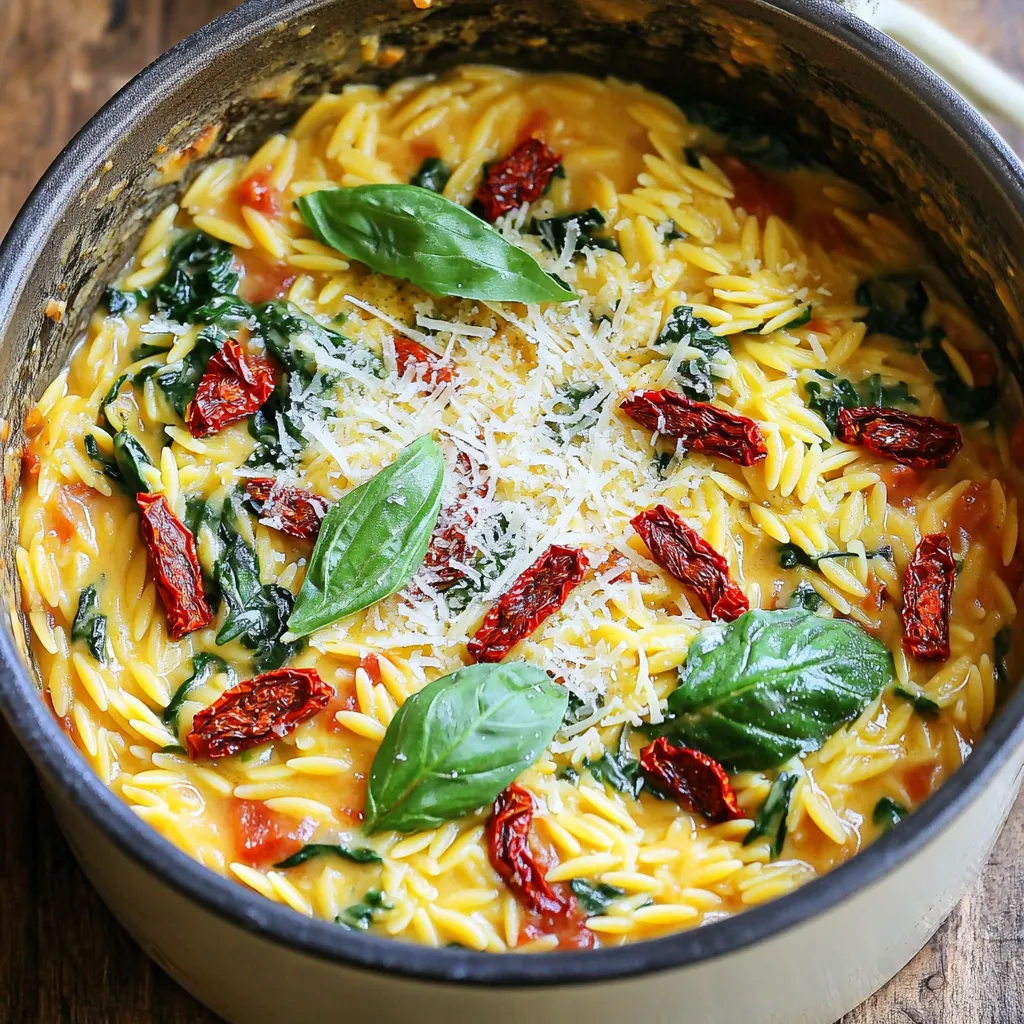
Welcome to One Pot Creamy Sun Dried Tomato Orzo Delight! If you’re craving a quick, tasty meal that combines rich

To make your High Protein Snickerdoodle Smoothie, gather these ingredients: - 1 cup unsweetened almond milk - 1 ripe banana - 1 scoop vanilla whey protein powder - 1 tablespoon almond butter - 1 teaspoon cinnamon - 1/2 teaspoon vanilla extract - 1 tablespoon maple syrup (optional for sweetness) - 1/4 cup rolled oats - Ice cubes (as needed for thickness) Each ingredient adds unique benefits to the smoothie. - Almond Milk: It is low in calories and high in vitamin E. - Banana: This fruit adds natural sweetness and provides potassium. - Vanilla Whey Protein Powder: It boosts protein content, promoting muscle health. - Almond Butter: Packed with healthy fats, it keeps you full longer. - Cinnamon: This spice adds flavor and may help regulate blood sugar. - Vanilla Extract: It enhances taste without added sugar. - Maple Syrup: Use it for a touch of sweetness if needed. - Rolled Oats: They offer fiber and help with digestion. - Ice Cubes: These make the smoothie cold and thick. You can easily modify the recipe to suit your needs. - For Dairy-Free: Use oat milk or coconut milk instead of almond milk. - For Vegan: Choose plant-based protein powder in place of whey. - For Nut Allergies: Substitute almond butter with sunflower seed butter. - For Lower Sugar: Omit maple syrup and rely on the banana for sweetness. - For Gluten-Free: Ensure your oats are certified gluten-free. These swaps keep the taste and nutrition while meeting your dietary needs. To make this smoothie, start by gathering your ingredients. You need: - 1 cup unsweetened almond milk - 1 ripe banana - 1 scoop vanilla whey protein powder - 1 tablespoon almond butter - 1 teaspoon cinnamon - 1/2 teaspoon vanilla extract - 1 tablespoon maple syrup (optional for sweetness) - 1/4 cup rolled oats - Ice cubes (as needed for thickness) 1. First, add the almond milk to your blender. 2. Next, peel and break the ripe banana into chunks. Toss it in. 3. Add the scoop of vanilla whey protein powder. This adds protein and flavor. 4. Spoon in the almond butter for healthy fats and creaminess. 5. Sprinkle in the cinnamon and vanilla extract. This gives the smoothie its snickerdoodle taste. 6. If you want it sweeter, add the maple syrup. 7. Toss in the rolled oats for a bit more texture and protein. 8. Blend everything on high speed until it’s smooth and creamy. To get the right thickness, consider these tips: - If the smoothie is too thin, add more rolled oats or ice cubes. - If it's too thick, add a splash more of almond milk. - Always blend on high for a smooth finish. Avoid these common pitfalls: - Don’t skip the ice cubes if you want a cold smoothie. - Make sure your banana is ripe for the best flavor. - Avoid adding too much maple syrup at once; you can always add more later. - Don’t forget to taste your smoothie before serving! Adjust the sweetness if needed. To make your smoothie super creamy, use ripe bananas. They add natural sweetness and a silky texture. Another great tip is to choose unsweetened almond milk. It blends well and keeps the flavor light. If you want extra creaminess, try adding a bit of almond butter. It boosts both flavor and protein. While cinnamon shines in this smoothie, you can add more flavors. Consider a dash of nutmeg for warmth. A little cocoa powder gives it a chocolate twist. For a fruitier note, try adding a handful of berries. These options keep your smoothie exciting and fun. To save time, prep your ingredients ahead. You can slice bananas and store them in the freezer. This way, you always have a cold base ready. Also, measure out your protein powder and oats in advance. Keep them in a container for quick access. These tricks make smoothie-making a breeze, even on busy mornings. {{image_2}} You can easily make this smoothie dairy-free and vegan. Simply switch the vanilla whey protein powder for a plant-based protein. Look for options like pea or rice protein. Use unsweetened almond milk, as it’s already dairy-free. Almond butter adds creaminess, but you can also try peanut or sunflower seed butter. These swaps keep the taste rich and smooth. If you want to cut back on sugar, there are great alternatives. Instead of maple syrup, try using dates or stevia. Dates add natural sweetness and fiber. Stevia is a zero-calorie sweetener that works well in smoothies. You can also skip sweeteners altogether for a less sugary option. The ripe banana already adds some sweetness. You can change the flavors by using seasonal ingredients. In fall, add pumpkin puree and spice it up with nutmeg. In summer, fresh berries like strawberries or blueberries offer a fruity twist. Each season brings new tastes, keeping your smoothie exciting. Don’t be afraid to explore different flavors with your ingredients! To store your High Protein Snickerdoodle Smoothie, pour any leftovers into a clean container. Seal it tightly to keep air out. This helps keep the smoothie fresh. Store it in the fridge for up to 24 hours. Beyond that, the taste and texture may change. You can freeze the smoothie for later. This is a great way to save a tasty treat. Pour the smoothie into ice cube trays or freezer bags. If you use bags, squeeze out the air before sealing. This keeps the smoothie from getting freezer burn. When you are ready to enjoy it, blend the frozen cubes with a splash of almond milk until smooth. For storing your smoothie, I recommend using glass jars or BPA-free plastic containers. Glass keeps flavors fresh and is easy to clean. Plastic containers are lightweight and perfect for on-the-go. Make sure your container has a tight lid to prevent leaks. If you want to take your smoothie with you, choose a travel mug with a straw for easy sipping. This smoothie packs a protein punch. The vanilla whey protein powder boosts muscle recovery. Almond milk offers low calories and is dairy-free. Bananas add potassium, which helps heart health. Oats provide fiber, promoting good digestion. Cinnamon can help regulate blood sugar. Overall, this smoothie supports energy and satiety. Yes, you can! Blend all the ingredients and store it in the fridge. For best taste, drink within 24 hours. Just give it a shake or stir before you enjoy it. If you want to prep several servings, consider freezing portions. Thaw in the fridge overnight for a quick treat. To boost protein, add more whey protein powder. You can also mix in Greek yogurt. Silken tofu is another great option for a creamy texture. Chia seeds are rich in protein and fiber, too. Each of these options will enhance the smoothie without changing the flavor much. Yes, it can work as a meal replacement. It has protein, carbs, and healthy fats. The oats and banana provide energy, while almond butter adds healthy fats. Just ensure it fits your daily calorie needs. If you want a heartier meal, add more oats or a side of fruit. If you need a substitute, try oat milk or coconut milk. Soy milk is another excellent choice for protein. Regular dairy milk works well too if you’re not dairy-free. Just remember, each option will slightly change the flavor and texture. Choose what fits your taste best! This blog shared how to create a high protein snickerdoodle smoothie. We explored key ingredients and their benefits. You learned how to prep with care and avoid common mistakes. We discussed ways to make it creamy and tasty. You can also swap ingredients to fit your diet. Storing tips let you keep leftovers fresh for later. In all, this smoothie is packed with flavor and nutrition. Enjoy making it your way!

High Protein Snickerdoodle Smoothie Taste Sensation

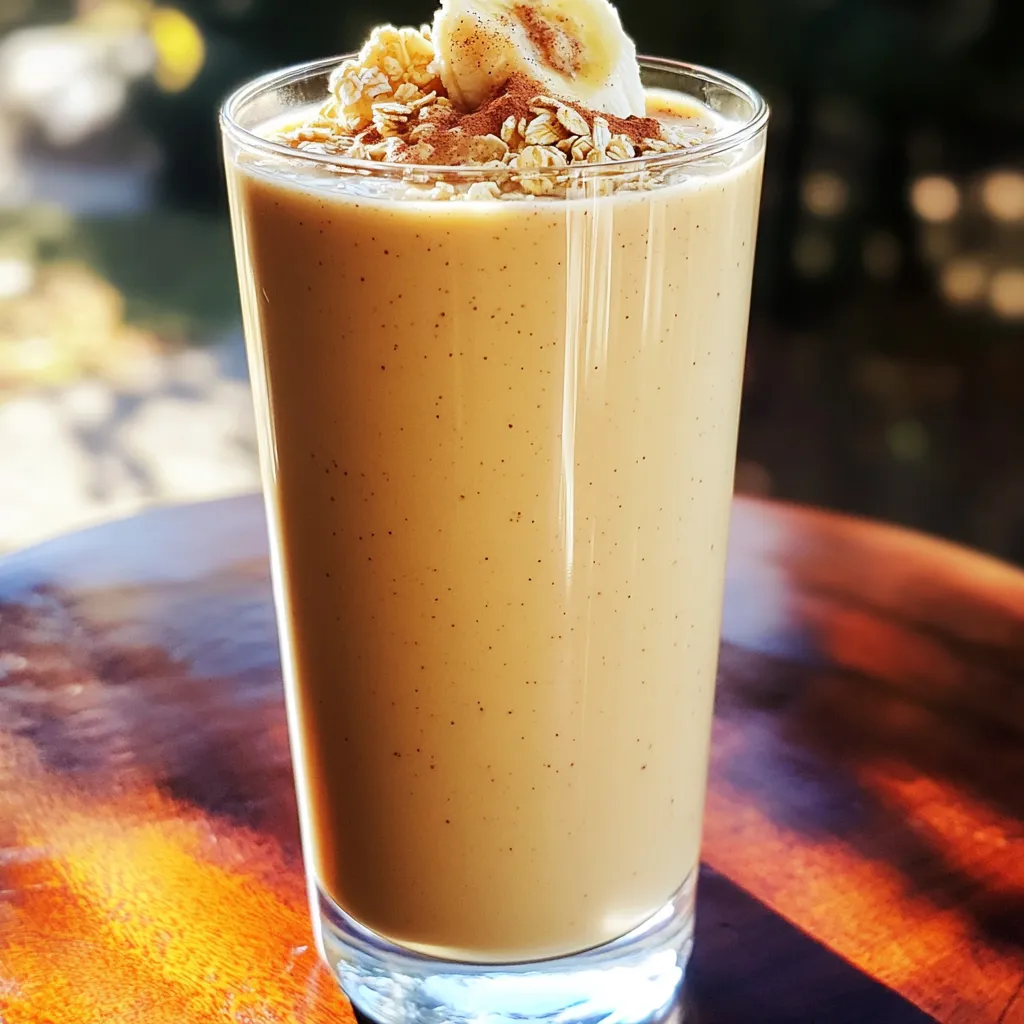
Get ready to delight your taste buds with my High Protein Snickerdoodle Smoothie! Imagine blending the warm, sweet flavors of

Older posts
Newer posts
← Previous Page1 … Page10 Page11 Page12 … Page132 Next →

dsad

© 2025 pureeatsnow • Built with GeneratePress

Our Policies

  • Copyright Policy
  • Cookie Policy
  • GDPR Policy
  • Privacy Policy
  • Disclaimer
  • Terms Of Use

More Information

  • Home
  • About
  • Contact
  • Appetizers
  • Dessert
  • Dinner
  • Drinks
©2025, pureeatsnow About Back To Top