Skip to content
DisclaimerTerms Of UseGDPR PolicyCookie Policy

pureeatsnow

  • Home
  • Drinks
  • Appetizers
  • Dinner
  • Dessert
  • About
  • Contact
  • Privacy Policy
DisclaimerTerms Of UseGDPR PolicyCookie Policy

Rachel

- 1 cup graham cracker crumbs - 4 tablespoons unsalted butter, melted - 2 tablespoons granulated sugar - 8 oz cream cheese, softened - 1/2 cup powdered sugar - 1 teaspoon vanilla extract - 1/2 cup heavy cream, whipped to soft peaks - Fresh berries for topping - Optional: melted chocolate for drizzling Making no-bake cheesecake bites is fun and easy. You need some simple ingredients. Start with graham cracker crumbs. They give a nice crunch. Melt some unsalted butter to mix in. This helps to bind the crust. Add granulated sugar for a touch of sweetness. Next, you focus on the creamy filling. Softened cream cheese is key. It mixes well and gets smooth. Add powdered sugar to sweeten it up. A little vanilla extract gives great flavor. Don't forget the whipped cream! It makes the filling light and fluffy. Top your cheesecake bites with fresh berries. Strawberries, blueberries, or raspberries work well. If you want more sweetness, drizzle melted chocolate on top. This adds extra flair and flavor. You can find the full recipe in the article. Enjoy creating these delightful bites! To make the crust, you start with graham cracker crumbs. In a mixing bowl, combine: - 1 cup graham cracker crumbs - 4 tablespoons unsalted butter, melted - 2 tablespoons granulated sugar Mix these ingredients until they look like wet sand. This means the crumbs are well coated. Next, press the mixture firmly into mini muffin tins or silicone molds. Use the back of a spoon to compact it. This step forms a solid base for your bites. Now, it’s time to create the creamy filling. In a separate bowl, beat: - 8 oz cream cheese, softened Use an electric mixer to achieve a smooth texture. Add: - 1/2 cup powdered sugar - 1 teaspoon vanilla extract Mix until everything is well combined. Then, gently fold in: - 1/2 cup heavy cream, whipped to soft peaks Be careful not to deflate the whipped cream. This keeps your filling light and fluffy. Spoon the creamy cheesecake filling into the prepared crusts in the muffin tins. Fill them almost to the top. After this, cover the tins with plastic wrap. Refrigerate for at least 2 hours or until the cheesecake bites are set. Once they are firm, pop them out of the molds and place them on a serving platter. Top each cheesecake bite with fresh berries. You can also drizzle them with melted chocolate if you want to add more flavor. This step makes your bites even more special. For the full recipe, you can find all the details mentioned above. To get the best texture for your cheesecake bites, start with the cream cheese. It must be soft. If it’s cold, your filling will be lumpy. Leave it out for at least 30 minutes before you use it. Next, fold in the whipped cream gently. This keeps it airy. Use a spatula and scoop from the bottom of the bowl. Lift it up to mix. This way, you don’t lose the volume. When it comes to serving, presentation matters. Place the cheesecake bites on a nice platter. Add some fresh berries on top. They add color and flavor. You can also drizzle melted chocolate for a special touch. Choose fruits that contrast well. Strawberries and blueberries are great choices. They not only taste good but look appealing too. You can even mix and match for a fun look. One big mistake is overmixing the filling. It can make your bites dense. Mix just until combined. Another mistake is not refrigerating long enough. The bites need time to set. Let them chill for at least two hours. If you skip this step, they will fall apart when you serve them. Refer to the Full Recipe for all the steps and details! {{image_2}} You can change the taste of your cheesecake bites easily. Want a fresh twist? Just add lemon juice. It brings a zesty kick that brightens each bite. Mix in two tablespoons of fresh lemon juice, and you have a delightful citrus treat. Do you love chocolate? You can easily add that flavor too. Just fold in some melted chocolate. For a rich taste, use one-third cup of melted dark chocolate. If you crave something nutty, add peanut butter. Mix in one-third cup of creamy peanut butter to the filling for a nutty profile. Toppings can make your cheesecake bites extra special. Fresh fruits like strawberries, blueberries, or raspberries add color and sweetness. I love using a mix of these berries for a beautiful look. For a touch of decadence, drizzle melted chocolate on top. You can also try caramel or berry sauces. Just warm the sauces slightly before drizzling. This extra step makes your bites look fancy and taste even better. You might have guests with special diets. No worries! You can adjust the recipe easily. For a gluten-free option, use gluten-free graham crackers. They work just as well for the crust. If you need a dairy-free version, swap cream cheese for a dairy-free cream cheese alternative. Use coconut cream in place of heavy cream for a rich texture. These changes keep your cheesecake bites tasty for everyone! To keep your no-bake cheesecake bites fresh, use airtight containers. I recommend using a glass or plastic container with a tight lid. This helps maintain the creamy texture. Store them in the fridge for up to 5 days. You want to enjoy them while they taste their best! If you want to save some for later, freezing is a great option. First, place the cheesecake bites in a single layer on a baking sheet. Freeze them for about 2 hours until firm. Then, transfer them to a freezer-safe container. This prevents them from sticking together. They can stay frozen for up to 2 months. To thaw them, move the bites from the freezer to the fridge. Let them thaw overnight before serving. This keeps the texture nice and smooth. Enjoy these sweet treats whenever you want! For the complete process, check the Full Recipe. Yes, you can make these cheesecake bites ahead of time. I suggest making them a day before you plan to serve. This gives them enough time to chill and set. Make sure to cover them well with plastic wrap to keep them fresh. The flavors blend nicely overnight, making them even tastier. No-Bake Cheesecake Bites can last about 4 to 5 days in the fridge. Store them in an airtight container. Always check for any change in smell or texture. If they look dry or have an off smell, it’s best to toss them. Freshness is key for the best taste! Absolutely! Using a store-bought crust can save time. Just choose a graham cracker crust for the best flavor. You might need to adjust the amount of filling if the crust is larger. Store-bought crusts are convenient and still allow for a tasty treat. In summary, making no-bake cheesecake bites is simple and fun. You start by mixing the crust and pressing it into muffin tins. Next, whip up the creamy filling and assemble everything. Remember to chill them well for the best taste. Finally, feel free to customize with flavors and toppings. These bites are great for sharing. With good storage, they can last longer and still taste fresh. Enjoy creating and tasting these treats!

No-Bake Cheesecake Bites Sweet and Simple Treat

Craving a sweet treat without the hassle of baking? You’re in the right place! These No-Bake Cheesecake Bites are simple

- 8 oz fettuccine or tagliatelle pasta - 1 lb fresh asparagus, trimmed and cut into 2-inch pieces - 2 tablespoons olive oil - 3 cloves garlic, minced - Zest and juice of 1 lemon - 1 cup grated Parmesan cheese - Salt and pepper - Fresh basil leaves for garnish (optional) In this recipe, the main ingredients are simple and fresh. The pasta forms the base of the dish. I prefer fettuccine or tagliatelle for their width, which holds the sauce well. Fresh asparagus adds a nice crunch and bright flavor. Olive oil is key for sautéing and brings richness to the dish. Next, we add flavor with garlic and lemon. Garlic gives a warm aroma that complements the asparagus. Lemon zest and juice add a bright, tangy flair. Finally, Parmesan cheese adds creaminess and depth. Don't forget the seasonings! Salt and pepper enhance every bite. Fresh basil leaves make a lovely garnish and add a pop of color. This combination of ingredients creates a tasty and vibrant meal. {{ingredient_image_1}} To start, boil water in a large pot. Add salt to the water for flavor. Once the water is boiling, add 8 ounces of fettuccine or tagliatelle pasta. Cook it as per the package instructions until it is al dente. This usually takes about 8 to 10 minutes. After that, save 1 cup of the pasta water. Drain the pasta in a colander and set it aside. Next, grab another pot and fill it with water. Bring this water to a boil. Add 1 pound of fresh asparagus cut into 2-inch pieces. Blanch the asparagus for about 2 to 3 minutes. It should turn bright green and get tender yet crisp. Once ready, drain the asparagus and plunge it into a bowl of ice water to stop cooking. After a few minutes, drain it again. In a large skillet, heat 2 tablespoons of olive oil over medium heat. Add 3 cloves of minced garlic and sauté for about 1 minute. You want to smell the garlic but avoid browning it. After that, toss in the blanched asparagus and cook for another 2 minutes. Stir everything well to combine. Now it’s time to mix it all together. Add the drained pasta to the skillet. Include the zest of 1 lemon, 3 tablespoons of lemon juice, and half of the 1 cup of grated Parmesan cheese. Toss everything together to coat the pasta. If the dish seems dry, add some reserved pasta water to make a light sauce. Season with salt and pepper to taste. Keep tossing until everything is heated through. Finally, serve the pasta in bowls. Top with the remaining Parmesan cheese and fresh basil leaves if you like. To prevent overcooking pasta and asparagus, follow these steps: - Cook pasta al dente: Boil the pasta in salted water for the time stated on the package. Test it a minute or two before it's done. It should be firm but not hard. - Blanch asparagus correctly: Boil the asparagus for just 2-3 minutes. Once it turns bright green, transfer it to ice water. This stops the cooking and keeps the crunch. To add extra flavor, try these ingredients: - Lemon zest: It brightens the dish with a fresh taste. - Red pepper flakes: These add a nice kick if you enjoy spice. - Cherry tomatoes: Cut them in half for sweetness and color. - Pine nuts: Toasted pine nuts give a nutty crunch. Feel free to mix and match! Experiment with your favorites. For the best pairing options, consider these: - Grilled chicken: It adds protein and complements the pasta's flavors. - Garlic bread: Serve with crusty bread to soak up the sauce. - A light salad: A fresh salad balances the meal with crispness. - White wine: Pair the dish with a chilled white wine for a lovely touch. These options enhance your dining experience and make it special. Pro Tips Use Fresh Asparagus: Fresh asparagus will provide a better texture and flavor compared to canned or frozen. Look for bright green stalks that are firm to the touch. Adjust Lemon to Taste: Depending on your preference for acidity, you can adjust the amount of lemon juice and zest. Start with less and add more to achieve your desired flavor. Reserve Cooking Water: Always reserve some pasta cooking water before draining. This starchy water can help to create a creamy sauce when mixed with the pasta and other ingredients. Garnish for Freshness: Adding fresh basil leaves not only enhances the dish's presentation but also adds a burst of flavor. Consider using other herbs like parsley or mint for variety. {{image_2}} You can boost the protein in Lemon Parmesan Asparagus Pasta by adding chicken or shrimp. Cooked chicken breast, sliced into strips, works well. Toss it in with the garlic and asparagus. For shrimp, sauté them in olive oil until pink. Then, mix them in with the pasta. Both options add great flavor and make the dish more filling. If you want to keep it vegetarian, consider adding more veggies. Cherry tomatoes bring a sweet burst, while bell peppers add crunch. You could also include spinach or peas for a pop of color. Just sauté them with the asparagus for a few minutes. It makes the dish even more vibrant and healthy. For a gluten-free option, swap out regular pasta for gluten-free varieties. Look for brown rice or chickpea pasta. They hold up well and still taste great. Cook them according to package instructions. The flavors of lemon and Parmesan will shine through, making it a lovely meal for everyone. Store leftovers in an airtight container. Let the pasta cool to room temperature first. Keep it in the fridge for up to three days. If you want to keep it longer, consider freezing it. To reheat, use a skillet over low heat. Add a splash of water or olive oil to help it warm up. Stir gently to avoid sticking. You can also use the microwave. Heat in short bursts, stirring in between. Yes, you can freeze Lemon Parmesan Asparagus Pasta. Place it in a freezer-safe container. It will last for up to two months in the freezer. Thaw overnight in the fridge before reheating. For this dish, fettuccine or tagliatelle works best. Both types have a wide surface. This allows them to hold the sauce well. You want a pasta that complements the fresh flavors of lemon and asparagus. Yes, you can prepare this pasta ahead of time. Cook the pasta and asparagus as per the recipe. Store them separately in airtight containers. When ready to eat, reheat gently in a skillet. Add a splash of water or olive oil to keep it moist. To make this recipe vegan, swap the Parmesan cheese for a vegan alternative. Nutritional yeast is a great option. It adds a cheesy flavor without dairy. Use olive oil and fresh veggies to keep it tasty and light. - Can I use frozen asparagus? Yes, frozen asparagus works too. Just thaw and sauté it briefly. - What can I serve with this pasta? A light salad or garlic bread pairs well. It adds freshness and crunch. - How do I store leftovers? Place leftovers in a sealed container in the fridge. They last for 2-3 days. This blog post detailed the steps to create a delicious Lemon Parmesan Asparagus Pasta. You learned about the main ingredients, including fresh asparagus and fettuccine, as well as tips for perfect cooking. We also explored variations, like adding proteins or making it gluten-free. Lastly, proper storage techniques ensure your leftovers stay fresh. Incorporating these ideas will help you create a tasty dish that's sure to impress. Enjoy your cooking journey!

Lemon Parmesan Asparagus Pasta Flavorful Delight Recipe

Looking for a fresh and tasty meal that’s quick to make? My Lemon Parmesan Asparagus Pasta is just what you

To make a perfect red velvet cake, you need the right ingredients. Here’s what you will need: - 2 ½ cups all-purpose flour - 1 ½ cups granulated sugar - 1 teaspoon baking soda - 1 teaspoon salt - 1 teaspoon cocoa powder - 1 ½ cups vegetable oil - 1 cup buttermilk, at room temperature - 2 large eggs, at room temperature - 2 tablespoons red food coloring - 1 teaspoon vanilla extract - 1 teaspoon white vinegar These ingredients work together to create the soft and moist texture of the cake. The buttermilk adds richness, while the cocoa powder gives a subtle chocolate taste. Frosting makes the cake even better. You can choose to buy store-bought cream cheese frosting or make your own. Here are the key components for creamy frosting: - 8 oz cream cheese, softened - ½ cup unsalted butter, softened - 4 cups powdered sugar - 1 teaspoon vanilla extract For a twist, consider adding some lemon zest or a pinch of salt to enhance the flavor. This frosting is smooth and rich, perfect for topping your red velvet cake. If you want to see a full recipe, check out the details above! 1. Preheat your oven and prepare cake pans: Start by preheating your oven to 350°F (175°C). Grease and flour two 9-inch round cake pans. This will help the cake come out easily after baking. 2. Combine dry ingredients in a mixing bowl: In a large mixing bowl, whisk together the following dry ingredients: - 2 ½ cups all-purpose flour - 1 teaspoon baking soda - 1 teaspoon salt - 1 teaspoon cocoa powder - 1 ½ cups granulated sugar Make sure these ingredients are mixed well. This ensures your cake will rise and have a great texture. 3. How to properly mix wet and dry ingredients: In another bowl, mix the wet ingredients: - 1 ½ cups vegetable oil - 1 cup buttermilk (at room temperature) - 2 large eggs (at room temperature) - 2 tablespoons red food coloring - 1 teaspoon vanilla extract - 1 teaspoon white vinegar Whisk these together until smooth. Slowly add this mix to your dry ingredients. 4. Importance of folding vs. mixing: When you combine the wet and dry ingredients, use a spatula or wooden spoon to gently fold them together. This method keeps your batter light and airy. Don’t overmix, as it can make the cake dense. 5. Ideal temperature and baking duration: Once mixed, divide the batter between the prepared pans. Bake in your preheated oven for 25-30 minutes. Check if they are done by inserting a toothpick in the center. It should come out clean. 6. Cooling techniques for perfect texture: After baking, let the cakes cool in the pans for about 10 minutes. Then, carefully transfer them to a wire rack. Let them cool completely before frosting. This step is crucial for a smooth texture when you frost the cake. This guide will help you create a stunning red velvet cake that everyone will love. For the full recipe, refer to the recipe section. To make a moist and flavorful red velvet cake, follow these tips: - Use buttermilk. It adds moisture and a slight tang. - Choose vegetable oil. It keeps the cake tender and light. The combination of buttermilk and oil creates the perfect cake texture. Buttermilk helps the cake rise well while adding a rich flavor. Oil prevents it from being dry and crumbly. Sometimes, cakes don’t turn out as planned. Here are some common problems and solutions: - Overmixing: This can make your cake tough. Mix just until combined. - Underbaking: A wet center means the cake is not done. Always do the toothpick test. To avoid a dry cake, measure your flour properly. Spoon flour into the measuring cup and level it off with a knife. For sinking tops, don’t open the oven door while baking. Applying cream cheese frosting can be tricky. Here’s how to do it right: - Start with a cool cake. This helps the frosting stay put. - Use a spatula to spread the frosting evenly. For an elegant finish, try these decoration techniques: - Add swirls with the spatula or a piping bag. - Sprinkle cocoa powder or red velvet crumbs on top. These tips help you create a beautiful and tasty red velvet cake. For a full recipe, check the link above. {{image_2}} You can have fun with red velvet cake. One great twist is to make red velvet cupcakes. To adapt the recipe, use the same ingredients but pour the batter into cupcake liners. Bake for about 20 minutes. These cupcakes are cute and perfect for parties. Another unique dessert option is red velvet cheesecake. Start with a red velvet cake base, then top it with a creamy cheesecake layer. Mix cream cheese, sugar, and eggs for the filling. Pour it over the baked red velvet layer and bake again. This dessert is rich and delicious. You can change the flavors for holidays. Think about adding spices like cinnamon and nutmeg for fall. For winter, mix in peppermint extract for a fresh taste. These flavors make the cake festive and fun. Color-themed variations are also a hit. For a spring celebration, add some lemon zest to brighten the flavor. You could also use pastel colors for frosting to match the season. These small changes make the cake perfect for any event. Making red velvet cake gluten-free is easy. Just substitute gluten-free flour for regular flour in the recipe. This keeps the cake light and fluffy. For a vegan version, swap the eggs and dairy. Use flaxseed meal mixed with water as an egg substitute. For the buttermilk, try almond milk with a splash of vinegar. These simple swaps help everyone enjoy this delicious cake. You can find the full recipe for the classic red velvet cake above. Enjoy experimenting with these variations! To keep your red velvet cake fresh, follow these simple steps: - Short-term storage: Place the cake in an airtight container. You can also cover it tightly with plastic wrap. This keeps moisture in and prevents drying out. Store it at room temperature if you plan to eat it within three days. - Long-term storage: For longer storage, wrap the cake layers with plastic wrap and then aluminum foil. This method protects the cake from freezer burn. You can store it in the freezer for up to three months. If you want to freeze your red velvet cake layers, here’s how: 1. Cool completely: Always let your cake layers cool fully before freezing. This prevents condensation from forming. 2. Wrap tightly: Wrap each layer in plastic wrap. Then, add an extra layer of foil. This protects your cake from freezer odors. 3. Label the layers: Write the date on the foil. This way, you can track how long they’ve been in the freezer. When you’re ready to enjoy your cake, use these thawing techniques: - Thaw in the fridge: Move the wrapped cake to the fridge for several hours or overnight. This keeps the cake moist and fresh. - Room temperature: If you’re in a hurry, you can unwrap the cake and let it sit at room temperature for about an hour. How long does red velvet cake last in the fridge? - It can last up to five days if stored properly in an airtight container. What are the signs of spoilage to watch for? - Mold: If you see any mold, throw the cake away. - Off smell: A sour or strange smell means it’s time to discard the cake. - Dry texture: If the cake feels dry, it may not taste good. Following these storage tips helps you enjoy your red velvet cake at its best! For the full recipe, check out the detailed instructions provided earlier. Red velvet cake has a rich history. It likely started in the 1800s. Many say it comes from the South. It became popular in the 1920s. A hotel in New York helped spread its fame. The cake’s name refers to its soft, velvety texture. The red color adds to its charm. Cocoa powder gives it a hint of chocolate. This cake is often linked to special occasions, especially Valentine’s Day. You can use natural options to color your cake. Beet juice is a great choice. It gives a nice red hue. You might also try pomegranate juice. Keep in mind that the color may be lighter. Cocoa powder can deepen the shade too. These options add flavor along with color. Expect a more earthy taste with these substitutes. Yes, you can make red velvet cake ahead of time. Bake the cakes one day before. Cool them completely and wrap them tightly. Store in the fridge overnight. Frost the cake on the day you serve it. This keeps the cake fresh and moist. You can also freeze layers for later use. Just remember to thaw them before frosting. You can find great red velvet cake at local bakeries. Look for ones that use fresh ingredients. Check online reviews for quality. Some bakeries offer delivery. You can also order from well-known online stores. When choosing a cake, check for a rich color and moist texture. A good frosting should be smooth and creamy. The luxurious red velvet cake comes together quickly. It takes about 30 minutes to prep. The total time is roughly 1 hour and 30 minutes. This recipe makes 12 delicious slices. You can find the full recipe above. Enjoy baking this beautiful dessert! Red velvet cake is a delightful treat made from simple ingredients. You learned about essential components, steps for baking, and tips for the best results. I shared creative variations and storage methods so your cake stays fresh. Remember, practice makes perfect in the kitchen. With each attempt, you get closer to mastering this beloved dessert. Whether for a special occasion or a simple indulgence, this cake will impress anyone. Enjoy your baking journey and savor every bite of your delicious creation.

Red Velvet Cake Irresistible Dessert Recipe Guide

Are you ready to impress your friends and family with a stunning dessert? This Red Velvet Cake Irresistible Dessert Recipe

To make a classic apple pie, you need a few key items: - 6 medium apples (Granny Smith and Honeycrisp work well) - 2 tablespoons lemon juice - 3/4 cup granulated sugar - 1 teaspoon ground cinnamon - 1/4 teaspoon ground nutmeg - 1/4 teaspoon salt - 2 tablespoons all-purpose flour - 2 tablespoons unsalted butter, cut into small pieces - 1 package (14 oz) refrigerated pie crusts (or homemade equivalent) These ingredients combine to create a sweet and tart filling, balanced by a flaky crust. You can add some optional ingredients to enhance your pie: - Sugar for sprinkling on the crust - 1 egg and 1 tablespoon milk for an egg wash The egg wash gives the crust a beautiful shine. A sprinkle of sugar adds a sweet crunch to the top. Feel free to explore the Full Recipe for detailed steps! First, I preheat my oven to 425°F (220°C). This high heat helps the crust get crispy. Next, I prepare the apples. I take 6 medium apples, like Granny Smith and Honeycrisp. I peel, core, and slice them thinly. I then toss the slices with 2 tablespoons of lemon juice. This keeps them fresh and bright. In another bowl, I mix together the dry ingredients. I combine 3/4 cup of granulated sugar, 1 teaspoon of ground cinnamon, 1/4 teaspoon of ground nutmeg, and 1/4 teaspoon of salt. I also add 2 tablespoons of all-purpose flour for thickening. This blend adds flavor and helps the filling set. Now, I roll out one pie crust. I fit it into a 9-inch pie pan, leaving the edges hanging over. I fill the crust with the apple mixture. I make sure to pile the apples higher in the center for a nice look. I then dot the apples with small pieces of butter. This adds richness and flavor. Next, I roll out the second pie crust. I place it over the filling and trim the excess crust, leaving about 1 inch over the edge. I fold the top crust under the bottom edge and crimp to seal it tight. I cut vents into the top crust. This lets steam escape and creates a pretty design. I bake the pie in the preheated oven for 15 minutes. After that, I reduce the temperature to 350°F (175°C). I continue baking for another 30 to 40 minutes. The pie is done when the apples are tender and the crust is golden brown. To check if it's ready, I look for a deep golden color. I also check the juices bubbling through the vents. Once done, I let the pie cool for at least 2 hours. This helps the juices set and makes slicing easier. Enjoy this classic apple pie with your favorite scoop of ice cream! For the full details, check out the Full Recipe. Choosing the right apples is key. I recommend using Granny Smith and Honeycrisp. Granny Smith gives a tart flavor. Honeycrisp adds sweetness. This mix creates a great balance in taste. Perfecting the crust is just as important. A flaky crust starts with cold ingredients. Keep your butter cold and cut it into the flour quickly. This helps form small layers. When you bake, those layers puff up. This gives you that perfect flaky texture. Serve your pie warm for the best taste. You can also serve it at room temperature. I like to add a scoop of vanilla ice cream or whipped cream on top. This adds a nice creamy touch. For garnish, a sprinkle of cinnamon looks nice. You can also add a few slices of fresh apple on the side. This makes your apple pie even more appealing. For the full recipe, check out the steps to create your delicious masterpiece! {{image_2}} You can get creative with apple pie! Try adding more fruits like pears or cherries. They bring extra flavor and fun. Spices also help. Consider adding ginger for a zing or cardamom for warmth. These small changes can make a big difference. Think about the crust, too. If you want a gluten-free option, use almond flour or a premade gluten-free crust. A lattice top can give your pie a beautiful look. It's easy to make and adds a rustic touch. Toppings change everything! Serve warm pie with a scoop of vanilla ice cream. The cold ice cream melts into the warm pie, creating a treat. You can also use whipped cream for a light and airy option. Feeling adventurous? Turn your pie into apple pie bars. Just use the same filling but layer it between two crusts in a baking dish. Bake until golden and cut into squares. You can even make an apple cobbler by mixing the apples with a biscuit topping. Both options are fun ways to enjoy this classic dish. For the full recipe, check out the details above! To store leftover apple pie, first, let it cool completely. Then, cover it with plastic wrap or aluminum foil. You can also place it in an airtight container. This method keeps the pie fresh for up to four days. If you want to keep your pie longer, freezing is a great option. To freeze apple pie, wrap it tightly in plastic wrap, then in aluminum foil. This double-wrapping prevents freezer burn. It can last up to three months in the freezer. When you're ready to enjoy it, simply thaw it in the fridge overnight. Reheating your apple pie properly is key to keeping its texture and flavor. The best method is to use the oven. Preheat it to 350°F (175°C). Place the pie on a baking sheet to catch any drips. Heat it for about 15-20 minutes. This will warm it through and crisp up the crust. If you're in a hurry, you can use the microwave. However, this method may make the crust soft. Heat a slice for about 30 seconds. Check it and heat more if needed. Enjoy your warm slice of classic apple pie! What are the best apples to use for apple pie? The best apples for pie are Granny Smith and Honeycrisp. Granny Smith gives a tart flavor. Honeycrisp adds sweetness and crispness. You can mix them for a balanced taste. Can I make apple pie without sugar? Yes, you can make apple pie without sugar. Use natural sweeteners like honey or maple syrup. You can also use ripe apples for natural sweetness. Adjust spices to enhance flavor. How do I prevent a soggy bottom crust? To avoid a soggy crust, pre-bake the bottom crust before adding filling. You can also use a bit of flour or cornstarch on the crust. This will help absorb excess moisture. Why is my pie crust tough? A tough crust might come from overworking the dough. Handle the dough gently and avoid adding too much water. Chill the dough before rolling it out for a tender texture. What to do if the pie filling oozes out? If the filling oozes out, it may be too watery. Ensure you use the right amount of thickener. You can also let the pie cool longer before slicing to let juices set. For an easy and delicious classic apple pie, check the Full Recipe for all the details! Classic apple pie blends simple ingredients through careful steps. Start with the right apples for tasty flavors. Achieve flaky crusts, and serve warm with ice cream. Explore unique variations for fun twists. Store leftovers wisely to keep them fresh. With this guide, you can craft a delicious apple pie with ease. Enjoy the process and share your creations!

Classic Apple Pie Irresistible and Easy Recipe

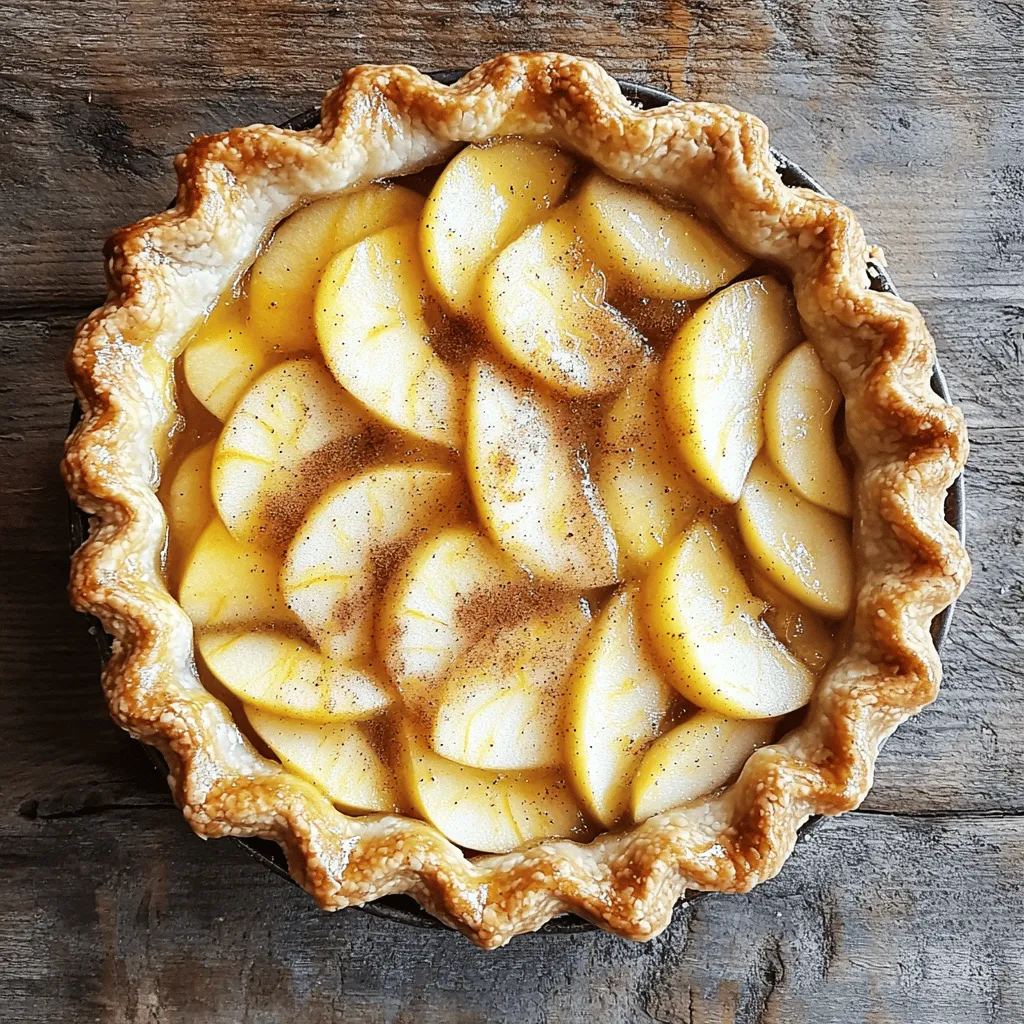
Do you crave a warm slice of home-baked apple pie? I’m here to guide you through making a Classic Apple

- 2 ½ cups all-purpose flour - 1 teaspoon baking powder - ½ teaspoon baking soda - ½ teaspoon salt - 1 cup unsalted butter, softened - 1 ½ cups granulated sugar - 1 large egg - 2 tablespoons lemon zest - 1 tablespoon fresh lemon juice - 1 teaspoon vanilla extract - 1 cup powdered sugar (for glaze) - 2 tablespoons fresh lemon juice (for glaze) - Optional: Lemon zest for garnish For precise baking, I recommend using weight conversions. Here’s a handy guide: - 2 ½ cups of flour = 312 grams - 1 cup of butter = 227 grams - 1 ½ cups of sugar = 300 grams If you have common allergens, here are some swaps: - Use gluten-free flour instead of all-purpose flour. - Use coconut oil instead of butter for a dairy-free version. - Replace the egg with a flax egg for a vegan option: mix 1 tablespoon of ground flaxseed with 2.5 tablespoons of water. Using fresh ingredients adds flavor. Fresh lemon juice and zest make a big difference. The taste is bright and full of life. For the glaze, you can also swap lemon juice for orange juice for a sweet twist. Follow the Full Recipe for step-by-step guidance, and enjoy baking your cookies! First, preheat your oven to 350°F (175°C). This step is key for even baking. Next, line two baking sheets with parchment paper. This keeps your cookies from sticking. Now, let's mix our dry ingredients. In a medium bowl, whisk together the following: - 2 ½ cups all-purpose flour - 1 teaspoon baking powder - ½ teaspoon baking soda - ½ teaspoon salt Set this bowl aside. This mixture will help your cookies rise. In a large bowl, cream 1 cup of softened butter and 1 ½ cups of granulated sugar. Use an electric mixer for about 3-4 minutes. The mix should be light and fluffy. This gives the cookies a nice texture. Next, add in 1 large egg, 2 tablespoons of lemon zest, 1 tablespoon of fresh lemon juice, and 1 teaspoon of vanilla extract. Beat these together until well mixed. Now, gradually add the dry ingredients to the wet mixture. Mix until combined, but don’t overmix. This keeps your cookies soft. Scoop tablespoon-sized balls of dough onto your baking sheets. Leave some space between each ball. They will spread while baking. Bake the cookies in the oven for 10-12 minutes. Look for lightly golden edges. The centers might look soft, but they will firm up as they cool. While the cookies cool, prepare your glaze. In a small bowl, whisk together 1 cup of powdered sugar and 2 tablespoons of fresh lemon juice until smooth. Once the cookies are cool, drizzle the glaze over them. Let the glaze set for a few minutes. For a fun touch, sprinkle some lemon zest on top. You can find the full recipe at the beginning of this article. Enjoy your sweet and tart lemon cookies! To get the best texture in your cookies, avoid overmixing the dough. When you mix too much, cookies can turn tough. You want a soft and tender cookie. Just mix until the dry and wet ingredients blend. For cookie spreading, scoop the dough into balls and leave space on the baking sheet. This allows room for spreading. Bake the cookies at 350°F for 10 to 12 minutes. The edges should be light brown, while the centers remain soft. They will firm as they cool. To make these cookies even more zesty, add extra lemon zest. This small change boosts the lemon flavor. You can also mix in other flavors. A teaspoon of vanilla or almond can add a lovely twist. These flavors work well with lemon and make the cookies unique. How you display your cookies can make a big difference. Stack them on a tiered stand for an eye-catching look. You can also arrange them nicely on a decorative plate. For a bright touch, add a lemon wedge or a sprig of mint next to each cookie. This adds color and freshness, perfect for special occasions. For the full recipe, check the earlier section to get started on your baking adventure! {{image_2}} You can play with flavors in your glazed lemon sugar cookies. Here are two fun ideas: - Blueberry lemon cookies: Add fresh blueberries to the dough. The sweet berries mix well with the tart lemon. They create a burst of flavor in every bite. - Lavender-infused lemon cookies: Use dried culinary lavender in the dough. It gives a lovely floral note that pairs nicely with lemon. Just be careful not to add too much; a little goes a long way! Changing the glaze can add a new twist to your cookies. Consider these options: - Cream cheese glaze option: Mix cream cheese with powdered sugar and lemon juice. This glaze is rich and creamy. It adds a tangy finish to the cookies. - Chocolate-drizzled lemon cookies: Melt dark or white chocolate. Drizzle it over the glazed cookies for a sweet contrast. This adds richness and makes the cookies extra special. If you have dietary needs, you can still enjoy these cookies. Here are some easy swaps: - Substituting for gluten-free flour: Use a gluten-free all-purpose flour blend. This works well in place of regular flour. Just check that it contains xanthan gum for better texture. - Vegan egg replacers for a plant-based option: Replace the egg with a flax egg or applesauce. For a flax egg, mix one tablespoon of ground flaxseed with three tablespoons of water. Let it sit for a few minutes until it thickens. This makes the cookies moist and tasty. These variations will keep your cookie game exciting. You can easily switch things up based on what you love! For the full recipe, don't forget to check out the details provided. To keep your glazed lemon sugar cookies fresh, follow these best practices. First, let the cookies cool completely before storing them. This helps prevent moisture buildup. Next, place the cookies in an airtight container. You can also use parchment paper between layers to avoid sticking. This way, your cookies stay soft and tasty. If you live in a humid area, store them in the fridge. The cool air helps maintain their texture. You can freeze your delicious cookies to enjoy later. Start by placing the cooled cookies in a single layer on a baking sheet. Freeze them for about an hour. Once frozen, transfer the cookies to a freezer-safe bag or container. Be sure to label the bag with the date. To thaw, take them out of the freezer and let them sit at room temperature. If you want to enjoy warm cookies, heat them in the oven at 350°F for about 5 to 7 minutes. This brings back their soft, fresh-baked taste. To stop your cookies from spreading, focus on the dough's consistency. Make sure your butter is softened but not too warm. If it's too soft, the cookies will spread too much. Chill the dough for at least 30 minutes before baking. This helps them hold their shape. When you scoop the dough, try to keep the balls compact and uniform. You can use bottled lemon juice, but fresh juice tastes better. Fresh lemons have bright, bold flavors that bottled juice lacks. Bottled lemon juice often contains preservatives, which can affect the taste. For the best lemon flavor, use fresh juice and zest from real lemons. It makes your cookies taste vibrant and fresh. Glazed cookies stay fresh for about 3 to 5 days. Store them in an airtight container at room temperature. Avoid stacking them right away after glazing. The glaze can stick to other cookies. For the best glaze, serve them soon after glazing. If you need to keep them longer, consider freezing them without glaze. You can glaze them later when ready to serve. This post covers how to make delicious lemon cookies. We discussed essential ingredients like flour, butter, and sugar. We went through each step, from mixing the dough to glazing the cookies. Tips for the perfect texture and flavor enhancements were shared. We explored variations and storage methods to keep your cookies fresh. In conclusion, with this guide, you can bake tasty lemon cookies. Enjoy creating and sharing them with friends and family. Happy baking!

Glazed Lemon Sugar Cookies Sweet and Tart Delight

Get ready to taste sunshine with my Glazed Lemon Sugar Cookies! These sweet and tart treats are perfect for any

- 3 medium apples (Granny Smith or Honeycrisp) - 1/2 cup brown sugar - 1 teaspoon cinnamon - 1/4 teaspoon nutmeg - 1 tablespoon lemon juice - 1 tablespoon cornstarch - 1 1/2 cups cream cheese - 1 cup granulated sugar - 1 teaspoon vanilla extract - 3 large eggs - 1 cup sour cream - 1/4 cup all-purpose flour - 1 1/2 cups graham cracker crumbs - 1/2 cup unsalted butter - 1/4 cup granulated sugar To make the Apple Pie Stuffed Cheesecake, you need a mix of sweet and tangy ingredients. The apple pie filling forms the heart of this dessert. The apples should be fresh and crisp. Granny Smith or Honeycrisp apples work great. The brown sugar adds sweetness, while cinnamon and nutmeg give warmth and spice. Lemon juice balances the flavors, and cornstarch thickens the filling. For the creamy cheesecake base, you need cream cheese as the star. Granulated sugar adds sweetness, and vanilla extract gives flavor. The eggs help set the cheesecake, making it smooth. Sour cream adds richness, while flour helps with the texture. The crust is simple yet tasty. Graham cracker crumbs create a crunchy base. Melted butter holds it together, and the sugar adds a touch of sweetness. Use these ingredients carefully to craft your cheesecake masterpiece. You can find the full recipe to guide your steps. Enjoy your cooking! - Combine 3 medium apples, 1/2 cup brown sugar, 1 tablespoon lemon juice, 1 teaspoon cinnamon, 1/4 teaspoon nutmeg, and 1 tablespoon cornstarch in a saucepan. - Cook over medium heat for 5-7 minutes. Stir often until the apples soften and the mix thickens. - Preheat your oven to 325°F (160°C). - Mix 1 1/2 cups graham cracker crumbs, 1/2 cup melted butter, and 1/4 cup sugar in a bowl. - Press this mix into a 9-inch springform pan to form an even crust. Bake for 10 minutes, then remove and let cool. - Beat 1 1/2 cups softened cream cheese in a large bowl until smooth. - Gradually add 1 cup granulated sugar and beat until fluffy. Mix in 1 teaspoon vanilla extract. - Add 3 large eggs one at a time, mixing well after each addition. - Finally, mix in 1 cup sour cream and 1/4 cup flour until just combined. - Pour half of the cheesecake batter over the cooled crust in the springform pan. - Spoon half of the apple pie filling over the batter, spreading it evenly. - Pour the rest of the cheesecake batter over the apple filling, then top with the remaining filling. - Use a knife to swirl the apple filling into the cheesecake for a beautiful marbled look. - Bake the cheesecake for 55-65 minutes. Look for set edges and a slight jiggle in the center. - Turn off the oven and crack the door open. Let the cheesecake cool inside for 1 hour to prevent cracks. - Once cooled, refrigerate the cheesecake for at least 4 hours. - When ready to serve, run a knife around the edges. Carefully remove the springform pan. You can find the full recipe for Apple Pie Stuffed Cheesecake above. - Use room temperature ingredients for a smooth mix. This helps the cream cheese blend well. - Avoid over-mixing to minimize air bubbles. Too much air can lead to cracks. - Allow cheesecake to cool slowly in the oven. This step helps it set correctly. - Chilling properly prevents cracks when slicing. A well-chilled cheesecake stays intact better. - Garnish with whipped cream and a sprinkle of cinnamon. This adds a lovely touch. - Serve with a slice of apple for an elegant touch. It looks great and tastes fresh. These tips will help you create a stunning Apple Pie Stuffed Cheesecake. For full details, check the Full Recipe. {{image_2}} You can have fun with the flavors in your cheesecake. Instead of apples, try other fruits. Pears or peaches work great in this recipe. They give a fresh twist to the filling. You can also mix in a caramel swirl. This adds a rich taste, giving you a caramel apple cheesecake. Everyone will love this sweet surprise! If you want a vegan version, you can swap some ingredients. Use dairy-free cream cheese and sour cream. This keeps the cheesecake creamy without dairy. For the crust, choose gluten-free graham crackers. This makes the dessert friendly for those with gluten sensitivities. You can still enjoy all that flavor without worry! Explore these variations to make your apple pie stuffed cheesecake unique. Check the Full Recipe for all the details you need to get started! You should store your cheesecake in the fridge for up to 5 days after making it. Make sure to cover it tightly with plastic wrap or foil. This keeps the cheesecake fresh and prevents it from absorbing any odors from the fridge. If you have any leftovers, this method will help maintain its creamy texture and rich taste. If you want to keep your cheesecake longer, you can freeze it. Freeze portions in airtight containers for up to 3 months. This is a great way to enjoy your dessert later. When you’re ready to eat, thaw the cheesecake in the refrigerator for best results. This slow thaw helps keep its texture smooth and delicious. Enjoy every bite, even after freezing! Yes, store-bought apple pie filling is a convenient alternative. It saves time and still tastes great. You can find it in most grocery stores. This option works well if you're short on time. Just remember to adjust the spices to fit your taste. The edges should be set with the center slightly jiggly. This means the cheesecake is perfectly baked. If your cheesecake looks too firm, it might dry out. Keep an eye on it towards the end of baking. Trust your instincts and check it often. Cracks can be covered with toppings like whipped cream or fruit to enhance presentation. You can also use chocolate drizzle for extra flair. If you're serving guests, a good topping hides any flaws. This makes your dessert look even more delicious. This blog covered how to make a delicious apple cheesecake. We explored the key ingredients, from apples to cream cheese, and outlined step-by-step instructions for preparation. I provided tips for the perfect texture and ways to avoid cracks. Remember, you can customize the flavors or follow dietary needs easily. Whether you store it in the fridge or freeze it, this cheesecake will please everyone. Now, it's time to enjoy that slice of apple cheesecake you crafted. Happy baking!

Apple Pie Stuffed Cheesecake Decadent Dessert Recipe

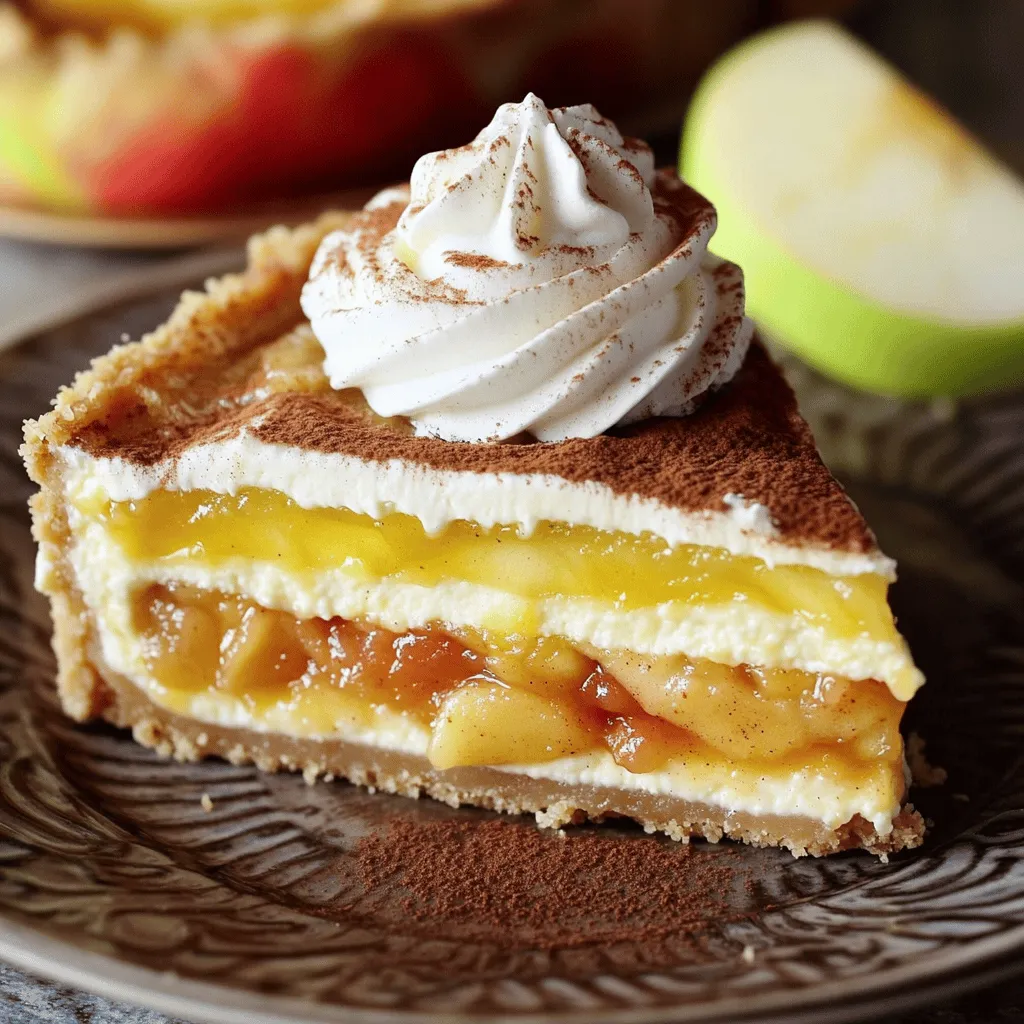
Are you ready to indulge in a dessert that combines two favorites? This Apple Pie Stuffed Cheesecake recipe will make

- 4 cups all-purpose flour - 1 cup whole milk, warmed - 1/2 cup granulated sugar - 1/4 cup unsalted butter, softened - 2 large eggs - 1 packet instant yeast - 1 teaspoon salt - 1 tablespoon ground cinnamon - 1/2 cup packed brown sugar - 1/4 cup unsalted butter, melted (for filling) - 1 cup powdered sugar (for frosting) - 2-3 tablespoons milk (for frosting) - 1 teaspoon vanilla extract (for frosting) To make the best homemade cinnamon rolls, you need simple, quality ingredients. Each item plays a key role in creating soft, fluffy rolls. Flour forms the base, giving structure. Use all-purpose flour for the right texture. Warm milk activates the yeast. This step is crucial for rising. Granulated sugar sweetens the dough. It also helps with browning. Softened butter adds richness and flavor. The eggs bind everything together and add moisture. Instant yeast makes rising easy and quick. Salt enhances flavor and strengthens the dough. Ground cinnamon gives that classic taste we love. Brown sugar adds a deep sweetness to the filling. For the frosting, powdered sugar provides sweetness. Milk thins it to the right consistency. Vanilla extract adds an inviting aroma and taste. - Mixing bowls - Rolling pin - Baking dish - Measuring cups and spoons - Whisk or wooden spoon Having the right tools makes the process smoother. Mixing bowls help combine ingredients easily. A rolling pin is essential for flattening the dough. A baking dish holds your rolls as they bake. Measuring cups and spoons ensure accuracy. This step is key for the perfect outcome. A whisk or wooden spoon will help mix your ingredients well. - Chopped nuts (pecans or walnuts) - Extra cinnamon for garnish - Fresh fruits like berries Toppings can elevate your cinnamon rolls. Chopped nuts add crunch and flavor. Extra cinnamon provides a beautiful touch and aroma. Fresh fruits like berries can offer a bright contrast. Feel free to get creative with these options. A little personal touch makes each batch unique. For the full recipe, check out the detailed guide. - Combine warm milk, sugar, and butter in a mixing bowl. - Add eggs and yeast, whisk until combined. - Gradually incorporate flour and salt, mixing until dough forms. Creating the dough is the first step to perfect cinnamon rolls. I like to heat the milk just enough to melt the butter. This warmth helps the yeast activate. When you add the eggs, make sure they are at room temperature. This will help the dough mix easily. - Knead dough on a floured surface for 7-10 minutes. - Let the dough rise for about 1 hour until doubled in size. Kneading is key for texture. I always knead the dough until it feels smooth and elastic. This builds the gluten, giving your rolls that perfect fluffy bite. After kneading, place the dough in a greased bowl. Cover it with a damp cloth. Let it sit in a warm area, which helps it rise. - Roll out the dough into a rectangle. - Brush with melted butter, sprinkle brown sugar and cinnamon. - Roll tightly and slice into 1-inch rolls. Next, roll out the dough into a rectangle about 1/4 inch thick. Be sure to brush melted butter evenly across the surface. Sprinkle the brown sugar and cinnamon generously. Rolling the dough tightly is important. This helps keep the filling inside while baking. - Place rolls in a greased baking dish and cover. - Let rise for 30-45 minutes, then bake at 350°F for 25-30 minutes. After shaping, place the rolls in a greased baking dish. Cover them with a cloth and let them rise again. This second rise makes your rolls even fluffier. When they are puffy, bake them until golden brown. The smell will fill your kitchen! - Mix powdered sugar, milk, and vanilla until smooth. - Drizzle frosting over warm rolls after baking. While the rolls bake, prepare the frosting. Combine powdered sugar, milk, and vanilla in a bowl. Stir until smooth. Once the rolls are out of the oven, drizzle the frosting on top. The warmth of the rolls makes the frosting melt slightly, creating a dreamy glaze. For the full recipe, check out the detailed instructions above. To get soft and fluffy cinnamon rolls, start with warm milk. The milk should feel warm to the touch but not hot. This helps activate the yeast. Knead your dough until it feels smooth and elastic. This step is key for a great texture. Once your rolls cool, store them in an airtight container. Keep them at room temperature for up to three days. For longer storage, refrigerate them. This will help keep them fresh. To enjoy your rolls warm again, use a microwave. Heat them for about 15-20 seconds. Alternatively, warm them in an oven for a few minutes at 350°F. This will bring back the soft texture you love. {{image_2}} You can easily change the flavor of your cinnamon rolls. Here are two fun ideas: - Add raisins or cranberries for a fruity twist. These fruits give a sweet and tangy pop. - Substitute brown sugar with maple sugar for a different flavor. Maple adds a rich, warm taste. The icing can also be transformed to suit your taste. Try these options: - Use cream cheese frosting instead of a vanilla glaze. Cream cheese adds a rich and tangy flavor. - Add cocoa powder for a chocolate frosting option. This makes the rolls even more indulgent. Changing the shape of your cinnamon rolls can be fun! Here are some suggestions: - Try making cinnamon roll twists or braids. These shapes look fancy and are easy to make. - Experiment with different sizes, like mini rolls. Mini rolls are perfect for a quick snack or dessert. Feel free to get creative with your flavors and shapes. The options are endless! For the full recipe, don’t forget to check out the Heavenly Homemade Cinnamon Rolls. To store your cinnamon rolls in the fridge, place them in an airtight container. They will stay fresh for up to a week. If you want extra protection, wrap them tightly in plastic wrap first. This helps keep moisture in and prevents them from drying out. You can freeze both unbaked and baked rolls. For unbaked rolls, place them in a greased dish and cover with plastic wrap. Once frozen solid, transfer them to a freezer-safe bag. If you freeze baked rolls, let them cool completely before wrapping. To enjoy, simply thaw in the fridge overnight. Then, warm them in the oven for that fresh-baked taste. To track how fresh your cinnamon rolls are, always check the date you made them. The best way to know if they are still good is to smell them. If they smell off or have an unusual look, it’s best to throw them out. Enjoy your rolls while they are fresh for the best taste! To make your dough rise faster, find a warm spot. Preheat your oven to 200°F for one minute. Turn it off, then place the dough inside. The gentle heat will help it rise quickly. You can also cover the bowl with a damp cloth. This will keep the dough warm and humid. Yes, you can use whole wheat flour, but it changes the rolls a bit. Whole wheat gives a nuttier taste and more fiber. However, it also makes the dough denser. If you want softer rolls, mix half whole wheat and half all-purpose flour. This keeps some lightness while adding health benefits. If your rolls don't rise, check a few things. First, make sure the yeast is fresh. Old yeast may not work well. Next, see if the dough was in a warm enough spot. Lastly, if it’s too cold, start over or give it more time. If it’s too hot, the yeast can die. Yes, you can prepare the dough in advance! After kneading, cover it tightly with plastic wrap. Store it in the fridge overnight. When you are ready, take it out and let it rise. This slow rise adds great flavor. Just remember to let it warm up before rolling. Look for a nice golden-brown color on top. You can also tap the bottom of a roll. If it sounds hollow, it’s done. Another way is to check the internal temperature. It should be about 190°F. If you see these signs, your rolls are ready to enjoy! In this post, I shared how to make delicious cinnamon rolls from scratch. You learned the key ingredients you need and the best steps to follow. I also provided tips for flavor variations and how to store your rolls. With these easy instructions, you can enjoy fresh, soft rolls anytime. Baking can be fun, and you’ll impress everyone with your skills. Get started today, and treat your friends and family to a warm batch of homemade cinnamon rolls!

Best Homemade Cinnamon Rolls Irresistible Recipe Guide

If you’re craving warm, sweet, and gooey cinnamon rolls, you’re in the right place! I’m excited to guide you through

To make the best strawberry pie, you need key ingredients. Here’s what you will need: - 2 cups fresh strawberries, hulled and halved - 1/2 cup granulated sugar - 1 tablespoon lemon juice - 1 tablespoon cornstarch - 1 tablespoon butter, cut into small pieces - 1 pre-baked pie crust (store-bought or homemade) - 1/2 teaspoon vanilla extract - Whipped cream for topping (optional) These ingredients create a sweet and tart flavor. The fresh strawberries bring a bright taste. The sugar adds sweetness, while the lemon juice gives a nice zing. Cornstarch thickens the pie filling, holding it together. Butter adds richness, and vanilla enhances the overall flavor. You can add a few optional ingredients for extra flavor. Consider using: - A pinch of salt to balance the sweetness - Fresh mint leaves for a refreshing touch - A splash of orange juice for a citrusy twist These options can take your pie to the next level. Feel free to mix and match based on your taste. When selecting strawberries, look for ripe, bright red ones. Here are some tips: - Check for firmness; they should not be mushy. - Look for a fresh green cap, which indicates freshness. - Smell the strawberries; they should have a sweet aroma. Choosing the best strawberries makes a big difference in taste. Sweet, juicy berries are key to a delightful pie. For the full recipe, see the section above. First, wash your strawberries under cold water. Next, hull and halve them. This makes it easy to eat. In a medium bowl, mix halved strawberries with granulated sugar, lemon juice, cornstarch, and vanilla extract. Toss gently until the berries are well coated. Let this sit for about 10-15 minutes. This step helps the strawberries release their sweet juices. Grab your pre-baked pie crust. Pour the strawberry mixture into it. Make sure the berries spread evenly across the crust. Dot the top with small pieces of butter for added flavor. This little touch makes the pie richer and creamier. Now, preheat your oven to 375°F (190°C). Place the pie in the oven and bake for 25-30 minutes. You want the filling to be bubbly and the crust lightly golden. Once done, take the pie out and let it cool to room temperature. This cooling time is important. It helps set the filling, making it easier to slice. For a sweet finish, serve each slice with whipped cream on top. You can find the Full Recipe for this delightful treat above. When making strawberry pie, avoid over-mixing the filling. This can break the berries down too much. Also, don’t skip the lemon juice. It brightens the flavor and balances the sweetness. If you don’t let the strawberry mix sit, you miss out on juicy goodness. Lastly, make sure to cool the pie before slicing. This helps the filling set properly. For a great pie crust, start with cold ingredients. Cold butter and water help make the crust flaky. If you use a store-bought crust, check for cracks. If you find any, patch them with a bit of dough. To avoid a soggy bottom, blind bake your crust before filling it. This means baking it alone first. It helps keep the crust crisp. I love serving strawberry pie with whipped cream on top. It adds a nice creaminess. You can also try a scoop of vanilla ice cream. The cold ice cream pairs well with the warm pie. For a unique twist, drizzle chocolate sauce over the pie. Fresh mint leaves make a nice garnish too. Try adding some fresh strawberries on the side for extra color. For the full recipe, refer to the earlier section. {{image_2}} You can make fun twists on strawberry pie. Try adding a layer of cream cheese in the pie crust. This adds a tangy flavor that pairs well with sweet strawberries. You can also swap out some strawberries for blueberries. This blend gives you a berry medley that is both colorful and tasty. Another idea is to use a graham cracker crust instead of the traditional pie crust. This adds a crunchy texture that contrasts nicely with the soft filling. Making a vegan version is easy! Replace butter with coconut oil or a vegan butter alternative. Use agave nectar or maple syrup instead of granulated sugar to keep it plant-based. For gluten-free options, choose a gluten-free pie crust. You can also make your own crust using ground almonds or oats. This way, anyone can enjoy a slice of delicious strawberry pie. Mixing flavors can take your pie to the next level. Add a splash of balsamic vinegar to the strawberries for a rich taste. You can also try adding herbs like basil or mint. These herbs bring a fresh note and surprise to each bite. Another great combination is to include a hint of lime zest with the strawberries. This zesty twist gives a bright flavor that enhances the sweetness of the fruit. For the full recipe, check out the [Full Recipe]. Store leftover strawberry pie in the fridge. Use an airtight container or cover it tightly with plastic wrap. This keeps the pie fresh for about three days. If you want to enjoy the pie later, freezing is a great option. To freeze strawberry pie, first let it cool completely. Wrap it in plastic wrap, then foil. This helps prevent freezer burn. You can freeze it for up to three months. When you're ready to eat, thaw it in the fridge overnight before serving. Always keep the pie covered in the fridge. This prevents it from drying out. Avoid cutting the pie until you are ready to serve. Each slice will stay fresher if the pie remains whole. If you use whipped cream, add it just before serving to keep it fluffy. For the full recipe, check out the details above. To make the best strawberry pie, start with fresh strawberries. You need two cups of hulled and halved strawberries. Combine them with half a cup of sugar, a tablespoon of lemon juice, and a tablespoon of cornstarch in a bowl. Toss the strawberries gently. Let them sit for about 10-15 minutes to release juices. Pour this mix into a pre-baked pie crust. Dot the top with small pieces of butter. Bake it at 375°F for 25-30 minutes. The pie is done when the filling bubbles and the crust turns golden. Cool it before serving. You can find the full recipe for more details. Yes, you can use frozen strawberries. Just make sure to thaw and drain them first. This helps avoid excess water in your pie. Frozen strawberries might be softer than fresh ones. They will still taste great. Adjust the sugar based on your taste. You may need a bit more cornstarch to thicken the filling. Homemade strawberry pie lasts about three days in the fridge. Cover it well to keep it fresh. If you want it to last longer, freeze it. Wrap it tightly in plastic wrap and foil before freezing. It can last up to three months in the freezer. Just remember to thaw it in the fridge overnight before serving. You can serve strawberry pie with whipped cream or vanilla ice cream. Both add a creamy touch. Fresh mint leaves also make a great garnish. They add a nice pop of color and flavor. You can even pair it with a cup of tea or coffee for a delightful treat. We explored how to make a delicious strawberry pie, from key ingredients to storage tips. I shared steps for prepping strawberries, assembling the pie, and avoiding common mistakes. You can even try fun variations, like vegan or gluten-free options. Remember, fresh strawberries make the best pie, and proper storage keeps it tasty. With these tips, you are set to create a scrumptious treat. Enjoy baking your own perfect pie!

Best Strawberry Pie Delight in Every Slice

If you’re craving a sweet treat that bursts with flavor, you’ve come to the right place! Dive into the ultimate

- 1 ½ cups graham cracker crumbs - ½ cup unsalted butter, melted - ¼ cup granulated sugar - 16 oz cream cheese, softened - ½ cup granulated sugar - 2 large eggs - 2 tablespoons all-purpose flour - Zest of 1 lemon - ¼ cup fresh lemon juice - 1 cup fresh raspberries (plus extra for garnish) - 1 teaspoon vanilla extract - 8x8 inch baking dish - Mixing bowls - Electric mixer or whisk - Parchment paper To make these delightful raspberry lemon cheesecake bars, you start with the crust. Combine graham cracker crumbs, melted butter, and sugar in a bowl. This mix should feel like wet sand. Press it firmly into an 8x8 inch baking dish. Bake it for about 10 minutes to set the base. Next, for the cheesecake filling, you need softened cream cheese. This makes mixing easier. In a large bowl, beat the cream cheese and granulated sugar until smooth. Add two large eggs, one at a time, mixing well each time. Now, add flour, lemon zest, fresh lemon juice, and vanilla extract. These flavors brighten the filling. Finally, fold in fresh raspberries gently to keep them whole. For equipment, you'll need a few basics. An 8x8 inch baking dish is key for the perfect size. Mixing bowls help keep your space tidy. An electric mixer or a whisk speeds up mixing. Parchment paper helps with easy removal later. For the full recipe, check above. Enjoy making this treat! - Preheat your oven to 350°F (175°C). - Combine graham cracker crumbs, melted butter, and sugar. - Press into the baking dish and bake for 10 minutes. - Beat cream cheese and sugar until smooth. - Add eggs, flour, lemon zest, lemon juice, and vanilla extract. - Fold in raspberries gently. - Pour over the pre-baked crust and bake for 25-30 minutes. - Allow to cool in the oven. - Refrigerate for at least 4 hours. - Lift out using parchment paper and slice into squares. For the full recipe, you can check the detailed instructions above. Enjoy your sweet creation! - Be sure cream cheese is softened for easier mixing. Cold cream cheese is hard to blend. It can leave lumps in your batter. - Avoid overmixing after adding eggs. This keeps your cheesecake light and fluffy. Overmixing can make it dense and heavy. - Garnish with fresh raspberries and mint leaves. This makes your bars look bright and fresh. - Dust with powdered sugar for a finishing touch. It adds a sweet look that catches the eye. - Pair with whipped cream or ice cream. The creamy textures complement the tangy cheesecake. - Serve with a light fruit sauce or compote. It adds extra flavor and makes each bite special. For the full recipe, check out my detailed instructions above. Enjoy these delightful treats! {{image_2}} You can change the flavors of these bars easily. For a twist, use different berries. Blueberries or strawberries work great. You might also try adding white chocolate. Mint can add a fresh taste too. These options let you make it your own. If you need a gluten-free treat, no worries! Just swap in gluten-free graham cracker crumbs. This small change keeps the crust tasty and safe for everyone. You won’t lose flavor or texture with this switch. Want a vegan version? Use silken tofu or a vegan cream cheese alternative. This still gives you that creamy texture. Follow the same steps in the Full Recipe to create your bars. You’ll enjoy the same delicious flavors without the dairy. To keep your raspberry lemon cheesecake bars fresh, store them in an airtight container. They will stay good in the fridge for up to 5 days. This way, you can enjoy a sweet treat anytime you crave it. If you want to save some for later, freeze the uncut bars. They can last for up to 2 months in the freezer. When you're ready to serve, simply thaw them in the fridge overnight. This keeps the texture just right for a delicious bite. Before serving your cheesecake bars after storage, make sure they are properly chilled. Chilling helps bring out the flavors and makes each bite feel refreshing and delightful. The edges will be set while the center will still have a slight jiggle. This means the cheesecake will be creamy and not overbaked. If you see the edges firming up but the middle looks soft, that’s perfect! Let them cool in the oven, and it will finish setting up. Yes, they can be made a day in advance and chilled. This allows the flavors to blend nicely. Just store them in the fridge covered. They taste even better the next day! Frozen raspberries or other berries can be used as alternatives. Blueberries, strawberries, or blackberries work well too. Just remember that frozen berries might release more juice, so adjust the baking time if needed. You now have a simple way to create delicious raspberry cheesecake bars. We covered all the key ingredients, equipment, and steps needed to make this treat. Remember to keep the cream cheese soft for the best mix and don’t overmix after adding the eggs. Feel free to customize flavors or adapt to gluten-free and vegan diets. Follow these tips, and your bars will impress everyone. Enjoy your delicious creation!

Raspberry Lemon Cheesecake Bars Delightful Sweet Treat

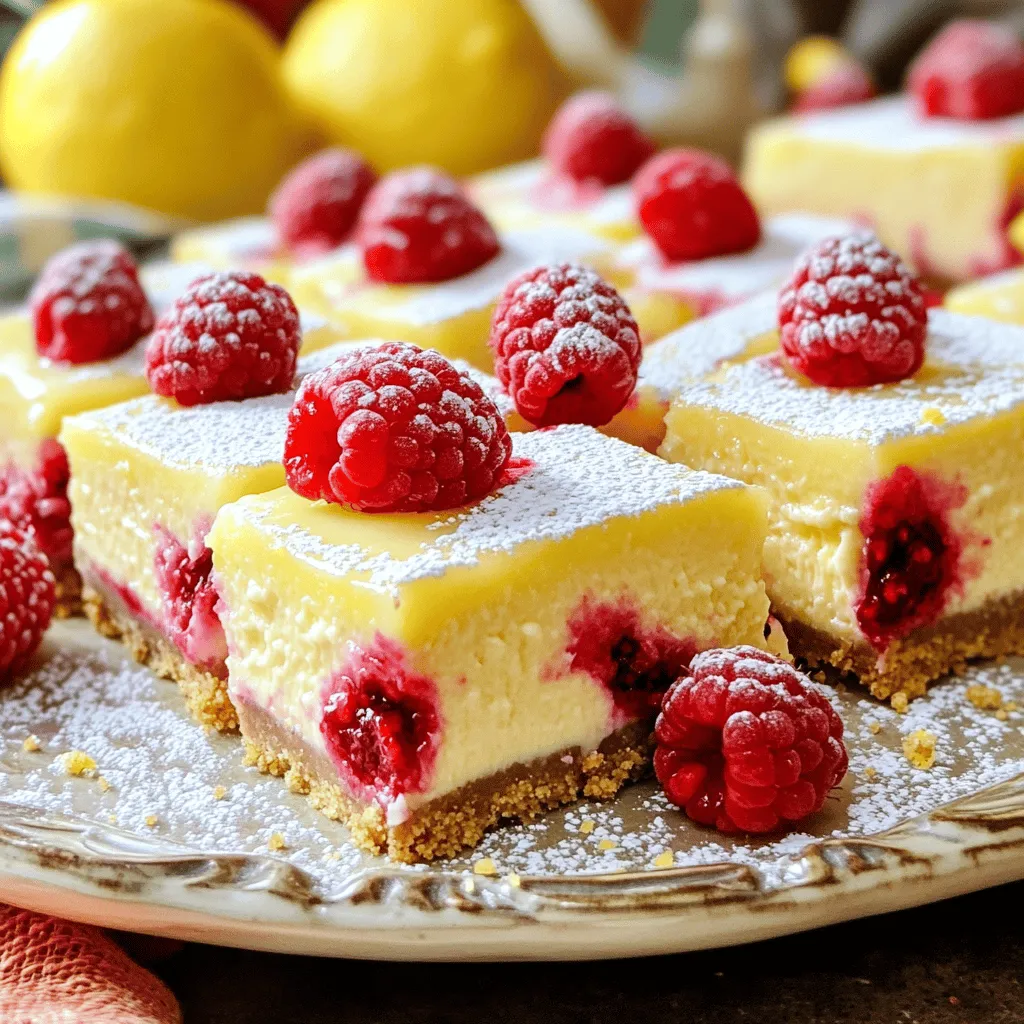
Are you ready to indulge in a sweet treat that combines creamy cheesecake and zesty lemon? These Raspberry Lemon Cheesecake

To create the best banana pudding, you need fresh and simple ingredients. Here’s what you will need: - 4 ripe bananas, sliced - 1 box (12 oz) vanilla wafers - 2 cups whole milk - 1 cup heavy cream Ripe bananas are key. They should have brown spots. This means they are sweet and soft. Vanilla wafers add a crunchy texture. Whole milk and heavy cream make the pudding rich and smooth. For sweetness, you can choose between two great options: - 1/2 cup granulated sugar - 1/2 cup packed brown sugar Granulated sugar gives a classic taste. Brown sugar adds a hint of caramel flavor. You can use one or mix both for a deeper taste. To give your pudding the right texture, you will need: - 1/4 cup cornstarch - 1 tablespoon pure vanilla extract Cornstarch helps the pudding thicken nicely. It creates a creamy consistency that holds well. Pure vanilla extract enhances the flavor, making each spoonful delightful. Using these ingredients, you can create a banana pudding that is tasty and satisfying. For the full recipe, check out the details above. First, gather your ingredients. You need whole milk, heavy cream, granulated sugar, brown sugar, cornstarch, salt, and vanilla extract. In a large saucepan, combine these ingredients. Whisk them together well. Next, cook the mixture over medium heat. Stir constantly until it thickens. This should take about 5 to 7 minutes. Look for small bubbles to form. Once it boils, cook for an extra 1 to 2 minutes. Remove the pan from heat and stir in the vanilla extract. Let the pudding cool for about 10 minutes. Now, it's time to layer. Start by taking your serving dish or cups. Place a layer of vanilla wafers at the bottom. Next, add a layer of sliced bananas. Pour a generous layer of pudding over the bananas. Repeat the layering process. Add more wafers, bananas, and pudding until you run out of ingredients. Make sure to end with a layer of pudding on top. This creates a beautiful finish for your dessert. After you finish layering, cover the dish with plastic wrap. Place it in the refrigerator for at least 4 hours. For best results, let it chill overnight. This helps the layers meld and the pudding set properly. When you’re ready to serve, top your pudding with whipped cream. Add extra banana slices and a sprinkle of crushed vanilla wafers for a nice touch. Serve it in clear dishes to show off those lovely layers. Enjoy every spoonful of this banana pudding delight! For a detailed guide, refer to the Full Recipe. Stirring is key to making smooth pudding. You must stir constantly while cooking. This helps prevent lumps. If lumps form, use a whisk to break them up. You want a creamy texture that makes every bite delightful. Spices add depth to your pudding. A pinch of cinnamon or nutmeg can make a big difference. You can also add a splash of almond or coconut extract for a twist. Using fresh bananas is very important too. Ripe bananas are sweeter and more flavorful, which boosts the taste of your dessert. Use clear dishes to showcase your layers. This makes your pudding visually appealing. You can also garnish it for extra flair. Top with whipped cream, banana slices, or crushed vanilla wafers. These simple touches can elevate the look and make it irresistible. For a full guide on making this dish, check out the Full Recipe. {{image_2}} Want to make banana pudding even better? Try adding cocoa powder or chocolate wafers. The rich chocolate flavor pairs well with bananas. For a simple twist, mix in two tablespoons of cocoa powder with the dry ingredients. You can also layer chocolate wafers instead of vanilla wafers. This variation gives a fun and bold taste that chocolate lovers will enjoy. You can make a delicious vegan banana pudding too! Use plant-based milk like almond or coconut. Replace heavy cream with coconut cream for a creamy texture. For sweeteners, maple syrup or agave nectar works great. This version keeps all the flavor without dairy. It’s perfect for those who avoid animal products or want a lighter dessert. For a dramatic look, layer banana pudding in a trifle dish. Start with a layer of vanilla wafers, followed by banana slices and pudding. Repeat these layers until you fill the dish. Top it off with whipped cream and extra banana slices. This tall dessert looks stunning and tastes great. It’s perfect for parties or special occasions. For the full recipe, check out the Banana Bliss Pudding. To keep your banana pudding fresh, use airtight containers. Glass or plastic containers work well. Make sure to seal them tightly. This prevents air from getting in and keeps the pudding creamy. If you used individual cups, cover them with plastic wrap. This will keep the flavors locked in, so you enjoy every spoonful later. Banana pudding can stay good in the fridge for about 3 to 4 days. It’s best to eat it sooner rather than later. The bananas can brown, and the texture may change if it sits too long. If you notice any changes in smell or taste, it's best to toss it. Always check before you dig in! If you want to save banana pudding for later, you can freeze it. First, place the pudding in a freezer-safe container. Leave some space at the top, as it will expand when frozen. Cover it tightly with a lid or plastic wrap. To defrost, move it to the fridge for several hours or overnight. When ready to eat, stir gently to bring back its creamy texture. Just be aware that the bananas may not look as fresh after freezing, but the flavor will still be delightful! To thicken your banana pudding, adjust the cornstarch amount. Use an extra tablespoon if needed. Cook the mixture longer, stirring constantly, until it thickens nicely. This helps it set better. Remember, the pudding will continue to thicken as it cools. So, don't be afraid to let it cook a little more. Yes, you can! Try adding fruits like strawberries, blueberries, or peaches. They add a fun twist and different flavors. Just make sure to slice them thinly, like you do with bananas. This keeps the layers nice and even. You can mix and match to find your favorite blend of fruits. Serve banana pudding chilled for the best taste. It’s great straight from the fridge. Use clear dishes to show off those lovely layers. Top it with whipped cream, banana slices, and crushed vanilla wafers. This adds a nice crunch and looks beautiful. Enjoy every spoonful of this delightful treat! For more details, check the Full Recipe. We covered the key steps to make delicious banana pudding. Start with ripe bananas, vanilla wafers, and rich cream. You can sweeten it with sugar or brown sugar. Remember to whisk and cook your mixture until thick. Don’t forget to layer your pudding right! Try variations like chocolate or vegan options for fun. Store leftovers in the right containers and enjoy them within a week. With these tips, you can make a tasty treat everyone will love. Enjoy your banana pudding adventure!

Best Banana Pudding Delight to Savor Every Spoonful

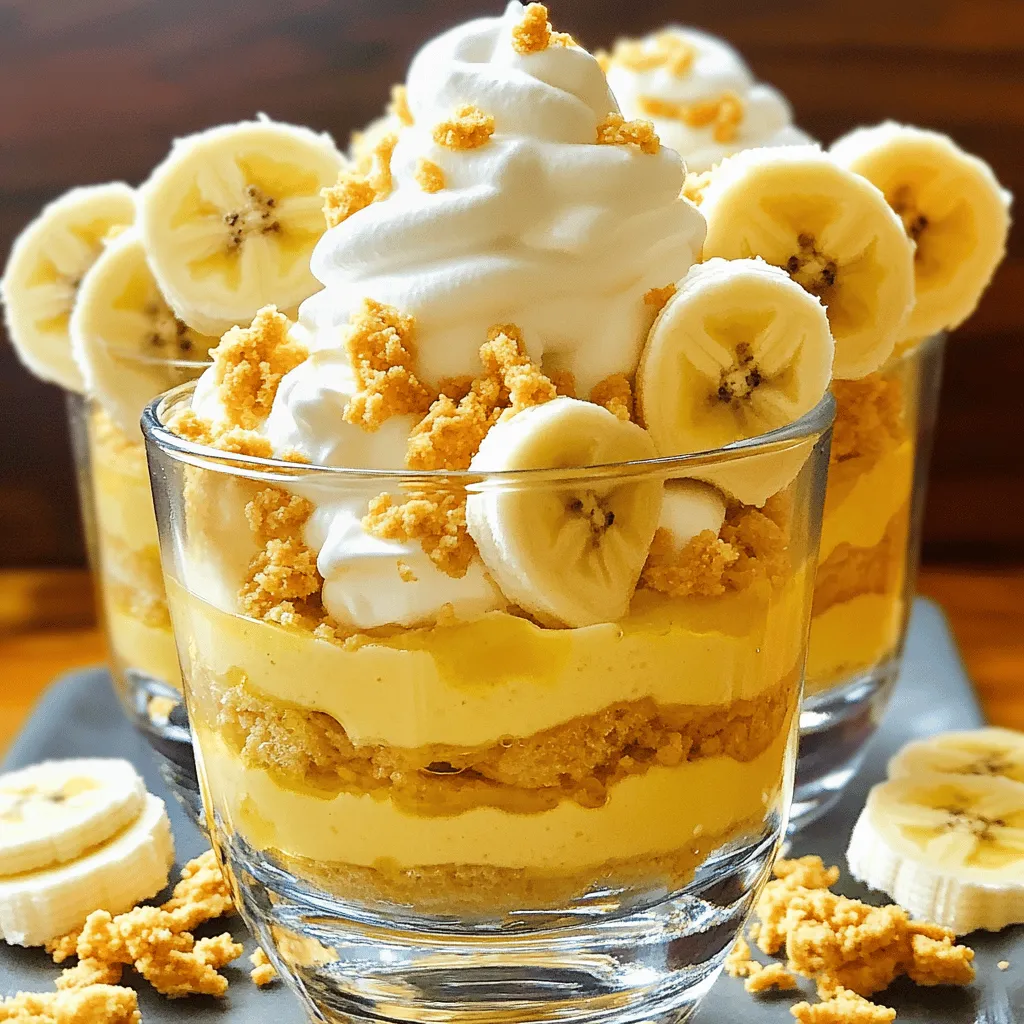
Are you ready to indulge in the ultimate comfort food? This Best Banana Pudding Delight to Savor Every Spoonful is

Older posts
Newer posts
← Previous Page1 … Page119 Page120 Page121 … Page132 Next →

dsad

© 2025 pureeatsnow • Built with GeneratePress

Our Policies

  • Copyright Policy
  • Cookie Policy
  • GDPR Policy
  • Privacy Policy
  • Disclaimer
  • Terms Of Use

More Information

  • Home
  • About
  • Contact
  • Appetizers
  • Dessert
  • Dinner
  • Drinks
©2025, pureeatsnow About Back To Top