Skip to content
DisclaimerTerms Of UseGDPR PolicyCookie Policy

pureeatsnow

  • Home
  • Drinks
  • Appetizers
  • Dinner
  • Dessert
  • About
  • Contact
  • Privacy Policy
DisclaimerTerms Of UseGDPR PolicyCookie Policy

Rachel

- 1 cup snap peas, trimmed - 1 cup asparagus, cut into 2-inch pieces - 1 bell pepper (red or yellow), sliced - 1 cup carrots, julienned - 1 zucchini, sliced into half-moons

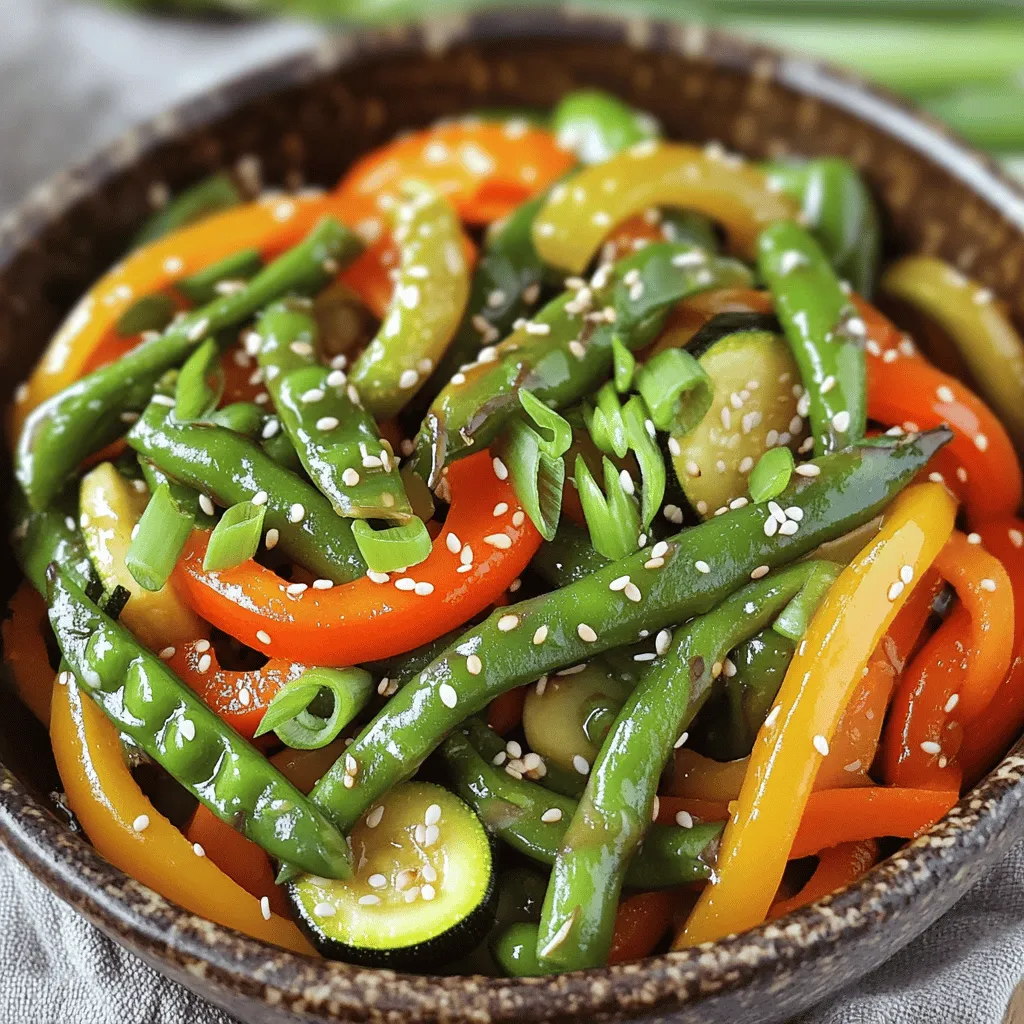
Spring Vegetable Stir-Fry Flavorful and Healthy Meal

Spring is the perfect time to enjoy fresh veggies, and nothing showcases them like a vibrant vegetable stir-fry! I’ve crafted

For this Easy Italian Baked Chicken, we need a few key items: - 4 boneless, skinless chicken breasts - 1 cup marinara sauce (store-bought or homemade) - 1 cup shredded mozzarella cheese - 1/2 cup grated Parmesan cheese

Easy Italian Baked Chicken Delicious and Simple Meal

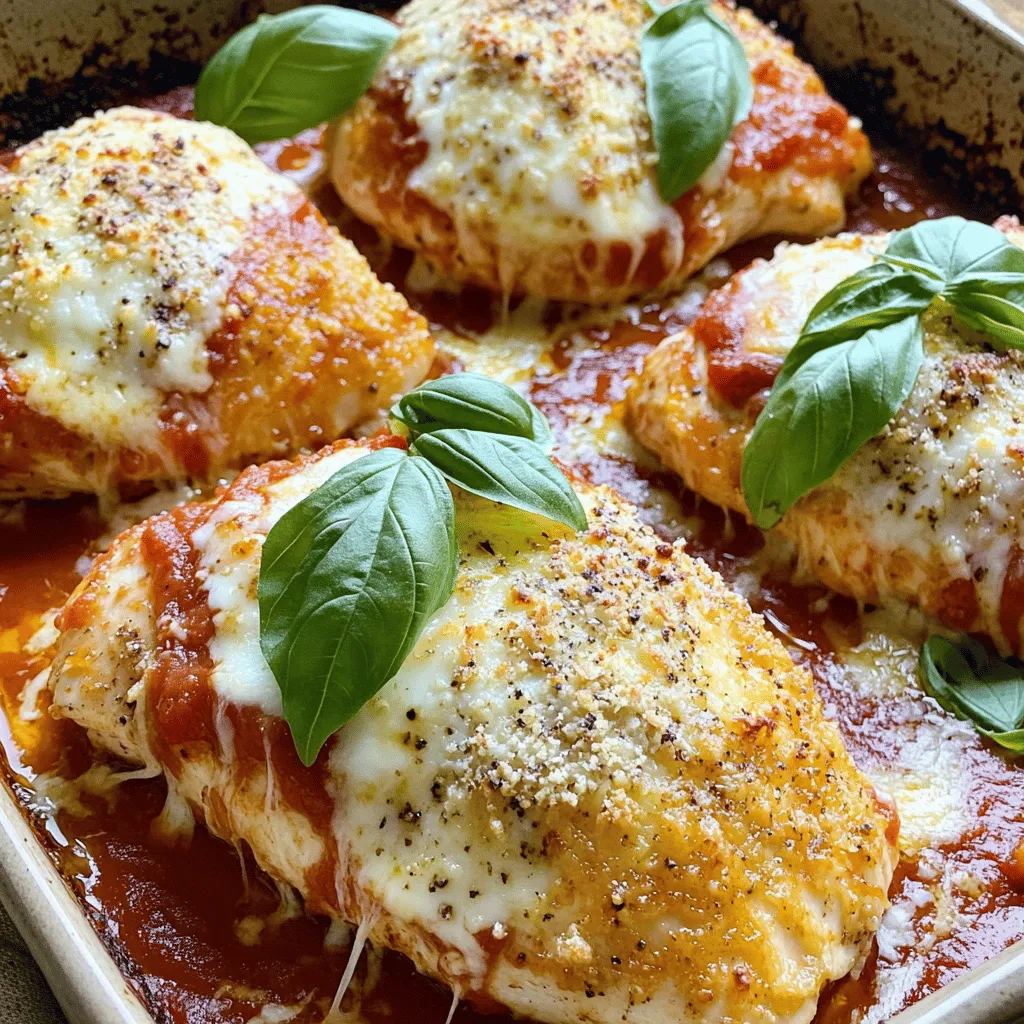
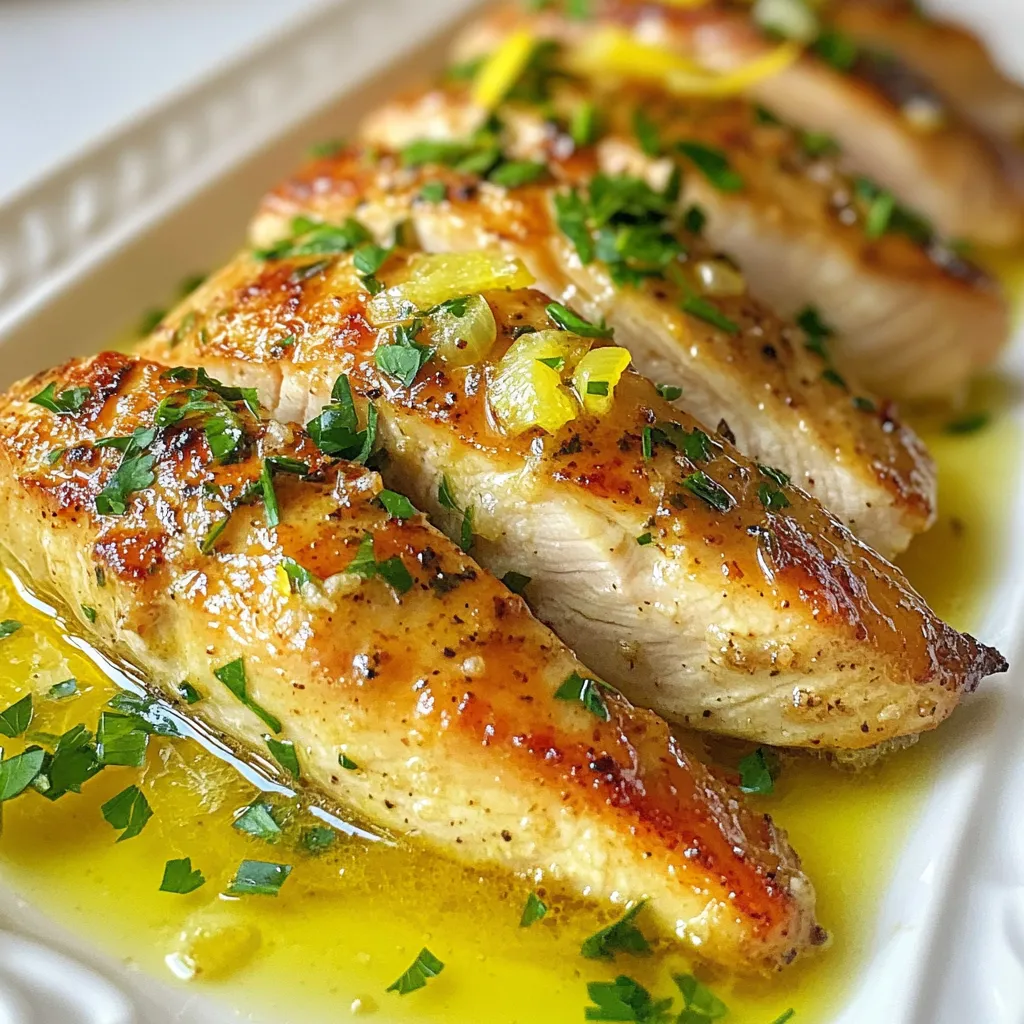
Are you ready to create a tasty meal that’s easy and delightful? My Easy Italian Baked Chicken is the answer!

- 300g udon noodles - 4 tablespoons chili oil - 2 cloves garlic, minced - 1-inch piece ginger, grated

Chili Oil Udon Noodles Savory and Simple Recipe

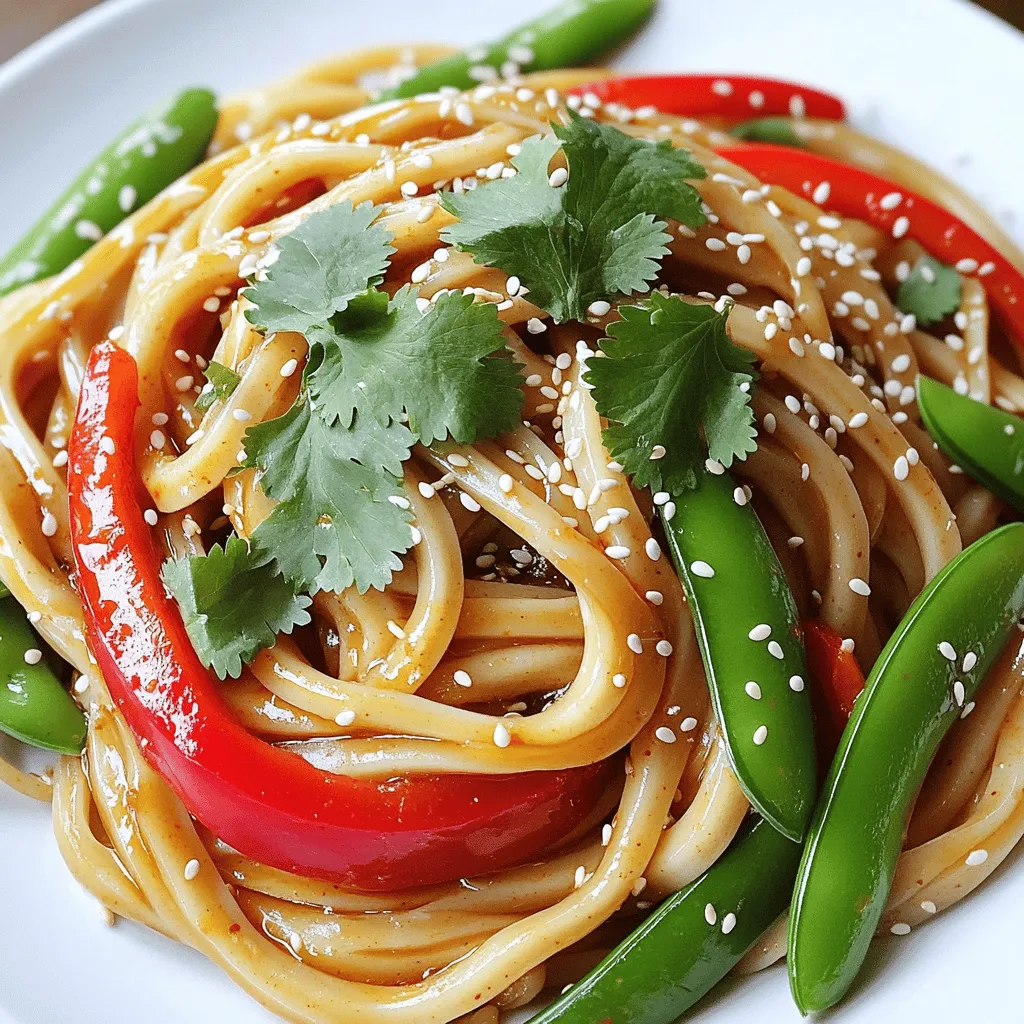
Craving a dish that’s both tasty and easy to make? Try my Chili Oil Udon Noodles! This simple recipe combines

- Pre-baked pie crust options: I recommend using a 9-inch pie crust. You can choose a store-bought crust for ease or make your own for a fresh touch.

Coconut Cream Pie Delightful and Simple Recipe

Coconut Cream Pie is a classic dessert that feels like a tropical vacation on your plate. In this blog, I’ll

- 4 chicken thighs and drumsticks (bone-in, skin-on) - 1 cup buttermilk and optional hot sauce - 1 ½ cups all-purpose flour with spices

Crispy Fried Chicken Delightful Flavor in Every Bite

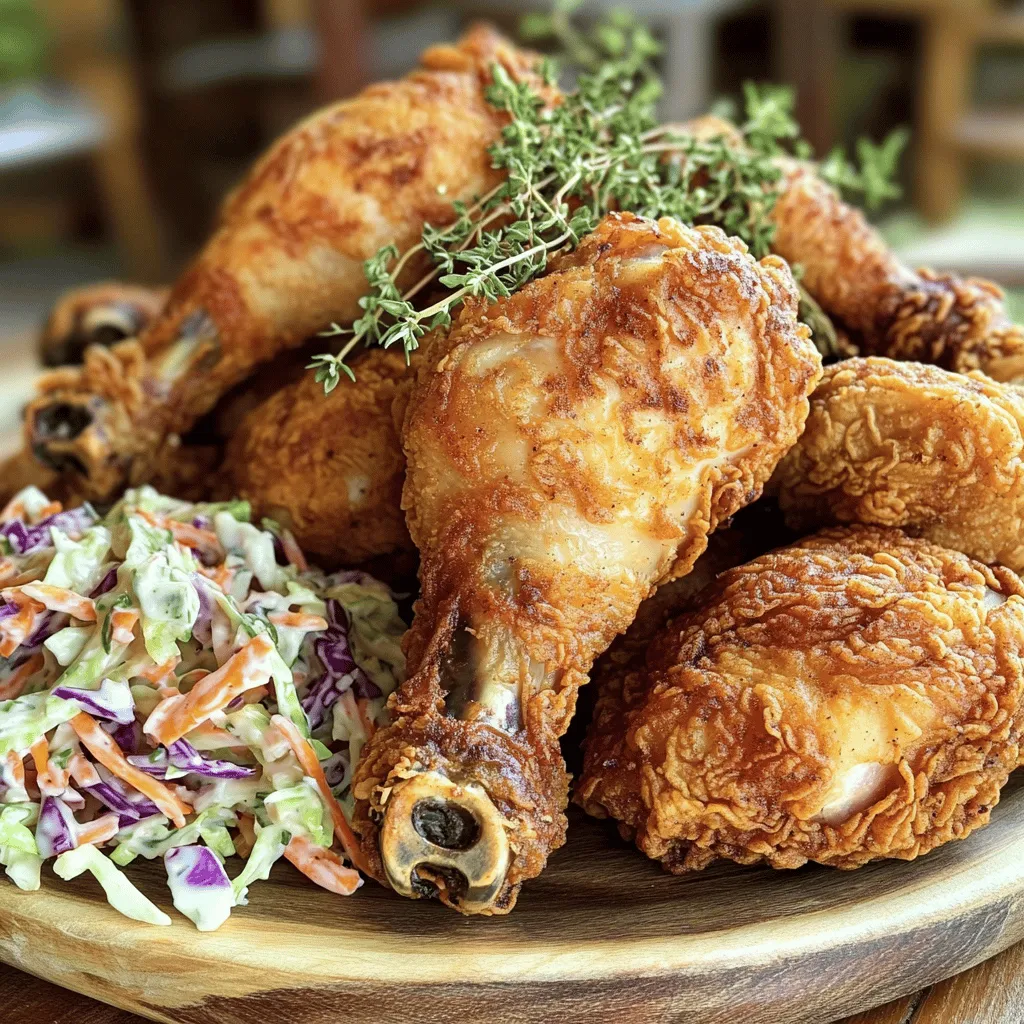
Do you crave crispy fried chicken that bursts with flavor? You’ve come to the right place! In this guide, I’ll

To make Tangy Lemon Garlic Roasted Carrots, gather the following simple ingredients:

Tangy Lemon Garlic Roasted Carrots Flavorful Side Dish

Looking for a vibrant and simple side dish? Tangy Lemon Garlic Roasted Carrots deliver fresh flavors and bright colors to

- 4 boneless, skinless chicken breasts - 1 can (15 oz) black beans, rinsed and drained - 1 can (15 oz) corn, drained - 1 can (10 oz) diced tomatoes with green chilies - 1 red bell pepper, diced - 1 yellow onion, chopped - 2 cloves garlic, minced - 1 tablespoon ground cumin - 1 tablespoon chili powder - 1 teaspoon smoked paprika - Salt and pepper to taste - Juice of 1 lime - Fresh cilantro, chopped (for garnish) - Optional toppings: sliced avocados, sour cream, and shredded cheese

Crockpot Mexican Chicken Flavorful and Simple Recipe

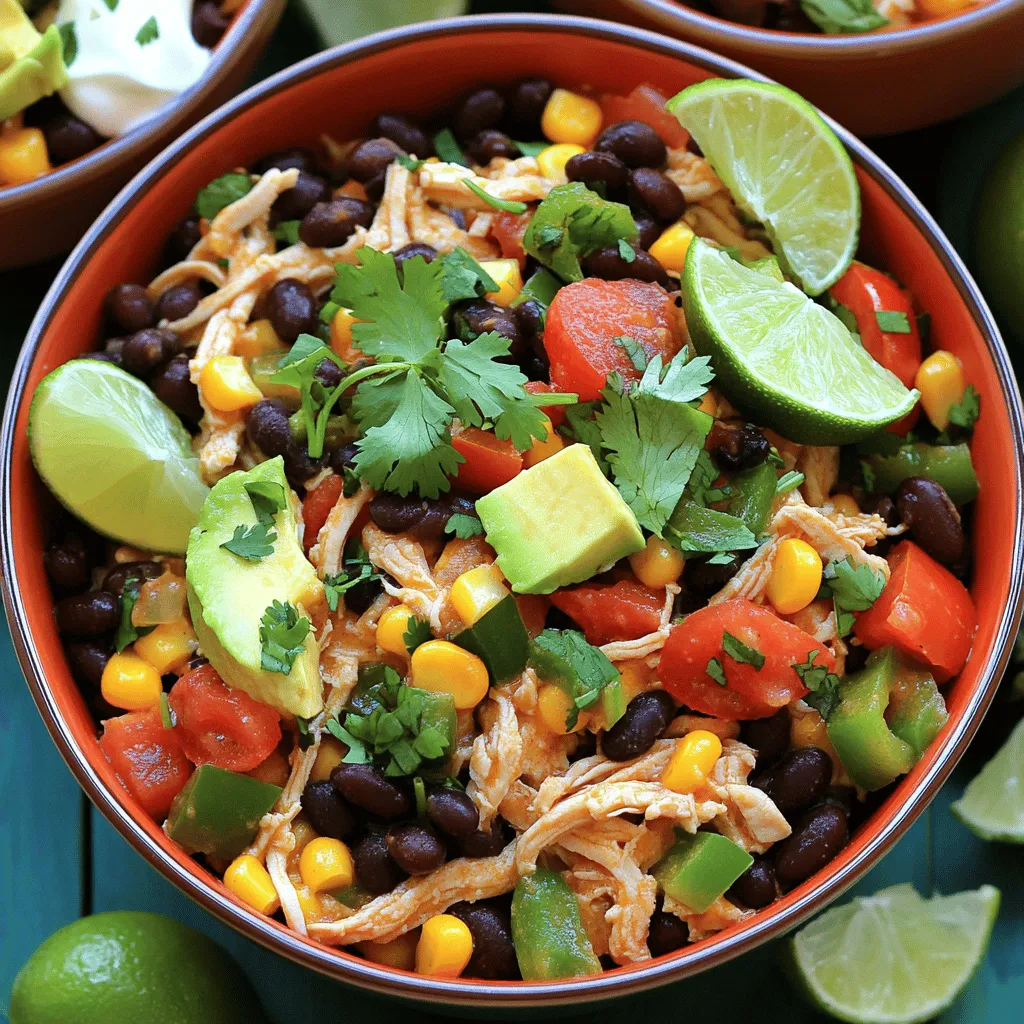
Are you looking for a simple yet flavorful meal? My Crockpot Mexican Chicken recipe is the answer! With tender chicken

- 3 cups frozen hash browns, thawed - 6 large eggs - 1 cup whole milk - 1 cup fresh spinach, chopped - 1 cup cherry tomatoes, halved

Spring Hash Brown Crust Quiche Delightful and Simple

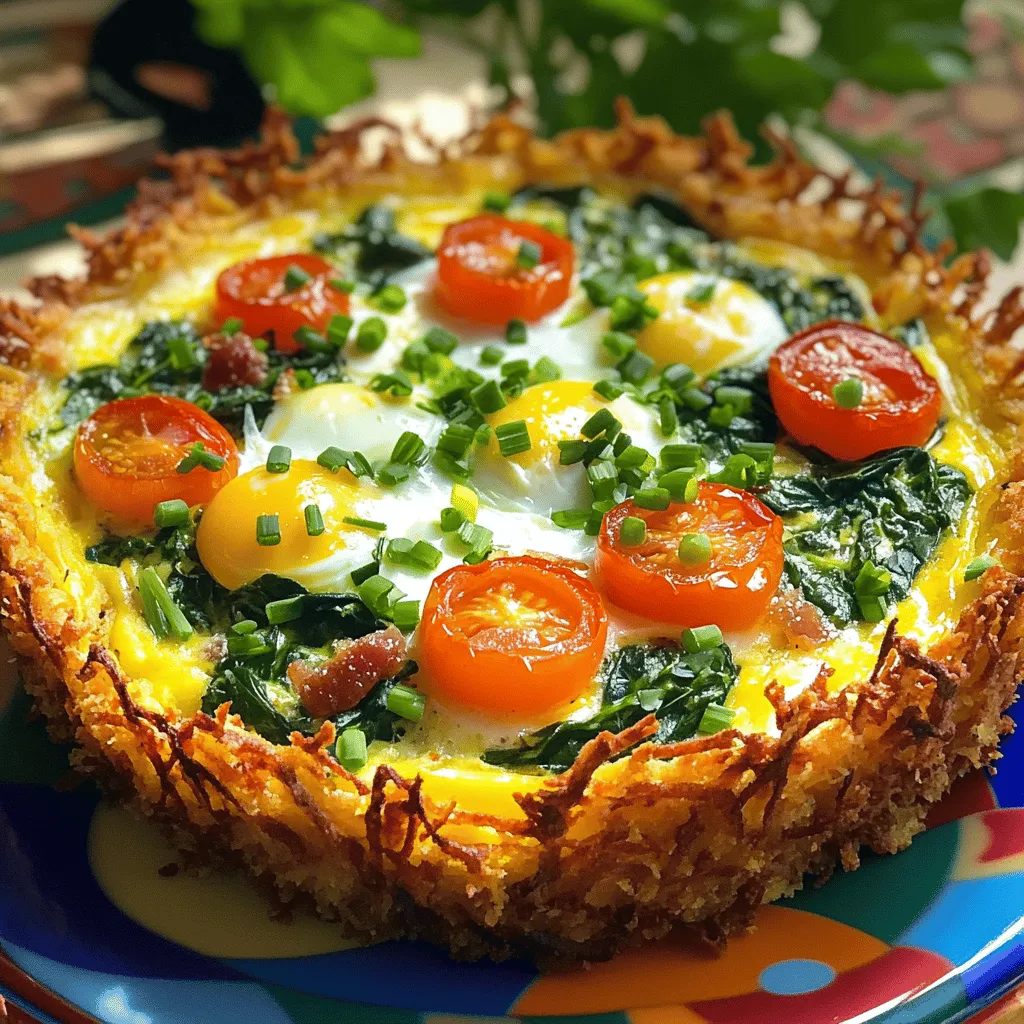
Looking for an easy yet tasty dish to brighten your spring days? This Spring Hash Brown Crust Quiche is your

To make the garlic butter turkey tenderloin, gather these items: - 2 turkey tenderloins (about 1.5 lbs total) - 4 tablespoons unsalted butter - 4 cloves garlic, minced - 1 teaspoon dried thyme - 1 teaspoon dried rosemary - Salt and pepper to taste - Zest of 1 lemon - Juice of 1 lemon - Fresh parsley for garnish If you lack any ingredients, here are some swaps: - Use olive oil instead of butter for a lighter option. - Fresh herbs like thyme and rosemary can replace dried ones if you have them. - Lemon juice can be swapped with vinegar for a different tang. You will need some basic tools: - An oven-safe skillet to cook and bake the turkey. - A meat thermometer to check the doneness. - A cutting board and knife for slicing the tenderloins. - Paper towels for drying the turkey before seasoning. These tools will help you create a delicious and juicy meal. Enjoy the cooking process and feel free to experiment! {{ingredient_image_1}} First, gather all your ingredients. You will need two turkey tenderloins, butter, garlic, herbs, salt, and pepper. Start by preheating your oven to 375°F (190°C). This step ensures even cooking. Next, pat the turkey tenderloins dry with paper towels. This helps them brown nicely. Then, season both sides with salt and pepper. Use enough to enhance the flavor. In an oven-safe skillet, melt two tablespoons of butter over medium heat. Once the butter is melted, add the minced garlic. Sauté it for about one minute until it smells great. This is key for rich flavor. Carefully place the turkey tenderloins in the skillet. Sear them for two to three minutes on each side until golden brown. This forms a lovely crust. After searing, sprinkle dried thyme and rosemary over the turkey. These herbs add depth and aroma. Drizzle the lemon juice over the tenderloins, then add the remaining butter. The butter will melt and create a sauce. Next, transfer the skillet to your preheated oven. Bake for 20 to 25 minutes. The turkey needs to reach an internal temperature of 165°F (75°C). This step ensures your meal is safe to eat. Once done, remove the skillet from the oven. Let the tenderloins rest for about five minutes. Resting helps the juices settle. Slice the tenderloins into thick pieces for serving. Drizzle the pan juices over the sliced turkey. This adds flavor and keeps it moist. Finally, garnish with freshly chopped parsley. This adds a pop of color and freshness. Your garlic butter turkey tenderloin is now ready to impress! To keep your turkey tenderloin juicy, start by patting it dry. This helps the seasoning stick better. Use salt and pepper to season each side well. When searing, keep an eye on the time. Sear each side for 2-3 minutes until golden brown. This locks in moisture and flavor. After searing, bake in the oven at 375°F. This gentle heat cooks the turkey through without drying it out. Always check the internal temperature. It should reach 165°F for safe eating. You can enhance the flavor of your turkey with simple herbs. I love using dried thyme and rosemary for a classic taste. These herbs pair well with the garlic and lemon. The lemon zest adds a bright touch, making each bite refreshing. Don't forget to drizzle lemon juice over the turkey before baking. It adds moisture and tang. Feel free to experiment with other herbs too. Try sage or oregano for a different twist! Searing is key for great flavor. Use an oven-safe skillet for easy transfer to the oven. Melt butter over medium heat to get it hot but not smoking. Add minced garlic right after the butter melts. This will create a fragrant base. Once your garlic is fragrant, add the turkey tenderloins. Make sure not to overcrowd the pan; this helps them brown evenly. Use tongs to flip them carefully. This way, you won’t lose any juices. If they stick to the pan, give them a bit more time. They’ll release once seared well. Pro Tips Resting Time: Let the turkey tenderloins rest for at least 5 minutes after removing them from the oven. This helps the juices redistribute, making the meat more tender and flavorful. Use a Meat Thermometer: To ensure your turkey is cooked perfectly, use a meat thermometer. The internal temperature should reach 165°F (75°C) for safe consumption. Flavor Variations: Feel free to experiment with different herbs and spices. Adding a pinch of paprika or swapping thyme for oregano can give your turkey a unique twist. Pan Sauce: Don't forget to make use of the pan juices! After removing the turkey, you can add a splash of white wine or broth to the skillet and scrape up the browned bits for an easy, delicious sauce. {{image_2}} You can change the flavor of garlic butter turkey tenderloin easily. Here are some ideas: - Herb Mix: Try different herbs like oregano or basil. They add a nice twist. - Spicy Kick: Add a pinch of red pepper flakes for heat. It gives a bold flavor. - Citrus Twist: Use orange zest instead of lemon. It adds a sweet and tangy touch. - Sweet and Savory: Mix in a tablespoon of honey. It balances the garlic well. These options let you create a dish that matches your taste. Experimenting with flavors makes cooking fun. Choosing the right side dishes enhances your meal. Here are some great pairings: - Roasted Vegetables: Carrots, broccoli, and bell peppers work well. Roast them with olive oil and salt. - Mashed Potatoes: Creamy, buttery mashed potatoes add comfort. They pair perfectly with turkey. - Quinoa Salad: A fresh salad with quinoa, cucumbers, and tomatoes keeps it light and healthy. - Steamed Rice: White or brown rice soaks up the tasty pan juices. It makes every bite better. These sides complement the garlic butter flavor of the turkey. You can adjust this turkey recipe for special diets. Here are some tips: - Gluten-Free: This recipe is naturally gluten-free. Just check your butter and seasoning for any hidden gluten. - Dairy-Free: Use coconut oil or olive oil instead of butter. It keeps the dish flavorful without dairy. - Low-Carb: Serve the turkey with leafy greens or cauliflower rice. This keeps the meal low in carbs. - Paleo-Friendly: Stick to the turkey, herbs, and healthy fats. Avoid grains and legumes for a clean meal. These adjustments allow everyone to enjoy this dish. Cooking for different needs can be easy and tasty. To keep your garlic butter turkey tenderloin fresh, store it in an airtight container. Make sure to let the turkey cool to room temperature before sealing it. This step helps reduce moisture and keeps it safe. You can store it in the fridge for up to four days. If you want to enjoy it later, freezing is a great option. When it’s time to reheat your turkey, keep it moist. The best way is to use the oven. Preheat it to 350°F (175°C). Place the turkey in a baking dish and add a splash of chicken broth or water. Cover the dish with foil to lock in moisture. Heat for about 15-20 minutes or until it’s hot throughout. You can also use a microwave; just cover the turkey with a damp paper towel to keep it juicy. If you want to freeze your garlic butter turkey tenderloin, slice it first. This makes it easier to thaw and reheat later. Wrap each piece tightly in plastic wrap, then place it in a freezer bag. Remove as much air as possible. You can freeze it for up to three months. To thaw, move it to the fridge the night before you plan to eat it. Always make sure it’s fully cooked when you reheat it. It takes about 20 to 25 minutes to cook turkey tenderloin in the oven. Start by preheating your oven to 375°F (190°C). After searing the tenderloin for 2-3 minutes on each side, place it in the oven. Ensure the internal temperature reaches 165°F (75°C) for safe eating. Use a meat thermometer to check the temperature. This way, your turkey will be juicy and full of flavor. Yes, you can use frozen turkey tenderloin. Just make sure to thaw it completely before cooking. Thawing in the fridge overnight works best. You can also use the microwave for a quick thaw. However, avoid cooking it straight from frozen, as it will cook unevenly. Always check the internal temperature to ensure it is fully cooked. Garlic butter turkey tenderloin pairs well with many sides. Here are some ideas: - Steamed green beans - Roasted potatoes - Garlic mashed potatoes - A fresh garden salad - Quinoa or rice These sides will complement the rich flavors of the tenderloin. They also add color and texture to your meal. Feel free to mix and match based on your taste! In this post, we covered turkey tenderloin from start to finish. We detailed each ingredient, with substitutions and tools needed. The step-by-step guide helped with preparation and cooking methods. You learned tips for juicy results, seasoning combinations, and cooking techniques. We explored flavor variations, side dish pairings, and storage tips. Use these insights to create a delicious meal. With the right approach, your turkey tenderloin will impress everyone at the table. Enjoy your cooking journey!

Garlic Butter Turkey Tenderloin Juicy and Flavorful Meal

Looking for a juicy and flavorful meal? You’ve come to the right place! In this blog, I’ll show you how

- 1 pound sirloin steak, cut into 1-inch cubes - 8 ounces cremini mushrooms, sliced - 4 tablespoons unsalted butter - 4 cloves garlic, minced - 1 teaspoon fresh thyme leaves (or ½ teaspoon dried thyme) - 1 teaspoon fresh parsley, chopped (plus more for garnish) - 1 tablespoon olive oil - Lemon wedges, for serving - Salt and pepper to taste When I cook Garlic Butter Mushroom Steak Bites, I love using fresh ingredients. The sirloin steak gives the dish a rich flavor. I cut it into 1-inch cubes for even cooking. Cremini mushrooms add an earthy taste, which pairs perfectly with the steak. Unsalted butter is key for this dish. It melts beautifully and enhances the flavors of garlic and herbs. Speaking of garlic, I use four cloves, minced finely. Garlic brings a wonderful aroma and depth to the dish. For seasoning, I like to add thyme and parsley. Fresh thyme adds a hint of sweetness. Parsley not only brightens the dish but also adds color. I always sprinkle extra parsley on top for garnish. Don't forget about the olive oil! It helps sear the steak and mushrooms. Lemon wedges add a zesty touch at the end. Finally, I season everything with salt and pepper to bring out the best flavors. Gather these ingredients, and you're ready to create a quick and tasty meal! {{ingredient_image_1}} To start, you need to season the steak. Take your sirloin steak cubes and sprinkle salt and pepper on all sides. This step is key in enhancing the flavor of the meat. Next, prepare your skillet. Grab a large skillet and heat up olive oil over medium-high heat. This oil will help to sear the steak bites perfectly. Now it's time to sear the steak bites. Add the seasoned steak cubes to the hot skillet in a single layer. Cook them for about 2-3 minutes on each side. This gives you a nice medium-rare steak. If you prefer it cooked more, just leave it a bit longer. Once done, take the steak out and set it aside. Then, sauté the mushrooms and garlic. In the same skillet, toss in the sliced cremini mushrooms. Cook them for about 4-5 minutes, stirring until they turn golden brown. They will also release moisture, which adds flavor. After that, push the mushrooms to one side of the skillet. Add the butter and minced garlic to the empty side. Let the garlic cook for about 30 seconds until it smells amazing. Then mix it with the mushrooms. Now, combine the steak with the mushrooms. Add the cooked steak bites back into the skillet. Stir everything together and cook for another 1-2 minutes. This will warm the steak through and blend the flavors. Lastly, adjust the seasoning. Taste your dish and add more salt or pepper if needed. This step ensures that each bite is full of flavor. Enjoy your meal! To get the steak just right, start with the right heat. Use medium-high heat when you sear the steak bites. Cook them for about 2-3 minutes on each side. This gives a nice brown crust. For medium-rare steak, aim for an internal temp of 130°F. Use a meat thermometer to check. For the garlic flavor, don't cook minced garlic too long. Just 30 seconds is enough to release its aroma. Add it to the skillet after the mushrooms have sautéed. This way, it won't burn and will stay sweet. Serve your garlic butter mushroom steak bites on a wooden board. It adds a rustic touch that looks inviting. You can also use a decorative platter for a more formal look. For garnishing, sprinkle extra chopped parsley on top. It adds color and freshness. Serve lemon wedges on the side. A squeeze of lemon adds a nice zing. Avoid overcooking the steak. It can turn tough and dry. Stick to the cooking times mentioned. Always check the internal temperature to ensure it’s just right. Another mistake is under-seasoning. Don’t skip the salt and pepper. Season the steak cubes well before cooking. Taste the mix at the end and adjust with more salt or pepper if needed. This step makes all the difference! Pro Tips Choose Quality Steak: Opt for a well-marbled sirloin steak for the juiciest and most flavorful bites. Perfect Searing: Ensure your skillet is hot before adding the steak. This helps achieve a beautiful crust. Don't Overcrowd the Pan: Cook the steak in batches if necessary to avoid steaming and to get that perfect sear. Enhance Flavor with Fresh Herbs: Use fresh thyme and parsley to elevate the dish's flavor profile and add a pop of color. {{image_2}} You can change the cut of steak for this recipe. While sirloin is great, you can use ribeye or flank steak. Both options add a nice flavor. Just make sure to cut them into similar-sized cubes. For mushrooms, cremini works well, but you can also try button or shiitake mushrooms. Each type brings its own taste and texture. Experiment to find your favorite! Adding spices makes the dish pop. You can try a pinch of paprika or a dash of cayenne for heat. Fresh herbs like rosemary or oregano can also work well. They add depth and a fresh taste. You might want to toss in some veggies too. Bell peppers or spinach can bring color and nutrition. Sauté them along with the mushrooms for a tasty twist. Pair these steak bites with sides for a complete meal. A simple salad or roasted vegetables complements the dish nicely. You could also serve it with garlic bread for a hearty touch. If you want something more filling, try serving over grains or pasta. Quinoa or rice absorb the garlic butter sauce beautifully. This adds a satisfying base to your meal. To keep your garlic butter mushroom steak bites fresh, store them in the fridge. First, let them cool down to room temperature. Then, place them in an airtight container. This will help prevent moisture loss and keep the flavors intact. Use glass or plastic containers that seal tightly. This will keep them safe for up to three days. When reheating, you have a few options. You can use the oven or a skillet. For the oven, preheat it to 350°F (175°C). Place the steak bites on a baking sheet and cover with foil. Heat for about 10-15 minutes. If you prefer a skillet, heat it over medium heat. Add a splash of olive oil and sauté the steak bites for about 5 minutes. This method helps keep them crispy and juicy. You can also microwave them if you’re in a hurry. Place the steak bites in a microwave-safe dish. Cover it with a lid or microwave-safe wrap. Heat on medium power for 1-2 minutes, stirring halfway through. This method is quick but can make the steak a bit chewy. If you want to freeze your steak bites, it’s easy! First, let them cool completely. Then, place them in a freezer-safe bag or container. Remove as much air as possible to prevent freezer burn. They can last up to three months in the freezer. When you're ready to eat, thaw them in the fridge overnight. If you're short on time, you can thaw them in cold water for a quicker option. Just remember not to refreeze them after thawing to keep them safe and tasty. The best steak for steak bites is sirloin. Sirloin is tender and flavorful. It cooks well in small pieces. You can also use ribeye or tenderloin. These cuts give a nice taste. Choose a cut that fits your budget and taste. Yes, you can use dried herbs instead of fresh. Just use less dried herbs. A good rule is to use one-third the amount. For example, if the recipe calls for one teaspoon of fresh thyme, use about one-third teaspoon of dried thyme. Dried herbs have a stronger flavor, so be careful. To check if your steak is medium-rare, use a meat thermometer. The internal temperature should be 130°F to 135°F. If you don’t have a thermometer, you can use the touch test. Press the steak with your finger. It should feel like the space between your thumb and index finger when relaxed. This helps you cook the steak just right. This blog post covered how to make delicious steak bites with mushrooms. We explored key ingredients, step-by-step cooking, tips for perfect results, and fun variations. Remember to avoid common mistakes like overcooking and not seasoning well. You can customize flavors and enhance your dish by adding different herbs or sides. Enjoy the process and feel free to experiment. With practice, you’ll master this tasty meal. Start cooking and impress yourself and others!

Garlic Butter Mushroom Steak Bites Quick and Tasty Meal

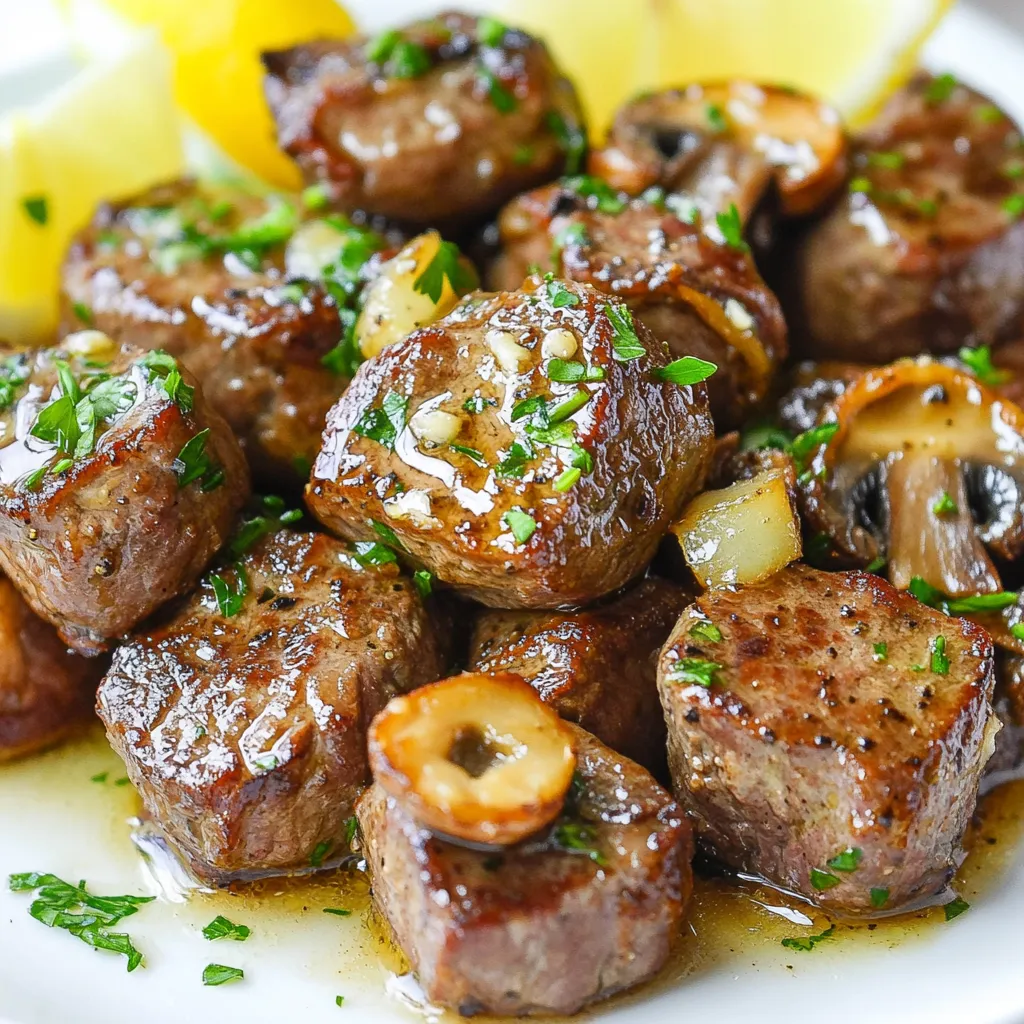
Looking for a quick and tasty meal? You’re in the right place! Garlic Butter Mushroom Steak Bites are ready in

Older posts
Newer posts
← Previous Page1 … Page122 Page123 Page124 … Page132 Next →

dsad

© 2025 pureeatsnow • Built with GeneratePress

Our Policies

  • Copyright Policy
  • Cookie Policy
  • GDPR Policy
  • Privacy Policy
  • Disclaimer
  • Terms Of Use

More Information

  • Home
  • About
  • Contact
  • Appetizers
  • Dessert
  • Dinner
  • Drinks
©2025, pureeatsnow About Back To Top