Skip to content
DisclaimerTerms Of UseGDPR PolicyCookie Policy

pureeatsnow

  • Home
  • Drinks
  • Appetizers
  • Dinner
  • Dessert
  • About
  • Contact
  • Privacy Policy
DisclaimerTerms Of UseGDPR PolicyCookie Policy

Rachel

- 4 medium zucchini (zoodles) - 2 tablespoons olive oil - 4 cloves garlic, minced - 1 cup heavy cream - 1 cup freshly grated Parmesan cheese Zucchini forms the base of the dish. You spiralize it into zoodles, which add a fun twist. Olive oil adds flavor while helping to cook the garlic. Fresh minced garlic gives the dish its rich taste. Heavy cream makes the sauce creamy and smooth. Lastly, freshly grated Parmesan cheese brings a salty, savory touch. - 1/2 teaspoon salt - 1/4 teaspoon black pepper - 1/4 teaspoon red pepper flakes (optional) - Fresh parsley, chopped (for garnish) Salt and black pepper enhance the overall flavor. Red pepper flakes add a bit of heat if you want a spicy kick. Fresh parsley not only brightens the dish but also adds a pop of color. These seasonings and garnishes elevate the creamy garlic Parmesan zoodles, making them more appealing and delicious. {{ingredient_image_1}} To start, spiralize the zucchini into zoodles. You can use a spiralizer or a julienne peeler. Aim for long, thin strands for the best texture. After spiralizing, lay the zoodles on a paper towel. This helps absorb excess moisture. Zucchini has a high water content. Removing this moisture keeps your dish from getting soggy. Next, heat the olive oil in a large skillet over medium heat. Once hot, add the minced garlic. Sauté the garlic for about one minute. You want it to smell great but not burn. After the garlic is fragrant, pour in the heavy cream. Let it come to a gentle simmer. Stir it often. This helps the cream thicken, which takes about three to four minutes. Now, it’s time to make it creamy! Gradually stir in the grated Parmesan cheese. Mix it well until the cheese melts completely. This creates a smooth sauce. Season the sauce with salt, black pepper, and red pepper flakes if you like some heat. Add the zoodles to the sauce and toss them well. Cook them for an additional two to three minutes. You want them tender but still crunchy. Finally, remove the skillet from heat. Serve the zoodles hot, garnished with fresh parsley for a pop of color. Enjoy your delicious, creamy garlic Parmesan zoodles! To avoid overcooked zoodles, cook them briefly. They only need 2-3 minutes in the sauce. Check for a gentle crunch. This keeps them fresh and tasty. To perfect the garlic flavor, sauté it for just one minute. Watch it closely. Burnt garlic tastes bitter. Fresh garlic adds a bright touch to your dish. Choosing the right zucchini is key. Look for firm, shiny zucchini. Avoid soft or wrinkled ones. Medium-sized ones work best for zoodles. If you need alternatives for heavy cream, try coconut cream or cashew cream. Both add richness without dairy. You can also use half-and-half for a lighter option. Pro Tips Choose Firm Zucchini: Look for zucchini that are firm and free of blemishes to ensure your zoodles have the best texture. Don’t Skip the Salt: Salting the zoodles before cooking helps to draw out excess moisture and keep them from becoming soggy. Fresh Garlic for Flavor: Use fresh garlic instead of pre-minced for a more intense and aromatic flavor in your sauce. Adjust Cream for Thickness: If you prefer a thicker sauce, let it simmer a bit longer before adding the zoodles for a creamier consistency. {{image_2}} You can switch up the cheese in this recipe. Try using mozzarella for a milder taste. Feta adds a nice tang, too. If you’re a cheddar fan, give that a go for a sharper flavor. Want to add some protein? Chicken or shrimp work great in this dish. Cook them in the skillet before adding the garlic. This way, they soak up all those tasty flavors. Just make sure they are cooked through before you mix in the zoodles. To take your zoodles up a notch, add herbs and spices. Fresh basil or oregano gives a bright taste. You can also try thyme or dill for something different. A pinch of nutmeg adds warmth and depth, too. If you're looking for a vegan version, swap the heavy cream for coconut milk. Nutritional yeast can replace the Parmesan cheese. This keeps the dish creamy and adds a cheesy flavor without any dairy. You won't miss the cheese at all! To keep your creamy garlic Parmesan zoodles fresh, follow these simple steps: - Place leftovers in an airtight container. - Store in the fridge for up to three days. - Keep the sauce separate if possible. This helps zoodles stay firm. If you want to freeze zoodles, here’s how: - Blanch zoodles in boiling water for two minutes. - Cool them quickly in ice water. - Drain and pack zoodles in freezer bags. Remove air to prevent freezer burn. - Freeze for up to three months. When it’s time to eat your leftovers, you can reheat them easily: - Use a skillet over low heat. Add a splash of olive oil to keep them moist. - Stir gently to avoid breaking the zoodles. - You can also microwave in short bursts. Stir in between to ensure even heating. To maintain texture and flavor, avoid overheating. Zoodles can become mushy if cooked too long. Enjoy your creamy dish again with these tips! Zoodles are noodles made from zucchini. To make them, you spiralize zucchini using a spiralizer or a julienne peeler. This gives you long, thin strands that look just like pasta. It’s a great way to enjoy veggies while keeping your meals light. Yes, you can prepare parts of this dish in advance. You can spiralize the zucchini and store it in the fridge for up to two days. However, I recommend making the sauce fresh when you are ready to serve. This keeps the flavors bright and the zoodles crisp. To avoid soggy zoodles, always absorb excess moisture after spiralizing. I place them on a paper towel to soak up water. Also, cook them just until tender. This keeps them from getting too soft and mushy. Absolutely! This recipe is great for meal prep. You can portion the sauce and zoodles separately. Store them in airtight containers in the fridge. When you're ready to eat, just combine and reheat for a quick meal. In this post, I shared a simple and tasty zoodle recipe. We covered the main ingredients, like zucchini and heavy cream, and how to make the sauce. I highlighted cooking tips to keep your zoodles firm and added variations for different flavors. Finally, I addressed common questions about zoodles and meal prep. Enjoy crafting your delicious zoodle meal. With these tips, you can impress anyone at your table. Happy cooking!

Creamy Garlic Parmesan Zoodles Quick and Easy Recipe

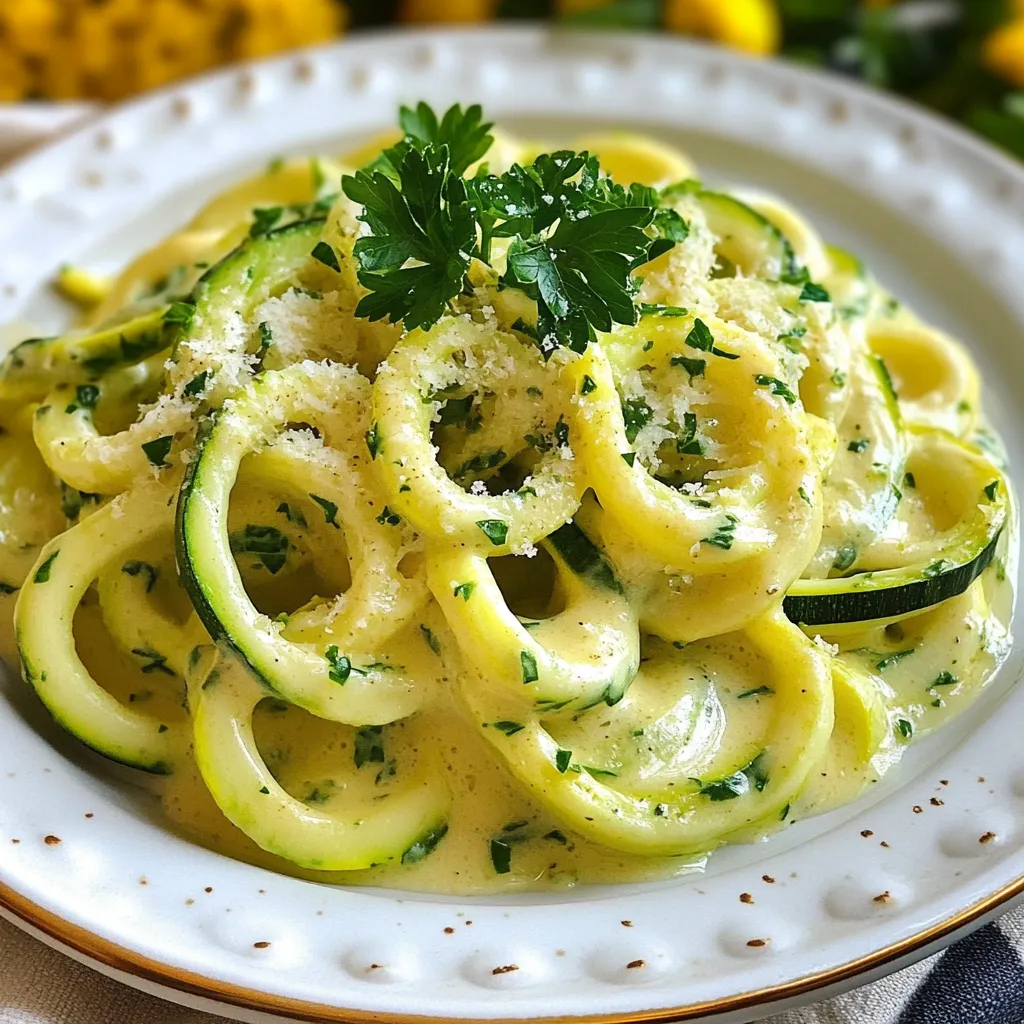
Craving a delicious, healthy meal that’s quick to whip up? You’re in the right place! My Creamy Garlic Parmesan Zoodles

- 1 cup rolled oats - 2 cups almond milk (or any milk of choice) - 2 tablespoons peanut butter - 2 tablespoons cocoa powder The main ingredients form the base of your overnight oats. Rolled oats are thick and chewy. Almond milk makes it creamy. Peanut butter gives a rich, nutty flavor. Cocoa powder adds a deep chocolate taste. - 2 tablespoons honey or maple syrup - 1 teaspoon vanilla extract - A pinch of salt For sweetness, choose honey or maple syrup. They balance the cocoa's bitterness. Vanilla extract adds a warm flavor. A pinch of salt enhances all the tastes. - Sliced banana - Chopped dark chocolate - Crushed peanuts Toppings make your oats fun and tasty. Sliced banana adds natural sweetness. Chopped dark chocolate gives a rich bite. Crushed peanuts add crunch and extra peanut flavor. You can mix and match toppings as you like! {{ingredient_image_1}} - In a medium bowl, combine the rolled oats, almond milk, peanut butter, cocoa powder, honey, vanilla extract, and salt. - Whisk until smooth and mixed. Make sure the peanut butter is well blended with the oats. - Divide the mixture evenly into two jars or airtight containers. - Seal the jars tightly and refrigerate overnight. This allows the oats to soak up the liquid and flavors. - In the morning, stir the oats well. If you want a creamier texture, add a splash of almond milk. - Top your oats with sliced banana, chopped dark chocolate, or crushed peanuts. These toppings add extra flavor and crunch. To get the right thickness, adjust the milk. If you want thicker oats, use less milk. For creamier oats, add more milk. Mix the ingredients well. Use a whisk to combine the oats, milk, and peanut butter. This helps everything blend nicely. You can change the nut butter if you like. Almond butter or cashew butter will work great too. You can also switch sweeteners. Try agave syrup or coconut sugar instead of honey or maple syrup. This gives you a new taste. Serve your oats in clear jars. This makes the layers look pretty. Add a drizzle of peanut butter on top for a nice touch. You can also sprinkle some chopped dark chocolate or crushed peanuts. This adds flavor and makes it more fun to eat. Pro Tips Use Overnight Oats Ratio: The ideal ratio of oats to liquid is typically 1:2. Adjust this based on your texture preference—more liquid for creamier oats! Experiment with Sweeteners: Try different sweeteners like agave syrup or stevia to customize the sweetness level to your liking. Layer Your Ingredients: For added visual appeal, layer your oats with toppings in the jar, creating a beautiful presentation. Make It a Meal Prep: Double the recipe and prep jars for the week. Quick, nutritious breakfasts are just a grab away! {{image_2}} You can change the taste of your overnight oats easily. Here are two fun ideas: - Chocolate Banana Overnight Oats: Add sliced bananas to the mix. This makes your oats even sweeter. The banana pairs well with chocolate and peanut butter. - Peanut Butter Cup Oats: Mix in some mini chocolate chips. This gives a nice crunch and extra chocolate flavor. It’s like eating a dessert for breakfast! You can also adjust this recipe to fit your needs: - Vegan options: Swap honey for maple syrup. This keeps the sweetness without using animal products. Almond milk is already a great choice for vegans. - Gluten-free alternatives: Ensure your oats are labeled gluten-free. This way, you can enjoy oats if you have gluten sensitivity. Toppings can change with the seasons, adding new flavors: - Fruits for different seasons: In spring, add strawberries. In summer, try peaches. In fall, diced apples with cinnamon taste great. Winter can call for pomegranate seeds. - Adding spices: Cinnamon or nutmeg can enhance the flavor. A little sprinkle can make your oats taste warm and cozy. To keep your chocolate peanut butter overnight oats fresh, store them in airtight containers. Glass jars work well and allow you to see the layers. Make sure to seal the jars tightly to keep out air and moisture. If you have leftovers, try to eat them within three days for the best taste. You can freeze your overnight oats for longer storage. Simply fill your jars, leaving some space at the top. This allows for expansion. Seal the jars well and place them in the freezer. When you’re ready to eat, move a jar to the fridge to thaw overnight. If you want a warm meal, you can microwave it after thawing. In the fridge, your oats will last for about four to five days. Check for signs of spoilage like an off smell or a change in texture. If you see or smell anything strange, it’s best to toss them out. Keeping your oats sealed tight will help them last longer. Yes, you can use quick oats. Quick oats cook faster and absorb liquid differently. They may give a mushier texture. Rolled oats stay chewier and have a heartier bite. If you want a creamy mix, quick oats work well. If you prefer texture, stick with rolled oats. To make these oats vegan, swap honey for maple syrup. Almond milk is already a great choice. Other plant-based milks, like oat or soy, work too. This way, you keep all the flavors without any animal products. Your oats will still taste yummy! Yes, you can make these oats for several days. Just store them in airtight containers. They last up to five days in the fridge. To keep them fresh, avoid adding toppings until you’re ready to eat. This keeps the oats from getting soggy. You can create delicious overnight oats with simple ingredients. The steps are easy, and you can make them your own with different flavors and toppings. Remember to store your oats properly to keep them fresh. This recipe is flexible for your dietary needs. Try adding seasonal fruits or other nut butters to keep things exciting. Enjoy the tasty rewards of your healthy choices and feel good about what you're eating. These oats are quick, fun, and nutritious—perfect for any time of day.

Chocolate Peanut Butter Overnight Oats Delicious Recipe

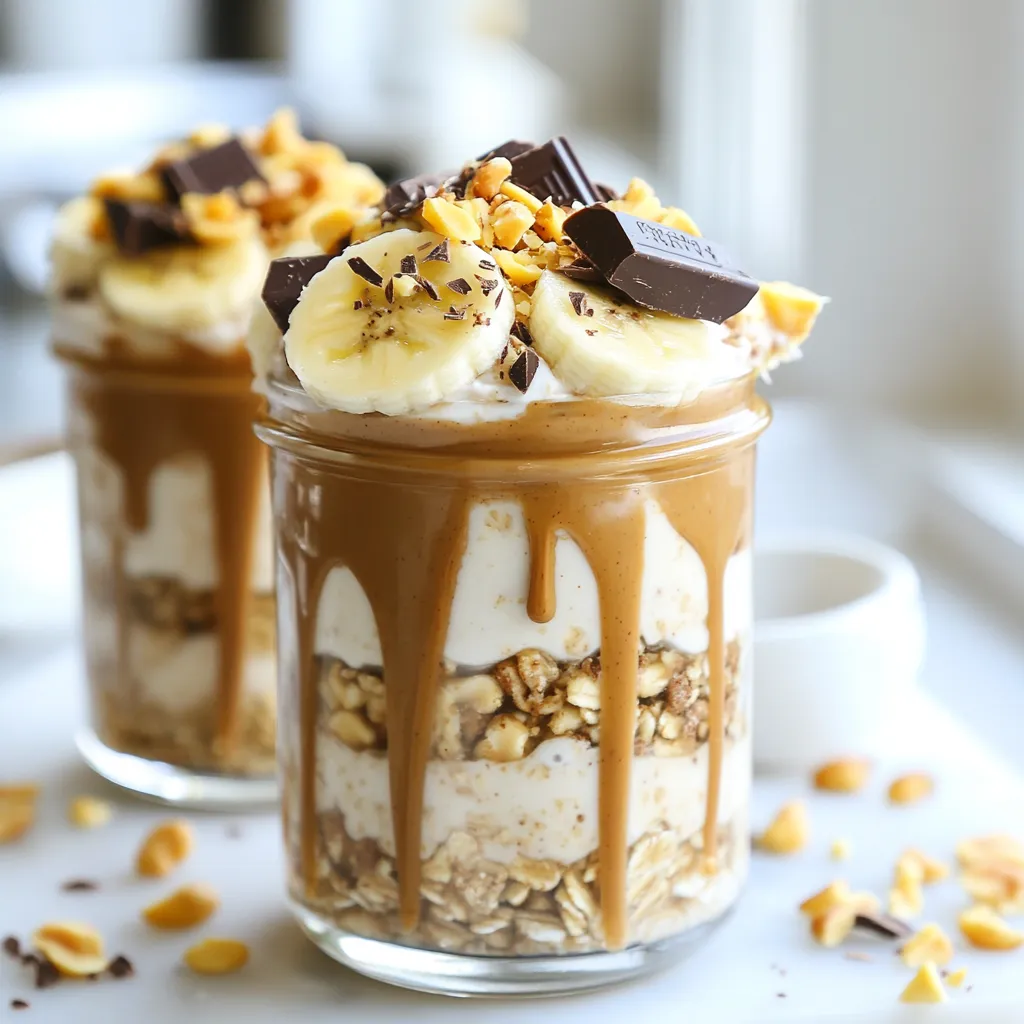
Are you ready to transform your breakfast into a delicious treat? My Chocolate Peanut Butter Overnight Oats recipe is both

sdfsa

dasdas

To create a truly delightful Creamy Tuscan White Bean Soup, you need a few simple ingredients. Each one plays a vital role in building flavor. Here’s what you will need: - 2 cans (15 oz each) white beans (cannellini or great northern), drained and rinsed - 1 medium onion, finely chopped - 2 carrots, diced - 2 celery stalks, diced - 3 cloves garlic, minced - 4 cups low-sodium vegetable broth - 1 cup coconut milk (or heavy cream) - 2 cups kale, chopped - 1 teaspoon dried thyme - 1 teaspoon dried oregano - 1 teaspoon smoked paprika - Salt and pepper to taste - 2 tablespoons olive oil - Fresh parsley, chopped (for garnish) These ingredients combine to create a rich and creamy soup. The white beans provide protein and creaminess. The garlic, onion, and herbs add depth and warmth. The kale gives the soup a fresh touch. Choosing coconut milk or heavy cream allows you to adjust the richness to your liking. Each ingredient works in harmony, ensuring your soup is savory and satisfying. Enjoy the process of gathering these ingredients; they will transform your kitchen into a Tuscan haven. {{ingredient_image_1}} - Sautéing the base vegetables: Start by heating 2 tablespoons of olive oil in a large pot over medium heat. Add 1 chopped onion, 2 diced carrots, and 2 diced celery stalks. Cook for 5-7 minutes until the veggies soften. - Adding herbs and spices: Next, add 3 minced garlic cloves, 1 teaspoon of dried thyme, 1 teaspoon of oregano, and 1 teaspoon of smoked paprika. Cook for another 1-2 minutes until the spices smell great. - Simmering the soup with beans and broth: Now, stir in 2 cans of drained and rinsed white beans and 4 cups of low-sodium vegetable broth. Bring this mix to a gentle boil, then lower the heat and let it simmer for 15 minutes. - Using an immersion blender versus a regular blender: For blending, I prefer using an immersion blender. It’s easy and quick. Just blend the soup until creamy, but keep some beans intact for texture. If you don't have one, pour half of the soup into a regular blender. Blend it smooth, then mix it back into the pot. - Stirring in coconut milk and kale: After blending, stir in 1 cup of coconut milk and 2 cups of chopped kale. Let it simmer for another 5 minutes. This will help the kale wilt and the flavors blend nicely. - Garnishing and serving suggestions: Finally, season the soup with salt and pepper to taste. Serve it in bowls and sprinkle with fresh chopped parsley for a lovely touch. Enjoy your creamy Tuscan white bean soup! To make this soup taste great, adjust the seasoning. Start with salt and pepper. Taste the soup as it cooks. You can always add more salt later. For a twist, use different herbs. Try basil or rosemary for a fresh touch. Smoked paprika adds a nice depth, too. The creamy texture is key. Blend the soup only partially. Leave some beans and veggies whole for bites. If you over-blend, it will become too smooth. You want a mix of creaminess and texture. Need a faster meal? Use pre-chopped vegetables. You can also cook the soup in a pressure cooker. It will save you time and still taste great. For meal prep, make a large batch. Store it in portions for easy lunches or dinners. This soup freezes well, too! Pro Tips Use Fresh Herbs: Fresh herbs can elevate the flavor profile of your soup, so consider adding fresh thyme or parsley just before serving for a vibrant touch. Enhance Creaminess: For an extra creamy texture, blend in a bit more coconut milk or heavy cream after cooking, adjusting to your desired richness. Texture Variation: To add more texture, reserve some of the sautéed vegetables before blending and stir them back into the soup after blending. Serve with Bread: This soup pairs wonderfully with crusty bread or a side salad, making for a hearty and satisfying meal. {{image_2}} You can easily make a vegan version of this creamy Tuscan white bean soup by using coconut milk instead of heavy cream. Coconut milk adds a rich flavor and keeps the soup light. It also fits well with the other ingredients. For gluten-free options, simply ensure the vegetable broth is labeled gluten-free. This way, everyone can enjoy the soup without worry. Want to boost the flavor? Consider adding proteins like chicken or sausage. These can bring a hearty touch to the soup. Just cook the meat separately first, then mix it in before serving. You can also add seasonal vegetables. Try zucchini, spinach, or bell peppers. These will not only enhance the taste but also add color and nutrients. This soup pairs well with crusty bread or a fresh salad. The bread can soak up the creamy soup, making each bite more enjoyable. For a full meal, serve it with a side salad topped with vinaigrette. If you have leftovers, store them in the fridge for a simple meal later. This soup tastes even better the next day! Store your Creamy Tuscan White Bean Soup in an airtight container. Let the soup cool down before placing it in the fridge. When stored properly, it lasts for about 4 to 5 days. Always check for any signs of spoilage like off smells or changes in color. To freeze the soup, let it cool completely first. Then, pour the soup into freezer-safe containers. Leave some space at the top for expansion. The soup freezes well for up to 3 months. When you're ready to eat, move it to the fridge overnight to thaw. You can reheat your soup on the stovetop or in the microwave. For stovetop, heat it gently on medium-low. Stir often to avoid burning. In the microwave, heat in short intervals, stirring in between. If the soup seems thick after freezing, add a splash of broth or water to adjust the texture. Yes, you can use fresh beans! If you choose this route, soak the dried beans overnight. After soaking, cook them until soft. This may take 1-2 hours. Then, follow the rest of the recipe as usual. Fresh beans can add a nice texture to the soup. To add some heat, try adding red pepper flakes. Start with a pinch and taste as you go. You can also add diced jalapeños or a splash of hot sauce. This will give your soup a nice kick without overpowering the flavors. Definitely! Spinach works well as a substitute. You can also use Swiss chard or collard greens. Just remember to chop them up and add them at the same time as the kale. They will wilt quickly and add great flavor. This soup pairs well with crusty bread or a simple salad. A fresh green salad with lemon dressing adds brightness. You can also serve it with a grilled cheese sandwich for a comforting meal. Both options complement the soup very well. To thicken your soup, you can blend more of the beans. Use an immersion blender to puree more of the mixture. Another option is to add a few tablespoons of cornstarch mixed with water. Stir it in and let the soup simmer until it thickens. This blog post covered how to make a tasty Creamy Tuscan White Bean Soup. I shared the ingredients, steps to cook, and tips to get it just right. You can add your own twist with spices or proteins. Remember, preparing your soup can be fun and easy. Proper storage keeps it fresh for later. Enjoy creating a warm bowl of this soup, perfect for any meal! Now, it's time to gather your ingredients and start cooking!

Creamy Tuscan White Bean Soup Savory and Satisfying

Indulge in the rich flavors of my Creamy Tuscan White Bean Soup, where comfort meets creativity! This hearty dish is

To create a rich and creamy avocado chocolate mousse, you will need these simple ingredients: - 2 ripe avocados - 1/2 cup unsweetened cocoa powder - 1/3 cup pure maple syrup - 1/4 cup almond milk - 1 teaspoon vanilla extract - A pinch of salt These ingredients work together to make a smooth, velvety mousse. The ripe avocados provide healthy fats and a creamy texture. The cocoa powder adds a rich chocolate flavor. Maple syrup sweetens the mousse naturally, while almond milk keeps it light. The vanilla extract gives an extra layer of flavor, and salt balances the sweetness. Feel free to customize your mousse with these fun toppings: - Whipped coconut cream - Dark chocolate shavings - Fresh berries These toppings not only add flavor but also make your dessert look beautiful. Whipped coconut cream is light and airy. Dark chocolate shavings add a touch of elegance. Fresh berries bring a pop of color and a hint of tartness. You can mix and match these toppings to impress your guests or treat yourself! {{ingredient_image_1}} - Cut the avocados in half. - Remove the pit with a spoon. - Scoop the green flesh into a food processor. - Add unsweetened cocoa powder to the processor. - Pour in pure maple syrup and almond milk. - Add one teaspoon of vanilla extract. - Toss in a pinch of salt for flavor. - Blend the mixture until it is smooth and creamy. - Stop to scrape down the sides of the bowl. - Taste the mousse to see if it’s sweet enough. - If needed, add a little more maple syrup. - Spoon the mousse into dessert cups or small bowls. - Chill the mousse for at least 30 minutes. - This helps the flavors mix and firm up. - Before serving, add whipped coconut cream on top. - Dark chocolate shavings or fresh berries make great toppings. To get a smooth mousse, scrape down the sides of your food processor. This helps mix in any bits that stick. If you don’t have a food processor, you can use an immersion blender. It works great and gives you control over the texture. To test the sweetness, scoop a small amount and taste it. If you want it sweeter, add more maple syrup. If you’re looking for a change, try agave syrup instead. It gives a nice flavor and works well in this mousse. For gatherings, serve the mousse in small cups or jars. It looks fancy and makes it easy for guests. To make it pretty, top with whipped coconut cream or dark chocolate shavings. Fresh berries also add a bright touch and taste great! Pro Tips Use Ripe Avocados: Make sure your avocados are ripe for the best creamy texture. They should yield slightly when gently pressed. If they are too firm, the mousse won't blend as smoothly. Adjust Sweetness: Taste the mousse before chilling and adjust the sweetness according to your preference. You can add more maple syrup or sweetener if you like it sweeter. Chill for Best Flavor: Allow the mousse to chill for at least 30 minutes in the refrigerator. This helps the flavors meld together and gives it a firmer texture. Creative Toppings: Get creative with your toppings! Whipped coconut cream, dark chocolate shavings, or fresh berries not only enhance the flavor but also make the dish visually appealing. {{image_2}} You can easily make this mousse dairy-free. Just swap almond milk for coconut milk. Coconut milk adds a rich creaminess. It also brings a slight coconut flavor that pairs well with chocolate. This change gives the mousse a tropical twist. Want to cut down on sugar? You can adjust the maple syrup. Use less syrup for a lighter touch. Or, try sugar substitutes like stevia or monk fruit. These options keep the mousse sweet without the extra sugar. To take the taste up a notch, add espresso powder. Just a small amount boosts the chocolate flavor. You can also mix in spices like cinnamon. This adds warmth and depth to the mousse. Experiment with different flavors to find what you love! To store leftover avocado chocolate mousse, place it in an airtight container. This keeps it fresh and tasty. Cover the top with plastic wrap to prevent air exposure. The mousse can last in the fridge for up to three days. Before serving again, stir it gently. This helps bring back the smooth texture. You can freeze avocado chocolate mousse if you have extra. Spoon it into an airtight container. Leave some space at the top for expansion. It can stay good in the freezer for about one month. To thaw, move it to the fridge overnight. Stir it well before serving to regain creaminess. Understanding spoilage is key. Look for changes in color or smell. If the mousse turns brown or develops a sour scent, it’s time to throw it away. Freshness is vital for taste and safety. Always check before enjoying your delicious treat! Yes, avocado chocolate mousse is healthy! Avocados are full of good fats. They help your heart and can lower bad cholesterol. They also provide fiber, which is great for digestion. Plus, they have vitamins like E and C. These help keep your skin healthy and strong. The cocoa powder adds antioxidants, which help fight off bad stuff in your body. Overall, this mousse is a tasty way to enjoy a sweet treat while still being kind to your body. Yes, you can easily make this mousse vegan! The main ingredients are already plant-based. Use maple syrup instead of honey for sweetness. You can also switch almond milk for any plant milk you prefer. If you want to add a topping, use coconut cream. This keeps everything dairy-free while still being rich and creamy. So, grab your avocados and enjoy this vegan delight! Making avocado chocolate mousse is quick! It takes about 10 minutes to prepare. Just scoop, blend, and taste. After mixing, chill the mousse for at least 30 minutes. This helps it firm up and brings out the flavors. So, in total, you’re looking at around 40 minutes from start to finish. Perfect for a last-minute dessert! This blog post shared how to make a tasty avocado chocolate mousse. We covered the main ingredients needed, like ripe avocados and cocoa powder. You learned easy preparation steps and how to blend for the perfect creamy texture. I gave tips on adjusting sweetness and presenting your mousse. We also explored variations, storage tips, and answered common questions about this dessert. In conclusion, this mousse is simple, healthy, and fun to make. Enjoy your treat and experiment with flavors!

Avocado Chocolate Mousse Rich and Creamy Delight

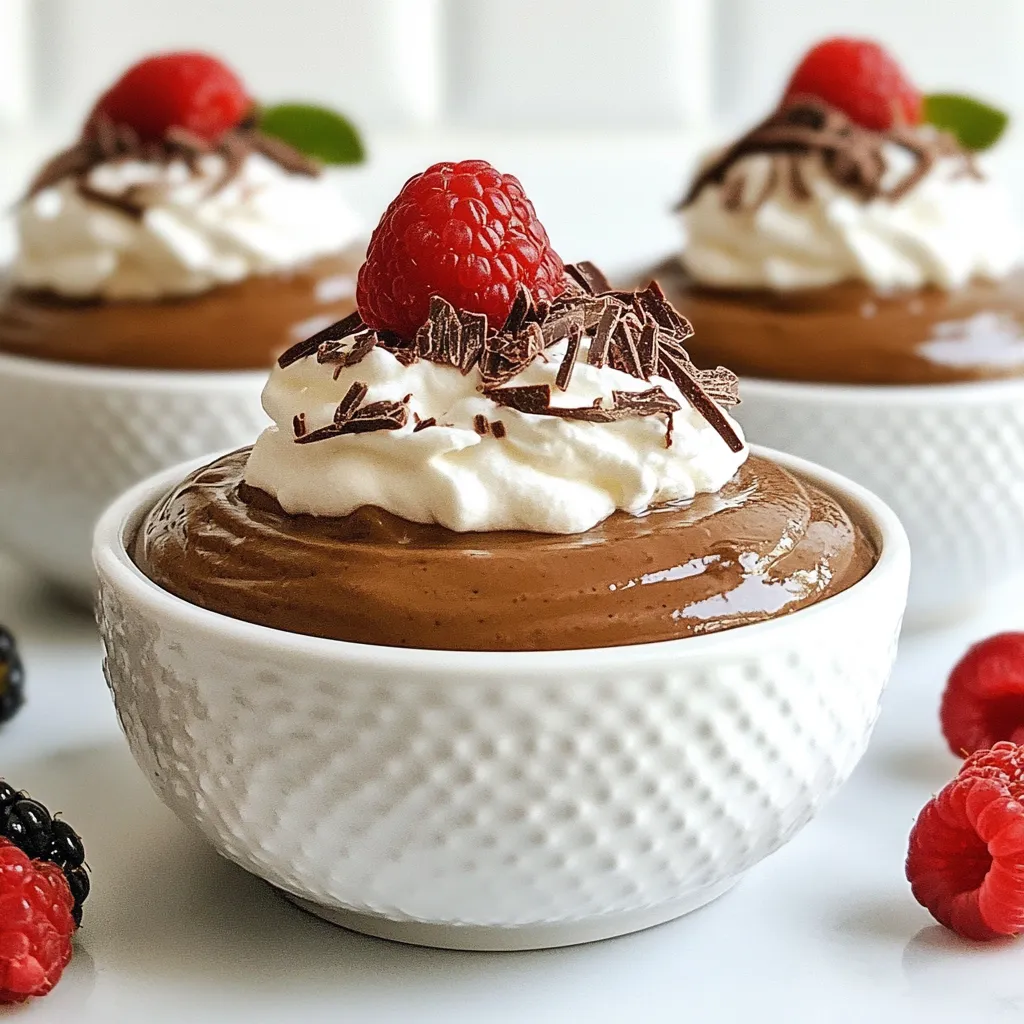
If you think desserts can’t be healthy and tasty, think again! I’m here to show you how to make Avocado

- 2 medium eggplants - 1 cup cooked quinoa - 1 cup cherry tomatoes, diced - ½ cup Kalamata olives, pitted and chopped - 1 cup spinach, chopped - ½ cup feta cheese, crumbled - 2 cloves garlic, minced - 1 teaspoon dried oregano - ½ teaspoon ground cumin - Fresh parsley for garnish - Olive oil - Salt and black pepper to taste Mediterranean stuffed eggplant is a fun dish to prepare. You start with two medium eggplants. They have a deep purple color and a soft texture when cooked. I use quinoa as a healthy base. It gives a nice texture and adds protein. Cherry tomatoes bring sweetness, while Kalamata olives give a salty punch. Spinach adds a pop of green and boosts nutrients. For seasonings, I use feta cheese for creaminess. Garlic adds a lovely aroma. Dried oregano and ground cumin give a warm flavor. Fresh parsley is key for garnish. It brightens up the dish and adds color. You’ll need olive oil to roast the eggplants. Salt and black pepper are key to enhance all these flavors. Each ingredient plays a role in making this dish both delicious and nutritious. {{ingredient_image_1}} 1. Preheat your oven to 375°F (190°C). This ensures even cooking. 2. Cut the eggplants in half and scoop out the flesh. Leave a thin layer for support. 3. Brush the eggplant halves with olive oil. Sprinkle with salt and black pepper. 4. Place the eggplant halves cut-side down on a baking sheet. 5. Roast the eggplants for 20 minutes. They should be tender when done. 1. While the eggplants roast, heat a skillet over medium heat. 2. Add 1 tablespoon of olive oil and minced garlic to the skillet. 3. Sauté the garlic for about 1 minute until it smells nice. 4. Add the chopped spinach to the skillet and cook until it wilts. 5. In a large bowl, mix the cooked quinoa, cherry tomatoes, Kalamata olives, sautéed spinach, crumbled feta cheese, oregano, cumin, and a pinch of salt and pepper. Stir well until everything is combined. 1. Take the roasted eggplants out of the oven. Carefully flip them over so the cut-side is facing up. 2. Spoon the quinoa mixture into each eggplant half. Press down lightly to pack the filling. 3. Place the stuffed eggplants back in the oven. Bake for another 15 to 20 minutes. 4. Look for slightly golden tops and ensure they are heated through. 5. Remove from the oven and let cool for a few minutes. Garnish with fresh parsley before serving. Roasting eggplants right is key to their flavor. Here are my best tips: - Choose the right eggplant. Look for firm, shiny skin without bruises. - Salting the eggplant helps. Before cooking, sprinkle salt on the cut sides. Let them sit for about 30 minutes. This step draws out excess moisture and bitterness. Rinse well and pat dry. - Brush with olive oil. This keeps the eggplant moist as it roasts. It adds a rich flavor too. To avoid a bitter taste, follow these steps: - Select young eggplants. Older ones tend to be more bitter. - Salt before cooking. This helps remove bitterness as mentioned earlier. - Cook until tender. Overcooking can lead to a mushy texture and may heighten bitterness. Aim for soft but not falling apart. Presentation matters, especially with stuffed eggplant. Here’s how to serve it nicely: - Use a large platter. Arrange the stuffed eggplants on it, cut-side up. - Drizzle with olive oil. This adds shine and flavor. - Garnish with parsley. Fresh herbs make the dish pop visually. Pair your stuffed eggplant with: - Simple salads. A fresh Greek salad complements it well. - Bread. Serve with warm pita or crusty baguette for a great texture contrast. - Wine. A crisp white wine like Sauvignon Blanc pairs perfectly. This dish is quite flexible for different diets: - Gluten-free options: The recipe is naturally gluten-free. Just ensure any bread served is gluten-free. - Vegetarian adaptations: This dish is vegetarian. You can add plant-based protein like chickpeas for extra nutrition. Pro Tips Choose the Right Eggplants: Look for eggplants that are firm and shiny with no blemishes. Smaller eggplants tend to be sweeter and less bitter. Customize the Filling: Feel free to add other vegetables like bell peppers or zucchini to the quinoa mixture for extra flavor and nutrients. Make it Vegan: Substitute the feta cheese with a vegan cheese alternative or omit it entirely for a delicious vegan option. Perfect Roasting: For a deeper flavor, roast the eggplants cut-side down for the first half and then flip them to fill, allowing the tops to caramelize. {{image_2}} You can change some ingredients in Mediterranean stuffed eggplant to suit your taste. If you want an alternative to quinoa, try using brown rice or farro. Both give a nice texture and absorb flavors well. For feta cheese, crumbled goat cheese works great, too. It adds a tangy kick. If you want extra protein, consider adding grilled chicken or chickpeas. Chicken adds a savory depth. Chickpeas bring a hearty feel and plant-based protein. They also mix well with the other flavors in the dish. Spices can change the whole dish. Try adding harissa for a spicy kick or smoked paprika for a warm, earthy note. Both spices can make your stuffed eggplant pop with flavor. You can also add nuts or seeds for extra crunch. Pine nuts or walnuts are good choices. They add a nice texture and enhance the taste. Just toast them lightly before mixing to bring out their flavor. Each Mediterranean country has unique flavors. You can give your stuffed eggplant a twist by adding ingredients from different regions. For example, use sun-dried tomatoes for an Italian touch or add za'atar for a Middle Eastern flair. Incorporate seasonal vegetables for freshness. Zucchini, bell peppers, or even artichokes work well. They can add color and make the dish even more nutritious. Explore different combinations to find what you love best! To store leftovers, let the stuffed eggplants cool down first. Then, place them in an airtight container. This keeps them fresh and tasty. You can also cover them tightly with plastic wrap. In the fridge, they will stay good for about 3 to 4 days. If you want them to last longer, consider freezing. Freezing stuffed eggplants is easy. First, let them cool completely. Then, wrap each eggplant half in plastic wrap. Place them in a freezer-safe bag or container. This keeps them from getting freezer burn. They can last up to 3 months in the freezer. When you're ready to eat, thaw them in the fridge overnight. To reheat, place them in the oven at 350°F (175°C) for about 20 to 25 minutes. To extend the shelf life of your ingredients, here are some tips: - Use fresh eggplants that feel firm. - Store quinoa in a cool, dry place. - Keep canned or jarred olives sealed tightly after opening. - Wash spinach just before using to avoid spoilage. Following these steps helps keep your ingredients fresh and ready for your next meal! How long does it take to make Mediterranean Stuffed Eggplant? It takes about 55 minutes to make this dish. You have 15 minutes for prep and 40 minutes for cooking. Can I make this dish ahead of time? Yes, you can prepare the stuffed eggplants a day before. Store them in the fridge. Just bake them when you're ready to eat. Can I use other types of cheese? Absolutely! You can swap feta cheese for mozzarella or goat cheese. Each will give a different taste. What if I can't find Kalamata olives? If you can't find Kalamata olives, use green olives or black olives instead. They will still add great flavor. Is Mediterranean Stuffed Eggplant healthy? Yes, this dish is healthy. It has plenty of veggies, grains, and healthy fats. What is the caloric content per serving? Each serving has about 280 calories. This makes it a light but filling meal option. In this blog post, we explored the vibrant world of Mediterranean Stuffed Eggplant. We covered key ingredients, from eggplants to quinoa and olives. Step-by-step, I guided you on preparing and baking them perfectly. We also shared tips for serving and storage, along with tasty variations. Mediterranean stuffed eggplants are not only delicious but also versatile. You can make this dish your own with different flavors and ingredients. Enjoy experimenting with it in your kitchen.

Mediterranean Stuffed Eggplant Delicious and Nutritious

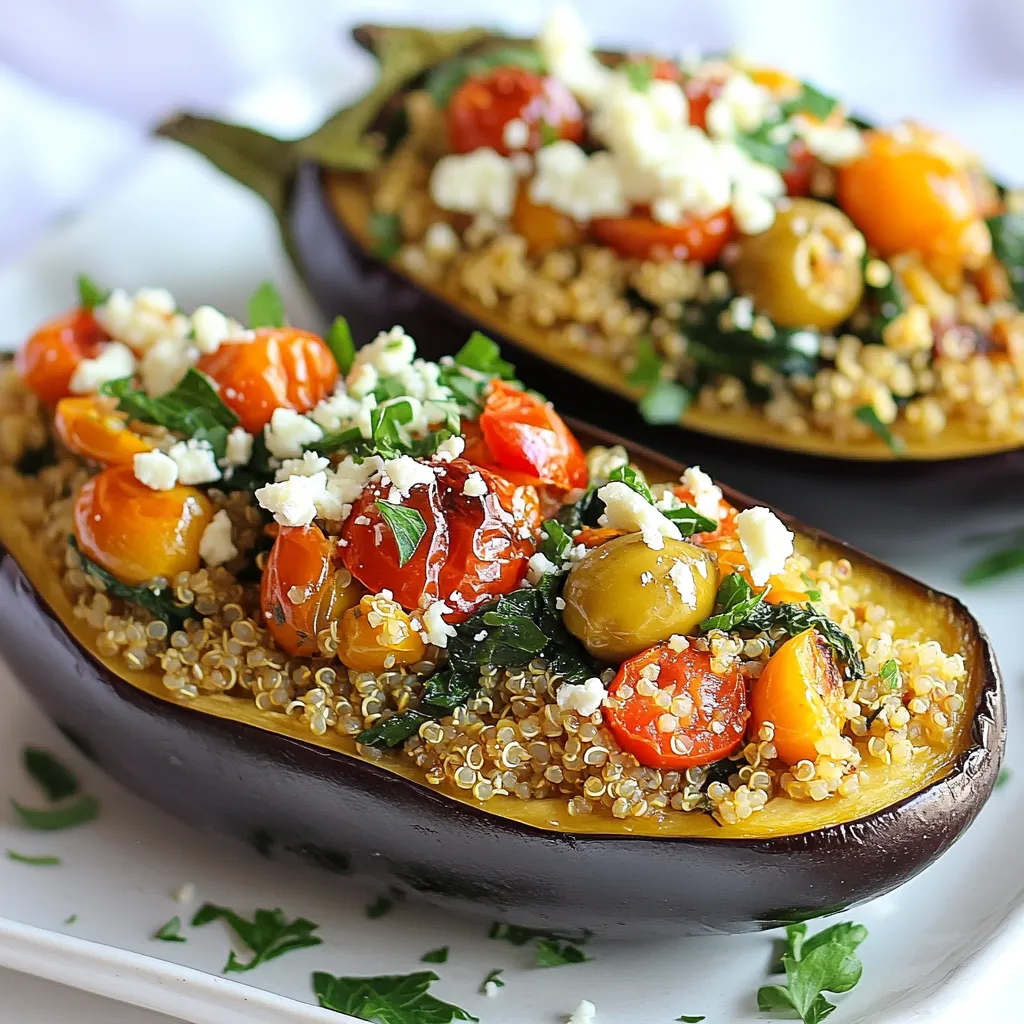
Looking for a dish that’s both flavorful and healthy? Mediterranean Stuffed Eggplant is your answer! This vibrant recipe combines fresh

- 1 cup red lentils, rinsed - 1 can (14 oz) coconut milk - 1 medium onion, diced - 2 cloves garlic, minced - 1 inch ginger, grated - 1 medium carrot, diced - 1 bell pepper, diced (any color) - 1 can (14 oz) diced tomatoes - 2 cups vegetable broth - 2 tablespoons curry powder - 1 teaspoon turmeric powder - 1 teaspoon cumin powder - Salt and pepper to taste - 2 tablespoons olive oil - Fresh cilantro, chopped (for garnish) - Lime wedges (to serve) When measuring ingredients, use dry measuring cups for solids like lentils and vegetables. For liquids, use a liquid measuring cup. Be precise with spices, as they greatly affect flavor. If you need more or less, adjust slowly and taste as you go. This helps you find the best balance for your curry. You can swap the red lentils for green or brown ones. They take longer to cook, so keep that in mind. If you lack coconut milk, try almond milk or cashew cream for a different taste. Any vegetable broth will work, but homemade adds extra flavor. For a lighter option, use less oil or skip it. Fresh herbs like basil or parsley can replace cilantro if you prefer. {{ingredient_image_1}} To start, gather all your ingredients. You will need: - 1 cup red lentils, rinsed - 1 can (14 oz) coconut milk - 1 medium onion, diced - 2 cloves garlic, minced - 1 inch ginger, grated - 1 medium carrot, diced - 1 bell pepper, diced (any color) - 1 can (14 oz) diced tomatoes - 2 cups vegetable broth - 2 tablespoons curry powder - 1 teaspoon turmeric powder - 1 teaspoon cumin powder - Salt and pepper to taste - 2 tablespoons olive oil - Fresh cilantro, chopped (for garnish) - Lime wedges (to serve) Make sure to rinse the lentils well. This helps remove any dust and keeps them clean. Dice the onion, carrot, and bell pepper into small pieces. Mince the garlic and grate the ginger. This prep work makes cooking smooth and quick. Heat a large saucepan over medium heat. Add the olive oil and let it warm up. Once hot, toss in the diced onion. Sauté for about five minutes until it turns translucent. This step builds a nice base flavor. Next, add the minced garlic and grated ginger to the pan. Cook for one to two minutes until you smell that lovely aroma. Then, add the diced carrot and bell pepper. Stir gently for about five minutes until they soften a bit. Time to spice things up! Mix in the curry powder, turmeric, and cumin. Stir well to coat the veggies in the spices. Cook for one to two minutes to let the flavors bloom. Now, add the rinsed lentils, diced tomatoes, coconut milk, and vegetable broth. Stir everything together well. Bring this mixture to a gentle simmer. Cover the pan, reduce the heat to low, and let it cook for 20-25 minutes. Stir occasionally until the lentils are tender and the curry thickens. Once the curry is cooked, season it with salt and pepper. If you want a thinner curry, add more broth or water. After removing it from the heat, let it sit for a few minutes. Serve the curry warm in bowls. Garnish each bowl with chopped cilantro and lime wedges on the side. The lime adds a bright touch. Enjoy this creamy coconut lentil curry with rice or naan for a complete meal. Cooking lentils is simple. Here are some tips to get it right: - Rinse your lentils: This removes dust and small stones. It helps clean them well. - Use the right type: Red lentils cook fast. They break down into a creamy texture. - Soak if needed: While red lentils do not need soaking, other types may benefit from it. Soaking helps them cook evenly. - Watch the water: Use enough liquid, but don’t drown them. Start with a ratio of 1 cup lentils to 3 cups liquid. To make your curry shine, try these ideas: - Fresh herbs: Add cilantro before serving. It brings freshness to your dish. - Spices: Use whole spices like cumin seeds. Toast them for a minute before adding. This step boosts flavor. - Acidity: A squeeze of lime right before serving brightens up the dish. - Coconut milk: Choose full-fat coconut milk for creaminess. It adds rich flavor and texture. Here are some pitfalls to skip: - Overcooking lentils: Keep an eye on them. Overcooked lentils turn mushy and lose texture. - Skipping seasoning: Don’t forget to taste and season your curry. Salt brings out all the flavors. - Not letting it sit: Let the curry rest after cooking. It helps the flavors meld together. - Ignoring texture: If your curry is too thick, add more broth. If too thin, cook it longer to thicken. With these tips, your creamy coconut lentil curry will be a hit! Pro Tips Soak the Lentils: Soaking red lentils for about 30 minutes before cooking can help them cook faster and more evenly. Add Extra Veggies: Feel free to add other vegetables like spinach, peas, or sweet potatoes for added nutrition and flavor. Spice it Up: Adjust the spice levels by adding chili powder or fresh chilies if you like a bit of heat in your curry. Make it Creamier: For an even creamier texture, blend a portion of the curry and stir it back into the pot before serving. {{image_2}} This recipe is already vegan-friendly! The key is to use plant-based ingredients. You can swap the vegetable broth if you want a richer taste. Just keep it to the same amount, and you’re set! Want to add some protein? You can include chickpeas or tofu. Both work well in this curry. If you choose chickpeas, use one can, drained and rinsed. For tofu, use 14 oz, pressed and cubed. Toss them in at the same time as the lentils. Do you like it hot? You can add fresh chili or red pepper flakes. Start with half a teaspoon for a mild kick. If you want it spicier, add more to taste. If you prefer a milder curry, skip the heat entirely. Adjusting spices makes this dish work for everyone! You can store leftover creamy coconut lentil curry in an airtight container. Place it in the fridge. It will stay fresh for about 3 to 4 days. Make sure to cool the curry before sealing it. This helps keep the flavors strong. To reheat, use a saucepan on medium heat. Add a splash of water or broth to help it warm up. Stir often to prevent sticking. You can also use the microwave. Heat it in short bursts, stirring in between. This ensures even heating. You can freeze the curry if you want to keep it longer. Use a freezer-safe container. Make sure to leave space at the top, as the curry may expand. It can last for about 2 to 3 months in the freezer. When you’re ready to eat, thaw it overnight in the fridge. Then, reheat as mentioned before. Yes, you can use other types of lentils. Brown and green lentils work well, but they take longer to cook. Red lentils cook faster and break down into a creamy texture, which is great for this curry. If you use brown or green lentils, adjust the cooking time to about 30-35 minutes. Make sure to check them for doneness. Creamy Coconut Lentil Curry pairs well with many sides. Here are a few ideas: - Steamed rice (white or brown) - Quinoa for a nutty flavor - Warm naan bread for dipping - A fresh salad to add crunch - Roasted vegetables for extra nutrients These sides enhance the meal and balance the rich flavors in the curry. This curry lasts about 4-5 days in the fridge. Store it in an airtight container to keep it fresh. The flavors often deepen after a day, making leftovers even tastier. Reheat on the stove or in the microwave until hot. If it thickens too much, add a splash of water or broth to loosen it up. In this blog post, we explored the key ingredients and steps for making Creamy Coconut Lentil Curry. You learned about measuring tips and substitutions to make it your own. We shared practical cooking tips and easy variations to fit your tastes. Lastly, proper storage and reheating ideas ensure your dish lasts longer. Embracing these insights will help you cook confidently and enjoy every bite. Trust me, this dish is worth trying!

Creamy Coconut Lentil Curry Flavorful and Easy Recipe

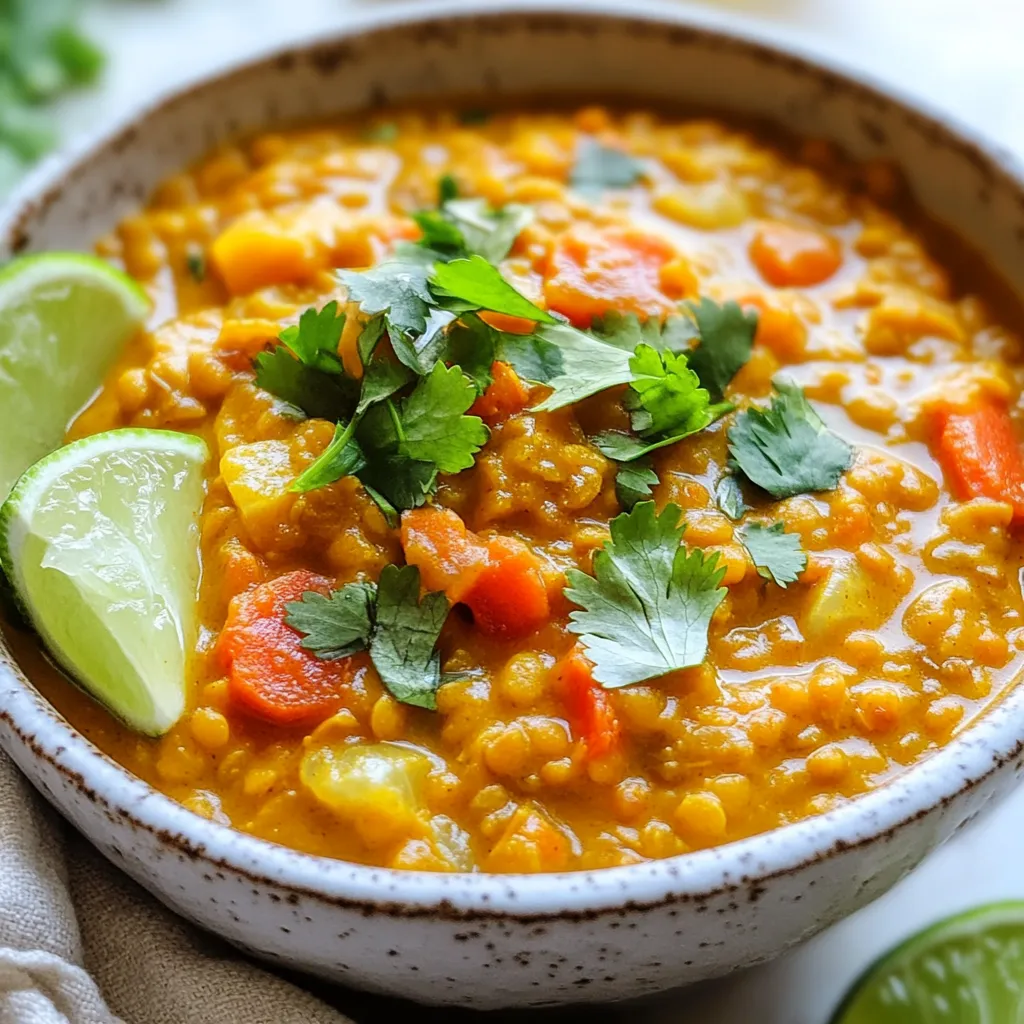
Are you ready to dive into a warm bowl of Creamy Coconut Lentil Curry? This recipe is simple, tasty, and

- 1 cup quinoa - 2 cups water - 1 cucumber, diced - 1 cup cherry tomatoes, halved - 1 cup chickpeas, drained and rinsed - 1/2 red onion, finely chopped - 1/2 cup feta cheese, crumbled - 1/4 cup Kalamata olives, pitted and sliced - 3 tablespoons olive oil - 2 tablespoons lemon juice - 1 teaspoon dried oregano - Salt and pepper to taste - Fresh parsley, chopped (for garnish) Quinoa is a star in these bowls. It is packed with protein and fiber. This grain helps keep you full. Cucumber adds crunch and hydration. Tomatoes provide vitamins A and C. Chickpeas boost protein and fiber as well. Red onion adds flavor and nutrients. Feta cheese gives a creamy touch and calcium. Kalamata olives offer healthy fats and a briny taste. Olive oil is full of good fats and helps with heart health. Lemon juice brightens the dish and adds vitamin C. Oregano brings a fresh herb taste and can aid digestion. If you need to avoid grains, consider using cauliflower rice instead of quinoa. For a vegan option, swap out feta with avocado or a vegan cheese. If you are gluten-free, this recipe is safe as it uses quinoa. For nut allergies, ensure your olives and dressing do not contain nuts. You can also replace chickpeas with cooked lentils for a different protein source. {{ingredient_image_1}} First, rinse the quinoa in cold water. This step helps remove any bitterness. Then, measure 1 cup of quinoa and 2 cups of water. In a medium pot, mix the quinoa and water. Bring this mixture to a boil. Once it boils, turn the heat down. Cover the pot and let it simmer for 15 minutes. When the water is gone, remove it from heat and let it sit for 5 more minutes. Finally, fluff the quinoa with a fork. Grab a large mixing bowl. Now, add your diced cucumber, halved cherry tomatoes, drained chickpeas, and finely chopped red onion. Next, crumble in 1/2 cup of feta cheese. Add 1/4 cup of sliced Kalamata olives for a briny kick. This mix brings fresh flavors together and is colorful too! Start by taking a bowl for each serving. Add a generous scoop of quinoa to the bottom of each bowl. Next, top the quinoa with your Greek salad mix. This adds a nice crunch and flavor. For the finishing touch, sprinkle fresh chopped parsley on top. If you like, add extra lemon wedges and a drizzle of olive oil for a bright look. Enjoy your Greek Quinoa Power Bowl! To cook quinoa just right, rinse it well first. This step removes its bitter taste. Use two cups of water for every cup of quinoa. Bring the water to a boil, then lower the heat. Cover the pot and let it simmer for 15 minutes. After that, let it sit for five minutes. Fluff the quinoa with a fork before serving. This makes it light and airy. A good dressing can change everything. For our Greek Quinoa Power Bowls, mix olive oil and lemon juice. Use three tablespoons of olive oil and two tablespoons of lemon juice. Add dried oregano, salt, and pepper to taste. Whisk it well to combine all flavors. This simple dressing makes the veggies pop with flavor. Don’t be afraid to taste as you go! Presentation is key to enjoying your meal. Start with a scoop of fluffy quinoa at the bottom. Add the colorful veggie mix on top. Sprinkle crumbled feta cheese and olives for extra color. Garnish with fresh parsley for a bright touch. You can also add lemon wedges on the side. A drizzle of olive oil enhances the look and taste. A well-presented bowl makes every bite more enjoyable! Pro Tips Rinse Your Quinoa: Always rinse quinoa under cold water before cooking to remove its natural bitterness, ensuring a pleasant flavor in your dish. Perfectly Cooked Quinoa: Allow the quinoa to sit covered for 5 minutes after cooking. This step helps it to fluff up nicely, giving it a light and airy texture. Customize Your Veggies: Feel free to add or substitute other vegetables based on your preference or what's in season, such as bell peppers or spinach, to enhance nutrition and flavor. Make Ahead: Prepare the quinoa and vegetable mixture in advance and store them separately in the fridge. Assemble the bowls just before serving for a fresh taste. {{image_2}} You can boost the protein in your Greek quinoa power bowls. Here are a few great options: - Grilled Chicken: This adds a nice flavor and makes it filling. - Shrimp: Quick to cook and works well with the Greek taste. - Tofu: A great choice for vegans; it soaks up flavors well. - Lentils: They are hearty and add fiber, making your meal more satisfying. This recipe is easy to adjust for vegetarian and vegan diets. If you want to keep it vegetarian, use feta cheese as is. For vegan options, simply leave out the feta. You can also add: - Avocado: It adds creaminess and healthy fats. - Nuts or Seeds: Almonds or pumpkin seeds give a nice crunch. - More Veggies: Try bell peppers or spinach for extra nutrients. You can change ingredients based on what’s in season. This keeps your bowls fresh and exciting. Here are some ideas: - Summer: Use fresh corn or zucchini. Both add sweetness. - Fall: Add roasted butternut squash or sweet potatoes for warmth. - Winter: Kale or Brussels sprouts can add a tasty crunch. - Spring: Incorporate asparagus or radishes for a crisp texture. These variations let you play with flavors while keeping your meal healthy and delicious! To keep your Greek Quinoa Power Bowls fresh, place leftovers in an airtight container. This helps maintain flavor and texture. Make sure the bowls cool to room temperature before sealing them. Store them in the fridge for best results. When you want to enjoy your leftovers, you can reheat them easily. Use a microwave for quick warming. Place the bowl in the microwave for about one to two minutes. Stir halfway through to ensure even heating. You can also reheat on the stove. Just add a splash of water to a pan and heat over low heat. Your Greek Quinoa Power Bowls will stay good for about three to four days in the fridge. If you want to keep them longer, consider freezing them. In the freezer, they can last for up to three months. Just remember to thaw them in the fridge before reheating. Yes, you can make Greek Quinoa Power Bowls ahead of time. The quinoa can be cooked and stored in the fridge. Prepare the salad mix with cucumber, tomatoes, chickpeas, onions, feta, and olives. Keep the dressing separate. This way, the flavors stay fresh. When it's time to eat, just combine everything. It makes for a quick and healthy meal. You can serve Greek Quinoa Power Bowls with many tasty sides. Try some warm pita bread for a nice touch. Hummus adds a creamy flavor that pairs well. A simple Greek yogurt dip can also be great. If you want more veggies, a side salad works well too. Each addition enhances the meal and makes it more filling. To make Greek Quinoa Power Bowls gluten-free, use quinoa as your base. Quinoa is naturally gluten-free. Ensure all other ingredients are also gluten-free. Check the labels on chickpeas, feta, olives, and dressing. Most brands are safe, but it’s good to be careful. This way, everyone can enjoy a delicious, gluten-free meal. Greek Quinoa Power Bowls blend taste and health. We covered key ingredients and their benefits. You learned how to prepare, mix, and assemble your bowls step by step. I shared tips for cooking and seasoning that boost flavor. We also explored variations for all diets. To keep leftovers fresh, proper storage is essential. Power Bowls are both simple and versatile. They fit meals for any occasion. Enjoy making this dish your own!

Greek Quinoa Power Bowls Fresh and Nutritious Meal

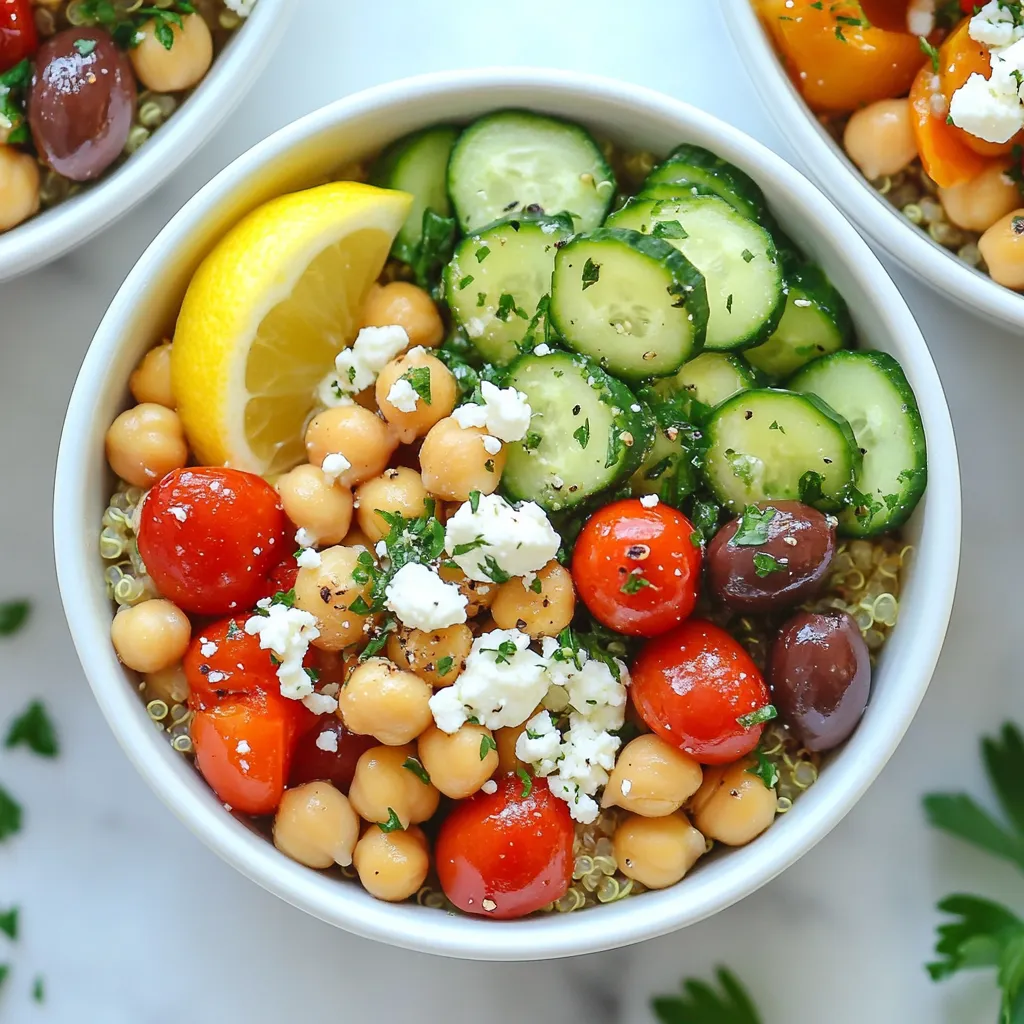
Looking for a fresh and nutritious meal? Greek Quinoa Power Bowls are the answer! Packed with vibrant veggies and protein-rich

Here’s what you need for the Smoky Paprika Pork Tenderloin Sheet Pan: - 1 pound pork tenderloin - Seasoning mix: - 2 tablespoons smoked paprika - 1 teaspoon garlic powder - 1 teaspoon onion powder - 1 teaspoon cumin - 1 teaspoon salt - ½ teaspoon black pepper - 2 tablespoons olive oil - Assorted vegetables: - 1 red bell pepper, sliced - 1 yellow bell pepper, sliced - 1 red onion, sliced - 1 zucchini, sliced - Fresh parsley for garnish These ingredients come together to create a meal that is rich in flavor and easy to prepare. The pork tenderloin serves as a tasty main dish, while the veggies add color and nutrients. The smoked paprika brings a warm, smoky flavor that ties everything together. You can find these ingredients at your local grocery store. Just make sure the pork is fresh for the best taste. {{ingredient_image_1}} 1. Preheat the oven and prepare the baking sheet Start by preheating your oven to 425°F (220°C). This high heat helps the pork cook well and makes the veggies tender. Line a large baking sheet with parchment paper. This keeps things clean and makes for easy cleanup. 2. Mix the seasoning paste In a small bowl, combine 2 tablespoons of smoked paprika, 1 teaspoon of garlic powder, 1 teaspoon of onion powder, 1 teaspoon of cumin, 1 teaspoon of salt, and ½ teaspoon of black pepper. Pour in 2 tablespoons of olive oil. Stir well until you get a thick paste. This mix gives the pork a lovely smoky flavor. 3. Prepare the pork tenderloin Take 1 pound of pork tenderloin and pat it dry using paper towels. This step helps the seasoning stick better. Rub the spice paste all over the pork. Make sure every side is coated. This flavor will really shine through when cooked. 1. Arrange the vegetables on the baking sheet Slice 1 red bell pepper, 1 yellow bell pepper, 1 red onion, and 1 zucchini. Place these veggies around the pork on the baking sheet. They will soak up the tasty juices from the pork while roasting. 2. Place the pork tenderloin and roast Drizzle a little olive oil over the veggies and toss them gently to coat. Place the seasoned pork tenderloin right in the center of the veggies. Roast everything in the preheated oven for 25-30 minutes. Use a meat thermometer to check that the pork reaches 145°F (63°C). The vegetables should be soft and slightly browned. 1. Check for doneness and rest the pork Once the pork is done, take it out of the oven. Let it rest for 5-10 minutes before slicing. This helps the juices stay in the meat. 2. Slice and serve After resting, slice the pork tenderloin into even pieces. Serve it alongside the roasted vegetables. A sprinkle of fresh parsley on top adds a nice touch and color. Enjoy this delicious meal! - How to achieve a perfect seasoning coat Start with dry pork. Pat it with paper towels. This helps the spice paste stick better. Mix smoked paprika, garlic powder, onion powder, cumin, salt, and black pepper in a bowl. Add olive oil to form a paste. Rub this mix all over the pork. Make sure every part is covered. - Recommendations for side dishes Serve this dish with fluffy rice or creamy mashed potatoes. You can also add a simple green salad. Roasted sweet potatoes are another great choice. They add a nice sweetness that pairs well with the smoky pork. - Ensuring even cooking of the pork Use a meat thermometer to check the pork’s temperature. Aim for 145°F (63°C). This keeps the pork juicy. Place the pork in the center of the pan. This helps it cook evenly with the veggies. - Tips for caramelizing vegetables Cut the veggies into uniform pieces. This helps them cook evenly. Drizzle olive oil over them and toss well. Spread them out on the baking sheet. Avoid crowding them; this lets them brown nicely. - Best accompaniments for the dish Pair the pork with a light red wine, like Pinot Noir. The flavors blend well. You can also serve it with crusty bread. This helps soak up any juices. - How to garnish for presentation Before serving, sprinkle fresh parsley over the pork and veggies. This adds a pop of color. You can also drizzle a little olive oil for shine. It makes the dish look inviting and fresh. Pro Tips Rest the Meat: Allow the pork tenderloin to rest for 5-10 minutes after roasting. This helps the juices redistribute, resulting in a more tender and flavorful dish. Customize Your Veggies: Feel free to swap out or add other vegetables like asparagus, carrots, or potatoes based on your preference or seasonal availability. Spice Paste Variation: Experiment with different spices or herbs in the paste, such as chili powder or thyme, to create unique flavor profiles for the pork. Use a Meat Thermometer: To ensure perfectly cooked pork, use a meat thermometer to check that the internal temperature reaches 145°F (63°C) for safe consumption. {{image_2}} You can change the flavors of this dish easily. Try using different seasonings. If you want a spicy kick, add cayenne pepper or chili powder. For a fresh touch, use herbs like rosemary or thyme. You can also switch the smoked paprika for regular paprika if you prefer a milder taste. When it comes to vegetables, the options are endless. Instead of bell peppers, use asparagus or broccoli. Carrots or sweet potatoes add sweetness and color. Feel free to mix and match to find your favorite blend. If you prefer slow cooking, this dish adapts well. Just season the pork and place it in a slow cooker with the veggies. Cook on low for 6-8 hours. This method makes the pork super tender and juicy. Grilling is another fun way to make this dish. Marinate the pork with the spice mix, then grill it over medium heat. Add the veggies in a grill basket. This gives everything a nice smoky flavor and char. For gluten-free options, check your spice labels. Most spices are gluten-free, but some blends might contain gluten. Use fresh herbs and spices to avoid this. If you're watching carbs, you can skip the potatoes and use only non-starchy veggies. Zucchini, bell peppers, and onions are great low-carb choices. This keeps the dish light while still being tasty. After enjoying your Smoky Paprika Pork Tenderloin, you may have some leftovers. To store them, let the pork cool first. Wrap it tightly in plastic wrap or aluminum foil. You can also place it in an airtight container. Store the leftover pork and veggies in the refrigerator. They should stay fresh for up to three days. Be sure to keep the veggies close to the pork for best flavor. If you want to save some for later, freezing is a great option. Wrap the pork tenderloin tightly in plastic wrap. Then, place it in a freezer-safe bag or container. You can freeze the roasted vegetables too. Make sure to cool them before wrapping. Use them within three months for the best taste. When it’s time to enjoy your leftovers, proper reheating is key. I recommend using the oven for the best results. Preheat your oven to 350°F (175°C). Place the pork and veggies in a baking dish. Cover them with foil to keep moisture in. Heat for about 15-20 minutes, or until warmed through. You can also use a microwave, but the oven gives better flavor. Enjoy your meal again! Pork tenderloin should reach an internal temperature of 145°F (63°C). This ensures it is safe to eat. Use a meat thermometer to check the temperature. After cooking, let it rest for 5-10 minutes. This helps keep the meat juicy. Cooking pork tenderloin takes about 25-30 minutes at 425°F (220°C). The timing may vary with the size of the meat. Always check the temperature to ensure it's fully cooked. Yes, you can change the spices in the marinade. Try using chili powder, rosemary, or thyme for new flavors. Experimenting with spices can lead to tasty results! Bell peppers, red onions, and zucchini are great choices. You can add carrots, broccoli, or Brussels sprouts for variety. Use your favorite veggies to make it your own! Yes, you can prepare the spice paste and marinate the pork ahead of time. Store it in the fridge for up to 24 hours. This allows the flavors to blend and intensify. Absolutely! This dish stores well and reheats nicely. Cook a larger batch to use throughout the week. Pair it with grains or salads for easy meals. Check the internal temperature with a meat thermometer. If it reads 145°F (63°C), it is done. The meat should be slightly pink but not raw in the center. Yes, grilling works well too! Preheat your grill to medium-high heat. Cook for about 20-25 minutes, turning occasionally. Ensure it still reaches the proper temperature. This dish pairs well with rice, quinoa, or a fresh salad. You can also serve it with crusty bread or roasted potatoes. Get creative with your sides! This blog post guided you through preparing a delicious pork tenderloin dish. We covered ingredients, cooking steps, and tips for a great meal. Remember, seasoning is key, and don’t shy away from mixing flavors. Feel free to experiment with different vegetables and cooking methods. Leftovers can be stored easily or frozen for later. With these insights, you can impress family and friends. Now, it's time to enjoy your masterpiece!

Smoky Paprika Pork Tenderloin Sheet Pan Delight

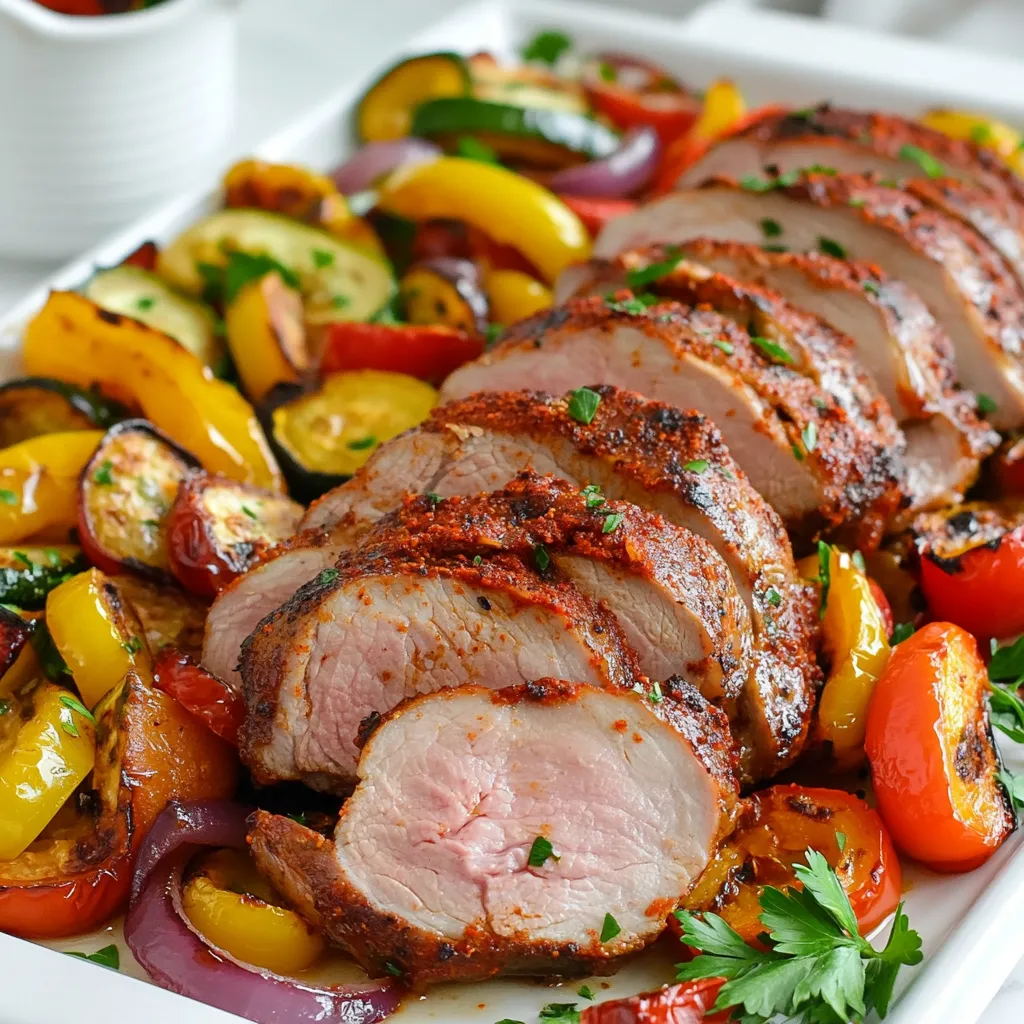
Are you ready to impress your family with a flavorful dish that’s easy to prepare? My Smoky Paprika Pork Tenderloin

- Fresh arugula (4 cups) - Ripe peaches (2, sliced) - Burrata cheese (8 oz) - Candied pecans (1/4 cup) or walnuts - Cherry tomatoes (1/4 cup, halved) - Olive oil (2 tablespoons) - Balsamic glaze (1 tablespoon) - Salt and pepper to taste - Fresh basil leaves for garnish Gather these ingredients to make a fresh and tasty Peach Burrata Arugula Salad. Fresh arugula gives a peppery kick that works well with sweet peaches. The burrata cheese adds a creamy touch, while the nuts bring a crunchy bite. Use ripe peaches for the best flavor. You can choose between candied pecans or walnuts, depending on your taste. Cherry tomatoes add color and a touch of sweetness. Olive oil and balsamic glaze enhance the flavors, while salt and pepper help balance everything. Fresh basil leaves not only look great but also add a nice aroma. This salad is simple yet elegant. You can prepare it in just ten minutes. It’s perfect as a side dish or a light main meal. Enjoy this delightful salad at your next gathering or as a refreshing meal on a warm day. {{ingredient_image_1}} Start by grabbing a large bowl. Place 4 cups of fresh arugula in it. This leafy green gives a nice peppery taste. Next, add your sliced peaches. Use 2 ripe peaches for the best flavor. The sweet, juicy peaches pair well with the arugula. Then, toss in 1/4 cup of halved cherry tomatoes. They add a burst of color and flavor. Now it’s time for the star of the salad: burrata cheese. Take 8 oz of burrata and tear it into pieces. Scatter these creamy pieces over the salad. This cheese will melt in your mouth and enhance the dish. For a crunchy texture, sprinkle 1/4 cup of candied pecans on top. You can also use walnuts if you prefer. Next, drizzle with 2 tablespoons of olive oil and 1 tablespoon of balsamic glaze. This combination adds richness and tang. Don’t forget to add salt and pepper to taste. Now, gently mix all the ingredients. Be careful not to break the burrata too much. You want to keep those lovely cheese pieces intact. Finally, garnish with fresh basil leaves for a fresh finish. Serve immediately for the best taste! To make the best Peach Burrata Arugula Salad, you need ripe peaches. Look for peaches that give slightly when you press them. They should smell sweet, too. This means they are ready to eat. For the burrata cheese, choose a fresh ball. Look for a creamy texture and a soft outer layer. You want it to be as fresh as possible for the best taste. Balancing flavors is key in this salad. Use about 4 cups of arugula. It provides a peppery taste that pairs well with the sweetness of the peaches. Add 2 sliced peaches to keep it fruity and fresh. For creaminess, use 8 ounces of burrata cheese. This gives the salad a rich flavor. You also want a 1/4 cup of candied pecans or walnuts for crunch. Finally, add 1/4 cup of halved cherry tomatoes for extra color and juiciness. Mixing these ingredients in the right amounts makes a perfect blend. A beautiful salad is a joy to serve. Start by placing the arugula on a large plate or bowl. Then, arrange the peach slices and cherry tomatoes on top. Tear the burrata into pieces and scatter it over the salad. Sprinkle the nuts last for a nice crunch. For a pop of color, add fresh basil leaves on top. Drizzle some olive oil and balsamic glaze to finish. This creates a stunning dish that is sure to impress your guests. Pro Tips Choose Ripe Peaches: Make sure your peaches are slightly soft to the touch for the best sweetness and flavor. Fresh Burrata: Use fresh burrata cheese for a creamier texture; it complements the salad beautifully. Toasting Nuts: Lightly toast the pecans or walnuts to enhance their flavor and add extra crunch to the salad. Serving Fresh: Serve the salad immediately after tossing to maintain the freshness of the ingredients. {{image_2}} You can switch up the cheese in this salad. If you want a different taste, try goat cheese. It has a tangy flavor that goes well with peaches. Feta cheese is another great option. It gives a salty kick that balances the sweetness of the fruit. For a creamier texture, use cream cheese. Each cheese adds a unique twist to your salad. You can change the fruits based on what is in season. Try using ripe nectarines or plums for a similar sweetness. Berries like strawberries or blueberries can also work well. They add a burst of color and flavor. If you want a tropical vibe, mango slices are a fun choice. Each fruit brings its own taste and makes your salad special. Instead of candied pecans, you can use almonds or walnuts. They add a nice crunch and flavor. For a fun twist, try sunflower seeds or pumpkin seeds. These seeds add a nutty taste and are great for a nut-free option. If you like a bit of sweetness, use candied walnuts. They pair nicely with the cheese and fruit. Each choice of nuts or seeds can change the whole salad experience. To keep your Peach Burrata Arugula Salad fresh, store it in a sealed container. Use a glass or plastic container with a lid. Make sure to eat it within two days for the best taste. If you have extra burrata, keep it separate. This way, it stays creamy and fresh. To keep salad ingredients fresh longer, store each item separately. Place arugula in a breathable bag in the fridge. Store peaches in a cool spot. If they are ripe, eat them soon. For the candied pecans, keep them in an airtight jar. This helps keep their crunch. You should not reheat this salad. The fresh ingredients do not hold up well to heat. Instead, enjoy the leftovers cold. If you want a warm dish, consider making a new salad with fresh ingredients. This keeps the flavors vibrant and tasty. The Peach Burrata Arugula Salad lasts about 2 days in the fridge. To keep it fresh, store it in an airtight container. The arugula may wilt, but the flavors will still be great. I recommend eating it within one day for the best taste and texture. Yes, you can make this salad ahead of time! To prep, wash and dry the arugula. Slice the peaches and tomatoes. Keep the nuts and burrata separate until serving. This way, the salad stays fresh. Toss everything together just before you eat. This salad pairs well with grilled chicken or fish. You can also serve it with crusty bread. A light pasta dish or a charcuterie board complements it well too. For a drink, try a crisp white wine or sparkling water with lemon. This Peach Burrata Arugula Salad combines fresh arugula, ripe peaches, and creamy burrata for a tasty treat. You simplified steps ensure anyone can make it. Remember to choose the best ingredients for great flavor. Also, don't hesitate to explore variations and get creative with toppings. Proper storage keeps leftovers fresh, so you can enjoy this salad later. Use these tips and enjoy your delicious creation. Give it a try and impress your friends!

Peach Burrata Arugula Salad Fresh and Tasty Delight

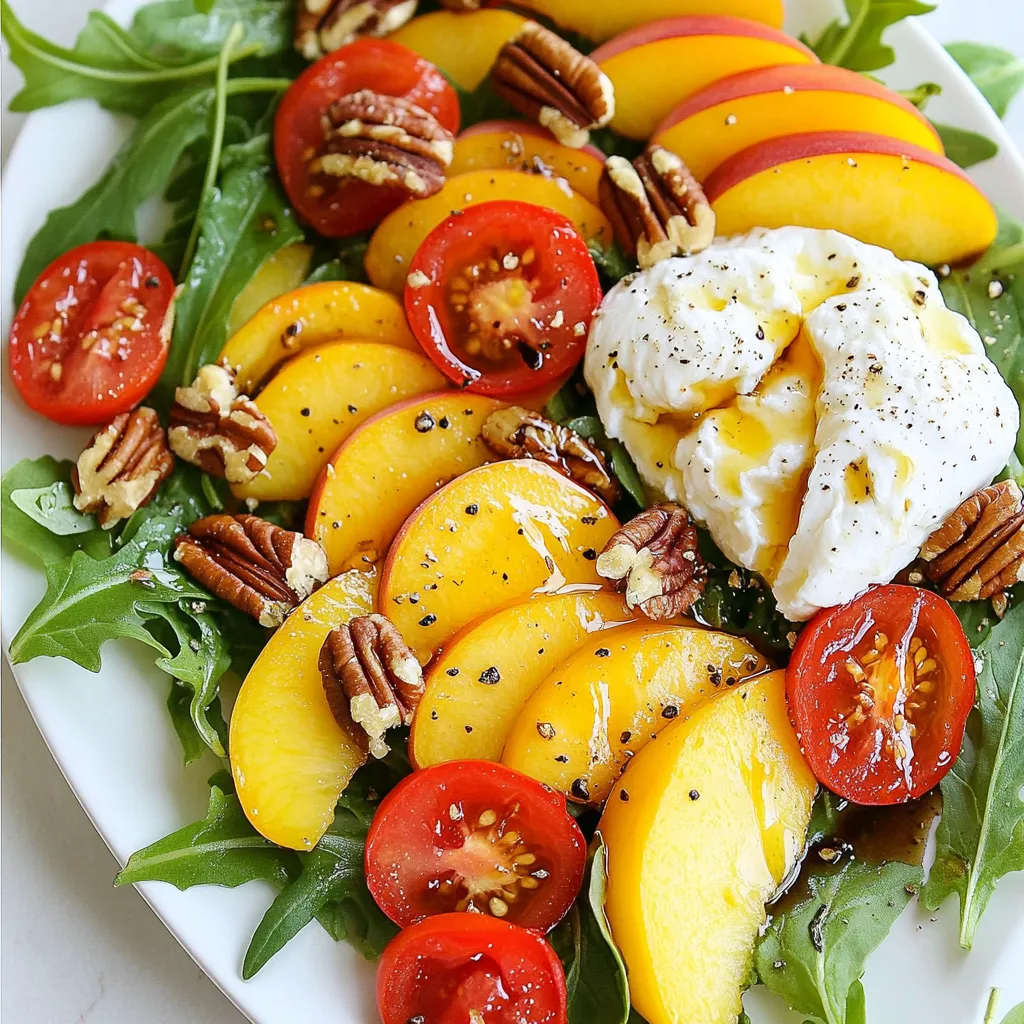
Looking for a fresh and tasty delight? Try this Peach Burrata Arugula Salad! It’s simple to make and full of

Older posts
Newer posts
← Previous Page1 … Page123 Page124 Page125 … Page132 Next →

dsad

© 2025 pureeatsnow • Built with GeneratePress

Our Policies

  • Copyright Policy
  • Cookie Policy
  • GDPR Policy
  • Privacy Policy
  • Disclaimer
  • Terms Of Use

More Information

  • Home
  • About
  • Contact
  • Appetizers
  • Dessert
  • Dinner
  • Drinks
©2025, pureeatsnow About Back To Top