Skip to content
DisclaimerTerms Of UseGDPR PolicyCookie Policy

pureeatsnow

  • Home
  • Drinks
  • Appetizers
  • Dinner
  • Dessert
  • About
  • Contact
  • Privacy Policy
DisclaimerTerms Of UseGDPR PolicyCookie Policy

Rachel

To make BBQ chicken flatbread, gather these ingredients: - 2 cups cooked chicken, shredded - 1/2 cup BBQ sauce (your favorite variety) - 4 flatbreads (store-bought or homemade) - 1 cup shredded mozzarella cheese - 1/2 cup red onions, thinly sliced - 1/2 cup corn kernels (fresh or canned) - 1/4 cup cilantro, chopped (for garnish) - 1 tablespoon olive oil - Salt and pepper to taste You can change up the cheese by using cheddar or pepper jack for extra flavor. For the chicken, try using rotisserie chicken for ease and a great taste. If you want to make it spicy, add jalapeños or hot sauce. You can also switch the flatbread for pita or naan for a different twist. Use black beans instead of corn for added protein and fiber. When picking chicken, choose breast meat that looks moist and not dried out. For the BBQ sauce, taste a few brands to find your favorite. Fresh cheese will give you the best melt, so avoid pre-shredded varieties if you can. Select flatbreads that feel soft and pliable. For veggies, look for bright colors and firm textures. Fresh cilantro should smell fragrant and green. Always check the expiration dates on canned goods and sauces to ensure freshness. {{ingredient_image_1}} 1. First, preheat your oven to 400°F (200°C). This step warms your oven for even cooking. 2. Next, take your cooked chicken and put it in a mixing bowl. Add 1/2 cup of BBQ sauce. Toss the chicken until it’s fully coated. This makes the chicken flavorful. 3. Now, grab your flatbreads. Lightly brush each one with olive oil. Season them with salt and pepper. This adds taste to the base. 4. Place the flatbreads on a baking sheet lined with parchment paper. This keeps them from sticking. 5. Evenly distribute the BBQ chicken mixture over the flatbreads. Make sure every piece gets enough chicken. 6. Sprinkle 1 cup of shredded mozzarella cheese on top of the chicken. This adds a melty, cheesy layer. 7. Add 1/2 cup of thinly sliced red onions and 1/2 cup of corn kernels on each flatbread. They give a nice crunch and sweetness. 8. Bake the flatbreads in your preheated oven for about 10-12 minutes. You want the cheese to melt and bubble. 9. Once done, take them out and let them cool for a couple of minutes. This helps with slicing. 10. Garnish with 1/4 cup of chopped cilantro before slicing them into wedges. Serve warm for the best taste. - Use fresh ingredients for the best flavor. Fresh chicken and veggies make a big difference. - Don’t overload the flatbreads with toppings. This helps them cook evenly. - Bake until the cheese is bubbly and slightly golden. This gives a nice texture. - Let the flatbreads cool slightly before slicing. This helps keep the toppings in place. - Baking sheet: For holding the flatbreads during baking. - Parchment paper: To prevent sticking and make cleanup easy. - Mixing bowl: For combining the chicken and BBQ sauce. - Brush: To apply olive oil to the flatbreads. - Knife: To slice the flatbreads after baking. - Measuring cups: For accurate ingredient amounts. To keep your BBQ chicken flatbread fresh, store it in an airtight container. This helps prevent moisture loss. If you have more than one piece, separate layers with parchment paper. This way, they won't stick together. You can keep it in the fridge for up to three days. If you want to save it for longer, consider freezing it. Wrap each flatbread in plastic wrap and then in foil. This helps keep the flavor and texture intact. Reheating flatbreads can be tricky. To get them warm without getting soggy, use the oven. Preheat your oven to 350°F (175°C). Place the flatbread on a baking sheet. Heat for about 10 minutes. Check that the cheese is melty and the flatbread is warm. You can also use a skillet. Heat it on medium-low and place the flatbread inside. Cover it with a lid for even heating. This keeps the bottom crispy and warms the toppings nicely. One common mistake is using too much BBQ sauce. This can make the flatbread soggy. Use just enough to coat the chicken well. Another mistake is not preheating the oven. This can lead to uneven cooking. Always ensure your oven is hot before baking. Lastly, don't skip the garnishing. Fresh cilantro adds flavor and a vibrant look. Remember, presentation matters! Pro Tips Use Grilled Chicken: For an extra layer of flavor, consider using grilled chicken instead of plain cooked chicken. The smoky taste will enhance your flatbreads significantly. Experiment with BBQ Sauce: Try different varieties of BBQ sauce to find your perfect match. From sweet to spicy, each type can create a unique flavor profile for your flatbreads. Add Vegetables: Incorporate more veggies like bell peppers or jalapeños for added crunch and nutrition. This will elevate the freshness of the dish. Serve with Dipping Sauce: Pair your BBQ chicken flatbreads with a side of ranch or blue cheese dressing for dipping to add a creamy element to each bite. {{image_2}} You can easily make a vegetarian flatbread. Swap the chicken for shredded jackfruit or mushrooms. Both options soak up BBQ sauce well. For a vegan choice, use plant-based cheese or skip cheese altogether. Add more veggies like bell peppers or zucchini for crunch. These swaps keep the dish tasty and filling. Explore different flavors by changing the BBQ sauce. Try a spicy or smoky sauce for a kick. You can also add fruits like pineapple or mango for sweetness. Mix in different cheeses like cheddar or gouda for a rich taste. For herbs, consider basil or mint to freshen the dish. The choices are endless, so have fun! Flatbreads come in many forms. You can use naan, pita, or even whole wheat wraps. Each option gives a unique taste and texture. For a gluten-free choice, look for flatbreads made from almond or coconut flour. Choose what fits your diet and flavor goals. The flatbread is the base, so pick one you love! To keep your BBQ Chicken Flatbread fresh, you have two great options: refrigerating or freezing. If you plan to eat leftovers within a few days, store them in the fridge. Wrap each flatbread tightly in plastic wrap or foil. Place them in an airtight container to keep moisture out. They’ll stay good for about 3-4 days. For longer storage, freezing is the way to go. Place the flatbreads in a freezer-safe bag. Squeeze out excess air before sealing. They can last up to three months in the freezer. To make your BBQ Chicken Flatbread last longer, avoid mixing toppings before storing. Keep the toppings separate until you’re ready to eat. This way, the flatbread stays crisp. You can also use parchment paper between layers if stacking. This keeps them from sticking together. Lastly, always cool your flatbreads completely before storing. This prevents moisture buildup, which can make them soggy. When you're ready to enjoy your leftovers, reheating them well is key. For the best texture, use the oven. Preheat it to 350°F (175°C). Place the flatbreads on a baking sheet for about 10-12 minutes. This warms them through and keeps them crispy. If you’re short on time, you can use the microwave. Heat them on a microwave-safe plate for 30 seconds. Check and add more time as needed. Just remember, the microwave may make the flatbread soft. Yes, you can use store-bought BBQ sauce. It saves time and still tastes great. Just choose your favorite brand. Some sauces are sweeter, while others are tangy. Experiment with different flavors to find what you like best. Great side dishes add balance to your meal. Try these options: - Coleslaw: The crunch pairs well with the flatbread. - Corn on the cob: Sweet and juicy, it complements the BBQ flavor. - Mixed greens salad: A fresh salad adds lightness to the meal. - Potato wedges: Crispy potatoes are always a hit. These sides will enhance your BBQ Chicken Flatbread experience. To change the spice level, add or reduce heat in the BBQ sauce. For mild taste, choose a sweet sauce. For heat, mix in hot sauce or chili powder. You can also add spicy toppings, like jalapeños. Taste as you go to get it just right. In this post, we explored all aspects of making BBQ Chicken Flatbread. We covered essential ingredients, cooking steps, and useful tips for a perfect dish. I shared variations to suit different tastes, along with storage info to keep your leftovers fresh. Remember, using quality ingredients and following my steps will lead to a tasty meal every time. Enjoy experimenting with flavors, and don’t hesitate to make it your own. Happy cooking!

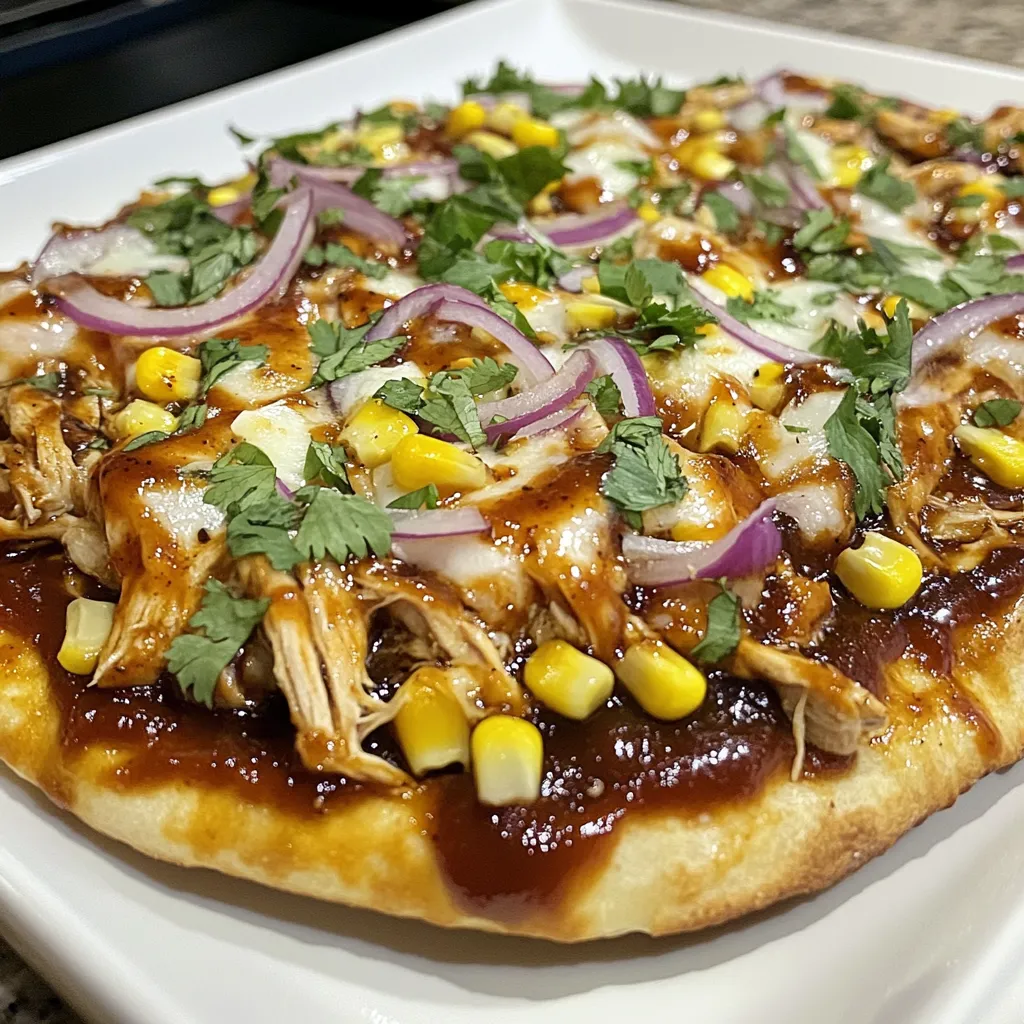
BBQ Chicken Flatbread Flavorful and Simple Recipe

Get ready to enjoy BBQ chicken flatbread like never before! This flavorful and simple recipe combines tender chicken, zesty BBQ

For these tasty honey lime shrimp tacos, gather the following: - 1 lb shrimp, peeled and deveined - 2 tablespoons honey - 2 tablespoons lime juice - 1 teaspoon lime zest - 1 teaspoon chili powder - 1 teaspoon cumin - 2 tablespoons olive oil - Salt and pepper to taste - 8 small corn tortillas - 1 cup red cabbage, shredded - 1 avocado, sliced - Fresh cilantro, for garnish - Lime wedges, for serving These ingredients blend together to create a fresh and flavorful dish. The honey and lime bring a sweet and tangy taste that pairs perfectly with the shrimp. You might want to add some extra flair to your tacos. Here are some optional toppings: - Diced tomatoes - Sliced jalapeños - Crumbled queso fresco - Sour cream or Greek yogurt Feel free to mix and match toppings. These additions can enhance the taste and add some color to your dish. To make these tacos, you'll need a few key tools: - A mixing bowl for the marinade - A whisk to blend ingredients - A grill or skillet for cooking shrimp - A separate skillet for warming tortillas Using the right equipment helps ensure you cook the shrimp perfectly and warm the tortillas just right. This way, you get a taco that is both delicious and visually appealing. {{ingredient_image_1}} To start, gather your ingredients for the marinade. You will need: - 2 tablespoons honey - 2 tablespoons lime juice - 1 teaspoon lime zest - 1 teaspoon chili powder - 1 teaspoon cumin - 2 tablespoons olive oil - Salt and pepper to taste In a bowl, mix the honey, lime juice, lime zest, chili powder, cumin, olive oil, salt, and pepper. Use a whisk to blend everything until smooth. This mixture will give your shrimp a sweet and tangy kick. Next, add 1 pound of peeled and deveined shrimp to the marinade. Make sure every shrimp is coated well. Cover the bowl and let it sit for 15 to 20 minutes. This step is key! It allows the shrimp to absorb all those great flavors. Heat a grill or skillet over medium-high heat. Once hot, add the marinated shrimp in a single layer. Cook them for about 3 to 4 minutes on each side. You will know they are done when they turn opaque. Remove them from the heat and set aside. While the shrimp cooks, warm 8 small corn tortillas in a separate skillet over low heat. Heat them for about 30 seconds on each side. They should be pliable and ready for the tacos. Now, you can assemble your tacos by placing the cooked shrimp into each tortilla. Top with shredded red cabbage and sliced avocado. Enjoy with fresh cilantro and lime wedges for added zest! For perfect shrimp, start with fresh or thawed shrimp. Ensure they are peeled and deveined. The shrimp need a quick cook time. Cook them for about 3-4 minutes on each side. They should turn opaque when done. Overcooking makes them tough. Keep an eye on the color. If they curl up, they are ready! Warming corn tortillas helps them stay soft and flexible. You can use a skillet or a griddle. Heat the skillet on low. Place the tortilla in the pan for about 30 seconds. Flip it over and heat the other side. They should be warm but not crispy. You can stack them in a clean cloth to keep them warm. You can add more zest to your tacos. Try diced tomatoes or chopped onions for crunch. Fresh jalapeños can add heat. A sprinkle of feta cheese gives a nice flavor twist. Lime wedges on the side help enhance the taste. Fresh herbs like cilantro add a pop of freshness. Mix and match until you find your favorite combo! Pro Tips Marinate for Maximum Flavor: Allow the shrimp to marinate for at least 20 minutes to absorb all the delicious honey-lime flavor. Perfectly Cooked Shrimp: Cook the shrimp until they are just opaque and curl into a C shape; overcooking can make them tough. Soft Tortillas: Warming the corn tortillas in a skillet makes them more pliable and enhances their flavor. Fresh Garnishes: Adding fresh cilantro and lime wedges at the end will brighten the dish and enhance the flavors. {{image_2}} To add heat, mix in some diced jalapeños or a few drops of hot sauce. You can sprinkle red pepper flakes on the shrimp while they cook. This will give your tacos a nice kick. The sweet honey and zesty lime will balance the spice well. If you like it hot, try using a spicy chili powder instead. If you want a meatless option, use grilled vegetables instead of shrimp. Bell peppers, zucchini, and corn work great. You could also use black beans or chickpeas for protein. Marinate the veggies in the same honey-lime mix for flavor. These options keep the dish fresh and tasty. Serve your tacos with a side of rice or beans. A fresh salad with lime dressing pairs nicely too. Chips and salsa make a fun snack on the side. You can also add a creamy dip, like guacamole, for extra flavor. Don’t forget lime wedges; they add a zesty touch to every bite! To store leftover shrimp tacos, place them in an airtight container. Keep them in the fridge for up to two days. If you have extra shrimp, store them separately from the tortillas. This helps keep the tortillas fresh. Adding the toppings later also helps maintain their crunchiness. To reheat, warm the shrimp in a skillet over low heat. This keeps them juicy and tasty. Heat the tortillas in a separate pan for about 30 seconds on each side. This method makes them soft and warm, just like fresh. You can also use the microwave, but be careful not to overheat. You can freeze the shrimp before cooking. Place them in a freezer bag and seal tightly. They will last for about three months. When you're ready to cook, thaw the shrimp in the fridge overnight. Cook them as you normally would. Avoid freezing the cooked shrimp as they may lose texture. Honey Lime Shrimp Tacos are a tasty dish made with shrimp marinated in honey and lime. The shrimp get a sweet and tangy flavor that blends well with spices like chili powder and cumin. You serve them in warm corn tortillas, topped with crunchy red cabbage and creamy avocado. This meal is bright, fresh, and perfect for any taco night. Yes, you can use frozen shrimp for this recipe. Just make sure to thaw them first. You can place them in cold water for about 15-20 minutes. After thawing, peel and devein them if they are not prepped. The flavor will still be great, and it saves time when fresh shrimp aren't available. To make your shrimp tacos healthier, consider these tips: - Use less honey in the marinade to cut sugar. - Add more veggies like diced tomatoes or bell peppers for extra nutrients. - Swap corn tortillas for whole-grain or lettuce wraps for fewer carbs. - Use avocado in place of sour cream to keep it creamy but healthy. These changes keep the flavor while boosting the nutrition in your meal. In this post, I covered essential ingredients, step-by-step instructions, and helpful tips for shrimp tacos. I shared tasty variations and storage tips to keep leftovers fresh. Remember, the key is to marinate well, cook shrimp properly, and try different toppings. Enjoy your cooking and experiment with flavors! Shrimp tacos can be easy and fun. With these tips, you can make a delicious meal every time.

Honey Lime Shrimp Tacos Flavorful and Simple Recipe

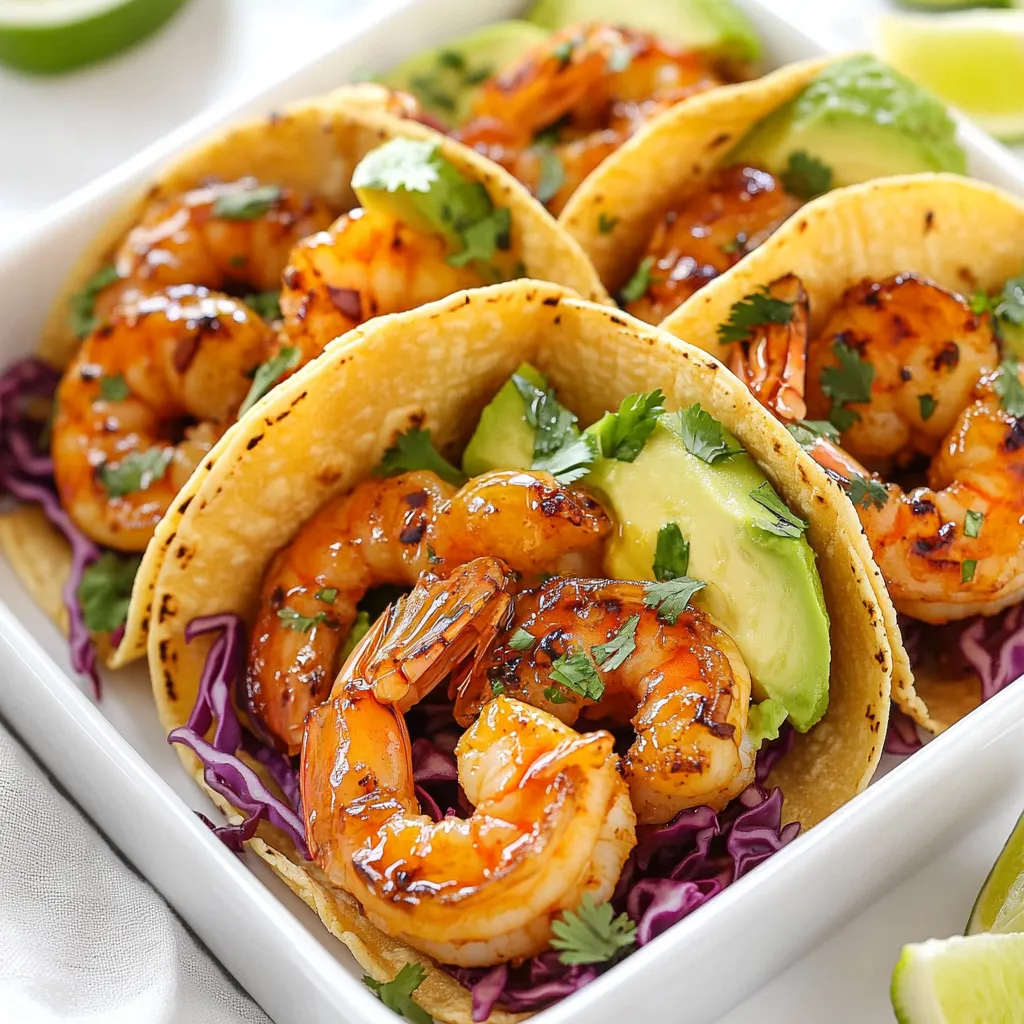
Welcome to the world of Honey Lime Shrimp Tacos, where bold flavors meet simple prep! If you love fresh, tasty

- 1 cup quinoa, rinsed - 2 boneless, skinless chicken breasts - 1/2 cup fresh cilantro, chopped Quinoa is a great grain. It cooks well and is full of protein. Chicken provides flavor and is easy to cook. Cilantro adds a fresh taste that makes this dish special. - 2 cups chicken broth (or water) - 1 tablespoon olive oil - 1 teaspoon cumin - 1 teaspoon paprika - Salt and pepper to taste - Juice of 2 limes - Zest of 1 lime - 1 cup cherry tomatoes, halved Chicken broth gives the quinoa a rich flavor. Olive oil keeps the chicken moist. Cumin and paprika add warmth to the dish. Lime juice and zest brighten the meal, while tomatoes add a splash of color. - 1 jalapeño, diced (for heat) - 1 avocado, diced You can add jalapeño for some heat, if you like spice. Avocado adds creaminess and balances the flavors. You can mix and match these ingredients to fit your taste. {{ingredient_image_1}} First, rinse the quinoa in cold water. This helps remove any bitter taste. Pour 1 cup of rinsed quinoa into a medium saucepan. Add 2 cups of chicken broth or water. Bring it to a boil. Once it starts boiling, lower the heat. Cover the pot and let it simmer for about 15 minutes. The quinoa will absorb all the liquid. After 15 minutes, fluff it gently with a fork. Set it aside while you cook the chicken. While the quinoa cooks, take the chicken breasts. Season both sides with cumin, paprika, salt, and pepper. Heat 1 tablespoon of olive oil in a skillet over medium-high heat. Once the oil is hot, add the chicken breasts. Cook them for about 6-7 minutes on each side. You want them golden brown and cooked through. Use a meat thermometer to check if the internal temperature reaches 165°F. When done, remove the chicken from the skillet. Let it rest for a few minutes before slicing it into strips. In a large mixing bowl, mix the cooked quinoa with the juice and zest of 2 limes. Add 1/2 cup of chopped cilantro, 1 cup of halved cherry tomatoes, and 1 diced avocado. If you like spice, toss in a diced jalapeño. Gently stir everything together to combine. Serve the quinoa mixture on a plate and top it with the sliced chicken. Add more cilantro on top if you wish for extra flavor. To get the best quinoa, stick to the right water ratio. Use 2 cups of chicken broth or water for every 1 cup of quinoa. This helps the quinoa cook evenly and absorb flavors well. After cooking, you need to fluff it. Use a fork to gently stir the quinoa. This makes it light and airy, which is perfect for mixing. Getting the chicken golden brown is key. Heat olive oil in your skillet over medium-high heat. Season each breast well with cumin, paprika, salt, and pepper. Cook the chicken for 6-7 minutes on each side. This gives it that nice, crispy look. To check if it’s done, use a meat thermometer. The chicken should reach 165°F (75°C) inside. Add extra garnishes for more flavor. Fresh cilantro on top can boost the taste. You can also add lime zest for an extra zing. If you like, marinate the chicken before cooking. A simple mix of lime juice, olive oil, and spices will infuse great flavor. Let it sit for about 30 minutes for best results. Pro Tips Rinsing Quinoa: Always rinse quinoa before cooking to remove its natural coating, called saponin, which can impart a bitter taste. Resting Chicken: Let the chicken rest for a few minutes after cooking. This helps retain its juices for a more tender bite. Fresh Ingredients: Use fresh lime juice and cilantro for the best flavor. Dried herbs and bottled lime juice won’t provide the same freshness. Customize the Heat: If you prefer more heat, adjust the amount of jalapeño or add a pinch of cayenne pepper to the quinoa mixture. {{image_2}} You can swap the chicken for tofu. Tofu absorbs flavors well, making it tasty. Just cut it into cubes and sauté it like chicken. You can also use shrimp or beef. Cook shrimp until pink and tender. For beef, choose thin strips and cook until browned. Each option adds a unique twist to the dish. If you want to change the grain, try brown rice or couscous. Brown rice gives a chewy texture. Couscous cooks quickly and adds a fluffy feel. You may also blend quinoa with other grains, like farro or barley. Each grain brings its own flavor and texture. To change the flavor, add different herbs like parsley or basil. Fresh herbs brighten the dish and add depth. You can also spice it up by adding cayenne or chili powder. This will give your meal a nice kick. Experiment with flavors to find your perfect mix! To store leftovers, let the dish cool to room temperature. Then, place the quinoa and chicken in an airtight container. Make sure to keep the chicken and quinoa separate if you prefer. This helps maintain their textures. For the best containers, use glass or BPA-free plastic. These materials keep food fresh and safe. Label your containers with the date, so you know when to eat them. You can freeze quinoa and chicken. First, cool the dish completely. Pack the quinoa and chicken in freezer-safe bags or containers. Press out excess air to prevent freezer burn. When you want to enjoy it again, thaw the dish in the fridge overnight. For reheating, use the microwave or a skillet. Add a splash of water to keep it moist. You can keep leftovers in the fridge for about 3 to 4 days. If stored well, they can last up to 3 months in the freezer. Look for signs of spoilage. If the quinoa has an off smell or the chicken looks discolored, it is best to toss it. Cilantro Lime Quinoa Chicken takes about 40 minutes to make. You will need 15 minutes for prep and 25 minutes for cooking. Yes, you can make this dish ahead of time. Cook the quinoa and chicken, and then store them separately. This keeps the chicken moist. Just reheat when ready to eat. You can also mix in the veggies and lime juice right before serving. You can serve this dish with many sides. Here are some great options: - Steamed broccoli - Roasted sweet potatoes - Mixed greens salad - Fresh corn on the cob - Grilled zucchini Each of these pairs well and adds more flavor to your meal. This blog post showed you how to make Cilantro Lime Quinoa Chicken. You learned about the main ingredients like quinoa, chicken, and cilantro, plus useful cooking tips. You also explored variations with different proteins and grains. Incorporating these steps makes cooking easy and tasty. This dish is perfect for meal prep and leftovers, offering flavor and nutrition. Ready to enjoy your culinary skills?

Cilantro Lime Quinoa Chicken Flavorful One-Pan Meal

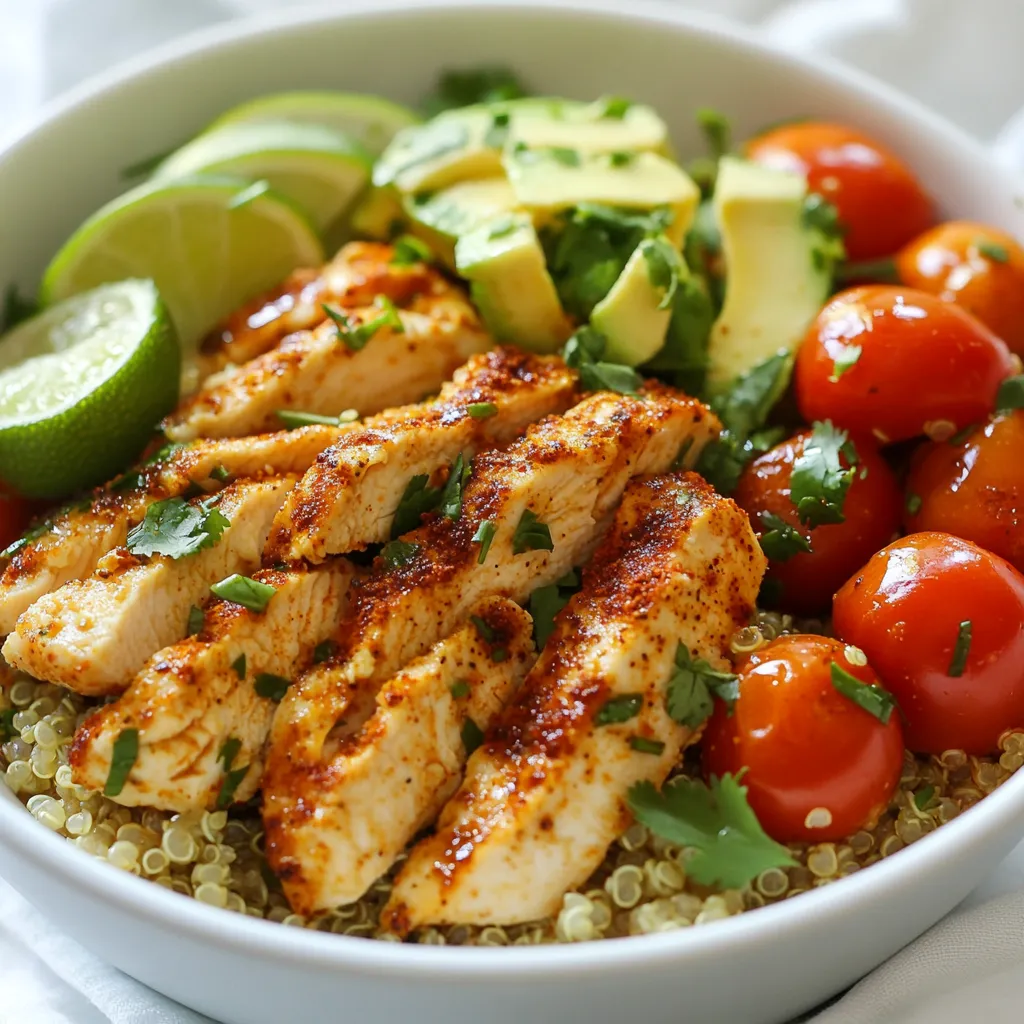
Are you ready to spice up your weeknight dinners? Cilantro Lime Quinoa Chicken is a flavorful, one-pan meal that will

To make spicy garlic edamame, you will need: - 2 cups edamame in pods (fresh or frozen) - 3 tablespoons olive oil - 4 cloves garlic, minced - 1 teaspoon red pepper flakes (adjust for spice level) - 1 tablespoon soy sauce - 1 tablespoon sesame oil - 1 teaspoon honey or agave syrup - Sea salt to taste - 1 tablespoon sesame seeds (for garnish) - Chopped green onions (for garnish) These ingredients work together to create a tasty, spicy dish. The edamame serves as a great source of protein. You can swap ingredients if you don't have them. Here are some ideas: - Edamame: Use green peas or lima beans as a substitute. - Olive oil: Can be replaced with avocado oil or vegetable oil. - Red pepper flakes: Try cayenne pepper for heat or paprika for less spice. - Soy sauce: Use tamari for a gluten-free option or coconut aminos. - Sesame oil: Can be replaced with peanut oil or omitted if needed. These options still keep the dish flavorful and satisfying. Edamame is nutritious and packed with health benefits. Here’s a quick look at what it offers: - Calories: About 120 per cup - Protein: 11 grams - Fat: 5 grams (mostly healthy fats) - Carbohydrates: 9 grams - Fiber: 4 grams - Vitamins: High in vitamin K and folate - Minerals: Good source of iron and magnesium Including edamame in your diet can help support muscle health and provide fiber for digestion. It’s a smart choice for a healthy snack or side dish. {{ingredient_image_1}} To start, you need to prepare the edamame pods. If you choose frozen edamame, boil a pot of water. Add the edamame and cook for 3-5 minutes. You want them tender but not mushy. If you use fresh edamame, rinse them well under cold water. Once cooked or rinsed, drain the edamame and set them aside. Now, let's make the spicy garlic sauce. In a large skillet, heat 3 tablespoons of olive oil over medium heat. Add 4 minced garlic cloves. Sauté the garlic for about 1-2 minutes until it smells great, but be careful not to burn it. Next, stir in 1 teaspoon of red pepper flakes. This adds a nice kick. Cook for an extra 30 seconds to release the flavor. It's time to combine everything! Add the cooked edamame to the skillet. Toss them gently to coat with the garlic oil. Pour in 1 tablespoon of soy sauce, 1 tablespoon of sesame oil, and 1 teaspoon of honey or agave syrup. Mix well so the flavors blend. Cook for another 2-3 minutes. This lets the edamame soak up the spicy goodness. Finally, season with sea salt to your taste. Transfer the spicy garlic edamame to a serving bowl. Sprinkle sesame seeds and chopped green onions on top for a lovely finish. Enjoy! To make delicious spicy garlic edamame, it’s key to season them well. After cooking, toss the edamame in the skillet with the sauce quickly. This helps each pod soak up the flavor. Add sea salt at the end for the best taste. Taste one pod and adjust the salt as needed. You can boost flavor by adding a squeeze of lime juice. This fresh touch brightens the dish. For a nutty flavor, toss in some chopped peanuts or cashews. You can also mix in some diced bell peppers or mushrooms for extra texture. These additions make the dish more fun and colorful. Everyone has different spice limits. To make your edamame milder, cut the red pepper flakes in half. You can also add a bit of sugar to balance the heat. If you love spice, try adding chili oil or sriracha to the sauce. Just mix it in before adding the edamame. Always remember to taste as you go! Pro Tips Fresh vs. Frozen Edamame: Using fresh edamame can enhance the flavor and texture, but frozen options are just as nutritious and convenient. Choose based on availability and preference. Adjusting Spice Levels: If you're sensitive to heat, start with fewer red pepper flakes and taste as you go. You can always add more for a spicier kick! Garnish for Flavor: Don't skip the sesame seeds and green onions! They add crunch and a burst of freshness that complements the spicy garlic flavor. Serving Suggestions: This dish pairs well with rice or noodles, making it a great side or appetizer. Consider serving it alongside a dipping sauce for extra flavor! {{image_2}} You can change the heat in spicy garlic edamame easily. If you like it mild, use less red pepper flakes. For medium spice, stick to the recipe. For extra heat, add more flakes or fresh chili. You can also try adding a splash of hot sauce for a kick. Flavors matter too! Try adding lime juice for a zesty touch. You could also use ginger for a warm, earthy flavor. Mixing in different herbs can make it unique. Fresh cilantro or basil can brighten the dish. This recipe is already vegetarian and vegan-friendly. The ingredients are plant-based and full of flavor. If you want to keep it vegan, use agave syrup instead of honey. You can also add more veggies for variety. Sliced bell peppers or carrots can add color and nutrition. Toss in some spinach for extra greens. These additions keep it healthy and tasty. Serving spicy garlic edamame can be fun! You can use it as a snack or appetizer. It pairs well with sushi or rice bowls. Try serving it in small bowls for a party. Guests can enjoy it while mingling. You can also use it as a topping for salads. It adds a crunchy texture and boosts the flavor. For a unique twist, serve it on a bed of quinoa. This makes a great side dish that’s filling and nutritious. Remember to sprinkle sesame seeds and green onions on top for a nice finish! To store leftover edamame, let them cool first. Place them in an airtight container. You can keep them in the fridge for up to three days. Make sure to seal it tightly to keep the flavor fresh. Reheat edamame in a skillet over medium heat. Add a splash of olive oil if needed. Stir until heated through, usually about 2-3 minutes. You can also microwave them in short bursts, checking often. This way, they stay tasty and warm. If you want to save some for later, freezing is simple. First, cook the edamame as you normally would. Drain and let them cool completely. Next, place them in a freezer-safe bag. Remove as much air as possible before sealing. They can last up to six months in the freezer. When you’re ready to use them, just boil or steam directly from frozen! Cooking edamame takes about 3 to 5 minutes. If you use fresh edamame, rinse it first. Boil water in a pot and add the pods. You will know they are ready when tender. Yes, frozen edamame works great! Just boil it in water for 3 to 5 minutes. This saves time and still gives you tasty edamame. Edamame is packed with protein and fiber. It also has vitamins and minerals. These nutrients help with heart health and digestion. They are low in calories too, making them a healthy snack option. You can easily modify this recipe. For a gluten-free option, use tamari instead of soy sauce. If you want it vegan, replace honey with agave syrup. You can also reduce the oil or salt to fit your needs. In this article, we explored making tasty spicy garlic edamame. We covered ingredients, easy steps, and plenty of tips to improve flavor. You learned how to adjust spice levels and serve it well. Storing and reheating methods were also shared to keep your dish fresh. Overall, edamame is delicious and healthy. Try out the variations for fun meals. Enjoy cooking and have fun experimenting!

Spicy Garlic Edamame Flavorful and Easy Recipe

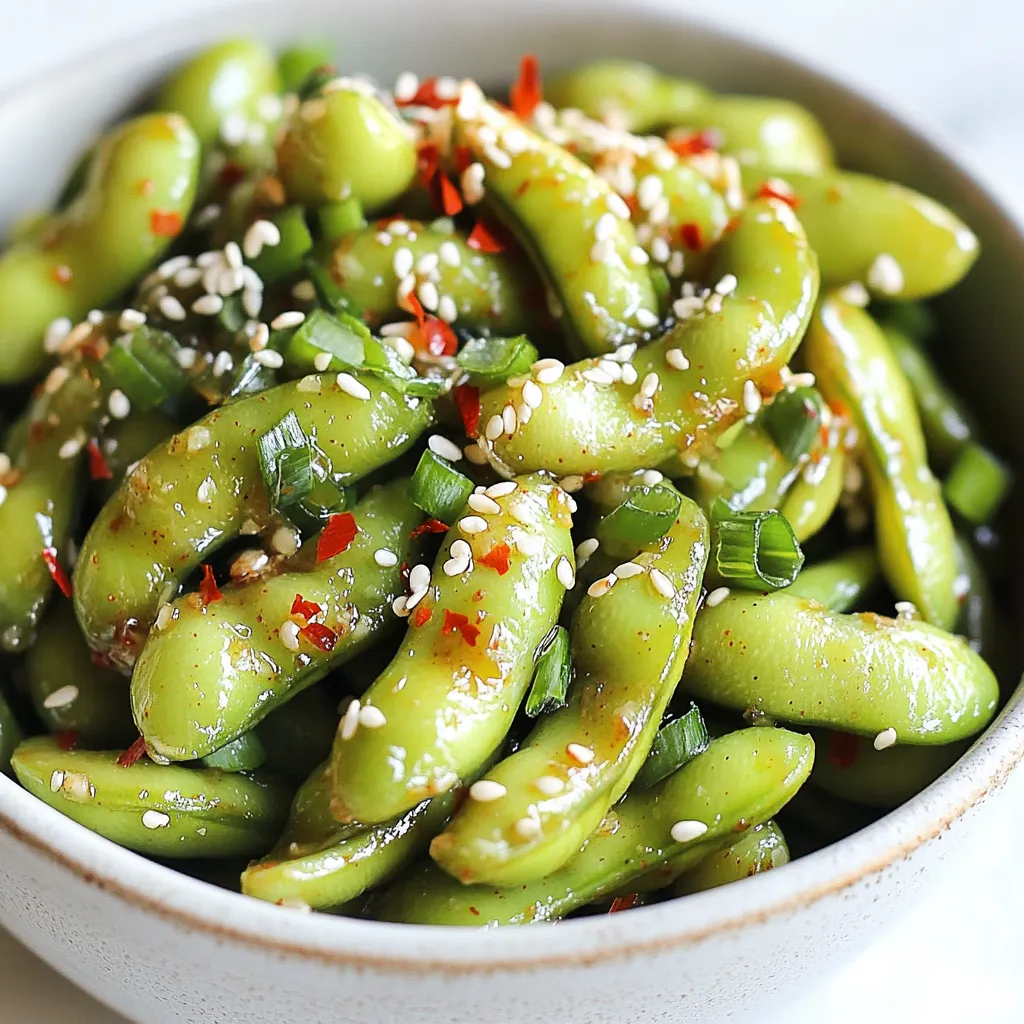
Looking for a snack that’s tasty, quick, and easy? You’re in the right place! This Spicy Garlic Edamame recipe combines

For the base of the meatloaf, I use a mix of ground beef and ground turkey. Each type brings its own unique flavor and texture. The beef adds richness, while the turkey keeps it lean. This combination makes for a well-rounded meatloaf that is both juicy and satisfying. You will need: - 1 lb ground beef - 1 lb ground turkey Cheese is a star in this recipe! I use both Parmesan and mozzarella. Parmesan gives a sharp taste and adds depth to the meat. Mozzarella melts beautifully and creates a gooey center. This blend ensures a delicious bite every time. You will need: - ½ cup grated Parmesan cheese - 1 cup shredded mozzarella cheese To enhance the taste, I add a few key flavorings. Pesto brings a fresh, herbaceous note, while garlic adds warmth. Dried Italian herbs provide a classic flavor profile. The breadcrumbs help bind everything together, and the egg adds moisture. Here’s the complete list: - ½ cup pesto sauce (store-bought or homemade) - 1 garlic clove, minced - 1 teaspoon dried Italian herbs - Salt and pepper to taste - 1 cup breadcrumbs - 1 large egg - 1 tablespoon olive oil {{ingredient_image_1}} Start by preheating your oven to 350°F (175°C). A warm oven cooks the meatloaf evenly. This step is key for a nice crust. In a large bowl, mix together the ground beef and turkey. Add the breadcrumbs, egg, Parmesan cheese, minced garlic, Italian herbs, salt, and pepper. Use your hands or a spoon to blend everything well. You want a uniform mix for even cooking. On a lined baking sheet, shape half of the meat mixture into a rectangle, about 1 inch thick. This is your base. Spread pesto sauce evenly over the meat. Next, sprinkle shredded mozzarella cheese on top. This adds a creamy, rich flavor. Now, take the remaining meat mixture and cover the cheese. Gently press down to seal it. Form it into a loaf shape. This keeps all the goodness inside. Drizzle olive oil over the top of the meatloaf. This helps keep it moist while baking. Place it in the oven and bake for 50-60 minutes. Use a meat thermometer to check if it hits 160°F (70°C). Once done, let it rest for about 10 minutes. This helps the juices stay in. Cut it into slices and serve warm. Pair it with roasted veggies or mashed potatoes for a tasty meal. Enjoy! To keep your meatloaf moist, use a mix of ground beef and turkey. The beef adds flavor, while the turkey keeps it light. Adding breadcrumbs helps too. They soak up moisture and keep the meatloaf tender. Don’t skip the olive oil drizzle before baking. It adds richness and helps lock in the juices. When you shape the meatloaf, make sure to flatten it evenly. This helps the stuffing spread well. After spreading the pesto, sprinkle the mozzarella cheese evenly. This way, every bite has that creamy goodness. Gently press the top layer of meat over the cheese to seal it in. This step keeps the flavors from escaping during baking. For a complete meal, serve your meatloaf with roasted vegetables or creamy mashed potatoes. The bright colors of the veggies will make your plate pop. For a nice touch, drizzle extra pesto over the top before serving. Garnish with fresh basil leaves for a burst of color and flavor. Serve it on a large platter, and let everyone dig in! Pro Tips Use Fresh Herbs: Fresh herbs can significantly enhance the flavor of your meatloaf. Consider adding chopped fresh basil or parsley to complement the pesto. Experiment with Fillings: Don’t hesitate to get creative with your stuffing! Try adding sun-dried tomatoes or roasted red peppers for an extra burst of flavor. Check for Doneness: Always use a meat thermometer to ensure your meatloaf is cooked through. The internal temperature should reach 160°F (70°C) for safe consumption. Rest Before Slicing: Allowing the meatloaf to rest helps retain its juices, ensuring each slice is moist and flavorful. Aim for at least 10 minutes of resting time. {{image_2}} You can swap mozzarella for other cheeses. Try using provolone for a sharper taste. Cheddar adds a nice kick, while gouda gives a rich flavor. If you want something creamier, consider using ricotta. Each cheese brings its own charm to the dish. Mix and match to find your favorite combo. Ground beef is classic, but you can mix it up! Ground pork adds sweetness. Ground chicken or turkey keeps it light and healthy. You can even use a blend of meats for more flavor. Each option changes the taste and texture. Don’t hesitate to experiment! Adding veggies can boost flavor and health. Chopped bell peppers or onions bring sweetness. Grated carrots add moisture and nutrition. Spinach or kale give a fresh touch. You can sauté them first for a deeper taste. Mixing in veggies keeps the meatloaf juicy and colorful! To store leftovers, let the meatloaf cool first. Then, wrap it tightly in plastic wrap or foil. You can also place it in an airtight container. This keeps the meatloaf fresh for about three to four days in the fridge. Always label with the date to track how long it’s been stored. When you're ready to enjoy the leftover meatloaf, preheat your oven to 350°F (175°C). Place the slices in a baking dish and cover with foil to keep them moist. Heat for about 15-20 minutes or until warmed through. You can also use a microwave. Just heat on medium power for 1-2 minutes, checking frequently to avoid overcooking. If you want to freeze the meatloaf, it’s best to do this before cooking. Shape the meatloaf and wrap it tightly in plastic wrap, then foil. Label it with the date. Freeze for up to three months. When you’re ready to cook, thaw it in the fridge overnight, then bake as directed. If you have leftover cooked meatloaf, you can freeze slices. Just make sure they are wrapped well. Yes, you can prepare the meatloaf in advance. Mix the ingredients, shape it, and place it in the fridge for up to 24 hours. This makes it easy to bake later. Just remember to cover it with plastic wrap to keep it fresh. The best way to reheat meatloaf is in the oven. Preheat your oven to 250°F (120°C). Place the sliced meatloaf in a baking dish, add a splash of broth or water, and cover with foil. Heat for about 20 minutes or until warm. This keeps the meatloaf moist and tasty. Absolutely! Homemade pesto is a great choice. It gives your meatloaf a fresh and vibrant flavor. Just use the same amount as you would with store-bought pesto. Plus, you can adjust the flavors to your liking. This blog post covered how to make a tasty meatloaf. We discussed ingredients like ground meats, cheese options, and extra flavors. I shared step-by-step instructions on baking and serving your meatloaf. Tips included keeping it moist and perfecting your stuffing technique. We explored fun variations, storage tips, and answered common questions. By trying these methods, you can create a meatloaf that everyone will love. Happy cooking!

Pesto Mozzarella Stuffed Meatloaf Savory Flavor Boost

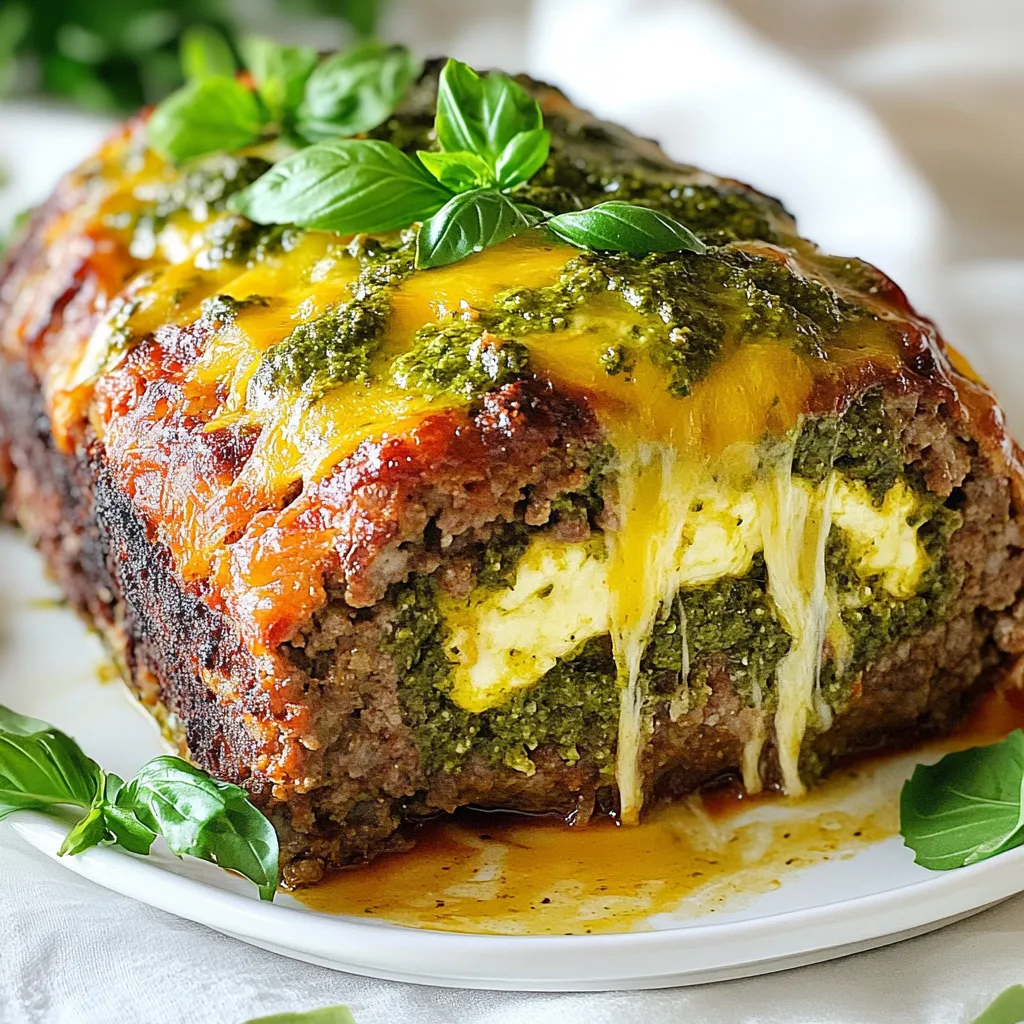
Are you ready to elevate your dinner game? This Pesto Mozzarella Stuffed Meatloaf brings a savory flavor boost to your

- 8 ounces whole wheat fusilli pasta - 1 cup cherry tomatoes, halved - 1 cucumber, diced - 1 bell pepper (any color), diced - 1/2 red onion, finely chopped - 1 cup Kalamata olives, pitted and halved - 1/2 cup feta cheese, crumbled - 1/4 cup fresh parsley, chopped - 1/4 cup olive oil - 2 tablespoons red wine vinegar (or lemon juice) - 1 teaspoon dried oregano - Salt and pepper to taste Whole wheat fusilli is hearty and adds fiber. Cherry tomatoes are sweet and juicy, adding freshness. Cucumbers bring crunch. Bell peppers add color and taste. Red onion gives a sharp bite, while Kalamata olives add a briny flavor. Feta cheese provides creaminess and tang. Fresh parsley adds brightness, and olive oil offers richness. Red wine vinegar gives a zesty kick, and dried oregano adds an aromatic touch. Salt and pepper enhance all the flavors. You can swap whole wheat pasta for gluten-free options like rice or corn pasta. Use vegan feta cheese to make it dairy-free. If you dislike olives, try artichoke hearts for a different taste. For a lower-calorie option, reduce the amount of olive oil. If you need a nut-free recipe, check for nut-based cheeses in your substitutions. Always taste as you go and adjust to your liking! {{ingredient_image_1}} First, bring a large pot of water to a boil. Add a pinch of salt for flavor. Then, add 8 ounces of whole wheat fusilli pasta. Cook it according to the package instructions until it is al dente. This usually takes about 8 to 10 minutes. When the pasta is done, drain it in a colander. Rinse it under cold water to cool it down. This step helps stop the cooking process and keeps the pasta firm. Set the pasta aside while you prepare the other ingredients. In a large mixing bowl, start adding your fresh ingredients. Add 1 cup of halved cherry tomatoes, 1 diced cucumber, and 1 diced bell pepper of your choice. Next, add 1/2 a finely chopped red onion for a bit of bite. Toss in 1 cup of pitted and halved Kalamata olives. Finally, sprinkle in 1/2 cup of crumbled feta cheese. Gently mix everything together. Make sure not to mash the feta; we want nice pieces to enjoy! Grab a smaller bowl for the dressing. In this bowl, whisk together 1/4 cup of olive oil and 2 tablespoons of red wine vinegar. If you prefer, you can use lemon juice instead. Add in 1 teaspoon of dried oregano and some salt and pepper to taste. Whisk well until everything is combined. This dressing will bring all the flavors together beautifully. Once your dressing is ready, pour it over the pasta and veggie mix. Toss everything gently until the pasta and vegetables are evenly coated. Add 1/4 cup of chopped fresh parsley for a bright finish. Cover the bowl and refrigerate for at least 30 minutes. This waiting time allows the flavors to meld together for a tasty experience! To boost the flavor, use fresh herbs like parsley and oregano. Fresh herbs add brightness and depth. Always taste your dressing before mixing. Adjust salt and pepper for your liking. If you want a tangy kick, add more vinegar or lemon juice. A bit of garlic in the dressing can enhance the overall taste too. For the best presentation, use a big, colorful bowl. You can also serve it in individual plates. Add extra parsley and a sprinkle of feta on top for a nice touch. This salad pairs well with grilled chicken or fish. For a full meal, add some crusty bread on the side. Chill the salad for at least 30 minutes before serving. This helps the flavors mix well. If you have more time, chilling for a few hours is even better. It allows the pasta to soak up the dressing. This salad tastes great as leftovers too, so make extra! Pro Tips Perfect Pasta: Cook the fusilli pasta just until al dente for the best texture. Overcooking can lead to a mushy salad. Chill Time: Allow the pasta salad to chill in the refrigerator for at least 30 minutes. This helps the flavors develop and meld together. Fresh Ingredients: Use fresh, high-quality vegetables and herbs for the best flavor. Seasonal produce will enhance the overall taste of your salad. Customizable Dressing: Feel free to adjust the dressing ingredients to your liking. Adding a bit of lemon zest or garlic can elevate the flavor profile. {{image_2}} You can boost your Greek pasta salad with protein. Grilled chicken adds great flavor. Simply chop it into bite-sized pieces. You can also use shrimp. Just sauté them until they turn pink. For a meatier option, add diced salami or pepperoni. For a vegetarian protein, try chickpeas. They add a nice crunch and extra nutrients. If you want a vegetarian twist, skip the feta cheese. Use a plant-based feta instead. It gives a similar taste without dairy. If you’re vegan, opt for a vegan dressing. Swap red wine vinegar for lemon juice for a fresh zing. You can also add avocado for creaminess. It makes the salad rich and smooth. Change your ingredients based on the seasons. In summer, use fresh basil instead of parsley. It adds a sweet, aromatic flavor. In fall, try roasted butternut squash for a warm touch. You can also add spinach in winter for a leafy green boost. Using seasonal produce makes your salad fresh and exciting. To keep your Greek pasta salad fresh, store it in an airtight container. Glass or plastic containers both work well. Make sure to seal the lid tightly to keep out air. This helps maintain flavor and texture. If you have leftovers, it's best to separate the salad from the dressing. You can mix the dressing in right before serving. When stored properly, Greek pasta salad lasts about 3 to 5 days in the fridge. The flavors will deepen as it sits, making it even tastier. However, if you added fresh herbs like parsley or basil, they might wilt. To keep your salad fresh, consider adding these herbs right before serving. You don’t need to reheat Greek pasta salad. It tastes best cold or at room temperature. If you prefer it warm, you can gently heat the pasta in the microwave for a few seconds before mixing it with the salad again. Make sure not to overheat it, as that can change the salad's texture. Enjoy it fresh, as that's when it's most delightful! Yes, you can use many pasta types. I love using rotini, penne, or even farfalle. Each shape holds the dressing well. Whole wheat or gluten-free options work too. Just cook them al dente. Rinse with cold water to stop cooking. This keeps the pasta firm and tasty. To make it gluten-free, choose gluten-free pasta. Many brands offer great options that taste good. Follow the same cooking steps for the gluten-free pasta. The rest of the ingredients are naturally gluten-free. Just check the labels on your olives and feta cheese. Serve your Greek Pasta Salad cold. I like to use a big, colorful bowl. This makes the salad pop! You can also use individual plates for a nice touch. Add a sprinkle of feta on top. Garnish with fresh parsley for extra color. This makes your dish more inviting and delicious! In this blog post, we explored the key ingredients for a tasty Greek pasta salad. We covered how to cook the pasta, mix fresh ingredients, and prepare the dressing. I shared tips for flavor and serving. Plus, we discussed variations with protein and seasonal swaps. Finally, I outlined best storage practices. Making this salad is easy and fun. With these steps, you can create a meal that your family will love. Enjoy your cooking!

Greek Pasta Salad Delightful and Fresh Recipe Tips

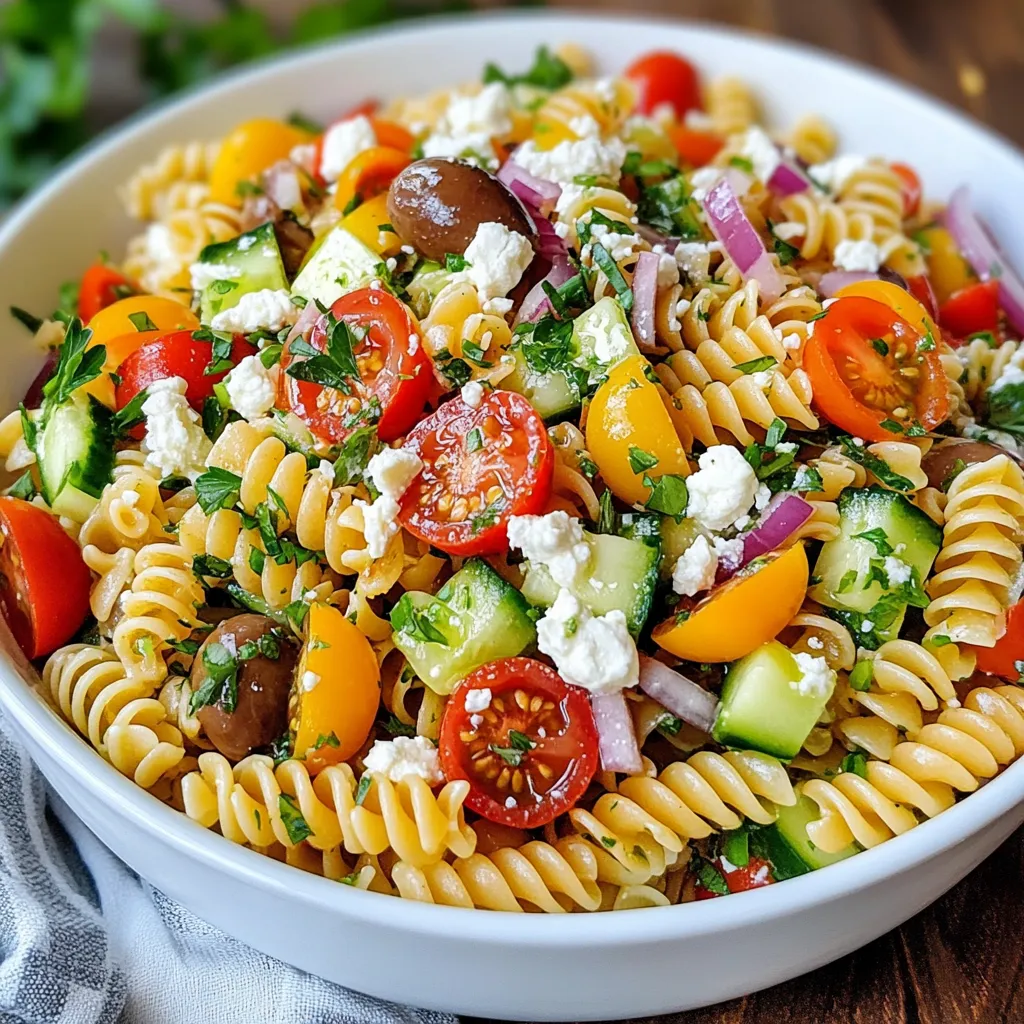
If you’re craving a salad that’s both fresh and tasty, Greek Pasta Salad is a perfect choice. Packed with vibrant

- 1 lb ground chicken (or turkey) - 1/4 cup breadcrumbs - 1/4 cup green onions, finely chopped - 1 tablespoon ginger, grated - 2 cloves garlic, minced - 1/4 cup soy sauce (low-sodium preferred) - 3 tablespoons honey - 1 tablespoon sesame oil - 1 1/2 cups cooked rice (white or brown) - 1 cup bell peppers, sliced (assorted colors) - 1/2 cup snap peas, trimmed - 1 tablespoon sesame seeds - Salt and pepper to taste These main ingredients create a great base for the teriyaki meatball rice skillet. The ground chicken gives a light texture. Breadcrumbs help keep the meatballs firm. Green onions and garlic add fresh taste and aroma. Ginger gives a zing that makes it special. Soy sauce and honey make the perfect teriyaki sauce. Sesame oil brings a warm flavor, while bell peppers and snap peas add color and crunch. Rice serves as the hearty base, and sesame seeds finish the dish with nice texture. - Additional vegetables (e.g., broccoli, carrots) - Fresh cilantro for garnish - Extra sesame seeds Adding optional ingredients lets you customize the dish. You can mix in other vegetables like broccoli or carrots for more nutrients. Fresh cilantro adds a pop of color and flavor. Extra sesame seeds can enhance the dish with a little crunch. Feel free to adjust based on your family's favorite tastes! {{ingredient_image_1}} - In a large bowl, mix 1 lb of ground chicken with 1/4 cup breadcrumbs. - Add 2 tablespoons of chopped green onions, 1 tablespoon of grated ginger, and 2 minced garlic cloves. - Sprinkle in a pinch of salt and pepper. Combine these ingredients well. - Form this mixture into small meatballs, about 1 inch wide. Aim for about 20 meatballs. - Heat 1 tablespoon of sesame oil in a large skillet over medium heat. - Once hot, add the meatballs. Cook them for 8-10 minutes. Turn them often until they are brown and cooked through. - While the meatballs cook, make the teriyaki sauce. In a small bowl, whisk together 1/4 cup soy sauce and 3 tablespoons honey until smooth. - After the meatballs are ready, pour the teriyaki sauce over them in the skillet. Let it simmer for 2-3 minutes to coat the meatballs. - Next, add 1 1/2 cups of cooked rice, 1 cup of sliced bell peppers, and 1/2 cup of snap peas to the skillet. Toss everything gently until the veggies are warm and tender. - Remove the skillet from heat. Top the dish with 1 tablespoon of sesame seeds and the remaining green onions. - For serving, use a large bowl. You can add fresh cilantro or extra sesame seeds for a nice look. Enjoy it warm! Using homemade teriyaki sauce gives you full control over the taste. Store-bought sauces can be sweet and thick. You can always adjust their flavor by adding fresh ginger, garlic, or even a splash of lime juice. Adding spices can elevate your dish. Try a hint of crushed red pepper for heat. You can also mix in sesame seeds for extra crunch and flavor. Fresh herbs like cilantro or basil can brighten the dish. To make perfect meatballs, keep your hands wet while shaping them. This helps avoid a sticky mess. Cook meatballs in batches to ensure even browning. Check their doneness with a meat thermometer. They should reach 165°F. For veggies, cut them into even pieces to promote even cooking. Add harder vegetables first, such as bell peppers, and softer ones like snap peas later. This keeps them crisp and colorful. Serve your teriyaki meatball rice skillet in a large bowl. This makes it easy for everyone to enjoy. Garnish with fresh cilantro or extra green onions for a pop of color. For added texture, place sesame seeds in a small bowl on the side. This invites guests to sprinkle them on top as they wish. A beautiful meal makes it even more fun to eat! Pro Tips Use Fresh Ingredients: For the best flavor, opt for fresh ginger and garlic. They add a vibrant taste that enhances the overall dish. Adjust the Sweetness: Feel free to adjust the amount of honey based on your personal preference for sweetness in the teriyaki sauce. Cook Rice Ahead of Time: Preparing your rice in advance can save time and make the cooking process smoother when combining everything in the skillet. Experiment with Vegetables: Don't hesitate to add other vegetables like broccoli or carrots for added nutrition and color in your dish. {{image_2}} You can switch out ground chicken for other meats. Ground turkey or beef works well. Each option gives a different taste and texture. For a healthier choice, turkey is lean and flavorful. Beef adds richness and depth. If you're looking for a meatless option, try plant-based meat. These alternatives make the dish tasty and healthy. Rice is a key part of this meal. You can use either white or brown rice. Brown rice has more fiber and a nutty taste. If you want something different, consider quinoa. Quinoa is high in protein and cooks quickly. Cauliflower rice is another great choice. It is low in carbs and adds a fresh flavor. Adding vegetables makes this dish colorful and healthy. You can swap seasonal vegetables based on your taste. Try broccoli, carrots, or zucchini for variety. Leafy greens like spinach or kale can boost nutrients. Just add them near the end of cooking to keep them bright and tender. To keep your teriyaki meatball rice skillet fresh, store any leftovers in the fridge. Use an airtight container to prevent moisture loss. Ideally, try to eat it within three days for the best taste. Reheat your skillet meal in a skillet over medium heat. This helps keep the meatballs juicy and the veggies crisp. Stir often to avoid sticking. You can also use a microwave. Just cover it to keep the moisture in. To freeze the dish, let it cool completely. Then, place it in a freezer-safe container. Use it within three months for best flavor. When you're ready to eat, thaw it in the fridge overnight. Reheat as mentioned above to enjoy a tasty meal again. You can swap ground chicken with several options. Ground turkey works well and has a similar taste. Ground beef provides a richer flavor. For a plant-based choice, try using lentils or chickpeas. You can also use crumbled tofu if you want a vegetarian option. Each choice gives a unique twist to the meatball texture and taste. To make gluten-free meatballs, use gluten-free breadcrumbs. You can easily find these at most stores. For soy sauce, choose a gluten-free brand, like tamari. This way, you keep the great flavor without the gluten. Always check labels to be sure. Yes, you can double or halve the recipe easily. If you double it, just use a larger skillet or cook in batches. Halving the recipe is also simple. Adjust cooking times as needed, especially for meatballs. Keep an eye on them to make sure they cook through. This dish pairs well with many sides. A simple green salad adds freshness. Steamed broccoli or carrots bring color and nutrients. You might also serve it with a light cucumber salad for crunch. Pick any of these to enhance your meal experience. This blog post covered how to make delicious teriyaki meatballs with rice. We explored main and optional ingredients, step-by-step cooking instructions, and tips for enhancing flavor. You can customize these meatballs with various proteins and vegetables. We also discussed how to store leftovers and answered common questions. Now, get cooking! Treat yourself to a yummy meal that’s simple and flexible. Enjoy sharing this dish with family or friends. Your mealtime just got tastier!

Teriyaki Meatball Rice Skillet Flavorful Weeknight Meal

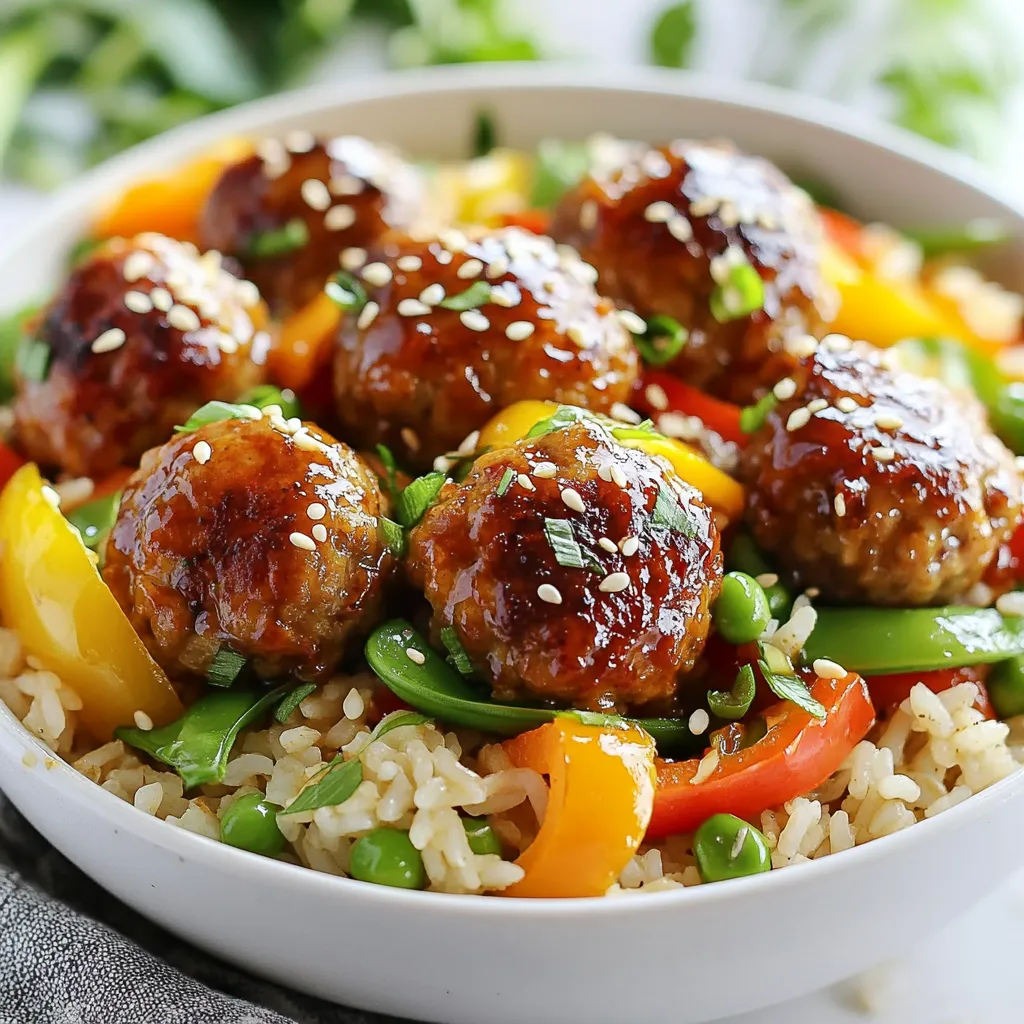
Looking for a quick and tasty dinner? You’ve come to the right place! This Teriyaki Meatball Rice Skillet recipe packs

To make Lemon Herb Couscous Chicken, gather these fresh and flavorful ingredients: - 2 boneless, skinless chicken breasts - 1 cup couscous - 1 ½ cups chicken broth (or vegetable broth for a vegetarian option) - Zest of 1 lemon - Juice of 1 lemon - 3 tablespoons olive oil - 2 cloves garlic, minced - 1 teaspoon dried oregano - 1 teaspoon dried thyme - 1 teaspoon cumin - Salt and pepper to taste - ¼ cup fresh parsley, chopped (for garnish) - Lemon wedges (for serving) Each ingredient plays a key role in bringing flavor to this dish. The chicken offers a protein base, while couscous adds a light, fluffy texture. The broth adds depth, and the lemon zest and juice brighten the meal. Olive oil provides richness, while garlic and herbs give it warmth and earthiness. Fresh parsley not only adds color but also enhances flavor. This balance makes the dish both simple and enjoyable. {{ingredient_image_1}} To marinate the chicken, start by mixing the marinade in a bowl. Combine 2 tablespoons of olive oil, minced garlic, lemon zest, lemon juice, oregano, thyme, cumin, salt, and pepper. Add the two chicken breasts to the bowl. Make sure they are fully coated with the marinade. Cover the bowl and let it marinate for at least 30 minutes. For a deeper flavor, marinate for up to 2 hours in the fridge. Next, bring 1 ½ cups of chicken broth to a boil in a medium saucepan. Once the broth is boiling, stir in 1 cup of couscous. Cover the pot and remove it from heat. Let it sit for about 5 minutes. This allows the couscous to absorb the liquid. After that, fluff the couscous with a fork and set it aside. Now, heat a large skillet over medium heat. Add the remaining tablespoon of olive oil. Once the skillet is hot, add the marinated chicken breasts. Cook them for about 5 to 7 minutes on each side. The chicken should turn golden brown. To ensure it is fully cooked, the internal temperature must reach 165°F. After cooking, remove the chicken from the skillet and let it rest for a few minutes before slicing. In a large bowl, mix the fluffed couscous with any remaining marinade from the chicken. This adds extra flavor. Taste the mixture and adjust the seasoning if needed. Toss in ¼ cup of chopped parsley for a fresh touch. To serve, slice the chicken and place it on top of the lemon herb couscous. Garnish the dish with extra parsley. Serve with lemon wedges on the side for a bright, fresh look. Enjoy your flavorful meal! To make your chicken burst with flavor, give it time to marinate. I suggest letting it soak in the marinade for at least 30 minutes. If you can, aim for two hours in the fridge. This extra time helps all those lovely flavors blend together. If you want to switch things up, try different marinades. A mix of yogurt and spices can add creaminess and tang. Or use a simple blend of soy sauce, honey, and ginger for an Asian twist. The options are endless! Couscous should be light and fluffy. Once it cooks, let it rest for a few minutes before fluffing. Use a fork to gently separate the grains. If you stir too hard, you risk making it mushy. To avoid overcooked couscous, watch the cooking time. Remember, let it sit covered for just five minutes after boiling. This small step makes a big difference! To check if your chicken is done, use a meat thermometer. It should read 165°F (75°C). This ensures it's safe to eat and juicy. After cooking, let the chicken rest for a few minutes. This helps keep it moist when you slice it. If you cut right away, the juices run out, and you lose flavor. Pro Tips Marinate for Maximum Flavor: The longer you marinate the chicken, the more flavorful it will be. Aim for at least 2 hours in the fridge if you have the time. Use Fresh Herbs: While dried herbs work well, using fresh herbs like parsley or thyme can elevate the dish with brighter flavors. Fluff the Couscous: After cooking, make sure to fluff the couscous with a fork to prevent it from becoming gummy and to enhance its texture. Check Chicken Temperature: Always use a meat thermometer to ensure the chicken is cooked through to an internal temperature of 165°F (75°C) for safety. {{image_2}} You can swap chicken for tofu or chickpeas. Tofu absorbs flavors well. Use firm tofu for the best texture. Marinate it just like the chicken. For chickpeas, rinse and drain canned ones. Toss them into the marinade, too. Both options make the dish hearty and healthy. Add seasonal vegetables for extra color and taste. Good choices include bell peppers, zucchini, or spinach. These veggies blend well with couscous. You can roast or sauté them before mixing. For fresh options, add raw veggies like cherry tomatoes or cucumber. They add crunch and freshness. Consider herbs like basil or mint for a twist. These herbs can brighten up the dish. You can also add spices like paprika or coriander for warmth. For texture, toss in nuts like almonds or walnuts. Dried fruits, like cranberries or apricots, give a sweet touch. These additions make the dish more exciting and tasty. To store your Lemon Herb Couscous Chicken, place it in the fridge. Use an airtight container to keep it fresh. It is best to keep the couscous and chicken separate. This prevents the couscous from getting soggy. Store leftovers for up to three days for the best taste. When you are ready to enjoy leftovers, use safe reheating methods. You can use the microwave or the stovetop. If using the microwave, heat on medium power in short bursts. Stir in between to ensure even heating. To avoid dry chicken, add a splash of broth or water before reheating. If using the stovetop, heat in a pan over low heat. Cover the pan to retain moisture. You can freeze Lemon Herb Couscous Chicken for later. The chicken and couscous freeze well. Place them in freezer-safe containers or bags. Be sure to label them with the date. For thawing, move to the fridge overnight. Reheat as described above after thawing. This way, you can enjoy a tasty meal anytime! To make this dish gluten-free, simply replace couscous with quinoa or rice. Both options work well. They absorb flavors nicely and offer a great texture. Make sure to use gluten-free broth too. This way, you keep all the tasty flavors intact while being gluten-free. Yes, you can prepare this meal ahead of time. Marinate the chicken the night before and keep it in the fridge. You can also cook the couscous in advance. Just store it in an airtight container. When you're ready to eat, just reheat everything. This makes dinner easy on busy days. If you don't have couscous, you can use quinoa, rice, or even bulgur. These grains all add a nice texture. Quinoa is a great choice for a protein boost. Rice is also a good option for a filling meal. Choose what you like best. To check if the chicken is cooked, use a meat thermometer. The inside should reach 165°F or 75°C. If you don’t have a thermometer, cut the chicken open. It should be white all the way through, with no pink. This ensures safe eating. You can serve this dish with a green salad, roasted veggies, or garlic bread. A fresh cucumber salad pairs well too. These side dishes balance the meal and add more colors. Choose what you enjoy to make the meal even better! This recipe combines juicy chicken and fluffy couscous with bright lemon flavor. You learned how to marinate chicken, cook couscous, and combine everything perfectly. Remember, you can customize this dish with extra veggies or spices. Store leftovers properly, and keep the couscous and chicken separate for best taste. Whether you choose to add nuts or go vegetarian, this dish is easy and satisfying. Enjoy your cooking journey with this vibrant meal!

Lemon Herb Couscous Chicken Simple and Flavorful Meal

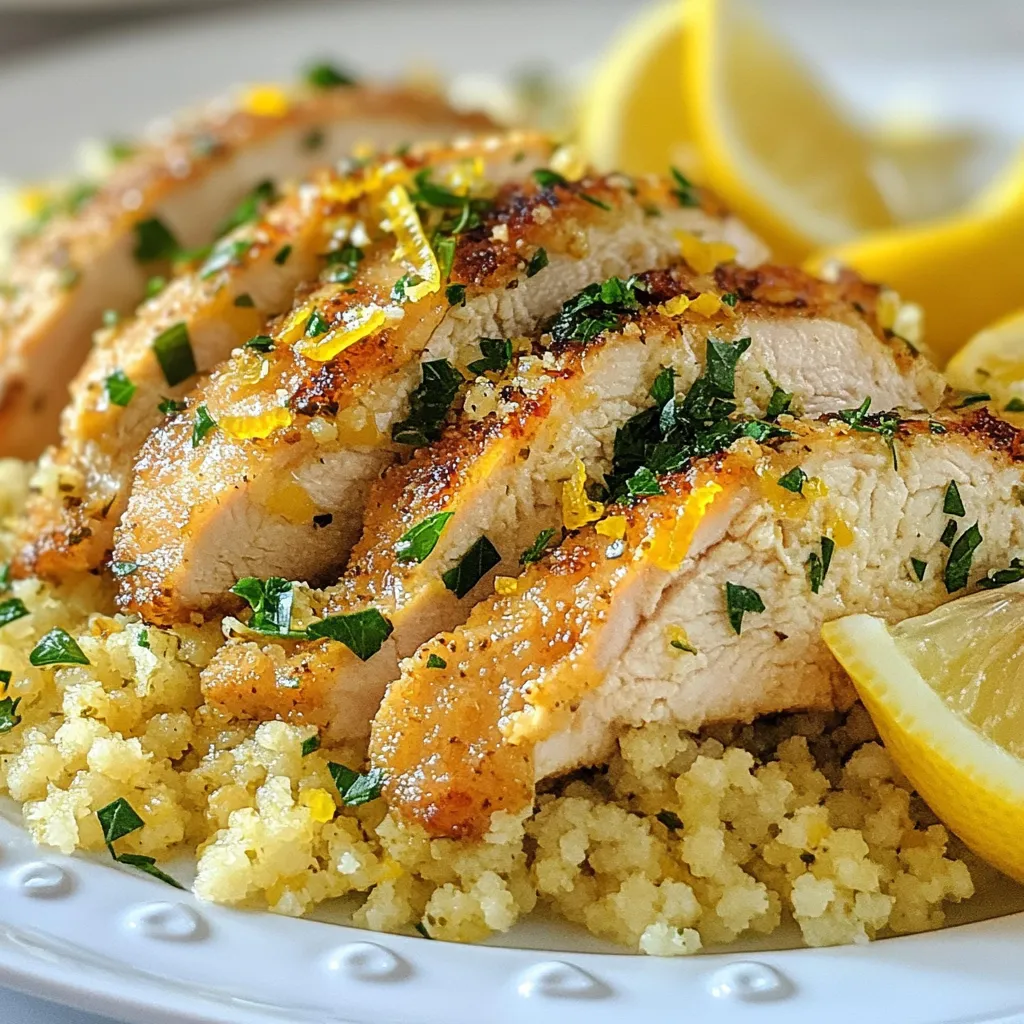
Looking for a dinner that’s both simple and bursting with flavor? Lemon Herb Couscous Chicken is the meal you need!

- 1 cup cream cheese, softened - 1/2 cup Greek yogurt - 1/3 cup powdered sugar - 1 tablespoon lemon juice - Zest of 1 lemon - 2 cups mixed berries (strawberries, blueberries, raspberries) - 1/2 cup granola (for crunch) For this Lemon Berry Cheesecake Salad, I use simple yet rich ingredients. The cream cheese gives a smooth base. Greek yogurt adds creaminess and tang. The powdered sugar sweetens it just right. Fresh lemon juice and zest bring bright flavor. I love mixed berries for their sweet and tart taste. Granola adds a fun crunch. - Fresh mint leaves I love to top my salad with fresh mint leaves. They add a nice pop of color and a hint of cool flavor. You can also drizzle extra honey over the top for added sweetness. This salad is great for many diets. It has dairy from cream cheese and yogurt. If you need a gluten-free option, choose gluten-free granola. You can swap Greek yogurt for a dairy-free version if needed. This way, everyone can enjoy this creamy delight! {{ingredient_image_1}} To start, gather all your ingredients. You need: - 1 cup cream cheese, softened - 1/2 cup Greek yogurt - 1/3 cup powdered sugar - 1 tablespoon lemon juice - Zest of 1 lemon - 2 cups mixed berries (strawberries, blueberries, raspberries) - 1/2 cup granola (for crunch) - Fresh mint leaves (for garnish) First, mix the softened cream cheese and Greek yogurt in a bowl. Add the powdered sugar, lemon juice, and lemon zest. Use an electric mixer to beat everything until smooth. This mixture should be creamy and light. Now, grab a large serving bowl. Start by layering half of the mixed berries at the bottom. Spread them out evenly so every bite has fruit. Next, take half of your creamy cheesecake mix and spoon it over the berries. Spread it gently to cover all the fruit. Repeat this step. Add the remaining berries, then top with the last of the cheesecake mixture. This will create beautiful layers. Finally, finish with granola on top. This adds a nice crunch to your salad. Now, it’s time to chill. Place the salad in the fridge for at least 30 minutes. This waiting time helps the flavors blend. To serve, I recommend garnishing with fresh mint leaves. They make the dish look pretty and add a fresh taste. Enjoy your Lemon Berry Cheesecake Salad! To get that smooth, creamy texture, start with room-temperature cream cheese. Cold cream cheese does not mix well. Use an electric mixer to blend the cream cheese, Greek yogurt, powdered sugar, lemon juice, and lemon zest. Mix until everything is well combined and fluffy. This step is key to a great cheesecake salad. If the mixture is too thick, add a splash of milk to loosen it up. You can boost the flavor of your salad easily. Try adding a splash of vanilla extract for warmth. A pinch of salt can help balance the sweetness too. For a fun twist, mix in some crushed pineapple or diced peaches. You can also use flavored yogurt instead of plain Greek yogurt. This can add a new layer of taste that pairs well with the berries. To make your salad look great, use a clear glass bowl. This way, your colorful layers show through. Layer the berries and creamy mixture carefully. Start with berries for the first layer, then add the cream. Finish with a sprinkle of granola on top for a nice crunch. Finally, add fresh mint leaves for a pop of green. This makes the dish look fresh and inviting. Pro Tips Use Fresh Ingredients: Always opt for fresh, ripe berries to enhance the flavor of your cheesecake salad and provide the best texture. Adjust Sweetness: Taste the cheesecake mixture before layering and adjust the powdered sugar according to your preference for sweetness. Chill for Best Flavor: Allowing the salad to chill for at least 30 minutes helps the flavors meld together, making every bite more delicious. Make Ahead: This salad can be prepared a few hours in advance or even the night before. Just add granola right before serving to keep it crunchy. {{image_2}} You can change the berries for fun flavors. Try blackberries or cherries. You can also use just one berry type. For a sweeter taste, use ripe strawberries. Mix any berries you love for a colorful dish. Each berry adds its own flavor and texture. Experiment to find your favorite mix! If you want less sugar, there are great options. Use honey or maple syrup instead of powdered sugar. You can also try stevia for a low-calorie choice. Each sweetener changes the taste slightly, so adjust to your liking. Taste as you go for the best results! Want a lighter version? Swap cream cheese for cottage cheese. Use low-fat yogurt instead of Greek yogurt for fewer calories. You can also skip the granola for a lighter dish. If you want crunch, add nuts or seeds. Make it your own while keeping it tasty! To keep your Lemon Berry Cheesecake Salad fresh, use an airtight container. This helps prevent the salad from drying out or absorbing other flavors. When storing, avoid adding granola until you serve. This keeps the crunch intact. You can also cover the bowl tightly with plastic wrap if you don't have a container. Your salad will stay fresh for about three days in the fridge. After that, the berries may start to lose their texture. Always check for any signs of spoilage before eating. If you see any mold or off smells, it’s best to toss it. Freezing this salad is not recommended. The cream cheese and yogurt may separate when thawed, leading to a watery texture. However, you can freeze the mixed berries separately. When you want to enjoy the salad again, just thaw the berries and prepare a fresh batch of the creamy mixture. Yes, you can use regular yogurt. It will change the texture a bit. Greek yogurt is thicker, giving a creamier feel. Regular yogurt makes it lighter. If you want a rich taste, stick with Greek yogurt. If you want a smoother texture, regular works fine. You can swap the cream cheese with a dairy-free cream cheese. Use coconut yogurt in place of Greek yogurt. For sweetening, choose a dairy-free powdered sugar. Make sure to check labels for hidden dairy. This way, you can enjoy the flavors without dairy. You can prepare the salad a day before. Just follow the steps and chill it overnight. The flavors will blend well this way. Keep the granola separate until serving. This keeps it crunchy. Enjoy the fresh taste anytime! This blog post covered all you need for a great salad. You learned about key ingredients, optional garnishes, and dietary options. Step-by-step instructions showed you how to prepare, layer, and chill your salad. I shared tips for creamy texture, flavor, and presentation. We explored tasty variations and important storage tips too. Now, you can make a delicious salad that fits your needs. Get ready to impress your friends and family!

Lemon Berry Cheesecake Salad Creamy Delight Recipe

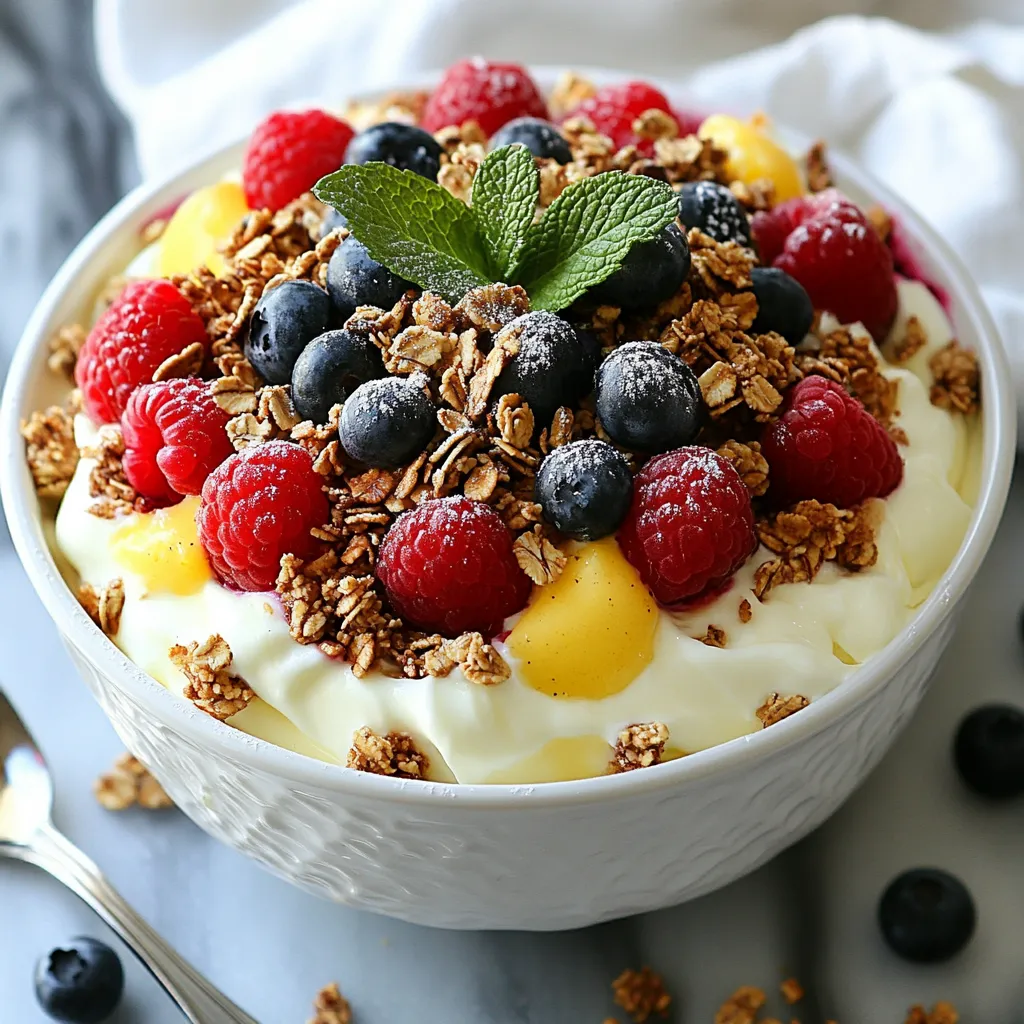
Are you ready to try a treat that’s both creamy and fresh? This Lemon Berry Cheesecake Salad is a fun

- 4 salmon fillets (6 ounces each) - 1/4 cup soy sauce (low sodium recommended) - 1/4 cup honey - 2 tablespoons sesame oil - 2 cloves garlic, minced - 1 teaspoon fresh ginger, grated - 1 tablespoon rice vinegar - 1 tablespoon green onions, chopped (for garnish) - 1 teaspoon sesame seeds (for garnish) - Salt and pepper to taste To make Sweet Soy Glazed Salmon, you need fresh salmon fillets. I like using wild-caught salmon for the best flavor. Low sodium soy sauce gives the dish a nice, balanced taste without being too salty. Honey adds a sweet touch that pairs well with the salty soy sauce. Sesame oil brings a nutty flavor to the glaze while minced garlic and grated ginger add depth. Rice vinegar brightens the dish and cuts through the richness of the salmon. For garnish, I use chopped green onions and sesame seeds, which add texture and visual appeal. With these ingredients, you create a flavorful, easy meal that impresses everyone at the table. You can find all these items at your local grocery store. Feel free to adjust the amounts to suit your taste. Enjoy cooking! {{ingredient_image_1}} First, grab a medium bowl. In this bowl, whisk together the soy sauce, honey, sesame oil, minced garlic, grated ginger, and rice vinegar. Mix until everything blends well. This mix is your marinade, full of flavor. Next, take your salmon fillets and place them in a shallow dish or resealable plastic bag. Pour the marinade over the salmon, making sure each fillet is well-coated. Cover or seal the dish and put it in the refrigerator. Let it marinate for at least 30 minutes. For an even richer taste, you can marinate up to 2 hours. Now, it's time to bake. Preheat your oven to 400°F (200°C). While the oven heats up, prepare your baking sheet. You can line it with parchment paper or lightly grease it to keep the salmon from sticking. After marinating, take the salmon out of the fridge. Remove excess marinade and place the fillets skin-side down on the baking sheet. Lightly season each fillet with salt and pepper. Bake in the oven for 12-15 minutes. Check if the salmon flakes easily with a fork. This means it’s cooked just right. While the salmon bakes, pour the leftover marinade into a small saucepan. Bring it to a simmer over medium heat. Cook for about 5-7 minutes, until it thickens slightly. Once your salmon is done, drizzle this thickened glaze over the fillets. For the final touch, garnish with chopped green onions and sesame seeds. This makes your dish look beautiful and adds extra flavor. Enjoy your Sweet Soy Glazed Salmon! For the best flavor, marinate your salmon for at least 30 minutes. If you have more time, two hours is even better. This lets the flavors soak in deeply. Adjust the marinade to suit your taste. Want it sweeter? Add more honey. Prefer it saltier? A bit more soy sauce will do the trick. You can cook your salmon in different ways. Besides baking, try grilling or pan-searing. Grilling gives a smoky flavor, while pan-searing adds a nice crust. To check if the salmon is done, use a fork. It should flake easily and look opaque throughout. Pair your salmon with simple sides. Steamed rice or roasted vegetables work great. You can also serve it over a bed of greens for a fresh touch. For style, plate the salmon nicely and drizzle the glaze over it. Add a sprinkle of green onions and sesame seeds for a pop of color. Pro Tips Marination Time: For a deeper flavor, marinate the salmon for up to 2 hours. This allows the flavors to penetrate the fish more thoroughly. Oven Temperature: Ensure your oven is fully preheated to 400°F (200°C) for even cooking and to achieve that perfect flaky texture. Sauce Thickness: Simmer the remaining marinade until it thickens to create a more concentrated flavor for drizzling over the salmon. Serving Suggestions: Pair the salmon with steamed rice or sautéed vegetables for a complete meal that complements the sweet and savory flavors. {{image_2}} You can easily swap salmon for other fish. Try using cod, trout, or tilapia. These fish will still soak up the sweet soy glaze well. Each will give a different twist to your dish. For sweeteners, honey is great, but you can use maple syrup or agave nectar. Both will add a unique flavor. You can also try brown sugar for a richer taste. Each swap will change the final flavor slightly, so feel free to experiment! Want to spice things up? Add some chili flakes or fresh chopped chili to the glaze. This will give your salmon a nice kick! Adjust the amount based on your heat preference. You can also add different herbs and spices to enhance the flavor. Try fresh basil, cilantro, or even mint. Each herb brings its own taste and aroma. Experiment to find your favorite combination! For sweet soy glazed salmon, I recommend storing leftovers in the fridge for 3 days. This keeps the fish fresh and safe to eat. Use an airtight container to keep out air and moisture. Place a piece of parchment paper between the salmon and the lid if it’s still warm. This will help prevent sogginess. When you want to eat it again, simply reheat gently to avoid overcooking. You can freeze cooked salmon for up to 3 months. To do this, wrap each fillet tightly in plastic wrap. Then, place the wrapped fillets in a freezer bag. Make sure to remove as much air as possible. When you're ready to enjoy it, thaw salmon in the fridge overnight. This keeps it safe and helps maintain its flavor. After thawing, reheat gently on the stove or in the oven until warm. You can pair sweet soy glazed salmon with tasty side dishes. Here are some great options: - Steamed rice: White or brown rice absorbs the sauce well. - Quinoa: This adds a nutty flavor and is full of protein. - Roasted vegetables: Try broccoli, carrots, or asparagus for color and crunch. - Salad: A light green salad with a citrus dressing complements the salmon. - Noodles: Asian-style noodles can add a nice twist. These sides will balance the sweet glaze and enhance your meal. Yes, you can marinate the salmon overnight. This gives the fish more time to soak up the flavors. Just remember a few things: - Use a glass or plastic container to avoid reactions. - Keep it in the fridge to stay safe. - If you marinate for too long, the fish can become mushy. Aim for 8 hours max. This time allows the garlic and ginger to really shine. Look for a few signs to know when your salmon is done: - Color: The salmon should change from bright pink to a pale pink or orange. - Flakiness: Use a fork to gently press down. It should flake easily. - Temperature: The internal temperature should reach 145°F (63°C). Checking these signs ensures you serve a perfectly cooked salmon. This blog post covered all you need for Sweet Soy Glazed Salmon. We looked at key ingredients, step-by-step cooking methods, and helpful tips. You learned how to perfect your marinade and pick sides that enhance your meal. Don’t forget about variations and storage tips for leftovers. Enjoy the taste and feel free to experiment. Your delicious salmon experience starts now!

Sweet Soy Glazed Salmon Flavorful and Easy Recipe

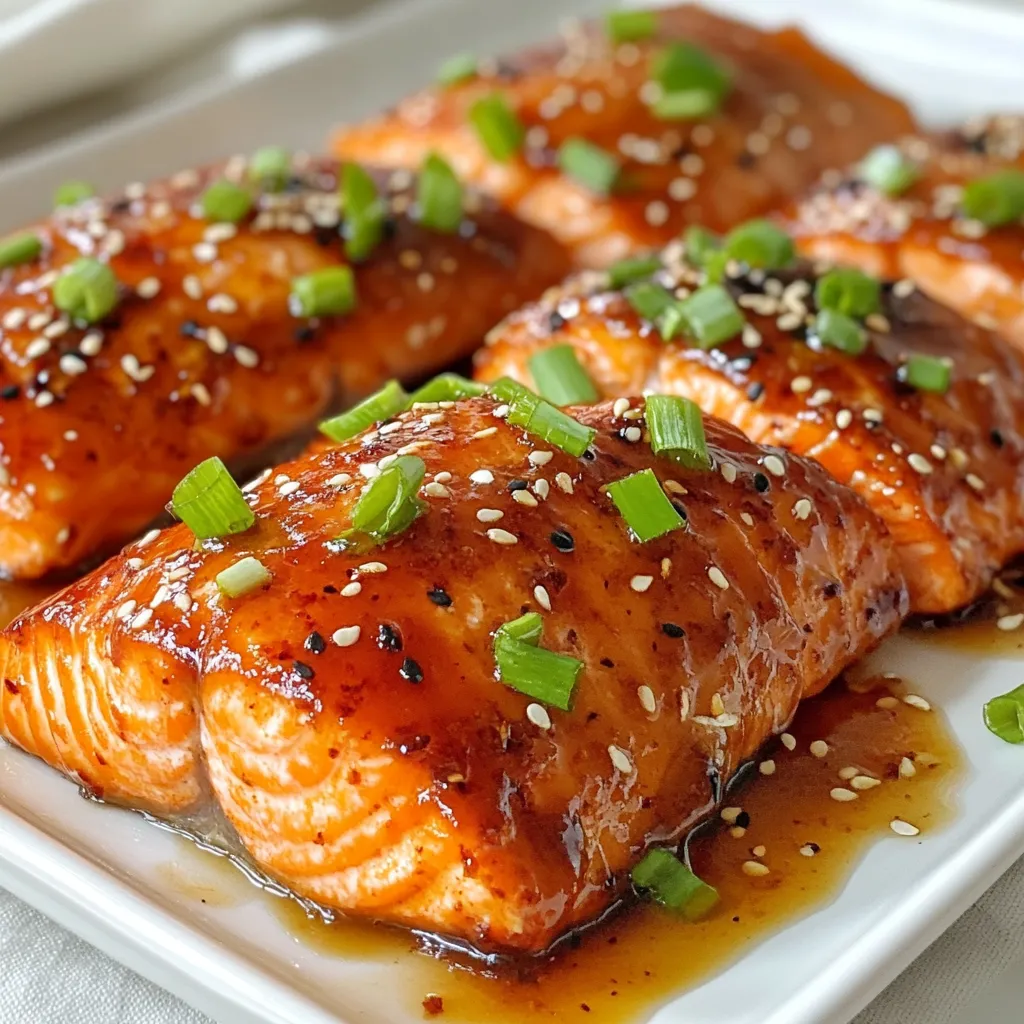
Are you ready to impress your family with a tasty dinner? My Sweet Soy Glazed Salmon recipe is packed with

Older posts
Newer posts
← Previous Page1 … Page125 Page126 Page127 … Page132 Next →

dsad

© 2025 pureeatsnow • Built with GeneratePress

Our Policies

  • Copyright Policy
  • Cookie Policy
  • GDPR Policy
  • Privacy Policy
  • Disclaimer
  • Terms Of Use

More Information

  • Home
  • About
  • Contact
  • Appetizers
  • Dessert
  • Dinner
  • Drinks
©2025, pureeatsnow About Back To Top