Skip to content
DisclaimerTerms Of UseGDPR PolicyCookie Policy

pureeatsnow

  • Home
  • Drinks
  • Appetizers
  • Dinner
  • Dessert
  • About
  • Contact
  • Privacy Policy
DisclaimerTerms Of UseGDPR PolicyCookie Policy

Rachel

For this dish, you need 1 cup of quinoa. Rinse it well under cold water. This step removes any bitterness. You will use a mix of colorful veggies. Gather the following: - 1 medium onion, finely chopped - 4 cloves of garlic, minced - 1 carrot, diced - 1 red bell pepper, diced - 1 cup of frozen peas These vegetables add flavor and nutrition. To bring out the taste, you will need: - 3 tablespoons of olive oil - 1 teaspoon of lemon zest - 2 tablespoons of fresh lemon juice - Salt and pepper to taste - Fresh parsley, chopped for garnish The lemon zest and juice brighten the dish. The parsley adds a nice touch at the end. {{ingredient_image_1}} First, take 1 cup of rinsed quinoa. Rinse it well under cold water to remove any bitterness. In a saucepan, bring 2 cups of vegetable broth to a boil. Add the quinoa and cover the pan. Lower the heat and let it simmer for 15 minutes. The quinoa should absorb all the liquid. After cooking, remove it from heat and let it sit for 5 minutes. Fluff the quinoa with a fork before serving. In a large skillet, heat 3 tablespoons of olive oil over medium heat. Add 1 medium chopped onion. Sauté it until it turns translucent, which takes about 3 to 4 minutes. Next, stir in 4 minced garlic cloves. Cook for another 1 to 2 minutes. You want the garlic to smell great but not burn. Then, add 1 diced carrot and 1 diced red bell pepper. Sauté these vegetables for 5 minutes until they start to soften. After that, mix in 1 cup of frozen peas. Cook for another 2 to 3 minutes, stirring every so often. Now, it’s time to mix everything together. Fold the cooked quinoa into the skillet with the sautéed vegetables. Add 1 teaspoon of lemon zest and 2 tablespoons of fresh lemon juice. Stir everything well to combine. Don’t forget to season with salt and pepper to taste. Finally, remove the skillet from heat and garnish with fresh chopped parsley before serving. Enjoy your flavorful Lemon Garlic Quinoa Pilaf! To make fluffy quinoa, start with rinsed grains. Rinsing helps remove the bitter coating. Use a ratio of 1 cup quinoa to 2 cups broth. This gives great flavor and moisture. Bring the broth to a boil before adding quinoa. Cover and reduce heat to a simmer. Let it cook for about 15 minutes. Once the liquid is gone, let it sit for 5 minutes. Finally, fluff it with a fork for perfect texture. You can easily boost flavor with extra ingredients. Try adding herbs like thyme or basil. Fresh herbs add brightness and depth. You can also include nuts or seeds for crunch. Toasted almonds or pine nuts work well. For a kick, add a pinch of red pepper flakes. These small changes make a big difference in taste. If you are short on time, there are quick options. Use a rice cooker or Instant Pot for cooking quinoa. It saves time and effort. You can also prepare the veggies ahead of time. Chop them on the weekend and store in the fridge. This way, you can quickly sauté them after cooking quinoa. Keep it simple and delicious even on busy nights. Pro Tips Rinse Your Quinoa: Always rinse quinoa under cold water before cooking to remove its natural coating, called saponin, which can impart a bitter taste. Customize Your Veggies: Feel free to substitute or add your favorite vegetables. Zucchini, spinach, or mushrooms can be great additions! Make It Ahead: This pilaf can be made in advance and stored in the fridge for up to 4 days. It also freezes well for up to a month! Boost the Flavor: For an extra flavor punch, consider adding a splash of white wine to the vegetable sauté process before adding the quinoa. {{image_2}} You can boost the protein in Lemon Garlic Quinoa Pilaf easily. Think about adding cooked chicken, shrimp, or tofu. Each choice pairs well with the flavors. For chicken, use shredded rotisserie chicken. For shrimp, just sauté them until they turn pink. If you choose tofu, press it first, then cube and sauté until golden. This adds texture and keeps your meal filling. Good news! Quinoa is already gluten-free. This dish is safe for gluten-sensitive diets. If you use vegetable broth, check the label to ensure no gluten is present. You can also add gluten-free sauces for extra flavor. Tamari is a great choice if you want a soy sauce option. You can change the flavor of this pilaf with herbs and spices. Fresh herbs like basil or dill can brighten the dish. For a spicy kick, add red pepper flakes or cayenne pepper. You can also try smoked paprika for a deeper flavor. Mixing in a teaspoon of cumin or curry powder gives an interesting twist. Experiment to find your favorite blend! After you make Lemon Garlic Quinoa Pilaf, let it cool down. Place leftovers in an airtight container. Store them in the fridge for up to three days. Make sure to label the container with the date. To reheat, you can use a microwave or a stove. If using a microwave, place the pilaf in a bowl. Add a splash of water to keep it moist. Heat it for one to two minutes, stirring halfway through. If using a stove, put the pilaf in a skillet over low heat. Stir it often until it warms up. You can freeze this pilaf for later. First, let it cool completely. Then, pack it in a freezer-safe container. It can last up to three months in the freezer. When you're ready to eat, thaw it in the fridge overnight. Reheat as mentioned above. Yes, you can make Lemon Garlic Quinoa Pilaf in advance. Cooked quinoa keeps well in the fridge. Store it in an airtight container for up to five days. When you are ready to eat, just reheat it on the stove or in the microwave. If you need a substitute for quinoa, you have options. Rice is a simple choice. You can also use couscous or farro. Each grain has a different texture and taste, so pick what you enjoy most. Yes, this recipe is vegan-friendly. All the ingredients come from plants. You use vegetable broth, olive oil, and fresh veggies. This dish is perfect for those who follow a vegan diet. To add spice, consider using red pepper flakes. You can also add diced jalapeños or a dash of hot sauce. Adjust the amount based on your heat tolerance. This way, you can make your pilaf as spicy as you like! You can create a tasty and easy Lemon Garlic Quinoa Pilaf with the right ingredients. We discussed quinoa, fresh veggies, and how seasonings bring flavor to the dish. I provided simple steps for prepping, sautéing, and combining the ingredients. You learned tips for perfect quinoa and ways to add proteins or flavors. Remember, you can store leftovers and even freeze them for quick meals. This recipe is flexible and fits many diets. Explore variations to match your taste. Enjoy your cooking!

Lemon Garlic Quinoa Pilaf Flavorful and Simple Dish

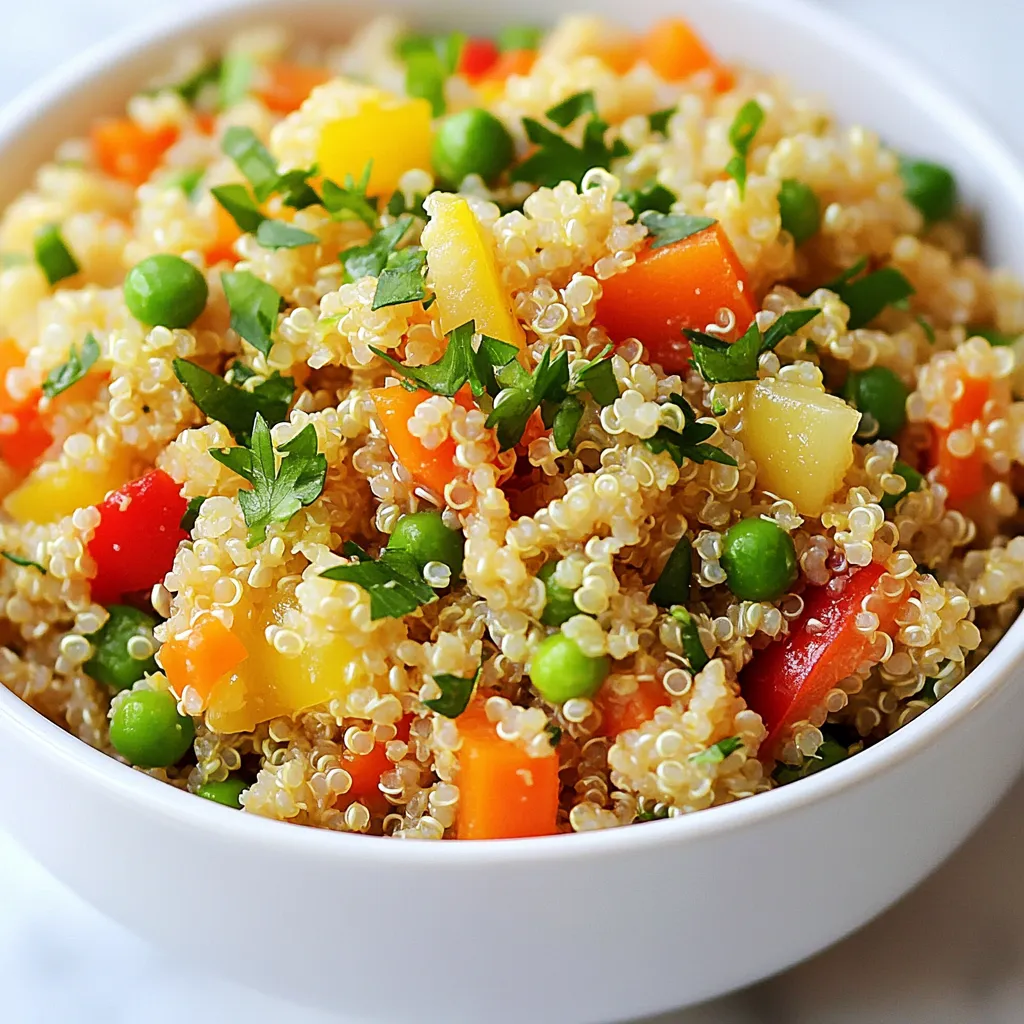
Welcome to a culinary adventure! Today, I’ll show you how to make a Lemon Garlic Quinoa Pilaf that’s packed with

To make peanut butter oatmeal energy bars, you need simple, wholesome ingredients. Each one plays a key role in flavor and texture. Here’s what you’ll need: - 2 cups rolled oats - 1 cup natural peanut butter - 1/4 cup honey or maple syrup - 1/2 cup mashed ripe banana (about 1 large banana) - 1/2 teaspoon vanilla extract - 1/4 cup dark chocolate chips (optional) - 1/4 cup chopped nuts (almonds or walnuts) - 1/4 cup dried fruit (raisins, cranberries, or apricots) - Pinch of salt You can adjust these ingredients to match your taste. Each ingredient adds something special. For example, rolled oats provide fiber and energy. Natural peanut butter gives healthy fats and protein. Honey or maple syrup adds sweetness and binds everything together. Mashed banana keeps the bars moist and adds flavor. If you like some crunch or extra sweetness, consider the optional mix-ins. Dark chocolate chips add a rich taste, while nuts give a nice bite. Dried fruit brings a chewy texture. Remember, a pinch of salt enhances all the flavors. Feel free to play around with these ingredients. The fun is in making it your own! {{ingredient_image_1}} 1. Preheat your oven and prepare the baking dish: Set your oven to 350°F (175°C). Line an 8x8 inch baking dish with parchment paper. Leave some paper hanging over the edges. This helps you lift the bars out later. 2. Mixing the base ingredients: In a large bowl, combine 2 cups of rolled oats, 1 cup of natural peanut butter, 1/4 cup of honey or maple syrup, 1/2 cup of mashed ripe banana, and 1/2 teaspoon of vanilla extract. Stir until it is well mixed and sticky. 3. Incorporating optional ingredients: If you want, add 1/4 cup of dark chocolate chips, 1/4 cup of chopped nuts (like almonds or walnuts), and 1/4 cup of dried fruit (such as raisins, cranberries, or apricots). Mix these in well, making sure everything is evenly spread throughout. 4. Transferring mixture and pressing it down: Pour the mixture into your lined baking dish. Use a spatula or the back of a spoon to press it down firmly. Make sure it is even all around. 5. Baking time and checking for doneness: Place the dish in the preheated oven. Bake for 20 to 25 minutes, or until the edges are golden brown. Keep an eye on them to avoid over-baking. Following these steps will help you create tasty peanut butter oatmeal energy bars. These bars are easy to make and full of flavor! To achieve the right texture for your energy bars, focus on the balance of wet and dry ingredients. Use enough peanut butter and banana to keep the bars moist. If your mix feels too dry, add a splash of water or more mashed banana. You want a sticky yet firm mix that holds together. For dietary needs, you can make easy substitutions. If you're allergic to nuts, try sunflower seed butter instead of peanut butter. For a vegan version, replace honey with maple syrup. If you want gluten-free bars, ensure your oats are certified gluten-free. Adjust the sweetener to your taste, too. For serving suggestions, presentation matters. Stack the bars on a pretty plate or wrap them in parchment for a snack on the go. To make them even more appealing, sprinkle some extra chocolate chips or nuts on top. This small touch adds a pop of color and texture. Pro Tips Use Overripe Bananas: They add natural sweetness and moisture to your bars, enhancing the flavor and texture. Chill Before Cutting: After cooling, refrigerate the bars for a bit before cutting; this helps them hold their shape better. Experiment with Mix-Ins: Feel free to customize with different nuts, seeds, or spices like cinnamon to suit your taste. Store Properly: Keep the bars in an airtight container in the fridge for up to a week or freeze for longer storage. {{image_2}} You can change up the flavors in your Peanut Butter Oatmeal Energy Bars. Here are some fun ideas: - Nut butter alternatives: Try almond or cashew butter instead of peanut butter. Each nut butter brings a unique taste and texture. Almond butter adds a slight sweetness, while cashew offers a creamy finish. - Adding spices: A dash of cinnamon or nutmeg can elevate the flavor. Cinnamon gives warmth, while nutmeg adds a hint of spice. Just a pinch can make your bars more exciting. - Other mix-in ideas: Get creative with seeds like chia or flax. You can also toss in coconut flakes for a tropical twist. Dried fruits, like apricots and cranberries, also add sweetness and chewiness. Feel free to mix and match these ideas. Each variation makes the bars your own! To keep your peanut butter oatmeal energy bars fresh, follow these tips: - Room temperature storage: You can store these bars at room temperature for up to one week. Place them in an airtight container. Keep them out of direct sunlight and heat. This way, they stay tasty and chewy. - Refrigeration tips for freshness: For longer life, refrigerate your energy bars. They can last up to two weeks in the fridge. Make sure to wrap them in plastic wrap or store them in a sealed container. This keeps them moist and prevents drying out. - Freezing energy bars for longer shelf life: If you want to save some for later, freeze the bars. Wrap each bar in plastic wrap and place them in a freezer-safe bag. They can last up to three months in the freezer. When ready to eat, take them out and let them thaw for a few minutes. Enjoy them anytime! How long do these energy bars last? These energy bars last about one week at room temperature. If you store them in the fridge, they can last up to two weeks. For longer storage, freeze them. They stay good for about three months in the freezer. Can I make them vegan? Yes, you can make these bars vegan easily. Just replace honey with maple syrup. Make sure to use dairy-free chocolate chips, and you’re all set! What are the calorie counts for one bar? Each bar has around 150-200 calories, depending on the mix-ins you choose. If you add more nuts or chocolate chips, the calorie count will go up. Can I skip the banana, and will it affect the recipe? You can skip the banana, but it helps bind the bars. If you leave it out, add more peanut butter or a bit of applesauce. This keeps the bars moist and tasty. In this post, I shared how to make delicious energy bars using simple ingredients. We covered necessary items like rolled oats and peanut butter, as well as steps for preparation and baking. I offered tips to customize your bars and shared storage advice. Remember, these bars are easy to make and full of nutrition. You can try different flavors and ingredients to find what you love. Enjoy creating your energy bars, and make them your own!

Peanut Butter Oatmeal Energy Bars Nutritious and Easy

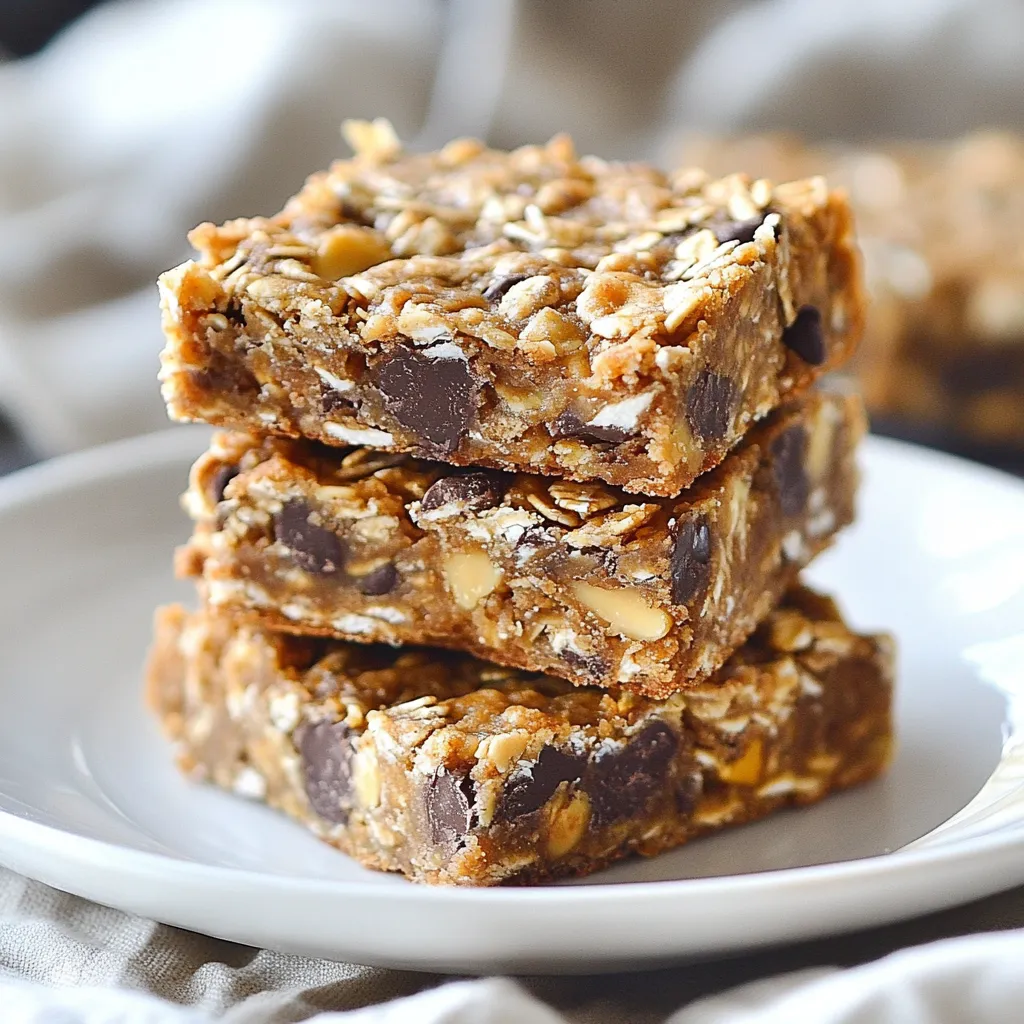
Looking for a quick, healthy snack? Peanut Butter Oatmeal Energy Bars are the answer! They’re simple to make and packed

- 1 lb baby carrots - 3 tablespoons olive oil - 4 cloves garlic, minced - 1/2 teaspoon salt - 1/4 teaspoon black pepper - 1/2 teaspoon dried thyme - 1/4 cup grated Parmesan cheese - 2 tablespoons fresh parsley, chopped To make garlic Parmesan roasted carrots, you need fresh baby carrots. They are sweet and tender. The olive oil adds richness and helps the garlic stick. Minced garlic brings a bold flavor. Salt and black pepper enhance the taste. Dried thyme adds a nice herby note. Grated Parmesan cheese gives a salty kick and a creamy texture. Finally, fresh parsley adds color and freshness on top. Each ingredient plays a key role in making this dish flavorful and fun. Using quality ingredients makes a big difference. You will taste it in every bite! {{ingredient_image_1}} - Preheat the oven to 425°F (220°C). This high heat helps the carrots roast well. - In a large bowl, mix 3 tablespoons of olive oil, 4 minced garlic cloves, 1/2 teaspoon salt, 1/4 teaspoon black pepper, and 1/2 teaspoon dried thyme. Stir until combined. This garlic-oil marinade adds great flavor. - Add 1 pound of cleaned baby carrots to the bowl. Toss them in the marinade until they are all coated. This step is key for taste. - Spread the carrots on a baking sheet. Use parchment paper to avoid sticking and for easy cleanup. - Roast the carrots for 20-25 minutes. They should be tender and caramelized. Toss them halfway through to ensure even cooking. This will make them crispy and flavorful. - After roasting, take the carrots out of the oven. Immediately sprinkle 1/4 cup of grated Parmesan cheese over them. Toss gently so the cheese melts a bit. - Transfer the carrots to a serving dish. Add 2 tablespoons of fresh chopped parsley on top for a bright finish. This adds color and freshness. When making garlic Parmesan roasted carrots, choose baby carrots for a sweet crunch. They cook quickly and add great flavor. Regular carrots work too, but cut them into even sticks. Always pick fresh carrots. Look for bright colors and firm texture. Fresh ingredients make a big difference in taste. For an extra kick, add herbs like rosemary or dill. A pinch of cayenne pepper can also spice things up. If you want a cheese swap, try Pecorino Romano or nutritional yeast for a vegan option. These alternatives still bring rich flavor. Using convection settings in your oven helps carrots crisp up nicely. The hot air circulates, cooking them evenly. To avoid soggy carrots, make sure they are in a single layer on the baking sheet. Toss them halfway through to promote even roasting and caramelization. Pro Tips Choose Fresh Carrots: Select firm, vibrant baby carrots for the best flavor and texture. Fresh carrots will caramelize beautifully and provide a sweet taste. Don't Skip the Toss: Tossing the carrots halfway through roasting ensures even cooking and caramelization, resulting in a deliciously uniform texture. Experiment with Cheese: While Parmesan adds a fantastic flavor, try mixing in other cheeses like Pecorino Romano or a sprinkle of feta for a unique twist. Garnish for Color: Fresh parsley not only adds a pop of color but also a fresh flavor that complements the roasted carrots beautifully. {{image_2}} You can swap out Parmesan for other cheeses. Pecorino Romano offers a nice sharpness. For a creamier taste, try mozzarella or Gouda. Mixing multiple cheeses can add depth. A blend of Parmesan and cheddar gives a rich flavor. Be creative with your cheese choices! Balsamic vinegar can bring out the carrots' sweetness. Just drizzle a little before roasting. It will add a tangy kick. Lemon zest brightens the dish, too. Add it after roasting for a fresh burst of flavor. These additions make the dish pop, enhancing every bite. Instead of roasting, you can grill the carrots. Grilling adds a smoky flavor and nice char. Steam them for a lighter option. Steamed carrots keep more nutrients and taste fresh. Try different cooking methods to find your favorite! To keep your garlic Parmesan roasted carrots fresh, follow these tips: - Allow the carrots to cool down. - Place them in an airtight container. - Store them in the fridge for up to 3 days. Using a glass or plastic container works well. Make sure it's tight to keep out air and moisture. When you want to enjoy your leftovers, reheating is key: - For the best results, use an oven. Preheat it to 350°F (175°C). - Spread the carrots on a baking sheet. Heat for about 10 minutes. This keeps them crisp. You can use a microwave if you’re short on time. Heat in short bursts, about 30 seconds. Check often to avoid sogginess. Garlic Parmesan roasted carrots are a tasty side dish. They combine the sweet taste of carrots with garlic and Parmesan cheese. You roast the carrots in the oven until they are tender and caramelized. The garlic adds a savory touch, while the cheese gives a rich flavor. This dish is easy to make and perfect for any meal. Yes, you can use frozen carrots. However, fresh carrots give better texture and flavor. If using frozen, thaw them first and pat them dry. This step helps avoid sogginess when roasting. Adjust the cooking time since frozen carrots may take longer to roast. To make this dish vegan, skip the Parmesan cheese. You can use nutritional yeast instead. It adds a cheesy flavor without dairy. You can also try vegan cheese if you prefer. The rest of the recipe remains the same, so you won’t lose any taste. Garlic Parmesan roasted carrots pair well with many dishes. They go great with roasted chicken or grilled fish. You can also serve them with pasta or rice dishes for a complete meal. Their bright flavor complements many main courses. Carrots are done roasting when they are tender and lightly browned. You can test their doneness by piercing them with a fork. If the fork goes in easily, they are ready. Tossing them halfway through helps ensure even cooking and browning. In this post, we explored a simple way to make garlic Parmesan roasted carrots. We discussed the key ingredients and detailed steps for roasting them to perfection. I also shared useful tips for choosing carrots and enhancing flavors. Remember, you can play with different cheeses or try grilling. Store leftovers properly for later enjoyment. With these ideas, I hope you feel ready to create a tasty side dish that everyone will love. Enjoy your cooking journey!

Garlic Parmesan Roasted Carrots Flavorful Side Dish

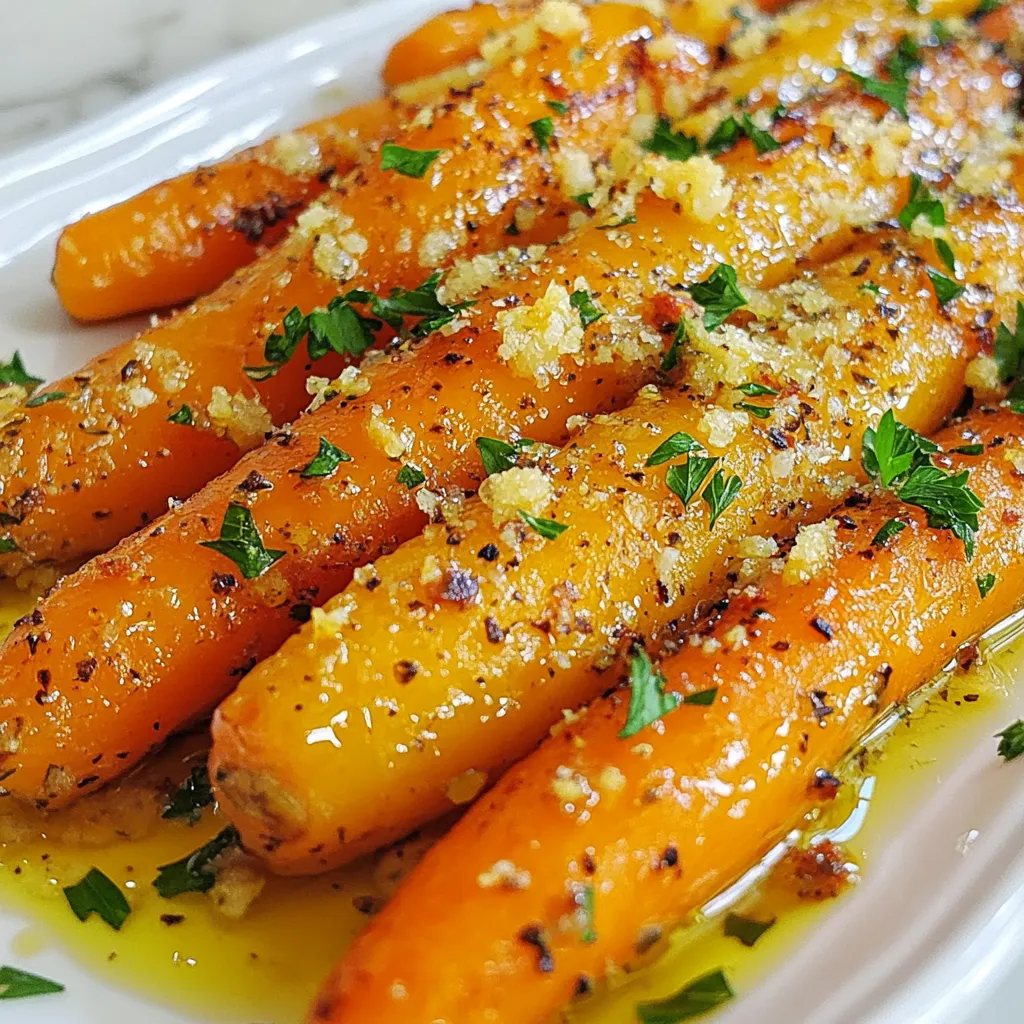
If you want a simple yet delicious side dish, try Garlic Parmesan Roasted Carrots. This recipe combines sweet baby carrots

To make Honey Lime Shrimp Skewers, you will need: - 1 lb large shrimp, peeled and deveined - 3 tablespoons honey - 2 tablespoons fresh lime juice - 1 teaspoon lime zest - 2 cloves garlic, minced - 1 teaspoon ground cumin - 1 teaspoon paprika - Salt and pepper to taste - 2 tablespoons olive oil - Fresh cilantro, chopped (for garnish) You need a few tools to make this dish: - Skewers (wooden or metal) - Mixing bowl for the marinade - Grill or grill pan for cooking - Whisk or fork for mixing Garnishes can make your dish pop. Here are some ideas: - Extra lime wedges for serving - Slices of avocado - Chopped green onions - Sliced jalapeños for a spicy kick - More fresh cilantro for a bright finish {{ingredient_image_1}} To start, grab a medium bowl. In this bowl, whisk together these key ingredients: - 3 tablespoons honey - 2 tablespoons fresh lime juice - 1 teaspoon lime zest - 2 cloves garlic, minced - 1 teaspoon ground cumin - 1 teaspoon paprika - Salt and pepper to taste - 2 tablespoons olive oil Mix them well until smooth. This marinade gives the shrimp a sweet and tangy flavor. Next, take 1 pound of large shrimp, peeled and deveined. Add the shrimp to the marinade. Make sure each shrimp gets a good coating. Cover the bowl with plastic wrap. Let the shrimp marinate for 30 minutes. You can also chill it for up to 2 hours for extra flavor. Now, preheat your grill or grill pan to medium-high heat. While it's heating, thread the marinated shrimp onto skewers. Aim for about 4-5 shrimp per skewer. This keeps them together while cooking. Lightly oil the grill grates to avoid sticking. Place the shrimp skewers on the grill. Cook each side for 2-3 minutes. The shrimp should turn opaque and be just cooked through. Once done, remove them from the grill. Garnish with fresh chopped cilantro before serving. Enjoy this tasty dish! To make the best honey lime shrimp skewers, start with the marinade. Combine honey, lime juice, and zest. Add minced garlic, ground cumin, and paprika. This mix brings out the best flavors. The shrimp should soak in this for at least 30 minutes. If you have more time, let them marinate for up to 2 hours. This helps the shrimp absorb all those tasty flavors. Don't skip this step; it is key for a great dish. Grill temperature matters. Aim for medium-high heat. This ensures the shrimp cook fast. Too low, and the shrimp can become tough. Too high, and they may burn. Preheat your grill for about 10 minutes before cooking. You want that perfect sear on each skewer. Lightly oil the grates to avoid sticking. This makes flipping easy and keeps the shrimp intact. Sometimes, things don’t go as planned. If shrimp stick to the grill, it may be the heat or oil. Make sure to oil the grill grates well. If your shrimp are overcooked, they will be rubbery. Keep an eye on them and cook for just 2-3 minutes on each side. Remove them once they turn opaque. If they look pink and shiny, they are ready to eat! Pro Tips Marinate for Maximum Flavor: Allow the shrimp to marinate for at least 30 minutes, but for the best flavor, try to marinate them for up to 2 hours in the refrigerator. Use Skewers Wisely: If using wooden skewers, soak them in water for 30 minutes before grilling to prevent burning. Don’t Overcook the Shrimp: Shrimp cook quickly; grill them just until they turn opaque and are slightly curled to maintain a tender texture. Garnish for Freshness: Always garnish with freshly chopped cilantro right before serving to enhance the dish's aroma and presentation. {{image_2}} You can swap shrimp for other proteins. Chicken or tofu works well. Use about 1 pound for each. Both absorb the honey-lime flavor nicely. You can also try scallops. They cook quickly and taste great with the marinade. Just like shrimp, they need about 2-3 minutes on each side. Want to change the taste? Try adding spices or herbs. A pinch of chili powder gives a nice kick. You can also add fresh herbs like basil or mint. These herbs add a fresh taste that brightens the dish. For a smoky flavor, try smoked paprika instead of regular paprika. Pair your skewers with tasty sides. Rice or quinoa makes a great base. You can also serve them with a fresh salad. A citrus salad with orange or grapefruit adds a nice touch. For something crunchy, consider coleslaw or grilled veggies. Enjoy your meal with a light drink like sparkling water or iced tea. After enjoying your Honey Lime Shrimp Skewers, store any leftovers in an airtight container. Place the container in the fridge. The shrimp will stay fresh for up to two days. Make sure to cool the skewers to room temperature before storing them. This helps keep the shrimp juicy and tasty. To reheat the shrimp skewers, use a skillet over medium heat. Add a splash of olive oil to the pan. Cook the skewers for about three to five minutes, turning them gently. You want to heat them through without overcooking. You can also use a microwave. Heat the skewers on a microwave-safe plate for about 30 seconds. Check to ensure they are warm but not rubbery. You can freeze the marinated shrimp before grilling. Place them in a freezer-safe bag. Make sure to remove as much air as possible before sealing. They can stay in the freezer for up to three months. When ready to use, thaw them overnight in the fridge. This keeps the shrimp safe and tasty. Do not freeze cooked shrimp, as they can lose their texture. I recommend marinating shrimp for at least 30 minutes. This time allows the shrimp to soak up the honey and lime flavors. If you want a stronger taste, you can marinate for up to 2 hours. Just remember, don’t go longer than that. The shrimp can become too soft. Yes, you can make these skewers in the oven. Preheat your oven to 400°F (200°C). Place the shrimp on a baking sheet lined with foil. Cook for about 6-8 minutes, flipping halfway through. Watch for the shrimp to turn opaque and curl slightly. These skewers pair well with various sides. You might try serving them with: - Rice or quinoa for a filling base. - Grilled veggies for a colorful plate. - A fresh salad for a light, crisp touch. - Corn on the cob for a sweet crunch. These options will enhance the meal and make it more exciting! Honey Lime Shrimp Skewers are easy to make and taste great. We covered the ingredients, equipment, and garnishes needed. I shared simple steps to marinate and grill the shrimp. The tips help you get the best flavor and fix any cooking problems. You can even try different proteins and flavors. Remember to store your leftovers properly too. This dish is perfect for any meal, and it pairs well with many sides. Enjoy your cooking adventure with these tasty skewers!

Honey Lime Shrimp Skewers Flavorful Grilled Delight

Are you ready to sink your teeth into a tasty treat? Honey Lime Shrimp Skewers will make your taste buds

For this creamy spinach orzo, you will need the following items: - 1 cup orzo pasta - 2 cups fresh spinach, chopped - 1 tablespoon olive oil - 1 small onion, finely diced - 2 cloves garlic, minced - 1/2 cup heavy cream - 1/2 cup vegetable broth - 1/2 cup grated Parmesan cheese - Salt and pepper to taste - 1/4 teaspoon nutmeg (optional) - Fresh parsley, chopped, for garnish This recipe makes four servings. It is great for a family meal or a cozy dinner. You can easily adjust the amounts based on how many people you serve. For a creamy dish, keep the ratio of pasta to sauce the same. If you want a lighter meal, add more spinach and less pasta. For dietary needs, you can make some tweaks: - To make it gluten-free, swap orzo with gluten-free pasta. - For a vegan option, use coconut cream and nutritional yeast instead of cheese. Using fresh ingredients makes a big difference in flavor. Fresh spinach gives this dish a vibrant taste and color. Look for bright green, crisp leaves. Choose a good quality Parmesan cheese for the best creaminess. Grating it yourself can also boost flavor. Olive oil should be extra virgin for a rich taste. Fresh garlic and onion add depth to the dish, so pick the freshest ones you can find. {{ingredient_image_1}} 1. Start by boiling salted water in a large pot. 2. Add 1 cup of orzo pasta and cook for 8-10 minutes. 3. Drain the orzo and set it aside. 4. In the same pot, heat 1 tablespoon of olive oil over medium heat. 5. Add 1 small diced onion. Sauté for 3-4 minutes until it is soft. 6. Stir in 2 minced garlic cloves. Cook for 1 minute until it smells great. 7. Add 2 cups of chopped fresh spinach. Sauté for 2-3 minutes until it wilts. 8. Pour in 1/2 cup of vegetable broth and let it simmer gently. 9. Next, stir in 1/2 cup of heavy cream. Mix it well. 10. Add the cooked orzo back into the pot. Stir to combine. 11. Fold in 1/2 cup of grated Parmesan cheese. Season with salt, pepper, and nutmeg. 12. Cook for another 2-3 minutes until everything is hot. 13. Remove from heat and sprinkle with fresh chopped parsley before serving. - Always use salted water for boiling the orzo. It helps add flavor. - Stir the orzo while it cooks. This prevents it from sticking together. - Check for doneness a minute before the package time ends. You want it al dente, not mushy. - Prepare all your ingredients before you start cooking. This saves time. - Keep the heat at medium to avoid burning the onions and garlic. - Serve immediately for the best creamy texture. If you wait too long, it may thicken up. When cooking creamy spinach orzo, avoid overcooking the orzo. This can make it mushy. Always check the package for the right cooking time. Another mistake is not draining the orzo well. Excess water can dilute the creaminess. Be sure to sauté the onion and garlic until soft. This builds a great base flavor. Also, don't skip the nutmeg. It adds a warm note that enhances the dish. A large pot is key for boiling the orzo. Use a good strainer to drain it easily. A wooden spoon works well for mixing ingredients. A sharp knife helps chop the onion and spinach quickly. A measuring cup for the cream and broth ensures accuracy. Don't forget a cutting board for easy prep. If you have a whisk, it helps blend cream and cheese smoothly. To boost flavor, try adding more garlic. You can also mix in some sun-dried tomatoes for a tangy twist. For extra creaminess, use cream cheese along with heavy cream. Adding fresh herbs like basil or cilantro can brighten the dish. A squeeze of lemon juice at the end adds fresh zest. Lastly, top with extra Parmesan for a rich finish. Pro Tips Use Fresh Spinach: Fresh spinach adds vibrant color and flavor to the dish. If you can, avoid frozen spinach for a more appealing texture. Adjust Creaminess: For a lighter version, substitute half of the heavy cream with Greek yogurt or a plant-based cream alternative. Enhance with Herbs: Experiment with different herbs like thyme or basil to elevate the flavor profile of your creamy orzo dish. Perfect Parmesan: Use freshly grated Parmesan cheese for the best flavor and texture, as pre-grated cheese often contains anti-caking agents. {{image_2}} If you want to switch things up, try different grains. You can use quinoa or farro. Both add nice texture and flavor. You can also use rice if you prefer. Just adjust the cooking time based on the grain you choose. This way, you still get that creamy spinach goodness. Want to make this dish heartier? Add some protein! Chicken and shrimp work great. Cook the protein first, then mix it into the creamy orzo. You can use cooked diced chicken or sauté shrimp until pink. This makes the dish filling and adds tasty flavor. If you want a vegan version, swap out the heavy cream and cheese. Use coconut milk or a nut-based cream. You can add nutritional yeast to mimic that cheesy flavor. This keeps the creaminess while making it plant-based. You won’t miss the dairy! To keep your creamy spinach orzo fresh, store it in an airtight container. Let it cool to room temperature first. Then, place it in the fridge. It should stay good for about 3-4 days. If you want to keep it longer, consider freezing it. When you reheat your orzo, add a splash of vegetable broth or cream. This helps keep it creamy. Use a microwave-safe dish and cover it with a lid. Heat in short bursts. Stir between each burst to ensure even warming. You can also reheat it on the stove over low heat. If you want to freeze the orzo, do it right after cooking. Cool it first, then portion it into freezer bags. Press out as much air as possible. It can last up to 3 months in the freezer. When ready to eat, thaw it overnight in the fridge before reheating. Yes, you can use frozen spinach. It saves time and is easy to use. Just thaw and drain it well before adding to the dish. This will help avoid excess water in your creamy orzo. Frozen spinach is also packed with nutrients, making it a great option. To make creamy spinach orzo gluten-free, swap the orzo with gluten-free pasta. Look for brands that offer gluten-free options. Cook it according to package directions. The rest of the recipe stays the same, so you won’t lose any flavor or creaminess. Creamy spinach orzo pairs well with grilled chicken or fish. You can also serve it with a side salad for a fresh crunch. For a hearty meal, try adding crusty bread to soak up the creamy sauce. It makes a satisfying and balanced dinner. In this blog post, we explored making creamy spinach orzo. We discussed essential ingredients, cooking steps, and tips to avoid mistakes. Using fresh spinach and quality cheese enhances your dish. Adding proteins or trying alternative grains can diversify your meals. Remember to store leftovers properly to keep them creamy. These tips ensure you enjoy this dish with confidence. Happy cooking!

Creamy Spinach Orzo Flavorful and Easy Recipe

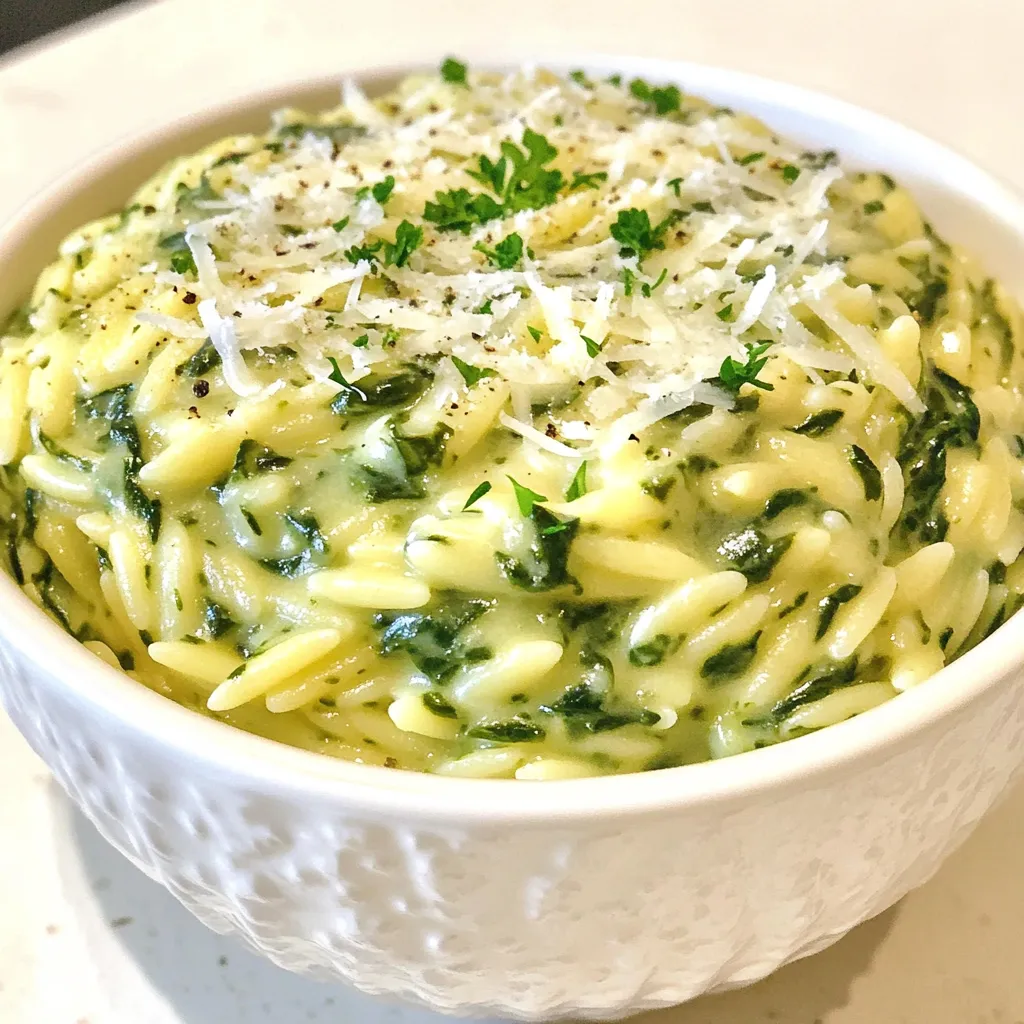
If you’re looking for a quick and tasty meal, you’ve found it! This Creamy Spinach Orzo recipe is simple yet

- 1 pound large shrimp, peeled and deveined - 1 can (14 oz) coconut milk - 2 tablespoons red curry paste These main ingredients bring the dish to life. The shrimp gives a wonderful taste and texture. Coconut milk adds creaminess and a subtle sweetness. Red curry paste packs a punch of flavor, making every bite exciting. - 1 medium onion, finely chopped - 2 cloves garlic, minced - 1 tablespoon fresh ginger, grated - 1 bell pepper (red or yellow), sliced - 1 cup snap peas or green beans Aromatics like onion, garlic, and ginger create a fragrant base. They help build the flavor as they cook. The bell pepper adds crunch and color. Snap peas or green beans bring freshness and brightness to the dish. - 2 tablespoons fish sauce - 1 tablespoon brown sugar - Juice of 1 lime - Fresh cilantro, chopped (for garnish) - Salt and pepper to taste Seasoning is key in this dish. Fish sauce enhances the umami flavor. Brown sugar balances the heat from the curry paste. Lime juice adds a zesty kick. Fresh cilantro on top adds a pop of color and a fresh taste. Adjust salt and pepper to make it just right for you. {{ingredient_image_1}} - Heat 1 tablespoon of olive oil in a large skillet over medium heat. - Add 1 medium onion, finely chopped. Sauté for 2-3 minutes until it softens. - Mix in 2 cloves of minced garlic and 1 tablespoon of grated ginger. Cook for 1 more minute until fragrant. - Stir in 2 tablespoons of red curry paste. Cook for 1 minute to release the flavors. - Pour in 1 can (14 oz) of coconut milk, mixing well. Bring the mixture to a gentle simmer. - Toss in 1 sliced bell pepper and 1 cup of snap peas. Let them simmer for about 5 minutes. They should be tender but still crisp. - Add 1 pound of large shrimp, 2 tablespoons of fish sauce, 1 tablespoon of brown sugar, and the juice of 1 lime. - Stir gently, cooking for about 3-5 minutes. The shrimp should turn pink and opaque. - Taste and adjust with salt and pepper as needed. - Remove from heat and garnish with fresh cilantro before serving. When choosing shrimp, you can pick fresh or frozen. Fresh shrimp tastes great but can be harder to find. Frozen shrimp is often just as good and more convenient. When buying, look for shrimp that smell like the ocean, not fishy. To peel and devein shrimp, start by holding it in one hand. With the other hand, remove the shell from the body. Then, use a small knife to make a shallow cut along the back. This reveals the dark vein. Remove the vein and rinse the shrimp under cold water. To adjust the spice in your dish, add more or less red curry paste. A little paste gives a mild kick, while more can really heat things up. Taste as you go, so you find your perfect level. Balancing sweetness is key. Brown sugar adds a nice touch. If your curry tastes too spicy, a bit of brown sugar can calm it down. Just a tablespoon can make a big difference. Garnishing your dish makes it look beautiful. Fresh cilantro adds a pop of color and a fresh taste. You can sprinkle it on top right before serving. For serving, coconut curry shrimp pairs well with rice or noodles. You can place the shrimp over a bed of rice or mix it with noodles for a hearty meal. Adding lime wedges on the side can also brighten the dish and enhance the flavors. Pro Tips Fresh Ingredients: Always use fresh shrimp and vegetables for the best flavor and texture in your coconut curry. Control the Heat: Adjust the amount of red curry paste to control the spiciness of the dish according to your preference. Balance the Flavors: Taste your curry before serving and adjust the lime juice, fish sauce, and brown sugar to balance sweetness and acidity. Serve with Sides: This dish pairs beautifully with steamed jasmine rice or quinoa to soak up the delicious curry sauce. {{image_2}} You can make this dish vegan by swapping shrimp for tofu or chickpeas. Tofu works well since it absorbs flavors easily. Use firm tofu for the best texture. If using chickpeas, canned ones are quick and ready to use. Just drain and rinse them. Adjust the cooking time for plant-based proteins. Cook the tofu for about 6-8 minutes until golden. For chickpeas, add them in when you add the vegetables. This keeps them warm and flavorful. If you love heat, try adding more curry paste or chili flakes. Start with an extra half tablespoon of curry paste. Mix it in when you add the coconut milk. For even more spice, use fresh chili peppers or jalapeños. These add fresh flavor and heat. You can also use spicy sauces, like Sriracha, for a kick. Adjust to your taste, but start small. You can always add more heat later. Make sure all sauce ingredients are gluten-free. Check the fish sauce and curry paste for hidden gluten. Many brands offer gluten-free options. For side dishes, pair with rice or quinoa, which are both gluten-free. You can also serve with roasted vegetables for a healthy balance. This way, everyone can enjoy the meal without worry. To store coconut curry shrimp, place it in an airtight container. This keeps it fresh and tasty. Make sure to cool it down before sealing. It will last in the fridge for about three days. To freeze this dish, let it cool completely first. Then, transfer it to a freezer-safe bag. Remove as much air as you can. Coconut curry shrimp can last about three months in the freezer. To reheat, thaw it in the fridge overnight. Heat it gently on the stove until hot. This keeps the shrimp tender and the sauce creamy. Coconut curry shrimp is great for meal prep. You can make a big batch on the weekend. Divide it into portions for the week. Pair it with rice or quinoa for a filling meal. Add a side salad for extra color and nutrition. This way, you have tasty meals ready to go. Coconut curry shrimp is a dish made with shrimp, coconut milk, and curry paste. It has roots in Southeast Asian cuisine, where coconut milk adds creaminess and flavor. The dish combines spices, herbs, and fresh vegetables, creating a delicious balance of tastes. You can find it in many Thai and Indian restaurants. Each chef adds their twist, but the core ingredients stay the same. Yes, you can make coconut curry shrimp ahead of time. Cook it fully and let it cool down. Store it in an airtight container in the fridge for up to three days. To reheat, warm it gently on the stove over low heat. If you want to save it for later, you can freeze it too. Just use a freezer-safe container. When you’re ready, thaw it overnight in the fridge and reheat as before. Coconut curry shrimp pairs well with several sides. Here are some tasty options: - Steamed jasmine or basmati rice - Noodles, like rice noodles or egg noodles - Fresh salad with lime dressing - Roasted or stir-fried vegetables For drinks, try pairing it with a light beer or a fruity cocktail. A refreshing iced tea also works well. Coconut curry shrimp is a simple yet tasty dish. You learned about the key ingredients, like shrimp and coconut milk. I shared step-by-step instructions to make the curry just right. Remember, you can customize it using vegan options or adjusting spice levels. Storing and reheating leftovers is easy, making it great for meal prep. Overall, this dish offers rich flavors and endless possibilities. Enjoy making it your own, and have fun sharing it with others!

Coconut Curry Shrimp Flavorful and Easy Weeknight Meal

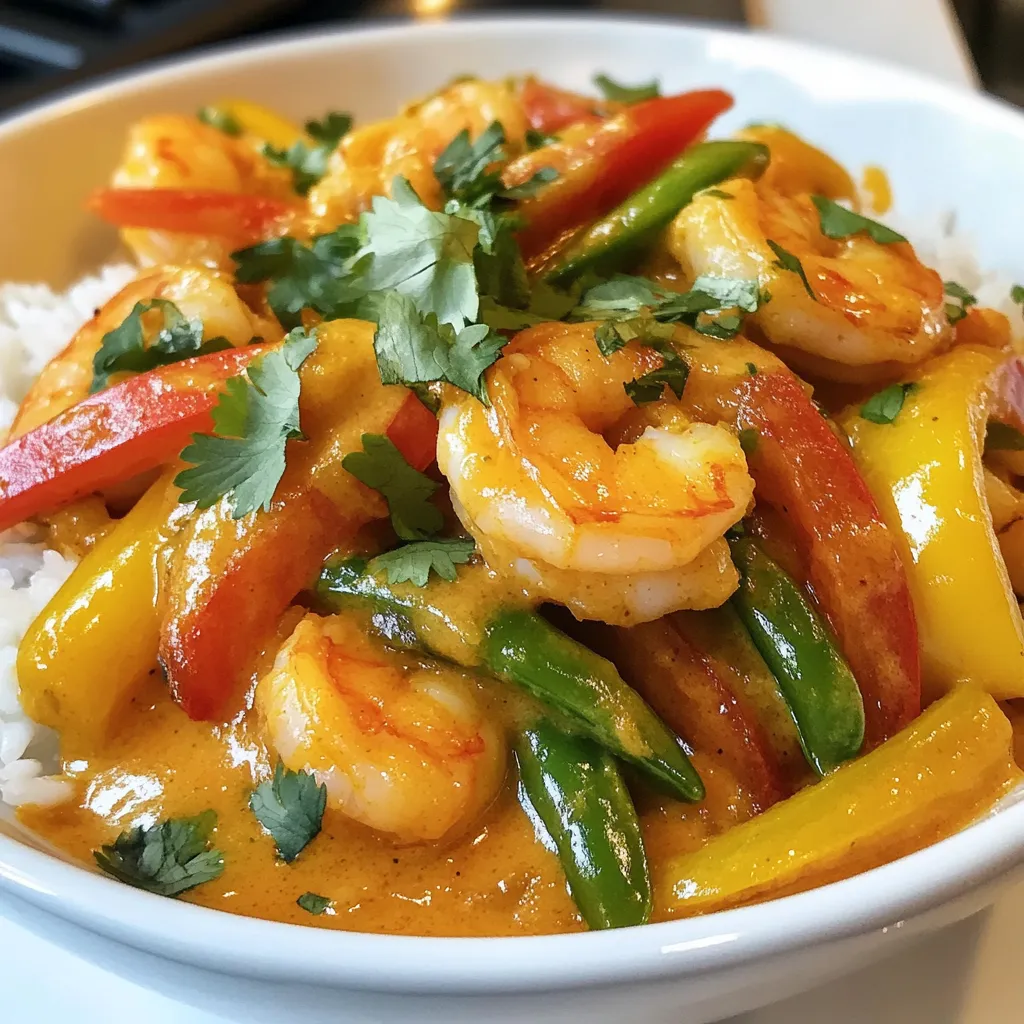
Looking for a quick and tasty dinner? Coconut Curry Shrimp is your answer! This dish blends creamy coconut milk with

For a rich and creamy Spinach Artichoke Pasta, gather these key items: - 8 oz. pasta (penne or rotini) - 2 cups fresh spinach, chopped - 1 cup canned artichoke hearts, drained and chopped - 1 cup cream cheese, softened - 1/2 cup heavy cream - 1/2 cup grated Parmesan cheese - 1 tablespoon olive oil - 3 cloves garlic, minced - 1 teaspoon onion powder - Salt and pepper to taste Adding a little flair is easy with these optional items: - Red pepper flakes (for heat) - Fresh parsley, chopped (for garnish) To make this dish, have these tools ready: - Large pot for boiling pasta - Frying pan for sautéing - Mixing bowl for combining ingredients - Measuring cups and spoons for precision {{ingredient_image_1}} Start by boiling water in a large pot. Add salt to the water for flavor. Once it boils, add 8 ounces of pasta, like penne or rotini. Cook it according to the package instructions until it’s al dente. This usually takes around 8 to 10 minutes. Drain the pasta and set it aside. In the same pot, add 1 tablespoon of olive oil and heat it over medium heat. Once warm, add 3 cloves of minced garlic. Sauté the garlic for about 1 minute until it smells good. Be careful not to burn it. Next, add 2 cups of chopped fresh spinach and 1 cup of chopped artichoke hearts. Cook this mix for 3 to 4 minutes until the spinach wilts down. Lower the heat and stir in 1 cup of softened cream cheese. Once it melts, add in 1/2 cup of heavy cream. Stir until the sauce is creamy and smooth. Then, mix in 1/2 cup of grated Parmesan cheese, 1 teaspoon of onion powder, salt, and pepper. Now it's time to bring it all together! Add the cooked pasta to the sauce in the pot. Toss the pasta gently to coat it well with the creamy sauce. If you like a bit of heat, sprinkle in some red pepper flakes. Taste and adjust the seasoning if needed. Serve your dish right away, garnished with fresh parsley and extra Parmesan if desired. Enjoy your rich and creamy spinach artichoke pasta! To boost flavor, use fresh herbs like basil or thyme. They add a bright taste. You can also add lemon juice for a zingy note. If you like spice, sprinkle in more red pepper flakes. This will give your dish a nice kick. Taste as you go, and adjust seasonings to your liking. One major mistake is overcooking the pasta. Cook it just until al dente. This keeps it firm and helps it hold the sauce better. Another mistake is not draining the artichokes well. Excess water can make your sauce too thin. Lastly, don’t skimp on the cheese! It adds richness to the dish. For a smooth sauce, make sure the cream cheese is softened. This helps it melt easily. Stir it in slowly, letting it blend with the spinach and artichokes. If the sauce is too thick, add a bit more heavy cream. This gives it a nice, creamy consistency. Keep stirring until it all comes together. Pro Tips Choose the Right Pasta: Opt for pasta shapes like penne or rotini that can hold the creamy sauce well, ensuring each bite is flavorful. Fresh Ingredients Matter: Use fresh spinach and artichoke hearts for the best flavor and texture. Canned artichokes can work, but fresh is always better! Adjust the Creaminess: If you prefer a lighter dish, reduce the amount of cream cheese or heavy cream, or substitute with Greek yogurt for a healthier option. Make It Ahead: This dish can be made ahead of time and stored in the refrigerator. Just reheat gently on the stove with a splash of cream to maintain creaminess. {{image_2}} You can easily add protein to your Spinach Artichoke Pasta. Chicken and shrimp work great. For chicken, use cooked, diced meat. You can sauté it with garlic before adding spinach. For shrimp, cook them in the same pot until pink. This adds flavor and makes the dish heartier. To make this dish vegetarian, skip the protein. Use vegetable broth instead of water when cooking pasta. For a vegan twist, replace cream cheese with cashew cream or tofu. Use coconut cream for a rich texture. Nutritional yeast can stand in for Parmesan cheese. You still get great flavor without animal products. If you need a gluten-free option, choose gluten-free pasta. Many brands now offer good choices. You can also try zucchini noodles or spaghetti squash. Both will give you a fun twist. Just remember to cook them until tender. This way, you can enjoy your dish without gluten. You can store leftovers in an airtight container. Let the pasta cool to room temperature first. Place it in the fridge for up to three days. When you’re ready to eat, check for any off smells before reheating. This helps keep your meal safe and tasty. To freeze the pasta, use a freezer-safe container. Make sure it is well-sealed to prevent freezer burn. The dish can last up to two months in the freezer. When ready to enjoy, thaw it overnight in the fridge. This keeps the texture and flavor intact. Reheat your pasta on the stove for best results. Add a splash of milk or cream to keep it creamy. Stir it over low heat until hot. You can also use the microwave, but cover it with a damp paper towel. This helps to avoid dryness. Enjoy your rich and creamy delight just like the first time! Yes, you can use frozen spinach. Just thaw and drain it well before adding. Frozen spinach is often just as tasty and saves time. If using frozen, expect a slightly different texture, but the flavor remains great. You can swap cream cheese for Greek yogurt or ricotta cheese. Both options give a creamy texture. Greek yogurt adds tang, while ricotta offers a mild taste. Adjust the amount based on your preference. To add heat, sprinkle in red pepper flakes. Start with a small amount and taste as you go. You can also add diced jalapeños or hot sauce for extra spice. Adjust according to your heat level. Yes, this dish is vegetarian-friendly. It uses spinach, artichokes, and dairy products. Ensure that your pasta is egg-free if you want it completely vegetarian. Enjoy this rich flavor without meat. Penne or rotini work best for this dish. Their shapes hold the creamy sauce well. You can also try bowtie or fusilli for fun shapes. Just make sure to cook until al dente for the best texture. This blog covered all you need for a great Spinach Artichoke Pasta. We looked at required and optional ingredients. I shared step-by-step cooking instructions and useful tips to enhance flavor. You learned about protein options and how to store leftovers. Remember, you can customize this dish to fit your tastes. Use what you have on hand and make it your own. Enjoy crafting this dish and impressing your family or friends!

Spinach Artichoke Pasta Rich and Creamy Delight

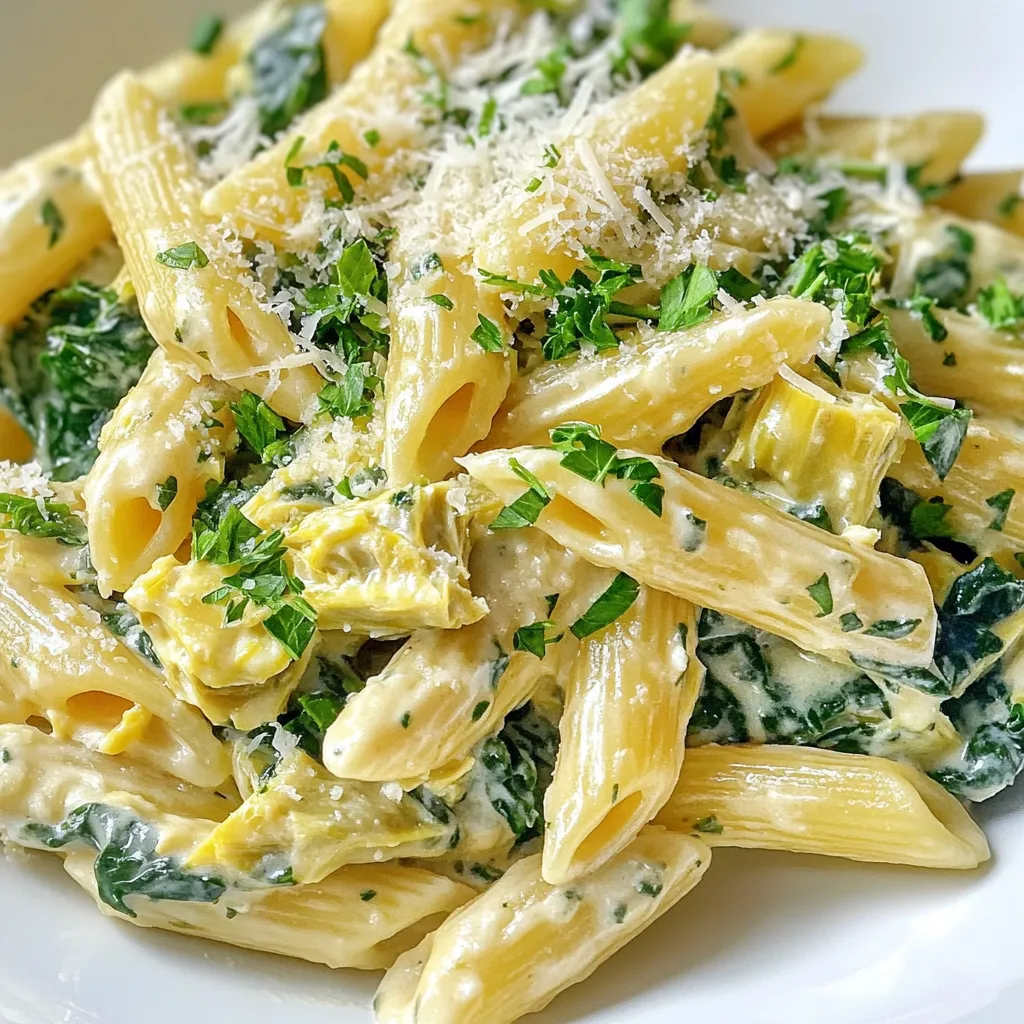
If you’re craving a rich and creamy dish that’s both easy and delicious, look no further! Spinach Artichoke Pasta combines

- 1 lb flank steak, sliced thinly against the grain - 2 cups broccoli florets - 2 cups cooked jasmine rice Flank steak is a great choice. It has rich flavor and tender texture. Slice it thinly against the grain. This gives you juicy bites. Broccoli florets add crunch and color. They also bring vitamins to the dish. Jasmine rice serves as the perfect base. Its nutty aroma complements the steak and broccoli. - 1/2 cup low-sodium soy sauce - 1/4 cup honey or maple syrup - 1 tablespoon sesame oil - 1 tablespoon olive oil - 2 cloves garlic, minced - 1 tablespoon fresh ginger, grated - 1 teaspoon cornstarch mixed with 2 tablespoons water - Salt and pepper to taste The sauce is key to this dish. Soy sauce is salty and savory. Honey or maple syrup adds sweetness. This balance creates great flavor. Sesame oil gives a nutty finish. Olive oil helps to cook the steak. Garlic and ginger add depth to the sauce. The cornstarch thickens the sauce, making it stick to the meat and veggies. Remember to season with salt and pepper for taste. - Sesame seeds - Green onions, sliced Garnishes make the dish pop. Sesame seeds add crunch and a nice look. They also give a slight nutty flavor. Green onions add freshness and a bit of spice. Toss them on just before serving for the best taste. {{ingredient_image_1}} To make the teriyaki sauce, start by whisking together key ingredients. In a small bowl, mix: - 1/2 cup low-sodium soy sauce - 1/4 cup honey or maple syrup - 1 tablespoon sesame oil - 2 cloves minced garlic - 1 tablespoon grated fresh ginger This simple blend creates a sweet and savory sauce. Make sure to taste it. If you want more sweetness, add a bit more honey or syrup. For a saltier flavor, increase the soy sauce. Balance is key for a great teriyaki sauce. Next, heat 1 tablespoon of olive oil in a large skillet or wok over medium-high heat. Add the thinly sliced flank steak. Season it with salt and pepper. Cook for about 3-4 minutes. You want the steak to be browned and cooked to your liking. Avoid overcrowding the pan. Searing the meat this way gives it a nice texture and flavor. Once done, remove the steak and set it aside. In the same skillet, add 2 cups of broccoli florets. Stir-fry them for 2-3 minutes. The goal is to keep the color bright and vibrant. This step is important because it helps lock in the nutrients. The broccoli should be tender yet still crisp. If it starts to lose its color, you’ve cooked it too long. After the broccoli is ready, pour the teriyaki sauce over it. Bring the mixture to a simmer. Let it bubble for about 1 minute. This helps the flavors meld together. Now, add the cornstarch mixed with 2 tablespoons of water. Stir well to thicken the sauce. It should coat the broccoli nicely. Finally, return the cooked steak to the skillet. Toss everything together for about a minute. This ensures the steak and broccoli are well-coated in sauce. Your dish is now ready to serve! To get tender steak, always slice against the grain. Slicing this way breaks up the muscle fibers, making it easier to chew. Choosing the right cut of meat is also key. I recommend flank steak for its great flavor and tenderness when cooked properly. For perfect broccoli, aim for a cooking time of just 2-3 minutes. This keeps the broccoli crisp and vibrant. If you want to mix things up, try using snap peas or bell peppers instead. Both add a nice crunch and color. If you have dietary needs, you can swap honey for maple syrup in the teriyaki sauce. This keeps the sweetness but makes it vegan. For convenience, store-bought teriyaki sauce works too, but be sure to check the label for added sugars. Homemade sauce allows for more control over flavors and ingredients. Pro Tips Rest the Steak: Allow the cooked steak to rest for a few minutes before slicing. This helps retain its juices, making for a more flavorful bite. Use Fresh Ingredients: Fresh garlic and ginger will elevate the flavor of your teriyaki sauce. Avoid pre-minced products for the best taste. Broccoli Cooking Time: Make sure not to overcook the broccoli. It should be bright green and slightly tender to retain its nutrients and crunch. Customize Your Bowl: Feel free to add other veggies like bell peppers or snap peas for extra color and nutrition. Adjust the teriyaki sauce quantity as needed. {{image_2}} You can switch the steak for chicken or tofu. Chicken gives a lighter taste. Tofu is great for a plant-based option. Both soak up the teriyaki sauce well. Seafood lovers can try shrimp in this bowl. Shrimp cooks fast and adds a sweet flavor. Just toss it in for a quick finish. If you want a change from jasmine rice, try brown rice or quinoa. These grains add more fiber and nutrients. They also have a nutty flavor. For a low-carb option, use cauliflower rice. It's light and lets the steak shine. Just sauté it lightly for a good texture. To enhance the taste, add spices like red pepper flakes or black pepper. These give some heat and depth. Fresh herbs like cilantro or basil can also brighten the dish. Want to mix in more sauces? Try hoisin or sriracha for a twist. These sauces can create unique flavors you’ll love. To keep your teriyaki steak and broccoli fresh, store it in an airtight container. Place it in the fridge right after cooling. Your leftovers can stay good for up to three days. This helps keep the flavors tasty and the texture nice. When you reheat your dish, use the microwave or a skillet. If using a microwave, heat it in short bursts. Stir in between to avoid hot spots. When using a skillet, add a splash of water to keep it moist. For reheating jasmine rice, sprinkle a little water before heating. This helps the rice regain its fluffy texture. If you want to freeze portions, place them in freezer-safe bags or containers. Make sure to remove as much air as possible. Your meal can last in the freezer for up to three months. To thaw, simply place it in the fridge overnight. You can also use the microwave for quick thawing. To make teriyaki sauce, you need a few simple ingredients. Gather: - 1/2 cup low-sodium soy sauce - 1/4 cup honey or maple syrup - 1 tablespoon sesame oil - 2 cloves garlic, minced - 1 tablespoon fresh ginger, grated To prepare, whisk together all these ingredients in a bowl. This sauce is sweet and savory. It adds great flavor to your steak and broccoli. Yes, you can use frozen broccoli. However, it may change the texture. Frozen broccoli can become softer and mushier when cooked. If you prefer crisp broccoli, fresh is better. If you use frozen, cook it for a shorter time to keep some crunch. You can serve many sides with these bowls. Here are a few ideas: - Steamed jasmine rice - Quinoa for a nutty flavor - A simple green salad - Edamame for extra protein These sides complement the dish well and complete your meal. This recipe is a balanced meal. It includes protein from steak and fiber from broccoli. Each serving has healthy fats from olive and sesame oil. By using low-sodium soy sauce, you reduce salt intake. Overall, this dish is nutritious and supports a healthy diet. This blog post covered how to make a delicious Teriyaki Steak and Broccoli Bowl. We discussed the main ingredients, sauces, and garnishes. You learned step-by-step instructions for preparing the sauce, cooking the steak, and stir-frying the broccoli. I shared tips for achieving the best texture and flavor, as well as variations to suit your taste. Finally, we explored storage options and answered common questions. You now have the tools to create a tasty and satisfying meal that you can enjoy. Dig in and share your cooking success with others!

Teriyaki Steak and Broccoli Bowls Flavorful Delight

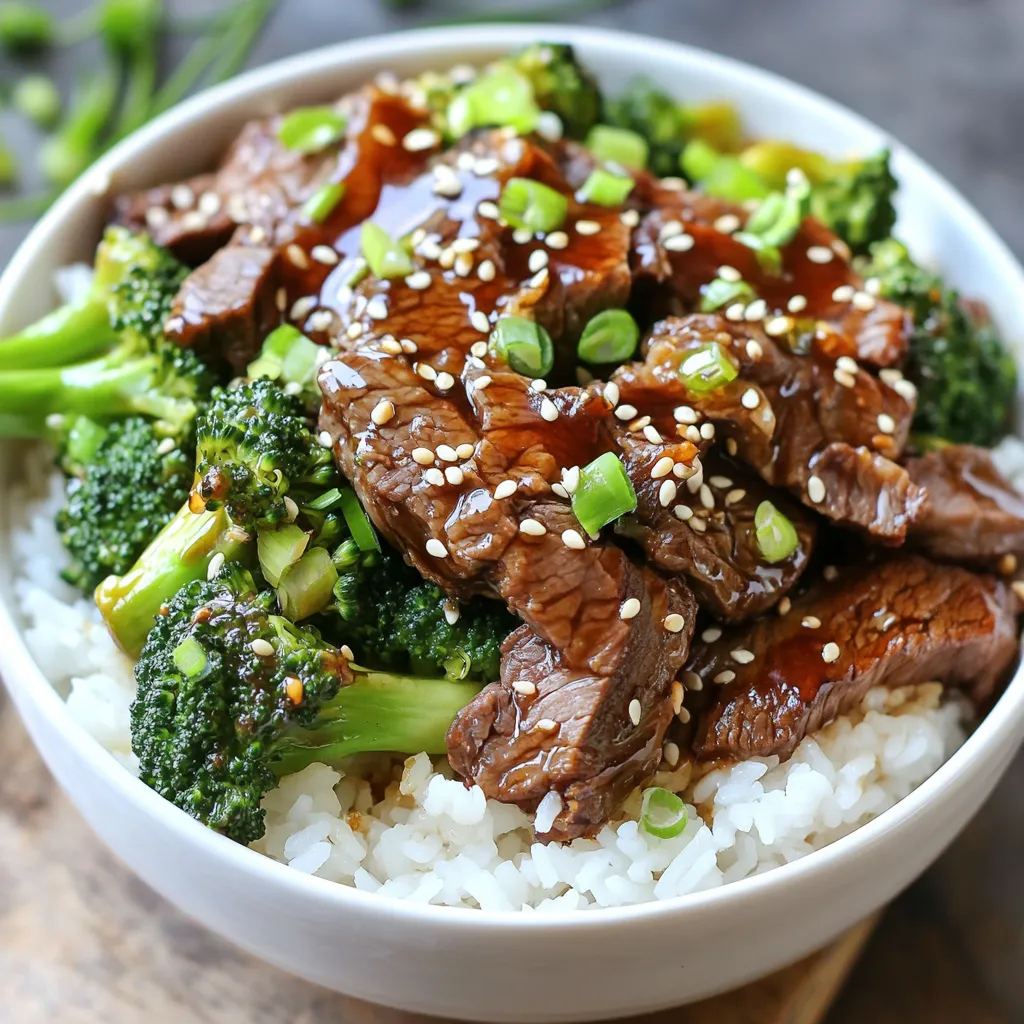
If you’re craving a meal that’s both tasty and easy to make, you’ll love my Teriyaki Steak and Broccoli Bowls!

To make this tasty dish, gather these main ingredients: - 8 oz spaghetti or your choice of pasta - 2 boneless, skinless chicken breasts - Salt and pepper, to taste - 1/2 cup all-purpose flour (for dredging) - 3 tablespoons olive oil - 3 cloves garlic, minced - 1 1/2 cups chicken broth - 3 tablespoons capers, drained and rinsed - Juice of 1 lemon (about 3 tablespoons) - Zest of 1 lemon - 1/4 cup fresh parsley, chopped These ingredients come together to create a bright and flavorful dish. The capers and lemon juice give it a refreshing kick. You might want to add some optional ingredients for extra flavor: - Grated Parmesan cheese, for serving Parmesan adds a creamy touch. It complements the bright lemon and salty capers well. If you need substitutions, here are some ideas: - For gluten-free pasta, use rice or corn pasta. - Instead of chicken, you can use firm tofu or chickpeas for a vegetarian option. - You can swap capers for green olives if you prefer. These swaps allow you to enjoy this dish no matter your dietary needs. Each option keeps the essence of the recipe while adding a personal twist. {{ingredient_image_1}} Start by boiling salted water in a large pot. Add 8 oz of spaghetti or your choice of pasta. Cook the pasta until it is al dente, as per the package instructions. This usually takes about 8-10 minutes. Once done, drain the pasta and set it aside. Be sure to save a cup of the pasta water for later. While the pasta cooks, season 2 boneless, skinless chicken breasts with salt and pepper. Dredge each chicken breast in 1/2 cup of all-purpose flour, shaking off any extra. In a large skillet, heat 3 tablespoons of olive oil over medium heat. Add the chicken breasts and sear them for 5-7 minutes on each side. The chicken should turn golden brown and be fully cooked. Remove the chicken from the skillet and let it rest on a cutting board. In the same skillet, add 3 cloves of minced garlic. Sauté the garlic for about 30 seconds until it smells great. Next, pour in 1 1/2 cups of chicken broth, scraping up any tasty bits stuck on the bottom. Stir in 3 tablespoons of drained and rinsed capers, along with the juice and zest of 1 lemon. Allow this sauce to simmer for around 5 minutes, letting it thicken slightly. Return the cooked spaghetti to the skillet with the lemon-caper sauce. Toss everything together to coat the pasta well. If the sauce seems too thick, add some of the reserved pasta water to loosen it up. While the pasta is hot, slice the seared chicken into strips. Serve the pasta on plates, adding the sliced chicken on top. Finish with chopped parsley and, if you like, sprinkle some grated Parmesan cheese on top. Enjoy your meal! To make great pasta, start with a large pot. Bring salted water to a boil. Use about 1 tablespoon of salt for every 4 quarts of water. This helps flavor the pasta. Add your spaghetti and cook it until al dente. Check the package for timing. Remember, you can always taste it! After cooking, save a cup of pasta water. This starchy water can help your sauce stick later. The key to juicy chicken is to not overcook it. Start by seasoning the chicken with salt and pepper. Dredge it in flour, shaking off the extra. Heat olive oil in a skillet over medium heat. Sear the chicken for 5-7 minutes on each side. It should be golden brown and cooked through. Let the chicken rest on a cutting board before slicing. This keeps the juices locked in. To create a flavorful sauce, use the same skillet where you cooked the chicken. Sauté minced garlic in the leftover oil for just 30 seconds. Then, add chicken broth to deglaze the pan. This means scraping up the browned bits for extra flavor. Stir in capers, lemon juice, and lemon zest. Let it simmer for about 5 minutes until it thickens slightly. This sauce will bring your dish to life with bright, zesty flavors. Pro Tips Use Fresh Ingredients: Opt for fresh lemon juice and zest for the best flavor. Fresh capers also enhance the dish's taste significantly. Don't Overcook the Chicken: Ensure the chicken is cooked just until golden brown and no longer pink inside to keep it juicy and tender. Reserve Pasta Water: Always save a cup of pasta water before draining. It’s perfect for adjusting the sauce consistency without losing flavor. Garnish for Presentation: Fresh parsley and a sprinkle of Parmesan cheese not only add flavor but also enhance the visual appeal of the dish. {{image_2}} You can easily make this dish vegetarian. Replace the chicken with mushrooms or tofu. Use vegetable broth instead of chicken broth. This helps keep the flavor strong. For a vegan twist, skip the cheese or use a plant-based option. Adding vegetables makes this meal even better. Try spinach, cherry tomatoes, or bell peppers. You can sauté them before adding the sauce. This not only boosts nutrition but also adds color and flavor. Feel free to mix any veggies you like. You can change the herbs for new flavors. Basil or thyme work great with lemon and capers. Try adding dill for a fresh taste, too. Each herb brings its own twist. Have fun experimenting to find what you like best! To keep your Lemon Caper Chicken Piccata Pasta fresh, store it in an airtight container. Make sure to let it cool before sealing. This helps prevent condensation and sogginess. Place the container in the fridge. Leftovers last about three days. When you are ready to enjoy your pasta again, reheat it on the stove. Add a splash of chicken broth or water to help it warm up. Heat over medium-low heat, stirring gently until warm. You can also use the microwave. Place in a microwave-safe bowl. Cover it with a damp paper towel and heat in 30-second bursts until hot. If you want to freeze your Lemon Caper Chicken Piccata Pasta, do it before adding the chicken. Freeze the pasta and sauce in separate bags. This keeps the pasta from getting mushy. It can last up to three months in the freezer. To thaw, place it in the fridge overnight. Reheat on the stove or in the microwave. Enjoy the fresh taste later! If you don’t have capers, use green olives or pickles. Their tangy flavor works well. You can also try a mix of lemon juice and a bit of salt for a similar taste. Yes! You can use any pasta you like. Penne, fettuccine, or even whole wheat pasta works great. Just make sure to adjust the cooking time as needed. Leftovers stay fresh for about three to four days. Store them in an airtight container. Make sure to reheat them well before eating. To make this dish gluten-free, use gluten-free pasta. The other ingredients are naturally gluten-free. Just check the flour if you use any for dredging. Add red pepper flakes to the sauce for heat. You can also use spicy sausage instead of chicken. Adjust the amount to suit your taste. In this post, we explored how to make Lemon Caper Chicken Piccata Pasta. We covered the main and optional ingredients, along with substitutions. You learned step-by-step instructions, cooking tips, and variations to fit your taste. With these insights, you can create a fun, flavorful dish. Enjoy your cooking adventure and don’t hesitate to experiment with ingredients! Your kitchen is your canvas, so make it delicious.

Lemon Caper Chicken Piccata Pasta Quick and Tasty Meal

Looking for a meal that’s quick, easy, and packs a flavor punch? Let me introduce you to Lemon Caper Chicken

To make the Greek Lemon Orzo Salad, gather these fresh ingredients: - 1 cup orzo pasta - 1 cup cherry tomatoes, halved - 1 cucumber, diced - 1/2 red onion, finely chopped - 1 cup Kalamata olives, pitted and halved - 1 cup feta cheese, crumbled - 1/4 cup fresh parsley, chopped - 1/4 cup fresh mint, chopped - 1/4 cup olive oil - 3 tablespoons lemon juice - 1 teaspoon dried oregano - Salt and pepper to taste You can swap ingredients to fit your taste or what you have. - Use quinoa or couscous instead of orzo for a different base. - Swap Kalamata olives for green olives if you prefer a milder flavor. - Use goat cheese or vegan feta as a cheese alternative. - Replace fresh herbs with dried ones, but use less for a stronger flavor. - If you want a bit of crunch, add bell peppers or radishes. This salad is not just tasty; it’s healthy too. - Orzo pasta provides complex carbs, giving you energy. - Cherry tomatoes are rich in antioxidants, which help fight free radicals. - Cucumbers are low in calories and high in water, keeping you hydrated. - Red onion has antioxidants and can support heart health. - Kalamata olives are good sources of healthy fats and vitamin E. - Feta cheese adds protein and calcium, great for bones. - Fresh parsley and mint are packed with vitamins and can aid digestion. These ingredients make the Greek Lemon Orzo Salad a fresh, colorful dish that is both nutritious and full of flavor. {{ingredient_image_1}} First, fill a large pot with water and add salt. Bring it to a boil. Add 1 cup of orzo pasta to the pot. Cook it according to the package instructions, which usually takes about 8-10 minutes. You want the orzo to be al dente, so don’t overcook it. Once done, drain the orzo using a colander. Rinse it under cold water to stop the cooking process. This helps keep the orzo firm and fresh. While the orzo cooks, let’s chop the veggies. Start with 1 cup of cherry tomatoes. Slice them in half. Next, take a cucumber and dice it into small pieces. Chop 1/2 of a red onion finely. Then, pit and halve 1 cup of Kalamata olives. Finally, get 1 cup of feta cheese and crumble it. Don’t forget the herbs! Chop 1/4 cup of fresh parsley and 1/4 cup of fresh mint. All these fresh ingredients will add great color and flavor to your salad. In a large mixing bowl, combine all your prepared veggies and herbs. This includes the cherry tomatoes, diced cucumber, red onion, Kalamata olives, feta cheese, parsley, and mint. In a small bowl, mix 1/4 cup of olive oil, 3 tablespoons of lemon juice, and 1 teaspoon of dried oregano. Add salt and pepper to taste. Whisk it well until combined. Pour this dressing over your vegetable mix. Now, add the cooled orzo to the bowl. Toss everything gently. Make sure each ingredient is coated with the dressing. Taste the salad and adjust the seasoning if needed. Let it chill in the fridge for at least 30 minutes before serving. Enjoy your fresh and flavorful Greek Lemon Orzo Salad! You can prepare this Greek Lemon Orzo Salad a day in advance. Cook the orzo, cool it, and mix it with the veggies and herbs. Store it in the fridge. Just wait to add the dressing until you are ready to serve. This keeps the salad fresh and tasty. To boost the flavor, add some zest from the lemon. This gives it a bright kick. You can also use fresh herbs like dill or basil. They add a lovely aroma. If you want a little heat, add red pepper flakes. Just a pinch goes a long way. For a beautiful presentation, use a large, shallow bowl. Layer the salad and drizzle some extra olive oil on top. You can garnish it with lemon slices or whole olives. This makes it look festive and inviting. Serve it next to grilled meats or fish for a full meal. Pro Tips Perfectly Cooked Orzo: Make sure to cook the orzo just until al dente to prevent it from becoming mushy. Rinse it under cold water immediately after draining to stop the cooking process. Fresh Herbs Matter: Use fresh parsley and mint for the best flavor. Dried herbs can work in a pinch, but fresh herbs elevate the dish significantly. Chill for Flavor: Allow the salad to chill in the refrigerator for at least 30 minutes before serving. This helps the flavors meld together beautifully. Customize Your Ingredients: Feel free to add other vegetables like bell peppers or artichokes, or even proteins like grilled chicken for a more filling meal. {{image_2}} You can make this Greek Lemon Orzo Salad heartier by adding protein. Grilled chicken adds a nice flavor. For a different twist, try shrimp or feta-stuffed peppers. For a plant-based option, include chickpeas or lentils. They boost the protein while keeping the dish light. This salad is easy to adapt for everyone. For vegetarians, the feta cheese adds creaminess. If you want a vegan option, just leave out the feta. You can replace it with avocado or a nut-based cheese. Both options give a creamy texture without dairy. Using seasonal ingredients makes this salad even better. In summer, add fresh corn or bell peppers for crunch. In fall, roasted butternut squash or Brussels sprouts give warmth. You can also swap out herbs based on the season. Fresh basil in spring or dill in winter can change the flavor profile completely. To keep your Greek lemon orzo salad fresh, store it in an airtight container. This will help keep the flavors bright. If you have leftovers, try to consume them within three days. Keep the salad in the fridge to prevent spoilage. Remember, the fresh herbs and vegetables taste best when they are crisp. Freezing this salad is not ideal. The texture of the vegetables may change when frozen. If you want to save it, consider freezing only the orzo. Cook the orzo, then cool it before placing it in a freezer-safe bag. You can freeze it for up to three months. When ready to use, thaw it in the fridge overnight. In the fridge, your Greek lemon orzo salad lasts about three days. After that, the flavors may fade, and the vegetables can become soggy. Always check for freshness before eating. If the salad looks or smells off, it is best to discard it. Enjoy your salad at its best! Yes, you can! While orzo gives this salad a nice texture, you can swap it. Try small pasta shapes like ditalini or mini shells. They will still hold the flavors well. Just make sure to cook them al dente. This keeps the pasta firm and tasty. No, traditional orzo is made from wheat. This means it isn’t gluten-free. If you need a gluten-free option, look for rice or quinoa orzo. These options will work well, and you can still enjoy all the fresh flavors. Just cook them according to package directions. Serve this salad chilled or at room temperature. It makes a great side dish or a light meal. If you want to impress, add some extra feta on top before serving. You can also garnish with fresh herbs like parsley or mint. This adds color and a burst of flavor! This blog post outlined the key ingredients for Greek Lemon Orzo Salad, including substitutes and nutrition. It provided simple step-by-step cooking instructions and smart tips for prep and flavor. You learned how to adapt the salad with protein or seasonal options. We also covered how to store leftovers effectively. In conclusion, this salad is easy to make and loaded with flavor. Customize it to suit your taste, and enjoy it at any meal.

Greek Lemon Orzo Salad Fresh and Flavorful Dish

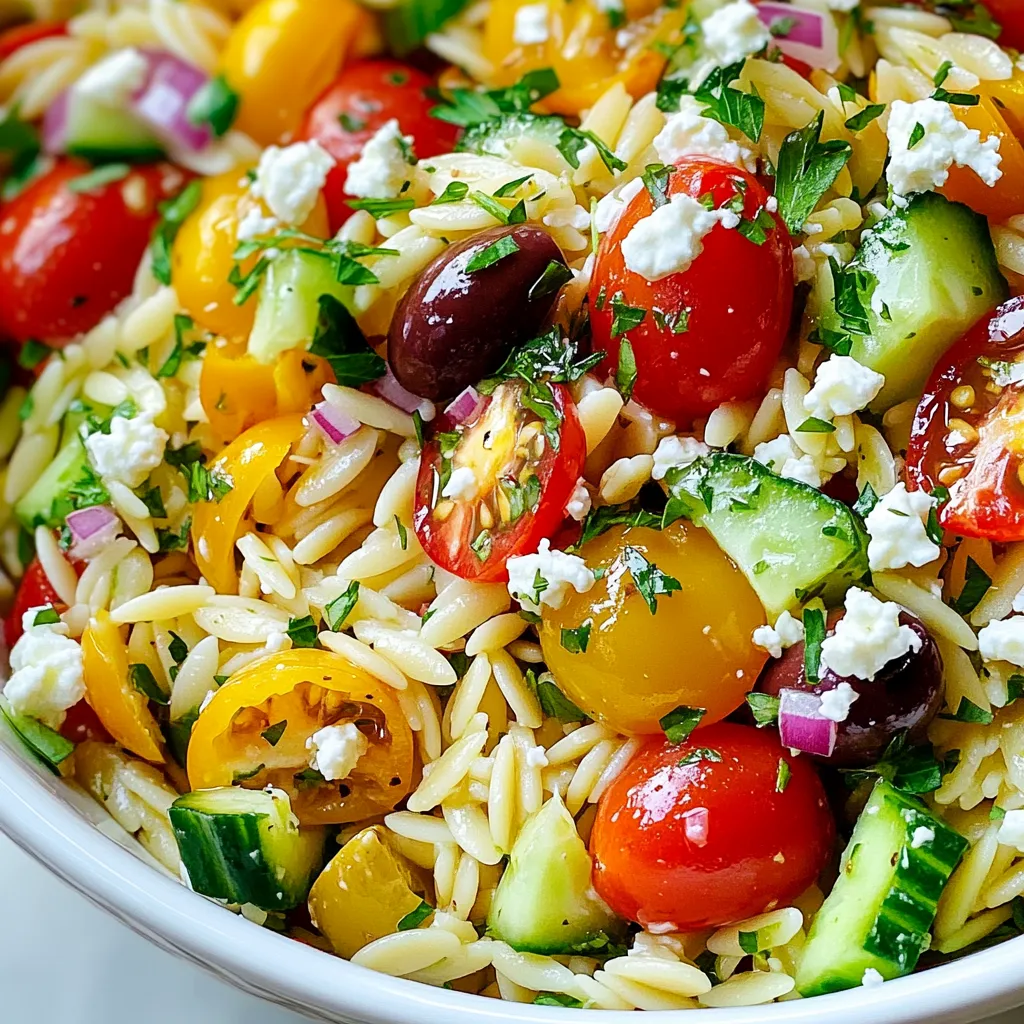
If you’re searching for a fresh and tasty dish, Greek Lemon Orzo Salad is a perfect choice. This colorful salad

Older posts
Newer posts
← Previous Page1 … Page126 Page127 Page128 … Page132 Next →

dsad

© 2025 pureeatsnow • Built with GeneratePress

Our Policies

  • Copyright Policy
  • Cookie Policy
  • GDPR Policy
  • Privacy Policy
  • Disclaimer
  • Terms Of Use

More Information

  • Home
  • About
  • Contact
  • Appetizers
  • Dessert
  • Dinner
  • Drinks
©2025, pureeatsnow About Back To Top