Skip to content
DisclaimerTerms Of UseGDPR PolicyCookie Policy

pureeatsnow

  • Home
  • Drinks
  • Appetizers
  • Dinner
  • Dessert
  • About
  • Contact
  • Privacy Policy
DisclaimerTerms Of UseGDPR PolicyCookie Policy

Rachel

Here is everything you need for creamy mushroom spinach orzo. Gather these simple items: - 1 cup orzo pasta - 2 tablespoons olive oil - 1 medium onion, diced - 3 cloves garlic, minced - 8 oz mushrooms, sliced (button or cremini) - 3 cups fresh spinach - 1 cup vegetable broth - 1 cup heavy cream or coconut cream - 1/2 cup grated Parmesan cheese (optional) - Salt and pepper to taste - 1 teaspoon dried thyme - 1 teaspoon lemon zest - Optional: Fresh parsley for garnish This list makes it easy to prepare a tasty meal. You can adjust some items based on your taste. For example, if you like mushrooms, add more. If you need a vegan option, use coconut cream and skip the cheese. Each ingredient plays an important role in building flavor and texture. Enjoy the cooking process and the delicious results! {{ingredient_image_1}} To start, fill a medium pot with water and add salt. Bring this salted water to a rolling boil. Next, add 1 cup of orzo pasta to the boiling water. Cook it according to the package instructions until it's al dente, usually about 8 to 10 minutes. Once done, drain the orzo and set it aside for later. In a large skillet, pour in 2 tablespoons of olive oil and heat over medium heat. When the oil is hot, add the diced onion. Sauté the onion for about 3 to 4 minutes until it softens. Then, stir in 3 cloves of minced garlic and cook for another minute. You will love the aroma that fills your kitchen! Add 8 ounces of sliced mushrooms to the skillet. Cook them for about 5 to 6 minutes, stirring occasionally. You want to ensure they turn golden brown and lose any excess moisture. This step adds a deep flavor to your dish. Next, stir in 3 cups of fresh spinach. Cook it for about 2 to 3 minutes until it wilts. After that, pour in 1 cup of vegetable broth. Bring this mixture to a gentle simmer. Lower the heat and mix in 1 cup of heavy cream or coconut cream. Add in 1 teaspoon of dried thyme, 1 teaspoon of lemon zest, and salt and pepper to taste. Let the sauce simmer gently for 3 to 4 minutes to thicken slightly. Now it's time to combine! Add the cooked orzo to the skillet. Stir it well until the orzo is fully coated with that creamy sauce. If you like, mix in 1/2 cup of grated Parmesan cheese until it melts and blends in nicely. Taste your dish and adjust the flavors. You might want to add more salt, pepper, or lemon zest. For a nice presentation, divide the creamy mushroom spinach orzo among plates or bowls. If you have fresh parsley, sprinkle some on top. Enjoy this delightful meal! To cook your orzo just right, start with salted water. This adds flavor. Bring the water to a rolling boil. Add your orzo and cook for about 8 to 10 minutes. Check for doneness a minute early. You want it al dente, meaning it should still have a slight bite. Once done, drain it right away. If you let it sit, it may become too soft. To make your orzo dish even tastier, use fresh herbs and spices. Dried thyme adds a nice touch. You can also try fresh basil or parsley. Lemon zest brightens the dish and gives a fresh taste. Consider adding a pinch of red pepper flakes for heat. The right mix of flavors makes a big difference. For a creamy dish, heavy cream works well. If you want a lighter option, use coconut cream. This keeps it rich but reduces fat. You can also try a blend of both. Start with half a cup of cream, then add more if you want it creamier. Always taste as you go. Adjust salt and pepper to your liking. Pro Tips Use Fresh Ingredients: Fresh spinach and mushrooms will enhance the flavor and texture of your dish. Opt for organic produce when possible for the best results. Customize Your Creaminess: If you want a lighter option, use coconut cream instead of heavy cream. It adds a unique flavor while keeping the dish creamy. Season in Layers: Make sure to taste and adjust your seasoning at each step of the cooking process. This helps build flavor and ensures a well-seasoned final dish. Garnish for Presentation: Don’t skip the fresh parsley garnish! It adds a pop of color and freshness that elevates the overall presentation of your dish. {{image_2}} You can make this dish gluten-free. Just use gluten-free orzo. Many stores sell this option now. You can also try rice or quinoa for a different twist. Both pair well with the creamy sauce. Want to boost the veggie power? You can add bell peppers, zucchini, or peas. Broccoli works great too! Think about what’s in season. Fresh veggies taste best. They also add color and texture. Want to make it heartier? Try adding chicken or shrimp. Cook these separately and mix them in. You can also add tofu for a plant-based option. It soaks up the flavors well and adds protein. To store leftovers, let the creamy mushroom spinach orzo cool down. Place it in an airtight container. This helps keep it fresh and tasty. Store it in the fridge. It can last for about 3 to 4 days. Make sure to reheat only the portion you want to eat. You can freeze this dish for longer storage. First, let it cool completely. Then, scoop the orzo into freezer-safe bags or containers. Try to remove as much air as possible to prevent freezer burn. It can last in the freezer for up to 2 months. When you're ready to enjoy it again, take the orzo out and thaw it in the fridge overnight. Reheat it gently on the stove or in the microwave. Add a splash of broth or cream for best results. This keeps the dish creamy and smooth. Creamy mushroom spinach orzo lasts about three to four days in the fridge. Store it in an airtight container to keep it fresh. When you reheat it, add a splash of broth or cream. This helps bring back the creamy texture. Yes, you can use different types of mushrooms. Button and cremini mushrooms work well. Shiitake or portobello mushrooms add a richer flavor. Just slice them and follow the same cooking steps. Feel free to mix them for a unique taste! Absolutely! You can make this recipe vegan by substituting the heavy cream with coconut cream or cashew cream. Use nutritional yeast instead of Parmesan cheese for a cheesy flavor. Lastly, ensure your vegetable broth is vegan-friendly. Creamy mushroom spinach orzo pairs well with a simple salad or roasted veggies. You can also serve it with garlic bread or crusty rolls. For protein, grilled chicken or sautéed shrimp makes a great addition. To add spice, try adding red pepper flakes during cooking. You can also stir in some chopped jalapeños or a dash of hot sauce. Adjust to your taste for the perfect kick! This blog post covered how to make creamy mushroom spinach orzo. You learned about key ingredients, step-by-step cooking, and helpful tips. Remember, each step matters for delicious results. You can customize this dish with different veggies, proteins, or creams to suit your taste. Store leftovers properly for another day. With this guide, you can feel confident in cooking and enjoying a tasty meal. Try it out; you'll impress yourself and others!

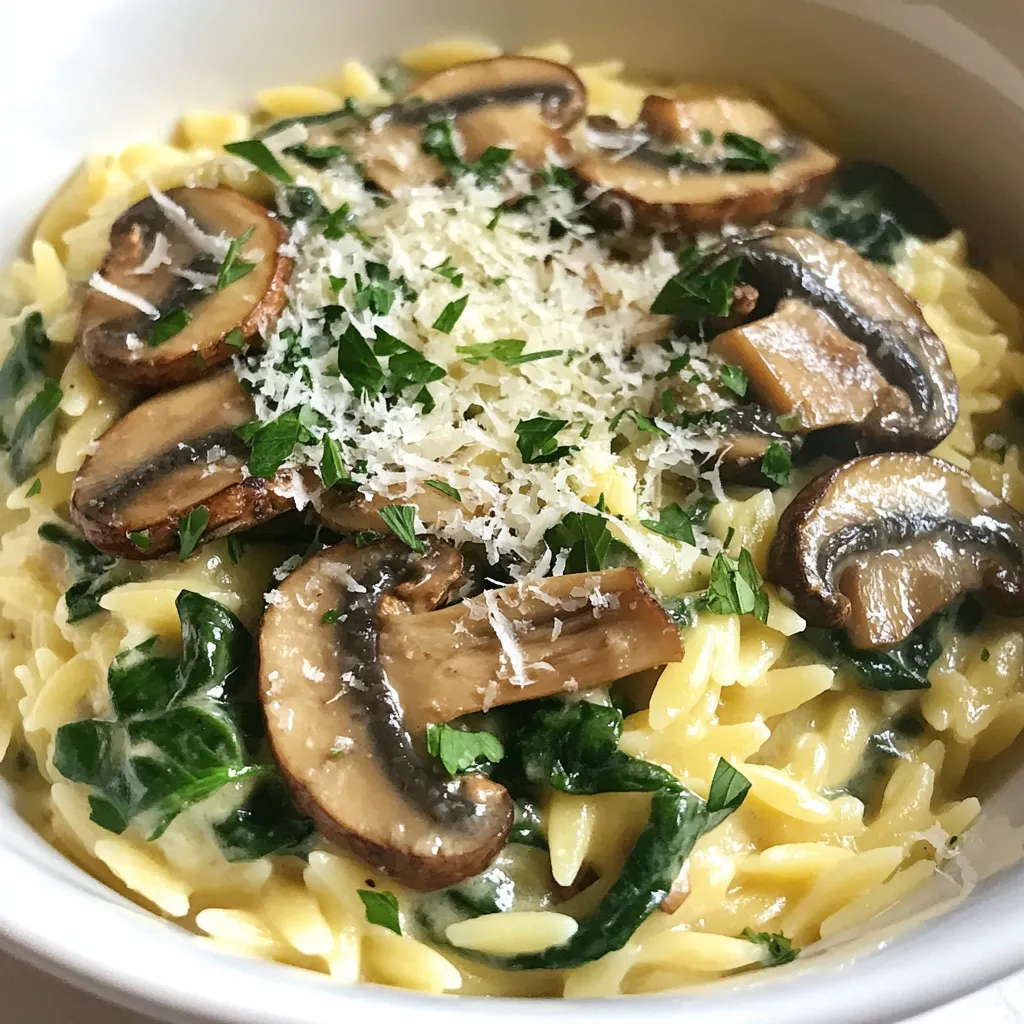
Creamy Mushroom Spinach Orzo Delightful and Easy Meal

Looking for a quick, delicious meal? This Creamy Mushroom Spinach Orzo is perfect for you. It’s easy to make and

To make Creamy Tomato Spinach Orzo, you need the following ingredients: - 1 cup orzo pasta - 2 tablespoons olive oil - 3 cloves garlic, minced - 1 can (14 oz) crushed tomatoes - 2 cups vegetable broth - 2 cups fresh spinach - 1/2 cup heavy cream - 1/2 cup grated Parmesan cheese - Salt and pepper to taste - Fresh basil leaves for garnish These simple ingredients come together to create a tasty dish. You can swap some ingredients for variety or dietary needs: - Use whole wheat or gluten-free orzo for a healthier option. - Substitute the heavy cream with coconut cream for a dairy-free choice. - For a vegan option, replace Parmesan cheese with nutritional yeast. - If you don’t have spinach, try kale or Swiss chard. - Use chicken broth instead of vegetable broth for extra flavor. These swaps keep the dish fun and flexible. Creamy Tomato Spinach Orzo has several dietary benefits: - It is a vegetarian dish, making it great for meatless meals. - You can easily adjust it to be vegan with simple swaps. - Using whole grain orzo adds fiber. - This dish is free from common allergens like nuts and shellfish. Always check the labels on packaged items to ensure they meet your dietary needs. Enjoy experimenting! {{ingredient_image_1}} Start by boiling a large pot of salted water. Add 1 cup of orzo pasta to the pot. Cook it according to the package instructions until it is tender. This usually takes about 8-10 minutes. Once it is done, drain the pasta in a colander and set it aside. Make sure to keep it warm. In the same pot, heat 2 tablespoons of olive oil over medium heat. Add 3 cloves of minced garlic and sauté for 1 minute until it smells nice. Next, pour in a 14-ounce can of crushed tomatoes and 2 cups of vegetable broth. Stir this mixture and bring it to a simmer. Then, add 2 cups of fresh spinach. Cook for 3-4 minutes until the spinach wilts down. Now, reduce the heat to low. Stir in 1/2 cup of heavy cream and 1/2 cup of grated Parmesan cheese. Mix until everything is creamy and well combined. Add the cooked orzo to the sauce and stir gently. Season with salt and pepper to taste. Let it cook together for 2-3 more minutes, allowing all the flavors to blend. Finally, remove the pot from heat and serve it hot. Garnish with fresh basil leaves for a lovely touch. To cook orzo just right, use plenty of water. This helps keep the pasta from sticking. Remember to salt the water well; it adds flavor. Cook the orzo until it is al dente. This means it should have a slight bite to it. After cooking, drain it and set it aside. You can toss it with a little olive oil to prevent sticking. This simple step makes a big difference. To boost creaminess, use heavy cream, which gives a rich texture. You can also add more cheese, like Parmesan, to deepen the flavor. Mixing in some cream cheese can add extra smoothness. If you want a lighter option, try using Greek yogurt. When you stir in these ingredients, do it on low heat. This keeps the cream from curdling and allows it to blend well. Garnishing makes your dish look pretty and adds flavor. Fresh basil leaves work great; they add a nice touch. You can tear them for a rustic look or chop them finely. A sprinkle of extra Parmesan on top adds a nice finish. If you want a little kick, add a dash of crushed red pepper. This can give extra flavor without overwhelming the dish. Pro Tips Perfectly Cooked Orzo: Make sure to cook the orzo al dente, as it will continue to absorb liquid and soften when combined with the sauce. Creamy Consistency: For an extra creamy texture, whisk the heavy cream before adding it to the pot to help it blend smoothly into the sauce. Fresh Spinach Substitutes: If fresh spinach isn't available, you can use frozen spinach. Just be sure to thaw and drain it well before adding it to the dish. Flavor Enhancements: Add a pinch of red pepper flakes or a splash of balsamic vinegar for a flavor boost that complements the tomatoes beautifully. {{image_2}} You can boost the protein in Creamy Tomato Spinach Orzo easily. Try adding cooked chicken for a hearty meal. Simply shred some rotisserie chicken and stir it in when you mix the orzo. You can also use shrimp for a light touch. Just sauté shrimp in olive oil before adding them to the dish. If you prefer plant-based options, consider chickpeas or lentils. They add great texture and protein without meat. Making this dish vegetarian is simple, as the base is already meat-free. Just ensure you use vegetable broth. To make it vegan, swap the heavy cream and cheese for plant-based alternatives. Coconut cream works well for a rich flavor. Nutritional yeast can replace Parmesan cheese, giving a cheesy taste without dairy. You can also add more vegetables, like zucchini or bell peppers, for extra nutrition. To elevate the flavors, think about adding herbs and spices. Fresh basil is a great start, but you can also use thyme or oregano. A pinch of red pepper flakes will add a nice kick. For a hint of smokiness, try adding smoked paprika. If you want a fresh taste, squeeze a bit of lemon juice over the dish before serving. These enhancements make the orzo even more delicious and satisfying. Store your leftover creamy tomato spinach orzo in an airtight container. Let it cool down first. Place it in the fridge if you plan to eat it within three days. This keeps the flavors fresh and tasty. To reheat, use a skillet over medium heat. Add a splash of water or broth to keep it moist. Stir often until warmed through. You can also use the microwave. Heat it in short bursts. Stir in between to make sure it warms evenly. You can freeze creamy tomato spinach orzo for up to three months. Use a freezer-safe container and leave space for expansion. When you're ready to eat, thaw it overnight in the fridge. Reheat it in a skillet as mentioned above. Enjoy a quick meal without losing flavor! To make Creamy Tomato Spinach Orzo vegan, swap the heavy cream and Parmesan cheese. Use a plant-based cream, like coconut cream or cashew cream. For cheese, you can use nutritional yeast. It adds a cheesy flavor without milk. This way, you keep the dish creamy and tasty while making it vegan-friendly. Creamy Tomato Spinach Orzo pairs well with many dishes. You can serve it with garlic bread for a crunchy bite. A fresh green salad with lemon dressing works great, too. If you like protein, grilled chicken or shrimp complements the orzo nicely. You can also add roasted vegetables for extra flavor and nutrition. Yes! You can use different pasta shapes instead of orzo. Small shells, penne, or even fusilli work well. Just make sure to adjust the cooking time based on the pasta you choose. Follow package instructions for cooking your pasta. The creamy sauce will still taste great with any shape you pick. In this blog post, I outlined how to make Creamy Tomato Spinach Orzo. We started with the essential ingredients and shared tasty substitutions. I guided you through simple steps for cooking orzo and making a rich sauce. You learned tips for perfect cooking and ways to customize the dish with proteins or flavors. Lastly, I provided storage methods for leftovers. This dish is easy to adapt and makes a great meal. Enjoy experimenting and making it your own!

Creamy Tomato Spinach Orzo Flavorful and Easy Dish

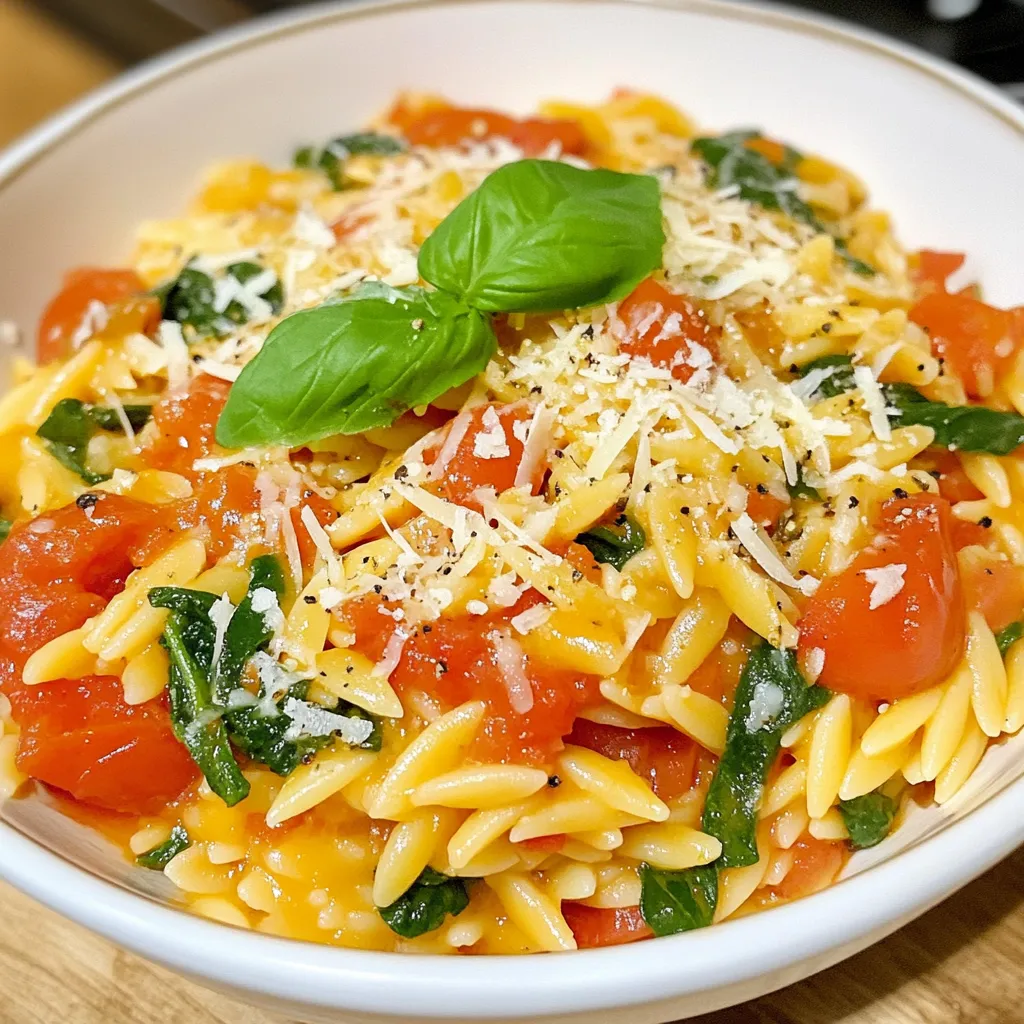
Craving a dish that’s both creamy and full of flavor? You’ll love this Creamy Tomato Spinach Orzo! It’s quick to

- 1 cup quinoa, rinsed - 2 cups vegetable broth - 1 can black beans, rinsed and drained - 1 cup cherry tomatoes, halved - 1 red bell pepper, diced - 1 small red onion, finely chopped - 1 cup corn (fresh, frozen, or canned) - 1 avocado, diced - 1 lime, juiced - 3 tablespoons olive oil - 1 teaspoon cumin - 1 teaspoon chili powder - Salt and pepper to taste - Fresh cilantro, chopped (for garnish) Rinsing quinoa is key. It removes saponins, which can make it bitter. Rinse it well in cold water. Use a fine mesh strainer for best results. Choosing vegetable broth matters too. A good broth adds flavor. Look for low-sodium options to control salt. Prepare your vegetables for the best texture. Dice and chop uniformly. This ensures even cooking and a nice bite in every forkful. {{ingredient_image_1}} To cook the quinoa, start by rinsing one cup of quinoa. Rinsing removes bitter flavors. Next, in a medium pot, mix the rinsed quinoa with two cups of vegetable broth. Bring this to a boil over medium heat. Once it boils, lower the heat. Cover the pot and let it simmer for about 15 minutes. After 15 minutes, check if the quinoa is done. It should be fluffy and have absorbed all the liquid. If it’s still wet, cover and simmer for a few more minutes. Once cooked, remove it from heat and let it cool. In a large mixing bowl, gather your veggies. Add one can of rinsed black beans, one cup of halved cherry tomatoes, one diced red bell pepper, and one finely chopped small red onion. Don’t forget one cup of corn, either fresh, frozen, or canned. Finally, add one diced avocado. Once the quinoa has cooled, add it to this bowl. To mix well, use a large spoon. Gently toss the ingredients together. This helps to distribute the flavors evenly throughout the salad. For the dressing, start with a small bowl. Whisk together the juice from one lime, three tablespoons of olive oil, one teaspoon of cumin, and one teaspoon of chili powder. Add salt and pepper to taste. To emulsify, whisk until the dressing looks smooth and combined. If you prefer it tangier, add more lime juice. For a richer taste, increase the olive oil. Adjust as needed to match your taste. Once ready, pour the dressing over the salad. Toss the salad gently to coat all the ingredients. Let it sit for at least 15 minutes. This allows the flavors to blend beautifully. Want to spice up your Southwest Quinoa Salad? Try adding jalapeños or a splash of hot sauce. This adds heat and excitement to each bite. If you prefer a milder option, skip the heat. You can also include cheese or nuts for extra flavor. Crumbled feta or cotija cheese brings creaminess. Chopped nuts like almonds or walnuts add crunch. Both options deepen the taste and texture. Serve your salad in a large, colorful bowl. This makes it eye-catching and fun. Garnish with chopped cilantro for a fresh touch. Add lime wedges on the side. They brighten the dish and invite guests to add more zing. Choose serving dishes that highlight the vibrant colors. Clear glass bowls work well, letting the salad shine. You can also use rustic wooden bowls for a cozy feel. To save time, prepare quinoa and vegetables in advance. Cook the quinoa a day ahead and store it in the fridge. Chop your vegetables earlier in the week. This keeps them fresh and ready to go. When storing salad, use airtight containers. This helps keep the salad crisp and tasty. If you plan to enjoy leftovers, store the dressing separately. Add it just before serving to maintain freshness. Pro Tips Rinse Quinoa Thoroughly: Always rinse quinoa under cold water before cooking to remove its natural coating, called saponin, which can give it a bitter taste. Use Fresh Lime Juice: For the best flavor, use freshly squeezed lime juice instead of bottled. It brightens up the salad and enhances the overall taste. Chill Before Serving: Allow the salad to sit in the fridge for at least 15 minutes after mixing to let the flavors meld together for a more delicious experience. Customize Your Veggies: Feel free to swap or add additional vegetables based on your preference or seasonality, such as cucumbers, radishes, or bell peppers of different colors. {{image_2}} You can switch up the beans in this salad. Try pinto beans or kidney beans for a new taste. If you want more veggies, add zucchini or bell peppers. You can use chickpeas for a protein boost. If you need gluten-free options, quinoa is already safe. You can also add nuts or seeds for extra protein and crunch. Instead of lime juice, use lemon or orange juice for a fresh twist. You can try apple cider vinegar for a zing. For a creamy dressing, mix in Greek yogurt or sour cream. Add a touch of chipotle for a smoky flavor. Each dressing choice will change the taste of your salad. This salad pairs well with grilled chicken or shrimp. You can create a complete meal by adding protein. It also goes well with spicy dishes or tacos. Serve it as a side dish for a BBQ or picnic. The bright flavors will make your meal pop. To keep your Southwest Quinoa Salad fresh, use airtight containers. Glass or BPA-free plastic work best. These containers help keep moisture in and air out. If you store it well, your salad stays tasty for up to four days in the fridge. Refrigerate the salad right after serving. Let it cool before sealing the container. This helps maintain the crispness of the veggies. You can also separate the dressing from the salad if you prefer. This keeps the salad fresh longer. You can freeze the quinoa and veggies separately. First, let the quinoa cool completely. Then, put it in a freezer-safe bag or container. Do the same for the vegetables. They will keep well for about three months. When you’re ready to eat, thaw the quinoa and veggies overnight in the fridge. You can add them to a bowl and mix them with your favorite dressing. Reheat the quinoa gently in the microwave or on the stove. This makes it warm and fluffy again. Quinoa is a tiny seed that acts like a grain. It is packed with nutrients. Quinoa is high in protein and fiber. It has all nine essential amino acids. This makes it a complete protein source. It is also a good source of vitamins and minerals. Quinoa is gluten-free, making it great for people with celiac disease. It is safe for those who avoid gluten. You can use quinoa in many dishes. It is light and fluffy, perfect for salads. Yes, you can make this salad ahead of time. It stays fresh in the fridge for about three days. To keep it tasty, store it in an airtight container. This helps stop it from drying out. Let the salad sit for a little bit before serving. This helps the flavors blend well. If you make it too early, add fresh avocado later. This keeps it green and tasty. If you need a substitute for black beans, try other legumes. Chickpeas or kidney beans work well. They add a nice texture and flavor. You can also use lentils for a different taste. Lentils are high in protein and cook quickly. All these options keep your salad healthy and satisfying. In this post, we explored a tasty quinoa salad recipe. We discussed key ingredients like quinoa, black beans, and fresh vegetables. You learned how to prepare these ingredients, cook the quinoa, and mix it all together with a zesty dressing. I shared tips on enhancing flavors and presented helpful ideas for meal prep. You can also see how to store leftovers and find options for variations. This dish is not only healthy but adaptable. I hope you enjoy making your own quinoa salad and try out different twists!

Southwest Quinoa Salad Flavorful and Fresh Meal

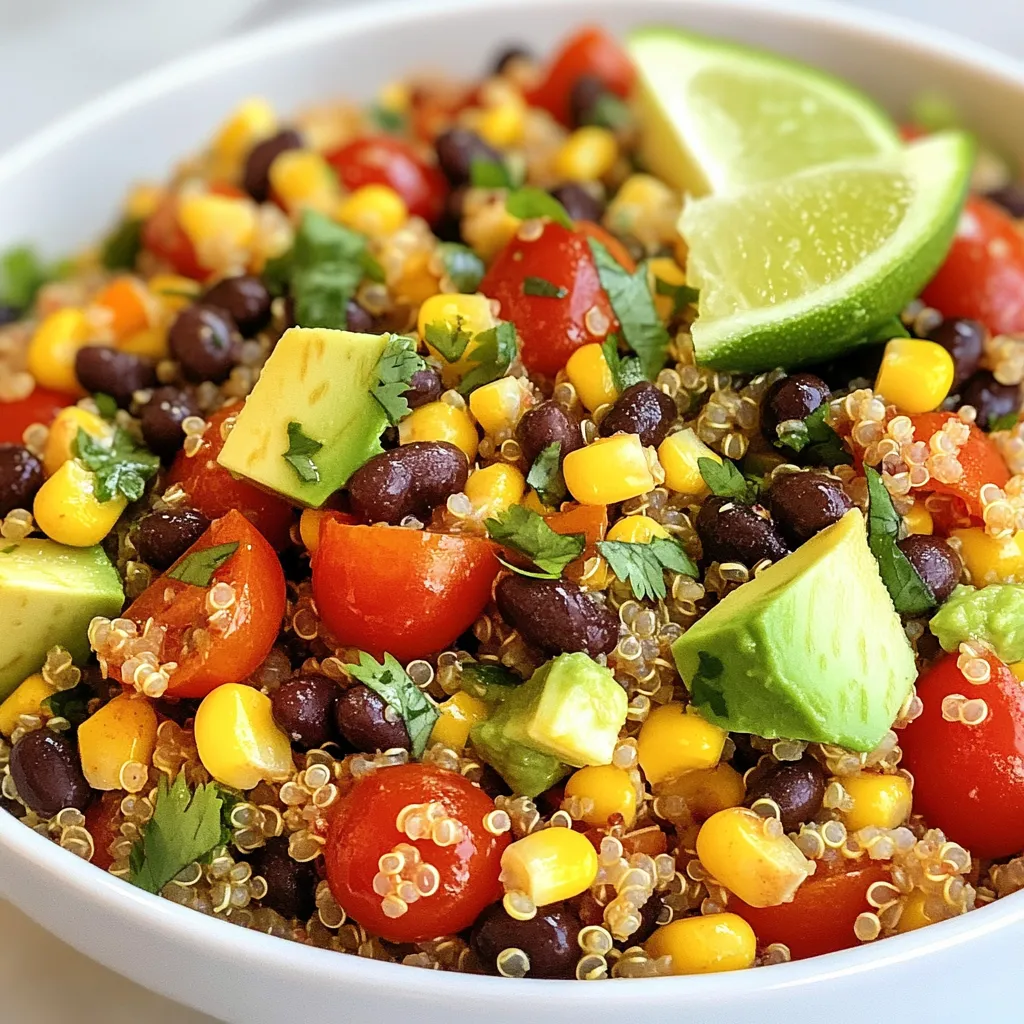
Looking for a fresh, tasty meal? My Southwest Quinoa Salad is packed with protein and vibrant veggies. It’s perfect for

- 2 ribeye steaks (about 1-inch thick) - 2 cups mushrooms (cremini or button), sliced - 4 tablespoons unsalted butter - 2 tablespoons olive oil - 4 cloves garlic, minced - 1 tablespoon fresh thyme leaves (or 1 teaspoon dried thyme) - Salt and freshly ground black pepper to taste - Fresh parsley, chopped In this recipe, the ribeye steak stands out because of its rich flavor and tenderness. You can choose either cremini or button mushrooms for a nice texture. I love using unsalted butter for the sauce because it lets the garlic shine. Olive oil helps me get a great sear on the steak. For seasoning, garlic brings a strong taste to the dish. Fresh thyme adds a touch of earthiness that pairs well with the steak. Salt and black pepper enhance all the flavors. Finally, fresh parsley adds color and freshness when you serve it. Gather these ingredients before you start cooking. This will make the process smooth and fun. Enjoy the simplicity of these flavors coming together! {{ingredient_image_1}} First, take the ribeye steaks out of the fridge. Let them rest at room temperature for about 30 minutes. This step helps the steak cook evenly. Next, pat the steaks dry with paper towels. This removes excess moisture and helps with browning. Then, season both sides with salt and fresh black pepper. Don’t be shy with the seasoning; it brings out the steak's flavor. Now, heat a large skillet on medium-high. Add 2 tablespoons of olive oil, letting it get hot. Place the steaks in the skillet, making sure not to crowd them. Sear the steaks for about 4 to 5 minutes on each side for medium-rare. Adjust the time for your preferred doneness. Once cooked, take the steaks out and let them rest on a plate, loosely covered with foil. This resting time allows the juices to redistribute. In the same skillet, lower the heat to medium. Add the sliced mushrooms and cook until they start to brown. This should take about 4 to 5 minutes. Stir them occasionally for even cooking. Once browned, add the minced garlic and thyme to the mushrooms. Cook for another 1 to 2 minutes until fragrant. Be careful not to burn the garlic; it can turn bitter. To get the best flavor in your steak, focus on temperature. For medium-rare, aim for 130°F to 135°F. Use a meat thermometer for accuracy. Always let your steak rest after cooking. This helps keep the juices inside, making it juicy and tender. For mushrooms, I recommend using cremini or button varieties. They add great taste and texture. You can also add herbs like rosemary or spices like paprika. These enhance the flavor and give the dish a nice twist. When making the garlic butter sauce, keep your heat low. This prevents the garlic from burning and turning bitter. If the sauce is too thin, cook it longer to thicken. If it’s too thick, add a splash of broth or water to reach your desired consistency. Pro Tips Resting the Steak: Letting the steaks rest after cooking helps retain juices, ensuring a tender and flavorful bite. Mushroom Selection: Use a mix of cremini and button mushrooms for a depth of flavor and varied texture in your dish. Butter Temperature: Make sure the butter is at room temperature to melt quickly and blend smoothly with the other ingredients. Seasoning Layers: Season each component of the dish separately for a more complex flavor profile that enhances the overall taste. {{image_2}} You can use other cuts of steak if you want. Sirloin or flank steak works well. These cuts are less fatty than ribeye but still tasty. You can also try cooking your steak in different ways. Grilling adds a fun smoky flavor. Broiling gives a nice crust on top and keeps the inside juicy. If you can't find cremini or button mushrooms, don’t worry. You can use portobello or shiitake mushrooms instead. These mushrooms have a rich taste and can add depth to your dish. You can also mix in other vegetables. Sautéed spinach or bell peppers can brighten up the plate and add crunch. Want to change things up? Try adding wine or brandy to the garlic butter sauce. It gives a nice kick and can enhance the flavors. You can also add cheese or cream to the mix. A sprinkle of parmesan or a splash of heavy cream can make the sauce even richer and more decadent. To store leftover steak, let it cool first. Wrap it in plastic wrap or foil. This keeps it fresh. Place it in an airtight container. It can last 3 to 4 days in the fridge. For the mushroom sauce, let it cool too. Store it in a separate airtight container. It also lasts for 3 to 4 days. Keeping them separate keeps flavors fresh. The best way to reheat steak is in the oven. Preheat it to 250°F. Place the steak on a baking sheet and cover it with foil. Heat for about 20 to 30 minutes. This keeps it juicy. You can also use a skillet. Heat it over low. Add a bit of oil or butter. Cook the steak for a few minutes on each side. This method can help avoid overcooking. Be careful not to leave it too long. Yes, you can freeze garlic butter mushroom steak. Wrap the steak tightly in plastic wrap. Then, place it in a freezer bag. It can last up to 3 months in the freezer. For the mushroom sauce, freeze it in a small container. Leave space for expansion. When ready to use, thaw it overnight in the fridge. Reheat it gently on low heat. This keeps the flavors intact. To make this dish, follow these steps: 1. Prep the Steak: Take your ribeye steaks from the fridge. Let them sit for 30 minutes. Pat them dry and season with salt and pepper. 2. Cook the Steaks: Heat 2 tablespoons of olive oil in a large skillet. Once hot, add the steaks. Sear for 4-5 minutes on each side for medium-rare. Remove and let them rest. 3. Sauté the Mushrooms: In the same skillet, lower the heat. Add sliced mushrooms. Cook until they start to brown, about 4-5 minutes. 4. Make the Garlic Butter: Add minced garlic and thyme to the mushrooms. Cook for 1-2 minutes until fragrant. 5. Add the Butter: Reduce the heat to low. Add the butter and let it melt. Mix well with the mushrooms and garlic. 6. Serve: Place the steaks back in the skillet. Spoon the garlic butter mushroom mix over the steaks. 7. Garnish and Plate: Plate the steaks and top with the mushroom mixture. Sprinkle with chopped parsley. Yes, you can use chicken or pork. Here’s how to adjust: - Cooking Time: Chicken breasts or pork chops may need different cooking times. Use a meat thermometer to check doneness. - Flavor: You may want to add a splash of lemon juice for chicken or pork to keep it juicy. Here are some great side dishes: - Mashed Potatoes: Creamy and buttery, perfect with steak. - Steamed Veggies: Broccoli or green beans add color and nutrients. - Salad: A fresh garden salad offers a crisp contrast to the rich steak. You can check steak doneness without a thermometer by doing this: - Touch Test: Press the steak with your finger. If it feels soft, it's rare. If it feels firm, it's well done. - Cut Test: Make a small cut in the steak. Look at the color inside. Pink means medium-rare, while gray means well done. This blog post covered how to make a delicious garlic butter mushroom steak. We discussed key ingredients like ribeye, mushrooms, and seasonings. I shared tips for achieving the perfect steak and variations you can try. Remember to store leftovers properly and choose sides that complement your meal. Cooking can be simple and enjoyable with the right guidance. Now, you have the tools to create a flavorful dish. Enjoy your cooking journey!

Garlic Butter Mushroom Steak Simple and Tasty Recipe

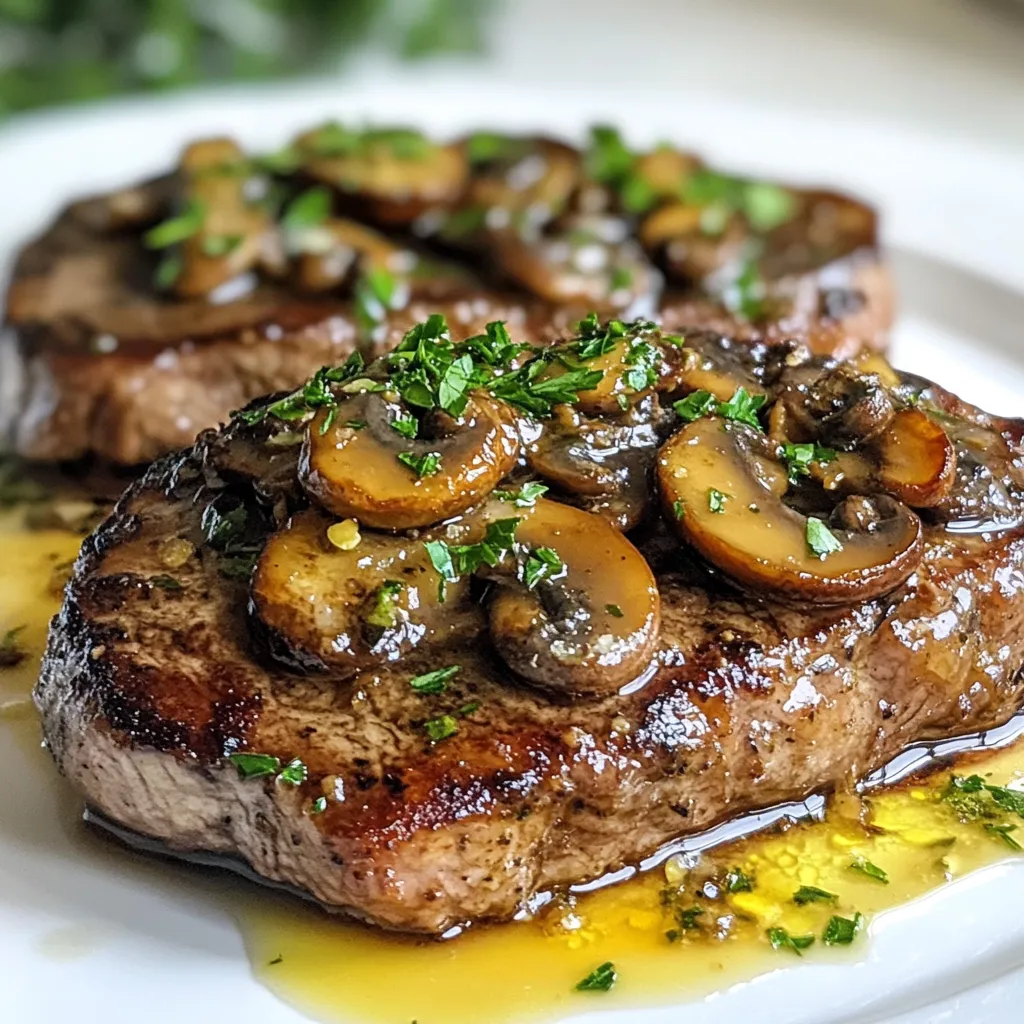
Are you ready to impress your taste buds? My Garlic Butter Mushroom Steak recipe combines juicy ribeye steak, savory mushrooms,

- 1 lb large shrimp, peeled and deveined - 1 can coconut milk (14 oz) - 2 tablespoons coconut oil - 1 medium onion, finely chopped - 2 garlic cloves, minced - 1 tablespoon fresh ginger, grated - 1 red bell pepper, sliced - 1 cup snap peas - 2 tablespoons red curry paste - 2 tablespoons lime juice - Zest of 1 lime - Salt and pepper to taste Large shrimp serve as the star of this dish. They soak up the rich coconut milk and spices. The coconut milk creates a creamy base. It adds a sweet flavor that balances the dish. Coconut oil adds a nice depth and aroma. Onions, garlic, and ginger are key in building flavor. When sautéed, they release their natural oils. This step enhances the taste of the whole dish. Red bell pepper and snap peas add a colorful crunch. They also provide a fresh contrast to the creamy sauce. Red curry paste brings heat and depth. You can adjust the amount based on your heat preference. Lime juice and zest brighten the dish with a tangy kick. Salt and pepper round out the flavors, making them pop. These ingredients come together to create a delightful experience. The blend of flavors makes each bite enjoyable. {{ingredient_image_1}} 1. First, grab a large skillet. Heat 2 tablespoons of coconut oil over medium heat until it melts. You want it to shimmer. 2. Next, add in 1 medium onion, finely chopped. Sauté it for 3-4 minutes until it turns translucent. 3. Then, stir in 2 minced garlic cloves and 1 tablespoon of grated ginger. Cook for 1 minute until you smell the aroma. 4. Now, toss in 1 sliced red bell pepper and 1 cup of snap peas. Stir them often for about 3 minutes. 5. Add 2 tablespoons of red curry paste. Make sure it coats the veggies well, cooking for another minute. 6. Pour in 1 can of coconut milk. Stir everything together and bring it to a gentle simmer. 7. Add 1 pound of large shrimp, peeled and deveined. Cook for 4-5 minutes until they turn pink and opaque. 8. Season your curry with 2 tablespoons of lime juice, zest from 1 lime, and salt and pepper to taste. 9. Remove the skillet from heat and let it sit for a couple of minutes. This helps the flavors blend nicely. 10. Serve your curry over cooked jasmine rice. Garnish with fresh cilantro for a bright finish. To make this dish shine, start with the curry paste. You can adjust the amount based on your spice level. If you like heat, add more paste. If you prefer mild, use less. Always taste as you go. Next, focus on the shrimp. Cook them just until they turn pink and opaque. If you overcook, they will be tough. Aim for about 4 to 5 minutes in the skillet. Garnishes can elevate your dish. Fresh cilantro adds a bright touch. Chopped green onions also bring a nice crunch. You might add a slice of lime on the side for extra zest. Serve your curry over jasmine rice. The fluffy rice soaks up the sauce well. You could also try coconut rice for added flavor. Manage the skillet heat carefully. Start at medium heat for even cooking. If it gets too hot, the shrimp might cook too fast. Adjust as needed. Layering flavors is key. Start with the onion, garlic, and ginger. Then, add the bell pepper and snap peas. This method builds a rich taste. Stir frequently to ensure even cooking and flavor melding. Pro Tips Use Fresh Shrimp: For the best flavor and texture, opt for fresh shrimp instead of frozen when possible. If using frozen shrimp, ensure they are fully thawed before cooking. Adjust Curry Paste: The heat level of red curry paste can vary, so start with a smaller amount and adjust according to your taste preference. You can always add more, but you can't take it away! Garnish for Freshness: Adding fresh cilantro at the end not only enhances the flavor but also adds a pop of color to your dish, making it visually appealing. Let it Rest: Allowing the dish to sit for a few minutes off the heat helps the flavors meld together, resulting in a more delicious and harmonious curry. {{image_2}} - Alternative proteins: You can swap shrimp for chicken or tofu. Chicken thighs offer a nice, juicy bite. Tofu gives a plant-based option that soaks up flavors well. - Dairy-free options: The recipe is already dairy-free with coconut milk. If you want a creamier texture, try adding almond milk or cashew cream. - Adding different spices: You can boost the flavor with spices like cumin or coriander. A pinch of turmeric adds color and warmth. For heat, add a sprinkle of chili flakes. - Incorporating fruit or other vegetables: Add pineapple chunks for a sweet twist. Broccoli or zucchini can add more veggies and crunch. Experiment with what you have on hand! - Serving styles: Serve the curry in a bowl over jasmine rice. You can also use coconut rice for extra flavor. - Creative garnishing tips: Top with sliced green onions or a wedge of lime. Fresh cilantro adds a pop of color and taste. For fun, use a colorful plate to make it eye-catching. After enjoying your Coconut Lime Shrimp Curry Skillet, store leftovers in an airtight container. Place the container in the fridge. This keeps the shrimp and other ingredients fresh. Use the curry within three days for the best taste. If you want to save it longer, you can freeze it. To freeze, place leftovers in a freezer-safe bag. Remove as much air as possible before sealing. This helps prevent freezer burn. When it's time to eat the leftovers, reheating is key. The best method is to use the stove. Heat a skillet over low heat. Add the curry and stir gently until warm. This keeps the shrimp from overcooking. You can also use the microwave. Place the curry in a microwave-safe dish. Heat in short bursts, stirring in between. Keep an eye on it to avoid rubbery shrimp. In the fridge, the Coconut Lime Shrimp Curry Skillet lasts for about three days. If you freeze it, you can enjoy it for up to three months. Always check for signs of spoilage before eating. If the shrimp smells off or the sauce has changed color, it’s best to toss it. Keeping an eye on freshness ensures you enjoy every bite! I recommend using coconut oil. It adds a great flavor. Coconut oil also has a high smoke point. This means it won’t burn easily when heated. You can also use vegetable oil if you prefer. Yes, you can make Coconut Lime Shrimp Curry Skillet ahead of time. Cook it fully and let it cool. Store it in an airtight container in the fridge. It stays good for about three days. Just reheat it before serving. The spice level depends on the red curry paste you use. Some brands are milder, while others pack more heat. You can adjust the amount of curry paste to suit your taste. If you want less spice, start with one tablespoon. This curry pairs well with jasmine rice. The rice soaks up the sauce nicely. You can also serve it with naan bread or a fresh salad. For a drink, try a light coconut water or iced tea. This dish uses large shrimp, coconut milk, and vibrant veggies for a bold flavor. Start by heating coconut oil and adding aromatic onions, garlic, and ginger. Then, introduce red pepper and snap peas for crunch. Cooking shrimp in coconut milk makes it creamy and delicious. To make it even better, adjust the curry heat and try different proteins or veggies. Store leftovers in the fridge for a few days or freeze for later. Enjoy this easy, tasty meal and impress your loved ones with your cooking skills.

Coconut Lime Shrimp Curry Skillet Flavorful Delight

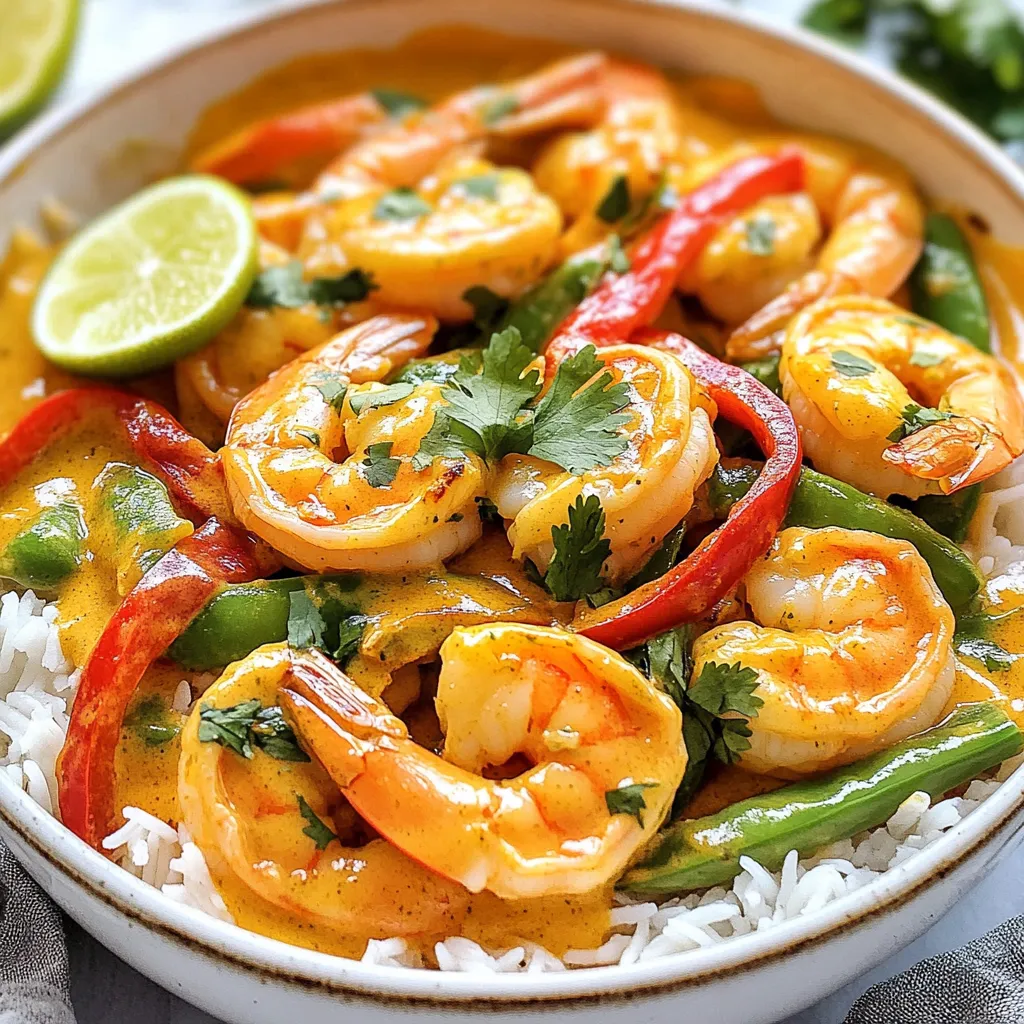
If you crave a quick, tasty meal, Coconut Lime Shrimp Curry Skillet is for you. This dish combines juicy shrimp,

- 2 cups cooked jasmine rice (preferably day-old) - 1 cup cooked chicken breast, diced - 2 tablespoons teriyaki sauce - 1 cup mixed vegetables (peas, carrots, and corn) - 2 green onions, chopped - 2 eggs, lightly beaten - 2 tablespoons sesame oil - 1 tablespoon soy sauce - Salt and pepper to taste - Sesame seeds for garnish To make teriyaki chicken fried rice, gather these fresh ingredients. Using day-old rice works best. It’s drier and fries better. Diced chicken gives protein and adds flavor. Teriyaki sauce brings a sweet and savory taste. Mixed vegetables like peas, carrots, and corn add color and nutrition. Chopped green onions give a nice crunch. Eggs add richness and help bind the dish. Sesame oil adds a nutty flavor that enhances everything. A touch of soy sauce adds depth, while salt and pepper balance all the tastes. Finally, sprinkle sesame seeds on top for a little crunch. Having these ingredients ready makes cooking quick and easy. You can customize any of these items based on your tastes or what you have. {{ingredient_image_1}} 1. Heat sesame oil in the skillet. Start by heating 1 tablespoon of sesame oil in a large skillet over medium-high heat. This oil adds rich flavor to your dish. 2. Stir-fry the mixed vegetables. Next, add 1 cup of mixed vegetables, like peas, carrots, and corn. Stir-fry for about 3 to 4 minutes. You want them tender but still crisp. 3. Scramble the eggs. Push the vegetables to one side of the skillet. Pour 2 lightly beaten eggs on the other side. Scramble them until fully cooked, then mix them with the veggies. 4. Add chicken and teriyaki sauce. Now it's time to add 1 cup of diced cooked chicken to the skillet. Pour in 2 tablespoons of teriyaki sauce. Stir-fry for another 2 minutes until everything heats through. 5. Incorporate jasmine rice and soy sauce. Add 2 cups of day-old jasmine rice and 1 tablespoon of soy sauce. Use a spatula to break apart any rice clumps. Stir-fry everything for 3 to 4 minutes. 6. Season and add green onions. Season your fried rice with salt and pepper to taste. Finally, add 2 chopped green onions. Mix them in just before you serve. - Use day-old rice for best texture: Day-old rice is drier. This helps it fry better. Fresh rice can turn mushy. The grains stay separate when you cook them. This gives your dish a nice bite. - Adjust teriyaki sauce for desired sweetness: Some like it sweet, and others don't. Start with two tablespoons. Taste it and add a bit more if you want more flavor. You control how sweet your fried rice will be. - Stir-frying tips for even cooking: Keep the heat high. This helps to cook the food fast. Stir the ingredients often. This makes sure everything cooks evenly. It also helps to keep the veggies crisp. - How to avoid mushy rice: Don't overcrowd the skillet. If you add too much rice at once, it can steam. This makes it sticky. Instead, work in batches if you need to. This keeps the rice light and fluffy. Pro Tips Use Day-Old Rice: Using day-old jasmine rice helps to achieve the perfect texture, preventing the fried rice from becoming mushy. High Heat Cooking: Cooking on high heat allows for a quick stir-fry that retains the vegetables' crunch and enhances the flavors. Customize Your Veggies: Feel free to swap in your favorite vegetables or whatever you have on hand for a personalized touch. Don’t Skip the Garnish: A sprinkle of sesame seeds and fresh green onions adds flavor and a beautiful finishing touch to your dish. {{image_2}} You can change this dish to fit your taste. If you want, substitute chicken with tofu or shrimp. Both options give a nice twist. Tofu adds a great texture and absorbs flavors well. Shrimp cooks quickly and adds a seafood flair. You can also add different vegetables. Bell peppers bring sweetness and color. Broccoli adds crunch and nutrients. Feel free to mix in your favorite veggies and make it your own. To boost the taste, try adding garlic or ginger. These ingredients add depth and warmth to your dish. You can either mince fresh garlic or use garlic powder. For ginger, fresh is best, but ground ginger works too. For a spicy kick, use spicy teriyaki sauce. This adds heat and excitement. Don’t be afraid to play around with flavors. Each change can lead to a new favorite version of this meal. To keep your teriyaki chicken fried rice fresh, use proper containers. Glass or plastic containers with tight seals work best. This helps prevent moisture loss. Make sure the rice cools down before sealing. Store it in the fridge for up to three days. When you put it in the fridge, place it on a middle shelf. This keeps the temperature steady. Avoid storing it in the door, as it fluctuates more. Keep an eye on any signs of spoilage, like off smells. For heating up leftovers, the goal is to keep the texture nice. The stovetop method is best. Heat a non-stick skillet over medium heat. Add a splash of water to keep it moist. Stir it often until it’s hot. This takes about five minutes. You can also use a microwave, but be careful. Place the rice in a microwave-safe bowl. Add a splash of water and cover it loosely. Heat for one minute, stir, then heat again in 30-second bursts. Check if it’s hot enough before serving. Yes, you can use other types of rice. Long-grain rice or brown rice works well. Jasmine rice, though, gives the best taste. If you use fresh rice, make sure to cool it down first. This helps keep the grains from getting mushy. Leftover teriyaki chicken fried rice lasts about three to four days in the fridge. Store it in an airtight container. Make sure it cools to room temperature before sealing. This keeps it fresh and tasty for your next meal. You can serve teriyaki chicken fried rice with many sides. A simple green salad adds freshness. You can also pair it with steamed broccoli or snap peas. For a fun twist, add some spring rolls or dumplings for extra crunch and flavor. This blog post shared a simple recipe for teriyaki chicken fried rice. We covered key ingredients, cooking steps, and helpful tips. You can customize this dish by changing proteins or veggies for more flavor. Storing and reheating tips help keep your meal fresh. Enjoy creating this tasty dish that fits your taste and needs. It’s easy to make and delicious to share. Keep experimenting and discovering new flavors in your cooking!

Teriyaki Chicken Fried Rice Flavorful Quick Meal

Craving a quick, tasty meal? Look no further! Teriyaki Chicken Fried Rice combines simple ingredients into a dish that bursts

To make a tasty Sesame Garlic Beef Stir Fry, gather these key ingredients: - 1 lb (450g) flank steak, thinly sliced against the grain - 2 tablespoons sesame oil - 4 cloves garlic, minced - 1 inch ginger, grated - 1 bell pepper (red or yellow), thinly sliced - 1 cup broccoli florets - 2 carrots, julienned - 3 tablespoons soy sauce (low-sodium if preferred) - 1 tablespoon rice vinegar - 1 tablespoon honey - 2 tablespoons sesame seeds - 3 green onions, chopped (for garnish) - Cooked jasmine rice or noodles (for serving) These ingredients work together to create a flavorful dish. The flank steak gives the stir fry its protein. The sesame oil adds a rich taste, while garlic and ginger bring warmth and depth. Fresh veggies like bell pepper, broccoli, and carrots add color and crunch. You can add your own twist to this recipe. Here are some ideas: - For heat, add red pepper flakes or sliced chili peppers. - Swap flank steak for chicken or tofu for a different protein. - Use snow peas or snap peas instead of broccoli for variety. - Try different bell pepper colors for a fun look. These optional ingredients allow you to customize the dish to your liking. Feel free to experiment and make it your own! This stir fry is not just tasty; it’s also healthy. Here’s a quick look at the nutrition: - Protein: The flank steak offers lean protein, which helps build muscle. - Vitamins: The bell pepper and broccoli are rich in vitamins A and C. - Fiber: Carrots and broccoli add fiber to help with digestion. Each serving provides a balanced meal. Pair it with jasmine rice or noodles for carbs. This dish is perfect for a fulfilling lunch or dinner. {{ingredient_image_1}} First, slice the flank steak thinly against the grain. This step helps the meat stay tender. In a medium bowl, mix the sliced beef with 1 tablespoon of sesame oil, minced garlic, and grated ginger. These flavors will soak into the meat. Let the beef marinate for at least 20 minutes. This waiting time allows the flavors to blend well. While the beef marinates, prepare your veggies. Heat the remaining tablespoon of sesame oil in a large skillet or wok over medium-high heat. Add the bell pepper, broccoli, and carrots. Stir-fry these vegetables for about 3-4 minutes. You want them tender but still crisp. Once done, remove them from the pan and set them aside. This keeps your veggies fresh and colorful. In the same skillet, add the marinated beef in a single layer. Let it cook without stirring for about 2-3 minutes. This gives the beef a nice sear. After that, stir-fry for another 2-3 minutes. Cook it until it reaches your desired doneness. While the beef cooks, mix the soy sauce, rice vinegar, and honey in a small bowl. Once the beef is ready, pour the sauce over it. Stir to combine everything well. Now, return the sautéed vegetables to the skillet. Toss everything together, letting it heat for another minute. This step ensures the flavors mix together. Finally, sprinkle sesame seeds over the stir-fry and mix well. Serve the dish over cooked jasmine rice or noodles. Top it with chopped green onions for a fresh finish. Enjoy your homemade sesame garlic beef stir fry! To make your beef tender, choose flank steak. It has great flavor and texture. Slice the meat thinly against the grain. This helps break down the muscle fibers. Marinate the beef for at least 20 minutes. Use sesame oil, garlic, and ginger for a tasty mix. The marinade adds flavor and helps tenderize the beef. For a colorful stir fry, add bell peppers, broccoli, and carrots. These veggies bring crunch and nutrients. Red or yellow bell peppers are sweet and bright. Broccoli adds a nice bite. Carrots give a hint of sweetness. You can also add snap peas or mushrooms for more variety. Choose vegetables you love for a personal touch. Timing is key in stir-frying. Heat your skillet or wok well before adding ingredients. Cook the veggies for 3-4 minutes until they are tender-crisp. Remove them from the pan so they don't overcook. Add the beef next. Let it sear for 2-3 minutes before stirring. This gives it a nice crust. Once the beef is done, mix everything back together. Heat for just one more minute to combine flavors. Enjoy your meal hot and fresh! Pro Tips Marinate for Flavor: Letting the beef marinate longer than 20 minutes, if possible, enhances the flavor and tenderness of the meat. High Heat is Key: Cooking on medium-high heat helps to sear the beef quickly, locking in juices and creating a nice crust. Veggie Variations: Feel free to add other vegetables like snap peas, mushrooms, or bok choy to customize the stir-fry to your taste. Perfecting the Sauce: Adjust the sauce ingredients to your preference; add more honey for sweetness or soy sauce for a saltier flavor. {{image_2}} You can easily turn this dish into a vegetarian or vegan meal. Instead of beef, use tofu or tempeh. These options soak up flavors well and add protein. For a deeper taste, marinate the tofu with soy sauce and sesame oil before cooking. Add more veggies like snap peas, mushrooms, or zucchini for color and crunch. You can also use a plant-based soy sauce for a vegan-friendly dish. Making this recipe gluten-free is simple. Use tamari instead of regular soy sauce. Tamari has a rich taste and works well in stir-fries. Ensure all your other ingredients are gluten-free, too. Most sesame oils and rice vinegars are gluten-free, but check labels to be sure. Serve over rice or gluten-free noodles to keep the dish satisfying. If you want to switch up the protein, try chicken or shrimp. Thinly slice chicken breast and follow the same steps. For shrimp, use peeled and deveined shrimp. Cook them for just a couple of minutes until they turn pink. You can even mix proteins, using half beef and half chicken for a fun twist. Each option brings its own unique flavor and texture to the stir-fry. To keep your Sesame Garlic Beef Stir Fry fresh, store leftovers in an airtight container. Make sure to let it cool before sealing. This helps to prevent condensation inside the container. You can keep it in the fridge for up to three days. When you’re ready to enjoy your leftovers, reheat them on the stove. Heat a skillet over medium heat and add a splash of water or oil. This helps keep the beef and veggies moist. Stir gently until everything is hot. You can also use a microwave, but stir halfway through to heat evenly. If you want to save some for later, you can freeze your stir fry. Place cooled portions in freezer-safe bags or containers. Squeeze out as much air as possible to avoid freezer burn. You can freeze it for up to three months. When ready to eat, thaw it overnight in the fridge and reheat as mentioned above. Storing and reheating correctly helps you enjoy this dish multiple times without losing flavor or texture! The best cut of beef for stir fry is flank steak. It is tender and has great flavor. Slice it thinly against the grain for the best results. You can also use sirloin or ribeye if you prefer. These cuts cook quickly and stay juicy. Yes, you can prepare this dish in advance. Marinate the beef and chop the veggies ahead of time. Store them in the fridge until you are ready to cook. You can also cook the stir fry and refrigerate it for up to three days. Just reheat it before serving. Serve this stir fry over cooked jasmine rice or noodles. Both options soak up the sauce well. You can also add a side of sliced cucumbers or a simple salad for freshness. This will balance the meal and add crunch. This recipe is mild and not very spicy. The garlic and ginger add flavor without heat. If you want more spice, add red pepper flakes or sliced chili peppers. You can also try a dash of sriracha for some extra kick. Adjust it to your taste for the perfect spice level. You learned about sesame garlic beef stir fry, its key ingredients, and how to prep it. We discussed tips for tender beef and the best veggies. I shared variations to fit different diets and how to store leftovers well. This dish is quick and easy for any meal. Experiment with flavors or proteins to make it your own. Now you can enjoy this tasty recipe anytime!

Sesame Garlic Beef Stir Fry Easy and Flavorful Recipe

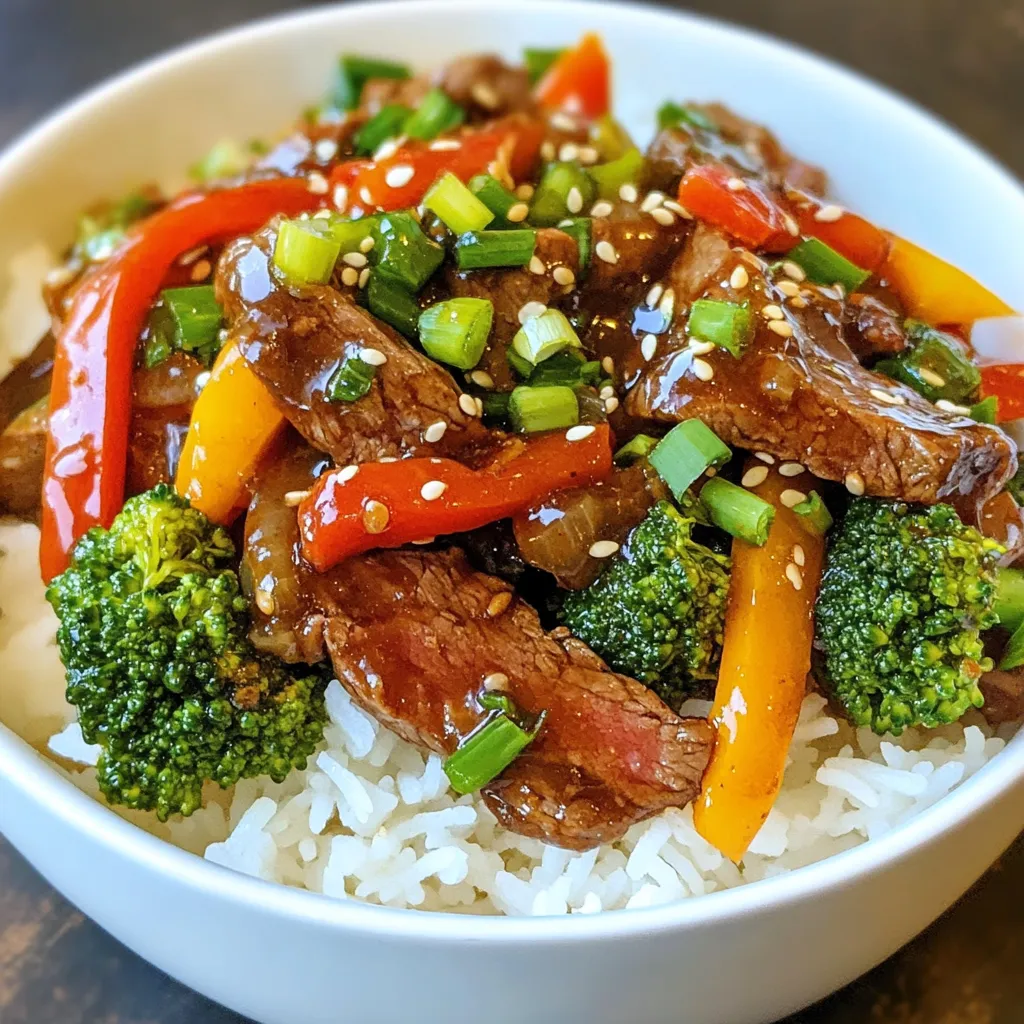
Are you ready to whip up a delicious and easy meal? This Sesame Garlic Beef Stir Fry is packed with

- 1 lb boneless, skinless chicken breasts, cut into bite-sized pieces - 1/2 cup honey - 3 cloves garlic, minced - 2 tablespoons soy sauce (low sodium recommended) - 1 teaspoon red pepper flakes (adjust for spice level) - 1 tablespoon apple cider vinegar - 1 tablespoon cornstarch - 2 tablespoons olive oil - Salt and pepper to taste - Sesame seeds for garnish - Fresh chopped green onions for garnish To make spicy honey garlic chicken bites, start with fresh chicken. Use boneless and skinless chicken breasts for tenderness. Cut them into small, bite-sized pieces. This size helps them cook evenly and soak up the sauce. Next, gather your sauces and condiments. You will need honey for sweetness. Garlic adds a strong flavor that blends well. Low-sodium soy sauce gives saltiness without too much sodium. Apple cider vinegar adds a nice tang. For spice, use red pepper flakes. You can change the amount based on your heat preference. Add cornstarch to help thicken the sauce. Olive oil is key for cooking the chicken to a golden brown. Finally, for garnishes, use sesame seeds and fresh chopped green onions. They add color and crunch to your dish. With all these ingredients, you will create a flavorful meal that’s easy to make! {{ingredient_image_1}} How to Prepare Chicken Start with 1 pound of boneless, skinless chicken breasts. Cut them into bite-sized pieces. This helps them cook evenly and makes them easy to eat. Season the chicken with salt and pepper. This simple step adds flavor right from the start. How to Make the Sauce In a medium bowl, whisk together the honey, minced garlic, soy sauce, red pepper flakes, apple cider vinegar, and cornstarch. Mix until smooth. This sauce is key to the dish. It gives the chicken its sweet and spicy kick. Cooking the Chicken Heat 2 tablespoons of olive oil in a large skillet over medium heat. Add the chicken pieces and cook for about 5 to 7 minutes. Stir occasionally to ensure they brown evenly. You want a nice golden color, which adds to the flavor. Simmering the Sauce Once the chicken is cooked through, lower the heat. Pour the honey garlic sauce over the chicken. Stir well to coat the pieces evenly. Allow the sauce to simmer for about 3 to 4 minutes. This thickens the sauce and makes it sticky. Serving Suggestions Remove the chicken bites from heat and transfer them to a serving dish. Garnish with sesame seeds and chopped green onions. These add color and crunch. Serve on a large platter with toothpicks or over steamed rice. Enjoy your spicy honey garlic chicken bites! To control the heat, start with red pepper flakes. If you want less spice, use half a teaspoon. For more heat, add more flakes. You can also try hot sauce or cayenne pepper. Both add a nice kick to the dish. To ensure your chicken cooks evenly, cut it into small, uniform pieces. This helps all pieces cook at the same rate. Heat your skillet over medium heat before adding the chicken. This step is key for even cooking. To get that golden brown color, don’t overcrowd the pan. Cook in batches if you need to. Let each piece sear without stirring too much. This creates a nice crust that adds flavor. Keep an eye on the chicken to avoid burning. Pro Tips Adjust the Spice Level: If you prefer a milder flavor, reduce the amount of red pepper flakes or omit them altogether. You can also add a pinch of sugar to balance the heat. Marinate for Extra Flavor: For deeper flavor, consider marinating the chicken in the honey garlic mixture for 30 minutes to an hour before cooking. Use a Non-Stick Skillet: This will help prevent the chicken from sticking and ensure an even golden-brown color while cooking. Serve with Dipping Sauce: Pair your chicken bites with a side of ranch or blue cheese dressing for an extra layer of flavor. {{image_2}} Chicken Alternatives If you want to switch the chicken, try using turkey or tofu. Both options work well. Turkey gives a leaner choice, while tofu is great for a plant-based meal. Cut them into bite-sized pieces just like the chicken. Cook them the same way for tasty bites. Vegan or Vegetarian Options To make this dish vegan, use cauliflower or chickpeas. Cauliflower provides a nice texture. Chickpeas add protein and heartiness. For both, marinate in the same honey garlic sauce. This keeps the flavors strong and delicious. Adding Citrus You can brighten the dish by adding citrus juice. Lime or lemon juice adds freshness. Just squeeze some over the chicken before serving. This small change makes a big difference in taste. It balances the sweetness and spice well. Incorporating Other Spices Want to mix up the flavors? Try adding ginger or cumin. Ginger brings warmth and zest. Cumin adds earthiness. Just a pinch can enhance the dish. Experiment to find your favorite blend. Each spice creates a new taste adventure. To keep your spicy honey garlic chicken bites fresh, store them properly. - Refrigeration Tips: Let your chicken bites cool first. Place them in an airtight container. You can store them in the fridge for up to 3 days. Make sure to separate any sauce to avoid sogginess. - Freezing Instructions: If you want to keep them longer, freeze the chicken bites. Place them in a freezer-safe bag. Remove as much air as you can. They will stay good for about 2 months. You want your chicken bites to taste fresh when you reheat them. - Best Practices for Reheating: The best way is to use an oven. Preheat it to 350°F (175°C). Place the chicken bites on a baking sheet. Heat for about 10-15 minutes. You can also use a microwave if you’re short on time. Just warm them up in short bursts of 30 seconds. Stir in between to ensure even heating. This way, your spicy honey garlic chicken bites stay tasty and juicy! You can prepare the chicken bites ahead of time. First, cook the chicken and sauce as directed. Once cooked, let the chicken cool. Store it in an airtight container in the fridge. You can keep it for up to three days. For best results, reheat it in a skillet. This keeps it juicy and flavorful. Yes, you can use other sweeteners. Maple syrup is a great choice. Agave nectar works well too. If you want a sugar-free option, try stevia. Adjust the amount based on the sweetener's strength. Each option adds a unique flavor twist. Here are some tasty sides and drinks to pair with your chicken bites: - Side dish suggestions - Steamed rice: White or brown rice absorbs the sauce nicely. - Vegetables: Try stir-fried broccoli, bell peppers, or snap peas. - Salad: A fresh green salad adds crunch and balance. - Noodles: Serve over rice noodles or soba for a hearty meal. - Drink pairing ideas - Iced tea: A refreshing option that cools down the spice. - Lemonade: The sweetness complements the heat. - Beer: A light lager or pale ale pairs well with the flavors. - Sparkling water: Add a slice of lemon for a refreshing sip. In this blog post, I covered how to make spicy honey garlic chicken bites. You learned the key ingredients and step-by-step instructions for preparation and cooking. Helpful tips for adjusting spice levels and proper cooking techniques were shared, along with variations for different diets. I also provided storage tips for leftovers and answered common questions about the dish. Enjoy making and sharing this tasty meal, and feel free to experiment with flavors to make it your own!

Spicy Honey Garlic Chicken Bites Flavorful and Easy

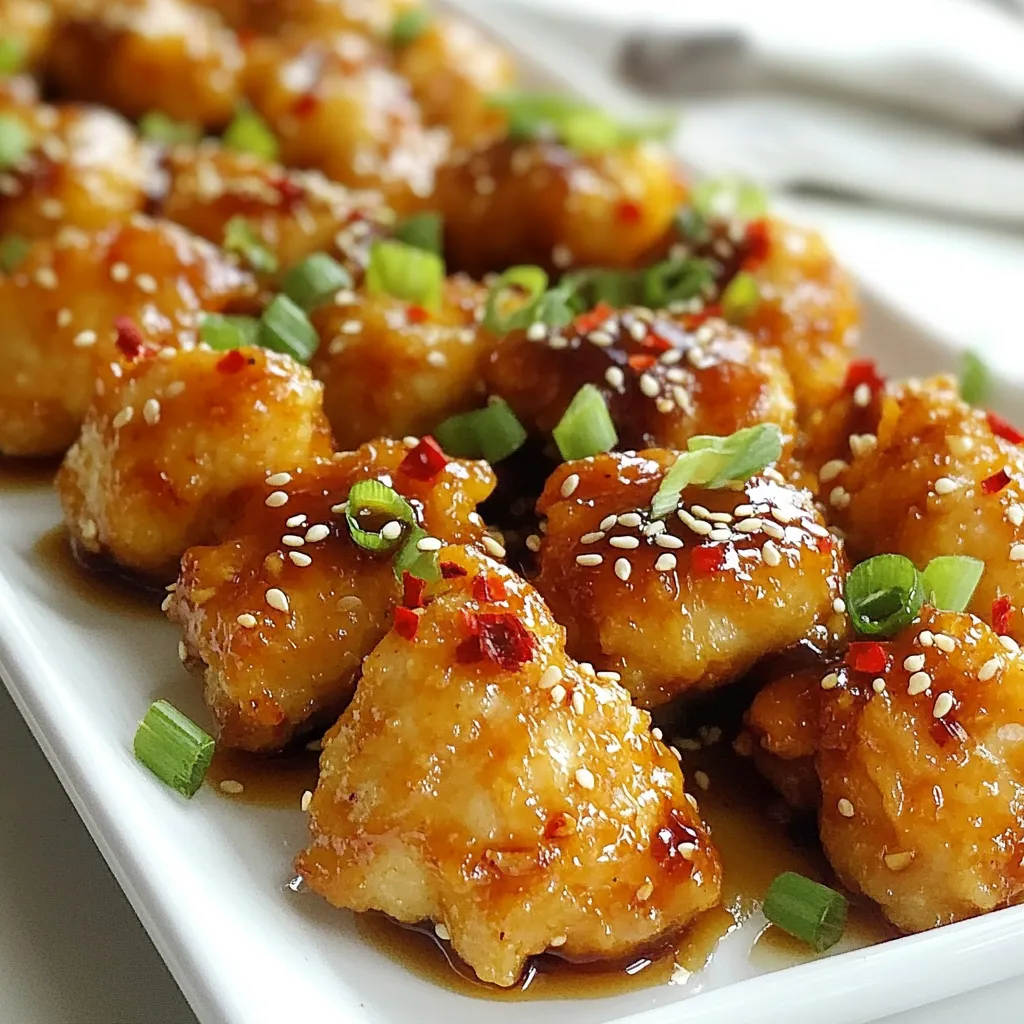
Get ready to elevate your dinner game with Spicy Honey Garlic Chicken Bites! These flavor-packed bites are easy to make

To make this tasty soup, gather these simple ingredients: - 1 tablespoon olive oil - 1 medium onion, finely chopped - 3 cloves garlic, minced - 1 can (28 oz) crushed tomatoes - 4 cups vegetable broth - 1 teaspoon dried basil - 1 teaspoon dried oregano - 1 teaspoon sugar - Salt and pepper to taste - 1 package (9 oz) cheese tortellini (fresh or frozen) - 1 cup heavy cream (or coconut cream for a dairy-free option) - Fresh basil leaves, for garnish - Grated Parmesan cheese, for serving (optional) You can swap some ingredients if needed. Here are a few ideas: - Use chicken broth instead of vegetable broth for more depth. - Replace heavy cream with coconut cream for a lighter option. - If you don’t have cheese tortellini, use any pasta you like. - Fresh herbs can replace dried herbs for a brighter taste. You will need a few basic tools to cook this soup: - A large pot for cooking the soup - A wooden spoon or spatula for stirring - A knife and cutting board for chopping - Measuring spoons for accuracy - A ladle for serving the soup These tools make cooking easy and fun! Enjoy your time in the kitchen. {{ingredient_image_1}} To make creamy tomato tortellini soup, start by gathering your ingredients. You will need olive oil, onion, garlic, crushed tomatoes, vegetable broth, dried herbs, sugar, salt, pepper, cheese tortellini, heavy cream, and fresh basil. 1. Heat 1 tablespoon of olive oil in a large pot over medium heat. 2. Add 1 finely chopped onion and sauté for about 5 minutes until soft. 3. Next, stir in 3 minced garlic cloves and cook for 1-2 minutes until fragrant. 4. Pour in 1 can of crushed tomatoes and 4 cups of vegetable broth. 5. Add 1 teaspoon of dried basil, 1 teaspoon of dried oregano, and 1 teaspoon of sugar. Season with salt and pepper. 6. Stir the mixture and bring it to a simmer. Let it cook for about 10 minutes to blend the flavors. 7. Now, add 1 package of cheese tortellini. Cook according to the package, usually about 3-5 minutes, until they float. 8. Once the tortellini are cooked, stir in 1 cup of heavy cream. Heat through for another 2-3 minutes. 9. Serve hot, garnished with fresh basil and grated Parmesan cheese if you like. - Use fresh tortellini for a better texture. Frozen tortellini works too but may take slightly longer to cook. - Make sure the soup is at a gentle simmer before adding the tortellini. This helps them cook evenly. - Stir the tortellini gently to avoid breaking them. They are delicate! - Don’t skip the simmering step. This helps the flavors combine well. - Avoid overcooking the tortellini. They should be tender but not mushy. - Be careful with seasoning. Taste as you go to find the perfect balance. To boost the flavor in your creamy tomato tortellini soup, try adding fresh herbs. A handful of fresh basil at the end gives a bright taste. You can also drizzle a bit of balsamic glaze before serving. It adds a nice tang and depth. If you want more heat, add a pinch of red pepper flakes while cooking. This can make your soup exciting and vibrant. If your soup is too thick, add a little vegetable broth or water. This will help thin it out without losing flavor. If it's too sour, a touch of sugar can balance it. Stir it in and taste again. If the soup lacks salt, sprinkle some in, but do it slowly. Taste as you go to find the right balance. Store any leftover soup in an airtight container. It will stay fresh in the fridge for up to three days. When you’re ready to eat, reheat it on the stove over low heat. Stir often to make sure it warms evenly. If the soup thickens in the fridge, add a splash of broth while reheating. This will bring back its creamy texture. Pro Tips Use Fresh Herbs: Fresh basil added at the end enhances the flavor and freshness of the soup. Adjust Creaminess: For a lighter soup, use less cream or substitute with a plant-based alternative like coconut cream. Enhance Flavor: Adding a splash of balsamic vinegar can deepen the flavor profile of the soup. Store Properly: If you have leftovers, store the soup and tortellini separately to prevent the pasta from becoming mushy. {{image_2}} You can easily make this soup dairy-free. Just swap the heavy cream for coconut cream. It gives a rich taste without dairy. You can also use vegan tortellini. Check your local store for options. This way, everyone can enjoy the soup, no matter their diet. Add more veggies to boost nutrition. Chopped spinach or kale works great. You can stir them in just before serving. Try diced carrots or zucchini for extra crunch. They add color and flavor. You can sneak in those healthy greens without anyone noticing! Feel free to play with herbs and spices. Fresh basil is a must, but try thyme or parsley too. A pinch of red pepper flakes adds a nice kick. If you love warmth, add some smoked paprika. Experimenting with flavors keeps the soup exciting. Each bowl can taste a little different! Creamy Tomato Tortellini Soup pairs well with many sides. Here are my favorites: - Garlic Bread: This crunchy bread is perfect for dipping. The garlic flavor adds a nice touch. - Side Salad: A simple green salad with light dressing balances the creamy soup. - Cheese Toast: Toast with melted cheese gives a savory bite. It’s easy and tasty. How you serve your soup matters. Here are some fun ideas: - Basil Garnish: Place fresh basil leaves on top for color and fresh flavor. - Parmesan Sprinkle: Add grated Parmesan for a touch of elegance. It looks great and tastes amazing. - Soup Bowls: Use colorful bowls to make your dish pop. It makes the meal more inviting. Think about what to serve with your soup. Here are some great options: - Roasted Vegetables: They add a healthy crunch. Try carrots, broccoli, or bell peppers. - Pasta Salad: This adds a different texture and flavor. Choose a light vinaigrette for a fresh taste. - Bruschetta: Topped with tomatoes and herbs, it makes a nice appetizer. It’s fresh and flavorful. These pairings and presentation ideas will make your meal stand out. Enjoy your cooking! Yes, you can make this soup in advance. Just follow the recipe until you add the tortellini. Cook the tortellini fresh right before serving. This keeps the pasta from becoming mushy. You can store the soup base in the fridge for up to three days. When ready to serve, heat the soup and add the tortellini. To store leftovers, let the soup cool first. Transfer it to an airtight container. It will stay fresh in your fridge for about three days. If you want to keep it longer, consider freezing it. Just remember to leave out the tortellini. Add it in when you reheat the soup. Yes, you can freeze Creamy Tomato Tortellini Soup. Store the soup in a freezer-safe container. It keeps well for up to three months. Just like with leftovers, do not add the tortellini before freezing. When you want to enjoy it, defrost and then cook the tortellini in the soup. This way, you will have a tasty meal ready in no time! This blog post covered everything you need for Creamy Tomato Tortellini Soup. We discussed the key ingredients and easy substitutes. You learned the essential tools for cooking and followed a simple step-by-step guide. Don’t forget the helpful tips to boost flavor and avoid mistakes. You saw various ways to customize your soup and how to serve it creatively. Now, you can make this dish your own while impressing family and friends. Happy cooking!

Creamy Tomato Tortellini Soup Rich and Flavorful Dish

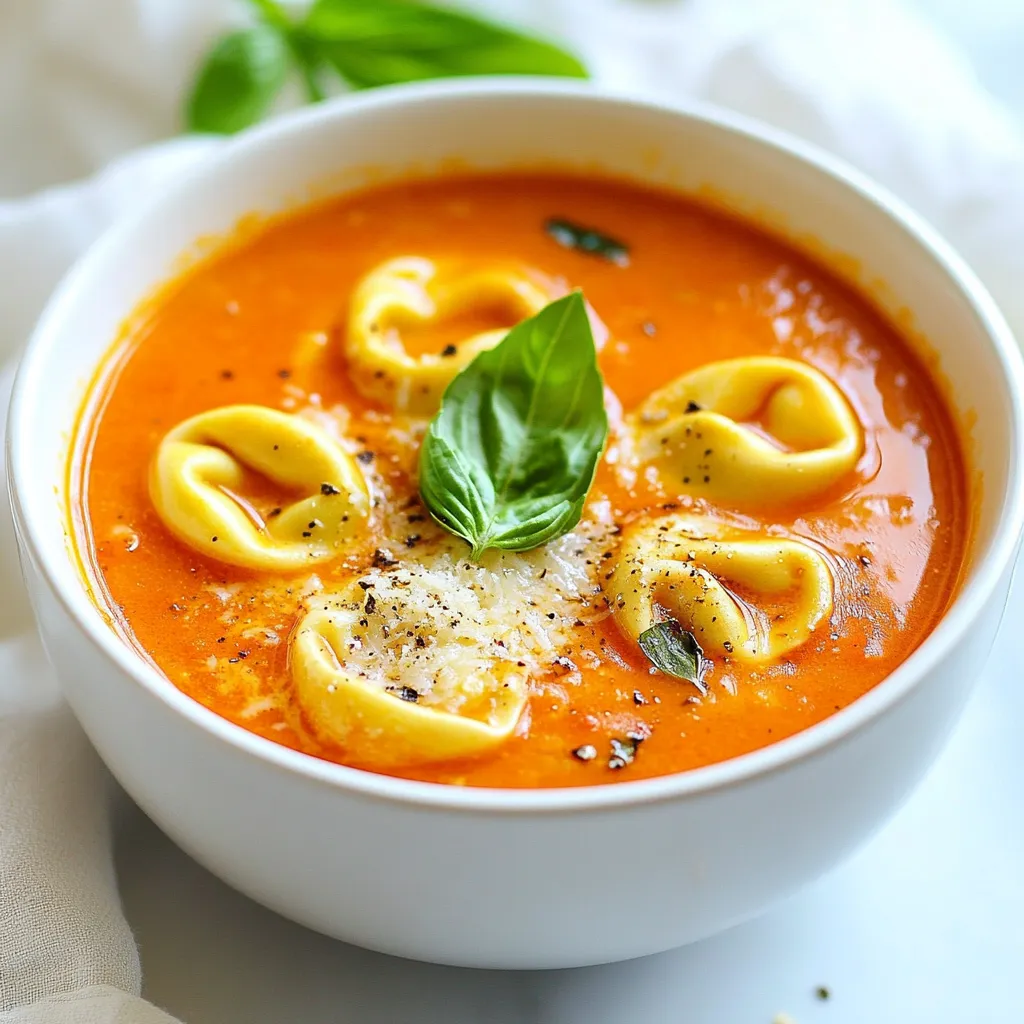
Looking for a quick yet hearty meal? Creamy Tomato Tortellini Soup is a rich and flavorful dish that satisfies your

- 14 oz firm tofu, pressed and diced - 1 red bell pepper, sliced - 1 cup broccoli florets - 1 carrot, julienned - 3 green onions, chopped - 2 cloves garlic, minced - 1 tablespoon fresh ginger, grated - 2 tablespoons vegetable oil - 2 tablespoons cornstarch - ¼ cup homemade teriyaki sauce - Sesame seeds for garnish - Cooked rice or quinoa for serving - For tofu, you can use tempeh or seitan. Both give a nice texture. - Swap veggies to your liking. Try snap peas or zucchini for a change. - Use gluten-free soy sauce to make the teriyaki sauce gluten-free. This keeps the flavor but makes it safe for gluten-sensitive folks. {{ingredient_image_1}} Start by making your teriyaki sauce. In a bowl, combine the following: - ¼ cup soy sauce - 2 tablespoons brown sugar - 1 tablespoon rice vinegar - 1 teaspoon sesame oil - 1 teaspoon cornstarch Whisk these ingredients together until smooth. This sauce will add great flavor. Set it aside for later. Next, we need to prepare the tofu. Press the tofu for about 15 minutes. This removes extra moisture. Once pressed, cut the tofu into bite-sized cubes. Now, coat the diced tofu with 2 tablespoons of cornstarch in a bowl. Toss gently until each piece is covered. This step helps the tofu get crispy when cooked. Heat 1 tablespoon of vegetable oil in a large skillet or wok over medium-high heat. Once the oil is hot, add the coated tofu cubes. Cook for about 5-7 minutes. Turn the tofu occasionally until it looks golden and crispy. When done, remove the tofu and set it aside. In the same skillet, add another tablespoon of oil. Now, toss in the sliced red bell pepper, broccoli florets, and julienned carrot. Sauté these vegetables for about 4-5 minutes. You want them tender but still bright and crunchy. Next, add the minced garlic and grated ginger. Cook for an additional minute until you smell that delicious aroma. Return the crispy tofu to the skillet. Pour the teriyaki sauce over the mixture. Toss everything together to coat well. Cook for another 2-3 minutes until the sauce thickens slightly. Finally, stir in the chopped green onions. Give it one last toss before you take it off the heat. Serve your stir fry hot over cooked rice or quinoa. Don’t forget to sprinkle sesame seeds on top for a nice finish! Tofu can be soft and soggy if you don’t press it. Pressing is key. It removes extra water. This helps the tofu get crispy when cooked. Press the tofu for about 15 minutes. Use a clean towel and a heavy object. Once pressed, cut it into bite-sized cubes. For even cooking, coat the tofu in cornstarch. Toss the cubes well until they are covered. This coating makes a crunchy crust. Cook the tofu in a hot pan. Use medium-high heat and don’t overcrowd the pan. Cook until golden brown, about 5-7 minutes. To boost the flavor, you can add extra seasonings. Try a splash of soy sauce or a hint of chili flakes. These can add depth and heat to your dish. Timing is also crucial. Add garlic and ginger after the veggies are soft. This way, they release their flavor without burning. Cook them for just one minute. This brings out the best taste without losing the fresh notes. For a beautiful plate, use deep bowls. Arrange the colorful veggies and crispy tofu nicely. Garnish with green onions and sesame seeds. This adds a nice pop of color and crunch. Serve your stir fry over rice or quinoa. Both options soak up the sauce well. Quinoa adds a nutty flavor, while rice is classic. Enjoy your meal hot for the best taste and texture! Pro Tips Press your tofu well: Ensure you press the tofu for at least 15 minutes to remove excess moisture. This step helps achieve a firmer texture and better crispiness when cooked. Coat evenly with cornstarch: Toss the diced tofu in cornstarch until evenly coated. This creates a crispy outer layer that enhances the overall texture of the dish. Don’t overcrowd the pan: When frying the tofu, make sure not to overcrowd the skillet. Cook in batches if necessary to allow for even cooking and crispiness. Customize your veggies: Feel free to substitute or add any seasonal vegetables you have on hand. Snap peas, bok choy, or zucchini would work wonderfully in this stir fry. {{image_2}} You can switch the tofu for tempeh or seitan. Both have unique flavors and textures. Tempeh is made from fermented soybeans. It adds a nutty taste and is packed with protein. Seitan is made from wheat gluten. It has a chewy texture that many find similar to meat. If you prefer meat, chicken or shrimp work well too. Chicken adds a mild flavor that absorbs the sauce. Shrimp cooks quickly, bringing a sweet taste to your stir fry. Both protein options can make your meal more filling. Feel free to swap in seasonal vegetables. For spring, use snap peas or asparagus. In summer, add zucchini or bell peppers. Fall brings great options like Brussels sprouts. Winter vegetables, like carrots and kale, also shine in this dish. You can also use frozen vegetables. They are quick and easy. Just make sure to thaw them before cooking. They may lose some crunch, but they still taste great. Want more heat? Try adding chili paste or sriracha for spicy teriyaki sauce. You can adjust the spice level to suit your taste. This gives your dish an exciting kick. If you’re short on time, store-bought teriyaki sauce is an option. Just be sure to check the label for added sugars. Some brands have lower sodium options, too. You can still enjoy a tasty meal without all the fuss. To store your Teriyaki Tofu Stir Fry, let it cool first. Place it in an airtight container. This helps keep the flavors fresh. Your leftovers will stay good in the fridge for 3 to 4 days. If you want to keep it longer, consider freezing. When reheating, I recommend using a skillet. Heat it over medium heat. Add a splash of water or oil to help with steam. This keeps the tofu crispy. Avoid using a microwave because it can make the tofu soggy. Stir frequently until heated through. You can freeze this stir fry for up to 3 months. Place it in a freezer-safe container. When you are ready to eat, thaw it overnight in the fridge. For quick thawing, use the microwave on defrost mode. After thawing, reheat in a skillet for the best texture. Enjoy your tasty meal again! Yes, Teriyaki Tofu Stir Fry is vegan. The main ingredients are plant-based. - Tofu: This is a great source of protein. - Vegetables: Red bell pepper, broccoli, carrot, and green onions add color and nutrients. - Teriyaki sauce: Made with soy sauce, brown sugar, rice vinegar, sesame oil, and cornstarch. This dish is healthy and full of flavor! Yes, you can make this dish gluten-free. The key is to use gluten-free soy sauce. - Look for tamari: This is a popular gluten-free soy sauce. - Check labels: Some brands offer gluten-free options. By swapping the soy sauce, you can enjoy this dish without gluten. Making homemade teriyaki sauce is simple and quick. Here’s how: 1. Combine ¼ cup soy sauce (or tamari) in a bowl. 2. Add 2 tablespoons brown sugar. 3. Mix in 1 tablespoon rice vinegar. 4. Stir in 1 teaspoon sesame oil. 5. Finally, add 1 teaspoon cornstarch. Whisk until smooth. This sauce adds a tasty sweet and salty flavor to your stir fry! In this post, we covered how to make a delicious teriyaki tofu stir fry. You learned about the main ingredients, optional additions, and easy substitutions. I guided you through step-by-step instructions for preparing the sauce, tofu, and vegetables. I shared tips for the best results and discussed variations to suit your taste. Finally, we talked about storing and reheating your dish. This stir fry is not only tasty but also adaptable. Enjoy experimenting with flavors and ingredients in your cooking journey!

Teriyaki Tofu Stir Fry Tasty and Simple Recipe

Looking for a quick, tasty meal that scores big in flavor? Try my Teriyaki Tofu Stir Fry! Packed with crispy

Older posts
Newer posts
← Previous Page1 … Page127 Page128 Page129 … Page132 Next →

dsad

© 2025 pureeatsnow • Built with GeneratePress

Our Policies

  • Copyright Policy
  • Cookie Policy
  • GDPR Policy
  • Privacy Policy
  • Disclaimer
  • Terms Of Use

More Information

  • Home
  • About
  • Contact
  • Appetizers
  • Dessert
  • Dinner
  • Drinks
©2025, pureeatsnow About Back To Top