Skip to content
DisclaimerTerms Of UseGDPR PolicyCookie Policy

pureeatsnow

  • Home
  • Drinks
  • Appetizers
  • Dinner
  • Dessert
  • About
  • Contact
  • Privacy Policy
DisclaimerTerms Of UseGDPR PolicyCookie Policy

Rachel

- 4 bone-in, skin-on chicken thighs - 2 tablespoons smoked paprika - 1 teaspoon garlic powder - 1 teaspoon onion powder - 1 teaspoon dried oregano - 1/2 teaspoon cayenne pepper (adjust for heat preference) - 2 tablespoons olive oil - Salt and black pepper to taste - 1 lemon, juiced - Fresh parsley, chopped (for garnish) - 1 cup chicken stock Using fresh ingredients makes your smoky paprika chicken thighs taste great. Fresh chicken ensures tenderness and juiciness. Fresh spices boost flavor and aroma. A ripe lemon adds a bright zing. Fresh parsley gives a pop of color and freshness. Always choose good quality items for the best results. If you lack smoked paprika, try regular paprika with a touch of cumin. Garlic powder can be swapped for fresh minced garlic. Dried oregano works well, but you can use Italian seasoning as a mix. If you prefer a milder dish, skip the cayenne pepper or use sweet paprika instead. For a different base, chicken broth can replace chicken stock. These swaps keep your dish tasty and fun! {{ingredient_image_1}} 1. Preheat your oven to 400°F (200°C). 2. Pat the chicken thighs dry with paper towels. This helps make the skin crispy. 3. In a small bowl, mix the smoked paprika, garlic powder, onion powder, dried oregano, cayenne pepper, salt, and black pepper. 4. Rub this spice mix evenly over both sides of the chicken thighs. Make sure to cover them well. 1. Heat olive oil in a large oven-safe skillet over medium-high heat. 2. Add the chicken thighs skin-side down. Sear them for 5-7 minutes. You want the skin to be crispy and golden brown. 3. Flip the chicken thighs over. Squeeze fresh lemon juice on top. 4. Pour the chicken stock around the thighs in the skillet. Avoid pouring it directly on the skin to keep it crispy. 5. Move the skillet to the oven and bake for 25-30 minutes. 1. Use a meat thermometer to check the chicken’s internal temperature. It should reach 165°F (75°C). 2. If you want extra crispy skin, broil the chicken for 2-3 minutes at the end. 3. Once done, take it out of the oven and let the chicken rest for 5 minutes before serving. 4. Garnish with freshly chopped parsley for a touch of color. To get that perfect crispy skin, start by drying the chicken. Use paper towels to pat the skin until it is dry. Moisture makes the skin soggy. Next, make sure to season well. Rub the spice mix all over the thighs, focusing on the skin side. When you sear the chicken, heat the oil until it shimmers. This helps create a nice golden-brown crust. If you want extra crispiness, broil the chicken for a few minutes at the end. Marinating adds depth to the chicken’s taste. Use a mix of smoked paprika, garlic powder, lemon juice, and olive oil. You can marinate the chicken for at least 30 minutes or up to overnight in the fridge. This allows the flavors to soak in deeply. If you want a kick, add a bit more cayenne pepper to the marinade. Always remember to bring the chicken to room temperature before cooking for even cooking. Pair your smoky paprika chicken thighs with sides that balance the flavors. Roasted vegetables like carrots, bell peppers, and zucchini work well. A simple green salad with a lemon vinaigrette adds freshness. You could also serve it with rice or quinoa for heartiness. If you want something more filling, try creamy mashed potatoes. Always garnish with fresh parsley for a pop of color and flavor. Pro Tips Choose Quality Chicken: Opt for organic or free-range chicken thighs for better flavor and texture. Let it Rest: Allow the chicken to rest after cooking to retain its juices for a more succulent bite. Customize Spices: Feel free to adjust the spices according to your preference; try adding cumin or smoked salt for a unique twist. Use a Meat Thermometer: Ensure perfect doneness by checking the internal temperature; it should reach 165°F (75°C). {{image_2}} You can change the flavor of your smoky paprika chicken thighs with different spice mixes. Try using cumin, coriander, and chili powder for a more Mexican twist. A mix of rosemary, thyme, and lemon zest can give a fresh herbal taste. The key is to use spices that you enjoy. Experiment with what you have at home. Grilling your chicken thighs adds a lovely smoky flavor. It also gives you those nice grill marks. To grill, start by marinating the chicken in the spices for a few hours. Preheat your grill to medium heat and cook for 6-8 minutes on each side. Baking is great for an easy, hands-off approach. In the oven, the skin gets crispy while the meat stays juicy. Both methods yield delicious results. Boneless thighs cook faster and can be very juicy. They also absorb flavors well. If you use chicken breasts, keep an eye on the cooking time. Breasts can dry out quickly. For boneless thighs, reduce the bake time to about 20-25 minutes. This keeps them tender and flavorful. Always check the temperature to ensure they reach 165°F (75°C). After cooking your smoky paprika chicken thighs, let them cool down. Place them in an airtight container. This keeps them fresh and safe. You can store them in the fridge for up to three days. If you want to keep them longer, freeze them. Wrap each thigh in plastic wrap, then place them in a freezer bag. This helps avoid freezer burn. They can last in the freezer for up to three months. To reheat chicken thighs, use the oven. Preheat it to 350°F (175°C). Place the thighs on a baking tray. Cover them with foil to keep them moist. Heat for about 15-20 minutes, or until they reach 165°F (75°C). You can also use the microwave. Place the thighs on a microwave-safe plate. Cover with a damp paper towel and heat for 1-2 minutes. Check the temperature before serving. Prepared chicken thighs have a good shelf life. In the fridge, they stay safe for three days. After that, they may lose quality and flavor. If frozen, they last for three months. However, for the best taste, eat them within one month. Always check for signs of spoilage like off smells or changes in color before eating. Yes, you can! Prepare the chicken thighs by seasoning them and store them in the fridge. You can do this up to one day ahead. When you are ready, just sear and bake them. This saves time and lets the flavors blend. If you don’t have smoked paprika, you can use regular paprika. You can also try a mix of paprika and a little cumin. Each option changes the flavor but still tastes good. The best way to check is by using a meat thermometer. Insert it into the thickest part of the thigh. It should read 165°F (75°C) to be safe. If you don’t have a thermometer, check if the juices run clear when you cut into the chicken. If they are pink, cook it a bit longer. This blog post covered how to make delicious smoky paprika chicken thighs. We explored the fresh ingredients needed, preparation steps, and cooking techniques. You learned tips for great flavor and texture, along with storage and reheating methods. In closing, using fresh ingredients helps you enjoy a tasty meal. Remember, cooking is about experimenting. So, feel free to try variations and make the recipe your own! Enjoy your cooking adventure!

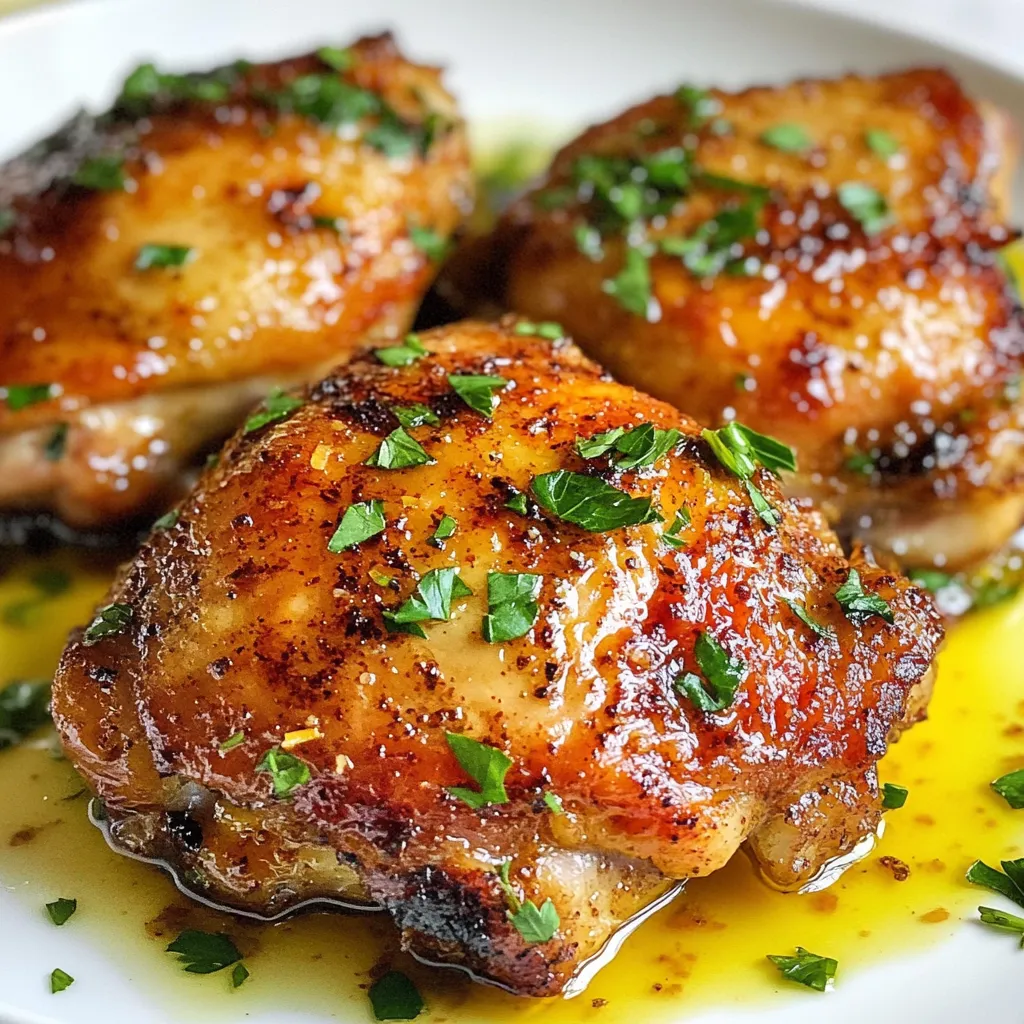
Smoky Paprika Chicken Thighs Tasty and Simple Dinner

Are you ready for a tasty and easy dinner idea? Smoky Paprika Chicken Thighs can transform your weeknight meals. This

Here is what you need for these delicious cupcakes: - 1 ½ cups all-purpose flour - 1 cup granulated sugar - ½ cup unsalted butter, softened - 2 large eggs - 1 cup brewed coffee, cooled - 1 ½ teaspoons baking powder - ½ teaspoon baking soda - ½ teaspoon salt - 1 teaspoon vanilla extract - ½ teaspoon almond extract - 1 cup caramel sauce, for filling and topping - 1 cup whipped cream, for frosting - 2 tablespoons espresso powder Each ingredient plays a key role. The flour gives structure, while the sugar adds sweetness. The butter makes the cupcakes moist, and eggs help with binding. If you need to swap some ingredients, here are some ideas: - Use coconut oil instead of unsalted butter for a dairy-free option. - Substitute brown sugar for granulated sugar for added depth. - Try almond milk instead of brewed coffee for a lighter taste. - If you can't find espresso powder, use instant coffee. Just adjust the amount to taste. These changes can still yield tasty cupcakes. Choosing the right ingredients makes a big difference. Here’s how to pick the best: - Butter: Go for unsalted butter for better control over salt levels. - Coffee: Use freshly brewed coffee for a richer flavor. - Flour: Choose organic all-purpose flour for better texture. - Caramel Sauce: Select a high-quality caramel for the best taste. Checking labels and choosing fresh products will enhance your cupcakes. {{ingredient_image_1}} First, heat your oven to 350°F (175°C). This is the perfect temperature for baking. Next, take a muffin tin and line it with cupcake liners. This step helps keep your cupcakes from sticking. Lining the tin also adds a nice touch to your presentation. In a large bowl, cream the softened butter and granulated sugar. Mix them until they look light and fluffy. This will take just a few minutes. Now, add the eggs one at a time. Mix well after each egg. Then, stir in the vanilla and almond extracts. In another bowl, mix the flour, baking powder, baking soda, salt, and espresso powder. Gradually add this dry mix to the wet mix. Alternate with the brewed coffee. Stir until everything is just combined. Be careful not to over-mix; we want soft cupcakes! Now, fill each cupcake liner about two-thirds full with batter. Place the muffin tin in the oven. Bake for 18-20 minutes. To check if they are done, insert a toothpick in the center of a cupcake. If it comes out clean, they are ready! Once baked, let the cupcakes cool in the tin for five minutes. After that, move them to a wire rack to cool completely. This keeps them from getting soggy. Now your cupcakes are ready for filling and frosting! To get soft and fluffy cupcakes, start with room temperature ingredients. This helps them mix well. Beat the butter and sugar until they look light and fluffy. This step is key for a nice rise. When mixing dry and wet ingredients, do it gently. Over-mixing can lead to dense cupcakes. Bake them until a toothpick comes out clean. This means they are done. For a fun look, use whipped cream for frosting. You can pipe it high for a café-style feel. Drizzle caramel sauce on top for flair. A sprinkle of espresso powder adds a nice touch, too. You can even add chocolate shavings or coffee beans for extra style. Arrange the cupcakes on a nice platter with small coffee cups. This makes a great presentation. One common mistake is not measuring ingredients properly. Use a scale or measuring cups for accuracy. Another is opening the oven door too soon. This can make your cupcakes sink. Also, avoid using cold ingredients. Cold butter or eggs can affect the batter. Lastly, don’t skip cooling before filling. Filling warm cupcakes can make the caramel runny. Pro Tips Use Fresh Espresso Powder: Ensure your espresso powder is fresh for the best flavor. Stale espresso can dull the taste of your cupcakes. Cool Coffee Properly: Allow your brewed coffee to cool to room temperature before adding it to the batter. This prevents the butter from melting and ensures a fluffy texture. Don’t Overmix: Mix the batter until just combined to keep your cupcakes light and airy. Overmixing can lead to dense cupcakes. Garnish Creatively: Enhance the presentation by adding chocolate shavings or a sprinkle of sea salt on top of the caramel drizzle for an elegant touch. {{image_2}} To make vegan caramel macchiato cupcakes, swap the eggs and butter. Use flax eggs instead of regular eggs. Mix 1 tablespoon of ground flaxseed with 3 tablespoons of water. Let it sit for a few minutes to thicken. For butter, use coconut oil or a vegan butter substitute. Replace milk with almond or oat milk. These swaps keep the flavor rich and delicious. For gluten-free caramel macchiato cupcakes, use a gluten-free flour blend. Many blends work well, like almond or coconut flour. You might need to adjust the liquid. Start with less coffee, then add more as needed. Check the baking powder to ensure it's gluten-free. This will let you enjoy a tasty treat without gluten. You can easily add new flavors to your cupcakes. For chocolate, mix in 1/3 cup of cocoa powder with dry ingredients. This gives a rich, chocolatey taste. If you love mocha, add more espresso powder. Just 1 tablespoon more will boost the coffee flavor. You can also add a hint of cinnamon for warmth. These enhancements create a unique twist on the classic cupcake. To keep your caramel macchiato cupcakes fresh, place them in an airtight container. Store them at room temperature for up to three days. If you want to keep them longer, refrigeration helps, but it might dry them out. In that case, wrap each cupcake in plastic wrap before putting them in the fridge. Freezing is a great way to save cupcakes for later. First, allow the cupcakes to cool completely. Next, wrap each cupcake tightly in plastic wrap. After that, place them in a freezer-safe bag or container. They can stay frozen for up to three months. When you're ready to enjoy them, just thaw them in the fridge overnight. To reheat your cupcakes, use your oven for the best results. Preheat the oven to 350°F (175°C). Place the cupcakes on a baking sheet and cover them loosely with foil. Heat for about 10 minutes. This method keeps them moist and tasty. If you're in a hurry, you can use the microwave. Heat each cupcake for about 10-15 seconds. Be careful not to overheat, as that can dry them out. To keep your cupcakes moist, use the right ingredients. Start with fresh eggs and butter. Cream them well for a fluffy texture. Adding brewed coffee gives great moisture and flavor. Do not overmix the batter; mix just until combined. Bake them until a toothpick comes out clean. Cooling them properly also helps keep them moist. Yes, you can use instant coffee. Just dissolve two tablespoons of instant coffee in one cup of hot water. This will mimic brewed coffee. However, brewed coffee gives a richer flavor. If you love coffee taste, stick to brewed. The choice is yours based on what you have at home. The best way to frost cupcakes is with whipped cream. Use a piping bag for a fun design. If you don’t have one, a knife works too. Start from the outside and swirl inwards. Drizzle caramel sauce on top to add flavor. For a special touch, sprinkle a bit of espresso powder on top. In this article, we explored all you need to know about caramel macchiato cupcakes. We examined ingredients, offered substitutions, and shared tips on choosing quality items. I provided step-by-step instructions for baking and cooling. Plus, I gave tricks for achieving perfect texture and fun decorating ideas. We addressed variations like vegan and gluten-free options and shared storage tips to keep your cupcakes fresh. Remember, a little care in each step will lead to delicious results. Enjoy baking and sharing these delightful treats!

Irresistible Caramel Macchiato Cupcakes Recipe Today

If you’re craving a sweet treat that captures the delicious flavors of caramel and coffee, you’re in for a treat!

To make your Sriracha Honey Salmon Rice Bowls, you'll need the following ingredients: - 2 salmon fillets - 2 tablespoons Sriracha sauce - 2 tablespoons honey - 1 tablespoon soy sauce - 1 teaspoon sesame oil - 1 cup jasmine rice - 2 cups vegetable broth (or water) - 1 avocado, sliced - 1 cup cucumber, julienned - 1 carrot, shredded - 2 green onions, chopped - Sesame seeds, for garnish - Salt and pepper to taste Using fresh ingredients can elevate your meal. I recommend: - Fresh salmon fillets for rich taste and texture. - Ripe avocados for creaminess and healthy fats. - Crisp cucumbers to add crunch and freshness. - Bright green onions to enhance flavor and color. - Fresh carrots for sweetness and color. To prepare this dish, you will need some basic tools: - A small bowl for mixing the marinade. - A shallow dish for marinating the salmon. - A medium saucepan for cooking the rice. - A baking sheet lined with parchment paper for the salmon. - A fork to fluff the rice. - Serving bowls to assemble your rice bowls. With these ingredients and tools, you are set to create a delicious meal that bursts with flavor. Enjoy the cooking process! {{ingredient_image_1}} To start, you will mix Sriracha, honey, soy sauce, and sesame oil in a bowl. This mixture gives the salmon its sweet and spicy kick. Place the salmon fillets in a shallow dish. Pour the marinade over the salmon, making sure to coat each piece well. Let the salmon sit for at least 15 minutes. This helps the flavors soak in. Next, rinse the jasmine rice under cold water. This takes out extra starch. You want the water to run clear. In a medium saucepan, bring 2 cups of vegetable broth to a boil. Add the rinsed rice and a pinch of salt. Lower the heat to simmer and cover the pot. Cook for about 15 minutes. The rice should absorb all the broth. Once done, fluff the rice with a fork and set it aside. Preheat your oven to 400°F (200°C). Line a baking sheet with parchment paper to prevent sticking. Place the marinated salmon fillets on the baking sheet. Bake for 12 to 15 minutes. The salmon should be cooked through and flake easily with a fork. This step makes the salmon tender and juicy. While the salmon bakes, prepare your fresh vegetables. In each serving bowl, start with a base of jasmine rice. Add sliced avocado, julienned cucumber, shredded carrot, and chopped green onions on top. Each of these adds color and crunch to your bowls. Once the salmon is ready, place a fillet on each rice bowl. Drizzle any leftover marinade from the baking sheet over the salmon. This adds even more flavor. Finally, sprinkle sesame seeds on top for a nice finish. If you want, add salt and pepper to taste. A squeeze of fresh lime juice gives it a bright touch. To get the best texture for your salmon, marinate it well. The Sriracha and honey mix adds flavor and moisture. Let it sit for at least 15 minutes. This helps the salmon absorb all the tasty goodness. When you cook it, aim for a temperature of 145°F (63°C). This ensures it is safe to eat and soft. You can bake, grill, or pan-sear your salmon. Baking is easy and gives even cooking. Grilling adds a nice smoky flavor. For pan-searing, heat oil in a skillet. Cook for about 4-5 minutes per side. Each method gives you different tastes, so try them all! When cooking jasmine rice, rinse it first. This removes excess starch and keeps it fluffy. Use vegetable broth for extra flavor. After cooking, let it sit covered for 5 minutes. Then, use a fork to fluff it gently. This keeps the grains separate and light. Enjoy your perfect rice with the salmon! Pro Tips Marinate Longer for More Flavor: For the best flavor, marinate the salmon for at least 30 minutes or even overnight in the refrigerator. This allows the flavors to penetrate the fish more deeply. Use Fresh Ingredients: Always opt for fresh vegetables and ripe avocados for optimal taste and texture. Fresh ingredients will elevate the overall quality of your dish. Perfectly Cooked Salmon: Keep an eye on the salmon as it bakes; cooking time can vary based on thickness. The internal temperature should reach 145°F (63°C) for perfectly cooked salmon. Customize Your Bowl: Feel free to add your favorite toppings such as radishes, edamame, or pickled ginger to personalize your rice bowl and make it your own! {{image_2}} You can change the taste of your sauce easily. Want more spice? Add extra Sriracha. Want it sweeter? Add more honey. If you like tang, try a splash of lime juice. You can also use maple syrup for a different flavor. Mix and match to find your perfect blend! You don’t have to stick to just one type of veggie. Try bell peppers for a sweet crunch. Broccoli adds a nice bite and color. You can use snap peas for a fresh twist, too. If you have carrots, try shredding them or cutting them into sticks. Get creative with what you have! Rice is great, but it is not the only option. You can use quinoa for a nutty flavor. Cauliflower rice is a low-carb choice. For a fun twist, try serving it in lettuce wraps! This keeps the dish light and fresh. You can even serve it with noodles for a different experience. To keep your Sriracha honey salmon rice bowls fresh, store them in a sealed container. Make sure to separate the salmon from the rice and veggies. This helps keep everything fresh. If you mix them, the rice may get soggy. Your leftovers can last for up to three days in the fridge. When you're ready to enjoy your leftovers, reheat them gently. For the salmon, place it in the oven at 350°F (175°C) for about 10 minutes. This keeps it moist. For the rice, you can use the microwave. Add a splash of water to keep it from drying out. Heat in short bursts, stirring in between. To keep your ingredients fresh, store your Sriracha and honey in a cool, dark place. Seal them tightly after each use. For the vegetables, put them in the fridge. Use the avocado soon, as it ripens quickly. Store it whole and uncut to last longer. Keep cucumbers and carrots in an airtight container with a little water to stay crisp. This helps maintain their crunch! Yes, you can! Prepare the rice and veggies a day ahead. Store them in the fridge. Marinate the salmon and keep it separate until you are ready to cook. This way, the salmon stays fresh. Cook the salmon just before serving for the best flavor. If you don’t have Sriracha, use another hot sauce. You can also mix chili paste with honey for a similar taste. If you want less heat, try using sweet chili sauce. Adjust the amount based on your spice level. Yes, this recipe works great for meal prep! You can make several servings at once. Divide the rice and salmon into containers. Add veggies on top. Store them in the fridge for up to four days. Just reheat the salmon before you eat it. The spice level is moderate. Sriracha gives it a nice kick, but the honey helps balance it. If you prefer less spice, use less Sriracha. You can also add more honey to tone it down. Adjust the heat to suit your taste. You learned how to make tasty Sriracha honey salmon rice bowls. We explored the best ingredients, cooking steps, and tips for perfect texture. You can customize the sauce and swap veggies to fit your taste. Storing leftovers is easy with simple practices. These bowls are great for meal prep and can be made ahead. Enjoy your cooking adventure and share this delicious recipe with family and friends!

Sriracha Honey Salmon Rice Bowls Flavorful and Simple

If you’re craving a dish that’s both easy and packed with flavor, you’re in the right place! My Sriracha Honey

- Fresh corn details and grilling note Use 4 ears of fresh corn. Husk them first. Then, grill them on medium-high heat. This adds a nice smoky flavor. Grill until the corn is slightly charred, about 10-15 minutes. Let it cool before cutting off the kernels. - Dairy components and their roles in the dip This dip needs cream cheese, sour cream, and mayonnaise. One cup of softened cream cheese gives richness. The half cup of sour cream adds tanginess. Half a cup of mayonnaise helps to make the dip creamy. - Spices and herbs for flavor enhancement We use chili powder and cumin in this recipe. One teaspoon of chili powder gives it a kick. A half teaspoon of cumin adds warmth. Fresh cilantro, chopped finely, brings a burst of freshness. Don’t forget the juice of one lime for a zesty finish. You can also add salt and pepper to taste. {{ingredient_image_1}} To make this dip, start by grilling the corn. I love using fresh corn for the best taste. Husk the corn first. Then, heat your grill to medium-high. Place the corn on the grill for about 10-15 minutes. Turn it often so it cooks evenly. Look for a nice char on the kernels; this adds great flavor. Safety is key when grilling. Use tongs to handle hot corn. Let the corn cool for a few minutes before cutting off the kernels. This helps avoid burns. Next, prepare the cream mixture. In a bowl, combine softened cream cheese, sour cream, and mayonnaise. You want it to be smooth and creamy. If your cream cheese is too stiff, let it sit at room temperature for a while. This makes mixing easier. Now, it's time to mix everything. Add the grilled corn, crumbled feta, chopped cilantro, lime juice, chili powder, cumin, salt, and pepper to the cream mixture. Stir well to combine. Mixing is crucial because it helps all the flavors develop. Taste the dip and adjust the seasoning if needed. Chilling the dip is essential. Once mixed, transfer it to a serving bowl. Cover it and place it in the fridge for at least 30 minutes. This waiting time allows the flavors to meld together. It also makes the dip taste even better when served. Enjoy your chilled Mexican street corn dip with tortilla chips! Choose corn with bright green husks. The silk at the top should be sticky and brown. Look for firm, plump kernels. If the kernels are dented or dry, skip that ear. Fresh corn has a sweet smell too. This means it’s ripe and ready to eat. You can change the heat in your dip. Add more chili powder for extra spice. If you like it mild, use less. You can also add jalapeños for a nice kick. For a tangy flavor, squeeze in more lime juice. Taste as you go to get your perfect mix. This dip tastes better when made in advance. Mix all the ingredients and chill for at least 30 minutes. This helps the flavors blend well. You can make it up to a day ahead. Just keep it covered in the fridge. It’s a great time-saver for parties or gatherings! Pro Tips Choosing the Right Corn: Use fresh, in-season corn for the best flavor and sweetness. Look for plump, well-filled ears with bright green husks. Grilling Tips: Grill the corn until it has nice char marks, which adds depth of flavor to the dip. Rotate it every few minutes for even cooking. Customize Your Spice: Feel free to adjust the chili powder and cumin to your preferred spice level. Add jalapeños for an extra kick! Make Ahead: Prepare the dip a day in advance to allow the flavors to intensify. Just store it in an airtight container in the fridge. {{image_2}} To add some heat, you can include jalapeños or hot sauce. Chop fresh jalapeños finely and mix them into the dip. This will bring a nice kick to the creamy blend. If you prefer, add a few dashes of your favorite hot sauce. Adjust the amount based on your heat preference. Keep tasting as you mix in the spice to find your perfect balance. If you want a vegetarian or vegan dip, substitute the dairy ingredients. You can use plant-based cream cheese and sour cream. Look for brands that taste creamy and rich. For the feta cheese, try crumbled tofu mixed with nutritional yeast. This adds the tangy flavor without dairy. You can also enhance the taste with a squeeze of lemon juice instead of lime. Feel free to get creative with mix-ins. Some great options include diced red onion, roasted red peppers, or black beans. Each adds a new layer of flavor and texture. You can also toss in some diced avocado for creaminess. For a crunch, consider adding corn nuts or crushed tortilla chips right before serving. Experiment with what you love! To keep your dip fresh, store it in an airtight container. This helps keep out air and moisture. You can place it in the fridge for later. Make sure to cool the dip before putting it away. This prevents extra moisture from forming. If you want to keep it longer, consider using a freezer-safe container. You can freeze this dip if you have leftovers. First, let it cool completely. Then, scoop it into a freezer-safe container. Leave some space at the top, as it will expand when frozen. To thaw, place it in the fridge overnight. You can also microwave it on low power for quick thawing. Stir well before serving again. In the fridge, this dip lasts for about three to five days. After that, it may lose flavor and texture. If you notice any changes, it’s best to throw it away. Always trust your senses. If it smells off or looks strange, do not eat it. Mexican Street Corn Dip is a creamy, flavorful dish inspired by elote, the classic Mexican street food. It features grilled corn mixed with creamy ingredients like cream cheese, sour cream, and mayo. This dip also has crumbled feta cheese, cilantro, lime juice, and spices, giving it a fresh and zesty flavor. You serve it chilled with crunchy tortilla chips, making it a perfect party snack. Yes, you can use canned corn! Canned corn is convenient and saves time. It is already cooked, so you can skip the grilling step. However, it may not have the same smoky flavor as grilled corn. Fresh corn offers a bright, sweet taste and a nice crunch. If you choose canned corn, rinse it well to remove excess salt. You can serve this dip with tortilla chips for a classic pairing. It also goes well with fresh veggies like carrots and cucumber for a healthier option. Try serving it with crunchy pita chips for a twist. For extra fun, you can use it as a topping for tacos or nachos. This dip is a crowd-pleaser at parties! This article covered making a delicious Mexican Street Corn Dip. We discussed fresh corn, dairy, spices, and how to grill corn safely. You learned how to prepare a creamy mixture and the need to chill the dip before serving. We provided tips on selecting fresh corn, adjusting spice levels, and making it ahead. Variations like spicy or vegan options were offered, alongside storage tips for leftovers. Enjoy creating this dip that surely impresses friends and family!

Mexican Street Corn Dip Flavorful and Easy Recipe

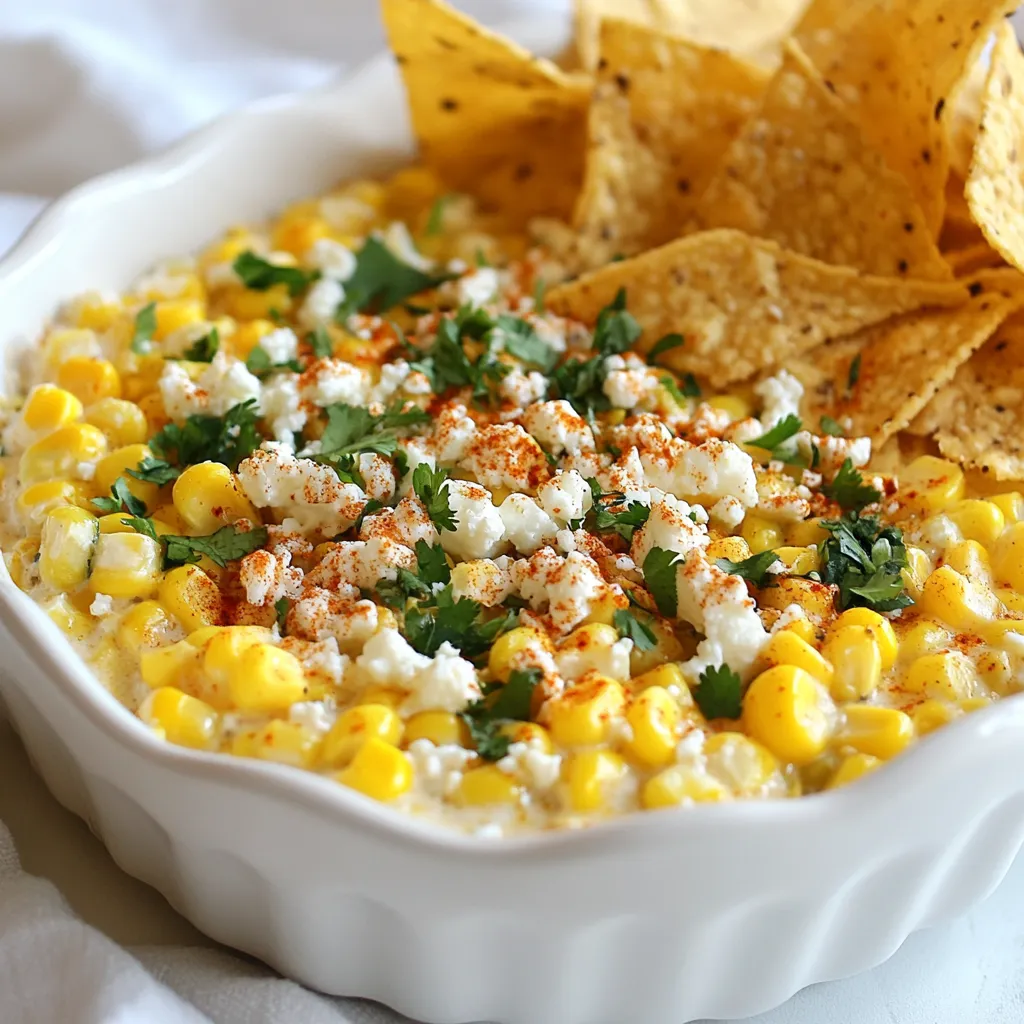
Are you ready to spice up your snack game? My Mexican Street Corn Dip is not only packed with flavor,

To make creamy roasted garlic cauliflower soup, you need: - 1 large head of cauliflower, chopped into florets - 1 whole bulb of garlic - 1 medium onion, chopped - 3 tablespoons olive oil - 4 cups vegetable broth - 1 cup heavy cream (or coconut cream for a dairy-free option) - 1 teaspoon thyme (fresh or dried) - Salt and pepper to taste These ingredients create a rich and creamy base for the soup. The cauliflower gives it body, while the garlic adds a deep, sweet flavor. For extra flavor and color, you can add: - Fresh parsley, chopped (for garnish) - A sprinkle of paprika (for garnish) Garnishes make your soup look beautiful and add a tasty twist. Fresh herbs brighten the dish, while paprika gives it a little kick. You can switch some ingredients based on your needs: - Use leeks instead of onion for a milder taste. - Swap heavy cream with coconut cream for a vegan option. - If you don’t have thyme, use rosemary or sage. These easy swaps allow you to customize the soup to your taste. You can even try adding roasted carrots or potatoes for a different twist. {{ingredient_image_1}} First, preheat your oven to 400°F (200°C). Slice the top off the garlic bulb. This exposes the cloves and helps them cook well. Drizzle one tablespoon of olive oil on top. Wrap the bulb in aluminum foil. Place it in the oven for 30 to 35 minutes. When it’s done, the garlic will be soft and golden. While the garlic roasts, prepare the cauliflower. Chop one large head into florets. In a big bowl, toss the florets with one tablespoon of olive oil. Add salt and pepper to taste. Spread the florets on a baking sheet. Roast them in the oven for 25 to 30 minutes until they turn golden brown and tender. Next, grab a large pot. Heat one tablespoon of olive oil over medium heat. Add the chopped onion. Sauté for five to seven minutes. The onion should become translucent and fragrant. Once the garlic is roasted, squeeze the soft cloves into the pot with the onions. Add the roasted cauliflower and one teaspoon of thyme. Pour in four cups of vegetable broth. Bring everything to a simmer and let it cook for five more minutes. This allows all the flavors to come together. Now, it’s time to blend the soup. Use an immersion blender to puree the mixture until it is smooth and creamy. If you don’t have one, transfer it to a regular blender. Cover the lid with a kitchen towel and blend carefully to avoid splatters. Return the pureed soup to the pot. Stir in one cup of heavy cream or coconut cream. Heat through for about two minutes. Taste and adjust seasoning with salt and pepper if needed. Ladle the soup into bowls. For a nice touch, garnish with fresh parsley. If you like, sprinkle a bit of paprika on top for color and flavor. Enjoy your creamy roasted garlic cauliflower soup warm. To make the soup creamy, use heavy cream or coconut cream. Both options add richness. Blend the soup well until it is smooth. An immersion blender works great for this. If you use a regular blender, do it in batches. Always cover the lid with a towel to avoid spills. Thyme adds a nice touch to this dish. You can use fresh or dried thyme. If you want more flavor, try adding a pinch of nutmeg. It pairs well with garlic and cauliflower. A sprinkle of paprika on top adds color and a mild spice. Fresh parsley gives a bright finish and freshness. Always taste as you go, adjusting salt and pepper for balance. Let the soup cool before storing it. Use airtight containers to keep it fresh. It can stay in the fridge for about 3-4 days. For longer storage, freeze the soup in portions. Just remember to leave some space in the container for expansion. Reheat gently on the stove, adding a splash of broth if needed. Pro Tips Roast Garlic Thoroughly: Make sure to roast the garlic until it’s very soft and caramelized, as this will enhance the sweetness and depth of flavor in your soup. Choose the Right Cream: If you prefer a dairy-free option, coconut cream adds a rich texture and subtle sweetness that pairs beautifully with the roasted garlic. Season Gradually: Taste and adjust seasoning as you go, especially after blending. The flavors will develop, and you may need more salt or pepper than you initially think. Garnish Wisely: Fresh parsley adds a pop of color and freshness. For an extra touch, consider adding roasted cauliflower florets on top for a delightful crunch. {{image_2}} You can make this soup dairy-free by using coconut cream. Coconut cream gives a rich flavor. Simply swap the heavy cream for one cup of coconut cream. This keeps the soup creamy and delicious. Feel free to add more veggies to your soup. Carrots, potatoes, or even spinach work well. Chop them small and roast them along with the cauliflower. This adds more nutrients and flavor to your dish. Want to change the taste? Try adding spices like cumin or curry powder. These spices bring a warm and exotic twist. You can also add a squeeze of lemon juice for a fresh taste. This gives a bright contrast to the creamy soup. Each serving of creamy roasted garlic cauliflower soup packs about 300 calories. You get 25 grams of fat, mostly from the cream and olive oil. The soup also has about 10 grams of carbs and 4 grams of protein. This makes it a great low-carb option. - Cauliflower: This veggie is rich in vitamins C and K. It’s also high in fiber, which aids digestion. - Garlic: Garlic boosts your immune system. It has compounds that fight off sickness and support heart health. - Olive Oil: This healthy fat contains antioxidants. It can help reduce inflammation and improve cholesterol levels. - Heavy Cream: While it adds richness, you can use coconut cream for a dairy-free choice. Coconut cream offers healthy fats and adds a nice flavor. I recommend serving this soup warm. Top it with fresh chopped parsley for color. A sprinkle of paprika adds a lovely touch. Pair it with crusty bread for a complete meal. Enjoy it as a starter or with a salad for lunch. You can make this soup a day before. Just follow the steps to cook it. After cooking, let it cool. Store it in the fridge in a sealed container. When you are ready to eat, heat it on the stove. Stir well and add a bit more cream if needed. Yes, you can freeze this soup! Let it cool completely first. Transfer it to an airtight container or freezer bags. Make sure to leave some space for the soup to expand. It can last for up to three months in the freezer. To eat, thaw it in the fridge overnight and reheat on the stove. This soup pairs well with many dishes. Try serving it with crusty bread or a fresh salad. You could also enjoy it with grilled cheese sandwiches for a cozy meal. For a light touch, add a drizzle of olive oil or a sprinkle of nuts. If your soup is too thick, add more vegetable broth or cream. Stir well and heat it through. If it’s too thin, simmer it a little longer to thicken. You can also blend in some extra roasted cauliflower to boost the texture. This blog post covered how to make creamy roasted garlic cauliflower soup. We explored key ingredients and the easy steps for preparing the soup. You learned tips for getting the right texture and taste, along with variations to try. Lastly, we shared important nutritional info and answered common questions. Making this soup can be fun and rewarding. Enjoy experimenting with flavors and textures to suit your taste!

Creamy Roasted Garlic Cauliflower Soup Delight

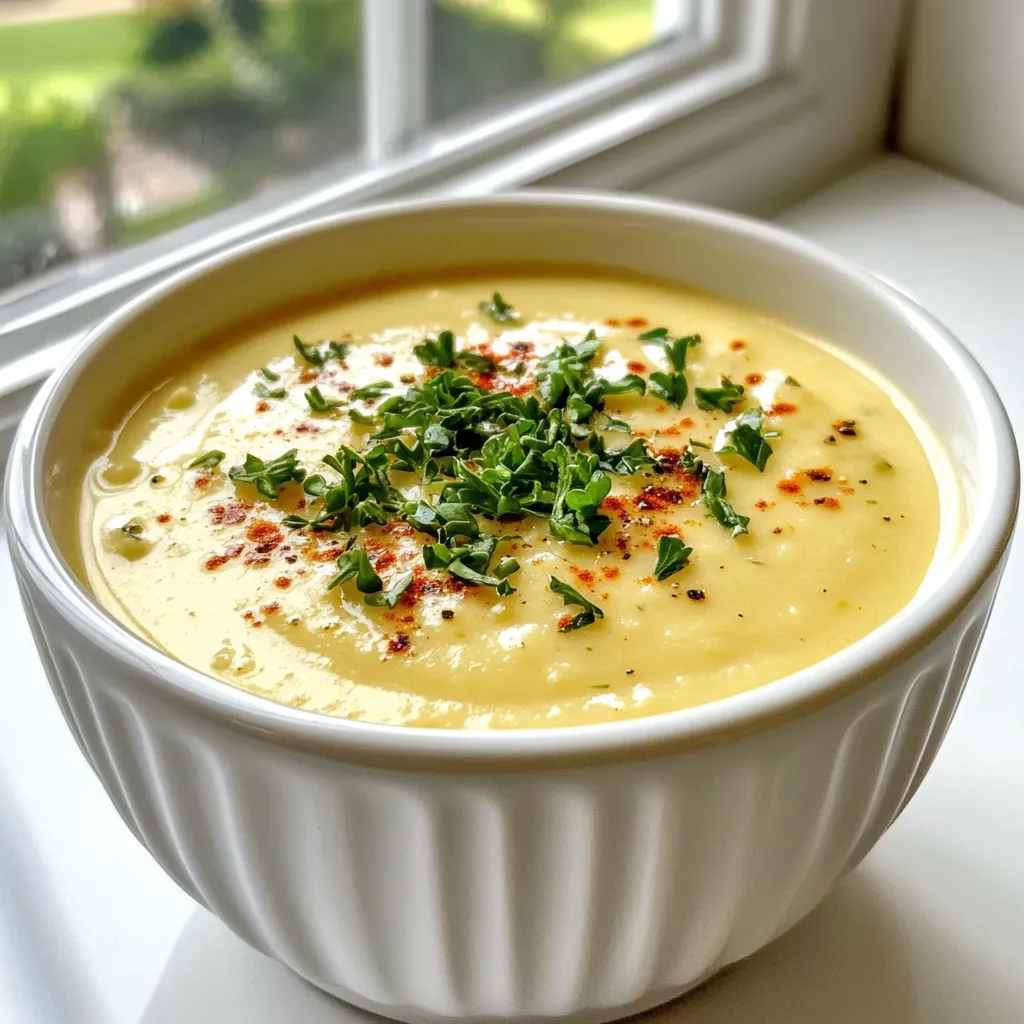
Welcome to a delightful journey of flavor with my Creamy Roasted Garlic Cauliflower Soup! If you crave warmth on a

- 2 cups all-purpose flour - 1/2 cup granulated sugar - 1 tablespoon baking powder - 1/2 teaspoon salt - 1/2 cup unsalted butter, cold and cubed - 3/4 cup heavy cream - 1 teaspoon vanilla extract - 1 cup fresh raspberries - 1/2 cup white chocolate chips - Extra cream and sugar for topping For these raspberry white chocolate scones, you need simple yet essential items. All-purpose flour serves as the base. Granulated sugar adds sweetness. Baking powder helps the scones rise. A pinch of salt enhances the flavors. You want cold unsalted butter. It creates a flaky texture. Heavy cream adds richness. Vanilla extract gives a lovely aroma. Fresh raspberries bring tartness and color. White chocolate chips add creamy hints. Lastly, extra cream and sugar make a sweet topping. Gather these ingredients before you start. It makes the cooking process smoother. Each item plays a key role in creating tasty scones. Enjoy the blend of flavors as they come together. {{ingredient_image_1}} 1. Preheat the oven and prepare baking sheet Start by preheating your oven to 400°F (200°C). Line a baking sheet with parchment paper. This helps the scones bake evenly and makes for easy cleanup. 2. Mix dry ingredients In a large mixing bowl, whisk together 2 cups of all-purpose flour, 1/2 cup of granulated sugar, 1 tablespoon of baking powder, and 1/2 teaspoon of salt. Mixing these dry ingredients well ensures that the flavors blend nicely. 3. Incorporate cold butter Next, add 1/2 cup of cold, cubed unsalted butter to the flour mixture. Use a pastry cutter or your fingers to mix until it looks like coarse crumbs. This step is key to getting the right texture. 4. Combine wet ingredients and add to dry mixture In a different bowl, combine 3/4 cup of heavy cream and 1 teaspoon of vanilla extract. Slowly pour this mixture into the dry ingredients. Stir gently until everything is just combined. Don’t over-mix; you want some lumps. 1. Fold in raspberries and white chocolate Carefully add 1 cup of fresh raspberries and 1/2 cup of white chocolate chips to the dough. Gently fold them in without crushing the raspberries. This adds flavor and color. 2. Knead and shape dough Transfer the dough to a lightly floured surface. Knead it gently a few times until it feels smooth. Pat the dough into a circle about 1 inch thick. 3. Cut scones and transfer to baking sheet Use a sharp knife or a pizza cutter to cut the dough into 8 wedges. Carefully transfer the wedges onto your prepared baking sheet, leaving space between them. 4. Brush with cream and sprinkle with sugar Brush the tops of the scones with a bit of extra cream. Then, sprinkle some sugar on top for a sweet touch. This helps create a lovely crust. 1. Recommended baking time and temperature Place the scones in the preheated oven and bake for 15-20 minutes. You want them to turn golden brown on top. 2. How to tell when scones are done Check if they are done by inserting a toothpick into the center. If it comes out clean, the scones are ready. Let them cool slightly before serving for the best taste. Using cold ingredients is key to great scones. Cold butter helps create a flaky texture. It keeps the butter from melting too fast. This leads to light and airy scones. Do not overwork the dough. Mix just until it comes together. Kneading too much can make scones tough. Aim for a gentle touch. This helps maintain the soft structure. For serving, dust scones with powdered sugar. This adds a lovely touch. You can also brush them with extra cream and sprinkle sugar for a sweet crust. Pair your scones with clotted cream or raspberry jam. This makes each bite extra tasty. The cream adds richness, and the jam gives a fruity burst. Enjoy them warm for the best experience. Pro Tips Use Cold Ingredients: Ensure your butter and cream are cold to create a flaky texture in the scones. Don't Overmix: Mix the dough just until combined to prevent tough scones; gentle folding is key. Fresh Berries: Use fresh raspberries for the best flavor and avoid watery scones; frozen berries can make the dough soggy. Serve Warm: For the best experience, serve the scones warm with clotted cream or jam for added richness. {{image_2}} You can change the flavor of your scones easily. Try substituting raspberries with other berries. Blackberries, blueberries, or strawberries work well too. Each berry brings its own taste. Mixing and matching is fun! You can also use different types of chocolate. Instead of white chocolate chips, try dark chocolate or milk chocolate. Each type adds a unique flavor. Think about your taste and what you enjoy most. If you need gluten-free scones, you can use gluten-free flour. Look for blends that work in baking. They can help you make scones just as tasty. For vegan options, substitute the butter with coconut oil or vegan butter. You can also use almond milk or oat milk instead of cream. These swaps keep the scones rich and delicious while fitting your diet needs. Enjoy experimenting! To keep your scones fresh, store them in an airtight container. This helps maintain their soft texture. If you plan to eat them within a few days, leave them at room temperature. For longer storage, refrigerate them. Just make sure to wrap them well. You can also freeze these scones for up to three months. Wrap each scone tightly in plastic wrap, then place them in a freezer-safe bag. This way, you can enjoy them later without losing flavor. To reheat scones, the oven works best. Preheat your oven to 350°F (175°C). Place the scones on a baking sheet. Heat them for about 5-10 minutes. This method helps keep the scones crispy on the outside and soft inside. You can also use a microwave, but it may make them soft. If using a microwave, heat them for 10-15 seconds. Check them often to avoid overcooking. Enjoy your warm scones just like fresh out of the oven! Can I use frozen raspberries instead of fresh? Yes, you can use frozen raspberries. They work well in this recipe. Just remember that frozen raspberries may release more juice. This can make the dough wetter. If you use frozen, add them straight from the freezer. Avoid thawing them first to keep the scones from getting mushy. How do I make my scones taller and fluffier? To make scones taller and fluffier, use cold ingredients. Cold butter and cream help create steam during baking. Do not overwork the dough. Gently mix the ingredients until just combined. This keeps the scones light and airy. Also, make sure your baking powder is fresh for the best rise. What can I serve with raspberry white chocolate scones? You can serve these scones with clotted cream or butter. They also taste great with a dollop of raspberry jam. A light dusting of powdered sugar on top enhances their sweetness. Pairing them with a cup of tea or coffee makes for a delightful treat. Enjoy! You learned how to make raspberry white chocolate scones with this guide. We covered ingredients, step-by-step instructions, and helpful tips. Use cold ingredients and don’t overwork the dough for the best results. Feel free to try different flavors and keep your scones fresh. Remember, you can always reheat them for a warm treat. Enjoy your baking and impress your friends with these delicious scones.

Raspberry White Chocolate Scones Simple and Tasty Treat

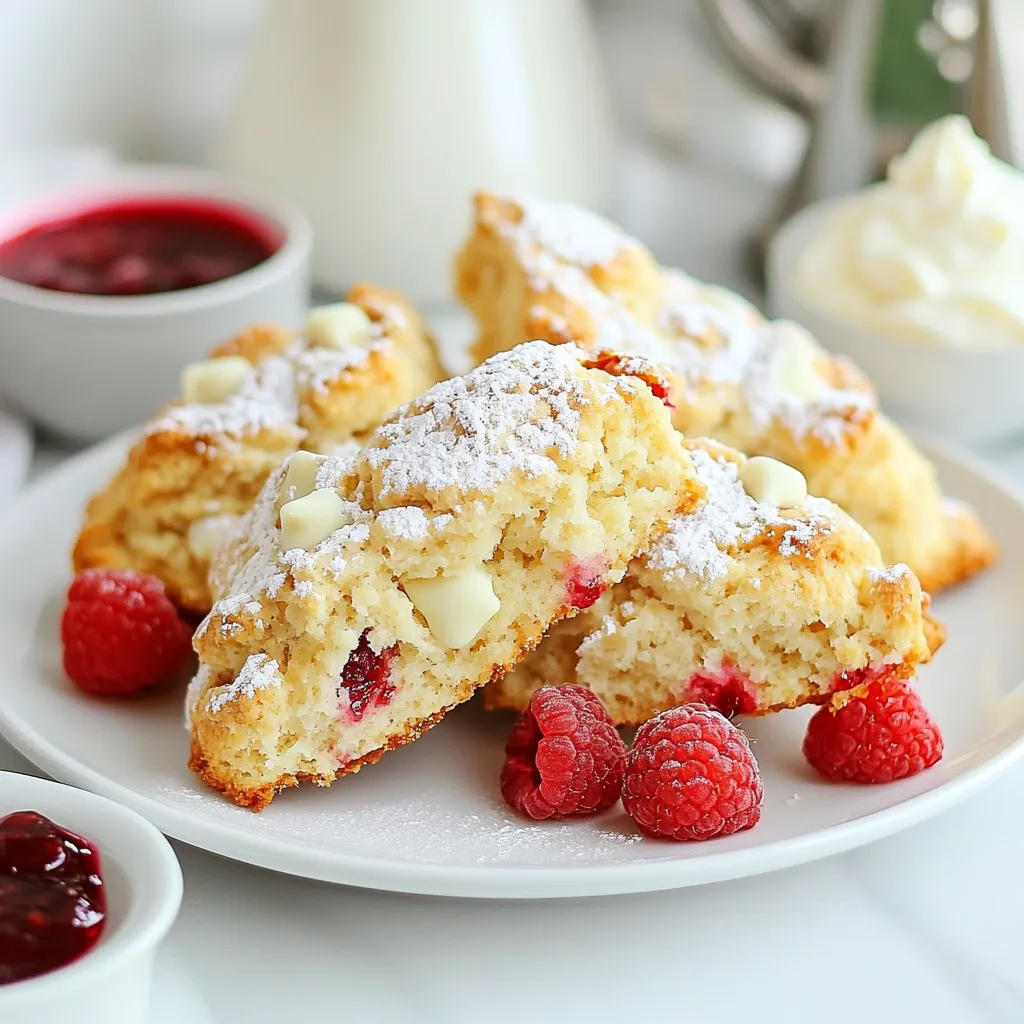
Are you ready to treat yourself? These Raspberry White Chocolate Scones are simple to make and absolutely delicious! Picture golden,

- 1 lb ground beef (80/20 blend for flavor) - 1 large onion, thinly sliced - 2 tablespoons olive oil - 1 tablespoon balsamic vinegar - 1 teaspoon sugar - 4 slices cheddar cheese - 4 small slider buns - Fresh arugula or spinach (for garnish) - BBQ sauce or mustard for topping The main ingredients create a juicy slider with a sweet onion taste. I always choose 80/20 ground beef for the best flavor. A good onion, like a sweet yellow onion, works wonders in this recipe. Olive oil helps caramelize the onions just right. You can add some balsamic vinegar and sugar to enhance the flavor. The vinegar adds depth, while the sugar balances the taste. Salt and pepper are crucial for seasoning the beef. For optional ingredients, I love melting cheddar cheese on top. It adds creaminess and richness. Slider buns are perfect for these small bites. Fresh greens, like arugula or spinach, give a nice crunch. Lastly, BBQ sauce or mustard makes a great topping. You can mix and match these ingredients to suit your taste. {{ingredient_image_1}} - Heat 2 tablespoons of olive oil in a skillet over medium heat. - Add the thinly sliced onion and a pinch of salt. - Cook the onions, stirring often, until they are soft and golden brown. This takes about 15-20 minutes. - Add 1 tablespoon of balsamic vinegar and 1 teaspoon of sugar. Stir until the liquid evaporates, and the onions become caramelized. Remove from heat and set aside. - While the onions cook, take 1 pound of ground beef and form it into 4 equal patties. - Season both sides of each patty with salt and pepper. - Press a small dent in the center of each patty. This helps prevent the patties from puffing up while cooking. - In a clean skillet or on a grill, heat over medium-high heat. - Cook the patties for about 3-4 minutes on one side. - Flip each patty and place a slice of cheddar cheese on top. Cook for another 3-4 minutes until the cheese melts and the beef reaches your desired doneness. - Cut the slider buns in half. - On each bottom bun, place a beef patty topped with caramelized onions. - Add a handful of fresh arugula or spinach for some crunch. - If you like, drizzle BBQ sauce or spread mustard on the top bun before putting it on. - Place the top bun on each slider and serve right away, while they are hot. For the best flavor in your sliders, choose an 80/20 ground beef blend. This mix has enough fat to keep the patties juicy. Grass-fed beef offers a rich taste and is often more nutritious than conventional beef. However, it may cost a bit more. Both options are great, but your choice depends on your budget and taste preference. Caramelizing onions takes time but brings out their natural sweetness. Start with a medium heat and add olive oil to your skillet. Stir the onions often for even cooking. If they begin to brown too fast, lower the heat. Aim for a soft, golden-brown look, which usually takes 15-20 minutes. If they burn, you’ll lose that sweet flavor. You can cook sliders on a grill or stovetop. Each method gives a nice flavor, but stovetop cooking allows better control. Use a meat thermometer to check doneness. Aim for 160°F for medium-well beef. Insert the thermometer in the center of the patty. This ensures you cook it just right every time. Pro Tips Use High-Quality Beef: Opt for an 80/20 blend for the perfect balance of flavor and juiciness, ensuring your sliders are tasty and satisfying. Caramelization is Key: Take your time when caramelizing the onions; low and slow is the best approach for developing deep, rich flavors. Indent Your Patties: Pressing a small indentation in the center of each patty helps prevent puffing up during cooking, resulting in even cooking and a better texture. Choose the Right Buns: Soft, slightly sweet slider buns complement the savory beef and sweet caramelized onions perfectly, enhancing the overall flavor of your sliders. {{image_2}} You can try different cheeses for your sliders. Here are some tasty options: - Gouda - Swiss - Pepper Jack - Blue cheese If you're vegan or lactose intolerant, look for these vegan cheese choices: - Cashew cheese - Almond cheese - Soy cheese These options add unique flavors, making your sliders even better. Want a lighter option? Use ground turkey instead of beef. Turkey is leaner but still tasty. You can also try plant-based ground meat for a vegan twist. Switch to whole grain buns for extra fiber. They taste great and boost nutrition. Adding spices can really kick up the flavor. Try these: - Garlic powder - Onion powder - Paprika You can also add fresh herbs, like: - Basil - Oregano - Thyme For toppings, mix it up! Use: - Pickles - Jalapeños - Avocado These little changes can make your sliders a big hit at your next meal. After cooking, let sliders cool to room temperature. Store them in the fridge within two hours. Use airtight containers to keep them fresh. I recommend glass or BPA-free plastic containers. These options help prevent any weird smells from other foods. You can reheat sliders in several ways. The oven is my favorite method. Preheat it to 350°F (175°C). Place sliders on a baking sheet and warm them for 10-15 minutes. You can also use a microwave. Heat them for 30 seconds to 1 minute. Finally, a skillet works well too. Heat on medium for about 3-4 minutes, flipping once. You can freeze both patties and assembled sliders. For patties, place them in a single layer on a baking sheet. Freeze for about 1 hour, then transfer to a freezer bag. For assembled sliders, wrap each one tightly in foil. Then, place them in a freezer-safe bag. This keeps them fresh for up to three months. Always label your bags with dates for easy tracking. You can make these sliders ahead of time with ease. First, prepare the beef patties and cook them as directed. After cooking, let the patties cool down. Then, store them in an airtight container in the fridge for up to three days. You can also caramelize the onions ahead. Just follow the recipe and store the onions in the fridge as well. When you are ready to serve, reheat the patties and onions. Assemble the sliders fresh for the best taste. These sliders pair well with many sides. Here are some tasty options: - Sweet potato fries - Crispy onion rings - Mixed green salad - Coleslaw - Potato chips These sides add fun crunch and flavor to your meal. You can mix and match based on your preference. To check if the beef is cooked right, use a meat thermometer. Insert it into the center of a patty. The safe internal temperature for ground beef is 160°F (71°C). If you don’t have a thermometer, look for these signs: - The meat should be brown inside. - There should be no pink color. - Juices should run clear. These tips help ensure your beef sliders are safe and tasty. You now have a clear path to making delicious beef sliders. We covered the key ingredients, from ground beef and onions to optional toppings like cheese and greens. You learned how to caramelize onions, prepare beef patties, and cook sliders to perfection. Finally, remember that these sliders are versatile. Feel free to try different cheeses or healthy substitutes. With these tips, you can impress your friends and family. Enjoy making your sliders and experimenting with variations!

Caramelized Onion Beef Sliders Delightful Flavor Burst

If you’re craving a flavorful bite, these Caramelized Onion Beef Sliders will hit the spot! Imagine juicy, tender beef patties

To make Creamy Garlic Mushroom Orzo, you need: - 1 cup orzo pasta - 2 tablespoons olive oil - 1 medium onion, finely chopped - 3 cloves garlic, minced - 8 ounces mushrooms, sliced (preferably cremini or button) - 3 cups vegetable broth - 1 cup heavy cream (or coconut milk for a lighter option) - 1/2 cup grated Parmesan cheese (or nutritional yeast for a vegan option) - Salt and pepper to taste - Fresh parsley, chopped (for garnish) If you want a lighter dish, use coconut milk instead of heavy cream. For a vegan twist, swap Parmesan cheese with nutritional yeast. You can also use gluten-free orzo if needed. This makes the dish friendly for many diets. I always prefer fresh ingredients for this recipe. Fresh garlic and onions give more flavor. Fresh mushrooms add a wonderful texture. However, dried herbs can work if fresh isn’t available. Just use less since dried herbs are stronger. Enjoy the vibrant tastes of this dish! {{ingredient_image_1}} 1. Start by heating 2 tablespoons of olive oil in a large skillet over medium heat. 2. Add 1 medium onion, finely chopped, and sauté it until it is soft. This takes about 3-4 minutes. 3. Next, add 3 minced garlic cloves. Cook for about 1 minute until you smell the garlic. 4. Now, stir in 8 ounces of sliced mushrooms. Cook them until they turn golden brown. This takes about 5-7 minutes. 5. Add 1 cup of orzo pasta to the skillet. Stir well to mix it with the onions and mushrooms. Toast the orzo for about 1 minute. 6. Gradually pour in 3 cups of vegetable broth. Keep stirring as the broth heats up. 7. Once it boils, lower the heat and cover the skillet. Let it simmer for 10-12 minutes. The orzo should be soft and most of the liquid absorbed. 8. After cooking, stir in 1 cup of heavy cream and 1/2 cup of grated Parmesan cheese. Add salt and pepper to taste. 9. Cook on low for another 3-4 minutes until everything is creamy and warm. 10. Finally, remove from heat and sprinkle with fresh parsley before serving. - Timing is key. Keep an eye on the orzo while it simmers. Stir occasionally to prevent sticking. - Use a lid to trap steam. This helps the orzo cook evenly and absorb the broth well. - Taste as you go. Adjust salt and pepper based on your preference. This recipe serves four, but you can easily adjust it. - To serve two, use half the ingredients. - To serve six, simply increase all ingredients by 1.5 times. - Keep in mind that cooking time may change slightly with larger batches. Always check for doneness. To get that rich, creamy texture, you need two key ingredients: heavy cream and Parmesan cheese. After cooking the orzo, stir in the heavy cream slowly. This helps it blend well. The cheese adds depth. If you want a lighter version, use coconut milk instead. It still tastes great! Keep an eye on the orzo while it cooks. Stir it often to prevent sticking. Start testing it around the 10-minute mark. It should be soft but still a bit firm. If it cooks too long, it can turn mushy. No one wants that in their dish! Want to elevate your orzo? Try adding fresh herbs like thyme or basil. They bring a nice aroma. You can also add a squeeze of lemon for brightness. For a kick, sprinkle in some red pepper flakes. These simple tweaks can transform your meal into something special. Pro Tips Use Fresh Ingredients: Fresh garlic, onions, and mushrooms will enhance the flavor of your dish significantly. Opt for seasonal produce when possible. Don't Overcook the Orzo: Keep an eye on the orzo while it simmers. It should be al dente, as it will continue to cook slightly after being removed from heat. Adjust Creaminess: If you prefer a lighter dish, feel free to substitute half of the heavy cream with more vegetable broth or use coconut milk for a lighter, dairy-free option. Garnish for Flavor: Fresh parsley not only adds color but also a fresh flavor. Consider adding a squeeze of lemon juice for a bright finish. {{image_2}} You can easily make this dish vegetarian or vegan. For a vegan option, swap heavy cream for coconut milk. Coconut milk adds creaminess without dairy. Use nutritional yeast instead of Parmesan cheese for a cheesy taste. This way, you keep the dish rich and tasty while catering to dietary needs. Feel free to switch out the mushrooms. Cremini and button mushrooms work well, but try shiitake or portobello too. Each type of mushroom gives a unique flavor. You can also change the orzo. Use whole wheat or gluten-free pasta for a different twist. This keeps the dish fresh and exciting. Add seasonal vegetables to brighten up your orzo. In spring, toss in fresh peas or asparagus. In summer, zucchini or bell peppers work great. In fall, consider adding spinach or kale for a hearty touch. Winter calls for root veggies like carrots or butternut squash. This makes your meal colorful and nutritious. To keep your Creamy Garlic Mushroom Orzo fresh, store it in an airtight container. Let the dish cool down before sealing. This prevents moisture build-up, which can make the orzo mushy. For best results, eat the leftovers within three days. When reheating, add a splash of vegetable broth or cream. This helps keep the dish creamy and prevents it from drying out. Heat it on low in a skillet, stirring gently until warm. You can also use the microwave but cover it with a damp paper towel to keep moisture in. You can freeze Creamy Garlic Mushroom Orzo, but it may change texture. To freeze, place it in a freezer-safe container. Make sure to leave space for expansion. When ready to eat, thaw it overnight in the fridge. Reheat it on the stove, adding a bit of liquid to restore creaminess. To make this dish gluten-free, use gluten-free orzo pasta. Many brands offer it now. Always check the label to ensure it meets gluten-free standards. The cooking method stays the same. Your dish will taste just as great. Yes, you can use other types of pasta. Small shapes like ditalini or mini shells work well. Just remember to adjust the cooking time based on the pasta you choose. The creamy sauce will still coat your pasta perfectly. Creamy Garlic Mushroom Orzo pairs well with various sides. You can serve it with a fresh salad or steamed veggies. Grilled chicken or shrimp adds protein and flavor. For a simple touch, a slice of garlic bread works great too. In this post, we explored the key steps to make Creamy Garlic Mushroom Orzo. We covered all the ingredients, including alternatives for diet needs. I shared helpful cooking tips to time your dish right and achieve perfect creaminess. Don't forget the variations, whether for seasons or dietary choices. In my experience, trying new ingredients enhances flavor and keeps meals exciting. Keep these tips in mind for creamy orzo that delights every time.

Creamy Garlic Mushroom Orzo Savory and Simple Dish

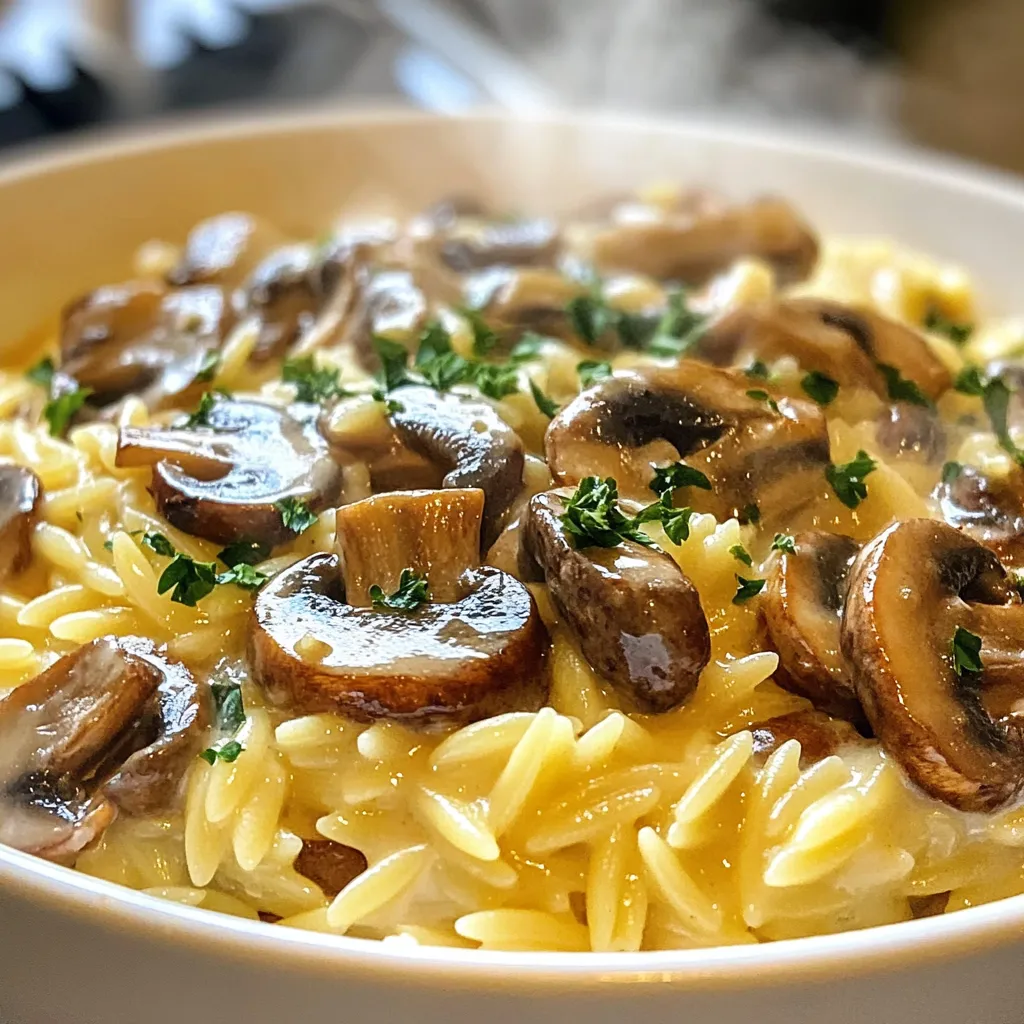
If you crave a dish that’s both creamy and packed with flavor, you’re in the right spot! My Creamy Garlic

To make Creamy Cajun Chicken Penne, you will need the following main ingredients: - 12 oz penne pasta - 2 tablespoons olive oil - 1 pound chicken breast, cut into bite-sized pieces - 1 bell pepper (red or yellow), sliced - 1 small onion, diced - 3 cloves garlic, minced - 1 cup heavy cream - 1 cup chicken broth - ½ cup grated Parmesan cheese - Salt and pepper to taste These ingredients form the base of your dish. The penne pasta gives it texture, while the chicken offers protein. The bell pepper, onion, and garlic add great flavor. Next, you will need some key seasonings to elevate your dish: - 2 tablespoons Cajun seasoning Cajun seasoning is the star here. It brings heat and depth. Feel free to adjust the amount to match your spice level. Salt and pepper should be added according to your taste. Finally, let’s talk about garnishing options to make your dish pop: - Chopped parsley for garnish Chopped parsley adds a fresh touch. You can also add more grated Parmesan or a sprinkle of Cajun seasoning on top for color. This finishing touch makes your plate look even more appetizing! {{ingredient_image_1}} To start, bring a large pot of salted water to a boil. This step is key. Once it boils, add 12 oz of penne pasta. Cook it based on the package instructions until it’s al dente. This means it should be firm but not hard. When done, drain the pasta and set it aside. Next, take a large skillet and heat 2 tablespoons of olive oil over medium-high heat. Season 1 pound of chicken breast, cut into bite-sized pieces, with 2 tablespoons of Cajun seasoning, salt, and pepper. Once the oil is hot, add the chicken to the skillet. Cook it for about 5-7 minutes. You want it to be golden brown and fully cooked. When it’s done, remove the chicken from the skillet and set it aside. In the same skillet, add 1 sliced bell pepper and 1 small diced onion. Sauté these for about 3-4 minutes until they soften. This adds great flavor. After that, add 3 minced garlic cloves and cook for one more minute. The garlic will start to smell amazing. Now, lower the heat to medium. Pour in 1 cup of chicken broth and 1 cup of heavy cream. Stir everything well to combine. Bring the mixture to a gentle simmer. Let it thicken slightly for about 3-4 minutes. This will be your creamy sauce. Return the cooked chicken to the skillet. Then, add the drained penne pasta. Stir in ½ cup of grated Parmesan cheese and mix until every piece is coated in the sauce. Taste it, and adjust the seasoning with more salt and pepper if needed. Remove the skillet from heat. Before serving, garnish your dish with chopped parsley. This adds a nice touch. Serve the pasta in wide bowls. For extra flair, sprinkle more Parmesan and a bit of Cajun seasoning on top. Enjoy your creamy Cajun chicken penne! To boost flavor, use fresh spices. Fresh garlic and herbs add bright notes. You can also try smoked paprika for extra depth. A squeeze of lemon juice can lift the dish, too. Always taste your sauce before serving. Adjust salt and pepper to fit your liking. One common mistake is overcooking the pasta. Aim for al dente, as it will finish cooking in the sauce. Another mistake is not letting the sauce thicken. Simmer it well to achieve that creamy texture. Also, don’t skip the Parmesan cheese. It adds richness and ties all the flavors together. For this dish, a large skillet is key. It allows even cooking of the chicken and veggies. A pot for boiling pasta is also important. Use a good-quality knife for chopping. Lastly, a wooden spoon works well for stirring. It helps prevent scratches on your skillet, keeping it in great shape. Pro Tips Perfectly Cooked Pasta: Always cook the penne until al dente for the best texture. It will continue to cook slightly when combined with the sauce. Homemade Cajun Seasoning: For a fresher flavor, consider making your own Cajun seasoning blend with paprika, cayenne, garlic powder, and herbs. Thickening the Sauce: If you want a thicker sauce, let it simmer a bit longer or add a cornstarch slurry (1 tablespoon cornstarch mixed with 1 tablespoon water) to achieve the desired consistency. Flavor Boost with Cheese: Experiment with different cheeses! Adding a bit of cream cheese or smoked Gouda can elevate the flavor profile of your dish. {{image_2}} You can switch up the chicken for other proteins. Shrimp works great in this dish. Just sauté the shrimp until pink and tender. You can also use cooked sausage for a heartier flavor. If you prefer, try turkey breast or even tofu for a leaner option. Each choice brings its own taste and texture, making it fun to experiment. To make this dish vegetarian, skip the chicken and use extra veggies. Mushrooms add a meaty texture. Zucchini and spinach also work well. You can replace chicken broth with vegetable broth for a full flavor. Adding chickpeas can increase protein and make the dish filling. This way, you still enjoy a creamy, flavorful meal without meat. If you need a gluten-free meal, use gluten-free penne pasta. Many brands offer tasty options that hold up well in this dish. Ensure your Cajun seasoning is gluten-free too. You can also use cornstarch to thicken the sauce, if needed. These swaps keep the creamy Cajun chicken penne delicious for everyone. To store your creamy Cajun chicken penne, let it cool first. Then, transfer it to an airtight container. It will stay fresh for about three to four days in the fridge. Make sure to label the container with the date. This helps you keep track of how long it has been stored. When you're ready to enjoy your leftovers, there are a few ways to reheat them. You can use a microwave, stovetop, or oven. If using the microwave, place the pasta in a bowl and cover it with a damp paper towel. Heat it in short bursts, stirring in between, until warm. On the stovetop, add a splash of chicken broth to a skillet, then add the pasta. Stir over medium heat until heated through. If you prefer the oven, preheat it to 350°F (175°C). Place the pasta in a baking dish, cover with foil, and heat for about 15-20 minutes. You can freeze creamy Cajun chicken penne for up to three months. To do this, let the pasta cool completely. Then, portion it into freezer-safe containers or bags. Remove as much air as possible before sealing. When you're ready to eat, thaw it overnight in the fridge. Reheat it using one of the methods above for best results. You can use half-and-half or coconut milk for a lighter option. Both give a nice creaminess. If you need a dairy-free choice, try cashew cream. Just blend soaked cashews with water until smooth. Yes, you can use any pasta type you like. Bowtie, fettuccine, or spaghetti all work well. Just remember to adjust cooking times based on the pasta you choose. Cajun seasoning can vary in heat. Some mixes are mild, while others pack a punch. If you're sensitive to spice, start with a little and taste as you go. You can always add more if you like it hot! To make it dairy-free, replace heavy cream with coconut cream or a nut-based cream. Use a dairy-free cheese for the Parmesan. This keeps the dish creamy and rich without dairy. Some great sides include a green salad or garlic bread. Roasted vegetables also make a nice balance. If you want something light, try a simple cucumber salad to cool the spice. This blog post covered the key ingredients and steps to make creamy Cajun chicken penne. We looked at the main ingredients, seasoning, and garnishing. I shared tips to avoid mistakes and offered variations for protein and dietary needs. As you try this dish, remember that practice makes perfect. Enjoy experimenting with flavors and creating your own twist! Have fun cooking and savoring every bite.

Creamy Cajun Chicken Penne Tasty and Simple Recipe

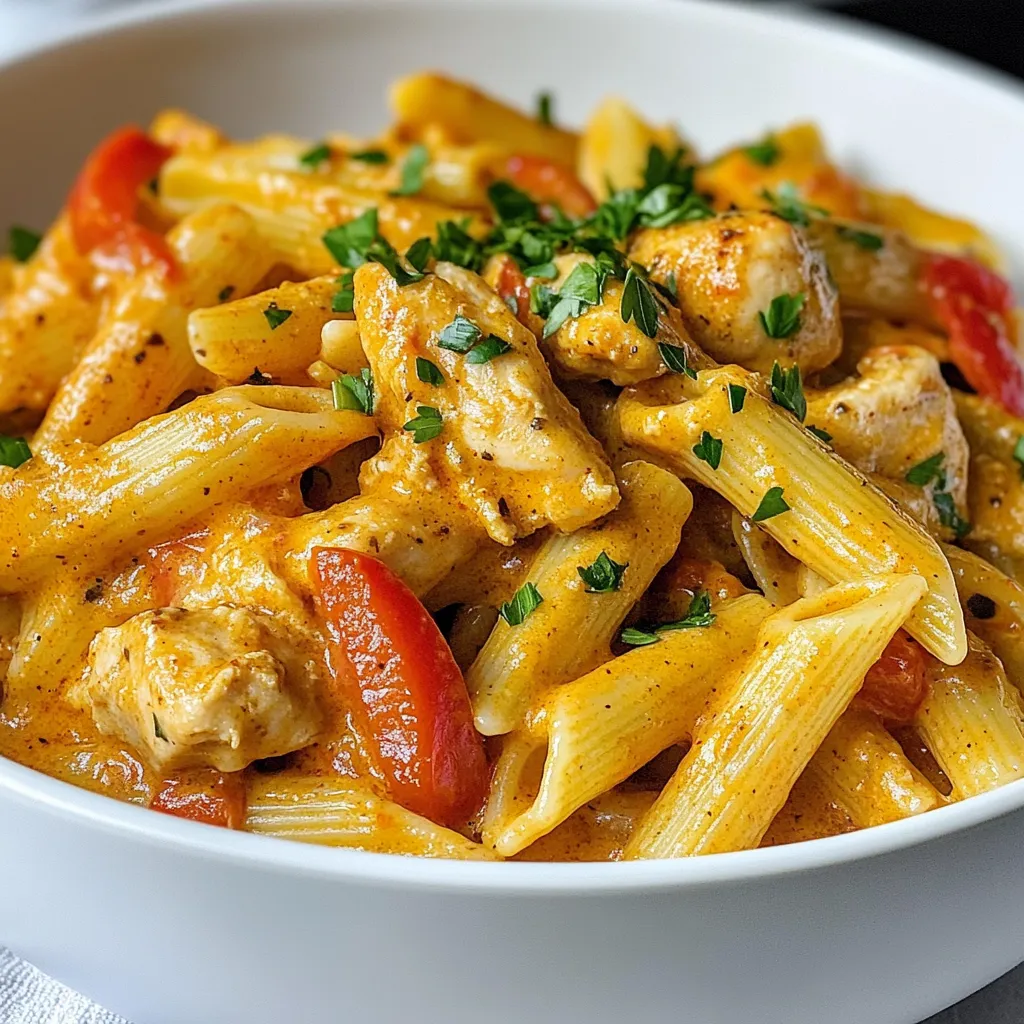
Looking for a dish that’s both quick and full of flavor? My Creamy Cajun Chicken Penne hits the spot. This

- 1 pound chicken breast, cut into 1-inch cubes - 1/4 cup honey - 3 tablespoons lime juice (freshly squeezed) - 2 tablespoons olive oil - 2 cloves garlic, minced - 1 teaspoon ground ginger - 1/2 teaspoon salt - 1/4 teaspoon black pepper - 1 red bell pepper, cut into chunks - 1 green bell pepper, cut into chunks - 1 small red onion, cut into chunks - Fresh cilantro for garnish (optional) - Pineapple chunks for sweetness - Zucchini slices for extra veggies - Chili flakes for a spicy kick Each serving of Honey Lime Chicken Skewers offers: - Calories: 280 - Protein: 25g - Carbohydrates: 20g - Fat: 10g - Fiber: 2g - Sugar: 12g These skewers are not just tasty; they also pack a healthy punch. The chicken provides lean protein, while the veggies add fiber and vitamins. You can mix in optional ingredients to fit your taste and boost nutrition. {{ingredient_image_1}} To start, gather your ingredients for the marinade. You need honey, lime juice, olive oil, garlic, ginger, salt, and pepper. In a medium bowl, whisk together these items. Mix until you see a nice blend of flavors. This marinade will give your chicken a sweet and tangy taste. Next, take your chicken breast and cut it into 1-inch cubes. Add the chicken to the bowl with the marinade. Make sure every piece is well coated. Cover the bowl and place it in the fridge. Let it marinate for at least 30 minutes. If you have time, let it sit for up to 2 hours. This will deepen the flavor and make the chicken tender. While the chicken marinates, soak your bamboo skewers in water. This helps prevent them from burning on the grill. After soaking, preheat your grill to medium-high heat. Now it’s time to assemble your skewers. Thread the marinated chicken onto the skewers, alternating with chunks of red and green bell peppers and red onion. This adds color and flavor. Place the skewers on the grill. Cook for 10 to 12 minutes, turning them often. The chicken is done when it reaches 165°F. When cooked, let them rest for a couple of minutes. For a fresh touch, sprinkle some cilantro on top before serving. Enjoy your flavorful grilling delight! Marinating chicken is key for great flavor. I suggest marinating for at least 30 minutes. If you have time, go for 2 hours. This allows the chicken to soak up all the tasty honey, lime, and spices. Be sure to coat every piece well. Use a bowl that can be covered tightly. This keeps the marinade from spilling. To get those perfect grill marks, heat your grill to medium-high. Place the skewers on the grill at a slight angle. Don’t move them too much. After about 4-5 minutes, give them a quarter turn. This turn will make those beautiful grill marks. Keep an eye on the chicken to make sure it cooks evenly. Safety is important when cooking chicken. Always check the internal temperature. Use a meat thermometer to ensure it reaches 165°F (75°C). This keeps you safe from foodborne illnesses. Also, never place cooked chicken back on the same plate as raw chicken. Clean your utensils and surfaces well to avoid cross-contamination. Enjoy your grilling safely! Pro Tips Marinate Longer for Flavor: For the best flavor, marinate the chicken for at least 2 hours or even overnight. This allows the marinade to penetrate deeper into the meat, enhancing the taste. Use Fresh Ingredients: Always use fresh lime juice and garlic for the marinade. Fresh ingredients elevate the flavor profile and provide a brighter taste compared to bottled alternatives. Check Skewers for Splinters: When using bamboo skewers, inspect them for splinters before use. A smooth skewer will prevent the chicken and vegetables from tearing when threading them on. Let Rest Before Serving: After grilling, let the skewers rest for a few minutes. This allows the juices to redistribute throughout the chicken, resulting in a juicier bite. {{image_2}} You can swap chicken for other proteins. Shrimp works great with this recipe. It cooks fast and absorbs flavors well. You can also use pork or beef. Just adjust cooking times based on the protein you choose. Ground meat like turkey can also work if shaped into patties. For a tasty vegetarian version, use firm tofu. Cut it into cubes like chicken. Marinate it in the same honey lime mix. You can also load skewers with veggies. Bell peppers, zucchini, and mushrooms pair nicely. Grilling brings out their natural sweetness. Soak wooden skewers first to avoid burning. You can change the flavor by using different marinades. Try a teriyaki sauce for a sweet and savory taste. Lemon garlic adds a fresh touch. For a spicy kick, use a chili-lime marinade. Each option opens up new possibilities. Mix and match for fun and unique skewers! To keep your Honey Lime Chicken Skewers fresh, let them cool first. Place the skewers in an airtight container. Store them in your fridge for up to three days. If you want to maintain their flavor, wrap them tightly in plastic wrap before placing them in the container. When it’s time to enjoy your leftovers, use the oven or a skillet. For the oven, preheat it to 350°F. Place the skewers on a baking tray and cover with foil. Heat for about 10-15 minutes, or until warm. If you use a skillet, heat it over medium heat. Cook the skewers for 5-7 minutes, turning them often to heat evenly. If you want to freeze your skewers, do this before cooking. After marinating, thread the chicken and veggies onto the skewers. Wrap each skewer in plastic wrap, then place them in a freezer bag. Make sure to remove as much air as possible. They can stay in the freezer for up to three months. When ready to cook, thaw them in the fridge overnight before grilling. Yes, you can prepare Honey Lime Chicken Skewers in advance. Marinate the chicken cubes and store them in the fridge. You can do this for up to two hours. If you want to save time, marinate the chicken the night before. Just remember to soak your bamboo skewers in water for 30 minutes before grilling. Bamboo skewers work great for grilling. They are easy to find and cheap. Just soak them in water to prevent burning. Metal skewers are another option. They can be reused, and they heat up well. Choose whichever you prefer for your grilling needs. To check if your chicken is done, use a meat thermometer. The internal temperature should reach 165°F (75°C). If you don’t have one, cut the chicken in the thickest part. It should be white and not pink. Juices should run clear, indicating it is fully cooked. You learned how to make tasty Honey Lime Chicken Skewers from scratch. We covered the key ingredients, step-by-step grilling instructions, and helpful tips for great results. Plus, we explored storage options and answered common questions. Making these skewers is fun and easy! You can even try different proteins or flavors. Follow these steps, and enjoy a delicious meal that you can share with family and friends. Happy grilling!

Honey Lime Chicken Skewers Flavorful Grilling Delight

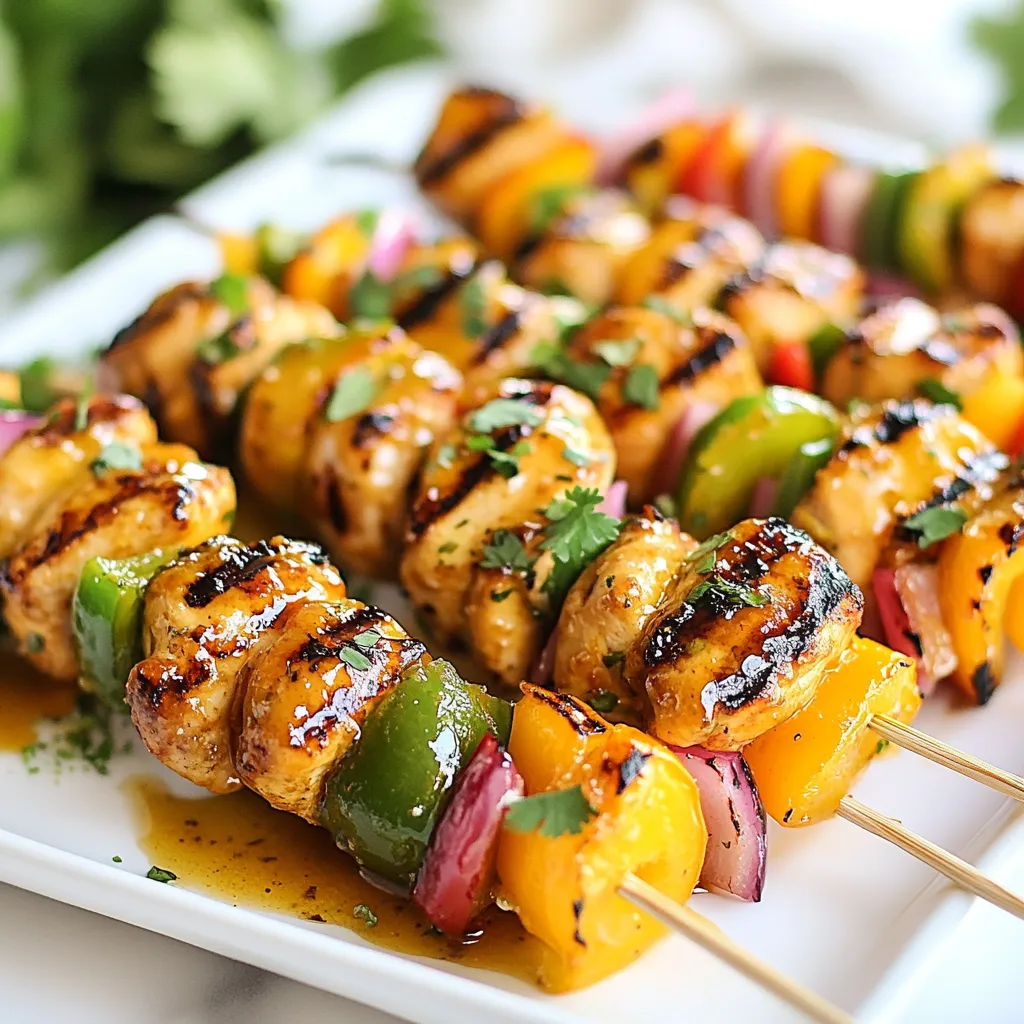
Get ready to fire up your grill with my Honey Lime Chicken Skewers! This simple yet tasty recipe brings sweet

Older posts
Newer posts
← Previous Page1 … Page128 Page129 Page130 … Page132 Next →

dsad

© 2025 pureeatsnow • Built with GeneratePress

Our Policies

  • Copyright Policy
  • Cookie Policy
  • GDPR Policy
  • Privacy Policy
  • Disclaimer
  • Terms Of Use

More Information

  • Home
  • About
  • Contact
  • Appetizers
  • Dessert
  • Dinner
  • Drinks
©2025, pureeatsnow About Back To Top