Skip to content
DisclaimerTerms Of UseGDPR PolicyCookie Policy

pureeatsnow

  • Home
  • Drinks
  • Appetizers
  • Dinner
  • Dessert
  • About
  • Contact
  • Privacy Policy
DisclaimerTerms Of UseGDPR PolicyCookie Policy

Rachel

To make these tasty blueberry streusel muffins, you will need: - 2 cups all-purpose flour - 1 cup fresh blueberries (or frozen, if necessary) - 1 cup granulated sugar - 1/2 cup unsalted butter, melted - 1 cup milk - 2 large eggs - 1 tablespoon baking powder - 1 teaspoon vanilla extract - 1/2 teaspoon salt For the streusel topping, gather: - 1/2 cup all-purpose flour - 1/3 cup brown sugar - 1/4 cup unsalted butter, cold and cubed - 1/2 teaspoon ground cinnamon - A pinch of salt You can add nuts like walnuts or pecans to the batter for crunch. A splash of lemon juice can brighten the flavor. If you want a sweeter muffin, try adding more sugar or a drizzle of honey on top. You can also swap in different fruits, like raspberries or strawberries, for a fun twist. Each muffin has about: - Calories: 200 - Total Fat: 10g - Saturated Fat: 5g - Carbohydrates: 28g - Sugars: 10g - Protein: 3g - Fiber: 1g These muffins are a delightful treat, perfect for breakfast or snacks. They pack a fruity punch while keeping things simple. Enjoying these muffins can also bring a smile to anyone who tries them! {{ingredient_image_1}} First, preheat your oven to 375°F (190°C). This step is key to making sure your muffins rise well. Line a muffin tin with paper liners or grease it with non-stick spray for easy removal. In a small bowl, mix together 1/2 cup flour, 1/3 cup brown sugar, 1/4 cup cold cubed butter, and 1/2 teaspoon cinnamon. Use a fork or pastry cutter to blend until the mix looks crumbly. Set this aside for later. Grab a large bowl and whisk together 1 cup granulated sugar and 1/2 cup melted butter. Keep whisking until it is smooth. Then add in 2 large eggs and 1 teaspoon vanilla extract. Whisk again until everything is well mixed. In another bowl, mix 2 cups flour, 1 tablespoon baking powder, and 1/2 teaspoon salt. Gradually add this dry mix to your wet ingredients. Alternate with 1 cup milk. Stir just until combined; don’t overmix or your muffins may be tough. Gently fold in 1 cup of fresh blueberries. Be careful not to crush them. This will keep your muffins full of juicy berries. Scoop your batter into the prepared muffin tin. Fill each cup about 2/3 full. This gives them room to rise without overflowing. Now, sprinkle the streusel mixture generously over the top of each muffin. This adds a sweet, crunchy layer that everyone loves. Place the muffin tin in the oven. Bake for 18 to 20 minutes. Check if they’re done by inserting a toothpick into the center. If it comes out clean, they are ready. Let the muffins cool in the pan for 5 minutes. Then, transfer them to a wire rack to cool completely. Enjoy the sweet aroma and the tasty muffins you just made! To make the best blueberry streusel muffins, start with fresh ingredients. Use fresh blueberries for the best flavor. If you use frozen berries, do not thaw them. This keeps muffins from becoming too wet. Mix the batter just until combined. Overmixing can make your muffins tough. One mistake is not measuring flour correctly. Too much flour can make muffins dry. Always spoon flour into your measuring cup and level it off. Another common error is skipping the streusel topping. This adds a sweet crunch that makes the muffins special. Enjoy these muffins warm with butter. They pair perfectly with coffee or tea. You can also serve them with a side of fresh fruit. For a fun twist, add a dollop of whipped cream on top. These muffins are great for breakfast or as a snack! Pro Tips Use Fresh Blueberries: Fresh blueberries will provide the best flavor and texture. If using frozen, make sure to fold them in gently to avoid mushiness. Room Temperature Ingredients: Ensure your eggs and milk are at room temperature before mixing. This helps create a smoother batter and contributes to a better rise. Don't Overmix: When combining the wet and dry ingredients, mix until just combined. Overmixing can lead to tough muffins. Customize Your Toppings: Feel free to add nuts or swap the streusel for a lemon glaze for a different flavor profile and added texture. {{image_2}} You can swap blueberries for many fruits. Raspberries, strawberries, or blackberries work well. Each fruit adds its own flavor. For a mix, try combining two or more types. Just remember to adjust the sugar based on the fruit's sweetness. This keeps your muffins balanced and tasty. If you want to try different sweeteners, use honey, maple syrup, or coconut sugar. Honey adds a nice flavor and moisture. Maple syrup gives a warm taste. Coconut sugar is less sweet but works great too. Just replace granulated sugar with the same amount of your choice. Be sure to check how it affects your batter's texture. For gluten-free muffins, choose gluten-free flour blends. These blends often have a mix of rice flour, almond flour, or tapioca starch. Use the same amount as regular flour. Adding a little xanthan gum helps with the texture. This makes your muffins light and fluffy. Enjoy the same delicious taste without gluten! After baking, let your blueberry streusel muffins cool completely. Once cool, place them in an airtight container. This keeps them fresh for up to four days at room temperature. If you live in a humid area, refrigeration may help them last longer. However, this can make them dry. Freezing is a great option if you want to save some muffins for later. Wrap each muffin in plastic wrap. Then, place them in a freezer bag. Make sure to press out as much air as possible. They can stay in the freezer for up to three months. When ready to eat, simply thaw them at room temperature. To reheat your muffins, you can use the microwave or the oven. For the microwave, heat each muffin for 15-20 seconds. This makes them warm and soft. If you prefer the oven, preheat it to 350°F (175°C) and warm the muffins for about 10 minutes. Enjoy them warm for the best taste! Blueberry streusel muffins stay fresh for about three days. Store them in an airtight container at room temperature. If you want them to last longer, refrigerate them for up to a week. For best taste, enjoy them fresh! Yes, you can use frozen blueberries. They work well in this recipe. Just add them straight from the freezer. Do not thaw them first, as they may become mushy. You can use several substitutes for eggs. Here are a few options: - 1/4 cup unsweetened applesauce per egg - 1/4 cup mashed banana per egg - 1 tablespoon ground flaxseed mixed with 2.5 tablespoons water per egg These options help bind your muffins while keeping them moist. Muffins can turn out dense for a few reasons. Common causes include: - Overmixing the batter, which adds too much air and makes them heavy. - Using too much flour, which can happen if you pack it into the cup. - Not using enough leavening agent, like baking powder. To achieve light and fluffy muffins, mix just until combined and measure flour correctly. We covered how to make delicious blueberry streusel muffins from start to finish. You learned about key ingredients and how to mix them right. We also shared tips for the best muffins and ways to customize them. Lastly, I provided storage tips so your treats stay fresh. Enjoy baking muffins that are not just tasty but also fun to share!

Blueberry Streusel Muffins Delicious and Easy Recipe

Looking for a treat that’s both easy and delicious? You’ve hit the jackpot with these Blueberry Streusel Muffins! I’ll show

- 2 boneless, skinless chicken breasts - 4 whole wheat pitas - 1 cup Greek yogurt - 1 tablespoon lemon juice - 1/2 cup feta cheese The main ingredients in this recipe are simple yet full of flavor. Chicken breasts are lean and easy to cook. Whole wheat pitas add a healthy touch. Greek yogurt serves as a creamy base. The lemon juice adds brightness, while feta cheese gives a nice salty kick. - 1 tablespoon olive oil - 2 teaspoons dried oregano - 1 teaspoon garlic powder - Salt and pepper to taste - 1 cup cherry tomatoes, halved - 1 cucumber, diced - 1/2 red onion, thinly sliced Seasonings make the chicken shine. Olive oil helps the spices stick. Dried oregano and garlic powder add classic Greek flavors. Salt and pepper bring everything together. The veggies add color and crunch. Cherry tomatoes, cucumber, and red onion balance the dish well. - 1/4 cup fresh parsley, chopped Fresh parsley rounds out the dish. It adds a pop of green and freshness. You can sprinkle it on top just before serving. This makes the meal even more inviting. Enjoy the mix of flavors in each bite! {{ingredient_image_1}} 1. Preheating the grill or grill pan Start by preheating your grill or grill pan to medium-high heat. This helps cook the chicken evenly and gives it nice grill marks. 2. Marinating the chicken In a small bowl, mix together 1 tablespoon of olive oil, 2 teaspoons of dried oregano, 1 teaspoon of garlic powder, and salt and pepper to taste. Coat the chicken breasts with this marinade and let them sit for about 15 minutes. This adds flavor and keeps the chicken juicy. 1. Grilling the chicken Place the marinated chicken on the hot grill. Cook for about 6-8 minutes on each side. Check that the chicken reaches 165°F inside. Once done, remove it from the grill and let it rest for 5 minutes. 2. Preparing the tzatziki sauce While the chicken rests, make the tzatziki sauce. In a small bowl, mix 1 cup of Greek yogurt, 1 tablespoon of lemon juice, and a pinch of salt. Stir well and set it aside. This creamy sauce adds cool flavor to the pitas. 1. Slicing the chicken After resting, slice the grilled chicken into thin strips. This makes it easier to fill the pitas. 2. Filling the pitas with ingredients Warm the pitas on the grill for 1-2 minutes. Open each pita pocket and stuff it with sliced chicken, halved cherry tomatoes, diced cucumber, thinly sliced red onion, a drizzle of tzatziki sauce, crumbled feta cheese, and chopped parsley. Serve them right away for a fresh and tasty meal. To ensure the chicken is cooked properly, use a meat thermometer. The ideal internal temperature is 165°F (75°C). Insert the thermometer into the thickest part of the chicken. This helps avoid dry chicken and keeps it juicy. For the best grill marks, preheat your grill or grill pan. A hot grill creates nice sear lines. After placing the chicken on the grill, avoid moving it for at least three minutes. Then, flip it to get those perfect lines. To enhance your tzatziki sauce, add minced garlic or fresh dill. Garlic adds a nice kick, while dill gives a fresh flavor. Both options can elevate your dish. If you want a different taste, try Greek yogurt alternatives. You can use plain yogurt or even sour cream. Each option gives a unique flavor to the sauce. Pair your Greek Chicken Stuffed Pitas with a fresh salad. A simple cucumber and tomato salad works great. You can also serve it with roasted veggies for a hearty side. For drinks, I recommend a light white wine or sparkling water with lemon. These beverages complement the flavors and keep your meal refreshing. Pro Tips Marinate for Flavor: Allow the chicken to marinate for at least 30 minutes for a deeper flavor infusion. Perfectly Grilled Chicken: Use a meat thermometer to ensure your chicken is cooked to the perfect internal temperature of 165°F (75°C). Fresh Ingredients: Use ripe, in-season tomatoes and cucumbers for the best flavor and texture in your stuffed pitas. Customize Your Toppings: Feel free to add other toppings like olives, bell peppers, or avocado for a personalized twist on this recipe. {{image_2}} You can switch the chicken for turkey or tofu. Turkey has a mild taste and cooks well on the grill. Tofu is a great choice for those wanting a plant-based option. Just press and marinate it like chicken. You can grill or bake both options. Grilling adds nice char and flavor. Baking is easy and keeps the meat juicy. For a vegetarian twist, use grilled vegetables and halloumi. Zucchini, bell peppers, and eggplant work great. Halloumi adds a salty, creamy taste. You can also try different dressings or sauces. Tahini or spicy yogurt can make the dish exciting. These alternatives keep the meal fresh and tasty. Want a kick? Add jalapeños or use spicy yogurt. You can slice jalapeños and mix them in. Spicy yogurt can be made by mixing plain yogurt with spices. Don't forget to experiment with herbs, too. Fresh dill or mint can elevate the flavors. These adjustments make your stuffed pitas unique and fun. To store leftovers in the fridge, place the stuffed pitas in an airtight container. Make sure they cool down first. Store them for up to three days. For best results, eat them within two days. When reheating, take out the filling. Warm the pitas separately in a pan or microwave. This keeps them soft. Heat the filling in the microwave or on the stove until hot. This method helps keep the flavors fresh. Freezing stuffed pitas is easy. Wrap each pita tightly in plastic wrap. Then, place them in a freezer bag. They can last up to three months in the freezer. When you want to eat them, take the pitas out and let them thaw overnight in the fridge. Reheat them in the oven or skillet for the best texture. Avoid the microwave, as it can make them soggy. The chicken and pitas will last in the fridge for about three days. After that, they may spoil. Watch for signs like a bad smell or a change in color. If the chicken looks slimy or the pitas feel hard, it’s time to throw them out. Always use your best judgment to ensure food safety. To keep your chicken juicy, marinate it well. I use a mix of olive oil, oregano, garlic powder, salt, and pepper. Let the chicken sit in the marinade for 15 minutes. This helps the flavors soak in. When grilling, cook it at medium-high heat for 6-8 minutes on each side. Check that the internal temperature hits 165°F (75°C). After grilling, let the chicken rest for 5 minutes. This step allows the juices to settle, making each bite tender. Yes, you can prepare Greek Chicken Stuffed Pitas ahead of time. Cook the chicken and let it cool before storing it in the fridge. You can also make the tzatziki sauce the day before. Store it in an airtight container. For the pitas, keep them separate until you’re ready to serve. This way, they won’t get soggy. When it's time to eat, warm the pitas and assemble your meal. Greek Chicken Stuffed Pitas pair well with many side dishes. Consider a fresh Greek salad with cucumbers, tomatoes, and olives. You could also serve roasted vegetables, like zucchini and bell peppers, for added flavor. For a nice crunch, try serving with potato wedges or oven-baked fries. A light lemon or herb dressing can brighten up the meal, making it even more enjoyable. In this article, we explored the key ingredients for Greek chicken stuffed pitas, like chicken and whole wheat pitas. We also covered cooking steps, seasoning tips, and tasty variations. By trying these recipes and tips, you can create a delicious meal that suits your taste. Keep it simple, enjoy the process, and share the flavors with family and friends. Happy cooking!

Greek Chicken Stuffed Pitas Flavorful and Easy Meal

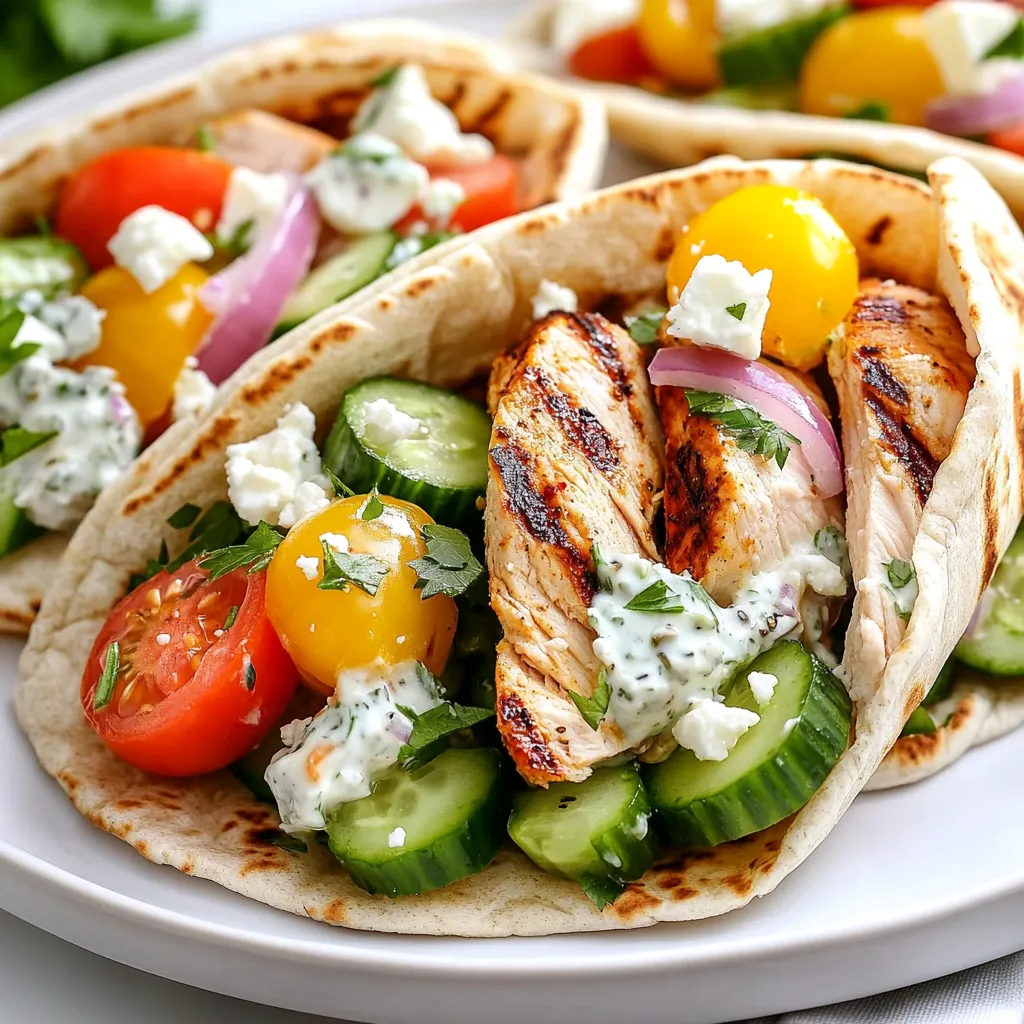
Looking for a quick and tasty meal? Greek Chicken Stuffed Pitas are your answer! With juicy chicken, fresh veggies, and

For this dish, you need 4 boneless, skinless chicken breasts. These are lean and cook quickly. They soak up the herb flavors well. You can also use other chicken parts if you prefer. Just adjust the cooking time as needed. You will use 1 pound of baby potatoes, halved. Baby potatoes are perfect because they cook evenly. Their creamy texture pairs well with the chicken. You can use regular potatoes, but cut them into smaller pieces to match the cook time. The magic comes from the herbs and seasonings. You need: - 6 garlic cloves, minced - 2 tablespoons fresh rosemary, chopped - 2 tablespoons fresh thyme, chopped - 1 teaspoon paprika - Salt and pepper to taste These add flavor that makes each bite special. Fresh herbs bring brightness that dried herbs can’t match. The garlic gives a nice punch, while paprika adds warmth. For a touch of color, consider garnishing with fresh parsley. You can also add lemon slices on top of the chicken. They add a bright, zesty flavor. Just remember, garnishes are not necessary but they do make the dish pop! {{ingredient_image_1}} First, set your oven to 400°F (200°C). This step warms it up for baking. Next, gather your ingredients. You will need chicken, potatoes, olive oil, garlic, herbs, and spices. It helps to have everything ready before you start cooking. Take 1 pound of baby potatoes and cut them in half. This way, they cook faster. In a big bowl, add the halved potatoes, 2 tablespoons of olive oil, half of the minced garlic, salt, and pepper. Toss the potatoes well so they are all coated. Spread them out in a single layer on a large baking sheet. This helps them cook evenly. In the same bowl, add 4 boneless, skinless chicken breasts. Drizzle the remaining 2 tablespoons of olive oil over them. Add the rest of the minced garlic, chopped rosemary, thyme, paprika, salt, and pepper. Rub this mixture all over the chicken. Make sure it is well coated for great flavor. Place the seasoned chicken on the baking sheet next to the potatoes. Arrange lemon slices on top of both the chicken and potatoes. This adds a nice zing. Bake everything in the preheated oven for 25 to 30 minutes. Check if the chicken is fully cooked and the potatoes are tender. After baking, you can broil for 2 to 3 minutes for a crispy finish. Remove the baking sheet from the oven. Let the dish rest for 5 minutes. This helps the juices settle. Garnish with fresh parsley before serving. Enjoy your meal with a side salad or steamed veggies for a complete dinner! To get juicy chicken, use a meat thermometer. Aim for 165°F (74°C) in the thickest part. This ensures your chicken cooks just right. Let the chicken rest for five minutes after baking. This helps keep it moist and tender. Feel free to change the herbs to suit your taste. If you like it spicy, add red pepper flakes. For a different twist, try using lemon zest in place of lemon slices. You can also swap fresh herbs for dried ones. Just use less, as dried herbs pack more flavor. For crispy potatoes, cut them smaller. This allows them to cook faster and get crispier. Toss them in olive oil and seasonings well. Spread them out evenly on the baking sheet. This prevents steaming and helps them brown nicely. If you want extra crunch, broil them for a few minutes at the end. Pro Tips Use Fresh Herbs: Fresh herbs like rosemary and thyme enhance the flavor significantly compared to dried ones. Always try to use fresh when possible for the best results. Check Chicken Temperature: To ensure your chicken is perfectly cooked, use a meat thermometer. The internal temperature should reach 165°F (75°C). Potato Size Matters: Halving baby potatoes ensures they cook evenly and absorb the flavors from the chicken and herbs better. Let It Rest: Allowing the chicken to rest for a few minutes after baking helps retain its juices, resulting in a more tender and juicy bite. {{image_2}} You can switch herbs based on your taste. If you lack rosemary or thyme, try basil or oregano. Both add a fresh flavor to the chicken. Use about 2 tablespoons of either. Dried herbs work too. Use 1 tablespoon of dried herbs instead of fresh. You can add more veggies to the dish. Carrots and bell peppers work great. Just chop them into bite-sized pieces. Toss them with the potatoes for extra color and flavor. Broccoli or green beans can also add a healthy crunch. You can cook this meal in different ways. Grilling gives a smoky flavor. Just marinate the chicken and veggies before grilling. Slow-cooking makes everything tender. Place all ingredients in a slow cooker and cook on low for 6-8 hours. Both methods keep the dish tasty and fun. You can store leftover Garlic Herb Chicken and Potatoes in the fridge. Place the chicken and potatoes in an airtight container. This keeps them fresh for up to three days. Make sure to let them cool before sealing. Label the container with the date. This helps you remember when you made it. Freezing is a great option if you want to save your meal for later. First, let the dish cool completely. Then, use a freezer-safe container or bag. Remove as much air as possible to prevent freezer burn. You can freeze the chicken and potatoes for up to three months. When ready to eat, thaw it in the fridge overnight. To reheat, use the oven for best results. Preheat your oven to 350°F (175°C). Place the chicken and potatoes in a baking dish. Cover with foil to keep them moist. Heat for about 20 minutes, or until warmed through. You can also use a microwave for quicker reheating. Just cover the dish and heat in short bursts, stirring in between. This helps avoid hot spots. Yes, you can use bone-in chicken. The cooking time will change. Bone-in chicken takes longer to cook than boneless. Make sure to check the internal temperature. It should reach 165°F (74°C) to be safe to eat. Adjust the baking time to about 35-45 minutes. This dish goes well with many sides. Try a simple green salad or steamed veggies. Roasted carrots or green beans add color and flavor. You can also serve it with rice or quinoa for a fuller meal. These sides balance the garlic and herbs nicely. Check the thickest part of the chicken. Use a meat thermometer for the best results. The chicken is safe to eat when it reaches 165°F (74°C). If you don’t have a thermometer, cut into the chicken. The meat should be white, not pink. Yes, this recipe is great for meal prep. You can cook a batch and store it in the fridge. Divide the chicken and potatoes into containers. They keep well for up to four days. This makes it easy to grab a healthy meal during the week. This blog post covered how to make delicious garlic herb chicken and potatoes. You learned about the key ingredients, from chicken and potatoes to herbs and seasonings. I shared easy step-by-step instructions to prep, cook, and serve. You also found tips for perfect chicken and ways to mix it up. Remember, storing leftovers well keeps them fresh for later. With these insights, you can create a tasty meal your family will love. Enjoy cooking and make this recipe your own!

Garlic Herb Chicken and Potatoes Simple Dinner Idea

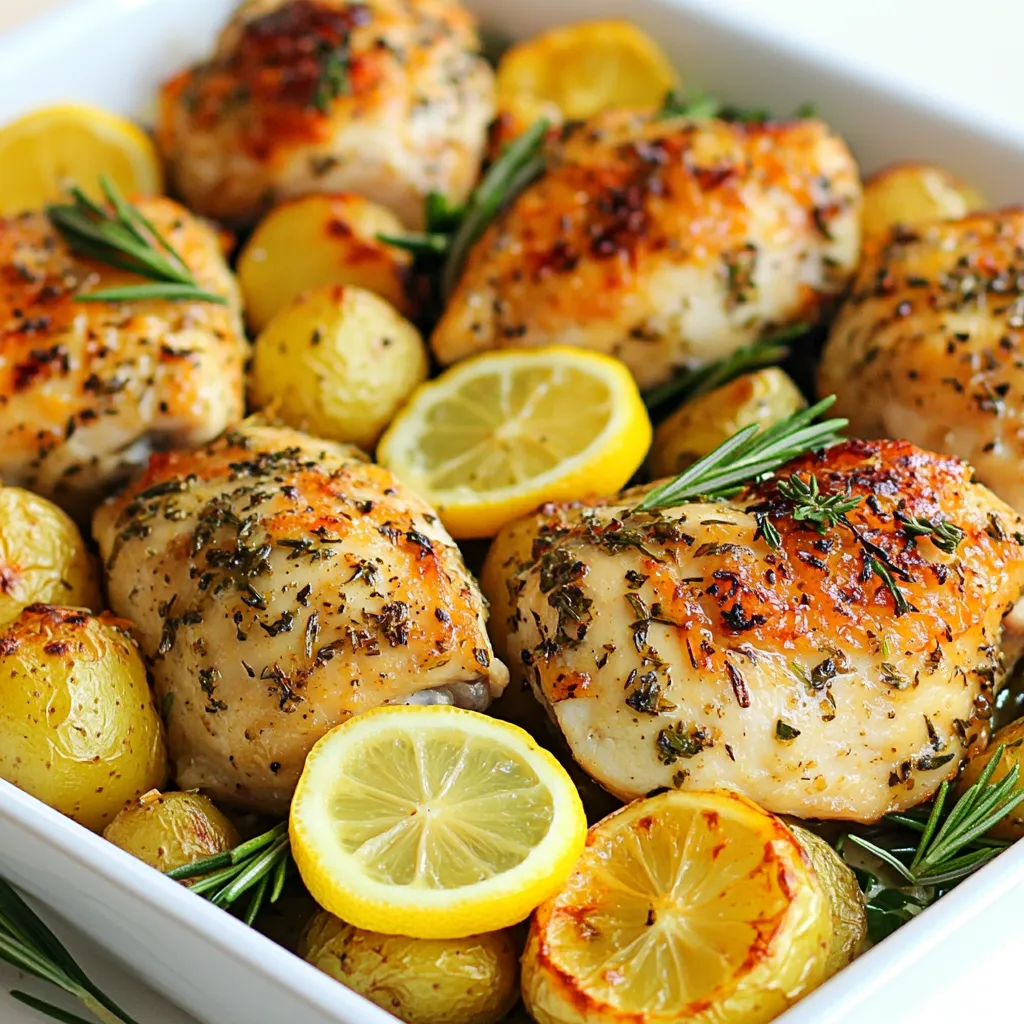
Looking for a quick, delicious dinner idea? Garlic Herb Chicken and Potatoes is your answer! This simple dish combines tender

- 1.5 pounds Brussels sprouts, trimmed and halved - 4 tablespoons olive oil - 1 cup grated Parmesan cheese Brussels sprouts are the star of this dish. I always choose fresh ones. Their natural sweetness shines when roasted. The rich flavor of Parmesan adds a nice touch. - 1 teaspoon garlic powder - 1 teaspoon onion powder - Salt and pepper to taste I use garlic powder and onion powder for depth. They bring out the best in Brussels sprouts. Just a pinch of salt and pepper makes it all pop. Feel free to adjust these seasonings based on your taste. - 1 tablespoon balsamic glaze (for drizzling) - Fresh parsley, chopped (for garnish) A drizzle of balsamic glaze adds a tangy kick. It contrasts well with the cheese. Fresh parsley makes everything look bright. These simple garnishes elevate your dish. {{ingredient_image_1}} - Preheat your oven to 400°F (200°C). - In a large bowl, combine 1.5 pounds of trimmed and halved Brussels sprouts with 4 tablespoons of olive oil, 1 teaspoon of garlic powder, 1 teaspoon of onion powder, salt, and pepper to taste. Toss the mixture until the Brussels sprouts are evenly coated. This step ensures that each sprout gets great flavor. - Spread the seasoned Brussels sprouts on a baking sheet lined with parchment paper. Make sure they are in a single layer. This helps them roast evenly. - Roast the sprouts in the preheated oven for 20 minutes. This initial roasting allows the sprouts to soften and develop a nice color. - After 20 minutes, take the baking sheet out of the oven. Sprinkle 1 cup of grated Parmesan cheese over the Brussels sprouts. This cheese adds a rich, savory taste. - Return the baking sheet to the oven and roast for an additional 10-15 minutes. Watch for the cheese to turn golden and crispy, while the Brussels sprouts become tender. - Once done, drizzle 1 tablespoon of balsamic glaze over the top and garnish with fresh chopped parsley. This adds a lovely finish and a splash of color. Enjoy your flavorful side dish hot! - Use fresh Brussels sprouts for the best taste. Look for bright green and firm sprouts. - Adjust seasonings based on your taste. Add more garlic or onion powder if you like. - For crispy cheese, make sure to sprinkle Parmesan evenly over the sprouts. - Spread the Brussels sprouts in a single layer. This helps them roast evenly and stay crisp. - Pair these sprouts with roasted chicken or steak for a great meal. - For presentation, serve in a colorful bowl. You can also sprinkle fresh parsley on top for a pop of color. Pro Tips Freshness Matters: Choose Brussels sprouts that are firm and bright green for the best flavor and texture. Even Cooking: Make sure to cut the Brussels sprouts in half to ensure they cook evenly and get nicely caramelized. Cheese Variation: Experiment with different cheeses like Pecorino Romano or a mix of cheeses for a unique flavor twist. Perfect Drizzle: Allow the balsamic glaze to come to room temperature for better drizzling and enhanced flavor. {{image_2}} You can try other cheeses besides Parmesan. Pecorino Romano adds a nice salty kick. Grana Padano works well too, with a milder taste. Mixing cheeses can boost flavor. Try adding mozzarella for creaminess or cheddar for sharpness. Combining these cheeses gives your dish depth and richness. Herbs and spices can elevate your Brussels sprouts. Consider adding thyme or rosemary for an earthy taste. A sprinkle of red pepper flakes adds a pleasant heat. For crunch, mix in nuts like walnuts or pecans. You can also add crispy bacon bits for a savory touch. These add-ins make each bite exciting. For a vegetarian version, use nutritional yeast instead of Parmesan. It gives a cheesy flavor without dairy. If you want a vegan option, skip the cheese entirely. Enhance the taste with lemon juice or balsamic vinegar. Both add brightness and flavor, making the dish tasty. To store leftovers properly, let the Brussels sprouts cool down. Place them in an airtight container. They will stay fresh for about 3 to 4 days in the refrigerator. Before serving again, check for any off smells or changes in texture. You can freeze roasted Brussels sprouts if you want to save them for later. First, allow them to cool completely. Spread them on a baking sheet and freeze for about an hour. Then, transfer the sprouts to a freezer bag. They can last up to 3 months in the freezer. When you’re ready to eat them, just thaw in the fridge overnight before reheating. Oven reheating is best to keep the sprouts crispy. Preheat your oven to 375°F (190°C) and place the sprouts on a baking sheet. Heat for about 10-15 minutes. This method helps the cheese stay crunchy. If you use a microwave, the sprouts may become soggy. If you must use a microwave, heat for a short time and serve immediately. Yes, you can use frozen Brussels sprouts. However, the texture will change. Frozen sprouts often become mushy. They also need longer cooking time. To use frozen sprouts, thaw them first. Pat them dry to remove excess moisture. This way, they will roast better and get crispy. If your Brussels sprouts taste bitter, try a few tricks. First, cut off the ends or outer leaves. This can help lessen the bitterness. You can also soak them in water with salt for 30 minutes. This step can draw out some bitterness. When cooking, add a little more olive oil and seasonings. This can help balance their flavor too. Good news! The ingredients in this recipe are gluten-free. Olive oil, garlic powder, and Parmesan cheese are all safe choices. If you want to switch the cheese, look for gluten-free options. Always check labels to be sure. You can also use nutritional yeast for a cheesy flavor without gluten. In this post, we explored the wonderful world of roasted Brussels sprouts. We covered the main ingredients, seasonings, and optional garnishes to make this dish shine. I shared step-by-step cooking instructions to achieve crispy sprouts with flavorful cheese. We discussed tips for perfect texture, serving suggestions, and even variations for different dietary needs. Remember, fresh ingredients and proper storage make all the difference. Enjoy experimenting with flavors, and elevate your meals with this simple, tasty side!

Parmesan Roasted Brussels Sprouts Flavorful Side Dish

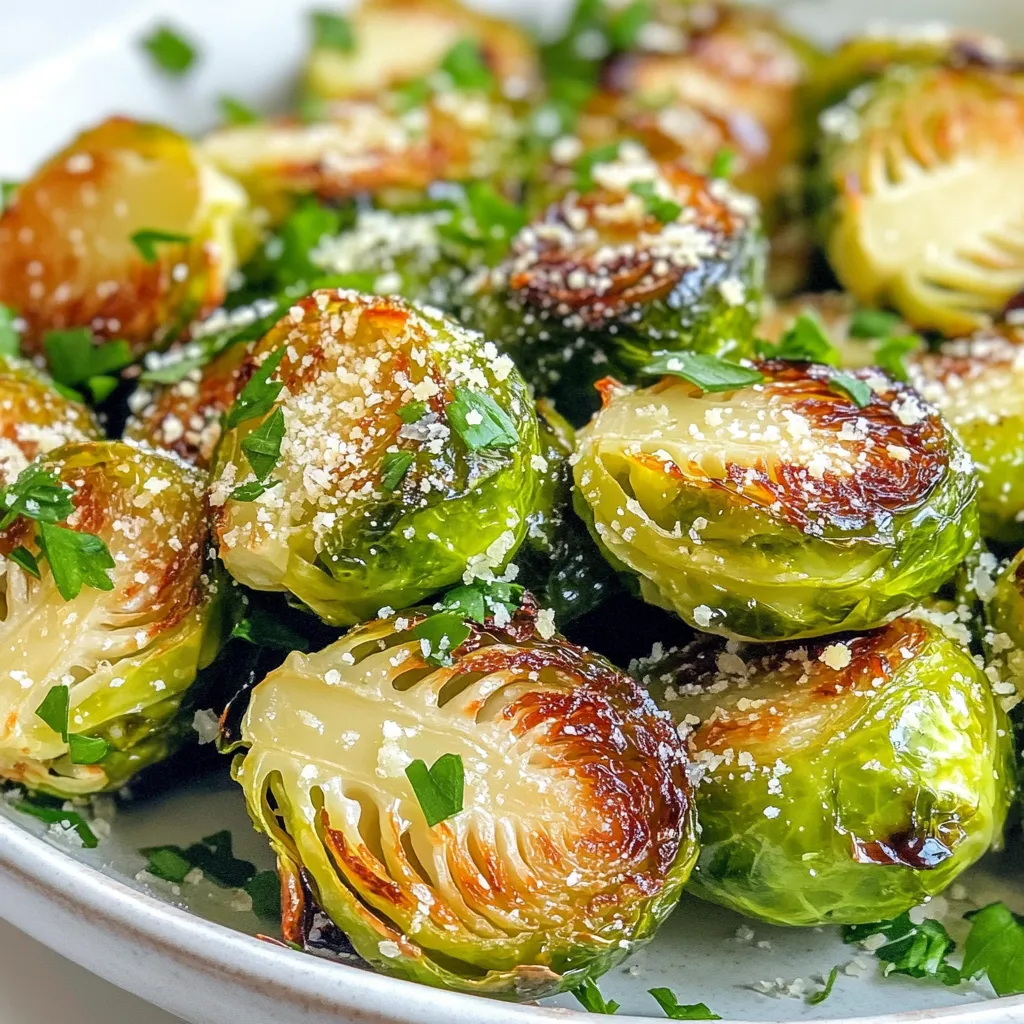
Craving a tasty and healthy side dish? Look no further than Parmesan roasted Brussels sprouts! This recipe combines fresh sprouts,

- 12 oz cheese tortellini (fresh or frozen) - 1 cup cherry tomatoes, halved - 1 cup fresh spinach, chopped - ½ cup cooked and chopped grilled chicken (optional) - 1 cup basil pesto (store-bought or homemade) - ½ cup cream cheese, softened - ¼ cup plain Greek yogurt - 2 tablespoons fresh lemon juice - Salt and pepper to taste The key to this dish is the tortellini. I love using cheese tortellini for its rich flavor. You can choose fresh or frozen; both work well. The cherry tomatoes add a nice burst of sweetness. Fresh spinach makes the salad bright and healthy. If you want protein, grilled chicken is a great choice. - ¼ cup pine nuts, toasted (for garnish) - Fresh basil leaves for garnish Adding pine nuts gives a nice crunch. They also bring a lovely nutty taste. Fresh basil leaves can boost the basil flavor in the dish. You can also consider adding roasted red peppers or olives for extra zest. - Toasted pine nuts - Fresh basil leaves These garnishes make your salad look beautiful and add texture. Just sprinkle them on top right before serving. The pine nuts offer a delightful crunch, while the basil leaves add a pop of color and freshness. This simple touch elevates your salad's visual appeal and flavor. {{ingredient_image_1}} Start by boiling water in a large pot. Add a pinch of salt to the water. Once it boils, add 12 oz of cheese tortellini. Cook it according to the package instructions until it is tender but still firm. This should take about 3 to 5 minutes. After cooking, drain the tortellini and rinse it under cold water. This stops the cooking and keeps it from getting mushy. Set the tortellini aside in a bowl. In a medium bowl, mix 1 cup of basil pesto with ½ cup of softened cream cheese. Add ¼ cup of plain Greek yogurt and 2 tablespoons of fresh lemon juice. Whisk these ingredients together until they form a smooth, creamy dressing. This dressing adds rich flavor and a nice texture to your salad. In a large mixing bowl, combine the cooked tortellini, 1 cup of halved cherry tomatoes, and 1 cup of chopped fresh spinach. If you want extra protein, add ½ cup of cooked and chopped grilled chicken. Pour the creamy pesto dressing over the top. Gently toss all the ingredients until the tortellini and veggies are well coated. Taste and add salt and pepper as needed. For the best flavor, let the salad chill in the fridge for at least 30 minutes. Before serving, sprinkle ¼ cup of toasted pine nuts and fresh basil leaves on top for a nice crunch. To get great flavor, use fresh ingredients. Fresh spinach and ripe cherry tomatoes shine in this dish. If you can, try homemade pesto for a richer taste. The lemon juice adds a nice zing. It helps balance the creaminess of the dressing. Always taste your salad before serving. Adjust the salt and pepper to your liking. Cook the tortellini in salted water. This adds flavor right from the start. Follow the package instructions for timing. You want them al dente, which means firm but not hard. After cooking, drain and rinse them under cold water. This stops the cooking and keeps them from getting mushy. Let the salad chill in the fridge for at least 30 minutes. This waiting time allows the flavors to mix well. If you can chill it longer, even better! Chilling enhances the taste and gives you a refreshing dish. Just before serving, add the toasted pine nuts and fresh basil. This keeps them crunchy and bright. Pro Tips Use Fresh Ingredients: For the best flavor, opt for fresh cherry tomatoes and spinach. They will enhance the overall taste of your salad. Customize Your Protein: Feel free to substitute grilled chicken with other proteins such as shrimp or tofu for a different twist. Make Ahead: This salad can be prepared a day in advance. Just keep the toppings separate until serving to maintain their crunch. Experiment with Flavors: Try adding other vegetables like bell peppers or olives for added texture and flavor variations in your salad. {{image_2}} You can easily enhance your creamy pesto tortellini salad by adding proteins. Grilled chicken is a great choice. It adds flavor and makes the dish more filling. You can also use shrimp or diced ham. These options add texture and taste. For a lighter meal, try adding shredded rotisserie chicken. It saves time while boosting flavor. Mix and match proteins to suit your taste. This salad can easily be made vegetarian or vegan. To make it vegetarian, simply skip the chicken. You can add more veggies, like bell peppers or zucchini. For a vegan version, replace the cream cheese and Greek yogurt with tofu or avocado. Use a vegan pesto, too. This keeps the creamy texture while being plant-based. You won't miss the dairy at all! If you're feeling creative, switch up the dressing. Instead of creamy pesto, try a vinaigrette. A lemon or balsamic vinaigrette adds a refreshing twist. You can also experiment with flavored oils. Garlic-infused olive oil adds a nice kick. For a spicy touch, mix in some red pepper flakes. Play with herbs like dill or parsley for new flavors. Each twist keeps the dish exciting and fresh! To keep your creamy pesto tortellini salad fresh, store it in an airtight container. This helps lock in flavors and moisture. Make sure the salad is cool before sealing it. If you have extra pine nuts or basil, store them separately. This keeps them crunchy and bright. Your salad will stay good in the fridge for about 3 days. After that, the freshness may fade. Always check for any off smells or changes in texture before eating. If it looks or smells funny, it’s best to toss it out. You can freeze this salad, but it may change a bit. The tortellini will become softer after thawing. For best results, freeze the salad without the dressing. You can mix in the creamy pesto dressing once you thaw it. Store it in a freezer-safe container for up to 3 months. Yes, you can use frozen tortellini. Just cook it as directed on the package. Frozen tortellini tastes great in this salad. It saves you time too. You can use ricotta cheese or sour cream instead of cream cheese. Both give a nice creamy texture. Greek yogurt is also a good option for a lighter choice. To make homemade pesto, blend fresh basil, garlic, pine nuts, Parmesan cheese, and olive oil. You can adjust the ingredients to taste. A little lemon juice adds a nice zing. This salad is not gluten-free if you use regular tortellini. Look for gluten-free tortellini at the store. Many brands offer tasty gluten-free options. Yes, you can make this salad ahead of time. Just chill it in the fridge for about 30 minutes. This helps the flavors blend well together. To make a creamy pesto tortellini salad, gather your main and optional ingredients. Follow the step-by-step guide for cooking, dressing, and combining. Use tips to enhance flavor and ensure perfect tortellini. Explore variations with proteins and different dressings. Proper storage keeps leftovers fresh. With this simple recipe, you can enjoy a tasty dish anytime. Try it out and enjoy the creamy goodness!

Creamy Pesto Tortellini Salad Fresh and Flavorful Dish

Welcome to a fresh and flavorful journey with my Creamy Pesto Tortellini Salad! This easy dish is perfect for busy

- 1 ½ cups warm water (110°F to 115°F) - 2 tablespoons granulated sugar - 1 packet (2 ¼ teaspoons) active dry yeast - 4 cups all-purpose flour - ¾ teaspoon salt - ½ cup baking soda (for boiling) - ½ cup unsalted butter, melted - ½ cup granulated sugar (for coating) - 2 teaspoons ground cinnamon These ingredients come together to create soft, fluffy bites. The warm water helps activate the yeast, which makes the dough rise. The granulated sugar adds sweetness and helps with browning. The all-purpose flour gives structure, while salt enhances flavor. The baking soda plays a key role when boiling the pretzel bites. It gives them that classic pretzel texture. Unsalted butter adds rich flavor and a nice glaze. For the final touch, the cinnamon sugar coating makes these bites irresistible. Mix the sugar with cinnamon for a sweet finish that pairs well with the warm pretzels. {{ingredient_image_1}} 1. Start by mixing 1 ½ cups of warm water with 2 tablespoons of granulated sugar in a large bowl. You want the water to be between 110°F and 115°F. This range helps activate the yeast. 2. Sprinkle 1 packet of active dry yeast over the water and sugar mixture. Let it sit for about 5 minutes. You will see it become frothy. This means your yeast is alive and ready. 1. Now, add 4 cups of all-purpose flour and ¾ teaspoon of salt to your yeast mixture. Stir until a dough starts to form. 2. Transfer the dough to a floured surface. Knead it with your hands for about 5 minutes. You need it to feel smooth and elastic. 1. Place your kneaded dough in a greased bowl. Cover it with a clean kitchen towel. Let it rise in a warm place for about 1 hour. It should double in size. 2. After it rises, punch the dough down and turn it out onto a floured surface. Divide it into small pieces, about 1 inch each. Roll each piece into a small ball. 3. In a large pot, bring about 10 cups of water to a boil. Add ½ cup of baking soda to the boiling water. Carefully drop your pretzel bites into the water. Boil them for about 30 seconds on each side. Use a slotted spoon to transfer them back to the parchment-lined baking sheet. 1. Preheat your oven to 425°F (220°C). 2. Brush the boiled pretzel bites with ½ cup of melted unsalted butter. Then, sprinkle them with your cinnamon sugar mix. Combine ½ cup of granulated sugar with 2 teaspoons of ground cinnamon in a small bowl. 3. Bake the pretzel bites in the preheated oven for 12-15 minutes. They should turn golden brown. 4. Let them cool slightly before serving. Enjoy these warm, fluffy treats! To make great pretzel bites, the dough must be just right. Aim for a smooth, elastic texture. If the dough is too sticky, add a bit more flour. You want it to hold its shape but not be dry. Knead your dough for about five minutes. Use a floured surface and push the dough with your palms. Fold it over, then push again. This builds strength in the dough. Boiling your pretzel bites is key to their flavor and texture. The baking soda adds a nice golden color. It also gives that classic pretzel taste. Bring about 10 cups of water to a boil and add ½ cup of baking soda. Drop the pretzel bites in for 30 seconds on each side. This step helps them puff up nicely when baking. These treats are great on their own, but dips can enhance the fun! Pair them with cream cheese or warm chocolate sauce. You can also serve them with a side of caramel sauce for a sweet twist. Try adding a sprinkle of sea salt for a salty-sweet treat. Enjoy experimenting with your favorite flavors! Pro Tips Use the Right Temperature: Make sure your water is between 110°F to 115°F to activate the yeast properly without killing it. Knead Thoroughly: Knead the dough for at least 5 minutes until it is smooth and elastic, which helps develop the gluten for a better texture. Boiling is Key: Don’t skip the boiling step! The baking soda bath gives the pretzel bites their signature flavor and chewy texture. Keep an Eye on Baking Time: Watch your pretzel bites closely as they bake; ovens can vary and you want them to be golden brown but not overdone. {{image_2}} You can make your cinnamon sugar pretzel bites even more fun! Try a chocolate or Nutella dipping sauce. This adds a rich taste that pairs well with the sweetness. Just melt the chocolate or use Nutella straight from the jar. You can also add toppings like sea salt. The salt balances the sweet flavor and brings out the cinnamon. Just sprinkle a pinch on top after baking for a tasty twist. Pretzel bites are great, but you can try different shapes too! You can make pretzel knots for a fun look. Just twist the dough into knots before boiling. Mini pretzel shapes are also a hit. Use smaller pieces of dough to form tiny pretzels. They are perfect for kids or as a snack for parties. If you need a gluten-free option, you can use different flours. Almond flour or a gluten-free blend works well. Just remember to check the package for the right amount. Follow the same steps, and you'll still enjoy these tasty bites! To keep your cinnamon sugar pretzel bites fresh, follow these tips: - Let them cool completely before storing. - Place them in an airtight container. - Keep the container in the fridge for up to four days. This helps maintain their soft texture and sweet flavor. When it’s time to enjoy leftovers, reheating is key. Here are the best methods: - Use an oven preheated to 350°F (175°C). - Place pretzel bites on a baking sheet. - Bake for about 5-7 minutes until warm. This method keeps them crisp and avoids sogginess. You can also use a microwave, but limit the time to 10-15 seconds. This prevents them from getting too soft. Enjoy your snack with a warm, fresh taste! Homemade cinnamon sugar pretzel bites can last about 2 to 3 days at room temperature. To keep them fresh, store them in an airtight container. This helps prevent them from drying out. If you notice them getting hard, you can warm them briefly in the oven. Just heat them at 350°F for a few minutes to soften. Yes, you can freeze cinnamon sugar pretzel bites! First, let them cool completely. Then, place them in a single layer on a baking sheet and freeze for about an hour. After that, transfer them to a freezer-safe bag or container. They can last up to 3 months in the freezer. To thaw, just take them out and let them sit at room temperature for about 30 minutes. You can also warm them in the oven for a few minutes. If you don’t have yeast, you can use baking powder as a quick alternative. Use about 2 teaspoons of baking powder for every packet of yeast. Mix it into the dry ingredients. Keep in mind that the texture might change a bit. The bites will be softer, but they will still taste great! Absolutely! Cinnamon sugar pretzel bites are perfect for kids. They are fun to eat and not too hard to make. Just watch out for the hot water when boiling. You can also serve them with dipping sauces like chocolate or cream cheese frosting. Kids will love these tasty treats! You learned how to make tasty cinnamon sugar pretzel bites. We covered each step, from mixing warm water with yeast to boiling and baking the dough. I shared tips for perfecting your bites and serving ideas to enjoy with friends. Pretzel bites are fun to make and easy to share. Experiment with flavors and shapes to find your favorite. With these methods, you’ll impress everyone with your homemade treats. Enjoy your baking!

Cinnamon Sugar Pretzel Bites Tasty Snack Recipe

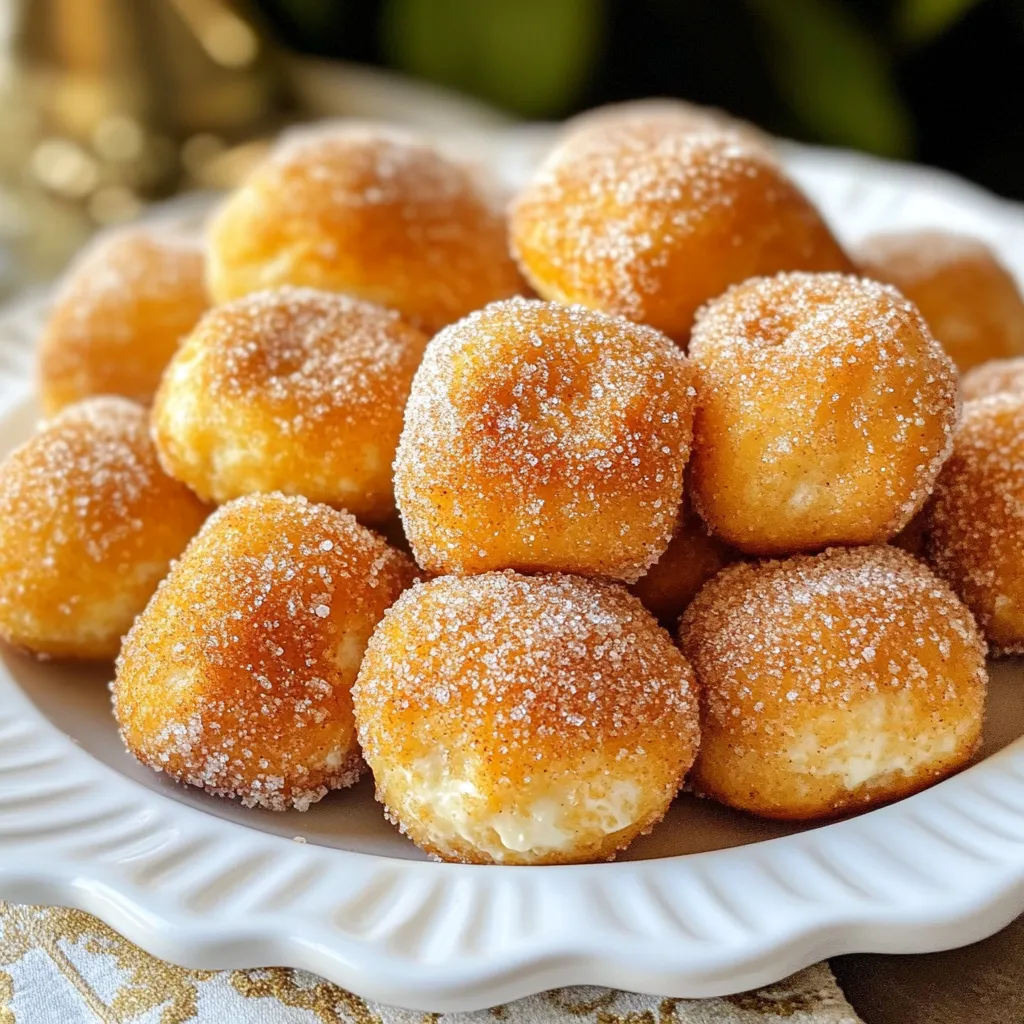
Looking for a sweet and salty treat that’s easy to make? Cinnamon sugar pretzel bites are the perfect snack! With

- 2 cups cooked chicken breast, shredded - 1 ripe avocado, mashed - 1/2 cup ranch dressing - 1 cup cherry tomatoes, halved - 1/2 cup shredded lettuce - 1/4 cup corn (canned or cooked) - 1/4 cup red onion, finely chopped - 1 teaspoon lime juice - 4 large flour tortillas or wraps - Salt and pepper to taste - Optional: cilantro for garnish Fresh ingredients make the dish taste great. Look for ripe avocados that feel soft when you press them gently. Choose vibrant cherry tomatoes that are firm and shiny. For lettuce, pick leaves that are crisp and bright green. Use freshly cooked chicken for the best flavor. You can swap some ingredients based on what you have. Instead of chicken, try turkey or tofu for a different protein. If you do not have ranch dressing, use Greek yogurt mixed with herbs. You can also replace corn with black beans for a twist. If you want a little heat, add sliced jalapeños. {{ingredient_image_1}} 1. First, grab a large bowl. Add the shredded chicken, mashed avocado, ranch dressing, lime juice, salt, and pepper. Mix these well until they are combined. This blend creates a creamy base for your wrap. 2. Next, add halved cherry tomatoes, shredded lettuce, corn, and red onion. Gently fold these in. Be careful not to mash the tomatoes. You want the fresh bites in your wrap. 3. Now, lay a tortilla flat on your clean surface. Spoon a good amount of the chicken mixture into the center. Leave about an inch of space at the edges. This space helps with wrapping. 1. To wrap neatly, fold the sides of the tortilla inward first. 2. Then, start rolling the wrap tightly from the bottom up. This keeps all the filling inside. 3. Make sure to repeat these steps with the other tortillas. If you have trouble, practice makes perfect! 1. For a crispy finish, heat a skillet over medium heat. 2. Place the wrapped tortillas in the skillet. Toast them for 2-3 minutes on each side. You want them golden brown and warm. 3. After toasting, slice each wrap in half diagonally. This makes them easy to eat. Serve them right away, and enjoy the fresh flavors! To pick the best avocados, look for ones that feel soft but not mushy. Gently press the skin. If it gives a little, it's ripe and ready to eat. Avoid any that have dark spots or wrinkles. Those signs mean the avocado is overripe. Store unripe avocados at room temperature until they soften. Once ripe, keep them in the fridge to slow down the ripening process. For easy shredding, use cooked chicken that's warm. This makes the meat easier to pull apart. You can use a fork or your hands. For a faster method, try using a stand mixer with a paddle attachment. Just mix on low speed for a few seconds. This will shred the chicken in no time. Make sure to remove any bones or skin before shredding. To amp up the taste of your wraps, try adding spices or herbs. A pinch of cumin or paprika adds warmth. Chopped fresh cilantro or parsley gives a fresh kick. For a bit of heat, add diced jalapeños or a splash of hot sauce. You can also mix in some lime zest for extra brightness. Don’t be afraid to get creative! Pro Tips Use Cooked Chicken: For a quicker preparation, use store-bought rotisserie chicken or leftover cooked chicken. Customize Your Veggies: Feel free to add other vegetables like bell peppers or cucumbers for extra crunch and flavor. Avocado Ripeness: Ensure your avocado is ripe for the best creamy texture; it should yield slightly to pressure when gently squeezed. Serving Suggestions: Pair these wraps with a side of tortilla chips and salsa for a complete meal. {{image_2}} You can switch up the protein in your wraps. Try using turkey, beef, or shrimp. You can also use tofu for a healthy twist. Each option gives a unique taste and texture. If you want something quick, use rotisserie chicken. It saves time and adds great flavor. For a vegetarian version, skip the chicken. Use black beans or chickpeas instead. They add protein and fiber. You can also add grilled veggies like bell peppers and zucchini. This makes the wraps colorful and tasty. Don't forget to keep the avocado and ranch dressing for creaminess. Feel free to explore different dressings. Ranch is great, but try Caesar or Greek dressing too. You can also mix your own, like yogurt with herbs. For a spicy kick, add hot sauce or jalapeños. Experiment with spices like cumin or paprika for added flavor. Each change can make the wraps exciting and new. To keep your Avocado Ranch Chicken Wraps fresh, store them in the fridge. Use an airtight container to avoid moisture. If you have extra filling, store it separately. This will keep your wraps from getting soggy. Leftovers can stay good for up to three days. Always check for freshness before eating. If you want to freeze your wraps, wrap each one in plastic wrap. Then, place them in a freezer-safe bag. They can last up to three months in the freezer. When you are ready to eat, take them out and thaw in the fridge overnight. You can also freeze the filling separately if you prefer. To reheat your wraps, use a skillet on medium heat. Heat for about 2-3 minutes on each side. This will make them crispy again. You can also use a microwave for a faster option. Just place the wrap on a microwave-safe plate and heat for 30-60 seconds. If you use the microwave, know that the wrap may become soft. Enjoy your meal! Yes, you can prepare these wraps ahead of time. To keep them fresh, wrap each one tightly in plastic wrap. Store them in the fridge for up to a day. This makes them great for lunches or picnics. Just remember to add the avocado and ranch mixture just before serving to keep the wraps fresh and tasty. You can serve these wraps with a variety of sides. Here are a few ideas: - Fresh fruit salad: This adds a sweet touch. - Chips and salsa: A crunchy and spicy option. - Vegetable sticks: Carrots or celery with dip are great choices. - A light salad: A simple green salad pairs well. These sides will complement your wraps and make a full meal. The wraps can last in the fridge for about 2-3 days. However, the fresher, the better. The ingredients may lose their crunch over time. If you see any browning on the avocado, it is best to eat it sooner. Always check for freshness before eating. We've explored the big picture of making Avocado Ranch Chicken Wraps. First, we covered the key ingredients and how to pick fresh ones. Then, I shared simple steps for preparation and tips for wrapping and cooking. We talked about variations and how to make these wraps fit your taste. Lastly, I gave advice on storing leftovers and reheating them. Enjoy making your wraps with ease. With this guide, you’ll create great meals. Happy cooking!

Avocado Ranch Chicken Wraps Easy and Tasty Meal

If you’re craving a quick and delicious meal, Avocado Ranch Chicken Wraps are the answer. I’ll guide you through making

- 1 cup quinoa, rinsed - 2 cups vegetable broth or water - 1 cup cherry tomatoes, halved - 1 cup fresh basil leaves, chopped - 1 cup mozzarella cheese, shredded - 1/2 cup Parmesan cheese, grated The main ingredients in this Caprese Quinoa Bake create a tasty dish. Quinoa serves as the base. It is high in protein and gluten-free. The cherry tomatoes add sweetness and color. Fresh basil gives a bright, herbaceous flavor. Mozzarella cheese melts beautifully, while Parmesan adds depth. Together, they create a cheesy, hearty meal. - 2 tablespoons olive oil - 3 cloves garlic, minced - 1 teaspoon dried oregano - Salt and pepper to taste Pantry staples help enhance the flavor of the dish. Olive oil adds richness and helps in cooking. Garlic brings a warm, savory taste. Dried oregano adds an earthy note. Salt and pepper are crucial for balancing flavors. Keep these ingredients handy for this recipe and more. - Recommended servings: 4 - Measurement conversions: 1 cup = 8 ounces, 1 tablespoon = 3 teaspoons This recipe serves four people, making it great for sharing. Each serving is filling, thanks to quinoa and cheese. If you need to adjust the recipe, use the measurement conversions. You can double it for a larger crowd or halve it for a smaller meal. Enjoy this dish as a main course or a side! {{ingredient_image_1}} First, rinse 1 cup of quinoa under cold water. This step removes any bitter taste. Next, in a medium saucepan, combine the rinsed quinoa with 2 cups of vegetable broth or water. Bring this mixture to a boil over high heat. Once it boils, reduce the heat to low. Cover the pot and let it simmer for 15 minutes. You will know the quinoa is done when it is fluffy, and all the water is absorbed. In a large mixing bowl, combine the cooked quinoa with 1 cup of halved cherry tomatoes, 1 cup of chopped fresh basil, and 3 cloves of minced garlic. Add 1 cup of shredded mozzarella cheese and 1/2 cup of grated Parmesan cheese to the bowl. Drizzle 2 tablespoons of olive oil over the mixture. Then, sprinkle in 1 teaspoon of dried oregano and season with salt and pepper to taste. Mix everything well until all ingredients are combined. Preheat your oven to 375°F (190°C). Grease a medium casserole dish with a little olive oil. Transfer the quinoa mixture into the dish, spreading it evenly. If you like extra cheese, sprinkle some leftover cheese on top. Bake in the preheated oven for 25 to 30 minutes. The bake is ready when the cheese is melted and golden brown. Once done, let it cool for a few minutes before serving. To ensure even cooking, spread the quinoa mixture evenly in the dish. This helps all parts cook at the same rate. You want each bite to be just as good as the last. For crispy cheese, try adding a layer of cheese on top before baking. This gives a nice golden crust. Adding herbs and spices boosts the flavor. Fresh basil brings brightness. Dried oregano adds a nice depth. You can also sprinkle some red pepper flakes for heat. For toppings, consider sliced olives or pine nuts. These add texture and flavor. A crisp side salad pairs well with the bake. The freshness of the salad balances the rich flavors. For presentation, serve directly from the casserole dish. Garnish with more fresh basil and a drizzle of olive oil. This makes your dish look inviting. Pro Tips Use Fresh Ingredients: For the best flavor, opt for fresh basil and ripe cherry tomatoes. They will elevate the dish with vibrant taste and aroma. Customize Your Cheese: Feel free to experiment with different types of cheese such as goat cheese or feta for a unique flavor twist. Make It Ahead: This dish can be prepared in advance and stored in the fridge. Simply bake it before serving for a quick meal. Experiment with Add-Ins: Consider adding vegetables like zucchini or spinach for added nutrition and flavor variety. {{image_2}} Gluten-free options: Quinoa is naturally gluten-free. If you use gluten-free veggie broth, you keep this dish safe for those avoiding gluten. Vegan substitutions: To make this dish vegan, swap mozzarella and Parmesan with vegan cheese. Nutritional yeast adds a cheesy flavor too. You can also use vegetable broth for added taste. Alternative cheeses: If you don’t have mozzarella, try cheddar or feta. Each cheese brings its own taste. For a creamier texture, use ricotta or cream cheese. Vegetable additions: You can add bell peppers or spinach for extra nutrition. Zucchini or mushrooms also work well. Mix in any favorite veggies to boost flavor and color. Mediterranean twist: For a Mediterranean flair, add olives and artichokes. Drizzle with balsamic glaze for a sweet touch. This gives the dish extra depth and brightness. Spicy Caprese: To spice things up, mix in red pepper flakes or jalapeños. You can also use spicy cheese for an added kick. This version will awaken your taste buds! To store leftovers, let the dish cool completely. Then, place it in an airtight container. This keeps the flavors fresh. I recommend glass containers for easy reheating and a clear view of your tasty meal. If you use plastic, ensure it’s BPA-free to stay healthy. For best results, freeze the bake in portions. Use freezer-safe containers or bags. Make sure to remove as much air as possible. This helps prevent freezer burn. To reheat, thaw overnight in the fridge. Then, bake at 350°F (175°C) until heated through, about 20 minutes. In the fridge, Caprese Quinoa Bake lasts about 3-5 days. Always check for signs of spoilage. If you see mold or an off smell, it’s best to toss it. Freshness is key to enjoying this dish! Making Caprese Quinoa Bake takes about 45 minutes in total. You will spend 15 minutes prepping the ingredients. Cooking the quinoa takes about 15 minutes. Then, baking the dish takes 25 to 30 minutes. It is best to rinse quinoa before cooking. Rinsing removes a bitter coating called saponin. This makes your dish taste much better. If you skip this step, your bake may have an off flavor. You can serve Caprese Quinoa Bake with a fresh side salad. A simple green salad pairs well. You might also enjoy it with roasted vegetables. For a heartier meal, add some grilled chicken or shrimp. In this article, we explored the delicious Caprese Quinoa Bake. We started with the key ingredients, like quinoa, cherry tomatoes, and mozzarella. Then, we covered step-by-step instructions for preparing, mixing, and baking. I shared tips for perfecting the dish and suggested fun variations. Lastly, we discussed storage and answered common questions. Now, you can enjoy this dish with family and friends. It's healthy, filling, and easy to make. Dive in and enjoy your cooking journey!

Caprese Quinoa Bake Flavorful Cheesy Dish

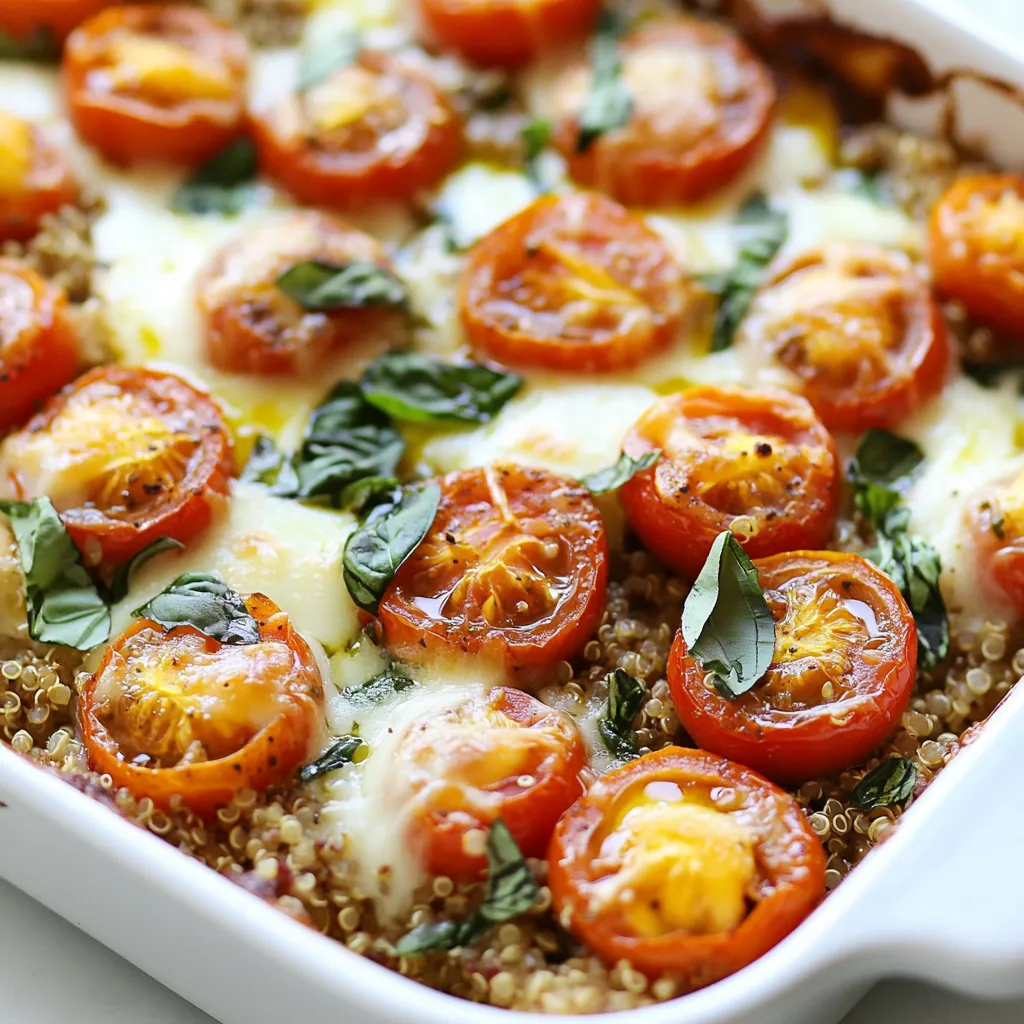
Looking for a cheesy dish that bursts with flavor? You’ve found it! This Caprese Quinoa Bake combines tender quinoa, sweet

To make Tuscan salmon in cream sauce, gather these ingredients: - 4 salmon fillets - 2 tablespoons olive oil - 3 cloves garlic, minced - 1 cup cherry tomatoes, halved - 1 cup fresh spinach - 1 cup heavy cream - 1 teaspoon Italian seasoning - Salt and black pepper to taste - Fresh basil leaves for garnish - Grated Parmesan cheese for serving You will need a few key tools for this recipe: - Large skillet - Spatula - Knife - Cutting board - Measuring cups and spoons Choosing fresh ingredients makes a big difference in taste. Here are some tips: - Salmon: Look for bright, moist fillets. The flesh should be firm and smell clean. - Cherry Tomatoes: Pick tomatoes that are bright and firm. Avoid any that feel soft or have blemishes. - Spinach: Choose spinach with vibrant green leaves. It should not be wilted or yellow. - Cream: Use heavy cream for a rich sauce. Check the expiration date for freshness. By following these tips, you can ensure your dish is not just delicious but also fresh and vibrant. {{ingredient_image_1}} To start, heat 2 tablespoons of olive oil in a large skillet over medium heat. When the oil is hot, add 4 salmon fillets. Season them with salt and black pepper. Sear each fillet for about 4-5 minutes on one side. Flip them and cook for another 4-5 minutes. You want them golden brown and cooked through. Once done, remove the fillets from the skillet and set them aside. This step gives the salmon a nice crust and flavor. In the same skillet, add 3 cloves of minced garlic. Sauté the garlic for about 30 seconds. You want it fragrant but not burnt. Next, add 1 cup of halved cherry tomatoes and 1 teaspoon of Italian seasoning. Cook these for about 3-4 minutes. You want the tomatoes to soften a bit. After that, stir in 1 cup of fresh spinach. Let it wilt for about a minute. Then, pour in 1 cup of heavy cream. Stir well and let it simmer for 2-3 minutes. This thickens the sauce slightly and blends the flavors. Now, it’s time to bring it all together. Return the salmon fillets to the skillet, spooning the cream sauce over each piece. Allow everything to warm through for another minute. Taste the sauce and adjust the seasoning with more salt and pepper if needed. To serve, place the salmon on a plate with the creamy sauce. Garnish with fresh basil leaves and a sprinkle of grated Parmesan cheese. This adds a nice touch and makes it look appealing. Enjoy your delicious Tuscan salmon! To get the best sear on salmon, start with dry fish. Pat it with a paper towel. This helps the skin crisp up nicely. Heat your olive oil in a hot skillet. You want it to shimmer. Place the salmon skin-side down first. Let it cook without moving it for 4-5 minutes. This helps build a nice crust. Flip it gently, and cook the other side for another 4-5 minutes. A good sear gives the salmon great flavor. To thicken your cream sauce, let it simmer gently. After adding the heavy cream, stir often. It will start to thicken in about 2-3 minutes. If you want it thicker, add a bit more cream. For added depth, you can sprinkle in some grated Parmesan cheese. It melts nicely and thickens the sauce. Taste it as you go. Adjust with salt and pepper for the best flavor. Serve your Tuscan salmon on a bed of the creamy sauce. Add extra cherry tomatoes and spinach around the plate. This adds color and texture. Pair it with a side of garlic bread for a complete meal. A light salad with lemon vinaigrette goes well too. For a drink, try a crisp white wine. It complements the flavors beautifully. Enjoy your delicious dinner! Pro Tips Use Fresh Ingredients: Fresh salmon and seasonal vegetables will elevate the flavor of your dish significantly. Perfectly Cooked Salmon: For best results, use a thermometer to ensure the salmon reaches an internal temperature of 145°F (63°C). Customize the Sauce: Feel free to add other herbs or spices like red pepper flakes for a bit of heat, or lemon zest for brightness. Serve Immediately: This dish is best enjoyed fresh, so serve it right after cooking for the creamiest texture and vibrant flavors. {{image_2}} If you can't find salmon, don’t worry! You can use other fish. Here are some great options: - Trout: It has a similar taste and texture. - Tilapia: This fish is mild and cooks quickly. - Cod: It holds up well in sauces and has a firm texture. Choose a fish that you enjoy. Adjust cooking times based on the thickness of the fillets. You can change the flavor with different spices and herbs. Here are some ideas: - Lemon Zest: Add this for a fresh twist. - Capers: These add a nice briny touch. - Red Pepper Flakes: If you like heat, sprinkle some in. You can also mix in other vegetables, like bell peppers or zucchini. Get creative and make it your own! If you want a dairy-free meal, it's easy to swap out ingredients. Try these tips: - Coconut Cream: Use this instead of heavy cream for a rich flavor. - Nut Milk: Almond milk or oat milk can work too. Just add a thickener like cornstarch. - Nutritional Yeast: This gives a cheesy taste without dairy. With these swaps, you can enjoy a tasty, creamy dish without the dairy! To store leftovers, let the dish cool first. Place the salmon in an airtight container. Make sure to separate the salmon from the sauce to keep it fresh. Use the leftovers within three days for the best flavor. When reheating, you can use a skillet or microwave. If using a skillet, warm it on low heat. Add a splash of cream to keep the sauce smooth. Stir gently to avoid drying out the salmon. In the microwave, heat in short bursts. Check often to ensure it warms evenly. You can freeze this dish, but it’s best to freeze the salmon and sauce separately. Use freezer-safe containers and label them with the date. The salmon is best used within two months. To thaw, place it in the fridge overnight. Reheat as mentioned above for the best taste. Yes, you can use frozen salmon. Just thaw it first. Place it in the fridge overnight or run it under cold water. Once thawed, pat it dry before cooking. This helps the salmon sear better. The taste will still be great! If you need a substitute, try using coconut milk or cashew cream. These options provide creaminess without dairy. You can also use half-and-half or whole milk. Just know that the sauce may be less thick. Adjust cooking time to get the right texture. To check if salmon is cooked, look for its color. It should be opaque and flake easily with a fork. The internal temperature should reach 145°F (63°C). Use a food thermometer for accuracy. If it’s not done, cook it a bit longer. This guide covers all you need for a great salmon dish. We explored essential ingredients, gear, and tips for the freshest picks. You learned step-by-step instructions for preparing the salmon, making the cream sauce, and serving. I shared tips for perfect searing, thickening sauce, and suggested pairings. You also discovered fun variations and how to store leftovers. Enjoy cooking your salmon dish, and remember to experiment with your flavors. Happy cooking!

Tuscan Salmon in Cream Sauce Flavorful Dinner Idea

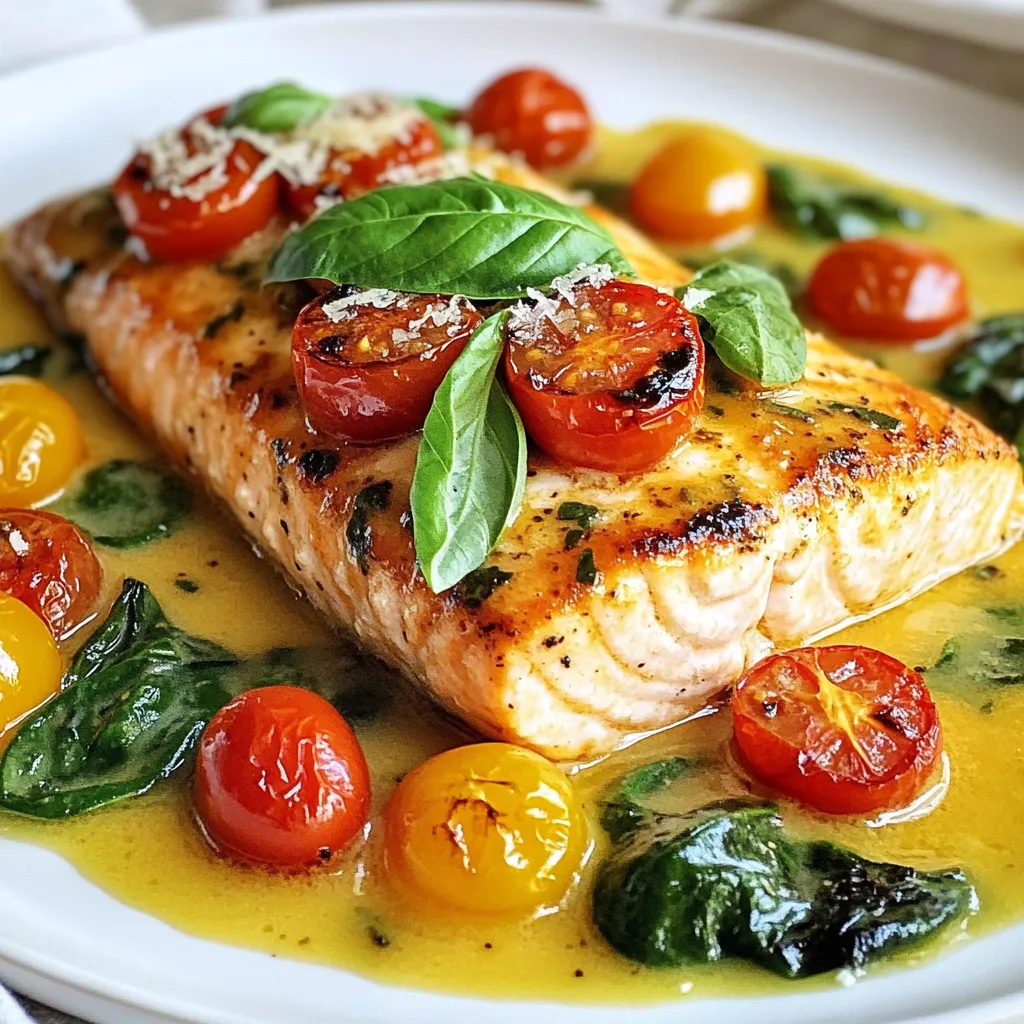
Are you ready to impress your family with a delicious dinner? This Tuscan Salmon in Cream Sauce is your answer!

- 2 cups cooked chicken, shredded - 1 teaspoon chipotle powder - 1 teaspoon smoked paprika - 1 teaspoon garlic powder - 1/2 teaspoon cumin - 1/2 teaspoon cayenne pepper (adjust to taste) - 1 cup shredded mozzarella cheese - 1 cup shredded cheddar cheese - 1 tablespoon olive oil - 4 large flour tortillas - 1/2 cup sour cream (for serving) - Fresh cilantro, chopped (for garnish) - Lime wedges (for serving) Each ingredient plays a key role in the flavor of the quesadilla. The chipotle powder gives a smoky heat. Smoked paprika adds depth, while garlic powder brings a savory note. Cumin adds warmth, and cayenne can kick up the heat. I use two types of cheese for a creamy texture and rich taste. If you don’t have chipotle powder, use chili powder. For a milder flavor, skip the cayenne pepper. You can swap mozzarella for pepper jack cheese to add more spice. If you prefer corn tortillas, they work well too. For a lighter option, try using grilled vegetables instead of chicken. {{ingredient_image_1}} First, gather your cooked chicken. You can shred it easily with two forks. Next, in a large bowl, mix the shredded chicken with the spices. Add 1 teaspoon of chipotle powder, 1 teaspoon of smoked paprika, 1 teaspoon of garlic powder, 1/2 teaspoon of cumin, and 1/2 teaspoon of cayenne pepper. Stir until the chicken is fully coated. This step adds a deep, smoky flavor to the chicken. Set the mixture aside while you heat the skillet. Now, heat 1 tablespoon of olive oil in a skillet over medium heat. Once the oil is hot, add your seasoned chicken mixture. Cook it for about 3 to 4 minutes. This warms the chicken and melds the flavors together. After cooking, remove the chicken from the skillet and set it aside. Next, take a large flour tortilla and lay it flat in the same skillet. Sprinkle about 1/4 cup of mozzarella and cheddar cheese over half of the tortilla. Add a good portion of your spicy chicken mixture on top, then add another layer of cheese. Fold the tortilla in half. Cook it for 2 to 3 minutes on each side until it turns golden brown and crispy. The cheese should melt beautifully inside. Repeat this process with the remaining tortillas and filling. Each quesadilla needs this perfect crunch and cheesy goodness. Slice each quesadilla into wedges. Arrange them on a platter for a nice presentation. Garnish with fresh chopped cilantro for color and flavor. Serve your quesadillas hot with a side of sour cream and lime wedges. The sour cream cools the heat from the chipotle, while the lime adds a fresh kick. Enjoy the burst of flavors with every bite! To get a crispy quesadilla, use a medium heat. If the heat is too high, the outside burns before the cheese melts. Always use enough cheese. It acts like glue, holding the filling inside. Cook each side for 2 to 3 minutes. You want a golden brown color. If you like extra crunch, try using a cast-iron skillet. The spice level can vary for everyone. Start with the cayenne pepper at 1/2 teaspoon. You can always add more if you want more heat. Chipotle powder adds a smoky flavor, so use 1 teaspoon. If you like it mild, reduce the chipotle powder to 1/2 teaspoon. Taste your chicken mixture before cooking. Adjust the spices to fit your taste. Cooking time can change based on your stove and skillet type. If you are cooking larger quesadillas, increase the time slightly. Check for melted cheese inside. If it’s not melted but the outside is brown, lower the heat. This helps cook the inside without burning the outside. Always keep an eye on your quesadillas while cooking. Pro Tips Adjust the Spice Level: If you prefer milder quesadillas, reduce the cayenne pepper or omit it entirely. You can also add more cheese to help balance the heat. Use Fresh Ingredients: Fresh cilantro and lime juice can elevate the flavors of your quesadillas. Always opt for fresh over bottled when possible. Perfectly Crispy Tortillas: To achieve a crispy texture, ensure your skillet is preheated before adding the quesadillas. Avoid overcrowding the pan to maintain even cooking. Experiment with Fillings: Feel free to customize your quesadillas with additional ingredients like black beans, corn, or bell peppers for added texture and flavor. {{image_2}} For a tasty vegetarian version, swap the chicken for black beans or sautéed veggies. You can use bell peppers, onions, or zucchini. Mix in the same spices to keep the flavor strong and bold. This keeps the dish colorful and satisfying. If you want a different cheese, try pepper jack or gouda. These cheeses add a nice twist. You can also use dairy-free cheese for a vegan version. Just make sure it melts well. You can change the protein in these quesadillas for variety. Try shredded beef or pulled pork for a rich taste. For a lighter option, grilled shrimp or fish works great too. Just season them like the chicken for the same spicy kick. After enjoying your spicy chipotle chicken quesadillas, you might have some left. To store them, let them cool for a bit. Place them in an airtight container. Make sure to separate the layers with parchment paper to avoid sticking. Store them in the fridge for up to three days. This keeps the flavors fresh. To reheat your quesadillas, use a skillet for the best texture. Heat the skillet on medium heat. Place the quesadilla in the skillet for about 2-3 minutes on each side. This makes them nice and crispy again. If you're short on time, you can use the microwave. Heat on a microwave-safe plate for about 1 minute. However, this might make the quesadilla a bit soft. If you want to save some for later, freezing is a great option. First, let the quesadillas cool completely. Wrap each one in plastic wrap tightly. Then, place them in a freezer bag. Label and date the bag. You can freeze them for up to two months. When you're ready to eat, thaw in the fridge overnight before reheating. Enjoy your flavorful treat anytime! Yes, you can use corn tortillas. They add a nice flavor. Corn tortillas are smaller and may not hold as much filling. Use two corn tortillas for each quesadilla. This way, you can stack the fillings well. If you lack chipotle powder, smoked paprika works well. It gives a nice smokiness without the heat. You can also use cayenne pepper for more spice. Just remember, cayenne is hotter than chipotle. Adjust the amount based on your taste. To increase the heat, add more cayenne pepper. You can also include fresh jalapeños to the chicken mix. Another option is to use hot sauce when serving. These changes will make the quesadillas extra spicy and flavorful. In this post, we explored the key ingredients for tasty quesadillas, from the chicken mixture to cooking tips. You learned how to adjust spices, try vegetarian options, and store leftovers properly. Quesadillas offer a fun way to enjoy different flavors. Remember, the perfect quesadilla is all about balance. Experiment with your choices and enjoy every bite. Cooking can be simple and fun!

Spicy Chipotle Chicken Quesadillas Bursting with Flavor

Get ready to spice up your next meal with my flavorful Spicy Chipotle Chicken Quesadillas! You’ll love how easy they

Older posts
Newer posts
← Previous Page1 … Page129 Page130 Page131 Page132 Next →

dsad

© 2025 pureeatsnow • Built with GeneratePress

Our Policies

  • Copyright Policy
  • Cookie Policy
  • GDPR Policy
  • Privacy Policy
  • Disclaimer
  • Terms Of Use

More Information

  • Home
  • About
  • Contact
  • Appetizers
  • Dessert
  • Dinner
  • Drinks
©2025, pureeatsnow About Back To Top