Skip to content
DisclaimerTerms Of UseGDPR PolicyCookie Policy

pureeatsnow

  • Home
  • Drinks
  • Appetizers
  • Dinner
  • Dessert
  • About
  • Contact
  • Privacy Policy
DisclaimerTerms Of UseGDPR PolicyCookie Policy

Rachel

- 1 cup crushed graham crackers - 4 tablespoons unsalted butter, melted - 1 (8 oz) package cream cheese, softened - 1/2 cup powdered sugar - 1 teaspoon vanilla extract - 1 cup whipped cream - 1 cup fresh strawberries, diced - Fresh whole strawberries for garnish - Mint leaves for garnish (optional) To make No-Bake Strawberry Cheesecake Cups, you need simple and fresh ingredients. First, the graham crackers form a crumbly base. You crush these crackers finely. Mix them with melted butter until it looks like wet sand. This mix will hold your cups together. Next, cream cheese is key for the cheesecake filling. Make sure it is soft. This helps it mix smoothly. Add powdered sugar for sweetness and a hint of vanilla for flavor. These three ingredients create a rich, creamy blend. Whipped cream adds lightness. You can use store-bought or homemade. Gently fold it into the cream cheese mixture. This keeps your filling fluffy and airy. Don’t forget the strawberries! They add freshness and flavor. Diced strawberries sit between layers of creamy filling. You can also use whole strawberries to decorate the tops. Mint leaves bring a pop of color, too. Gather all these items, and you’re ready to create a delightful dessert that everyone will love! To make the crust, start by mixing the crushed graham crackers and melted butter in a small bowl. Stir until it looks like wet sand. This ensures it will hold together well. Next, take about two tablespoons of this mixture and spoon it into the bottom of each cup. Press it down gently with your fingers or the back of a spoon. You want a firm base for your cheesecake. Now, let's move on to the filling. In a medium bowl, beat the softened cream cheese until it is nice and smooth. Make sure there are no lumps for a creamy texture. Add in the powdered sugar and vanilla extract. Mix again until everything is well blended. Next, gently fold in the whipped cream. This step adds air and makes the filling light and fluffy. Be careful not to stir too hard, as you don’t want to lose that fluffiness. Assembling the cups is the fun part! Start by layering the cream cheese mixture over the crust in each cup. Fill them about halfway. Next, add a layer of diced strawberries on top of the cream cheese. This adds a fresh, fruity flavor. Then, top with the rest of the cream cheese mixture, filling the cups almost to the top. Finish with more diced strawberries on top. For a nice touch, garnish each cup with a whole strawberry and a mint leaf if you like. Finally, cover the cups and place them in the fridge for at least two hours. This will help the flavors meld and the cheesecake to set perfectly. Using room temperature ingredients is key. This helps the cream cheese mix smoothly. If your cream cheese is cold, it could be lumpy. Take it out of the fridge for about 30 minutes before you start. When you fold in the whipped cream, do it gently. This keeps the mixture light and fluffy. Use a spatula and lift the cream from the bottom to the top. Don’t stir too hard; you don’t want to deflate the air. For serving, get creative! Use clear cups so guests can see the layers. You can also use small mason jars for a rustic look. Place them on a pretty tray to make a nice display. Garnishing makes a big difference. Top each cup with a whole strawberry for color. Adding a mint leaf gives a fresh touch. You can also sprinkle some crushed graham crackers on top for extra crunch. {{image_2}} You can easily change the fruit in these cheesecake cups. Try blueberries or raspberries for a new taste. Just swap the strawberries for your favorite fruit. You can also add layers of chocolate or caramel. Melted chocolate drizzled on top adds a rich touch. A layer of caramel gives a sweet twist that kids will love. If you need a gluten-free option, look for gluten-free graham crackers. Many stores sell these, and they work well in this recipe. For vegan options, use dairy-free cream cheese and whipped cream. Coconut cream is a great substitute for whipped cream. These swaps keep the taste tasty and creamy while meeting dietary needs. You can store your no-bake strawberry cheesecake cups in the fridge for up to three days. It’s best to keep them covered. This helps keep the cups fresh and prevents them from absorbing other flavors in the fridge. Use plastic wrap or an airtight container for the best results. Yes, you can freeze cheesecake cups! They freeze well for up to a month. To do this, place the cups in a freezer-safe container. Make sure to leave some space at the top, as they may expand. When you’re ready to enjoy them, let the cups thaw in the fridge overnight. This helps maintain the creamy texture. Avoid thawing them at room temperature, as this can make them too soft. Serve them chilled for the best taste. These cups need at least 2 hours in the fridge to set. This time allows the flavors to blend and the cheesecake to firm up. If you can wait longer, they taste even better after chilling overnight. Yes, you can use low-fat cream cheese. It will change the taste and texture a bit. The cheesecake may not be as rich and creamy, but it will still be tasty. If you want a lighter dish, this is a good option. You can use Greek yogurt as a lighter option. It will still give a creamy texture. Another choice is to blend silken tofu for a dairy-free version. Both alternatives keep your cheesecake light and enjoyable. You now know how to make no-bake strawberry cheesecake cups. We covered the needed ingredients, easy steps, and helpful tips. Remember to use room temperature items for the best texture. You can swap fruits or adjust for different diets, too. Store these delicious cups in the fridge or even freeze them for later. With these ideas, you’ll impress friends with your tasty treats. Enjoy your dessert-making journey!

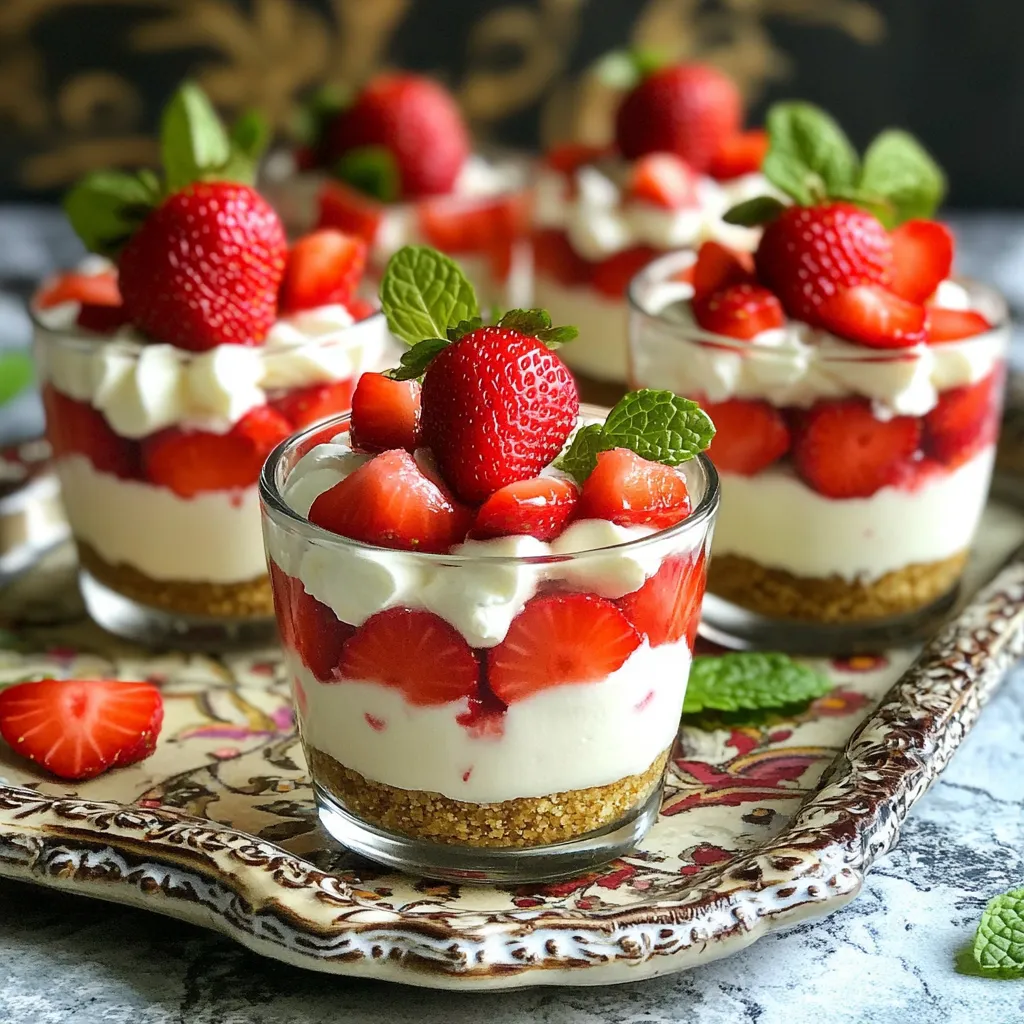
No-Bake Strawberry Cheesecake Cups Deliciously Easy

If you’re looking for a sweet treat that’s easy to make, you’re in the right place! These No-Bake Strawberry Cheesecake

- 8 oz rice noodles - 2 tablespoons peanut butter - 2 tablespoons soy sauce - 1 tablespoon sriracha - 1 cup broccoli florets - 1/2 red bell pepper, thinly sliced - 1/2 cup shredded carrots - 2 green onions, chopped - 1 tablespoon crushed peanuts - Fresh cilantro - Lime wedges The key to making Minute Spicy Peanut Noodle Stir-Fry is having all these ingredients ready. Rice noodles are the base of the dish. They cook quickly and absorb flavors well. Peanut butter adds creaminess and richness. Soy sauce gives depth and saltiness. Sriracha brings the heat, and you can adjust it to your taste. For the fresh produce, I love using broccoli florets for crunch and color. Red bell pepper adds sweetness, while shredded carrots provide a vibrant look. Chopped green onions finish the stir-fry with a fresh bite. You can elevate your dish with optional garnishes. Crushed peanuts add texture and a nutty flavor. Fresh cilantro brings brightness, and lime wedges offer a zesty kick. Each ingredient plays a role in creating a delicious, quick meal that packs flavor in every bite. Start by boiling a large pot of water. Once it bubbles, add 8 oz of rice noodles. Cook them for about 4 to 5 minutes. Check the package for exact times. After cooking, drain the noodles in a colander. Rinse them under cold water. This stops the cooking. Set the noodles aside for later. In a small bowl, mix together 2 tablespoons of peanut butter, 2 tablespoons of soy sauce, 1 tablespoon of sriracha, and 1 tablespoon of sesame oil. Whisk until smooth. If it’s too thick, add a splash of water. This helps get the right consistency. Your peanut sauce should be creamy and easy to pour. Heat a teaspoon of sesame oil in a large skillet or wok over medium-high heat. Add 1 cup of broccoli florets, 1/2 sliced red bell pepper, and 1/2 cup of shredded carrots. Stir-fry these veggies for about 3 to 4 minutes. You want them tender but still crisp. This adds great texture to your dish. Now, add the cooked noodles to the skillet. Pour the peanut sauce over the noodles and veggies. Toss everything together. Keep mixing for about 2 to 3 minutes. This ensures everything is heated evenly and well-coated with the sauce. Remove the skillet from heat. Stir in 2 chopped green onions for freshness. Transfer the stir-fry to serving plates. Garnish with 1 tablespoon of crushed peanuts and some fresh cilantro. Serve with lime wedges on the side for a zesty touch. Enjoy your meal! You can change the heat level easily. If you want less spice, use less sriracha. Start with a teaspoon and add more if you like. You can also try other hot sauces. Options like chili garlic sauce or sambal oelek can work well. Cooking the noodles just right matters. Aim for al dente, which means firm to the bite. This gives a nice texture when mixed with the sauce. To make the veggies crispy, don’t overcook them. Stir-fry for three to four minutes until they are tender but still crunchy. Cleaning up can be fast and simple. Use a large bowl to hold all your prep waste. This keeps your workspace tidy. When you cook, wash the tools you don’t need anymore. This saves time and space. {{image_2}} You can add chicken, shrimp, or tofu for extra protein. If you want to use chicken, cut it into small pieces. Cook it in the skillet for about 5-7 minutes until it's done. For shrimp, add them for just 3-4 minutes until they turn pink. If you prefer tofu, use firm tofu. Cube it and fry it for 5-6 minutes until golden. Each protein brings a unique taste and texture to your stir-fry. If you want to change the veggies, use snap peas or zucchini instead of broccoli and bell peppers. You can also try seasonal vegetables like asparagus in spring or squash in fall. Mixing vegetables keeps the dish fresh and exciting. The key is to choose veggies that cook quickly. This keeps them bright and crunchy. To make the dish gluten-free, use gluten-free soy sauce. Many brands offer this option. For the noodles, you can swap rice noodles with gluten-free pasta or zucchini noodles. These options keep the dish tasty while meeting dietary needs. Experiment with these changes to find your favorite mix! To keep your Minute Spicy Peanut Noodle Stir-Fry fresh, store leftovers in an airtight container. This helps prevent any strong odors from spreading in your fridge. Make sure the stir-fry cools to room temperature before sealing it up. In the fridge, it will stay good for about 3 to 5 days. When you're ready to enjoy your leftovers, the best way to reheat them is in a skillet. Heat over medium heat. This method keeps the noodles and veggies nice and crisp. Stir often to warm everything evenly. You can also use the microwave. Just place it in a microwave-safe bowl and cover it loosely with a lid. Heat in short bursts, stirring in between. You can freeze your stir-fry for future meals. Just let it cool completely, then transfer it to a freezer-safe container. It will keep well for about 2 to 3 months. When you want to eat it, move it to the fridge overnight to thaw. For quick thawing, you can use a microwave. After thawing, reheat it in a skillet to keep that tasty texture. Making this dish takes about 15 minutes. You spend around 10 minutes prepping. Cooking the noodles and stir-frying the veggies takes about 5 minutes. It's quick, easy, and perfect for busy days. Yes, you can swap rice noodles for other types. Here are some options: - Whole wheat noodles for a hearty choice. - Egg noodles for a richer flavor. - Zucchini noodles if you want a low-carb option. Feel free to pick what you like best! This stir-fry pairs well with many side dishes. Try these: - Steamed edamame for added protein. - Cucumber salad for a refreshing crunch. - Fried tofu for extra texture and taste. These sides will make your meal more complete. Yes, this dish is great for meal prep! Here are some tips: - Cook extra noodles and veggies to save time during the week. - Store the stir-fry in airtight containers in the fridge. - Reheat in the microwave or on the stove for a quick meal. This way, you can enjoy delicious meals all week! In this post, we explored Minute Spicy Peanut Noodle Stir-Fry. You learned about key ingredients, like rice noodles and fresh veggies, plus how to mix a tasty peanut sauce. I shared tips to adjust flavors, perfect textures, and simplify clean-up. You can get creative with proteins and gluten-free options. Keep these ideas in mind as you make your stir-fry. It's a quick, tasty meal perfect for busy days. Enjoy your cooking!

Minute Spicy Peanut Noodle Stir-Fry Quick and Easy Meal

Looking for a quick meal that packs a punch? My Minute Spicy Peanut Noodle Stir-Fry is your answer! With just

- 2 cups all-purpose flour - 1 tablespoon baking powder - 1 teaspoon baking soda - 1/2 teaspoon salt - 1 cup granulated sugar - 1/2 cup brown sugar, packed - 1/2 cup unsalted butter, softened - 2 large eggs - 1 cup buttermilk - 1 tablespoon cinnamon - 1/2 cup brown sugar, packed - 1/2 cup chopped pecans - 1 cup caramel sauce (store-bought or homemade) - 1/2 cup chopped pecans (for garnish) In making this cake, you need simple ingredients. The cake base is soft and fluffy. You start with flour, baking powder, and baking soda. Salt adds a nice balance. Granulated sugar adds sweetness. Brown sugar gives it a rich flavor. Unsalted butter makes the cake creamy. Eggs help with texture. Buttermilk keeps it moist. For the cinnamon swirl, you just mix cinnamon with brown sugar. Chopped pecans add a nice crunch. You layer this mixture in the cake. It makes every bite special. Finally, the caramel topping is what makes this cake shine. You can use store-bought caramel sauce or make your own. It’s sweet and sticky. The chopped pecans on top add a lovely finish. Each layer of flavor creates a delightful experience. - Preheat your oven to 350°F (175°C) and grease a 9x13 inch baking dish. - In a large bowl, whisk together the flour, baking powder, baking soda, and salt. - In another bowl, beat together granulated sugar, brown sugar, and softened butter until the mix is light and fluffy. - Add the eggs one at a time. Mix well after each one. Gradually pour in the buttermilk while mixing. - Pour half of the batter into the baking dish and spread it evenly. - Sprinkle half of the cinnamon mixture and half of the chopped pecans over the batter. - Add the rest of the batter on top and gently spread to cover the cinnamon layer. - Finally, sprinkle the remaining cinnamon sugar mixture and pecans on top. - Use a knife to swirl the mix slightly for a marbled look. Bake for 30-35 minutes. - Once baked, let the cake cool for about 10 minutes. Drizzle warm caramel sauce over the top and sprinkle with chopped pecans. To make your cake light and fluffy, avoid overmixing the batter. Mix just until you combine the wet and dry ingredients. This helps keep air in, giving you that perfect texture. For a moist cake, use fresh buttermilk. It adds richness and helps keep the cake soft. Also, make sure your butter is just soft enough. If it's too melted, your cake can turn out dense. Want to make it your own? You can add chocolate chips or dried fruits like raisins or cranberries. They add fun bursts of flavor. If you want a nutty twist, try walnuts or almonds instead of pecans. Each nut brings its unique taste and crunch. This cake shines when served warm. A scoop of vanilla ice cream on top makes it even better. You can also serve it at room temperature, which works great for gatherings. Whipped cream is another tasty option that pairs well with the sweet caramel. Enjoy experimenting with how you serve it! {{image_2}} You can change the nuts in this cake for a new twist. Walnuts work great instead of pecans. They add a nice crunch and a different flavor. If you need a nut-free option, you can skip the nuts entirely. You might try seeds, like sunflower or pumpkin seeds, for texture. This keeps the cake tasty while also being safe for those with nut allergies. Flavor is key to making this cake special. Adding a splash of vanilla or almond extract can boost the taste. Just a teaspoon can make a big difference! For those who love spice, try adding nutmeg or allspice. Just a pinch can warm up the flavor profile. These small changes can turn a classic recipe into something new and exciting. If you need a gluten-free cake, there are good flour options. You can use almond flour or a gluten-free blend. These will keep the cake moist and tasty. Just remember, gluten-free flour may need a bit more liquid. Watch the baking time too. Gluten-free cakes often bake faster, so check for doneness a few minutes early. Enjoy your delicious treat, no matter your diet! To store leftover cake in the fridge, cover it tightly with plastic wrap. This keeps the cake fresh and moist. You can also use an airtight container for more protection. Place it on a flat shelf in your fridge to avoid crushing. Enjoy the cake within five days for the best taste. To freeze the cake, let it cool completely first. Then, slice the cake into pieces. Wrap each slice in plastic wrap. Next, put the wrapped slices in a freezer bag or a container. When you're ready to eat, take out a slice and thaw it in the fridge overnight. You can also warm it in the microwave for a few seconds. When stored correctly, the cake lasts about five days in the fridge. In the freezer, it can stay fresh for up to three months. Look for signs of spoilage, like a dry texture or off smell. If you see mold, throw it away right away. Keeping an eye on freshness helps you enjoy your cake longer! To check if your cake is done, use the toothpick test. Insert a toothpick into the center of the cake. If it comes out clean or with a few crumbs, the cake is ready. It should not be wet or sticky. Typically, this cake takes 30 to 35 minutes to bake. Keep an eye on it as ovens can vary. Yes, you can make the batter ahead. Mix the dry and wet ingredients separately. Store them in the fridge until you are ready to bake. Just remember to combine them right before baking. This keeps the batter fresh and helps the cake rise nicely. It’s a great way to save time! If you lack buttermilk, don't worry! You can use milk with vinegar or lemon juice. Just add 1 tablespoon of vinegar or lemon juice to 1 cup of milk. Let it sit for about 5 minutes. This will create a similar tangy flavor. Alternatively, plain yogurt or sour cream can work too. You now have all the steps to make a great cake. We covered the ingredients, preparation, and baking. Remember, avoid overmixing to keep your cake light and fluffy. You can even add your favorite nuts or flavors to make it special. Store any leftovers properly to enjoy later. Baking can be fun and rewarding. With these tips, you’ll impress everyone with your skills. Try it out and share your tasty results!

Caramel Pecan Cinnamon Roll Cake Delightful Treat

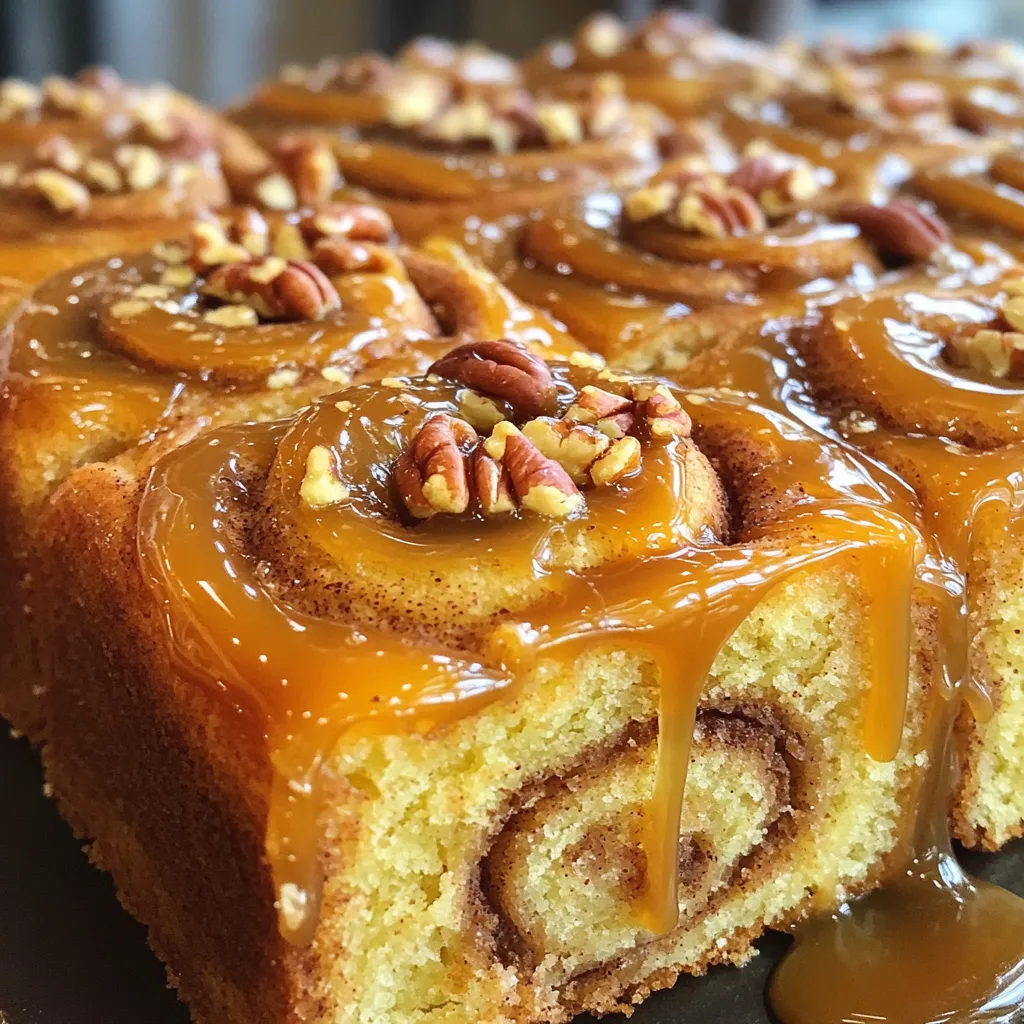
Craving a sweet and nutty treat? Let me introduce you to the Caramel Pecan Cinnamon Roll Cake! This delightful recipe

To make a tasty Spinach Artichoke Pasta Bake, gather these key items: - 8 oz (225 g) pasta (penne or rigatoni) - 1 tablespoon olive oil - 3 cloves garlic, minced - 1 can (14 oz) artichoke hearts, drained and chopped - 4 cups fresh spinach, roughly chopped - 1 cup cream cheese, softened - 1/2 cup sour cream - 1 cup grated Parmesan cheese - 1 cup shredded mozzarella cheese - 1 teaspoon lemon juice - 1/2 teaspoon red pepper flakes (optional for some heat) - Salt and pepper to taste - Fresh parsley, chopped (for garnish) These ingredients work together to create a creamy and rich flavor. The artichokes and spinach add freshness, while the cheeses give a wonderful texture. For extra flavor, consider adding: - 1/2 teaspoon dried oregano - 1/4 cup chopped sun-dried tomatoes - A splash of white wine These options can enhance the dish's taste. Sun-dried tomatoes bring sweetness, while dried oregano adds a nice herbal note. You can also swap ingredients if you have dietary needs: - Use gluten-free pasta for a gluten-free version. - Replace cream cheese with a vegan cream cheese. - Use dairy-free cheese for a plant-based option. These swaps can help everyone enjoy this meal. Remember, cooking is about making it work for you! {{ingredient_image_1}} Start by preheating your oven to 350°F (175°C). This step is key for a good bake. While the oven heats, boil a large pot of salted water. Once the water is boiling, add 8 ounces of pasta, like penne or rigatoni. Cook it until it is al dente, about 8-10 minutes. Drain the pasta and set it aside. Next, grab a large skillet and heat 1 tablespoon of olive oil over medium heat. Add 3 cloves of minced garlic and sauté for about 1 minute until it smells amazing. Add a can of chopped artichoke hearts and 4 cups of roughly chopped fresh spinach. Cook everything for about 3-4 minutes until the spinach wilts and the artichokes warm up. In a separate bowl, mix 1 cup of softened cream cheese with 1/2 cup of sour cream. Add 1 cup of grated Parmesan cheese, 1 teaspoon of lemon juice, and salt and pepper to taste. If you like heat, add 1/2 teaspoon of red pepper flakes. Stir until the mixture is smooth and creamy. Now, combine the cooked pasta with the sautéed spinach and artichokes in the cheese sauce. Make sure everything is coated well. Then, pour this mixture into a greased 9x13 inch baking dish. Top it all off with 1 cup of shredded mozzarella cheese, spreading it evenly. Place the baking dish in your preheated oven and bake for 25-30 minutes. Look for a bubbly and golden brown top. Once it is done, take it out and let it cool for a few minutes. For a fresh touch, garnish with chopped parsley before serving. Enjoy your delicious Spinach Artichoke Pasta Bake! To get the best flavor in your Spinach Artichoke Pasta Bake, use fresh ingredients. Fresh spinach tastes brighter than frozen. And fresh artichokes add a nice texture. Add a touch of lemon juice for brightness. It lifts the dish and balances the creaminess. Red pepper flakes can give it a nice kick. But only use them if you like some heat. Cooking pasta al dente means it's firm yet tender. This is key for a great bake. Boil your pasta in salted water for the right flavor. Follow the package instructions closely. Drain it just before it’s fully cooked. It will continue to cook in the oven, so stop cooking early. This helps prevent mushy pasta in your dish. Softened cream cheese blends easier than cold. Leave it out for about 30 minutes before mixing. Use a hand mixer or a whisk for a smoother blend. Mix it with sour cream and Parmesan until creamy. This makes a rich sauce that coats the pasta well. Avoid lumps for the best texture in your bake. Garnishing makes your dish look more appealing. Fresh parsley adds a pop of color. Chop it finely and sprinkle it over the top just before serving. You can also add a few extra red pepper flakes for color. This shows off the dish's flavor and makes it look inviting. A beautiful garnish makes everyone want to dig in! Pro Tips Use Fresh Spinach: Fresh spinach not only enhances the flavor but also retains more nutrients compared to frozen spinach. Perfectly Cooked Pasta: Make sure to cook the pasta al dente as it will continue to cook while baking, preventing it from becoming mushy. Cheese Variations: Feel free to mix cheeses; adding a bit of gouda or fontina can elevate the creaminess and flavor profile. Make Ahead: This dish can be assembled ahead of time and stored in the fridge for up to 24 hours before baking—perfect for meal prep! {{image_2}} You can keep this dish vegetarian with easy swaps. Use more veggies like bell peppers or zucchini. You can also add fresh herbs like basil or thyme. These add great flavor without meat. For a gluten-free version, choose gluten-free pasta. Many brands offer tasty options made from rice or chickpeas. This way, you still enjoy the creamy goodness without gluten. Want to make it heartier? Add cooked chicken or shrimp. Cook the chicken in the skillet first, then mix it with the pasta. For shrimp, just add them to the skillet with the spinach. Both options give you protein and flavor. Boost the taste with add-ins. Sauté mushrooms with the garlic for umami flavor. Sun-dried tomatoes also work well. They add a tangy bite that pairs nicely with the creamy sauce. Just chop them up and mix them into the bake for a delicious twist. To keep your Spinach Artichoke Pasta Bake fresh, let it cool first. Once cool, place it in an airtight container. Store it in the fridge for up to three days. If you want to enjoy it later, consider freezing it. When reheating, use the oven for the best results. Preheat the oven to 350°F (175°C). Place the pasta bake in a baking dish, cover with foil, and heat for about 20 minutes. This helps keep the top from burning while warming the inside. Check it after 15 minutes to see if it’s hot enough. To freeze, prepare the dish but do not bake it. Cover it tightly with plastic wrap and then aluminum foil. Label it with the date. It can last up to three months in the freezer. When ready to eat, thaw it overnight in the fridge. Bake it at 350°F (175°C) for 30-40 minutes or until bubbly. Enjoy your delicious meal anytime! Yes, you can prepare this dish ahead. Simply follow all the steps up to baking. Cover the dish and store it in the fridge for up to 24 hours. When you are ready to bake, let it sit at room temp for a bit. Then, bake it as directed. This helps the pasta heat evenly. This pasta bake pairs well with a fresh salad. A simple side of garlic bread also works nicely. You can also add roasted veggies or a light soup for a full meal. These sides balance the creamy texture of the pasta bake. You will know the bake is done when the top is golden brown and bubbly. Use a fork to check the pasta. It should be hot and soft all the way through. If you see any cheese not melted, give it a few more minutes. Yes, frozen spinach works well. Just make sure to thaw it first and squeeze out any extra water. This prevents the dish from becoming watery. You can follow the same steps as with fresh spinach. Penne or rigatoni are the best choices. These shapes hold the sauce well. You can also use shells or fusilli if you like. Just make sure they are cooked al dente for the best texture in the bake. This blog post covered how to make a delicious Spinach Artichoke Pasta Bake. We explored key ingredients and simple steps to create a creamy dish. You learned useful tips for flavor and cooking pasta just right. We also discussed variations and storage methods to keep it fresh. Embrace this recipe for your next meal. It’s easy and tasty, perfect for all occasions. Enjoy your cooking!

Spinach Artichoke Pasta Bake Flavorful and Simple Dish

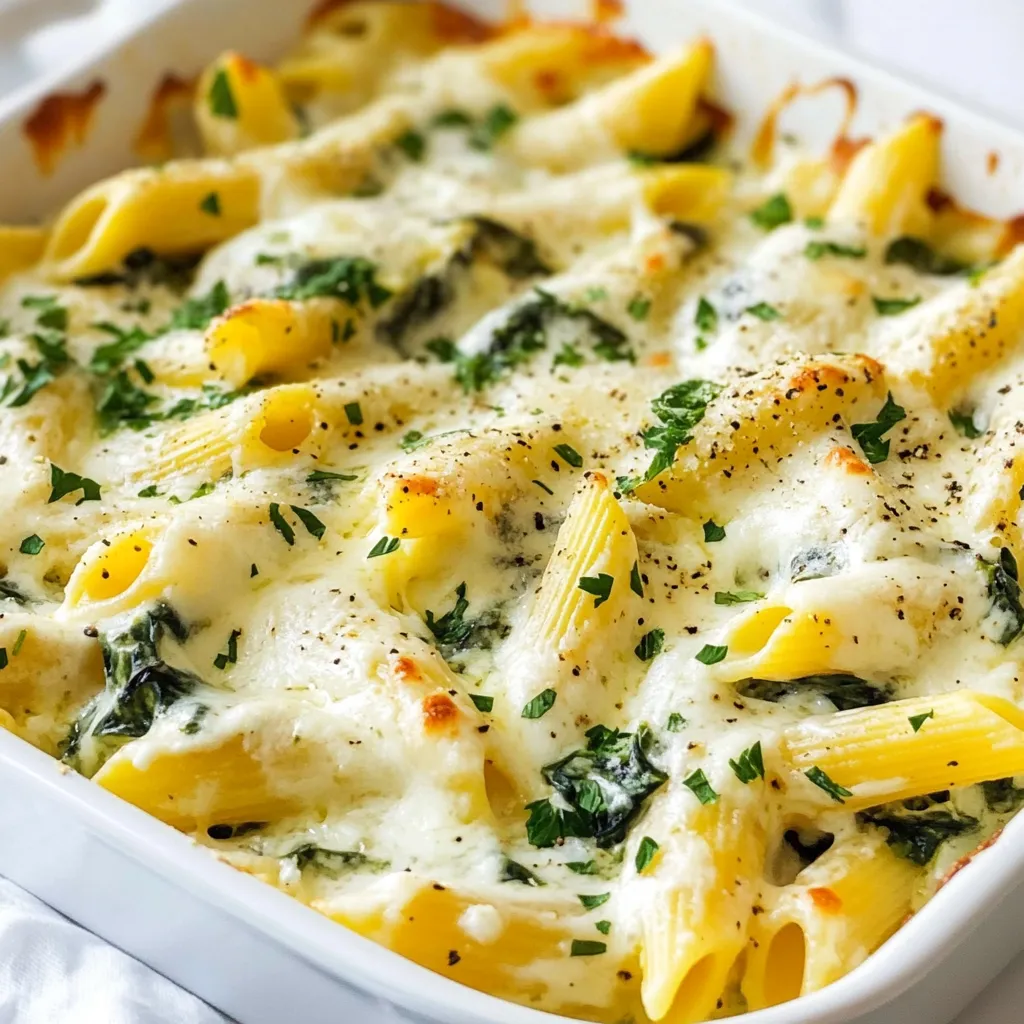
Looking for a tasty dinner that’s easy to make? You’re in the right spot! This Spinach Artichoke Pasta Bake shines

For my Pumpkin Chocolate Chip Scones, you need both dry and wet ingredients. Here’s the list: Dry Ingredients: - 2 cups all-purpose flour - 1/2 cup brown sugar, packed - 1 tablespoon baking powder - 1/2 teaspoon baking soda - 1/2 teaspoon salt - 1 teaspoon cinnamon - 1/2 teaspoon nutmeg - 1/4 teaspoon ginger Wet Ingredients: - 1/2 cup unsalted butter, cold and cubed - 3/4 cup pumpkin puree - 1/4 cup heavy cream - 1 large egg Optional Ingredients for Variations: - 1 cup semi-sweet chocolate chips The dry ingredients give the scones their structure. The wet ingredients add moisture and flavor. You can also try different chocolate types or add nuts for fun twists. Enjoy mixing and matching! First, preheat your oven to 400°F (200°C). This helps the scones cook evenly. Next, line a baking sheet with parchment paper. This keeps the scones from sticking. Now, let’s mix the dry ingredients. In a large bowl, sift together: - 2 cups all-purpose flour - 1/2 cup brown sugar, packed - 1 tablespoon baking powder - 1/2 teaspoon baking soda - 1/2 teaspoon salt - 1 teaspoon cinnamon - 1/2 teaspoon nutmeg - 1/4 teaspoon ginger After that, it’s time to incorporate the wet ingredients. In a separate bowl, whisk together: - 3/4 cup pumpkin puree - 1/4 cup heavy cream - 1 large egg Make sure everything is well combined before moving on. Now, mix the wet and dry ingredients. Pour the pumpkin mixture into the dry mix. Stir gently until just combined. It’s important not to overmix. Next, fold in the chocolate chips. Use 1 cup of semi-sweet chocolate chips for a sweet surprise in each bite. Once your dough is ready, shape it. Turn the dough onto a floured surface. Pat it into a 1-inch thick circle. Now, how do you cut scones? Cut the dough into wedges, about 8 pieces. Place each scone on your prepared baking sheet. Make sure to leave space between each piece. For baking, place the scones in the oven. Bake for 18-20 minutes. They are ready when the edges are golden brown. A toothpick should come out clean when inserted into the center. After baking, let the scones cool slightly on the baking sheet. Then, transfer them to a wire rack to cool completely. Enjoy your delicious pumpkin chocolate chip scones! Importance of ingredient temperature Using cold butter helps create flaky scones. When you add cold butter, it keeps its shape. This forms pockets of air during baking. The result? A light, tender scone. Also, use cold pumpkin puree and heavy cream for best results. Avoiding overmixing Mix your dough just enough. Overmixing can make your scones tough. Stir until the wet and dry ingredients are just combined. When you fold in the chocolate chips, be gentle. This keeps the texture soft and tender. Ideal pairings for scones Pumpkin chocolate chip scones pair well with warm drinks. Try serving them with coffee, chai, or tea. A dollop of pumpkin butter or honey adds a sweet touch too. For a fun twist, add a scoop of vanilla ice cream on the side. Presentation ideas Serve the scones warm for the best taste. Dust them with powdered sugar for a nice look. You can drizzle melted chocolate on top for extra flair. Arrange them on a pretty plate or a wooden board for a rustic feel. Best practices for refrigerating and freezing To store scones, let them cool first. Then, place them in an airtight container. They can stay fresh in the fridge for up to three days. If you want to freeze them, wrap each scone in plastic wrap. Place them in a freezer bag. They can last for up to three months. To enjoy, thaw overnight in the fridge and warm them in the oven. {{image_2}} You can change the flavor of your scones with a few easy swaps. Instead of cinnamon, try using cardamom or allspice. Both spices add warmth and depth. If you love a fruity twist, consider adding dried cranberries or chopped apples. You can also use dark chocolate chips for a richer taste. Making these scones gluten-free is simple. Substitute the all-purpose flour with a gluten-free flour blend. Make sure it has xanthan gum for the best texture. For a vegan version, replace the butter with coconut oil. Use almond milk instead of heavy cream and a flax egg in place of the egg. Mix one tablespoon of ground flaxseed with two and a half tablespoons of water, then let it sit for five minutes. Fall brings many flavors to explore. You can add maple syrup to the dough for a sweet twist. Or, mix in chopped pecans for extra crunch. If you want to be adventurous, add a teaspoon of vanilla extract or a splash of bourbon. Both will enhance the flavor and make your scones more unique. You can store your pumpkin chocolate chip scones at room temperature or in the fridge. If you plan to eat them within two days, keep them at room temperature in an airtight container. This keeps them soft and fresh. If you want to keep them longer, store them in the fridge. Just make sure to wrap them well to avoid drying out. Freezing is a great way to save scones for later. To freeze, place cooled scones in a single layer in a freezer bag. Remove as much air as possible before sealing. You can freeze them for up to three months. To thaw, take them out and let them sit at room temperature for a couple of hours. You can also warm them in the oven for five to ten minutes at 350°F (175°C) for a fresh-baked taste. These scones are best enjoyed fresh. At room temperature, they stay good for two days. In the fridge, they last for about a week. If frozen, they remain tasty for three months. Always check for signs of spoilage, like a strange smell or dry texture, before eating. Can I make these scones ahead of time? Yes, you can make these scones ahead of time. You can prepare the dough and shape it into wedges. Wrap the dough tightly in plastic wrap and store it in the fridge for up to 24 hours. When you're ready, bake them straight from the fridge. This will save you time and still give you warm, fresh scones. How do I know when the scones are done baking? You will know the scones are done when their edges turn golden brown. Insert a toothpick into the center of a scone. If it comes out clean, they are ready. If you see wet dough on the toothpick, bake them a little longer. Keep a close eye on them in the last few minutes of baking. Can I use fresh pumpkin instead of canned? Absolutely! You can use fresh pumpkin puree instead of canned. To make your own, steam or roast fresh pumpkin until it’s soft. Then, mash it until smooth. Just make sure it is not too watery. This will give your scones a fresh taste and great texture. What are the nutritional values of these scones? Each scone roughly contains around 200 calories. They have about 8 grams of fat, 30 grams of carbs, and 2 grams of protein. Keep in mind that these values may change based on the ingredients you choose. For a healthier twist, you can also opt for whole wheat flour or reduce the sugar. In this blog post, we explored how to make delicious pumpkin chocolate chip scones. We covered the essential ingredients, preparation steps, and baking tips. I shared ways to customize your scones with different flavors and seasonal twists. You learned how to store them properly for freshness. Remember, baking is fun and can be easy with the right knowledge. Now, grab your ingredients and start baking! Enjoy your tasty scones with friends or family.

Pumpkin Chocolate Chip Scones Simple and Tasty Recipe

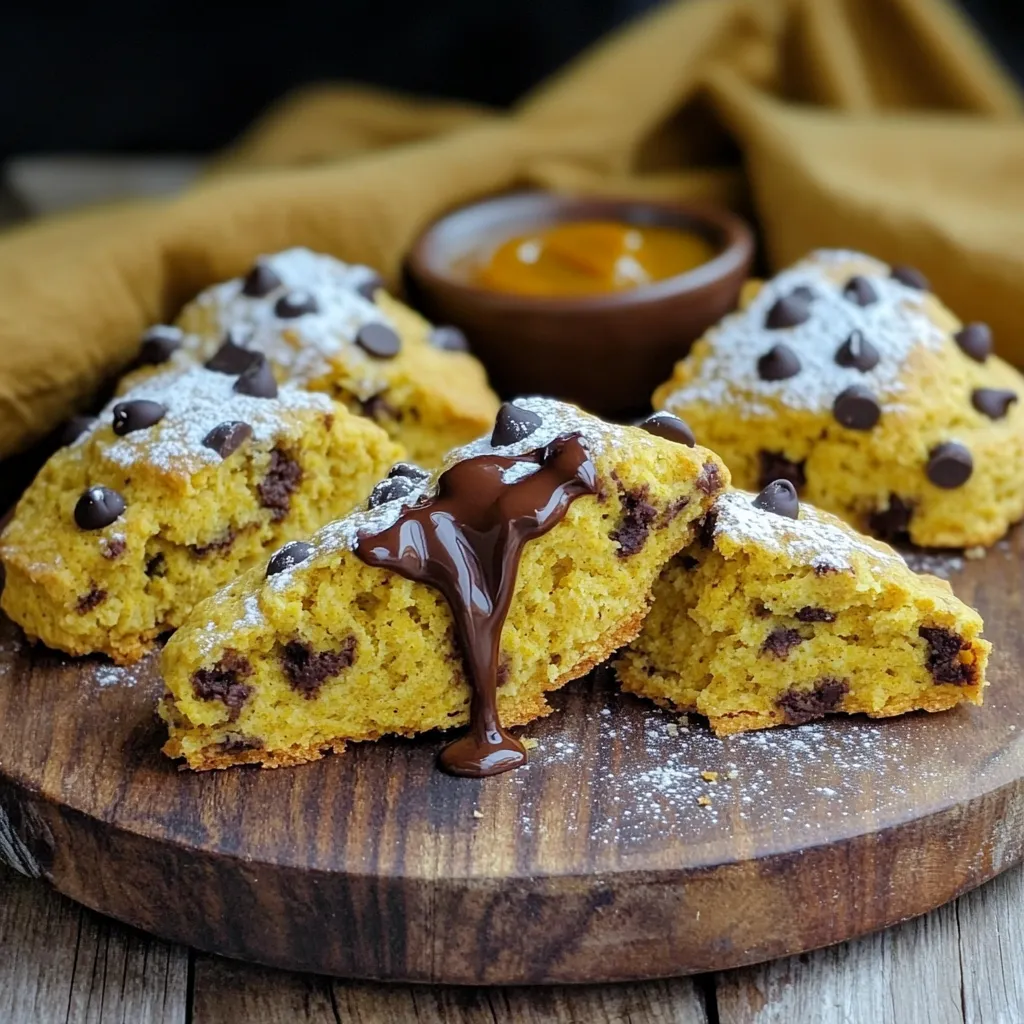
Are you ready to enjoy fall with a warm treat? This simple Pumpkin Chocolate Chip Scones recipe will be your

To make these yummy cookies, gather these key items: - 1 cup unsalted butter, softened - 1 cup granulated sugar - 1 cup brown sugar, packed - 2 large eggs - 1 teaspoon vanilla extract - 3 cups all-purpose flour - 1 teaspoon baking soda - 1 teaspoon baking powder - 1/2 teaspoon salt - 2 teaspoons ground cinnamon - 1 1/2 cups diced apples (about 2 medium apples) - 1 cup caramel sauce (for drizzling) - 1/4 cup granulated sugar mixed with 1 teaspoon cinnamon (for topping) These ingredients create a perfect blend of sweet, tangy, and buttery flavors. Apples bring moisture and texture, while the sugars add sweetness and depth. You can tweak the recipe with these additions: - 1/2 cup chopped nuts (pecans or walnuts) - 1/2 teaspoon nutmeg - 1/4 cup raisins or dried cranberries These ingredients can add a nice crunch or extra flavor. Feel free to mix and match based on what you like! Accurate measuring is key for great cookies. Here are some tips: - Use dry measuring cups for flour and sugar. - Spoon flour into your cup, then level it off with a knife. - For brown sugar, pack it firmly into the cup. - Use a liquid measuring cup for eggs and vanilla. By measuring correctly, you ensure your cookies turn out just right every time! Start by setting your oven to 350°F (175°C). This temperature helps the cookies bake evenly. While the oven heats, line two baking sheets with parchment paper. This step keeps the cookies from sticking and makes cleaning easier. In a large mixing bowl, add 1 cup of softened butter, 1 cup of granulated sugar, and 1 cup of packed brown sugar. Use a mixer on medium speed to beat these together. Mix for about 2-3 minutes until the mixture is light and fluffy. This step is key for a soft cookie. Next, crack in 2 large eggs, one at a time. Add 1 teaspoon of vanilla extract. Mix until everything is combined. In a separate bowl, whisk together 3 cups of all-purpose flour, 1 teaspoon of baking soda, 1 teaspoon of baking powder, 1/2 teaspoon of salt, and 2 teaspoons of ground cinnamon. Gradually add this dry mix to the wet mixture. Stir gently until just combined. Be careful not to overmix, as this can make the cookies tough. Now, it’s time to fold in the apples. You’ll need 1 1/2 cups of diced apples, about 2 medium apples. Use a spatula to gently combine them into the dough. This keeps the apples intact. For scooping, use a cookie scoop or a spoon. Drop rounded tablespoons of dough onto your baking sheets, leaving about 2 inches of space between each cookie. Before baking, sprinkle the dough balls with cinnamon sugar. This adds a nice touch. Bake in your preheated oven for 10-12 minutes. Look for lightly golden edges and set centers. Once done, let the cookies cool on the baking sheet for a few minutes before moving them to a wire rack. Drizzle warm caramel sauce over each cookie before serving. Enjoy! Baking cookies can be tricky. Here are some common mistakes to steer clear of: - Not Measuring Ingredients Correctly: Use a scale or measuring cups. Accuracy is key. - Overmixing the Dough: Mix just until combined. This helps keep cookies soft. - Skipping the Cooling Step: Let the cookies cool before drizzling caramel. This prevents a messy drizzle. Storing cookies well keeps them fresh. Here’s how to do it: - Use an Airtight Container: This keeps cookies moist and prevents them from drying out. - Separate Layers with Parchment Paper: This stops cookies from sticking together. - Keep in a Cool Place: Avoid warm areas to maintain texture and flavor. You want your cookies soft and chewy. Here are some tips: - Use Room Temperature Ingredients: This helps the dough mix smoothly. - Add Apples Gently: Fold them in carefully to keep the dough light. - Watch Baking Time Closely: Bake until edges are golden but centers are still soft. {{image_2}} You can add fun twists to make your cookies unique. Try mixing in different types of apples. Sweet Fuji or tart Granny Smith can change the taste. You can also add spices like nutmeg or ginger to the dough. For a crunchy bite, use crushed graham crackers in the mix. This gives a nice texture that reminds you of pie crust. You can easily make these cookies gluten-free. Just swap all-purpose flour with a gluten-free blend. Ensure it has a good balance of starches and fibers. For vegan cookies, replace butter with coconut oil. Use flax eggs instead of regular eggs. Mix one tablespoon of flaxseed meal with three tablespoons of water to create one flax egg. This keeps the cookies moist and delicious! Want to add more flavor? Nuts and dried fruits work well in these cookies. Chopped pecans or walnuts give a nice crunch. Dried cranberries or raisins add sweetness. Just fold them in when adding the apples. Remember to keep balance in your dough. Too many add-ins can change the texture, so use them wisely! To keep your cookies fresh, store them in an airtight container. This helps keep moisture in, which prevents the cookies from drying out. You can layer the cookies with parchment paper to avoid sticking. Store them at room temperature for up to one week. If you want to keep them longer, consider freezing them. Freezing cookies is easy! First, let the cookies cool completely. Then, place them in a single layer on a baking sheet. Freeze for about an hour until firm. After that, transfer them to a freezer bag or container. Make sure to remove as much air as possible. You can freeze the cookies for up to three months. To enjoy your cookies warm, reheat them in the oven. Set your oven to 350°F (175°C). Place the cookies on a baking sheet for about 5-7 minutes. This helps revive their crispy edges and soft centers. You can also use the microwave for quick heating. Heat for about 10-15 seconds. Just be careful not to overheat, or they may become tough! Yes, you can use many types of apples. Sweet apples like Fuji and Gala work well. Tart apples, such as Granny Smith, add a nice zing. Mixing types gives a great flavor too. Try different apples for a unique taste. To make the cookies chewier, use more brown sugar. Brown sugar adds moisture and a rich taste. Chilling the dough before baking helps too. It slows the spread and keeps them thick. Bake just until the edges set for a soft center. Yes, you can make the dough in advance. Store it in the fridge for up to three days. For longer storage, freeze the dough. Wrap it tightly in plastic wrap. When you're ready, thaw it overnight in the fridge before baking. Serve these cookies warm for the best taste. Drizzle extra caramel sauce on top. A sprinkle of chopped nuts adds crunch and flavor. Pair them with vanilla ice cream for a treat. They also look lovely on a decorative platter. These cookies last for about a week at room temperature. Store them in an airtight container. For longer freshness, keep them in the fridge. If frozen, they can last for up to three months. Just thaw before enjoying again. Caramel apple pie cookies combine sweet flavors with rich texture. You learned about essential ingredients and how to prep. Following the step-by-step guide, you can mix and bake easily. I shared tips to avoid mistakes and store your cookies well. Variations give you plenty of ways to enjoy these treats. Remember, you can adjust the recipe to fit your taste. Happy baking! Enjoy these cookies fresh and warm or keep them for later.

Caramel Apple Pie Cookies Irresistible Treat Recipe

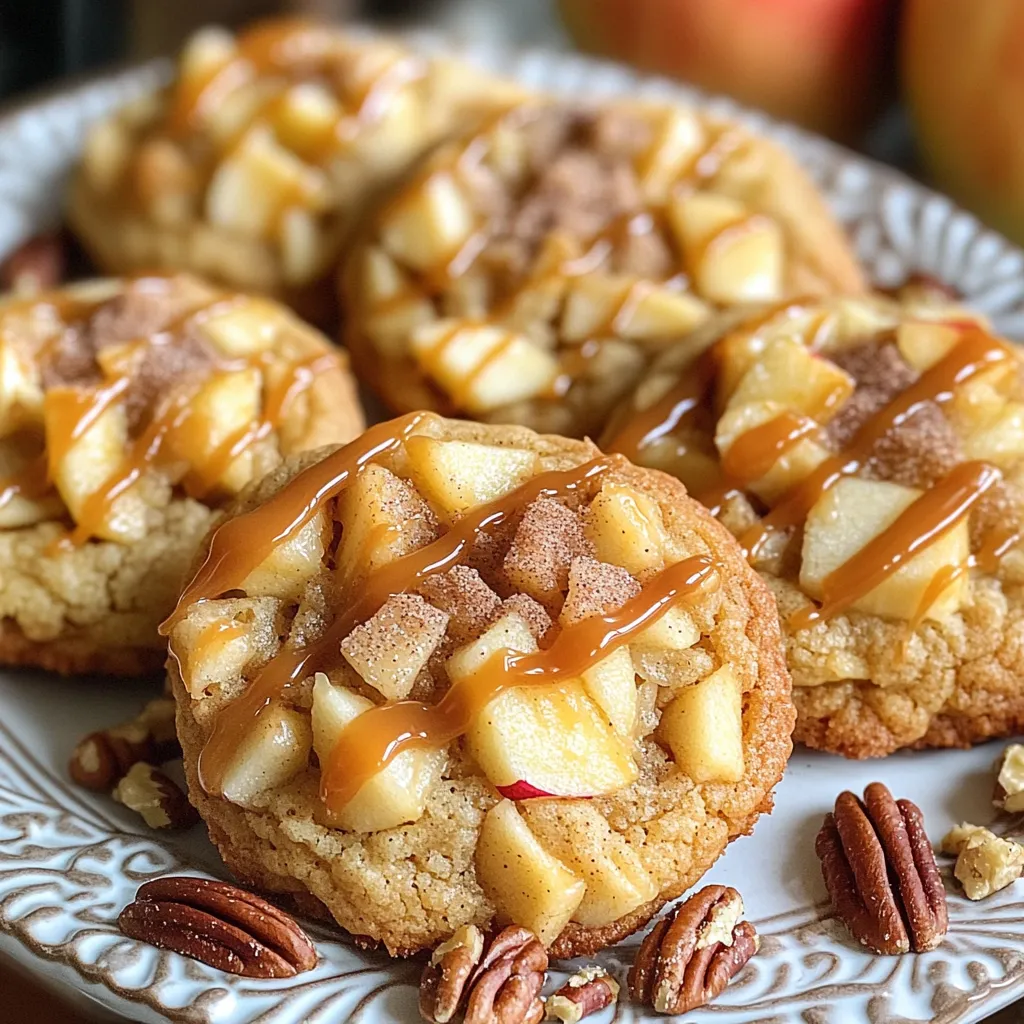
If you love warm, gooey desserts, you’re in for a treat! Caramel Apple Pie Cookies combine the sweet flavors of

To make One-Pot Creamy Tomato Basil Tortellini, you need a few key items. Gather these essential ingredients: - 2 tablespoons olive oil - 3 cloves garlic, minced - 1 can (14 oz) diced tomatoes (with juices) - 4 cups vegetable broth These ingredients form the base of your dish. The olive oil adds richness. Garlic gives a strong, savory flavor. Diced tomatoes bring sweetness and acidity. Vegetable broth adds depth to the sauce. Next, you'll need the main elements that make this dish creamy and tasty. Grab these key components: - 1 package (9 oz) refrigerated cheese tortellini - 1 cup heavy cream - 1 cup fresh basil leaves, chopped - 1 teaspoon Italian seasoning Cheese tortellini provides a delightful bite. Heavy cream creates a smooth, rich sauce. Fresh basil adds bright, herbal notes. Italian seasoning gives that classic Italian flavor. Finally, finish your dish with some seasoning and garnish. Use these to enhance your meal: - Salt and pepper to taste - Grated Parmesan cheese for serving Salt and pepper help balance flavors. Grated Parmesan adds a savory touch when you serve the dish. Together, these ingredients make your One-Pot Creamy Tomato Basil Tortellini a delicious treat. - Preparing the ingredients: Gather all your ingredients first. You will need olive oil, minced garlic, diced tomatoes, and vegetable broth. This makes cooking easier and faster. - Sautéing garlic: In a large pot, heat 2 tablespoons of olive oil over medium heat. Once hot, add 3 minced garlic cloves. Sauté for 1 to 2 minutes. You want the garlic to smell great, but don’t let it burn. - Combining tomatoes and broth: After the garlic is ready, pour in 1 can of diced tomatoes with their juices. Next, add 4 cups of vegetable broth. Stir it well so everything mixes nicely. - Bringing the mixture to a simmer: Turn the heat up slightly until the mixture starts to bubble. This means it is simmering, which is perfect for the next step. - Cooking time and stirring instructions: Add 1 package of refrigerated cheese tortellini to the pot. Cook according to the package instructions, usually about 5 to 7 minutes. Stir it gently from time to time to keep it from sticking to the bottom. - Adding cream and basil: Once the tortellini is tender, lower the heat. Stir in 1 cup of heavy cream and 1 cup of chopped fresh basil. Mix until everything is creamy and warm. - Adjusting sauce consistency: If the sauce seems too thick, add a bit more broth or water. This will help you get the creaminess you like. - Serving suggestions: Serve the dish hot. Garnish with grated Parmesan cheese and a few extra basil leaves. Pair it with some crusty bread for dipping. Enjoy your meal! How to choose the right tortellini For this dish, I like to use cheese tortellini. Look for fresh or refrigerated options. They cook faster and taste better than dried ones. Check the label for quality cheese and simple ingredients. Adjusting creaminess levels You can control how creamy your sauce is. If you want it richer, add more heavy cream. For a lighter option, use less cream or substitute with milk. If your sauce gets too thick, just add a bit more broth or water. Additional spices to try To boost flavor, consider adding a pinch of red pepper flakes. This adds a nice heat. Fresh herbs like thyme or oregano can also elevate the taste. Experiment with these to find your perfect mix. Using different types of tomatoes Try using fire-roasted tomatoes for a smoky flavor. San Marzano tomatoes also work well and add sweetness. You can even blend fresh tomatoes into the sauce for a vibrant taste. Creative serving ideas Serve your tortellini in rustic bowls for a cozy feel. Add a sprinkle of grated Parmesan on top. A few extra basil leaves make it look fresh and inviting. Pairing with sides and drinks Crusty bread is perfect for dipping. A simple green salad with lemon vinaigrette complements the dish nicely. For drinks, a light white wine or sparkling water enhances the meal. {{image_2}} You can change the proteins in your tortellini dish. Try adding cooked chicken or shrimp for a heartier meal. If you want a lighter option, use turkey sausage. For plant-based alternatives, choose tofu or tempeh. These options add flavor and nutrition. Add vegetables to boost nutrition and flavor. Spinach, zucchini, or bell peppers work well. Simply chop and toss them in during cooking. You can also experiment with cheeses. Try adding mozzarella, ricotta, or goat cheese for different tastes. Each cheese will change the dish’s creaminess and flavor. For gluten-free options, use gluten-free tortellini. Many brands offer this choice. You can also make a simple sauce with gluten-free pasta. If you're vegan, replace heavy cream with coconut cream or cashew cream. For a cheese-free version, skip the Parmesan or use a vegan cheese alternative. To store leftovers, let the dish cool to room temperature. Then, place it in an airtight container. This helps keep the flavors fresh. I recommend using glass containers for easy reheating. You can use plastic containers, but glass is safer for hot food. For freezing, portion the dish into smaller containers. Leave some space at the top for expansion. This helps avoid spills. When you are ready to eat, thaw it in the fridge overnight. For reheating, place it in a pot over low heat. Stir often until it is heated through. The tortellini can stay in the fridge for about 3-5 days. In the freezer, it lasts up to 3 months. Signs of spoilage include off smells, changes in color, or mold. If you see any of these signs, it is best to throw it away. Can I use frozen tortellini? Yes, you can use frozen tortellini. Just add them directly to the pot. You might need to extend the cooking time by a couple of minutes. Keep stirring until they are cooked through. How do I make it less creamy? To make it less creamy, reduce the amount of heavy cream. You can also add more vegetable broth. This will keep the dish flavorful while making it lighter. How can I make it spicier? Add red pepper flakes or a dash of hot sauce. This will give your dish a nice kick. You can also try adding sautéed jalapeños for more heat. What's the best way to reheat? Reheat in a pot over low heat. Stir often to avoid sticking. You may need to add a splash of broth to keep it creamy. Can I use fresh tomatoes instead of canned? Yes, fresh tomatoes work well. Use about four medium tomatoes, chopped. You may need to add a little water for moisture. What if I don’t have heavy cream? You can use half-and-half or milk instead. For a dairy-free option, try coconut milk. This will still give you a creamy texture. This blog post covered a simple but tasty tortellini recipe. We explored the essential ingredients, like olive oil and garlic, and key components such as cheese tortellini and heavy cream. I shared step-by-step cooking instructions, plus tips to make your dish pop. You can swap ingredients, adjust flavors, and even store leftovers safely. Feel free to experiment based on your taste and diet. With these ideas, you can create a delicious meal every time. Enjoy cooking, and let your creativity shine!

One-Pot Creamy Tomato Basil Tortellini Delight

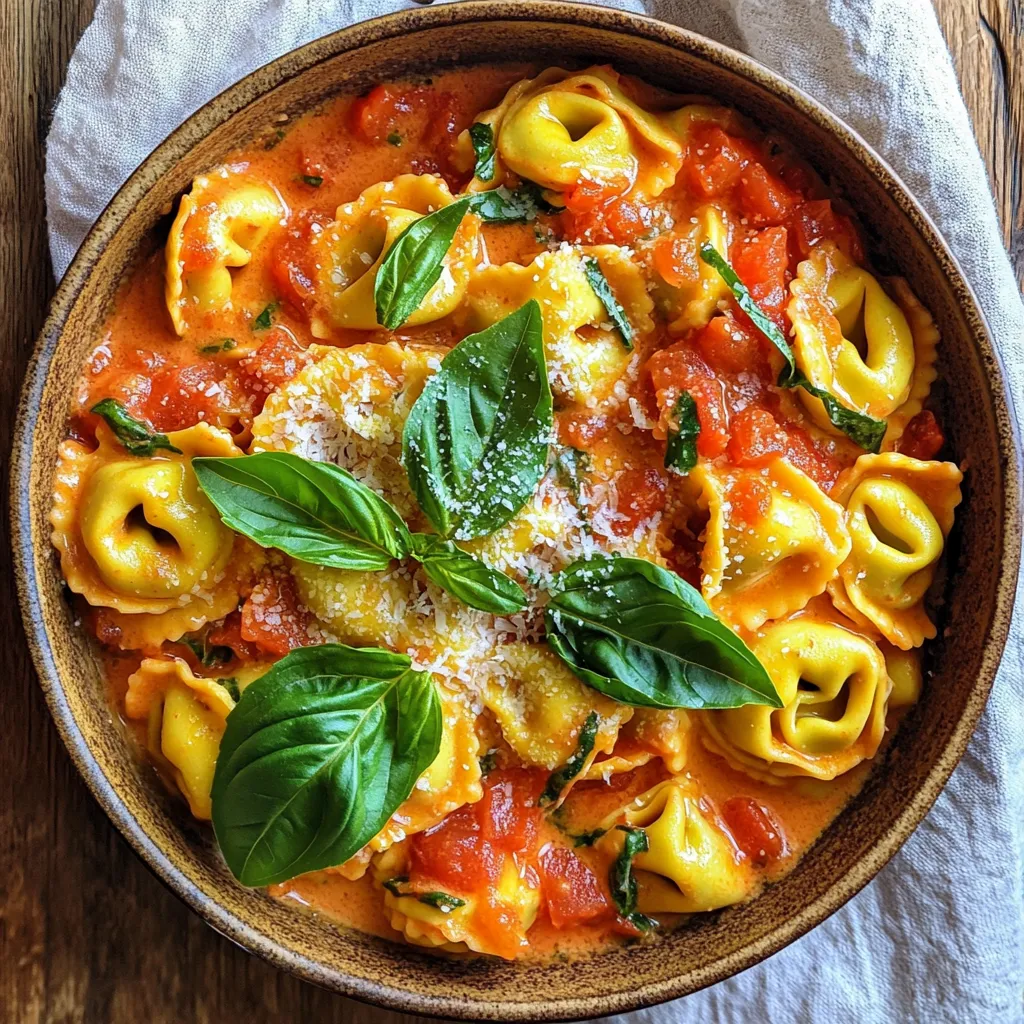
Welcome to One-Pot Creamy Tomato Basil Tortellini Delight. If you crave a hearty meal that’s quick and easy, you’re in

- 1.5 lbs chicken breast, sliced into strips - 2 tablespoons olive oil - 2 teaspoons dried oregano - 2 teaspoons garlic powder - 1 teaspoon paprika - Salt and pepper to taste - 1 red bell pepper, sliced - 1 yellow bell pepper, sliced - 1 red onion, sliced - 1 cucumber, diced - 1 cup cherry tomatoes, halved The heart of this recipe starts with chicken breast. It’s tender and juicy, perfect for roasting. I use olive oil to help the spices stick and add flavor. Dried oregano brings a nice and earthy taste, while garlic powder and paprika give depth. Salt and pepper are key for enhancing all the flavors. The veggies add color and crunch. Red and yellow bell peppers provide sweetness. Red onion adds a slight bite, and the cucumber and cherry tomatoes give freshness. Each bite will be full of flavor. - 1/2 cup feta cheese, crumbled - 1/4 cup Kalamata olives, sliced - Fresh parsley, chopped (for garnish) Garnishes take the dish to the next level. Feta cheese adds creaminess and tang. Kalamata olives bring a briny taste that pairs well with the chicken. Fresh parsley adds a burst of color and a hint of herbiness, making your bowl look and taste fresh. - 1 cup cooked quinoa or brown rice - Tzatziki sauce (for serving) For a filling base, I use either quinoa or brown rice. Both are hearty and nutritious. Tzatziki sauce is a must! It’s cool and creamy, balancing the warm flavors of the roasted chicken and veggies. Drizzle it on top for a delicious finish. 1. Preheat your oven to 425°F (220°C). This high heat helps to crisp the chicken and veggies. 2. Line a large baking sheet with parchment paper. This keeps your food from sticking. 3. In a large bowl, mix 2 tablespoons of olive oil, 2 teaspoons of dried oregano, 2 teaspoons of garlic powder, 1 teaspoon of paprika, and salt and pepper to taste. This mix adds great flavor. 4. Add 1.5 lbs of sliced chicken breast to the bowl. Toss the chicken until all the pieces are well-coated with the marinade. 1. Spread the marinated chicken on one side of the baking sheet. Keep it in a single layer for even cooking. 2. On the other side, arrange the sliced red and yellow bell peppers, and red onion. Use a single layer here too. 3. Roast everything in the oven for 20-25 minutes. The chicken should be cooked through, and the veggies should feel tender. Flip both halfway through cooking for best results. 1. Start with a base of cooked quinoa or brown rice. This gives your bowl a hearty foundation. 2. Top with the roasted chicken strips and vegetables. Add diced cucumbers and halved cherry tomatoes for freshness. 3. Sprinkle crumbled feta cheese and sliced Kalamata olives on top. These add a salty kick and depth to your dish. 4. Finish with a garnish of fresh parsley and a drizzle of tzatziki sauce. This sauce adds creaminess and zesty flavor to your bowl. To ensure even cooking of chicken and vegetables, follow these steps: - Cut chicken and veggies into similar sizes. This helps everything cook at the same rate. - Spread the chicken and veggies in a single layer on the baking sheet. This promotes better heat circulation. - Flip the chicken and veggies halfway through cooking. This gives both sides a nice roast. For marinating the chicken effectively: - Use a large bowl for mixing. This helps the chicken absorb all the flavors. - Let the chicken marinate for at least 30 minutes. The longer you marinate, the more flavor it gains. - Try to use a mix of spices like oregano and garlic powder. These add a nice flavor boost. For pairing with additional sides: - Serve with a fresh Greek salad. This adds crunch and freshness to your meal. - Pita bread works well too. It’s great for dipping in tzatziki or wrapping around the chicken. Recommended beverage pairings include: - A crisp white wine like Sauvignon Blanc enhances the flavors of the dish. - For a non-alcoholic option, try sparkling water with lemon. It refreshes the palate and complements the meal. {{image_2}} You can change the protein in this dish. Try shrimp or pork instead of chicken. Both options bring a new taste. Shrimp cooks fast and adds a nice, sweet flavor. Pork gives a rich, hearty bite. You can also swap the veggies. Use zucchini or asparagus for variety. These vegetables roast well and add a fresh crunch. You can even mix in some artichoke hearts or eggplant for a unique twist. Different sauces can change the flavor profile of these bowls. Try tahini sauce for a nutty taste. A simple lemon vinaigrette adds brightness. Or, go bold with a spicy yogurt sauce to kick up the heat. For a homemade tzatziki, combine the following: - 1 cup plain Greek yogurt - 1/2 cucumber, grated - 2 cloves garlic, minced - 1 tablespoon olive oil - 1 tablespoon lemon juice - Salt to taste Mix all ingredients and chill for a refreshing sauce. This tzatziki will elevate your gyro bowls with its cool, creamy goodness. To store leftovers from your Sheet-Pan Greek Chicken Gyro Bowls, let them cool first. Place them in an airtight container. I suggest separating the chicken, veggies, and grains. This keeps everything fresh. You can store them in the fridge for up to four days. When you're ready to eat, just reheat the portions you want. If you want to save some for later, freezing is a great choice. Divide your meal into single portions. Use freezer-safe containers or bags. Remove as much air as possible to avoid freezer burn. These meals can last up to three months in the freezer. When you're ready to enjoy your frozen gyro bowls, thaw them overnight in the fridge. Reheat in the oven or microwave until hot. This way, you can enjoy the flavors anytime! Can I make this recipe ahead of time? Yes, you can prepare this dish ahead. Marinate the chicken and cut the veggies one day before. Store them in the fridge. When you're ready, just roast everything. The flavors will blend nicely! What sides pair well with Greek Chicken Gyro Bowls? Great sides include a simple Greek salad or roasted potatoes. You can also serve warm pita bread with hummus. These sides balance the flavors and add variety to your meal. How can I make this dish spicier? To spice things up, add red pepper flakes or cayenne pepper to the marinade. You can also serve with hot sauce or a spicy tzatziki. Adjust the spice level to fit your taste! Can I use boneless thighs instead of chicken breast? Absolutely! Boneless thighs work well in this recipe. They add more flavor and stay juicy. Just adjust the cooking time slightly, as thighs may take a bit longer to cook through. This blog post covered a healthy recipe for Greek Chicken Gyro Bowls. We explored key ingredients, garnishes, and serving suggestions. I shared step-by-step instructions for preparing, roasting, and assembling your bowls. Cooking tips helped you achieve the best results. Variations included ingredient swaps and alternative sauces. Lastly, we discussed storage methods for leftovers. Try making these bowls for a quick, tasty meal. The fresh flavors promise to impress everyone!

Sheet-Pan Greek Chicken Gyro Bowls Flavorful Delight

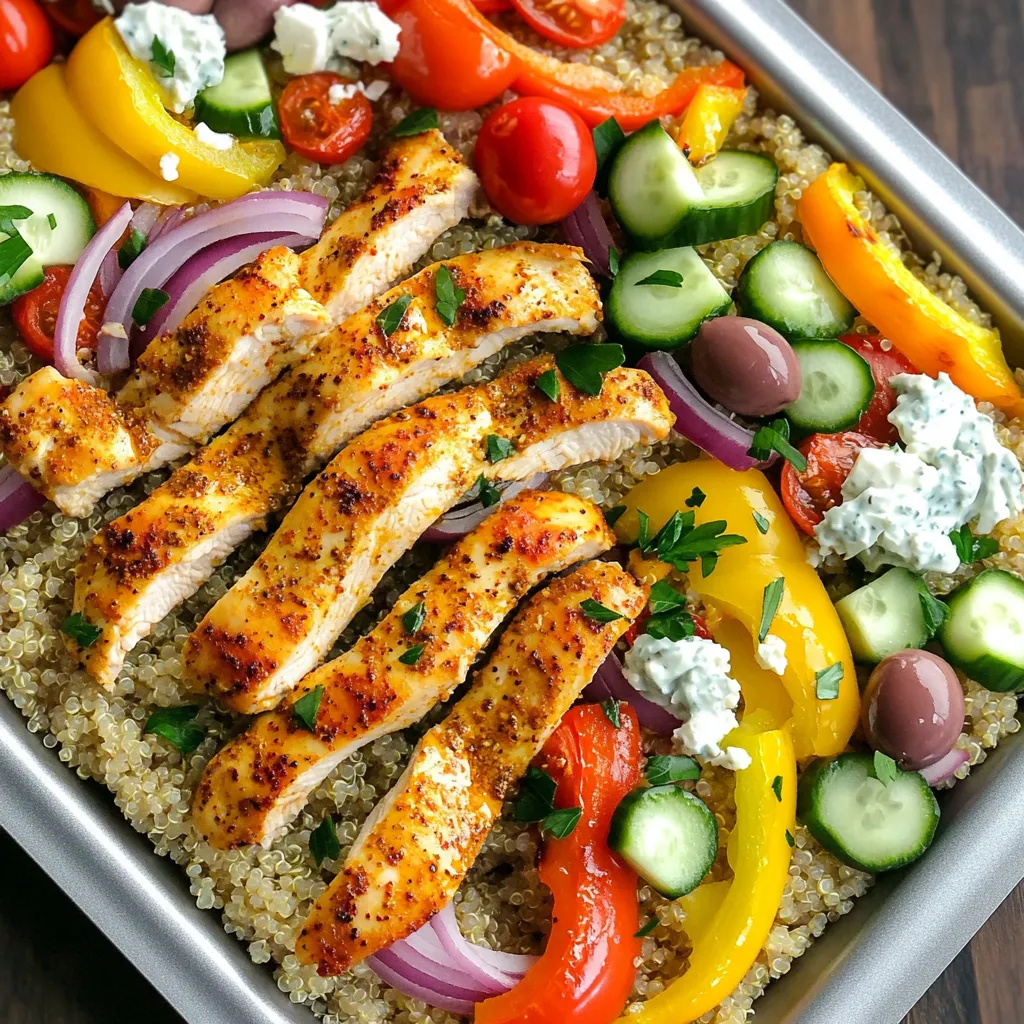
Get ready for a taste adventure with my Sheet-Pan Greek Chicken Gyro Bowls! These flavorful bowls pack perfectly seasoned chicken,

To make Air Fryer Crispy Coconut Shrimp, you need the following main ingredients: - 1 lb large shrimp, peeled and deveined - 1 cup shredded coconut (you can use sweetened or unsweetened) - 1 cup panko breadcrumbs - 2 large eggs - 1/2 cup all-purpose flour - 1 tsp garlic powder - 1 tsp paprika - Salt and pepper to taste - Cooking spray These ingredients work together to create a crunchy, tasty coating for the shrimp. The combination of coconut and panko gives each piece a nice texture. While the main ingredients are key, you can add a few optional ones for extra flavor. Consider adding: - A pinch of cayenne pepper for heat - A squeeze of lime juice for brightness - Fresh herbs like cilantro or parsley for garnish These additions can enhance your dish and make it more fun! To make your meal even better, serve the crispy coconut shrimp with: - Sweet chili sauce for dipping - Mango salsa for a fruity twist - Lime wedges to squeeze over the shrimp These sides not only complement the shrimp but also add color and freshness to your plate! Start with one pound of large shrimp. Make sure they are peeled and deveined. Use paper towels to dry the shrimp well. Dry shrimp will hold the coating better. This step is key to getting a crispy finish. Next, gather your three bowls. In the first bowl, mix half a cup of flour with salt, pepper, garlic powder, and paprika. This adds flavor to the shrimp. In the second bowl, beat two large eggs. The egg will help the coating stick. In the third bowl, combine one cup of shredded coconut with one cup of panko breadcrumbs. This mix gives a nice crunch. Preheat your air fryer to 400°F (200°C). This takes about five minutes. While it heats, spray the air fryer basket with cooking spray. This prevents the shrimp from sticking. Take each shrimp and dredge it in the flour mix. Shake off extra flour. Then, dip it in the beaten eggs. Finally, roll it in the coconut and panko mix. Press gently to make sure it sticks. Arrange the shrimp in a single layer in the basket. Do not overcrowd them; this ensures they cook evenly. Lightly spray the tops of the shrimp with cooking spray. Cook for eight to ten minutes. Flip the shrimp halfway through to brown both sides. Once golden and crispy, remove them from the air fryer. Repeat with any remaining shrimp. Enjoy your delicious coconut shrimp! To get the best crunch, dry your shrimp well. Use paper towels to soak up moisture. This helps the coating stick and stay crisp. Also, use panko breadcrumbs. They are lighter and give a better texture. Lightly spray the shrimp with cooking spray before cooking. This adds extra crispiness as they fry. One big mistake is overcrowding the air fryer. If you pack too many shrimp in, they won’t cook evenly. Always use a single layer for best results. Another mistake is skipping the drying step. Wet shrimp will lead to soggy shrimp. Take your time with the breading. Ensure each shrimp is well-coated for a great crunch. Cooking time may change depending on shrimp size. For large shrimp, cook for about 8-10 minutes. If you're using smaller shrimp, reduce cooking time to 6-8 minutes. Always flip them halfway for even cooking. Check for a golden brown color to know they’re done. If unsure, a food thermometer can help; shrimp should reach 120°F. {{image_2}} You can add flavors to the shrimp by mixing spices. Try using cayenne pepper for heat. A bit of curry powder gives a nice twist too. You can also add zest from a lime or lemon. These spices can change the taste and make it unique. Don’t stick just to coconut and panko. You can use crushed cornflakes for a crunchy bite. Almond flour is another great option, especially for a nutty flavor. If you want a gluten-free choice, try using gluten-free bread crumbs. Each option will give a different texture to the shrimp. Serve your shrimp with fun dips. Sweet chili sauce adds a nice kick. Mango salsa brings sweetness to balance the dish. Pair with lime wedges for a fresh twist. You can also serve them over a bed of rice or salad to make a full meal. To store leftover coconut shrimp, place them in an airtight container. Keep them in the fridge for up to three days. Make sure they cool down first. This helps keep them crispy. If you have more shrimp than you can eat, consider freezing them instead. When you're ready to enjoy your shrimp again, use the air fryer to reheat. Set it at 350°F (175°C). Cook for about 5 to 7 minutes. This keeps them crispy. You can also use an oven, but the air fryer works best for a crunchy texture. If you want to freeze the shrimp, first let them cool completely. Arrange them in a single layer on a baking sheet. Freeze them for about an hour. Once frozen, transfer them to a freezer bag. They can last for up to three months in the freezer. When ready to cook, no need to thaw; just air fry them straight from the freezer! Yes, you can use frozen shrimp. Just make sure to thaw them first. Thawing helps the coating stick better. Place the shrimp in cold water for about 15-20 minutes. Once thawed, pat them dry with paper towels. This will remove extra moisture and prevent sogginess. Many sauces go well with coconut shrimp. Here are some great options: - Sweet chili sauce - Mango salsa - Honey mustard - Pineapple dipping sauce These sauces will add a nice contrast to the sweet and crispy shrimp. To make coconut shrimp gluten-free, swap regular flour for gluten-free flour. Also, use gluten-free panko breadcrumbs. You can find these in most stores. Follow the same steps for breading and cooking. The shrimp will still turn out crispy and delicious. In this post, we explored how to make delicious coconut shrimp. We covered the key ingredients, tips for crispiness, and common mistakes to avoid. I shared fun ways to vary the dish and storage info to keep leftovers tasty. Remember, the right shrimp and cooking time make a big difference. Enjoy experimenting with flavors and sauces. Coconut shrimp can be your crowd-pleaser at any meal. Now, it’s time for you to try it out and enjoy!

Air Fryer Crispy Coconut Shrimp Easy and Delicious Meal

Are you ready to elevate your dinner game? Let’s dive into making Air Fryer Crispy Coconut Shrimp—an easy and delicious

- 4 salmon fillets (6 oz each) - ¼ cup honey - 2 tablespoons Sriracha sauce The main stars of this dish are salmon, honey, and Sriracha. Salmon is rich in omega-3 fatty acids and protein. The honey adds a sweet touch, while Sriracha gives it a spicy kick. Together, they create a balanced flavor that excites your taste buds. - 2 tablespoons soy sauce - 1 tablespoon fresh ginger, grated - 2 cloves garlic, minced These ingredients enhance the dish. Soy sauce adds umami, bringing depth to the glaze. Fresh ginger provides warmth and a hint of spice. Garlic infuses a savory note that rounds out the flavor profile. - 2 green onions, sliced (for garnish) - Sesame seeds (for garnish) Garnishes add visual appeal and flavor. Green onions give a fresh crunch, while sesame seeds add nuttiness. These touches make your dish look and taste even better. Enjoy the contrast of colors and textures on your plate! First, set your oven to 400°F (200°C). This hot temperature ensures a nice glaze on the salmon. Next, take a baking sheet and line it with parchment paper. This makes cleanup easy and prevents sticking. In a mixing bowl, combine the following ingredients for the glaze: - ¼ cup honey - 2 tablespoons Sriracha sauce - 2 tablespoons soy sauce - 1 tablespoon fresh ginger, grated - 2 cloves garlic, minced - 1 tablespoon sesame oil - 1 tablespoon rice vinegar Whisk these together until they blend well. The glaze should smell sweet and spicy. This will coat your salmon perfectly. Now, take 4 salmon fillets, each about 6 oz, and season them with salt and pepper. Place them skin-side down on the prepared baking sheet. This helps the skin get crispy and keeps the fish moist. Brush the honey Sriracha glaze over each salmon fillet generously. Save a little glaze for later basting. Bake the salmon for 12-15 minutes. The fish is ready when it flakes easily with a fork. Halfway through, baste the salmon with the reserved glaze for extra flavor. When the salmon is done, let it rest for a few minutes. This helps keep it juicy. For the final touch, garnish each fillet with sliced green onions and a sprinkle of sesame seeds. This adds color and a nice crunch. Enjoy your flavorful dish! To adjust spice levels, start with less Sriracha. You can always add more if you like heat. For a milder glaze, use honey and a bit of soy sauce. If you have leftover glaze, store it in a sealed container. It will last up to one week in the fridge. You can use it later on grilled veggies or chicken. Baking the salmon is simple and reliable. It keeps the fish moist and flavorful. If you prefer grilling, place it on medium heat. Grill for about 6-8 minutes on each side. To check doneness, use a fork to see if it flakes easily. The salmon should reach an internal temperature of 145°F (63°C). Serve your Honey Sriracha Glazed Salmon on a bed of jasmine rice. Steamed vegetables also make a great side. For a pop of color, consider adding a few bright veggies. Drizzle any extra glaze over the top for a shiny and tasty finish. Garnish with green onions and sesame seeds for a beautiful touch. {{image_2}} You can change the flavors in this dish easily. Adding citrus zest brightens the glaze. Use lemon or lime zest for a fresh twist. If you want more heat, try different hot sauces. You can use less Sriracha for a milder taste or mix in chili flakes for extra spice. If you want to switch the protein, chicken or tofu works great. For chicken, use boneless thighs or breasts. Cook them for about 20-25 minutes at the same oven temperature. For tofu, press it to remove water, then cut it into cubes. Bake the tofu for around 15-20 minutes, brushing on the glaze halfway through. The way you serve this dish can change its look. Place the glazed salmon on a bed of jasmine rice or steamed veggies. This adds color and nutrition. You can also add seasonal vegetables like asparagus or bell peppers for a pop of color. Drizzle extra glaze on top for a beautiful finish. To keep your Honey Sriracha Glazed Salmon fresh, store leftovers in an airtight container. This helps prevent odors and keeps the salmon moist. I recommend eating it within 3 days for the best taste. When reheating salmon, use the oven or a skillet. Preheat the oven to 350°F (175°C) and place the salmon on a baking sheet. Heat for about 10 minutes. If using a skillet, warm it over low heat. This keeps the salmon juicy and tasty. Avoid using a microwave, as it can dry out the fish. You can freeze your glazed salmon if you have extras. Wrap each fillet tightly in plastic wrap, then place them in a freezer bag. This helps prevent freezer burn. To thaw, place the salmon in the fridge overnight. You can also use cold water for a quicker method. Just make sure to cook it right away after thawing. To check if salmon is cooked, look for flakiness. Use a fork to gently poke the fish. If it flakes easily, it's done. Salmon should also reach an internal temperature of 145°F (63°C). This ensures it is safe to eat while still being moist and tender. Yes, you can make the glaze ahead of time. Simply mix the honey, Sriracha, soy sauce, ginger, garlic, sesame oil, and rice vinegar in a bowl. Store it in an airtight container in the fridge. It will last for about a week. Just give it a good stir before using it again. This dish goes great with many sides. Here are some tasty options: - Steamed jasmine rice - Roasted vegetables like broccoli or asparagus - Quinoa salad with fresh herbs - Creamy mashed potatoes These sides balance the sweet and spicy flavors of the salmon. Yes, this recipe is perfect for meal prep. To do this: - Cook the salmon and let it cool. - Portion it into meal prep containers. - Add your choice of sides. - Store in the fridge for up to four days. This way, you have quick and easy meals ready to go throughout the week. You learned how to make delicious Honey Sriracha Glazed Salmon. We covered key ingredients, preparation steps, and tips for the best results. I shared ideas for variations and storage methods, too. This dish is easy to adjust based on your taste. Remember to play with spices and try new proteins. Enjoy getting creative in the kitchen, and happy cooking!

Honey Sriracha Glazed Salmon Flavorful and Simple Dish

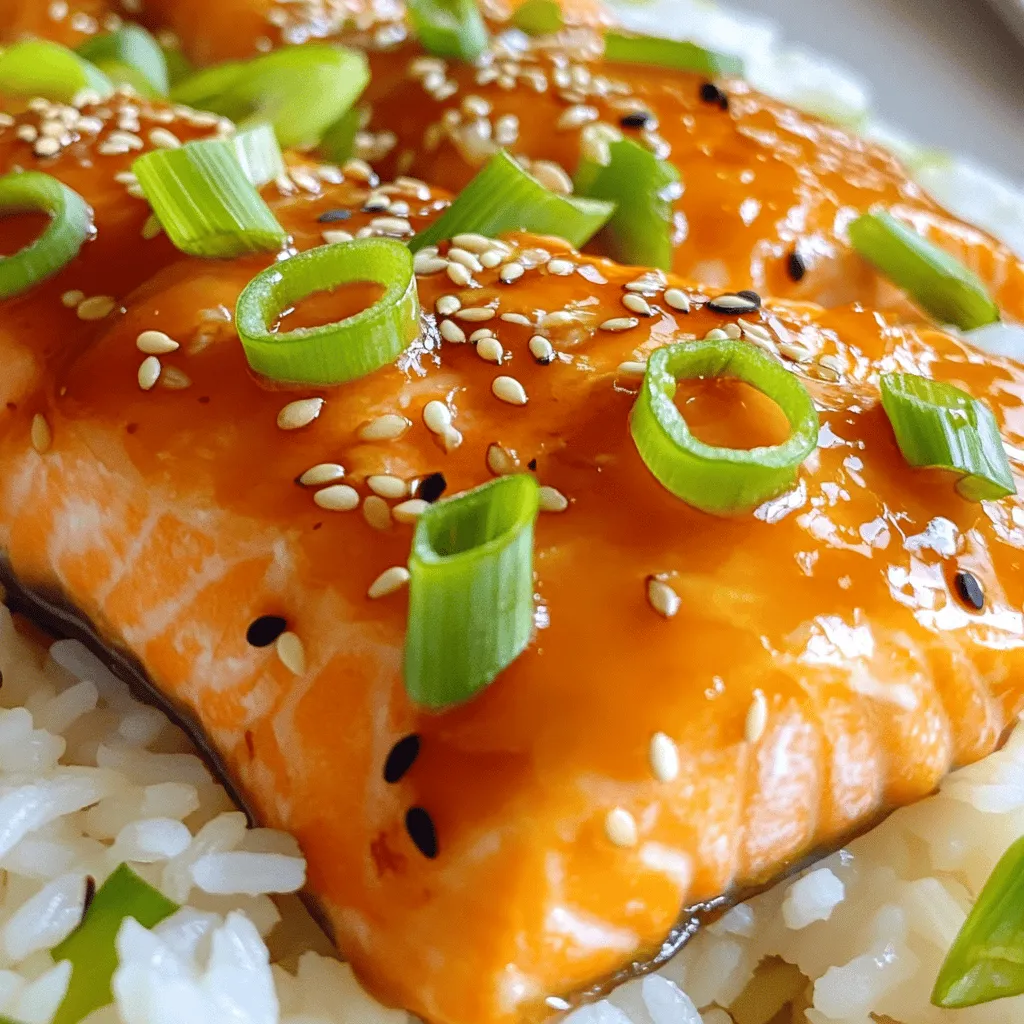
Looking for a quick and tasty meal? My Honey Sriracha Glazed Salmon is perfect for you! This dish combines the

Older posts
Newer posts
← Previous Page1 … Page14 Page15 Page16 … Page132 Next →

dsad

© 2025 pureeatsnow • Built with GeneratePress

Our Policies

  • Copyright Policy
  • Cookie Policy
  • GDPR Policy
  • Privacy Policy
  • Disclaimer
  • Terms Of Use

More Information

  • Home
  • About
  • Contact
  • Appetizers
  • Dessert
  • Dinner
  • Drinks
©2025, pureeatsnow About Back To Top