Skip to content
DisclaimerTerms Of UseGDPR PolicyCookie Policy

pureeatsnow

  • Home
  • Drinks
  • Appetizers
  • Dinner
  • Dessert
  • About
  • Contact
  • Privacy Policy
DisclaimerTerms Of UseGDPR PolicyCookie Policy

Rachel

To make Tuscan salmon in cream sauce, gather these ingredients: - 4 salmon fillets - 2 tablespoons olive oil - 3 cloves garlic, minced - 1 cup cherry tomatoes, halved - 1 cup fresh spinach - 1 cup heavy cream - 1 teaspoon Italian seasoning - Salt and black pepper to taste - Fresh basil leaves for garnish - Grated Parmesan cheese for serving You will need a few key tools for this recipe: - Large skillet - Spatula - Knife - Cutting board - Measuring cups and spoons Choosing fresh ingredients makes a big difference in taste. Here are some tips: - Salmon: Look for bright, moist fillets. The flesh should be firm and smell clean. - Cherry Tomatoes: Pick tomatoes that are bright and firm. Avoid any that feel soft or have blemishes. - Spinach: Choose spinach with vibrant green leaves. It should not be wilted or yellow. - Cream: Use heavy cream for a rich sauce. Check the expiration date for freshness. By following these tips, you can ensure your dish is not just delicious but also fresh and vibrant. {{ingredient_image_1}} To start, heat 2 tablespoons of olive oil in a large skillet over medium heat. When the oil is hot, add 4 salmon fillets. Season them with salt and black pepper. Sear each fillet for about 4-5 minutes on one side. Flip them and cook for another 4-5 minutes. You want them golden brown and cooked through. Once done, remove the fillets from the skillet and set them aside. This step gives the salmon a nice crust and flavor. In the same skillet, add 3 cloves of minced garlic. Sauté the garlic for about 30 seconds. You want it fragrant but not burnt. Next, add 1 cup of halved cherry tomatoes and 1 teaspoon of Italian seasoning. Cook these for about 3-4 minutes. You want the tomatoes to soften a bit. After that, stir in 1 cup of fresh spinach. Let it wilt for about a minute. Then, pour in 1 cup of heavy cream. Stir well and let it simmer for 2-3 minutes. This thickens the sauce slightly and blends the flavors. Now, it’s time to bring it all together. Return the salmon fillets to the skillet, spooning the cream sauce over each piece. Allow everything to warm through for another minute. Taste the sauce and adjust the seasoning with more salt and pepper if needed. To serve, place the salmon on a plate with the creamy sauce. Garnish with fresh basil leaves and a sprinkle of grated Parmesan cheese. This adds a nice touch and makes it look appealing. Enjoy your delicious Tuscan salmon! To get the best sear on salmon, start with dry fish. Pat it with a paper towel. This helps the skin crisp up nicely. Heat your olive oil in a hot skillet. You want it to shimmer. Place the salmon skin-side down first. Let it cook without moving it for 4-5 minutes. This helps build a nice crust. Flip it gently, and cook the other side for another 4-5 minutes. A good sear gives the salmon great flavor. To thicken your cream sauce, let it simmer gently. After adding the heavy cream, stir often. It will start to thicken in about 2-3 minutes. If you want it thicker, add a bit more cream. For added depth, you can sprinkle in some grated Parmesan cheese. It melts nicely and thickens the sauce. Taste it as you go. Adjust with salt and pepper for the best flavor. Serve your Tuscan salmon on a bed of the creamy sauce. Add extra cherry tomatoes and spinach around the plate. This adds color and texture. Pair it with a side of garlic bread for a complete meal. A light salad with lemon vinaigrette goes well too. For a drink, try a crisp white wine. It complements the flavors beautifully. Enjoy your delicious dinner! Pro Tips Use Fresh Ingredients: Fresh salmon and seasonal vegetables will elevate the flavor of your dish significantly. Perfectly Cooked Salmon: For best results, use a thermometer to ensure the salmon reaches an internal temperature of 145°F (63°C). Customize the Sauce: Feel free to add other herbs or spices like red pepper flakes for a bit of heat, or lemon zest for brightness. Serve Immediately: This dish is best enjoyed fresh, so serve it right after cooking for the creamiest texture and vibrant flavors. {{image_2}} If you can't find salmon, don’t worry! You can use other fish. Here are some great options: - Trout: It has a similar taste and texture. - Tilapia: This fish is mild and cooks quickly. - Cod: It holds up well in sauces and has a firm texture. Choose a fish that you enjoy. Adjust cooking times based on the thickness of the fillets. You can change the flavor with different spices and herbs. Here are some ideas: - Lemon Zest: Add this for a fresh twist. - Capers: These add a nice briny touch. - Red Pepper Flakes: If you like heat, sprinkle some in. You can also mix in other vegetables, like bell peppers or zucchini. Get creative and make it your own! If you want a dairy-free meal, it's easy to swap out ingredients. Try these tips: - Coconut Cream: Use this instead of heavy cream for a rich flavor. - Nut Milk: Almond milk or oat milk can work too. Just add a thickener like cornstarch. - Nutritional Yeast: This gives a cheesy taste without dairy. With these swaps, you can enjoy a tasty, creamy dish without the dairy! To store leftovers, let the dish cool first. Place the salmon in an airtight container. Make sure to separate the salmon from the sauce to keep it fresh. Use the leftovers within three days for the best flavor. When reheating, you can use a skillet or microwave. If using a skillet, warm it on low heat. Add a splash of cream to keep the sauce smooth. Stir gently to avoid drying out the salmon. In the microwave, heat in short bursts. Check often to ensure it warms evenly. You can freeze this dish, but it’s best to freeze the salmon and sauce separately. Use freezer-safe containers and label them with the date. The salmon is best used within two months. To thaw, place it in the fridge overnight. Reheat as mentioned above for the best taste. Yes, you can use frozen salmon. Just thaw it first. Place it in the fridge overnight or run it under cold water. Once thawed, pat it dry before cooking. This helps the salmon sear better. The taste will still be great! If you need a substitute, try using coconut milk or cashew cream. These options provide creaminess without dairy. You can also use half-and-half or whole milk. Just know that the sauce may be less thick. Adjust cooking time to get the right texture. To check if salmon is cooked, look for its color. It should be opaque and flake easily with a fork. The internal temperature should reach 145°F (63°C). Use a food thermometer for accuracy. If it’s not done, cook it a bit longer. This guide covers all you need for a great salmon dish. We explored essential ingredients, gear, and tips for the freshest picks. You learned step-by-step instructions for preparing the salmon, making the cream sauce, and serving. I shared tips for perfect searing, thickening sauce, and suggested pairings. You also discovered fun variations and how to store leftovers. Enjoy cooking your salmon dish, and remember to experiment with your flavors. Happy cooking!

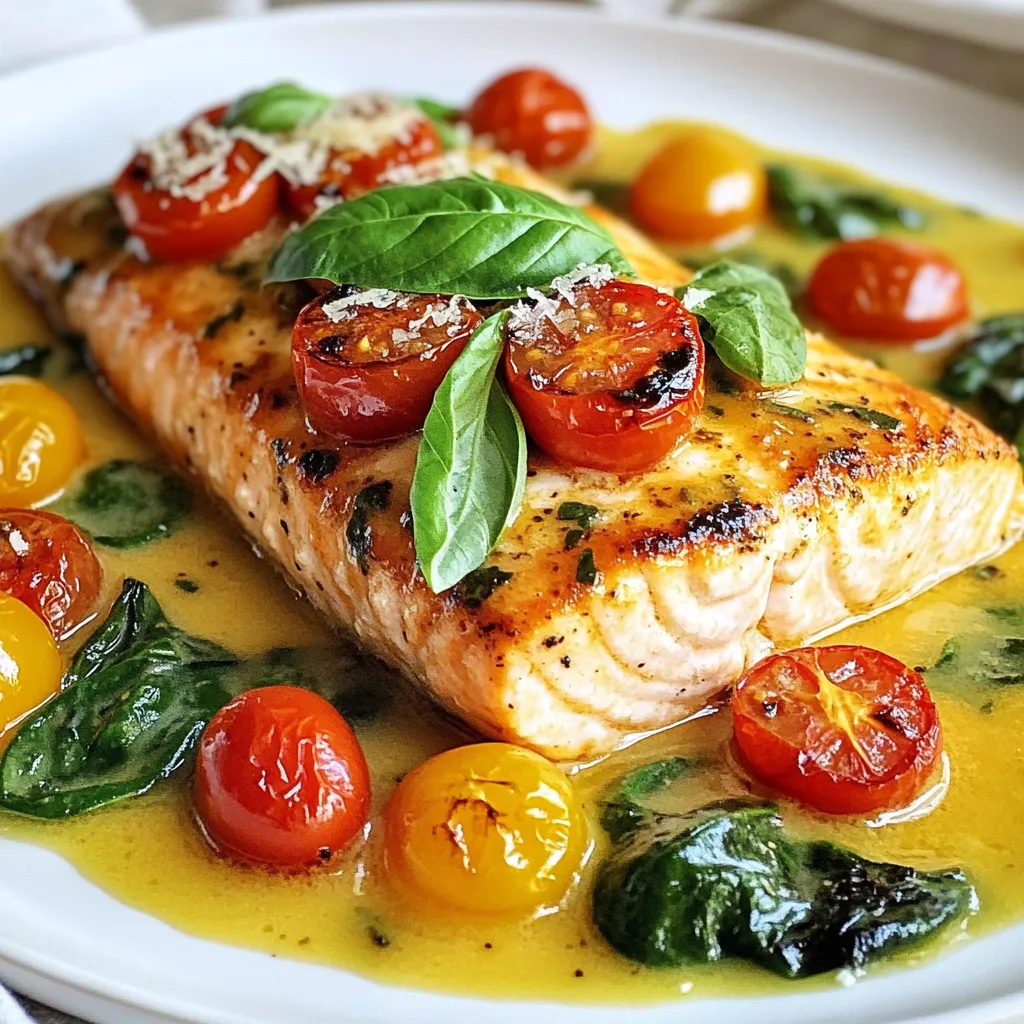
Tuscan Salmon in Cream Sauce Flavorful Dinner Idea

Are you ready to impress your family with a delicious dinner? This Tuscan Salmon in Cream Sauce is your answer!

- 2 cups cooked chicken, shredded - 1 teaspoon chipotle powder - 1 teaspoon smoked paprika - 1 teaspoon garlic powder - 1/2 teaspoon cumin - 1/2 teaspoon cayenne pepper (adjust to taste) - 1 cup shredded mozzarella cheese - 1 cup shredded cheddar cheese - 1 tablespoon olive oil - 4 large flour tortillas - 1/2 cup sour cream (for serving) - Fresh cilantro, chopped (for garnish) - Lime wedges (for serving) Each ingredient plays a key role in the flavor of the quesadilla. The chipotle powder gives a smoky heat. Smoked paprika adds depth, while garlic powder brings a savory note. Cumin adds warmth, and cayenne can kick up the heat. I use two types of cheese for a creamy texture and rich taste. If you don’t have chipotle powder, use chili powder. For a milder flavor, skip the cayenne pepper. You can swap mozzarella for pepper jack cheese to add more spice. If you prefer corn tortillas, they work well too. For a lighter option, try using grilled vegetables instead of chicken. {{ingredient_image_1}} First, gather your cooked chicken. You can shred it easily with two forks. Next, in a large bowl, mix the shredded chicken with the spices. Add 1 teaspoon of chipotle powder, 1 teaspoon of smoked paprika, 1 teaspoon of garlic powder, 1/2 teaspoon of cumin, and 1/2 teaspoon of cayenne pepper. Stir until the chicken is fully coated. This step adds a deep, smoky flavor to the chicken. Set the mixture aside while you heat the skillet. Now, heat 1 tablespoon of olive oil in a skillet over medium heat. Once the oil is hot, add your seasoned chicken mixture. Cook it for about 3 to 4 minutes. This warms the chicken and melds the flavors together. After cooking, remove the chicken from the skillet and set it aside. Next, take a large flour tortilla and lay it flat in the same skillet. Sprinkle about 1/4 cup of mozzarella and cheddar cheese over half of the tortilla. Add a good portion of your spicy chicken mixture on top, then add another layer of cheese. Fold the tortilla in half. Cook it for 2 to 3 minutes on each side until it turns golden brown and crispy. The cheese should melt beautifully inside. Repeat this process with the remaining tortillas and filling. Each quesadilla needs this perfect crunch and cheesy goodness. Slice each quesadilla into wedges. Arrange them on a platter for a nice presentation. Garnish with fresh chopped cilantro for color and flavor. Serve your quesadillas hot with a side of sour cream and lime wedges. The sour cream cools the heat from the chipotle, while the lime adds a fresh kick. Enjoy the burst of flavors with every bite! To get a crispy quesadilla, use a medium heat. If the heat is too high, the outside burns before the cheese melts. Always use enough cheese. It acts like glue, holding the filling inside. Cook each side for 2 to 3 minutes. You want a golden brown color. If you like extra crunch, try using a cast-iron skillet. The spice level can vary for everyone. Start with the cayenne pepper at 1/2 teaspoon. You can always add more if you want more heat. Chipotle powder adds a smoky flavor, so use 1 teaspoon. If you like it mild, reduce the chipotle powder to 1/2 teaspoon. Taste your chicken mixture before cooking. Adjust the spices to fit your taste. Cooking time can change based on your stove and skillet type. If you are cooking larger quesadillas, increase the time slightly. Check for melted cheese inside. If it’s not melted but the outside is brown, lower the heat. This helps cook the inside without burning the outside. Always keep an eye on your quesadillas while cooking. Pro Tips Adjust the Spice Level: If you prefer milder quesadillas, reduce the cayenne pepper or omit it entirely. You can also add more cheese to help balance the heat. Use Fresh Ingredients: Fresh cilantro and lime juice can elevate the flavors of your quesadillas. Always opt for fresh over bottled when possible. Perfectly Crispy Tortillas: To achieve a crispy texture, ensure your skillet is preheated before adding the quesadillas. Avoid overcrowding the pan to maintain even cooking. Experiment with Fillings: Feel free to customize your quesadillas with additional ingredients like black beans, corn, or bell peppers for added texture and flavor. {{image_2}} For a tasty vegetarian version, swap the chicken for black beans or sautéed veggies. You can use bell peppers, onions, or zucchini. Mix in the same spices to keep the flavor strong and bold. This keeps the dish colorful and satisfying. If you want a different cheese, try pepper jack or gouda. These cheeses add a nice twist. You can also use dairy-free cheese for a vegan version. Just make sure it melts well. You can change the protein in these quesadillas for variety. Try shredded beef or pulled pork for a rich taste. For a lighter option, grilled shrimp or fish works great too. Just season them like the chicken for the same spicy kick. After enjoying your spicy chipotle chicken quesadillas, you might have some left. To store them, let them cool for a bit. Place them in an airtight container. Make sure to separate the layers with parchment paper to avoid sticking. Store them in the fridge for up to three days. This keeps the flavors fresh. To reheat your quesadillas, use a skillet for the best texture. Heat the skillet on medium heat. Place the quesadilla in the skillet for about 2-3 minutes on each side. This makes them nice and crispy again. If you're short on time, you can use the microwave. Heat on a microwave-safe plate for about 1 minute. However, this might make the quesadilla a bit soft. If you want to save some for later, freezing is a great option. First, let the quesadillas cool completely. Wrap each one in plastic wrap tightly. Then, place them in a freezer bag. Label and date the bag. You can freeze them for up to two months. When you're ready to eat, thaw in the fridge overnight before reheating. Enjoy your flavorful treat anytime! Yes, you can use corn tortillas. They add a nice flavor. Corn tortillas are smaller and may not hold as much filling. Use two corn tortillas for each quesadilla. This way, you can stack the fillings well. If you lack chipotle powder, smoked paprika works well. It gives a nice smokiness without the heat. You can also use cayenne pepper for more spice. Just remember, cayenne is hotter than chipotle. Adjust the amount based on your taste. To increase the heat, add more cayenne pepper. You can also include fresh jalapeños to the chicken mix. Another option is to use hot sauce when serving. These changes will make the quesadillas extra spicy and flavorful. In this post, we explored the key ingredients for tasty quesadillas, from the chicken mixture to cooking tips. You learned how to adjust spices, try vegetarian options, and store leftovers properly. Quesadillas offer a fun way to enjoy different flavors. Remember, the perfect quesadilla is all about balance. Experiment with your choices and enjoy every bite. Cooking can be simple and fun!

Spicy Chipotle Chicken Quesadillas Bursting with Flavor

Get ready to spice up your next meal with my flavorful Spicy Chipotle Chicken Quesadillas! You’ll love how easy they

To make these tasty Chocolate Coconut Energy Bars, gather these simple ingredients. Each one adds flavor and nutrition to the bars. - 1 cup rolled oats - 1/2 cup unsweetened shredded coconut - 1/2 cup almond butter (or any nut butter of your choice) - 1/4 cup honey or maple syrup - 1/2 cup dark chocolate chips - 1/4 teaspoon sea salt - 1/2 teaspoon vanilla extract - 1 tablespoon chia seeds (optional for added nutrition) These ingredients work together to create a healthy snack. The rolled oats give a good base, while the shredded coconut adds a nice texture. Nut butter binds everything, and the sweetener gives a hint of sweetness. Dark chocolate chips add a rich flavor that makes these bars fun to eat. Sea salt balances the sweetness, and vanilla enhances the overall taste. If you want extra benefits, add chia seeds for more nutrition. {{ingredient_image_1}} 1. First, grab a large mixing bowl. Add 1 cup rolled oats, 1/2 cup unsweetened shredded coconut, and 1 tablespoon chia seeds if you want extra nutrition. Stir these dry ingredients together well. This mix gives the bars a chewy base. 2. Next, take a small saucepan. On low heat, melt 1/2 cup almond butter and 1/4 cup honey or maple syrup. Stir until smooth. Remove it from the heat and stir in 1/2 teaspoon vanilla extract. This mixture brings a sweet and nutty flavor to your bars. 3. Now, pour this melted mix over the dry ingredients in your bowl. Mix everything until it’s all coated evenly. Then, add 1/2 cup dark chocolate chips and 1/4 teaspoon sea salt. Make sure the chocolate is spread throughout the mix for tasty bites. 1. Line an 8x8 inch baking dish with parchment paper. Leave some paper hanging over the sides. This makes it easy to lift out the bars later. 2. Transfer your mixture into the baking dish. Use a spatula or your hands to press it down firmly. Make sure it’s even. This step helps the bars hold together well. 1. Place the dish in the fridge for at least 1 hour. This cooling time helps the bars set properly. 2. Once firm, lift the bars out of the dish using the parchment paper. Cut them into even squares or rectangles. Use a sharp knife to make clean cuts. Store your energy bars in an airtight container in the fridge. Enjoy them for a tasty and healthy snack! You can switch up the nut butter. Try peanut butter or cashew butter. Each nut butter gives a new taste. If you want less sugar, use mashed bananas instead of honey. Applesauce also works well as a sweetener. To stop your bars from crumbling, press the mixture down hard in the dish. If the bars are too dry, add a bit more honey or nut butter. Adjust the sweetness by tasting the mix before pressing it. Add a little more sweetener if needed. These bars pair well with fresh fruits like bananas or berries. You can also serve them with yogurt for a tasty snack. They are great for meal prep. Just grab a bar when you need a quick bite! Pro Tips Use Fresh Ingredients: Always use fresh, high-quality ingredients for the best flavor and texture in your energy bars. Customize Your Nuts: Feel free to swap almond butter with any nut or seed butter of your choice to suit your taste preferences or dietary needs. Experiment with Add-ins: Consider adding nuts, seeds, or dried fruits to enhance the nutritional value and add different textures to your bars. Proper Storage: Keep your energy bars in an airtight container in the refrigerator to maintain freshness and avoid spoilage. {{image_2}} You can enhance your energy bars with different flavors. Add nuts or seeds like almonds or sunflower seeds. They add crunch and protein. You can also mix in dried fruits like raisins or cranberries. These fruits add natural sweetness and chewiness. Choosing the right chocolate can change the taste. Milk chocolate gives a sweet, creamy flavor. Dark chocolate is richer and less sweet. You can also coat the bars in melted chocolate for a tasty finish. This adds a layer of chocolate that makes them even more delicious. If you follow a vegan diet, use maple syrup instead of honey. You can also choose a nut butter that is vegan-friendly, like almond or cashew butter. For gluten-free options, make sure your oats are certified gluten-free. This way, everyone can enjoy these tasty energy bars. To keep your Chocolate Coconut Energy Bars fresh, use airtight containers. These containers block air and moisture, which can spoil the bars. Store them in the fridge, where it is cool. This helps preserve flavor and texture. These bars last up to one week in the fridge. If you want to save them longer, freeze them. Wrap each bar tightly in plastic wrap. Then place them in a freezer-safe bag. They can last up to three months in the freezer. Check for changes in smell or texture. If the bars smell off or feel sticky, they may be bad. Look for mold spots or an unusual color. If you see any, it’s best to throw them away. You can make these energy bars without nut butter by using mashed bananas or unsweetened applesauce. These options will add moisture and a bit of sweetness. Simply replace the nut butter with the same amount of either mashed banana or applesauce. Mix it well with the honey or maple syrup until smooth. Then, follow the rest of the recipe as usual. This makes the bars nut-free and still delicious! No, you should not use coconut flour instead of shredded coconut. Coconut flour absorbs a lot of moisture and will change the texture. Shredded coconut gives a nice chew and adds flavor. If you want to use coconut flour, reduce the amount of other dry ingredients to keep the right balance. However, I recommend sticking with shredded coconut for the best results. Yes, these energy bars are great for kids! They are full of healthy ingredients like oats and dark chocolate. I find that kids love the sweet taste and chewy texture. You can also adjust the sweetness by using less honey or maple syrup if needed. They make a perfect snack for school or after playtime. Absolutely! You can customize these energy bars to fit your taste. Try adding spices like cinnamon or nutmeg for warmth. You could also mix in different nuts or seeds for extra crunch. If you want a fruitier flavor, consider adding dried fruits like cranberries or apricots. The options are endless, so get creative! These energy bars are nutritious and packed with energy. Each bar offers a good mix of carbs, fats, and proteins. Here’s a rough breakdown for one bar: - Calories: About 150 - Protein: 4g - Carbs: 18g - Fat: 7g - Fiber: 3g They are a great snack to fuel your day! This blog post covered how to make tasty energy bars. We discussed ingredients like oats, coconut, and chocolate. I shared step-by-step instructions for mixing, pressing, and cooling your bars. You learned tips for substitutions and texture, plus fun variations to try. Lastly, I gave storage advice to keep them fresh. Enjoy making these bars that fit your taste and diet. They can be a healthy snack anytime!

Chocolate Coconut Energy Bars Easy and Nutritious Treat

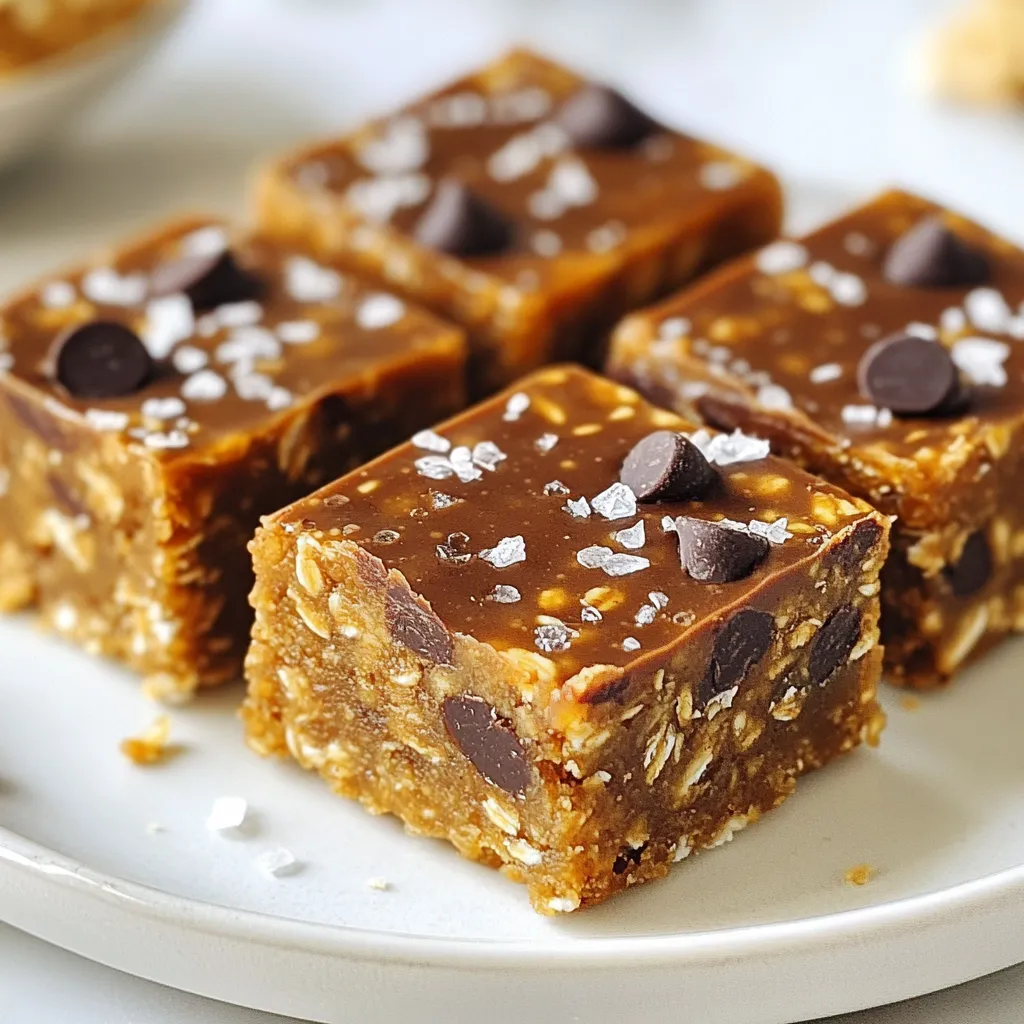
Are you looking for a quick snack that fuels your body without sacrificing taste? Chocolate Coconut Energy Bars are the

- 4 boneless, skinless chicken breasts - 2 tablespoons olive oil - 4 cloves garlic, minced - 1 cup heavy cream - 1 cup grated Parmesan cheese The main ingredients are simple yet packed with flavor. Chicken breasts give a nice base. Olive oil helps cook the chicken. Garlic adds a strong taste, while heavy cream and Parmesan create a rich sauce. - 1 teaspoon dried basil - 1 teaspoon Italian seasoning - 1/2 teaspoon salt - 1/4 teaspoon black pepper Seasonings make this dish shine. Dried basil and Italian seasoning bring warmth and depth. Salt and pepper enhance the other flavors. - 1 cup baby spinach - Chopped parsley for garnish Adding baby spinach gives a fresh touch. Chopped parsley brightens the dish and adds color. You can use these for a lovely presentation. {{ingredient_image_1}} First, let's season the chicken. Take four boneless, skinless chicken breasts. Sprinkle them with salt and black pepper. This will add flavor. Next, heat two tablespoons of olive oil in a large skillet over medium heat. Once the oil is hot, gently place the chicken breasts in the skillet. Cook each side for about six to seven minutes. You want them to be golden brown and cooked through. When done, remove the chicken from the skillet and set it aside on a plate. Now, let’s make the sauce. In the same skillet, add four cloves of minced garlic. Sauté the garlic for one to two minutes. You want it fragrant, but be careful not to burn it. Then, pour in one cup of heavy cream while stirring constantly. Bring this to a gentle simmer. Next, gradually whisk in one cup of grated Parmesan cheese. Keep stirring until the cheese melts and the sauce becomes creamy. Add one teaspoon of dried basil and one teaspoon of Italian seasoning. Mix these into the sauce thoroughly. Now it’s time to bring it all together. Return the cooked chicken breasts to the skillet. Lower the heat to low and let them simmer in the creamy sauce for about five minutes. This allows the chicken to absorb all those rich flavors. Finally, add one cup of baby spinach to the skillet. Stir gently until the spinach wilts and combines with the sauce. Adjust the seasoning if needed. Your creamy garlic Parmesan chicken skillet is almost ready to serve! To cook chicken just right, aim for an internal temperature of 165°F. Use a meat thermometer for accuracy. This ensures your chicken stays juicy and safe to eat. To avoid dry chicken, let it rest after cooking. This helps the juices redistribute. Also, be careful not to overcook it. The skillet should be hot but not too hot. If you want a creamier sauce, add more heavy cream. You can start with half a cup more. This will give your dish a rich flavor. To thicken the sauce, consider using cornstarch. Mix one tablespoon with cold water, then stir it in. Let it simmer for a few minutes until it thickens. Pair this dish with crusty bread or pasta. Both options soak up the creamy sauce well. For plating, use wide bowls. Drizzle extra sauce over the chicken for a nice touch. Garnish with chopped parsley for color. It makes the dish look fresh and inviting. Pro Tips Perfectly Cooked Chicken: Use a meat thermometer to ensure the chicken reaches an internal temperature of 165°F (74°C) for safe consumption. Enhance the Flavor: For an extra depth of flavor, marinate the chicken in olive oil, garlic, and Italian herbs for at least 30 minutes before cooking. Creamy Sauce Consistency: If the sauce becomes too thick, add a splash of chicken broth or pasta water to achieve your desired consistency. Spinach Substitutes: Feel free to substitute baby spinach with kale or Swiss chard for a different texture and flavor in the dish. {{image_2}} You can change the chicken if you want. Try using turkey or tofu for a twist. Both options work well with the creamy sauce. If you need a dairy-free option, use coconut cream or cashew cream. These swaps keep the dish rich and tasty. To boost flavors, add herbs like thyme or rosemary. These herbs give a fresh taste. You can also sprinkle in some red pepper flakes for heat. If you enjoy more veggies, toss in mushrooms or bell peppers. They add crunch and color to your meal. Want to make it spicy? Add diced jalapeños or a dash of hot sauce. That will fire up your dish! You can also choose to cook it in the oven. Just place the chicken in a baking dish with sauce and bake until cooked. This method gives a different texture. To keep your creamy garlic Parmesan chicken fresh, follow these tips: - Best practices for refrigeration: Place leftovers in an airtight container. Store them in the fridge for up to three days. Make sure the chicken cools down before sealing the container. This step helps prevent moisture build-up. - Freezing options: You can freeze the chicken too! Place it in a freezer-safe bag or container. It lasts for up to three months. When ready to eat, thaw it in the fridge overnight. Reheating your chicken correctly keeps it tasty. - How to reheat in skillet: Heat a skillet over low to medium heat. Add a splash of cream or broth to keep it moist. Place the chicken in the skillet, cover, and heat for about 5-7 minutes, turning it gently. - Microwave reheating tips: If you choose the microwave, use a microwave-safe dish. Cover it with a damp paper towel to keep moisture in. Heat for 1-2 minutes, checking after each 30 seconds to avoid overcooking. How long does it take to cook chicken in a skillet? It takes about 12 to 14 minutes to cook chicken in a skillet. Make sure to cook each side for 6 to 7 minutes. This timing gives you juicy chicken that is golden brown. Can I use fresh garlic instead of minced? Yes, you can use fresh garlic. Just chop 4 cloves of fresh garlic and sauté them in the skillet. Fresh garlic adds a bright flavor to the dish. What to do if the sauce is too thick/thin? If the sauce is too thick, add a little more heavy cream. If it is too thin, simmer it longer to thicken. Stir constantly to help it reach the right consistency. Can I make this dish ahead of time? Yes, you can make this dish ahead. Cook the chicken and sauce, then store them in the fridge. Reheat before serving for the best taste. How can I serve this dish for a larger group? To serve more people, simply double the recipe. Cook the chicken in batches if your skillet is small. This way, everyone enjoys the creamy goodness. How many calories per serving? This dish has about 450 calories per serving. The creamy sauce and chicken make it rich and satisfying. Is this dish gluten-free? Yes, this dish is gluten-free. All the ingredients are safe for those who avoid gluten. Enjoy without worry! This blog provided you with a great recipe to make a creamy chicken dish. You learned about the key ingredients, cooking instructions, and helpful tips for success. Variations and storage advice ensure you can customize this meal. Use these ideas to impress your loved ones at dinner. Remember, cooking is about enjoying your time in the kitchen. Happy cooking!

Creamy Garlic Parmesan Chicken Skillet Delight

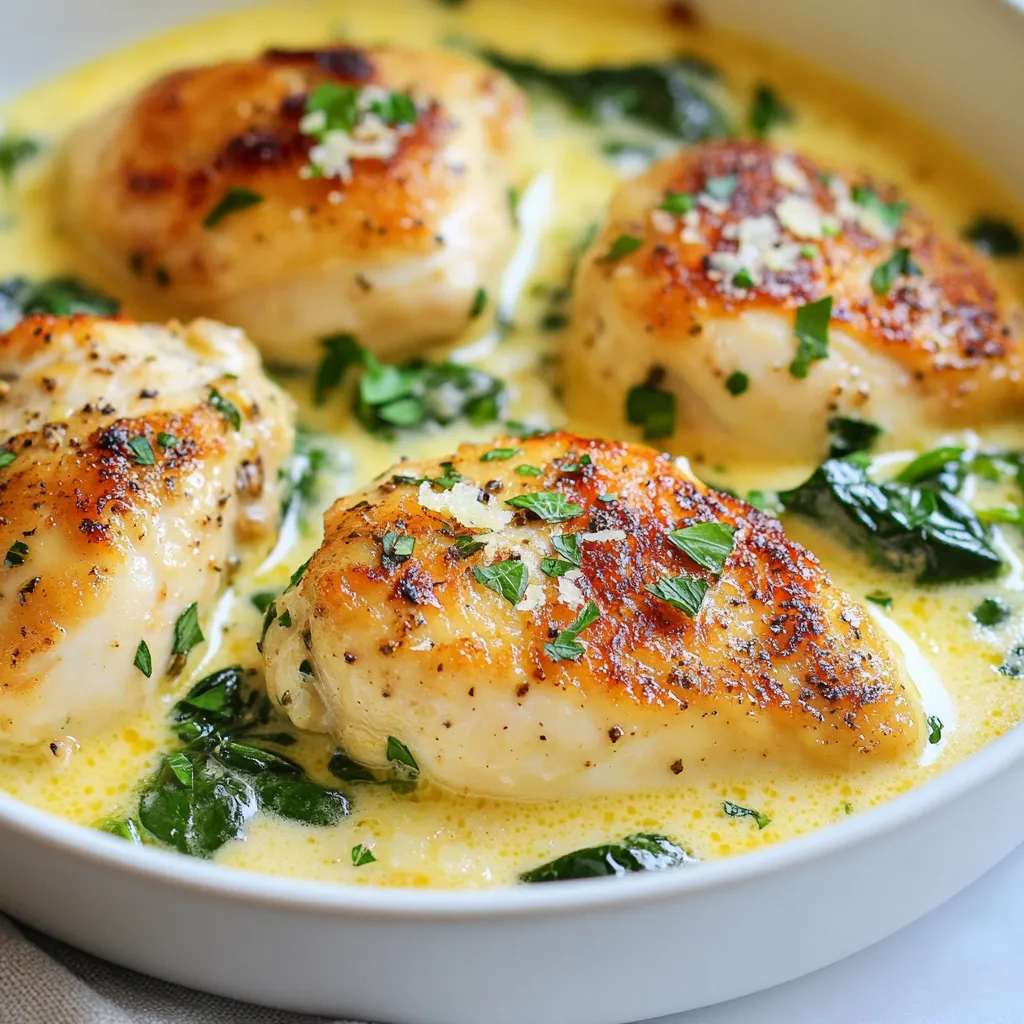
Welcome to my kitchen, where I’ll show you how to make Creamy Garlic Parmesan Chicken Skillet Delight! This dish is

- 4 boneless, skinless chicken breasts - Salt and pepper to taste - 1/2 cup all-purpose flour - 4 tablespoons unsalted butter - 2 tablespoons olive oil The main ingredients create the base of this dish. Chicken breasts are the star, giving us a hearty protein. Salt and pepper add flavor, while flour helps to give the chicken a nice crust. Butter and olive oil work together to create a rich, flavorful cooking fat. - 3 cloves garlic, minced - 1 cup chicken broth (low-sodium) - 1 lemon (juice and zest) - 2 tablespoons capers, rinsed and drained - Fresh parsley, chopped (for garnish) These additional ingredients bring the dish to life. Garlic adds depth, while chicken broth gives moisture and flavor. The lemon juice and zest provide a bright, tangy note. Capers add a salty, briny touch, enhancing the overall taste. Fresh parsley and lemon slices make for a beautiful garnish, giving the dish that final touch. {{ingredient_image_1}} To start, you need to flatten the chicken breasts. Place each breast between two pieces of plastic wrap. Use a meat mallet and pound them until they are about 1/2 inch thick. This helps them cook evenly. Next, season both sides of the chicken with salt and pepper. Then, dredge each piece lightly in flour. Shake off any extra flour to avoid a heavy coating. This step adds a nice crust when you cook them. Now, it’s time to cook. In a large skillet, heat 2 tablespoons of butter and the olive oil over medium-high heat. Wait until the butter melts and gets bubbly. Add the chicken breasts to the skillet in a single layer. Cook them for about 4-5 minutes on each side. You want them golden brown and fully cooked. Once done, remove the chicken from the skillet and keep it warm on a plate. In the same skillet, add minced garlic. Sauté it for about 30 seconds until fragrant. This will add a wonderful flavor to your sauce. Carefully pour in the chicken broth, lemon juice, and lemon zest. Scrape the bottom of the pan to get all those tasty bits. Bring the mixture to a simmer. Stir in the rinsed capers and let the sauce cook for another 2-3 minutes. You want it to reduce and thicken slightly. Now, combine the chicken with the sauce. Reduce the heat to low, and return the chicken to the skillet. Spoon the sauce over the top of the chicken. Add the remaining 2 tablespoons of butter for a rich finish. Cook for one more minute to warm the chicken through. Make sure each piece is well-coated in the sauce. Finally, serve the chicken piccata right away. Garnish it with fresh parsley and extra lemon slices if you like. Enjoy this tasty meal! To cook chicken perfectly, you need to check the temperature. Use a meat thermometer. The chicken should reach 165°F (75°C) for safe eating. Cook the chicken for 4-5 minutes on each side. Look for a golden brown crust. That means it’s ready to flip. To avoid dry chicken breast, pound the chicken to even thickness. This helps it cook evenly. Also, don’t overcook it. Remove the chicken just when it reaches the right temperature. Let it rest for a couple of minutes before serving. This keeps it juicy. For better taste, try adjusting the seasoning. Add a pinch more salt or pepper if needed. You can also add a little garlic powder for extra flavor. Fresh ingredients always shine in this dish. Use fresh garlic and a ripe lemon for the best taste. Fresh parsley adds a nice touch too. It brightens up the plate and the flavor. Always choose quality ingredients to make your dish stand out. Pro Tips Flatten the Chicken Evenly: Make sure to pound the chicken breasts evenly to ensure they cook uniformly and stay juicy. Use Fresh Ingredients: Fresh lemon juice and zest will enhance the flavor of your piccata sauce significantly compared to bottled options. Don't Skip the Capers: Capers add a unique briny flavor that complements the lemon and chicken beautifully; don't leave them out! Garnish for Presentation: A sprinkle of fresh parsley and lemon slices not only adds color but also a fresh aroma to your dish. {{image_2}} To make Lemon Butter Chicken Piccata fit your needs, you can swap some ingredients. If you need a gluten-free option, use gluten-free flour for dredging the chicken. This choice keeps the dish tasty without the gluten. You can also add vegetables for a complete meal. Try adding fresh spinach or cherry tomatoes to the skillet when you cook the chicken. These veggies will soak up the sauce's great flavor and add color to your plate. Lemon Butter Chicken Piccata pairs well with many sides. Serve it over creamy mashed potatoes for a cozy meal. You can also try it with rice, which absorbs the lemon butter sauce nicely. For a fun twist, serve the chicken with pasta. Toss the pasta in the lemon butter sauce for extra zest. You can even use zucchini noodles for a lighter option. This way, you get a dish that's fresh and filling! To keep your Lemon Butter Chicken Piccata fresh, follow these tips: - Refrigeration: Store leftovers in an airtight container. Keep them in the fridge for up to three days. Make sure they cool down before sealing to prevent moisture build-up. - Freezing: For longer storage, freeze the chicken piccata. Place it in a freezer-safe container. It can last for up to three months. When ready to eat, thaw it in the fridge overnight before reheating. To enjoy your Lemon Butter Chicken Piccata again, use these methods: - Stovetop: Heat a skillet over low to medium heat. Add a splash of chicken broth or water to prevent sticking. Place the chicken in the skillet, cover, and heat until warm. - Microwave: Place the chicken on a microwave-safe plate. Add a few drops of water on top to keep it moist. Cover with a microwave-safe lid. Heat in short bursts, checking often to avoid overcooking. Following these steps ensures your Lemon Butter Chicken Piccata stays tasty and safe to eat! How do I make the sauce thicker? To thicken the sauce, you can use a few simple methods. One way is to add more flour. Mix a tablespoon of flour with a little cold water to make a slurry. Stir this into the sauce while it simmers. Another option is to let the sauce cook longer. This reduces the liquid and makes it thicker. You can also add a bit of cornstarch mixed with water for a quick fix. Just stir it in and cook until it thickens. Can I use chicken thighs instead of breasts? Yes, chicken thighs work well in this dish. They have more fat, making them juicy and flavorful. Use boneless and skinless thighs for the best results. Just adjust the cooking time slightly, as thighs may take longer to cook through. Check the internal temperature to ensure they reach 165°F. Is it okay to make this ahead of time? You can make Lemon Butter Chicken Piccata ahead of time. Cook the chicken and sauce, then store them separately in the fridge. When you're ready to serve, reheat both on the stove. This helps keep the chicken tender and the sauce fresh. Just avoid reheating in the microwave, as it can dry out the chicken. How to substitute capers if necessary? If you don't have capers, you can use green olives. Chop them finely to mimic the briny flavor of capers. Another option is to use a mix of lemon juice and a pinch of salt. This adds a similar tangy taste. If you want to skip them entirely, just increase the lemon juice for extra flavor. You now have all the tools to make delicious Lemon Butter Chicken Piccata. We covered the main and additional ingredients, cooking steps, and tips to ensure perfect chicken. You can even try fun variations and learn how to store leftovers. With these insights, you can create a tasty meal that impresses everyone. Enjoy your cooking adventure and make this dish your own!

Lemon Butter Chicken Piccata Flavorful Dinner Recipe

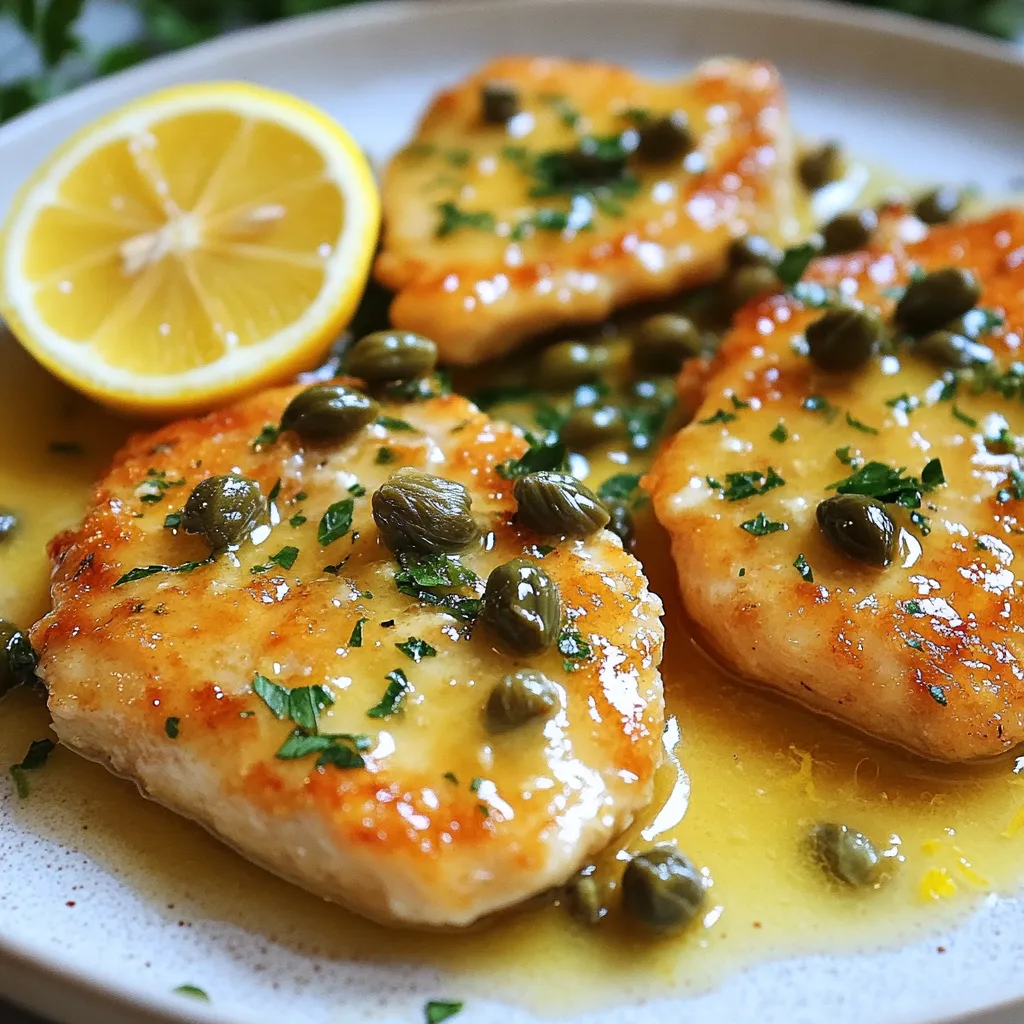
Are you looking for a dinner that will impress? My Lemon Butter Chicken Piccata is your answer! This dish combines

For this dish, you will need: - 1 pound large shrimp, peeled and deveined - 1 cup coconut milk - 2 tablespoons lime juice - Zest of 1 lime - 1 tablespoon honey or maple syrup - 1 teaspoon garlic powder - 1 teaspoon ginger powder - ½ teaspoon salt - ½ teaspoon black pepper - 2 cups cooked jasmine rice - 1 cup cherry tomatoes, halved - 1 avocado, sliced - ¼ cup fresh cilantro, chopped - Lime wedges for serving These ingredients blend to create a fresh, bright flavor that makes each bite amazing. You can boost your bowls with fun add-ins! Try these: - Sliced radishes for crunch - Shredded coconut for texture - Chopped green onions for a mild onion taste - Sliced jalapeños for a spicy kick These options let you customize your dish and make it uniquely yours. To make this recipe, you need: - A mixing bowl for the marinade - A non-stick skillet for cooking shrimp - Measuring spoons for accuracy - A sharp knife for cutting veggies - A cutting board for prep Having these tools ready will make your cooking time smooth and enjoyable. {{ingredient_image_1}} To start, grab a bowl. In it, mix one cup of coconut milk, two tablespoons of lime juice, and the zest of one lime. Add one tablespoon of honey or maple syrup for sweetness. Then, sprinkle in one teaspoon of garlic powder and one teaspoon of ginger powder. Don’t forget to add half a teaspoon of salt and black pepper. Whisk it all together until smooth. Now, add one pound of peeled and deveined shrimp into the bowl. Make sure each shrimp gets coated in the marinade. Cover the bowl and let it sit for at least 15 minutes. Heat a non-stick skillet over medium heat. When it’s hot, add the marinated shrimp. Cook them for about 2-3 minutes on each side. You will know they are done when they turn pink and opaque. Be careful not to overcook them. Overcooked shrimp can become tough. Once cooked, remove the shrimp from the skillet. Now it's time to build your bowls! Scoop about half a cup of cooked jasmine rice into each bowl. Next, place the cooked shrimp on top of the rice. Add a handful of halved cherry tomatoes and some sliced avocado on the side. If you want, drizzle any leftover coconut-lime marinade over the shrimp. Finally, sprinkle chopped cilantro on top for freshness. Serve with lime wedges on the side for that extra zing! To cook shrimp just right, timing is key. Start with large shrimp for the best texture. When the shrimp turn pink and opaque, they are done. This usually takes about 2-3 minutes per side. Avoid overcooking, or they will become tough. Keep an eye on them while cooking. Fresh ingredients make all the difference. Use fresh lime juice and zest for a bright taste. Fresh cilantro adds a pop of color and flavor. Try to use ripe avocados for creaminess. Cherry tomatoes should be juicy and sweet. These ingredients boost the dish and make it shine. This recipe is great for meal prep. You can marinate the shrimp a day before. Store the shrimp in the fridge. Cook the shrimp just before serving. You can also prepare your rice ahead of time. Store it in the fridge to keep it fresh. Assemble the bowls when you're ready to eat. Pro Tips Perfect Shrimp Cooking: Ensure the shrimp are cooked just until they turn pink and opaque to avoid overcooking, which can make them rubbery. Marinating Time: For more flavor, consider marinating the shrimp for up to 30 minutes instead of just 15 minutes. Rice Alternative: If you want to switch things up, try using quinoa or cauliflower rice for a different texture and flavor. Freshness Boost: Adding a squeeze of fresh lime juice right before serving can enhance the flavors and provide a refreshing finish. {{image_2}} You can easily swap ingredients in this recipe. If you are allergic to shrimp, try chicken or tofu instead. Both will soak up that tasty coconut-lime flavor. For a low-carb option, use cauliflower rice instead of jasmine rice. This change keeps the dish light and fresh. If you want a vegan version, replace honey with maple syrup. It adds sweetness without animal products. If you like spice, add diced jalapeños or red pepper flakes to the marinade. This will heat things up nicely. You can also include a dash of hot sauce for extra kick. I recommend tasting the marinade first. Adjust the heat to your liking. Remember, a little heat can balance the sweetness of coconut and lime. These bowls are perfect for lunch or dinner. Serve them with a side of crispy tortilla chips for crunch. You can also add a simple salad to bring in more veggies. Try mixing greens with a light vinaigrette to complement the shrimp. For a tropical twist, serve with pineapple slices on the side. Each bite will feel like a mini vacation! To keep your Coconut Lime Shrimp Bowls fresh, store them in airtight containers. Let the shrimp cool before placing them in the fridge. You can store the shrimp and rice separately for best results. Make sure to keep any extra coconut-lime marinade in a separate container. When you are ready to enjoy leftovers, reheat the shrimp gently. You can use a skillet over low heat. Cook them for about 2-3 minutes until warmed through. If using a microwave, heat in short bursts to avoid overcooking. Reheating jasmine rice is easy; just sprinkle some water and cover it. Cooked shrimp can last in the fridge for about 3 days. Jasmine rice can stay fresh for about 4-5 days. Keep your cherry tomatoes and avocado separate from the shrimp to maintain their freshness. The coconut milk can be kept sealed in the fridge for up to a week after opening. Yes, you can use frozen shrimp. Just remember to thaw them first. Place the shrimp in the fridge for a few hours or run them under cold water. This helps them cook evenly. Frozen shrimp may have a bit more water. Pat them dry with a paper towel before marinating. This way, the shrimp will soak up all the tasty coconut lime flavors. This recipe is already dairy-free! The coconut milk adds creaminess without any dairy. If you want to enhance the taste further, add more lime juice or honey. You can also swap in other ingredients like almond milk if you prefer. Just stick with non-dairy options to keep it light and flavorful. Many side dishes go well with these bowls. Here are some ideas: - Grilled pineapple for a sweet touch - Steamed broccoli for a green bite - Quinoa for a nutty flavor - Cucumber salad for a refreshing crunch - Corn on the cob for a summery feel You can mix and match these sides. This adds variety and makes your meal even more fun! Coconut lime shrimp bowls are easy to make and fun to enjoy. You learned about the key ingredients, how to cook the shrimp, and tips for great flavor. I shared ways to customize the recipe for your needs. Remember to store your bowls properly to keep them fresh. Experiment with different ingredients for new tastes. Enjoy making this dish, and share it with others! Each bowl offers a taste of the tropics right at home.

Coconut Lime Shrimp Bowls Flavorful and Easy Recipe

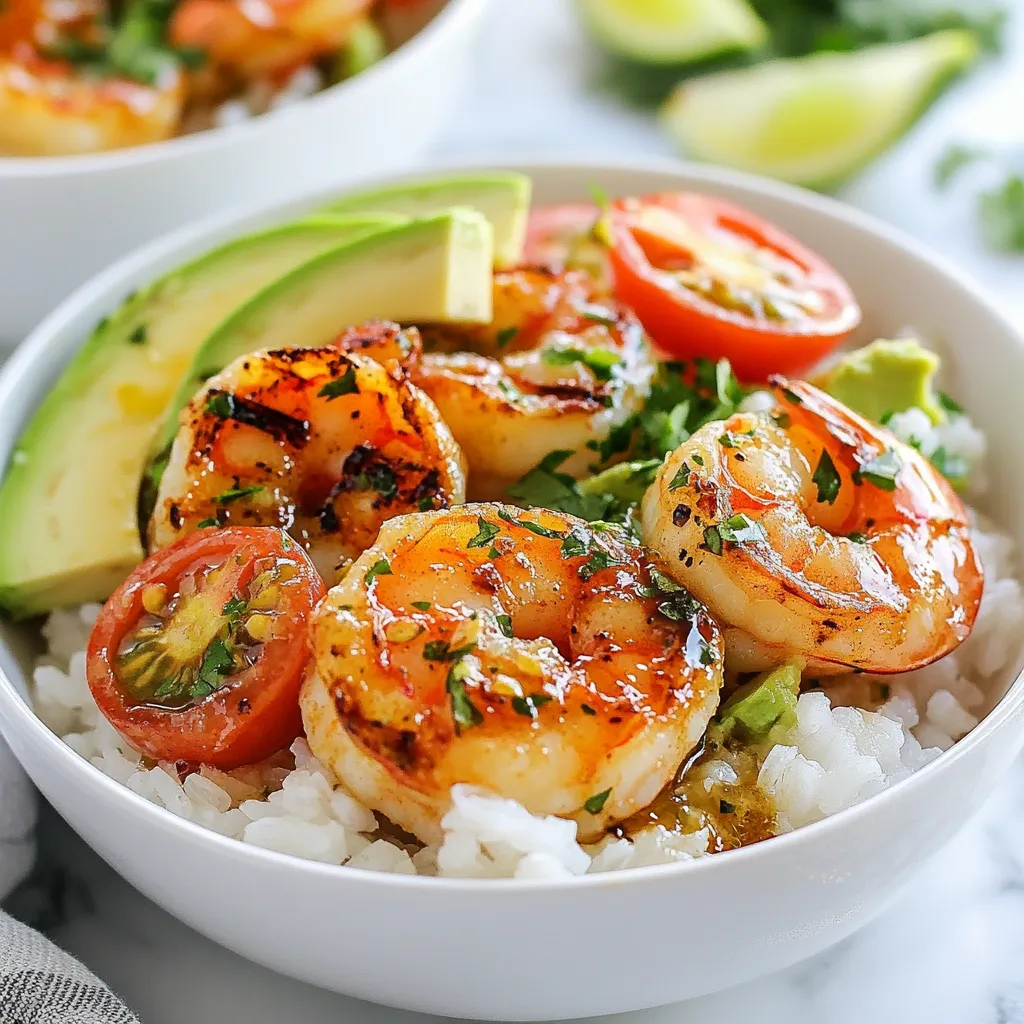
Are you ready to dive into a delicious and easy meal that bursts with flavor? Coconut Lime Shrimp Bowls are

You need a mix of fresh and bold flavors to make Spicy Szechuan Noodles. Here’s what you will need: - 8 oz Szechuan noodles (or any noodle of choice) - 2 tablespoons vegetable oil - 3 cloves garlic, minced - 1 inch ginger, grated - 1 red bell pepper, sliced - 1 carrot, julienned - 1 cup snap peas - 1/4 cup Szechuan chili paste - 2 tablespoons soy sauce - 1 tablespoon rice vinegar - 1 teaspoon sesame oil - 1 tablespoon sugar - 3 green onions, chopped - 2 tablespoons toasted sesame seeds - Fresh cilantro for garnish Each ingredient adds a special touch to the dish. The Szechuan noodles are the base. They soak up the sauce well. The garlic and ginger provide depth and warmth. The veggies add crunch and color. If you can’t find Szechuan noodles, you can use other noodles. Rice noodles or egg noodles work great too. For the Szechuan chili paste, you can use sambal oelek or a mix of red pepper flakes with soy sauce. This keeps the spice but changes the flavor a bit. If you prefer less heat, reduce the chili paste. You can also add more veggies like broccoli or mushrooms. They will blend in well and add more nutrients. Using fresh ingredients is key to a great dish. Fresh veggies like bell peppers and snap peas add crunch and flavor. Fresh garlic and ginger bring out strong aromas that make your kitchen smell amazing. They also enhance the taste, making it richer and more satisfying. When you use fresh ingredients, you get better texture and taste. So, always choose the freshest produce you can find. It truly makes a difference in your cooking! {{ingredient_image_1}} Start by boiling a large pot of salted water. Add 8 oz of Szechuan noodles. Cook them according to the package instructions. This usually takes about 3-5 minutes. Once they’re tender, drain the noodles. Rinse them under cold water to stop the cooking. Set the noodles aside for later. In a large skillet or wok, heat 2 tablespoons of vegetable oil over medium-high heat. Add 3 cloves of minced garlic and 1 inch of grated ginger. Stir-fry them for about 30 seconds until they smell great. Next, toss in 1 sliced red bell pepper, 1 julienned carrot, and 1 cup of snap peas. Stir-fry these for 3-4 minutes until they are crisp but tender. In a small bowl, mix 1/4 cup of Szechuan chili paste, 2 tablespoons of soy sauce, 1 tablespoon of rice vinegar, 1 teaspoon of sesame oil, and 1 tablespoon of sugar. Stir this mixture until it is well combined. Add the cooked noodles into the skillet with the veggies. Pour the Szechuan sauce over the noodles. Toss everything together well. Make sure the noodles get coated with the sauce. Cook for an additional 2-3 minutes to heat everything through. Remove the skillet from heat. Toss in 3 chopped green onions. Plate the noodles in bowls. Garnish with 2 tablespoons of toasted sesame seeds and fresh cilantro. Enjoy your spicy Szechuan noodles! To adjust the spice level of your Szechuan noodles, you have options. Start with less Szechuan chili paste if you prefer a milder taste. You can always add more later. If the dish becomes too spicy, add a little sugar or extra vegetables. This will help balance the heat. You can also serve yogurt or sour cream on the side for a cooling effect. Stir-frying is key for this dish. Use a large skillet or wok for space. Heat the oil well before adding ingredients. This helps cook them fast while keeping them crisp. Keep the heat high but not too high to burn the garlic. Stir constantly to avoid sticking. Cook each vegetable just until tender, not mushy. Always prep ingredients ahead of time; stir-frying goes quickly! Presentation matters! Serve your noodles in bowls for an inviting look. Top with chopped green onions and toasted sesame seeds. Fresh cilantro adds color and flavor, making the dish pop. You can also add lime wedges for a zesty finish. This makes your meal look gourmet while adding extra taste. Enjoy your delicious, colorful Spicy Szechuan Noodles! Pro Tips Choose the Right Noodles: For an authentic Szechuan experience, opt for fresh Szechuan noodles if available. They have a unique texture that enhances the dish. Adjust the Spice Level: If you prefer a milder dish, reduce the amount of Szechuan chili paste or add it gradually to taste. You can always add more, but it's hard to take it out! Add Protein: Consider adding protein such as chicken, shrimp, or tofu to make the dish heartier. Simply stir-fry the protein before adding the vegetables. Garnish Generously: Fresh cilantro and toasted sesame seeds add flavor and texture to the dish. Don't skip the garnish for the best presentation and taste! {{image_2}} To make Spicy Szechuan Noodles vegetarian, just skip the meat. You can use tofu for protein. Firm tofu works best. Simply cube it and stir-fry it with your veggies. For vegan noodles, ensure your sauces, like soy sauce, are plant-based. You can swap the sugar for maple syrup or agave. This keeps the dish tasty and cruelty-free. If you need gluten-free noodles, you have options. Look for rice noodles or gluten-free pasta. Many brands offer great alternatives. Just check the labels to ensure they fit your diet. For sauce, use tamari instead of soy sauce. This swap keeps the flavor while being gentle on your stomach. Feel free to get creative with your Szechuan Noodles. Some popular add-ins include: - Cooked chicken or shrimp for extra protein - Broccoli or bok choy for more greens - Cashews or peanuts for crunch You can also adjust the spice level. Add more chili paste for heat or less for a milder flavor. Enjoy your personal twist on this spicy dish! Store your leftover Spicy Szechuan Noodles in an airtight container. Make sure to cool them down first. They will stay fresh for up to three days in the fridge. Keep them away from strong-smelling foods to avoid odor transfer. To reheat, you can use the microwave or a skillet. If you use the microwave, heat them in short bursts. Stir in between to ensure even heating. If using a skillet, add a splash of water or oil. Heat over medium-low until warm. This keeps the noodles from drying out. You can freeze the Szechuan Noodles if you want to save some for later. Place them in a freezer-safe bag or container. Make sure to remove as much air as possible. They can last up to two months in the freezer. When ready to eat, thaw them in the fridge overnight before reheating. Szechuan noodles are spicy due to Szechuan chili paste. This paste has hot peppers and other spices. It gives the dish its bold heat. You can adjust the spice by adding more or less paste. If you want a milder flavor, use less chili paste. The balance of heat and flavor makes this dish exciting. You can find authentic Szechuan noodles at Asian grocery stores. Look for fresh or dried Szechuan noodles in the pasta aisle. Some stores may also sell them online. If you can’t find Szechuan noodles, any Asian noodle will work. Just make sure they are thin and can soak up the sauce well. You can prepare the Szechuan noodles in advance. Cook the noodles and store them in the fridge. Keep the sauce and veggies separate until you are ready to serve. When you are ready, simply stir-fry the veggies, add the sauce, and mix in the noodles. This method keeps everything fresh and tasty. Enjoy your meal at any time! Spicy Szechuan noodles combine bold flavors and fresh ingredients for a delightful meal. I covered key ingredients, step-by-step cooking, and tips to adjust spice levels. Storage options ensure you enjoy leftovers later. Whether you choose vegetarian, gluten-free, or customized versions, the dish is fun to make and share. Embrace your inner chef and explore variations to suit your taste. Szechuan noodles are not just a meal; they are an adventure in flavor. Enjoy creating a dish that excites your taste buds!

Spicy Szechuan Noodles Flavorful and Easy Recipe

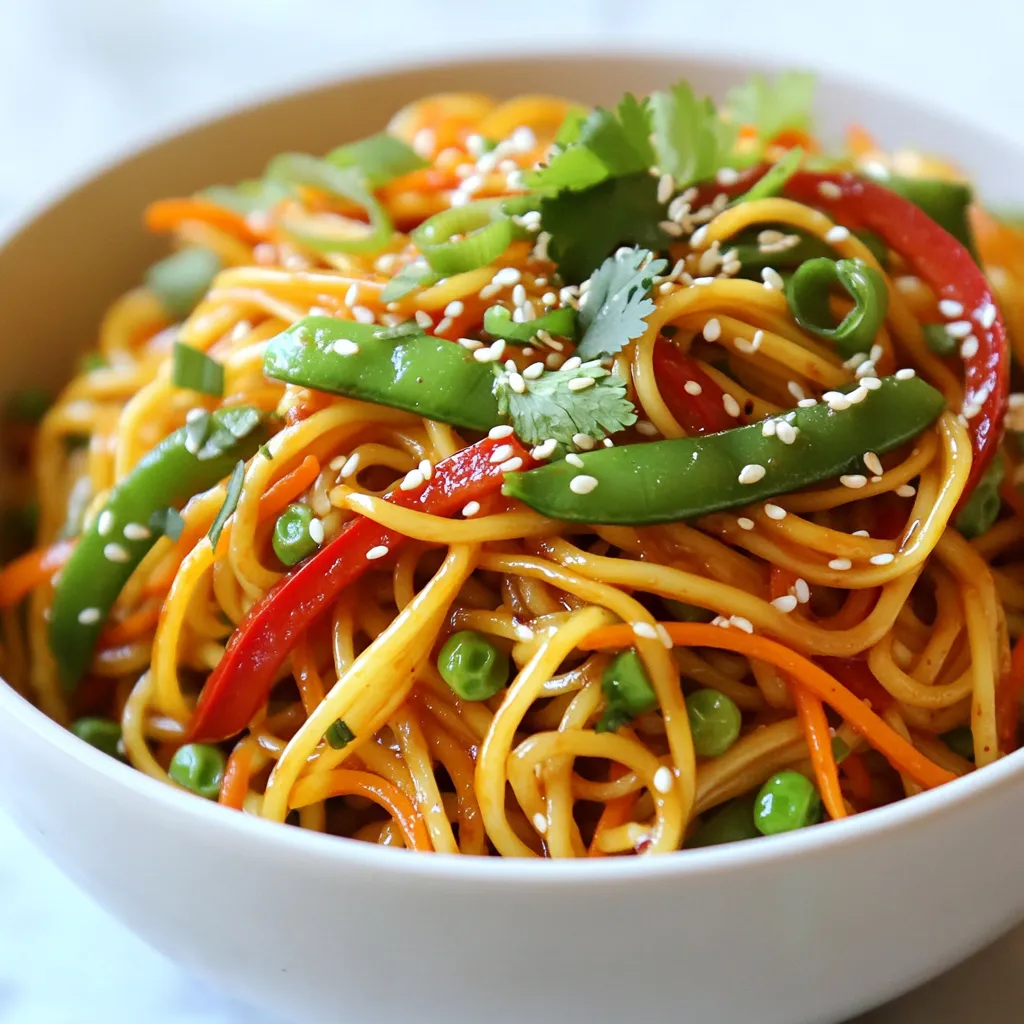
Do you crave bold flavors that wake up your taste buds? In this post, I’ll guide you through making Spicy

To make Tex-Mex quinoa stuffed peppers, you will need: - 4 large bell peppers (any color) - 1 cup quinoa, rinsed - 2 cups vegetable broth - 1 can (15 oz) black beans, drained and rinsed - 1 cup corn (frozen or canned) - 1 cup diced tomatoes (canned or fresh) - 1 teaspoon cumin - 1 teaspoon chili powder - ½ teaspoon smoked paprika - ½ teaspoon garlic powder - 1 cup shredded cheddar cheese (or a dairy-free alternative) - Salt and pepper to taste For extra flavor and looks, consider these garnishes: - Fresh cilantro, chopped - Slices of avocado, for serving (optional) Let’s break down the nutrition of some key ingredients: - Quinoa: This grain is high in protein and fiber. It also offers essential amino acids. - Black beans: These add protein and fiber. They help keep you full and satisfied. - Bell peppers: Rich in vitamins A and C, they boost your immune system. - Corn: This adds sweetness and is a good source of fiber. - Cheddar cheese: Provides calcium and protein. Choose a dairy-free option for a lighter dish. Using these ingredients will make your meal not just tasty, but healthy too. Enjoy the blend of flavors and textures in every bite! {{ingredient_image_1}} Start by cooking your quinoa. Rinse one cup of quinoa under cold water. This removes any bitter taste. In a saucepan, add the rinsed quinoa and two cups of vegetable broth. Bring the mixture to a boil. Once boiling, reduce the heat to low, cover the pot, and simmer for about 15 minutes. The quinoa will absorb all the broth. After the time is up, remove the pot from the heat but keep it covered for five more minutes. This helps the quinoa fluff up nicely. While your quinoa cooks, prepare the bell peppers. Choose four large peppers in any color you like. Cut off the tops and remove the seeds. Place the peppers upright in a baking dish. Next, mix your filling. In a large bowl, combine the cooked quinoa, one can of drained black beans, one cup of corn, and one cup of diced tomatoes. Add one teaspoon of cumin, chili powder, half a teaspoon of smoked paprika, and garlic powder. Season with salt and pepper to taste. Stir in half of the shredded cheese. Spoon this tasty mixture into each pepper, packing it lightly. Finally, sprinkle the remaining cheese on top of each stuffed pepper. Now it’s time to bake! Preheat your oven to 375°F (190°C). Cover your baking dish with aluminum foil. Bake the stuffed peppers for 25 minutes. After that, remove the foil and bake for an additional 10 to 15 minutes. You want the cheese to be melted and bubbly. Once done, take the baking dish out of the oven. Let the peppers cool for a few minutes. Garnish with fresh cilantro before serving. Enjoy your delicious Tex-Mex quinoa stuffed peppers! When picking bell peppers, look for ones that feel heavy and firm. They should have smooth skin and bright colors. Avoid any with soft spots or wrinkles. Each color offers a different flavor. Green peppers are more bitter, while red peppers are sweet. Choose your favorite based on the taste you want in your dish. To cook quinoa well, rinse it first to remove bitterness. Use a ratio of 1 cup of quinoa to 2 cups of vegetable broth. Bring it to a boil, then lower the heat and cover it. Let it simmer for about 15 minutes. When done, it should look fluffy and have a tiny tail. Let it sit for 5 minutes with the lid on. This helps it steam and stay fluffy. To boost flavor, use fresh spices like cumin and chili powder. These spices add warmth and depth. Mixing in black beans and corn adds sweetness and protein. If you want more flavor, try adding lime juice or hot sauce. Don’t forget to season with salt and pepper before stuffing the peppers. Finally, topping with cheese adds a rich, creamy finish. Enjoy the burst of Tex-Mex goodness in every bite! Pro Tips Choose Colorful Peppers: Using a mix of colorful bell peppers not only enhances the visual appeal of the dish but also adds a variety of flavors. Rinse Quinoa Thoroughly: Always rinse quinoa before cooking to remove its natural coating, called saponin, which can impart a bitter taste. Customize Your Spices: Feel free to adjust the spices according to your preference. Adding a pinch of cayenne pepper can add extra heat! Let Them Rest: Allow the stuffed peppers to rest for a few minutes after baking; this helps the flavors meld and makes them easier to serve. {{image_2}} You can easily make these Tex-Mex quinoa stuffed peppers vegetarian or vegan. To keep it vegetarian, just ensure you use cheese made from dairy. For a vegan option, swap the cheese for a dairy-free alternative. Many brands offer great vegan cheese that melts well. You can also add more veggies like zucchini or mushrooms to boost flavor and nutrition. If you have dietary restrictions, you can switch out some ingredients. For gluten-free needs, quinoa is already a safe choice. If you can't have beans, try using lentils or chickpeas instead. You can also replace corn with diced zucchini or carrots. For a lower-carb option, use cauliflower rice instead of quinoa. These swaps keep your stuffed peppers delicious and safe. You can adjust the spice level to suit your taste. For a milder dish, skip the chili powder or use less. Instead, add a pinch of paprika for flavor without heat. If you like more spice, add diced jalapeños or a splash of hot sauce to the filling. This lets everyone enjoy these stuffed peppers, no matter their spice tolerance. After enjoying your Tex-Mex quinoa stuffed peppers, store leftovers in an airtight container. This keeps them fresh for up to three days in the fridge. If you plan to eat them later, avoid adding toppings like avocado or cilantro until serving. This way, your peppers stay tasty and vibrant. To reheat your stuffed peppers, place them in the oven. Set it to 350°F (175°C) and cover with foil. Heat for about 15-20 minutes or until warm. This method helps the cheese melt and keeps the peppers soft. You can also use a microwave. Heat them on medium for about 2-3 minutes, but the oven gives better results. If you want to save some stuffed peppers for later, freezing works great. First, allow them to cool completely. Then, wrap each pepper in plastic wrap and place them in a freezer bag. They can last up to three months in the freezer. When ready to eat, thaw them overnight in the fridge before reheating. Yes, you can make these stuffed peppers ahead of time. Prepare them up to the baking step. After stuffing the peppers, cover them and store them in the fridge for one day. When you're ready, just bake them as the recipe says. This makes dinner easy and quick. No worries! If you don’t have quinoa, you can use rice instead. Brown rice or white rice works well. Just make sure to adjust the cooking time. Quinoa cooks fast, while rice takes longer. You can also try couscous or even cauliflower rice for a low-carb option. Absolutely! You can use any cheese you like. Monterey Jack or pepper jack adds a nice kick. If you prefer no cheese, that’s fine too. The dish will still be tasty. You might want to add more spices to boost the flavor without cheese. We’ve covered a lot in this blog post about making stuffed peppers. You learned about key ingredients, step-by-step cooking steps, and helpful tips to improve flavor. We discussed variations for different diets and how to store leftovers. With these insights, you can create tasty meals easily. Remember, cooking is an art. Feel free to experiment with your ingredients and have fun. Enjoy your delicious stuffed peppers!

Tex-Mex Quinoa Stuffed Peppers Flavorful and Satisfying

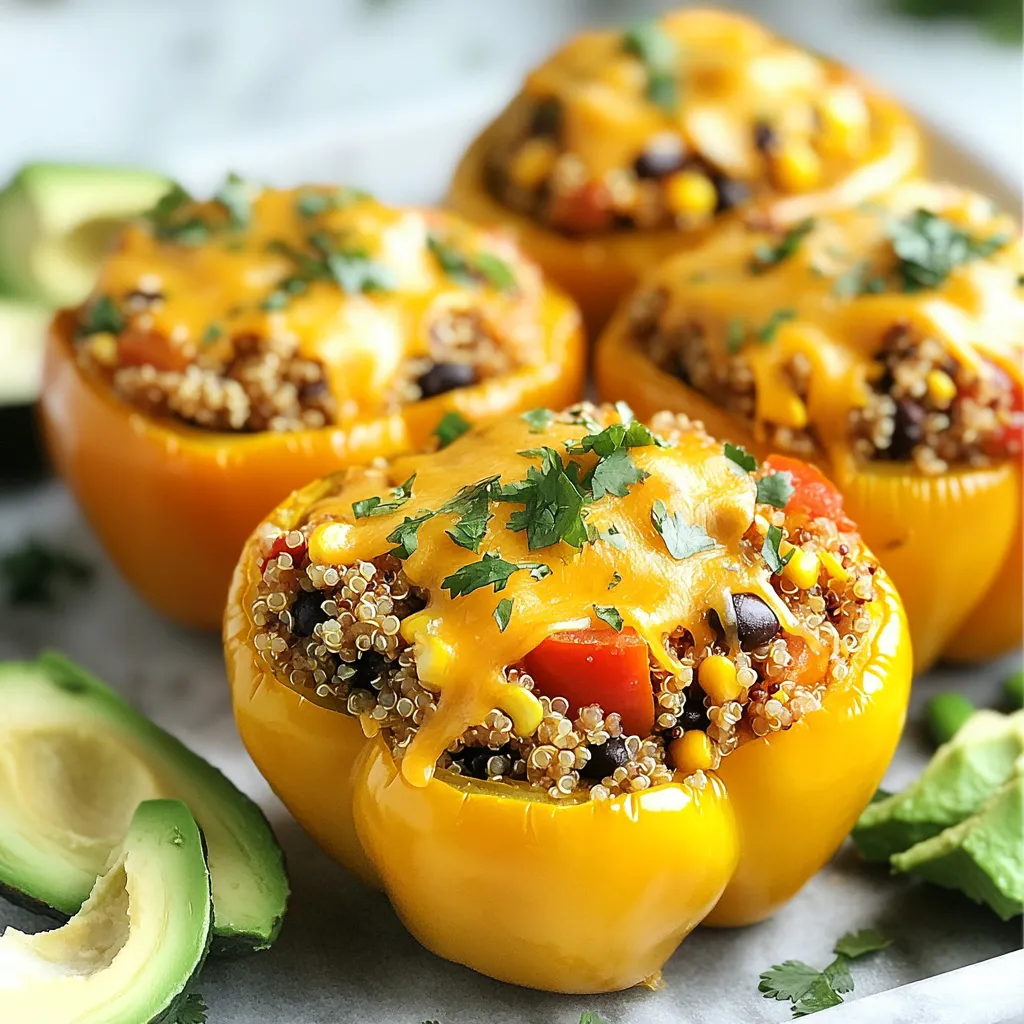
Looking for a hearty meal that pops with flavor? These Tex-Mex Quinoa Stuffed Peppers are just what you need! Packed

To make Creamy Garlic Herb Chicken, gather these main ingredients: - 4 boneless, skinless chicken breasts - 1 tablespoon olive oil - 4 cloves garlic, minced - 1 cup heavy cream - 1 cup chicken broth - 1 cup spinach, chopped - 1/2 cup grated Parmesan cheese These ingredients create a rich and flavorful dish that will impress everyone at the table. The right spices bring your dish to life. For this recipe, use: - 1 teaspoon dried thyme - 1 teaspoon dried rosemary - 1 teaspoon onion powder - Salt and pepper to taste These spices enhance the flavors of the chicken and sauce. Always taste and adjust to your liking. Garnishes add charm to your meal. Consider these options: - Fresh parsley for garnish A sprinkle of fresh parsley not only looks nice but also adds a hint of freshness. You can also serve the chicken with roasted vegetables or garlic bread for a complete meal. {{ingredient_image_1}} Start by seasoning the chicken breasts. Use salt, pepper, onion powder, thyme, and rosemary. Coat both sides well for full flavor. This step is key to a tasty dish. Next, heat olive oil in a large skillet over medium-high heat. Once the oil is hot, add the chicken breasts. Sear them for about 5-6 minutes on each side. Look for a nice golden brown color and ensure they are fully cooked. Remove the chicken and set it aside. In the same skillet, add minced garlic. Sauté for about 1 minute until it smells great. Be careful not to burn it. Pour in the chicken broth, scraping the skillet's bottom to collect all the flavors. Lower the heat and stir in heavy cream. Bring this mixture to a gentle simmer. Add grated Parmesan cheese to the cream mixture. Stir constantly until it melts and the sauce thickens a bit. This will create a rich, creamy sauce. Next, stir in the chopped spinach. Let it cook for 2-3 minutes until the spinach wilts down. Now, return the cooked chicken breasts to the skillet. Spoon the creamy sauce over the chicken. Let it simmer for another minute to warm the chicken. Taste the sauce and adjust the seasoning if needed. Finally, garnish with fresh parsley before serving. Enjoy this savory dish! To cook chicken perfectly, start with even pieces. This helps them cook evenly. Season both sides well with salt, pepper, onion powder, thyme, and rosemary. Heat your skillet until hot. Add olive oil, then the chicken. Sear it for 5-6 minutes on each side. Look for a nice golden color. After cooking, let the chicken rest. This keeps it juicy. For the sauce, use heavy cream. It gives a rich texture. Start by sautéing minced garlic in the same skillet. Be careful not to burn it. After a minute, add chicken broth. Scrape the pan to get all that flavor. Lower the heat before adding heavy cream. Stir in grated Parmesan cheese slowly. This helps the sauce thicken nicely. Add chopped spinach last. It should wilt but stay vibrant. This creamy garlic herb chicken pairs well with many sides. Try roasted vegetables for a healthy touch. Garlic bread makes a great addition too. You could also serve it with pasta for a heartier meal. A fresh salad adds a nice crunch. Whatever you choose, keep it simple and delicious. Pro Tips Rest the Chicken: Let the chicken rest for a few minutes after cooking. This allows the juices to redistribute, resulting in a more tender and juicy piece of meat. Use Fresh Herbs: For a more vibrant flavor, consider using fresh herbs instead of dried. Fresh thyme and rosemary can elevate the dish significantly. Adjust Creaminess: If you prefer a lighter sauce, you can substitute half of the heavy cream with milk or a non-dairy alternative for a less rich flavor. Serve with Sides: Pair this dish with steamed vegetables or a side salad to balance the richness of the creamy sauce and enhance your meal. {{image_2}} You can swap chicken for other proteins. Try pork chops, turkey, or shrimp. Each option brings a new twist. For pork, use thick chops. For shrimp, cook them until pink and tender. These proteins cook fast, so adjust your times. To make a vegetarian dish, use mushrooms or tofu. Both options soak up flavor well. For mushrooms, use portobello or cremini. Sauté them until golden brown. For tofu, press it to remove moisture. Then cut into cubes and cook until crispy. Add the cream sauce just like with chicken. You can boost flavor with herbs and spices. Try adding fresh basil or a splash of lemon juice. Both enhance the dish's taste. For heat, add red pepper flakes or diced jalapeños. Want a richer flavor? Toss in sun-dried tomatoes or olives. They add depth and excitement. To store leftover Creamy Garlic Herb Chicken, let it cool first. Place the chicken and sauce in an airtight container. This keeps the dish fresh. You can store it in the fridge for up to 3 days. Make sure to seal it well. If you want to keep it longer, freezing is a great option. To reheat, place the chicken in a skillet over medium heat. Add a splash of chicken broth or cream to keep it moist. Heat for about 5-7 minutes. Stir the sauce occasionally. You can also microwave it. Use a microwave-safe dish and cover it. Heat in 30-second intervals until warm. For freezing, place the cooled chicken and sauce in freezer bags. Try to remove as much air as possible. Label the bags with the date. You can freeze it for up to 3 months. When ready to eat, thaw in the fridge overnight. Reheat it gently for the best taste. Cook chicken breasts for about 5-6 minutes on each side. This time will give you a nice golden color and keep it juicy. Make sure the internal temperature reaches 165°F. A meat thermometer helps ensure it's fully cooked. Yes, you can use alternatives like coconut milk or almond milk. However, these may change the flavor and thickness. If you want a creamy sauce, look for a non-dairy cream. You can also use Greek yogurt for a healthier twist. This dish pairs well with roasted vegetables or garlic bread. A side salad adds freshness. You can also serve it over pasta or rice to soak up the sauce. Choose sides that balance the rich creaminess. Yes, this recipe is gluten-free as it uses no wheat products. Always check the labels of your ingredients, especially the chicken broth. Make sure it is labeled gluten-free to avoid any cross-contamination. Enjoy this dish worry-free! This blog post covered how to make a delicious creamy garlic herb chicken. You learned about the key ingredients and spices, plus tips for perfect cooking. I shared ways to store leftovers and answered common questions. Remember, you can also try variations, like using different proteins. Cooking can be fun and tasty. Enjoy making this dish, and impress your family with your skills!

Creamy Garlic Herb Chicken Savory and Simple Recipe

Craving a meal that’s both rich and easy to make? Dive into my Creamy Garlic Herb Chicken recipe! This dish

To make this delightful cinnamon swirl banana bread, gather these items: - 3 ripe bananas, mashed - 1/3 cup melted butter - 1 teaspoon baking soda - Pinch of salt - 3/4 cup sugar (or brown sugar for a richer flavor) - 1 large egg, beaten - 1 teaspoon vanilla extract - 1 1/2 cups all-purpose flour - 2 teaspoons ground cinnamon (for the swirl) - 2 tablespoons sugar (for the swirl) You can switch some items if you wish. For bananas, use 2 large bananas or 4 small ones. Instead of butter, try coconut oil or vegetable oil. If you want less sugar, use 1/2 cup of honey or maple syrup. You can also replace all-purpose flour with whole wheat flour for a healthier option. If you want a nutty crunch, add chopped nuts or chocolate chips. Choose bananas that are yellow with brown spots. These spots show that the bananas are sweet and ready for baking. If your bananas are too green, leave them out for a few days. To speed up ripening, place them in a brown paper bag. This traps ethylene gas, which helps them ripen faster. Avoid bananas with bruises that look too dark or mushy. These may spoil your bread's taste. {{ingredient_image_1}} First, set your oven to 350°F (175°C). This heat is perfect for baking. Next, get a 4x8 inch loaf pan. You can grease it with butter or use parchment paper. The paper helps with easy removal later. In a mixing bowl, mash 3 ripe bananas. Add 1/3 cup of melted butter to the bowl. Mix these well until smooth. Then, stir in 1 teaspoon of baking soda and a pinch of salt. Next, add 3/4 cup of sugar. You can use brown sugar for a richer taste. Mix in 1 large beaten egg and 1 teaspoon of vanilla extract. Finally, gently fold in 1 1/2 cups of all-purpose flour. Be careful not to overmix. In a small bowl, mix 2 teaspoons of ground cinnamon and 2 tablespoons of sugar. Pour half of your banana batter into the pan. Sprinkle half of the cinnamon-sugar mixture on top. Pour the rest of the batter into the pan, then add the remaining cinnamon-sugar mix. Use a knife to gently swirl the batter. Aim for a marbled look without mixing too much. Now you are ready to bake! To get that soft and moist banana bread, use ripe bananas. Look for yellow bananas with brown spots. The more spots, the sweeter your bread will taste. Mix the batter gently. Overmixing can make it tough. It is okay if the batter looks a bit lumpy; this is normal. Let the bread cool slightly in the pan. This helps keep it moist and tender. One big mistake is using unripe bananas. They don’t have enough flavor. Another is overbaking. Check the bread with a toothpick. If it comes out clean, it’s done! Also, avoid skipping the cinnamon swirl step. That’s what makes this bread special. Lastly, don’t rush the cooling time. Let it cool fully before slicing to avoid a mushy texture. Here are some tools to help you bake the best banana bread: - Large mixing bowl - 4x8 inch loaf pan - Measuring cups and spoons - Whisk for mixing - Spatula for folding - Toothpick for checking doneness - Parchment paper for easy removal These tools make the process easier and more fun. Happy baking! Pro Tips Use Overripe Bananas: The riper the bananas, the sweeter and more flavorful your banana bread will be. Look for bananas that are heavily speckled or even brown. Don’t Overmix: When combining the flour with the wet ingredients, mix gently until just combined. Overmixing can lead to a dense bread. Check for Doneness: Ovens can vary, so start checking your banana bread a few minutes before the suggested baking time. A toothpick should come out clean when it’s done. Storage Tips: To keep your banana bread fresh, wrap it tightly in plastic wrap or aluminum foil and store it at room temperature for up to 3 days. For longer storage, freeze slices in an airtight container. {{image_2}} You can easily add nuts or chocolate chips to your banana bread. I love using walnuts or pecans for a nice crunch. Just chop about 1/2 cup of nuts and fold them into the batter before baking. If you prefer chocolate, add 1/2 cup of chocolate chips instead. The blend of flavors is simply delightful. You can make this banana bread gluten-free easily. Substitute all-purpose flour with a gluten-free blend. Make sure the blend has a good structure. For a vegan option, replace the egg with a flax egg. Mix 1 tablespoon of ground flaxseed with 2.5 tablespoons of water. Let it sit for 10 minutes to thicken. Then, use it in place of the egg. Enhancing the flavor of your banana bread is fun! Try adding 1/4 teaspoon of nutmeg for a warm touch. You can also boost the vanilla flavor by using 1 tablespoon instead of 1 teaspoon. These small changes make a big impact on taste. Experiment with other spices too, like cardamom or clove, for unique flavors. To keep your cinnamon swirl banana bread fresh, wrap it well. Use plastic wrap or aluminum foil. You can also store it in an airtight container. Place it at room temperature for short-term storage. If you want it to last longer, the fridge is a good option. Just remember, cold can dry it out a bit. For best flavor, eat it fresh! Freezing is a great way to save your banana bread for later. First, let the bread cool completely. Slice it into pieces for easy thawing. Wrap each slice in plastic wrap. Then place the wrapped slices in a freezer bag. Make sure to remove as much air as possible. This helps prevent freezer burn. You can freeze it for up to three months. When stored at room temperature, cinnamon swirl banana bread lasts about 3-4 days. If you keep it in the fridge, it can last up to a week. Once frozen, it stays good for about three months. Always check for signs of spoilage, like mold or off smells, before eating. Yes, you can use frozen bananas. Just thaw them first. Drain excess liquid to avoid too much moisture. Frozen bananas work great and add sweetness. They can make your bread even more moist. Check the center with a toothpick. Insert it into the thickest part. If it comes out clean, your bread is ready. It should also look golden brown around the edges. If it's not done, bake for a few more minutes. Many flavors go well with cinnamon. Nutmeg adds warmth and depth. Vanilla improves sweetness and aroma. Walnuts or pecans add a nice crunch. Chocolate chips can bring a sweet twist. Feel free to mix and match for fun! In this post, we covered the essential steps for making delicious cinnamon swirl banana bread. We explored ingredients, helpful tips, and variations for every taste. Remember to select ripe bananas and avoid common mistakes while baking. Try adding nuts or chocolate chips for extra flavor. Store your bread well to keep it fresh. Baking should be fun, so experiment and enjoy every bite! With these tips, you are ready to create a tasty treat. Happy baking!

Cinnamon Swirl Banana Bread Delightful and Moist Recipe

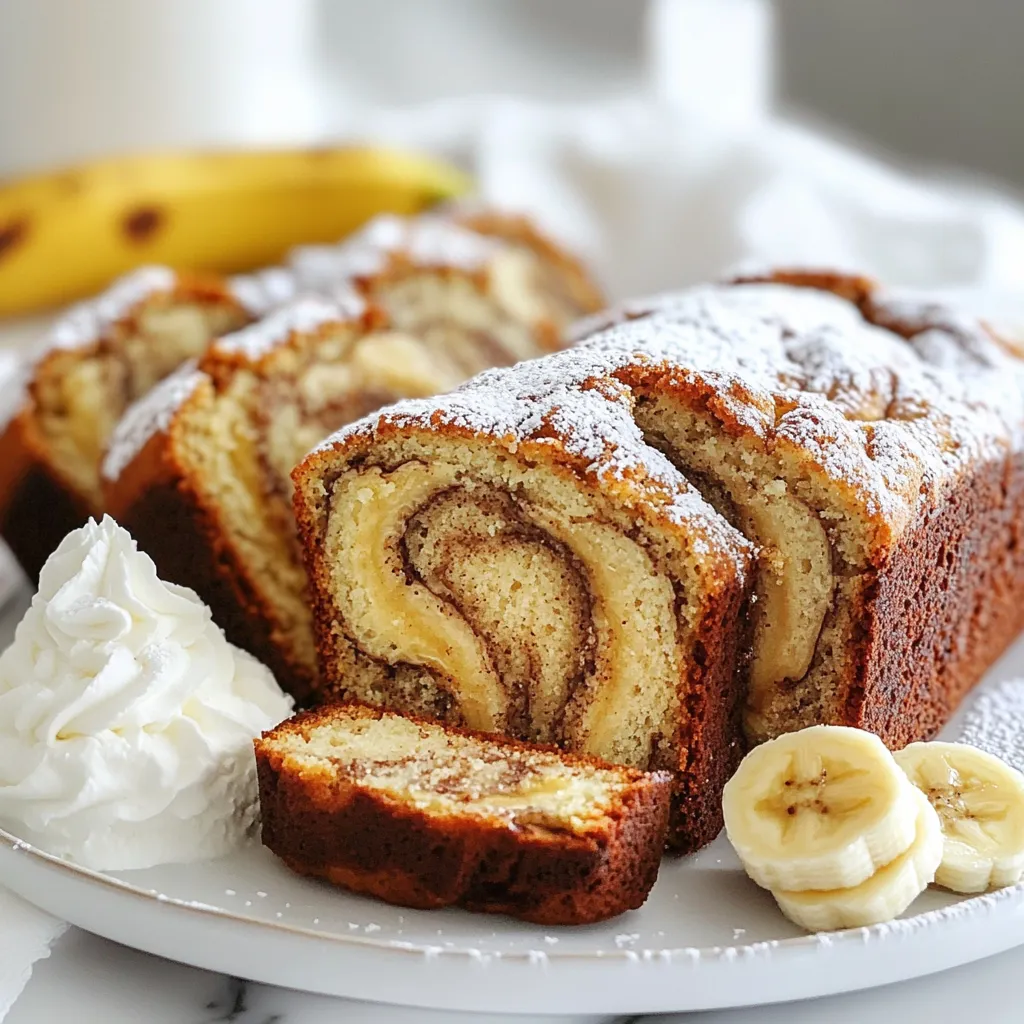
If you love the warm, cozy taste of fresh banana bread, you’re in for a treat! This Cinnamon Swirl Banana

Older posts
Newer posts
← Previous Page1 … Page159 Page160 Page161 Next →

dsad

© 2026 pureeatsnow • Built with GeneratePress

Our Policies

  • Copyright Policy
  • Cookie Policy
  • GDPR Policy
  • Privacy Policy
  • Disclaimer
  • Terms Of Use

More Information

  • Home
  • About
  • Contact
  • Appetizers
  • Dessert
  • Dinner
  • Drinks
©2026, pureeatsnow About Back To Top