Skip to content
DisclaimerTerms Of UseGDPR PolicyCookie Policy

pureeatsnow

  • Home
  • Drinks
  • Appetizers
  • Dinner
  • Dessert
  • About
  • Contact
  • Privacy Policy
DisclaimerTerms Of UseGDPR PolicyCookie Policy

Rachel

To make this tasty dish, you need these main ingredients: - 1 lb Brussels sprouts, trimmed and halved - 3 tablespoons olive oil - ¼ cup maple syrup - 2 tablespoons balsamic vinegar - ¼ teaspoon salt - ¼ teaspoon black pepper These ingredients work together to create a sweet and savory flavor. The Brussels sprouts become tender, and the maple syrup adds a nice glaze. You can enhance your dish with a few optional ingredients: - ¼ cup pecans, roughly chopped - ¼ teaspoon red pepper flakes (optional) - Fresh parsley, chopped for garnish The pecans add a crunchy texture. The red pepper flakes give a spicy kick if you like heat. If you have special diet needs, here are some substitutions: - Use avocado oil instead of olive oil for a different fat. - Swap maple syrup with agave nectar for a vegan option. - Try apple cider vinegar if you want a fruity twist. These swaps help everyone enjoy this dish, no matter their diet. Start by trimming the Brussels sprouts. Cut off the tough stem ends. Then, slice each sprout in half. This helps them cook evenly and soak up flavors. Rinse them under cold water to remove dirt. Dry them well with a clean towel. Dry sprouts will caramelize better. In a large bowl, add the halved Brussels sprouts. Pour in 3 tablespoons of olive oil. Next, add ¼ cup of maple syrup and 2 tablespoons of balsamic vinegar. Sprinkle in ¼ teaspoon of salt and ¼ teaspoon of black pepper. Toss everything well until the sprouts are fully coated. This mixture adds a sweet and tangy flavor. Preheat your oven to 400°F (200°C). Spread the coated Brussels sprouts on a baking sheet. Make sure they are cut side down. This helps them brown nicely. Roast them for 20 minutes. Halfway through, stir them gently to cook evenly. After 20 minutes, sprinkle ¼ cup of chopped pecans over the Brussels sprouts. If you like a kick, add ¼ teaspoon of red pepper flakes. Return the baking sheet to the oven and roast for another 10-15 minutes. When they are tender and caramelized, take them out. Drizzle with more maple syrup if you want. Toss them gently and transfer to a serving platter. Garnish with chopped parsley for a fresh touch. Serve warm and enjoy! To get that sweet, rich flavor, you need a few key tips. First, always cut the Brussels sprouts in half. This helps them cook evenly and caramelize well. Make sure they are cut side down on the baking sheet. This way, they get a nice sear. Avoid crowding the pan, as this can lead to steaming instead of roasting. If they are too close together, they won’t brown nicely. Preheat your oven to 400°F (200°C). This temperature is perfect for caramelizing. Roast the Brussels sprouts for 20 minutes first. After that, stir them to ensure even cooking. Add the chopped pecans and optional red pepper flakes, then roast for another 10 to 15 minutes. You want the sprouts to be tender and golden brown. Keep an eye on them toward the end to avoid burning. You can change this recipe to fit your taste! Want it sweeter? Add more maple syrup. For a tangy kick, increase the balsamic vinegar. You can also swap pecans for walnuts or almonds. If you like heat, add more red pepper flakes. For a savory twist, sprinkle some crumbled bacon on top before serving. These adjustments can make the dish your own! {{image_2}} You can easily change the flavor of Maple Caramelized Brussels Sprouts. Try adding some garlic or onion for a savory touch. You can also mix in some orange zest for a bright, fresh flavor. If you love heat, add more red pepper flakes. A sprinkle of cheese, like feta or Parmesan, makes a rich addition. You can swap Brussels sprouts with other seasonal veggies. Try using butternut squash or carrots in the fall. In spring, asparagus brings a light taste. For summer, zucchini works well. Just adjust cook times to fit the new veggie. These swaps keep the dish fresh and exciting all year. This dish is easy to make vegan or gluten-free. Use maple syrup and olive oil, which are both vegan and gluten-free. To make it nut-free, skip the pecans or use seeds instead. You can also change the balsamic vinegar to a gluten-free option if needed. With these changes, everyone can enjoy this tasty side. To store leftover Maple Caramelized Brussels Sprouts, place them in an airtight container. Make sure to let them cool first. Store them in the fridge for up to three days. This helps keep their taste fresh and delicious. When you're ready to enjoy the leftovers, reheat them for the best flavor. Preheat your oven to 350°F (175°C). Spread the Brussels sprouts on a baking sheet. Heat for about 10 minutes or until warmed through. This method maintains their caramelized texture. You can also use a microwave, but the oven gives better results. You can freeze Maple Caramelized Brussels Sprouts if you need to store them longer. First, let them cool completely. Then, place them in a freezer-safe bag. Squeeze out as much air as you can. They will stay fresh in the freezer for up to three months. When you’re ready to eat, thaw them overnight in the fridge before reheating. Yes, you can prepare Maple Caramelized Brussels Sprouts ahead of time. Cook them fully, then let them cool. Store them in an airtight container in the fridge for up to two days. When you are ready to serve, reheat them in the oven for about 10 minutes at 350°F (175°C). This keeps them crisp and tasty. Maple Caramelized Brussels Sprouts pair well with many dishes. Try serving them alongside roasted chicken or pork. They also go great with quinoa or rice. For a vegetarian option, serve them with a creamy risotto or a fresh salad. The sweet and savory flavor makes them a perfect side. You’ll know Brussels sprouts are cooked when they are tender. Use a fork to check. If it goes in easily, they are ready. Look for a nice golden-brown color on the outside. This shows they have caramelized well. If they are still hard, give them a few more minutes in the oven. Yes, you can use honey or agave syrup as a substitute for maple syrup. Both options add sweetness. However, honey has a stronger flavor, while agave is milder. If you want a sugar-free option, try using a sugar substitute like stevia. Adjust the amount based on your taste preferences. We explored how to make delicious Maple Caramelized Brussels Sprouts. You learned about main and optional ingredients, along with tips on prepping and roasting. I shared advice on achieving the perfect caramelization and creative recipe twists. We also covered storage tips and common questions. Enjoy trying this recipe to impress your family and friends. Simple steps lead to a tasty dish that makes Brussels sprouts shine. Happy cooking!

Maple Caramelized Brussels Sprouts Flavorful Side Dish

Are you ready to transform your side dish game? Maple Caramelized Brussels Sprouts offer a sweet and savory twist that

- 12 oz (340g) penne pasta - 1 can (14 oz) crushed tomatoes - 1 cup vegetable broth - 1 cup heavy cream or coconut cream - 1 small onion, finely diced - 3 cloves garlic, minced - 1 teaspoon Italian seasoning - 1/2 teaspoon red pepper flakes (optional) - Salt and pepper to taste - 1 cup fresh basil leaves, chopped - 1/2 cup grated Parmesan cheese (optional) To make this Instant Pot Creamy Tomato Basil Pasta, you need simple and fresh ingredients. The star of the dish is the penne pasta, which soaks up all the flavors. The crushed tomatoes bring a rich, tangy base, while the vegetable broth adds depth. Heavy cream or coconut cream creates that luscious, creamy texture. The onion and garlic provide aromatic notes, giving your dish a warm feel. Italian seasoning adds an authentic touch, while red pepper flakes can bring a hint of spice. Fresh basil leaves brighten the dish with color and flavor. If you like, you can sprinkle some grated Parmesan cheese on top for extra richness. This combination of ingredients makes a delightful meal that is both satisfying and easy to prepare. Now, gather these items, and get ready for a tasty cooking adventure! To start, set your Instant Pot to the sauté function. Add a splash of oil to the pot. Once hot, add the finely diced onion. Sauté for about 3-4 minutes until it turns translucent. Next, add the minced garlic. Sauté for another 30 seconds until it smells wonderful. This step builds a great flavor base. Now, it’s time to add the main ingredients. Pour in the penne pasta, a can of crushed tomatoes, and 1 cup of vegetable broth. Don’t forget the Italian seasoning! If you like spice, add the red pepper flakes too. Add salt and pepper to taste. Stir it all together, ensuring the pasta is fully submerged. This helps it cook evenly. Close the Instant Pot lid and set the valve to sealing. Cook on manual high pressure for 5 minutes. When the time is up, perform a quick release of pressure. Be careful as the steam escapes. This step cooks the pasta perfectly while soaking up all the flavors. After the pressure has released, carefully open the lid. Stir in the heavy cream or coconut cream until it mixes in well. Then add the chopped basil and mix again. This step gives the pasta its creamy and rich texture. Serve the pasta hot in deep bowls. If you like, top it with grated Parmesan cheese. Add an extra sprinkle of fresh basil for color. A piece of crusty bread on the side is great for soaking up the creamy sauce. Enjoy! To get the best creamy texture, start with the right amount of cream. Use one cup of heavy cream or coconut cream. If you want it creamier, add more cream. You can also use pasta water to adjust the texture. After cooking, save a little pasta water before draining. Stir this water into the dish to thin it out if needed. Seasoning is key to great flavor. After mixing in the cream and basil, taste your dish. You can add more salt and pepper to bring out the tastes. If you like a little heat, add more red pepper flakes. For a fresh twist, try adding lemon juice or zest. A splash of lemon brightens the flavors. Cleaning your Instant Pot is easy. After cooking, unplug it and let it cool. Remove the inner pot and wash it with warm, soapy water. Use a soft cloth for the lid and sealing ring. Make sure to check for food particles in the steam vent. Keeping your pot clean helps it last longer and work better. {{image_2}} You can make this dish even better by adding different vegetables. Try adding: - Spinach - Zucchini - Bell peppers - Mushrooms These veggies add more color and flavor. You can sauté them with the onion and garlic. This gives you a tasty, veggie-packed pasta. If you want a dairy-free dish, you can swap the cream and cheese. Try using: - Coconut cream instead of heavy cream - Nutritional yeast instead of Parmesan cheese These swaps keep the pasta creamy and rich while being dairy-free. If you want to add protein, consider chicken or shrimp. For chicken, you can: - Dice it and sauté it with the onions - Cook it separately and add it before serving For shrimp, just add it in during the last minute of cooking. This way, your pasta will be hearty and satisfying. To keep your creamy tomato basil pasta fresh, use airtight containers. Glass or BPA-free plastic containers work best. Allow the pasta to cool to room temperature before sealing. This helps prevent moisture build-up, which can make the pasta soggy. Store it in the fridge for up to three days. When it's time to reheat, you have a few good options. The microwave is quick and easy. Place the pasta in a bowl and cover it with a damp paper towel. Heat in short bursts, stirring in between. This keeps the pasta from drying out. You can also reheat it on the stove. Add a splash of water or broth to a pan, then heat gently over low heat, stirring often. This method helps keep the pasta creamy. Yes, you can freeze creamy pasta! To do this, make sure to cool it completely first. Use freezer-safe containers or bags to store it. Leave some space at the top, as the pasta will expand when frozen. It can last up to three months in the freezer. To thaw, move it to the fridge overnight. Reheat it gently, adding a splash of cream or broth to restore its creamy texture. Yes, you can use other pasta shapes. If you choose a different type, adjust the cooking time. Shorter pasta, like macaroni, cooks faster. For long pasta, like spaghetti, it may take a bit longer. Always check the package for cooking times. You can use coconut cream for a dairy-free option. Other great choices include almond milk or cashew cream. These will give you a nice, creamy texture without dairy. Just remember to adjust the flavor as needed. To add heat, use more red pepper flakes. You can also add chopped jalapeños or a dash of hot sauce. Start with a little, then taste. You can always add more spice, but it's hard to take it out. Yes, you can double the recipe! Just make sure your Instant Pot has enough space. If it gets too full, it may not cook evenly. Also, you may need to adjust the cooking time slightly. This creamy tomato basil pasta lasts about 3 to 5 days in the fridge. Store it in an airtight container for best results. Before eating, just reheat it gently on the stove or in the microwave. Enjoy your leftovers! This blog post explored making a creamy tomato basil pasta in an Instant Pot. You learned about key ingredients like pasta, tomatoes, and cream. I provided step-by-step instructions to help you through cooking and serving. You also found tips for enhancing flavors and storage advice. In conclusion, this dish is easy and fun to make. With a few variations, you can customize it to fit your taste. Enjoy your cooking adventure, and don’t forget to share your results!

Instant Pot Creamy Tomato Basil Pasta Delight

Are you craving a quick and creamy pasta dish? Look no further! My Instant Pot Creamy Tomato Basil Pasta Delight

- 1 lb flank steak - 2 tablespoons unsalted butter - 4 cloves garlic The flank steak is the star here. It has great flavor and cooks fast. You want to slice it into thin strips for the best results. The butter adds richness, while the garlic gives a lovely aroma and depth of flavor. - Cumin - Smoked paprika - Chili powder These seasonings bring the fajitas to life. Cumin adds warmth, while smoked paprika gives a subtle smokiness. Chili powder adds a little kick, perfect for those who enjoy a bit of heat. - Bell pepper - Red onion - Zucchini - Small flour tortillas Fresh vegetables add color and crunch. Use any color bell pepper you like. The red onion provides sweetness, while zucchini adds a nice texture. Small flour tortillas are perfect for wrapping up all those tasty fillings. 1. Preheat the oven: First, set your oven to 400°F (200°C). This will help cook everything evenly. Line a large sheet pan with parchment paper. It makes cleanup much easier. 2. Prepare the garlic butter mixture: In a small bowl, mix two tablespoons of melted unsalted butter with four minced garlic cloves. Add one teaspoon each of cumin, smoked paprika, and chili powder. Stir it well until it's combined. 1. Combine the steak and vegetables: In a large bowl, add one pound of sliced flank steak, one sliced bell pepper, one sliced red onion, and one sliced zucchini. Drizzle the garlic butter mixture over the top. Season with salt and pepper to taste. 2. Spread on the sheet pan: Toss everything together until all pieces are coated well. Then, evenly spread the mixture on the prepared sheet pan. Make sure nothing overlaps for even cooking. 1. Remove from oven: After 20-25 minutes, check if the steak is done and the veggies are tender. Carefully take the sheet pan out of the oven. Let it rest for a few minutes. 2. Warm the tortillas: In a dry skillet, warm eight small flour tortillas over medium heat. Do this for about 30 seconds on each side or until they are soft and pliable. Now you are ready to serve! Place a generous portion of the fajita mix on each tortilla. Garnish with fresh cilantro and a squeeze of lime juice for that extra zing. Enjoy your meal! How to achieve the best doneness for steak: To get the best doneness, check the steak with a meat thermometer. Aim for 130°F for medium-rare. Let it rest for a few minutes after cooking. This helps keep it juicy and flavorful. Ensuring vegetables are cooked evenly: Cut all vegetables into similar sizes. This helps them cook at the same rate. Spread them out on the sheet pan without overlapping. This way, they roast perfectly and get nice and tender. Creative serving ideas: Wrap the fajitas in foil for a fun touch. You can also arrange them on a colorful platter. Serve with lime wedges and your favorite salsa for a pop of color. Enhancing visual appeal with garnishes: Use fresh cilantro as a bright garnish. A sprinkle of lime juice adds freshness. You can also add diced avocados or sliced jalapeños for extra flair. {{image_2}} Alternative meats You can swap flank steak for chicken, shrimp, or beef sirloin. Chicken thighs work well too. Each meat has its own flavor and texture. Adjust cooking time based on your choice. Shrimp cooks quickly, so keep an eye on it. If using chicken, ensure it reaches 165°F for safe eating. Vegetarian options For a vegetarian twist, use firm tofu or tempeh instead of meat. Both options soak up flavors well. You can also add beans like black beans or pinto beans for protein. They add a creamy texture and extra heartiness. Use the same garlic butter and spices for a delicious meal. Adding more spices Want a bolder taste? Try adding cayenne pepper or crushed red pepper flakes. They bring heat and depth to your dish. You can also mix in oregano or coriander for a twist. Experiment with your favorite spices to find the perfect blend. Incorporating different vegetables Feel free to change up the veggies! Try adding mushrooms, corn, or asparagus for a new flavor. Each vegetable brings its own taste and crunch. Use seasonal veggies for freshness. Mixing colorful vegetables also makes your dish more appealing. To keep your garlic butter steak fajitas fresh, place leftovers in an airtight container. Store the container in the fridge. They will stay good for about three days. If you want to keep them longer, freeze the fajita mixture. Just make sure to let it cool before you freeze it. When you are ready to eat, thaw in the fridge overnight. Reheating your fajitas can be simple. To keep the flavors, use a skillet on medium heat. Add a splash of water or broth to help steam the mixture. Stir it for about five minutes until heated through. You can also use the microwave if you are in a hurry. Just cover the dish with a lid or a wet paper towel. Heat in short bursts, stirring in between, until warm. This helps keep the steak tender and the veggies crisp. How do you know when steak is done? You can check steak doneness by using a meat thermometer. For medium rare, aim for 135°F. For medium, look for 145°F. Another way is to press the steak gently. A soft feel means it's rare, while firmer means it's well done. Can I use frozen steak? Yes, you can use frozen steak. Just make sure to thaw it fully before cooking. This helps it cook evenly and stay tender. To thaw, place it in the fridge overnight or use a cold water bath for a quicker method. What should I serve with fajitas? Fajitas pair well with many sides. Try beans, rice, or a fresh salad. You can also serve guacamole or salsa for extra flavor. Don’t forget lime wedges for a zesty kick! Can I make this recipe ahead of time? Yes, you can prep the steak and veggies ahead of time. Just store them in the fridge. Combine them with the garlic butter mixture right before cooking. This saves time on busy days. How to make the fajitas spicier? To add heat, include a diced jalapeño or sprinkle red pepper flakes. You can also use a spicier chili powder. Just remember to adjust the amount to match your taste. Pairing ideas with sides and salsas For a vibrant meal, serve fajitas on a colorful platter. Add sides like Mexican rice or black beans. Fresh salsa and guacamole make great dips. Garnish with cilantro and lime wedges for a bright touch. This blog post covered all you need for tasty fajitas. We explored the main ingredients, including flank steak, butter, and fresh vegetables. You learned step-by-step how to prepare and cook your meal. With cooking tips and creative serving ideas, your fajitas can impress anyone. Remember, variations let you customize flavors to your liking. Enjoy trying these tips and recipes. Your fajitas are sure to be amazing!

Garlic Butter Steak Fajitas Sheet Pan Delight

Get ready for a flavor blast with Garlic Butter Steak Fajitas Sheet Pan Delight! This dish combines juicy flank steak,

To make this creamy and flavorful One-Pot Alfredo Orzo, gather these simple ingredients: - 1 cup orzo pasta - 2 cups vegetable broth - 1 cup heavy cream - 1 cup grated Parmesan cheese - 2 tablespoons unsalted butter - 2 cloves garlic, minced - 1 cup spinach, roughly chopped - 1/2 teaspoon black pepper - 1/4 teaspoon nutmeg - Salt to taste - Fresh parsley, chopped (for garnish) If you want to add more flavor, try these optional ingredients: - A pinch of red pepper flakes for spice. - Lemon zest for a bright twist. - Mushrooms for an earthy taste. - Cooked chicken or shrimp for protein. You can make this recipe fit your diet. Here are some easy swaps: - Use whole wheat or gluten-free orzo for a healthier option. - Replace heavy cream with coconut milk for a dairy-free version. - Try nutritional yeast instead of Parmesan for a vegan choice. - Use olive oil instead of butter for a lighter fat option. {{ingredient_image_1}} To start, gather your ingredients. You will need: - 1 cup orzo pasta - 2 cups vegetable broth - 1 cup heavy cream - 1 cup grated Parmesan cheese - 2 tablespoons unsalted butter - 2 cloves garlic, minced - 1 cup spinach, roughly chopped - 1/2 teaspoon black pepper - 1/4 teaspoon nutmeg - Salt to taste - Fresh parsley, chopped (for garnish) Make sure you have a large pot ready. 1. Melt the butter in the pot over medium heat. 2. Add the minced garlic and cook for 1 minute. You want it to smell good. 3. Toss in the orzo pasta and toast it for about 2 minutes. 4. Pour in the vegetable broth and bring it to a gentle boil. 5. Lower the heat, cover the pot, and simmer for about 10 minutes. Stir it often. 6. When the orzo is al dente, pour in the heavy cream. Stir well. 7. Gradually mix in the grated Parmesan cheese. Keep stirring until it melts. 8. Next, add the chopped spinach, black pepper, nutmeg, and salt. Mix until the spinach wilts. 9. Taste it! Adjust the seasoning if needed. Then, take it off the heat. 10. Serve hot and sprinkle fresh parsley on top for a nice touch. To get the best texture, follow these tips: - Stir often while cooking. This helps the orzo absorb the broth well. - If the mixture is too thick, add a splash of broth or cream. - For a creamier finish, mix in a bit more cheese at the end. These steps will help you make a creamy and flavorful One-Pot Alfredo Orzo that everyone will love! When making One-Pot Alfredo Orzo, watch out for a few common mistakes. First, do not skip toasting the orzo. This step adds a nice flavor. If you add the broth too fast, it can make the orzo mushy. Keep an eye on the heat. Too high can burn the garlic, ruining the dish. Lastly, be careful with salt. Parmesan cheese is salty, so taste before adding more. You can boost flavor in many ways. Try adding fresh herbs like basil or thyme. A squeeze of lemon juice can brighten the dish. For a kick, add a pinch of red pepper flakes. You can also mix in sun-dried tomatoes for a tangy twist. If you love garlic, add more cloves to the pot. The key is to taste as you go. Having the right tools makes cooking easier. Use a large pot to give the orzo space to cook. A wooden spoon works best for stirring and scraping the bottom. If you have a microplane, use it to grate the cheese finely. This helps it melt faster. A measuring cup is great for accurate portions, especially for broth and cream. Lastly, keep a sharp knife handy for chopping garlic and spinach. Pro Tips Choose the Right Orzo: Use high-quality orzo pasta for the best texture and flavor. Whole wheat orzo can also add a nutty taste and extra fiber. Customize the Creaminess: For a lighter version, substitute half of the heavy cream with low-fat milk or almond milk. You can also add more cheese for extra creaminess. Incorporate More Veggies: Feel free to add other vegetables like peas, bell peppers, or mushrooms for added nutrition and color. Just sauté them along with the garlic. Perfect Seasoning: Always taste and adjust the seasoning towards the end of cooking. A squeeze of lemon juice can brighten the flavors and add a nice zing. {{image_2}} You can boost the protein in your One-Pot Alfredo Orzo easily. Cooked chicken or shrimp works great. Here’s how: - Chicken: Use diced, cooked chicken breast. Add it when you mix in the cream and cheese. - Shrimp: Toss in peeled shrimp during the last few minutes of cooking. They cook fast and add a nice flavor. Adding protein not only makes the dish heartier but also more filling. If you want to keep it vegetarian, that's totally fine! You can add more veggies to enhance taste and nutrition. Here are some ideas: - Mushrooms: Sauté sliced mushrooms along with the garlic for a rich flavor. - Broccoli: Add chopped broccoli with the spinach. It cooks quickly and adds nice color. - Peas: Stir in frozen peas at the end for a pop of sweetness. These add-ins make the dish colorful and fun! Experimenting with herbs and spices can make your Alfredo Orzo unique. Here are my favorites: - Italian herbs: A mix of dried oregano, basil, and thyme adds depth. - Crushed red pepper: A pinch gives a little heat if you like spice. - Lemon zest: Add zest for a bright, fresh taste that pairs well with cream. Feel free to mix and match these options to create your perfect bowl of creamy goodness! After you make your One-Pot Alfredo Orzo, let it cool down. Transfer the orzo to an airtight container. This helps keep the dish fresh. Store it in the fridge for up to three days. If you plan to keep it longer, freezing is a good option. To reheat, you can use the stove or microwave. If using the stove, add a splash of broth or cream. This will help bring back the creaminess. Heat it on low until warm, stirring often. In the microwave, cover the dish and heat for one to two minutes. Check and stir halfway through to ensure even heating. You can freeze the orzo for up to three months. Portion it out into smaller containers for easy meals. Make sure to leave some space in the containers. This allows the orzo to expand. When ready to eat, thaw it overnight in the fridge before reheating. Yes, you can use other pasta types. Try using penne, fusilli, or even spaghetti. Keep in mind that cooking times may change. Always check the package for cooking times. Stir often to keep the pasta from sticking. To make this dish vegan, switch dairy for plant-based options. Use almond or coconut milk instead of heavy cream. Replace Parmesan with a vegan cheese or nutritional yeast. These swaps keep the creamy texture and taste. You can serve this dish with many sides. A fresh salad pairs well, adding crunch and nutrition. Garlic bread makes for a tasty side too. Roasted veggies add color and flavor. Enjoy this meal with your favorite drink for a complete dinner! In this blog post, we explored key ingredients and steps for making One-Pot Alfredo Orzo. We discussed optional ingredients and dietary substitutions, plus tips for a perfect dish. You learned about common mistakes and kitchen tools. We also covered protein additions, vegetarian options, and flavor enhancements. Finally, I shared storage tips and answered important FAQs. Enjoy experimenting with your version of this dish! Take these tips and tricks for a tasty success.

One-Pot Alfredo Orzo Creamy and Flavorful Recipe

Are you ready to elevate your dinner game? This creamy One-Pot Alfredo Orzo recipe is your new go-to meal. It

- 4 medium russet potatoes, scrubbed and cut into wedges - 3 tablespoons olive oil - 4 cloves garlic, minced - 1 teaspoon onion powder - 1 teaspoon dried oregano - 1 teaspoon paprika - ½ cup grated Parmesan cheese - Salt and pepper to taste - Fresh parsley, chopped for garnish For my Air Fryer Garlic Parmesan Potato Wedges, I use simple, fresh ingredients. First, I grab 4 medium russet potatoes. These potatoes have the perfect texture. I scrub them well and cut them into wedges. Next, I add 3 tablespoons of olive oil. This oil helps the wedges crisp up nicely. Then, I use 4 cloves of fresh garlic, minced. Garlic adds great flavor and aroma. I also include a teaspoon each of onion powder, dried oregano, and paprika. These seasonings work together to create a tasty blend. I make sure to add salt and pepper to taste for balance. Finally, I sprinkle in ½ cup of grated Parmesan cheese. This cheese gives the wedges their rich, cheesy flavor. For garnish, I chop fresh parsley. It adds color and a fresh taste to the dish. These ingredients come together to make a delightful snack or side dish. The combination of flavors is both simple and exciting. You will love making this dish! First, you need to preheat your air fryer. Set it to 400°F (200°C) and let it heat for about 5 minutes. This step is key for getting your potato wedges nice and crispy. Now, grab your medium russet potatoes. Scrub them well under running water to remove dirt. Cut each potato into wedges. Aim for even sizes so they cook at the same time. In a large bowl, toss your potato wedges with 3 tablespoons of olive oil. Make sure they are well coated. Next, add 4 minced garlic cloves, 1 teaspoon of onion powder, 1 teaspoon of dried oregano, and 1 teaspoon of paprika to the bowl. Season with salt and pepper. Mix until every wedge gets that tasty garlic-seasoning blend. Finally, sprinkle in ½ cup of grated Parmesan cheese. Toss gently again. This helps the cheese stick to the wedges, adding flavor and crunch. Place the coated potato wedges in the air fryer basket. Arrange them in a single layer. Avoid overcrowding to ensure they cook evenly. If your air fryer is small, you may need to work in batches. Air fry the wedges for 15 to 20 minutes. Halfway through, shake the basket to help them crisp up. Cook until they turn a golden brown and are tender inside. Once done, take them out and put them on a serving platter. For a pop of color and flavor, garnish with fresh chopped parsley. Enjoy your crispy Air Fryer Garlic Parmesan Potato Wedges! To get that perfect crisp on your potato wedges, follow these steps. First, make sure your potatoes are dry after washing. Water can make them soggy. Second, coat them well with olive oil. This helps them fry up nicely. Lastly, don't overcrowd the basket. If the wedges touch, they won't crisp up well. For these garlic parmesan potato wedges, I suggest setting your air fryer to 400°F (200°C). Preheat the air fryer for about 5 minutes before adding the wedges. This heat will help them cook faster and get crispy. Cook them for 15 to 20 minutes, shaking the basket halfway through. This way, every side gets that golden crunch. Feel free to get creative with seasonings! You can add a pinch of cayenne for heat or swap oregano for thyme. If you want a cheesy twist, try using cheddar or feta instead of parmesan. For a fresh taste, mix in some lemon zest. Experimenting with flavors can make each batch unique and exciting. {{image_2}} You can switch up the taste of your potato wedges with fun flavors. Spicy Garlic Parmesan If you like heat, add cayenne pepper or chili flakes to the seasoning mix. This will make your wedges spicy and tasty. You can also mix in some hot sauce with the olive oil for an extra kick. Herb-Infused Options Try adding fresh herbs like rosemary or thyme. Chop them finely and mix them into the garlic and oil. This gives your wedges a fresh, garden taste. You can also use dried herbs if that’s what you have. Sweet potatoes are a great swap for regular potatoes. They have a naturally sweet taste and pair well with garlic. To make sweet potato wedges, just follow the same steps. Cut them into wedges, coat with oil, and season as you like. The cooking time might be a bit shorter. Keep an eye on them as they air fry. If you want to make these wedges vegan, skip the Parmesan cheese. You can use nutritional yeast instead. It gives a cheesy flavor without any dairy. Just sprinkle some on the wedges before air frying. You can also use vegan cheese if you prefer. After making your garlic parmesan potato wedges, let them cool. Place the leftovers in an airtight container. Store them in the fridge for up to three days. This helps keep the flavors fresh. If you want to keep them longer, consider freezing. To reheat, preheat your air fryer to 350°F (175°C). Place the wedges in a single layer. Heat for about 5-7 minutes. This will restore their crispiness. You can also use your oven. Just place them on a baking sheet and reheat at 350°F (175°C) for 10-15 minutes. For freezing, allow the wedges to cool completely. Lay them flat on a baking sheet first. This prevents them from sticking together. Once frozen, transfer them to a freezer-safe bag. They can last up to two months in the freezer. When ready to eat, you can cook them straight from frozen. Just add a few extra minutes to the air fryer time. Yes, you can use other potatoes. Yukon gold or red potatoes work well. They add a different taste and texture. However, russet potatoes give the best crispiness. Choose what you like best. You should air fry the wedges for 15-20 minutes. Check them halfway through and shake the basket. This helps them cook evenly. Look for a golden brown color to know they are done. Many sauces taste great with these wedges. Try ranch, ketchup, or garlic aioli. For a spicy kick, use sriracha mayo. These sauces enhance the savory flavor of the wedges. Yes, you can bake them in the oven. Preheat to 425°F (220°C). Spread the wedges on a baking sheet. Bake them for about 25-30 minutes. Flip them halfway for even cooking. They will still be tasty! You have learned how to make tasty garlic Parmesan potato wedges. We covered the best ingredients and step-by-step instructions to help you cook them. I also shared tips for extra crispiness and ideas for variations. Don't forget about storage and reheating tips to keep your wedges fresh. Remember, these wedges are easy to customize and perfect for sharing. Enjoy making this simple dish and impress everyone with your cooking skills.

Air Fryer Garlic Parmesan Potato Wedges Delight

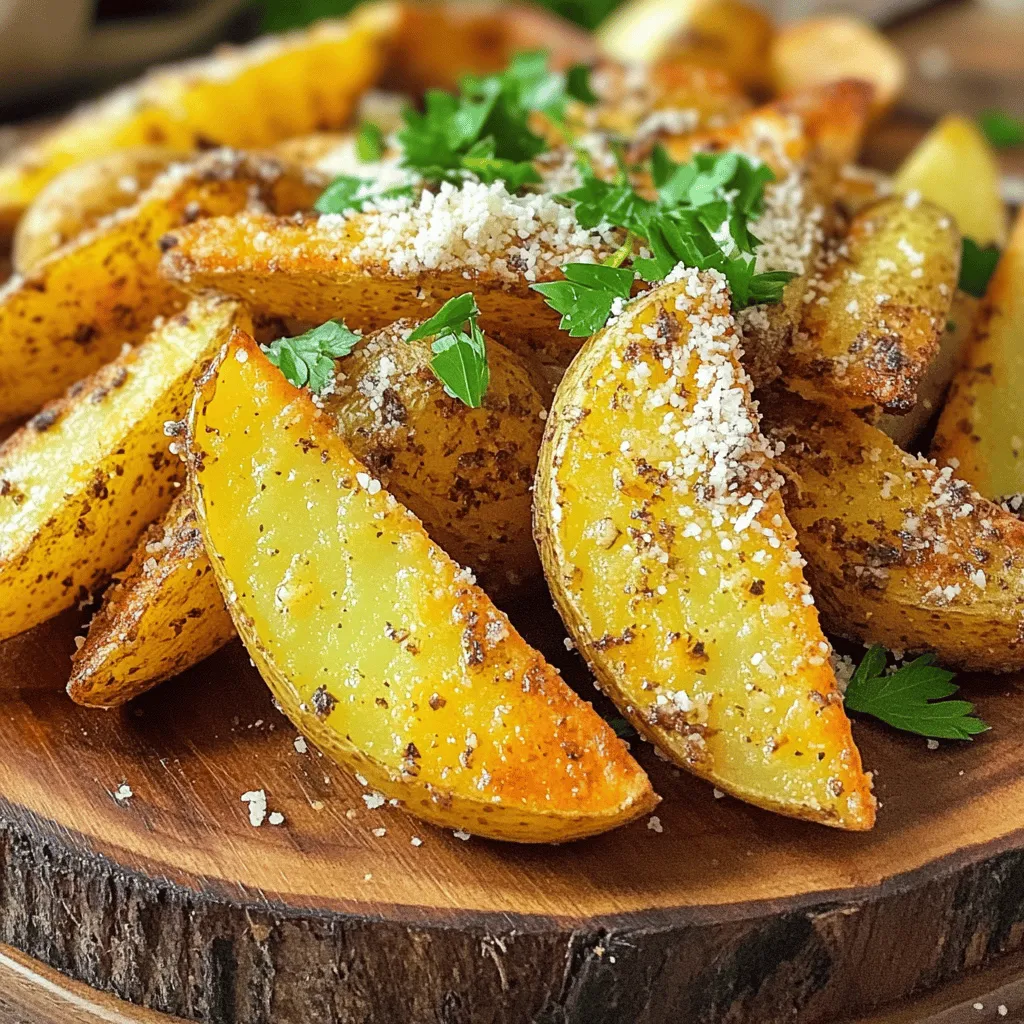
Craving a crunchy, cheesy snack? You’re in the right place! Today, I’ll show you how to make Air Fryer Garlic

To make a great Cheesy Broccoli Rice Casserole, you need these key items: - 2 cups cooked brown rice - 2 cups fresh broccoli florets - 1 cup shredded cheddar cheese - 1 cup cream of mushroom soup - 1 cup milk - 1/2 cup diced onion - 2 cloves garlic, minced - 1 teaspoon garlic powder - 1 teaspoon onion powder - Salt and pepper to taste - 1/2 cup breadcrumbs - 2 tablespoons olive oil - Fresh parsley, chopped These ingredients create a creamy, cheesy base. The brown rice adds heartiness, while broccoli gives it a healthy touch. You can tweak this dish to fit your taste. Here are some fun options: - Add cooked chicken or ham for extra protein. - Use different cheeses like mozzarella or gouda for unique flavors. - Toss in some red pepper flakes for a spicy kick. - Swap out the cream of mushroom soup for cream of chicken soup. These options let you make this casserole your own. Get creative and have fun with it! If you don’t have something on hand, here are some easy swaps: - Use white rice instead of brown rice. - Frozen broccoli works great in place of fresh. - For a dairy-free option, try almond milk and a dairy-free cheese. - Instead of cream of mushroom soup, blend some cooked mushrooms with broth. These substitutions make the recipe flexible. You can still enjoy a tasty casserole even if you miss an ingredient! Start by preheating your oven to 350°F (175°C). This helps ensure even cooking. Next, gather your ingredients. You will need cooked brown rice, fresh broccoli florets, diced onion, minced garlic, and your cheese and soup. In a large saucepan, heat 2 tablespoons of olive oil over medium heat. Add 1/2 cup of diced onion and 2 cloves of minced garlic. Sauté them until the onion is soft. This should take about 3-4 minutes. Then, add 2 cups of fresh broccoli florets. Cook for another 2-3 minutes, so the broccoli softens a bit. Remove the pan from heat. In a large mixing bowl, combine the cooked brown rice, sautéed onions, and broccoli. Add 1 cup of cream of mushroom soup and 1 cup of milk. Sprinkle in 1 teaspoon of garlic powder, 1 teaspoon of onion powder, and salt and pepper to taste. Stir this mixture until it's well combined. Next, fold in 3/4 cup of shredded cheddar cheese. Transfer this mix into a greased 9x13 inch casserole dish, spreading it evenly. Sprinkle the remaining 1/4 cup of cheddar cheese over the top of the casserole. In a small bowl, mix 1/2 cup of breadcrumbs with a drizzle of olive oil. Sprinkle this breadcrumb mixture over the cheese layer. Bake your casserole uncovered for 25-30 minutes. You want the top to be bubbly and golden brown. Once done, let it cool for a few minutes. Garnish with fresh parsley before serving. Enjoy your delicious Cheesy Broccoli Rice Casserole! To get that gooey, melty cheese, use fresh cheddar. Shred it yourself for the best texture. When you sprinkle cheese on top, let it melt slowly. Bake at 350°F until bubbly and golden. This slow cooking helps the cheese melt evenly and keeps it creamy. To keep the broccoli bright green, don’t overcook it. Sauté it for just a few minutes. This way, it stays crisp and colorful. You can also blanch the florets before adding them to the mix. Just dip them in boiling water for a minute, then cool them in ice water. This keeps the bright color and crunch. Cook your brown rice ahead of time. You can even use leftover rice. Chop your onions and garlic in advance too. Store them in the fridge to save time. If you're in a real hurry, buy pre-cut broccoli. These tips cut down on prep time, so you can enjoy your dish faster. {{image_2}} You can easily add protein to your Cheesy Broccoli Rice Casserole. Chicken, ham, or tofu all work well. If you use chicken, cook it first and cut it into small pieces. For ham, diced cooked ham adds a nice flavor. Tofu is a great choice for a vegetarian option. Use firm tofu, press it to remove water, and then cube it. Mix the protein into the rice and broccoli mixture before baking. This makes the dish heartier and more filling. For a vegetarian or vegan version, make a few simple swaps. Replace the cream of mushroom soup with a vegan cream soup or a homemade nut cream. Use plant-based milk instead of regular milk. For cheese, try a vegan cheese that melts well. Nutritional yeast also adds a cheesy flavor without dairy. These changes keep the casserole tasty while fitting a plant-based diet. You can boost the flavor of your casserole with different seasonings. Try adding paprika for a bit of smokiness. A pinch of cayenne pepper gives it some heat. Fresh herbs like thyme or basil can also add nice notes. If you want a tangy kick, a splash of lemon juice works well. Experiment with these seasonings to find what you love best. Each small change can make your dish unique and exciting. To store your leftover Cheesy Broccoli Rice Casserole, let it cool first. Place it in an airtight container. This keeps it fresh for about 3-4 days in the fridge. Make sure to cover it well to prevent drying out. When you’re ready to enjoy your leftovers, preheat the oven to 350°F (175°C). Place the casserole in an oven-safe dish. Cover it with foil to keep it moist. Heat for about 20-25 minutes, or until it’s hot. You can also microwave it in a bowl for 2-3 minutes, stirring halfway through. You can freeze the casserole if you want to save it for later. To do this, let it cool completely. Then, wrap it tightly in plastic wrap or aluminum foil. Place it in a freezer-safe container or bag. It can last for up to 3 months in the freezer. When you’re ready to eat, thaw it overnight in the fridge. Then, reheat as mentioned above. Yes, you can use frozen broccoli. Just thaw it and drain any water. This saves time and makes cooking easier. Frozen broccoli is often pre-cut and blanched, which helps it cook fast. You can use cream of chicken soup or a dairy-free cream soup. If you prefer to make your own, blend cooked mushrooms with cream or broth. You can also use a mix of sour cream and milk for a creamy base. To prepare ahead, mix all the ingredients and store them in the fridge. You can assemble the casserole a day before. Just cover it tightly. When you're ready to bake, let it sit out for about 30 minutes. Then, bake as directed. Yes, you can make it gluten-free! Use gluten-free breadcrumbs and check your soup for gluten-free options. Most ingredients, like rice and cheese, are already gluten-free. Just be sure to read labels carefully. In this post, we explored the tasty world of Cheesy Broccoli Rice Casserole. We detailed essential and optional ingredients, along with substitutions. Step-by-step instructions made cooking easy, while tips helped you perfect your dish. You learned ways to add protein and prioritize flavor too. Lastly, we covered storage, reheating, and common questions. Enjoy making this dish and feel free to get creative!

Cheesy Broccoli Rice Casserole Simple and Tasty Dish

If you love comfort food, you’re in for a treat! Cheesy Broccoli Rice Casserole is a simple and tasty dish

To make this Zesty Lime Cilantro Quinoa Salad, gather these fresh ingredients: - 1 cup quinoa, rinsed - 2 cups water or vegetable broth - 1 cup cherry tomatoes, halved - 1 bell pepper (red or yellow), diced - 1/2 cucumber, diced - 1/4 red onion, finely chopped - 1 cup corn (fresh or canned) - 1/2 cup fresh cilantro, chopped - Juice of 2 limes - 3 tablespoons olive oil - 1 teaspoon cumin - Salt and pepper to taste You can add even more flavor and crunch to your salad with these optional ingredients: - Black beans for protein - Avocado for creaminess - Jalapeños for heat - Feta cheese for richness - Spinach or kale for extra greens This salad is not only tasty but also packed with nutrients. Here’s a quick look: - High in protein from quinoa - Rich in vitamins from fresh veggies - Healthy fats from olive oil - Low in calories, making it a great choice for a light meal This salad is a great way to enjoy fresh flavors while getting a nutrient boost. The combination of lime and cilantro adds a zesty kick that makes your taste buds dance! Start by rinsing 1 cup of quinoa in cold water. This step helps remove any bitter taste. In a medium saucepan, bring 2 cups of water or vegetable broth to a boil. Once boiling, add the rinsed quinoa and a pinch of salt. Cover the pot and reduce the heat to low. Let it cook for about 15 minutes, or until the quinoa absorbs all the liquid. After that, remove it from heat. Keep it covered for another 5 minutes. Fluff the quinoa with a fork and let it cool down. While the quinoa cooks, chop the vegetables. In a large mixing bowl, combine 1 cup of halved cherry tomatoes, 1 diced bell pepper, 1/2 diced cucumber, 1/4 finely chopped red onion, and 1 cup of corn. You can use fresh corn or canned corn, depending on what you have. Mix the vegetables well. This colorful mix adds crunch and flavor to the salad. In a small bowl, you’ll make the dressing. Squeeze the juice of 2 limes into the bowl. Add 3 tablespoons of olive oil, 1 teaspoon of cumin, and some salt and pepper. Whisk everything together until it’s combined. The lime adds brightness, and cumin gives a warm flavor. This dressing will pull the salad together. Once the quinoa is cool, add it to the bowl with the vegetables. Pour the dressing over the quinoa and veggies. Chop 1/2 cup of fresh cilantro and add it in. Gently toss everything together. Make sure all the ingredients are well mixed. Taste the salad and adjust the seasoning with more salt, pepper, or lime juice if needed. For the best flavor, chill the salad in the fridge for at least 30 minutes before serving. Enjoy this fresh and zesty dish! To make fluffy quinoa, start with rinsing it well. Rinsing helps remove the bitter coating called saponin. Next, use a 2:1 water-to-quinoa ratio. This means for every cup of quinoa, add two cups of water or broth. Bring it to a boil, then lower the heat. Cover the pot and let it simmer for about 15 minutes. After the water is absorbed, let it rest for 5 minutes. Fluff with a fork to separate the grains. This method gives you light, fluffy quinoa every time. To boost the flavor of your salad, think about adding some extras. You can mix in diced avocado for creaminess. Crumbled feta cheese adds a salty kick. If you like spice, try diced jalapeños for heat. Fresh herbs like parsley or mint can also brighten the dish. You can even sprinkle some chili powder for a little warmth. These additions make the salad even more delicious and exciting. Make your salad eye-catching with simple presentation tricks. Use a large, clear bowl to show off the vibrant colors. Layer the quinoa and vegetables for a beautiful look. Garnish with extra cilantro and lime wedges on top. For a fun twist, serve in lettuce cups or small jars. This makes it easy to grab and enjoy. A beautiful presentation will make your dish even more inviting for your guests. {{image_2}} For a vegan twist, ensure all ingredients are plant-based. The quinoa salad is already vegan. Just check your broth if you use it. Use vegetable broth for cooking the quinoa. This adds more flavor without any animal products. You can also add avocado for creaminess. It pairs well with lime. If you have allergies, you can swap out ingredients. For a nut-free option, skip any nuts. Use fresh corn instead of canned if you want to avoid preservatives. If you're sensitive to nightshades, replace bell peppers and tomatoes with zucchini or carrots. Chopped celery adds a nice crunch, too. To boost protein, add beans or legumes. Black beans work great in this salad. You can also add chickpeas for a nutty taste. Grilled chicken or shrimp makes excellent protein choices. Adding these also makes the dish heartier. Tofu cubes are another great option for a plant-based protein boost. They soak up the flavors well. To keep your Zesty Lime Cilantro Quinoa Salad fresh, store it in an airtight container. Make sure it is completely cool before sealing. Place it in the fridge. This helps maintain the flavors and texture. It’s best eaten within three days for optimal taste. If you want to freeze the salad, I suggest leaving out fresh herbs. They don’t freeze well. Instead, pack the quinoa and veggies in a freezer-safe container. You can enjoy it later by thawing it in the fridge overnight. Reheat it gently to bring back the flavor. When stored properly in the fridge, the salad lasts about three days. If you notice any changes in smell or color, it’s best to discard it. Always check for signs of spoilage before eating. Keeping it fresh is key to enjoying the zesty flavors. Yes, you can use other grains. Brown rice or farro work well. Both grains add a nice texture. Just remember to adjust cooking times. For brown rice, you’ll need about 45 minutes. Farro cooks in about 30 to 40 minutes. Rinse the grains before cooking, just like quinoa. This salad stays fresh for about three days. Keep it in an airtight container. The flavors will meld over time, making it even tastier. However, some veggies may lose crunch. If you want extra freshness, add them right before serving. Yes, it’s great for meal prep! You can make it a day in advance. Just store it in the fridge. This gives the salad time to soak up the flavors. If you’re worried about soggy veggies, add them closer to serving time. Enjoy the convenience of having a healthy meal ready! You now have a complete guide to making a delicious quinoa salad. We covered the key ingredients, from the main list to optional add-ins and their nutrition. You learned step-by-step instructions for cooking and preparing each component. Tips for perfect quinoa and ways to boost flavor were shared. We explored variations to suit different diets and storage info for your leftovers. With this knowledge, you can enjoy this salad anytime. Get creative and make it your own!

Zesty Lime Cilantro Quinoa Salad Fresh Flavor Boost

Looking for a fresh flavor boost? This Zesty Lime Cilantro Quinoa Salad is here to impress! Bursting with bright flavors

- 4 mini bagels, split in half - 1 cup Greek yogurt - 2 tablespoons honey - 1 teaspoon vanilla extract - 1/4 teaspoon cinnamon - Fresh fruits (strawberries, blueberries, sliced bananas) - Chopped nuts (walnuts, almonds) - Optional toppings (chia seeds, coconut flakes, granola) To make Greek yogurt bagel bites, you first need the right ingredients. Start with 4 mini bagels. These little bagels are perfect for a quick snack or breakfast. You split them in half so they are easy to top. Next, grab 1 cup of Greek yogurt. This yogurt adds creaminess and protein. To sweeten it up, add 2 tablespoons of honey. Honey gives the bites a nice touch of sweetness. For some extra flavor, you will need 1 teaspoon of vanilla extract and 1/4 teaspoon of cinnamon. These two ingredients will make your yogurt mixture taste amazing. Now, for the toppings! You can use fresh fruits like strawberries, blueberries, or sliced bananas. They add color and freshness. Chopped nuts like walnuts or almonds give a nice crunch. If you want to get creative, you can also use optional toppings like chia seeds, coconut flakes, or granola. These toppings can make your bagel bites even better! With these ingredients, you are ready to create a tasty breakfast treat that everyone will love! - Preheat the oven to 350°F (175°C). - Arrange split mini bagel halves on a baking sheet. First, I set my oven to 350°F. This helps the bagels warm up just right. Next, I take my mini bagels and split them in half. I place them cut side up on a baking sheet. I like using parchment paper here. It makes cleanup easy. - Combine Greek yogurt, honey, vanilla extract, and cinnamon. - Stir until well blended. Now, I grab a bowl and combine one cup of Greek yogurt, two tablespoons of honey, one teaspoon of vanilla extract, and a quarter teaspoon of cinnamon. I mix it all together until it looks nice and smooth. The yogurt mixture adds a creamy taste that pairs perfectly with the bagels. - Spread yogurt mixture over each bagel half. - Add fresh fruits and sprinkle chopped nuts. - Bake for 10-12 minutes. Next, I spread the yogurt mixture over each bagel half. I want a nice, thick layer. After that, I top each one with fresh fruits. Strawberries, blueberries, and sliced bananas are my favorites. Then, I sprinkle some chopped nuts on top for crunch. Finally, I bake them in the oven for about 10 to 12 minutes. They will be warm and a little crisp. Once out of the oven, I let them cool for a minute before enjoying this tasty breakfast treat! How to ensure bagels don't get soggy To keep your bagels from getting soggy, do not over-saturate them with the yogurt mix. Spread just enough to coat each half. Use a thin layer of yogurt. This helps them stay crisp. Also, bake them on a parchment-lined tray. This allows heat to circulate and keeps the bottoms dry. Baking time adjustments for desired crispness Bake your bagel bites for about 10-12 minutes. If you want them crispier, add 1-2 minutes. Keep an eye on them as they bake. The edges should turn golden brown for the perfect crunch. Best ways to present Greek yogurt bagel bites For a beautiful display, arrange the bagel bites on a colorful platter. Drizzle extra honey on top for a sweet touch. Add mint leaves for a pop of color. This makes the dish look fresh and inviting. Pairing options for beverages Pair your bagel bites with a refreshing drink. A glass of cold milk or a cup of herbal tea works well. You can also serve them with fresh juice. This makes a tasty breakfast or snack combo. Health advantages of Greek yogurt Greek yogurt is a great source of protein. It helps build muscle and keeps you full longer. It also contains probiotics, which aid digestion and boost gut health. Plus, it has less sugar than regular yogurt. Why choose mini bagels over regular ones Mini bagels are a smart choice for portion control. They let you enjoy the taste without eating too much. They can easily fit into your hand for a quick snack. Plus, kids love their fun size! {{image_2}} You can mix and match fruits for your bagel bites. Strawberries, blueberries, and sliced bananas work great. These fruits add color and flavor. You can also use flavored Greek yogurt. It can make your bagel bites even tastier. Try vanilla, honey, or berry flavors to change things up. If you need a gluten-free option, look for gluten-free mini bagels. They taste just as good. You can also swap Greek yogurt for a non-dairy yogurt. Almond, coconut, or soy yogurts work well. This way, everyone can enjoy them. You can create sweet or savory bagel bites. For savory bites, add toppings like avocado or smoked salmon. This adds a rich, creamy flavor. For sweet bites, try chocolate spread or nut butter. These options are perfect for a treat any time of day. To store leftover bagel bites, let them cool first. Then, place them in a sealed container. Keep them in the fridge. They will stay fresh for up to three days. To keep toppings fresh, store fruits separately. Use small containers for fruits and nuts. This keeps them from getting soggy. You can add them just before serving. Yes, you can freeze Greek yogurt bagel bites! First, let them cool completely. Wrap each bagel bite in plastic wrap. Place them in a freezer bag. They will last for up to two months in the freezer. To reheat after freezing, take them out and let them thaw in the fridge overnight. Preheat your oven to 350°F (175°C). Bake them for about 10 minutes. This warms them up nicely and brings back the crispness. In the fridge, Greek yogurt bagel bites last for about three days. After that, they may lose texture and flavor. Watch for signs of spoilage. If you see mold or an off smell, throw them away. Freshness is key to enjoying these tasty treats! To make Greek yogurt bagel bites, follow these steps: 1. Preheat the oven to 350°F (175°C). 2. Split the mini bagels in half and place them on a baking sheet lined with parchment paper. 3. Mix 1 cup of Greek yogurt, 2 tablespoons of honey, 1 teaspoon of vanilla extract, and 1/4 teaspoon of cinnamon in a bowl. Stir it well. 4. Spread the yogurt mixture over each bagel half. Make sure to cover them nicely. 5. Add your favorite toppings. Top with fresh fruits and sprinkle chopped nuts on each bagel. 6. Bake in the oven for about 10-12 minutes, until they are warm and slightly crispy. 7. Cool for a minute before serving. This simple process lets you enjoy a tasty treat in no time! Yes, you can prepare Greek yogurt bagel bites ahead of time. Here’s how: - Prep the bagels: You can split the bagels and store them in an airtight container. - Make the yogurt mixture: Prepare the yogurt mix and keep it in the fridge. This keeps it fresh. - Add toppings later: Wait to add fresh fruits and nuts until you are ready to bake. This keeps them crunchy. By prepping ahead, you save time in the morning! There are many delicious toppings you can use for Greek yogurt bagel bites. Here are some popular ideas: - Fresh fruits: Strawberries, blueberries, and sliced bananas are great choices. - Chopped nuts: Walnuts and almonds add a nice crunch. - Optional toppings: Try chia seeds, coconut flakes, or granola for extra flavor and texture. Feel free to mix and match your favorite toppings to make them your own! These Greek yogurt bagel bites are quick to make and fun to eat. You split mini bagels, layer on a yogurt mix, and add fruits and nuts for crunch. Try different flavors or toppings to match your taste. Store leftovers wisely to keep them fresh longer. Whether sweet or savory, these bites bring joy to any meal. You now have everything to make delicious bagel bites that satisfy!

Greek Yogurt Bagel Bites Tasty Breakfast Treat

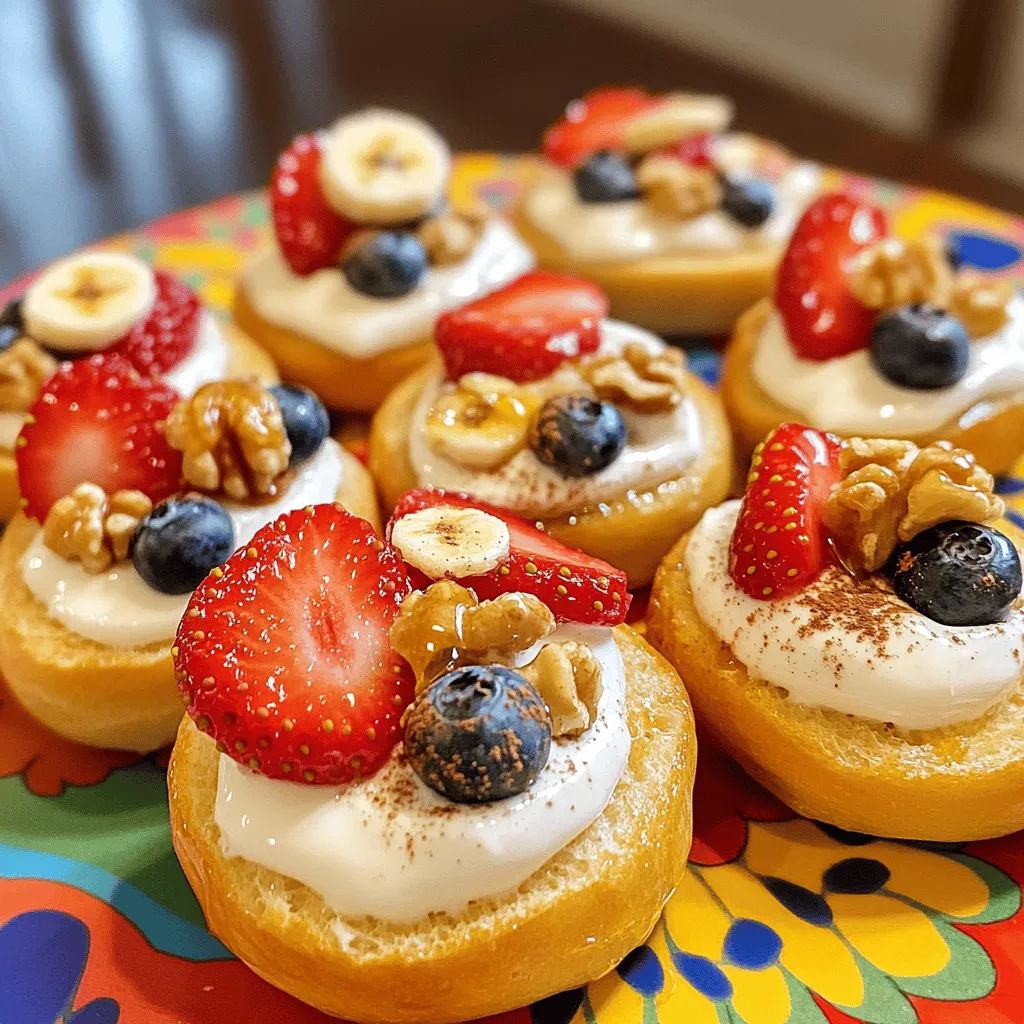
Start your day right with my Greek Yogurt Bagel Bites! They’re simple, tasty, and packed with flavor. Using just three

- 3 ripe bananas, mashed - 1/2 cup creamy peanut butter - 1/3 cup melted coconut oil - 1/2 cup brown sugar - 2 large eggs - 1 teaspoon vanilla extract - 1 teaspoon baking soda - 1/4 teaspoon salt - 1 cup all-purpose flour - 1/2 cup cocoa powder - 1/2 cup chocolate chips (dark or semi-sweet) - Optional: 1/4 cup chopped walnuts or pecans The first step to making chocolate peanut butter banana bread is gathering the right ingredients. You need three ripe bananas. The riper they are, the sweeter your bread will taste. You will also want half a cup of creamy peanut butter. This adds a rich flavor and moisture. Next, get one-third cup of melted coconut oil. This helps bind the bread and adds a light coconut taste. Half a cup of brown sugar gives sweetness and a nice color. You will also need two large eggs to help the bread rise. Do not forget one teaspoon of vanilla extract for flavor. You also need one teaspoon of baking soda. This is key for making your bread rise. A little salt, just a quarter teaspoon, enhances all the flavors. Now, you'll need one cup of all-purpose flour and half a cup of cocoa powder. These give the bread its structure and that delicious chocolate flavor. Lastly, grab half a cup of chocolate chips. Dark or semi-sweet work well, and you can add a quarter cup of chopped walnuts or pecans if you like some crunch. These ingredients come together to create a rich and flavorful bread that is sure to impress. Happy baking! 1. Preheat your oven and prepare the loaf pan. Set your oven to 350°F (175°C). Grease a 9x5 inch loaf pan or line it with parchment paper for easy removal. 2. Mix wet ingredients in a large bowl. Take three ripe bananas and mash them well. Add 1/2 cup of creamy peanut butter to the bananas. Stir until the mix is smooth. Then, pour in 1/3 cup of melted coconut oil and mix again. Add 1/2 cup of brown sugar, two large eggs, and 1 teaspoon of vanilla extract. Beat it all together until fluffy. 3. Combine dry ingredients in a separate bowl. In another bowl, whisk together 1 teaspoon of baking soda, 1/4 teaspoon of salt, 1 cup of all-purpose flour, and 1/2 cup of cocoa powder. This mix gives the bread a rich chocolate flavor. 4. Gradually mix wet and dry ingredients. Slowly add the dry mix to the wet mix. Stir gently until just combined. Avoid overmixing to keep the bread light and fluffy. 1. Pour batter into the loaf pan. Pour the batter into your prepared loaf pan. Use a spatula to smooth the top. 2. Bake and check for doneness. Place the pan in the preheated oven. Bake for 55-65 minutes. To check if it’s done, insert a toothpick into the center. If it comes out clean, the bread is ready. 3. Cool the bread before serving. Let the bread cool in the pan for about 10 minutes. Then, transfer it to a wire rack to cool completely. This step makes slicing easier and helps keep it moist. - Choosing ripe bananas for optimal flavor: Always use ripe bananas. Look for bananas with brown spots. They are sweeter and add moisture to your bread. Ripe bananas mash easily and blend well. - How to prevent overmixing: Mix just until the dry ingredients blend with the wet ones. Overmixing can make your bread tough. Gently fold the batter with a spatula. This keeps the bread soft and moist. - Tips for fluffy texture: Use room temperature eggs. This helps the batter mix better and rise well. Also, make sure your baking soda is fresh. It helps your bread puff up nicely. - Presentation tips for serving: Slice the banana bread while warm. Dust some powdered sugar on top for a nice look. You can also add a drizzle of peanut butter for a tasty touch. - Topping ideas for added flavor: Try serving with sliced bananas or a scoop of ice cream. Chopped nuts on top can add crunch and flavor. Enjoy your banana bread warm for the best taste! {{image_2}} For this chocolate peanut butter banana bread, you can switch things up with fun add-ins. - Nuts: You can use walnuts or pecans. Walnuts add a rich taste. Pecans give a sweeter crunch. Choose what you like best! - Chocolate chips: You can choose between dark chocolate and semi-sweet chocolate chips. Dark chocolate adds a bold flavor. Semi-sweet gives a nice balance of sweet and rich. - Fruits: You can add chopped apples or berries. If you prefer, swap out the bananas for another soft fruit. You can easily make this recipe fit different diets. - Gluten-free: To make this bread gluten-free, use almond flour or a gluten-free all-purpose flour blend. It will still taste great! - Vegan-friendly: You can replace eggs with flax eggs. Just mix one tablespoon of flaxseed meal with three tablespoons of water. Let it sit for a few minutes to thicken. Using these tips, you can enjoy a delicious chocolate peanut butter banana bread that suits your taste and needs! To keep your chocolate peanut butter banana bread fresh, follow these tips: - Room Temperature: Wrap the bread in plastic wrap or foil. This keeps it soft. Place it in an airtight container. It lasts about 3 days. If you want it to stay longer, consider freezing it. - Freezing Instructions: Cut the bread into slices first. Wrap each slice in plastic wrap. Then, place the wrapped slices in a freezer bag. Remove as much air as possible. This way, it can last up to 3 months in the freezer. To use, just let it thaw at room temperature. When you want to enjoy your banana bread again, use these methods: - Best Methods: The oven or microwave works well. For the oven, preheat it to 350°F (175°C). Place the slice on a baking sheet. Heat for about 10 minutes. For the microwave, place a slice on a microwave-safe plate. Heat it for 10 to 15 seconds. - Maintaining Moisture and Freshness: To keep it moist, cover the bread with a damp paper towel when microwaving. This prevents it from drying out. Enjoy your warm slice with a cup of tea or coffee! Can I use frozen bananas? Yes, you can use frozen bananas. Just thaw them first. Frozen bananas work well because they become soft and easy to mash. This helps keep your bread moist and adds natural sweetness. How do I know when the banana bread is done? Check the bread after 55 minutes. Insert a toothpick into the center. If it comes out clean, the bread is ready. If it has batter on it, bake for a few more minutes. The edges should look golden brown too. Can I omit sugar or use a sugar substitute? You can reduce sugar or try a substitute. Mashed bananas add sweetness, so you might not need as much. If using a sugar substitute, follow the package instructions for the right amount. What can I serve with chocolate peanut butter banana bread? Serve it warm or at room temperature. You can add a dusting of powdered sugar for a nice touch. Drizzle peanut butter on top or pair it with sliced bananas. Ice cream or yogurt also makes a great side! In this blog post, we explored how to make chocolate peanut butter banana bread. We covered the key ingredients, step-by-step instructions, and helpful tips to make it great. Remember to use ripe bananas and avoid overmixing for the best texture. You can also try different add-ins and save leftovers easily. Baking this bread is fun and rewarding. Enjoy every bite and make it your own!

Chocolate Peanut Butter Banana Bread Delight Recipe

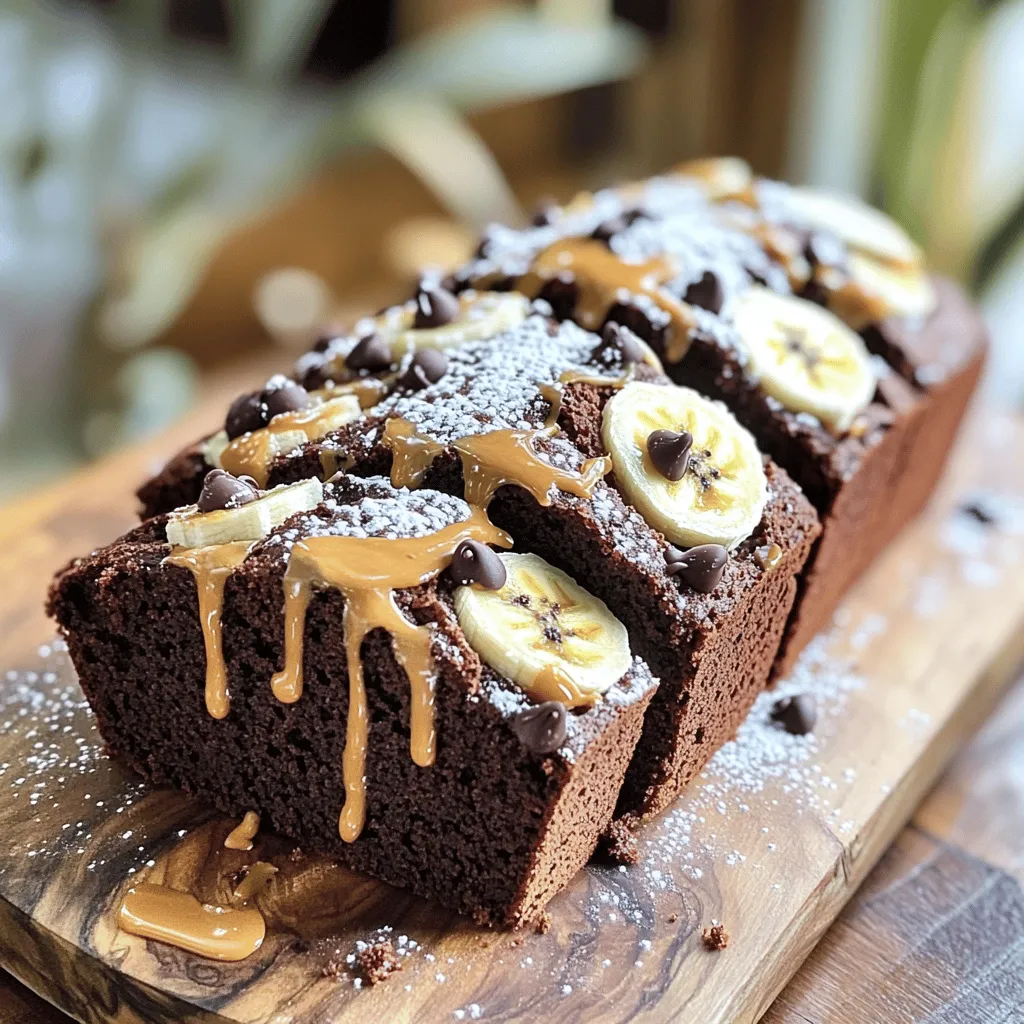
Are you ready to indulge in a treat that combines three amazing flavors? This Chocolate Peanut Butter Banana Bread is

- 6 medium-sized carrots, cut into thin strips - 2 tablespoons olive oil - 3 tablespoons pure maple syrup - 1 teaspoon garlic powder - 1 teaspoon smoked paprika - Salt and pepper to taste - Fresh parsley, finely chopped (for garnish) Carrots are the star of this dish. They give a sweet taste and bright color. I like to use medium-sized carrots so they cut easily into strips. Next, we need olive oil. This oil helps the carrots crisp up nicely in the oven. You can also use other oils, but olive oil adds a great flavor. Maple syrup is my secret weapon. It brings a sweet, rich taste that pairs well with the carrots. Use pure maple syrup for the best flavor. Garlic powder adds a savory kick. It balances the sweetness of the syrup. Smoked paprika gives a hint of smokiness that makes these fries special. Don’t forget salt and pepper! They enhance all the flavors. Just use them to your liking. Lastly, fresh parsley is a lovely touch. It adds color and freshness when you serve the fries. These ingredients come together to make a tasty and healthy snack. You will love the sweet and savory flavors! - Preparing the Baking Sheet: First, grab a baking sheet. Line it with parchment paper. This helps the fries not stick to the sheet. It also makes for easy cleanup. - Preheating the Oven: Now, turn on your oven to 425°F (220°C). This is the right temperature for crispy fries. Let it heat while you prepare the carrots. - Combining Carrot Strips with Coating: In a large bowl, add the carrot strips. Pour in the olive oil and maple syrup. Then, sprinkle the garlic powder, smoked paprika, salt, and pepper. Toss everything together. Make sure each carrot strip gets coated well. This mix gives the fries a sweet and savory flavor. - Spreading on Baking Sheet: Take the coated carrot strips. Spread them out on your prepared baking sheet. Place them in a single layer. This step is key. If they overlap, they won’t cook evenly. - Baking Process and Flipping: Place the baking sheet in the oven. Bake for 20-25 minutes. Halfway through, take them out and flip the fries. This helps them brown on both sides. When they look golden and caramelized, they are ready. To get crispy carrot fries, follow these steps. First, cut the carrots into thin strips. This helps them cook evenly. Next, spread the carrot fries in a single layer on your baking sheet. Avoid overcrowding. If the fries touch, they will steam instead of bake. For even baking, flip the fries halfway through cooking. This ensures all sides get nice and crispy. You may need to adjust the cooking time based on your oven. If you like them extra crispy, add a few more minutes. To make your maple glazed carrot fries pop, add some seasonings. Garlic powder is a great start. It gives a savory touch. Smoked paprika adds a nice, smoky flavor. You can also sprinkle salt and pepper to taste. If you want a kick, add a pinch of cayenne pepper. This heat balances the sweet maple syrup. Don’t be afraid to experiment. Each spice can change the flavor profile, making it unique. Garnishing makes a dish look appealing. After baking, sprinkle fresh parsley on top. This adds color and freshness. For serving, consider using a fun platter or bowl. You can pair these fries with a dip. A yogurt-based dip or ranch works well. This adds a creamy element to the sweet fries. Enjoy your beautiful, tasty, and healthy snack! {{image_2}} Using Different Vegetables You can switch carrots for other veggies. Try sweet potatoes, parsnips, or zucchini. Each veggie will give a unique taste and texture. Cut them into thin strips, just like the carrots. This change keeps the snack fresh and exciting. Varying Sweeteners Maple syrup is sweet and rich, but you can use other sweeteners. Honey or agave nectar works well too. If you want less sugar, use a sugar substitute like stevia. Each option will change the flavor a bit, so try them out! Savory vs. Sweet Profiles You can make your fries sweet or savory. For a sweeter taste, add more maple syrup. If you like savory, skip the sweeteners and add more spices. Try chili powder or cumin for a kick. This way, you can enjoy different flavors every time. Adding Herbs and Spices Fresh herbs and spices can elevate your carrot fries. Try rosemary or thyme for a fragrant twist. If you want heat, add cayenne pepper or red pepper flakes. Mix and match to find your favorite flavor combination! Air Fryer Instructions Using an air fryer is a quick and easy method. Coat the carrot strips as before. Place them in the air fryer basket in a single layer. Cook at 400°F (200°C) for about 15 minutes. Shake the basket halfway through for even cooking. Grilling Option Grilling adds a smoky flavor to your fries. Toss the carrot strips with your glaze. Then, place them on a grill basket. Grill over medium heat for about 10-15 minutes. Turn them often to avoid burning. Enjoy the charred goodness! Store your leftover carrot fries in the fridge. Place them in an airtight container. This keeps them fresh for up to three days. If you have a lot, divide them into smaller portions. This makes it easy to grab a quick snack. To reheat, use the oven or an air fryer. Preheat your oven to 350°F (175°C). Spread the fries on a baking sheet. Bake them for about 10 minutes. This helps keep them crispy. If using an air fryer, set it to 350°F (175°C) for 5-7 minutes. You can freeze carrot fries before cooking. Just cut and coat them, then lay them flat on a tray. Freeze until solid, then transfer to a freezer bag. For freezing after cooking, let them cool first. Then, place them in an airtight container. They can last up to three months. Yes, you can use baby carrots. They will work well in this recipe. Just cut them into thin strips. This will help them cook evenly, just like regular carrots. You can tell the fries are done when they turn golden brown. They should also be soft on the inside. If they are crispy on the edges, that's a good sign too. Check them around 20 minutes into baking. Flip them halfway for even cooking. These carrot fries pair well with many dishes. You can serve them with grilled chicken or fish. They also go well with a fresh salad. For a dip, try ranch or garlic sauce. Yes, carrot fries are healthier than regular fries. Carrots have more vitamins and less fat. They are lower in calories too. Plus, they have natural sweetness from the maple syrup. Yes, this recipe is already vegan-friendly. It uses plant-based ingredients like carrots and maple syrup. Just ensure your olive oil is vegan. You can enjoy these tasty fries without any animal products. In this article, we explored how to make delicious maple glazed carrot fries. We covered the key ingredients like carrots, olive oil, and spices, along with step-by-step instructions for perfect baking. I shared tips for the best texture and flavor, as well as variations and storage info. With this recipe, you can enjoy a tasty snack that is easy to make and customize. Try it out and impress your family with your cooking skills while enjoying these healthy fries!

Maple Glazed Carrot Fries Tasty Healthy Snack

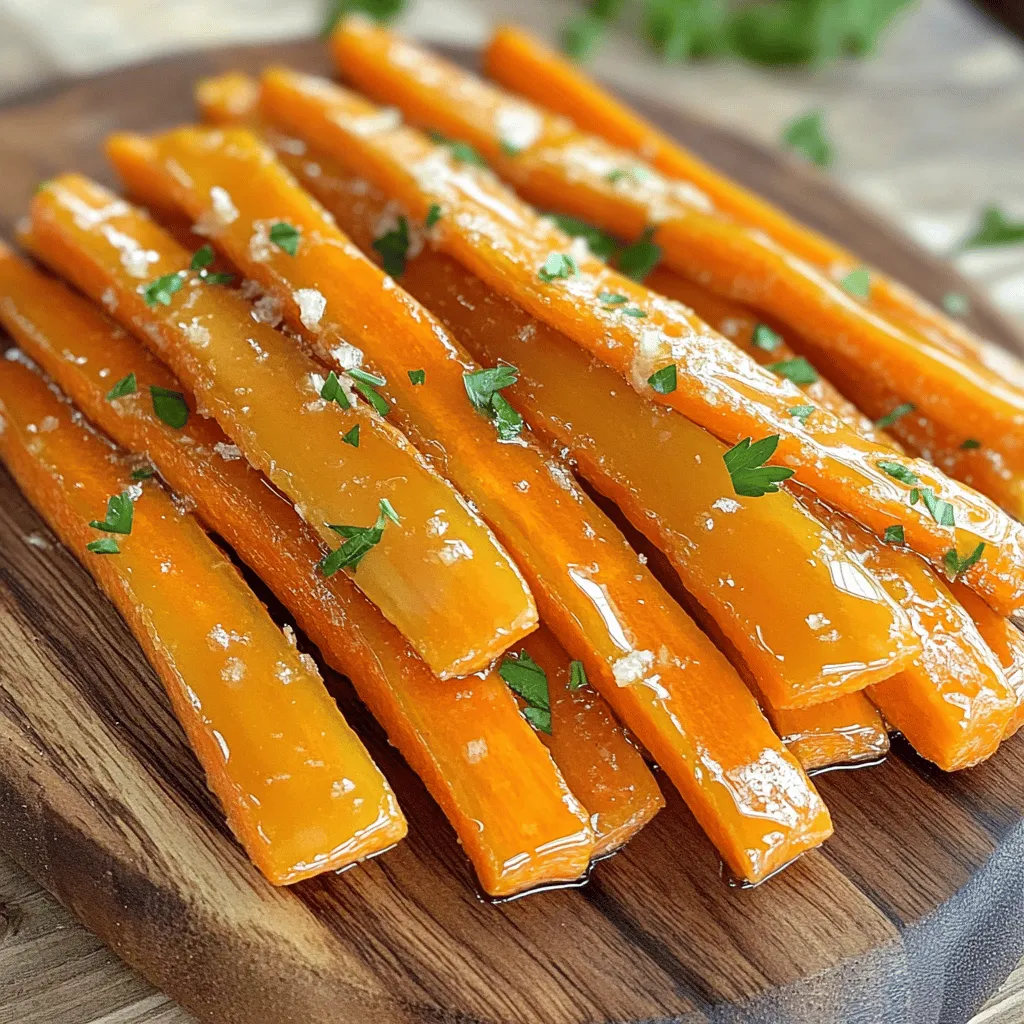
Looking for a tasty and healthy snack? Try my Maple Glazed Carrot Fries! These flavorful bites are not only fun

Older posts
Newer posts
← Previous Page1 … Page19 Page20 Page21 … Page132 Next →

dsad

© 2025 pureeatsnow • Built with GeneratePress

Our Policies

  • Copyright Policy
  • Cookie Policy
  • GDPR Policy
  • Privacy Policy
  • Disclaimer
  • Terms Of Use

More Information

  • Home
  • About
  • Contact
  • Appetizers
  • Dessert
  • Dinner
  • Drinks
©2025, pureeatsnow About Back To Top