Skip to content
DisclaimerTerms Of UseGDPR PolicyCookie Policy

pureeatsnow

  • Home
  • Drinks
  • Appetizers
  • Dinner
  • Dessert
  • About
  • Contact
  • Privacy Policy
DisclaimerTerms Of UseGDPR PolicyCookie Policy

Rachel

To make a great veggie pizza, gather these key items: - 1 pre-made pizza dough - 1/2 cup pizza sauce - 1 cup shredded mozzarella cheese Choose colorful toppings to make your pizza pop: - Mix red and green bell peppers for a sweet crunch. - Add halved cherry tomatoes for a burst of flavor. - Use sliced mushrooms for an earthy touch. Add some zest with these herbs and oils: - Sprinkle dried oregano and basil for classic taste. - Drizzle olive oil to enhance the flavors. These ingredients will set you up for a delicious veggie pizza. For the full recipe, check out Easy Veggie Pizza. To start, roll out your pizza dough. Use a floured surface to prevent sticking. Aim for a thickness of about a quarter-inch. If the dough resists, let it rest for a few minutes. This makes it easier to roll out. Now, let's transfer the dough. You can use a rolling pin to help. Gently lift the dough and place it on your baking surface. If you're using a pizza stone, make sure it's hot. This helps the crust get crisp. Next, spread the pizza sauce. Use the back of a spoon to create an even layer. Leave a small border around the edges for a nice crust. Now, sprinkle the shredded mozzarella cheese evenly over the sauce. This helps the veggies stick better. Time to add the toppings! Arrange your sliced bell peppers, cherry tomatoes, red onions, mushrooms, and black olives on top. Make it colorful and fun! Before baking, preheat your oven to 475°F (245°C). If you have a pizza stone, keep it inside while it heats. This gives the pizza a good base. Now, check your timing. Bake for 12 to 15 minutes. Keep an eye on the cheese; it should be bubbling and golden. The crust should turn brown and crisp. When it's done, remove your pizza and let it cool for a few minutes. Then, slice it up and enjoy! For more details, check out the Full Recipe. To get the best cheese melt, use shredded cheese. This helps it melt evenly. Spread the cheese all over the sauce, but leave some area for the toppings. For a crispy crust, preheat your oven to 475°F. If you have a pizza stone, place it in the oven while it heats. This keeps the bottom of the crust nice and crisp. You can also roll your dough thin for extra crunch. Want to add a protein? Consider cooked chicken or pepperoni for a heartier meal. You can also use tofu for a tasty, plant-based option. If you want to try a different cooking method, grilling is fun. Just make sure to use a grill-safe pan or a pizza stone. The smoke adds a unique flavor to your pizza. When it's time to serve, cut your pizza into wedges. This makes it easy to share. You can also try cutting it into squares for a fun twist. For serving, a rustic wooden board adds a nice touch. Don’t forget to garnish with fresh basil leaves or a drizzle of olive oil. These small details make your pizza look gourmet. {{image_2}} You can create many types of veggie pizza. For a Mediterranean twist, use toppings like artichokes, feta cheese, and sun-dried tomatoes. These bright flavors can make your pizza pop. For a spicy veggie pizza, add jalapeños, spicy sausage, or red pepper flakes. This heat can excite your taste buds and make your meal fun. Want a healthier option? Try a cauliflower crust instead of regular dough. It is lower in carbs and gluten-free. You can make it at home or buy it pre-made. If you are vegan, use plant-based cheese. Many brands offer great taste and melt well. This swap lets everyone enjoy pizza without dairy. Seasonal veggies can lift your pizza. In summer, add fresh zucchini, corn, and basil. These ingredients taste bright and vibrant. In winter, use hearty vegetables like spinach, butternut squash, and Brussels sprouts. They bring warmth and comfort to your dish. For more ideas, check out the Full Recipe. To keep your veggie pizza fresh, store it in the fridge. Use an airtight container for best results. If you do not have one, wrap the pizza tightly in plastic wrap. This will help prevent it from drying out. Make sure to eat the leftovers within three days for the best taste. When it's time to enjoy your leftover pizza, avoid the microwave. Microwaving can make the crust soggy. Instead, use the oven or a skillet. Preheat your oven to 375°F (190°C) and bake for about 10 minutes. This keeps the crust crispy. If you use a skillet, heat it over medium heat. Place the pizza in the skillet and cover it for about 5-7 minutes. This will heat the toppings nicely while keeping the crust firm. You can freeze veggie pizza if you want to save it for later. First, let the pizza cool completely. Then, wrap it in plastic wrap tightly. After that, place it in a freezer bag or container. Label it with the date. When you want to eat it, take it out and let it thaw in the fridge overnight. Reheat it in the oven or skillet for the best taste. This way, you can enjoy your Easy Veggie Pizza even weeks later. Check the [Full Recipe] for more great ideas! Yes, you can use homemade pizza dough. It gives a fresh taste. Pros of Homemade Dough: - You control the ingredients. - You can adjust the flavor. - It can be healthier. Cons of Homemade Dough: - It takes more time. - You need some skills to make it right. - It may not rise as well as store-bought. Store-bought dough saves time and is easy to use. Both options work great for this veggie pizza. The best vegetables for pizza add flavor and color. I love using fresh veggies. Here are my top choices: - Bell peppers: Use red and green for a mix of sweet and crunchy. - Cherry tomatoes: They burst with flavor when cooked. - Red onions: They add a nice bite to every slice. - Mushrooms: They give a savory depth. - Black olives: They add saltiness and richness. When choosing vegetables, look for bright colors and firm textures. Fresh veggies taste better and make your pizza look great! To make gluten-free pizza, try these crust options: - Cauliflower crust: This is a popular choice. It’s healthy and low in carbs. - Gluten-free pizza dough: Many stores sell pre-made gluten-free dough. - Chickpea flour crust: This option is rich in protein and fiber. Each option has a unique taste and texture. Make sure to check the labels for gluten-free ingredients. Enjoy your pizza without worry! Making veggie pizza is fun and easy. We covered essential ingredients like dough, sauce, and cheese. You now know how to choose flavorful toppings, seasonings, and extras. I shared step-by-step instructions to prepare and bake your pizza. Remember the tips to achieve that perfect crispy crust and melted cheese. Experiment with variations and healthy options to keep things interesting. Store and reheat leftovers properly for a tasty meal later. Enjoy creating your unique veggie pizza!

Easy Veggie Pizza Quick and Tasty Recipe Guide

Looking for a quick and tasty way to enjoy pizza? My Easy Veggie Pizza recipe is just what you need!

To make a delightful no-bake lemon cheesecake, you need these ingredients: - 1 ½ cups graham cracker crumbs - ½ cup unsalted butter, melted - 1 tablespoon sugar - 2 cups cream cheese, softened - 1 cup powdered sugar - 1/3 cup fresh lemon juice - Zest of 1 lemon - 1 teaspoon vanilla extract - 1 cup heavy whipping cream These key ingredients create a creamy texture and bright flavor. The graham cracker crumbs form a tasty crust. The cream cheese gives the cheesecake its rich base. Fresh lemon juice and zest add a refreshing zing that makes each bite special. You can enhance your cheesecake with these fun toppings: - Whipped cream dollops - Extra lemon zest - Thin lemon slices - Fresh berries These garnishes add color and extra flavor. They also make your dessert look more appealing. Feel free to get creative with your toppings! To prepare your no-bake lemon cheesecake, gather these tools: - Mixing bowls - Electric mixer - Spatula - 9-inch springform pan - Plastic wrap Having the right tools makes the process smooth and easy. The springform pan is key for easy removal. You’ll love how simple it is to whip up this dessert! Check out the Full Recipe for more guidance. First, gather these ingredients: - 1 ½ cups graham cracker crumbs - ½ cup unsalted butter, melted - 1 tablespoon sugar In a mixing bowl, combine the graham cracker crumbs, melted butter, and sugar. Stir until the crumbs feel like wet sand. This mixture should hold together when pressed. Next, take a 9-inch springform pan and press the crumb mix into the bottom. Make it even and compact. Chill the crust in the refrigerator for about 30 minutes. This helps it firm up nicely. Now, let’s create the creamy filling. You’ll need: - 2 cups cream cheese, softened - 1 cup powdered sugar - 1/3 cup fresh lemon juice - Zest of 1 lemon - 1 teaspoon vanilla extract - 1 cup heavy whipping cream In a large bowl, beat the softened cream cheese with an electric mixer. Make it smooth and creamy. Gradually add the powdered sugar, mixing well each time. This keeps the filling sweet without lumps. Then, pour in the fresh lemon juice, lemon zest, and vanilla extract. Beat again until it’s fluffy and smooth. Now, in a separate bowl, whip the heavy cream until stiff peaks form. Gently fold this whipped cream into the lemon mixture. Be careful; you don’t want to lose that airiness. This step makes your cheesecake light and airy. After making the filling, remove the chilled crust. Pour the lemon filling over it and smooth the top with a spatula. Cover the cheesecake tightly with plastic wrap. Chill it in the refrigerator for at least 4 hours. For the best results, leave it overnight. When it’s set, carefully remove the sides of the springform pan. Slice your cheesecake and serve it cold. For a lovely touch, add a dollop of whipped cream, a sprinkle of lemon zest, and a slice of fresh lemon on each piece. You can find the full recipe for this delightful dessert in the earlier sections. Enjoy! To get the best texture for your no-bake lemon cheesecake, make sure your cream cheese is very soft. Take it out of the fridge an hour before you start. This warmth helps it blend smoothly. When you fold in the whipped cream, do it gently. This keeps the air in and makes your cheesecake light and fluffy. One big mistake is not chilling the crust long enough. If it’s not cold, the filling won’t set well. Another common error is overmixing the cream cheese. This can make your cheesecake dense. Lastly, don’t skip the lemon zest. It adds a pop of flavor that brightens the whole dessert. Presentation is key for any dessert. After slicing your cheesecake, add a dollop of whipped cream to each piece. This makes it look fancy and inviting. Sprinkle some lemon zest on top for color. A slice of fresh lemon on the plate adds a cheerful touch. For a fun twist, serve it with fresh berries on the side. {{image_2}} You can change up the flavor of your cheesecake easily. Try adding fruit! Fresh strawberries or blueberries mix really well. For a tropical twist, use lime juice instead of lemon. You might also love using orange zest for a bright, new flavor. Mix in some chocolate or caramel for a richer taste. You can even swirl in raspberry puree for a fun look! If you’re missing an ingredient, don’t worry. You can use any cookie crumbs for the crust. Vanilla wafers or digestive biscuits work great. For cream cheese, try mascarpone or ricotta cheese. If you want a lighter version, use Greek yogurt instead. You can swap heavy cream for coconut cream for a dairy-free option. This cheesecake shines at any event. For birthdays, add colorful sprinkles on top. At summer barbecues, serve with fresh berries and mint leaves. For holidays, top with whipped cream and a dusting of graham crumbs. You can create individual cups for easy serving. Just layer the crust and filling in small jars. Everyone will love this fun treat! Visit the Full Recipe for more ideas. To keep your no-bake lemon cheesecake fresh, store it in the fridge. Use an airtight container or cover it tightly with plastic wrap. This helps prevent the cheesecake from drying out or absorbing other smells. Place it on a flat surface to avoid any damage. Refrigerate it for up to five days. You can also freeze your cheesecake for longer storage. First, make sure it is fully set. Slice the cheesecake into pieces. Wrap each slice in plastic wrap, then place them in a freezer-safe bag. This keeps the cheesecake fresh for up to three months. When ready to enjoy, thaw it in the fridge overnight. The shelf life of your no-bake lemon cheesecake is about five days in the fridge. Always check for any off smells or changes in texture before eating. If you see any signs of spoilage, it’s best to discard it. For frozen cheesecake, use it within three months for the best taste and texture. Enjoy this refreshing treat safely! For the complete recipe, check out the Full Recipe. You can tell your cheesecake is set when it feels firm to the touch. After chilling, the edges will be slightly firmer than the center. The center should jiggle a bit, like Jell-O. If it appears too soft, let it chill longer. Ideally, chill it overnight for the best results. This ensures a creamy texture that melts in your mouth. You can use both fresh and bottled lemon juice. However, fresh lemon juice offers a stronger flavor. Fresh lemons add brightness and zest to your cheesecake. Bottled juice works well if fresh lemons aren’t available. Just choose a quality brand for the best taste. Using a springform pan is not necessary, but it helps. This pan allows easy removal of the cheesecake. If you don’t have one, use a regular pie dish. Just be careful when slicing and serving from a standard pan. To make a gluten-free no-bake lemon cheesecake, swap the graham crackers. Look for gluten-free graham cracker crumbs or use crushed nuts. Almonds or pecans can create a tasty crust. Just ensure all ingredients are labeled gluten-free for safety. This no-bake lemon cheesecake is simple and fun to make. We covered key ingredients, step-by-step instructions, and helpful tips. Remember to avoid common mistakes and choose your toppings wisely. Feel free to try different flavors or make it gluten-free. Proper storage helps keep your cheesecake fresh longer. Enjoy your creation at any special event. Now, you have all the tools to impress friends and family with your delicious dessert. Happy baking!

No-Bake Lemon Cheesecake Tempting Dessert Delight

Looking for a dessert that dazzles without the fuss? You’re in the right place! This No-Bake Lemon Cheesecake is a

To make these tasty No-Bake Cookie Dough Bites, you will need: - 1 cup almond flour - 1/2 cup rolled oats - 1/3 cup maple syrup - 1/4 cup coconut oil, melted - 1 teaspoon vanilla extract - 1/2 teaspoon sea salt - 1/2 cup chocolate chips (or vegan chocolate chips) - 1/4 cup chopped walnuts (optional) These ingredients combine to create a rich and satisfying treat. You can swap some ingredients based on your tastes or needs. If you don’t have almond flour, use oat flour or all-purpose flour. Instead of maple syrup, try honey or agave syrup. For a nut-free option, replace the coconut oil with a neutral oil like canola oil. You can also skip the walnuts or use another nut, like pecans or almonds. These simple swaps keep the flavor while meeting dietary needs. For the best results, measure your ingredients carefully. Use a dry measuring cup for the almond flour and oats. Level off the top with a knife for accuracy. For sticky ingredients like maple syrup, use a liquid measuring cup. Oil the cup lightly with cooking spray to help the syrup pour out easily. Precision leads to perfect cookie dough bites every time. To start making No-Bake Cookie Dough Bites, gather your ingredients first. In a large mixing bowl, combine the almond flour and rolled oats. Mix them well until they are fully blended. Next, add the maple syrup, melted coconut oil, vanilla extract, and sea salt. Stir the mixture until it becomes a sticky dough. This dough is the base for your bites. Now, fold in the chocolate chips and walnuts. Make sure they distribute evenly throughout the dough. This step adds great flavor and texture. When shaping the cookie dough bites, use your hands. Take about a tablespoon of the dough. Roll it into a ball. It’s okay if they are not perfect. Just make sure they hold their shape. Place each ball on a parchment-lined plate. This will help keep them from sticking. Repeat this step until you use all the dough. You can make 12 to 15 bites, depending on their size. After shaping the bites, it’s time to chill them. Place the plate in the fridge. Let the cookie dough bites chill for at least 30 minutes. This helps them firm up and makes them easier to eat. If you want them to be extra cold, let them chill longer. Chilling also enhances the flavors. When ready, take them out and enjoy as a quick snack or dessert. For a special touch, drizzle melted chocolate on top before serving. For more details, check the Full Recipe. You can have fun with flavors in your cookie dough bites. Try adding peanut butter for a rich taste. Cocoa powder can give a chocolate twist. Use coconut extract for a tropical vibe. You can also mix in dried fruit like cranberries or raisins for sweetness. Using almond flour gives a nice nutty flavor. It also makes the bites soft and chewy. If you want a crunch, add chopped nuts like walnuts or almonds. Shredded coconut can add flavor and texture too. Want a creamier texture? Try using nut butter instead of some coconut oil. One mistake is not measuring ingredients properly. Always use a measuring cup for the best results. Another mistake is not chilling the bites long enough. They need at least 30 minutes in the fridge to firm up. If the dough is too dry, add a little more maple syrup. If it’s too wet, add more almond flour. These tips will help you make the best no-bake cookie dough bites. For the complete recipe, check out the Full Recipe section. Enjoy! {{image_2}} You can easily make gluten-free cookie dough bites. Just swap out the almond flour for a gluten-free blend. Many blends work well, but make sure they are finely ground. This keeps the texture smooth. You can also use oats labeled gluten-free to avoid cross-contamination. These changes keep the bites both tasty and safe for those who can't have gluten. For a vegan version, use maple syrup as your sweetener. This recipe already uses coconut oil, which is plant-based. If you want to skip the chocolate chips, try using dried fruit instead. Chopped dates or raisins add sweetness without dairy. Also, look for vegan chocolate chips. They taste just as good and keep your bites fully plant-based. You can create many flavors with just a few changes. For a peanut butter twist, add a half cup of creamy peanut butter to the mix. This gives a rich taste and a smooth texture. For oatmeal raisin bites, use rolled oats as the base and fold in raisins instead of chocolate chips. A dash of cinnamon can enhance the flavor too. Experimenting with flavors makes each batch unique and exciting. For the full recipe, check out the detailed instructions. To keep your cookie dough bites fresh, store them in an airtight container. Use parchment paper to separate layers. This helps prevent sticking. Place the container in the fridge for quick access. You can also freeze them for longer storage. In the fridge, cookie dough bites last about one week. In the freezer, they can last up to three months. This makes them a great make-ahead snack. Just remember to label your containers with the date. When you want to enjoy frozen cookie dough bites, take them out of the freezer. Let them sit at room temperature for about 10 to 15 minutes. This will make them softer and easier to eat. You can also warm them slightly in the microwave for a few seconds. Enjoy them as a tasty treat anytime! Yes, you can! Almond flour works well, but you can try other flours. Oat flour or whole wheat flour are great options. Each flour changes the taste and texture. Just make sure to adjust the liquid if needed. To make these bites healthier, use less maple syrup. You can also swap in nut butter instead of coconut oil. Adding seeds like chia or flax can boost nutrition. You can even use dark chocolate chips for lower sugar. If the dough is too dry, add a splash of maple syrup or coconut oil. Mix it well until it comes together. For wet dough, add a bit more almond flour or oats. This will help absorb the extra moisture. Yes, they are safe! We use almond flour, which is heat-treated. So, you can enjoy these bites without worry. Just make sure all your other ingredients are safe to eat raw, like the chocolate chips. To make them more indulgent, add extra chocolate chips or drizzle melted chocolate on top. You can also mix in caramel or peanut butter for a richer taste. Experiment with flavors to find your favorite! For the full recipe, check out the detailed instructions and create your own delicious No-Bake Cookie Dough Bites. You learned how to make delicious No-Bake Cookie Dough Bites. We covered the ingredients, steps, and tips for customizing flavors. Remember to be mindful of measuring and storage for the best results. There are many ways to enjoy these bites, whether gluten-free, vegan, or indulgent. With the right techniques, you can avoid common mistakes. Enjoy your tasty treats and share them with others. Happy cooking!

No-Bake Cookie Dough Bites Simple and Delicious Snack

Looking for a quick and tasty snack? No-Bake Cookie Dough Bites are the answer! In just a few simple steps,

For this tasty treat, you need just a few key items. Here’s what to gather: - 1 cup dark chocolate chips (at least 70% cocoa) - 1/2 cup almond butter (smooth or crunchy, depending on preference) - 1/4 cup sliced almonds - 1 teaspoon vanilla extract - Sea salt, for sprinkling These main ingredients create the rich taste and texture of the bark. The dark chocolate gives a deep flavor, while the almond butter adds creaminess. You will love the crunch from the sliced almonds. You can add some fun extras to make your bark even better. Consider trying: - 1/4 cup dried cranberries or cherries for a sweet-tart taste - A sprinkle of cinnamon for warmth - A few pinches of chili powder for a spicy kick These optional add-ins let you play with flavors. They can make each bite unique and exciting. To make this bark, you’ll need a few simple tools: - A baking sheet - Parchment paper - A microwave-safe bowl - A spatula and a skewer or knife These tools help you melt the chocolate and mix the almond butter. The parchment paper makes cleanup easy and helps you lift the bark out later. For the best results, make sure everything is ready before you start. Check out the Full Recipe for more details on the process. First, gather all your ingredients. You will need: - 1 cup dark chocolate chips (at least 70% cocoa) - 1/2 cup almond butter (smooth or crunchy) - 1/4 cup sliced almonds - 1/4 cup dried cranberries or cherries (optional) - Sea salt, for sprinkling - 1 teaspoon vanilla extract Next, line a baking sheet with parchment paper. Leave some paper hanging over the sides. This helps you lift the bark out later. Now, melt your dark chocolate chips. Use a microwave-safe bowl. Heat them in 30-second bursts. Stir between each burst until the chocolate is smooth. Once melted, mix in the vanilla extract to enhance the flavor. Pour the melted chocolate onto the lined baking sheet. Use a spatula to spread it into a layer about 1/4-inch thick. Take spoonfuls of almond butter and drop them onto the chocolate layer. Use a skewer or knife to swirl the almond butter into the chocolate. This creates a lovely marbled look. Sprinkle the sliced almonds on top. If you want a sweet and tart kick, add dried cranberries or cherries. Finally, sprinkle a bit of sea salt over the whole bark. This step adds a nice contrast to the sweetness. Place the baking sheet in the refrigerator. Let it chill for about 1-2 hours. The chocolate should harden completely. Once set, grab the edges of the parchment paper. Lift the bark out of the baking sheet. Break it into large pieces or cut smaller squares, depending on your preference. For a great presentation, serve the bark on a pretty platter or in small cups. Dust with a little extra sea salt for flair. Enjoy this tasty treat as a snack or dessert! To melt chocolate, you need patience. Use a microwave-safe bowl. Heat the dark chocolate chips in short bursts. Start with 30 seconds. Stir well between each burst. This helps avoid burning. Once smooth, the chocolate is ready. If you prefer, you can also use a double boiler. Just heat water in a pot, then place a bowl on top. The steam will melt the chocolate gently. Swirling almond butter into the chocolate is fun! After pouring the melted chocolate, drop spoonfuls of almond butter on top. Use a skewer or a knife to create swirls. Move gently to keep the design nice. Don’t mix too much; you want the marbled look. This adds both taste and beauty to your bark. You can boost flavor easily! Adding sea salt on top gives a nice contrast. It can make the sweet chocolate pop. Try mixing in dried cranberries or cherries for a fruity touch. They add a bit of tartness and color. Experiment with spices like cinnamon or a dash of espresso. These small changes can make the bark even more special. For the full recipe, make sure to check the details! {{image_2}} You can swap almond butter for other nut butters. Peanut butter gives a strong flavor. Cashew butter adds a sweet, creamy touch. Sunflower seed butter is a great choice for nut-free needs. Each nut butter changes the bark's taste and texture. If you want a sweeter bark, use milk chocolate instead of dark. You can also add more dried fruit. Try using honey or maple syrup for extra sweetness. Just remember, these changes can also change the texture. Get creative with seasonal flavors! For fall, add pumpkin spice or dried apples. In winter, try peppermint extract or crushed candy canes. Fresh berries in summer can bring a burst of flavor. These additions keep the bark fresh and fun. Using these variations, you can make your Chocolate Almond Butter Bark unique and enjoyable. Check the Full Recipe for the basic version to start from! To keep your Chocolate Almond Butter Bark fresh, store it in an airtight container. Place parchment paper between layers if you stack pieces. This prevents them from sticking together. Store the container in a cool, dry place, away from sunlight. When stored correctly, this bark lasts about two weeks. However, it will taste best in the first week. The chocolate can lose its shine and flavor after that. If you notice any changes in smell or texture, it’s best to toss it. You can freeze Chocolate Almond Butter Bark for up to three months. Wrap each piece in plastic wrap, then place them in a freezer-safe bag. When you want to enjoy it, take it out and let it thaw in the fridge. Avoid thawing at room temperature to keep the texture nice. For the full recipe, check the earlier section. Yes, you can use milk chocolate. It will make the bark sweeter and creamier. However, it may not have the same rich flavor as dark chocolate. If you like a sweeter treat, milk chocolate works just fine. This recipe is already gluten-free! The ingredients do not contain gluten. Just make sure your chocolate chips and almond butter are marked gluten-free. This way, you can enjoy the bark without worry. To cut the bark, first let it cool completely. Then, use a sharp knife to score it. You can also break it into pieces with your hands for a rustic look. If you want neat squares, cut it while it’s slightly soft. Yes! You can use any nuts you like. Walnuts, pecans, or cashews all work well. Just chop them up and sprinkle them on top of the chocolate. You can store it for up to two weeks. Keep it in an airtight container at room temperature. If it’s warm, you may want to refrigerate it to keep it fresh. The bark pairs well with hot drinks like coffee or tea. You can also enjoy it with yogurt or as a topping on ice cream. It adds a nice crunch and flavor. Absolutely! Peanut butter or cashew butter can be used instead of almond butter. Each nut butter will give the bark a unique taste. Choose what you love best. To make it healthier, you can reduce the amount of chocolate. Use less chocolate or add more nuts and dried fruit. This adds flavor and nutrients without extra sugar. Microwaving chocolate works well. Heat it in short bursts, stirring often. This prevents it from burning. You can also use a double boiler on the stove for even melting. Yes! Adding spices can enhance the flavor. Cinnamon or sea salt can add a nice touch. Just sprinkle a little on top before it sets for a tasty twist. Yes! Kids can help with mixing and adding toppings. It’s a fun kitchen project. Plus, they will love the sweet taste of the bark. You can find the full recipe above and explore even more ways to enjoy this tasty treat! You now have all the details to make delicious chocolate almond butter bark. We covered the main and optional ingredients, preparation steps, and cooking methods. I shared tips for melting chocolate and adding flavors. You can adjust sweetness and even use different nuts. Lastly, proper storage will keep your bark fresh longer. Enjoy experimenting with this treat. With these steps, you can create your own tasty version. Dive in and have fun!

Chocolate Almond Butter Bark Irresistible Treat Recipe

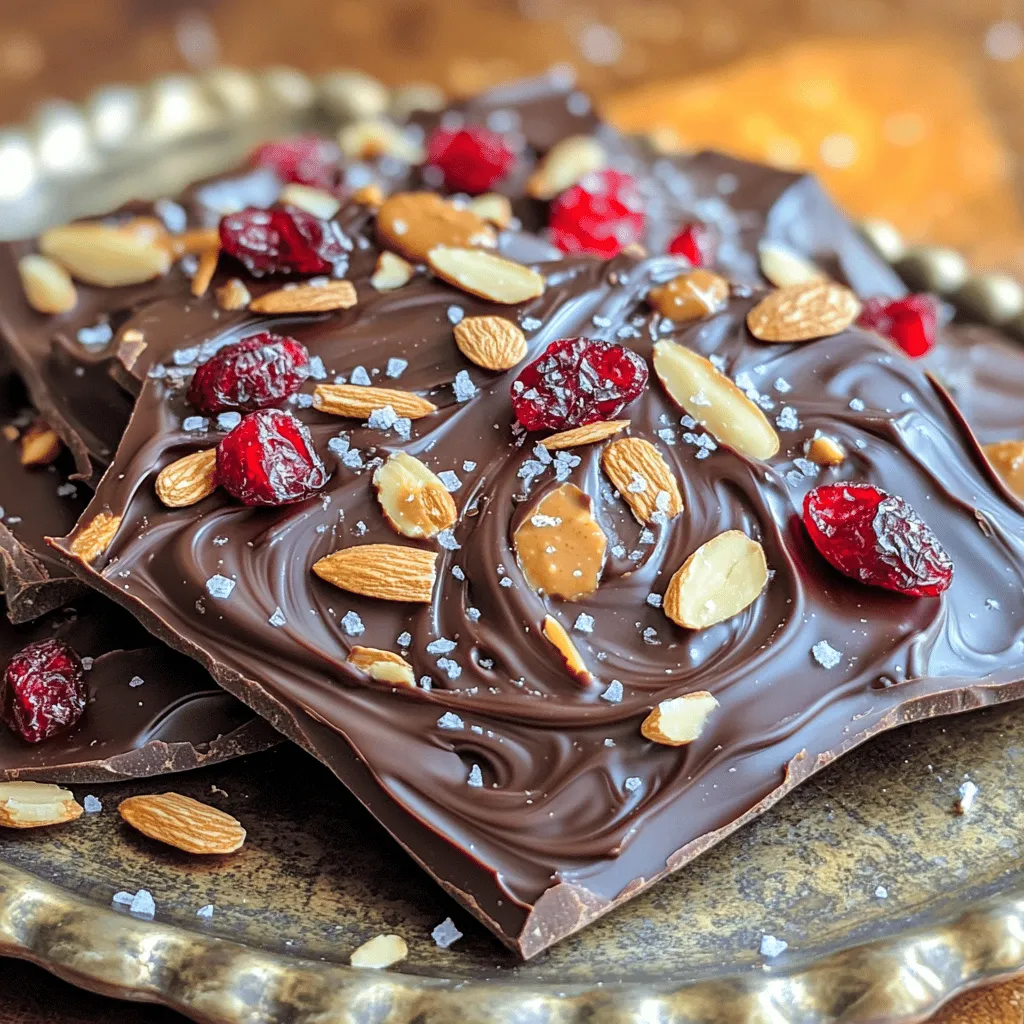
If you love chocolate and nuts, you’ll adore my Chocolate Almond Butter Bark recipe. This easy treat is rich, creamy,

- 1 medium head of cauliflower, cut into bite-sized florets - 1 cup all-purpose flour - 1 cup buttermilk (or a plant-based milk mixed with 1 tbsp of vinegar) - 1 cup panko breadcrumbs - 1/2 cup buffalo sauce (store-bought or homemade) - 1 tablespoon olive oil - 1 teaspoon garlic powder - 1 teaspoon onion powder - Salt and pepper to taste - 8 small corn or flour tortillas - 1 avocado, sliced - 1 cup shredded cabbage (green or purple for color) - Fresh cilantro leaves for garnish - Lime wedges for serving These ingredients come together to create a tasty dish. The cauliflower serves as the star of the show, bringing a nice crunch. The buffalo sauce gives it a kick that pairs well with the toppings. Each serving offers about 300 calories, 10 grams of fat, 45 grams of carbs, and 8 grams of protein. This makes it a filling yet healthy choice! If you need gluten-free options, use almond flour instead of all-purpose flour. You can swap panko with crushed rice cereal. For a dairy-free version, make buttermilk with plant-based milk and vinegar. These swaps keep the flavor while catering to your needs. Try these adjustments to make your Buffalo Cauliflower Tacos just right for you. Check out the full recipe for detailed steps on how to create this delicious meal! - Preheat the oven to 425°F (220°C) and line a baking sheet with parchment paper. - In a bowl, mix together flour, garlic powder, onion powder, salt, and pepper. - In another bowl, pour in the buttermilk or your plant-based milk mix. - Start by taking a cauliflower floret. Dip it in the flour mix first. - Next, move it to the buttermilk, coating it well. - Finally, roll the floret in panko breadcrumbs until fully covered. - Place the coated florets on the baking sheet. - Drizzle olive oil over all the coated cauliflower. - Bake in the preheated oven for 25 to 30 minutes. Look for a golden brown color. - When done, take the cauliflower out and toss it in buffalo sauce. - Bake for another 5 to 7 minutes for extra crispiness. - While baking, warm the tortillas in a skillet or oven. - To assemble, place the crispy cauliflower on each tortilla. - Top with shredded cabbage, avocado, and fresh cilantro. - Serve with lime wedges for a zesty kick. For more details, check the Full Recipe. To get that perfect crunch, olive oil and panko breadcrumbs are key. Olive oil helps the cauliflower brown and adds flavor. Panko breadcrumbs create a light and crispy coating. A good bake time is 25 to 30 minutes at 425°F (220°C). You can add 5 to 7 more minutes for extra crispiness after adding buffalo sauce. Always check for a golden brown color to ensure they are done. To enhance flavor, I love topping my tacos with fresh avocado and crunchy cabbage. You can also add pickled onions for a tangy twist. For a drink pairing, a light beer or a refreshing soda works well. If you prefer non-alcoholic options, try a citrusy lemonade. These drinks balance the heat from the buffalo sauce. Serve the tacos on a colorful platter to catch everyone's eye. Arrange them neatly and add a drizzle of buffalo sauce on top for flair. For a splash of color and texture, sprinkle sesame seeds or chopped herbs like cilantro over the tacos. Adding lime wedges on the side makes them pop with freshness. {{image_2}} You can change up how you serve your Buffalo Cauliflower Tacos. Instead of traditional tortillas, try using lettuce wraps. They are fresh and light. You can also choose gluten-free tortillas made from corn or rice. This way, more people can enjoy your tacos. You can easily adjust flavors to suit your taste. Add spices like cumin or smoked paprika for a smoky kick. Want some heat? Try drizzling extra buffalo sauce or a spicy sriracha. For toppings, consider adding cheese, fresh salsa, or sliced jalapeños. Each addition makes the dish more exciting and unique. If you want more protein, you can add cooked chicken or tofu. Cook the chicken with similar spices and toss it with buffalo sauce. For tofu, press it first to remove moisture, then bake or pan-fry it. Both options boost the meal's heartiness while keeping it delicious. For the complete guide to preparing these tasty tacos, check out the Full Recipe. To store your Buffalo Cauliflower Tacos, place them in an airtight container. Keep them in the fridge for up to three days. If you have leftover cauliflower, you can freeze it. Place the cooled cauliflower in a freezer-safe bag. Remove air and seal tightly. Label the bag and use it within three months for the best taste. To reheat the tacos, the oven works best. Preheat to 350°F (175°C). Place the tacos on a baking sheet. Heat for about 10 minutes. This keeps them crispy. If you use a microwave, the tacos might get soggy. To avoid this, heat the cauliflower separately and then reassemble. The shelf life of the ingredients varies. Fresh cauliflower lasts about a week in the fridge. Panko breadcrumbs and flour can last for months if kept dry. Buttermilk lasts about two weeks after opening. If any ingredient smells bad or looks strange, it’s best to discard it. Yes, you can prepare many parts in advance. You can cut the cauliflower and store it in the fridge. Make the flour mixture and buffalo sauce ahead too. When you're ready to eat, just coat and bake the cauliflower. This way, you save time when serving. These tacos pair well with many sides. Here are some tasty ideas: - Rice or quinoa for a hearty side. - A fresh salad with greens and a light dressing. - Chips and salsa for a crunchy snack. - Pickled veggies for a tangy contrast. These options enhance your meal and add variety. Buffalo Cauliflower Tacos are vegetarian since they use no meat. If you use plant-based milk, they are vegan too. This dish features cauliflower, which is a vegetable. It also uses flour, breadcrumbs, and spices. All these ingredients are plant-based. Enjoy a tasty meal that fits many diets! Buffalo Cauliflower Tacos make a fun and tasty meal. We covered all the key ingredients, from cauliflower to toppings. You learned how to prepare and coat the cauliflower for a crispy finish. We shared helpful tips on serving and storing leftovers. Try different flavors and protein additions for variety. These tacos are not just tasty; they're also versatile and adaptable. Enjoy experimenting with new toppings and styles to find your favorite version!

Buffalo Cauliflower Tacos Flavorful and Healthy Treat

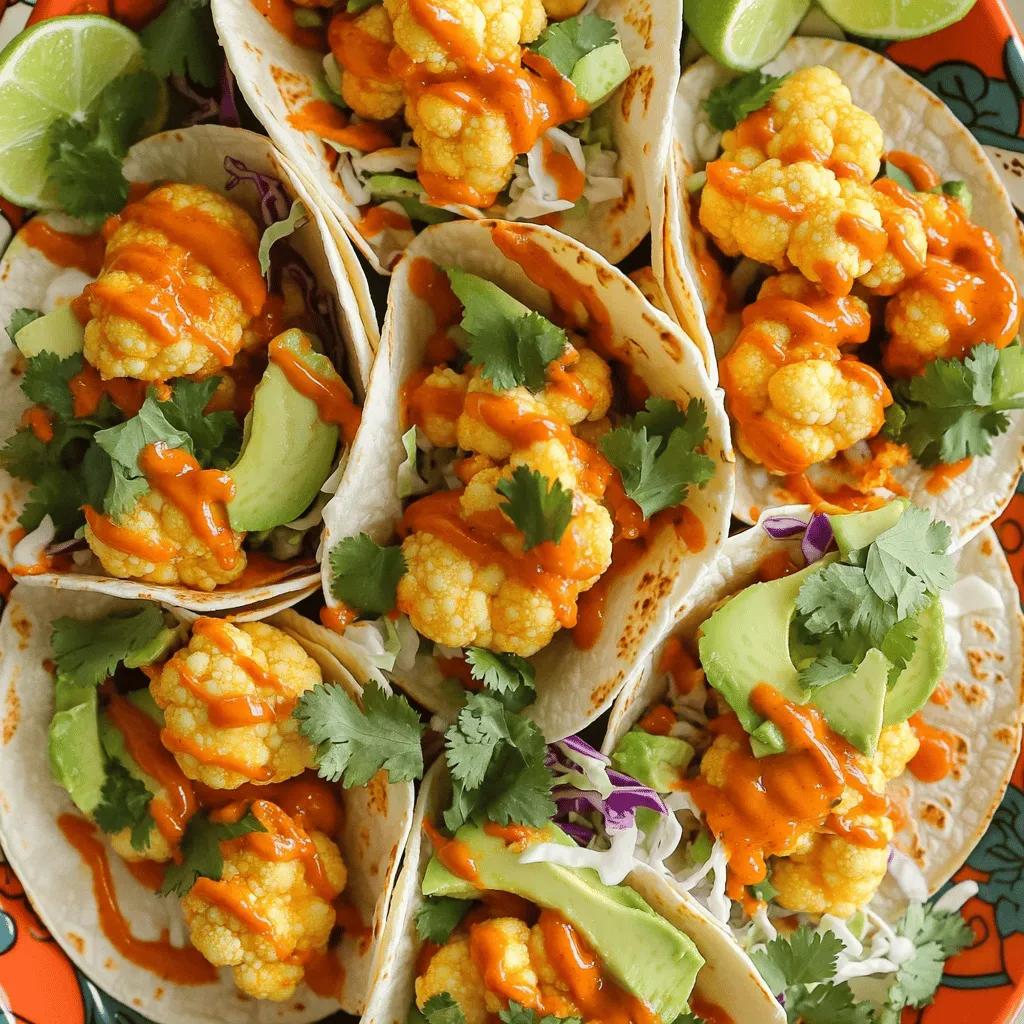
Are you ready to spice up your taco night? Buffalo Cauliflower Tacos are a flavorful and healthy treat that everyone

Making raspberry swirl yogurt popsicles is easy and fun! This recipe uses simple ingredients you can find at any store. It takes just 15 minutes to prep. You will freeze them to enjoy later. Here’s what you need for this tasty treat: - 2 cups Greek yogurt (plain or vanilla) - 1 cup fresh raspberries (plus extra for swirling) - 2 tablespoons honey or maple syrup - 1 teaspoon vanilla extract - A pinch of salt - Optional: Fresh mint leaves for garnish Each popsicle offers a burst of flavor and health. Here’s what you get per serving: - Calories: 90 - Protein: 5g - Carbohydrates: 12g - Fat: 2g - Sugars: 6g - Fiber: 1g These raspberry swirl yogurt popsicles are not just tasty; they are also a smart choice! To start, gather your ingredients. You need Greek yogurt, fresh raspberries, honey, vanilla extract, and a pinch of salt. I find using fresh raspberries gives the best flavor. First, place the raspberries in a blender. Add honey or maple syrup and a pinch of salt. Blend until smooth, but keep some raspberry chunks. This adds texture and makes the popsicles more fun. Next, in a mixing bowl, combine the Greek yogurt and vanilla extract. Stir well until they mix completely. This yogurt base will be creamy and delicious. Grab your popsicle molds. Pour a layer of the yogurt mixture into each mold, filling it about one-third full. This layer creates a nice base. Then, add a spoonful of the raspberry mixture on top. Use a skewer or a spoon to swirl it gently. It looks pretty and mixes the flavors well. After that, pour another layer of yogurt over the raspberry mix. Repeat this process until the molds are full. You want to see swirls of raspberry throughout each popsicle. This layering adds to the fun when you take a bite. Once your molds are full, insert popsicle sticks. Place the molds in the freezer for at least 4-6 hours. This ensures they freeze solid. If you want to speed up freezing, set your freezer to a colder setting. When they’re ready, run warm water over the outside of the molds for a few seconds. This helps release the popsicles. Gently pull them out, and you’ll have beautiful raspberry swirl yogurt popsicles. Enjoy this fresh and fruity treat! To create those beautiful raspberry swirls, use a gentle hand. After adding the raspberry mix, do not over-mix it with the yogurt. Just a few gentle swirls with a toothpick or chopstick will do. This keeps the bright raspberry color vibrant and fun. Aim for a mix that looks marbled, not blended. For creamy popsicles, use Greek yogurt. It gives a rich, smooth base. If you prefer a lighter texture, you can mix in a little milk. This helps thin out the yogurt while keeping it tasty. Blend your raspberries until they are mostly smooth, but leave some small chunks for that tasty bite. When ready to serve, dip the molds in warm water for a few seconds. This makes it easy to pull out your popsicles. You can serve them on a pretty plate, garnished with fresh mint and extra raspberries. For a fun twist, try drizzling some honey on top before serving. This adds a sweet touch and makes your popsicles look fancy! {{image_2}} You can switch up the raspberries for other fruits. Strawberries, blueberries, or peaches work great. Each fruit brings its own taste. For a tropical twist, try mango or pineapple. Just blend the fruit the same way as raspberries. You can create fun colors and flavors! If you want a dairy-free treat, use coconut yogurt or almond yogurt. These options still give a creamy texture. You can also try cashew yogurt, which adds a nice flavor. Just follow the same steps in the Full Recipe. You won’t miss the dairy! Add fun flavors to your popsicles! Consider mixing in a little lemon or lime juice for a zesty kick. You can also add a touch of cinnamon or nutmeg. Want something a bit sweeter? Try vanilla bean or chocolate syrup. Let your taste buds guide you to tasty combinations! To keep your popsicles fresh, store them in an airtight container. This will prevent freezer burn. You can also wrap each popsicle in plastic wrap. This adds extra protection. Always label the container with the date. This way, you know when you made them. These popsicles stay good for about two months in the freezer. After that, they may lose flavor and texture. If you freeze them longer, check for ice crystals. Ice crystals can affect the taste. It's best to enjoy them within the first month for the best quality. You can reuse your popsicle molds for different flavors. Just wash them in warm, soapy water after each use. Rinse well to remove any soap. If you want to switch flavors, try to use neutral molds. If you make a strong flavor, let the mold soak for a bit to remove the taste. This keeps your new popsicles tasting fresh and fruity. For the full recipe, check the section above. Yes, you can use frozen raspberries. They work well in this recipe. Just blend them straight from the freezer. This keeps the pops cool and refreshing. If you want more texture, let them thaw a bit before blending. You can still achieve that lovely swirl in your popsicles. These popsicles can last up to two months in the freezer. Just make sure to wrap them tightly. This keeps ice crystals from forming. If they are well sealed, they will taste great even after a while. If you want a substitute for Greek yogurt, try regular yogurt or coconut yogurt. Both options work nicely. They may change the flavor a bit, but they still taste great. You can also use a dairy-free yogurt if you prefer. Just pick one that is thick and creamy for the best results. You learned how to make tasty popsicles with fresh ingredients. We covered what you need and how to prepare them step by step. I shared tips for the best texture and fun variations to try. Remember to store your popsicles right, so they stay fresh. If you have questions, like using frozen fruit or yogurt substitutes, I’ve got answers. Enjoy making and sharing these popsicles with friends and family. Your next treat will be a hit!

Raspberry Swirl Yogurt Popsicles Fresh and Fruity Treat

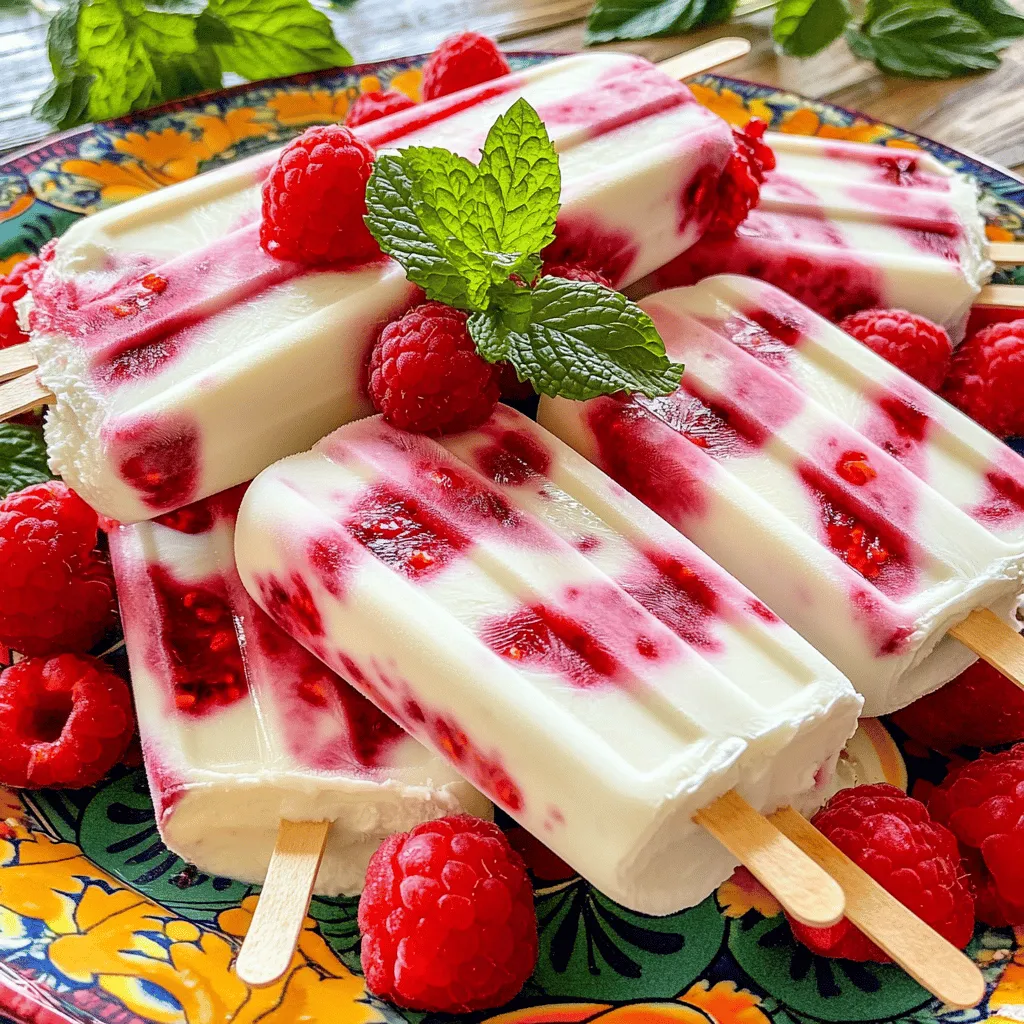
Looking for a cool treat that’s both fruity and fun? You’ll love these Raspberry Swirl Yogurt Popsicles! Packed with fresh

- 1 pound baby carrots (or regular carrots, peeled and cut into sticks) - 3 tablespoons honey - 3 tablespoons olive oil - 4 cloves garlic, minced - 1 teaspoon fresh thyme leaves (or ½ teaspoon dried thyme) - Salt and pepper to taste - Optional: Chopped fresh parsley for garnish When making honey garlic roasted carrots, choose your carrots wisely. Freshness is key. Look for carrots that feel firm and have a vibrant color. Baby carrots are sweet and tender, making them a great choice. If you pick regular carrots, peel and cut them into sticks for even cooking. - Choose firm and smooth carrots. - Avoid carrots with soft spots or cracks. - Look for vibrant colors to ensure freshness. For flavor boosts, consider adding a pinch of red pepper flakes or a squeeze of lemon juice. These enhance the honey and garlic without overpowering the dish. Fresh herbs like rosemary or dill can also add a unique twist. - Red pepper flakes for some heat - Lemon juice for a zing - Fresh herbs like rosemary or dill Using these tips, you can make this dish your own. It's all about finding flavors you enjoy. Try experimenting with different herbs and spices to create your perfect honey garlic roasted carrots. For the full recipe, check out the detailed instructions. First, preheat your oven to 400°F (200°C). This helps the carrots roast well. Next, take a large mixing bowl. In this bowl, combine 3 tablespoons of honey, 3 tablespoons of olive oil, 4 minced garlic cloves, 1 teaspoon of fresh thyme, salt, and pepper. Whisk them together until they mix well. This honey-garlic glaze will give your carrots a sweet and savory taste. Now, add 1 pound of baby carrots to the bowl. Toss them well to coat each carrot with the glaze. To make sure the glaze sticks, you should coat the carrots evenly. Use your hands to mix if you need. Then, line a baking sheet with parchment paper or lightly grease it. Spacing the carrots is key. Spread them in a single layer. This way, they roast evenly without steaming. Place the baking sheet in the preheated oven. Roast the carrots for about 25-30 minutes. Stir them halfway through to ensure they cook evenly. You’ll know they are done when they are tender and slightly caramelized. To check for doneness, pierce a carrot with a fork. If it goes in easily, they are ready. For the full recipe, you can refer to the section above. Enjoy the sweet and garlicky flavor of your roasted carrots! To get crispy yet tender carrots, start by cutting them into even pieces. This helps them cook evenly. Use baby carrots for a sweet bite or regular carrots for more flavor. I like to coat them well with the honey-garlic mixture. This glaze helps caramelize the carrots. For the best results, position your baking sheet in the middle of the oven. This allows for even heat circulation. Stir the carrots halfway through roasting. This step promotes even caramelization and prevents burning. You can prep the carrots ahead of time. Just wash and cut them into the desired shape. Store them in an airtight container in the fridge for up to two days. You can also mix the honey-garlic glaze in advance. Keep it in a separate container. Just combine everything when you are ready to cook. This saves time and makes dinner easier. Honey garlic roasted carrots pair well with many dishes. Serve them alongside grilled chicken or fish. They also complement quinoa or couscous nicely. For a beautiful presentation, arrange the carrots on a platter. Sprinkle fresh parsley on top for color. This simple touch makes the dish look gourmet. You can also serve them warm or at room temperature for a casual meal. For the full recipe, check out the complete instructions above. {{image_2}} You can easily switch up the flavor of these honey garlic roasted carrots. Try adding spices like cumin, paprika, or even a pinch of cayenne pepper for heat. If you enjoy citrus, add some fresh orange or lemon juice. This gives the dish a bright, zesty flavor. For a sweet and spicy twist, mix in some sriracha or chili flakes. These changes can make this dish even more exciting. If you want to change the veggies, use parsnips, sweet potatoes, or bell peppers. Each brings a unique flavor and texture. You can also use frozen carrots if fresh ones are not available. For a gluten-free option, this recipe is already safe, as no gluten ingredients are used. If you're vegan, swap honey with maple syrup or agave nectar. This keeps the dish sweet without any animal products. Explore different cuisines by adding herbs and spices from around the world. For a Mediterranean flair, try adding oregano or basil. If you want an Asian touch, use sesame oil and sprinkle sesame seeds on top. For a South American vibe, cilantro and lime can brighten the dish. These international twists can make your honey garlic roasted carrots even more flavorful. Check out the Full Recipe for more tips and ideas. To keep your honey garlic roasted carrots fresh, place them in an airtight container. Store the container in the fridge. They stay tasty for about 3 to 5 days. Make sure to cool them down before sealing. This helps keep moisture out and flavor in. You can reheat your carrots in two ways: the microwave or the oven. The microwave is quick but may make them soft. To retain their texture and flavor, I recommend using the oven. Preheat it to 350°F (175°C). Spread the carrots on a baking tray, and heat for about 10 minutes. This keeps them crisp and delicious. Yes, you can freeze honey garlic roasted carrots! First, let them cool completely. Then, place them in a freezer-safe bag or container. Remove as much air as possible to prevent freezer burn. When you're ready to eat them, thaw in the fridge overnight. Reheat them in the oven for the best taste and texture. - How long to cook baby carrots? You should roast baby carrots for about 25-30 minutes at 400°F (200°C). Check them halfway through. Stirring helps them cook evenly. They should be tender and slightly caramelized when done. - Can I use regular carrots instead of baby carrots? Yes, you can! Just peel and cut regular carrots into sticks. They will take about the same time to roast. The flavor will still shine through. - What are the health benefits of carrots? Carrots are rich in beta-carotene, which is good for your eyes. They also have fiber, which helps digestion. Plus, they are low in calories, making them a great snack. - Caloric content and serving size details One serving of honey garlic roasted carrots (about 1/4 of the recipe) has roughly 120 calories. This includes all the healthy fats and sugars from the honey and olive oil. - How to adjust the recipe for more servings To serve more people, just double or triple the ingredients. Make sure to use a bigger baking sheet so the carrots roast well. - Scaling for large gatherings or meal prep For large gatherings, batch cooking helps. You can roast multiple trays at once. Just keep an eye on the time and check for doneness. For the complete recipe, check out the [Full Recipe]. Honey garlic roasted carrots offer great taste and healthy benefits. We explored ingredients, tips for selecting carrots, instructions, and storage methods. Remember, the right carrots make a big difference. Try adding different spices or herbs for a new twist. Enjoy your dish and impress others with your cooking! With these tips, you can create a flavorful side that everyone will love. Don't hesitate to experiment and find your favorite variations!

Honey Garlic Roasted Carrots Flavorful and Easy Recipe

Carrots can be so boring, right? Not anymore! My Honey Garlic Roasted Carrots recipe turns ordinary vegetables into a sweet

- 4 salmon fillets (6 oz each) - 2 tablespoons olive oil - Salt and black pepper to taste - 1 cup heavy cream - 2 tablespoons fresh dill, chopped (or 1 tablespoon dried dill) - Zest of 1 lemon - 2 tablespoons fresh lemon juice - 2 cloves garlic, minced - ½ teaspoon onion powder - ½ teaspoon paprika Gathering the right ingredients is key to making creamy lemon dill salmon a hit. You want fresh salmon for the best flavor. Olive oil adds richness and helps with seasoning. Salt and black pepper will enhance the taste of the fish. Heavy cream gives the dish its creamy texture, while dill adds a fresh herb taste. Lemon zest and juice brighten the flavors, bringing a pop of freshness. Minced garlic adds depth, and onion powder and paprika provide subtle warmth. You can easily find these items at your local grocery store or farmer's market. - Baking sheet - Parchment paper - Medium saucepan - Measuring cups and spoons - Spatula or whisk Using the right tools makes cooking easier. A baking sheet lined with parchment paper helps with cleanup and prevents sticking. A medium saucepan is perfect for making the creamy sauce. Measuring cups and spoons ensure you add the right amounts of each ingredient. A spatula or whisk is handy for mixing the sauce well. All these tools will help you create a great dish that impresses everyone. For the full recipe, check the complete details above. - Preheat the oven to 400°F (200°C) and prepare the baking sheet. - Season the salmon fillets with olive oil, salt, and pepper. First, you need to set your oven. Preheating it to 400°F makes sure the salmon cooks evenly. Grab your baking sheet, and line it with parchment paper. This helps with easy cleanup later. Next, take your salmon fillets. Pat them dry with paper towels. This step is key to getting a nice sear. Drizzle olive oil on both sides of each fillet. Sprinkle salt and pepper to taste. Place the fillets skin-side down on your baking sheet. - Prepare the creamy sauce in the saucepan and simmer. - Coat the salmon with sauce and bake until cooked. Now, let's make the creamy sauce. In a medium saucepan, mix heavy cream, minced garlic, lemon zest, lemon juice, chopped dill, onion powder, and paprika. Turn the heat to medium and stir. You want it to simmer gently. Let it cook for about 5-7 minutes. The sauce will thicken a bit. Once the sauce is ready, pour it over the salmon fillets. Make sure each fillet is coated evenly. Then, place the baking sheet in the oven. Bake for 12-15 minutes. You’ll know it’s done when the salmon flakes easily with a fork. - Rest the salmon and serve with additional sauce. - Garnish options for presentation. After baking, take the salmon out of the oven. Let it rest for a few minutes. This helps the flavors mix well. When you’re ready, place the salmon on a serving platter. Drizzle any extra creamy sauce over the top. For a beautiful touch, consider garnishing with fresh dill or lemon slices. These add a pop of color and flavor. Serve with sides like steamed asparagus and fluffy rice or quinoa. Enjoy your creamy lemon dill salmon dish, a delightful meal that is both simple and delicious! To cook salmon well, aim for a flaky texture. You can check for doneness by gently pressing the fish with a fork. If it flakes easily, it's ready! For the best flavor, use fresh dill. Fresh herbs bring a bright taste that dried herbs can't match. If fresh isn't an option, dried dill still works well, but use less. You can adjust the sauce to fit your taste. Adding capers gives a nice briny kick. A little mustard can add depth as well. If you like spice, try adding a pinch of red pepper flakes. It adds heat without overpowering the dish. You can also adjust the creaminess by using less heavy cream if desired. Explore these variations to make the dish your own. For the full recipe, check the beginning of this article. {{image_2}} To keep your creamy lemon dill salmon fresh, cool it down first. Let it sit at room temperature for no more than two hours. Use airtight containers to store the leftovers. Glass containers work best, as they do not retain odors. Refrigerate the salmon right away. It can last up to three days in the fridge. If you want to keep it longer, consider freezing it. Wrap the salmon tightly in foil or use freezer-safe bags. Frozen salmon can stay good for up to three months. When reheating salmon, you want to keep it moist. The best method is to use the oven. Preheat it to 275°F (135°C). Place the salmon in a baking dish, and cover it with foil. Heat for about 15 minutes or until warm. You can also use the microwave. Place the salmon on a plate and cover it with a damp paper towel. Heat in short bursts of 30 seconds. Check often to avoid drying it out. Leftover salmon is great in many meals. Flake it into salads or pasta dishes. You can also make salmon sandwiches with creamy sauce for a tasty lunch! Can I use frozen salmon for this recipe? Yes, you can use frozen salmon. Just thaw it fully before cooking. This helps the salmon cook evenly and ensures a nice texture. What can I serve with creamy lemon dill salmon? You can serve it with steamed asparagus and fluffy rice or quinoa. A side salad also pairs well with this dish. The fresh flavors of the sides will complement the salmon nicely. How do I know when the salmon is fully cooked? When the salmon flakes easily with a fork, it is done. You can also check if the meat turns opaque and has an internal temperature of 145°F (63°C). Can I substitute heavy cream for another ingredient? Yes, you can use coconut milk or cashew cream for a lighter option. These alternatives will give a different flavor but still create a creamy sauce. What's the best type of salmon to use for this dish? I recommend using sockeye or king salmon. They have great flavor and a rich texture. Both types hold up well during cooking and absorb the sauce nicely. How can I make this recipe dairy-free or gluten-free? To make it dairy-free, swap heavy cream with coconut cream or a nut-based cream. For gluten-free, ensure all other ingredients are certified gluten-free. In this post, we explored how to make creamy lemon dill salmon. We covered the ingredients, including salmon, cream, and fresh herbs. I shared tools you'll need, step-by-step cooking tips, and ways to adjust flavor. Plus, we discussed storage and reheating methods for leftovers. Remember, cooking can be fun. Experiment and find what works for you. Enjoy your delicious salmon!

Creamy Lemon Dill Salmon Delightful and Simple Dish

Welcome to a culinary adventure that’s both delightful and simple: Creamy Lemon Dill Salmon! If you crave a dish that

- 4 cups fresh broccoli florets - 1 cup cooked rice (white or brown) - 1 cup shredded sharp cheddar cheese - 1 cup cream of mushroom soup - 1/2 cup milk - 1/2 teaspoon garlic powder - 1/2 teaspoon onion powder - Salt and pepper to taste - 1/2 cup crushed crackers (like Ritz or butter crackers) - 2 tablespoons melted butter Feel free to customize this dish! You can add cooked chicken, diced ham, or even some sautéed onions for extra flavor. You might also replace the cheddar with mozzarella or gouda for a different taste. Each serving has about 300 calories. It contains around 15 grams of fat and 12 grams of protein. Broccoli is a great source of vitamins K and C, and it helps support your immune system. Cheese adds calcium and protein, making this dish not only tasty but also nutritious. How to prepare the broccoli and rice Start by boiling water in a large pot. Add 4 cups of fresh broccoli florets. Blanch the broccoli for 2-3 minutes. You want it bright green and slightly tender. Drain the broccoli and set it aside. Next, cook 1 cup of rice. You can use white or brown rice. Once cooked, let the rice cool a bit before mixing. Mixing the casserole ingredients In a big bowl, combine the cooked rice, 3/4 cup of shredded sharp cheddar cheese, 1 cup of cream of mushroom soup, and 1/2 cup of milk. Add 1/2 teaspoon of garlic powder and 1/2 teaspoon of onion powder. Season with salt and pepper to taste. Mix everything until well combined. Gently fold in the blanched broccoli, ensuring it is evenly mixed with the rice blend. Temperature and time guidelines Preheat your oven to 350°F (175°C). Once your mixture is ready, transfer it into a greased 9x13 inch baking dish. Spread the mixture evenly across the dish. Tips to ensure even baking To add crunch, mix 1/2 cup of crushed crackers with 2 tablespoons of melted butter and the remaining 1/4 cup of cheddar cheese. Sprinkle this mixture on top of the casserole. Bake in the preheated oven for 25-30 minutes. Keep an eye on it. Look for melted cheese and a golden-brown top. Once done, let it cool for a few minutes before serving. For the full recipe, refer to the section above. To make your casserole creamy, use plenty of cheese and soup. The cream of mushroom soup adds moisture and flavor. Mix it well with rice and broccoli. For added richness, use full-fat milk. This makes every bite delicious and smooth. To avoid mushy broccoli, blanch it briefly. Cook it in boiling water for just 2-3 minutes. This keeps the bright green color and crispness. After blanching, drain and quickly cool it in ice water. This step is key to keeping your broccoli fresh. Spices can boost the flavor of your casserole. Try adding a pinch of paprika for warmth. A bit of cayenne pepper can add a nice kick. Fresh herbs like thyme or parsley can also brighten up the dish. If you want to add protein, consider cooked chicken or ham. This makes the meal more filling. You can also mix in some beans for a plant-based option. Just ensure any protein is cooked before mixing it in. For the full recipe, check out the Easy Cheesy Broccoli Casserole section. {{image_2}} You can use many types of cheese in this casserole. Sharp cheddar gives a strong flavor. Monterey Jack adds creaminess. Mozzarella melts well and makes it gooey. For a twist, try Parmesan for a nutty taste. If you want a dairy-free option, use vegan cheese. Look for brands that melt well, like cashew or almond cheese. Crushed crackers are a classic topping, but you can mix it up. Try panko breadcrumbs for extra crunch. You can also use toasted nuts like almonds or walnuts for a nutty bite. For a kick, sprinkle on some crushed red pepper flakes. You can even mix in herbs like parsley or thyme for added flavor. To keep your Easy Cheesy Broccoli Casserole fresh, first let it cool completely. Then, place it in an airtight container. Cover it tightly to prevent moisture loss. Store it in the fridge for up to 4 days. For longer storage, freezing is a great option. Use a freezer-safe container and leave some space at the top. This space allows for expansion when the casserole freezes. You can enjoy it for up to 3 months in the freezer. When you’re ready to enjoy leftovers, reheating is key. The best method is to use the oven. Preheat it to 350°F (175°C). Place the casserole in a baking dish, cover it with foil, and heat for about 20 minutes. This method keeps the texture nice and creamy. If you're short on time, you can also use the microwave. Heat it in short bursts of 1-2 minutes, stirring in between. To refresh the dish, consider adding a sprinkle of cheese or fresh herbs before serving. This little touch can make it feel new again. Can I make this dish ahead of time? Yes, you can prepare this casserole a day early. Just follow the recipe up to the baking step. Cover it well and store it in the fridge. When you're ready, bake it straight from the fridge. You may need to add a few extra minutes to the baking time. Is it possible to make this recipe gluten-free? Absolutely! Use gluten-free crackers instead of regular ones. Also, check that your cream of mushroom soup does not contain gluten. Many brands offer gluten-free versions, so you can enjoy this dish without worry. Can I use frozen broccoli instead of fresh? Yes, frozen broccoli works well. Just thaw and drain it before adding it to the dish. You may need to adjust the cooking time slightly, as frozen broccoli can release more water. What if I don’t have cream of mushroom soup? No problem! You can use cream of chicken soup or even a homemade white sauce. Mix in some mushrooms for flavor if you like. This keeps the dish creamy and delicious. Suggested sides to pair with the casserole Pair your casserole with a simple green salad or some crusty bread. The fresh crunch of the salad complements the creamy casserole perfectly. You can also serve it with baked chicken or fish for a complete meal. Ideas for meal preparation with this dish This casserole is great for meal prep. You can portion it into containers for easy lunches. It also freezes well, so you can make extra for busy days. Just reheat and enjoy! For the full recipe, refer to the Easy Cheesy Broccoli Casserole section. You learned how to make a delicious cheesy broccoli casserole. We covered the best ingredients, steps, and tips. This dish is easy to customize and offers great health benefits. You can also store leftovers for later. If you try this recipe, explore different cheese and topping options too. Your meals can be simple but still full of flavor. Enjoy this dish as a comforting favorite or a new family tradition. Happy cooking and sharing!

Easy Cheesy Broccoli Casserole Fast and Simple Meal

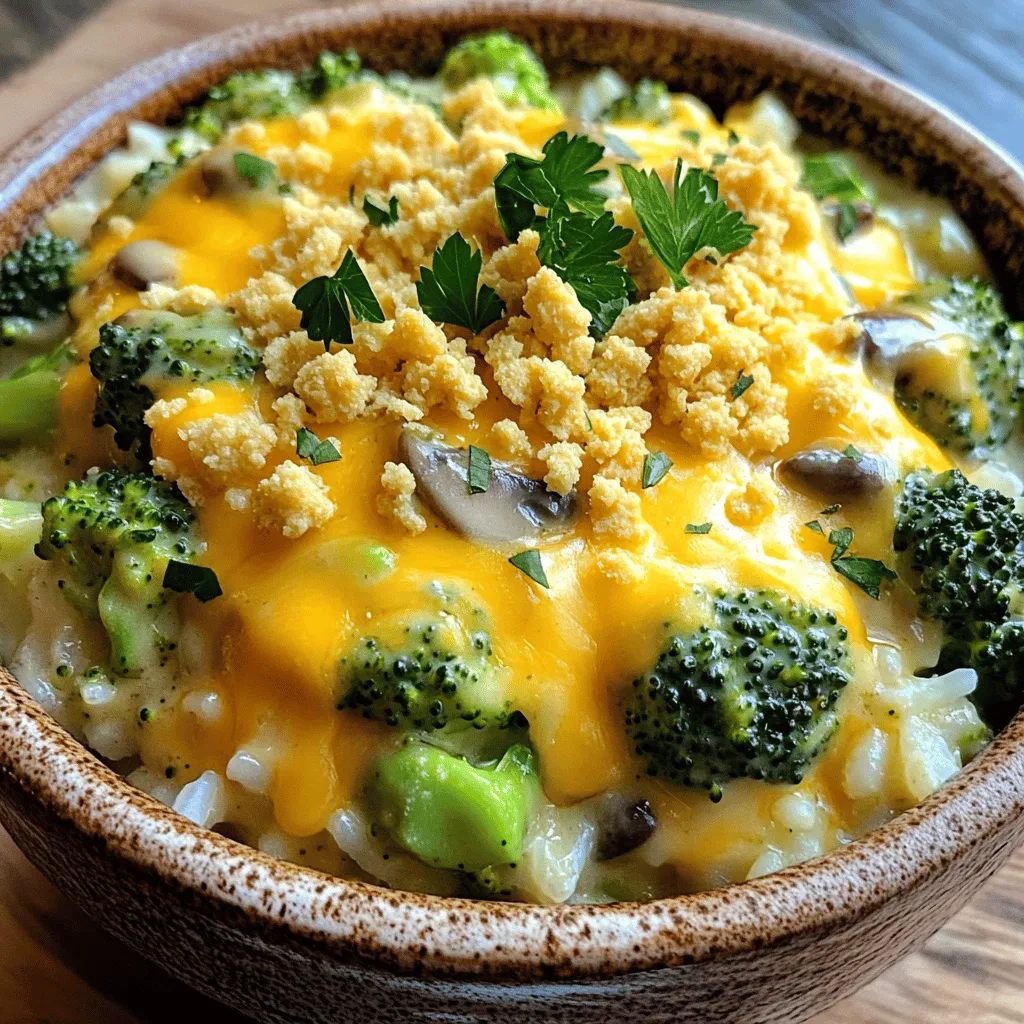
Looking for a meal that’s both tasty and simple? This Easy Cheesy Broccoli Casserole fits the bill! With its creamy

- Medium eggplant - Breadcrumbs (panko recommended) - Parmesan cheese (or nutritional yeast) - Garlic powder - Onion powder - Smoked paprika - Salt and pepper - Eggs - Olive oil - Fresh parsley (optional for garnish) These ingredients make the perfect crispy air fryer eggplant fries. The eggplant brings a nice texture, while panko breadcrumbs add crunch. You can use Parmesan or nutritional yeast based on your diet. Each seasoning enhances flavor and makes each bite tasty. When selecting your eggplant, look for ones that feel firm and heavy. This ensures freshness and good taste. Panko breadcrumbs give a lighter crunch than regular ones, making them my go-to choice. The spices like garlic powder and smoked paprika add depth and warmth. Using fresh parsley for garnish brightens the dish. It adds a pop of color and freshness. You can skip it if you prefer, but it really elevates the look. The combination of these ingredients makes for a delicious snack. Each part plays a role in flavor and texture. For the full recipe, check out the detailed instructions. First, wash your eggplant well. Cut it into thin fries, about 1/4 inch thick. This size helps them cook evenly. If you want, you can coat them lightly with flour. This helps the egg stick better. Next, grab three bowls. In one bowl, place the flour (if using). In the second bowl, beat the two large eggs. In the third bowl, mix the breadcrumbs, Parmesan cheese, garlic powder, onion powder, smoked paprika, salt, and pepper. Stir until everything is well combined. Now it's time to air fry! Preheat your air fryer to 400°F (200°C) for about 5 minutes. Dip each eggplant fry into the beaten eggs, then roll them in the breadcrumb mix. Press gently so the crumbs stick well. Place the fries in a single layer in the air fryer basket. Drizzle olive oil on top for extra crunch. Cook for 10-12 minutes. Shake the basket halfway through to cook evenly. Your eggplant fries will turn golden brown and crispy. To make your eggplant fries crispy, start by preheating your air fryer. Preheating helps create a hot cooking environment. This hot air cooks the fries quickly and evenly. Aim for 400°F (200°C) for the best results. Next, drizzle some olive oil over your fries. Olive oil adds flavor and helps the fries brown nicely. A little oil goes a long way in making them crunchy. Not all eggplants are the same. Choose a medium eggplant with shiny skin. Look for one that feels heavy for its size. This freshness means better texture and flavor. When cutting the eggplant, aim for thin fries. Thinner pieces cook faster and get crispier. One big mistake is overcrowding the air fryer basket. If you pile fries on top of each other, they won’t cook evenly. Give them space to breathe. Another mistake is skipping seasonings. Don’t forget to season your fries! A mix of garlic powder, onion powder, and smoked paprika adds great taste. Use the full recipe for more details on seasonings. {{image_2}} For a vegan twist, swap Parmesan cheese with nutritional yeast. This adds a cheesy taste without dairy. You can also try using other plant-based coatings. Some options include crushed nuts or seeds. They provide a nice crunch and flavor. You can change the taste by using different spices. Try adding cayenne for heat or Italian herbs for a fresh touch. If you want a cheesy flavor, consider adding cheese alternatives like vegan mozzarella. These changes keep the dish exciting and new. Eggplant fries taste great with many dipping sauces. Marinara, ranch, or a spicy aioli work well. You can also serve them with sides like a fresh salad or roasted veggies. This makes your snack even more delicious and satisfying. For the full recipe, check the details provided earlier. To store your leftover eggplant fries, place them in an airtight container. Make sure they cool completely before sealing. This helps keep their texture. You can refrigerate them for up to three days. After that, the fries may lose their crunch and become soggy. The best way to reheat eggplant fries is in the air fryer. Preheat the air fryer to 350°F (175°C). Place the fries in a single layer and heat for about 5 to 6 minutes. This method keeps them crispy. If you don’t have an air fryer, you can use an oven. Spread the fries on a baking sheet and bake at 350°F (175°C) for about 10 minutes. To freeze eggplant fries, let them cool completely first. Lay them out in a single layer on a baking sheet. Freeze them for about an hour until solid. Then, transfer the fries to a freezer-safe bag. This helps keep them from sticking together. When you’re ready to eat, thaw them in the fridge overnight. For the best texture, reheat them in an air fryer. This keeps them crispy after thawing. To make your eggplant fries crispy, follow these tips: - Use panko breadcrumbs. They add extra crunch. - Preheat your air fryer. This helps start the cooking right. - Don’t overcrowd the basket. Give each fry space to crisp up. - Drizzle olive oil. A little oil goes a long way for crunch. - Shake the basket. This ensures even cooking and browning. Yes, you can! Here are some great choices: - Zucchini. It cooks well and tastes great. - Sweet potatoes. They add a nice sweetness. - Carrots. These give a good crunch and flavor. - Bell peppers. They are colorful and tasty. Just cut them into fry shapes and follow the same method. Popular dipping sauces for eggplant fries include: - Marinara sauce. It’s a classic choice. - Ranch dressing. Creamy and tasty with fries. - Garlic aioli. A flavorful twist on dipping. - Spicy sriracha. For those who like it hot. Feel free to get creative and mix your favorite flavors! Look for these signs of perfectly cooked eggplant fries: - Golden brown color. This means they are crisp and ready. - Crunchy texture. They should feel firm when you bite in. - No soft spots. The fries should feel even all over. If you see these signs, you’re good to go! For the full recipe, check back to the earlier sections. In this post, we covered how to make crispy eggplant fries. You need a few main ingredients, like medium eggplant, panko breadcrumbs, and Parmesan cheese. Prepping the eggplant correctly and using the right seasonings are key steps. Remember to preheat your air fryer for the best results. Feel free to experiment with flavors and dipping sauces. Enjoy your delicious eggplant fries, and have fun making them!

Crispy Air Fryer Eggplant Fries Quick and Easy Snack

Looking for a tasty snack that’s both healthy and crispy? Try my Crispy Air Fryer Eggplant Fries! They’re quick to

Older posts
Newer posts
← Previous Page1 … Page23 Page24 Page25 … Page79 Next →

dsad

© 2025 pureeatsnow • Built with GeneratePress

Our Policies

  • Copyright Policy
  • Cookie Policy
  • GDPR Policy
  • Privacy Policy
  • Disclaimer
  • Terms Of Use

More Information

  • Home
  • About
  • Contact
  • Appetizers
  • Dessert
  • Dinner
  • Drinks
©2025, pureeatsnow About Back To Top