Skip to content
DisclaimerTerms Of UseGDPR PolicyCookie Policy

pureeatsnow

  • Home
  • Drinks
  • Appetizers
  • Dinner
  • Dessert
  • About
  • Contact
  • Privacy Policy
DisclaimerTerms Of UseGDPR PolicyCookie Policy

Rachel

For this tasty treat, you need just a few key items. Here’s what to gather: - 1 cup dark chocolate chips (at least 70% cocoa) - 1/2 cup almond butter (smooth or crunchy, depending on preference) - 1/4 cup sliced almonds - 1 teaspoon vanilla extract - Sea salt, for sprinkling These main ingredients create the rich taste and texture of the bark. The dark chocolate gives a deep flavor, while the almond butter adds creaminess. You will love the crunch from the sliced almonds. You can add some fun extras to make your bark even better. Consider trying: - 1/4 cup dried cranberries or cherries for a sweet-tart taste - A sprinkle of cinnamon for warmth - A few pinches of chili powder for a spicy kick These optional add-ins let you play with flavors. They can make each bite unique and exciting. To make this bark, you’ll need a few simple tools: - A baking sheet - Parchment paper - A microwave-safe bowl - A spatula and a skewer or knife These tools help you melt the chocolate and mix the almond butter. The parchment paper makes cleanup easy and helps you lift the bark out later. For the best results, make sure everything is ready before you start. Check out the Full Recipe for more details on the process. First, gather all your ingredients. You will need: - 1 cup dark chocolate chips (at least 70% cocoa) - 1/2 cup almond butter (smooth or crunchy) - 1/4 cup sliced almonds - 1/4 cup dried cranberries or cherries (optional) - Sea salt, for sprinkling - 1 teaspoon vanilla extract Next, line a baking sheet with parchment paper. Leave some paper hanging over the sides. This helps you lift the bark out later. Now, melt your dark chocolate chips. Use a microwave-safe bowl. Heat them in 30-second bursts. Stir between each burst until the chocolate is smooth. Once melted, mix in the vanilla extract to enhance the flavor. Pour the melted chocolate onto the lined baking sheet. Use a spatula to spread it into a layer about 1/4-inch thick. Take spoonfuls of almond butter and drop them onto the chocolate layer. Use a skewer or knife to swirl the almond butter into the chocolate. This creates a lovely marbled look. Sprinkle the sliced almonds on top. If you want a sweet and tart kick, add dried cranberries or cherries. Finally, sprinkle a bit of sea salt over the whole bark. This step adds a nice contrast to the sweetness. Place the baking sheet in the refrigerator. Let it chill for about 1-2 hours. The chocolate should harden completely. Once set, grab the edges of the parchment paper. Lift the bark out of the baking sheet. Break it into large pieces or cut smaller squares, depending on your preference. For a great presentation, serve the bark on a pretty platter or in small cups. Dust with a little extra sea salt for flair. Enjoy this tasty treat as a snack or dessert! To melt chocolate, you need patience. Use a microwave-safe bowl. Heat the dark chocolate chips in short bursts. Start with 30 seconds. Stir well between each burst. This helps avoid burning. Once smooth, the chocolate is ready. If you prefer, you can also use a double boiler. Just heat water in a pot, then place a bowl on top. The steam will melt the chocolate gently. Swirling almond butter into the chocolate is fun! After pouring the melted chocolate, drop spoonfuls of almond butter on top. Use a skewer or a knife to create swirls. Move gently to keep the design nice. Don’t mix too much; you want the marbled look. This adds both taste and beauty to your bark. You can boost flavor easily! Adding sea salt on top gives a nice contrast. It can make the sweet chocolate pop. Try mixing in dried cranberries or cherries for a fruity touch. They add a bit of tartness and color. Experiment with spices like cinnamon or a dash of espresso. These small changes can make the bark even more special. For the full recipe, make sure to check the details! {{image_2}} You can swap almond butter for other nut butters. Peanut butter gives a strong flavor. Cashew butter adds a sweet, creamy touch. Sunflower seed butter is a great choice for nut-free needs. Each nut butter changes the bark's taste and texture. If you want a sweeter bark, use milk chocolate instead of dark. You can also add more dried fruit. Try using honey or maple syrup for extra sweetness. Just remember, these changes can also change the texture. Get creative with seasonal flavors! For fall, add pumpkin spice or dried apples. In winter, try peppermint extract or crushed candy canes. Fresh berries in summer can bring a burst of flavor. These additions keep the bark fresh and fun. Using these variations, you can make your Chocolate Almond Butter Bark unique and enjoyable. Check the Full Recipe for the basic version to start from! To keep your Chocolate Almond Butter Bark fresh, store it in an airtight container. Place parchment paper between layers if you stack pieces. This prevents them from sticking together. Store the container in a cool, dry place, away from sunlight. When stored correctly, this bark lasts about two weeks. However, it will taste best in the first week. The chocolate can lose its shine and flavor after that. If you notice any changes in smell or texture, it’s best to toss it. You can freeze Chocolate Almond Butter Bark for up to three months. Wrap each piece in plastic wrap, then place them in a freezer-safe bag. When you want to enjoy it, take it out and let it thaw in the fridge. Avoid thawing at room temperature to keep the texture nice. For the full recipe, check the earlier section. Yes, you can use milk chocolate. It will make the bark sweeter and creamier. However, it may not have the same rich flavor as dark chocolate. If you like a sweeter treat, milk chocolate works just fine. This recipe is already gluten-free! The ingredients do not contain gluten. Just make sure your chocolate chips and almond butter are marked gluten-free. This way, you can enjoy the bark without worry. To cut the bark, first let it cool completely. Then, use a sharp knife to score it. You can also break it into pieces with your hands for a rustic look. If you want neat squares, cut it while it’s slightly soft. Yes! You can use any nuts you like. Walnuts, pecans, or cashews all work well. Just chop them up and sprinkle them on top of the chocolate. You can store it for up to two weeks. Keep it in an airtight container at room temperature. If it’s warm, you may want to refrigerate it to keep it fresh. The bark pairs well with hot drinks like coffee or tea. You can also enjoy it with yogurt or as a topping on ice cream. It adds a nice crunch and flavor. Absolutely! Peanut butter or cashew butter can be used instead of almond butter. Each nut butter will give the bark a unique taste. Choose what you love best. To make it healthier, you can reduce the amount of chocolate. Use less chocolate or add more nuts and dried fruit. This adds flavor and nutrients without extra sugar. Microwaving chocolate works well. Heat it in short bursts, stirring often. This prevents it from burning. You can also use a double boiler on the stove for even melting. Yes! Adding spices can enhance the flavor. Cinnamon or sea salt can add a nice touch. Just sprinkle a little on top before it sets for a tasty twist. Yes! Kids can help with mixing and adding toppings. It’s a fun kitchen project. Plus, they will love the sweet taste of the bark. You can find the full recipe above and explore even more ways to enjoy this tasty treat! You now have all the details to make delicious chocolate almond butter bark. We covered the main and optional ingredients, preparation steps, and cooking methods. I shared tips for melting chocolate and adding flavors. You can adjust sweetness and even use different nuts. Lastly, proper storage will keep your bark fresh longer. Enjoy experimenting with this treat. With these steps, you can create your own tasty version. Dive in and have fun!

Chocolate Almond Butter Bark Irresistible Treat Recipe

If you love chocolate and nuts, you’ll adore my Chocolate Almond Butter Bark recipe. This easy treat is rich, creamy,

- 1 medium head of cauliflower, cut into bite-sized florets - 1 cup all-purpose flour - 1 cup buttermilk (or a plant-based milk mixed with 1 tbsp of vinegar) - 1 cup panko breadcrumbs - 1/2 cup buffalo sauce (store-bought or homemade) - 1 tablespoon olive oil - 1 teaspoon garlic powder - 1 teaspoon onion powder - Salt and pepper to taste - 8 small corn or flour tortillas - 1 avocado, sliced - 1 cup shredded cabbage (green or purple for color) - Fresh cilantro leaves for garnish - Lime wedges for serving These ingredients come together to create a tasty dish. The cauliflower serves as the star of the show, bringing a nice crunch. The buffalo sauce gives it a kick that pairs well with the toppings. Each serving offers about 300 calories, 10 grams of fat, 45 grams of carbs, and 8 grams of protein. This makes it a filling yet healthy choice! If you need gluten-free options, use almond flour instead of all-purpose flour. You can swap panko with crushed rice cereal. For a dairy-free version, make buttermilk with plant-based milk and vinegar. These swaps keep the flavor while catering to your needs. Try these adjustments to make your Buffalo Cauliflower Tacos just right for you. Check out the full recipe for detailed steps on how to create this delicious meal! - Preheat the oven to 425°F (220°C) and line a baking sheet with parchment paper. - In a bowl, mix together flour, garlic powder, onion powder, salt, and pepper. - In another bowl, pour in the buttermilk or your plant-based milk mix. - Start by taking a cauliflower floret. Dip it in the flour mix first. - Next, move it to the buttermilk, coating it well. - Finally, roll the floret in panko breadcrumbs until fully covered. - Place the coated florets on the baking sheet. - Drizzle olive oil over all the coated cauliflower. - Bake in the preheated oven for 25 to 30 minutes. Look for a golden brown color. - When done, take the cauliflower out and toss it in buffalo sauce. - Bake for another 5 to 7 minutes for extra crispiness. - While baking, warm the tortillas in a skillet or oven. - To assemble, place the crispy cauliflower on each tortilla. - Top with shredded cabbage, avocado, and fresh cilantro. - Serve with lime wedges for a zesty kick. For more details, check the Full Recipe. To get that perfect crunch, olive oil and panko breadcrumbs are key. Olive oil helps the cauliflower brown and adds flavor. Panko breadcrumbs create a light and crispy coating. A good bake time is 25 to 30 minutes at 425°F (220°C). You can add 5 to 7 more minutes for extra crispiness after adding buffalo sauce. Always check for a golden brown color to ensure they are done. To enhance flavor, I love topping my tacos with fresh avocado and crunchy cabbage. You can also add pickled onions for a tangy twist. For a drink pairing, a light beer or a refreshing soda works well. If you prefer non-alcoholic options, try a citrusy lemonade. These drinks balance the heat from the buffalo sauce. Serve the tacos on a colorful platter to catch everyone's eye. Arrange them neatly and add a drizzle of buffalo sauce on top for flair. For a splash of color and texture, sprinkle sesame seeds or chopped herbs like cilantro over the tacos. Adding lime wedges on the side makes them pop with freshness. {{image_2}} You can change up how you serve your Buffalo Cauliflower Tacos. Instead of traditional tortillas, try using lettuce wraps. They are fresh and light. You can also choose gluten-free tortillas made from corn or rice. This way, more people can enjoy your tacos. You can easily adjust flavors to suit your taste. Add spices like cumin or smoked paprika for a smoky kick. Want some heat? Try drizzling extra buffalo sauce or a spicy sriracha. For toppings, consider adding cheese, fresh salsa, or sliced jalapeños. Each addition makes the dish more exciting and unique. If you want more protein, you can add cooked chicken or tofu. Cook the chicken with similar spices and toss it with buffalo sauce. For tofu, press it first to remove moisture, then bake or pan-fry it. Both options boost the meal's heartiness while keeping it delicious. For the complete guide to preparing these tasty tacos, check out the Full Recipe. To store your Buffalo Cauliflower Tacos, place them in an airtight container. Keep them in the fridge for up to three days. If you have leftover cauliflower, you can freeze it. Place the cooled cauliflower in a freezer-safe bag. Remove air and seal tightly. Label the bag and use it within three months for the best taste. To reheat the tacos, the oven works best. Preheat to 350°F (175°C). Place the tacos on a baking sheet. Heat for about 10 minutes. This keeps them crispy. If you use a microwave, the tacos might get soggy. To avoid this, heat the cauliflower separately and then reassemble. The shelf life of the ingredients varies. Fresh cauliflower lasts about a week in the fridge. Panko breadcrumbs and flour can last for months if kept dry. Buttermilk lasts about two weeks after opening. If any ingredient smells bad or looks strange, it’s best to discard it. Yes, you can prepare many parts in advance. You can cut the cauliflower and store it in the fridge. Make the flour mixture and buffalo sauce ahead too. When you're ready to eat, just coat and bake the cauliflower. This way, you save time when serving. These tacos pair well with many sides. Here are some tasty ideas: - Rice or quinoa for a hearty side. - A fresh salad with greens and a light dressing. - Chips and salsa for a crunchy snack. - Pickled veggies for a tangy contrast. These options enhance your meal and add variety. Buffalo Cauliflower Tacos are vegetarian since they use no meat. If you use plant-based milk, they are vegan too. This dish features cauliflower, which is a vegetable. It also uses flour, breadcrumbs, and spices. All these ingredients are plant-based. Enjoy a tasty meal that fits many diets! Buffalo Cauliflower Tacos make a fun and tasty meal. We covered all the key ingredients, from cauliflower to toppings. You learned how to prepare and coat the cauliflower for a crispy finish. We shared helpful tips on serving and storing leftovers. Try different flavors and protein additions for variety. These tacos are not just tasty; they're also versatile and adaptable. Enjoy experimenting with new toppings and styles to find your favorite version!

Buffalo Cauliflower Tacos Flavorful and Healthy Treat

Are you ready to spice up your taco night? Buffalo Cauliflower Tacos are a flavorful and healthy treat that everyone

Making raspberry swirl yogurt popsicles is easy and fun! This recipe uses simple ingredients you can find at any store. It takes just 15 minutes to prep. You will freeze them to enjoy later. Here’s what you need for this tasty treat: - 2 cups Greek yogurt (plain or vanilla) - 1 cup fresh raspberries (plus extra for swirling) - 2 tablespoons honey or maple syrup - 1 teaspoon vanilla extract - A pinch of salt - Optional: Fresh mint leaves for garnish Each popsicle offers a burst of flavor and health. Here’s what you get per serving: - Calories: 90 - Protein: 5g - Carbohydrates: 12g - Fat: 2g - Sugars: 6g - Fiber: 1g These raspberry swirl yogurt popsicles are not just tasty; they are also a smart choice! To start, gather your ingredients. You need Greek yogurt, fresh raspberries, honey, vanilla extract, and a pinch of salt. I find using fresh raspberries gives the best flavor. First, place the raspberries in a blender. Add honey or maple syrup and a pinch of salt. Blend until smooth, but keep some raspberry chunks. This adds texture and makes the popsicles more fun. Next, in a mixing bowl, combine the Greek yogurt and vanilla extract. Stir well until they mix completely. This yogurt base will be creamy and delicious. Grab your popsicle molds. Pour a layer of the yogurt mixture into each mold, filling it about one-third full. This layer creates a nice base. Then, add a spoonful of the raspberry mixture on top. Use a skewer or a spoon to swirl it gently. It looks pretty and mixes the flavors well. After that, pour another layer of yogurt over the raspberry mix. Repeat this process until the molds are full. You want to see swirls of raspberry throughout each popsicle. This layering adds to the fun when you take a bite. Once your molds are full, insert popsicle sticks. Place the molds in the freezer for at least 4-6 hours. This ensures they freeze solid. If you want to speed up freezing, set your freezer to a colder setting. When they’re ready, run warm water over the outside of the molds for a few seconds. This helps release the popsicles. Gently pull them out, and you’ll have beautiful raspberry swirl yogurt popsicles. Enjoy this fresh and fruity treat! To create those beautiful raspberry swirls, use a gentle hand. After adding the raspberry mix, do not over-mix it with the yogurt. Just a few gentle swirls with a toothpick or chopstick will do. This keeps the bright raspberry color vibrant and fun. Aim for a mix that looks marbled, not blended. For creamy popsicles, use Greek yogurt. It gives a rich, smooth base. If you prefer a lighter texture, you can mix in a little milk. This helps thin out the yogurt while keeping it tasty. Blend your raspberries until they are mostly smooth, but leave some small chunks for that tasty bite. When ready to serve, dip the molds in warm water for a few seconds. This makes it easy to pull out your popsicles. You can serve them on a pretty plate, garnished with fresh mint and extra raspberries. For a fun twist, try drizzling some honey on top before serving. This adds a sweet touch and makes your popsicles look fancy! {{image_2}} You can switch up the raspberries for other fruits. Strawberries, blueberries, or peaches work great. Each fruit brings its own taste. For a tropical twist, try mango or pineapple. Just blend the fruit the same way as raspberries. You can create fun colors and flavors! If you want a dairy-free treat, use coconut yogurt or almond yogurt. These options still give a creamy texture. You can also try cashew yogurt, which adds a nice flavor. Just follow the same steps in the Full Recipe. You won’t miss the dairy! Add fun flavors to your popsicles! Consider mixing in a little lemon or lime juice for a zesty kick. You can also add a touch of cinnamon or nutmeg. Want something a bit sweeter? Try vanilla bean or chocolate syrup. Let your taste buds guide you to tasty combinations! To keep your popsicles fresh, store them in an airtight container. This will prevent freezer burn. You can also wrap each popsicle in plastic wrap. This adds extra protection. Always label the container with the date. This way, you know when you made them. These popsicles stay good for about two months in the freezer. After that, they may lose flavor and texture. If you freeze them longer, check for ice crystals. Ice crystals can affect the taste. It's best to enjoy them within the first month for the best quality. You can reuse your popsicle molds for different flavors. Just wash them in warm, soapy water after each use. Rinse well to remove any soap. If you want to switch flavors, try to use neutral molds. If you make a strong flavor, let the mold soak for a bit to remove the taste. This keeps your new popsicles tasting fresh and fruity. For the full recipe, check the section above. Yes, you can use frozen raspberries. They work well in this recipe. Just blend them straight from the freezer. This keeps the pops cool and refreshing. If you want more texture, let them thaw a bit before blending. You can still achieve that lovely swirl in your popsicles. These popsicles can last up to two months in the freezer. Just make sure to wrap them tightly. This keeps ice crystals from forming. If they are well sealed, they will taste great even after a while. If you want a substitute for Greek yogurt, try regular yogurt or coconut yogurt. Both options work nicely. They may change the flavor a bit, but they still taste great. You can also use a dairy-free yogurt if you prefer. Just pick one that is thick and creamy for the best results. You learned how to make tasty popsicles with fresh ingredients. We covered what you need and how to prepare them step by step. I shared tips for the best texture and fun variations to try. Remember to store your popsicles right, so they stay fresh. If you have questions, like using frozen fruit or yogurt substitutes, I’ve got answers. Enjoy making and sharing these popsicles with friends and family. Your next treat will be a hit!

Raspberry Swirl Yogurt Popsicles Fresh and Fruity Treat

Looking for a cool treat that’s both fruity and fun? You’ll love these Raspberry Swirl Yogurt Popsicles! Packed with fresh

- 1 pound baby carrots (or regular carrots, peeled and cut into sticks) - 3 tablespoons honey - 3 tablespoons olive oil - 4 cloves garlic, minced - 1 teaspoon fresh thyme leaves (or ½ teaspoon dried thyme) - Salt and pepper to taste - Optional: Chopped fresh parsley for garnish When making honey garlic roasted carrots, choose your carrots wisely. Freshness is key. Look for carrots that feel firm and have a vibrant color. Baby carrots are sweet and tender, making them a great choice. If you pick regular carrots, peel and cut them into sticks for even cooking. - Choose firm and smooth carrots. - Avoid carrots with soft spots or cracks. - Look for vibrant colors to ensure freshness. For flavor boosts, consider adding a pinch of red pepper flakes or a squeeze of lemon juice. These enhance the honey and garlic without overpowering the dish. Fresh herbs like rosemary or dill can also add a unique twist. - Red pepper flakes for some heat - Lemon juice for a zing - Fresh herbs like rosemary or dill Using these tips, you can make this dish your own. It's all about finding flavors you enjoy. Try experimenting with different herbs and spices to create your perfect honey garlic roasted carrots. For the full recipe, check out the detailed instructions. First, preheat your oven to 400°F (200°C). This helps the carrots roast well. Next, take a large mixing bowl. In this bowl, combine 3 tablespoons of honey, 3 tablespoons of olive oil, 4 minced garlic cloves, 1 teaspoon of fresh thyme, salt, and pepper. Whisk them together until they mix well. This honey-garlic glaze will give your carrots a sweet and savory taste. Now, add 1 pound of baby carrots to the bowl. Toss them well to coat each carrot with the glaze. To make sure the glaze sticks, you should coat the carrots evenly. Use your hands to mix if you need. Then, line a baking sheet with parchment paper or lightly grease it. Spacing the carrots is key. Spread them in a single layer. This way, they roast evenly without steaming. Place the baking sheet in the preheated oven. Roast the carrots for about 25-30 minutes. Stir them halfway through to ensure they cook evenly. You’ll know they are done when they are tender and slightly caramelized. To check for doneness, pierce a carrot with a fork. If it goes in easily, they are ready. For the full recipe, you can refer to the section above. Enjoy the sweet and garlicky flavor of your roasted carrots! To get crispy yet tender carrots, start by cutting them into even pieces. This helps them cook evenly. Use baby carrots for a sweet bite or regular carrots for more flavor. I like to coat them well with the honey-garlic mixture. This glaze helps caramelize the carrots. For the best results, position your baking sheet in the middle of the oven. This allows for even heat circulation. Stir the carrots halfway through roasting. This step promotes even caramelization and prevents burning. You can prep the carrots ahead of time. Just wash and cut them into the desired shape. Store them in an airtight container in the fridge for up to two days. You can also mix the honey-garlic glaze in advance. Keep it in a separate container. Just combine everything when you are ready to cook. This saves time and makes dinner easier. Honey garlic roasted carrots pair well with many dishes. Serve them alongside grilled chicken or fish. They also complement quinoa or couscous nicely. For a beautiful presentation, arrange the carrots on a platter. Sprinkle fresh parsley on top for color. This simple touch makes the dish look gourmet. You can also serve them warm or at room temperature for a casual meal. For the full recipe, check out the complete instructions above. {{image_2}} You can easily switch up the flavor of these honey garlic roasted carrots. Try adding spices like cumin, paprika, or even a pinch of cayenne pepper for heat. If you enjoy citrus, add some fresh orange or lemon juice. This gives the dish a bright, zesty flavor. For a sweet and spicy twist, mix in some sriracha or chili flakes. These changes can make this dish even more exciting. If you want to change the veggies, use parsnips, sweet potatoes, or bell peppers. Each brings a unique flavor and texture. You can also use frozen carrots if fresh ones are not available. For a gluten-free option, this recipe is already safe, as no gluten ingredients are used. If you're vegan, swap honey with maple syrup or agave nectar. This keeps the dish sweet without any animal products. Explore different cuisines by adding herbs and spices from around the world. For a Mediterranean flair, try adding oregano or basil. If you want an Asian touch, use sesame oil and sprinkle sesame seeds on top. For a South American vibe, cilantro and lime can brighten the dish. These international twists can make your honey garlic roasted carrots even more flavorful. Check out the Full Recipe for more tips and ideas. To keep your honey garlic roasted carrots fresh, place them in an airtight container. Store the container in the fridge. They stay tasty for about 3 to 5 days. Make sure to cool them down before sealing. This helps keep moisture out and flavor in. You can reheat your carrots in two ways: the microwave or the oven. The microwave is quick but may make them soft. To retain their texture and flavor, I recommend using the oven. Preheat it to 350°F (175°C). Spread the carrots on a baking tray, and heat for about 10 minutes. This keeps them crisp and delicious. Yes, you can freeze honey garlic roasted carrots! First, let them cool completely. Then, place them in a freezer-safe bag or container. Remove as much air as possible to prevent freezer burn. When you're ready to eat them, thaw in the fridge overnight. Reheat them in the oven for the best taste and texture. - How long to cook baby carrots? You should roast baby carrots for about 25-30 minutes at 400°F (200°C). Check them halfway through. Stirring helps them cook evenly. They should be tender and slightly caramelized when done. - Can I use regular carrots instead of baby carrots? Yes, you can! Just peel and cut regular carrots into sticks. They will take about the same time to roast. The flavor will still shine through. - What are the health benefits of carrots? Carrots are rich in beta-carotene, which is good for your eyes. They also have fiber, which helps digestion. Plus, they are low in calories, making them a great snack. - Caloric content and serving size details One serving of honey garlic roasted carrots (about 1/4 of the recipe) has roughly 120 calories. This includes all the healthy fats and sugars from the honey and olive oil. - How to adjust the recipe for more servings To serve more people, just double or triple the ingredients. Make sure to use a bigger baking sheet so the carrots roast well. - Scaling for large gatherings or meal prep For large gatherings, batch cooking helps. You can roast multiple trays at once. Just keep an eye on the time and check for doneness. For the complete recipe, check out the [Full Recipe]. Honey garlic roasted carrots offer great taste and healthy benefits. We explored ingredients, tips for selecting carrots, instructions, and storage methods. Remember, the right carrots make a big difference. Try adding different spices or herbs for a new twist. Enjoy your dish and impress others with your cooking! With these tips, you can create a flavorful side that everyone will love. Don't hesitate to experiment and find your favorite variations!

Honey Garlic Roasted Carrots Flavorful and Easy Recipe

Carrots can be so boring, right? Not anymore! My Honey Garlic Roasted Carrots recipe turns ordinary vegetables into a sweet

- 4 salmon fillets (6 oz each) - 2 tablespoons olive oil - Salt and black pepper to taste - 1 cup heavy cream - 2 tablespoons fresh dill, chopped (or 1 tablespoon dried dill) - Zest of 1 lemon - 2 tablespoons fresh lemon juice - 2 cloves garlic, minced - ½ teaspoon onion powder - ½ teaspoon paprika Gathering the right ingredients is key to making creamy lemon dill salmon a hit. You want fresh salmon for the best flavor. Olive oil adds richness and helps with seasoning. Salt and black pepper will enhance the taste of the fish. Heavy cream gives the dish its creamy texture, while dill adds a fresh herb taste. Lemon zest and juice brighten the flavors, bringing a pop of freshness. Minced garlic adds depth, and onion powder and paprika provide subtle warmth. You can easily find these items at your local grocery store or farmer's market. - Baking sheet - Parchment paper - Medium saucepan - Measuring cups and spoons - Spatula or whisk Using the right tools makes cooking easier. A baking sheet lined with parchment paper helps with cleanup and prevents sticking. A medium saucepan is perfect for making the creamy sauce. Measuring cups and spoons ensure you add the right amounts of each ingredient. A spatula or whisk is handy for mixing the sauce well. All these tools will help you create a great dish that impresses everyone. For the full recipe, check the complete details above. - Preheat the oven to 400°F (200°C) and prepare the baking sheet. - Season the salmon fillets with olive oil, salt, and pepper. First, you need to set your oven. Preheating it to 400°F makes sure the salmon cooks evenly. Grab your baking sheet, and line it with parchment paper. This helps with easy cleanup later. Next, take your salmon fillets. Pat them dry with paper towels. This step is key to getting a nice sear. Drizzle olive oil on both sides of each fillet. Sprinkle salt and pepper to taste. Place the fillets skin-side down on your baking sheet. - Prepare the creamy sauce in the saucepan and simmer. - Coat the salmon with sauce and bake until cooked. Now, let's make the creamy sauce. In a medium saucepan, mix heavy cream, minced garlic, lemon zest, lemon juice, chopped dill, onion powder, and paprika. Turn the heat to medium and stir. You want it to simmer gently. Let it cook for about 5-7 minutes. The sauce will thicken a bit. Once the sauce is ready, pour it over the salmon fillets. Make sure each fillet is coated evenly. Then, place the baking sheet in the oven. Bake for 12-15 minutes. You’ll know it’s done when the salmon flakes easily with a fork. - Rest the salmon and serve with additional sauce. - Garnish options for presentation. After baking, take the salmon out of the oven. Let it rest for a few minutes. This helps the flavors mix well. When you’re ready, place the salmon on a serving platter. Drizzle any extra creamy sauce over the top. For a beautiful touch, consider garnishing with fresh dill or lemon slices. These add a pop of color and flavor. Serve with sides like steamed asparagus and fluffy rice or quinoa. Enjoy your creamy lemon dill salmon dish, a delightful meal that is both simple and delicious! To cook salmon well, aim for a flaky texture. You can check for doneness by gently pressing the fish with a fork. If it flakes easily, it's ready! For the best flavor, use fresh dill. Fresh herbs bring a bright taste that dried herbs can't match. If fresh isn't an option, dried dill still works well, but use less. You can adjust the sauce to fit your taste. Adding capers gives a nice briny kick. A little mustard can add depth as well. If you like spice, try adding a pinch of red pepper flakes. It adds heat without overpowering the dish. You can also adjust the creaminess by using less heavy cream if desired. Explore these variations to make the dish your own. For the full recipe, check the beginning of this article. {{image_2}} To keep your creamy lemon dill salmon fresh, cool it down first. Let it sit at room temperature for no more than two hours. Use airtight containers to store the leftovers. Glass containers work best, as they do not retain odors. Refrigerate the salmon right away. It can last up to three days in the fridge. If you want to keep it longer, consider freezing it. Wrap the salmon tightly in foil or use freezer-safe bags. Frozen salmon can stay good for up to three months. When reheating salmon, you want to keep it moist. The best method is to use the oven. Preheat it to 275°F (135°C). Place the salmon in a baking dish, and cover it with foil. Heat for about 15 minutes or until warm. You can also use the microwave. Place the salmon on a plate and cover it with a damp paper towel. Heat in short bursts of 30 seconds. Check often to avoid drying it out. Leftover salmon is great in many meals. Flake it into salads or pasta dishes. You can also make salmon sandwiches with creamy sauce for a tasty lunch! Can I use frozen salmon for this recipe? Yes, you can use frozen salmon. Just thaw it fully before cooking. This helps the salmon cook evenly and ensures a nice texture. What can I serve with creamy lemon dill salmon? You can serve it with steamed asparagus and fluffy rice or quinoa. A side salad also pairs well with this dish. The fresh flavors of the sides will complement the salmon nicely. How do I know when the salmon is fully cooked? When the salmon flakes easily with a fork, it is done. You can also check if the meat turns opaque and has an internal temperature of 145°F (63°C). Can I substitute heavy cream for another ingredient? Yes, you can use coconut milk or cashew cream for a lighter option. These alternatives will give a different flavor but still create a creamy sauce. What's the best type of salmon to use for this dish? I recommend using sockeye or king salmon. They have great flavor and a rich texture. Both types hold up well during cooking and absorb the sauce nicely. How can I make this recipe dairy-free or gluten-free? To make it dairy-free, swap heavy cream with coconut cream or a nut-based cream. For gluten-free, ensure all other ingredients are certified gluten-free. In this post, we explored how to make creamy lemon dill salmon. We covered the ingredients, including salmon, cream, and fresh herbs. I shared tools you'll need, step-by-step cooking tips, and ways to adjust flavor. Plus, we discussed storage and reheating methods for leftovers. Remember, cooking can be fun. Experiment and find what works for you. Enjoy your delicious salmon!

Creamy Lemon Dill Salmon Delightful and Simple Dish

Welcome to a culinary adventure that’s both delightful and simple: Creamy Lemon Dill Salmon! If you crave a dish that

- 4 cups fresh broccoli florets - 1 cup cooked rice (white or brown) - 1 cup shredded sharp cheddar cheese - 1 cup cream of mushroom soup - 1/2 cup milk - 1/2 teaspoon garlic powder - 1/2 teaspoon onion powder - Salt and pepper to taste - 1/2 cup crushed crackers (like Ritz or butter crackers) - 2 tablespoons melted butter Feel free to customize this dish! You can add cooked chicken, diced ham, or even some sautéed onions for extra flavor. You might also replace the cheddar with mozzarella or gouda for a different taste. Each serving has about 300 calories. It contains around 15 grams of fat and 12 grams of protein. Broccoli is a great source of vitamins K and C, and it helps support your immune system. Cheese adds calcium and protein, making this dish not only tasty but also nutritious. How to prepare the broccoli and rice Start by boiling water in a large pot. Add 4 cups of fresh broccoli florets. Blanch the broccoli for 2-3 minutes. You want it bright green and slightly tender. Drain the broccoli and set it aside. Next, cook 1 cup of rice. You can use white or brown rice. Once cooked, let the rice cool a bit before mixing. Mixing the casserole ingredients In a big bowl, combine the cooked rice, 3/4 cup of shredded sharp cheddar cheese, 1 cup of cream of mushroom soup, and 1/2 cup of milk. Add 1/2 teaspoon of garlic powder and 1/2 teaspoon of onion powder. Season with salt and pepper to taste. Mix everything until well combined. Gently fold in the blanched broccoli, ensuring it is evenly mixed with the rice blend. Temperature and time guidelines Preheat your oven to 350°F (175°C). Once your mixture is ready, transfer it into a greased 9x13 inch baking dish. Spread the mixture evenly across the dish. Tips to ensure even baking To add crunch, mix 1/2 cup of crushed crackers with 2 tablespoons of melted butter and the remaining 1/4 cup of cheddar cheese. Sprinkle this mixture on top of the casserole. Bake in the preheated oven for 25-30 minutes. Keep an eye on it. Look for melted cheese and a golden-brown top. Once done, let it cool for a few minutes before serving. For the full recipe, refer to the section above. To make your casserole creamy, use plenty of cheese and soup. The cream of mushroom soup adds moisture and flavor. Mix it well with rice and broccoli. For added richness, use full-fat milk. This makes every bite delicious and smooth. To avoid mushy broccoli, blanch it briefly. Cook it in boiling water for just 2-3 minutes. This keeps the bright green color and crispness. After blanching, drain and quickly cool it in ice water. This step is key to keeping your broccoli fresh. Spices can boost the flavor of your casserole. Try adding a pinch of paprika for warmth. A bit of cayenne pepper can add a nice kick. Fresh herbs like thyme or parsley can also brighten up the dish. If you want to add protein, consider cooked chicken or ham. This makes the meal more filling. You can also mix in some beans for a plant-based option. Just ensure any protein is cooked before mixing it in. For the full recipe, check out the Easy Cheesy Broccoli Casserole section. {{image_2}} You can use many types of cheese in this casserole. Sharp cheddar gives a strong flavor. Monterey Jack adds creaminess. Mozzarella melts well and makes it gooey. For a twist, try Parmesan for a nutty taste. If you want a dairy-free option, use vegan cheese. Look for brands that melt well, like cashew or almond cheese. Crushed crackers are a classic topping, but you can mix it up. Try panko breadcrumbs for extra crunch. You can also use toasted nuts like almonds or walnuts for a nutty bite. For a kick, sprinkle on some crushed red pepper flakes. You can even mix in herbs like parsley or thyme for added flavor. To keep your Easy Cheesy Broccoli Casserole fresh, first let it cool completely. Then, place it in an airtight container. Cover it tightly to prevent moisture loss. Store it in the fridge for up to 4 days. For longer storage, freezing is a great option. Use a freezer-safe container and leave some space at the top. This space allows for expansion when the casserole freezes. You can enjoy it for up to 3 months in the freezer. When you’re ready to enjoy leftovers, reheating is key. The best method is to use the oven. Preheat it to 350°F (175°C). Place the casserole in a baking dish, cover it with foil, and heat for about 20 minutes. This method keeps the texture nice and creamy. If you're short on time, you can also use the microwave. Heat it in short bursts of 1-2 minutes, stirring in between. To refresh the dish, consider adding a sprinkle of cheese or fresh herbs before serving. This little touch can make it feel new again. Can I make this dish ahead of time? Yes, you can prepare this casserole a day early. Just follow the recipe up to the baking step. Cover it well and store it in the fridge. When you're ready, bake it straight from the fridge. You may need to add a few extra minutes to the baking time. Is it possible to make this recipe gluten-free? Absolutely! Use gluten-free crackers instead of regular ones. Also, check that your cream of mushroom soup does not contain gluten. Many brands offer gluten-free versions, so you can enjoy this dish without worry. Can I use frozen broccoli instead of fresh? Yes, frozen broccoli works well. Just thaw and drain it before adding it to the dish. You may need to adjust the cooking time slightly, as frozen broccoli can release more water. What if I don’t have cream of mushroom soup? No problem! You can use cream of chicken soup or even a homemade white sauce. Mix in some mushrooms for flavor if you like. This keeps the dish creamy and delicious. Suggested sides to pair with the casserole Pair your casserole with a simple green salad or some crusty bread. The fresh crunch of the salad complements the creamy casserole perfectly. You can also serve it with baked chicken or fish for a complete meal. Ideas for meal preparation with this dish This casserole is great for meal prep. You can portion it into containers for easy lunches. It also freezes well, so you can make extra for busy days. Just reheat and enjoy! For the full recipe, refer to the Easy Cheesy Broccoli Casserole section. You learned how to make a delicious cheesy broccoli casserole. We covered the best ingredients, steps, and tips. This dish is easy to customize and offers great health benefits. You can also store leftovers for later. If you try this recipe, explore different cheese and topping options too. Your meals can be simple but still full of flavor. Enjoy this dish as a comforting favorite or a new family tradition. Happy cooking and sharing!

Easy Cheesy Broccoli Casserole Fast and Simple Meal

Looking for a meal that’s both tasty and simple? This Easy Cheesy Broccoli Casserole fits the bill! With its creamy

- Medium eggplant - Breadcrumbs (panko recommended) - Parmesan cheese (or nutritional yeast) - Garlic powder - Onion powder - Smoked paprika - Salt and pepper - Eggs - Olive oil - Fresh parsley (optional for garnish) These ingredients make the perfect crispy air fryer eggplant fries. The eggplant brings a nice texture, while panko breadcrumbs add crunch. You can use Parmesan or nutritional yeast based on your diet. Each seasoning enhances flavor and makes each bite tasty. When selecting your eggplant, look for ones that feel firm and heavy. This ensures freshness and good taste. Panko breadcrumbs give a lighter crunch than regular ones, making them my go-to choice. The spices like garlic powder and smoked paprika add depth and warmth. Using fresh parsley for garnish brightens the dish. It adds a pop of color and freshness. You can skip it if you prefer, but it really elevates the look. The combination of these ingredients makes for a delicious snack. Each part plays a role in flavor and texture. For the full recipe, check out the detailed instructions. First, wash your eggplant well. Cut it into thin fries, about 1/4 inch thick. This size helps them cook evenly. If you want, you can coat them lightly with flour. This helps the egg stick better. Next, grab three bowls. In one bowl, place the flour (if using). In the second bowl, beat the two large eggs. In the third bowl, mix the breadcrumbs, Parmesan cheese, garlic powder, onion powder, smoked paprika, salt, and pepper. Stir until everything is well combined. Now it's time to air fry! Preheat your air fryer to 400°F (200°C) for about 5 minutes. Dip each eggplant fry into the beaten eggs, then roll them in the breadcrumb mix. Press gently so the crumbs stick well. Place the fries in a single layer in the air fryer basket. Drizzle olive oil on top for extra crunch. Cook for 10-12 minutes. Shake the basket halfway through to cook evenly. Your eggplant fries will turn golden brown and crispy. To make your eggplant fries crispy, start by preheating your air fryer. Preheating helps create a hot cooking environment. This hot air cooks the fries quickly and evenly. Aim for 400°F (200°C) for the best results. Next, drizzle some olive oil over your fries. Olive oil adds flavor and helps the fries brown nicely. A little oil goes a long way in making them crunchy. Not all eggplants are the same. Choose a medium eggplant with shiny skin. Look for one that feels heavy for its size. This freshness means better texture and flavor. When cutting the eggplant, aim for thin fries. Thinner pieces cook faster and get crispier. One big mistake is overcrowding the air fryer basket. If you pile fries on top of each other, they won’t cook evenly. Give them space to breathe. Another mistake is skipping seasonings. Don’t forget to season your fries! A mix of garlic powder, onion powder, and smoked paprika adds great taste. Use the full recipe for more details on seasonings. {{image_2}} For a vegan twist, swap Parmesan cheese with nutritional yeast. This adds a cheesy taste without dairy. You can also try using other plant-based coatings. Some options include crushed nuts or seeds. They provide a nice crunch and flavor. You can change the taste by using different spices. Try adding cayenne for heat or Italian herbs for a fresh touch. If you want a cheesy flavor, consider adding cheese alternatives like vegan mozzarella. These changes keep the dish exciting and new. Eggplant fries taste great with many dipping sauces. Marinara, ranch, or a spicy aioli work well. You can also serve them with sides like a fresh salad or roasted veggies. This makes your snack even more delicious and satisfying. For the full recipe, check the details provided earlier. To store your leftover eggplant fries, place them in an airtight container. Make sure they cool completely before sealing. This helps keep their texture. You can refrigerate them for up to three days. After that, the fries may lose their crunch and become soggy. The best way to reheat eggplant fries is in the air fryer. Preheat the air fryer to 350°F (175°C). Place the fries in a single layer and heat for about 5 to 6 minutes. This method keeps them crispy. If you don’t have an air fryer, you can use an oven. Spread the fries on a baking sheet and bake at 350°F (175°C) for about 10 minutes. To freeze eggplant fries, let them cool completely first. Lay them out in a single layer on a baking sheet. Freeze them for about an hour until solid. Then, transfer the fries to a freezer-safe bag. This helps keep them from sticking together. When you’re ready to eat, thaw them in the fridge overnight. For the best texture, reheat them in an air fryer. This keeps them crispy after thawing. To make your eggplant fries crispy, follow these tips: - Use panko breadcrumbs. They add extra crunch. - Preheat your air fryer. This helps start the cooking right. - Don’t overcrowd the basket. Give each fry space to crisp up. - Drizzle olive oil. A little oil goes a long way for crunch. - Shake the basket. This ensures even cooking and browning. Yes, you can! Here are some great choices: - Zucchini. It cooks well and tastes great. - Sweet potatoes. They add a nice sweetness. - Carrots. These give a good crunch and flavor. - Bell peppers. They are colorful and tasty. Just cut them into fry shapes and follow the same method. Popular dipping sauces for eggplant fries include: - Marinara sauce. It’s a classic choice. - Ranch dressing. Creamy and tasty with fries. - Garlic aioli. A flavorful twist on dipping. - Spicy sriracha. For those who like it hot. Feel free to get creative and mix your favorite flavors! Look for these signs of perfectly cooked eggplant fries: - Golden brown color. This means they are crisp and ready. - Crunchy texture. They should feel firm when you bite in. - No soft spots. The fries should feel even all over. If you see these signs, you’re good to go! For the full recipe, check back to the earlier sections. In this post, we covered how to make crispy eggplant fries. You need a few main ingredients, like medium eggplant, panko breadcrumbs, and Parmesan cheese. Prepping the eggplant correctly and using the right seasonings are key steps. Remember to preheat your air fryer for the best results. Feel free to experiment with flavors and dipping sauces. Enjoy your delicious eggplant fries, and have fun making them!

Crispy Air Fryer Eggplant Fries Quick and Easy Snack

Looking for a tasty snack that’s both healthy and crispy? Try my Crispy Air Fryer Eggplant Fries! They’re quick to

For Rainbow Fruit Skewers, you need a mix of colorful fruits. Here is the complete list of ingredients: - 1 cup strawberries, hulled - 1 cup orange segments - 1 cup pineapple chunks - 1 cup green grapes - 1 cup blueberries - 1 banana, sliced - Fresh mint leaves for garnish - Honey or agave syrup (optional, for drizzling) These ingredients bring bright colors and sweet flavors to your skewers. Each fruit adds its unique taste and texture, making every bite exciting. Strawberries are juicy, while oranges provide a zesty burst. Pineapple adds a tropical twist, and green grapes offer a crisp crunch. Blueberries are small but packed with flavor, and bananas bring creaminess to the mix. Using fresh mint leaves as a garnish makes your skewers look beautiful and adds a refreshing note. If you want extra sweetness, drizzle honey or agave syrup over the finished skewers. This simple touch elevates the flavors and makes them even more enjoyable. For the complete recipe, check the section above. Now, let’s bring these ingredients together to create a fun and healthy treat! To create your rainbow fruit skewers, start with the fruit prep. Wash the strawberries, grapes, and blueberries under cool water. This step helps remove dirt and germs. Hull the strawberries and slice them in half if they are large. Peel the oranges and separate them into segments. For the pineapple, chop it into bite-sized chunks. Lastly, slice the banana into rounds. Each fruit adds a burst of color and flavor. Grab a skewer and begin threading the fruit. Start with a strawberry on the skewer, followed by an orange segment. Next, add a chunk of pineapple, then a green grape. After that, place a blueberry, and finish with a slice of banana. This order creates a lovely rainbow effect. Leave some space at the end of each skewer for easier handling. Repeat this process until you use all the fruit. Once all skewers are assembled, it’s time for the final touches. If you like, drizzle a little honey or agave syrup on top for extra sweetness. This adds a nice glaze and enhances the flavor. For a refreshing look, garnish with fresh mint leaves. To present your skewers, arrange them upright in a glass or on a pretty platter. You can even serve them with a small bowl of yogurt for dipping. A sprinkle of edible flowers can make the display even more special. For the full recipe, check out the details above. When choosing fruits, look for bright colors and firm texture. Strawberries should be red, with no white spots. Oranges need to feel heavy for their size and have smooth skin. Pineapples should have a sweet smell at the base. Grapes should be plump and green, while blueberries must be deep blue. Bananas should be yellow with a few brown spots for perfect sweetness. Always wash your fruits well before using them. This helps remove dirt and pesticides. Use sturdy wooden or metal skewers for best results. Start by piercing the fruit at the center. This makes it easier to thread. Alternate fruit types on each skewer to create a rainbow effect. Keep a little space at the end for easy handling. If you have kids, let them help. They will love making their own skewers! To impress guests, arrange skewers upright in a tall glass. This creates a fun centerpiece. You can also lay them flat on a colorful platter. Add a small bowl of yogurt for dipping. For an extra touch, sprinkle edible flowers around the skewers. This makes the dish look even more appealing. The Full Recipe can guide you through making these fun treats! {{image_2}} You can mix up the fruits for your rainbow skewers. Try using kiwi for green or raspberries for red. You can also add peaches or apples to change the taste. If you want a tropical twist, mango and papaya work well too. The key is to keep the colors bright and fun! Make your skewers fit any theme or party. For a summer picnic, use watermelon and cantaloupe. For a birthday, add colorful sprinkles or mini marshmallows between the fruit. You can even make holiday-themed skewers. Use red and green fruits for Christmas or pastels for Easter. Themed skewers add extra excitement! Kids love to help in the kitchen. Let them pick their favorite fruits. You can even let them make funny shapes with cookie cutters. Instead of skewers, use fruit cups for a mess-free treat. Add yogurt or a fun dip to make it extra special. Making these treats fun can get kids excited about healthy eating! For the complete recipe, check out [Full Recipe]. Store leftover rainbow fruit skewers in an airtight container. Keep them in the fridge. They stay fresh for up to two days. If you notice any browning on the banana, remove that slice. The other fruits will stay colorful and tasty. To save time, you can prep your fruit a day ahead. Wash and cut the fruit, then place it in separate containers. Cover each container tightly. When you're ready to assemble, just grab the fruit and thread it onto the skewers. This keeps everything fresh. I do not recommend freezing rainbow fruit skewers. The texture of the fruit changes when frozen. If you freeze them, fruits like strawberries and bananas become mushy. It’s best to enjoy these skewers fresh for the best taste and texture. For more details, check the Full Recipe. You can use many fruits for rainbow fruit skewers. Here are my favorites: - Strawberries - Oranges - Pineapple - Green grapes - Blueberries - Bananas These fruits create a beautiful rainbow look. You can also mix in other fruits like kiwi or raspberries. Just pick fruits with bright colors and sweet flavors. Feel free to get creative! Fruit skewers last about 2 to 3 days in the refrigerator. Make sure to store them in an airtight container. This keeps the fruit fresh and prevents drying. Check for any signs of spoilage before eating. If the fruit looks dull or mushy, it’s time to toss it. Yes, you can make these skewers ahead of time. Prepare them a few hours before serving for the best taste. This gives the flavors a chance to blend together. Just remember to keep them in the fridge. If you want to prepare them a day ahead, it’s still fine. Just check the fruit for freshness before serving. For the full recipe, refer to the section above. You learned how to make fun and tasty fruit skewers. We covered all the ingredients, from strawberries to bananas. I shared easy steps to prepare and layer your fruit. You got tips for selecting ripe fruits and creative ways to present them. Don't forget about the variations for different themes or events. Store leftovers well to keep them fresh. Enjoy making these colorful skewers for any occasion! Add your own touch, and let the fun begin.

Rainbow Fruit Skewers Colorful and Healthy Treat

Looking for a fun and healthy treat? You’re in the right place! Rainbow fruit skewers are a colorful snack that

To make Lemon Herb Quinoa Salad, gather these ingredients: - 1 cup quinoa, rinsed - 2 cups vegetable broth or water - 1 cup cherry tomatoes, halved - 1 cucumber, diced - 1 bell pepper, diced (any color) - 1 avocado, diced - 1/4 cup fresh parsley, chopped - 1/4 cup fresh mint, chopped - 3 tablespoons olive oil - 2 tablespoons lemon juice - 1 teaspoon lemon zest - Salt and pepper to taste This salad is not just tasty; it's also good for you. Here’s a quick look at its benefits: - Quinoa is a great protein source. It has all essential amino acids. - Vegetables like tomatoes and cucumbers add vitamins and fiber. - Avocado gives healthy fats, which are good for your heart. - Lemon juice boosts your vitamin C intake and adds zest. A serving of this salad can provide you with energy and nutrients without excess calories. If you don't have some ingredients, do not worry. Here are some easy swaps: - Quinoa: Use brown rice or couscous if you prefer. - Cherry tomatoes: Regular tomatoes can be diced, or you can skip them. - Cucumber: Zucchini makes a fresh and crunchy alternative. - Bell pepper: Any color works, or you can use shredded carrots. - Avocado: Try using hummus for creaminess if you're out of avocado. - Fresh herbs: Basil or cilantro can give a nice twist if you don't have parsley or mint. These substitutions keep the salad fresh and enjoyable, no matter what you have on hand. Start by rinsing 1 cup of quinoa in cold water. This step removes any bitter taste. In a medium saucepan, mix the rinsed quinoa with 2 cups of vegetable broth or water. Turn the heat to medium-high and bring it to a boil. Once it boils, reduce the heat to low. Cover the saucepan and let it simmer for about 15 minutes. You want the quinoa to absorb all the liquid and become fluffy. After 15 minutes, take it off the heat and let it cool. While the quinoa cools, it's time to chop the veggies. Grab a large mixing bowl. Add 1 cup of halved cherry tomatoes, 1 diced cucumber, and 1 diced bell pepper of any color. Next, take 1 diced avocado and add it to the bowl. These fresh veggies will add color and crunch to your salad. In a small bowl, whisk together 3 tablespoons of olive oil, 2 tablespoons of lemon juice, and 1 teaspoon of lemon zest. Add salt and pepper to taste. This dressing is bright and tangy, perfect for the salad. Once the quinoa has cooled, fluff it with a fork. Add it to the bowl with your chopped vegetables. Next, pour the dressing over the mixture. Toss everything gently to combine. Finally, fold in 1/4 cup of chopped fresh parsley and 1/4 cup of chopped fresh mint. Taste your salad and adjust the salt and pepper if needed. For the full recipe, check out the details above. Enjoy your fresh and flavorful Lemon Herb Quinoa Salad! To fluff quinoa, first let it cool after cooking. Use a fork to gently stir the quinoa. This action lifts the grains and separates them. Doing this prevents clumping. The result is light and fluffy quinoa that makes the salad shine. Keep your salad fresh by using crisp vegetables. Choose firm cherry tomatoes, fresh cucumbers, and ripe avocados. Prep your veggies right before serving. This way, they stay crunchy and vibrant. If you make the salad early, store it in the fridge. Use an airtight container to maintain freshness. Serve the Lemon Herb Quinoa Salad in a large bowl or individual plates. Add extra lemon wedges for a pop of color. Sprinkle fresh herbs on top for a fragrant touch. For a fun twist, serve with whole grain crackers or pita chips. This adds a nice crunch and balance to the dish. Check out the Full Recipe for more details! {{image_2}} Quinoa is naturally gluten-free. You can enjoy this salad without worry. Just check the broth you use. Make sure it’s gluten-free too. Most vegetable broths are safe, but it’s wise to look at labels. Want to make the salad a meal? Add protein to boost nutrition. Chickpeas are a great choice. They add fiber and flavor. You can also use grilled chicken for a hearty touch. Simply mix in one cup of chickpeas or chicken after the quinoa cools. Use fresh veggies based on the season. This keeps the salad vibrant and fun. In spring, add peas or asparagus. In summer, try zucchini or corn. In autumn, diced sweet potatoes shine. Winter calls for roasted root veggies. Feel free to mix and match! For the full recipe, check the complete guide above. To keep your Lemon Herb Quinoa Salad fresh, store it in an airtight container. Make sure to cool the salad completely before sealing it. This helps prevent moisture build-up, which can make the salad soggy. Keep it in the fridge for the best taste. You can enjoy it cold, which is when the flavors really shine. You can freeze this salad, but it's best to do it without the avocado. Avocado does not freeze well and can turn brown when thawed. Instead, prepare your salad as usual, but leave out the avocado. Place the salad in a freezer-safe container. It can last for about 2 to 3 months in the freezer. When you're ready to eat, thaw it overnight in the fridge. If stored correctly, your Lemon Herb Quinoa Salad lasts about 3 to 5 days in the fridge. Check for any changes in smell or appearance before eating. If you notice anything off, it’s best to toss it. This salad makes a great meal prep option, so consider making a big batch to enjoy throughout the week. If you want more details on making it, check the Full Recipe. Yes, you can make this salad ahead of time. It keeps well in the fridge. I suggest storing it in an airtight container. The flavors blend nicely when it sits. You can prepare it up to a day in advance. Just add the avocado right before serving to keep it fresh. Quinoa salad is best served cold. After cooking the quinoa, let it cool down. This helps the flavors shine. You can chill the salad in the fridge for a refreshing taste. It makes a great side dish for any meal. To adjust for meal prep, make a big batch. You can double or triple the recipe. Portion it into containers for easy grab-and-go meals. Leave out the dressing until you are ready to eat. This keeps the salad fresh and crunchy. You can use many other herbs in this salad. Basil adds a nice touch of flavor. Cilantro gives a fresh taste that pairs well with lemon. Dill also works great for a different twist. Feel free to mix and match your favorites! This blog post covered many key points about making quinoa salad. We discussed ingredients, nutritional value, and substitutes. Then, we provided a clear recipe with step-by-step instructions. You learned tips for fluffing quinoa and keeping salads fresh. We also explored variations and storage options. Finally, we answered common questions about preparation and herbs. In conclusion, quinoa salad is easy to make and versatile. Enjoy your healthy dish!

Lemon Herb Quinoa Salad Fresh and Flavorful Dish

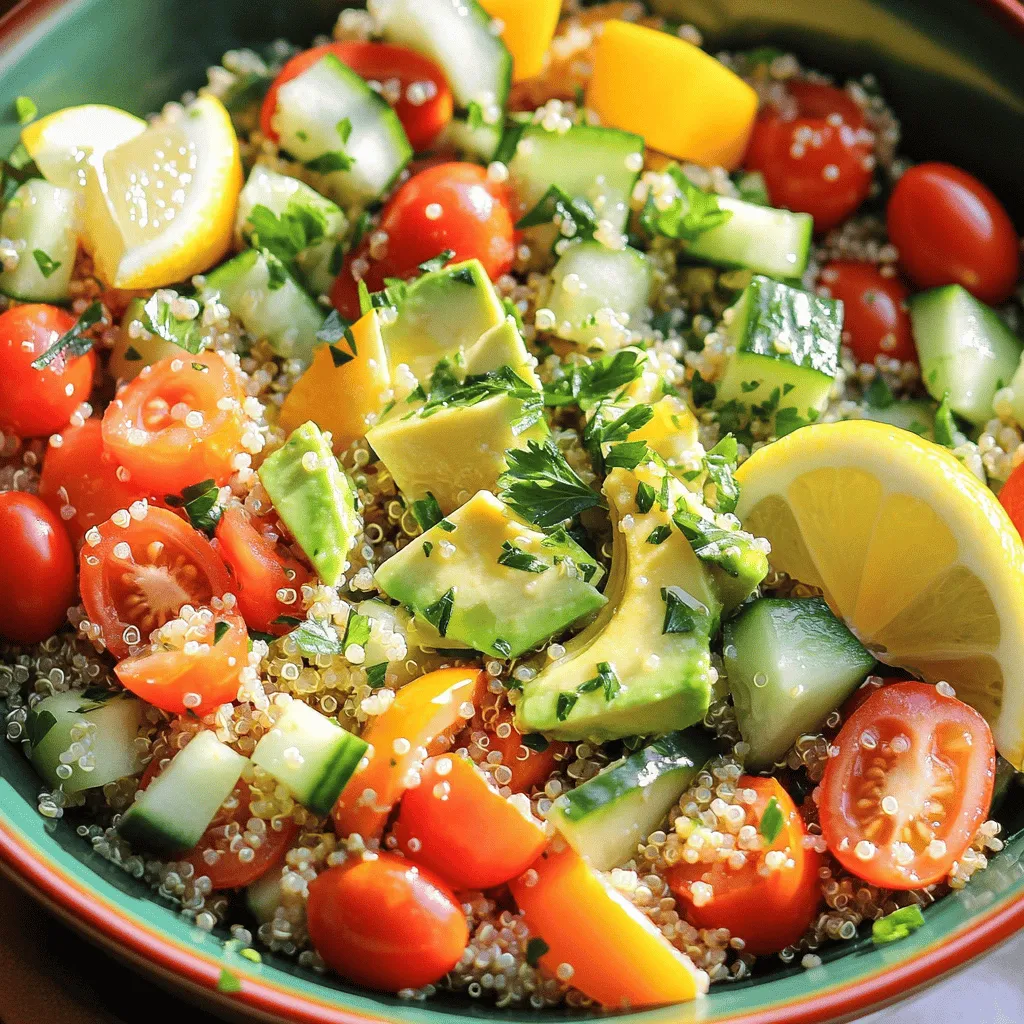
Looking for a fresh and tasty dish? My Lemon Herb Quinoa Salad is just what you need! This simple recipe

- 4 cups fresh spinach, washed and dried - 1 cup strawberries, hulled and sliced - 2 kiwi fruits, peeled and sliced - 1/2 cup feta cheese, crumbled - 1/4 cup walnuts, toasted and roughly chopped - 2 tablespoons honey - 2 tablespoons balsamic vinegar - 1 tablespoon olive oil - Salt and pepper to taste Fresh ingredients make this salad pop. Spinach serves as a crisp base. It packs nutrients and a mild flavor. Strawberries offer sweetness and vibrant color. Their bright red slices shine against the greens. Kiwi adds a tropical twist with its tangy taste. The green and yellow hues make the dish eye-catching. Feta cheese brings a salty creaminess. It melts in your mouth with every bite. Walnuts contribute a crunchy texture. Toasting them enhances their nutty flavor. Together, these ingredients create a delightful mix. For the dressing, honey adds sweetness. Balsamic vinegar provides a sharp contrast. Olive oil brings richness and helps blend the flavors. Salt and pepper round out the taste. This simple dressing makes the salad shine. You can find the complete recipe for this delicious salad in the Full Recipe section. Enjoy making this vibrant mix! - Place fresh spinach in a large salad bowl. - Arrange sliced strawberries and kiwi on top of spinach. To start, I love using fresh spinach as the base. It adds a nice crunch and is packed with nutrients. Next, I carefully layer the sliced strawberries and kiwi on top. The bright colors make the salad look inviting. The sweet strawberries and tangy kiwi create a wonderful mix. - Sprinkle crumbled feta cheese and toasted walnuts over salad. Next, I like to add some crumbled feta cheese. It gives a salty kick that contrasts well with the sweet fruits. Then, I sprinkle toasted walnuts on top. They add a nice crunch and earthy flavor. This combination of toppings makes every bite tasty and exciting. - Whisk together honey, balsamic vinegar, olive oil, salt, and pepper. - Drizzle dressing over salad and toss gently. Now, let’s make the dressing. In a small bowl, I whisk honey, balsamic vinegar, olive oil, salt, and pepper together. The honey gives a sweet touch, while the balsamic vinegar adds a tangy taste. Once mixed, I drizzle the dressing over the salad. Using salad tongs, I gently toss everything. This way, the dressing coats the salad without crushing the fruits. For the freshest taste, serve it right away, or chill it for a few minutes. Enjoy your Strawberry Kiwi Spinach Salad! For the complete details, refer to the Full Recipe. - Use fresh ingredients for maximum flavor. Fresh spinach, ripe strawberries, and juicy kiwi make a great base. - Chill the salad briefly before serving for enhanced taste. A quick 10-15 minutes in the fridge can do wonders. - Apply dressing just before serving to keep salad crisp. This helps the greens stay vibrant and crunchy. - Adjust seasoning to taste for personal preference. A little extra salt or pepper can elevate the flavors. - Serve in a large platter or individual bowls. This makes it easy for guests to help themselves. - Garnish with extra fruit slices for visual appeal. A few extra strawberries and kiwi can brighten the dish. These tips ensure your Strawberry Kiwi Spinach Salad is fresh, tasty, and visually stunning. For a detailed guide, check out the Full Recipe. {{image_2}} Nut substitutions can change the taste and texture of your salad. If you want a different crunch, substitute walnuts with pecans or almonds. Both nuts add a nice twist. If you need a nut-free option, simply omit the nuts. Your salad will still taste great! You can also play with the fruit in this salad. Add blueberries for a burst of color and flavor. Mandarin oranges can give a sweet touch. These fruits pair well with the existing strawberries and kiwi. You can also try different cheeses. Goat cheese offers a creamy texture that contrasts nicely with the fruits. Dressing alternatives can make your salad unique. Instead of balsamic dressing, a citrus vinaigrette can add brightness. The zing from citrus makes the salad refreshing. If you prefer a creamy style, try a yogurt-based dressing. It adds a smooth texture and works well with the fruits. For the full recipe, check out the [Full Recipe]. Store any leftover salad in an airtight container in the refrigerator. This keeps the salad fresh. Consume it within 1-2 days for the best quality. The flavors and crunch will still be there! To keep your salad crisp, keep the dressing separate until you are ready to serve. This step is key for a fresh bite. Also, use paper towels to absorb any excess moisture from the fruits. This helps keep everything crunchy and vibrant. Freezing is not recommended for this salad. The fresh ingredients change texture when frozen. You really want to enjoy this salad fresh. Trust me; it tastes best when all the flavors are bright and lively! You can make this salad vegan by replacing the feta cheese with vegan cheese. If you prefer, you can also skip the cheese altogether. This keeps the salad fresh and still very tasty. Yes, you can prep the ingredients ahead of time. Chop the fruits and wash the spinach. Just remember to wait to dress the salad until you are ready to serve it. This keeps everything crisp and bright. Yes, all the ingredients in this salad are naturally gluten-free. Just make sure any extra products, like dressings, are gluten-free too. This way, everyone can enjoy this healthy dish without worry. This salad combines fresh produce, cheese, and nuts for a delightful meal. You learned how to prepare, dress, and serve it right. Following our tips keeps your salad fresh and tasty. Remember, you can switch up the fruits, nuts, and dressing for variety. Store leftovers wisely to avoid sogginess. Enjoy experimenting with flavors while keeping it simple and healthy!

Strawberry Kiwi Spinach Salad Fresh and Flavorful Mix

Are you ready to elevate your salad game? This Strawberry Kiwi Spinach Salad is a fresh, colorful dish bursting with

Older posts
Newer posts
← Previous Page1 … Page24 Page25 Page26 … Page79 Next →

dsad

© 2025 pureeatsnow • Built with GeneratePress

Our Policies

  • Copyright Policy
  • Cookie Policy
  • GDPR Policy
  • Privacy Policy
  • Disclaimer
  • Terms Of Use

More Information

  • Home
  • About
  • Contact
  • Appetizers
  • Dessert
  • Dinner
  • Drinks
©2025, pureeatsnow About Back To Top