Skip to content
DisclaimerTerms Of UseGDPR PolicyCookie Policy

pureeatsnow

  • Home
  • Drinks
  • Appetizers
  • Dinner
  • Dessert
  • About
  • Contact
  • Privacy Policy
DisclaimerTerms Of UseGDPR PolicyCookie Policy

Rachel

- 1 cup rolled oats - 1 ½ cups almond milk (or any milk of choice) - 1 cup fresh strawberries, hulled and sliced - 1 tablespoon honey or maple syrup - ½ teaspoon vanilla extract - ½ cup Greek yogurt (or dairy-free yogurt) - 2 tablespoons chia seeds - A pinch of salt This simple list packs a punch of flavor. Rolled oats form the base. They soak up almond milk, making them creamy and filling. Fresh strawberries add sweetness and a pop of color. Honey or maple syrup brings in a touch of natural sweetness. Vanilla extract enhances the overall taste, while Greek yogurt adds protein and richness. Chia seeds help thicken the mix and boost nutrition. A pinch of salt balances the sweetness. - Sliced almonds - Coconut flakes - Extra strawberries These toppings are fun and add texture. Sliced almonds give a nice crunch, while coconut flakes add a tropical twist. Extra strawberries can brighten the dish even more. Feel free to mix and match based on your taste or what you have on hand. For the full recipe, check out the Strawberry Dream Overnight Oats. It's a great way to start your day. 1. Start by taking a medium-sized bowl. Combine the rolled oats, almond milk, chia seeds, honey, vanilla extract, and a pinch of salt. Mix it well until everything blends together. 2. Next, add in the sliced strawberries. Gently fold them into the oat mix. Make sure the strawberries are evenly spread. 3. Now, divide the mixture into two jars or any containers with lids. This makes it easy to grab in the morning. 1. Once you have your jars ready, seal them tightly. This keeps the oats fresh and tasty. 2. Place the jars in the fridge overnight. You need at least four hours for the oats to soak up the liquid and soften. Overnight is best for great flavor! 1. In the morning, take a jar out and stir the oats well. This mixes all the flavors together. 2. You can add fun toppings! Try sliced almonds, coconut flakes, or more strawberries. Each adds a nice crunch and extra flavor. Enjoy your delicious breakfast! To adjust the sweetness of your overnight oats, you can use honey or maple syrup. Start with one tablespoon, and taste it. If you want it sweeter, add a bit more. For other sweeteners, consider agave nectar or stevia. These options can help suit your taste. Adding chia seeds gives your oats a creamy texture. They soak up the liquid and expand, making the dish rich. Make sure to use rolled oats, too. Rolled oats absorb liquid well and provide a nice chew. Instant oats can get mushy, so stick with rolled for the best results. The best soaking time for overnight oats is at least four hours, but overnight is ideal. This allows the oats to soften fully. When prepping, make sure to portion them into jars. This makes breakfast easy and quick. You can grab a jar and go! {{image_2}} You can switch up the fruit in your overnight oats. Berries like blueberries and raspberries add a different taste. Each berry brings its own flavor and color. You can use a mix of these fruits for extra fun! Seasonal fruits, like peaches in summer or apples in fall, can also work well. Just slice them and add them to the mix. This way, you can enjoy fresh flavors year-round. If you want to make your oats dairy-free, it’s simple! Swap Greek yogurt for dairy-free yogurt made from coconut or almond. Use almond milk or any other plant-based milk instead of regular milk. This keeps your dish creamy and tasty. For a vegan version, use maple syrup instead of honey. These swaps let everyone enjoy the meal. Adding spices can boost the flavor of your oats. A sprinkle of cinnamon or nutmeg can warm up the taste. You can also try flavored extracts like almond or coconut. Just a few drops can change the whole dish. Feel free to get creative! Mixing in these extras makes your oats fun and unique. You can keep your strawberries and cream overnight oats in the fridge for about 3 to 5 days. After that, the oats may start to lose their freshness. Always check for signs of spoilage. If you see any mold or a strange smell, it’s best to toss them out. Use glass jars or BPA-free plastic containers for the best storage. These containers should have airtight seals to keep your oats fresh. An airtight seal prevents air from getting in, which helps avoid spoilage. Yes, you can freeze overnight oats! Just make sure to use freezer-safe containers. When you’re ready to eat, move them to the fridge to thaw overnight. To reheat, microwave them for about a minute, adding a splash of milk to restore creaminess. Enjoy your oats warm or cold! For the full recipe, check out the Strawberry Dream Overnight Oats. To make Strawberries and Cream Overnight Oats, follow these simple steps: 1. In a bowl, mix together rolled oats, almond milk, chia seeds, honey, vanilla extract, and a pinch of salt. Stir until smooth. 2. Add sliced strawberries to the bowl. Gently fold them in to keep their shape. 3. Divide the mixture into two jars or containers. 4. Top each jar with Greek yogurt for creaminess. 5. Seal the jars and place them in the fridge overnight, or for at least four hours. 6. In the morning, stir the oats and check if you'd like more sweetness. 7. Add your favorite toppings like sliced almonds or extra strawberries before enjoying. This method gives you creamy, flavorful oats that are perfect for breakfast. Yes, you can prepare these oats last minute! If you need to make them quickly, just follow these tips: - Use quick oats instead of rolled oats. They soak up liquid faster. - Allow at least 30 minutes in the fridge instead of overnight. - Use warm almond milk to help the oats soften quicker. With these ideas, you can enjoy your oats even if you're short on time. Strawberries and Cream Overnight Oats are healthy and delicious. Here’s a quick look at the nutritional value: - Calories: About 300 per serving. - Protein: Around 10 grams, thanks to Greek yogurt. - Carbs: Roughly 50 grams, mainly from oats and fruit. - Fats: About 5-7 grams, depending on your choice of milk. These oats provide fiber, vitamins, and antioxidants from strawberries. They keep you full and energized for the day. For the complete preparation steps and more details, check out the Strawberry Dream Overnight Oats recipe. You can also find tips for variations and extra resources for making this dish your own. Strawberries and cream overnight oats are easy to make and delicious. You need just a few simple ingredients. Prepare the oats, refrigerate overnight, and enjoy. You can add fruits or toppings for more variety. Adjust sweetness and texture to your liking. This dish is perfect for meal prep. Store it safely for the week or freeze for later. Try different fruits or flavors to keep it fun. Enjoy your healthy breakfast choice knowing it’s nutritious and satisfying. This recipe makes mornings smoother and more delicious for you.

Strawberries and Cream Overnight Oats Easy Recipe

Are you craving a delicious and easy breakfast? Strawberries and Cream Overnight Oats is the perfect answer! This simple recipe
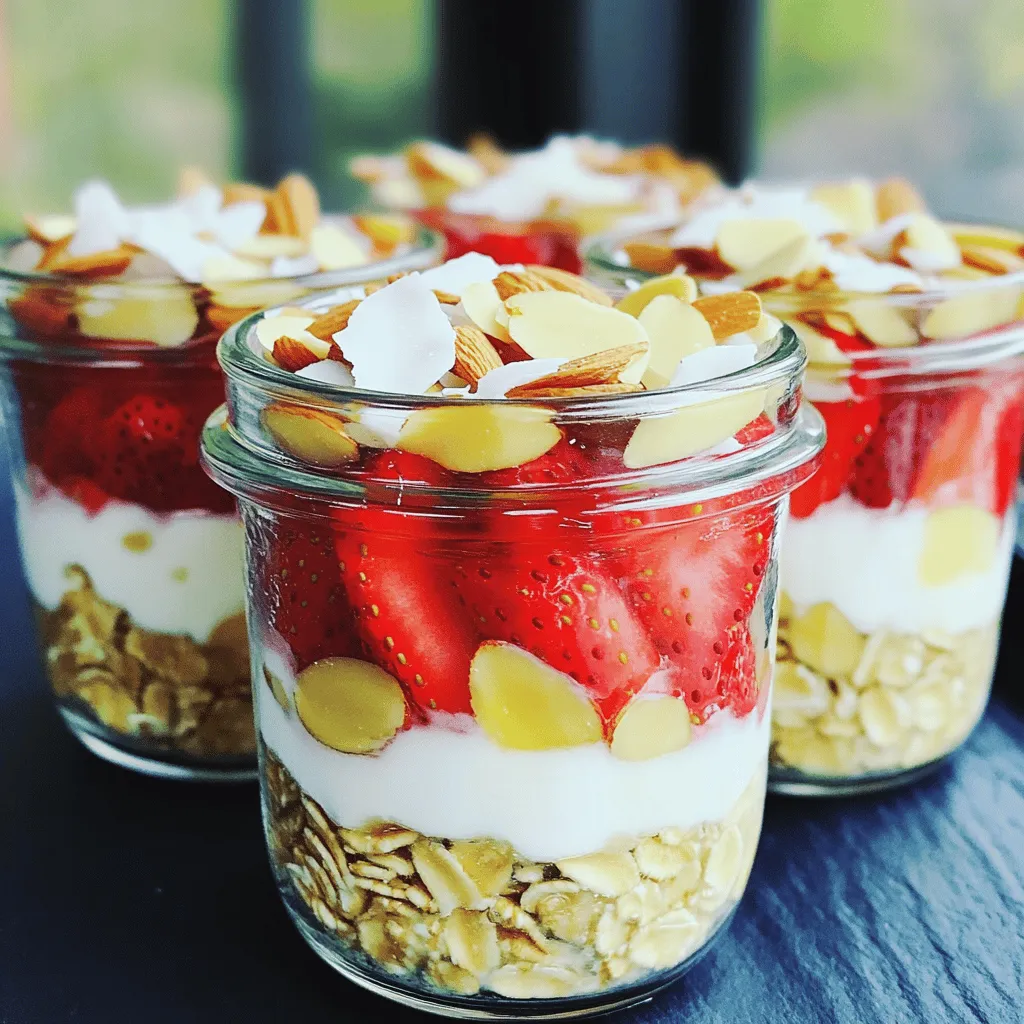
To make the perfect Strawberry Lemon Yogurt Parfaits, gather the following ingredients: - 2 cups Greek yogurt - 1 cup fresh strawberries, hulled and sliced - 1/4 cup honey (adjust sweetness to taste) - 2 tablespoons fresh lemon juice - 1 teaspoon lemon zest - 1 cup granola (store-bought or homemade) - Fresh mint leaves for garnish Each ingredient plays a special role. Greek yogurt gives a creamy base and adds protein. Fresh strawberries add sweetness and color. Honey brings a touch of natural sweetness. Lemon juice and zest brighten the flavor. Granola adds crunch and texture. Finally, mint leaves make your parfaits look and smell fresh. You can easily adjust the sweetness with honey. If you like it less sweet, use less honey. For more zing, add more lemon juice. This recipe is flexible and fun. Enjoy choosing the perfect balance for your taste! To start, grab a mixing bowl. Add 2 cups of Greek yogurt to the bowl. Next, pour in 1/4 cup of honey. This will sweeten your yogurt. Then, squeeze in 2 tablespoons of fresh lemon juice. This adds a nice zing! Finally, add 1 teaspoon of lemon zest for even more flavor. Mix well until everything is creamy and smooth. Taste it, and adjust the sweetness if you want. Now, let’s build our parfaits! Take clear glasses or dessert cups. Start by spooning a layer of the yogurt mixture into the bottom. Make it about 1/3 full. Next, layer 1 cup of sliced strawberries on top of the yogurt. Spread them out evenly. After that, sprinkle a layer of granola over the strawberries. This adds a crunchy texture. Repeat these layers until the glasses are full. End with a layer of yogurt on top. For the final touch, slice a few strawberries and place them on top. Add a fresh mint leaf for a pop of color. This makes your parfaits look pretty and inviting. Enjoy your tasty creation! If you want to see the full process, check the Full Recipe. To make the yogurt mixture smooth, use Greek yogurt. It has a thick texture that holds well. Mix the yogurt with honey, lemon juice, and lemon zest. Stir until it is creamy and there are no lumps. Taste it and adjust the honey for sweetness. If you want a tart flavor, use less honey. For a beautiful presentation, use clear glasses or dessert cups. Start with a layer of yogurt, then add strawberries. Follow with granola for a nice crunch. Repeat the layers until you fill the glass. Finish with yogurt on top and garnish with mint leaves. This adds color and a fresh touch to your parfaits. If you have leftovers, store them in the fridge. Use an airtight container to keep them fresh. The parfaits taste best within two days. If you want to keep layers separate, store yogurt, fruit, and granola apart. This keeps the granola crunchy and prevents sogginess. For the full recipe, check the previous section. {{image_2}} You can switch up the fruit in this parfait. Try blueberries, raspberries, or peaches. Each fruit brings its own taste. It adds a fun twist to your dish. Mix and match to find your favorite combo. You can also use frozen fruits. Just let them thaw before mixing in. Greek yogurt is thick and creamy, but you can try others. Plain yogurt works well if you want a lighter texture. For a sweeter taste, use vanilla yogurt. Dairy-free yogurts made from almond or coconut are great too. They add a unique flavor while keeping it creamy. Granola adds crunch, but you have choices. Try crushed nuts for a nutty twist. Seeds like pumpkin or sunflower also work well. You can use cereal for a quick option. Just make sure it’s crunchy. Each choice brings a new texture and flavor to your parfait. For the complete recipe, check the [Full Recipe]. A serving of Strawberry Lemon Yogurt Parfait is both tasty and healthy. Each serving has about: - Calories: 250 - Protein: 12 grams - Carbohydrates: 35 grams - Fat: 8 grams - Sugar: 15 grams This parfait is a great snack or breakfast choice. The Greek yogurt packs protein, while the fruit and honey provide natural sweetness. Each ingredient in the parfait offers unique health perks: - Greek Yogurt: Rich in protein and good for gut health. It supports digestion and keeps you feeling full. - Strawberries: High in vitamin C and antioxidants. They help fight free radicals and boost your immune system. - Honey: A natural sweetener with antibacterial properties. It can soothe a sore throat and provide quick energy. - Lemon Juice and Zest: Great for vitamin C. They can aid digestion and add a refreshing taste. - Granola: Provides fiber and energy. It keeps you satisfied and is great for heart health. You can easily modify this recipe to suit different diets: - Dairy-Free: Use coconut or almond yogurt as a substitute for Greek yogurt. - Sugar-Free: Replace honey with stevia or another sugar alternative. - Gluten-Free: Ensure your granola is gluten-free. You can also use oats instead. - Low-Calorie: Opt for low-fat yogurt and reduce the amount of granola. These adjustments let everyone enjoy this delightful treat! For the complete recipe, check the Full Recipe section. Yes, you can make these parfaits ahead of time. Prepare the yogurt mixture and layer it in glasses. Store them in the fridge. I recommend enjoying them within 24 hours for the best taste. These parfaits can last up to three days in the fridge. However, the granola may get soggy after a day. For the best texture, add granola just before serving. If you want to avoid honey, you can use maple syrup or agave nectar. Both will give a nice sweetness to your parfait. You can also use coconut sugar, but it may change the color a bit. For a sugar-free option, try a sugar substitute like stevia. You can find the full recipe for this delightful treat above! Making Strawberry Lemon Yogurt Parfaits is easy and fun. You will love the blend of flavors. This recipe is simple, and you can make it in just 15 minutes. - 2 cups Greek yogurt - 1 cup fresh strawberries, hulled and sliced - 1/4 cup honey (adjust sweetness to taste) - 2 tablespoons fresh lemon juice - 1 teaspoon lemon zest - 1 cup granola (store-bought or homemade) - Fresh mint leaves for garnish 1. Prepare the Yogurt Mixture: In a bowl, mix Greek yogurt, honey, lemon juice, and lemon zest. Stir well until creamy. Taste and adjust the sweetness if you want. 2. Layer the Parfaits: Grab clear glasses or dessert cups. Start with a layer of the yogurt mix at the bottom. 3. Add Strawberries: Place a layer of sliced strawberries on top of the yogurt. Spread them evenly for a nice look. 4. Granola Layer: Sprinkle granola over the strawberries. This gives a nice crunch. 5. Repeat Layers: Keep adding layers of yogurt, strawberries, and granola. Finish with a layer of yogurt on top. 6. Garnish: Top with a few sliced strawberries and a mint leaf. This adds color and freshness. Follow this [Full Recipe] to enjoy a tasty treat. It’s perfect for breakfast or dessert! This blog post explored how to make delicious Strawberry Lemon Yogurt Parfaits. We covered the key ingredients like Greek yogurt and fresh strawberries. Then, I walked you through the steps to prepare, layer, and garnish your parfaits. I shared tips for perfecting your yogurt mix and ideas for serving. You learned about variations to try and the nutritional benefits of each ingredient. These parfaits are easy to make and perfect for any meal. Enjoy your tasty creation!

Strawberry Lemon Yogurt Parfaits Simple Delight Recipe

Looking for a quick, tasty treat? You’ll love these Strawberry Lemon Yogurt Parfaits! This simple delight combines creamy Greek yogurt

- 1 cup cooked quinoa - 1 red bell pepper, diced - 1 small zucchini, diced - 1 cup cherry tomatoes, halved - 1 avocado, sliced - 1 cup leafy greens (spinach or romaine) - 1 cup corn kernels (fresh, frozen, or canned) - Fresh cilantro (for garnish) - Lime wedges (for serving) - 1 can black beans, rinsed and drained - 1 teaspoon ground cumin - 1 teaspoon paprika - 1 tablespoon olive oil - Salt and pepper to taste Each serving of this veggie burrito bowl has about: - Calories: 350 - Protein: 12g - Carbohydrates: 50g - Fat: 14g - Fiber: 10g Start by gathering all your fresh veggies. Wash them well. Dice the red bell pepper and zucchini into small pieces. This helps them cook evenly. Halve the cherry tomatoes. Set all these aside. They will add color and flavor to your bowl. Heat a large skillet over medium heat. Pour in the olive oil. Once the oil is hot, add the diced bell pepper and zucchini. Sauté them for about 5 minutes until they are soft. Then, add the corn and black beans. Sprinkle in the ground cumin, paprika, salt, and pepper. Stir well to mix everything. Cook this mixture for another 3-4 minutes. Make sure it is heated through. Now, it’s time to build your burrito bowls! Start with a layer of cooked quinoa at the bottom of each serving bowl. Next, add the sautéed veggie and bean mixture on top of the quinoa. Then, pile on some leafy greens and the halved cherry tomatoes. Finish with slices of avocado for creaminess. Don’t forget to garnish with fresh cilantro. Serve with lime wedges on the side for a zesty kick. For the complete recipe, check out the Full Recipe. You can make your veggie burrito bowl unique. Swap quinoa for brown rice or cauliflower rice. Use your favorite beans like pinto or kidney beans. Add different veggies like carrots or broccoli. For a spicy kick, toss in jalapeños. You can even add fruits like mango or pineapple for sweetness. Mix and match until you find your perfect flavor! For the best taste, sauté your vegetables. This method brings out their natural sweetness. Use medium heat so they cook evenly. Stir often to prevent burning. Adding spices early helps infuse flavors. Don't forget to drizzle olive oil when you cook; it makes everything richer. Let the mixture sit for a minute to enhance the taste before serving. Toppings can take your bowl to the next level. Try crunchy tortilla strips or crushed tortilla chips for a crisp bite. Fresh herbs like cilantro or parsley add brightness. A dollop of sour cream or Greek yogurt can add creaminess. For extra zest, squeeze lime juice over the top. You can even sprinkle cheese for a touch of richness. Feel free to experiment with toppings and find what you love! For the complete recipe, check out the Full Recipe section. {{image_2}} You can easily make this dish vegan. All the ingredients in the Easy Veggie Burrito Bowls are plant-based. Use firm tofu in place of beans for extra protein. You can also add more veggies like mushrooms or carrots for variety. This recipe is already gluten-free! Quinoa is a great base that fits this need. If you want more options, try using rice or cauliflower rice instead. Both work well and keep your meal gluten-free. Love heat? Add diced jalapeños or serrano peppers to the veggie mix. You can also use spicy salsa or hot sauce as a topping. For an extra kick, sprinkle in some cayenne pepper while cooking. This will give your burrito bowl a warm, zesty flavor. To keep your veggie burrito bowls fresh, store them in airtight containers. Divide the bowls into single servings. This makes it easy to grab one when you need a quick meal. Keep the toppings, like avocado and cilantro, separate to prevent them from getting mushy. Refrigerate the containers right after the meal to maintain freshness. When you’re ready to enjoy your leftovers, reheat them in the microwave. Place the bowl in for about 1-2 minutes. Stir halfway through to ensure even heating. If you prefer, you can also heat them on the stove. Just add a splash of water and cover the pan. This keeps everything moist and tasty. The cooked quinoa and veggie mixture will last 3-4 days in the fridge. The avocado should be eaten within a day or two for the best flavor and texture. If you want to keep ingredients longer, freeze the quinoa and beans. They can last up to 3 months in the freezer. Just remember to label your containers with the date. Yes, you can use other beans in this recipe. Pinto beans, kidney beans, or chickpeas work well. Each type adds a unique taste and texture. Just remember to rinse and drain canned beans to reduce sodium. You can prep this recipe ahead of time easily. Cook the quinoa and veggies first. Store them in separate containers in the fridge. When you're ready to eat, just combine everything in a bowl. This makes meal time faster and keeps the flavors fresh. Pair your veggie burrito bowl with simple sides. Some great options are tortilla chips with salsa or a fresh fruit salad. You can also serve it with a side of guacamole or a light soup. Each side adds a nice touch to your meal. For the full recipe, check out the Easy Veggie Burrito Bowls instructions above! This post covered all you need to make delicious burrito bowls. We started with fresh ingredients and pantry staples, plus nutrition details. Then, I showed you how to prep veggies, cook the base, and assemble. Customization tips and cooking techniques helped you find your perfect flavor. We also explored vegan options and storage tips to keep meals fresh. You can enjoy these bowls anytime, making them your own. I hope you’re ready to cook up amazing burrito bowls!

Easy Veggie Burrito Bowls Quick and Tasty Meal

Looking for a quick and tasty meal? You’ve come to the right place! My Easy Veggie Burrito Bowls are perfect

To make Chocolate Peanut Butter Banana Bites, gather these simple ingredients: - Ripe bananas - Creamy peanut butter - Dark chocolate chips - Coconut oil - Sea salt - Optional toppings Each ingredient plays a role in the flavor and texture of the bites. Ripe bananas are sweet and soft, making them perfect for this snack. Creamy peanut butter adds richness and protein. Dark chocolate chips give a sweet and slightly bitter taste that pairs well with the other flavors. Coconut oil helps to smooth the chocolate. A sprinkle of sea salt boosts the overall taste. You can get creative with optional toppings, like chopped nuts or crushed graham crackers, to add extra crunch. For the full recipe, check the details above. Start by peeling the ripe bananas. I like to use bananas that are yellow with a few brown spots. Next, slice them into 1/2-inch thick rounds. The slices should be thick enough to hold the toppings but not too thick to freeze well. Set these banana slices aside while you prepare the chocolate. Now, grab a microwave-safe bowl and add the dark chocolate chips and coconut oil. The coconut oil helps the chocolate melt smoothly. Heat the bowl in the microwave for 30 seconds. After this, take it out and stir. Repeat this process until the chocolate is melted and smooth. It usually takes about 1 to 2 minutes total. Once the chocolate is ready, take a fork. Dip each banana slice into the melted chocolate. Make sure to coat each slice fully. Let any excess chocolate drip off before placing them on a lined baking sheet. After all the slices are coated, add a dollop of creamy peanut butter on top of each one. If you want a crunch, sprinkle chopped nuts or crushed graham crackers on top. After assembling, sprinkle a tiny pinch of sea salt on each bite. This adds a nice flavor contrast. Place the baking sheet in the freezer for about 30 minutes. This helps the chocolate set and makes the bites firm. After they are frozen, you can serve them right away. If you want to save some for later, store them in an airtight container in the freezer. Enjoy this easy snack treat! For the full recipe, check out the detailed instructions above. To make the best Chocolate Peanut Butter Banana Bites, pick ripe bananas. Look for bright yellow skin with small brown spots. These spots show they are sweet and ready. Avoid bananas that are mostly green. They will not taste as good. Ripe bananas are soft and easy to slice. They also blend well with chocolate and peanut butter. Melting chocolate is simple, but it needs care. Use a microwave or a double boiler. If using a microwave, heat in 30-second bursts. Stir after each burst. This helps the chocolate melt evenly. If it gets too hot, it will burn. When melting with a double boiler, fill the bottom pot with water. Heat it on low and place chocolate in the top pot. Stir until smooth. Adding coconut oil helps the chocolate stay shiny and pourable. Toppings can make your bites even better. You can add chopped nuts for crunch. Almonds, walnuts, or peanuts work well. Crushed graham crackers also add a nice texture. For a sweet touch, try adding shredded coconut. A tiny sprinkle of sea salt on top balances the sweetness. This makes each bite pop with flavor. You can get creative with your toppings. Mix and match to find your favorite combo. {{image_2}} You can change up the nut butter in this recipe. Almond butter works well and adds a nice twist. Cashew butter is also creamy and tasty. If you like sunflower seeds, try sunflower seed butter. Each will give your bites a different flavor. The type of chocolate can change the taste too. You can use milk chocolate for a sweeter treat. If you like dark chocolate, stick with that for a rich taste. White chocolate is another option if you want something creamy and sweet. Each chocolate type will give a unique flavor to your bites. There are many ways to boost the flavor of your bites. You can add a sprinkle of cinnamon for warmth. A dash of vanilla extract in the chocolate can add depth. Try using crushed pretzels for a salty crunch. You can also mix in some dried fruit for a sweet touch. These simple swaps can make your bites exciting and fun! To keep your chocolate peanut butter banana bites fresh, store them in an airtight container. You can also use freezer bags. Just make sure to remove as much air as possible. Layer the bites with parchment paper to prevent sticking. This way, you can grab one or two easily later. These tasty treats can last in the freezer for up to three months. After that, they may lose their nice texture or flavor. If you plan to eat them sooner, they are best enjoyed within a month. Write the date on the container to track how long they’ve been stored. When you want to enjoy your banana bites, take them out of the freezer. Let them sit at room temperature for about 5 to 10 minutes. This helps the chocolate soften a bit. You can also heat them in the microwave for a few seconds if you prefer a warm treat. They taste great chilled or at room temperature! Yes, you can use frozen bananas. Frozen bananas work great in this recipe. They are soft and sweet. Just make sure to let them thaw a bit. This way, they will be easier to slice and dip in chocolate. You can make these bites healthier by making a few simple swaps. Use dark chocolate with a higher cocoa content. This gives more antioxidants. You can also reduce the peanut butter amount or use natural nut butter. Adding nuts or seeds boosts the fiber and protein too. These bites are packed with nutrients. Bananas provide potassium and fiber. Peanut butter gives healthy fats and protein. Dark chocolate adds antioxidants, which are good for your heart. Together, these ingredients make a tasty treat that can fuel your day. Yes, you can make these ahead of time. They freeze well for up to a month. Just store them in an airtight container. When you're ready to enjoy, take them out and let them sit for a few minutes. Enjoy them cold or at room temperature! For the full recipe, check out the Chocolate Peanut Butter Banana Bites! You learned how to make tasty bites with simple ingredients. Ripe bananas, peanut butter, and dark chocolate create a perfect treat. We discussed tips for choosing the best ingredients and ways to melt chocolate smoothly. You can also customize these bites with different nut butters or toppings. Remember to store them well for freshness. Enjoy making and sharing these delicious snacks!

Chocolate Peanut Butter Banana Bites Easy Snack Treat

Looking for a tasty snack that’s quick and easy? You’ve found it! Chocolate Peanut Butter Banana Bites are simple to

- 4 medium sweet potatoes - 1 can (15 oz) chickpeas, drained and rinsed - 1/2 cup buffalo sauce (adjust to preference) - 1 tablespoon olive oil - 1 teaspoon garlic powder - 1 teaspoon onion powder - Salt and pepper to taste - 1/2 cup Greek yogurt or dairy-free yogurt (for topping) - 1 green onion, chopped (for garnish) - Fresh cilantro (optional, for garnish) When I make Buffalo Chickpea Stuffed Sweet Potatoes, I love gathering the best ingredients. The sweet potatoes bring a natural sweetness. The chickpeas add protein and texture. I always choose a good buffalo sauce, as it gives that spicy kick. The olive oil keeps everything moist and flavorful. For seasoning, garlic powder and onion powder really enhance the taste. Salt and pepper are must-haves, too. I like to add Greek yogurt on top for creaminess. If you want fresh herbs, chopped green onion and cilantro make great garnishes. This recipe is simple, and the ingredients are easy to find. You can adjust the buffalo sauce to your heat level. If you want to learn how to make this dish, check out the Full Recipe. 1. Preheat your oven to 400°F (200°C). This step is key for great sweet potatoes. 2. Wash the sweet potatoes well. Poke several holes in each with a fork. 3. Place them on a baking sheet lined with parchment paper. This keeps them from sticking. 4. Bake sweet potatoes for about 45-50 minutes. They should feel soft when you poke them with a fork. 1. While the sweet potatoes bake, prepare the chickpea filling. In a medium bowl, mash the chickpeas slightly with a fork. 2. Leave some whole for texture. This adds a nice bite to the filling. 3. Add the buffalo sauce, olive oil, garlic powder, onion powder, salt, and pepper. Mix well until combined. 1. Once sweet potatoes are cooked, remove them from the oven. Let them cool slightly before you handle them. 2. Cut a slit down the center of each potato. This creates an opening for the filling. 3. Scoop out a bit of sweet potato flesh if needed. Mix it into the buffalo chickpea mixture. 4. Stuff each sweet potato with the filling. Press it down gently to pack it in. 5. Return stuffed sweet potatoes to the oven. Bake for another 10 minutes to heat everything through. This recipe makes a fun and tasty meal. For more details, check the Full Recipe. To achieve the perfect roast on sweet potatoes, follow these steps: - Preheat your oven to 400°F (200°C). - Wash the sweet potatoes and poke holes with a fork. This helps steam escape. - Bake for 45-50 minutes until tender. You can test this by piercing them with a fork. If you want to adjust buffalo sauce levels, start with half the amount. Mix in more as needed to reach your preferred spice. Remember, you can always add more, but it’s hard to take it out! When it comes to toppings, Greek yogurt is a must. It adds creaminess and balances the heat. Chopped green onions add a fresh crunch. If you like, sprinkle some cilantro for extra flavor. For a complete meal, pair these stuffed sweet potatoes with a simple salad. A light green salad with lemon vinaigrette works great. You can also serve them with a side of roasted vegetables for added nutrition. For more details, check out the Full Recipe. {{image_2}} You can change up the sauce to keep it fun. Try ranch dressing for a creamy twist. Alternatively, use sriracha for a spicy kick. Each sauce brings a unique flavor. Adjust the spice levels to suit your taste. A milder sauce works well for kids. A bolder sauce can spice up your meal. To make these stuffed sweet potatoes even better, add veggies or proteins. Spinach, peppers, or corn can boost flavor and nutrition. If you want extra protein, consider black beans or quinoa. These options fit well into vegetarian and vegan diets. Feel free to mix and match to find your favorite combination. Using different fillings keeps the dish fresh and exciting. Try these ideas to create your perfect meal! For more details on how to make this dish, check out the Full Recipe. To keep your Buffalo Chickpea Stuffed Sweet Potatoes fresh, store them properly. First, let the stuffed sweet potatoes cool to room temperature. Then, wrap each potato in plastic wrap or foil. Place them in an airtight container to avoid moisture loss. This helps maintain their flavor and texture. For best results, store them in the fridge. They will last up to four days. You can also freeze the stuffed potatoes. Just make sure to use freezer-safe containers. They can last for up to three months in the freezer. When you're ready to enjoy your leftovers, reheating is key. For the best results, use the oven. Preheat your oven to 350°F (175°C). Place the stuffed sweet potatoes on a baking sheet. Cover them with foil to keep them from drying out. Heat for about 15-20 minutes, or until warm. You can also use the microwave for a quicker option. Place a stuffed sweet potato on a microwave-safe plate. Heat it for 1-2 minutes. Check if it's warm enough. If not, heat in 30-second intervals until hot. To keep the taste and texture, avoid boiling them. Microwaving or baking works best. Enjoy your delicious stuffed sweet potatoes! Can I prep the sweet potatoes in advance? Yes, you can prep the sweet potatoes early. Bake them and store them in the fridge. This makes it quick to stuff and bake them later. Just ensure they cool before you store them. What can I substitute for chickpeas? You can use black beans or lentils as a great alternative. Both offer protein and a nice texture. If you prefer a different flavor, try using shredded chicken or tofu. How do I make it spicier or milder? To make it spicier, add more buffalo sauce or a pinch of cayenne pepper. For a milder taste, reduce the sauce or use a mild version. You can also add more yogurt to balance the heat. What’s the caloric content per serving? Each serving has about 350 to 400 calories. This depends on the amount of buffalo sauce and yogurt used. Sweet potatoes and chickpeas are both healthy and filling. Are there any health benefits? Yes, sweet potatoes are high in vitamins A and C. They also have fiber, which is great for digestion. Chickpeas add protein and help keep you full longer. This dish is tasty and nutritious! This recipe shows how to make stuffed sweet potatoes with chickpeas and buffalo sauce. You learned to prepare, stuff, and bake them perfectly. With tips on storage and variations, you can customize your meal. Try different sauces or add extra veggies for fun twists. Serve them hot and enjoy! Cooking can be simple, tasty, and healthy.

Buffalo Chickpea Stuffed Sweet Potatoes Delight

Are you ready to spice up your dinner? My Buffalo Chickpea Stuffed Sweet Potatoes are both tasty and packed with

For this Zesty Lemon Greek Yogurt Dip, you will need: - 1 cup plain Greek yogurt - 2 tablespoons fresh lemon juice - Zest of 1 lemon - 1 clove garlic, minced - 1 tablespoon fresh dill, chopped - 1 tablespoon olive oil These ingredients make a creamy base with a bright, zesty flavor. The Greek yogurt gives a smooth texture, while the lemon juice and zest add freshness. Garlic adds depth, and dill brings an herby note. Olive oil helps blend everything nicely. You can also add some optional ingredients for extra flavor: - 1/4 teaspoon cayenne pepper (optional for spice) - Salt and pepper, to taste Cayenne pepper adds a little heat if you like spice. Salt and pepper help to balance the flavors. Adjust these to your taste for the best experience. This dip pairs well with: - Vegetable sticks (carrots, cucumbers, bell peppers) - Chips - Crackers These options make for a fun and healthy snack. The crunchy veggies contrast nicely with the creamy dip. You can serve it at parties or enjoy it as a quick snack at home. Check out the Full Recipe for more tips on preparation! To start, grab a medium-sized mixing bowl. First, combine 1 cup of plain Greek yogurt, 2 tablespoons of fresh lemon juice, and the zest of 1 lemon. Stir well until everything blends nicely. Next, add 1 clove of minced garlic, 1 tablespoon of fresh dill, and 1 tablespoon of olive oil. Mix these ingredients until they are fully incorporated. This step lays the base for your dip's fresh flavor. Now, it's time to season. Sprinkle in salt and pepper to taste. This step is crucial as it enhances the dip's flavor. If you want a little heat, add 1/4 teaspoon of cayenne pepper. Mix again to blend the spice in well. This optional ingredient can give your dip a delightful kick. Cover the bowl with plastic wrap and refrigerate for at least 30 minutes. This chilling process allows the flavors to meld together, making your dip even tastier. After chilling, taste the dip. Adjust the seasoning if needed. Finally, serve it cold with an assortment of vegetable sticks like carrots, cucumbers, or bell peppers. For the full recipe, check out the previous section. Enjoy your zesty lemon Greek yogurt dip! To make your dip creamier, simply add more Greek yogurt. You can also mix in sour cream. Both options will enhance the texture and taste. Creamy dips are perfect for scooping with veggies. Fresh herbs make a big difference in flavor. Use fresh dill and lemon juice. Fresh ingredients brighten the dip and add zest. You can even try different herbs. Parsley or basil can add new tastes. Serve your dip in fun bowls to impress guests. You can garnish with extra dill or lemon zest. Colorful veggie sticks make a great display. Arrange them around the dip for a vibrant look. Enjoy your Zesty Lemon Greek Yogurt Dip with style! {{image_2}} You can change the taste of the Zesty Lemon Greek Yogurt Dip easily. Try adding fresh herbs like parsley or basil. These herbs bring a fresh twist to the dip. You can also mix in roasted red peppers or olives. These add color and a nice bite. Each option makes the dip even more fun. This dip is not just for veggies! You can use it in many ways. Turn it into a healthy pasta salad dressing. Just mix it with some cooked pasta and fresh veggies. It makes a light and tasty meal. You can also spread it on sandwiches. It adds creaminess and flavor, making your lunch special. If you want a dairy-free version, use coconut yogurt instead of Greek yogurt. It gives a nice, creamy texture and a hint of sweetness. For those who need gluten-free options, pair the dip with gluten-free crackers or rice cakes. These make great dippers, so everyone can enjoy the flavor. Check out the Full Recipe to get started on making your own Zesty Lemon Greek Yogurt Dip! To keep your Zesty Lemon Greek Yogurt Dip fresh, use airtight containers. Place the dip in the container and seal it tightly. This method helps keep out air and moisture, ensuring your dip stays tasty. When stored correctly, this dip lasts up to one week in the fridge. Check for any signs of spoilage, like changes in smell or color, before using. If it looks or smells off, it's best to toss it. I do not recommend freezing this dip. Freezing can change the texture, making it watery when thawed. Enjoy it fresh for the best taste and texture. For more delicious ideas, check out the Full Recipe for Zesty Lemon Greek Yogurt Dip. You can keep the Zesty Lemon Greek Yogurt Dip in the fridge for up to one week. Store it in an airtight container. This keeps it fresh and tasty. If you see any signs of spoilage, toss it out. It’s best to enjoy it within the first few days for optimal flavor. Yes, you can use non-fat Greek yogurt. It will make the dip lighter. However, it may lack the creamy texture of full-fat yogurt. The flavor might be less rich, too. If you want a creamier dip, I suggest sticking with full-fat Greek yogurt. This dip pairs well with many options. I love serving it with crunchy vegetable sticks like carrots and cucumbers. You can also try it with chips or crackers. For a fun twist, use pita bread or even spread it on sandwiches. The possibilities are endless! Yes, this dip is gluten-free! All the ingredients are safe for those with gluten restrictions. Pair it with gluten-free snacks to keep it safe for everyone. Always check labels to ensure your dippers are gluten-free. Enjoy the fresh flavors without worry! This blog post covered how to make a zesty lemon Greek yogurt dip. We looked at the main and optional ingredients, like Greek yogurt, lemon juice, and garlic. The step-by-step instructions made it simple to prepare and flavor the dip. Tips on creaminess and fresh taste helped enhance it. Variations showed how to customize the dip for different uses. Finally, we discussed storage options to keep it fresh. Enjoy your dip in creative ways and share it with others!

Zesty Lemon Greek Yogurt Dip Fresh and Flavorful Treat

Are you looking for a fresh and zesty dip that will impress your guests? My Zesty Lemon Greek Yogurt Dip

To make savory vegan chocolate peanut butter cups, you need some tasty and simple ingredients. Here’s what you'll need: - 1 cup dairy-free dark chocolate chips - 1/2 cup natural peanut butter - 2 tablespoons maple syrup - 1/4 cup coconut oil, melted - Pinch of sea salt - Optional toppings: crushed nuts, sea salt flakes, or shredded coconut These ingredients blend well to create a rich and creamy treat. The dark chocolate gives a deep flavor, while the peanut butter adds creaminess. Maple syrup sweetens it up just right. The coconut oil helps the chocolate melt smoothly and set nicely. You can also add toppings for extra texture and flavor. Crushed nuts give a nice crunch, while sea salt flakes offer a great contrast to the sweetness. Shredded coconut adds a tropical twist that can be fun. Each ingredient plays a role in making these cups delicious. I love how easy it is to find vegan options for all these ingredients. You can whip up this treat in no time! If you want to see the full recipe, it’s right here for you to explore. - Step 1: Prepare the molds Line a muffin tin with cupcake liners. You can also use silicone molds. This helps with easy removal later. - Step 2: Melt the chocolate In a heatproof bowl, mix the dairy-free dark chocolate chips with half of the melted coconut oil. Microwave this mix in 30-second bursts. Stir between each session until smooth and melted. - Step 3: Create the base layer Spoon about 1 tablespoon of the melted chocolate into each liner. Spread it evenly across the bottom. Place the tray in the freezer for 10 minutes to let it set. - Step 4: Make the filling In a new bowl, mix the peanut butter, maple syrup, and a pinch of sea salt. Stir well until it blends into a smooth mixture. Set it aside. - Step 5: Add the filling Take the chocolate base from the freezer. Add 1 tablespoon of the peanut butter mix on top of the chocolate layer in each cup. Use the back of a spoon to smooth it out evenly. - Step 6: Top with chocolate Pour the rest of the melted chocolate over the peanut butter layer. Make sure it covers everything completely. Gently tap the muffin tin on the counter to remove air bubbles. - Step 7: Chill to set Return the cups to the freezer for 20 to 30 minutes. This lets them set fully. - Step 8: Serve Once set, remove the cups from the liners. Enjoy right away! You can sprinkle crushed nuts, sea salt flakes, or shredded coconut on top for extra flavor. For the complete instructions and ingredient details, check out the Full Recipe. To create the best vegan chocolate peanut butter cups, focus on a few key areas. - Consistency of chocolate: Melt your chocolate slowly. Stir often to avoid burning. The right texture should be smooth and glossy. - Adjusting sweetness: Taste your peanut butter filling. If you want it sweeter, add more maple syrup. Remember, you can always add but you cannot take away. - Alternative nut butters: If you don’t like peanut butter, try almond, cashew, or sunflower seed butter. Each will give a unique flavor and texture. Gathering the right tools makes this recipe easy and fun. - Muffin tin or silicone molds: Use these to shape your cups. Silicone molds help with easy removal. - Heatproof bowl: This is essential for melting the chocolate safely. - Measuring cups and spoons: Accurate measurements ensure your cups taste great every time. With these tips and tools, you can make delicious vegan chocolate peanut butter cups. For a step-by-step guide, check the full recipe. {{image_2}} You can switch up the nut butter in this recipe. Here are three tasty options: - Almond butter: This nut butter is creamy and has a mild flavor. It pairs well with chocolate. - Cashew butter: Cashew butter is smooth and has a rich taste. It adds a nice twist to the cups. - Sunflower seed butter: This is a great option for those allergic to nuts. It has a unique flavor that works well with chocolate. Adding flavors can take your cups to the next level. Here are some ideas: - Adding spices: A sprinkle of cinnamon or a drop of vanilla can add warmth and depth. - Incorporating fruit purees: Try adding banana or raspberry puree for a fruity kick. This gives a nice contrast to the chocolate. - Experimenting with chocolate varieties: You can use milk chocolate or white chocolate. Each type brings its own taste and texture. Feel free to mix and match these ideas to create your perfect vegan chocolate peanut butter cups. To keep your vegan chocolate peanut butter cups fresh, store them in an airtight container. This helps protect them from moisture and keeps them tasty. You can choose to refrigerate or freeze them based on how long you want to keep them. - Refrigeration: If you plan to eat them within a week, store them in the fridge. They can last up to 5-7 days when chilled. - Freezing: For longer storage, freeze them. They stay good for up to 3 months in the freezer. If you want to enjoy your cups again, you might need to soften the chocolate. Here’s how to do it without losing texture: - Microwave: Place the cups on a microwave-safe plate. Heat them in short bursts, around 10-15 seconds, checking often. - Warm Water Bath: For a gentler method, place the cups in a bowl of warm water. This helps melt the chocolate slowly and keeps it smooth. These tips ensure you enjoy your delicious treats just as they were meant to be! For the complete recipe, refer to the Full Recipe section. Can I use unsweetened chocolate? Yes, you can use unsweetened chocolate. Just add a sweetener to balance the taste. Unsweetened chocolate gives a rich flavor. How do I make it sugar-free? To make it sugar-free, swap maple syrup with a sugar-free sweetener. Use options like erythritol or stevia. Both will keep your treats sweet without added sugars. Where can I buy vegan chocolate chips? You can find vegan chocolate chips at most grocery stores. Look in the baking aisle. Online stores also offer a wide range of choices. Can I substitute coconut oil with another oil? Yes, you can use other oils like canola or grapeseed oil. These oils work well but may change the flavor slightly. Stick with oils that are neutral in taste. - Estimated calories per cup: Each cup has about 150 calories. - Breakdown of protein and fat content: Each cup has around 3 grams of protein and 10 grams of fat. - Vegan benefits of the ingredients: This recipe uses healthy fats from peanut butter and coconut oil. These ingredients can support heart health and provide energy. For the complete instructions and ingredient details for Decadent Vegan Chocolate Peanut Butter Cups 🥜, check the Full Recipe. These vegan chocolate peanut butter cups are simple and fun to make. We covered essential ingredients, step-by-step instructions, and handy tips to help you succeed. You learned about variations and storage methods too. Enjoy experimenting with different nut butters and flavors. Use this recipe as a base to create your favorite treats. With each bite, you can savor a sweet, guilt-free indulgence. Try making these and delight in a tasty reward that fits your lifestyle!

Savory Vegan Chocolate Peanut Butter Cups Delight

Looking for a sweet treat that’s both vegan and delicious? You’re in for a real treat with my Savory Vegan

To make easy veggie sushi rolls, gather these ingredients: - 1 cup sushi rice - 1 ¼ cups water - 2 tablespoons rice vinegar - 1 tablespoon sugar - ½ teaspoon salt - 4 sheets nori (seaweed) - 1 small cucumber, julienned - 1 small carrot, julienned - 1 ripe avocado, sliced - ¼ red bell pepper, julienned - 2 tablespoons sesame seeds - Soy sauce, for serving If you don’t have some ingredients, here are easy swaps: - Sushi rice can be replaced with short-grain rice. - Rice vinegar can be swapped for apple cider vinegar. - Sugar can be replaced with agave syrup or honey. - Nori can be replaced with thin slices of cucumber for a wrap. - You can use any veggies you like, such as bell peppers or radishes. You will need a few tools to make these sushi rolls: - A bamboo sushi mat (or a clean kitchen towel) - A sharp knife for slicing - A saucepan for cooking rice - A bowl for mixing rice vinegar and sugar - A clean cutting board for assembling sushi This list covers everything you need to start making your easy veggie sushi rolls. Get your gear ready and enjoy the process! For a full recipe, check out the Easy Veggie Sushi Rolls 🥒 section above. To make great sushi, start with the rice. Rinse 1 cup of sushi rice under cold water. Keep rinsing until the water runs clear. This step removes extra starch and helps the rice cook well. Drain the rice in a colander. Next, combine the rinsed rice and 1 ¼ cups water in a saucepan. Bring it to a boil over high heat. Once boiling, lower the heat and cover the pan. Let it simmer for 18 to 20 minutes. The rice should become tender and absorb all the water. While the rice cooks, mix 2 tablespoons of rice vinegar, 1 tablespoon of sugar, and ½ teaspoon of salt in a bowl. Microwave this mix for 15 to 20 seconds. Stir until the sugar dissolves. When the rice is done, move it to a large bowl. Fold in the vinegar mix gently. Let the rice cool to room temperature. Now it's time to assemble! Take 1 sheet of nori and place it on a bamboo sushi mat or a clean surface. Make sure the shiny side faces down. Wet your hands to avoid sticking. Spread a thin layer of sushi rice over the nori. Leave about an inch at the top edge. Next, add your fillings. Lay julienned cucumber, carrot, sliced avocado, and red bell pepper across the center of the rice. Feel free to use any veggies you like! For extra crunch, sprinkle 2 tablespoons of sesame seeds over the fillings. Now for the fun part—rolling! Start at the edge of the mat closest to you. Carefully roll the sushi away from you, pressing gently to form a tight roll. When you reach the top, dampen the edge of the nori with water to seal it. Repeat this process for the remaining nori sheets and fillings. Once you have all your rolls, slice each one into bite-sized pieces. Use a sharp knife for clean cuts. Wipe the knife with a damp cloth between cuts to keep it tidy. Serve your sushi rolls on a platter with soy sauce for dipping. Enjoy your delicious creation! For the full recipe, check out the Easy Veggie Sushi Rolls 🥒 section. To make great sushi, you need perfect sushi rice. Start with high-quality sushi rice. Rinse it under cold water until clear. This removes extra starch. Use a rice cooker or saucepan for cooking. Combine one cup of sushi rice with 1 ¼ cups of water. Bring it to a boil, then lower the heat. Cover it and let it simmer for 18-20 minutes. When it's done, let it sit for a few minutes. Mix rice vinegar, sugar, and salt while it cools. Fold this mix into the rice gently. This adds flavor and shine. Rolling sushi can be tricky, but with practice, it becomes easy. Use a bamboo sushi mat to help you roll. Always place the nori shiny side down. Wet your hands before handling the rice. This keeps it from sticking to your fingers. Spread the sushi rice evenly, leaving space at the top. Place your fillings in the center. When you start to roll, keep it tight but not too tight. Use the mat to guide the roll. Dampen the edge of the nori to seal it. Practice makes perfect, so don’t worry if it's not perfect the first time! Make your sushi roll pop with flavor and color. Try adding fresh herbs like cilantro or mint for a twist. You can use flavored rice vinegar to add depth. Sprinkling sesame seeds on top adds crunch and looks great too. For a fun presentation, slice the rolls at a slight angle. Arrange them on a platter with colorful garnishes like pickled ginger or wasabi. Serve with soy sauce, or try a spicy mayo for a kick. Explore different combinations to find what you love best. For the full recipe, check out the Easy Veggie Sushi Rolls. {{image_2}} You can get creative with your veggie sushi rolls. Try using different fillings for fun flavors. Here are some tasty ideas: - Spinach: Fresh, crunchy, and packed with nutrients. - Mango: Adds a sweet twist and bright color. - Radish: Crunchy and spicy for a unique kick. - Pickled vegetables: Great for adding tang and depth. - Cream cheese: A smooth texture that pairs well with veggies. Feel free to mix and match these ingredients to find your favorites. Each variation brings a new taste and texture to your sushi. Making sushi to fit your diet is easy. The recipe is already vegan, as it contains no animal products. For gluten-free options, choose gluten-free soy sauce. Here are some tips: - Rice: Always check that your sushi rice is gluten-free. - Nori: Most nori is gluten-free, but verify the label. - Fillings: Use fresh veggies and fruits that fit your diet. With these swaps, you can enjoy sushi without worry. Dipping sauces can elevate your sushi experience. Here are some easy and tasty options: - Soy sauce: A classic choice that adds saltiness. - Wasabi: For a spicy kick, add a little to your soy sauce. - Spicy mayo: Mix mayonnaise with sriracha for creaminess and heat. - Sesame oil: Drizzle this for a rich flavor. - Peanut sauce: Creamy and nutty, it pairs well with fresh veggies. Experiment with these sauces to find your perfect match. They add flavor and fun to your sushi rolls. For the full recipe, check out the complete guide. To keep leftover sushi rolls fresh, wrap them tightly in plastic wrap. This will help keep air out. You can also place them in an airtight container. Store the rolls in the fridge for up to 24 hours. Sushi rice can dry out, so do not leave them out for too long. For the best taste, eat sushi rolls the same day you make them. If you cannot do this, store them properly. Keep your sushi rice moist to maintain the right texture. Avoid adding extra sauces or toppings until you are ready to eat. This will help keep the flavors fresh. Sushi is best served cold, but if you want to reheat it, do so carefully. You can microwave sushi for about 10 seconds. Make sure to cover it with a damp paper towel. This will help prevent it from drying out. However, keep in mind that reheating may change the texture and taste. Enjoy your Easy Veggie Sushi Rolls fresh from the kitchen! For the full recipe, refer to the section above. To make sushi rice, start with 1 cup of sushi rice. Rinse it under cold water until the water runs clear. This step removes excess starch and helps the rice stick. Then, combine the rinsed rice with 1 ¼ cups of water in a saucepan. Bring it to a boil over high heat. Lower the heat, cover, and simmer for about 18-20 minutes. The rice should be tender and the water fully absorbed. Once cooked, mix 2 tablespoons of rice vinegar, 1 tablespoon of sugar, and ½ teaspoon of salt in a bowl. Microwave it for 15-20 seconds to dissolve the sugar. After the rice is done cooking, fold in this mixture gently. Let the rice cool to room temperature before using it for your sushi rolls. This process gives your sushi rice that perfect flavor and sticky texture. Yes, you can make sushi ahead of time! However, it’s best to enjoy sushi fresh. If you need to prepare it early, make sure to store it properly. Keep the rolls in an airtight container in the fridge. This helps maintain freshness. Try to eat them within 24 hours to enjoy the best taste. If you have leftover sushi rice, store it in a sealed container at room temperature. Veggie sushi rolls pair well with a variety of sides. Here are some tasty options: - Edamame: Lightly salted and steamed, they add a fun crunch. - Miso Soup: This warm soup is a classic choice that complements sushi. - Pickled Ginger: This adds a zesty bite and helps cleanse the palate. - Seaweed Salad: A refreshing side that enhances your sushi experience. - Soy Sauce: Always a must-have for dipping your sushi rolls. You can mix and match these sides to create a complete meal. Enjoy your homemade veggie sushi rolls with these delightful accompaniments! For the full recipe, check the Easy Veggie Sushi Rolls section above. You learned how to make easy veggie sushi rolls using simple ingredients. We discussed essential equipment and step-by-step instructions, from preparing sushi rice to rolling and slicing. Tips ensured a perfect roll, while variations offered creative ideas. Storage advice helps keep your sushi fresh. Now, you can enjoy making your sushi at home. Experiment with flavors, fillings, and dips. This process can be fun and tasty. Dive in and impress your friends and family with your new skills!

Easy Veggie Sushi Rolls Tasty and Simple Recipe

Looking to impress your friends with something tasty and fun? My Easy Veggie Sushi Rolls are the perfect choice! With

To make No Bake Cookie Dough Energy Balls, gather these simple ingredients: - 1 cup rolled oats - 1/2 cup almond butter (or peanut butter) - 1/4 cup honey or maple syrup - 1/2 cup chocolate chips (semi-sweet or dark) - 1/4 cup ground flaxseed - 1 teaspoon vanilla extract - Pinch of salt These ingredients work together to create a tasty, healthy snack. You can swap out some ingredients for different flavors or diets. Here are a few options: - Use sunflower seed butter instead of almond or peanut butter for a nut-free version. - Try agave syrup in place of honey or maple syrup for a vegan option. - If you want more protein, add chia seeds instead of or with flaxseed. - Use dried fruit like raisins or cranberries instead of chocolate chips for a fruity twist. These swaps keep the energy balls delicious while meeting your needs. These energy balls are not only tasty but also nutritious. Each ball contains: - Rolled oats provide fiber and energy. - Almond butter adds healthy fats and protein. - Honey or maple syrup gives natural sweetness. - Chocolate chips offer a little indulgence, while flaxseed boosts omega-3s. Each energy ball is around 100 calories. They make a great snack or a quick breakfast option. Enjoy the balance of flavors and nutrients in every bite! Making no bake cookie dough energy balls is simple. You only need a few bowls and a spatula. Gather all your ingredients first. This helps streamline the process. You’ll save time and avoid messes. Start by mixing the dry ingredients. In a large bowl, combine: - 1 cup rolled oats - 1/4 cup ground flaxseed - A pinch of salt Stir them well until they blend together. Next, in another bowl, mix the wet ingredients. Combine: - 1/2 cup almond butter (or peanut butter) - 1/4 cup honey or maple syrup Stir until smooth. This step is key for a good texture. Now, pour the wet mixture into the dry bowl. Add: - 1 teaspoon vanilla extract - 1/2 cup chocolate chips Mix everything together with a spatula or your hands. The dough should feel sticky and hold together well. Once your dough is mixed, it’s time to shape the energy balls. Use your hands to scoop out small portions. Roll them into balls about 1 inch wide. You should get around 12 to 15 of them. Place the balls on a parchment-lined baking sheet or plate. This keeps them from sticking. After shaping, refrigerate the balls for at least 30 minutes. This helps them firm up. Enjoy your no bake cookie dough energy balls as a tasty snack or workout boost! For the complete recipe, check the Full Recipe. To get the best texture, start with fresh ingredients. Old oats or nut butter can make the balls dry. Mix the dry and wet ingredients well. This helps the oats soak in the flavors. If the mix feels too dry, add a little more honey or nut butter. If it’s too wet, add more oats. The perfect mix should be sticky but easy to roll into balls. One common mistake is not measuring ingredients correctly. Too much nut butter can make the balls too rich. Too little will leave them dry. Another mistake is not letting them chill long enough. The energy balls need time to firm up in the fridge. Skipping this step can make them fall apart. Always use a parchment-lined sheet for easy removal, too. You can eat these energy balls as a quick snack. They are great after a workout or as a tasty treat. Try adding them to your breakfast or lunchbox. You can also keep them in the fridge for a quick bite. If you like, dip them in yogurt for a fun twist. For the full recipe, check out the complete guide. {{image_2}} You can change the flavor of your energy balls easily. Try using different nut butters. Almond, cashew, or sunflower seed butter all work well. You can also swap out chocolate chips for dried fruit, like cranberries or raisins. For a fun twist, add a pinch of cinnamon or cocoa powder. This can give your energy balls a unique taste. Mix and match until you find your favorite combo. Making these energy balls fit your diet is simple. To make them vegan, just replace honey with maple syrup. This keeps the sweetness while staying plant-based. For gluten-free options, ensure your oats are certified gluten-free. This small change keeps them safe for those with gluten sensitivities. Boost the nutrition of your energy balls by adding seeds or nuts. Chia seeds or pumpkin seeds add healthy fats and fiber. You can also try adding protein powder for an extra protein kick. This is great for after workouts or busy days. Mix in nut pieces or coconut flakes for more texture and flavor. These add-ins help make your energy balls even better! For the full recipe, check out the details above. To keep your no bake cookie dough energy balls fresh, place them in an airtight container. I prefer using glass jars or plastic containers with tight lids. Make sure to layer parchment paper between the balls to prevent them from sticking together. Store them in the refrigerator, where they will stay tasty for about a week. If you want to save some for later, freezing is a great option. First, let the energy balls chill in the fridge for about 30 minutes. Once firm, transfer them to a freezer-safe bag. Label the bag with the date, so you know when you made them. You can freeze them for up to three months. When you're ready to enjoy, just thaw them in the fridge overnight. These energy balls can last up to a week in the fridge. However, freezing extends their life significantly. To keep their flavor, avoid leaving them out at room temperature for too long. If you notice any signs of spoilage, like an off smell or change in texture, it's best to discard them. Enjoy your no bake cookie dough energy balls fresh for the best taste! Yes, you can use any nut butter you like. Almond butter and peanut butter work well. Cashew butter or sunflower seed butter are also great options. Just make sure it has a similar texture to keep the balls firm. These energy balls last about one week in the fridge. You can store them in an airtight container to keep them fresh. If you want them to last longer, you can freeze them for up to three months. Absolutely! If you want to skip chocolate chips, you can add dried fruit or nuts. Chopped dates or raisins add sweetness. Try adding coconut flakes for a fun twist. The recipe is flexible and allows for your tastes. You can serve these energy balls cold or at room temperature. They make a great snack for kids and adults. Pack them in lunchboxes or take them on hikes. You can even serve them at parties for a healthy treat! Yes, they are a healthy snack! These energy balls have protein, fiber, and healthy fats. They provide energy without refined sugars. You can feel good about enjoying them as a quick snack or post-workout treat. Check the Full Recipe for more details! You now have a complete guide to making no-bake cookie dough energy balls. We covered all the key ingredients, step-by-step instructions, and helpful tips. You learned how to customize flavors and make dietary adjustments, too. Remember to store them properly for the best taste and texture. These energy balls are not just tasty but also healthy snacks. Now you can enjoy a quick, nutritious treat whenever you want. Embrace your creativity and have fun making variations that suit your taste!

No Bake Cookie Dough Energy Balls Packed with Flavor

Looking for a quick, tasty snack? My No Bake Cookie Dough Energy Balls are packed with flavor and healthy ingredients.

For these tasty boats, you need a few simple items. Here’s what you will need: - 1 medium spaghetti squash - 1 cup marinara sauce - 1 cup cooked ground turkey or beef - 1 cup spinach, chopped - 1 cup mozzarella cheese, shredded These ingredients create a satisfying meal. The spaghetti squash acts as the perfect base. It holds all the flavors well. Seasonings bring out the best in your dish. Here are the key ones to use: - 1 teaspoon Italian seasoning - 1/2 teaspoon garlic powder - Salt and pepper to taste - Fresh basil, for garnish Italian seasoning gives a nice herbal note. Garlic powder adds depth without the fuss of fresh garlic. Fresh basil on top adds a bright touch. You can customize your boats easily. Here are some ideas for add-ins: - Diced bell peppers for crunch - Black olives for a briny flavor - Mushrooms for an earthy taste - Different cheeses like feta or cheddar Feel free to mix and match. These add-ins can make each batch unique. For the full recipe, check out the complete instructions above. Start by preheating your oven to 400°F (200°C). Next, take your medium spaghetti squash and cut it in half lengthwise. Be careful as you do this! Scoop out all the seeds from the center. Drizzle the insides with olive oil. Then, season them with salt and pepper. Place the squash cut side down on a baking sheet. Bake it for 30-40 minutes. The squash should be tender and easy to pierce with a fork when done. While the squash bakes, grab a skillet. Add your cooked ground turkey or beef to it. Pour in the marinara sauce, and add the chopped spinach. Sprinkle in the Italian seasoning and garlic powder. Heat this mixture until it’s warm throughout. This filling is packed with flavor and adds great texture. Once the squash is done baking, let it cool for a few minutes. Then, use a fork to scrape the flesh into strands. Mix these strands with your meat sauce until everything is well combined. Now, stuff the mixture back into the squash halves, packing it tightly. Top each half with shredded mozzarella cheese. Return the stuffed squash to the oven and bake for another 15-20 minutes. This step melts the cheese and makes it bubbly. When you take it out, garnish with fresh basil. Let it cool for a few minutes before enjoying your tasty meal. For the complete details, check out the Full Recipe. The right cooking time is key. Preheat your oven to 400°F (200°C). Bake the squash for 30 to 40 minutes. Check for tenderness by piercing it with a fork. If it goes in easily, it is ready. This will give you a nice soft texture. When buying spaghetti squash, look for a firm one. The skin should be bright yellow and free of soft spots. A smaller squash often has better flavor. Hold it in your hands; it should feel heavy for its size. This means it is fresh and moist inside. You can boost flavor with fresh herbs like basil or parsley. These add brightness and freshness. Don’t skip the salt and pepper. They bring out the natural sweetness of the squash. For a crunchy texture, try adding toasted breadcrumbs on top. It adds a great contrast to the soft filling. You can find the Full Recipe linked above for more tips. {{image_2}} You can easily make a vegetarian version of baked spaghetti squash boats. Replace the ground turkey or beef with cooked lentils or black beans. Use a vegetable marinara sauce instead of regular marinara. Add more veggies like bell peppers, zucchini, or mushrooms for extra flavor and nutrition. This option is tasty and filling without any meat. Baked spaghetti squash boats are naturally gluten-free. Just ensure your marinara sauce is labeled gluten-free. Most store-bought sauces are safe, but always check the label. You can use gluten-free breadcrumbs or crushed nuts on top for a nice crunch if you want a crispy texture. Feel free to switch up your sauces! Try pesto, Alfredo, or even a spicy arrabbiata. You can also mix in different proteins. Grilled chicken, shrimp, or even chickpeas work well. Don’t be afraid to experiment! Each combination brings a unique twist to your baked spaghetti squash boats. For the full recipe, refer back to the main section. To store leftover baked spaghetti squash boats, first let them cool. Place them in an airtight container. You can keep them in the fridge for up to four days. If you want to save them longer, consider freezing. Make sure to label the container with the date. For reheating, use the oven for the best results. Preheat your oven to 350°F (175°C). Place the squash boats on a baking sheet. Heat them for about 15-20 minutes, or until warmed through. You can also use the microwave for a quicker option. Just heat them on a microwave-safe plate for 2-3 minutes. To freeze, wrap each squash half tightly in plastic wrap. Then place it in a freezer-safe bag or container. They can last up to three months in the freezer. When ready to eat, thaw in the fridge overnight. Reheat as mentioned above for a tasty meal! For the full recipe and more tips, check the [Full Recipe]. Yes, you can use other squashes, like butternut or acorn. Each squash has a unique taste. However, they will alter the texture and flavor of your dish. Spaghetti squash is special because its flesh pulls into strands. This mimics pasta, making it a fun alternative. If you swap squashes, consider adjusting the cooking time. Always check for doneness with a fork. The squash is done when it's tender and easily pierced. You can test it with a fork. If it glides in smoothly, it's ready. Typically, roasting takes about 30-40 minutes at 400°F. The skin should be slightly golden, and the flesh will look translucent. Let it cool a bit before you scrape it into strands. This helps avoid burns. Many toppings work well with this dish! Here are some tasty ideas: - Grated Parmesan cheese - Chopped green onions - Crushed red pepper flakes - Fresh herbs like parsley or cilantro - A dollop of sour cream or Greek yogurt These toppings add flavor and color. Feel free to mix and match based on your taste. For more ideas, check out the Full Recipe. Baked spaghetti squash boats offer a fun twist on dinner. We covered ingredients, filling options, cooking tips, and variations to enhance your meal. You learned how to store and reheat leftovers for future enjoyment. Remember, you can customize it to fit your taste. Experiment with different fillings and sauces to find your favorite. Enjoy your time in the kitchen and savor every bite. You’ll love serving this tasty dish to friends and family!

Baked Spaghetti Squash Boats Flavorful and Easy Recipe

Are you ready to try something delicious and healthy? Baked spaghetti squash boats are a fun twist on traditional pasta.

Older posts
Newer posts
← Previous Page1 … Page29 Page30 Page31 … Page80 Next →

dsad

© 2025 pureeatsnow • Built with GeneratePress

Our Policies

  • Copyright Policy
  • Cookie Policy
  • GDPR Policy
  • Privacy Policy
  • Disclaimer
  • Terms Of Use

More Information

  • Home
  • About
  • Contact
  • Appetizers
  • Dessert
  • Dinner
  • Drinks
©2025, pureeatsnow About Back To Top