Skip to content
DisclaimerTerms Of UseGDPR PolicyCookie Policy

pureeatsnow

  • Home
  • Drinks
  • Appetizers
  • Dinner
  • Dessert
  • About
  • Contact
  • Privacy Policy
DisclaimerTerms Of UseGDPR PolicyCookie Policy

Rachel

To make Chocolate Peanut Butter Protein Balls, you need a few simple ingredients. Here’s a complete list of what you’ll need: - 1 cup rolled oats - 1/2 cup peanut butter (creamy or crunchy) - 1/4 cup honey or maple syrup - 1/4 cup chocolate protein powder - 1/4 cup mini chocolate chips - 1/4 teaspoon salt - 1 teaspoon vanilla extract - Optional: 1/4 cup chopped nuts or shredded coconut These ingredients blend together to create a tasty and healthy snack. The oats serve as a great base, giving you fiber. Peanut butter adds protein and healthy fats. Honey or maple syrup sweetens the mix, while chocolate protein powder boosts nutrition. Mini chocolate chips provide extra sweetness and fun. If you want to add a twist, consider including chopped nuts or shredded coconut. They add texture and flavor. You can easily adjust these ingredients to fit your taste. For example, swap the honey for a different sweetener if you need. I love this recipe because it’s quick and easy. You can have a healthy treat ready in no time with very little prep. You can check the Full Recipe for step-by-step instructions. - Mixing dry ingredients: Start by grabbing a large mixing bowl. Add 1 cup of rolled oats, 1/4 cup of chocolate protein powder, and 1/4 teaspoon of salt. Mix these together well. This step sets a strong base for your protein balls. - Incorporating wet ingredients: Next, add 1/2 cup of peanut butter and 1/4 cup of honey (or maple syrup) to the bowl. Use a spatula or your hands to mix everything. It should feel sticky yet moldable. If it feels too dry, add a touch more peanut butter. - Forming the protein balls: Once everything is mixed, stir in 1/4 cup of mini chocolate chips. If you want, you can also add 1/4 cup of chopped nuts or shredded coconut for extra crunch. Scoop out about a tablespoon of the mixture and roll it into a ball. Repeat this until you form all the balls. This recipe makes about 12-15 protein balls. - Refrigerating the mixture: After rolling the balls, place them on a parchment-lined baking sheet or plate. This makes them easy to remove later. - Ideal time for firming up: Put the balls in the fridge for at least 30 minutes. This helps them firm up and hold their shape. Enjoy these tasty treats as a snack or post-workout boost. For the full recipe, check the details above! To get the best texture for your chocolate peanut butter protein balls, start with the right peanut butter. If the mix feels too dry, add more peanut butter. This gives your balls moisture and creaminess. If you want a crunch, add chopped nuts or shredded coconut. Make sure to mix well so every bite has flavor. Next, it’s key to distribute the ingredients evenly. When you mix the oats and protein powder, ensure they blend well. This helps each ball have the same taste. When adding the wet ingredients, stir until fully mixed. You want every part of the mix to have that yummy chocolate and peanut flavor. You can enjoy these protein balls in many ways. They make a great snack before or after a workout. Pair them with fruit for a balanced treat. Try them with a banana or some apple slices. You can also enjoy them as a dessert. They taste great chilled or at room temperature. For a fun twist, dip them in melted dark chocolate. This adds a rich layer of flavor. You can also drizzle some honey or maple syrup on top for extra sweetness. Whichever way you choose to enjoy them, they are sure to satisfy your cravings! For the complete recipe, check out the Full Recipe above. {{image_2}} I love to make these Chocolate Peanut Butter Protein Balls fit for everyone. If you follow a vegan diet, you can easily swap honey for maple syrup. This keeps the sweetness while making it plant-based. For those who need gluten-free snacks, use certified gluten-free oats. They work great and keep the texture just right. You can also boost the flavor of these protein balls. Adding spices like cinnamon gives a warm taste. A dash of cocoa powder can enhance the chocolate flavor, making it richer. If you want to switch up the nut butter, feel free! Almond butter or cashew butter makes for tasty alternatives. Each choice offers a unique twist, keeping your snacks exciting. For the full recipe, check out the details above. To keep your chocolate peanut butter protein balls fresh, use an airtight container. This helps prevent moisture and keeps them tasty. I recommend glass or BPA-free plastic containers. Always place the balls in the fridge after making them. The cold helps maintain their shape and flavor. When stored properly, these protein balls last up to a week in the fridge. For best freshness, eat them within the first few days. If you notice any change in smell or texture, it’s best to toss them. Signs of spoilage include a dry or hard texture and an off-putting scent. Enjoy your treats while they are at their best! How long can I keep Chocolate Peanut Butter Protein Balls? You can store Chocolate Peanut Butter Protein Balls in an airtight container in the fridge for up to one week. They stay fresh and tasty. If you want them to last longer, keep them in the freezer. Can I freeze these protein balls? Yes, you can freeze these protein balls! They freeze well and can last for about three months. Just place them in a freezer-safe bag or container. When you want to eat one, let it thaw in the fridge. What are the nutritional benefits of these snacks? These protein balls are packed with nutrients. They offer a great mix of protein, healthy fats, and fiber. The oats provide carbs for energy. Peanut butter adds protein and healthy fats. The chocolate protein powder gives you an extra boost. Can I use other types of protein powder? Absolutely! You can use different protein powders. Whey, plant-based, or casein all work well. Just pick one that fits your taste and diet. Is it possible to replace honey with another sweetener? Yes, you can swap honey for other sweeteners. Maple syrup works well too. You can also use agave nectar or even a sugar substitute if you prefer a lower sugar option. For the full recipe, check out the details above. This blog post covers how to make delicious chocolate peanut butter protein balls. We explored the key ingredients, simple steps to prepare, and helpful tips for the best texture. I shared variations for different diets and flavor options. Finally, we discussed storage tips to keep them fresh and answered common questions. Remember, you can enjoy these treats anytime. They are nutritious and fun to make!

Chocolate Peanut Butter Protein Balls Healthy Snack Option

Looking for a quick and tasty snack? These Chocolate Peanut Butter Protein Balls are your answer! Packed with protein and

To make the best peach yogurt muffins, you need these key ingredients: - 1 cup all-purpose flour - 1 teaspoon baking powder - 1/2 teaspoon baking soda - 1/4 teaspoon salt - 1/2 teaspoon ground cinnamon - 1/4 cup brown sugar - 1/2 cup plain yogurt (Greek or regular) - 1/4 cup vegetable oil - 1 large egg - 1 teaspoon vanilla extract - 1 cup fresh peaches, peeled and diced These ingredients work together to create a moist and flavorful muffin. The yogurt adds creaminess, while the peaches bring sweetness. You can customize your muffins by adding these optional ingredients: - 1/4 cup chopped pecans - 1/4 cup raisins or dried cranberries - 1/2 teaspoon nutmeg for extra spice Adding pecans gives a nice crunch. Dried fruits add chewiness and natural sugar. For the best peach yogurt muffins, I suggest using: - High-quality vanilla extract for richer flavor - Fresh, ripe peaches for natural sweetness - Organic flour for a finer texture Using these products ensures your muffins taste amazing. You can find the full recipe to guide you through the steps. Enjoy your baking! First, gather your ingredients. Make sure you have everything ready. Preheat your oven to 350°F (175°C). This step is key for even baking. Line your muffin tin with paper liners or grease it to prevent sticking. In a medium bowl, whisk together the dry ingredients. Combine 1 cup of all-purpose flour, 1 teaspoon of baking powder, 1/2 teaspoon of baking soda, and 1/4 teaspoon of salt. Add 1/2 teaspoon of ground cinnamon and 1/4 cup of brown sugar. Mix until everything is well blended. This helps the muffins rise and taste great. In a separate large bowl, mix the wet ingredients. Use 1/2 cup of plain yogurt, either Greek or regular. Add 1/4 cup of vegetable oil, 1 large egg, and 1 teaspoon of vanilla extract. Stir these together until smooth. This mixture gives the muffins moisture and flavor. Now it’s time to add the peaches. Peel and dice 1 cup of fresh peaches. Gently fold the diced peaches into the wet mixture. If you want, add 1/4 cup of chopped pecans for a nice crunch. Be careful not to overmix; you want to keep the peaches whole. Spoon the muffin batter into the prepared muffin tin. Fill each cup about 2/3 full. Bake in your preheated oven for 18-20 minutes. Check if they are done by inserting a toothpick into the center. If it comes out clean, they are ready. Let the muffins cool in the pan for 5 minutes. Then, transfer them to a wire rack to cool completely. Enjoy your delicious peach yogurt muffins fresh from the oven! Don’t forget to check out the Full Recipe for more details. When making Peach Yogurt Muffins, you want a fluffy texture. Overmixing makes muffins dense. Mix the wet and dry ingredients until just combined. You may see some flour bits. That’s okay! Gently fold in your peaches. This method keeps muffins light and airy. Peeled peaches add great flavor to your muffins. To peel easily, use ripe peaches. Start by boiling water in a pot. Dip the peaches in boiling water for about 30 seconds. Then, put them in ice water. The skins will slip right off! Slice the peaches, and chop them into small pieces for the best texture. Serve these muffins warm for the best taste. Add a sprinkle of powdered sugar on top for a sweet touch. A dollop of yogurt next to the muffin makes it even better. You can also pair them with sliced peaches. This makes a great snack or breakfast treat. Enjoy them with a cup of tea or coffee for a cozy moment. For the Full Recipe, check out the earlier section. {{image_2}} You can swap peaches for other fruits. Apples, blueberries, or strawberries work well. Each fruit gives a new taste. For example, blueberries add sweetness. Apples add a nice crunch. Feel free to experiment with what you love. Just keep the same amount of fruit. This keeps your muffins moist and tasty. If you need gluten-free muffins, try almond or coconut flour. These flours change the texture. Almond flour gives a nutty flavor. Coconut flour absorbs more moisture. Use less coconut flour than regular flour. Start with 1/3 cup and add more if needed. You can also use a gluten-free flour blend. This helps keep the taste similar to the original recipe. To make these muffins vegan, replace the egg with a flax egg. Mix one tablespoon of flaxseed meal with three tablespoons of water. Let it sit for five minutes to thicken. Use plant-based yogurt instead of regular yogurt. This keeps the muffins moist. You can also use coconut oil instead of vegetable oil. These swaps keep the muffins delicious and friendly for everyone. For the full recipe, check the section above. To keep your peach yogurt muffins fresh, store them in an airtight container. Line the container with paper towels to absorb moisture. Place the muffins in a single layer. If you need to stack them, add more paper towels between layers. This keeps them soft and prevents sogginess. When stored correctly, these muffins last up to five days at room temperature. If you want them to last longer, you can refrigerate them for about a week. For even more freshness, consider freezing them. To enjoy your muffins warm, preheat your oven to 350°F (175°C). Place the muffins on a baking sheet and heat for about 5-10 minutes. You can also use a microwave. Heat each muffin for about 15 to 20 seconds. This makes them soft and delicious again. Yes, you can use canned peaches. Just make sure to drain them well. Fresh peaches add a nice texture and flavor, but canned ones work in a pinch. They may make the muffins a bit softer. If you don't have yogurt, you can use sour cream or buttermilk. Both give a similar texture and tang. You can also use plant-based yogurt for a dairy-free option. To check if the muffins are done, insert a toothpick into the center. If it comes out clean, the muffins are ready. They should also be golden brown on top and spring back when touched. Yes, you can freeze peach yogurt muffins. Allow them to cool completely, then wrap them tightly in plastic wrap. Place them in a freezer bag for up to three months. Thaw them at room temperature when ready to eat. For more details on making these delicious muffins, check the Full Recipe. In this post, we covered key ingredients and steps to make delicious peach yogurt muffins. I shared tips to avoid overmixing, how to peel peaches, and great serving ideas. You also learned about variations, storage, and frequently asked questions. Now, you’re ready to bake your own tasty muffins. Enjoy experimenting with flavors and sharing them with friends. Happy baking!

Peach Yogurt Muffins Fresh for Every Occasion

Get ready to bake some Peach Yogurt Muffins that will wow everyone! With fresh peaches and creamy yogurt, these muffins

To make a tasty zucchini rice casserole, you need simple, fresh ingredients. Here’s what you’ll need: - 2 medium zucchinis, grated - 1 cup long-grain rice, rinsed - 2 cups vegetable broth - 1 cup diced tomatoes (canned or fresh) - 1 onion, finely chopped - 2 cloves garlic, minced - 1 cup shredded cheese (cheddar or mozzarella) - 1 teaspoon dried oregano - 1 teaspoon paprika - ½ teaspoon ground black pepper - Salt to taste - 2 tablespoons olive oil - Fresh basil leaves for garnish These ingredients come together to create a rich and creamy dish that highlights the fresh taste of zucchini. You can get creative with your casserole! Try these optional add-ins or substitutes to suit your taste: - Protein: Add cooked chicken or chickpeas for extra protein. - Herbs: Fresh thyme or parsley can enhance the flavor. - Spice: For a kick, add red pepper flakes or jalapeños. - Vegetables: Mix in bell peppers, spinach, or corn for added color and nutrients. Feel free to swap ingredients based on what you have at home. This recipe is very flexible! Knowing the nutrition facts helps you enjoy your meal better. Here’s a breakdown of what one serving offers: - Calories: Approximately 250 - Protein: 10g - Carbohydrates: 36g - Fat: 8g - Fiber: 3g - Sugar: 3g This casserole is not only delicious but also a well-rounded option for a meal. For the full recipe, check out the Zesty Zucchini Rice Casserole. Start by grating the zucchinis. Use a box grater or food processor. Grating helps them mix well. Next, chop the onion into small pieces. Heat olive oil in a large skillet over medium heat. Add the chopped onion and sauté until it turns clear. This takes about five minutes. Then, add minced garlic and cook for one to two minutes. You will smell a nice aroma. Now, stir in the grated zucchini. Cook for another three to four minutes until it softens slightly. This step makes the veggies tender and full of flavor. In a big bowl, mix rinsed rice with vegetable broth. Then, add diced tomatoes along with their juices. Sprinkle in dried oregano, paprika, salt, and black pepper. Stir the mixture well. This adds a lot of taste. Pour the zucchini and onion mix into the rice mixture. Make sure everything blends together nicely. This is where the magic happens. The flavors meld and create a tasty base for your casserole. Now, it’s time to bake! Preheat your oven to 375°F (190°C). Transfer the combined mixture into a greased casserole dish. Spread it evenly across the dish. Top it off with shredded cheese. Cover the dish with aluminum foil. Bake it in the preheated oven for 30 minutes. After that, take off the foil and bake for another 10 to 15 minutes. You want the cheese to bubble and turn golden brown. Once done, let the casserole cool for a few minutes. Garnish it with fresh basil leaves. This adds color and a fresh taste. Enjoy your delicious Zucchini Rice Casserole! You can find the Full Recipe to guide you through the steps. To make a great zucchini rice casserole, follow these steps. Start by grating the zucchini. This helps it mix well with the rice. Sauté the onion and garlic until soft. This brings out their sweet flavors. Use vegetable broth for cooking the rice. It adds more taste than water does. Cover the casserole dish with foil when baking. This keeps it moist. Remove the foil for the last part of baking. It lets the cheese get golden and bubbly. Avoid these common mistakes for the best results. Don't skip the rinsing of rice. This removes extra starch and prevents stickiness. Watch the baking time carefully. Overbaking can dry out the casserole. Make sure to add enough salt. This enhances all the flavors. Don’t forget to check the rice for doneness before serving. If it’s still hard, bake a bit longer. Pair your zucchini rice casserole with tasty sides. A fresh green salad gives a nice crunch. Garlic bread adds a delicious touch to the meal. You can also serve it with grilled chicken or shrimp for protein. For a vegetarian option, add black beans or chickpeas. This adds more fiber and fills you up. Enjoy this dish hot from the oven, and don’t forget to share the Full Recipe with friends! {{image_2}} To make this dish vegetarian, simply use vegetable broth. For a vegan twist, skip the cheese or use a plant-based cheese. You can also add more veggies like bell peppers, spinach, or carrots for extra nutrients. These options keep the dish tasty and colorful. If you love cheese, consider trying different types. Swap cheddar for gouda or feta for a tangy touch. You can mix two kinds for more flavor. For a creamier texture, add cream cheese or ricotta before baking. This makes every bite rich and satisfying. Adding protein boosts the casserole's heartiness. For chicken, use cooked pieces. Stir them in with the rice mixture. If you prefer tofu, choose firm tofu, press it, and cube it. Then sauté it with the zucchini for added flavor. These options make the dish filling and yummy. For the complete recipe, check the [Full Recipe]. To keep your zucchini rice casserole fresh, let it cool first. Then, place the leftovers in an airtight container. Store them in the fridge for up to three days. This keeps the flavors intact and the dish safe to eat. If you want to save some for later, freezing is a great option. First, let the casserole cool completely. Then, wrap it tightly in plastic wrap or aluminum foil. Place it in a freezer-safe bag or container. You can freeze it for up to three months. When you’re ready to eat, just thaw it in the fridge overnight. To reheat your casserole, preheat the oven to 350°F (175°C). Remove the casserole from the fridge or freezer. If frozen, let it thaw in the fridge first. Cover the dish with foil to avoid drying it out. Heat for about 20-25 minutes, or until warmed through. You can also microwave it for faster results, but the oven keeps the texture nice. Enjoy your meal just like the first time! Yes, you can use brown rice. Brown rice takes longer to cook. So, adjust the liquid and time. Use 2.5 cups of broth for every cup of brown rice. Cook the casserole a bit longer to ensure the rice is tender. This change adds a nutty flavor and more fiber. You can use nutritional yeast for a cheesy taste without dairy. You can also try vegan cheese. Other options include cashew cream or almond cheese. These substitutes keep the dish creamy and tasty. To add some heat, include chopped jalapeños or hot sauce. You can also add red pepper flakes or a dash of cayenne pepper. These spices will give your casserole a nice kick without overpowering the flavor. Zucchini rice casserole is easy to make and fun to enjoy. We explored the main ingredients, cooking steps, tips, and variations. Each detail helps you make the perfect dish. Fresh ingredients and simple techniques bring big flavors. Try these tips to avoid common mistakes and enhance your meal. You now have all the tools to create this tasty casserole. Enjoy your cooking and share it with your family for smiles around the table.

Zucchini Rice Casserole Flavorful and Easy Recipe

If you’re looking for a delicious and easy dinner idea, try my Zucchini Rice Casserole! This dish combines fresh zucchini,

- 2 cups fresh peaches, peeled and diced - 1 tablespoon lemon juice - 1 teaspoon vanilla extract Fresh peaches bring bright flavor to this dessert. Choose ripe, juicy peaches for the best taste. The lemon juice adds a nice tang and keeps the fruit vibrant. The vanilla extract enhances the natural sweetness of the peaches. - 1 cup all-purpose flour - 1 cup rolled oats - ½ cup brown sugar, packed - ½ cup granulated sugar - ½ teaspoon baking powder - ½ teaspoon salt - 1 teaspoon ground cinnamon - ¼ teaspoon nutmeg The dry ingredients form the crumble base. The flour and oats give it a great texture. Brown sugar adds a rich flavor, while granulated sugar provides sweetness. Baking powder gives the bars a light lift. Spices like cinnamon and nutmeg make it warm and cozy. - ½ cup unsalted butter, melted Melted butter helps bind the dry ingredients. It also adds richness and flavor. Make sure to let it cool slightly before mixing. This helps the bars hold together better. For the full recipe, check out the Peach Crumble Bars recipe above. - Preheat oven to 350°F (175°C). - Line an 8x8 inch baking dish with parchment paper. This helps with easy removal. - Combine 2 cups of diced peaches, 1 tablespoon lemon juice, and 1 teaspoon vanilla extract. - Gently toss the peaches to coat them well. Set this mixture aside. - In a large bowl, mix the dry ingredients: 1 cup all-purpose flour, 1 cup rolled oats, ½ cup brown sugar, ½ cup granulated sugar, ½ teaspoon baking powder, ½ teaspoon salt, 1 teaspoon ground cinnamon, and ¼ teaspoon nutmeg. - Pour in ½ cup melted butter and mix until crumbly. - Reserve 1 cup of this mixture for topping later. - Press the remaining crumble mixture into the bottom of the prepared dish. Make sure it forms an even layer. - Spread the peach mixture over the crust. - Sprinkle the reserved crumble on top of the peaches. This will create a nice, crunchy topping. - Bake your bars for 30-35 minutes. Look for a golden brown top and bubbling fruit. - After baking, cool in the pan for about 10 minutes. Use the parchment paper to lift them out. - Transfer to a wire rack to cool completely before slicing. Enjoy your Peach Crumble Bars! For the full recipe, check out the detailed instructions above. To get the best texture in your peach crumble bars, you need to cut the peaches right. Here’s how: - Use ripe peaches for sweetness. - Peel them first for a smooth bite. - Cut them into small, even pieces. This method helps the peaches cook evenly. Also, let the bars cool completely before cutting. If you cut them too soon, they may fall apart. Cooling helps the filling set and makes slicing easier. You can boost the flavor of your bars with simple additions. Consider these options: - Add a pinch of nutmeg for warmth. - Mix in a dash of almond extract for a nutty touch. - Chopped nuts like pecans or walnuts can add crunch. - You can also mix in berries for a fruity twist. These adjustments make your bars even more delicious and personal. Baking the peach crumble bars evenly is key. Here are some tips: - Place your baking dish in the center of the oven. This helps the heat spread evenly. - Check for doneness by looking for a golden brown top. You can also gently press the top. It should feel firm. These simple steps ensure you get a perfect bake every time. For the complete instructions, refer to the Full Recipe. {{image_2}} You can switch up the fruit in these bars. Try using blueberries, raspberries, or apples. Each fruit brings its own taste and charm. You can also add almond or coconut flavors to the crumbly topping. Use almond extract or shredded coconut for a fun twist. If you need a gluten-free option, use almond flour instead of all-purpose flour. This change keeps the bars tasty and light. For a vegan version, swap butter with a plant-based butter. You can also use coconut sugar or maple syrup instead of regular sugar. These swaps make it easy to enjoy everyone’s favorite bars. These peach crumble bars taste great warm. Serve them with a scoop of vanilla ice cream. The cold ice cream balances the warm, sweet bars. You can also pair them with whipped cream or yogurt. Both options add creaminess and make the dessert even more enjoyable. For the full recipe, check the previous section. To keep your peach crumble bars fresh, store them in the refrigerator. Place the bars in an airtight container. This helps maintain their flavor and texture. If you want to enjoy them later, freezing is a great option. Wrap each bar tightly in plastic wrap, then place them in a freezer-safe bag. This keeps them safe from freezer burn. When stored properly, peach crumble bars last up to one week in the fridge. If you freeze them, they can last for three months. To keep them tasty, make sure they are sealed well. Before serving, let frozen bars thaw in the fridge for a few hours. This helps the texture return to its best state. Enjoy your peach crumble bars at their best by following these tips! You can prepare the peach crumble bars in advance. Start by making the filling and crumble. Once mixed, store them separately in the fridge. You can keep the peach filling for up to two days. The crumble can last for about three days. When you are ready to bake, just assemble and cook as per the full recipe. This method saves time and helps you enjoy fresh bars whenever you like. Yes, frozen peaches work well in this recipe. Make sure to thaw and drain them first. This step prevents excess moisture in your bars. If you use frozen peaches, add a bit more lemon juice to balance the flavor. The texture may differ slightly, but they will still taste great. Peach crumble and peach crisp are quite similar but differ slightly in texture. A crumble has a buttery and crumbly topping. It usually uses flour and oats. A crisp, on the other hand, often includes nuts or more oats for a crunchier topping. Both are delicious, but they offer different eating experiences. You can tell the bars are ready by their color and smell. Look for a golden brown topping. You should also see the peach filling bubbling around the edges. If you insert a toothpick into the center, it should come out clean with a few crumbs. This ensures your peach crumble bars are baked just right. These peach crumble bars are easy to make and taste great. You mix fresh peaches and spices for a yummy filling. Then, you layer it with a crunchy crumble. Remember to let the bars cool for the best texture. Feel free to experiment with different fruits and flavors to make it your own. Store any extras in the fridge or freezer. With these tips and tricks, you’ll be a pro at baking peach crumble bars. Enjoy this delicious treat any time you want!

Peach Crumble Bars Delicious and Simple Dessert Recipe

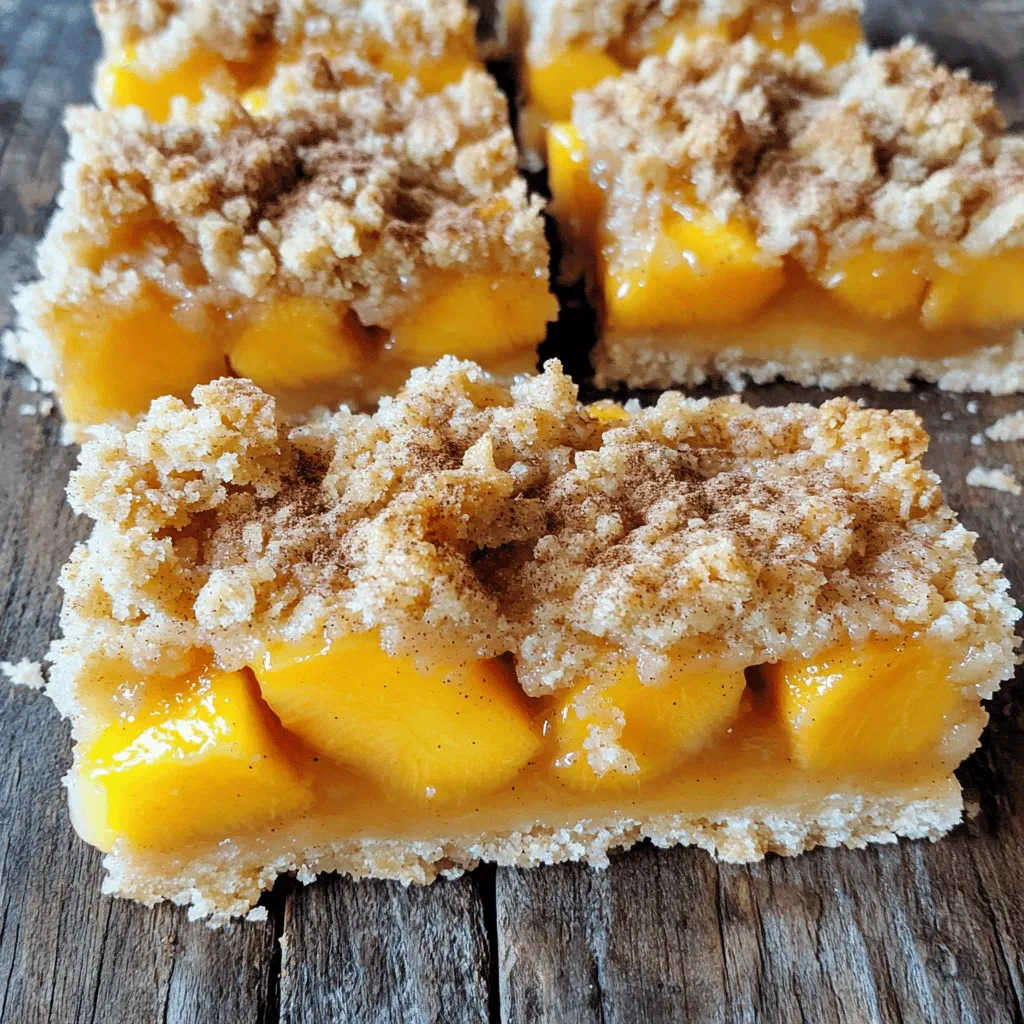
Looking for a dessert that’s both delicious and easy to make? These Peach Crumble Bars are the answer! With fresh

- 1 cup finely grated zucchini (squeeze out excess moisture) - 2 ripe bananas, mashed - 1/3 cup melted coconut oil - 1/2 cup brown sugar - 1/4 cup honey or maple syrup - 2 large eggs - 1 teaspoon vanilla extract - 1 teaspoon baking soda - 1/2 teaspoon baking powder - 1/2 teaspoon salt - 1 teaspoon ground cinnamon - 1 1/2 cups all-purpose flour - 1/2 cup chopped walnuts or pecans (optional) To make zucchini banana bread, gather these key ingredients. This mix gives you a moist and tasty loaf. The zucchini adds great texture and keeps the bread soft. The ripe bananas bring natural sweetness. - Substitutes for coconut oil: You can use butter or sunflower oil. Both give a nice flavor. - Gluten-free flour options: Almond flour or a gluten-free blend works well. Adjust liquid as needed. - Vegan alternatives for eggs and honey: Use flax eggs or applesauce for eggs. Maple syrup can replace honey. These alternatives ensure anyone can enjoy this treat. With the right swaps, you can make it fit your needs. This flexibility makes zucchini banana bread a favorite for many. For the full recipe, check out the details above. 1. Start by preheating your oven to 350°F (175°C). This helps the bread rise well. 2. Next, grease a 9x5 inch loaf pan. You can also line it with parchment paper for easy removal. 3. In a large bowl, mix the melted coconut oil with brown sugar. Stir until smooth. 4. Add the mashed bananas, eggs, honey, and vanilla extract. Mix until everything blends well. 5. Now, fold in the grated zucchini. Make sure it spreads evenly throughout the mixture. 1. In a separate bowl, whisk together the flour, baking soda, baking powder, salt, and ground cinnamon. This step is key for even baking. 2. Slowly add the dry ingredients to the wet mixture. Fold gently to combine. 3. Be careful not to overmix! A few lumps are okay, which keeps the bread light and fluffy. 1. Pour the batter into the prepared loaf pan. Use a spatula to smooth the top. 2. Bake in the preheated oven for 50-60 minutes. Check for doneness by inserting a toothpick. It should come out clean. 3. Once baked, cool the bread in the pan for about 10 minutes. Then, transfer it to a wire rack to cool completely. This recipe creates a moist and flavorful zucchini banana bread, perfect for any time of day. For the full recipe, check out the details above! To make your zucchini banana bread the best it can be, focus on texture. Mix the wet and dry ingredients gently. Overmixing can make the bread dense. Aim for a few lumps in the batter; this helps keep it light and fluffy. Moisture control is key when using zucchini. Squeeze excess moisture out before adding it to the mix. Too much moisture can lead to a soggy loaf. Use a clean kitchen towel for this step. It makes the process simple and effective. The ripeness of your bananas matters. Choose bananas that are very ripe, with brown spots. Riper bananas add natural sweetness and flavor. They also blend well into the batter, ensuring a smooth texture. Pair your zucchini banana bread with butter for a rich taste. Honey drizzled on top adds a sweet touch. You can also serve it warm for a comforting treat. For slicing, use a sharp knife. This ensures clean cuts without squishing the bread. Serve the slices on a plate, and consider garnishing with a sprinkle of cinnamon. Fresh banana slices also make a lovely addition. Get creative with serving! Try adding a scoop of vanilla ice cream on the side. The warm bread and cold ice cream create a delightful contrast. You can also enjoy it as a snack or breakfast with a cup of coffee or tea. For the full recipe, check out the detailed instructions above. {{image_2}} You can make gluten-free zucchini banana bread using different flours. Here are some good ones: - Almond flour - Coconut flour - Oat flour - Gluten-free all-purpose flour mix When using these flours, you might need to adjust the liquid in the recipe. Gluten-free flours absorb more moisture. Add a bit more liquid if the batter looks too thick. A good tip is to let the batter rest for about 10 minutes. This helps it thicken and blend better. To make this bread vegan, you need to replace eggs. Here are some great egg substitutes: - 1/4 cup unsweetened applesauce - 1/4 cup mashed banana - 1 tablespoon ground flaxseed mixed with 2.5 tablespoons water (let sit for 5 minutes) For sweeteners, you can use: - Maple syrup - Agave nectar - Coconut sugar These options keep the bread sweet and moist. Adjust the amount based on your taste. Adding extra flavors makes this bread even better. You can try these options: - Chocolate chips - Dried fruits like raisins or cranberries - Nuts for crunch You can also add spices for more depth: - Nutmeg - Ginger - Cloves These additions make every bite exciting. You can mix and match to find your favorite combination. Each variation makes the bread unique and fun! Store your Zucchini Banana Bread at room temperature for up to three days. Use an airtight container to keep it fresh. If you prefer, you can store it in the fridge. This will help it last a bit longer. However, the cold can make the bread drier. Always wrap it tightly before placing it in the fridge. Freezing is a smart way to save leftover bread. Wrap it well in plastic wrap or foil. Then, place it in a freezer-safe bag. This helps to keep out air and moisture. Your bread can last up to three months in the freezer. When you want to eat it, thaw it overnight in the fridge. This keeps the bread moist and tasty. Reheat your Zucchini Banana Bread in the oven for the best results. Set it to 350°F (175°C) and warm it for about 10 minutes. This way, it stays soft and delicious. If you're in a hurry, you can use a microwave. Heat it in short bursts of 10 to 15 seconds. Be careful not to overheat; this can dry it out. Enjoy it warm for the best flavor. Yes, you can use frozen zucchini. First, defrost it in the fridge overnight. After thawing, squeeze out extra moisture. This step is key to keeping your bread from becoming soggy. You can use several egg replacements. Common options include: - 1/4 cup unsweetened applesauce per egg - 1/2 ripe banana per egg - 1 tablespoon ground flaxseed mixed with 2.5 tablespoons water (let sit for 5 minutes) Each of these options will work well in this recipe. On the counter, zucchini banana bread lasts about 3 to 4 days. If you store it in the fridge, it can last up to a week. Make sure to keep it in an airtight container to maintain freshness. Yes, you can add more zucchini. If you do, reduce the amount of other wet ingredients slightly. This will help keep the bread from getting too moist. Start with an extra 1/4 cup and adjust as needed. Common causes for dense banana bread include: - Overmixing the batter, which develops gluten - Using too much flour - Not enough leavening agents, like baking soda or baking powder To avoid density, mix until just combined and measure flour accurately. Enjoy your baking! For the full recipe, check out the complete section above. Zucchini banana bread is a delightful treat made from fresh ingredients. You learned how to create a moist loaf using ripe bananas and finely grated zucchini. We covered step-by-step instructions, tips for perfecting your bread, and storage solutions. You can also adapt the recipe to fit gluten-free or vegan diets. Incorporate your creative twists and enjoy this simple recipe. Share it with loved ones for a delicious treat everyone will crave. Enjoy every slice and keep experimenting for more fun in the kitchen!

Zucchini Banana Bread Moist and Flavorful Delight

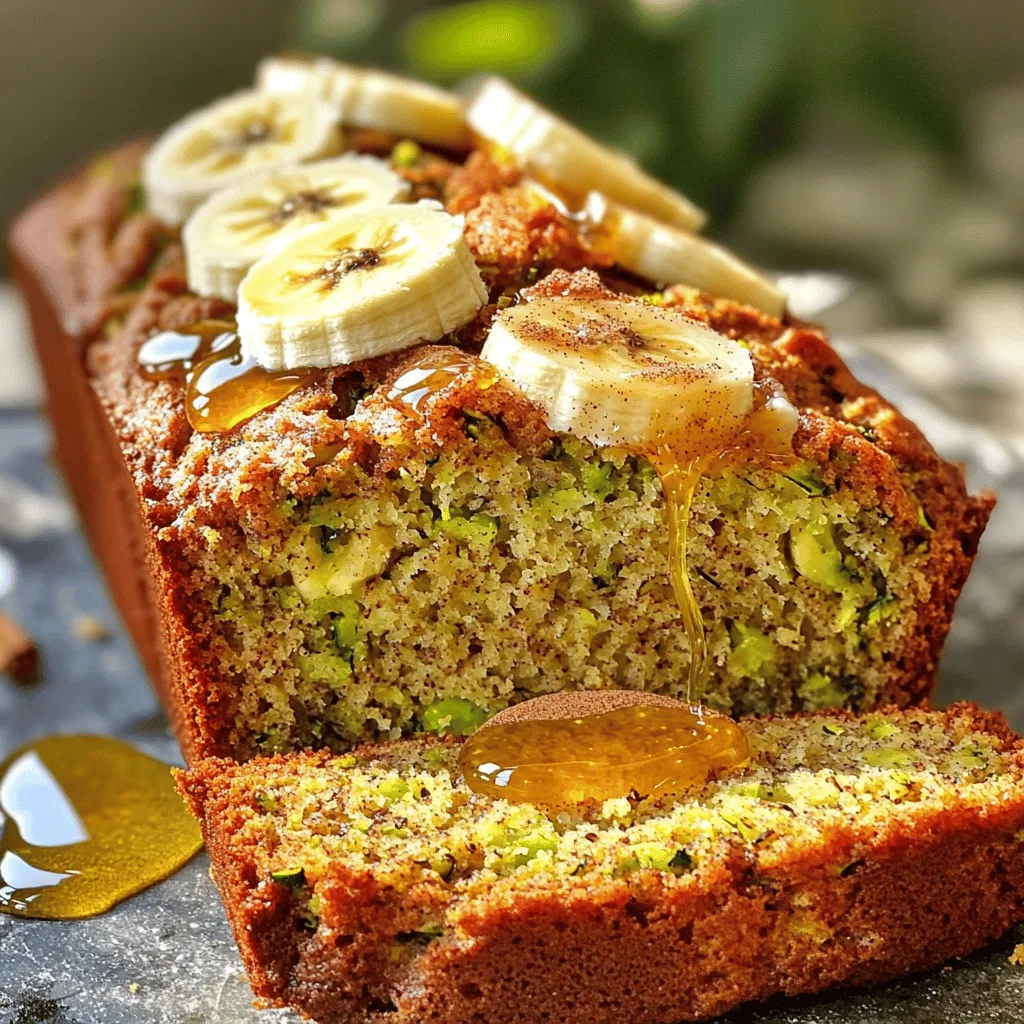
Are you ready to bake a treat that combines two of your favorite flavors? Zucchini Banana Bread is a moist

To make a refreshing Cucumber Lemonade Spritzer, gather these simple ingredients: - 1 large cucumber, peeled and sliced - 2 medium lemons, juiced - 1/3 cup honey or agave syrup (adjust for sweetness) - 4 cups sparkling water - Fresh mint leaves for garnish - Ice cubes Using fresh ingredients makes a big difference. Choose a large cucumber that feels firm to the touch. Look for bright green skin with no soft spots. For the lemons, organic is best. They have a richer flavor and fewer chemicals. Fresh mint adds a nice touch; it should smell strong and look vibrant. Always try to use ingredients in their prime for the best taste. You don't need fancy tools for this recipe. Here’s what you need: - A blender to mix the cucumber and lemon juice - A fine mesh sieve to strain the mixture - A large pitcher for serving - A measuring cup for honey or agave syrup - A juicer for the lemons - Ice cube trays for chilling your drink These tools will help you create a perfect Cucumber Lemonade Spritzer every time. For the full recipe, you can refer to the previous section. To start, you need to peel and slice one large cucumber. The cucumber gives a fresh taste. Next, juice two medium lemons. Make sure to remove any seeds. Then, place the cucumber slices and lemon juice into a blender. Blend it all until smooth. This mix is bright and full of flavor. Now, strain the cucumber-lemon mixture. Use a fine mesh sieve to catch any pulp. Pour the smooth liquid into a large pitcher. Next, stir in one-third cup of honey or agave syrup. This adds sweetness to balance the tartness. Mix until the sweetener fully dissolves. Then, slowly add four cups of sparkling water. Gently stir to keep the bubbles. Taste your drink to see if it needs more sweetness. Fill your glasses with ice cubes first. Then, pour the cucumber lemonade spritzer over the ice. For a pretty touch, garnish with fresh mint leaves. You can add extra cucumber slices for a nice look. Serve this drink right away to keep it bubbly and refreshing. Enjoy this summer treat with friends and family! For the complete recipe, check out the Full Recipe section. Sweetness can change a drink's taste. If you want it sweeter, add more honey or agave syrup. If you prefer less sweetness, reduce the amount. Taste as you mix. This will help you find your perfect blend. Remember, a little goes a long way. You can always add more, but you can't take it out. You can make your Cucumber Lemonade Spritzer ahead of time. Prepare the cucumber-lemon mix and store it in the fridge for up to two days. Just add the sparkling water before serving. This keeps the bubbles fresh. Always add ice when serving to keep it cold. If you make it too early, the fizz will fade. For a bolder taste, try adding fresh herbs. Mint or basil pairs well with cucumber and lemon. You can muddle the herbs in the bottom of your glass before pouring in the spritzer. This step brings out more flavor. You can also add sliced strawberries or raspberries for a fruity twist. Play with flavors and have fun! {{image_2}} You can make your Cucumber Lemonade Spritzer even more fun by adding flavors. Try fresh herbs like basil or rosemary. These add a nice twist and a fresh scent. You can also mix in fruits like strawberries or blueberries. They not only give great color but also taste great. Just muddle the herbs or fruits in the bottom of your glass. Then pour in the cucumber lemonade. This drink shines as both a non-alcoholic and alcoholic drink. For a refreshing mocktail, stick to the original recipe. You can sip it all day. If you want a kick, add a splash of vodka or gin. Just mix it in before you serve. The drink stays light and bubbly, perfect for summer fun. Seasonal changes can inspire new flavors. In spring, add fresh strawberries for a sweet touch. You can also try a splash of elderflower syrup for a floral note. In the fall, consider adding apple slices and a hint of cinnamon. This gives a cozy twist that warms up chilly days. Each season brings new tastes, so feel free to play with the recipe! You can find the Full Recipe above for all the details. To keep your Cucumber Lemonade Spritzer fresh, store it in a clean, airtight pitcher. Make sure to use a lid to help maintain its fizz. Avoid leaving it out at room temperature. Instead, place it in the fridge right after serving. This keeps it cold and refreshing for your next drink. If you notice any leftover mint leaves, remove them before storing. They can wilt and affect the taste. You can enjoy your Cucumber Lemonade Spritzer for up to three days in the fridge. After that, it may lose its sparkle and flavor. It’s best to drink it fresh, but if you have leftovers, just remember that the taste may change over time. Always check for any odd smells or changes in color before you pour a glass. Do not let leftover cucumber or lemon go to waste! Use extra cucumber slices in salads or sandwiches. You can also add lemon juice to dressings or marinades. Both ingredients are versatile and can bring brightness to many dishes. If you have leftover mint leaves, try using them in tea or as a garnish for desserts. These ideas help you maximize your ingredients while reducing waste. Yes, you can easily use other sweeteners. You may try agave syrup, maple syrup, or stevia. Each option will change the taste slightly. Stevia is much sweeter, so use less. Adjust the amount to fit your taste. Experiment to find what you like best! You can store Cucumber Lemonade Spritzer in the fridge for up to three days. Keep it in a covered pitcher or jar. The drink may lose some fizz over time. To enjoy the best flavor, drink it fresh. Cucumbers are low in calories and high in water. They help keep you hydrated. Lemons are packed with vitamin C. This boosts your immune system and helps you feel bright. Together, they make a refreshing drink that can aid digestion and promote healthy skin. Enjoy this drink while also reaping the benefits of its ingredients! The Cucumber Lemonade Spritzer is refreshing and versatile. We covered essential ingredients, tools, and steps for making it. Adjust sweetness to fit your taste, or try different flavors for fun twists. Remember to store leftovers properly to enjoy later. This drink is not just tasty; it also has health benefits from the main ingredients. With these tips and tricks, you can impress anyone with your spritzer-making skills. Enjoy your creations, and share them with friends!

Cucumber Lemonade Spritzer Refreshing Summer Drink

Looking for a drink that screams summer? Meet the Cucumber Lemonade Spritzer! Crisp cucumbers and tangy lemons come together to

- 6 ripe peaches, pitted and sliced - 1 tablespoon lemon juice - 1/2 cup brown sugar - 1 teaspoon cinnamon - 1/2 teaspoon nutmeg - 1 cup rolled oats - 1/2 cup all-purpose flour - 1/2 cup softened butter - 1/4 cup granulated sugar - 1/4 teaspoon salt - Total preparation and cooking time: 50 minutes - Number of servings: 8 When you gather your ingredients, aim for fresh peaches. Ripe peaches bring the best flavor. You can tell they are ripe by their sweet smell. The lemon juice adds a nice zing and keeps the peaches bright. Brown sugar gives a rich taste, while cinnamon and nutmeg add warmth. For the topping, rolled oats are key. They bring texture and crunch. The flour helps bind everything. Softened butter gives a rich taste and helps the topping crisp up. Granulated sugar sweetens it just right. A pinch of salt balances the flavors. For the full recipe, follow the steps to create this delightful dessert. Start by washing the peaches. Use ripe ones for the best taste. Slice the peaches and remove the pits. In a large bowl, mix the sliced peaches with lemon juice, brown sugar, cinnamon, and nutmeg. Toss the peaches gently until they are coated well. This will give your crisp a burst of flavor. Next, grease a 9x13 inch baking dish. Spread the peach mixture evenly in the dish. In another bowl, combine rolled oats, all-purpose flour, and salt. Mix these dry ingredients together. Then, add the softened butter. Use your hands or a fork to mix until it looks crumbly. This crumbly topping will give your peach crisp a nice texture. Layer the peach mixture in the greased baking dish. Evenly sprinkle the oat topping over the peaches. Set your oven to 350°F (175°C) and bake for 30-35 minutes. You want the peaches to be bubbly and the topping to turn golden brown. When it is done, let the crisp cool for a few minutes before you dig in. For the full recipe, check out the detailed instructions above. Using ripe peaches is key for the best flavor. Look for peaches that feel soft but not mushy. Their sweetness will shine in your crisp. To achieve a golden topping, make sure to mix the butter well with the oats and flour. Use your hands for a crumbly texture. This helps create that perfect crispy layer on top. Serve your peach crisp warm for the best taste. A scoop of vanilla ice cream on top adds creaminess. You can also drizzle some caramel sauce for extra sweetness. If you prefer, whipped cream is a great choice too. It balances the warm crisp perfectly. You can add nuts like walnuts or almonds for a crunchy twist. Chopped nuts bring a new flavor and texture to your dish. Mixing in other fruits, like berries or apples, can also enhance the taste. For sweetening, consider using honey or maple syrup instead of sugar. These options can give a unique flavor to your peach crisp recipe. For more details, check out the Full Recipe. {{image_2}} You can switch up the fruit in peach crisp. Berries like blueberries or raspberries work great. Apples also add a nice crunch. Mixing different fruits gives your crisp a new flavor. Try using peaches with blackberries or strawberries for a summer twist. The sweet and tart blend makes each bite exciting. If you need a gluten-free option, use almond flour or coconut flour for the topping. These flours keep the crisp light and tasty. You can also mix in nuts for added crunch. Just make sure to watch the texture. You want it crumbly, not too wet or dry. For a vegan peach crisp, swap the butter for coconut oil. Use brown sugar or maple syrup instead of regular sugar. These changes keep the flavor rich and sweet. If the recipe calls for eggs, use flaxseed meal or applesauce as a substitute. This keeps the mixture moist and flavorful without any animal products. Check out the Full Recipe for more tips and ideas! After making your peach crisp, let it cool. Cover it with plastic wrap or foil. Store it in the fridge. The best temperature is around 40°F (4°C). It stays fresh for about 3 to 5 days. If you want to keep it longer, freezing is a great option. To freeze your peach crisp, first let it cool completely. Wrap it tightly with plastic wrap. Then, add a layer of foil for extra protection. You can freeze it for up to 3 months. When ready to bake, remove the wrap. Bake it from frozen at 350°F (175°C) for about 40 to 45 minutes. To reheat, place the leftover crisp in the oven. Preheat the oven to 350°F (175°C). Bake for about 15 to 20 minutes. This helps restore the crisp texture. It also warms the peach filling nicely. Enjoy it warm with a scoop of vanilla ice cream! The cold ice cream pairs well with the warm crisp. For a better experience, serve it fresh from the oven. Yes, you can use canned peaches. They save time and are easy to find. However, fresh peaches taste better and have a firmer texture. Canned peaches are often softer and sweeter. If you choose canned peaches, drain them well. This prevents excess liquid in your crisp. You might want to reduce the sugar since canned peaches can be sweetened. You can tell the peach crisp is done when the topping is golden brown. The fruit should be bubbly, and you will see juices around the edges. Stick a fork into the topping. If it feels crisp and not mushy, it's ready. Let it cool for a few minutes before serving. This helps the juices set a bit more. If you need an oat substitute, try using almond flour or crushed nuts. Both options give a nice crunch. You can also use quinoa flakes for a gluten-free choice. If you prefer a grain-free option, try shredded coconut. Each substitute will change the flavor and texture, so choose what you like best. This blog post covered how to make a delicious peach crisp. We discussed fresh ingredients, step-by-step instructions, and helpful tips. You can even try variations like gluten-free or vegan options. Remember, using ripe peaches is key for flavor. Serve it warm with ice cream for a treat. Enjoy your cooking and savor each bite. Peach crisp is a simple way to delight friends and family!

Peach Crisp with Oat Topping Simple Dessert Delight

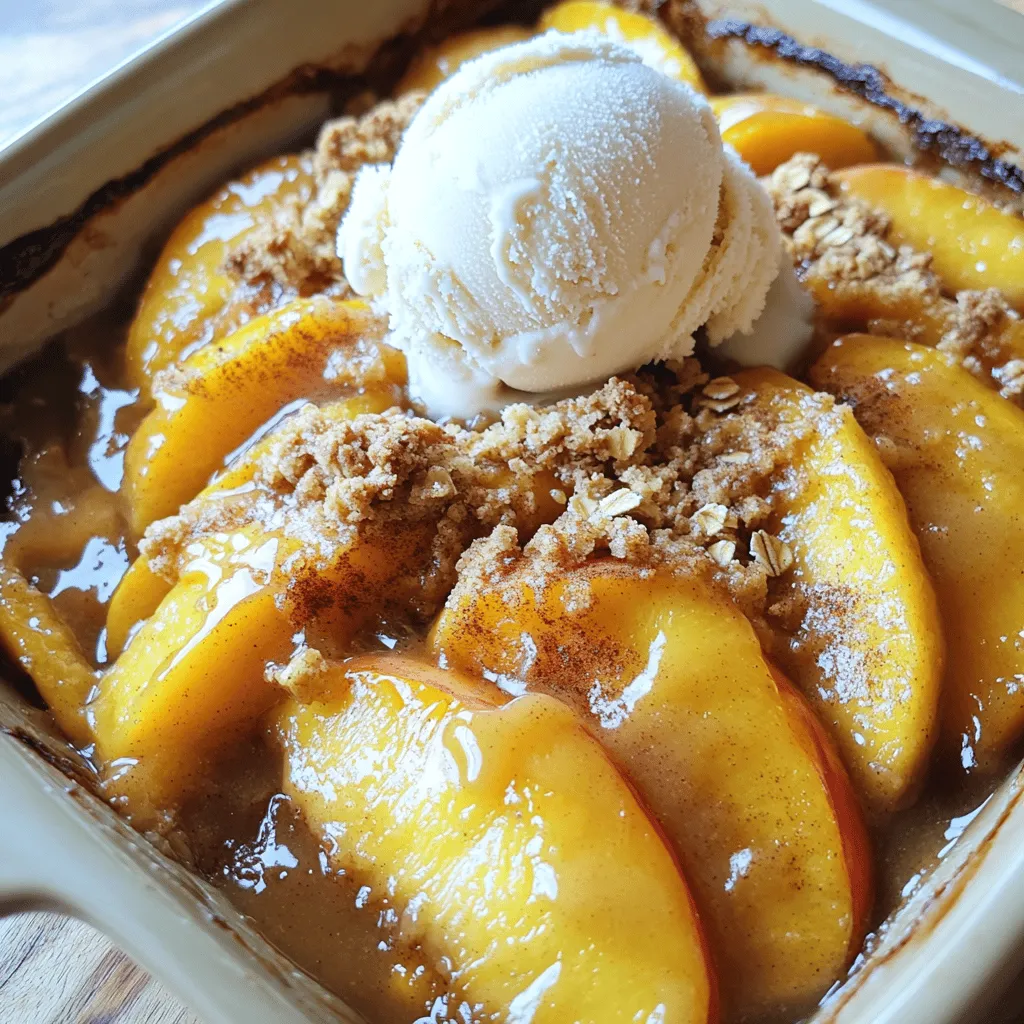
Craving a sweet and simple treat? This Peach Crisp with Oat Topping is just what you need! It’s an easy

To make delicious zucchini taco boats, gather these items: - 4 medium zucchinis - 1 cup cooked quinoa - 1 can (15 oz) black beans, rinsed and drained - 1 cup corn (fresh or frozen) - 1 cup cherry tomatoes, halved - 1 avocado, diced - 1 teaspoon chili powder - 1 teaspoon cumin - 1 teaspoon garlic powder - Salt and pepper to taste - ½ cup shredded cheese (cheddar or Mexican blend) - ¼ cup fresh cilantro, chopped - Lime wedges for serving These zucchini taco boats are not just tasty; they are also healthy. Each serving offers a good mix of nutrients. You get protein from quinoa and beans. Zucchini adds fiber and vitamins. Avocado gives healthy fats. If you want to count calories, one serving has about 350 calories. This makes it a great meal for lunch or dinner. You can make your zucchini taco boats even better with some fun toppings. Here are a few suggestions: - Salsa for a fresh kick - Sour cream for creaminess - Sliced jalapeños for heat - Extra avocado for richness - Crumbled feta or goat cheese for a tangy flavor Feel free to get creative. The toppings can make each bite unique and exciting! If you want the full recipe, check out the detailed steps above. Start by preheating your oven to 375°F (190°C). Take your zucchinis and slice them in half lengthwise. Use a spoon to scoop out the seeds. This creates the perfect little boats for your filling. Place the zucchini halves cut side up on a baking sheet. This step is key for even cooking. In a large mixing bowl, combine 1 cup of cooked quinoa, 1 can of rinsed black beans, and 1 cup of corn. Add 1 cup of halved cherry tomatoes and 1 diced avocado. Sprinkle in 1 teaspoon of chili powder, cumin, and garlic powder. Don't forget to add salt and pepper to taste. Mix everything well. This filling is colorful and packed with flavor. Now, it’s time to fill those zucchini boats! Spoon the filling into each half, packing it down lightly. Top them with ½ cup of shredded cheese. Bake the zucchini in the preheated oven for 25-30 minutes. You want them tender, and the cheese should be melted and bubbly. After baking, let them cool for a few minutes. Garnish with fresh cilantro and serve with lime wedges for that zesty finish. Enjoy your flavorful meal! For the complete recipe, check out the full recipe section. When picking zucchini, look for firm, shiny skin. Choose smaller zucchinis, as they taste sweeter. Avoid ones that feel soft or have dark spots. Fresh zucchini has a bright color and no blemishes. This ensures the best flavor for your taco boats. You can change up the filling based on what you have. Here are some ideas: - Use cooked rice or farro instead of quinoa. - Add ground turkey or beef for more protein. - Try different beans, like pinto or kidney beans. - Mix in diced bell peppers or onions for extra crunch. The options are endless, so feel free to get creative! Serve your zucchini taco boats with fresh lime wedges. The juice brightens the dish. You can also add toppings like: - Diced jalapeños for heat. - Sour cream or Greek yogurt for creaminess. - Sliced radishes for a nice crunch. - Fresh salsa or guacamole for added flavor. These extras make each bite a delight. For the full recipe, check out the recipe section. {{image_2}} Zucchini taco boats are very easy to make vegetarian or vegan. For a vegetarian twist, use cheese made from milk. You can also add more veggies for flavor. Try bell peppers, mushrooms, or spinach. For a vegan option, skip the cheese. Use a plant-based cheese or leave it out completely. The filling remains delicious without it! Want more heat? Add diced jalapeños or a dash of hot sauce to your filling. If you like it milder, reduce the chili powder. You can also replace it with smoked paprika for a nice flavor without the heat. Adjust the spice level to match your taste buds! Get creative with your fillings! You can add cooked lentils for more protein. Swap black beans for pinto beans or chickpeas if you prefer. Try adding spices like oregano or fresh herbs like basil for a fresh touch. You can even mix in some diced bell peppers or shredded carrots for extra crunch. The options are endless, so have fun experimenting! For the full recipe, check the main section. After enjoying your Zucchini Taco Boats, let them cool down. Place any leftovers in an airtight container. Store them in the fridge. They will stay fresh for about 3 to 4 days. If you want to keep them longer, freezing is a great option. When you're ready to enjoy your leftovers, preheat your oven to 350°F (175°C). Place the zucchini boats on a baking sheet. Cover them with foil to keep them moist. Heat for about 15 to 20 minutes or until warm. You can also use a microwave. Just heat them for about 1 to 2 minutes. Check if they are hot enough before serving. To freeze Zucchini Taco Boats, first, let them cool completely. Wrap each boat tightly in plastic wrap. Then put them in a freezer-safe bag. Remove as much air as possible. They will keep well for up to 3 months. When you’re ready to eat, thaw them overnight in the fridge before reheating. This way, they’ll taste fresh and delicious. Enjoy your meal anytime! For the full recipe, check out the details above. Yes, you can use different proteins in zucchini taco boats. Ground beef, turkey, or chicken work great. If you prefer plant-based options, try lentils or tempeh. Mix and match to fit your taste. Just make sure the protein is cooked before adding it to the filling. Leftover zucchini taco boats last about three days in the fridge. Store them in an airtight container. This keeps the flavors fresh. If you notice any change in smell or texture, it’s best to toss them out. You can make zucchini taco boats ahead of time. Prepare the filling and stuff the zucchini boats. Cover and store them in the fridge for up to 24 hours. When ready to eat, just bake them. This makes dinner quick and easy! For the full recipe, check out the details above. Zucchini taco boats are an easy and tasty dish. We covered the best ingredients, steps to prepare them, and fun toppings. I shared tips for choosing zucchini and creative filling ideas. You can also store leftovers and reheat them easily. Whether you're vegetarian or want to change the spice level, these boats fit your needs. Enjoy making this dish and experimenting with new flavors. Keep it simple, and have fun in the kitchen!

Zucchini Taco Boats Flavorful and Easy Meal Idea

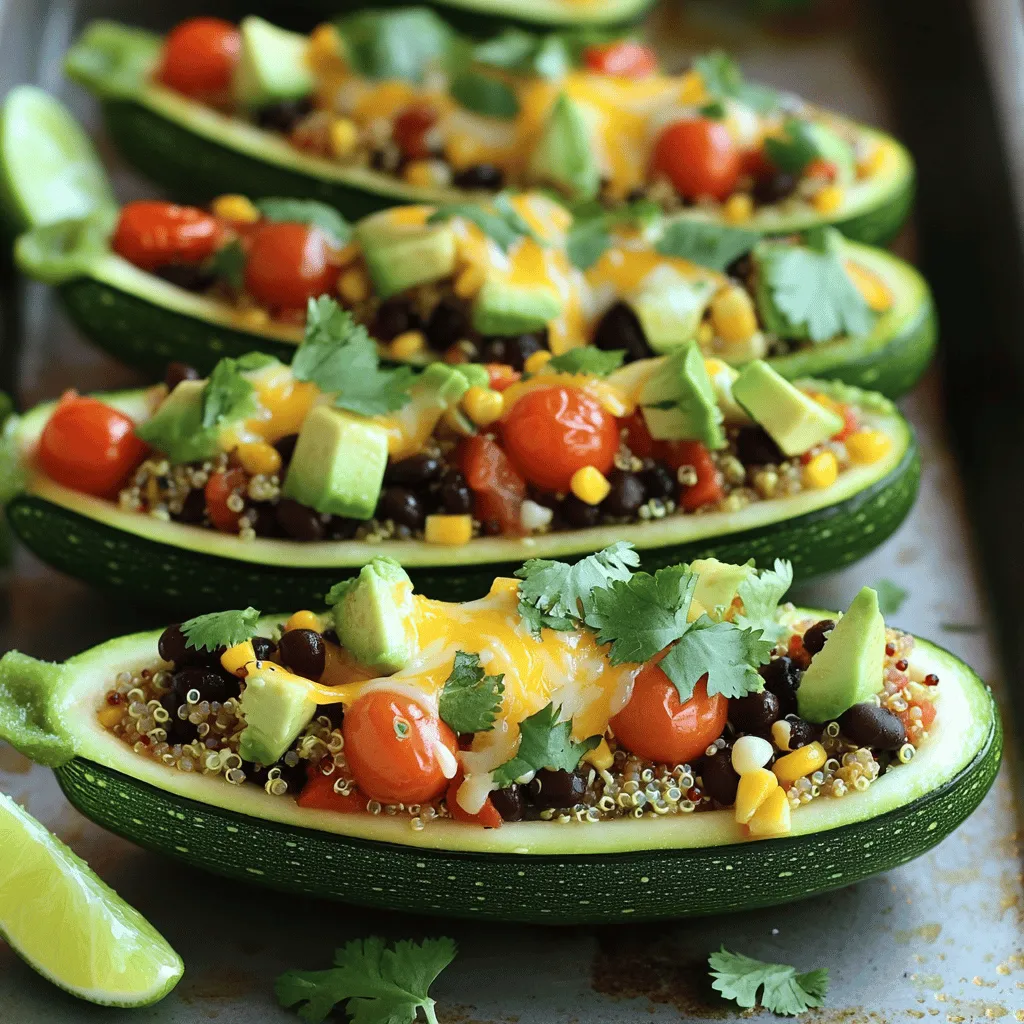
Looking for a tasty and easy meal idea? Try my Zucchini Taco Boats! They’re fun to make and packed with

For a delicious Cucumber Basil Smoothie, gather these simple ingredients: - 1 large cucumber, peeled and chopped - 1 ripe banana - 1 cup fresh basil leaves, packed - 1 cup almond milk (or any preferred plant-based milk) - 1 tablespoon honey or maple syrup (optional for sweetness) - 1 tablespoon lime juice - 1/2 cup ice cubes - A pinch of sea salt Each ingredient adds its own unique flavor. The cucumber gives a refreshing crunch, while the banana adds a sweet creaminess. Fresh basil brings a lovely herbal note, making this smoothie truly special. Almond milk makes it smooth and rich, and lime juice brightens the taste. You can adjust the sweetness by adding honey or maple syrup if you prefer. The sea salt enhances all the flavors. This recipe is not only tasty but also healthy, making it perfect for any time of day. For the full recipe, check below and enjoy making your own refreshing drink! - First, peel and chop the cucumber. Cut it into small pieces for easy blending. - Next, grab a ripe banana. Peel it and break it into chunks. This makes blending smooth. - Now, add the cucumber and banana to your blender. Make sure you have enough room. - Toss in the fresh basil leaves. They add a great flavor and aroma. - Pour in the almond milk. This gives your smoothie a creamy base. - If you want a touch of sweetness, add honey or maple syrup. It’s optional but nice. - Squeeze in the lime juice. This adds a zesty kick to the drink. - Finally, sprinkle in a pinch of sea salt. It enhances all the flavors. - Incorporate the ice cubes into the blender. They chill the smoothie and make it refreshing. - Blend everything on high speed until it is smooth and creamy. This takes about 30-60 seconds. - If you like a thinner drink, add a bit more almond milk. Blend again to mix. - Taste your smoothie. If you'd like it sweeter, add more honey or syrup. Blend once more. - Pour the smoothie into glasses and enjoy. You can garnish it with a basil leaf or cucumber slice for style. For the full recipe, refer to the earlier section. To get the perfect thickness for your cucumber basil smoothie, focus on the balance of ingredients. Start with the cucumber and banana, as they create a nice base. Use one cup of almond milk for smoothness. Blend well until you reach a creamy texture. If your smoothie feels too thick, don’t worry. Just add a bit more almond milk slowly. Blend again and check the texture. You want it smooth, not watery. Adjust to your liking for the best experience. Presentation matters, especially with a vibrant smoothie. To make it pop, garnish each glass with a fresh basil leaf. A cucumber slice on the rim adds a special touch. This simple step makes your drink look professional and inviting. Serve your smoothie right away for the best taste. Freshness is key to enjoying the bright flavors. Pour it into chilled glasses for an extra refreshing sip. Enjoy your creation and impress your guests! For the full recipe, check the details above. {{image_2}} You may want to change some ingredients in your cucumber basil smoothie. If you don't have almond milk, you can use other milks. Here are some ideas: - Oat milk - Soy milk - Coconut milk These options still keep your drink creamy. For sweeteners, honey and maple syrup are great. But if you need a change, try these: - Agave nectar - Stevia - Coconut sugar These choices can change the taste and sweetness to your liking. Adding new flavors can make your smoothie even more exciting. Consider these options: - Try adding other fruits like mango or pineapple. They bring a sweet twist. - You can mix in herbs like mint or cilantro for a fresh kick. If you want more nutrition, add protein or superfoods. Here are some ideas: - Greek yogurt for creaminess and protein. - Chia seeds for fiber and omega-3s. - Spinach for extra vitamins without changing the taste. These simple tweaks allow you to make the cucumber basil smoothie your own. You can find the full recipe in the earlier sections. To store your leftover Cucumber Basil Smoothie, pour it into a clean jar. Use a jar with a tight lid to keep it fresh. Make sure to seal it well. This method helps to avoid exposure to air. Store it in the fridge for up to 24 hours. The smoothie tastes best fresh but will last a bit longer this way. If you want to keep your smoothie for a longer time, freezing is your best bet. Pour the smoothie into ice cube trays or freezer-safe bags. This allows you to store it in small portions. When you want to enjoy it again, simply thaw it in the fridge overnight. If you need it faster, leave it at room temperature for about an hour. Once it’s thawed, pour it back into the blender. Blend it again for a smooth texture. This helps recover its original taste and freshness. Enjoy your Cucumber Basil Smoothie anytime! For the full recipe, check out the Cucumber Basil Bliss Smoothie section. What are the health benefits of cucumbers and basil? Cucumbers are low in calories and high in water content. They keep you hydrated and help with weight loss. They also provide vitamins like K and C. Basil is filled with antioxidants. It can help reduce inflammation and improve digestion. Together, they make a great pair for your health. How can I make this recipe vegan-friendly? To make this smoothie vegan, just use almond milk or any plant-based milk. Replace honey with maple syrup for sweetness. This keeps the recipe vegan while still tasting delicious. Can I make this smoothie ahead of time? Yes, you can make this smoothie ahead. However, it’s best to drink it fresh for the best taste. If you must store it, put it in a sealed container in the fridge. Stir or shake well before you drink it. What to do if the smoothie is too bitter or not sweet enough? If your smoothie tastes bitter, try adding more sweetener. A bit of honey or maple syrup works well. You can also add a ripe banana for natural sweetness. Blend again to mix it in well. How to fix a too-thick smoothie? If your smoothie is too thick, add a little more almond milk. Blend until you reach the right consistency. You can always add more ice for chill without making it too thick. This blog covered how to make a tasty smoothie. You learned the essential ingredients and the steps for blending. I shared tips on achieving the perfect consistency and making it look great. You can also explore variations and storage options to keep your smoothie fresh. Remember, you can adjust flavors to your taste and enjoy experimenting. Smoothies can be simple and fun. Get creative, and drink healthy!

Cucumber Basil Smoothie Refreshing and Healthy Drink

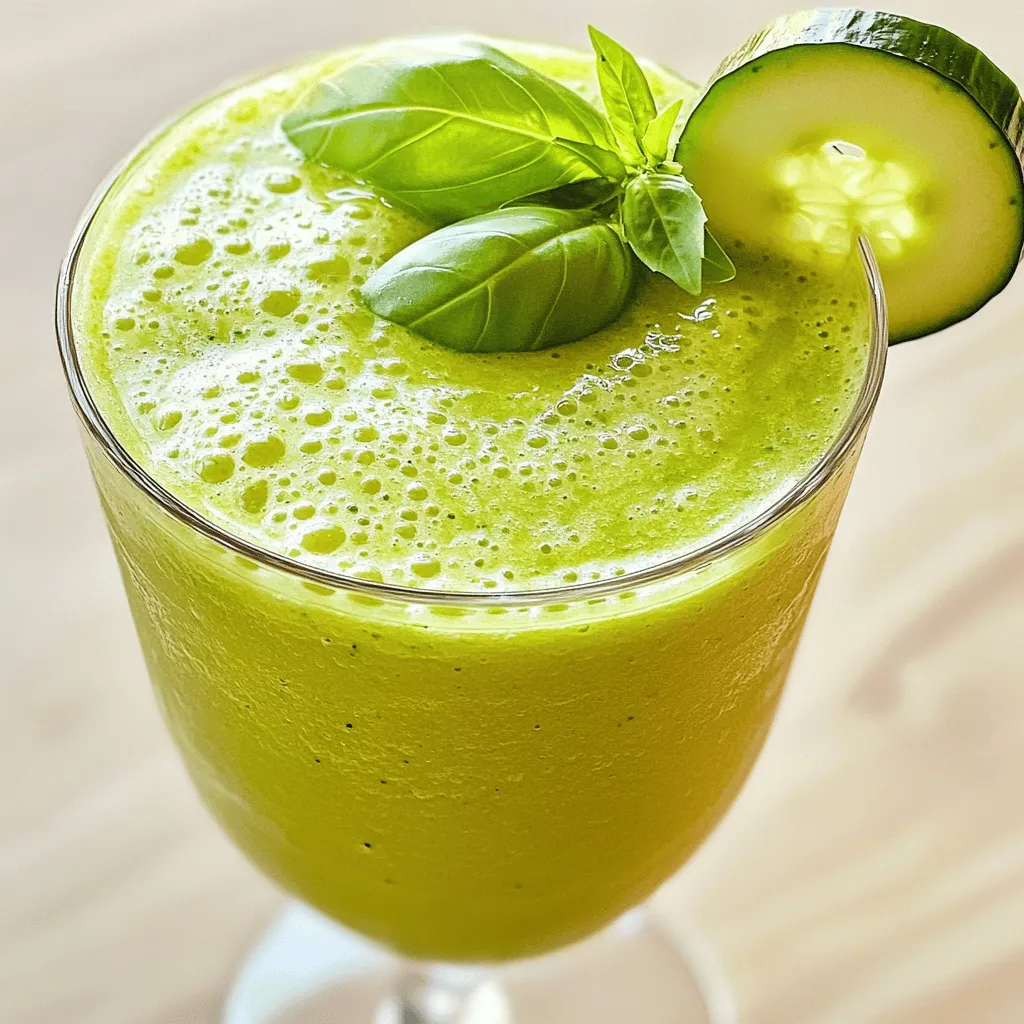
Looking for a refreshing drink that boosts your health? The Cucumber Basil Smoothie is a tasty and simple way to

Using ripe peaches is key. Choose four juicy peaches that are soft to the touch. Slice them into thin wedges. These sweet peaches create a lovely topping. Their natural sugars caramelize when baked. This adds a rich flavor to the cake. You need some basic baking items for this cake. Gather these ingredients: - 4 ripe peaches, pitted and sliced - 1/2 cup unsalted butter, softened - 1 cup brown sugar, packed - 1 cup all-purpose flour - 1 teaspoon baking powder - 1/2 teaspoon baking soda - 1/4 teaspoon salt - 1/2 cup granulated sugar - 2 large eggs - 1 teaspoon vanilla extract - 1/2 cup buttermilk - 1 teaspoon ground cinnamon These items ensure your cake rises and bakes evenly. Each ingredient plays a role in taste and texture. While the cake is delicious on its own, you can add extras. Consider serving it with: - Whipped cream - Vanilla ice cream - Fresh mint leaves These toppings enhance the cake's flavor and add a fun twist. They make it look even more appealing on your table. You can find the full recipe to try this delightful dessert and impress your family or friends! Start by preheating your oven to 350°F (175°C). This step is key for even baking. Next, grab a 9-inch round cake pan. Grease it well with some butter. This helps the cake come out easily after baking. In a medium saucepan, melt 1/4 cup of unsalted butter over medium heat. Once melted, stir in 1 cup of packed brown sugar. Mix until it’s all dissolved and bubbly. Pour this sweet mixture into the bottom of your prepared cake pan. Now, take your 4 ripe peaches. Pitting and slicing them is next. Arrange the peach slices over the brown sugar mix in a nice pattern. This will make the cake look pretty when you flip it over. In a large mixing bowl, whisk together 1 cup of all-purpose flour, 1 teaspoon of baking powder, 1/2 teaspoon of baking soda, 1/4 teaspoon of salt, and 1 teaspoon of ground cinnamon. This dry mix gives your cake its structure and flavor. In another bowl, cream together the remaining 1/4 cup of softened butter and 1/2 cup of granulated sugar. Mix until it feels light and fluffy. Add in 2 large eggs one at a time, mixing well after each. Then, stir in 1 teaspoon of vanilla extract. Now, it’s time to combine the wet and dry mixes. Gradually add the dry ingredients to the butter mix. Alternate this with 1/2 cup of buttermilk. Mix just until everything is combined. Be careful not to overmix, as that can make the cake tough. Pour the batter gently over the arranged peaches in the pan. Smooth it out with a spatula. Place the cake in the preheated oven and bake for 35-40 minutes. To check if it's done, insert a toothpick in the center. It should come out clean. After baking, let the cake cool in the pan for about 10 minutes. Then, carefully invert it onto a serving plate. Let it cool completely before serving. Enjoy your Peach Paradise Upside Down Cake for a delightful treat! To get a great bake, check your oven’s temperature. An oven thermometer helps. If your oven runs hot or cold, adjust the time. Use a toothpick to test the cake. It should come out clean when done. Let the cake cool for a bit in the pan before flipping it. This step helps keep it from breaking. A soggy cake can ruin your delight. Make sure to use ripe, but not overripe, peaches. Overripe fruit can release too much juice. Also, drain any extra juice from the peaches before you arrange them. Avoid overmixing the batter; this can add too much air and lead to a dense cake. Serving this cake is fun! Try it warm with a scoop of vanilla ice cream. Whipped cream adds a nice touch too. A sprinkle of cinnamon can enhance the flavor. For a fresh twist, add mint leaves on top. For more details, check the Full Recipe. {{image_2}} You can swap peaches for other fruits. Pineapples work great for a classic twist. You can also try apples or pears for a fall vibe. Berries like blueberries or raspberries add a fresh touch. Choose fruits that caramelize well. This keeps the cake sweet and juicy. Experiment with your favorites for a fun change. Adding spices can elevate your cake. Try nutmeg or ginger for a warm kick. A splash of almond extract gives a nice nutty flavor. You can also add lemon zest for a bright taste. For chocolate lovers, fold in chocolate chips for richness. These little changes make the cake even more delightful. If you need a gluten-free option, use almond flour or a gluten-free blend. Make sure your other ingredients are gluten-free too. The texture may differ, but the taste stays yummy. Always check your baking powder and other pantry staples. This way, everyone can enjoy a slice of this peach upside down cake. For the full recipe, refer back to the Peach Paradise Upside Down Cake. To keep your peach upside down cake fresh, store it in an airtight container. Place a piece of parchment paper between the cake and the lid to absorb moisture. This helps prevent sogginess. You can keep it at room temperature for up to two days. If you want it to last longer, refrigerate it. The cool air will keep the flavors intact but may dry it out slightly. You can freeze the cake if you have leftovers. First, let the cake cool completely. Then, slice it into pieces. Wrap each piece in plastic wrap, then in aluminum foil. This keeps the air out and helps it stay fresh. You can freeze it for up to three months. To enjoy, simply thaw it in the fridge overnight or at room temperature for a few hours. When you're ready to eat your cake, reheating is easy. You can use the oven or microwave. For the oven, preheat it to 350°F (175°C). Place the cake on a baking sheet and cover it with foil. Heat for about 10-15 minutes. If using the microwave, warm a slice for 15-20 seconds. This brings back the soft texture. Enjoy your delicious peach upside down cake! For more details, check the Full Recipe. Yes, you can make this cake ahead. Bake it and let it cool completely. Once cooled, cover it tightly with plastic wrap. Store it in the fridge for up to three days. You can also freeze it for longer storage. Just make sure to wrap it well to avoid freezer burn. To check if the cake is done, insert a toothpick into the center. If it comes out clean, the cake is ready. You can also gently press the top of the cake. If it springs back, it is done. Bake for 35-40 minutes for best results. If you don't have buttermilk, you can make a quick substitute. Mix 1/2 cup of milk with 1/2 tablespoon of vinegar or lemon juice. Let it sit for 5 minutes. This will mimic buttermilk's tangy flavor. You can also use plain yogurt or sour cream, thinned with a little milk. This blog post covered how to make a delicious peach cake. We explored ingredients, from fresh peaches to optional toppings. I shared step-by-step instructions for preparation and baking. You learned tips to ensure a perfect bake and avoid soggy cake. We also discussed variations and storage best practices. Finally, I answered common questions about making the cake ahead and substitutes. Enjoy baking, and have fun experimenting with flavors and fruits! Your peach cake will impress everyone.

Peach Upside Down Cake Delight Simple Recipe Idea

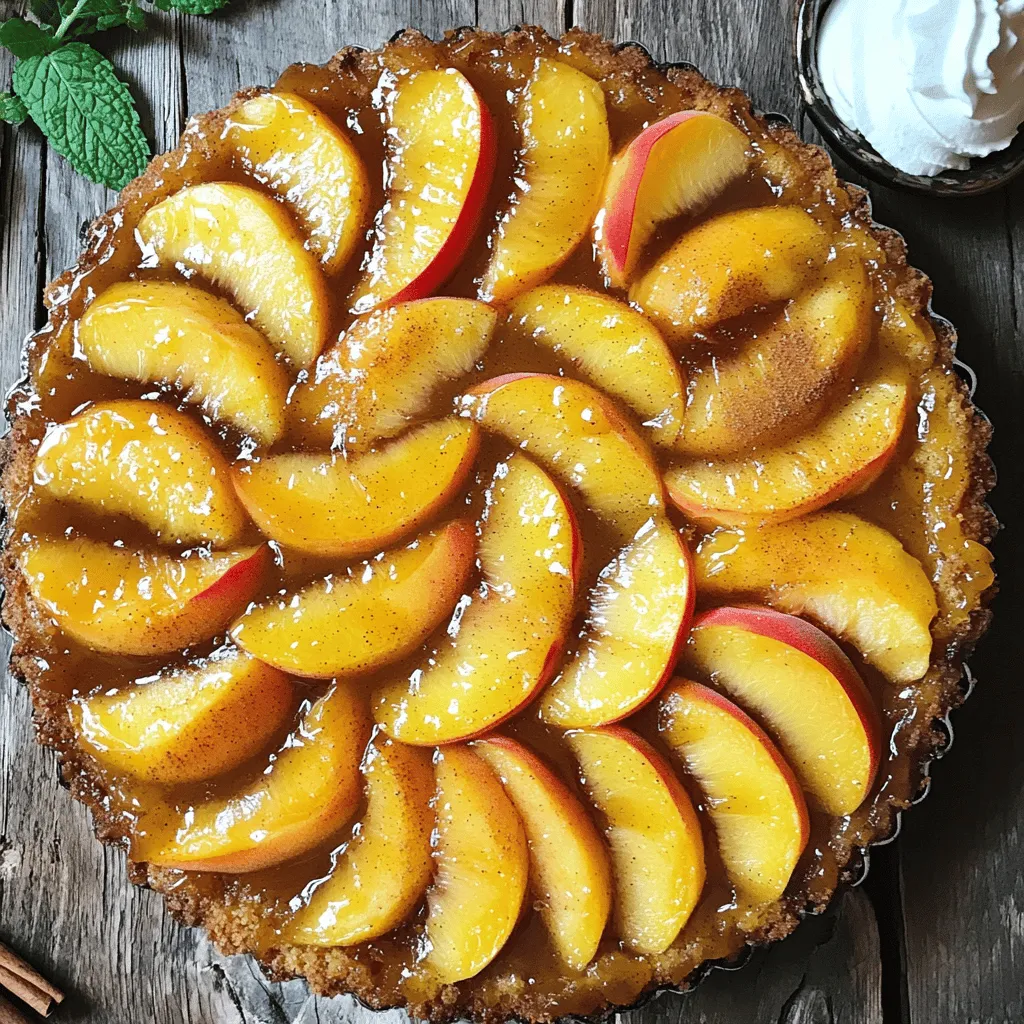
If you love sweet, juicy peaches, you’re in for a treat! This Peach Upside Down Cake is a simple, fun

Older posts
Newer posts
← Previous Page1 … Page35 Page36 Page37 … Page80 Next →

dsad

© 2025 pureeatsnow • Built with GeneratePress

Our Policies

  • Copyright Policy
  • Cookie Policy
  • GDPR Policy
  • Privacy Policy
  • Disclaimer
  • Terms Of Use

More Information

  • Home
  • About
  • Contact
  • Appetizers
  • Dessert
  • Dinner
  • Drinks
©2025, pureeatsnow About Back To Top