Skip to content
DisclaimerTerms Of UseGDPR PolicyCookie Policy

pureeatsnow

  • Home
  • Drinks
  • Appetizers
  • Dinner
  • Dessert
  • About
  • Contact
  • Privacy Policy
DisclaimerTerms Of UseGDPR PolicyCookie Policy

Rachel

To make Easy Shrimp Scampi Pasta, we need a few key items. I’ll break them down by category for you. Pasta: - 8 oz linguine or spaghetti Shrimp: - 1 lb large shrimp, peeled and deveined Aromatics: - 4 cloves garlic, minced Fats: - 1/4 cup unsalted butter - 2 tablespoons olive oil Seasonings: - Zest and juice of 1 lemon - 1/4 teaspoon red pepper flakes (optional) - Salt and pepper to taste - Fresh parsley, chopped (for garnish) - Grated Parmesan cheese (for serving) You can easily swap some ingredients for what you have. If you don’t have linguine or spaghetti, try fettuccine or penne. For the shrimp, use scallops or chicken if you prefer. If you want a dairy-free option, swap butter with olive oil or vegan butter. Fresh parsley can be replaced with basil for a different flavor. These simple changes help you enjoy this dish even if you're missing some items. For the full recipe, check the details. To cook linguine or spaghetti, start by boiling salted water in a large pot. This adds flavor to your pasta. For best results, follow the package instructions. You want the pasta to be al dente, which means it's cooked but still firm to the bite. Usually, this takes about 8-10 minutes. Before you drain the pasta, save about 1/2 cup of the pasta water. This water is starchy and will help your sauce later. Next, it's time to sauté the garlic. In a large skillet, mix butter and olive oil over medium heat. Wait until the butter melts completely. Then, add the minced garlic. Stir it often for about 1-2 minutes. You want the garlic to smell great, but don’t let it burn. Burnt garlic can taste bitter and ruin your dish. Now, you will cook the shrimp. Add them straight to the skillet with the garlic. Season with salt, pepper, and red pepper flakes if you want some heat. Cook the shrimp for 2-3 minutes on one side. When they turn pink and opaque, flip them over. Cook for another 2-3 minutes until fully cooked. Perfectly cooked shrimp will curl slightly and have a nice sheen. Once the shrimp is ready, add lemon zest and juice. This brightens up the dish. Now, gently toss in the cooked pasta. If the mix looks dry, pour in some reserved pasta water. Add it slowly until it reaches your desired consistency. Make sure every strand of pasta is coated well with the sauce. Lastly, it’s time for the finishing touches. Remove the skillet from heat. Garnish your dish with fresh parsley for color. If you love lemon, squeeze a little more juice on top. Serve the pasta hot and sprinkle with grated Parmesan cheese. This makes for a beautiful presentation that looks gourmet! For the full recipe, check out the details above. - Overcooking shrimp and pasta: This can ruin texture. Shrimp should be pink and firm. Pasta should be al dente. Keep a close eye on cooking times. - Skipping ingredient prep or substitutions: Always prep your ingredients first. This saves time and keeps you organized. If you lack an ingredient, find a suitable swap. - Additional spices and herbs for customization: You can add red pepper flakes or fresh herbs. Consider using basil, oregano, or thyme. These can boost flavor without much effort. - Alternatives to butter and oil for a healthier option: Try using avocado oil or ghee. These options provide healthy fats. They also add unique flavors to the dish. - Using pre-cooked shrimp options: Pre-cooked shrimp can cut down your cooking time. Just heat them gently with the garlic for a quick meal. - Meal prep strategies for quick assembly: Prepare your ingredients ahead of time. Chop garlic and herbs, and measure spices. This makes the cooking process smoother and faster. For the complete recipe, check out the Full Recipe section. {{image_2}} You can make shrimp scampi even better by adding vegetables. Spinach and cherry tomatoes are great choices. They add color and nutrients. To add spinach, toss it in during the last minute of cooking. It wilts quickly, making it easy to mix in. For cherry tomatoes, cut them in half and add them when you cook the shrimp. They will soften and release their juices, adding a nice flavor. If you like heat, try spicy shrimp scampi. You can use more red pepper flakes for a kick. Start with a pinch and add more to taste. You can also add crushed red pepper or cayenne pepper. Be careful not to overpower the dish. Use just enough spice to enhance the flavor. Balance is key. If it gets too spicy, add a touch of cream or extra butter to smooth it out. To make a creamy version of shrimp scampi, simply add heavy cream or cream cheese. Start with 1/2 cup of cream after you cook the shrimp. Stir it in well and let it heat up. If you want a richer flavor, add grated Parmesan cheese. This makes the dish feel more luxurious. You can also reduce some of the pasta water to thicken the sauce. For more details, check the Full Recipe. To store leftovers, first let the shrimp scampi pasta cool. Place it in an airtight container. This keeps the pasta fresh and prevents odors. Use a glass or plastic container with a tight lid. Glass containers are great for reheating. They won’t hold onto smells and are easy to clean. If you want to freeze shrimp scampi pasta, make sure it cools completely. Use freezer-safe containers or zip-top bags. Remove as much air as possible. This keeps the dish from getting freezer burn. For best results, eat it within three months. When you're ready to eat, thaw it in the fridge overnight. To reheat, use a skillet over low heat. Add a splash of water or broth to keep it moist. Stir often to warm it evenly. You can also use a microwave. Cover it with a damp paper towel to trap steam. This helps revive the flavors and keeps it from drying out. Add a bit of fresh lemon juice before serving for a flavor boost. For the full recipe, check out the Garlic Lemon Shrimp Scampi Pasta. Shrimp scampi pasta lasts about three days in the fridge. To keep it fresh, store it in an airtight container. Always check for any off smells or changes in texture before eating. If it looks or smells bad, it's best to throw it away. Yes, you can use frozen shrimp! Just make sure to thaw them first. You can do this overnight in the fridge or quickly in cold water. Fresh shrimp is great, but frozen is often just as good. It’s a time-saver too! Linguine or spaghetti works best for shrimp scampi. These shapes hold the sauce well and allow the shrimp to shine. You can also try fettuccine for a different texture. Just pick your favorite and enjoy! If you want shrimp scampi without wine, use chicken broth or vegetable broth. Both add great flavor. You can also add more lemon juice for a fresh taste. The key is to create depth with what you have on hand. Yes, shrimp scampi can be gluten-free! Just use gluten-free pasta instead of regular pasta. Many brands offer options like rice or quinoa pasta. This way, everyone can enjoy this tasty dish without worry. In this blog, I broke down how to make shrimp scampi pasta. We covered ingredients, cooking steps, and how to avoid common mistakes. You learned tips to enhance flavors and ideas for variations. I shared storage tips to keep leftovers fresh and delicious. Remember, cooking is about creativity and fun. Feel free to adjust the recipe to suit your taste! Enjoy crafting your perfect shrimp scampi pasta!

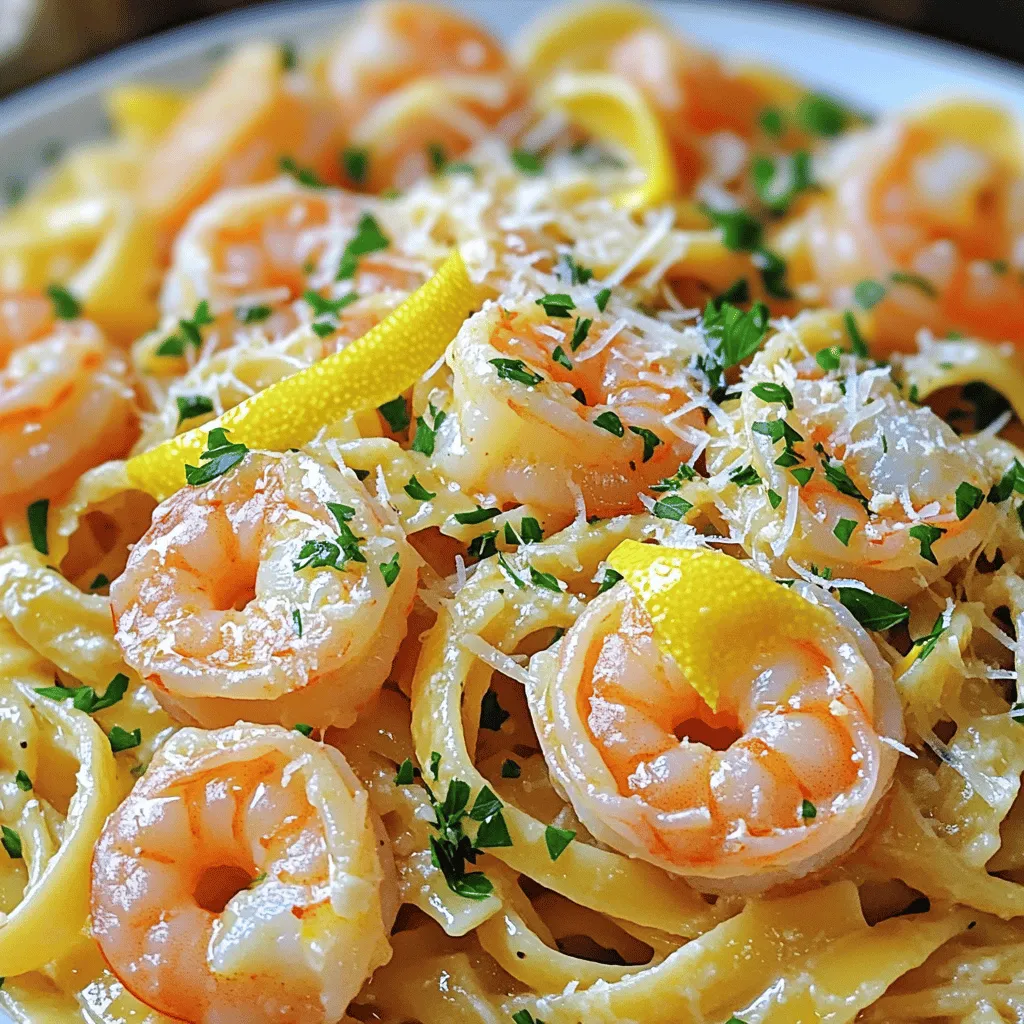
Easy Shrimp Scampi Pasta Quick and Flavorful Meal

Looking for a quick and tasty meal? Easy Shrimp Scampi Pasta is your answer! This dish combines tender shrimp, fragrant

- 8 oz egg noodles (or any preferred noodle) - 4 tablespoons sesame oil - 6 cloves garlic, minced - 1 teaspoon red pepper flakes (adjust to taste) - 2 tablespoons soy sauce - 1 tablespoon oyster sauce (vegetarian) - 1 tablespoon sriracha (or more for heat) - 1 cup mixed bell peppers, julienned - ½ cup green onions, sliced - Sesame seeds for garnish - Fresh cilantro for garnish In this dish, the egg noodles serve as the perfect base. You can use other noodles like rice or even whole wheat. The sesame oil brings a rich flavor that pairs well with garlic. Garlic is the star here. It adds depth and aroma. I use six cloves, but you can adjust this based on your taste. The red pepper flakes give a nice kick. If you like things hotter, add more! The soy sauce and oyster sauce (or vegetarian substitute) enhance the savory flavor. Sriracha can be increased for more heat. For crunch and color, I add mixed bell peppers. They brighten up the dish and add texture. Green onions provide a fresh note. Finally, sesame seeds and cilantro are must-have garnishes. They finish off the dish beautifully. - Large pot for boiling noodles - Skillet or wok for sautéing - Mixing bowls for sauce preparation - Cooking utensils To cook these noodles, you’ll need a large pot to boil water. A skillet or wok works great for sautéing garlic and veggies. Use mixing bowls to prepare your sauces. Simple cooking utensils like spatulas and tongs will help you combine everything easily. - Calories: Approximately 400 per serving - Carbohydrates: 60g - Protein: 10g - Fat: 15g - Allergens: Contains soy and sesame This dish is filling and packed with flavor. The calories can vary based on your ingredients. Always check for allergens, especially if serving guests. You can find the full recipe in the article for more detailed steps. - Bring water to a boil, add salt. - Cook noodles until al dente, drain. Cooking the noodles is the first step. Use a big pot for boiling. Make sure the water is salty, like the sea! This adds flavor to the noodles. Stir them in so they don’t stick. Check the package for cooking time. Al dente means they should be firm but not hard. Drain the water when done, and set the noodles aside. - Combine soy sauce, oyster sauce, and sriracha. - Mix to ensure an even consistency. Next, we make the sauce. In a small bowl, combine soy sauce, oyster sauce, and sriracha. This mix gives the noodles a bold flavor. Stir it well until everything blends nicely. You want a smooth sauce to coat the noodles evenly. - Heat sesame oil and sauté garlic. - Add red pepper flakes, stir for fragrance. - Introduce mixed bell peppers, stir-fry until slightly softened. Now it’s time to sauté. In a large skillet or wok, heat sesame oil over medium heat. Add minced garlic and red pepper flakes. This will smell amazing! Stir for 1-2 minutes, but be careful. We don’t want to burn the garlic. Next, toss in the bell peppers. Stir-fry them for about 2-3 minutes. They should be soft but still crisp. - Toss cooked noodles with sautéed ingredients. - Ensure noodles are evenly coated with sauce. It’s time to combine everything! Add the drained noodles to the skillet. Pour the sauce over the noodles. Toss everything together until the noodles are coated. Make sure every noodle gets some sauce. This is key to a tasty dish. - Stir in sliced green onions. - Cook for an additional minute to heat through. For the final touches, toss in sliced green onions. These add a fresh crunch. Stir everything and let it cook for another minute. This ensures the dish is hot and ready to serve. - Plate in deep bowls with garnishes. - Optional lime wedge for added freshness. Serve your spicy garlic noodles in deep bowls. Garnish with sesame seeds and fresh cilantro for color. If you like, add a lime wedge on the side. A squeeze of lime brings a bright flavor that pairs perfectly with the spicy noodles. Enjoy this bold and flavorful delight! To make the perfect spicy garlic noodles, you can easily adjust the heat. Start with one teaspoon of red pepper flakes. Taste and add more if you want it spicier. Remember, everyone's spice tolerance is different! When sautéing garlic, pay close attention. If it burns, it will taste bitter. Cook it just until fragrant, about one to two minutes. This dish is fun to customize. You can swap out the egg noodles for rice noodles or even whole wheat noodles. If you want to add protein, try chicken, shrimp, or tofu. Just cook your protein before adding it to the noodles for a balanced meal. To make your dish look as good as it tastes, sprinkle sesame seeds and fresh cilantro on top. A colorful mix of vegetables can enhance the visual appeal. Use bright bell peppers, carrots, or snap peas. Arrange them nicely for a beautiful plate! For a special touch, serve in deep bowls with a drizzle of extra sesame oil. {{image_2}} To make spicy garlic noodles vegan, swap oyster sauce for vegetable broth. This keeps the dish tasty and plant-based. You can also add more veggies like carrots or broccoli. These not only boost nutrition but add bright colors too. For a gluten-free option, choose gluten-free noodles. Rice noodles or quinoa noodles work well. Make sure all sauces are gluten-free. Check labels on soy sauce and oyster sauce to be safe. If you love heat, increase the sriracha and red pepper flakes. You can also add sliced jalapeños. This will give your dish a serious kick. Just remember to taste as you go, so it’s just right for you. For full details on how to make these variations, check the Full Recipe. To keep your spicy garlic noodles fresh, place them in an airtight container. This will help lock in flavor and moisture. You can refrigerate them for up to 3 days. After that, the noodles may lose their taste and texture. When it's time to enjoy your leftovers, reheat them on the stovetop. This method warms the noodles evenly. To prevent them from drying out, add a splash of water or oil while reheating. Stir well to mix everything together. If you want to save some for later, you can freeze the noodles. They can be frozen for up to a month. However, freeze them before adding any fresh garnishes. This keeps the flavors intact and ensures the best taste when you defrost and reheat. You can reduce the spice by cutting back on red pepper flakes and sriracha. Start with half the amount. Taste the dish as you go. This way, you keep control over the heat. Yes, you can prepare the noodles in advance. Just store them in the fridge in an airtight container. When you're ready, reheat them on the stove or in the microwave. Pair these noodles with Asian-inspired appetizers. Spring rolls and dumplings make great choices. They balance the dish and add variety to your meal. Yes, you can skip the garlic. However, this changes the flavor a lot. Garlic adds depth and richness that you might miss. Absolutely! This recipe works with various noodle types. Try rice noodles, udon, or soba. Each brings a unique taste and texture. Sesame oil is my go-to for this dish. It gives a rich flavor that enhances the noodles. If you don’t have it, vegetable oil can work too. This blog post detailed a simple guide to making Spicy Garlic Noodles. We covered ingredients, cooking steps, and ways to customize your dish. Remember, you can adjust spice levels and swap in your favorite noodles. This recipe is flexible, allowing for vegan and gluten-free options. Enjoy experimenting with flavors and presentation for your meals. Now, you have the tools to create a tasty dish that's perfect any day!

Spicy Garlic Noodles Bold and Flavorful Delight

Get ready to wake up your taste buds with Spicy Garlic Noodles: Bold and Flavorful Delight! This quick, easy recipe

Here are the ingredients you'll need for Cheesy Broccoli Stuffed Chicken: - 4 boneless, skinless chicken breasts - 1 cup broccoli florets, steamed and chopped - 1 cup shredded cheddar cheese - 1/2 cup cream cheese, softened - 1/4 teaspoon garlic powder - 1/4 teaspoon onion powder - 1/2 teaspoon paprika - Salt and pepper to taste - 2 tablespoons olive oil - 1/4 cup breadcrumbs (optional, for topping) To make this dish, I love using fresh, quality ingredients. The chicken breasts need to be boneless and skinless, which makes them easy to stuff. The broccoli should be steamed first for soft texture and great flavor. I recommend using sharp cheddar cheese for that bold taste. Cream cheese adds creaminess, making the stuffing rich. Spices like garlic powder, onion powder, and paprika bring out the flavors. Salt and pepper are essential for taste. Olive oil keeps the chicken moist during baking. If you want a crunchy topping, breadcrumbs work well. You can find the full recipe for this delicious dish [Full Recipe]. Using these ingredients, you can create a juicy and flavorful meal that is sure to impress. - Preheat your oven to 375°F (190°C). Grease a baking dish with olive oil. - In a bowl, mix steamed broccoli, cheddar cheese, cream cheese, garlic powder, onion powder, paprika, salt, and pepper. Stir well until smooth. - Take each chicken breast and carefully slice a pocket into the side. Do not cut all the way through. - Stuff each chicken breast pocket with the broccoli and cheese mix. Press it gently to close. - Place the stuffed chicken in the greased dish. Brush the tops with olive oil. If you like, sprinkle breadcrumbs on top for extra crunch. - Bake for 30-35 minutes. Check if the chicken is cooked through and juices run clear. If using breadcrumbs, they should be golden and crispy. For the complete recipe and more tips, check out the Full Recipe. To keep your chicken juicy, use a meat thermometer. Cook the chicken to 165°F. This ensures safe eating while keeping moisture in. Another tip is to let the chicken rest after cooking. This helps the juices stay put. When stuffing chicken, slice a pocket carefully. Aim for a good size but don't cut all the way through. Too small, and you can't fit the filling. Too big, and it may burst. For plating, place the stuffed chicken on a nice plate. Drizzle it with balsamic glaze for color and flavor. Garnish with fresh parsley. This adds a nice touch and makes it look fancy. Pair the chicken with a side salad or roasted vegetables. These sides balance the meal and add nutrition. You can also serve it with rice or mashed potatoes for a filling dinner. For the full recipe, check out the Cheesy Broccoli Stuffed Chicken. {{image_2}} You can change the cheese to fit your taste. Cream cheese works well, but you can also use mozzarella or pepper jack for a kick. If you want a sharp flavor, consider using gouda or parmesan. Each cheese adds a unique twist to the dish. For veggies, broccoli is great, but you can mix in spinach, kale, or even roasted bell peppers. Chopped mushrooms or zucchini also add flavor and texture. Get creative! You can grill or air fry this stuffed chicken for a different taste. For grilling, preheat your grill to medium-high. Cook the chicken for about 6-7 minutes per side. Keep an eye on it so it cooks evenly. If you prefer air frying, set your air fryer to 375°F. Cook for around 18-20 minutes. Check that it reaches an internal temperature of 165°F. For a slow cooker, place the stuffed chicken in the cooker. Add a little broth for moisture. Cook on low for 4-5 hours. This method makes the chicken super tender and juicy. For the full recipe, check out the main section. To store leftover stuffed chicken, let it cool first. Wrap each piece in plastic wrap or foil. You can also use an airtight container to keep it fresh. Proper storage helps maintain the flavor and texture of the chicken. Keep it in the fridge for up to three days. If you want it to last longer, consider freezing it. I recommend using glass or BPA-free plastic containers. These containers help avoid any unwanted taste from the plastic. Make sure they seal tightly to keep air out. When you reheat stuffed chicken, you want to keep it juicy. The best way to do this is in the oven. Preheat your oven to 350°F (175°C). Place the chicken in a baking dish and cover it with foil. This helps retain moisture. Heat for about 20 minutes or until warm. If you use a microwave, be careful. Microwaves can dry out the chicken. To avoid this, place the chicken on a microwave-safe plate. Add a splash of water and cover it with a damp paper towel. Heat for about 2 to 3 minutes, checking often. For more details, you can check the Full Recipe. How long to cook stuffed chicken? You should cook the stuffed chicken for 30 to 35 minutes at 375°F (190°C). This time ensures the chicken cooks all the way through. Always check that the juices run clear to confirm it's done. Can I make this recipe ahead of time? Yes, you can prepare the Cheesy Broccoli Stuffed Chicken ahead of time. Stuff the chicken breasts and store them in the fridge for up to 24 hours before baking. This can save you time on busy nights. What to serve with Cheesy Broccoli Stuffed Chicken? I love serving this dish with a side salad or roasted vegetables. The fresh flavors balance the richness of the stuffed chicken. You can also try garlic bread for a nice touch. Caloric breakdown per serving Each serving of Cheesy Broccoli Stuffed Chicken has around 400 calories. This number may vary based on your specific ingredients and portion sizes. Key nutrients contained in the dish This dish packs protein from the chicken and calcium from the cheese. Broccoli adds fiber and vitamins, making it a healthy choice. Can I freeze the stuffed chicken? Yes, you can freeze the stuffed chicken before baking. Wrap each piece tightly in plastic wrap and store it in an airtight container. It can last for up to three months. What can I use instead of broccoli? Feel free to swap broccoli with spinach or kale. You can also use mixed vegetables for a fun twist. Just make sure to chop them finely for easy stuffing. For more details and insights, check the Full Recipe. In this blog post, I shared a tasty recipe for Cheesy Broccoli Stuffed Chicken. You learned about the ingredients, step-by-step instructions, cooking tips, and creative variations. This dish is simple and perfect for any meal. Use fresh ingredients for the best flavor. Don't hesitate to try new stuffings or cooking methods. With practice, you’ll make a dish that impresses everyone at the table. Happy cooking!

Cheesy Broccoli Stuffed Chicken Juicy and Flavorful Meal

If you’re craving a meal that bursts with flavor and comfort, you’ve landed in the right place. Cheesy Broccoli Stuffed

- 1 cup unsalted butter - 1 cup granulated sugar - 1/2 cup packed brown sugar - 4 large eggs - 1 teaspoon vanilla extract - 1 cup all-purpose flour - 1/2 cup unsweetened cocoa powder - 1/2 teaspoon salt - 1/2 teaspoon baking powder - 1 cup chocolate hazelnut spread - 1/2 cup chopped hazelnuts (optional) I love using simple, fresh ingredients to create delicious treats. Each one plays a key role in the flavor and texture of these brownies. The butter gives them richness, while the sugars add sweetness. Eggs make them moist and fluffy. The cocoa powder brings that deep chocolate flavor. I often pick high-quality chocolate hazelnut spread for the best taste. If you want a crunchy bite, add chopped hazelnuts. They also add a nice nutty flavor. - 9x13-inch baking pan - Parchment paper - Medium saucepan - Mixing bowls - Whisk and spatula You need a few basic tools to make this recipe. A 9x13-inch baking pan is perfect for these brownies. Parchment paper helps with easy removal. Use a medium saucepan for melting the butter. Mixing bowls are great for combining wet and dry ingredients. A whisk and spatula make mixing easy and fun. - Prep Time: 15 mins - Cook Time: 25-30 mins - Servings: 16 brownies These brownies are quick to make. You can prep them in just 15 minutes. Once baked, they take 25 to 30 minutes in the oven. You’ll end up with 16 delicious brownies to share or enjoy on your own. Check out the Full Recipe for more details! - Preheat the oven to 350°F (175°C). - Grease and line the baking pan with parchment paper. This helps with easy removal later. - Melt butter in a saucepan over low heat. Keep an eye on it so it doesn't burn. - Stir in granulated and brown sugar until combined. You want it smooth. - Add the eggs one at a time and mix well after each. Then, stir in the vanilla extract. - In another bowl, whisk together flour, cocoa powder, salt, and baking powder. Make sure no lumps remain. - Gradually add the dry mixture to the wet ingredients. Mix just until combined. Overmixing can make the brownies tough. - Fold in the chocolate hazelnut spread. This gives rich flavor and a gooey texture. - Optionally, mix in chopped hazelnuts for extra crunch. They add a nice contrast to the soft brownies. - Pour the batter into the prepared pan. Spread it evenly for even baking. - Bake for 25-30 minutes or until the toothpick test is clean. A few moist crumbs are fine. - Let cool in the pan for 10 minutes. This helps them set. - Transfer to a wire rack to cool completely. Cut into squares for serving. Enjoy your delicious brownies! For the full recipe, check the section above. To make the best brownies, you need to avoid overmixing. Mix just until the ingredients blend well. This keeps your brownies soft and fudgy. The right baking time is also key. Check them at 25 minutes. If a toothpick comes out with moist crumbs, they are done. For a richer taste, add a pinch of espresso powder. This small touch makes a big difference. You can also try different nuts or chocolate chips. Each type brings its own flavor to the brownies. Serve your brownies warm with a scoop of vanilla ice cream. The cold ice cream melts into the warm brownie, creating a perfect treat. You can also drizzle chocolate or caramel sauce on top. This adds extra sweetness and makes your brownies look fancy. For the full recipe, check the section above. {{image_2}} You can easily make these brownies gluten-free. Just substitute the all-purpose flour with a gluten-free blend. Many stores sell good blends. Ensure you check the ingredients for any added flavors or sugars. If you follow a vegan diet, you can still enjoy these brownies. Use a dairy-free butter alternative. Instead of eggs, use flax eggs. To make a flax egg, mix one tablespoon of ground flaxseed with two and a half tablespoons of water. Let it sit for a few minutes until it thickens. Feel free to play with flavors! Try using different chocolate spreads. Almond or peanut butter spreads can add unique twists. Each spread changes the taste and texture. Experiment to find your favorite flavor! Store brownies in an airtight container at room temperature for up to 3 days. This keeps them fresh and tasty. I love to enjoy them on the first day when they are soft and chewy. You can refrigerate brownies for up to a week. If you want to keep them longer, freeze them for up to 3 months. Just wrap each brownie in plastic wrap and place them in a freezer bag. You can enjoy a sweet treat whenever you like! To bring back that warm, fresh-baked taste, warm brownies in the microwave for 10-15 seconds. This makes them soft and gooey, just like when you first baked them. If you want to get fancy, add a scoop of ice cream on top! It’s a delightful way to enjoy your chocolate hazelnut spread brownies. For the complete recipe, check out the Full Recipe section. Yes, you can substitute with hazelnut or peanut butter spreads. Each spread adds a unique flavor. Hazelnut spread gives a rich, nutty taste that pairs well with chocolate. Peanut butter adds a creamy, salty twist. Experiment to find your favorite! Use the toothpick test: insert into the center and ensure it comes out with a few moist crumbs. If it comes out clean, the brownies may be overcooked. Aim for that perfect balance of gooey and set. This method works every time! Absolutely, they keep well in the fridge and can be made a few days before serving. Just store them in an airtight container. This makes it easy for parties or gatherings. You can enjoy them fresh, even days later! Excellent with ice cream, whipped cream, or fresh berries. Ice cream adds cold creaminess. Whipped cream adds lightness. Fresh berries give a fruity contrast. Each pairing enhances the rich brownie flavor. Enjoy creating your perfect dessert plate! We explored how to make delicious chocolate hazelnut spread brownies. You learned about key ingredients, tools, and even variations. Remember, the right mix of wet and dry ingredients makes the best brownies. With a few tips, you can enhance flavor and texture. Enjoy these treats fresh or store them for later. No matter how you serve them, these brownies will impress. You now have everything you need to bake perfectly fudgy brownies!

Chocolate Hazelnut Spread Brownies Delightful Treat

Are you ready to indulge in a rich, fudgy dessert? My Chocolate Hazelnut Spread Brownies are sure to be your

- 1 lb Brussels sprouts, trimmed and halved - 3 tablespoons olive oil - 1/4 cup pure maple syrup - 2 tablespoons balsamic vinegar - 1 teaspoon Dijon mustard - 2 cloves garlic, minced - 1/2 teaspoon salt - 1/4 teaspoon black pepper - 1/4 teaspoon red pepper flakes (optional) - 1/4 cup chopped pecans - Fresh parsley, chopped The main ingredients for my maple glazed Brussels sprouts are simple yet flavorful. You start with fresh Brussels sprouts. Halve them for even cooking. Next, you’ll need olive oil. It adds a lovely richness. The star of this dish is pure maple syrup. It brings a sweet touch to balance the sprouts' natural bitterness. Balsamic vinegar adds a hint of tang. The Dijon mustard ties it all together with a bit of spice. For spices, you'll need minced garlic, salt, black pepper, and red pepper flakes if you like some heat. The garlic adds a warm flavor. The salt and pepper enhance all the taste. Lastly, for a crunchy finish, I use chopped pecans and fresh parsley. The pecans add texture, while the parsley gives a fresh burst. These ingredients combine to make a dish that is not just tasty, but also a feast for the eyes. Check the Full Recipe for precise amounts and instructions. 1. Preheat oven to 400°F (200°C). This helps the Brussels sprouts roast evenly. 2. Combine Brussels sprouts with olive oil, salt, and seasonings. In a large bowl, add 1 lb of trimmed and halved Brussels sprouts. Pour in 3 tablespoons of olive oil, 1/2 teaspoon of salt, and a dash of black pepper. Toss until well coated. 1. Spread Brussels sprouts on a baking sheet. Line your baking sheet with parchment paper for easy cleanup. Arrange the Brussels sprouts in a single layer. This step is important to get them crispy. 2. Roast for 20-25 minutes until golden brown. Check halfway through and stir them around. This helps them cook evenly and get that nice golden color. 1. Combine glaze ingredients in a saucepan. In a small saucepan, mix 1/4 cup pure maple syrup, 2 tablespoons balsamic vinegar, 1 teaspoon Dijon mustard, and 2 minced garlic cloves. 2. Simmer until thickened, about 5 minutes. Heat on medium and stir often until the mixture bubbles gently. Then reduce the heat and let it simmer. You want it to thicken up a bit so it clings to the sprouts well. For a full recipe, check out the details above. Enjoy this simple yet flavorful dish! To get the best out of your Brussels sprouts, spread them in a single layer on your baking sheet. This step helps them roast evenly. If the sprouts overlap, some parts will steam instead of roast. Stir them halfway through cooking. This action ensures all sides get that nice golden brown color. You can add more flavor with spices like smoked paprika or garlic powder. These spices give a nice twist. If you want to change the sweetness, add more maple syrup. For a tangy touch, increase the balsamic vinegar. Adjust these flavors to suit your taste. Presentation matters! Serve your sprouts warm on a nice platter. Top with extra pecans and parsley for a pop of color. Pair them with roasted chicken or grilled salmon for a great meal. They also fit nicely with holiday dishes, making them a favorite at family gatherings. For the full recipe, check out the detailed instructions above. {{image_2}} You can switch up the recipe using different nuts or seeds for garnish. Try walnuts, almonds, or sunflower seeds. Each option brings a new crunch and flavor. You can also substitute maple syrup with honey or agave. This gives a different sweetness, making it fun to taste. To make this dish vegan, simply ensure your maple syrup is pure. It already fits this diet, and the other ingredients are vegan too. If you want a gluten-free option, this recipe is perfect as it contains no gluten. You can also reduce calories by cutting back on olive oil or using less maple syrup. You won't lose flavor with these changes. Incorporating seasonal vegetables can enhance this dish. Try adding carrots or sweet potatoes in the fall. In the spring, fresh peas can add a nice touch. Adjust your ingredients based on what's fresh and available at the market. This keeps the dish exciting and flavorful throughout the year. For the full recipe, check out the main article. To keep your maple glazed Brussels sprouts fresh, store them in an airtight container. Place them in the fridge right after they cool down. They stay good for about three days. When reheating, use a skillet over medium heat. This method helps to keep their crispness. Avoid using a microwave, as it can make them soggy. You can freeze Brussels sprouts, but it’s best to do it before cooking. Blanch them in boiling water for two minutes, then cool in ice water. Drain and pack them in freezer bags. They can last up to six months in the freezer. When you’re ready to eat them, thaw overnight in the fridge. Reheat in a skillet or roast from frozen for a tasty meal. In the fridge, cooked Brussels sprouts last for about three days. If you freeze them, they can last up to six months without losing too much flavor. Look for signs of spoilage like a bad smell, discoloration, or mushy texture. If you see these, it’s best to throw them out. To make maple glazed Brussels sprouts, follow these simple steps: 1. Preheat your oven to 400°F (200°C). 2. Take 1 lb of Brussels sprouts, trim them, and cut them in half. 3. In a large bowl, mix the halved sprouts with 3 tablespoons of olive oil, 1/2 teaspoon of salt, and 1/4 teaspoon of black pepper. You can add red pepper flakes for a kick. 4. Spread the Brussels sprouts on a baking sheet in a single layer. 5. Roast for 20-25 minutes until they are golden brown. 6. While they roast, make the glaze. In a saucepan, combine 1/4 cup pure maple syrup, 2 tablespoons balsamic vinegar, 1 teaspoon Dijon mustard, and 2 minced garlic cloves. Heat until it simmers and thickens. 7. Once the sprouts are done, drizzle the glaze over them and toss well. 8. Serve with 1/4 cup of chopped pecans and fresh parsley on top. For the full recipe, check the details above. Yes, you can prepare this dish ahead of time. Here are some tips: - Prep the Brussels sprouts: Trim and halve them a day before. Store them in an airtight container in the fridge. - Make the glaze: You can cook the maple glaze and store it in the fridge for up to a week. Just reheat it before using. - Roast before serving: It’s best to roast the sprouts just before serving for maximum crunch. Maple glazed Brussels sprouts pair well with many dishes. Here are some ideas: - Main dishes: Serve these sprouts with roasted chicken, pork chops, or grilled salmon. - Holidays or special occasions: This dish is perfect for Thanksgiving or Christmas dinners. Its sweet and savory flavor adds a festive touch. Absolutely! Maple glazed Brussels sprouts are great for meal prep. Here's how: - Storage: Store leftovers in the fridge in an airtight container for up to 4 days. - Portioning: Divide the sprouts into single servings for easy reheating. Just warm them in the oven or microwave when ready to eat. Enjoy your cooking adventure! In this blog post, you learned how to make delicious maple glazed Brussels sprouts. We covered the main ingredients, the steps to prepare and roast, and tips to enhance flavor. You also discovered variations and storage methods. These Brussels sprouts are not only tasty but fun to make. Whether for a meal or a special occasion, they can impress everyone at the table. Enjoy trying this recipe and add your twist. Make it yours!

Maple Glazed Brussels Sprouts Flavorful and Simple Dish

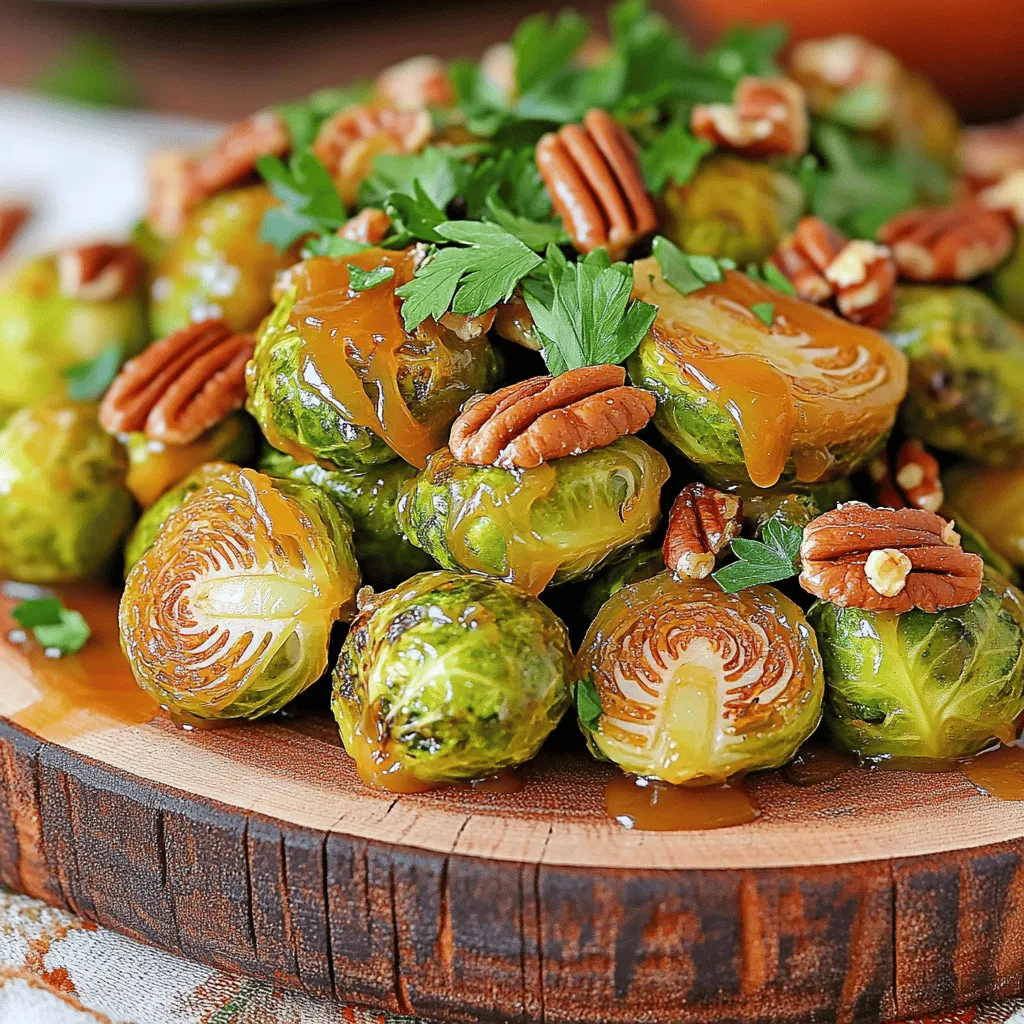
Looking for a tasty, healthy side dish? Maple Glazed Brussels Sprouts are packed with flavor and easy to make. With

- 8 oz (225g) pasta of choice - 1 cup sun-dried tomatoes - 1/2 cup heavy cream or coconut cream - 1/4 cup grated parmesan cheese or nutritional yeast - Crushed red pepper flakes for heat - 1/4 cup baby spinach for added greens - Salt and pepper to taste - 1 tablespoon olive oil - 3 cloves garlic, minced - 1/4 cup fresh basil, chopped The main ingredients in this creamy sun-dried tomato pasta form the heart of the dish. You can use any pasta you like, such as fettuccine or penne. The sun-dried tomatoes bring a rich, tangy flavor. For creaminess, use heavy cream or coconut cream for a dairy-free option. For extra flavor, you can add optional ingredients like grated parmesan cheese or nutritional yeast if you prefer a vegan option. If you like spice, crushed red pepper flakes add a nice kick. Baby spinach is great for a pop of color and added nutrition. Seasoning is key to enhance the dish. Use salt and pepper to taste, along with olive oil and minced garlic to build a rich base. Fresh basil adds a burst of freshness and aroma. Each ingredient plays its part in creating a creamy, flavorful meal that feels special. You can find the full recipe for all the steps to make this delicious dish. - Cook pasta according to package instructions. - Reserve pasta cooking water and drain. To begin, bring a large pot of salted water to a boil. Add your choice of pasta, like fettuccine or penne. Cook it al dente, which means it should be firm but cooked through. This will help the pasta hold up in the sauce. Once cooked, reserve about half a cup of the pasta water before draining it. Set the pasta aside while you work on the sauce. - Sauté garlic in olive oil. - Add sun-dried tomatoes and sauté until fragrant. - Stir in cream and parmesan cheese. In a large skillet, heat one tablespoon of olive oil over medium heat. Add three cloves of minced garlic and cook for about one minute. You want it fragrant, not browned. Next, toss in one cup of chopped sun-dried tomatoes. Sauté them for two to three minutes to bring out their rich flavor. Lower the heat and pour in half a cup of heavy cream, stirring it in well. If you’re using parmesan cheese, add a quarter cup now until it melts and makes the sauce creamy. - Season the sauce with salt, pepper, and red pepper flakes. - Toss cooked pasta with sauce and adjust consistency with reserved water. - Fold in fresh basil and spinach and heat through. Season your sauce with salt, pepper, and a pinch of crushed red pepper flakes if you like heat. Now, add the drained pasta to the skillet. Toss everything together until the pasta is well coated with the creamy sauce. If the sauce seems too thick, add a splash of the reserved pasta water until it reaches your desired consistency. Finally, fold in a quarter cup of fresh chopped basil and some baby spinach if you want more greens. Heat it through just until the spinach wilts. For the full recipe, check out the earlier section. Enjoy your delicious meal! To cook pasta al dente, use a large pot and plenty of water. Add salt to the water before boiling. Follow the package instructions for timing. Taste the pasta a minute before the time is up. It should be firm but not hard. If you want to adjust the sauce thickness, add reserved pasta water a little at a time. This will help create a creamy texture without making the sauce too runny. For a flavor boost, add fresh herbs like thyme or oregano. You can also use spices like garlic powder or onion powder for depth. If you want to add protein, consider cooked chicken or shrimp. Both options pair well with sun-dried tomatoes. They will absorb the sauce flavors and make the dish heartier. Garnish your dish with fresh basil and a sprinkle of cheese. This adds color and flavor to the meal. Serve it in a large bowl for a family-style feel. Pair the pasta with crusty bread to soak up the sauce. This makes for a complete and satisfying meal. For more tips, check the Full Recipe for extra details. {{image_2}} You can make this dish fit your diet. For a vegan option, use coconut cream instead of heavy cream. Replace parmesan cheese with nutritional yeast for a cheesy flavor without dairy. If you need gluten-free pasta, many brands offer tasty options made from rice or chickpeas. Feel free to switch up your pasta. Whole wheat pasta adds more fiber, while gluten-free pasta can cater to dietary needs. You can also add other veggies. Try mushrooms or zucchini for extra flavor and nutrition. They blend well with the sun-dried tomatoes. Travel the world with this dish! For a Mediterranean twist, add olives and capers for a salty kick. If you're craving something more Italian, mix in different cheeses like mozzarella or ricotta. You can even add cooked meats like chicken or sausage to make it heartier. Explore these variations for a Creamy Sun-Dried Tomato Pasta that fits your taste! For the full recipe, check out the main article. To store leftovers, place the creamy sun-dried tomato pasta in an airtight container. This keeps it fresh and tasty. Make sure to let it cool down before sealing. In the fridge, it lasts for about three to four days. When you're ready to eat, reheat it gently on the stove. Add a splash of water or cream to bring back the sauce's creaminess. Stir it often to heat evenly. If you want to save some for later, freezing is a great option. However, creamy pasta dishes can change when thawed. To freeze, let the pasta cool completely. Then, put it in a freezer-safe bag or container. Remove as much air as possible to prevent freezer burn. It can last up to three months in the freezer. When it’s time to eat, thaw it in the fridge overnight. Reheat it on low heat, adding a bit of cream or water to help with the texture. In the fridge, your creamy sun-dried tomato pasta stays good for three to four days. Always check for signs of spoilage before eating. If you see mold or smell a sour odor, it's time to toss it. Fresh basil may wilt, and the sauce may separate too. These are signs that it’s best not to eat. Enjoy your meal, knowing it can stay fresh for a bit! You can use many types of pasta for this dish. I recommend fettuccine or penne. Both hold the sauce well and add a nice texture. If you prefer something different, try farfalle or rigatoni. The key is to choose a pasta that you enjoy. Yes, you can prepare this creamy sun-dried tomato pasta in advance. Cook the pasta and sauce separately, then combine just before serving. This way, your pasta stays firm, and the sauce remains creamy. Store in the fridge for up to three days. Reheat gently on low heat, adding a splash of water if needed. Absolutely! For a dairy-free version, swap heavy cream with coconut cream. It makes the dish rich and creamy without dairy. You can also replace parmesan cheese with nutritional yeast. This ingredient adds a cheesy flavor and is perfect for vegan diets. Enjoy the same great taste without dairy! This blog post covered a creamy pasta dish that's both easy and delicious. You learned about the main ingredients, like pasta, sun-dried tomatoes, and cream. I shared tips to cook the pasta just right and ways to enhance flavor. Variations can suit different diets or tastes. Remember, store your leftovers properly to enjoy later. With these guidelines, you can make a tasty meal that fits your needs and impresses your guests. Enjoy your cooking and let your flavors shine!

Creamy Sun-Dried Tomato Pasta Rich and Flavorful Meal

If you’re craving a dish that’s both rich and flavorful, look no further! This Creamy Sun-Dried Tomato Pasta is a

- 4 large russet potatoes - 4 tablespoons olive oil - 1 head of garlic, roasted - 1 teaspoon garlic powder - 1 teaspoon onion powder - 1 teaspoon smoked paprika - 1 teaspoon dried oregano - Salt and pepper to taste To make these wedges shine, I use russet potatoes. They are starchy and crisp up well. Scrub them clean and cut them into quarters. The garlic is key for flavor. Roasting brings out its sweet, rich taste. Wrap the garlic in foil and roast it in the oven. This makes it soft and buttery. Then, mash it up to mix with the potatoes. - ½ cup freshly grated Parmesan cheese - Fresh parsley, chopped (for garnish) Parmesan cheese adds a salty, nutty kick. I always use fresh cheese for the best taste. Sprinkle it on the wedges in the last few minutes of baking. Fresh parsley brings color and a hint of freshness. It makes the dish look and taste great. - Use a kitchen scale for precise potato sizes. - For seasonings, I recommend using measuring spoons. When measuring potatoes, look for uniform sizes. This helps them cook evenly. For seasoning, start with small amounts. You can always add more if needed. Tasting as you go is a great way to find the right balance. Check out the Full Recipe for details on making these tasty garlic Parmesan potato wedges! 1. Preheating the oven and preparing the baking sheet Start by preheating your oven to 425°F (220°C). This step is crucial for crispiness. While it heats, line a baking sheet with parchment paper. This makes clean-up easy and helps the wedges cook evenly. 2. Roasting the garlic For the roasted garlic, take a head of garlic and cut off the top. Drizzle a bit of olive oil on it. Wrap it in aluminum foil and place it in the oven. Roast for about 30 minutes, until the cloves are soft. Once cool, squeeze the soft garlic into a bowl and mash it until smooth. 3. Combining potatoes and seasoning In a large bowl, combine the quartered russet potatoes with the roasted garlic, olive oil, garlic powder, onion powder, smoked paprika, oregano, salt, and pepper. Use a spoon or your hands to mix it all together. Make sure the potatoes get an even coating of all the tasty seasonings. 4. Ensuring even coating It’s key to coat all the potatoes well. This ensures that every wedge is packed with flavor. Take your time with this step. You want each piece to shine with that roasted garlic goodness. 5. Spreading potato wedges Spread the seasoned potato wedges in a single layer on your prepared baking sheet. Make sure they have space to breathe. If they are too close, they will steam instead of crisping up. 6. Flipping for even cooking Bake the wedges for 30 to 35 minutes. About halfway through, flip them over. This helps them cook evenly and become golden brown on all sides. Following these steps helps create the perfect Roasted Garlic Parmesan Potato Wedges. For the complete recipe, check out the Full Recipe. Using fresh herbs can boost flavor. Fresh oregano adds a bright taste. Dried herbs work too but lack some zing. Try adding spices like cayenne for heat or lemon zest for a fresh twist. These small changes can elevate your dish. Choose a sturdy baking sheet. A heavy one helps with even cooking. Use parchment paper for easy cleanup. It also prevents sticking. For handling, a large spatula works great. Tongs make flipping easy too. To get crispy wedges, space them out on the baking sheet. Crowding them makes them steam and soggy. Flip them halfway through cooking for even browning. If you see any soft spots, they need more time. Keep an eye on them near the end to avoid burning. {{image_2}} You can easily change the taste of your roasted garlic parmesan potato wedges. Try using different cheeses. Cheddar adds a sharp flavor, while goat cheese gives a creamy touch. Both options will elevate your snack. If you like heat, add red pepper flakes or a splash of hot sauce. This will bring a spicy kick to your wedges. Mix and match these flavors to find your favorite combination! You can make these potato wedges vegan or dairy-free with simple swaps. Use nutritional yeast instead of parmesan cheese. This gives a cheesy flavor without dairy. For a gluten-free option, you don’t need to change anything. The ingredients are naturally gluten-free. These potato wedges pair well with many dips. Sour cream is a classic choice, but BBQ sauce adds a sweet twist. You can also serve them as a side dish or appetizer. They are great for parties or cozy nights in. Enjoy them hot for the best taste! For more details, check out the Full Recipe. To keep leftover potato wedges fresh, store them in the fridge. Place them in an airtight container. This helps to keep moisture out and maintain crispness. You can also wrap them tightly in plastic wrap. This method works well too. The wedges will stay good for about 3 to 5 days. When reheating, the oven is best for crispness. Preheat it to 350°F (175°C). Spread the wedges on a baking sheet. Heat them for about 10 to 15 minutes. This method keeps them crispy. If you use a microwave, they may turn soft. If you must use the microwave, place a paper towel under the wedges. This absorbs extra moisture. Yes, you can freeze cooked potato wedges. First, let them cool completely. Then, place them in a freezer-safe bag. Remove as much air as you can. They will last up to 2 months in the freezer. To thaw, move them to the fridge overnight. You can reheat them directly from the freezer too. Just add a few extra minutes to the baking time. For the best taste, eat them fresh whenever possible. Check out the Full Recipe for more tips! For potato wedges, I recommend using russet potatoes. They have a high starch content. This gives them a light, fluffy inside. Their skin is thick, which helps with crispiness. Yukon Gold potatoes are another good choice. They offer a buttery flavor and creamy texture. Both types hold up well when roasted. You want potatoes that can get crispy and stay fluffy inside. Roasted garlic potato wedges last about 3 to 5 days in the fridge. Make sure to store them in an airtight container. If you freeze them, they can last for up to 3 months. To tell if they are spoiled, look for mold or an off smell. If they feel slimy, it’s best to toss them. Yes, you can prepare these wedges ahead of time. You can cut and season the potatoes a few hours before cooking. Just keep them in cold water to prevent browning. For best results, bake them fresh. If you need to reheat, warm them in the oven. This keeps them crispy and tasty. Check out the Full Recipe for more details. This blog post shared how to make tasty roasted garlic potato wedges. We covered the main ingredients and toppings, plus measuring tips for accurate seasoning. I provided step-by-step instructions for preparation, cooking, and flavor enhancements. You also learned about variations for different diets and storage options. Enjoy experimenting with these potato wedges. Bring your personal touch to the recipe. Remember, cooking is about joy and creativity. Happy cooking!

Roasted Garlic Parmesan Potato Wedges Irresistible Snack

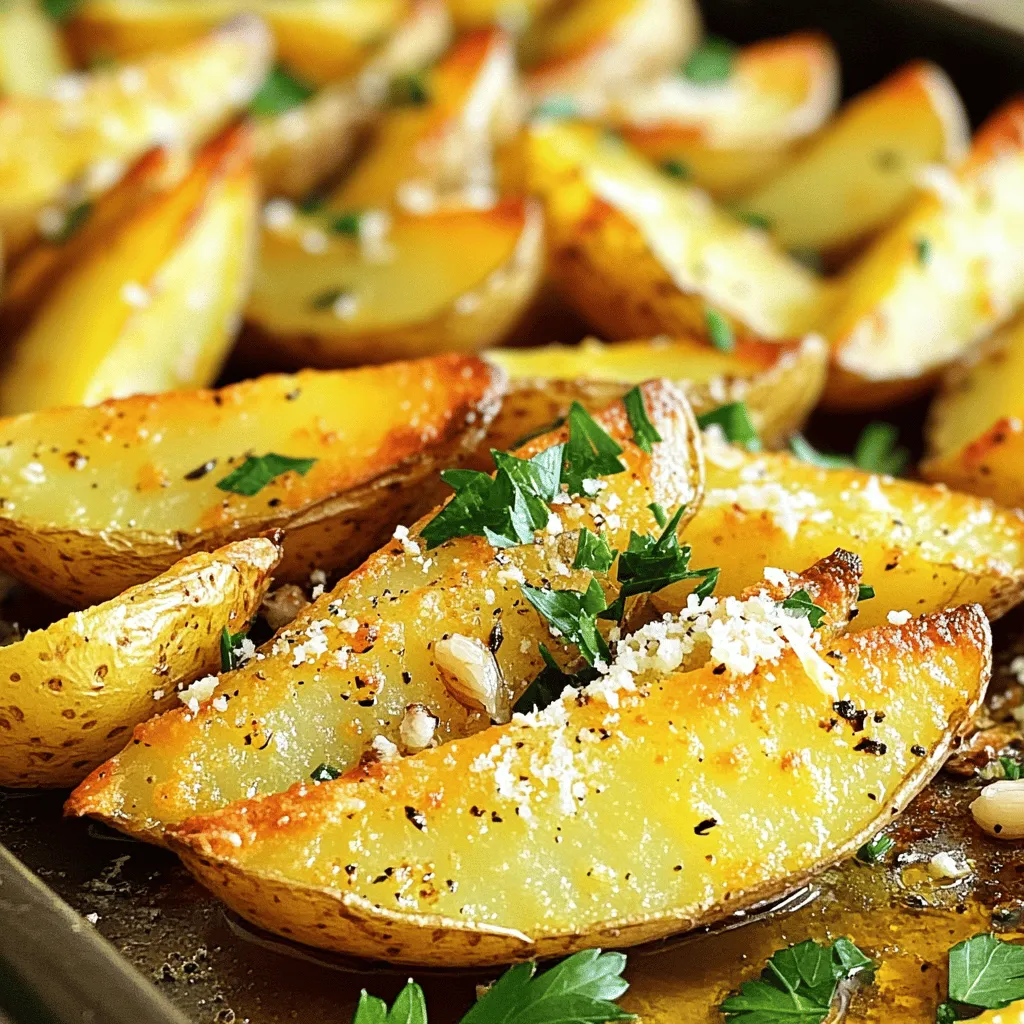
Are you ready to elevate your snack game? These Roasted Garlic Parmesan Potato Wedges are a simple yet delicious treat.

- 1 pound boneless, skinless chicken thighs, thinly sliced - 2 tablespoons vegetable oil - 4 cloves garlic, minced - 2 Thai bird's eye chilies, sliced (adjust for heat preference) - 1 red bell pepper, sliced - 1 cup green beans, trimmed - 1/4 cup soy sauce - 2 tablespoons oyster sauce - 1 tablespoon fish sauce - 1 tablespoon brown sugar - 1 cup fresh Thai basil leaves - Cooked jasmine rice, for serving The chicken is the star of this dish. I love using boneless, skinless chicken thighs for their juicy texture. They cook quickly and absorb flavors well. Garlic adds a great aroma, making your kitchen feel warm and inviting. The Thai bird's eye chilies offer heat, but you can adjust them to your taste. Red bell pepper gives a sweet crunch, while green beans add color and texture. The sauces—soy, oyster, and fish—bring depth and umami. Brown sugar balances the saltiness, giving a sweet touch. Thai basil is essential. Its unique flavor makes this dish special and aromatic. - Thai bird's eye chilies - Mild options: bell peppers, sweet chili sauce - Spicy options: more chilies, sriracha You can control the heat by choosing the right chilies. Thai bird's eye chilies pack a punch. If you want less heat, use fewer chilies. You can also replace them with sweet bell peppers for a milder taste. If you love spice, add more chilies or even some sriracha to kick it up. - Jasmine rice - Cucumber salad - Spring rolls I always serve this stir-fry with jasmine rice. The soft rice soaks up the flavorful sauce. You can also try a cool cucumber salad on the side. It adds a refreshing contrast to the spicy stir-fry. Spring rolls are another great option. They make for a fun appetizer and pair well with the meal. For the full recipe, check out the detailed instructions. Happy cooking! - Slicing the chicken Start with 1 pound of boneless, skinless chicken thighs. Thinly slice the chicken into bite-sized pieces. This helps it cook fast and evenly. - Chopping vegetables Next, slice 1 red bell pepper and trim 1 cup of green beans. Keep the veggies in similar sizes for even cooking. Also, mince 4 cloves of garlic and slice 2 Thai bird's eye chilies. Adjust the chilies based on your heat preference. - Sautéing vs. stir-frying Sautéing uses lower heat and cooks food slowly. Stir-frying uses high heat and cooks food quickly. For this recipe, we stir-fry to keep the chicken juicy and the veggies crisp. - Heat management Heat your skillet or wok over medium-high heat. This gives you control while cooking. Once hot, add 2 tablespoons of vegetable oil. When the oil shimmers, it’s time to add the garlic and chilies. - Adding sauces In a small bowl, mix 1/4 cup soy sauce, 2 tablespoons oyster sauce, 1 tablespoon fish sauce, and 1 tablespoon brown sugar. After stir-frying the chicken and veggies, pour this sauce over them. Toss everything well to coat. - Incorporating Thai basil Remove the skillet from heat and add 1 cup of fresh Thai basil leaves. Stir until the leaves wilt. This adds a fresh, aromatic flavor to your dish. Serve hot over cooked jasmine rice for a complete meal. For the full recipe, check [Full Recipe]. To make the best Thai basil chicken stir-fry, you must balance flavors. Start with sweetness and saltiness. Add a little brown sugar to make the dish sweet. The soy sauce adds salt, so taste as you go. If it’s salty, add more sugar. You can also sprinkle in a touch of lime juice for a fresh twist. Next, add depth with spices. Garlic and chilies give heat and flavor. For more layers, consider adding some crushed black pepper or a pinch of cumin. These small changes add big flavor. Timing is key to avoid overcooking your chicken and veggies. Cook the chicken for about 5 to 7 minutes. It should be brown and cooked through. Then, add the vegetables. Stir-fry them for just 2 to 3 minutes. They should stay bright and crisp. Use high heat to get a nice sear on the chicken. This helps lock in juices. If the heat is too low, your chicken will steam instead of fry. A great meal needs a beautiful presentation. Garnish your stir-fry with fresh basil leaves. Add a few slices of red chili on top for color. This makes the dish look vibrant and fresh. For plating, serve the stir-fry on a bright plate. Add a wedge of lime on the side. This not only looks good but adds zest when squeezed over the dish. Enjoy your meal! {{image_2}} You can switch the chicken for tofu or shrimp. Tofu gives a nice texture and absorbs flavors well. For shrimp lovers, use peeled, deveined shrimp. They cook fast and add a sweet touch. If you have dietary restrictions, choose plant-based proteins like tempeh. This option fits many diets while keeping the dish tasty. Feel free to swap in seasonal vegetables. Broccoli, snap peas, or carrots work great. You can also add leafy greens like spinach or bok choy. These greens add nutrients and color to the dish. Mixing veggies keeps it fresh and fun, making each meal unique. You can find gluten-free soy sauce for a safer choice. Tamari is a great option. For more flavor, try adding lime juice or a splash of coconut aminos. This keeps the dish bright and zesty. Adjusting the sauce lets you customize the taste to your liking. Don't be afraid to experiment! For the full recipe, check out the details above. To keep your Thai basil chicken stir-fry fresh, store leftovers in an airtight container. Place it in the fridge within two hours of cooking. This helps prevent bacteria growth. You can enjoy the dish for up to three days. If you want to keep it longer, freezing is a good option. Use freezer-safe containers or bags. Store the stir-fry for up to two months. Remember to label the bags with the date. When reheating, you can use either the microwave or stovetop. The microwave is quick but may make the chicken a bit chewy. If you want better texture, use the stovetop. Heat a pan over medium heat and add a splash of water. Stir the chicken gently until it's hot. This keeps the dish moist and tasty. In the fridge, your Thai basil chicken stir-fry lasts about three days. After that, it may spoil. Signs of spoilage include a sour smell or change in color. If you see any mold, toss it out right away. Always trust your senses! If it doesn’t look or smell right, don’t eat it. Thai basil is a type of basil with a unique flavor. It has a hint of anise and a spicy kick. This makes it different from regular sweet basil, which is milder. Thai basil has purple stems and small green leaves. You can find it in Asian markets or grocery stores. Yes, you can make Thai Basil Chicken Stir-Fry ahead of time. Cook the chicken and vegetables, but keep the basil separate. Store in airtight containers in the fridge for up to two days. When ready to eat, reheat the stir-fry and add fresh basil just before serving. This keeps the basil vibrant and flavorful. To make this dish kid-friendly, reduce the spice levels. Use fewer bird's eye chilies or skip them altogether. You can also add a bit of sugar to balance flavors. Consider using sweet bell peppers for more color and taste. This way, kids can enjoy a fun and tasty meal! Thai Basil Chicken Stir-Fry is a tasty dish you can easily make. We covered the key ingredients, cooking steps, and tips for perfect flavor. Adjust the spice level to fit your taste, and try different proteins or veggies. Remember to store leftovers correctly to enjoy them later. This dish is fun to modify and share with family or friends. Dive into this recipe, explore your options, and create a meal everyone will love!

Thai Basil Chicken Stir-Fry Flavorful and Quick Meal

Looking for a quick and tasty meal? Thai Basil Chicken Stir-Fry is your answer! This dish packs a punch with

To make a bright and tasty Lemon Dill Orzo Salad, you need simple and fresh ingredients. Here’s what you’ll need: - 1 cup orzo pasta - 2 tablespoons olive oil - 1 tablespoon fresh lemon juice - Zest of 1 lemon - 1 cup cherry tomatoes, halved - 1 cucumber, diced - 1/4 red onion, finely chopped - 1/4 cup fresh dill, chopped - Salt and pepper to taste - Feta cheese, crumbled (optional) Each ingredient adds its own flavor and texture. The orzo pasta serves as a great base. It cooks up soft and holds the dressing well. Cherry tomatoes bring sweetness and color, while cucumbers add crunch. Fresh dill gives the salad a bright, herbal note. I love using fresh herbs when I can; they really enhance the dish. The lemon juice and zest provide a zesty kick that wakes up your taste buds. You can also sprinkle some crumbled feta on top for creaminess. It is not required, but it makes the salad even more delicious. This fresh dish is perfect for summer picnics or light lunches. For the full recipe, you can find all the steps to make this delightful salad. To start, bring a pot of salted water to a boil. Add your orzo pasta and cook it for about 8 to 10 minutes. You want the pasta to be al dente, which means it should still have a slight bite. After cooking, drain the orzo in a colander. Rinsing it under cold water is very important. This stops the cooking and keeps the orzo from getting sticky. Next, let’s make the lemon dressing. You will need: - 2 tablespoons olive oil - 1 tablespoon fresh lemon juice - Zest of 1 lemon - Salt and pepper to taste In a small bowl, add the olive oil, lemon juice, and lemon zest. Whisk them together until smooth. This step helps blend the flavors well. Now, it’s time to put the salad together. In a large mixing bowl, combine the cooled orzo, halved cherry tomatoes, diced cucumber, finely chopped red onion, and fresh dill. Mixing everything gently is key to keeping the ingredients intact and evenly distributed. For a nice presentation, serve the salad in a large bowl or on a platter. You can sprinkle crumbled feta cheese on top for an extra touch. This salad pairs well with grilled chicken or fish. It’s light, fresh, and packed with flavor. Check out the Full Recipe for more details! Using fresh herbs makes a big difference. Fresh dill adds a bright taste. Dried herbs lack the same punch. You can also try adding garlic or a pinch of red pepper flakes for more depth. A splash of vinegar, like white wine, can add a nice tang too. To avoid mushy pasta, always cook orzo in boiling salted water. Stir it often while it cooks. Check for doneness by tasting a piece. It should be firm but not hard. Drain the orzo and rinse it. This stops the cooking process and keeps it from sticking together. If you want a change from lemon dressing, try a yogurt-based dressing. A creamy dressing can add richness. For protein, grilled chicken or shrimp works well. Canned chickpeas are a great option too. They add texture and nutrition without much fuss. For the full recipe, visit the section above. {{image_2}} You can change the Lemon Dill Orzo Salad with seasonal ingredients. In spring, I love to add sweet peas or tender asparagus. These veggies bring a crisp taste and bright color to the dish. In summer, fresh corn or colorful bell peppers work wonders. The corn adds a sweet crunch, while bell peppers give a nice pop of flavor. If you need a gluten-free dish, try using rice or quinoa instead of orzo. Both options keep the salad tasty and fun. For a vegan version, simply skip the feta cheese. You can also add a plant-based protein like chickpeas for extra nutrition. Want to take your salad to another level? Try a Mediterranean twist! Add olives, artichokes, or roasted red peppers. These ingredients will give your salad a unique flair. For an Asian-inspired version, mix in edamame, sesame oil, and ginger. This change will turn the salad into an exciting new dish. Feel free to explore these variations and make the Lemon Dill Orzo Salad yours. For a detailed guide, don’t forget to check the Full Recipe! To keep your Lemon Dill Orzo Salad fresh, store it in the fridge. I suggest using an airtight container. This helps keep the flavors strong and the salad crisp. Make sure to cool the salad to room temperature before sealing it. This step prevents condensation inside the container. Your salad can last 3 to 5 days in the fridge. Always check for signs of spoilage. If you see mold or an off smell, it’s best to toss it. A soggy texture means the salad has lost its freshness. You can enjoy this salad cold or warm. If you prefer it warm, gently heat it in a pan over low heat. Stir often to avoid burning. Avoid using a microwave, as it can make the orzo mushy. Enjoy this salad as a refreshing side or a light meal. For the full recipe, check out the section above. You can make this salad a day ahead. Cook the orzo and let it cool. Mix the vegetables and dressing separately. Combine them just before serving. This keeps the salad fresh and bright. Yes, you can easily swap ingredients. Try quinoa instead of orzo for a gluten-free option. Use parsley if you don’t have dill. Cherry tomatoes can be replaced with bell peppers. Absolutely! This salad is perfect for meal prep. It stores well in the fridge for up to three days. Just keep the dressing separate until you are ready to eat. This salad pairs well with grilled chicken. It also goes nicely with fish or shrimp. Serve it alongside pita bread or a fresh green salad for a full meal. You can adjust the flavor easily. Add more lemon juice for tang. For a spicy kick, include red pepper flakes. Experiment with different herbs to find your favorite combination. For the [Full Recipe], check out the full details! In this post, we covered a simple yet delicious Lemon Dill Orzo Salad. We explored each ingredient, cooking tips, and how to make this dish shine. You can easily add your twist with fresh ingredients or dietary changes. Remember, this salad is great for a meal prep or a quick side. With these steps, you’ll create a vibrant dish that everyone will love. Enjoy experimenting and making it your own!

Lemon Dill Orzo Salad Fresh and Flavorful Dish

Looking for a bright and tasty dish? The Lemon Dill Orzo Salad is just what you need! This fresh and

For these Smoky Chipotle Black Bean Burgers, you need a few simple yet key ingredients. Black beans form the base of the burger. They provide protein and fiber, making your meal hearty. Quinoa adds a nice texture and boosts the nutrition. It is a complete protein, so it pairs well with the beans. Breadcrumbs help bind the mixture. They ensure your patties hold their shape while cooking. Spices are crucial for flavor. You’ll want smoked paprika, cumin, salt, and black pepper. These spices give the burgers a warm, smoky taste. Fresh herbs, like cilantro, enhance the flavor. They add brightness and freshness to your burgers. Don’t skip the chipotle peppers in adobo sauce. They bring heat and a unique taste that makes these burgers special. Toppings can take your Smoky Chipotle Black Bean Burgers to the next level. Sliced avocado brings creaminess and pairs well with the spice. Crisp lettuce adds crunch, balancing the burger's texture. Fresh tomato slices provide a juicy burst of flavor. For sauces, consider chipotle mayo for an extra kick. Salsa is another great option, adding freshness. Feel free to mix and match your favorite toppings! To prepare these burgers, you’ll need a few basic tools. A large mixing bowl is essential for combining ingredients. A fork or potato masher helps mash the black beans. This ensures a good texture for the patties. You’ll also need measuring cups for accuracy. A grill or non-stick skillet is necessary for cooking. A spatula will help you flip the patties without breaking them. Finally, a cutting board and knife make chopping ingredients easy. Check out the Full Recipe for a complete list of ingredients and instructions! To start, you need to mash the black beans. Open the cans and rinse the beans under cool water. In a large bowl, use a fork or potato masher to mash them. Leave some chunks for texture. This adds a nice bite to your burgers. Next, add the cooked quinoa. It gives protein and a great texture. Chop your cilantro and red onion finely. Mince the garlic and chipotle peppers. If you want more heat, add more chipotle. Finally, gather your spices: smoked paprika, cumin, salt, and black pepper. These will give your burgers a smoky flavor. Mix everything in the bowl until well combined. If the mixture feels wet, add more breadcrumbs. Now, it's time to form the patties. Divide the mixture into equal portions. Aim for about 6-8 patties, roughly 1 inch thick. To shape them, use your hands. Press gently to keep them together without making them too tight. This helps them cook evenly. If they fall apart, add a bit more breadcrumbs to bind them. Make sure to set the patties on a plate. Cover them with plastic wrap while you heat your grill or skillet. This keeps them fresh and ready to cook. You can cook the patties on a grill or in a skillet. If using a grill, preheat it to medium heat. For a skillet, use a non-stick one and add a tablespoon of olive oil to prevent sticking. Place the patties on the hot grill or skillet. Cook them for about 4-5 minutes on each side. You want them crispy on the outside and warm in the middle. If you like, toast the burger buns on the grill for added flavor. Now your Smoky Chipotle Black Bean Burgers are ready to enjoy! To get the right texture in your Smoky Chipotle Black Bean Burgers, focus on binding and moisture. - Use cooked quinoa to help bind the mixture. - Add breadcrumbs to soak up any extra moisture. - If the mixture is too wet, sprinkle in more breadcrumbs. - Don’t mash the beans too much; keep some chunks for a good bite. This balance helps the patties hold together while staying tasty. Want to take these burgers to the next level? Consider adding more spices or ingredients. - Extra garlic can boost flavor and aroma. - A splash of lime juice adds freshness. - Try adding a pinch of cayenne for more heat. - Fresh herbs, like parsley or basil, can brighten the taste. These small changes can make your burgers stand out. Cooking in batches is great for meal prep. Here’s how to do it efficiently: - Shape all patties first before cooking. - Store uncooked patties in the fridge for up to 24 hours. - Freeze extras between layers of parchment paper for later use. - When cooking, use a wide skillet or grill to fit more patties. This method saves time and ensures you always have a tasty meal ready. {{image_2}} You can easily change some ingredients in Smoky Chipotle Black Bean Burgers. If you need a gluten-free option, use gluten-free breadcrumbs. You can swap quinoa for brown rice or even lentils. If you want to avoid beans, chickpeas work well too. Fresh herbs like parsley can replace cilantro if you prefer a different flavor. To adjust the heat in your burgers, modify the chipotle peppers. Start with one pepper for a milder taste. You can always add more if you want it spicier. Adding a pinch of cayenne pepper also boosts the heat. If you want less spice, skip the smoked paprika. You can serve these burgers in many ways. For a fun twist, turn them into a bowl. Simply place a patty over rice or quinoa. Top it with veggies and sauce. You can also chop the patties and add them to a salad. This way, you get all the flavors in a light meal. To keep your Smoky Chipotle Black Bean Burgers fresh, follow these steps: - Cool the burgers completely before storage. - Place them in an airtight container. - Store in the fridge for up to 4 days. - For longer storage, freeze them. Wrap each patty in plastic wrap. - Use a freezer bag to prevent freezer burn. When reheating, you want to keep the flavor and texture. Here’s how: - From the fridge: Heat in a skillet over medium heat for 3-4 minutes per side. - From the freezer: Thaw in the fridge overnight. Then, heat in a skillet. - You can also use an oven. Preheat to 350°F (175°C). Bake for 10-12 minutes. - Add a splash of water to keep the patties moist. How long can you store these tasty burgers? - In the fridge, they last about 4 days. - In the freezer, they can last for up to 3 months. - Make sure to label your containers with the date. This helps you track freshness. To make these burgers spicier, add more chipotle peppers. You can also mix in cayenne pepper or crushed red pepper flakes. Start with a small amount and taste the mix. Adjusting spice lets you control the heat. Yes, you can prepare these burgers ahead of time. Shape the patties and store them in the fridge for up to a day. You can also freeze them for later. Just make sure to wrap each patty well to avoid freezer burn. These burgers pair well with many sides. Try serving them with sweet potato fries or a simple salad. You can also add grilled corn or a fresh salsa. These tasty sides enhance the meal and add color to your plate. For the complete recipe, click [here](#). You now have all the details to make Smoky Chipotle Black Bean Burgers. We covered essential ingredients, tasty toppings, and handy tools. I shared step-by-step instructions to ensure your patties come out perfect. With tips on texture, flavor, and storage, you can enjoy these burgers anytime. You can even customize them to fit your taste. Dive into the recipe and get cooking, because these burgers are a game-changer!

Smoky Chipotle Black Bean Burgers Tasty and Easy Recipe

Craving a delicious meal that’s easy to make? Try my Smoky Chipotle Black Bean Burgers! These tasty burgers pack a

Older posts
Newer posts
← Previous Page1 … Page36 Page37 Page38 … Page79 Next →

dsad

© 2025 pureeatsnow • Built with GeneratePress

Our Policies

  • Copyright Policy
  • Cookie Policy
  • GDPR Policy
  • Privacy Policy
  • Disclaimer
  • Terms Of Use

More Information

  • Home
  • About
  • Contact
  • Appetizers
  • Dessert
  • Dinner
  • Drinks
©2025, pureeatsnow About Back To Top