Skip to content
DisclaimerTerms Of UseGDPR PolicyCookie Policy

pureeatsnow

  • Home
  • Drinks
  • Appetizers
  • Dinner
  • Dessert
  • About
  • Contact
  • Privacy Policy
DisclaimerTerms Of UseGDPR PolicyCookie Policy

Rachel

This quesadilla is packed with flavor and texture. Here’s what you need: - 2 cups cooked chicken, shredded - 1 cup sliced mushrooms - 1 cup Alfredo sauce (store-bought or homemade) - 1 cup shredded mozzarella cheese - 4 large flour tortillas - 2 tablespoons olive oil - 1 teaspoon garlic powder - 1 teaspoon onion powder - Salt and pepper to taste - Fresh parsley, chopped (for garnish) You can customize your quesadilla with these extras: - Spinach or kale for some greens - Jalapeños for a spicy kick - Other cheeses like cheddar or gouda - Bell peppers for added crunch To make this dish, gather these tools: - Large skillet for cooking - Mixing bowl for combining ingredients - Spatula for flipping the quesadilla - Cutting board and knife for slicing - Measuring cups and spoons for accuracy With these ingredients and tools, you are ready to create a delicious Chicken and Mushroom Alfredo Quesadilla. For the full recipe and detailed steps, check the Full Recipe section. First, gather all your ingredients. You need cooked chicken, sliced mushrooms, Alfredo sauce, mozzarella cheese, flour tortillas, olive oil, and seasonings. Make sure your chicken is shredded and mushrooms are ready to sauté. This will make cooking easier and faster. Heat one tablespoon of olive oil in a large skillet over medium heat. Add the sliced mushrooms. Cook them until they are golden brown and tender, about five to seven minutes. Sprinkle in garlic powder, onion powder, salt, and pepper. Mix well and let the flavors blend. Once done, remove the mushrooms from the skillet and set them aside. In a mixing bowl, combine the cooked chicken, sautéed mushrooms, and Alfredo sauce. Stir well to coat everything evenly. This mixture will be the heart of your quesadilla, so make sure it’s tasty. Now it’s time to assemble! Heat the remaining tablespoon of olive oil in the skillet again. Place one tortilla in the skillet and sprinkle half of the shredded mozzarella cheese over it. Next, spread half of the chicken and mushroom Alfredo mixture over the cheese. Top it with more mozzarella cheese and place another tortilla on top. Cook this for three to four minutes. You want the bottom tortilla to be golden and crispy. Carefully flip your quesadilla using a large spatula. Cook the other side for another three to four minutes. Once both sides are crispy, remove the quesadilla from the skillet. Let it cool for a minute, then cut it into wedges. Repeat this process with the rest of the tortillas and filling. Each quesadilla will be a delight filled with chicken and mushroom Alfredo goodness. Finish by garnishing with fresh chopped parsley before serving. Enjoy your tasty creation! To get that perfect crisp, use medium heat. A hot pan helps the tortillas brown. Add a bit of oil to each side of the quesadilla. This creates a nice, golden crust. Press down gently with a spatula while cooking. This helps everything cook evenly and stay together. You can switch out the chicken for turkey or even tofu. If you don’t have mushrooms, try spinach or bell peppers. For the sauce, use a white sauce or cheese sauce if you prefer. Mozzarella can be swapped for cheddar or pepper jack for a kick. Serve your quesadilla with a side of fresh salsa or guacamole. A dollop of sour cream adds creaminess. You can also sprinkle some fresh herbs like cilantro or parsley on top. This adds color and a fresh taste. Enjoy it with a simple salad to balance the meal. For more delicious ideas, check the Full Recipe. {{image_2}} You can easily make a vegetarian version of the Chicken and Mushroom Alfredo Quesadilla. Just replace the chicken with extra mushrooms or your favorite veggies. Try spinach, bell peppers, or zucchini for added flavor. Use the same Alfredo sauce to keep it creamy and delicious. This version is perfect for anyone wanting a meat-free meal. If you like heat, add some spice! Mix in diced jalapeños or chili flakes into the chicken and mushroom mix. You can also use pepper jack cheese instead of mozzarella. This twist gives the quesadilla a nice kick. It’s a great way to spice up your dinner! For cheese lovers, try mixing different cheeses. Add sharp cheddar, creamy goat cheese, or even feta for a tangy flavor. Fresh herbs can add a nice touch too. Basil, thyme, or oregano work well. These flavors can really enhance your quesadilla and make it stand out. You can also add a bit of pesto for extra zest. Explore these variations to find your favorite! For the full recipe, check the instructions above. To keep your Chicken and Mushroom Alfredo Quesadilla fresh, let it cool first. Place any leftovers in an airtight container. Make sure to seal it well to avoid air. Store the container in the fridge. These quesadillas will stay good for about three days. When you want to enjoy your leftovers, reheat them in a skillet. Heat the skillet over medium heat. Place the quesadilla in the skillet for about 2-3 minutes on each side. This method keeps the quesadilla crispy. You can also use a microwave, but it may not be as crispy. Heat it for 30-60 seconds until warm. You can freeze quesadillas for later meals. Wrap each quesadilla tightly in plastic wrap. Then, put them in a freezer-safe bag or container. They can last for up to three months in the freezer. When you’re ready to eat, thaw them in the fridge overnight before reheating. Yes, you can use homemade Alfredo sauce. Making it yourself gives a fresh taste. You can control the flavor and creaminess. If you have a favorite recipe, go for it! Yes, you can make this quesadilla in advance. Prepare the filling and store it in the fridge. When you are ready, just assemble and cook it. This saves time on busy days. Several sides work well with this quesadilla. Consider a simple salad for freshness. You can also serve it with salsa or sour cream. For a heartier option, try some rice or refried beans. These sides add balance to your meal. This blog post covered all the steps to make a Chicken and Mushroom Alfredo Quesadilla. We explored key and optional ingredients, necessary tools, and detailed instructions for cooking. You learned tips for a crispy finish and ideas for variations. Plus, I provided storage info and answered common questions. Cooking doesn’t have to be hard. Enjoy making this tasty dish, and share it with loved ones. Happy cooking!

Chicken and Mushroom Alfredo Quesadilla Delight

Are you ready to impress your taste buds? In this blog, I’ll show you how to make a Chicken and

To make a Chicken and Cheese Quesadilla Alfredo, you will need a few key ingredients. Here’s the list: - Large flour tortillas - Cooked chicken breast - Shredded mozzarella cheese - Grated Parmesan cheese - Alfredo sauce - Optional additions (spinach, garlic powder, black pepper) - Cooking oil or spray Each of these items plays a big role in creating a tasty quesadilla. The flour tortillas provide a soft and warm base. You can use any cooked chicken breast, whether leftover or freshly made. The mozzarella cheese adds a nice stretch, while the Parmesan gives a rich flavor. Alfredo sauce is the star of this dish. It makes everything creamy and delicious. If you want to boost the flavor, consider adding optional ingredients like spinach or spices. Spinach adds color and nutrition, while garlic powder and black pepper give extra taste. Cooking oil or spray helps to crisp the tortillas. You can use olive oil or any cooking spray you prefer. These ingredients will come together to create a delightful dish that is sure to please everyone. For the full recipe, check out the instructions that follow! Mixing the filling ingredients Start by taking a bowl. Add the shredded chicken, mozzarella cheese, Parmesan cheese, and Alfredo sauce. If you like, toss in the chopped spinach. Sprinkle in garlic powder and black pepper. Mix well until everything is evenly coated. Heating the skillet Next, grab a non-stick skillet. Set it on medium heat. Drizzle some olive oil or spray it with cooking spray. This helps prevent sticking and adds crispness. Assembling the quesadilla Place one flour tortilla in the skillet. Spoon half of the chicken and cheese mixture onto the tortilla. Spread it evenly. Then, place the second tortilla on top. Press down gently to hold it in place. Cooking each side Cook the quesadilla for about 3 to 4 minutes. Look for a golden brown color on the bottom. Then, flip it carefully using a spatula. Cook the other side for another 3 to 4 minutes. The cheese should be melted, and both sides should be crispy. Remove it from the skillet and let it cool for a minute before slicing. Enjoy your Chicken and Cheese Quesadilla Alfredo! For the full recipe, check the sections above. Choosing the right cheese For a great quesadilla, pick the right cheese. I love using mozzarella because it melts perfectly. You can mix it with other cheeses, like sharp cheddar, for added flavor. Parmesan adds a nice touch, too. Cooking tips for crispy tortillas To get crispy tortillas, heat your skillet well. A medium heat works best. Use olive oil or cooking spray to coat the pan. This helps the tortillas crisp up nicely. Press down gently while cooking to ensure even heat. Flavor enhancement ideas with spices Spices can make your quesadilla shine. Garlic powder adds a nice punch. Black pepper gives it a bit of heat. You can also try adding a pinch of cumin or chili powder for extra depth. Experiment with your favorite spices to find your perfect blend. Check out the Full Recipe for all the details! {{image_2}} You can change this dish to fit your tastes. If you want a vegetarian option, replace the chicken with black beans or mushrooms. These work well and add great flavor. For cheese, try different types. Cheddar gives a sharp taste. Pepper jack adds a spicy kick. You can mix cheeses for a fun twist. Feel free to add more toppings or fillings. Chopped bell peppers and onions taste great in this quesadilla. You could also add cooked shrimp or beef for extra protein. These simple swaps make the Chicken and Cheese Quesadilla Alfredo fit any craving. You can explore so many flavors while keeping it simple. For the full recipe, check the earlier section. To keep your quesadillas fresh, wrap them tightly. Use plastic wrap or foil. Store them in the fridge for up to three days. Make sure they cool down first. This helps keep the texture nice. When you want to reheat, use a skillet. Heat it over medium heat. Place the quesadilla in the skillet for about three minutes on each side. This keeps the outside crispy and the cheese melty. You can also use the microwave. If you do, cover it with a damp paper towel. This keeps moisture in and helps it heat evenly. If you want to freeze quesadillas, wrap them well in plastic wrap and then foil. They can last up to three months in the freezer. When you are ready to eat, thaw them in the fridge overnight. Then, reheat in a skillet for the best taste. For the full recipe, check out the details above. Enjoy your delicious Chicken and Cheese Quesadilla Alfredo! Yes, you can make these quesadillas ahead of time. Just prepare the filling and assemble the quesadillas. Store them in the fridge for up to 24 hours. When ready to eat, cook them in a skillet until golden brown. This keeps them fresh and tasty, so you can enjoy them later. Many sauces go great with this quesadilla. I like to serve it with extra Alfredo sauce. You can also try salsa, guacamole, or sour cream. Each sauce adds its own twist, so taste them all to find your favorite! To make this quesadilla gluten-free, swap out the flour tortillas for gluten-free ones. These are easy to find at most stores. Just make sure to check the label for gluten-free certification. The rest of the recipe stays the same, and you still get all the delicious flavors. For the [Full Recipe], check out the detailed steps to create this delightful dish! In this blog post, we covered how to make a Chicken and Cheese Quesadilla Alfredo. You learned about the key ingredients, like tortillas and cheese, plus optional extras. I outlined simple steps for preparation and shared tips for the best results. You can also explore variations and learn how to store leftovers. Quesadillas can be fun and easy to make. Experiment with flavors, and enjoy every bite. Your kitchen can be a place for tasty meals!

Chicken and Cheese Quesadilla Alfredo Delightful Dish

Welcome to the world of comfort food with my Chicken and Cheese Quesadilla Alfredo Delightful Dish! This recipe combines creamy

- 2 cups cooked chicken, shredded - 1 cup broccoli florets, steamed and chopped - 1 cup Alfredo sauce - 2 cups shredded mozzarella cheese - 4 large flour tortillas - 1 tablespoon olive oil - 1 teaspoon garlic powder - 1 teaspoon onion powder - Salt and pepper to taste - Fresh parsley, chopped To create my Chicken and Broccoli Alfredo Quesadilla, I start with the main ingredients. I use two cups of cooked chicken. Shredding it makes it easy to mix. I then add one cup of steamed and chopped broccoli florets. This veggie adds nice color and health. Next, I pour in one cup of rich Alfredo sauce. You can use store-bought or make your own. Finally, I mix in two cups of shredded mozzarella cheese. This cheese melts perfectly and keeps everything together. Next, I grab four large flour tortillas. These are perfect for folding. I heat one tablespoon of olive oil in a skillet. This oil helps the quesadilla brown nicely. I also sprinkle in one teaspoon each of garlic powder and onion powder. These spices add great flavor. I then season with salt and pepper to taste. For the finishing touch, I chop fresh parsley. This brightens up the dish and adds a pop of color. You can find the full recipe for the Cheesy Chicken & Broccoli Alfredo Quesadilla in the article. Enjoy these tasty bites! Start by gathering your ingredients. In a mixing bowl, combine: - 2 cups cooked chicken, shredded - 1 cup broccoli florets, steamed and chopped - 1 cup Alfredo sauce - 1 teaspoon garlic powder - 1 teaspoon onion powder - Salt and pepper to taste Mix these well until the chicken and broccoli are coated in the sauce. This combination gives your quesadilla a creamy, rich flavor. Next, heat a non-stick skillet over medium heat and add 1 tablespoon of olive oil. Once the oil is hot, place one large flour tortilla in the skillet. Spread half of the chicken and broccoli filling evenly over the tortilla. Then, sprinkle 1 cup of shredded mozzarella cheese on top. Carefully place another tortilla on top and press it down gently. Cook for 3-4 minutes or until the bottom tortilla turns golden brown and the cheese starts to melt. Using a spatula, flip the quesadilla carefully. Cook for another 3-4 minutes until both sides are crispy and golden brown. Remove the quesadilla from the skillet and let it cool for a minute. Slice it into wedges for easy eating. For a pop of color and flavor, garnish with fresh parsley. This adds a nice touch and makes your dish look even more appealing! Enjoy this cheesy delight with your favorite dipping sauce. To make the best quesadilla, use a non-stick skillet. This helps prevent sticking and burning. Heat the skillet over medium heat for even cooking. Once hot, add a little olive oil. This adds flavor and helps the tortilla crisp up. After placing your filling on the tortilla, press down gently. This ensures all the cheese melts and everything cooks evenly. Cheese is key for a tasty quesadilla. I love to blend different cheeses for fun flavors. Try using sharp cheddar for a tangy kick. Pepper jack adds a nice touch of heat. Mixing mozzarella with these cheeses creates a creamy texture. Feel free to experiment with your favorites! To boost the taste, think about spices. Adding red pepper flakes gives a nice kick. If you prefer sweetness, sautéed onions work well. They add depth and pair nicely with the chicken and broccoli. You can also try herbs like basil or oregano for fresh flavor. {{image_2}} You can make a tasty vegetarian version of this dish. Simply swap out the chicken for grilled mushrooms. Mushrooms add a rich flavor. You can also add extra broccoli for crunch and nutrition. This keeps the dish colorful and satisfying. Don’t be afraid to get creative with sauces. Instead of Alfredo, try cheese sauce. It brings a nice creamy texture. Ranch sauce also works well for a zesty kick. Each sauce gives a new twist to the quesadilla. Tortillas can change the whole dish. Whole wheat tortillas offer a healthier choice. They add fiber and a nutty taste. You might also try spinach tortillas for a fun color and extra nutrients. Both options keep things interesting and healthy. For more details on making this dish, check the Full Recipe. Store any leftovers in an airtight container. This keeps your quesadillas fresh for up to three days. Make sure to let them cool first. This step helps prevent sogginess. For the best taste, reheat in a skillet. This method gives your quesadilla a crispy texture. Just heat it on medium until warm. If you need a quick fix, the microwave works too. Heat for 30 seconds to 1 minute, checking often. You can freeze uncooked quesadillas or leftovers. Wrap each quesadilla tightly in plastic wrap. Place them in a freezer bag for extra protection. They can last up to three months. When you're ready to eat, thaw in the fridge overnight and reheat. Enjoy your Chicken and Broccoli Alfredo Quesadilla anytime! To keep your quesadillas crispy, make sure to use a non-stick skillet. Heat the skillet before adding oil. This helps the quesadilla cook evenly. Use moderate heat and avoid overcrowding the pan. Flip the quesadilla only when the bottom is golden brown. Cooking in batches works well if you make more than one. Yes, you can prepare quesadillas ahead of time. Assemble them, but don’t cook them yet. Wrap each one in plastic wrap and store them in the fridge. They will stay fresh for a day or two. You can also freeze them for longer storage. Just be sure to separate them with parchment paper. These quesadillas pair well with several side dishes. Try a simple green salad with vinaigrette. A cup of tomato soup also complements the creamy flavor. For a crunchy side, serve tortilla chips with salsa. Guacamole is a tasty option too, adding creaminess to your meal. You can find the full recipe for Cheesy Chicken & Broccoli Alfredo Quesadilla [here](#). Enjoy making this delicious dish! This blog post covered all you need to make Chicken and Broccoli Alfredo Quesadillas. You learned about the key ingredients, step-by-step instructions, and helpful tips. You can even adjust recipes based on your taste or dietary needs. Enjoy experimenting with different cheeses and sauces for new flavors. Don't forget to store leftovers properly to keep them fresh. Try these quesadillas for a quick meal that everyone will love. Happy cooking!

Chicken and Broccoli Alfredo Quesadilla Delight

Are you ready to take your quesadilla game to a whole new level? The Chicken and Broccoli Alfredo Quesadilla Delight

- 2 cups cooked chicken, shredded - 1 cup cream cheese, softened - 1 cup mozzarella cheese, shredded - 1 cup cheddar cheese, shredded - 1 cup Alfredo sauce - 1 teaspoon taco seasoning - 8 large flour tortillas - 1/2 cup green onions, chopped - 1/4 cup fresh cilantro, chopped - 1 tablespoon olive oil - Salt and pepper to taste These ingredients create a tasty blend for Chicken and Cheese Enchiladas Alfredo Quesadilla. The shredded chicken adds protein and flavor. Cream cheese makes the filling creamy. Mozzarella and cheddar provide a rich cheese pull that everyone loves. The Alfredo sauce enhances the creaminess and binds the mixture. Taco seasoning adds a fun kick. The large flour tortillas wrap everything up nicely. Green onions and cilantro give a fresh touch. Olive oil helps brown the quesadillas to a golden color, while salt and pepper round out the flavors. For the full recipe, check out the detailed instructions. You’ll love how easy it is to make this dish! - In a mixing bowl, combine: - 2 cups cooked chicken, shredded - 1 cup cream cheese, softened - 1/2 cup mozzarella cheese, shredded - 1/2 cup cheddar cheese, shredded - 1 cup Alfredo sauce - 1 teaspoon taco seasoning - Salt and pepper to taste Mix these ingredients until they form a smooth blend. Next, lay a tortilla on a clean surface. Spread about 1/3 cup of the chicken and cheese mixture over half of the tortilla. Don’t forget to sprinkle a tablespoon of the remaining mozzarella and cheddar cheese on top of the mixture. Fold the tortilla over to make a half-moon shape, pressing gently to seal it. Repeat this for the rest of the tortillas. - Heat 1 tablespoon of olive oil in a large skillet over medium heat. - Add the quesadillas one at a time. Cook them for 3-4 minutes on each side. Look for a golden-brown color and melted cheese. Once cooked, remove the quesadillas from the skillet. Let them rest for a minute before slicing them into wedges. Garnish the quesadilla wedges with chopped green onions and fresh cilantro. For a fun touch, serve them with dipping options like salsa or guacamole. This adds extra flavor and makes for a vibrant dish. If you want to impress, drizzle some extra Alfredo sauce on top before serving. Enjoy this Chicken and Cheese Enchiladas Alfredo Quesadilla Delight! For the full recipe, check the details above. To make your quesadillas golden-brown, follow these tips: - Heat your skillet first: A hot skillet helps achieve that perfect crispy texture. - Use olive oil generously: This adds flavor and helps with browning. - Press down gently: While cooking, press the quesadilla slightly to ensure even cooking. For gooey cheese, here’s what you should do: - Mix cheeses well: Blend mozzarella and cheddar for a smooth melt. - Don’t rush: Let them cook long enough to melt the cheese but not too long to burn the tortilla. Want to boost the flavor? Add these spices: - Cumin: It adds warmth and depth. - Chili powder: For a little kick, sprinkle some in. - Garlic powder: This gives a nice savory touch. If you like it spicy, here’s how to adjust: - Add more chili powder or jalapeños: Increase heat based on your taste. - Use milder cheese: If the heat is too much, swap cheddar for a milder cheese. Storing leftovers properly keeps them fresh. Here’s how: - Use airtight containers: This keeps moisture in and prevents drying out. - Store in the fridge: Eat them within 3 to 4 days for the best taste. For reheating, follow these steps: - Use the skillet: Reheat on medium heat for a crispy texture. - Cover with a lid: This helps melt the cheese without burning the tortilla. For the full recipe, check out the complete details to get started on making Chicken and Cheese Enchiladas Alfredo Quesadilla Delight! {{image_2}} You can swap proteins in this dish. Try using ground beef or turkey instead of chicken. If you want a veggie option, use black beans or sautéed spinach. Each swap changes the taste and keeps it fresh. For cheese, consider using pepper jack for a kick. You can also mix in some feta or goat cheese for a tangy twist. These variations make your meal exciting while still being creamy and delicious. If you need gluten-free options, use corn tortillas. They work great and add a nice flavor. You can also find gluten-free flour tortillas at many stores. To make a lighter version, use low-fat cream cheese and reduced-fat cheese. You can even skip the cheese altogether and use more veggies for a fresh touch. This keeps the dish tasty without the extra calories. You can change how you serve this dish. Instead of quesadillas, layer the filling in a baking dish. Top with cheese and bake until bubbly for a fun twist on a casserole. For parties, cut the quesadillas into smaller wedges. Serve with salsa, guacamole, or extra Alfredo sauce for dipping. This makes them perfect for sharing and keeps the flavors bright and lively. For the full recipe, check out the detailed steps above. To keep your Chicken and Cheese Enchiladas Alfredo Quesadilla fresh, use airtight containers. Glass or plastic containers work well. This helps keep moisture in and air out. Store them in the fridge for up to three days. If you want to enjoy them later, freezing is a great option. To freeze your quesadillas, place them in a single layer on a baking sheet. Freeze them for about an hour until firm. Then, wrap each quesadilla in plastic wrap and place them in a freezer bag. This keeps them safe from freezer burn. When you're ready to eat, take them out and thaw them in the fridge overnight. For the best results, reheat them in a skillet on low heat. This warms them through while keeping them crispy. You can also use an oven set to 350°F (175°C) for about 15 minutes. Enjoy your delicious quesadillas anytime! Chicken and Cheese Enchiladas Alfredo Quesadilla can last up to four days in the fridge. Make sure you store them in an airtight container. This keeps them fresh and safe to eat. Always check for any signs of spoilage before enjoying leftovers. Yes, you can prep these quesadillas ahead of time. Prepare the chicken and cheese mixture. Then, fill the tortillas and store them in the fridge. Just remember to cover them well. You can cook them the next day or even later in the week. This makes for a quick meal when you are busy. These quesadillas pair well with many side dishes. You can serve them with a fresh salad or some Mexican rice. Salsa and guacamole also make great dips. For beverages, try pairing them with a light beer or a refreshing lemonade. This completes your meal and adds flavor. In this post, we covered a tasty Chicken and Cheese Enchiladas Alfredo Quesadilla recipe. You learned about the key ingredients and their roles. I shared step-by-step instructions for making these quesadillas crispy and delicious. We also explored tips, flavor enhancements, and variations to suit your taste. Don't forget the storage options for leftovers and how to reheat them. By using these ideas, you can create a meal that friends and family will love. Now, it's time to get cooking and enjoy your creation!

Chicken and Cheese Enchiladas Alfredo Quesadilla Delight

Love cheesy comfort food? You’re in for a treat with my Chicken and Cheese Enchiladas Alfredo Quesadilla Delight. This dish

To make this dip, you need the following key items: - 1 cup fresh spinach, chopped - 1 cup artichoke hearts, canned or frozen, drained and chopped - 1 cup cream cheese, softened - ½ cup sour cream - ½ cup mayonnaise - 1 cup shredded mozzarella cheese - ½ cup grated Parmesan cheese - 2 cloves garlic, minced - 1 teaspoon onion powder - Salt and pepper to taste These ingredients create a rich and creamy base. The spinach and artichokes bring a fresh taste. The cheeses add flavor and creaminess. Garlic and onion powder give depth to the dip. If you want to enhance the taste, consider these options: - Red pepper flakes for a spicy kick - Fresh herbs like parsley or basil for more freshness - A dash of lemon juice for brightness Using these optional items can change the dip’s flavor. They add personal touches to suit your taste. To make your cooking easier, gather these tools: - Mixing bowl - Baking dish - Spoon or spatula for mixing - Oven for baking Having the right tools makes cooking simpler. You can mix and bake with ease. For best results, use a sturdy baking dish to hold your dip while it bakes. For the complete method on how to create this tasty dish, check out the Full Recipe. Start by gathering your ingredients. You will need fresh spinach, artichoke hearts, cream cheese, sour cream, mayonnaise, mozzarella cheese, Parmesan cheese, garlic, onion powder, salt, and pepper. If you want some heat, grab red pepper flakes. 1. Preheat your oven to 375°F (190°C). This step is key for a great melt. 2. In a bowl, mix the softened cream cheese, sour cream, and mayonnaise. Stir until it's smooth and creamy. This base holds the dip together. 3. Add minced garlic, onion powder, salt, and pepper. Mix well to blend all the flavors. You want balanced taste in every bite. 4. Fold in the chopped spinach and artichoke hearts. Add the mozzarella and Parmesan. If you like spice, sprinkle in some red pepper flakes. Now, it’s time to bake. 1. Transfer the mixture to a baking dish. Spread it out evenly. This helps it cook evenly. 2. Bake in the preheated oven for 25-30 minutes. Look for a bubbly, golden top. This shows it’s ready. Once it’s done, let it cool for a few minutes. This helps with serving. - Serve warm with tortilla chips, pita bread, or fresh cut veggies. - For a pop of color, sprinkle extra Parmesan or fresh parsley on top. - Enjoy sharing this creamy delight with friends and family. This simple and tasty recipe is perfect for gatherings. Follow these steps for a dip everyone will love! For the complete recipe, check out the Full Recipe. To make the creamiest spinach artichoke dip, use full-fat cream cheese. Softened cream cheese blends well with other ingredients. Mix it with sour cream and mayonnaise for a rich base. I recommend folding in spinach and artichokes gently. This keeps the texture nice and creamy. One common mistake is overcooking the dip. Bake it just until bubbly and golden. This way, the cheese stays smooth and melty. Another mistake is not seasoning enough. Always taste and adjust salt and pepper before baking. Remember, flavors deepen as it cooks. You can boost flavor with simple seasonings. I love using garlic and onion powder for depth. Adding red pepper flakes gives a nice kick. For extra zest, try a squeeze of lemon juice. Fresh herbs like parsley or basil also add brightness. Explore different combinations to find your favorite mix. If you want the full recipe, check out the link above! {{image_2}} To make a lighter version of spinach artichoke dip, swap some ingredients. Use Greek yogurt instead of sour cream and mayonnaise. This change cuts calories and adds protein. You can also choose low-fat cream cheese. Add more spinach to boost fiber and nutrients. This way, you keep the dip creamy and tasty without all the fat. If you're looking for vegetarian or vegan options, you can easily adjust the recipe. For a vegan dip, replace cream cheese with cashew cream or tofu. Use dairy-free yogurt instead of sour cream. Nutritional yeast can add a cheesy flavor without dairy. You can still enjoy the same great taste while following a plant-based diet. If you love spice, there are many ways to kick up the heat. Add diced jalapeños or a few dashes of hot sauce to the mix. You can also use pepper jack cheese instead of mozzarella. For a smoky flavor, try adding smoked paprika. This will give your dip a fun twist that your friends will love. To keep your spinach artichoke dip fresh, store it in an airtight container. Make sure to let it cool down first. If you have a lot left, divide it into smaller portions. This way, you can easily grab just what you need later. Always label the container with the date so you know when you made it. When stored correctly, spinach artichoke dip lasts about 3 to 4 days in the fridge. If you want it to last longer, you can freeze it. In the freezer, it can stay good for 2 to 3 months. Just remember that freezing might change the texture a bit. To reheat your dip, place it in an oven-safe dish. Preheat your oven to 350°F (175°C). Cover the dish with aluminum foil to keep it moist. Heat for about 20 minutes, or until it's warm throughout. You can also use a microwave; just heat in short bursts and stir in between. This helps keep it creamy and tasty, just like when you first made it. If needed, add a splash of cream or milk to restore the texture. For the full recipe, check out the Creamy Spinach Artichoke Delight. Yes, you can prepare this dip a day before. Just mix the ingredients and store them in the fridge. This helps the flavors blend well. When ready to serve, simply bake it as directed in the Full Recipe. Yes, you can freeze this dip. Just cool it completely before placing it in a freezer-safe container. When you want to enjoy it, thaw it in the fridge overnight. Reheat it in the oven until warm and bubbly. Serve the dip warm with: - Tortilla chips - Pita bread - Cut vegetables You can also garnish it with extra Parmesan or fresh parsley for a nice touch. To make this dip more friendly for dietary needs: - Use dairy-free cream cheese for a vegan option. - Swap sour cream and mayo with plant-based versions. - Add gluten-free chips or veggies for dipping. These changes keep the dip tasty and enjoyable for everyone! In this post, we explored how to make the perfect spinach artichoke dip. We covered essential and optional ingredients, tools for prep, and step-by-step instructions. You learned tips for the creamiest dip and ways to avoid common mistakes. We also shared tasty variations and storage info for leftovers. Now, you can impress friends with this delicious dish, no matter your cooking level. Enjoy creating and sharing your version of this classic dip!

Classic Spinach Artichoke Dip Simple and Tasty Recipe

Are you ready to whip up a classic that everyone loves? My Classic Spinach Artichoke Dip recipe is simple and

To make this cool treat, gather the following ingredients: - 1 ½ cups graham cracker crumbs - ½ cup unsalted butter, melted - 1 cup sweetened condensed milk - ½ cup fresh lemon juice - 2 tablespoons lemon zest - 1 teaspoon vanilla extract - 1 cup heavy whipping cream - 2 tablespoons powdered sugar - Fresh mint leaves and lemon slices for garnish (optional) These ingredients blend to create a refreshing pie. The graham cracker crumbs form a sweet, crunchy crust. The filling is a zesty mix of lemon juice and zest, giving it a bright flavor. You can garnish with mint leaves or lemon slices for a pop of color and taste. This pie is perfect for hot summer days. You can prepare it in just 20 minutes. Then, let it chill for at least four hours to set. For the full recipe, check out the detailed instructions later in this article. Enjoy the refreshing taste of summer with each slice! First, grab a medium bowl. Add 1 ½ cups of graham cracker crumbs and ½ cup of melted unsalted butter. Mix them well until the crumbs are coated. This mixture will be your pie crust. Next, take a 9-inch pie pan. Press the crumb mixture firmly into the bottom and up the sides. Make sure it is even and compact. This helps the crust hold its shape. Once done, place the crust in the refrigerator. Let it chill while you prepare the filling. Now, get a large mixing bowl. Combine 1 cup of sweetened condensed milk with ½ cup of fresh lemon juice. Add in 2 tablespoons of lemon zest and 1 teaspoon of vanilla extract. Whisk these ingredients together until smooth. In another bowl, whip 1 cup of heavy cream with 2 tablespoons of powdered sugar. Use an electric mixer until stiff peaks form. This step is key for a light filling. Gently fold the whipped cream into the lemon mixture. Do this slowly to keep the whipped cream fluffy. This will give your pie a light and airy texture. Pour the lemon filling into the crust. Use a spatula to smooth the top. Make sure it is even and looks nice. Cover the pie with plastic wrap. Place it in the refrigerator for at least 4 hours. This time helps the pie set properly. When it's ready, slice and serve chilled. You can add fresh mint leaves or lemon slices on top if you like. For the full recipe, refer to the section above. Enjoy! To make perfect whipped cream, start with cold tools. Chill your mixing bowl and beaters. Cold helps the cream whip faster. Pour in the heavy cream and add the powdered sugar. Mix at medium speed until you see soft peaks. This means the cream holds some shape but is still soft. Once you see soft peaks, raise the speed to high. Watch closely as it thickens. Stop when you see stiff peaks. Stiff peaks stand tall when you lift the whisk. Avoid mixing too long; over-mixing turns cream into butter. To prevent deflation, use a gentle touch. When folding the whipped cream into the lemon mixture, do it slowly. Use a spatula to lift the cream from the bottom. Turn the bowl as you fold. This keeps air in the whipped cream. For a bright and fresh look, garnish each slice. Fresh mint leaves add color and a hint of flavor. Lemon slices on top enhance the pie's tangy taste. You can also sprinkle extra lemon zest for a pop of color. Pair this pie with a cool drink. Sparkling water with lemon complements the pie well. For a sweet touch, try it with iced tea or lemonade. These drinks balance the tartness of the lemon pie. Explore these ideas to make your No Bake Lemon Icebox Pie shine at your summer gatherings. For the full recipe, check the beginning of this article. {{image_2}} You can change the taste of your No Bake Lemon Icebox Pie. If you want a twist, try lime juice instead of lemon juice. Lime gives a nice tang and bright flavor. You can also mix in orange juice for a citrus blend. For a richer taste, add a bit of almond extract. Just a small amount goes a long way! You can also boost the flavor by adding more lemon zest. This gives the pie a fresh, zesty kick. If you love floral notes, use lavender extract. It adds a lovely aroma and pairs well with lemon. The crust can change too! You don’t have to stick with graham crackers. Try using crushed shortbread cookies for a buttery touch. Chocolate wafer cookies can add a fun chocolate flavor. If you want something nutty, use crushed almonds or pecans mixed with butter. If you need a gluten-free option, use gluten-free graham crackers or almond flour. You can also make a simple crust using oats and coconut oil. Just mix them and press them into the pan. Each of these options can give your pie a new and exciting flavor. For the full recipe, check out the delicious details! To keep your No Bake Lemon Icebox Pie fresh, store it in the fridge. Make sure to cover it well with plastic wrap. This helps prevent the pie from absorbing odors. The pie stays fresh for about a week. After that, the flavor may fade. If you want to save the pie for later, freezing is a great option. First, wrap the pie tightly in plastic wrap. Then, place it in an airtight container to prevent freezer burn. To thaw it, move the pie to the fridge for several hours or overnight. When it’s ready, slice and serve. It tastes just as delicious as fresh! Yes, you can make this pie ahead. I suggest preparing it one day before serving. The flavors will blend nicely in the fridge. Just cover it well after chilling. This pie tastes best when cold. Absolutely! You can swap a few ingredients for a vegan pie. Use vegan butter for the crust. Replace sweetened condensed milk with coconut cream or silken tofu. For the whipped cream, use coconut whipped cream. These swaps keep the lemon flavor bright. You can store leftovers for about three days in the fridge. Make sure to cover the pie well to keep it fresh. If you see any changes in texture or smell, it's best to throw it out. Enjoy your pie while it's fresh! We covered a lot in this article about No Bake Lemon Icebox Pie. I outlined the key ingredients and shared step-by-step instructions to guide you. You learned tips to perfect your whipped cream and ideas for serving. I also explored variations and storage options. You can enjoy this pie fresh or frozen, and even make it vegan. Now you’re ready to make a delicious treat that everyone will love! Enjoy your pie-making adventure.

No Bake Lemon Icebox Pie Perfect for Summer Refreshment

When summer heat kicks in, you need a sweet, cool treat. I have just the recipe: No Bake Lemon Icebox

To make Easy Chicken Tetrazzini, you need simple and tasty ingredients. Here’s what to gather: - 8 oz spaghetti or fettuccine - 2 cups cooked chicken, shredded - 1 cup sliced mushrooms - 1 cup frozen peas - 1 small onion, finely chopped - 3 cloves garlic, minced - 2 cups chicken broth - 1 cup heavy cream - 1 cup grated Parmesan cheese - 2 tablespoons olive oil - 1 teaspoon dried thyme - Salt and pepper to taste - Fresh parsley for garnish (optional) These ingredients come together to create a creamy and satisfying dish. Using fresh ingredients can boost flavor. Fresh mushrooms and peas often taste better than frozen. They add a nice texture and flavor. However, don't worry if you only have frozen options. They work well, too. Frozen peas are easy and still tasty. Chicken is best if it’s cooked and shredded at home. You can use leftover roast chicken or rotisserie chicken. This saves time and adds great taste. If you want to change things up, here are some great swaps: - Use whole wheat pasta for a healthier option. - Swap chicken for turkey or ham if you have leftovers. - Try different cheese, like mozzarella or cheddar, for a unique twist. - Add bell peppers or spinach for more veggies. These alternates keep the recipe fun and fresh. You can mix flavors to suit your taste. Feel free to experiment! You can find the Full Recipe at the beginning of this article. Start by gathering all your ingredients. You will need: - 8 oz spaghetti or fettuccine - 2 cups cooked chicken, shredded - 1 cup sliced mushrooms - 1 cup frozen peas - 1 small onion, finely chopped - 3 cloves garlic, minced - 2 cups chicken broth - 1 cup heavy cream - 1 cup grated Parmesan cheese - 2 tablespoons olive oil - 1 teaspoon dried thyme - Salt and pepper to taste - Fresh parsley for garnish (optional) Next, preheat your oven to 350°F (175°C). Cook the pasta according to the package. Drain it and set it aside. In a large skillet, heat olive oil over medium heat. Add the chopped onion and garlic. Sauté them until they turn translucent, which takes about five minutes. Now, toss in the sliced mushrooms. Cook them for about three to four minutes, stirring often until they soften. Next, pour in the chicken broth and heavy cream. Stir to mix everything well. Add thyme, salt, and pepper. Bring this mixture to a gentle simmer. Once simmering, add the shredded chicken and frozen peas. Cook for an extra two to three minutes until everything is warm. In a large mixing bowl, combine the cooked pasta with the chicken mixture. Stir in three-quarters of the Parmesan cheese and mix it all thoroughly. Transfer the pasta mix into a greased 9x13 inch baking dish. Top it with the remaining Parmesan cheese. Bake your dish in the preheated oven for 25 to 30 minutes. You want the top to be golden and bubbly. Once baked, let it cool slightly before serving. If you like, garnish with fresh parsley. This step-by-step guide makes creating your easy chicken tetrazzini smooth and fun. For detailed instructions, check the Full Recipe. When making Easy Chicken Tetrazzini, some mistakes can make it less tasty. Here are a few to watch for: - Overcooking the pasta: Cook the pasta only until al dente. It will continue cooking in the oven. - Not seasoning enough: Taste your sauce! Add salt and pepper as needed. - Skipping the cheese: Parmesan adds flavor. Don't skip it or use less than the recipe calls for. You can make this dish your own with simple changes. Here are some ideas: - Add veggies: Try bell peppers or spinach for more color and nutrients. - Use different proteins: Swap chicken for turkey or even cooked shrimp. - Spice it up: Add a pinch of red pepper flakes for heat. You can prepare Easy Chicken Tetrazzini in advance. Here’s how: - Prep the dish: Assemble the casserole, cover, and store it in the fridge for up to 24 hours. - Freezing option: You can freeze it before baking. Wrap it tightly for up to three months. - Baking from frozen: Add 10-15 minutes to the baking time if you bake it straight from the freezer. Use these tips to make your Chicken Tetrazzini even better. For the full step-by-step guide, check out the Full Recipe. {{image_2}} You can make a vegetarian version of Chicken Tetrazzini. Just skip the chicken. Use 2 cups of your favorite veggies instead. Good choices are bell peppers, zucchini, or broccoli. You can add more mushrooms for extra flavor. The rest of the recipe stays the same. The creamy sauce and pasta will still taste great! To make a seafood tetrazzini, use shrimp or crab instead of chicken. Cook the seafood briefly so it stays tender. Add it to the sauce just like you would with chicken. You can also use fish fillets if you like. This version adds a lovely ocean taste to the dish. It’s a fun twist that seafood lovers will enjoy! If you want to change the protein, there are many options. You can use turkey, ham, or even tofu. Cook them the same way as you would the chicken. Shred or chop them into small pieces. Each option will give a different flavor. Feel free to mix and match your favorites. The Full Recipe helps guide you through any changes. After you enjoy your Easy Chicken Tetrazzini, store leftovers in an airtight container. Make sure to let it cool first. This way, it stays fresh longer. You can keep it in the fridge for up to three days. If you want to keep it longer, freezing is a great option. To freeze Chicken Tetrazzini, let it cool completely. Then, place it in a freezer-safe container. You can also use freezer bags. For best results, remove as much air as you can. Label the container with the date. It can stay in the freezer for up to three months. When you’re ready to eat it, thaw it in the fridge overnight. When you reheat Chicken Tetrazzini, there are a few good methods. You can use the oven, microwave, or stovetop. For the oven, preheat it to 350°F (175°C). Place the tetrazzini in a baking dish and cover it with foil. Heat for about 20-25 minutes. If using a microwave, heat in short bursts, stirring in between. This helps it warm evenly. For stovetop, add a splash of chicken broth to a pan, and reheat gently. Always check the temperature before serving. Enjoy your meal! Yes, you can use any pasta you like. Fettuccine and spaghetti work great. But, penne or rotini can also add fun shapes. Just cook it al dente. Then, mix it with the chicken sauce as you would with the original recipe. This keeps the pasta from getting mushy. You can store Chicken Tetrazzini in the fridge for three to four days. Make sure to keep it in an airtight container. It also freezes well. If you freeze it, it can last up to three months. Just remember to thaw it in the fridge before reheating. Chicken Tetrazzini pairs well with a fresh salad. A simple green salad with vinaigrette is a good choice. Garlic bread is also a great side. It adds a nice crunch. You can even serve some steamed veggies for extra color and nutrition. For more ideas, check out the Full Recipe for tips on sides! In this post, we explored the key ingredients for Chicken Tetrazzini and how to use them. We covered fresh versus frozen options and provided helpful substitutions. The step-by-step cooking instructions ensure you achieve great results. You also discovered tips to avoid common mistakes and how to customize this dish to fit your taste. Lastly, we discussed storage methods and answered common questions. Remember, Tetrazzini is flexible, so feel free to experiment with ingredients and flavors. Enjoy your cooking!

Easy Chicken Tetrazzini Flavorful and Simple Recipe

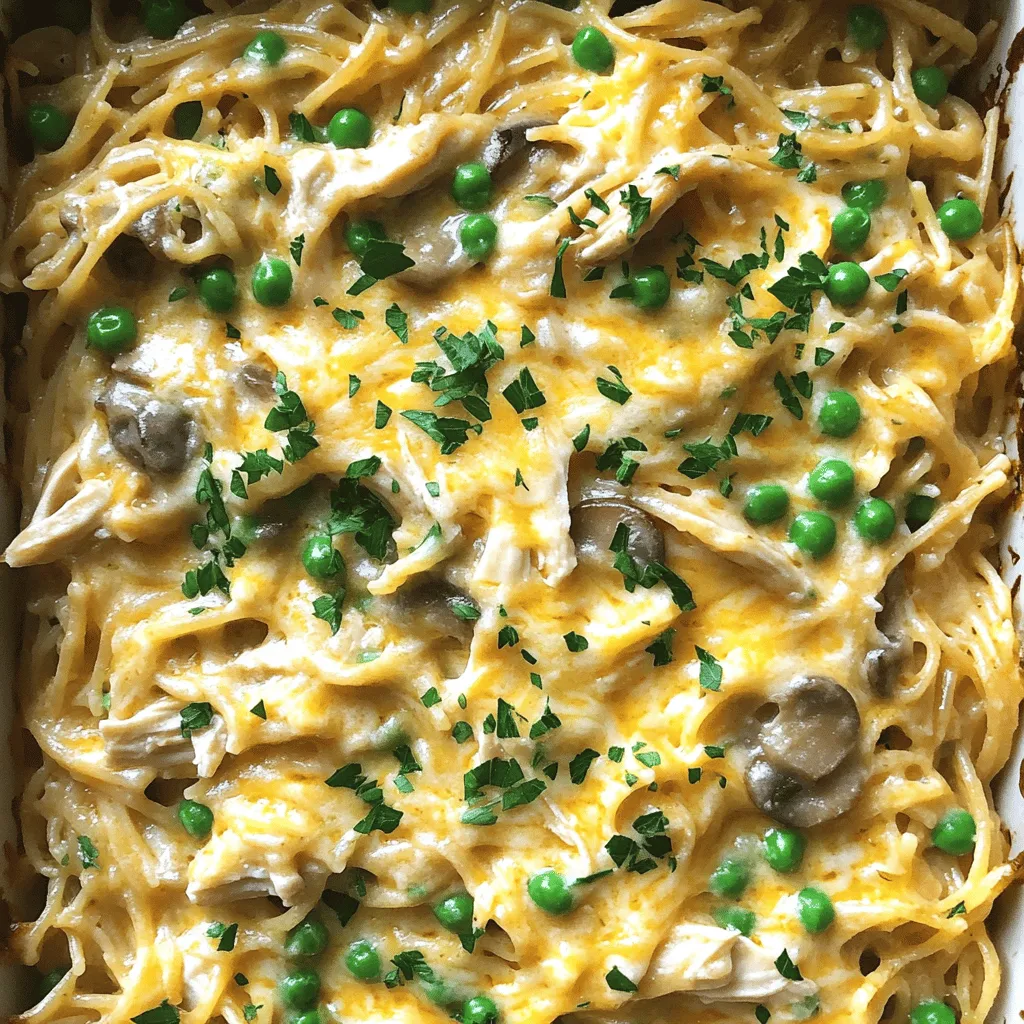
Welcome to my easy Chicken Tetrazzini recipe! If you want a tasty, simple dish that warms your heart, you’ve found

- 4 chicken thighs, bone-in and skin-on - 4 cloves garlic, minced - 2 lemons (zest and juice) - 3 tablespoons olive oil - 2 teaspoons fresh thyme leaves - 1 teaspoon smoked paprika - Salt and pepper to taste - Fresh parsley for garnish For this dish, chicken thighs are perfect. Their rich flavor and juicy texture make them a great choice. Bone-in, skin-on thighs give you crispy skin and tender meat. Next, garlic and lemons add a bright, zesty taste. Minced garlic enhances the flavor. Fresh lemon juice and zest bring a refreshing twist to the dish. Olive oil is key for keeping the chicken moist. It helps the seasonings stick to the meat while adding depth. A mix of thyme, smoked paprika, salt, and pepper rounds out the flavor profile. - Fresh herbs - Side dishes for serving You can add fresh herbs like rosemary or oregano for more flavor. They give a lovely aroma and pair well with lemon. Consider side dishes like roasted veggies, rice, or a crisp salad. They complement the chicken perfectly and make a complete meal. For the full recipe, check out the Lemon Garlic Roasted Chicken Thighs section. 1. Preheat the oven to 425°F (220°C). This step is key for crispy skin. 2. Prepare your ingredients. You will need 4 chicken thighs, 4 cloves of minced garlic, 2 lemons for zest and juice, 3 tablespoons of olive oil, 2 teaspoons of fresh thyme leaves, 1 teaspoon of smoked paprika, salt, and pepper. 3. Make the marinade. In a small bowl, mix the minced garlic, lemon zest, lemon juice, olive oil, thyme, smoked paprika, salt, and pepper. This mixture adds a bright flavor to the chicken. 1. Marinate the chicken thighs. Place the chicken thighs in a large baking dish. Pour the marinade over them, making sure each piece is well-coated. Let it sit for at least 30 minutes at room temperature or refrigerate for up to 2 hours for deeper flavor. 2. Arrange and roast in the oven. Once marinated, place the chicken thighs skin-side up in the baking dish. Roast them in the preheated oven for 35-40 minutes. The skin should be crispy, and a meat thermometer should read 165°F (74°C) at the thickest part. 3. Finish with broiling for crispiness. If you want extra crispy skin, turn on the broiler for the last 2-3 minutes. Keep an eye on it to avoid burning. This step adds a nice crunch that makes the dish even better. You can check out the Full Recipe for more details on this vibrant dish! To get the best flavor, marinate your chicken thighs well. Start by mixing garlic, lemon juice, and olive oil. This blend gives the chicken a bright taste. Make sure to coat each piece evenly. I recommend marinating for at least 30 minutes. If you have time, let it sit for up to 2 hours. This extra time helps the flavors soak in deeper. For even cooking, place the chicken thighs skin-side up in the baking dish. This way, the skin crisps up nicely. To check for doneness, use a meat thermometer. Insert it into the thickest part of the thigh. When it reads 165°F (74°C), your chicken is ready. If you want extra crispiness, turn on the broiler for a few minutes at the end. Just keep an eye on it so it doesn't burn. To serve your chicken attractively, garnish with fresh parsley. This adds a pop of color. Drizzle some of the pan juices over the chicken for extra flavor. Arrange the thighs neatly on a plate. You can pair them with sides like roasted veggies or a fresh salad. This makes your meal look even better and more inviting. For the full recipe, check out the earlier sections. {{image_2}} You can easily switch up the taste of lemon garlic roasted chicken thighs. Adding different herbs can bring new life to this dish. Try fresh rosemary or oregano for a twist. These herbs pair well with the garlic and lemon, making each bite a delight. You can also add a pinch of red pepper flakes for heat. It adds a warm kick without overpowering the dish. Using other citrus fruits can also change the flavor profile. Lime or orange juice can replace lemon juice. Each fruit adds a unique taste. Lime gives a zesty kick, while orange adds sweetness. Experiment with these fruits to find your favorite flavor. You don’t have to roast these chicken thighs in the oven. Grilling is a great option too. It gives the chicken a smoky flavor. Just marinate the thighs as usual, then grill them on medium heat. Cook for about 6-7 minutes per side until they reach 165°F (74°C). If you prefer pan-searing, heat some oil in a skillet. Sear the thighs skin-side down to get a crispy skin. Then, flip them and cover the pan. Cook until done. This method gives a nice crust and keeps the chicken juicy. Using a slow cooker is another great choice. Simply place the marinated thighs in the slow cooker. Cook on low for 6 hours or high for 3 hours. This method makes the chicken very tender and full of flavor. You can find the full recipe for lemon garlic roasted chicken thighs to guide you through these variations. To store your leftover lemon garlic roasted chicken thighs, let them cool first. Place them in an airtight container. You can keep them in the fridge for up to three days. If you want to store them longer, freezing is a great option. For freezing, wrap each thigh tightly in plastic wrap. Then, place them in a freezer bag. This way, they can last for up to three months. Remember to label the bags with the date, so you know when you froze them. When it's time to eat your leftovers, reheating is key. The best way to reheat chicken thighs is in the oven. Preheat it to 350°F (175°C). Place the thighs in a baking dish and cover with foil. This will keep them moist. Heat for about 20-25 minutes. You can also use a microwave. Place the thighs on a microwave-safe plate. Cover with a damp paper towel to keep moisture in. Heat in short bursts of 1-2 minutes until warm. Check often to avoid drying them out. To keep the flavor, consider adding a splash of chicken broth or a bit of olive oil before reheating. This will help bring back the juicy taste, making your meal just as delightful as when it was first cooked. How long to marinate chicken thighs? I suggest marinating chicken thighs for at least 30 minutes. For the best results, leave them in the marinade for 2 hours in the fridge. This gives the flavors time to soak in. Can I use boneless thighs instead? Yes, you can use boneless thighs. They will cook faster, so keep an eye on them. Adjust the cooking time to about 25-30 minutes. What temperature to cook chicken thighs? Cook chicken thighs at 425°F (220°C). This high heat helps crisp the skin while keeping the meat juicy. How to tell when chicken is fully cooked? The best way is to use a meat thermometer. Insert it into the thickest part of the thigh. It should read 165°F (74°C) when done. What to serve with lemon garlic roasted chicken thighs? You can serve these chicken thighs with roasted vegetables, rice, or a fresh salad. They complement many side dishes. Ideas for matching side dishes and drinks Pair your meal with a chilled white wine, like Sauvignon Blanc. For sides, consider garlic mashed potatoes or steamed green beans. This post covers everything you need for tasty lemon garlic roasted chicken thighs. You learned about key ingredients, from chicken thighs to herbs, and how to prepare the dish with step-by-step instructions. We discussed tips for marinating and cooking and even explored variations and storage methods. As you whip up this dish, remember that a few tweaks can make a big difference. Enjoy your cooking and impress your family with delicious flavors!

Lemon Garlic Roasted Chicken Thighs Juicy and Flavorful

Are you ready for a dish that will make your taste buds dance? Lemon Garlic Roasted Chicken Thighs are juicy,

To make these tasty blueberry scones, gather the following ingredients: - 2 cups all-purpose flour - 1/2 cup granulated sugar - 1 tablespoon baking powder - 1/2 teaspoon salt - 1/2 cup unsalted butter, cold and cubed - 1 cup fresh blueberries (or frozen, if unavailable) - 3/4 cup heavy cream - 1 large egg - 1 teaspoon vanilla extract - Zest of 1 lemon (optional) - Extra cream and sugar for topping Using high-quality ingredients makes a big difference. Choose fresh blueberries for the best taste. If you use frozen blueberries, make sure they are not mushy. Use unsalted butter for a balanced flavor. Choosing organic flour and sugar can enhance the overall quality. The zest of a fresh lemon adds a bright touch. You can easily switch out some ingredients based on what you have. For a dairy-free option, use coconut cream instead of heavy cream. Substitute almond milk for a lighter touch. If you don’t have fresh blueberries, try raspberries or chopped strawberries. You can also replace all-purpose flour with a gluten-free blend. For sweetness, consider using honey or maple syrup instead of sugar. For the full recipe, check the link provided. To make these blueberry scones, gather a few simple tools: - Large mixing bowl - Whisk - Pastry cutter or your hands - Baking sheet - Parchment paper - Rolling pin (optional) - Wire rack for cooling Having these tools ready makes the process smooth and fun. Start by measuring 2 cups of all-purpose flour. Add 1/2 cup of granulated sugar, 1 tablespoon of baking powder, and 1/2 teaspoon of salt. Use a whisk to mix these dry ingredients well. This step is key for even flavor. In a separate bowl, combine 3/4 cup of heavy cream, 1 large egg, 1 teaspoon of vanilla extract, and the zest of 1 lemon if you like. Whisk these together until mixed. Pour this mixture into the dry ingredients. Stir gently until it just comes together. Be careful not to overmix; the dough should remain a bit sticky. Turn the dough out onto a floured surface. Shape it into a circle about 1 inch thick. You can cut it into wedges or use a round cutter for individual scones. This is where you can get creative! Preheat your oven to 400°F (200°C) and line your baking sheet with parchment paper. Place the scones on the sheet. Brush the tops with a little extra cream and sprinkle with sugar for a nice finish. Bake for 15-20 minutes, until they are lightly golden. Let them cool on a wire rack for a few minutes before serving. Enjoy your homemade blueberry scones! For the complete method and ingredients, check the [Full Recipe]. To get soft and fluffy scones, handle the dough gently. Overworking the dough makes them tough. When you mix the wet and dry ingredients, stir just until they blend. A slightly sticky dough is great for light scones. Use cold butter and cream to keep the scones tender. If you can, chill the dough for a few minutes before baking. This helps them rise beautifully. One big mistake is not measuring ingredients correctly. Always use measuring cups for dry and wet items. Also, avoid using warm butter; it should be cold and cube-sized. Don’t skip the baking powder; it helps the scones rise. Lastly, remember not to open the oven door too soon. This can cause them to sink. You can make your scones even better with fun add-ins. Try adding a teaspoon of cinnamon or nutmeg for warmth. Chopped nuts, like walnuts or almonds, give a nice crunch. If you love citrus, add more lemon zest for brightness. You can even mix in some chocolate chips for a sweet twist. Always fold in these extras gently to keep the scones light. For the full recipe, check out the earlier section! {{image_2}} Lemon blueberry scones bring a bright twist to the classic recipe. To make them, add the zest of one lemon to your dough. This small change adds a fresh, tangy flavor that pairs perfectly with sweet blueberries. You can also drizzle a lemon glaze on top for extra sweetness. Just mix powdered sugar with lemon juice until smooth and drizzle it over cooled scones. If you need a gluten-free option, it's easy to adapt! Use a gluten-free baking mix instead of regular flour. Look for a mix that has xanthan gum, as this helps with texture. The rest of the recipe stays the same, and you still get those fluffy, tasty scones. Just remember, gluten-free flours can vary, so you may need to adjust the liquid slightly for the right dough consistency. You can make your scones even more exciting by adding different fruits or nuts. Try chopped strawberries, raspberries, or even peaches. For a nutty crunch, add chopped walnuts or pecans. Just keep the total fruit weight similar to the blueberries to maintain the right dough balance. This way, you can create a new flavor every time you bake! For the full recipe, check out the delicious steps above! To keep your scones fresh, store them in an airtight container. Place parchment paper between layers to avoid sticking. If you have leftover scones, let them cool completely first. Store them at room temperature for up to two days. If you want to keep them longer, consider freezing. Freezing scones is simple and smart. After baking, let them cool down. Wrap each scone tightly in plastic wrap. Then, place them in a freezer-safe bag or container. They can last in the freezer for up to three months. When you're ready to enjoy, just pull them out and thaw. To bring back that fresh-baked taste, reheat scones in the oven. Preheat your oven to 350°F (175°C). Place the scones on a baking sheet and cover them with foil. Heat for 10 to 15 minutes. This method keeps them soft and fluffy. You can also microwave them for 15-20 seconds, but they may lose some texture. For best results, stick with the oven. For the full recipe, check out my guide on deliciously fluffy blueberry scones. Blueberry scones stay fresh for about two days at room temperature. After that, they may dry out. If you want them to last longer, store them in an airtight container in the fridge for up to a week. You can freeze them too, and they will keep for about three months. Yes, you can use frozen blueberries! Just make sure to thaw them first. Pat them dry with a paper towel to remove excess moisture. This helps prevent the dough from becoming too wet. Frozen blueberries are a great option when fresh ones aren’t available. Blueberry scones are tasty on their own, but you can pair them with clotted cream, butter, or jam. A dollop of lemon curd adds a nice zing. Some fresh blueberries on the side look pretty and taste great too. A cup of tea or coffee complements them nicely. Look for a light golden color on top. The edges should be firm, and the centers should spring back when lightly pressed. If you insert a toothpick, it should come out clean or with a few crumbs. Keep an eye on them in the last few minutes of baking. You can make the dough ahead of time! Shape it into a round, wrap it tightly in plastic wrap, and store it in the fridge. It will stay fresh for up to 24 hours. When you are ready, slice and bake as directed in the full recipe. This makes for a quick and easy treat! You learned how to make delicious blueberry scones from scratch. We covered key ingredients and tips for quality. You now know how to mix, shape, and bake them perfectly. With our variations, you can explore new flavors. Store your scones properly to keep them fresh longer. Remember these steps, and you will enjoy tasty scones anytime. Happy baking, and enjoy your treats!

Homemade Blueberry Scones Simple and Tasty Treat

Are you ready to bake something delicious? These homemade blueberry scones are simple and tasty! With fresh blueberries and a

To make Air Fryer Coconut Shrimp, gather these simple ingredients: - 1 lb large shrimp, peeled and deveined - 1 cup shredded coconut (unsweetened) - 1 cup panko breadcrumbs - 1/2 cup all-purpose flour - 2 large eggs - 1 teaspoon garlic powder - 1 teaspoon paprika - 1/2 teaspoon salt - 1/4 teaspoon black pepper - Cooking spray These ingredients create a crunchy and tasty coating that pairs well with shrimp. You can switch some ingredients if needed: - Shrimp: Use smaller shrimp or even chicken tenders. - Coconut: Try sweetened coconut for a different flavor. - Panko: Swap panko breadcrumbs with crushed cornflakes for an extra crunch. - Eggs: For a vegan option, replace eggs with a mixture of ground flaxseed and water. These substitutions can keep your dish fresh and interesting. Using fresh ingredients is key to great flavor. Fresh shrimp taste better and have a firm texture. If your coconut is old, it may taste stale. Fresh eggs improve the coating’s binding. When you use fresh ingredients, your Air Fryer Coconut Shrimp will truly stand out. Plus, they will look and taste amazing on your plate! To start, choose large shrimp. I like to use shrimp that are already peeled and deveined. This saves time and makes cooking simple. Rinse the shrimp under cold water, then pat them dry with a paper towel. Dry shrimp help the coating stick better. Set the shrimp aside while you prepare the other ingredients. The dredging process is key for crispy coconut shrimp. First, mix the flour, garlic powder, paprika, salt, and black pepper in a large bowl. This blend adds great flavor. In another bowl, beat the eggs until they are smooth. For the final step, combine shredded coconut and panko breadcrumbs in a shallow dish. Now, take each shrimp. Dip it into the flour mixture first. Make sure to shake off any excess. Next, dunk the shrimp in the egg wash. Let any extra egg drip off. Finally, coat the shrimp in the coconut-panko mix. Press gently to make sure the coating sticks well. Preheat your air fryer to 400°F (200°C). This step is important for crispiness. Arrange the coated shrimp in a single layer in the air fryer basket. Do not let them overlap, as this can cause uneven cooking. Lightly spray the shrimp with cooking spray. This helps them turn golden brown. Cook the shrimp for 8 to 10 minutes. Flip them halfway for even browning. They are ready when they are golden and crispy. Once cooked, let the shrimp rest for a couple of minutes. This allows the juices to settle. Serve them warm with your favorite dipping sauce. Enjoy this crispy treat! For the full recipe, check out the earlier section. To get that perfect crisp, spray the shrimp with cooking spray. This helps the coating brown nicely. Make sure your air fryer is hot before adding the shrimp. Preheating to 400°F (200°C) for five minutes is key. Arrange shrimp in a single layer. Overcrowding can lead to soggy shrimp. Flip them halfway for even cooking. One common mistake is not drying the shrimp properly. Moist shrimp will not hold the coating well. Another mistake is rushing the dredging process. Take your time and coat each shrimp fully. Also, don’t skip the cooking spray. It adds crunch and helps the shrimp brown. Finally, avoid using too much flour. Just a light coat is best. Pair your coconut shrimp with great dipping sauces. Sweet chili sauce is a classic choice. It adds a nice kick and sweetness. For a twist, try a mango salsa. The fresh fruit balances the coconut flavor. You can also mix a simple yogurt sauce. Just combine plain yogurt with lime juice and a bit of garlic. These sauces enhance the experience and make it more fun. {{image_2}} Want to kick up the heat? Add some spice! Mix cayenne pepper or chili powder into the flour. You can also blend in some red pepper flakes with the coconut. This gives your shrimp a fiery crunch. Don’t be shy—adjust the spice to your taste. Pair this spicy version with a cooling dip, like yogurt or ranch. If you're looking for a lighter option, swap the panko breadcrumbs for crushed cornflakes. They add a nice crunch without the extra calories. You can also use almond flour instead of regular flour. This will make your shrimp gluten-free and full of flavor. For an even healthier treat, try baking the shrimp instead of air frying. Just remember, it may take a bit longer to achieve that golden look. Explore different tastes by adding global flavors. Try a Thai twist by mixing lime zest and cilantro into the coconut. For a Caribbean flair, use mango or pineapple juice in your dipping sauce. You can even experiment with Japanese flavors by adding wasabi to your breading for a unique kick. Each of these ideas opens a world of delicious possibilities, making your coconut shrimp a dish that travels the globe. For the full recipe, check out the detailed cooking steps above. To keep your air fryer coconut shrimp fresh, let them cool first. Place them in an airtight container. This helps prevent moisture build-up. Store the shrimp in the fridge for up to three days. If you want them to stay crispy, avoid stacking them in the container. When reheating, you want to keep that crispiness. Use your air fryer if you have one. Preheat it to 350°F (175°C). Place the shrimp in a single layer. Heat for about 3-5 minutes. This method brings back the crunch. You can also use an oven, but it may take a bit longer. If you want to save some shrimp for later, freezing works great. Make sure they are completely cool. Arrange them in a single layer on a baking sheet. Freeze until solid, about 1-2 hours. Once frozen, transfer them to a freezer bag. They will last for up to three months. When ready to eat, you can cook them straight from the freezer. Just add a few extra minutes to the cooking time. Enjoy your coconut shrimp anytime! For the full recipe, refer to the complete instructions above. Cooking Air Fryer Coconut Shrimp takes about 8 to 10 minutes. You should air fry them at 400°F (200°C). Make sure to flip them halfway through for even cooking. When they turn golden brown, they are done. Yes, you can use frozen shrimp. Just make sure to thaw them first. Place the frozen shrimp in the fridge overnight or put them in a bowl of cold water for about 20 minutes. Pat them dry before you start cooking. This helps the coating stick better. Coconut shrimp pairs well with many sides. Here are some great choices: - Rice with lime and cilantro - Quinoa salad with veggies - Fresh green salad with a light dressing - Sweet potato fries - Tropical fruit salsa These sides will complement the sweet and savory flavors of the shrimp. For a fun twist, serve them with sweet chili sauce for dipping. You can find the full recipe for this dish to explore more details. This post covered all you need for Air Fryer Coconut Shrimp. I shared key ingredients and substitutions. You learned how to prepare and cook shrimp for that perfect crisp. We discussed common mistakes and great dipping sauces. Variations and storage tips help you get the most from this dish. Remember, using fresh ingredients makes a big difference. With practice, you will master this recipe and impress everyone. Enjoy your tasty coconut shrimp!

Air Fryer Coconut Shrimp Crispy and Flavorful Treat

Get ready to indulge in a crispy, flavorful treat with my Air Fryer Coconut Shrimp! This dish combines juicy shrimp

Older posts
Newer posts
← Previous Page1 … Page37 Page38 Page39 … Page79 Next →

dsad

© 2025 pureeatsnow • Built with GeneratePress

Our Policies

  • Copyright Policy
  • Cookie Policy
  • GDPR Policy
  • Privacy Policy
  • Disclaimer
  • Terms Of Use

More Information

  • Home
  • About
  • Contact
  • Appetizers
  • Dessert
  • Dinner
  • Drinks
©2025, pureeatsnow About Back To Top