Skip to content
DisclaimerTerms Of UseGDPR PolicyCookie Policy

pureeatsnow

  • Home
  • Drinks
  • Appetizers
  • Dinner
  • Dessert
  • About
  • Contact
  • Privacy Policy
DisclaimerTerms Of UseGDPR PolicyCookie Policy

Rachel

- 2 lbs chicken wings - 1 tablespoon baking powder - 1 teaspoon salt - 1/2 teaspoon black pepper - 1 teaspoon garlic powder - 1 teaspoon onion powder - 1 teaspoon smoked paprika For crispy lemon pepper wings, you need chicken wings as the main ingredient. Baking powder is key for that satisfying crunch. Salt, black pepper, garlic powder, onion powder, and smoked paprika add the right flavor. - 1/2 cup unsalted butter, melted - Zest of 1 lemon - 2 tablespoons fresh lemon juice - 1 tablespoon fresh parsley, chopped (for garnish) I make a zesty sauce with melted butter, lemon zest, and lemon juice. This sauce brings a bright taste to the wings. Fresh parsley adds a nice touch and color to the dish. - Baking sheet - Wire rack - Mixing bowls You will need a baking sheet to catch drips and a wire rack for even cooking. Mixing bowls help you combine ingredients easily. Using the right tools makes cooking smoother and more fun. For the full recipe, check out [Full Recipe]. - Preheat the oven to 400°F (200°C). This heat makes the wings crispy. - Pat the chicken wings dry with paper towels. Dry wings help them crisp up better. - In a small bowl, mix the baking powder, salt, black pepper, garlic powder, onion powder, and smoked paprika. This is your spice mix. - Sprinkle the mix over the wings. Toss them well to coat every piece. - Arrange the wings on the wire rack in a single layer. Make sure they do not touch. This allows hot air to flow around them. - Bake the wings for 40-45 minutes. Flip them halfway to ensure they cook evenly. For the full experience, check out the Full Recipe. To make your wings very crispy, drying them is key. Moisture makes wings soggy. After washing, use paper towels to pat them dry. This step ensures they get nice and crunchy. The right oven temperature is also important. Preheat your oven to 400°F (200°C). This heat helps the wings cook evenly. Bake them for 40 to 45 minutes. Flip the wings halfway through for even crispiness. Crispy lemon pepper wings taste great with dips. Try ranch or blue cheese dressing. They also pair well with fresh veggies like carrot sticks or celery. For drinks, a cold beer goes well with wings. Lemonade or iced tea also make great choices. Choose a drink that balances the flavor of the wings. Garnish your wings for a tasty touch. Fresh herbs like parsley add color and flavor. You can also use a sprinkle of paprika for extra zest. For presentation, serve the wings on a large platter. Add lemon wedges for a bright look. A sprinkle of chopped parsley makes them even more appealing. Check out the Full Recipe for complete instructions! {{image_2}} To kick up the heat, add hot sauce to the lemon pepper sauce. You can mix in a few tablespoons of your favorite hot sauce. This adds a bold kick that spice lovers will enjoy. You can also use alternative spice blends, like Cajun or chili powder, for a different flavor twist. These blends can enhance the zest of lemon and pepper. For a rich flavor, try adding grated Parmesan cheese to your wings. This cheese pairs well with the lemon and adds a savory note. You can also modify the sauce by blending lemon juice with garlic and Parmesan. This creates a creamy, tangy sauce that coats each wing beautifully. Grilling wings gives a smoky flavor that many people love. To grill, first preheat your grill to medium-high heat. Place the wings on the grill for about 20-25 minutes, flipping them often. Check for crispiness, and make sure they are cooked through. Cooking time will vary based on your grill and wing size. To keep your crispy lemon pepper wings fresh, store them in the fridge. Start by letting the wings cool down to room temperature. Place them in an airtight container. This prevents moisture from making them soggy. A plastic or glass container works best. You can also use resealable bags if you’re tight on space. When it’s time to enjoy your leftovers, reheating properly is key. The oven is the best method to keep wings crispy. Preheat your oven to 375°F (190°C). Place the wings on a baking sheet. Heat them for about 10-15 minutes or until hot. For a quicker option, you can use a microwave. However, this may make the wings less crispy. If using the microwave, heat in short bursts, about 30 seconds at a time. If you want to save wings for later, freezing is a great option. First, allow the wings to cool completely. Place them in freezer bags or airtight containers. Make sure to remove as much air as possible. This helps prevent freezer burn. To thaw, move the wings to the fridge overnight. For reheating, use the oven as mentioned above. This method keeps them crispy and tasty. Crispy lemon pepper wings can last about 3 to 4 days in the fridge. For best results, store them in an airtight container. This keeps them fresh and tasty. Always let wings cool before sealing them. If you want to keep them longer, freezing is a great option. Yes, you can make these wings ahead of time. You can prepare them up to a day in advance. Cook the wings and let them cool. Then, store them in the fridge. When you’re ready to serve, just reheat them in the oven to regain crispiness. This saves time on busy days. If you don’t have baking powder, you can use cornstarch instead. Cornstarch helps make the wings crispy too. You can also try using baking soda, but use less. Just remember to balance it with an acid, like lemon juice. This will help achieve that perfect crunch. You can find crispy lemon pepper wings at many restaurants and sports bars. Look for places that specialize in wings or comfort food. Many pizza spots also serve great wings. To find the best options, check local reviews or food apps. This way, you can enjoy them without cooking! Crispy lemon pepper wings are a treat everyone loves. This post covered essential ingredients, tips for perfecting your wings, and fun variations. You learned how to make them crispy, store leftovers, and reheat for best flavor. Remember, you can always adjust the spice to fit your taste. Enjoy making these wings with family and friends. They’re sure to be a hit at your next gathering! Get cooking and savor every bite!

Crispy Lemon Pepper Wings Easy and Flavorful Recipe

If you crave a flavor-packed snack, look no further! This easy Crispy Lemon Pepper Wings recipe will make your taste

Here is what you need to make the best chocolate chip zucchini bread: - 2 cups grated zucchini (about 1 large zucchini) - 1 cup all-purpose flour - 1 cup whole wheat flour - 1 teaspoon baking soda - 1 teaspoon baking powder - 1/2 teaspoon salt - 1 teaspoon ground cinnamon - 1/4 teaspoon nutmeg (optional) - 1/2 cup granulated sugar - 1/2 cup brown sugar, packed - 1/2 cup vegetable oil (or melted coconut oil) - 3 large eggs - 1 teaspoon vanilla extract - 1 cup semi-sweet chocolate chips - 1/2 cup chopped walnuts or pecans (optional) These ingredients come together to create a moist and sweet bread. The zucchini adds moisture and fiber, while the chocolate chips bring rich flavor. The mix of all-purpose and whole wheat flour gives the bread a nice texture. You can even add nuts for crunch. Make sure your zucchini is fresh and grated well. This helps it blend into the batter smoothly. You can find the full recipe above. 1. Preheat the oven and prepare the pan: Set your oven to 350°F (175°C). Grease a 9x5 inch loaf pan or line it with parchment paper. This helps the bread release easily later. 2. Mix wet ingredients thoroughly: In a large bowl, combine 2 cups of grated zucchini, 1/2 cup of vegetable oil, 1/2 cup of granulated sugar, and 1/2 cup of brown sugar. Add 3 large eggs and 1 teaspoon of vanilla extract. Mix well until everything is combined. 3. Combine dry ingredients separately: In another bowl, whisk together 1 cup of all-purpose flour, 1 cup of whole wheat flour, 1 teaspoon of baking soda, 1 teaspoon of baking powder, 1/2 teaspoon of salt, 1 teaspoon of ground cinnamon, and 1/4 teaspoon of nutmeg if you like. This keeps the bread fluffy. 1. Gradually incorporate dry ingredients into wet: Slowly add the dry mix to the wet mix. Stir gently until just combined. It’s okay if the batter is a bit lumpy. Overmixing can make the bread tough. 2. Fold in chocolate chips and nuts: Gently fold in 1 cup of semi-sweet chocolate chips and 1/2 cup of chopped walnuts or pecans, if you want them. This adds great flavor and crunch. 1. Pour batter into the loaf pan: Carefully pour the batter into your prepared loaf pan. Spread it evenly for even cooking. 2. Bake and check for doneness: Place the pan in the oven. Bake for 50-60 minutes. Check with a toothpick; if it comes out clean, the bread is done. 3. Cooling process after baking: Once baked, remove the pan from the oven. Let it cool in the pan for about 10 minutes. Then, transfer the bread to a wire rack to cool completely. This step is key for a nice texture. Follow these steps for a delicious Chocolate Chip Zucchini Bread. For the complete list of ingredients and more details, check the Full Recipe. To keep your bread moist but not soggy, squeeze the grated zucchini. Use a clean kitchen towel to wring out excess water. This gives you the right balance of moisture. When adding chocolate chips, toss them in a bit of flour first. This helps them stay suspended in the batter. You can use semi-sweet or dark chocolate chips for a richer taste. Mix your batter gently. Stir just until combined; lumps are okay. Overmixing makes the bread tough, and nobody wants that! One big mistake is not preparing the zucchini properly. Always squeeze out the extra moisture. This step is key for the right texture in your bread. Another pitfall is baking time. Overbaking makes the bread dry, while underbaking leaves it gooey. Use a toothpick to check for doneness; it should come out clean. Don't ignore ingredient swaps. If you're low on sugar, try using honey or maple syrup. Adjust ratios for best results. {{image_2}} To make this bread gluten-free, swap regular flour for gluten-free flour. You can use a 1:1 gluten-free blend. Look for one that has xanthan gum in it. This helps bind the bread and keeps it from being crumbly. For texture, add a bit more moisture. You might need an extra tablespoon of oil or applesauce. This will help keep the loaf soft and moist. The flavor will remain rich and tasty, thanks to the zucchini and chocolate. To make a vegan version, replace the eggs. Use flaxseed meal mixed with water. For each egg, mix 1 tablespoon of flaxseed meal with 2.5 tablespoons of water. Let it sit for a few minutes to gel. This will act as a binder in your bread. When you switch to plant-based ingredients, the bread may taste slightly different. Use almond milk or soy milk instead of regular milk. This change keeps it moist and adds a nice flavor. You can make your bread even better with some added spices. Try a pinch of nutmeg or a dash of cardamom. These will give it a warm, cozy flavor that pairs well with chocolate. Consider adding fruits or nuts too! Chopped apples or crushed pineapple can add moisture and sweetness. Walnuts or pecans give a nice crunch and rich taste. Feel free to get creative with what you have on hand. For the full recipe, check out the Chocolate Chip Zucchini Bread section. To keep your chocolate chip zucchini bread fresh, wrap it tightly in plastic wrap or foil. This helps prevent it from drying out. You can also place slices in an airtight container. This will keep the moisture locked in, making each bite just as good as the first. The best storage container is a glass or plastic container with a seal. These containers help keep air out and prevent mold. You should store your bread at room temperature for up to three days. If you want to keep it longer, freezing is a great option. To freeze individual slices, first let the bread cool completely. Then, slice the bread into portions. Wrap each slice in plastic wrap, then place the wrapped slices in a freezer bag. Make sure to remove as much air as possible before sealing. For thawing, take a slice out and let it sit at room temperature for about an hour. You can also microwave it for about 15-20 seconds for a quick thaw. This keeps the taste and texture just right. Enjoy your delicious chocolate chip zucchini bread anytime! To know if your zucchini bread is done, look for a few signs. The top should be golden brown. The bread should spring back when you gently press it. You can also check with a toothpick. Insert it into the center of the bread. If it comes out clean or with a few crumbs, your bread is ready. For best results, use a toothpick or cake tester. Insert it into the thickest part of the bread. If it comes out wet, bake for a few more minutes. Keep an eye on it to avoid overbaking. Overbaked bread can be dry. Yes, you can use frozen zucchini. It can save time and reduce waste. Frozen zucchini works well if you prepare it right. Thaw the zucchini and squeeze out excess water. This helps keep the bread from being too wet. Using frozen zucchini can add convenience. It is a great way to use extra zucchini from your garden. Just make sure it is finely grated, similar to fresh zucchini. Zucchini has many health benefits. It is low in calories and packed with nutrients. A cup of grated zucchini has vitamins A, C, and K. It also contains fiber, which helps digestion. Adding vegetables like zucchini to desserts can boost nutrition. It makes baked goods healthier without losing flavor. The moisture from zucchini keeps the bread soft and tasty. Plus, it adds a hidden veggie that kids will enjoy. You can make delicious chocolate chip zucchini bread by following simple steps. We covered the key ingredients, preparation, and baking process. I shared tips to avoid common mistakes and suggested fun variations. Remember, with these methods, you create tasty treats that may surprise anyone. Enjoy your baking, and don't hesitate to get creative. Zucchini adds moisture and nutrition. Try this recipe, and you will love it!

Chocolate Chip Zucchini Bread Irresistible Recipe Guide

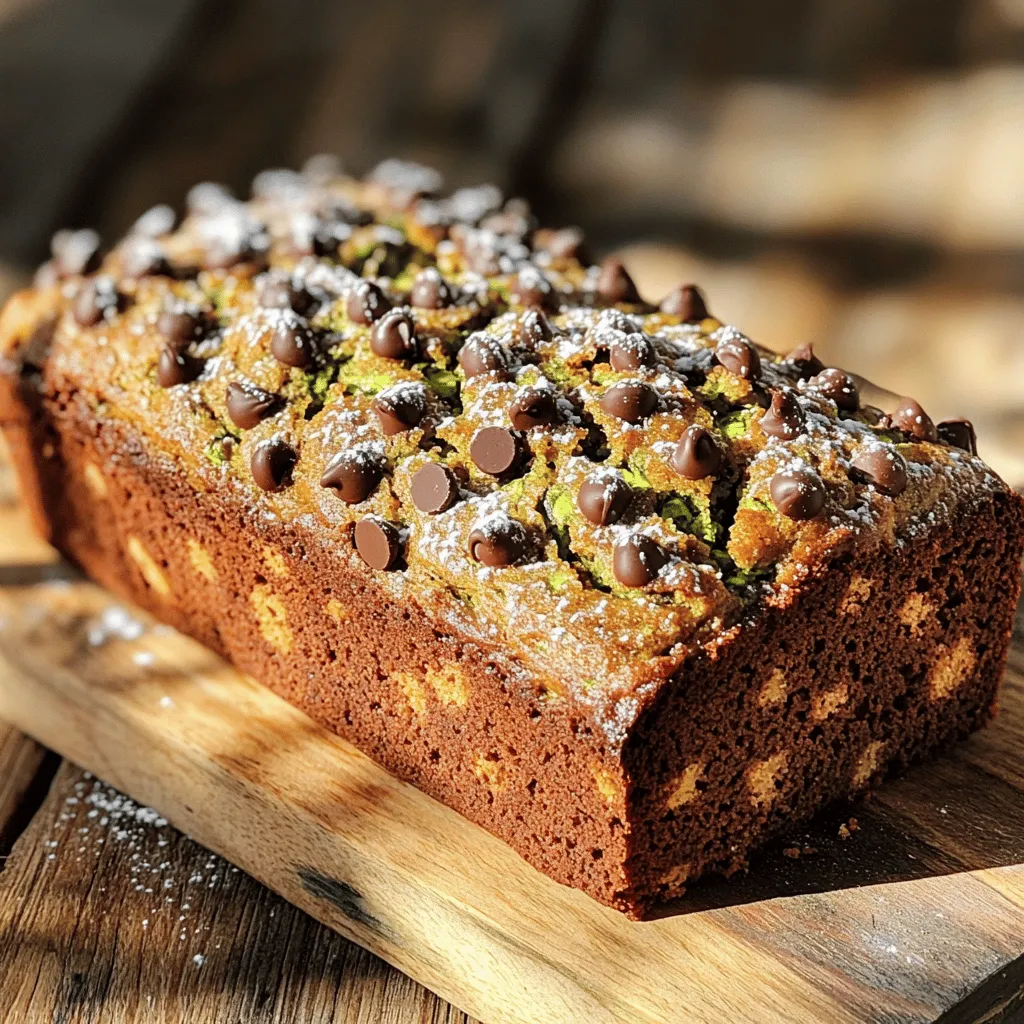
Are you ready to bake something special? This Chocolate Chip Zucchini Bread recipe is a standout! Packed with moist, rich

- 4 large bell peppers (any color) - 1 cup quinoa, rinsed - 2 cups vegetable broth - 1 can (15 oz) black beans, rinsed and drained - 1 cup corn (fresh or frozen) - 1 cup diced tomatoes (canned or fresh) - 1 small red onion, finely chopped - 2 cloves garlic, minced - 1 teaspoon cumin - 1 teaspoon smoked paprika - 1/2 teaspoon chili powder - 1/2 teaspoon salt - 1/4 teaspoon black pepper - 1/4 cup fresh cilantro, chopped - Juice of 1 lime - 1 avocado, sliced (for topping) - Optional: vegan cheese for topping When picking bell peppers, choose ones that feel heavy and firm. Look for bright, shiny skin, and avoid any with soft spots or wrinkles. Fresh bell peppers add great taste and color to your dish. They also provide vitamins and minerals that are healthy for you. Now, let's talk nutrition. Each serving of these stuffed bell peppers is packed with protein, fiber, and essential nutrients. Quinoa offers a complete protein source, while black beans and corn add more fiber and taste. This dish is not just filling; it’s fun and colorful too. Want to dive deeper? Check out the Full Recipe to see how these ingredients come together beautifully! 1. Preheat your oven to 375°F (190°C). This step is key for even cooking. 2. Cut the tops off the bell peppers. Remove the seeds and membranes. Place them upright in a baking dish. This holds the filling well. 3. Rinse and measure 1 cup of quinoa. This adds protein and texture. 4. Combine quinoa and broth in a medium saucepan. This gives the quinoa flavor. Bring to a boil, then reduce heat. Cover and simmer for about 15 minutes or until the liquid is absorbed. Fluff with a fork and set aside. 1. Heat a large skillet over medium heat. Add chopped onion and minced garlic. Sauté until the onion is soft and clear, about 3-4 minutes. This builds a rich base flavor. 2. Add black beans, corn, and diced tomatoes to the skillet. Mix in cumin, smoked paprika, chili powder, salt, and black pepper. Cook for 5 minutes. This blends the flavors well. 3. Stir in the cooked quinoa, cilantro, and lime juice until fully mixed. The lime juice brightens the flavor. 1. Spoon the filling into each bell pepper. Pack it tightly to make them full. If you like, add vegan cheese on top. 2. Pour a little water into the bottom of the baking dish. This helps steam the peppers. Cover the dish with foil. 3. Bake for 30 minutes. Remove the foil and bake for another 10-15 minutes. This makes the peppers tender. 4. Let cool for a few minutes before serving. Top each pepper with sliced avocado. This adds creaminess and taste. For the full recipe, refer to the [Full Recipe]. The cooking time for vegan stuffed bell peppers is crucial. Start by preheating the oven to 375°F (190°C). Bake the stuffed peppers for about 30 minutes covered with foil. This helps them steam and become soft. Afterward, remove the foil and bake for an extra 10-15 minutes. This step lets the tops brown a little. Keep an eye on them to avoid overcooking. To get tender peppers, select firm ones with smooth skin. Cut the tops off and remove the seeds. Cooking them in a little water during baking helps too. When you pack the filling, try not to overstuff. This allows steam to circulate, making them tender but not mushy. Let them cool slightly before serving to keep their shape. Serve your stuffed peppers with fresh avocado slices on top. Sprinkle extra cilantro for a fresh touch. You can also pair them with a side salad or rice for a complete meal. A squeeze of fresh lime juice adds a nice zing. For a fun twist, try adding vegan cheese on top before baking. It melts beautifully and adds great flavor. If you want the full recipe, check out the [Full Recipe]. {{image_2}} You can swap quinoa for other grains. Brown rice adds chewiness. It has a nutty taste. Couscous cooks fast and soaks up flavors well. Barley offers a hearty texture. Try farro for a chewy bite. Each grain gives a unique taste. Get creative with fillings! Lentils are a great choice. They pack protein and taste great. Chopped mushrooms add umami. You can also use spinach for a fresh touch. For a crunchy twist, add diced zucchini. The options are endless, so have fun! Spices can change the whole dish. Add more cumin for warmth. A dash of cayenne brings heat. Fresh herbs like basil or parsley brighten flavors. You can even try curry powder for an exotic twist. Just remember to taste as you go! To store leftover stuffed peppers, let them cool to room temperature. Place them in an airtight container. They will stay fresh in the fridge for about 4-5 days. If you want to keep them longer, freezing is a great option. When you are ready to enjoy your leftovers, preheat your oven to 350°F (175°C). Place the peppers in an oven-safe dish. Cover them with foil to keep them moist. Heat for about 20-25 minutes or until they are warm throughout. You can also use a microwave for a quicker option. Just heat them for 2-3 minutes, checking to ensure they are warm all the way through. To freeze your stuffed peppers, wrap each one tightly in plastic wrap. Then, place them in a freezer bag or container. They can be frozen for up to three months. When you are ready to eat them, thaw them overnight in the fridge. Then, reheat them using the instructions above. This way, you can enjoy the flavors of these vibrant vegan stuffed bell peppers anytime! For the complete recipe, check out the [Full Recipe]. Yes, you can use various peppers. Green, yellow, and orange bell peppers all work well. You can also try poblano or Anaheim peppers for a unique twist. Each pepper brings a different flavor and texture. Just make sure to adjust cooking times if the peppers vary in size. To add heat, include fresh jalapeños or serrano peppers in the filling. You can also add more chili powder or cayenne pepper. A dash of hot sauce on top before serving gives an extra kick. Experiment with spice to find your perfect level of heat. Great side dishes include a fresh salad or roasted vegetables. You might also serve quinoa or brown rice for a filling meal. A light soup can balance the meal well. Pair with guacamole or salsa for extra flavor. This recipe is packed with flavor and nutrients. It makes for a hearty meal that delights. Vegan stuffed bell peppers combine fresh ingredients, simple steps, and tasty flavors. We covered key ingredients, cooking methods, and variations to suit your taste. You can mix grains and add spices for a unique twist. Remember to store leftovers properly for later enjoyment. These peppers are not just healthy; they are also colorful and fun. Enjoy making this dish as much as you will enjoy eating it. Happy cooking!

Vegan Stuffed Bell Peppers Flavorful and Nutritious Dish

Are you ready to delight your taste buds with a colorful, healthy meal? Vegan stuffed bell peppers combine nutrition and

- Chicken breasts: Using boneless and skinless chicken breasts is key. They cook evenly and stay juicy. Bone-in or skin-on chicken can take longer to cook and may dry out. - Mango salsa components: Ripe mangos are sweet and juicy, making them perfect for this dish. Red bell pepper adds a nice crunch and color. Red onion gives a mild bite. Jalapeño adds heat, but you can adjust it to your taste. Fresh cilantro brings a fresh flavor, while lime juice brightens the salsa. Olive oil helps to blend all the ingredients. - Seasonings: Ground cumin, salt, and pepper are essential. Cumin adds a warm, earthy taste. Salt enhances all other flavors, while pepper adds a slight kick. This combination creates a bright, fresh dish. You can find the full recipe for Mango Salsa Chicken above, which is simple yet full of flavor. First, I preheat the grill or grill pan over medium-high heat. This step is key for perfect cooking. A hot grill seals in all the juices. It also gives the chicken a nice char. You want that sizzle when the chicken hits the grill! Temperature control is vital for cooking chicken. Too hot, and the outside burns while the inside stays raw. Too cool, and the chicken becomes dry. Aim for about 375°F (190°C). A meat thermometer helps ensure you cook to the right temperature. While the grill heats up, I prepare the mango salsa. In a bowl, I mix diced mangos, red bell pepper, red onion, jalapeño, cilantro, and lime juice. I combine these gently. I want to keep the mangos intact for texture. To enhance the flavor, I recommend using ripe mangos. They add sweetness and balance the spice from the jalapeño. You can adjust the spice level based on your taste. If you want more heat, leave in some jalapeño seeds. Next, I coat the chicken breasts with olive oil. This keeps them moist and helps the spices stick. I sprinkle ground cumin, salt, and pepper on each breast. Rubbing the spices into the meat is a must for flavor. Now, I place the chicken on the hot grill. I cook it for about 6-7 minutes on each side. Check the internal temperature; it should reach 165°F (75°C). This ensures juicy and safe-to-eat chicken. After cooking, I let the chicken rest for about 5 minutes. Resting helps the juices redistribute throughout the meat. This step is crucial for flavor and moisture. Once done, I serve the grilled chicken topped generously with mango salsa. For the full recipe, check the beginning of the article. Enjoy this vibrant dish! To keep your chicken juicy, let it rest after grilling. This step allows the juices to settle back into the meat. Aim for about five minutes of resting time after you take the chicken off the grill. To avoid overcooking, use a meat thermometer. Cook the chicken until it reaches 165°F (75°C). This ensures it is safe to eat without being dry. Also, keep an eye on the grill heat. Medium-high heat works best. If the grill is too hot, the outside may burn while the inside stays raw. For a beautiful presentation, plate your chicken on a large dish. Top it with the bright mango salsa. Add a sprinkle of fresh cilantro for color. Serve lime wedges on the side for an extra zest. Pair this dish with simple side items. Rice makes a great choice. You can also serve steamed veggies for a healthy touch. These sides balance the flavors and add nutrition to the meal. You can spice up your mango salsa. Adding a pinch of chili powder gives it a kick. For more tang, mix in some diced tomatoes. If you want a sweeter taste, add a little honey. Experimenting with flavors makes the dish your own. You can customize the salsa to suit your taste. For the full recipe, refer to the original recipe. This will help you create a complete and delicious meal. {{image_2}} If you want to switch things up, try using shrimp or tofu instead of chicken. Shrimp cooks quickly and brings a nice sweetness. Just grill them for about 2-3 minutes per side. Tofu is a great vegetarian option. Use firm tofu, press out excess water, and cut it into thick slices. Marinate it like the chicken for added flavor. Both options give a tasty twist to the dish. You can also change the salsa ingredients to suit your taste. Pineapple or peach goes well with the other flavors. These fruits add a refreshing sweetness. You can also adjust the spice level. If you like it hot, add more jalapeño or even diced habanero. For a milder version, use fewer spicy peppers. Customize your salsa to make it just right for you. You can bake the chicken if you don’t have a grill. Baking takes longer, about 25-30 minutes at 375°F (190°C). This method keeps the chicken juicy. However, grilling gives a nice smoky flavor and beautiful grill marks. If you want a charred taste, grilling is the way to go. Each method has its perks, so choose what fits your style. To store leftover Mango Salsa Chicken, let it cool first. Place the chicken in an airtight container. This helps keep it fresh. You can refrigerate it for up to three days. If you want to keep it longer, freeze it. Frozen chicken can last up to three months. Just make sure to label the container with the date. This helps you track its freshness. When reheating, you want to avoid drying out the chicken. One great method is using the oven. Preheat the oven to 350°F (175°C). Place the chicken in a baking dish and cover it with foil. This keeps moisture in. Heat for about 20 minutes or until warm. You can also use a microwave. Place the chicken on a microwave-safe plate. Cover it with a damp paper towel. Heat in short bursts, checking often. For serving reheated dishes, add fresh mango salsa again. This brings back the bright flavors. You can also serve it with rice or a fresh salad for a complete meal. Enjoy your leftovers just as much as the first time! If you cannot find ripe mangos, try using peaches or pineapples. Both fruits bring a sweet and juicy flavor. If you want a tart option, consider using kiwi or even diced apples. You can mix and match based on what you like. The key is to choose fruits that are ripe and sweet. Yes, you can make Mango Salsa Chicken ahead of time. You can prepare the mango salsa a day before. Just store it in the fridge until you are ready to grill. For the chicken, marinate it with the olive oil and spices a few hours in advance. This helps the flavors soak in. Cooked chicken lasts in the fridge for up to four days. Make sure to keep it in an airtight container. Each serving of Mango Salsa Chicken contains about 300 calories. It has around 30 grams of protein and 10 grams of fat. The chicken gives you lean protein, while the mango adds vitamins A and C. The red bell pepper and onion offer fiber and antioxidants. This dish is not just tasty; it is also healthy! This recipe for Mango Salsa Chicken combines fresh flavors with easy steps. You learned about key ingredients, tips for grilling, and ways to enhance your dish. Remember to let your chicken rest for juicy results. Feel free to try different proteins or fruity salsas. Enjoy making this healthy meal, and don’t forget to share it with friends and family! Your kitchen is now a place for tasty experiments. Happy cooking!

Mango Salsa Chicken Flavorful and Simple Grilling Recipe

Are you ready to elevate your grilling game? If you love the sweet and spicy mix of flavors, this Mango

Cooking Chicken Cacciatore is simple and fun. Here’s what you need: - 4 chicken thighs, bone-in and skin-on - 2 tablespoons olive oil - 1 large onion, diced - 2 cloves garlic, minced - 1 bell pepper (red or yellow), sliced - 1 zucchini, sliced - 1 cup sliced mushrooms - 1 can (14 oz) crushed tomatoes - 1 cup chicken broth - 1 teaspoon dried oregano - 1 teaspoon dried basil - Salt and pepper to taste - Fresh parsley, chopped (for garnish) - Cooked spaghetti or crusty bread (for serving) Gather these ingredients for a delicious meal. The chicken thighs add rich flavor. The veggies bring color and texture. The crushed tomatoes and broth create a hearty sauce. Each herb enhances the dish. You can adapt the recipe with your favorite veggies or herbs. This makes it fun and personal. If you want to try a twist, check out the Full Recipe for more ideas. 1. Sear the chicken thighs First, heat the olive oil in a large skillet over medium-high heat. Place the chicken thighs in the skillet, skin-side down. Sear them for about 5-7 minutes until the skin is golden brown. Flip the chicken and cook for another 5 minutes. Remove the chicken and set it aside on a plate. 2. Sauté the vegetables In the same skillet, add the diced onion. Cook it for about 3 minutes until it becomes soft and clear. Then, stir in the minced garlic and cook for one more minute. Next, add the sliced bell pepper, zucchini, and mushrooms. Sauté these vegetables for about 5 minutes until they start to soften. 3. Simmer with the sauce Now, pour in the crushed tomatoes and chicken broth. Stir in the dried oregano, dried basil, salt, and pepper. Bring the mixture to a simmer. This is where the magic begins! The flavors will blend beautifully. 1. Return chicken to sauce Place the seared chicken thighs back into the skillet. Nestle them into the sauce. Cover and let it simmer on low heat for 30-35 minutes. This makes the chicken very tender and full of flavor. 2. Adjust seasonings as needed After the chicken is cooked, taste the sauce. Adjust the seasonings if needed. If you want a thicker sauce, uncover and let it simmer for an extra 10 minutes. 3. Serve with sides Serve the chicken cacciatore over cooked spaghetti or with crusty bread. This will help soak up all the delicious sauce. Don’t forget to garnish with fresh parsley for a nice touch! For the full recipe, check out the Rustic Chicken Cacciatore. Enjoy your cooking adventure! For perfect chicken cacciatore, searing the chicken well is key. Start by heating olive oil in your pan. When it shimmers, add the chicken thighs skin-side down. Sear them for 5 to 7 minutes until golden. This step adds depth to the flavor. Flip them over and sear for another 5 minutes. This ensures a juicy result. To get the right sauce consistency, keep an eye on the simmering time. If the sauce is too thin, uncover it and simmer longer. This helps it thicken nicely. You can also mash some of the tomatoes with a spoon to help. Taste it often to make sure it’s just right. To boost flavor, add fresh herbs like thyme or rosemary. They work well with the dish. A pinch of red pepper flakes can add some heat if you like spice. For wine pairing, choose a medium-bodied red wine. Chianti or Sangiovese works great with the rich sauce. Serve a glass alongside your meal for a perfect match. For the full recipe, check out the Rustic Chicken Cacciatore . Enjoy your cooking! {{image_2}} You can change the chicken to fit your taste. Try chicken breasts if you want less fat. Thighs add more flavor, but breasts cook faster. You can also use skinless chicken if you prefer. For a vegetarian option, swap chicken for hearty vegetables. Use eggplant or portobello mushrooms. You can add chickpeas for protein. This makes a filling dish without meat. If you like heat, add jalapeños to spice things up. Chop them finely and add with the onions. This gives your cacciatore a nice kick. For a Mediterranean twist, toss in olives and capers. They add briny notes that enhance the sauce. Use green or black olives based on your taste. This variation brings a fresh vibe to the dish. Remember, you can mix and match these ideas. They let you create a chicken cacciatore that suits your style. For the classic recipe, check out the Full Recipe. To keep your chicken cacciatore fresh, store it in an airtight container. Place the leftovers in the fridge for up to three days. If you want to keep it longer, freezing is a good option. For freezing, use a freezer-safe container or bag. Make sure to label it with the date. This way, you can enjoy it later. When it's time to eat your leftovers, the best way to reheat is on the stove. Pour the chicken cacciatore into a pot. Heat it over medium heat, stirring often. This helps to keep the flavors and texture. If you prefer, you can also use the microwave. Place it in a microwave-safe dish and cover it. Heat in short bursts, stirring in between, until it’s hot. Enjoy your flavorful meal! For the full recipe, check out the Rustic Chicken Cacciatore section. Chicken Cacciatore, or "hunter's chicken," comes from Italy. Chefs made it with fresh, local ingredients. The dish reflects rustic cooking, often featuring chicken, tomatoes, and herbs. It gained fame in many Italian kitchens and homes. Each region has its own spin with herbs and vegetables. This dish tells a story of Italian culture and tradition. Yes, you can make Chicken Cacciatore in a slow cooker. Start by searing the chicken on the stove for flavor. Then, place the chicken and all other ingredients in the slow cooker. Cook on low for about 6-8 hours or high for 3-4 hours. The chicken will be tender, and the sauce will be rich. Just check the seasoning before serving. To make Chicken Cacciatore gluten-free, use gluten-free chicken broth. Ensure the crushed tomatoes are free from gluten as well. You can serve it with gluten-free pasta or bread. Always check labels for hidden gluten in canned products. Enjoy a delicious meal without worry. For the full recipe, check out the Rustic Chicken Cacciatore section. This blog post covered all you need for a great Chicken Cacciatore. We looked at key ingredients, cooking steps, and tips for perfect flavor. Remember, you can easily swap ingredients to suit your taste. Consider serving with spaghetti or crusty bread. Don’t forget to store leftovers properly. This dish offers flavor and comfort in every bite. Enjoy cooking and sharing this delicious meal with others!

Classic Chicken Cacciatore Flavorful Home-Cooked Meal

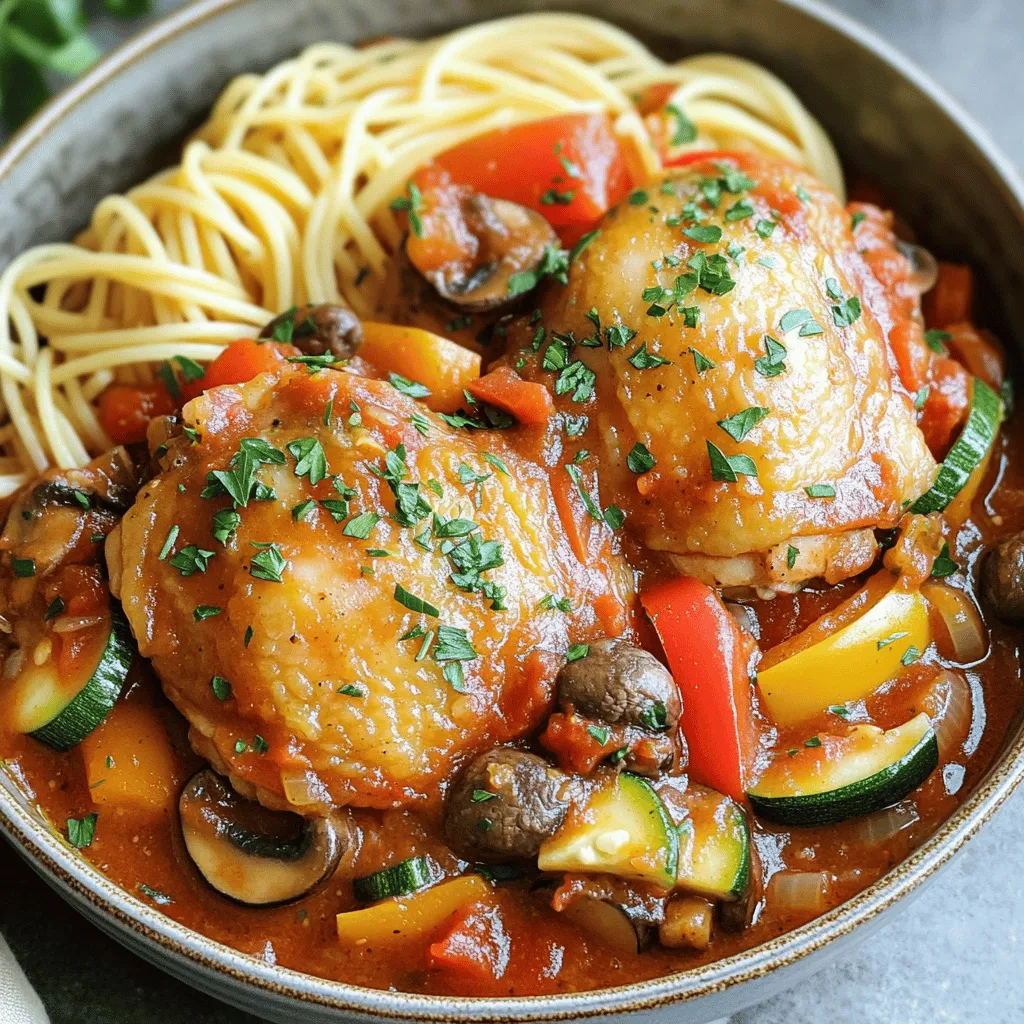
Looking for a warm, hearty meal that brings the taste of Italy to your table? Classic Chicken Cacciatore is a

- 1 cup almond flour - ½ cup peanut butter (or almond butter) - ¼ cup maple syrup To make no-bake cookie dough bites, you need key ingredients. Almond flour serves as a great base. It gives a soft texture and nutty flavor. Peanut butter adds richness and creaminess. You can also use almond butter for a different taste. Maple syrup sweetens the dough and binds it all together. - 1 teaspoon vanilla extract - ½ cup mini chocolate chips - ¼ teaspoon sea salt Next, we add flavor enhancers. Vanilla extract brings warmth and depth. Mini chocolate chips offer sweet bursts in every bite. Sea salt balances this sweetness perfectly. Just a pinch goes a long way. - ¼ cup chopped nuts (for crunch) For extra crunch, consider adding chopped nuts. They add texture and a nutty flavor. You can use walnuts, pecans, or even almonds. If you want a simple and fun treat, feel free to skip this step. For the full recipe, check out the ingredients listed above. Start by gathering your ingredients. In a large bowl, combine the almond flour, peanut butter, maple syrup, and vanilla extract. Mix these until they form a smooth dough. You want to ensure there are no lumps. This step is key for a good texture. Now, it’s time to make your dough even better. Add the mini chocolate chips and sea salt to the dough. If you like crunch, fold in the chopped nuts. Mixing in these extras will give your bites a delightful taste and texture. Next, scoop out tablespoon-sized portions of the dough. Roll them into small balls between your palms. This is the fun part! Once you have all your balls, place them on a baking sheet lined with parchment paper. This helps keep them from sticking. For the full recipe, check out the details above. To get the right texture, you might need to adjust the moisture. Adding more almond flour helps if the dough feels too sticky. Start with a small amount, then mix it in well. If you find the dough too dry, add a little maple syrup. When kneading the dough, use your hands to mix it well. This helps combine all the ingredients. Make sure to press firmly to blend everything. Don't worry if it feels a bit crumbly at first; it will come together. You can switch up the nut butter to change the taste. Almond butter gives a nice flavor twist. Cashew butter works well too. Each nut butter adds a unique touch to your cookie dough bites. Spices like cinnamon can elevate the flavor. Just a pinch can make a big difference. Try adding a little nutmeg or even a dash of sea salt to enhance the sweetness. These bites go great with milk or coffee. The creamy drinks balance out the sweetness. Try serving them after dinner or as a midday snack. You can also use these cookie dough bites as dessert toppings. Crumble them over ice cream or yogurt for a fun twist. They add a nice crunch and flavor to any dessert. For the complete recipe, check out the Full Recipe. {{image_2}} You can easily change the flavor of your cookie dough bites. Swap in dark chocolate chips for a richer taste. Dark chocolate has less sugar and more antioxidants. You can also add cocoa powder to the dough. This gives a nice chocolate flavor. Just add 1-2 tablespoons of cocoa powder to the mix. Your cookie dough bites will taste even more like a treat! If you need a nut-free option, you can still enjoy these bites. Use sunflower seed butter instead of peanut butter. Sunflower seed butter is creamy and tasty. It works well in our recipe. You can also leave out the chopped nuts. This way, everyone can enjoy these delicious bites without worry. Want a vegan version? It’s simple! Just check that your maple syrup is plant-based. Most brands are vegan, but it's good to confirm. If you want extra sweetness, try using agave syrup or date syrup. Both are great options and keep the recipe vegan-friendly. Enjoy these treats without missing out on flavor! To keep your no-bake cookie dough bites fresh, store them in an airtight container. This method keeps moisture out and flavor in. Place the container in the refrigerator. They will stay fresh for about a week. I find that this keeps them tasty and ready for snacking. You can freeze cookie dough bites for longer storage. First, let the bites chill in the fridge for about 30 minutes. This helps them firm up. Then, place them in a single layer on a baking sheet and freeze until solid. Once frozen, transfer them to a freezer-safe bag. To enjoy, thaw them in the fridge. This keeps the taste and texture just right. These cookie dough bites can last up to two weeks in the fridge. In the freezer, they can stay good for up to three months. Check for any signs of spoilage, like off smells or changes in texture. If they look or smell funny, it’s best to toss them. Enjoy your treats while they are fresh for the best taste! Yes, you can use many nut butters. Almond butter works well. Cashew butter is another tasty option. If you need a nut-free choice, try sunflower seed butter. Each nut butter brings its own flavor and texture. This makes your cookie dough bites unique. You can mix and match to find your favorite! These cookie bites need to chill for at least 30 minutes. Chilling helps them firm up and hold their shape. It also improves the flavors. If you have time, chill them longer for a better taste. You can even chill them overnight. Just remember to cover them well! These cookie dough bites have some healthy ingredients. Almond flour is rich in protein and fiber. Peanut butter provides healthy fats and protein, too. Maple syrup gives sweetness without refined sugar. However, they are still a treat. Enjoy them in moderation for a balanced diet. If you want a healthier twist, you can adjust the ingredients. This blog post shares a simple recipe for tasty cookie dough bites. You learned about key ingredients like almond flour, nut butter, and chocolate chips. The step-by-step guide shows how to prepare and form the bites easily. Also, we explored variations and storage tips. In closing, these bites are perfect for snacks or dessert. Enjoy making them your own with different flavors!

No-Bake Cookie Dough Bites Easy and Fun Treat

If you love sweet treats but want to skip the oven, you’re in for a treat! No-Bake Cookie Dough Bites

- 2 medium zucchinis, thinly sliced - 2 tablespoons olive oil - 1 teaspoon garlic powder - 1 teaspoon onion powder - 1 teaspoon paprika - Salt and pepper to taste I love using fresh zucchinis for this recipe. They add a lovely crunch. Thin slices work best, so aim for about 1/8 inch thick. You can use a knife or a mandoline for even slices. Olive oil helps the spices stick and gives the chips a nice flavor. The garlic and onion powders add depth. Paprika gives a warm, smoky taste. Salt and pepper enhance all the flavors. - Grated Parmesan cheese for flavor enhancement - Fresh herbs for garnish While the basic recipe is great on its own, I like to sprinkle Parmesan cheese on top right after frying. It melts slightly and adds a savory touch. Fresh herbs like basil or parsley make the dish look vibrant and fresh. You can mix and match flavors to suit your taste! For the full recipe, check out the earlier section. Start by washing the zucchinis well under cool water. This step is key for cleanliness. Next, slice the zucchinis into thin rounds, about 1/8 inch thick. For even slices, I recommend using a mandoline. A mandoline will help you get consistent thickness, which is important for cooking. In a large bowl, combine the sliced zucchinis with olive oil. Add garlic powder, onion powder, paprika, salt, and pepper. Toss the mixture well until every slice is coated. This step adds great flavor to your chips. First, preheat your air fryer to 375°F (190°C) for about 5 minutes. This is important for achieving that crispy texture. Place the zucchini slices in the air fryer basket in a single layer. If you have many slices, work in batches to avoid overcrowding. Cook the zucchini chips for 10-12 minutes. Make sure to shake the basket halfway through. This ensures even cooking. You want them to be golden brown and crispy. If you like, sprinkle freshly grated Parmesan cheese on top right after cooking. Let the chips cool for a few minutes before serving. They will get even crispier as they cool. For the full recipe, check out the earlier section. To make your zucchini chips super crispy, avoid overcrowding the air fryer. If you pack too many slices in at once, they will steam instead of crisp up. Cook in batches to let each chip get enough heat. When air frying, shaking the basket is key. Halfway through the cooking time, give the basket a good shake. This helps the chips cook evenly and prevents any from sticking together. You want all your chips to be golden and crunchy. You can easily change the taste of your zucchini chips. Try different seasoning mixes like a blend of chili powder and lime for a zesty kick. Or, go sweet with cinnamon and a hint of sugar for a fun treat. Before serving, consider adding cheese. Grated Parmesan sprinkled on hot chips melts slightly, adding a rich flavor. You can also use cheddar or nutritional yeast for a vegan option. Presentation matters when you serve your zucchini chips. Use a colorful plate to make the dish pop. A small bowl of marinara sauce or ranch dressing works great as a dip. Garnish with fresh herbs like basil or parsley to give it a fresh look. Think about what else to serve with your chips. Pair them with hummus for a healthy snack or sour cream for something rich. These ideas will make your snack time even more enjoyable. For the full recipe, check out the details above. {{image_2}} You can use other vegetables when making air fryer chips. Good options include sweet potatoes, carrots, or beets. Each vegetable has its unique flavor and texture. For example, sweet potatoes give a sweet taste, while carrots offer a fresh crunch. When cooking different veggies, adjust the time and temperature. Thin slices cook faster. For instance, sweet potatoes need about 15 minutes at 375°F. Thicker cuts may need up to 20 minutes. Always check for crispiness before serving. This recipe is easy to modify for different diets. To keep it gluten-free, ensure your spice blends do not contain wheat. Most spices are safe. For a vegan version, skip the Parmesan cheese. You can use nutritional yeast for a cheesy flavor without dairy. If you have allergies, substitute olive oil with avocado oil or coconut oil. These oils work well with high heat and add nice flavors. You can also bake zucchini chips in the oven if you don’t have an air fryer. Start by preheating your oven to 425°F. Spread the zucchini slices on a baking sheet in a single layer. Bake for 20-25 minutes, turning halfway through. Keep an eye on them to prevent burning. The oven method gives a different texture but can still be crispy and delicious. Cooking times may vary, so check for golden brown edges to know they are ready. For the full recipe, refer to the earlier section. To keep your zucchini chips crispy, use an airtight container. Glass jars or plastic containers work well. Line the bottom with paper towels to absorb any moisture. This helps keep the chips crunchy. Avoid storing them in a damp area. To reheat your zucchini chips, use the air fryer again. Set it to 350°F (175°C) for about 5 minutes. This method warms them up while keeping them crispy. You can also use an oven. Place the chips on a baking sheet and heat for 5-7 minutes. Zucchini chips last about 1-2 weeks in the pantry. Store them in a cool, dry place. If you notice any soft spots or a bad smell, it's time to toss them. Freshness is key for the best taste and crunch. For the full recipe, check out the section above. Zucchini chips are done when they look golden brown and feel crispy. You can also check by lightly pressing them. If they break easily, they are ready. If they feel soft, they need more time. Keep a close eye on them during the last few minutes. They can go from perfect to too brown quickly! Using frozen zucchini is not the best choice. Freezing changes the texture of the zucchini. It tends to become mushy when cooked. This mushiness can ruin the crunchiness you want in your chips. Fresh zucchini gives the best results. The flavor is better too! Zucchini chips are great with dips! You can try hummus or guacamole for a healthy snack. Marinara sauce is also a tasty option. You might even enjoy them with yogurt-based dips. For a fun twist, pair them with salsa. They make a great side for sandwiches or salads too. Enjoy the crunch! Zucchini chips are easy to make and tasty. You need simple ingredients and quick steps. Prepping the zucchini and seasoning it right makes a big difference. Remember, the air fryer provides a crispy finish. For a healthy snack, try different seasonings. Don’t forget to store your chips well to keep them fresh. With these tips, you can enjoy delicious zucchini chips anytime. Your kitchen is ready for some healthy fun!

Easy Air Fryer Zucchini Chips Crispy and Flavorful Snack

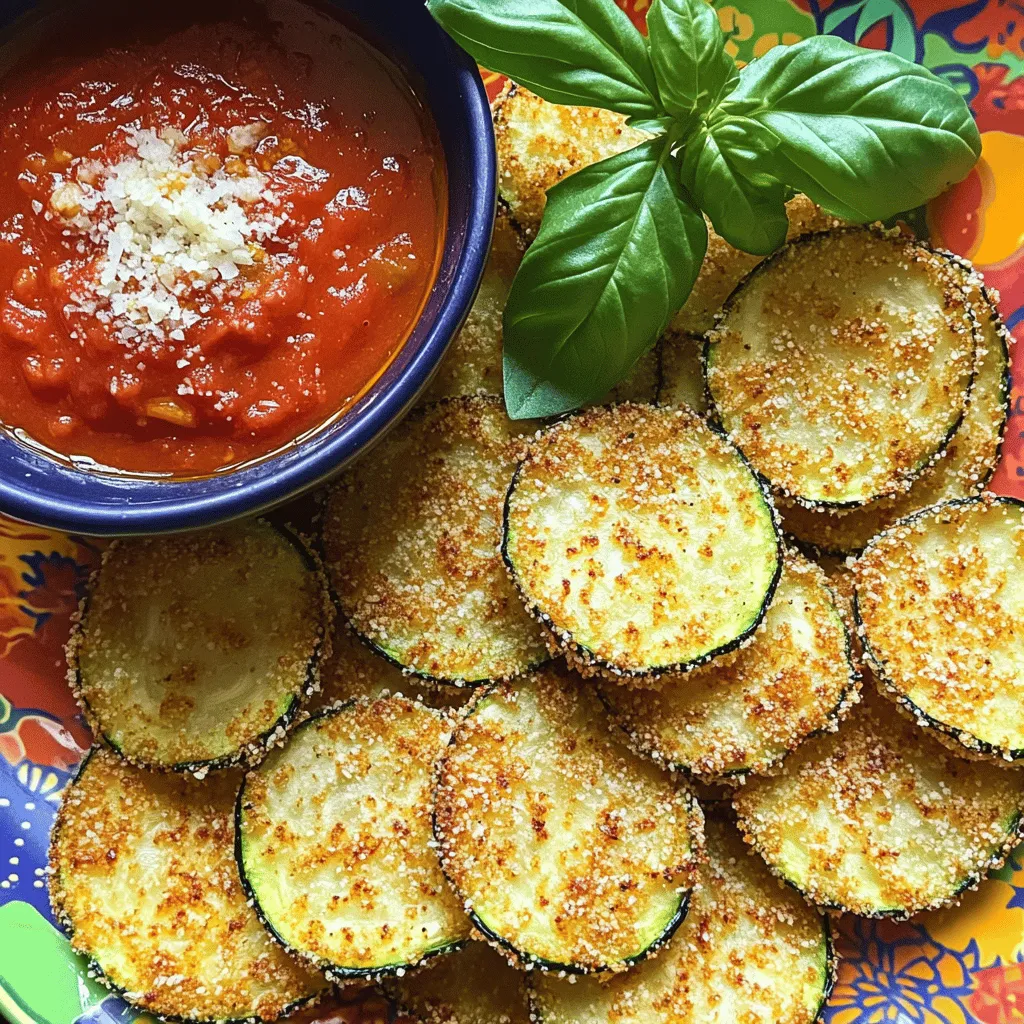
If you’re craving a quick and healthy snack, look no further! These Easy Air Fryer Zucchini Chips are crispy, flavorful,

To make a classic spinach quiche, you need some key ingredients. Here they are: - 1 pre-made pie crust (9-inch) - 2 cups fresh spinach, chopped - 1 cup ricotta cheese - 1 cup shredded mozzarella cheese - 3 large eggs - 1 cup milk - 1/2 teaspoon nutmeg - 1/2 teaspoon garlic powder - 1/2 teaspoon salt - 1/4 teaspoon black pepper - 1/4 cup grated Parmesan cheese - 1 tablespoon olive oil These ingredients work well together to create a creamy and flavorful quiche. The spinach adds a fresh taste, while the cheeses bring richness. You can make this quiche your own by adding extra ingredients. Here are some ideas: - Cooked bacon or ham for extra protein - Fresh herbs like dill or basil for flavor - Different cheeses like feta or goat cheese for a twist - Other vegetables like bell peppers or mushrooms for added texture Feel free to experiment with what you have on hand. Customizing your quiche makes it unique and fun. Before you start cooking, gather your tools. You will need: - A large mixing bowl - A whisk for mixing - A skillet for sautéing the spinach - A measuring cup for liquids - A pie dish for baking Having these tools ready will make your cooking process smooth and easy. Enjoy the fun of making your classic spinach quiche with this full recipe! Start by preheating your oven to 375°F (190°C). This helps the quiche cook evenly. Next, take your pre-made pie crust and place it in a 9-inch pie dish. Make sure it fits snugly. If you like, you can prick the bottom of the crust with a fork. This helps prevent bubbles during baking. In a skillet, heat 1 tablespoon of olive oil over medium heat. Once hot, add 2 cups of chopped spinach. Sauté it for about 3-4 minutes until it wilts. Stir it often for even cooking. After it wilts, remove the skillet from heat and let it cool. This step brings out the spinach's flavor. In a large mixing bowl, whisk together 3 large eggs, 1 cup of milk, 1 cup of ricotta cheese, and 1 cup of shredded mozzarella cheese. Add 1/2 teaspoon of nutmeg, 1/2 teaspoon of garlic powder, 1/2 teaspoon of salt, and 1/4 teaspoon of black pepper. Mix until smooth. Then stir in the cooled spinach until it is well mixed. Pour this mixture into your prepared pie crust. Spread it evenly. Finally, sprinkle 1/4 cup of grated Parmesan cheese on top. Place your assembled quiche in the preheated oven. Bake for 30-35 minutes. You want the quiche to be set and lightly golden on top. To check if it is done, insert a toothpick into the center. If it comes out clean, your quiche is ready. Let it cool for about 10 minutes before slicing. This will help it hold its shape. Enjoy your classic spinach quiche warm or at room temperature! For the full recipe, refer to the earlier section. To achieve a perfectly set quiche, focus on three key steps. First, avoid overmixing your egg mixture. Whisk just until combined. Second, bake at the right temperature. I recommend 375°F (190°C) for even cooking. Lastly, check for doneness using a toothpick. Insert it in the center. If it comes out clean, your quiche is ready. Store leftover quiche in the fridge. Wrap it tightly in plastic wrap or place it in an airtight container. This keeps it fresh for up to three days. For longer storage, freeze the quiche. Cut it into slices, wrap each slice, and place them in a freezer bag. You can enjoy it for up to three months. You can change the texture of your quiche using different cooking methods. For a crispy crust, try baking it in a cast-iron skillet. This gives a nice crunch. If you prefer a softer texture, steam the quiche in a water bath. This method keeps it moist. Each option offers a new taste experience. {{image_2}} You can change the taste of your spinach quiche by adding different cheeses. Try using feta for a tangy twist. Goat cheese adds a creamy texture and fun flavor. Mixing sharp cheddar gives a bold taste that many love. Each cheese brings a unique flavor, so feel free to mix and match. Just remember to keep the total cheese amount around two cups for best results. Want to add more nutrition? Toss in other veggies! Bell peppers, onions, or mushrooms work well. You can also add zucchini or broccoli for a colorful look. Just sauté them first to soften them up. This way, they blend well with the spinach and cheese. More veggies mean more vitamins and a better taste. Plus, it makes your quiche look even more inviting. If you need a gluten-free option, you have choices! You can use a gluten-free pie crust that you find at stores. Or, make a simple crust using almond flour or cauliflower. Both options give you a great base for your quiche. Just follow the package instructions for baking times. This way, everyone can enjoy your tasty spinach quiche without worry. For the full recipe, visit the link above. To keep your classic spinach quiche fresh, let it cool first. Cover it tightly with plastic wrap or foil. You can also use an airtight container. Store it in the fridge for up to three days. This helps maintain its taste and texture. When you're ready to enjoy your quiche, preheat your oven to 350°F (175°C). Place the quiche on a baking sheet. Heat it for about 15-20 minutes until warm. This method keeps the crust crispy. You can also microwave slices for about one minute. But the crust may get a bit soft. For longer storage, freezing is a great option. First, let the quiche cool completely. Wrap it tightly in plastic wrap and then in aluminum foil. You can freeze it for up to three months. When you're ready to eat, thaw it overnight in the fridge. Reheat it in the oven for the best results. This way, you can enjoy your savory spinach delight whenever you want. For the full recipe, check the earlier section. To reheat spinach quiche, use your oven. Preheat to 350°F (175°C). Place the quiche on a baking sheet. Cover it with foil to keep it moist. Heat for about 15-20 minutes. You can also use a microwave, but it may make the crust soggy. Yes, you can make Classic Spinach Quiche ahead of time. Prepare the quiche, then cool it completely. Wrap it tightly in plastic wrap. Store it in the fridge for up to two days. You may also freeze it. Just ensure it's well-wrapped to avoid freezer burn. Spinach quiche pairs well with fresh salad. A light green salad adds a nice crunch. You can also serve it with a fruit platter. Fresh fruit balances the savory flavors. For a heartier meal, add roasted potatoes or a side of soup. Yes, you can use frozen spinach. Just make sure to thaw and drain it well. Remove all excess water to prevent a soggy quiche. Use about 1.5 cups of frozen spinach to equal two cups of fresh. This makes the recipe easy and quick. You know the quiche is fully cooked when it is set in the middle. A toothpick inserted into the center should come out clean. The top should also be lightly golden. If it jiggles too much, give it a few more minutes in the oven. You learned about making a classic spinach quiche, from key ingredients to cooking tips. We covered essential tools, step-by-step instructions, and ways to customize your dish. Remember to store leftovers well and reheating is key for flavor. With variations and freezer tips, you can make this dish work for any meal. Use these insights to enjoy your quiche fully. Easy choices make cooking fun!

Classic Spinach Quiche Tasty and Simple Recipe

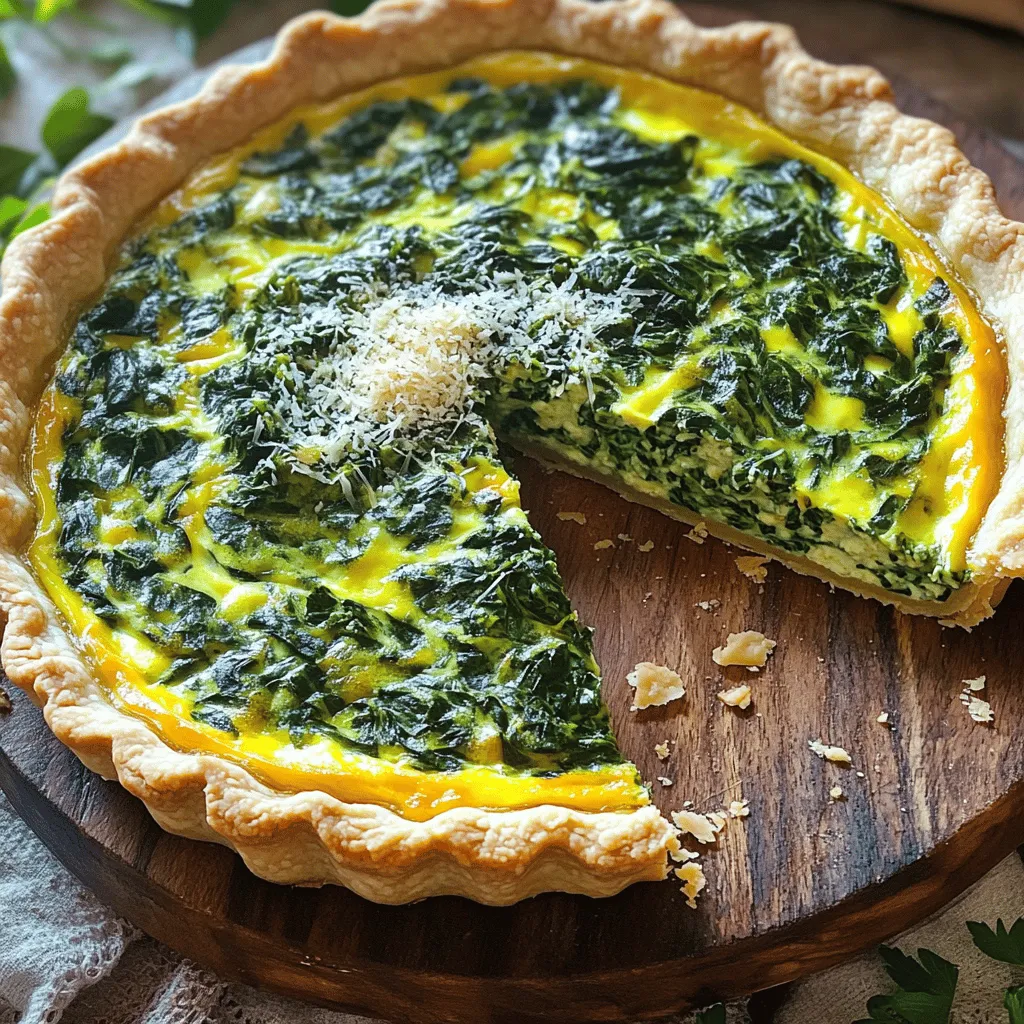
Are you ready to whip up a delicious Classic Spinach Quiche that impresses everyone? This tasty and simple recipe combines

- 4 salmon fillets (about 6 oz each) - 4 tablespoons olive oil - 4 cloves garlic, minced Salmon fillets are the star here. They are rich in omega-3 fatty acids. You want them fresh for the best taste. Olive oil adds a smooth, rich flavor. It also helps with cooking. Fresh garlic gives this dish a bold kick. Mince it well to release all the flavor. - 1 teaspoon dried oregano - 1 teaspoon smoked paprika - 1 cup cherry tomatoes, halved - 1 cup green beans, trimmed Dried oregano brings a warm, earthy taste. It pairs well with salmon and vegetables. Smoked paprika adds a hint of smokiness. This balances the dish nicely. Cherry tomatoes provide sweetness and a pop of color. Green beans add crunch and freshness. Both vegetables cook perfectly alongside the salmon. - 2 lemons (1 sliced into rounds, 1 juiced) - Fresh parsley, chopped (for garnish) - Salt and pepper to taste Lemon slices on top add a zesty brightness. The juice enhances all the flavors, making it fresh. Fresh parsley is a lovely garnish. It adds a splash of green and a hint of freshness. Don't forget salt and pepper; they boost the taste. These simple ingredients make this meal both rich and vibrant. For the full recipe, make sure to check out the [Full Recipe]. First, grab a small bowl. In it, mix 4 tablespoons of olive oil, 4 minced garlic cloves, and the juice of 1 lemon. Add 1 teaspoon of dried oregano, 1 teaspoon of smoked paprika, and salt and pepper to taste. This will create a zesty marinade. Stir well to combine all the flavors. The garlic and lemon will give your salmon a fresh taste. Now, take a large baking sheet and line it with parchment paper. This helps with easy cleanup later. Place 4 salmon fillets on one side of the sheet pan. Brush them generously with the marinade. On the other side, add 1 cup of halved cherry tomatoes and 1 cup of trimmed green beans. Drizzle the leftover marinade over the veggies and toss them to coat. Finally, lay lemon slices on top of the salmon and scatter any extra slices over the vegetables. Preheat your oven to 400°F (200°C). Once it’s hot, slide the sheet pan into the oven. Bake for about 15 to 18 minutes. You’ll know it’s done when the salmon flakes easily with a fork and the veggies are tender. After baking, let it rest for a few minutes. This allows the flavors to settle. For the final touch, sprinkle with chopped fresh parsley before serving. Enjoy your meal! For the full recipe, check the details above. To achieve the right doneness, aim for salmon that flakes easily. Bake it at 400°F for 15-18 minutes. Insert a fork gently into the thickest part of the fillet. If it separates easily, it's done. The salmon should look opaque, not raw or dry. A perfect salmon fillet is moist and tender. Marinating is key to adding depth. I suggest letting the salmon sit in the marinade for at least 30 minutes. This lets the flavors soak in. You can also add spices like cumin or dill if you want. Try rosemary for a fresh twist, too. For a little heat, add red pepper flakes. These options can brighten the dish even more. Cleanup can take time, but using parchment paper helps. Line your baking sheet with it before cooking. This way, you avoid scrubbing stuck-on food later. After cooking, just toss the paper away. Also, wash your prep bowls right after use. It makes the process smoother. Less mess means more time to enjoy your meal. {{image_2}} You can switch out the salmon for other proteins. Chicken and shrimp work well too. For chicken, use boneless thighs or breasts. Cut them into even pieces and adjust the cooking time. Bake chicken for about 20-25 minutes. For shrimp, peel and devein them. Add the shrimp in the last 5-7 minutes of cooking. This keeps them juicy and tender. Mix up the veggies based on the season. In spring, use asparagus and snap peas. In summer, zucchini and bell peppers shine. Fall brings great options like Brussels sprouts and carrots. Winter is perfect for root vegetables like sweet potatoes and parsnips. Just remember to cut them into similar sizes for even cooking. Boost the taste with fresh herbs or spices. Try thyme, rosemary, or dill for a fresh twist. If you love heat, add a pinch of red pepper flakes. These little changes make a big difference. You can also add a splash of soy sauce for depth. Experiment and find your favorite combo! For more ideas, check the Full Recipe. After enjoying your delicious Sheet Pan Lemon Garlic Salmon, store any leftovers in the fridge. Place the salmon and veggies in an airtight container. This helps keep them fresh. Try to eat your leftovers within two days. The longer they sit, the less tasty they become. When it's time to eat again, you want your salmon to taste great. Preheat your oven to 350°F (175°C). Place the salmon and veggies on a baking sheet. Cover them with foil to keep them moist. Heat for about 10-15 minutes until warm. You can also use a microwave, but this may dry out the salmon. If you use the microwave, heat it for just a minute at a time. If you want to save your dish for later, freezing is a great option. Wrap the salmon tightly in plastic wrap, then place it in a freezer bag. This helps avoid freezer burn. You can freeze it for up to three months. When you're ready to cook it, thaw it overnight in the fridge. This keeps the flavor and texture nice. Bake salmon for 15 to 18 minutes at 400°F. This time cooks the fish well. It should flake easily with a fork. Check the salmon after 15 minutes to avoid overcooking. The fish is done when its color is opaque and it feels firm. Yes, you can use frozen salmon. Just remember to thaw it first. Place the salmon in the fridge overnight. If you’re short on time, use the microwave on the defrost setting. Once thawed, follow the recipe as normal. The cooking time may be a bit longer, so check the fish closely. I love serving roasted vegetables or a fresh salad with this dish. Try pairing the salmon with: - Quinoa or rice for a filling side. - Steamed broccoli or asparagus for a crunchy bite. - A simple green salad with lemon dressing for freshness. For the full details and instructions, check the [Full Recipe]. It offers all the steps you need for this tasty meal. You now have a complete guide for making Sheet Pan Lemon Garlic Salmon. Start with fresh salmon, garlic, and your choice of vegetables. Follow the easy steps to prepare and bake your dish efficiently. Use my tips for perfect texture and flavor. Feel free to explore variations and store leftovers properly. This dish is quick, tasty, and great for any meal. Enjoy your cooking journey and savor every bite!

Sheet Pan Lemon Garlic Salmon Flavorful and Quick Meal

Looking for a quick and tasty dinner? This Sheet Pan Lemon Garlic Salmon recipe is a game changer! In just

Easy Chicken Chimichangas are a quick and fun meal. This dish combines chicken, beans, and cheese. You can enjoy them crispy and hot right from the pan. The flavors blend well, making every bite delicious. To make these chimichangas, you will need: - 2 cups cooked chicken, shredded - 1 cup refried beans - 1 cup shredded cheese (cheddar or a Mexican blend) - 1 small onion, diced - 1 jalapeño, finely chopped (optional for heat) - 1 teaspoon cumin - 1 teaspoon chili powder - Salt and pepper to taste - 6 large flour tortillas - Oil for frying (vegetable or canola) - Sour cream (for serving) - Fresh cilantro (for garnish) For best results, I suggest using specific brands. Look for high-quality tortillas, like Mission or TortillaLand. They hold up well when frying. For refried beans, try Amy's or Old El Paso. You can choose shredded cheese from brands like Sargento or Kraft for great flavor. If you prefer spice, fresh jalapeños from your local market add a nice kick. Enjoy experimenting with your favorite flavors! Start by gathering your ingredients. You need cooked chicken, refried beans, cheese, onion, jalapeño, cumin, chili powder, salt, and pepper. In a large bowl, mix the shredded chicken, refried beans, diced onion, and jalapeño if you want heat. Add cumin, chili powder, and season with salt and pepper. Mix everything well until it’s combined. The flavors will blend as you prepare the chimichangas. Now, let’s assemble the chimichangas. Take a large flour tortilla and lay it flat. Spoon about one-sixth of the chicken mixture into the center of the tortilla. Fold the sides in first, then roll it up tightly from the bottom. This keeps the filling inside. Repeat this process for the remaining tortillas and filling. Make sure each chimichanga is sealed well to avoid spills while frying. Frying is where the magic happens! Heat oil in a large skillet over medium heat. You need enough oil to cover the bottom of the skillet. Once hot, carefully place each chimichanga seam-side down in the oil. Fry for about 3 to 4 minutes on each side. You want them golden brown and crispy. When they are done, remove them from the skillet and drain on paper towels. This helps get rid of extra oil. Top with the remaining cheese, letting it melt slightly before you serve. Enjoy your delicious, crispy chicken chimichangas! For the full recipe, check the earlier section. When making chicken chimichangas, avoid overfilling the tortillas. If you add too much, they might break. Another mistake is not sealing the edges well. This can cause the filling to leak during frying. Make sure to roll them tightly to keep everything inside. To ensure even cooking, fry the chimichangas in batches. Don’t crowd the pan. This helps the oil stay hot and allows for better crispiness. Also, keep the heat at medium. Too high a heat can burn the outside while leaving the inside cold. If you want more heat, add extra jalapeños or chili powder to the filling. For milder flavors, leave out the jalapeños or use less chili powder. Taste the filling before rolling it in the tortillas. This way, you can adjust the spices to suit your taste. You control the heat! {{image_2}} You can easily make chimichangas vegetarian. Swap the chicken for cooked veggies. Try using black beans, bell peppers, and corn. This mix adds flavor and a nice crunch. You can also use tofu for protein. It soaks up spices well and gives a great texture. Cheese adds a creamy touch to your chimichangas. While cheddar works great, you can mix it up. Try using Monterey Jack for a milder taste. A Mexican blend offers a kick with multiple flavors. You can even add cream cheese for a rich filling. Play with spices to make your chimichangas unique. Add more chili powder for heat. A pinch of smoked paprika brings a nice depth. Fresh herbs like cilantro or parsley can brighten the dish. Don't forget to try lime juice for a tasty twist. Each little change can make a big difference in flavor. For the full recipe, check out the Easy Chicken Chimichangas. To keep your leftover chimichangas fresh, store them in an airtight container. Let them cool first. This helps prevent sogginess. You can also wrap each chimichanga in foil or plastic wrap. Make sure to eat them within 3 to 4 days for the best taste. When you want to enjoy your chimichangas again, reheating is key. The best way is to use the oven. Preheat your oven to 375°F (190°C). Place the chimichangas on a baking sheet and heat for about 15 to 20 minutes. This keeps them crispy. You can also use a microwave, but they won't be as crispy. Heat them for 1 to 2 minutes, checking often. Freezing is a great way to save chimichangas for future meals. Wrap each one tightly in plastic wrap, then foil. This extra layer helps prevent freezer burn. Place them in a freezer bag or container. They can last up to 3 months in the freezer. When you're ready to eat, thaw them in the fridge overnight. Then, reheat in the oven for the best results. For the full recipe, check back to the top! Yes, shredded rotisserie chicken works great in this recipe. It saves you time and adds flavor. Just mix it with the other ingredients as you would with cooked chicken. The result will still be tasty and satisfying. You can make chimichangas healthier by using whole wheat tortillas. This adds fiber and nutrients. You can also use less cheese or choose a low-fat option. Adding more veggies, like peppers or spinach, boosts nutrition too. Bake the chimichangas instead of frying for fewer calories. Many sauces go well with chicken chimichangas. Sour cream is a classic choice. It adds creaminess and cuts through the heat. Guacamole also works nicely for a fresh taste. Salsa is another great option, adding a zesty kick. You can even try a creamy cilantro sauce for a twist. For the full recipe, check out the Easy Chicken Chimichangas. You now have a clear path to make delicious chimichangas. We covered the key ingredients and steps to prepare them perfectly. I shared tips to avoid common mistakes and enhance flavor. You can even customize the recipe with variations. Remember to store leftovers properly for future meals. With these tips, you can enjoy tasty chimichangas any time. Happy cooking!

Easy Chicken Chimichangas Flavorful and Quick Meal

Are you ready to spice up your dinner routine? These Easy Chicken Chimichangas are not just quick to make; they

Older posts
Newer posts
← Previous Page1 … Page38 Page39 Page40 … Page79 Next →

dsad

© 2025 pureeatsnow • Built with GeneratePress

Our Policies

  • Copyright Policy
  • Cookie Policy
  • GDPR Policy
  • Privacy Policy
  • Disclaimer
  • Terms Of Use

More Information

  • Home
  • About
  • Contact
  • Appetizers
  • Dessert
  • Dinner
  • Drinks
©2025, pureeatsnow About Back To Top