Skip to content
DisclaimerTerms Of UseGDPR PolicyCookie Policy

pureeatsnow

  • Home
  • Drinks
  • Appetizers
  • Dinner
  • Dessert
  • About
  • Contact
  • Privacy Policy
DisclaimerTerms Of UseGDPR PolicyCookie Policy

Rachel

When making a Classic BLT Pasta Salad, you need the right ingredients to make it fresh and tasty. Here’s a complete list of what you’ll need: - Pasta: I recommend using 8 ounces of rotini or fusilli pasta. These shapes hold the dressing well and add a fun twist to the salad. - Vegetables: Use 1 cup of cherry tomatoes, halved, for sweetness. You also need 1 cup of chopped romaine lettuce for crunch. Lastly, add 1/2 cup of finely diced red onion to give it a bit of zing. - Dressing components: For the dressing, mix 1/2 cup of mayonnaise, 2 tablespoons of apple cider vinegar, and 1 tablespoon of Dijon mustard. Don’t forget salt and pepper to taste. Fresh parsley or basil can be used as a garnish to add a pop of color and flavor. With these fresh ingredients, your Classic BLT Pasta Salad will shine. For the full recipe, check out the details above. To start, you need to cook the pasta. I use rotini or fusilli for this salad. Boil water in a large pot. Add a pinch of salt for flavor. Cook the pasta according to the package instructions. I usually cook it for about 8 to 10 minutes. You want it al dente, so it has a nice bite. After cooking, drain the pasta. Rinse it under cold water to stop the cooking process. This cooling method helps keep the pasta from getting mushy. Next, let’s make the dressing. In a small bowl, combine mayonnaise, apple cider vinegar, and Dijon mustard. Whisk these ingredients together until smooth. You want a creamy consistency. If it seems too thick, add a little water to loosen it. Season with salt and pepper to taste. This dressing brings all the flavors together. Now, it’s time to assemble the salad. In a large bowl, add the cooled pasta first. Next, add the chopped turkey bacon. Then, toss in the halved cherry tomatoes, chopped romaine lettuce, and finely diced red onion. Pour the dressing over the top. Toss gently until all the ingredients are well-coated. For the best taste, cover the salad and chill it in the fridge for at least 30 minutes. This allows the flavors to blend. When you’re ready to serve, give it another gentle toss. Garnish with freshly chopped parsley or basil for a pop of color. Enjoy your delicious Classic BLT Pasta Salad! To make your Classic BLT Pasta Salad even better, think about adding herbs. Fresh basil or parsley gives a nice touch. You can also try dill for a tangy twist. If you love heat, add a pinch of crushed red pepper flakes. This will give your salad a spicy kick. Mixing in garlic powder or onion powder can also boost flavor. These small changes make a big difference. Texture is key in any dish. For a crunchy bite, add celery or bell peppers. These veggies add a fresh crunch. If you want creaminess, mix in some avocado or extra mayonnaise. Cream cheese can also work well. Try adding nuts like walnuts for a unique crunch. Each choice brings a new layer to your salad. A great-looking dish makes it more fun to eat. Use a big bowl to show off the colors. Layer the ingredients for a beautiful look. Place the cherry tomatoes on top for a pop of red. A sprinkle of freshly chopped herbs adds a nice touch. You can use a lemon wedge on the side for a bright touch. These tricks make your salad not just tasty, but pretty too. For the full recipe, check out the details above. {{image_2}} You can easily change the bacon in this salad. Try different types, like pork or beef bacon. If you want a vegetarian option, use tempeh or coconut bacon. Both will add a nice flavor. You can even use smoked paprika for a smoky taste. If you need a gluten-free option, choose gluten-free pasta. There are many types, like rice or corn pasta. For the dressing, use gluten-free mayonnaise. This way, everyone can enjoy the salad without worry. In the summer, add fresh corn or zucchini for a sweet crunch. During fall, try roasting butternut squash and mixing it in. You can also add seasonal fruits like strawberries or peaches for a twist. Each season brings new flavors to your Classic BLT Pasta Salad. It keeps the dish exciting and fresh. Don't forget to check the Full Recipe for more ideas! To keep your Classic BLT Pasta Salad fresh, store it in an airtight container. This helps prevent air from wilting the lettuce and making the pasta soggy. Always make sure the salad is cool before sealing the container. You can also layer parchment paper between the salad and the lid to absorb excess moisture. The salad can last up to three days in the fridge. However, for the best taste and texture, enjoy it within two days. If you notice any signs of spoilage, like an off smell or slimy lettuce, it's best to discard it. Keeping it chilled will help keep those flavors bright. If you want to serve the salad later, avoid reheating it. The pasta and veggies do not heat well and can lose their crunch. Instead, take the salad out of the fridge and let it sit for a few minutes. You can add a splash of apple cider vinegar or a bit more mayonnaise to revive the flavors before serving. This will keep your meal fresh and tasty. For more details, check the Full Recipe. Classic BLT Pasta Salad stays fresh for about three to five days in the fridge. Make sure to store it in an airtight container. This keeps the ingredients crispy and prevents odors from other foods. Yes, you can make the salad ahead of time! This salad tastes even better after chilling in the fridge. You can prepare it a day before your gathering. Just be sure to toss it again before serving. This salad pairs well with many dishes. You can serve it with grilled chicken or burgers for a hearty meal. It also goes great with fresh fruit or a light soup for a lighter option. Try serving it at your next picnic or barbecue! For the complete recipe, check out the Full Recipe. In this post, we covered how to create a tasty Classic BLT Pasta Salad. We explored the best ingredients and shared step-by-step cooking tips. You learned ways to enhance flavor and customize texture. We also discussed how to store your salad so it stays fresh. With these tips, you can enjoy this dish anytime. Use your favorite ingredients to make it your own. Happy cooking!

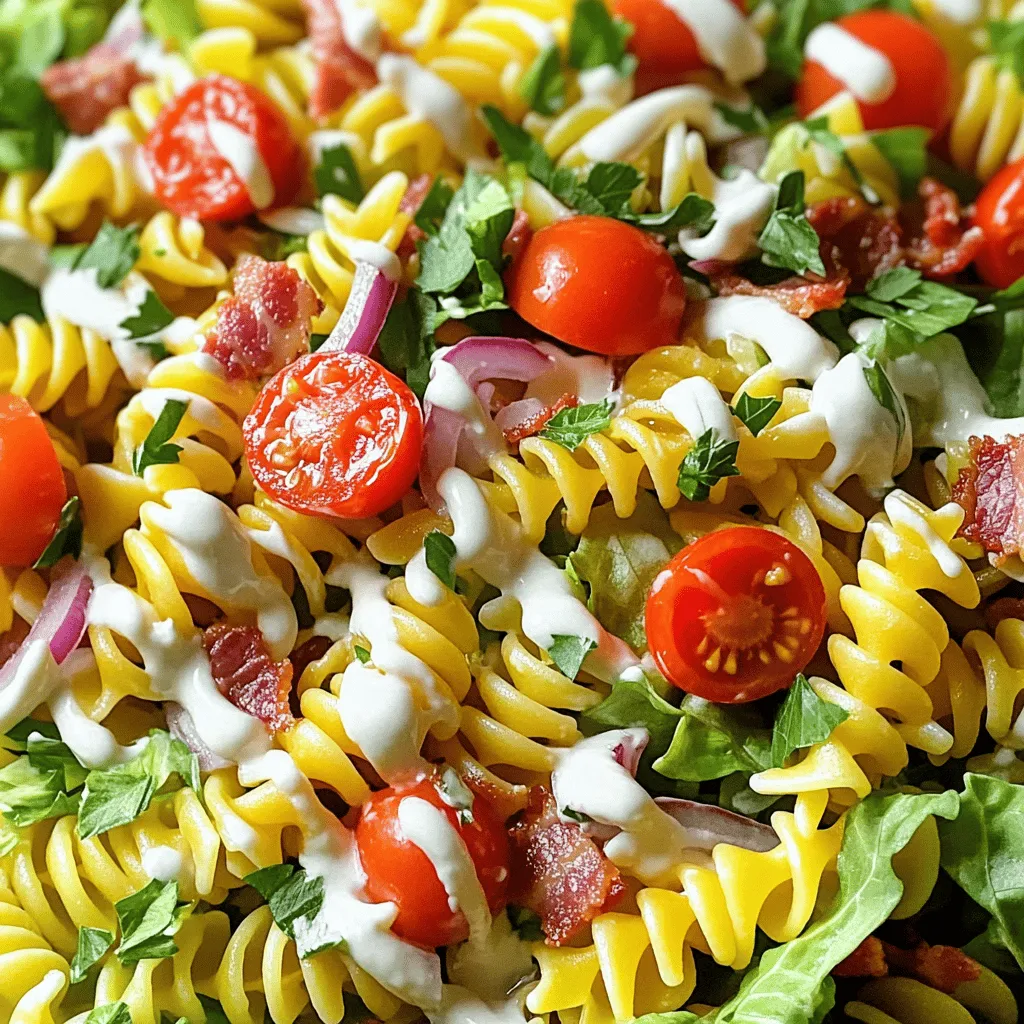
Classic BLT Pasta Salad Fresh and Flavorful Meal

Are you ready for a fresh twist on the classic BLT? This Classic BLT Pasta Salad combines the beloved flavors

To make this soup, you need some key ingredients. Here’s what to gather: - 1 lb boneless, skinless chicken breasts, diced - 1 cup long-grain white rice, rinsed - 1 medium onion, chopped - 2 cloves garlic, minced - 3 carrots, sliced - 2 celery stalks, diced These ingredients form the base of your creamy chicken and rice soup. The chicken adds protein, while the veggies bring flavor and texture. Next, we need to enhance the flavor. Here’s what to include: - 6 cups chicken broth - 1 cup heavy cream - 1 teaspoon dried thyme - 1 teaspoon dried oregano - Salt and pepper to taste The chicken broth creates a rich base. The heavy cream adds that luscious, creamy texture. Thyme and oregano provide a lovely herbal note that rounds out the dish. Finally, we can add some garnishes to elevate the soup. Consider these: - Fresh parsley, chopped (for garnish) - Crusty bread for serving Fresh parsley adds a pop of color and freshness. Crusty bread is perfect for dipping and makes the meal feel complete. For the full recipe, check out the detailed instructions on how to prepare this comforting soup. First, heat the olive oil in a large pot over medium heat. Add the chopped onion and sauté it until it is soft and translucent, about 5 minutes. This step builds the base flavor for your soup. Next, stir in the minced garlic, sliced carrots, and diced celery. Cook these vegetables for another 3-4 minutes. You want them to soften but not lose their crunch. Now, it's time to add the chicken. Season the diced chicken with salt, pepper, thyme, and oregano. Place it in the pot and cook until the chicken turns golden and is no longer pink, about 6-8 minutes. This browning adds depth to the soup's flavor. Once the chicken is ready, mix it well with the softened vegetables. Pour in the chicken broth and bring the mixture to a boil. It should bubble nicely! Once boiling, stir in the rinsed rice. This step is crucial as the rice will absorb flavors from the broth. Reduce the heat to low, cover the pot, and let it simmer for about 20-25 minutes. This allows the rice to cook and the flavors to meld beautifully. After simmering, remove the pot from heat. Now, stir in the heavy cream. This will make your soup rich and creamy. Taste the soup and adjust the seasoning with more salt and pepper if needed. The cream adds a luxurious finish that makes each spoonful comforting and delicious. For the full recipe, check out the [Full Recipe]. Enjoy your cooking experience! To make the best creamy chicken and rice soup, you should sauté your vegetables well. Start with the onions; they add a sweet base. Cook them until they are soft and clear. This step builds flavor for your soup. When adding the rice, avoid overcooking it. Rice can turn mushy if left too long. Keep an eye on the timer and taste it for doneness. The rice should be tender yet firm, adding the right texture to your soup. To make your soup even better, consider adding spices. A pinch of paprika or a dash of cayenne can bring warmth. Fresh herbs like parsley can brighten the dish at the end. Using homemade broth is a great choice. It has a deeper flavor than store-bought broth. If you use store-bought, look for low-sodium options. This lets you control how salty your soup will be. One common error is adding too much liquid. You want a creamy texture, not a thin soup. Start with the amount of broth in the recipe. If you feel it needs more, add a little at a time. Another mistake is cooking the chicken too long. Overcooked chicken becomes dry. Cook it until it is just done, then remove it from the heat. This keeps your chicken juicy and tender. For the full recipe, check out [Full Recipe]. {{image_2}} You can change the protein in this soup. Try using turkey instead of chicken. This keeps the dish light but still hearty. You could also use tofu for a vegetarian option. Just cube the tofu and add it when you cook the vegetables. Both options taste great and give a new twist to the soup. Adding greens boosts nutrition and flavor. Spinach or kale works well in this soup. You can toss in fresh spinach just before serving. It wilts quickly and adds a nice color. If you prefer kale, chop it finely and add it when you cook the chicken. Both options make the soup feel fresh and healthy. Want to add a twist to your soup? A splash of lemon juice gives it a bright taste. Simply squeeze some lemon in just before serving. You can also add cheese for a richer flavor. Stir in grated parmesan or cheddar as you mix in the cream. These small changes can make your soup even more delightful. For the full recipe, check out the detailed steps. To keep your creamy chicken and rice soup fresh, let it cool first. Once cooled, place the soup in an airtight container. Store it in the fridge for up to three days. When ready to eat, check for any signs of spoilage, like off smells or changes in texture. Freezing this soup is a great way to save leftovers. First, let the soup cool completely. Then, transfer it to a freezer-safe container. Leave some space at the top for expansion. You can freeze the soup for up to three months. When you’re ready to enjoy it again, just thaw it in the fridge overnight before reheating. Reheat your soup gently to keep its creamy texture. You can use the stove or microwave. If using the stove, warm it on low heat, stirring often. For the microwave, heat in short bursts, stirring in between. If the soup seems too thick, add a bit of chicken broth or water to reach your desired consistency. You can easily prepare this soup ahead of time. First, make the soup as directed. Let it cool completely before storing. Pour it into an airtight container and place it in the fridge. It will stay fresh for about three days. If you want to keep it longer, freeze it. Just remember to leave some space in the container, as the soup will expand. To reheat, simply thaw it in the fridge overnight. Then, warm it on the stove over low heat. Stir frequently to keep it creamy. If it seems thick, add a bit of broth or water to thin it out. Yes, you can substitute heavy cream for lighter options. Coconut milk is a great choice. It adds a nice taste without all the fat. You can also use half-and-half if you want something creamier but lighter than heavy cream. For a lower-calorie option, try unsweetened almond milk. It won’t be as rich, but it will still taste good. Just remember that using these substitutes may change the soup's texture and flavor a bit. So, taste it and adjust the seasoning if needed. This soup pairs well with many sides. A fresh green salad adds a nice crunch. You can also serve it with crusty bread for dipping. Garlic bread is another tasty option. If you want something heartier, grilled cheese sandwiches are a classic choice. You can even add some fruit, like apple slices, for a sweet touch. These sides will complement the soup and make your meal feel complete. This blog post covered how to make creamy chicken and rice soup. We talked about the key ingredients, like chicken, rice, and vegetables. I shared steps to cook the soup, with tips for better flavor. You learned about variations and how to store leftovers too. In the end, this recipe is simple and versatile. You can adjust it based on what you like. Enjoy making this warm and tasty soup for you and your loved ones. It’s comfort food at its best!

Creamy Chicken and Rice Soup Comforting Easy Recipe

Looking for a meal that wraps you in warmth? This Creamy Chicken and Rice Soup is just what you need!

- 2 cups cooked chicken, shredded - 1 cup shredded cheese (cheddar or Monterey Jack) - 1/2 cup cream cheese, softened - 1 teaspoon taco seasoning - 1/2 cup corn (canned or frozen) - 1/4 cup chopped fresh cilantro - 12 small flour tortillas - Olive oil for brushing To make Easy Chicken Taquitos, you need simple, tasty ingredients. Start with cooked chicken. You can use rotisserie chicken for speed. Shredded cheese, like cheddar, melts well and adds flavor. Cream cheese makes the filling rich and creamy. Next, add taco seasoning to bring that zesty kick. Corn adds a nice crunch and sweetness. Fresh cilantro brightens the dish. Finally, small flour tortillas wrap everything together. Don't forget olive oil! It helps the taquitos crisp up nicely in the oven. For the full recipe, check out the details above. Enjoy creating these delicious taquitos! First, you need to preheat your oven to 400°F (200°C). This heat will make your taquitos crispy and golden. Next, line a baking sheet with parchment paper. This will help with cleanup later. In a large bowl, mix your filling. Combine 2 cups of shredded chicken, 1 cup of cheese, and 1/2 cup of cream cheese. Add 1 teaspoon of taco seasoning, 1/2 cup of corn, and 1/4 cup of chopped cilantro. Stir well until everything blends nicely. Now, it’s time to roll the taquitos. Take a small flour tortilla. Spoon about 2 tablespoons of the filling onto one end. Roll it tightly, folding in the sides as you go. This keeps the filling inside. Repeat this step with all your tortillas and filling. Place each rolled taquito seam-side down on your baking sheet. This helps them stay rolled while baking. Brush the tops lightly with olive oil. This will give them a nice, crispy texture. Bake your taquitos in the preheated oven for 20 minutes. Keep an eye on them until they turn golden brown and crispy. When they are done, let them cool for a few minutes. This makes them easier to handle. Serve them with salsa and guacamole for a fresh touch. Enjoy your homemade crispy chicken taquitos! Check the [Full Recipe] for more details. To make your taquitos perfect, focus on filling and rolling them well. - Fill evenly: Use about 2 tablespoons of filling per tortilla. This gives a good balance and helps with rolling. - Roll tightly: Start at one end and roll the tortilla snugly. Fold in the sides as you roll to keep the filling inside. - Avoid soggy taquitos: Brush the outside with olive oil before baking. This helps them crisp up and keeps them dry. To make your meal special, pair your taquitos with delicious sides. - Salsa: Fresh or store-bought salsa adds great flavor. The acidity helps balance the richness of the taquitos. - Guacamole: Creamy guacamole makes a perfect dip. You can mash avocados with lime, salt, and garlic for a fresh taste. Try serving taquitos with a side salad or rice for a complete meal. You can prep these taquitos in advance for easy meals later. - Prep in advance: Fill and roll the taquitos, then place them in a single layer on a baking sheet. Freeze them for about an hour until firm. - Freezing: Transfer the frozen taquitos to a zip-top bag. They can stay in the freezer for up to three months. - Reheating: Bake from frozen at 400°F (200°C) for about 25-30 minutes. This gives you crispy, hot taquitos without the wait. For more details, check out the Full Recipe for Easy Chicken Taquitos. {{image_2}} You can easily switch up the proteins in your taquitos. Instead of chicken, try ground beef, shredded pork, or even beans for a tasty veggie option. Each choice brings its own flavor. Cheese is another fun area to mix and match. While I love cheddar or Monterey Jack, you can use pepper jack for a kick or mozzarella for a milder taste. The cheese you choose will change the whole vibe of your dish. Looking to spice things up? Add diced jalapeños to the filling for a nice heat. You can also try other spices, like cayenne or chili powder, to really amp up the flavor. For dipping, consider creative sauces. A zesty chipotle sauce or creamy avocado dressing can take your taquitos to the next level. The right sauce can make each bite more exciting. Want to make a healthier version? Use whole wheat or corn tortillas instead of regular flour ones. This small swap adds fiber and nutrients to your meal. You can also get creative with the fillings. Try using grilled veggies or lean turkey for a lower-calorie option. These choices keep your taquitos tasty while making them more nutritious. For the full recipe, check out the Easy Chicken Taquitos page! To keep your Easy Chicken Taquitos fresh, store them in the fridge. Place them in an airtight container. This helps lock in moisture and flavor. You can also wrap them in plastic wrap. This adds another layer of protection. Use a container that fits the taquitos snugly. This way, they won’t get squished. When reheating, I recommend using the oven. It helps keep the taquitos crispy. Preheat your oven to 375°F (190°C). Place the taquitos on a baking sheet. Heat them for about 10 minutes. Check to see if they are warm throughout. If you use a microwave, they may turn soggy. If you must use one, heat them for short bursts. This prevents moisture from building up. Your Easy Chicken Taquitos last up to three days in the fridge. Always check for signs of spoilage. Look for changes in color or texture. If you notice any off smells, it’s best to toss them. Keeping an eye on these signs ensures your food stays safe and tasty. For more details on making these tasty taquitos, check the Full Recipe. Can I use raw chicken instead of cooked? No, use cooked chicken for this recipe. Raw chicken takes too long to cook in taquitos. You want juicy and tender chicken, which cooked chicken provides. How do I make chicken taquitos in an air fryer? To make taquitos in an air fryer, preheat it to 375°F (190°C). Roll your taquitos as usual. Place them in a single layer in the air fryer basket. Cook for about 10-12 minutes, flipping halfway through. They should be crispy and golden. Are these taquitos gluten-free? The recipe as written uses flour tortillas, which are not gluten-free. However, you can use corn tortillas. Ensure they are labeled gluten-free to accommodate gluten-sensitive diets. Vegetarian options for this recipe You can make vegetarian taquitos by replacing chicken with beans or sautéed veggies. Use cheese and cream cheese for the filling as well. This keeps the texture creamy and satisfying. What is the best cheese for taquitos? Cheddar and Monterey Jack are great choices. They melt well and add nice flavor. You can also try pepper jack for a spicy kick. Can I make taquitos without cream cheese? Yes, you can skip cream cheese. Use more shredded cheese or add some Greek yogurt instead. This keeps the filling creamy and tasty without it. You now have a full guide on making easy chicken taquitos. Start with the essential ingredients, like chicken and cheese, then move to step-by-step instructions for rolling and baking. Use tips for perfecting your recipe, and explore variations to match your taste. Don't forget about storage options for leftovers. Whether you're making them for a meal or a snack, these taquitos are sure to please! Enjoy your cooking adventure and impress your friends and family with your tasty creations.

Easy Chicken Taquitos Tasty and Quick Dinner Recipe

Looking for a quick and tasty dinner idea? These Easy Chicken Taquitos are perfect! With just a few simple ingredients,

For a perfect roasted garlic cauliflower mash, gather these simple items: - 1 large head of cauliflower, cut into florets - 5-6 cloves of garlic, unpeeled - 3 tablespoons olive oil - ½ cup heavy cream or unsweetened almond milk - ½ teaspoon salt - ¼ teaspoon black pepper - Fresh chives or parsley for garnish You can swap some ingredients if needed. Here are a few ideas: - Instead of heavy cream, try coconut cream for a dairy-free option. - Use vegetable broth instead of almond milk for added flavor. - If you don't have fresh herbs, dried herbs work too, but use less. Choosing the right ingredients makes a big difference. Here are some tips: - Pick a fresh cauliflower head. It should be firm and white, with no brown spots. - Select garlic that feels heavy and has a firm skin. Avoid soft or sprouted garlic. - Use good-quality olive oil for a richer taste. Look for extra virgin if you can. - For creaminess, choose your cream or milk based on your taste and diet. With these ingredients and tips, you’ll create a creamy side dish that everyone will love. Check out the Full Recipe for all the steps to make this dish shine! First, gather all your ingredients. You will need: - 1 large head of cauliflower, cut into florets - 5-6 cloves of garlic, unpeeled - 3 tablespoons olive oil - ½ cup heavy cream or unsweetened almond milk - ½ teaspoon salt - ¼ teaspoon black pepper - Fresh chives or parsley for garnish Make sure your cauliflower is fresh. Look for firm florets with no brown spots. This will ensure a tasty mash. Next, preheat your oven to 400°F (200°C). Toss the cauliflower florets and unpeeled garlic cloves with 2 tablespoons of olive oil on a baking sheet. Spread them in a single layer. This helps them roast evenly. Roast in the oven for 25-30 minutes. You want the cauliflower to be tender and lightly golden. When done, take them out and let them cool for a few minutes. This cooling step helps to keep the mash creamy. Now comes the fun part: blending. Squeeze the roasted garlic out of its skins into a large mixing bowl or food processor. Add the roasted cauliflower, heavy cream (or almond milk), salt, and pepper. Blend until smooth and creamy. If the mash is too thick, add more cream or almond milk until you reach your desired texture. Taste it and adjust the seasoning, if needed. Serve warm, drizzled with the remaining tablespoon of olive oil and garnished with fresh chives or parsley. This Roasted Garlic Cauliflower Mash will impress your family and friends. Enjoy every creamy bite! To make the best roasted garlic cauliflower mash, watch the roasting time. If you roast too long, the cauliflower can burn. Aim for a tender, golden color. Also, do not skip squeezing the roasted garlic. It adds a sweet and rich flavor. If you blend too much, the mash can become gummy. Blend just until smooth. Seasoning is key to a great dish. Start with salt and black pepper. After blending, taste your mash. You might want to add more salt or pepper. For extra flavor, try adding a pinch of smoked paprika or garlic powder. Fresh herbs like chives or parsley are perfect for a fresh touch. They add color and taste. Want to save time? You can prep in advance. Cut the cauliflower and garlic the day before. Store them in the fridge until you are ready to cook. If you're short on time, use a microwave to steam the cauliflower. This can cut down your cooking time. Another tip is to use a food processor for blending. It makes the job faster and easier. For the full recipe, check the section above. {{image_2}} To make a dairy-free version, simply swap out heavy cream for unsweetened almond milk. You can also use coconut cream for a richer taste. Both options keep the mash creamy and delicious. If you prefer a vegan dish, ensure your almond milk is unsweetened and check the label on any other ingredients. This way, you can enjoy a tasty, plant-based side. You can mix in other veggies to enhance the mash. Some great options include steamed carrots, broccoli, or even sweet potatoes. These additions boost the flavor and add nutrition. Just make sure to roast them along with the cauliflower. This helps all the flavors blend well together. To take the mash up a notch, consider adding fresh herbs or spices. Chopped rosemary or thyme works wonders. You can also add a pinch of smoked paprika for a subtle kick. If you’re feeling adventurous, a dash of nutritional yeast gives a cheesy flavor without dairy. These twists will keep your Roasted Garlic Cauliflower Mash exciting and new. For more ideas, check the Full Recipe. To keep your roasted garlic cauliflower mash fresh, let it cool first. Then, place it in an airtight container. Store it in the fridge for up to three days. If you want to keep it longer, freezing is a good option. When you're ready to enjoy your mash again, take it out of the fridge. You can reheat it in a pot on low heat. Stir it often to keep it smooth. If it seems too thick, add a splash of cream or almond milk. You can also use a microwave. Heat it in 30-second bursts, stirring in between. If you freeze the mash, use it within one month for the best taste. To thaw, move it to the fridge overnight. When you’re ready to eat, reheat as mentioned above. This way, you’ll enjoy the creamy goodness anytime. For the full recipe, check out the instructions earlier in the article. To make your mash less creamy, cut back on the cream. You can use less heavy cream or almond milk than the recipe calls for. Start with a small amount and blend. Taste it as you go. If you want it even thicker, add more cauliflower. You could also use a potato or another vegetable for more texture. This will help you find the right balance. Yes, you can use frozen cauliflower. Just make sure to thaw it first. Drain any excess water after thawing. This will help keep your mash from becoming too watery. Roasting frozen cauliflower can change the texture, so steaming it may work better. Once it’s ready, follow the same steps in the Full Recipe to blend it into a smooth mash. Cauliflower is low in calories and high in nutrients. It’s a great source of vitamins C and K. It also contains fiber, which helps with digestion. Cauliflower is high in antioxidants, which support health. Eating cauliflower can help reduce inflammation and lower the risk of chronic diseases. Plus, it is a fantastic low-carb substitute for grains and legumes. This makes it a smart choice for many diets. In this post, we explored the process of making roasted garlic cauliflower mash. We looked at ingredient choices, steps for preparing delicious mash, and tips to avoid common mistakes. You learned about variations and storage tips to keep it fresh. Experimentation and good practices will enhance your dish. Remember, cooking is about fun and creativity. Enjoy making your mash tasty and unique!

Roasted Garlic Cauliflower Mash Creamy Side Dish

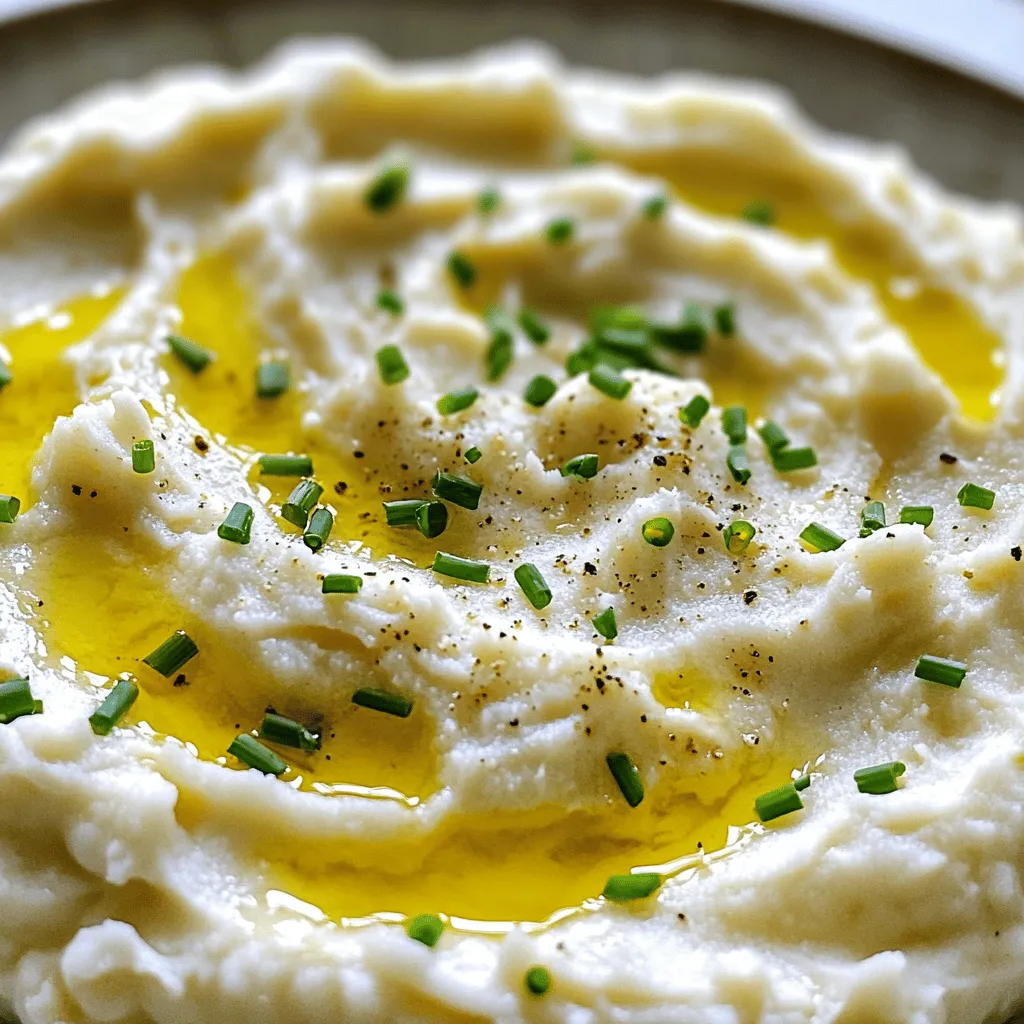
Looking for a creamy side dish that’s both delicious and healthy? Roasted Garlic Cauliflower Mash is your answer! This tasty

To make these rich and fudgy vegan chocolate brownies, you will need the following ingredients: - 1 cup all-purpose flour - 1 cup coconut sugar (or any granulated sugar) - 1/2 cup unsweetened cocoa powder - 1/2 teaspoon baking soda - 1/4 teaspoon salt - 1/3 cup unsweetened applesauce - 1/3 cup almond milk (or any plant-based milk) - 1/4 cup vegetable oil (or melted coconut oil) - 1 teaspoon vanilla extract - 1/2 cup dark vegan chocolate chips (optional) Choosing the right brands can make your brownies even better. Here are some trusted vegan brands: - Coconut Sugar: Wholesome Sweeteners - Cocoa Powder: Ghirardelli or Hershey's - Plant-Based Milk: Silk or Almond Breeze - Dark Vegan Chocolate Chips: Enjoy Life or Theo Chocolate These brands offer quality products that enhance the flavor of your brownies. If you want to customize the recipe, here are some easy substitutions: - All-Purpose Flour: Use whole wheat flour or gluten-free flour for a different texture. - Coconut Sugar: Try brown sugar or maple syrup, but adjust the liquid accordingly. - Unsweetened Applesauce: Substitute with mashed bananas or silken tofu for added moisture. - Almond Milk: Any plant milk, like oat or soy milk, works well here. - Vegetable Oil: Use melted coconut oil, avocado oil, or even nut butter for richness. These swaps keep your brownies tasty while fitting your diet or taste preferences. First, gather all your ingredients. This makes the process smooth and fun. Preheat your oven to 350°F (175°C). Grease an 8x8-inch baking pan or line it with parchment paper. In a large bowl, combine these dry ingredients: - 1 cup all-purpose flour - 1 cup coconut sugar - 1/2 cup unsweetened cocoa powder - 1/2 teaspoon baking soda - 1/4 teaspoon salt Whisk them together until they blend well. In another bowl, mix the wet ingredients: - 1/3 cup unsweetened applesauce - 1/3 cup almond milk - 1/4 cup vegetable oil - 1 teaspoon vanilla extract Stir these until smooth. Pour the wet mix into the dry mix. Stir gently until just combined. A few lumps are okay. If you love chocolate, fold in 1/2 cup dark vegan chocolate chips. Now, pour the brownie batter into your prepared pan. Spread it evenly with a spatula. Bake in your preheated oven for 25-30 minutes. Check them with a toothpick. If it comes out clean or with a few moist crumbs, they’re ready. After baking, let the brownies cool in the pan for 10 minutes. Then, transfer them to a wire rack to cool completely. This step is key for the perfect texture. Cut into squares once cool. For a nice touch, serve them dusted with powdered sugar and fresh mint leaves. A scoop of vegan ice cream on the side makes it even better! For the full recipe, check the details above. Baking is fun, but small mistakes can happen. Here are some tips to avoid them: - Measuring Ingredients: Always measure your flour and sugar. Too much can make brownies dry. - Overmixing the Batter: Mix just until combined. Overmixing can lead to tough brownies. - Not Preheating the Oven: Always preheat your oven. This helps the brownies rise well. - Using Cold Ingredients: Let ingredients like almond milk and applesauce warm up a bit. Cold items can affect texture. A fudgy brownie needs a few key elements. Follow these tips for the best results: - Use Applesauce: It adds moisture and helps create a soft texture. - Incorporate Coconut Sugar: This sugar keeps brownies moist and adds a rich flavor. - Monitor Baking Time: Baking too long can dry them out. Check for moist crumbs on the toothpick. - Cool Before Cutting: Let brownies cool completely for easier cutting. Warm brownies can fall apart. Having the right tools makes baking easier. Here are my must-haves: - Mixing Bowls: Use large bowls for mixing dry and wet ingredients. - Whisk: A good whisk helps combine ingredients smoothly. - Spatula: A silicone spatula works great for mixing and scraping the bowl. - 8x8-Inch Baking Pan: This size is perfect for brownies. It ensures even baking. - Parchment Paper: Line your pan with parchment for easy removal. For the full recipe, check out the details above. Happy baking! {{image_2}} You can boost the flavor of your vegan chocolate brownies with fun add-ins. Try adding nuts like walnuts or pecans for a crunchy texture. Chopped fruits, like bananas or cherries, also work great. If you want a twist, try adding shredded coconut. These add-ins make the brownies more unique and tasty. If you need gluten-free brownies, use almond flour or oat flour instead of all-purpose flour. Be sure to check that your cocoa powder and other ingredients are gluten-free. This way, everyone can enjoy these rich and fudgy treats without worry. To elevate the taste, you can add a teaspoon of espresso powder. It deepens the chocolate flavor. For a fresh twist, add a few drops of mint extract. This gives a nice cooling effect. You can also try orange zest for a citrus kick. These little tweaks can make your brownies even more special. For the full recipe, check out the Decadent Vegan Chocolate Brownies section. Once your vegan brownies cool, store them in an airtight container. This keeps them fresh. You can place parchment paper between layers to avoid sticking. Store at room temperature for up to three days. If you want to keep them longer, refrigerate them for up to a week. To freeze your vegan brownies, first, let them cool completely. Then, cut them into squares. Wrap each brownie tightly in plastic wrap. Place the wrapped brownies in a freezer-safe bag. They can stay fresh in the freezer for up to three months. When you're ready to eat, just take them out and let them thaw at room temperature. To reheat the brownies, use the microwave or oven. If using a microwave, warm them for about 10-15 seconds. Check if they are warm enough. If you prefer the oven, preheat it to 350°F (175°C). Place the brownies on a baking sheet and heat for about 5-10 minutes. This method keeps them nice and fudgy. For added flavor, serve with a scoop of vegan ice cream. Enjoy this rich and fudgy delight! For the complete recipe, check the Full Recipe section. Yes, you can use different types of sugar. Coconut sugar works well, but brown sugar or cane sugar also works. Each sugar type adds a unique flavor. Coconut sugar gives a hint of caramel. Brown sugar makes the brownies a bit chewier. Feel free to mix and match to find what you like best. To make these brownies oil-free, replace the oil with more applesauce. Use 1/2 cup of unsweetened applesauce instead of 1/4 cup oil. The applesauce keeps the brownies moist and fudgy. You could also use mashed bananas as an alternative. Bananas add a nice flavor and sweetness. The best way to tell if the brownies are done is to use a toothpick. Insert it into the center of the brownies. If it comes out clean or with a few moist crumbs, they are ready. Overbaking can lead to dry brownies, so keep an eye on them. Vegan brownies last about 3 to 5 days at room temperature. Store them in an airtight container to keep them fresh. If you want to keep them longer, you can freeze them. They can last up to 3 months in the freezer. Just remember to thaw them before enjoying. Vegan chocolate brownies are simple and fun to make. We covered essential ingredients, brands, and substitutions for your baking needs. The step-by-step guide helps you prepare, bake, and cool your brownies. I shared tips to avoid mistakes and tools that make baking easier. You can also try different add-ins and variations. Remember to store and freeze your brownies correctly for the best taste later. Enjoy your delicious, plant-based treats, and don't hesitate to experiment with flavors!

Vegan Chocolate Brownies Rich and Fudgy Delight

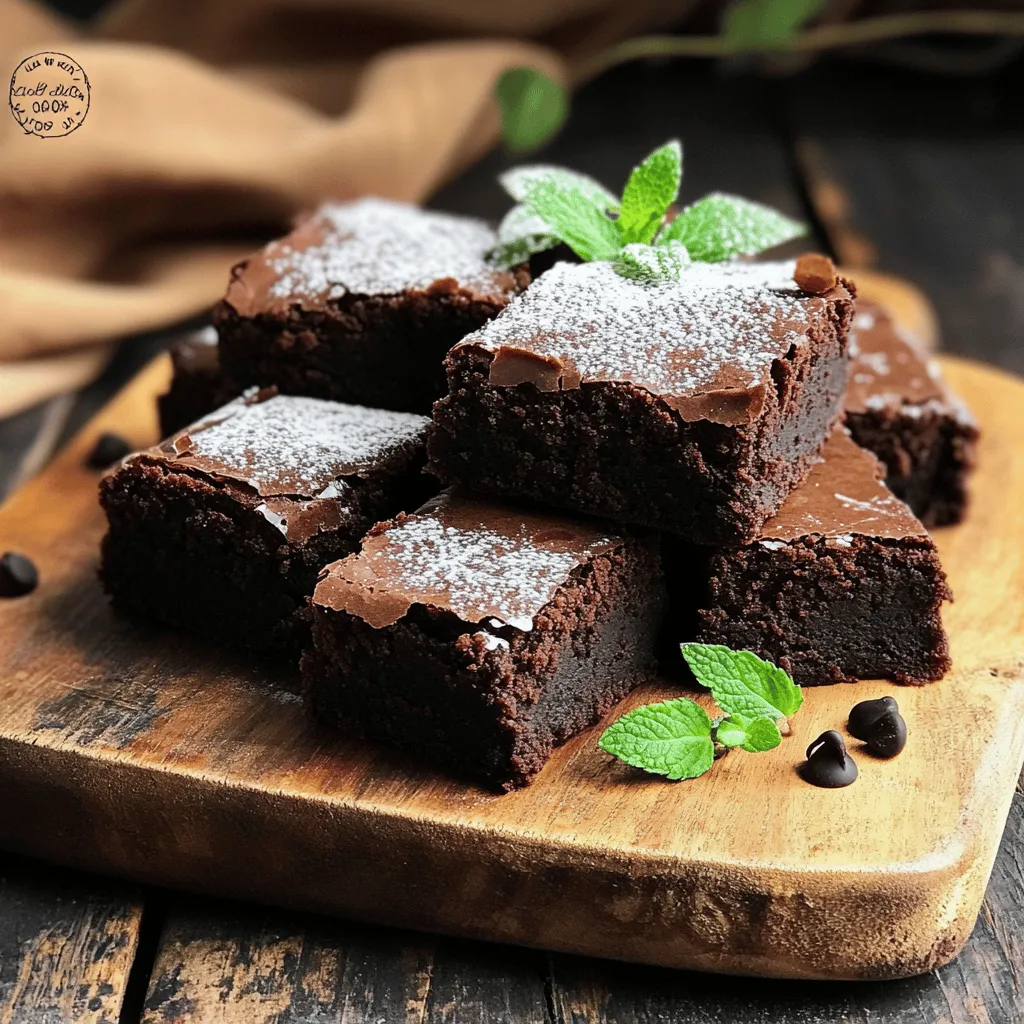
Are you ready to indulge in a rich and fudgy treat without the guilt? These vegan chocolate brownies pack a

Orzo pasta is the star of this dish. It is a small, rice-shaped pasta. It cooks quickly and absorbs flavors well. This makes it perfect for creamy sauces. For the broth, I suggest using vegetable broth. It adds a rich taste without overpowering the dish. You can also use chicken broth if you prefer. Fresh garlic is key to this recipe. It gives a strong, aromatic flavor. You must mince the garlic finely to release its oils. Parmesan cheese brings creaminess and a salty kick. Grate it fresh for the best flavor. Pre-grated cheese can lose some of its taste. You can enhance the flavor by adding a few extras. Consider adding spinach or sun-dried tomatoes for color and nutrition. Cooked chicken or shrimp can also boost protein content. If you have dietary needs, there are good substitutes. Use gluten-free orzo for a gluten-free option. For a vegan version, swap heavy cream with coconut milk and Parmesan with nutritional yeast. Check the Full Recipe for more details on how to make this creamy garlic Parmesan orzo. First, gather all your ingredients. This makes cooking easier and more fun. You need: - 1 cup orzo pasta - 2 tablespoons olive oil - 4 cloves garlic, minced - 2 cups vegetable broth - 1 cup heavy cream - 1 cup grated Parmesan cheese - 1 teaspoon Italian seasoning - Salt and pepper to taste - 1/4 cup fresh parsley, chopped (for garnish) Measuring your ingredients accurately is key. This helps the dish turn out just right. Too much or too little of an ingredient can change the taste and texture. Start by heating the olive oil in a large saucepan over medium heat. Add minced garlic and sauté for about 1 minute. You want the garlic fragrant, not browned. Next, pour in the vegetable broth and bring it to a simmer. Once it's simmering, add the orzo pasta. Stir it well to combine. Cook the orzo for 8 to 10 minutes. Stir occasionally until the orzo is tender. Now, reduce the heat to low. Stir in the heavy cream and grated Parmesan cheese. Mix well until the cheese melts, making the dish creamy. Add the Italian seasoning, salt, and pepper to taste. Cook for an additional 2 to 3 minutes. Stir frequently until the dish is heated through. After cooking, remove it from heat. Let it rest for a couple of minutes so it can thicken. To make your dish look great, garnish it with fresh parsley. Just sprinkle it on top before serving. For serving suggestions, this orzo goes well with grilled chicken or roasted vegetables. You can also enjoy it as a main dish or a side. This creamy garlic Parmesan orzo is a treat for any meal. You can find the Full Recipe for more details. To get the right creaminess, start with the heavy cream. If you want it richer, add more cream. For a lighter dish, you can mix in some broth. Always stir well to combine. The orzo will absorb moisture, so adjust as you go. Best practices for cooking orzo include using a large pot. This helps prevent sticking. Stir the orzo often while it cooks. This keeps it from clumping together. Cook it until it's just tender, about 8-10 minutes. You want it al dente, not mushy. You can boost the flavor with spices. Try adding a pinch of red pepper flakes for heat. Fresh herbs like thyme or basil also work well. They add a fresh taste that brightens the dish. For a more filling meal, add protein. Cooked chicken or shrimp complements the dish nicely. You can also toss in vegetables like spinach or peas. They add color and nutrition, making the meal even better. When cooking orzo, avoid using too little water. This can lead to sticky pasta. Make sure to follow the water-to-orzo ratio closely. Another mistake is overcooking. This makes the orzo mushy and less enjoyable. Keep an eye on the cooking time. Stirring often helps prevent clumping. If you notice any sticking, add a splash of broth or olive oil. For more details, check the Full Recipe for Creamy Garlic Parmesan Orzo. {{image_2}} To make creamy garlic Parmesan orzo gluten-free, switch orzo for gluten-free pasta. You can find options made from rice or quinoa. These alternatives will keep the dish tasty and safe for those with gluten allergies. For a vegan twist, replace heavy cream with coconut milk or cashew cream. Use nutritional yeast instead of Parmesan. This option gives a cheesy flavor while keeping it plant-based. By making these swaps, you can enjoy the dish without dairy. Playing with cheese can change the whole dish. Try feta for a tangy touch or Gouda for a smoky flavor. Mixing different cheeses adds depth. You can also explore using blue cheese for a bold kick. Seasonal vegetables can enhance taste and nutrition. Think about adding spinach in the spring or roasted butternut squash in the fall. These veggies not only add color, but they also make the meal more filling. Get creative with how you serve this dish. You can bake it in a casserole dish to create a crispy top. This method makes it look fancy and perfect for dinner parties. You can also try serving it in individual bowls for a personal touch. Creamy garlic Parmesan orzo can be enjoyed hot or cold. Serve it warm as a side dish or let it cool for a pasta salad. Each way offers a unique taste experience. For the full recipe, check out the detailed instructions to make this dish perfect every time. To store leftover creamy garlic Parmesan orzo, let it cool first. Place it in an airtight container to keep it fresh. This dish stays good in the fridge for about 3 to 4 days. Make sure to label the container with the date to track its freshness. You can freeze creamy garlic Parmesan orzo for longer storage. Use a freezer-safe container. It’s best to freeze it without any extra cream added. This helps keep the texture and flavor intact. When you’re ready to eat it, thaw it overnight in the fridge. To reheat, you can use a microwave or stovetop. If using the microwave, heat in short bursts and stir often. For stovetop, add a splash of broth or cream when warming. This helps bring back the creaminess after storage. Enjoy your creamy garlic Parmesan orzo just like the first time! What can I substitute for heavy cream? If you need a substitute for heavy cream, try using half-and-half or whole milk mixed with butter. You can also use coconut cream for a dairy-free option. Each will change the dish’s flavor slightly, but they can still give a creamy texture. Can I make this dish ahead of time? Yes, you can make this dish ahead of time. Cook the orzo and mix in the sauce. Store it in the fridge. When you want to serve it, just reheat it on the stove. Add a bit of broth if it seems too thick. Why is my orzo mushy? Mushy orzo usually happens if you cook it too long. Keep an eye on the time and taste it as it cooks. Orzo should be al dente, which means it should have a slight bite when you chew it. How long does the dish last in the fridge? This dish lasts about 3 to 4 days in the fridge. Store it in an airtight container to keep it fresh. Can I use whole wheat orzo instead? Yes, you can use whole wheat orzo. It adds a nutty flavor and is a bit healthier. Just remember that it may take a little longer to cook. Is it necessary to use fresh garlic? Fresh garlic gives the best flavor. However, you can use garlic powder in a pinch. Just use less, as it is stronger than fresh garlic. This blog post covered how to make creamy garlic Parmesan orzo. We discussed essential ingredients like orzo, broth, garlic, and Parmesan. You learned steps for preparation, cooking, and garnishing. Tips for creaminess and avoiding mistakes were shared. Incorporating variations for diets or flavor adds fun. Proper storage is key to enjoying leftovers. Remember, with practice, you can master this dish and impress anyone at your table. Enjoy cooking!

Creamy Garlic Parmesan Orzo Flavorful and Simple Dish

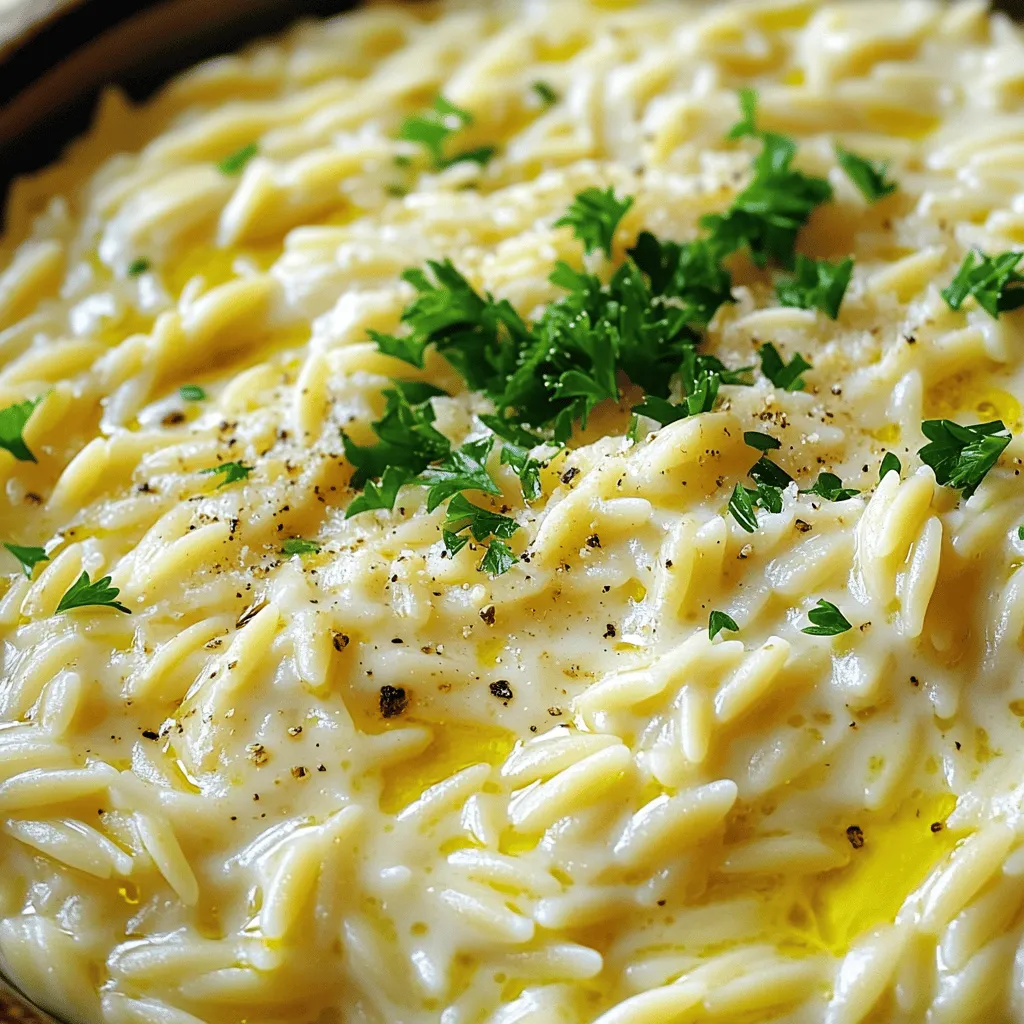
Looking for a quick yet delicious meal? This Creamy Garlic Parmesan Orzo is your answer! It’s simple and packed with

- 2 medium sweet potatoes - 1 red bell pepper - 1 green bell pepper - 1 small red onion - 2 cloves garlic - 1 teaspoon smoked paprika - 1/2 teaspoon ground cumin - 1/4 teaspoon cayenne pepper - Salt and pepper to taste - 3 tablespoons olive oil - 4 large eggs - Fresh parsley or cilantro for garnish Sweet potato breakfast hash is a colorful and healthy dish. The sweet potatoes give it a rich taste and texture. You can easily find these ingredients at your local store. The spices add warmth and depth. Smoked paprika brings a hint of smokiness. Ground cumin adds an earthy flavor that pairs well with sweet potatoes. Cayenne pepper gives it a kick, but you can skip it if you want less heat. Olive oil is perfect for cooking. It helps to crisp the sweet potatoes and makes the dish flavorful. Fresh herbs like parsley or cilantro add brightness and color when you garnish your hash. For the full recipe, check out the cooking section. - Begin with peeling and dicing sweet potatoes. Cut them into small cubes for even cooking. - Chop the red and green bell peppers into bite-sized pieces. Dice the red onion and mince the garlic. - Heat 3 tablespoons of olive oil in a large skillet over medium heat. This helps the sweet potatoes cook nicely. - Add the diced sweet potatoes to the skillet and season them well with salt, pepper, smoked paprika, and ground cumin. Stir everything together to coat the sweet potatoes. - Cover the skillet with a lid and cook for about 10-15 minutes. Stir occasionally until the sweet potatoes are tender and slightly caramelized. - In another smaller skillet, heat the remaining tablespoon of olive oil. Add the diced red onion and minced garlic. Sauté for about 2-3 minutes until they become fragrant and translucent. - Now, add the chopped bell peppers to the onion and garlic mixture. Keep sautéing for another 5-7 minutes until the peppers are tender. - Once the sweet potatoes are cooked, add the onion and pepper mixture into the skillet with the sweet potatoes. Stir everything together and cook for another 2-3 minutes. - Create four small wells in the mixture and crack an egg into each well. Cover the skillet and let the eggs cook for about 5-7 minutes. The whites should be set, but the yolks should remain runny. - Finally, remove the skillet from the heat and garnish the hash with freshly chopped parsley or cilantro. Enjoy your hearty and filling Sweet Potato Breakfast Hash! For more details, check the Full Recipe. - Use a non-stick skillet for easier cooking and cleanup. - Make sure to stir sweet potatoes occasionally for even cooking. Cooking sweet potatoes well is key. If you don’t stir them, some may burn while others stay raw. A non-stick skillet helps keep the potatoes from sticking. This saves you time and makes cleanup easy. - Serve hot with a drizzle of hot sauce. - Pair with avocado slices or crusty bread. I love to serve my hash hot right from the skillet. It keeps the meal cozy and inviting. A drizzle of hot sauce adds a nice kick. You can also add fresh avocado slices for creaminess. Crusty bread is great too, as it soaks up all the flavors. - Add proteins like sausage or bacon. - Include additional veggies like spinach or zucchini. Feel free to make this hash your own! You can add proteins like sausage or bacon for more flavor. If you want to pack in more veggies, spinach or zucchini works well. These additions boost texture and taste, making your breakfast even more satisfying. Check out the Full Recipe for more ideas! {{image_2}} You can easily mix up the sweet potato breakfast hash by changing some ingredients. Swap sweet potatoes for regular potatoes or butternut squash. Each option brings its own taste and texture. You can also try different colors of bell peppers. Red, yellow, and orange peppers add brightness and flavor. This simple swap can make your dish more fun and colorful. Let your taste buds explore new flavors. Experiment with herbs like thyme or rosemary for a fresh twist. These herbs can give your hash a lovely aroma. You can also add cheese to make it creamy. Feta or cheddar work great here. Just sprinkle it on top before serving for a rich flavor. If you want a vegan version, there are easy swaps. Replace eggs with tofu scramble or a chickpea flour scramble. Both options provide protein and taste great. Use olive oil or vegan butter for cooking. This keeps the dish plant-based. You can still enjoy a hearty meal without the eggs. Store leftover hash in an airtight container. This keeps it fresh and tasty. You can keep it in the fridge for up to 4 days. Make sure to cool it down before sealing. If you want to save some for later, freeze it in single portions. This makes reheating easy. When you're ready to eat, thaw it completely before reheating on the stove. This helps keep the flavor and texture. To reheat, place the hash in a skillet on medium heat. This method gives the best results. Add a splash of water or broth while reheating. This prevents it from drying out. Enjoy your delicious meal again! Total time is approximately 30 minutes with a prep time of 10 minutes. You can enjoy this hearty dish quickly, making it perfect for busy mornings. Yes, you can prepare the mixture and store it before adding eggs. This saves time and makes breakfast easier. Just heat it up and add the eggs when you are ready to eat. This dish pairs well with toast, avocado, or fresh fruit. These sides add flavor and nutrition. You can mix and match to find your favorite combination. For more details on how to prepare this delicious meal, check the Full Recipe. This Sweet Potato Breakfast Hash is simple and delicious. You learned how to prepare it using fresh ingredients and spices. I shared tips on cooking, serving, and even customizing your hash. Don’t forget about storage options for your leftovers. Experiment with different ingredients to make it your own. Whether you add proteins or switch to vegan options, the flavor will shine. Enjoy this dish as a quick breakfast or a hearty brunch with friends. It’s versatile and satisfying—perfect for starting your day right!

Sweet Potato Breakfast Hash Hearty and Filling Meal

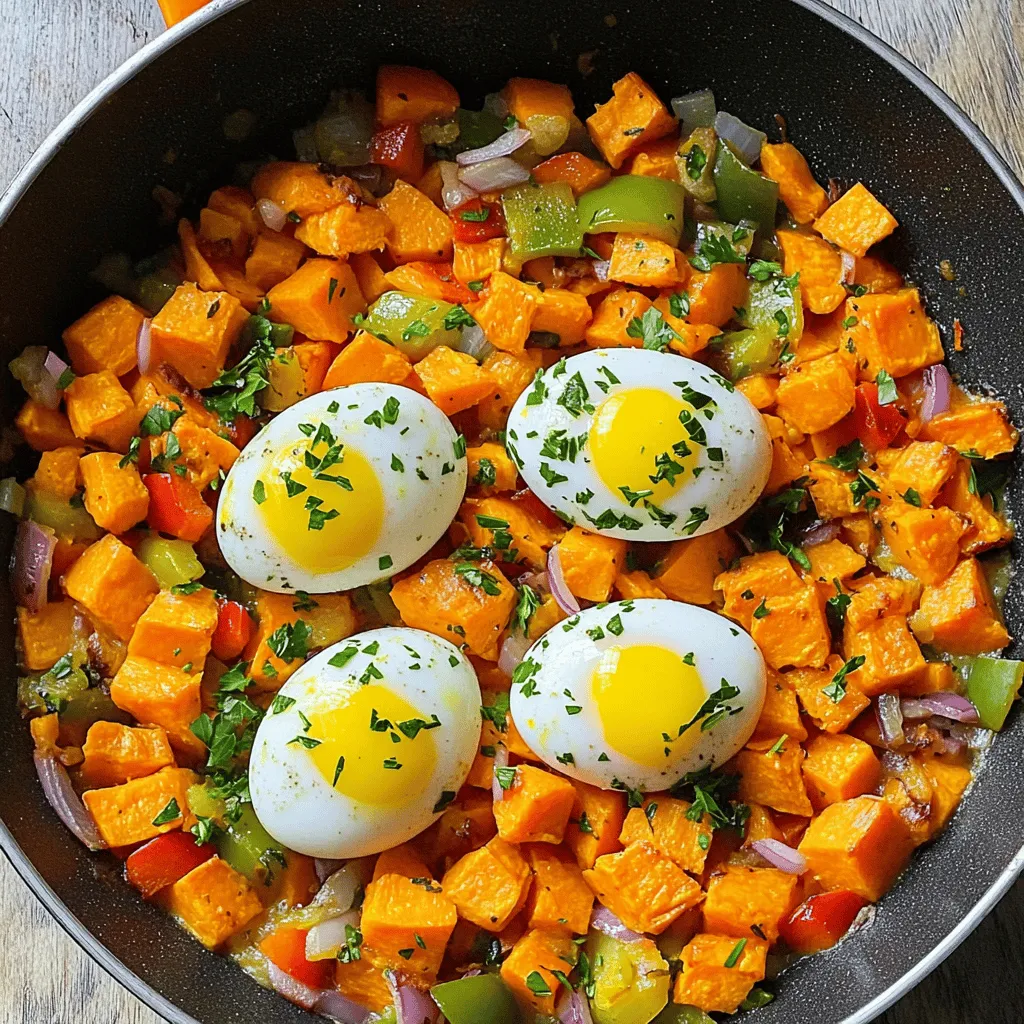
Start your day with a warm bowl of Sweet Potato Breakfast Hash, a hearty and filling meal. This dish combines

Loaded chicken nachos are a fun and tasty meal. They combine crispy chips with savory chicken and cheese. This dish is perfect for sharing or enjoying solo. You can serve it as a snack or a main dish. - 2 cups tortilla chips - 1 cup cooked chicken, shredded (grilled or rotisserie) - 1 cup shredded cheddar cheese - 1 cup black beans, rinsed and drained - 1/2 cup corn (canned or frozen) - 1 jalapeño, sliced (optional) - 1/2 cup diced tomatoes - 1/4 cup chopped green onions - 1/4 cup sour cream - 1/4 cup guacamole - 1/4 cup salsa - 1 teaspoon taco seasoning - Olive oil for drizzling You can add many toppings to make your nachos even better. Some tasty options include: - Fresh cilantro for a burst of flavor - Sliced olives for a salty kick - Jalapeños for extra heat - Sliced avocados for creaminess - Lime wedges for a zesty finish Feel free to mix and match to find your perfect nacho topping! For the full recipe, check out Loaded Chicken Nachos . First, gather all your ingredients. You will need tortilla chips, cooked chicken, and cheese. The other ingredients are black beans, corn, jalapeños, tomatoes, green onions, sour cream, guacamole, salsa, and taco seasoning. 1. Preheat your oven to 350°F (175°C). This step helps the cheese melt nicely. 2. Spread the tortilla chips on a large baking sheet. Make sure they are in a single layer. 3. In a bowl, mix the shredded chicken with taco seasoning. This gives the chicken a tasty kick. 4. Scatter the seasoned chicken evenly over the chips. This ensures every bite has flavor. 5. Next, add the black beans and corn over the chips and chicken. They add texture and taste. 6. Sprinkle the shredded cheddar cheese on top. Cover all the ingredients well. 7. Now, add sliced jalapeños, diced tomatoes, and green onions. They bring freshness and color to your dish. 8. Drizzle a bit of olive oil over everything. This helps the nachos get crispy when baked. 1. Bake in the oven for about 10-15 minutes. Watch for the cheese to melt and bubble. 2. Once done, carefully remove the tray from the oven. Let the nachos cool slightly to avoid burns. 3. Top with dollops of sour cream, guacamole, and salsa as you like. These add creaminess and flavor. To present your nachos, you can serve them right on the baking sheet. This gives a fun, rustic look. Or, you can use a decorative platter for a nicer touch. For dipping, add extra bowls of guacamole, salsa, and sour cream on the side. This way, everyone can enjoy their own toppings. Enjoy your loaded chicken nachos! For the full recipe, check out the section above. To get the best crispy nachos, start with quality tortilla chips. Use thick, sturdy chips. Thin chips will get soggy quickly. Spread the chips in one layer on a baking sheet. Overlapping them creates steam, which makes them soft. Drizzle olive oil lightly on top for extra crispness. Keeping nachos warm can be tricky. Use a low oven setting, around 200°F (93°C). After baking, leave the nachos in the oven while you prepare dips. Cover them lightly with foil to hold in heat. If you serve them at a party, use a warming tray. This keeps the nachos warm and crispy for longer. Gather your tools before cooking. A large baking sheet helps spread the chips evenly. Use a mixing bowl for seasoning the chicken. A good knife is key for chopping veggies like jalapeños and green onions. Consider using a cheese grater for fresh cheese. Pre-grated cheese does not melt as smoothly. You can find the Full Recipe to guide you through the process. {{image_2}} Loaded chicken nachos are great, but there are many fun ways to switch things up. Here are a few tasty variations you can try. For a meatless option, swap the chicken for tasty veggies. Use the same tortilla chips, cheese, and toppings, but add things like bell peppers, zucchini, or mushrooms. You can also add more beans for extra protein. Black beans or pinto beans work well. This way, you still have a filling dish that everyone can enjoy. If you love BBQ sauce, this one is for you. Instead of taco seasoning, mix shredded chicken with your favorite BBQ sauce. It gives a sweet and smoky flavor. Layer the BBQ chicken on your chips, then add cheddar cheese, jalapeños, and red onions. Bake it the same way as the original recipe. You’ll love the rich taste. Want to kick up the heat? Add spicy toppings like sliced jalapeños or diced serrano peppers. You can also use spicy cheese or a spicy salsa. Mix in some diced green chilies or hot sauce into your chicken for an extra kick. Make sure you balance the spice with creamy toppings like sour cream and guacamole. They cool down the heat and make every bite enjoyable. These variations keep loaded nachos fun and exciting. You can easily customize them for everyone’s taste. Just remember to check out the full recipe for the base ingredients! To store leftover loaded chicken nachos, place them in an airtight container. Make sure to cover the nachos well. This helps keep them fresh for up to two days. Avoid stacking them too high, as this can make them soggy. If you have extra toppings like sour cream or guacamole, store them separately. When you're ready to eat the leftovers, preheat your oven to 350°F (175°C). Spread the nachos out on a baking sheet. This helps them crisp up nicely. Heat for about 10 minutes or until they are warm. You can also microwave them, but they may get soggy. If you use the microwave, heat in short bursts and check often. Freezing loaded nachos is not the best option. The chips can become soft and lose their crunch. If you must freeze them, try to freeze the chicken and toppings separately. When you're ready to eat, bake the chips fresh and add the toppings. This way, you can enjoy that crispy texture again! Yes, you can prepare Loaded Chicken Nachos ahead of time. Start by cooking the chicken and mixing it with taco seasoning. You can also chop the veggies and gather all toppings. Store these items in the fridge. When you are ready to bake, layer the chips, chicken, and toppings on a baking sheet. Bake as directed in the Full Recipe. This method helps save time and makes for a quick dinner. Loaded Chicken Nachos pair well with many sides. Here are some great options: - Fresh salsa - Guacamole - Refried beans - Mexican rice - A simple green salad These sides add flavor and balance to your meal. They also help satisfy everyone at the table. Making Loaded Chicken Nachos dairy-free is easy. First, skip the cheddar cheese. Instead, try using dairy-free cheese or a cashew cheese sauce. You can also add more fresh toppings, like avocado or a vegan sour cream. This way, you keep all the great flavors while making it suitable for dairy-free diets. Enjoy your delicious nachos without worry! Loaded nachos are fun to make and enjoy. We discussed ingredients, step-by-step instructions, and helpful tips. You learned how to create variations and store your leftovers. In the end, nachos are versatile and can fit any taste. I hope you enjoy making your own loaded nachos at home. You can impress friends and family with your skills. Happy cooking!

Loaded Chicken Nachos Flavorful Dinner Delight

Are you ready to elevate your dinner game with a sensational twist? Loaded Chicken Nachos are more than a snack;

- 4 boneless, skinless chicken thighs - 1 cup jasmine rice - 2 cups chicken broth - 1 medium onion, diced - 3 cloves garlic, minced - 1 teaspoon dried oregano - 1 teaspoon dried thyme - 1 teaspoon paprika - 1 cup cherry tomatoes, halved - 1/2 cup Kalamata olives, pitted and sliced - 1/2 cup feta cheese, crumbled - 2 tablespoons olive oil - Salt and pepper to taste - Fresh parsley for garnish When I make One Pot Greek Chicken and Rice, I love to gather all the ingredients first. It makes cooking so much easier. The chicken thighs are the star of this dish. They stay moist and full of flavor. The jasmine rice is perfect here. It cooks well and absorbs all the tasty broth. Chicken broth adds depth, while the onion and garlic bring a sweet aroma. Herbs like oregano and thyme give a fresh taste. Paprika adds a nice color and a hint of spice. The cherry tomatoes burst with sweetness, and Kalamata olives add a salty bite. Feta cheese is the cherry on top, adding creamy texture. I always finish with fresh parsley for a pop of color. These ingredients come together to create a savory delight that’s sure to impress. For the complete cooking instructions, check out the Full Recipe. This dish uses a one-pot method, which makes cooking and cleanup simple. You’ll brown the chicken, sauté the veggies, toast the rice, and add broth. This way, all the flavors blend together nicely. - Heat olive oil and brown the chicken thighs Start by heating 2 tablespoons of olive oil in a large pot over medium heat. Season the chicken thighs with salt, pepper, and paprika. When the oil is hot, add the chicken. Brown it for about 5 minutes on both sides. When done, take it out and set it aside. - Sauté onion and garlic In the same pot, add the diced onion. Sauté until it turns translucent, about 3-4 minutes. Next, stir in 3 minced garlic cloves. Cook for another minute. This step fills your kitchen with a great aroma! - Toast the rice and add chicken broth Add 1 cup of jasmine rice to the pot. Stir it for 1-2 minutes to toast it lightly. Pour in 2 cups of chicken broth and return the browned chicken to the pot. Then, sprinkle 1 teaspoon each of dried oregano and thyme over the top. For the full recipe, follow the steps closely, and you’ll have a tasty meal ready in no time! To make this dish shine, seasoning is key. First, season your chicken well. Use salt, pepper, and paprika. This simple step adds flavor. You can also add garlic powder or lemon zest for a twist. Cooking rice can be tricky. Always rinse jasmine rice before cooking. This removes excess starch, making the rice fluffy. When you add broth, ensure it’s hot. This helps the rice cook evenly. For extra flavor, consider adding more herbs. Fresh herbs like parsley or dill enhance the taste. You can also use lemon juice for brightness. Toss in bell peppers or spinach for added nutrition. You can find the full recipe in the earlier section. Enjoy your cooking! {{image_2}} You can switch proteins in this dish. For example, chicken breasts work well. Shrimp also adds a nice touch. Just adjust the cooking time. Shrimp cooks faster than chicken. You can also pick different rice types. Brown rice is a great option. It adds a nutty flavor and more fiber. Basmati rice gives a fragrant twist. Keep in mind that cooking times may change. Adding herbs or spices can change the taste. Try fresh dill or parsley for a bright flavor. You can also add cumin for a warm note. Experiment with your favorite seasonings. Adding vegetables can make your meal heartier. Bell peppers add color and sweetness. Spinach gives a lovely green touch and nutrition. Feel free to mix and match your choices. For more ideas, check the Full Recipe. After enjoying One Pot Greek Chicken and Rice, you might have some leftovers. Storing them correctly keeps them fresh and tasty. - Best practices for refrigeration: Let the dish cool to room temperature first. Then, transfer it to an airtight container. Store it in the fridge for up to 3 days. This helps keep the flavors intact. - Tips for freezing the dish: To freeze, place cooled leftovers in a freezer-safe container. Make sure to leave some space at the top for expansion. You can freeze it for up to 3 months. Label the container with the date for easy tracking. Reheating your leftovers can be simple and keeps the meal flavorful. - Steps for reheating without losing flavor: When ready to eat, thaw the dish overnight in the fridge if frozen. Heat it in a pot over medium heat, stirring occasionally. You can also add a splash of chicken broth for moisture. If using a microwave, cover the dish and heat in short intervals, stirring in between to heat evenly. Enjoy your meal as if it were fresh! How long does it take to cook One Pot Greek Chicken and Rice? It takes about 40 minutes to cook this dish. You spend 10 minutes prepping the ingredients and 30 minutes cooking. The rice absorbs the broth and flavors from the chicken. You will enjoy every bite. Can I make this dish ahead of time? Yes, you can make this dish ahead of time. It tastes great when reheated. Just cook it, let it cool, and store it in the fridge. It stays fresh for up to three days. How should I store leftovers? Store leftovers in an airtight container. Keep it in the fridge for up to three days. If you want to keep it longer, freeze it. Just thaw it overnight before reheating. What can I serve with One Pot Greek Chicken and Rice? You can serve this dish with a simple Greek salad. The fresh veggies will balance the meal. Pita bread or tzatziki sauce also pairs well. You can even add a glass of white wine for a special touch. This blog post covered a simple, tasty One Pot Greek Chicken and Rice recipe. We discussed essential ingredients like chicken thighs, jasmine rice, and Kalamata olives. I shared easy steps to cook your meal, tips for perfecting it, and variations to keep things interesting. Remember, you can adjust the dish to suit your taste. Consider how you store and reheat leftovers for the best results. Enjoy the cooking process and make this meal your own!

One Pot Greek Chicken and Rice Savory Delight

If you’re searching for a quick, tasty meal that impresses with minimal effort, you’ve found it! This One Pot Greek

To make crispy lemon pepper wings, I use a few key items. Here’s what you need: - 2 lbs chicken wings - 1 tablespoon baking powder - 1 teaspoon salt - 1 teaspoon black pepper - 1 tablespoon garlic powder - 1 tablespoon onion powder - 2 tablespoons lemon zest - 1/4 cup unsalted butter, melted - 2 tablespoons fresh lemon juice - 1 teaspoon crushed red pepper flakes (optional) - Fresh parsley, chopped for garnish These ingredients work together to create a tasty, crispy wing. Adding a few extras can take your wings to the next level. Here are some optional ingredients: - Honey or maple syrup for sweetness - Fresh herbs like thyme or rosemary - Other spices like smoked paprika or cayenne pepper These additions let you customize your wings for any occasion. If you’re missing something, don’t worry! Here are some substitutes you can use: - Use cornstarch instead of baking powder for crispiness - Replace lemon zest with lime zest for a different zing - Swap melted butter with olive oil for a lighter option These swaps keep your wings delicious and fun! For the full recipe, check out the instructions above. To start, grab your chicken wings. You need 2 lbs of wings for this recipe. Rinse them under cold water and pat them dry with paper towels. Dry wings help create a crispy finish. In a large bowl, mix together baking powder, salt, black pepper, garlic powder, and onion powder. Toss the wings in this mix until they are fully coated. Now, preheat your oven to 425°F (220°C). Line a baking sheet with parchment paper. Place the coated wings in a single layer on the sheet. Don’t let them touch each other; this helps them crisp up. Bake the wings for 40-45 minutes. Flip them halfway through cooking to ensure even crispiness. Look for a golden brown color when they are done. While the wings bake, prepare the lemon butter sauce. In a small bowl, combine melted butter, lemon zest, and fresh lemon juice. If you like a little heat, add crushed red pepper flakes. Mix well until combined. Once your wings are golden and crispy, toss them in this sauce. Ensure every wing is well-coated for maximum flavor. To get extra crispy wings, start with dry chicken. Pat the wings with paper towels to remove moisture. Use baking powder in your mix. This helps to crisp up the skin. Bake the wings at a high temperature. I recommend 425°F (220°C). Flip them halfway through cooking for even crispiness. Baking is a healthier choice, but frying gives a great crunch. If you bake, keep wings in a single layer. This helps air circulate and crisp them up. Frying requires more oil but can make the wings super crispy. If you fry, use oil that can handle high heat, like vegetable oil. Lemon pepper seasoning should be bright and zesty. The key is to balance flavors. Use fresh lemon zest and juice for the best taste. Garlic and onion powder add depth to the wings. If you want heat, add crushed red pepper flakes. This gives an extra kick without overpowering the lemon. These tips will help you make the best crispy lemon pepper wings. For the full recipe, don’t forget to check out the detailed instructions! {{image_2}} You can change up the flavor of your wings easily. For a spicy kick, add more crushed red pepper flakes. This spice brings a mouthwatering heat that many love. If you prefer sweet, mix honey with your lemon butter sauce. The honey adds a nice sweetness to the tangy lemon. For a smoky flavor, add smoked paprika or use smoked salt. Each option gives you a different taste experience. If you want a boneless version, use chicken breast instead. Cut the chicken into bite-sized pieces for easy eating. Follow the same steps in the recipe. The cooking time may be shorter, around 20-25 minutes, so keep an eye on them. Toss the cooked pieces in your lemon butter sauce just like you would with wings. They are just as tasty! Crispy lemon pepper wings go great with many sides. Try serving them with celery and carrot sticks for crunch. A simple ranch or blue cheese dip adds creaminess. You can also serve them with a fresh green salad. This helps balance the richness of the wings. Another tasty option is crispy fries or sweet potato wedges. They soak up the sauce and make every bite better. For the full recipe, check out the section above. To keep your crispy lemon pepper wings fresh, place them in an airtight container. Cover them well to keep moisture out. You can store them in the fridge for up to three days. If you want to keep them longer, consider freezing. For the best taste, reheat your wings in the oven. Preheat the oven to 350°F (175°C). Spread the wings on a baking sheet. Heat them for about 10-15 minutes, until they are warm. This method restores their crispiness better than a microwave. To freeze the wings, let them cool completely. Place them in a single layer on a baking sheet. Freeze them for two hours, then transfer to a freezer-safe bag. This method helps prevent them from sticking together. You can keep them frozen for up to three months. When ready to eat, thaw in the fridge overnight before reheating. Try the Full Recipe for the best wings! The secret to crispy wings lies in the baking powder. Baking powder helps make the skin crisp. It pulls moisture from the wings, which creates that perfect crunch. For best results, make sure to coat the wings evenly. Spread them out on the baking sheet so they don’t touch. This allows hot air to circulate around each wing. You can also flip them halfway through baking. This ensures both sides cook evenly. Yes, you can use frozen chicken wings! However, you need to thaw them first. Thawing allows for even cooking and helps the seasoning stick better. You can thaw them in the fridge overnight or submerge them in cold water for quicker results. After thawing, pat the wings dry. This step is key to getting that crispy skin. You can then follow the recipe as normal. Making this recipe gluten-free is easy! Just ensure the baking powder you use is gluten-free. Most brands are gluten-free, but always check the label. The other ingredients in this recipe are naturally gluten-free. So, feel free to enjoy these wings without worry. You will still get that tasty flavor and crunch. For the full recipe, you can refer to the section above. Crispy lemon pepper wings offer a tasty twist for any feast. We explored key ingredients and optional flavors to enhance your dish. I shared step-by-step instructions for perfect wings, from preparation to sauce. Tips for extra crispiness and cooking methods help you choose the best way to cook. Variations let you try spicy or sweet flavors, and I covered storage and reheating for leftovers. Enjoy crafting your wings and impressing your guests with great taste.

Crispy Lemon Pepper Wings Flavorful and Tangy Treat

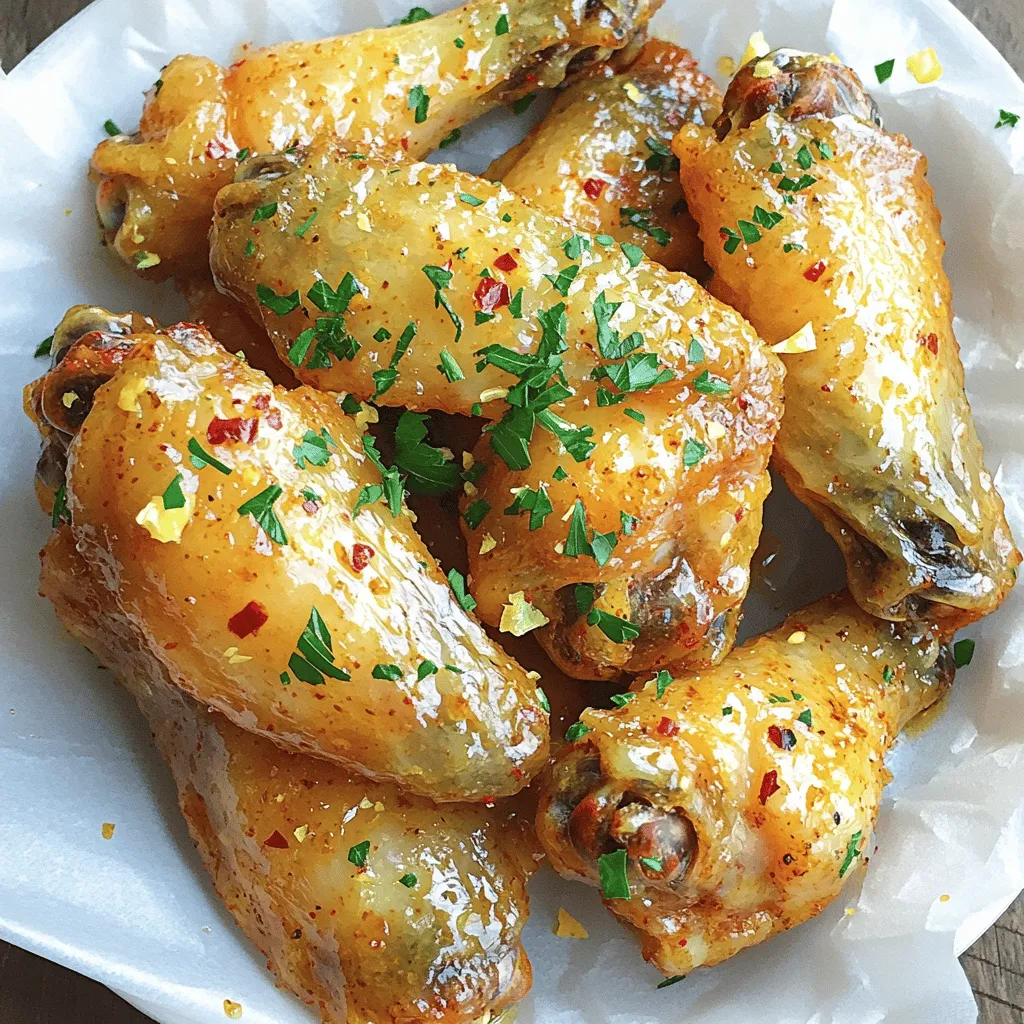
Are you ready to take your taste buds on a zesty adventure? Crispy Lemon Pepper Wings are the perfect mix

Older posts
Newer posts
← Previous Page1 … Page39 Page40 Page41 … Page79 Next →

dsad

© 2025 pureeatsnow • Built with GeneratePress

Our Policies

  • Copyright Policy
  • Cookie Policy
  • GDPR Policy
  • Privacy Policy
  • Disclaimer
  • Terms Of Use

More Information

  • Home
  • About
  • Contact
  • Appetizers
  • Dessert
  • Dinner
  • Drinks
©2025, pureeatsnow About Back To Top