Skip to content
DisclaimerTerms Of UseGDPR PolicyCookie Policy

pureeatsnow

  • Home
  • Drinks
  • Appetizers
  • Dinner
  • Dessert
  • About
  • Contact
  • Privacy Policy
DisclaimerTerms Of UseGDPR PolicyCookie Policy

Rachel

To make Spicy Garlic Edamame, gather these simple ingredients: - 2 cups shelled edamame (fresh or frozen) - 3 tablespoons olive oil - 4 cloves garlic, minced - 1-2 teaspoons red pepper flakes (adjust to taste) - 1 tablespoon soy sauce (low sodium) - 1 tablespoon sesame oil - 1 teaspoon grated ginger - Salt to taste - Sesame seeds for garnish - Chopped green onions for garnish You can swap ingredients based on what you have. Use peanut oil instead of olive oil for a different flavor. If you don’t have sesame oil, try a few drops of sesame paste. For a milder taste, use less red pepper flakes or skip them entirely. You can also replace soy sauce with tamari for a gluten-free option. Edamame packs a punch when it comes to nutrition. It is rich in protein, making it a great snack. One cup offers about 17 grams of protein. Edamame is also high in fiber, which helps keep you full. It contains vitamins C and K, supporting your immune system and bone health. Plus, it has healthy fats and antioxidants, which are good for your heart. Enjoying Spicy Garlic Edamame gives you a tasty snack that nourishes your body. For the full recipe, check the entire article. To start making spicy garlic edamame, gather your ingredients. I always prefer fresh edamame when possible. Next, if you’re using frozen edamame, bring a pot of water to a boil. Add the frozen edamame and cook for about five minutes. This step makes them tender. Drain them and set aside. If you use fresh edamame, you can skip this step altogether. Now, heat three tablespoons of olive oil in a large skillet over medium heat. Once the oil is hot, add in four minced garlic cloves and one teaspoon of grated ginger. Sauté these for one to two minutes. You want them fragrant but not browned. Next, stir in one to two teaspoons of red pepper flakes. Sauté them for about 30 seconds. This step helps release their spicy flavor into the oil. Now, it’s time to add the cooked edamame to the skillet. Toss the edamame to coat it well in the garlic oil. Pour in one tablespoon of low-sodium soy sauce and one tablespoon of sesame oil. Mix everything together thoroughly. Sauté for about three to four minutes. This allows the edamame to soak up all those delicious flavors. Don’t forget to season with salt to taste before removing from heat. Finally, transfer your spicy garlic edamame to a serving bowl. Sprinkle sesame seeds and chopped green onions on top. These add a nice touch for decoration. When it comes to prepping edamame, both fresh and frozen options work great. Fresh edamame usually has a better texture and taste, but frozen is super convenient. If you choose fresh, look for bright green pods. They should feel firm and plump. Frozen edamame is easy to find in stores. It’s often pre-shelled, making your job simpler. The cooking time is the only difference. Frozen edamame takes a few minutes longer to boil. But either way, you’ll end up with a tasty snack. Sautéing is key to getting that bold flavor in spicy garlic edamame. This method cooks food quickly over high heat. It helps to create a lovely caramelization on the garlic and ginger. When you sauté, always keep an eye on the heat. Too high, and you may burn the garlic. Too low, and you won’t release the flavors properly. Stir the ingredients often to ensure even cooking. This step is crucial for a satisfying taste. For the best results, follow the sautéing steps closely. This way, you enhance the flavors and create a delicious snack. For the full recipe, check the recipe section above! To make your spicy garlic edamame shine, use fresh ingredients. Use fresh garlic and ginger for the best taste. If you want more depth, add a splash of lime juice. The acidity brightens the flavors and adds a nice zing. You can also try adding a dash of rice vinegar for extra tang. Remember, the key is to balance the heat and flavor. Cooking time can change based on the type of edamame. If you use frozen edamame, cook it for about 5 minutes. Fresh edamame requires no boiling. Simply sauté it right away. Adjust your sautéing time too. If you want a bit of crunch, reduce the time to 2-3 minutes after adding the edamame. This keeps them tender yet crisp. Serve your spicy garlic edamame in a fun bowl. Add lime wedges on the side for a fresh twist. Pair it with sushi or a salad for a nice meal. It also works great as a party snack. Offer some rice or noodles on the side for a complete dish. Enjoy this tasty treat as a starter or snack anytime! For the full recipe, check out the cooking instructions above. {{image_2}} You can easily add extra veggies to your spicy garlic edamame. Try adding bell peppers, snow peas, or carrots. These add color and crunch. Just chop them into small pieces. Sauté them with garlic and ginger. This way, they soak up the great flavors. You can enjoy a more colorful dish! This recipe is already vegan, which is great for everyone. If you want a non-vegan twist, add shrimp or chicken. Cook the meat first, then add the edamame. This gives a different taste and makes it heartier. You get to choose what fits your meal best! You can switch up the flavors too. Want a sweeter touch? Add some honey or maple syrup. For a tangy kick, squeeze in lime juice or add some vinegar. You can also use different oils. Try chili oil for heat or peanut oil for nuttiness. Each change makes a unique snack! For the full recipe, check out the details above. After you enjoy your spicy garlic edamame, you might have some left. To keep it fresh, let it cool to room temperature. Then, place it in an airtight container. This way, it stays tasty for up to three days in the fridge. If you want to keep it longer, you can freeze it. When you are ready to eat the leftovers, you can reheat them easily. Just take the container out of the fridge. You have two options: microwave or stovetop. If you use the microwave, heat it for about 30 seconds. Stir it, then heat for another 30 seconds if needed. On the stovetop, add a splash of olive oil to a pan. Heat it on medium until warm, stirring occasionally. If you want to freeze your edamame, it’s simple. First, pack the cooled edamame into freezer bags. Make sure to remove as much air as possible. Label the bags with the date. You can freeze it for up to three months. When you’re ready to eat it, thaw it in the fridge overnight. Then, reheat as mentioned above. For the full recipe, check out the Spicy Garlic Edamame section. The best way to cook edamame is by boiling or steaming. If you use frozen edamame, boil water in a pot. Add the edamame and cook for five minutes. If using fresh edamame, skip this step. This method keeps the pods tender and bright green. You can also sauté it afterward for extra flavor. Yes, you can make Spicy Garlic Edamame ahead of time. Cook it, let it cool, and store it in the fridge. Just reheat it when you are ready to serve. The flavors will still shine through even after storage. Yes, Spicy Garlic Edamame is a healthy snack. Edamame is high in protein and fiber. It also contains vitamins and minerals that are good for your body. Using olive oil and garlic adds healthy fats and antioxidants. Enjoying this snack can be a smart choice! To adjust the spice level, change the amount of red pepper flakes. Start with one teaspoon for mild heat. If you like more spice, add more to taste. You can also try using fresh chili peppers for a different kick. Spicy Garlic Edamame pairs well with many dishes. It works great as an appetizer before a meal. You can serve it with rice bowls or sushi. It also complements grilled meats and salads nicely. For a fun twist, serve it with cocktails or beer! You can find the full recipe to make this tasty snack. This post covered the key aspects of cooking and enjoying edamame. We explored the ingredients, steps, tips, and variations to enhance your dishes. Remember, edamame is not just tasty; it's also healthy. Use these methods to create flavorful meals effortlessly. Whether you're a novice or an expert cook, I hope you feel inspired to try out what you've learned. Enjoy your next cooking adventure with edamame!

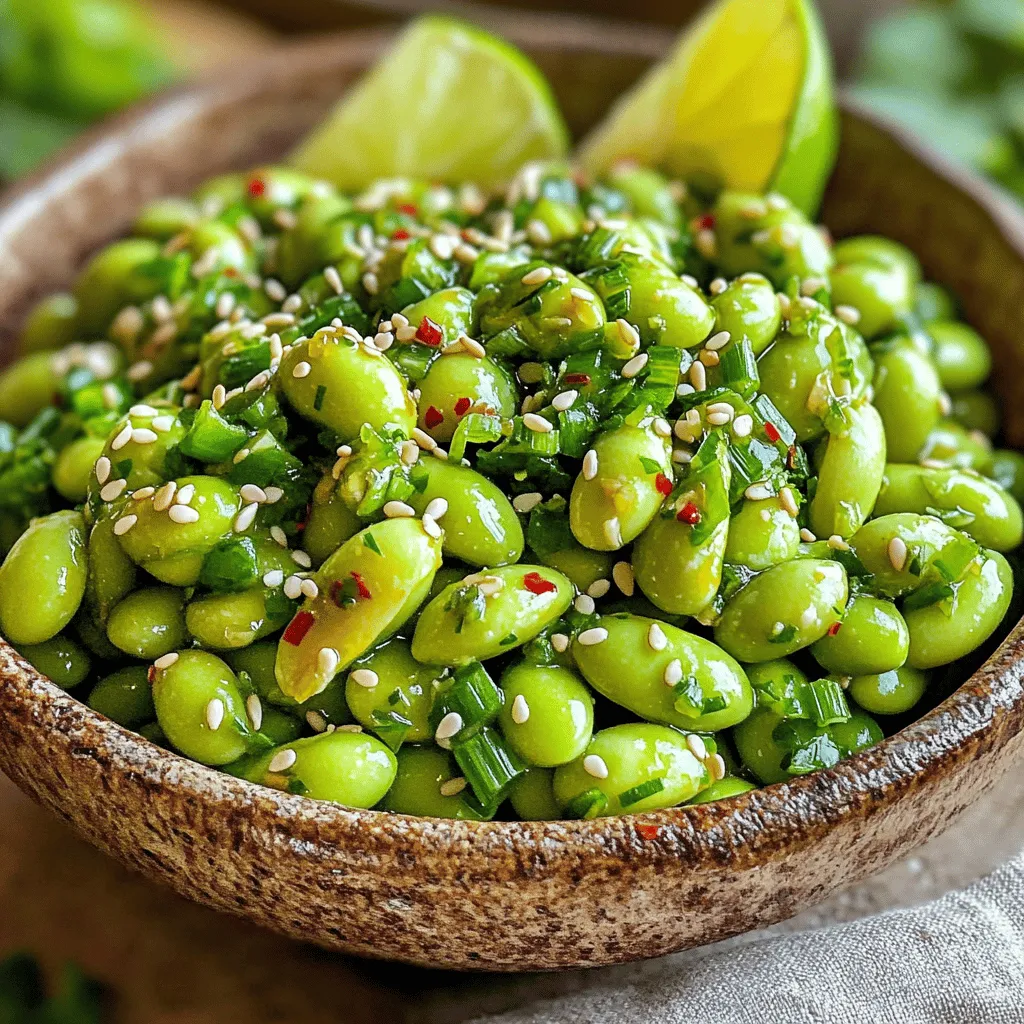
Spicy Garlic Edamame Flavorful and Tasty Snack

Are you on the hunt for a snack that’s both tasty and simple to make? Look no further! Spicy Garlic

This Chicken Caesar Pasta Salad is fresh and full of flavor. It takes just 30 minutes to make and serves four people. You can enjoy it as a main dish or a side. The mix of pasta, chicken, and veggies makes it a filling meal. For the best Chicken Caesar Pasta Salad, you need these key ingredients: - 2 cups rotini pasta - 2 cups cooked chicken breast, shredded - 1 cup romaine lettuce, chopped - 1/2 cup cherry tomatoes, halved - 1/3 cup croutons - 1/4 cup grated Parmesan cheese - 1/3 cup Caesar dressing - 1 tablespoon lemon juice - 1 teaspoon garlic powder - Salt and pepper to taste - Fresh parsley for garnish These ingredients work together to create a tasty dish. The rotini pasta holds the dressing well. The chicken adds protein, while the lettuce and tomatoes give crunch and freshness. You can change this salad to fit your taste. Here are some optional ingredients: - Avocado for creaminess - Red onion for a bit of bite - Bell peppers for added color - Spinach for more greens - Different cheeses like feta or mozzarella Feel free to mix and match these options. They can help you make the salad your own. Enjoy exploring flavors and textures that you love! First, you need to cook the rotini pasta. Bring a pot of salted water to a boil. This helps flavor the pasta. Once the water boils, add the pasta. Cook it according to the package instructions until it's al dente. This usually takes about 8-10 minutes. After cooking, drain the pasta in a colander. Rinse it under cold water to cool it down quickly. This step keeps the pasta from getting mushy. Next, prepare the chicken mixture. In a large mixing bowl, combine the shredded chicken with Caesar dressing. Add lemon juice and garlic powder to enhance the flavors. Mix everything well until the chicken is fully coated. This gives the chicken a tasty, creamy texture. Make sure every piece of chicken gets the dressing. You want each bite to be flavorful. Now, it's time to mix everything together. Add the cooled rotini pasta to the chicken mixture. Gently toss to combine. Ensure the pasta is well coated with the dressing. Then, fold in the chopped romaine lettuce and halved cherry tomatoes. Be gentle to avoid bruising the lettuce. Finally, season with salt and pepper to your liking. Just before serving, add croutons and grated Parmesan cheese. Toss it all together lightly. This adds crunch and flavor. Serve the pasta salad in bowls or on a platter. Garnish with fresh parsley for a lovely touch. Enjoy your fresh and flavorful Chicken Caesar Pasta Salad! For more details, check the Full Recipe. When making Chicken Caesar pasta salad, the pasta is key. Cook the rotini pasta until it’s al dente. This means it should be firm, not mushy. Rinse it under cold water right after cooking. This stops the cooking process and cools it down fast. You want the pasta to mix well with the other ingredients without clumping together. Make sure to chop your romaine lettuce and cherry tomatoes into bite-sized pieces. This helps every forkful be easy to eat. For the chicken, using shredded cooked chicken breast adds great texture. You can use leftover chicken or buy a rotisserie chicken for quick prep. For the best taste, use a high-quality Caesar dressing. It adds creaminess and tang. You can also make your own dressing for a fresh twist. Combine mayonnaise, lemon juice, Worcestershire sauce, garlic, and Parmesan cheese for a homemade version. Don’t skip the lemon juice! It brightens the flavors and makes the dish pop. Add fresh herbs like parsley for extra flavor and color. Just before serving, toss in croutons for crunch. They give a nice texture contrast to the creamy salad. Leftovers are great! Store your Chicken Caesar pasta salad in an airtight container. It lasts up to three days in the fridge. However, keep the croutons separate to avoid sogginess. If you plan to eat the salad later, add them just before serving. If you have too much salad, you can freeze it. Just remember, the texture may change when thawed. It’s best to enjoy it fresh. For quick meals, keep this salad in mind. It’s easy to make and perfect for busy days. For the full recipe, check out the details above! {{image_2}} You can easily make a vegetarian version of Chicken Caesar Pasta Salad. Start by swapping the cooked chicken for grilled tofu or chickpeas. Both options add protein and texture. Use the same delicious Caesar dressing, or switch to a dairy-free version. This change keeps the salad fresh and tasty while catering to plant-based diets. While Caesar dressing shines in this dish, you might like to try different dressings. A creamy ranch or a tangy vinaigrette can change the flavor. You can also add in some extras. Try sliced olives, red onions, or even artichoke hearts. These ingredients add pops of flavor and color to your salad. You can adjust your salad based on what’s in season. In spring, toss in fresh peas or asparagus. Summer calls for ripe bell peppers or zucchini. In fall, consider adding roasted butternut squash or figs. These seasonal swaps keep the dish vibrant and exciting throughout the year. Store Chicken Caesar pasta salad in an airtight container. Keep it in the fridge. It will stay fresh for about 3 days. The dressing may soak into the pasta over time. To keep it crisp, add croutons just before serving. I don’t recommend freezing Chicken Caesar pasta salad. The lettuce and tomatoes can lose their texture. If you need to freeze it, leave out the vegetables and croutons. You can freeze the chicken and pasta mix. When you're ready, thaw it in the fridge. Reheat the chicken and pasta mix in the microwave. Use a low setting to warm it gently. Stir often to avoid hot spots. Once warm, add fresh lettuce and tomatoes. Then, drizzle with more Caesar dressing to refresh the flavors. Chicken Caesar Pasta Salad stays fresh for about three to four days in the fridge. Make sure to store it in an airtight container. This keeps the flavors strong and the ingredients crisp. Yes, you can make Chicken Caesar Pasta Salad in advance. It tastes even better after the flavors mix. I suggest preparing the salad a few hours before serving. Just add croutons right before you eat. This keeps them crunchy and tasty. If you want to change the dressing, you have options. Use ranch dressing for a milder taste. You can also try a creamy garlic dressing for a unique twist. For a healthier choice, Greek yogurt with lemon juice works well too. Just pick what you like best! For the full recipe, check out the Zesty Chicken Caesar Pasta Salad. This Chicken Caesar Pasta Salad combines tasty flavors and quick steps. We covered key ingredients and how to make each part. You learned to store leftovers and even customize the recipe. For a fresh twist, try the variations mentioned. With the right tips and tricks, you’ll impress everyone. Enjoy this fun dish any time. It's easy, delicious, and perfect for sharing!

Chicken Caesar Pasta Salad Fresh and Flavorful Dish

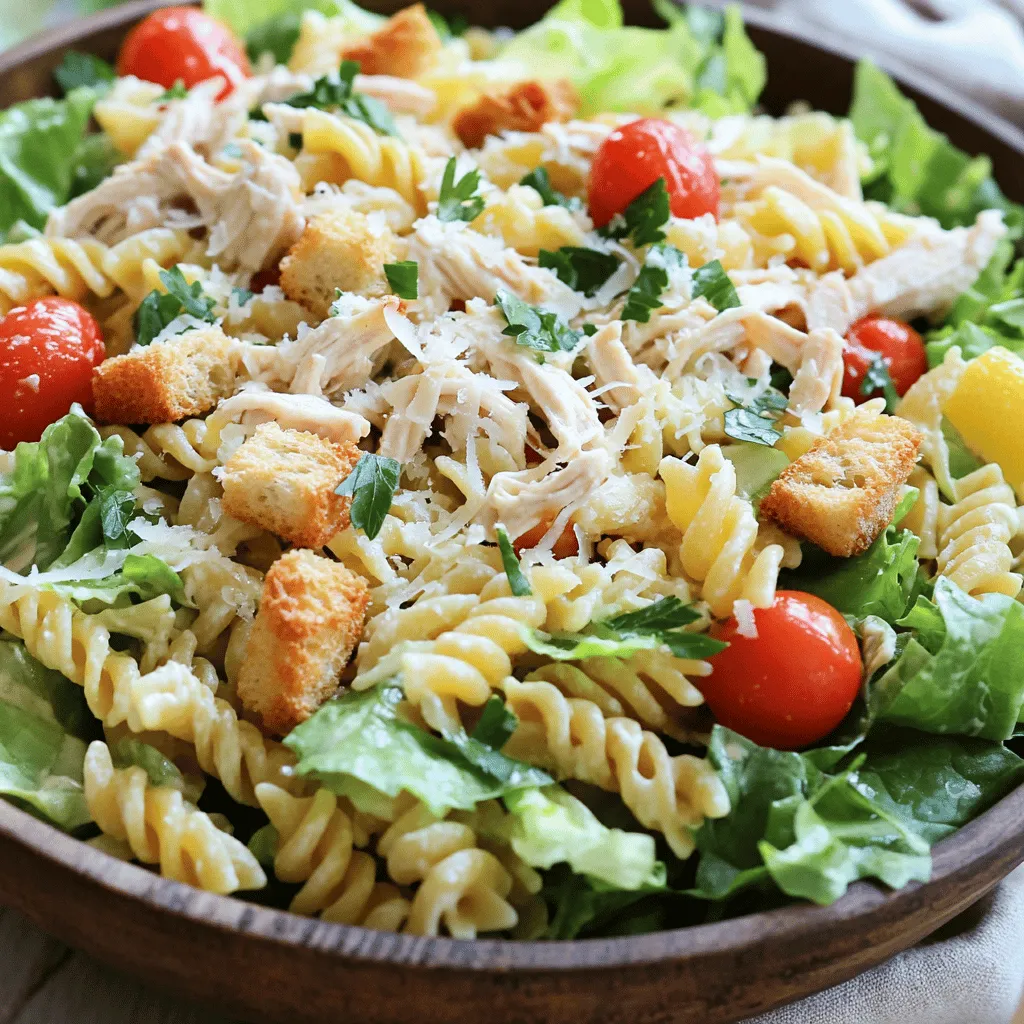
Looking for a fresh, tasty dish? Let me introduce you to Chicken Caesar Pasta Salad! This meal combines tender chicken,

- Sweet Potatoes and Vegetables - 2 large sweet potatoes, peeled and cubed - 1 red bell pepper, diced - 1/2 red onion, finely chopped - Seasoning and Dressing Components - 2 tablespoons olive oil - 1 teaspoon paprika - 1 teaspoon cumin - Salt and pepper to taste - Juice of 1 lemon - 1 tablespoon honey (or maple syrup for a vegan option) - Optional Additions and Toppings - 1 cup cooked quinoa - 1/4 cup feta cheese, crumbled (optional) - 1/4 cup fresh parsley, chopped When I make this salad, I love using fresh, high-quality ingredients. Sweet potatoes are the star of this dish. Their natural sweetness pairs well with the spices and other veggies. I also like to add quinoa for a boost of protein and texture. You can swap out the feta for a vegan option or skip it altogether. Each ingredient plays a role in creating a colorful and tasty meal. For my dressing, I use lemon juice for brightness and honey for sweetness. The spices add depth to the roasted sweet potatoes. This combination makes the salad not just a side, but a satisfying main dish. You can find the full recipe at the end of this section. To start, roast the sweet potatoes. First, preheat your oven to 425°F (220°C). This high heat helps the sweet potatoes get crispy outside and soft inside. Next, peel and cube two large sweet potatoes. In a big bowl, toss the cubes with olive oil, paprika, cumin, salt, and pepper. Make sure they are well coated. Spread the sweet potatoes on a lined baking sheet. Roast them for 25-30 minutes. Turn them halfway to ensure even cooking. They should be golden brown and tender when done. While the sweet potatoes roast, prepare the salad base. In a large bowl, combine cooked quinoa, diced red bell pepper, finely chopped red onion, and chopped parsley. This mix adds great texture and flavor. Once the sweet potatoes are done, let them cool for about five minutes. Add them to the bowl with the quinoa mixture. For the dressing, whisk together lemon juice and honey (or maple syrup) in a small bowl. Pour this over the salad and toss gently. This step brings all the flavors together. Serving this salad is fun! Use a large, shallow bowl for a beautiful presentation. This way, the bright colors of the sweet potatoes and veggies pop. For a finishing touch, garnish with extra parsley on top. This adds freshness and looks great. Enjoy your Roasted Sweet Potato Salad! For the full recipe, check out the details above. Achieving a Golden Brown Finish To get that lovely golden brown color, I recommend using a high oven temperature. Preheat your oven to 425°F (220°C). This heat helps the sweet potatoes caramelize. Make sure to cut the sweet potatoes into even cubes. This way, they cook at the same rate. Toss them well with olive oil and spices. Spread them out on the baking sheet. Give them space so they roast, not steam. Avoiding Soggy Sweet Potatoes To prevent soggy sweet potatoes, avoid overcrowding the baking sheet. If they are too close, they won’t crisp up. Also, make sure to turn them halfway through roasting. This helps them cook evenly. If you want extra crispiness, try using a wire rack on the baking sheet. This allows hot air to circulate all around. Suggested Spice Combinations You can play with spices to boost the flavor. Beyond paprika and cumin, try adding cinnamon for a warm note. A pinch of cayenne can add heat if you like spice. You can also mix in garlic powder for a savory twist. These spices work well with sweet potatoes and make them pop. Alternative Dressings for Added Taste While lemon and honey make a great dressing, feel free to experiment. A tahini dressing adds a creamy texture. You can whisk together tahini, lemon juice, and garlic. For a zesty option, use a balsamic vinaigrette. Just mix balsamic vinegar, olive oil, and a bit of mustard. Each dressing brings a new flavor to your salad. For the full recipe, check out the [Full Recipe]. {{image_2}} You can easily make this salad vegan. Just skip the feta cheese. Substitute honey with maple syrup for a sweet touch. This keeps the dish plant-based and just as tasty. You can also add plant-based protein, like chickpeas or black beans, for more nutrition. This roasted sweet potato salad is already gluten-free. Quinoa, a great grain choice, is naturally free of gluten. If you prefer other grains, use rice or millet. These options keep your meal gluten-free and delicious. Feel free to add more veggies. Roasted Brussels sprouts or broccoli would work well. You can also use kale or spinach for extra greens. Mix and match to find your favorite combination. These swaps can add fun textures and flavors to your salad. Quinoa is popular, but you can use other grains too. Try farro or bulgur for a different taste. You can also add nuts like almonds or walnuts for crunch. These swaps enhance the salad's flavor and nutrition. You can check the Full Recipe for more details on how to make this salad! To keep your roasted sweet potato salad fresh, store it in an airtight container. Place it in the fridge right after it cools. This way, it stays tasty and safe to eat. The salad will last about 3 to 5 days in the fridge. If you want to keep it longer, you can freeze it. Just put the salad in a freezer-safe container. It’s best to freeze it without the dressing. This helps keep the texture nice. You can freeze it for up to 3 months. When you reheat your salad, do it gently. Use the microwave or a pan on low heat. This keeps the sweet potatoes soft and the flavors bright. If you use the microwave, heat it in short bursts. Stir in between to check the warmth. You can also add a splash of lemon juice or extra olive oil when reheating. This boosts the flavor again and keeps it fresh. Enjoy your meal! What can I substitute for quinoa? If you don’t have quinoa, try using brown rice or farro. Both offer a nice texture. You could also use couscous for a quicker option. Each grain adds its own flavor and feels great in the salad. How can I make this dish spicier? To add spice, mix in some cayenne pepper or crushed red pepper flakes. Adding jalapeños or a dash of hot sauce works well too. Start with a small amount and taste as you go. You can always add more. Is it safe to eat leftovers after a few days? Yes, you can eat leftovers for about three days. Store them in an airtight container in the fridge. If you notice any strange smells or colors, it’s best to throw it away. Always trust your senses when it comes to food safety. For the complete recipe, check out the Full Recipe section to enjoy this dish! This blog explored how to make a delicious roasted sweet potato salad. We covered the key ingredients, steps for preparation, and tips for the best results. You learned the secrets to perfect roasting and ways to enhance flavors. Plus, variations make it customizable for any diet. Lastly, we shared storage tips to keep leftovers fresh. Remember, this dish is vibrant and healthy. Try making it your own, and enjoy every bite. Your kitchen adventures await!

Roasted Sweet Potato Salad Flavorful and Nutritious Dish

Looking for a tasty and healthy meal? This Roasted Sweet Potato Salad is packed with flavor and nutrients. You’ll love

- 4 bone-in, skin-on chicken thighs - 4 cloves of garlic, minced - 2 tablespoons fresh rosemary, chopped - 2 tablespoons fresh thyme, chopped - 1 tablespoon olive oil - 1 teaspoon lemon zest - Salt and black pepper to taste - 1 cup chicken broth - Fresh parsley, for garnish When I cook Garlic Herb Chicken Thighs, I always start with quality ingredients. You want your chicken to have a nice skin, so bone-in and skin-on is best. The skin gets crispy in the oven, and the bones add flavor. Minced garlic brings a strong taste, while fresh herbs like rosemary and thyme add a lovely aroma. Olive oil helps to sear the chicken and enhances the flavor. For seasoning, lemon zest adds brightness. Salt and black pepper are essential to make each bite tasty. Chicken broth keeps the meat juicy and moist as it cooks. Fresh parsley is perfect for a colorful garnish. You can find the full recipe in this section, but remember, using fresh ingredients makes all the difference. - Preheat the oven to 400°F (200°C). - Pat chicken thighs dry with paper towels. - Season both sides with salt and pepper. I always start by preheating the oven. This way, the chicken cooks evenly. Drying the chicken thighs is key. It helps the skin get crispy. Don't skip seasoning; it adds a lot of flavor. - Heat olive oil in an oven-safe skillet. - Sear chicken thighs skin side down for 5 minutes. - Flip and sear the other side for 3 minutes. Next, heat olive oil in a skillet. Make sure it’s hot before adding the chicken. Searing the skin side first helps lock in juices. After 5 minutes, flip the chicken for even browning. - Remove chicken and sauté minced garlic. - Add chopped rosemary, thyme, and lemon zest. - Pour in chicken broth and deglaze the pan. Once the chicken is browned, take it out. In the same pan, add minced garlic. It smells amazing as it cooks. Then, add fresh herbs and lemon zest for a bright flavor. Pour in chicken broth and scrape the pan. This gets all the tasty bits. - Return chicken to skillet, skin side up. - Bake for 25-30 minutes until internal temperature reaches 165°F. - Let rest for 5-10 minutes before serving. Now, place the chicken back in the skillet, skin side up. Bake it in the oven for 25-30 minutes. Use a meat thermometer to check if it reached 165°F. After baking, let it rest. This step keeps it juicy. For the full recipe, check out the details. - Use fresh herbs for the best flavor. Fresh rosemary and thyme make a big difference. - Consider adding a splash of white wine for extra depth. Wine adds nice acidity and balances the dish. - Prepare ingredients before starting. Chop herbs and mince garlic for smooth cooking. - Use a meat thermometer for accuracy. It ensures the chicken is cooked to a safe 165°F. - Pair garlic herb chicken thighs with roasted vegetables or a fresh salad. This adds color and nutrition to your plate. - Serve alongside crusty bread to soak up the delicious juices. The bread will enhance your meal experience. For more detailed instructions, check out the Full Recipe. {{image_2}} You can change the herbs in this dish. Try using basil or oregano if you want a different taste. Both herbs add a fresh flavor to the chicken. If you prefer a milder taste, experiment with parsley. It gives a nice touch without being too strong. There are many ways to cook chicken thighs. Grill the chicken for a smoky flavor that many love. Grilling adds a crispy skin and juicy meat. Another option is to slow cook the chicken. This method makes the meat tender and allows it to fall off the bone. It’s perfect for a comforting meal. If you need gluten-free options, you can still enjoy this dish. Use gluten-free broth to keep it safe. For those watching their salt, low-sodium broth works great too. You can still enjoy flavor without the extra salt. Enjoy these variations to make your Garlic Herb Chicken Thighs unique. For the full recipe, check out the detailed instructions above. Store your Garlic Herb Chicken Thighs in an airtight container in the refrigerator. This keeps the chicken fresh and safe to eat. Consume the leftovers within 3-4 days for best quality. The flavor will stay great, and the meat will remain tender if you store it properly. To enjoy your leftovers, reheat them in the oven or skillet. This step keeps the chicken skin crispy. If you use the oven, set it to 350°F. Heat until the chicken warms through. Make sure the chicken reaches at least 165°F before serving. This ensures it is safe to eat and tastes delicious. Bake for 25-30 minutes at 400°F. This time ensures the chicken cooks through but stays juicy. Yes, you can use skinless thighs. Just make sure to adjust the cooking time. Skin helps keep moisture in. Without it, the chicken may dry out. This dish pairs well with rice, mashed potatoes, or steamed vegetables. These sides soak up the tasty juices and add balance to your meal. The best way is to check the meat with a thermometer. The internal temperature should reach 165°F. This ensures your chicken is safe to eat and perfectly cooked. To sum up, this recipe for Garlic Herb Chicken Thighs brings together fresh ingredients and simple steps. You learned to season and sear, then bake for juicy results. Experimenting with herbs and methods can enhance flavor. Store leftovers for a quick meal later. Cooking chicken is easy when you follow these tips. Enjoy your delicious dish and feel proud of your cooking skills!

Garlic Herb Chicken Thighs Tasty and Simple Recipe

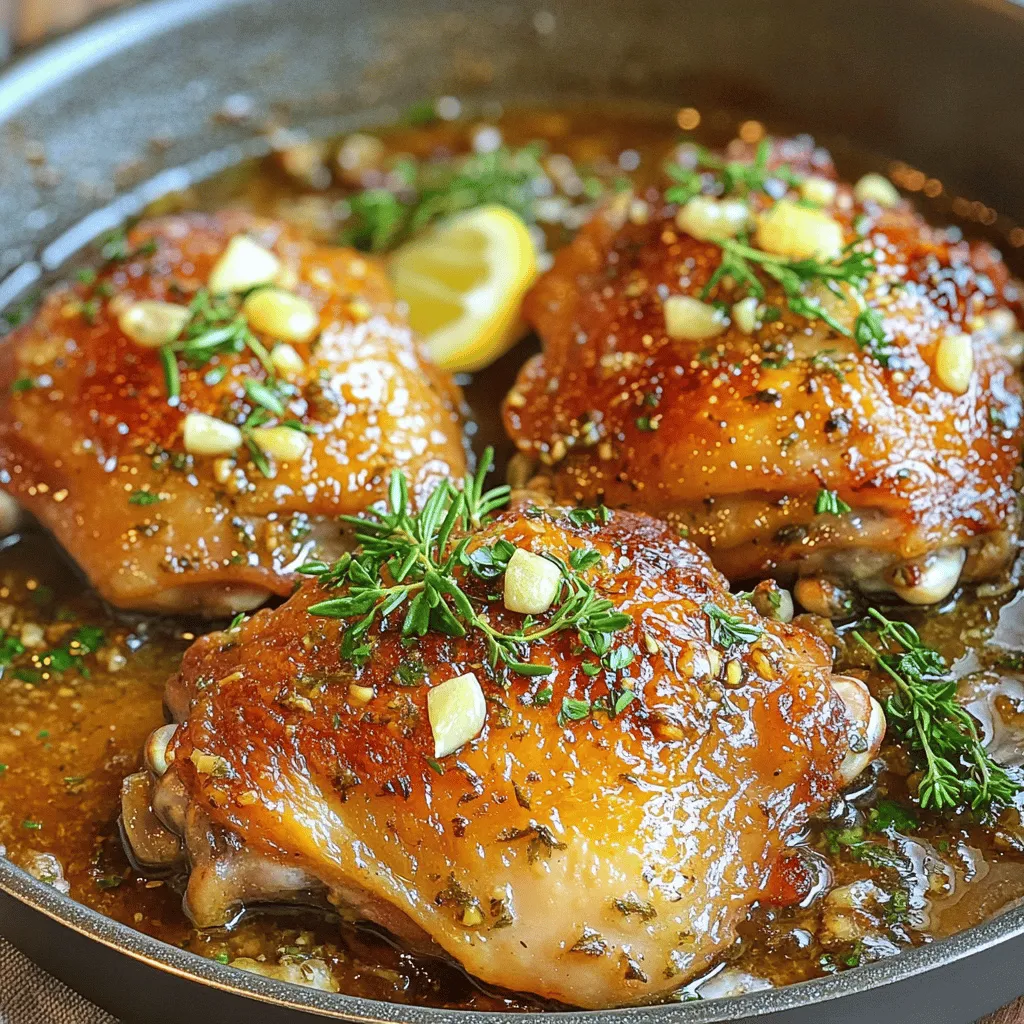
Are you ready to impress your family with a delicious meal that’s easy to make? Look no further than my

- 2 medium sweet potatoes, diced - 1 can (15 oz) chickpeas, rinsed and drained - 1 cup cooked quinoa - 2 cups baby spinach - 1 avocado, sliced - 2 tablespoons olive oil - 1 teaspoon smoked paprika - 1 teaspoon ground cumin - Salt and pepper to taste - 1 tablespoon tahini - Juice of 1 lemon - Sesame seeds for garnish You will need sweet potatoes as the main star. They add a sweet taste and vibrant color. Chickpeas offer protein and fiber. Quinoa adds a nutty flavor and extra nutrients. Baby spinach brings freshness and a nice crunch. An avocado adds creaminess and healthy fats. Olive oil helps with roasting and adds flavor. Smoked paprika and cumin give warmth and depth. Lemon juice brightens the dish, while tahini adds a rich, nutty taste. Lastly, sesame seeds bring a delightful crunch. A serving contains about 450 calories. It offers a good mix of protein, carbs, and fats. You get around 15g of protein, 70g of carbs, and 15g of healthy fats. Sweet potatoes are rich in vitamins A and C. They support eye health and boost your immune system. Chickpeas help with digestion and keep you full longer. Quinoa is a complete protein, making it great for vegans. Spinach adds iron, which is vital for energy. Avocados provide heart-healthy fats and fiber, promoting overall health. Olive oil is good for your heart. This bowl is not just tasty; it's a powerhouse of nutrients. Each ingredient works together to support your health and keep you satisfied. For the full recipe, check out the Sweet Potato Chickpea Buddha Bowl. 1. Preheating the oven Start by preheating your oven to 400°F (200°C). This step is key for getting that perfect roast. 2. Preparing and tossing vegetables Next, take your diced sweet potatoes and chickpeas. Toss them in a bowl with olive oil, smoked paprika, ground cumin, salt, and pepper. Make sure all pieces are well-coated for maximum flavor. 3. Making the dressing In a small bowl, mix tahini, lemon juice, a pinch of salt, and 2 tablespoons of water. Whisk until smooth. If needed, add more water to achieve your desired consistency. 1. Roasting sweet potatoes and chickpeas Spread the sweet potatoes and chickpeas on a baking sheet in an even layer. Roast them in the oven for about 25-30 minutes. Stir halfway through to ensure even cooking. They should come out tender and slightly crispy. 2. Assembling the Buddha bowl In a large bowl, layer the cooked quinoa first. Add the roasted sweet potatoes and chickpeas on top. Then, add the baby spinach and sliced avocado. Drizzle your tahini dressing over everything, and sprinkle sesame seeds for a nice touch. You can toss gently to mix or keep it layered for a beautiful look. For the complete recipe, check out the [Full Recipe]. To get crispy sweet potatoes, follow these steps: - Cut sweet potatoes into even cubes. This helps them cook uniformly. - Toss them with olive oil and spices. This adds flavor and helps with crispiness. - Spread them out on the baking sheet. Avoid crowding the pan; this ensures even roasting. For timing and temperature: - Preheat your oven to 400°F (200°C). This high temperature helps achieve a nice crust. - Roast for 25 to 30 minutes. Stir halfway through to ensure even cooking. - Look for a fork-tender texture and slight browning. This means they are done. To make your Buddha bowl look stunning: - Start with a base of quinoa. Use a deep bowl to show off the layers. - Layer your roasted sweet potatoes and chickpeas next. This adds height and color. - Finish with fresh baby spinach and sliced avocado on top. For garnishes: - Drizzle extra tahini dressing over the top. It adds shine and flavor. - Sprinkle sesame seeds for crunch. They also look pretty. - Add a lemon wedge on the side. It gives a fresh pop of color and flavor. These simple tips will make your Sweet Potato Chickpea Buddha Bowl not only tasty but also beautiful. Check out the Full Recipe to make this nutritious delight! {{image_2}} You can change some ingredients for different flavors. Try using brown rice or farro instead of quinoa. These grains add a nice texture. They also give more chewiness to your bowl. For greens, baby kale or arugula work great too. They add a peppery taste that is delightful. You could even use roasted Brussels sprouts or broccoli for a crunch. To boost the taste, add spices or herbs. A pinch of cinnamon or a dash of chili powder can add warmth. Fresh herbs like cilantro or parsley can brighten the dish. They make it feel fresh and lively. You can also switch up the dressing. Instead of tahini, try a yogurt-based dressing or a zesty vinaigrette. Lemon juice mixed with olive oil can create a light and tangy flavor. This will keep each bite exciting. For more details on the full recipe, check out the Full Recipe link. To keep your Sweet Potato Chickpea Buddha Bowl fresh, first let it cool. Place the leftovers in an airtight container. Store in the fridge for up to 4 days. If you want to keep it longer, freeze the components separately. Sweet potatoes and chickpeas freeze well, while quinoa may become mushy. Use freezer-safe bags or containers to avoid freezer burn. Label the containers with the date. This helps you know when to use them. When it’s time to eat your leftovers, reheating is key. For the best taste and texture, use the oven. Preheat it to 350°F (175°C). Spread the sweet potatoes and chickpeas on a baking sheet. Heat for about 10-15 minutes until warm. This method keeps them crispy. You can also reheat quinoa in the microwave. Just add a splash of water to keep it moist. Heat for 1-2 minutes and stir. Enjoy your nutritious delight again! For the full recipe, check here. You can easily make this Buddha bowl vegan. All the ingredients in the recipe are plant-based. Just ensure the tahini you choose does not contain any animal products. If you want a creamier texture, add more avocado or use a vegan yogurt in place of tahini. Yes, you can use canned sweet potatoes. They will save you time. Rinse them well and add them to the bowl once heated. However, fresh sweet potatoes offer a better texture and flavor. You can serve the bowl with a side of crusty bread or a fresh salad. A light soup also pairs well. If you want more protein, add grilled tofu or tempeh. It takes about 15 minutes to prep and 30 minutes to cook. So, you can have this delicious dish ready in about 45 minutes. This makes it perfect for a quick weeknight dinner. If you don’t have tahini, try using peanut butter or sunflower seed butter. You can also blend cooked chickpeas with lemon juice and olive oil for a creamy dressing. These swaps will keep the bowl tasty and creamy. For the full recipe, check out the Sweet Potato Chickpea Buddha Bowl recipe above! This Buddha bowl is simple and tasty. You learned about its key ingredients, like sweet potatoes and chickpeas. I showed you how to roast and assemble it, plus tips for a better dish. You can mix things up with different grains and flavors. Remember to store leftovers right for freshness. Make this bowl your own and enjoy it! This healthy meal fits many diets and makes eating fun.

Sweet Potato Chickpea Buddha Bowl Nutritious Delight

Are you ready to create a meal that delights your taste buds and nourishes your body? The Sweet Potato Chickpea

- 1 lb Brussels sprouts - 2 tablespoons olive oil - 1 teaspoon garlic powder - 1 teaspoon paprika - 1/2 teaspoon sea salt - 1/4 teaspoon black pepper - 1/4 teaspoon cayenne pepper (optional) - 1 tablespoon nutritional yeast Crispy Brussels sprout chips are fun to make and tasty to eat. You only need a few simple ingredients to create this healthy snack. Fresh Brussels sprouts are the star here. They add crunch and nutrients. Olive oil helps them crisp up nicely while adding flavor. Garlic powder and paprika give the chips a nice kick. Sea salt and black pepper bring out the taste. If you want a little heat, add cayenne pepper. Nutritional yeast gives the chips a cheesy flavor without any dairy. It's a great way to boost the flavor while keeping it healthy. - High in vitamins and minerals - Low-calorie snack option - Source of dietary fiber Brussels sprouts are not just tasty; they are packed with nutrition. They are high in vitamins C and K. These vitamins help support your immune system and bone health. Plus, they are a low-calorie snack option, making them perfect for any diet. They also provide dietary fiber, which helps with digestion. Eating fiber can keep you full longer, too. So, when you enjoy these crispy chips, you are treating yourself to a snack that's good for your body as well. For the full recipe, check out the instructions that follow! - Rinse and dry the Brussels sprouts. - Trim and halve the Brussels sprouts. First, I rinse the Brussels sprouts under cold water. This step is key to remove dirt and dust. After rinsing, I dry them with a clean kitchen towel. This helps them crisp up later. Next, I trim off the ends of the sprouts. I also remove any yellow or damaged leaves. This ensures I get the best parts of the sprouts. Then, I slice each Brussels sprout in half lengthwise. This creates the perfect shape for chips. - Toss with olive oil and seasonings. - Arrange on baking sheet. In a large bowl, I add the halved Brussels sprouts. I pour in olive oil, garlic powder, paprika, sea salt, black pepper, and cayenne pepper if I want a kick. I toss everything together well. This helps the sprouts absorb the flavors. Once coated, I arrange the Brussels sprout halves on a baking sheet. I place them cut side down for maximum crispiness. Using parchment paper makes for easy cleanup too. - Preheat oven to 375°F. - Bake for 20-25 minutes, flipping halfway. I preheat my oven to 375°F (190°C). This temperature helps them bake evenly. I then place my baking sheet in the oven. I set a timer for 20-25 minutes. Halfway through, I flip the chips for even cooking. I know they are done when the edges turn golden brown and crispy. If you want even more flavor, sprinkle nutritional yeast on top right after they come out. It adds a cheesy taste without the dairy. For the full recipe, refer to the earlier section. To get your Brussels sprout chips really crispy, start by drying them well. Water on the leaves makes them steam instead of crisp up. Use a clean kitchen towel to pat them dry. Next, avoid overcrowding the baking sheet. If the chips touch, they will not bake evenly. Give them space to breathe and crisp up nicely. Don't be afraid to get creative with your spices. Try adding a pinch of cumin or chili powder for a different kick. Nutritional yeast adds a cheesy flavor without any dairy. It balances the spices and makes the chips taste great. Mix and match your favorite seasonings to find the perfect blend. Serve your Crispy Brussels sprout chips in a rustic bowl for a homey feel. This adds charm to your snack. You can also garnish with a sprinkle of sea salt or fresh herbs like parsley. A little color makes the dish pop and looks inviting on your table. {{image_2}} You can boost the flavor of your crispy Brussels sprout chips in fun ways. One easy method is to add cheese or vegan cheese alternatives. Sprinkle some grated Parmesan or nutritional yeast for a cheesy kick. This adds a rich taste without too many calories. You can also try different spices. Cumin gives a warm, earthy flavor, while chili powder adds a nice heat. Mix and match spices to find your favorite blend. You have options when cooking Brussels sprout chips. Air-frying is one great method. It gives you crispy chips with less oil. Simply toss the Brussels sprouts with oil and seasonings, then place them in the air fryer. Cook at 375°F for about 10-15 minutes. Remember to shake the basket halfway for even cooking. Pan-frying is another quick way to prepare these chips. Heat oil in a skillet and add the Brussels sprouts. Stir-fry them until they turn golden and crisp. Incorporating seasonal ingredients can add a fun twist to your chips. For example, in fall, you might add a sprinkle of pumpkin spice. In the summer, toss in some fresh corn for sweetness. You can also enhance your chips with fresh herbs. Rosemary adds a lovely aroma, while thyme gives a hint of earthiness. Mix these in before cooking for an extra layer of flavor in your crispy Brussels sprout chips. Explore these variations to keep your snack exciting! Store leftover Crispy Brussels sprout chips in an airtight container. This keeps them fresh and prevents moisture. Make sure the container seals tightly. You can keep them at room temperature for up to two days. If you want to keep them longer, place them in the fridge. They can last about a week in the fridge, but they may lose some crispiness. To reheat, use an oven or an air fryer. Preheat the oven to 350°F (175°C). Spread the chips in a single layer on a baking sheet. Heat for about 5-10 minutes. This keeps them crispy. The air fryer is also great. Set it to 350°F and cook for about 3-5 minutes. This method works well without adding extra oil. Can you freeze Crispy Brussels sprout chips? Yes, but they may lose crunch. If you want to freeze them, let them cool completely first. Then, place them in a single layer on a baking sheet. Freeze until solid, then transfer to a freezer bag. Remove as much air as possible before sealing. For best taste, use them within a month. When ready to eat, thaw in the fridge and reheat for best results. Yes, you can use frozen Brussels sprouts, but the texture changes. Frozen sprouts often become mushy when cooked. They lack the crunch we want in chips. Fresh Brussels sprouts hold their shape and crisp better. I recommend using fresh ones for the best results. Brussels sprout chips pair well with many snacks. You can serve them with hummus for dipping. They also go great with a yogurt-based dip. Try them alongside a cheese platter or as a side to soups. They make a fun and healthy addition to any snack spread. Look for the edges to turn golden brown. The chips should feel crispy and light when you touch them. If they seem soft, give them a few more minutes. Flipping them halfway helps ensure even crispiness. Trust your eyes and taste; they will tell you when they're perfect. In this blog post, we explored how to make crispy Brussels sprout chips. We covered all the ingredients, including olive oil and spices, and offered detailed steps for preparation and cooking. I shared tips for achieving the perfect texture and how to enhance flavors. We also discussed storage options for leftovers and answered common questions. With these simple steps, you can enjoy a healthy, tasty snack. Don't hesitate to try different spices or cooking methods to make this recipe your own.

Crispy Brussel Sprout Chips Crunchy and Healthy Snack

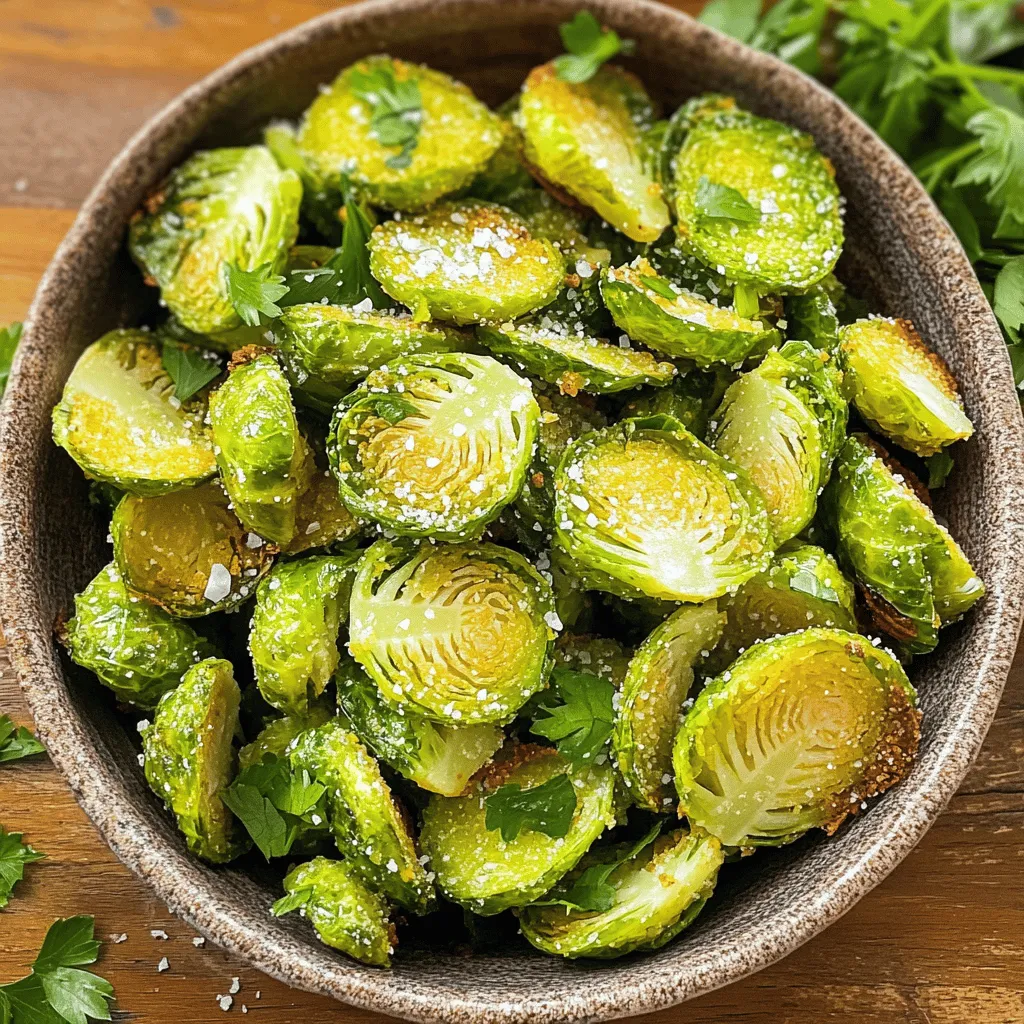
Looking for a snack that’s both crunchy and healthy? Crispy Brussels sprout chips are the answer! I’ll guide you through

To make Eggplant Parmesan, gather these simple ingredients: - 2 large eggplants, sliced into 1/2-inch rounds - 1 teaspoon salt - 1 cup all-purpose flour - 3 large eggs, beaten - 2 cups breadcrumbs (preferably Italian-style) - 2 cups marinara sauce (homemade or jarred) - 3 cups fresh mozzarella cheese, sliced - 1 cup grated Parmesan cheese - 1 teaspoon dried oregano - Fresh basil leaves for garnish - Olive oil for frying These ingredients create a rich and tasty dish. Each plays an important role in the flavor and texture. If you don't have an ingredient, here are some swaps: - Use zucchini instead of eggplant for a lighter dish. - Almond flour can replace all-purpose flour for a gluten-free option. - Try using egg substitutes like flaxseed or chia seeds. - For a different flavor, use a spicy marinara sauce. - Use Gouda or provolone cheese instead of mozzarella. These substitutions can help you enjoy this dish with what you have. Eggplant Parmesan shines with these tasty sides: - A fresh green salad with lemon vinaigrette. - Garlic bread for a crunchy side. - Roasted vegetables for added nutrition. For wine, consider a light red like Chianti or a crisp white like Pinot Grigio. These pairings can enhance your meal and elevate your dining experience. For the full Eggplant Parmesan recipe, check out the [Full Recipe]. Start by slicing your eggplants into 1/2-inch rounds. This size helps them cook evenly. Sprinkle salt on the slices and let them sit in a colander for about 30 minutes. The salt draws out moisture and bitterness. After 30 minutes, rinse the slices under cold water. Pat them dry with paper towels until they are not wet. Next, set up your breading station. You need three shallow dishes. Fill one with flour, the second with beaten eggs, and the third with breadcrumbs. Take each eggplant slice and dip it into the flour first. Make sure to shake off any extra flour. Then, dip it in the eggs, ensuring it's fully coated. Finally, press it into the breadcrumbs. This step gives the eggplant a nice crispy layer. Now it’s time to cook! In a large skillet, heat olive oil over medium heat. Fry the breaded eggplant slices in batches. Cook each side for about 3-4 minutes until they turn golden brown. Transfer the fried slices to a paper towel-lined plate to drain excess oil. Preheat your oven to 375°F (190°C). In a baking dish, layer a thin layer of marinara sauce. Add half of the fried eggplant slices, then half the marinara sauce, half of the mozzarella cheese, and half of the Parmesan cheese. Repeat the layers. Bake for 30-35 minutes or until the cheese is bubbly and golden. For more details, check the Full Recipe. To boost flavor, add fresh herbs. Basil and oregano work well. You can also try thyme or parsley for a twist. A pinch of red pepper flakes adds a nice kick. Feel free to mix and match herbs to find your favorite blend. You want each bite to burst with taste. If you want a lighter dish, try baking instead of frying. Brush the eggplant slices with olive oil and bake them until golden. This cuts down on fat and still gives you great flavor. You can also use whole wheat breadcrumbs for added fiber. Another option is to use less cheese, but keep it flavorful with herbs. One common mistake is skipping the salting step. This draws out moisture and bitterness. Always let your eggplants sit with salt before cooking. Also, avoid overcrowding the pan while frying. This can lead to soggy eggplant. Lastly, don't rush the baking time. Let the dish bubble and brown for the best results. For the full recipe, check out Eggplant Paradise Parmesan. {{image_2}} Eggplant Parmesan is already a great vegetarian dish. You can add more veggies for extra flavor. Consider adding layers of zucchini, mushrooms, or spinach. These vegetables complement the eggplant and add more texture. You can also use a plant-based cheese to keep it vegan. To make a gluten-free version, swap the breadcrumbs with gluten-free bread crumbs or crushed nuts. Almonds or walnuts work well for a crunchy texture. You can also use gluten-free flour for breading the eggplants. This way, everyone can enjoy the dish! Get creative with your toppings! You can add fresh herbs like thyme or rosemary for extra flavor. A sprinkle of red pepper flakes can bring some heat. For a richer taste, add a layer of ricotta cheese between the eggplant and sauce. These little tweaks make every bite unique and delightful. For the complete recipe, check out the Full Recipe. After enjoying your Eggplant Parmesan, store leftovers in an airtight container. Let it cool to room temp before sealing. This keeps moisture in and helps maintain flavor. You can store the dish in the fridge for up to three days. If you have more than you can eat, consider freezing some portions for later. When you’re ready to enjoy your leftovers, reheat them carefully. Use an oven set at 350°F (175°C) for the best results. Place the Eggplant Parmesan in a baking dish and cover it with foil. Heat for about 20 minutes. This method helps the cheese melt nicely without drying out the dish. You can also microwave it, but the oven keeps it more tender. If you choose to freeze your Eggplant Parmesan, do so before baking. Wrap it tightly in plastic wrap and then in foil. This helps prevent freezer burn. It can last up to three months in the freezer. When you’re ready to bake it, thaw it overnight in the fridge. Then, bake it as directed in the Full Recipe for a delicious meal again! You can bake the eggplants instead of frying them. First, slice the eggplants and salt them to draw out moisture. After 30 minutes, rinse and dry the slices. Then, brush them lightly with olive oil. Place the slices on a baking sheet lined with parchment paper. Bake them at 400°F (200°C) for 20-25 minutes, flipping halfway through. This method keeps the eggplants tender and reduces oil use. You will still get a nice texture and flavor without the frying. Yes, you can use different cheeses in Eggplant Parmesan. While mozzarella and Parmesan are classic, feel free to switch it up. You might try provolone for a sharper taste or ricotta for creaminess. Mixing cheeses can add depth to the dish. Just remember to use cheeses that melt well for that gooey texture. Eggplant Parmesan pairs well with many sides. A simple green salad with a light vinaigrette complements the richness. Garlic bread is another great choice, adding crunch and flavor. You might also serve it with pasta for a heartier meal. If you want something refreshing, try roasted vegetables or a caprese salad. Each of these options balances the dish perfectly. For more ideas, check out the Full Recipe. This article covered the main elements of making Eggplant Parmesan. We explored the key ingredients, preparation methods, and tips for enhancing flavor. I shared variations to suit different diets and discussed storage best practices. Remember, cooking is about finding what you love. Don’t be afraid to try new things. Enjoy your cooking journey and create a dish that makes you proud.

Eggplant Parmesan Flavorful Comfort Food Recipe

If you crave flavorful comfort food, my Eggplant Parmesan recipe is perfect for you! This dish combines layers of tender

- 4 large bell peppers (any color) - 1 cup quinoa, rinsed and drained - 2 cups vegetable broth - 1 can (15 oz) black beans, rinsed and drained - 1 cup corn kernels (fresh or frozen) - 1 cup diced tomatoes (canned or fresh) - 1 small red onion, diced - 2 cloves garlic, minced - 1 teaspoon ground cumin - 1 teaspoon smoked paprika - 1 tablespoon olive oil - Salt and pepper to taste - Fresh cilantro, chopped (for garnish) - Avocado slices (for topping) - Fresh herbs - Lime wedges Each serving has about 300 calories. You will find 10g protein, 45g carbs, and 8g fat per serving. This meal offers a good balance of nutrients and keeps you full. These ingredients create a dish that bursts with flavor. Each bite gives you a mix of textures and tastes. You can find the full recipe easily for more details and cooking steps. Feel free to mix and match different spices or veggies as you like. Adding lime juice can brighten the dish. Fresh herbs can add lovely notes as well. Experiment to find your perfect combo! - Preheat oven to 375°F (190°C). - Cut the tops off each bell pepper and remove seeds. - Cook quinoa in vegetable broth until fluffy. - Sauté onion and garlic, then add spices and other ingredients. - Fill peppers with the quinoa mixture. - Cover and bake for 25 minutes. - Remove foil and bake for 10 more minutes for a charred finish. Follow these steps to create a dish full of flavor. This recipe is simple and fun. You can find the full recipe to guide you even more. Enjoy the process and the tasty results! To choose fresh bell peppers, look for ones that are firm and shiny. They should feel heavy for their size. Check for any soft spots or wrinkles, as these can show age. Color matters, too! - Green peppers: They taste slightly bitter. - Red peppers: They are sweet and full of flavor. - Yellow and orange peppers: They have a milder, fruity taste. Each color brings a different flavor. Mix colors for a fun dish! To ensure even cooking, cut the tops off the peppers evenly. This helps them cook at the same rate. Place the peppers upright in a baking dish, so they stay steady. For added flavor, consider these tips: - Use fresh herbs like parsley or cilantro. - Add a squeeze of lime for brightness. - Sprinkle some nutritional yeast for a cheesy taste. Experiment with spices to make the dish your own! Vegan stuffed peppers pair well with many sides. Try serving them with a simple green salad or roasted veggies. For sauces, consider these options: - A tangy tomato sauce. - A creamy avocado dressing. - A spicy salsa for some heat. These pairings enhance the meal and make it more enjoyable! {{image_2}} You can change the filling in your stuffed peppers easily. Substitute quinoa with rice or other grains like farro or barley. These grains add unique textures and flavors. You can also mix in different beans or legumes. Try using chickpeas or lentils for a twist. Each choice gives a fresh take on the classic dish. Want more heat? Use spicy peppers inside the mix. Add jalapeños or serrano peppers to bring a nice kick. You can also adjust spices to suit your taste. If you love heat, increase the cumin or sprinkle in some cayenne. Each change lets you create a version that fits your palate perfectly. Think beyond the regular stuffed pepper. You can make mini stuffed peppers for fun appetizers. They are perfect for parties or gatherings. Another idea is turning the stuffing into a casserole. Just layer the filling in a baking dish and top with pepper halves. This style is hearty and easy to serve. To store leftover stuffed peppers, let them cool first. Place them in an airtight container. You can keep them in the fridge for about 3 to 4 days. This way, they stay fresh and safe to eat. If you want to freeze stuffed peppers, wrap each one in plastic wrap. Then, place them in a freezer-safe bag. They can last up to 3 months in the freezer. When it's time to eat, take them out and thaw them in the fridge overnight. You can reheat stuffed peppers in the microwave or oven. If you use the microwave, heat them for about 2-3 minutes. For the oven, preheat it to 350°F (175°C) and cook for about 15 minutes. Reheating in the oven helps keep the peppers' texture and flavor. Yes, you can make these stuffed peppers ahead of time. Start by preparing the filling. Cook the quinoa, sauté the onion and garlic, and mix in the beans and corn. Let everything cool, then fill the peppers. Cover them and store in the fridge for up to a day. When ready to cook, just bake them as instructed in the full recipe. This makes for a quick, easy dinner! If you want to substitute quinoa, you have options. You can use rice, bulgur, or couscous. Each has a different cooking time. For rice, cook it for about 15-20 minutes. Bulgur cooks fast in about 12 minutes. Couscous takes just 5 minutes to prepare. Choose what you like best for your filling! Yes, vegan stuffed peppers can be gluten-free. Just make sure to use gluten-free grains like quinoa or rice. Check the labels on canned goods, like beans and tomatoes, to be safe. Most of these ingredients are naturally gluten-free, making this dish a great option for everyone! In this blog post, I shared how to create delicious vegan stuffed peppers. You learned about the required fresh ingredients and optional garnishes. I provided simple steps for preparation, cooking, and baking. Tips on selecting peppers and enhancing flavors were included. I also shared variations and storage methods. These stuffed peppers are not just tasty; they are healthy and versatile. You can customize them to fit your taste. Enjoy making, sharing, and savoring this dish!

Powerful Vegan Stuffed Peppers Filled with Flavor

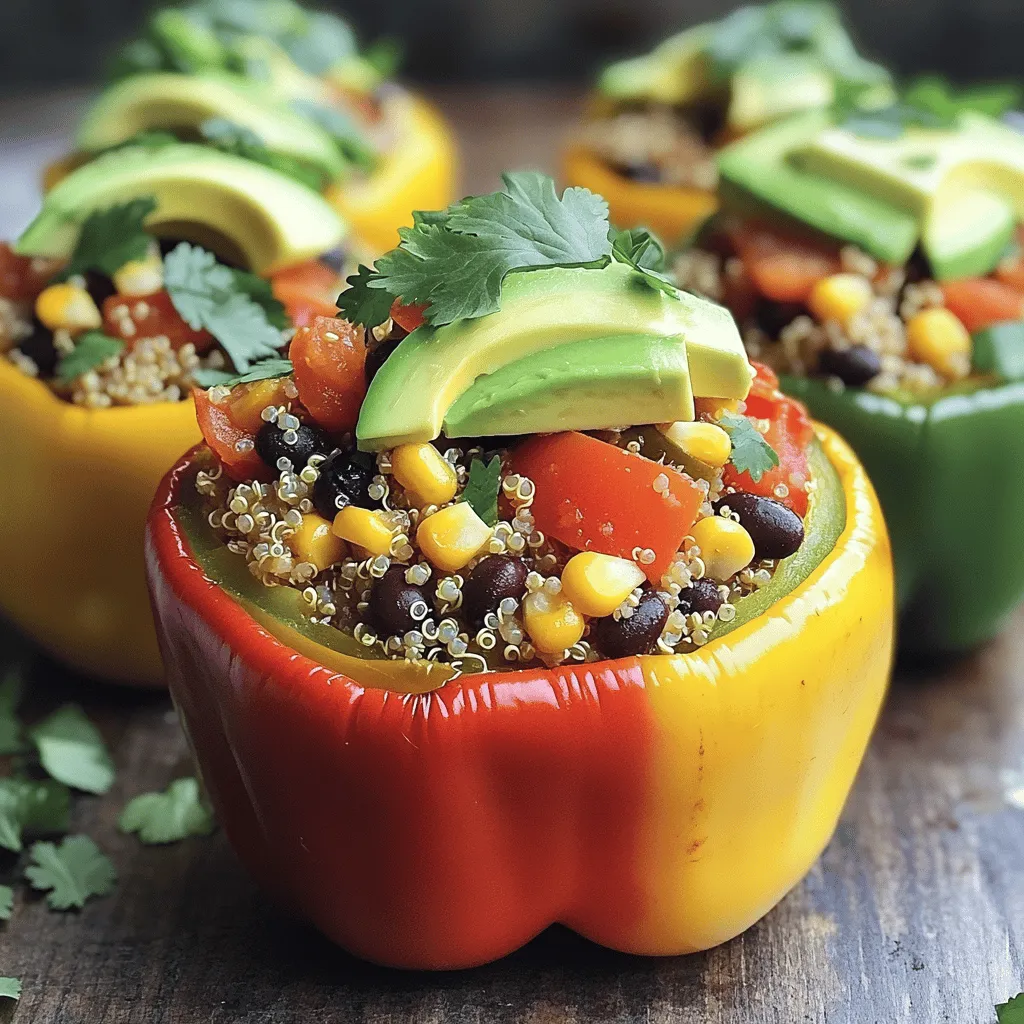
Looking for a tasty and healthy meal that packs a punch? These powerful vegan stuffed peppers are your answer! Filled

This Loaded Breakfast Skillet is a tasty way to start your day. It combines potatoes, veggies, and eggs in one dish. You can customize it to fit your taste. Here’s what you need for this delicious meal: - 4 medium-sized potatoes, diced - 1 tablespoon olive oil - 1 red bell pepper, diced - 1 green bell pepper, diced - 1 small onion, finely chopped - 4 large eggs - 1 cup cherry tomatoes, halved - 1 cup spinach, chopped - 1 teaspoon garlic powder - 1 teaspoon paprika - Salt and pepper to taste - ½ cup shredded cheese (cheddar or your choice) - Fresh herbs for garnish (chives or parsley) These ingredients create layers of flavor and texture. The potatoes give a great base, while the eggs add protein. The peppers and spinach bring color and nutrients. You can add some fun toppings to make your skillet even better: - Sliced avocado for creaminess - Hot sauce for a kick - Sour cream for richness - More fresh herbs for brightness Feel free to mix and match these garnishes. They can take your dish to the next level! This Loaded Breakfast Skillet is not just filling; it looks great too. Serve it hot for a fantastic breakfast treat. Start by washing your potatoes. I like to use medium-sized ones. Dice them into small cubes. This way, they cook evenly. Heat a large skillet over medium heat. Add one tablespoon of olive oil. Once the oil is hot, place the diced potatoes in the skillet. Season them with salt and pepper. Cook for about 10 to 12 minutes. Stir them often. You want them golden brown and tender. Next, add the chopped onion and bell peppers to the skillet. I use both red and green bell peppers for color. Sauté these veggies for about 5 minutes. You want them to soften, but not lose their crunch. Sprinkle in one teaspoon of garlic powder and paprika. Stir to mix the spices in well. Let it cook for about one minute. This will bring out the flavors. Now, add the halved cherry tomatoes and chopped spinach. Cook for another 2 to 3 minutes. You’ll see the spinach wilt and the tomatoes soften. Now it’s time for the eggs! Create small wells in the veggie mixture. Crack an egg into each well. Cover the skillet and let it cook for about 5 to 7 minutes. You can adjust the time based on how you like your eggs. If you want runny yolks, check them early. Once the eggs are cooked, sprinkle ½ cup of shredded cheese on top. Let it melt for about one minute. Then, remove from heat. Garnish with fresh herbs for a pop of color. Enjoy your delicious Loaded Breakfast Skillet! Check out the Full Recipe for more tips. To get the best eggs, crack them into wells. Cover the skillet to trap heat. This helps the eggs cook evenly. If you want runny yolks, check them often. They usually take 5-7 minutes. For firm yolks, leave them a bit longer. You can boost flavor with spices. Try adding more garlic powder or smoked paprika. Fresh herbs like chives or parsley add brightness. For a kick, add hot sauce or red pepper flakes. Mixing in some avocado can also add creaminess. Cooking time may change based on your stove. If your skillet is hot, watch closely. If it’s cooler, you may need extra time. Stir the veggies and potatoes well. This helps them cook evenly and avoid burning. Check the eggs often to avoid overcooking. For the full recipe, you can refer to the earlier sections. {{image_2}} You can have fun with your Loaded Breakfast Skillet by trying different flavors. Here are some tasty options. For a meat-free option, swap out the eggs for plant-based proteins. You can use tofu or chickpeas. Add extra veggies like mushrooms or zucchini for more taste. The key is to keep the colorful bell peppers and onions. They add great flavor and crunch. You can also use a vegan cheese if you like. This version is packed with nutrients and keeps you full. If you love meat, this is the perfect choice. Start with crispy bacon or sausage. Cook them first in the skillet for a smoky flavor. Once the meat is ready, add the potatoes and veggies as usual. For extra protein, toss in some diced ham or cooked ground beef. Finish with a layer of cheese on top. This hearty dish satisfies any meat lover's cravings. Turn up the heat with a spicy twist! Add chopped jalapeños or a dash of hot sauce to the skillet. Use pepper jack cheese instead of cheddar for more kick. You can also spice up the potatoes with cayenne pepper or chili powder. The cherry tomatoes bring a nice balance to the heat. This version is for those who enjoy a fiery start to their day. Each variation brings a new taste to the table. You can find the Full Recipe above to start your loaded breakfast adventure! Store your loaded breakfast skillet in an airtight container. Let it cool for 30 minutes first. This helps keep the flavors locked in. You can keep it in the fridge for up to 3 days. If you want to enjoy it later, make sure to separate the eggs from the veggies. This keeps the eggs from getting rubbery. To reheat, use a skillet on medium heat. Add a splash of water to steam it. Cover the skillet to help it warm evenly. Stir occasionally to heat it through. You can also use a microwave. Heat in 30-second bursts, stirring in between. This helps prevent hot spots and keeps it tasty. Freezing is an option if you have lots of leftovers. First, cool your skillet completely. Then, portion it into freezer-safe containers. Make sure to leave some space for expansion. It can last up to three months in the freezer. When ready to eat, thaw it in the fridge overnight. Reheat as mentioned above for a quick meal. Enjoy your delicious loaded breakfast skillet anytime! For the full recipe, refer to above sections. Yes, you can make this recipe ahead of time. Cook the potatoes and veggies first. Store them in the fridge for up to three days. When you're ready to eat, warm it up in a skillet. Then, add the eggs and cheese. This way, you save time and enjoy a quick breakfast. You can use several options in place of potatoes. Sweet potatoes are a great choice for a sweeter taste. Zucchini works well, too, for a lighter dish. Cauliflower can also be a low-carb option. Just make sure to adjust the cooking time. These substitutes add different flavors and textures. To make this dish healthier, consider using fewer eggs or egg whites. You can add more veggies like mushrooms or kale. Use less cheese or choose a lower-fat option. Try cooking everything in a non-stick skillet with less oil. These changes keep the meal tasty while making it lighter. For the full recipe, check the earlier section. This blog post covered all you need to know about creating a loaded breakfast skillet. We explored the key ingredients, step-by-step cooking, useful tips, and tasty variations. Remember, you can adjust cooking times and flavors to suit your taste. Don't hesitate to experiment with different veggies or proteins. Proper storage extends the life of your meal, letting you enjoy it longer. Now, it's time to try this recipe and make it your own! Happy cooking!

Loaded Breakfast Skillet Flavorful Morning Delight

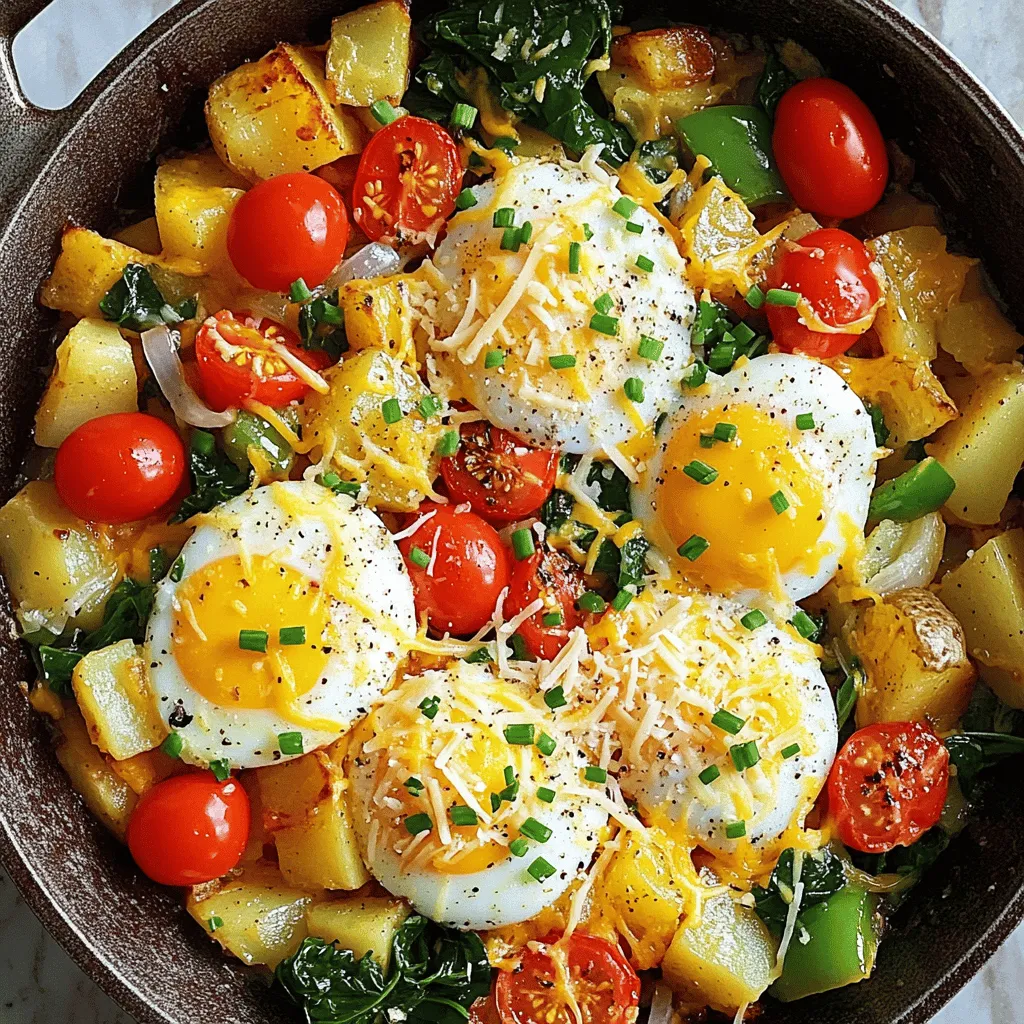
Start your day with the Loaded Breakfast Skillet, a flavorful delight that fuels your morning! This dish combines crispy potatoes,

To make Teriyaki Salmon with Asparagus, you need the following items: - 4 salmon fillets (6 oz each) - 1 cup teriyaki sauce (store-bought or homemade) - 1 tablespoon fresh ginger, grated - 2 cloves garlic, minced - 1 tablespoon honey - 1 pound asparagus, trimmed - 2 tablespoons olive oil - Salt and pepper to taste - Sesame seeds, for garnish - Sliced green onions, for garnish Fresh salmon is key for this dish. It has a rich flavor and tender texture. Frozen salmon can work, but it may lack the same taste. Always choose fresh when you can. Fresh vegetables also enhance the meal's flavor. Use crisp asparagus for the best results. You can add more flavor with these garnishes: - Chopped cilantro - Lemon wedges - Chili flakes for spice If you want to swap out the teriyaki sauce, try soy sauce mixed with honey. You can also use orange juice for a fruity twist. Other vegetables like broccoli or bell peppers pair well with salmon. They add color and nutrients to your plate. For the full recipe, check out the detailed instructions. To make the marinade, start with a mixing bowl. Combine the teriyaki sauce, grated ginger, minced garlic, and honey. Whisk until smooth. This blend brings rich flavors to the salmon. For marination, place the salmon fillets in a shallow dish. Pour the marinade over them. Cover the dish and let it chill in the fridge. Aim for at least 30 minutes. If you have more time, let it marinate for an hour. This step boosts flavor and tenderness. Preheat your oven to 425°F (220°C). This high heat cooks the salmon perfectly. While the oven warms up, line a baking sheet with parchment paper. This makes cleanup easy. In a bowl, toss the asparagus with olive oil, salt, and pepper. Coat them well. Spread the asparagus on one side of the baking sheet. After that, take the salmon out of the marinade. Place it skin-side down on the other side of the sheet. Bake everything for 12 to 15 minutes. Check the salmon; it should flake easily with a fork. Halfway through, baste the salmon with the reserved marinade. This adds extra flavor. Once cooked, take the baking sheet out of the oven. Let the salmon rest for a couple of minutes. This helps keep it juicy. To plate your dish, start with a bed of asparagus. Place the salmon right on top. This creates a lovely contrast. For garnish, sprinkle sesame seeds over the salmon. Add sliced green onions for color and crunch. These small touches make your dish look appealing and inviting. For the full recipe, check out Teriyaki Salmon Delight. To check for salmon doneness, use a fork. Gently press the salmon in the thickest part. If it flakes easily, it's done. You can also use a food thermometer. Aim for 125°F (52°C) for moist salmon. Remember, salmon continues to cook slightly after removing it from the oven. For marinating salmon, 30 minutes is great for flavor. You can marinate for up to an hour for a bolder taste. Ensure the salmon is fully covered in the marinade. This helps the fish absorb all the tasty flavors. Store the salmon in the fridge while it marinates. If you want to add spice or heat, try red pepper flakes. A pinch can make your dish more exciting. You can also drizzle a bit of sriracha on top before serving. This gives a nice kick without overpowering the teriyaki flavor. Sprinkling herbs adds freshness. Chopped cilantro or basil can brighten the dish. You can also use sesame seeds for crunch. They make a lovely garnish and enhance the look of your plate. A common pitfall when baking salmon is cooking it too long. Keep an eye on the time and check for doneness early. Overcooking makes the salmon dry and tough. When cooking asparagus, avoid overcooking it too. It should be bright green and tender-crisp. Bake asparagus for about 10–12 minutes. If you see it turning dark, it may be overdone. Keep it crunchy for the best texture. For the full recipe, check out the entire process in detail. {{image_2}} You can cook teriyaki salmon in different ways. Grilling adds a smoky flavor. Just preheat the grill and cook the salmon for about 5-7 minutes on each side. Baking is easy and keeps the fish moist. Set your oven to 425°F (220°C) and bake for 12-15 minutes. You can also pan-sear the salmon for a crispy outside. Try steaming it too, which makes it tender and juicy. Each method gives a unique taste. To make this dish gluten-free, choose a gluten-free teriyaki sauce. Many brands offer this option, or you can make your own with tamari. If you're vegetarian, try marinating tofu in the same sauce. Bake or grill the tofu as you would the salmon. Cauliflower steaks also work well as a substitute. You’ll still get great flavor and texture without the fish. Experimenting with sauces can change the whole dish. Try adding a spicy chili sauce for heat or a sweet mango sauce for a fruity twist. For texture, add chopped nuts like almonds or cashews. You can also mix in fruits like pineapple or citrus zest in the marinade. These additions will bring fresh flavors and a fun crunch, making your meal even more exciting. For the complete recipe, refer to the Full Recipe above. To keep your teriyaki salmon and asparagus fresh, store them properly. Place the leftovers in airtight containers. Make sure to separate the salmon from the asparagus to keep both tasting great. Refrigerate them within two hours after cooking. They will last for about three days in the fridge. Remember, freshness matters for the best flavor. When you reheat salmon, your goal is to keep it moist. I suggest using the oven. Preheat it to 275°F (135°C). Place the salmon on a baking sheet lined with parchment. Add a splash of water or broth to help retain moisture. Cover the salmon with foil. Heat for about 15 minutes, or until warmed through. For asparagus, a quick method is to use the microwave. Place the asparagus on a microwave-safe plate. Add a few drops of water and cover with a damp paper towel. Heat for 30 seconds to 1 minute. This keeps the asparagus crisp and tasty. Yes, you can freeze teriyaki salmon! Wrap each fillet tightly in plastic wrap. Then, place them in a freezer bag or airtight container. It’s best to freeze them within two hours of cooking. Label the bag with the date. They can last up to three months in the freezer. To thaw the salmon, move it to the fridge overnight. For quick thawing, place the sealed bag in cold water for about an hour. Avoid using a microwave, as it can change the texture. Enjoy your frozen teriyaki salmon as if it was just made! You can serve many sides with teriyaki salmon. Here are some great options: - Steamed rice - Quinoa - Roasted vegetables - Salad with light dressing - Noodles with soy sauce - Miso soup These sides add flavor and balance to the meal. I love how they complement the sweet and savory notes of the salmon. Yes, you can use chicken in this recipe. Just follow these tips: - Use boneless, skinless chicken thighs or breasts. - Marinate the chicken the same way as the salmon. - Bake until the chicken reaches an internal temperature of 165°F (75°C). This swap gives you a new dish to enjoy while keeping the great teriyaki taste. You can store leftovers for up to three days. Here are some storage tips: - Place salmon and asparagus in an airtight container. - Keep the container in the fridge. - Reheat gently in the oven or microwave. Make sure to eat your leftovers within this time for the best taste and safety. You learned how to make Teriyaki Salmon with Asparagus. Fresh ingredients greatly enhance flavor, while marinades add depth. With careful cooking steps, you can create a delicious dish. Remember to check cooking times for the salmon and asparagus. Use these tips to avoid common mistakes. Explore variations and don't hesitate to try new ingredients. Enjoy your meal and share it with others who love good food!

Teriyaki Salmon with Asparagus Tasty and Simple Recipe

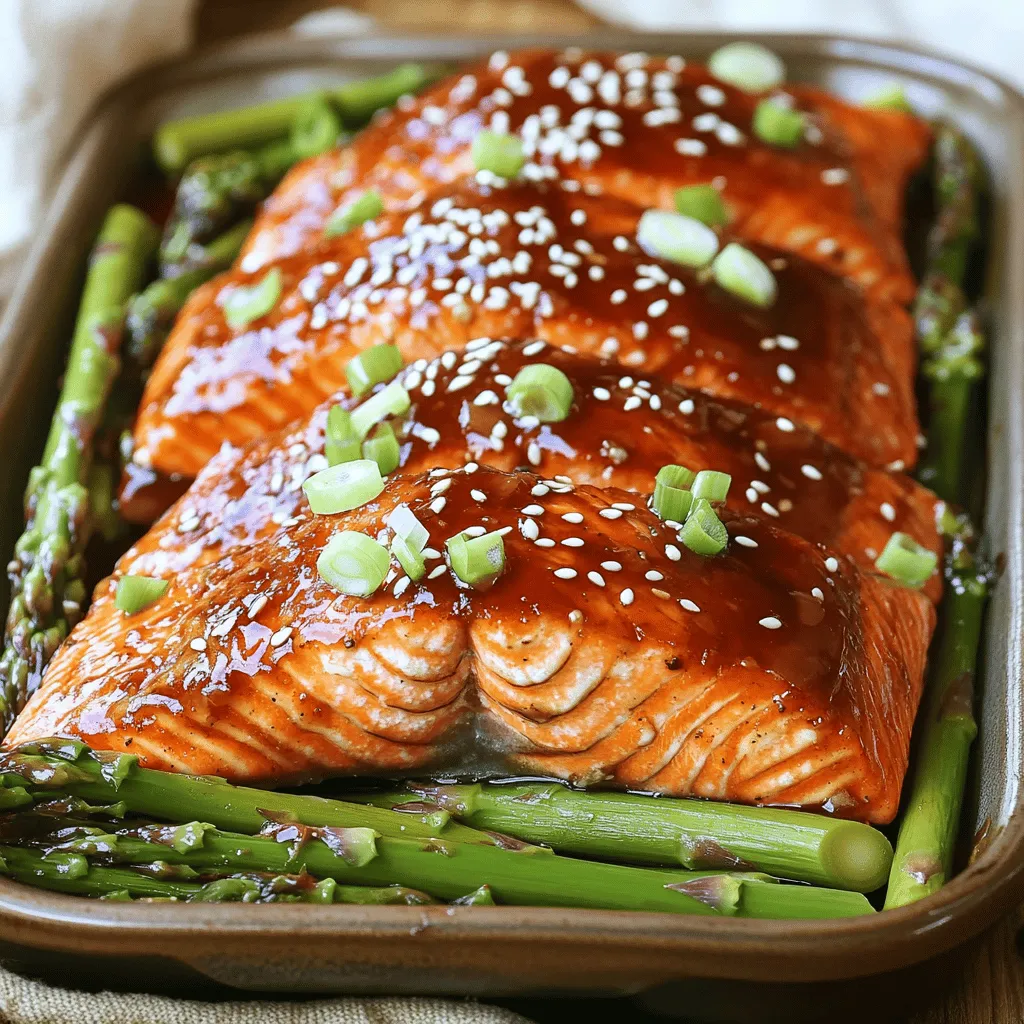
If you’re looking to add a burst of flavor to your dinner, Teriyaki Salmon with Asparagus is a perfect choice.

Older posts
Newer posts
← Previous Page1 … Page40 Page41 Page42 … Page79 Next →

dsad

© 2025 pureeatsnow • Built with GeneratePress

Our Policies

  • Copyright Policy
  • Cookie Policy
  • GDPR Policy
  • Privacy Policy
  • Disclaimer
  • Terms Of Use

More Information

  • Home
  • About
  • Contact
  • Appetizers
  • Dessert
  • Dinner
  • Drinks
©2025, pureeatsnow About Back To Top