Skip to content
DisclaimerTerms Of UseGDPR PolicyCookie Policy

pureeatsnow

  • Home
  • Drinks
  • Appetizers
  • Dinner
  • Dessert
  • About
  • Contact
  • Privacy Policy
DisclaimerTerms Of UseGDPR PolicyCookie Policy

Rachel

- 2 Ahi tuna steaks (about 6 oz each) - 1/4 cup sesame seeds (a mix of white and black) - 2 tablespoons soy sauce (low sodium) - 1 tablespoon sesame oil - 1 tablespoon olive oil - 1 teaspoon fresh ginger, grated - 2 green onions, chopped - 1 avocado, sliced - 1 cucumber, thinly sliced - Sea salt and black pepper to taste You can switch the Ahi tuna for other fish like salmon or swordfish. If you need a gluten-free option, use tamari instead of soy sauce. For the fresh ingredients, try using radishes instead of cucumbers. Fresh herbs like cilantro can also add a nice touch. Using fresh ingredients is key for this dish. Fresh fish tastes better and has more nutrients. When you use seasonal produce, you get the best flavor and quality. Fresh ingredients really lift the dish and make it shine. How to marinate the tuna To start, make the marinade. In a small bowl, whisk together soy sauce, sesame oil, grated ginger, and a pinch of black pepper. This mix adds flavor to the tuna. Place the Ahi tuna steaks in a shallow dish. Pour the marinade over them and cover. Let them sit for 15-20 minutes. This lets the tuna soak up the flavors well. The process of preparing the sesame coating While the tuna marinates, prepare the sesame coating. On a plate, combine white and black sesame seeds. This colorful mix will create a beautiful crust. Make sure to have enough seeds to coat both sides of the tuna steaks evenly. This step is key for that crunchy texture. Searing the tuna for the perfect doneness Heat a non-stick skillet over medium-high heat. Add olive oil once hot. Carefully place the coated tuna steaks in the skillet. Sear each side for 1-2 minutes. For rare, the center should stay pink. Keep an eye on them for the best results. Resting and slicing the tuna After searing, remove the tuna from the skillet. Let it rest for a minute. This helps keep the juices inside. Once rested, slice the tuna against the grain into thin pieces. This makes each bite tender and easy to eat. Best practices for presenting the dish Arrange the thin slices of tuna on a plate. Fan them out for a lovely look. Surround the tuna with avocado and cucumber slices. This adds color and freshness to the dish. Suggestions for garnishing Top the tuna with chopped green onions for a nice crunch. You can drizzle some leftover soy sauce for extra flavor. A sprinkle of sea salt may also enhance the taste. Enjoy your sesame-crusted Ahi tuna as a beautiful meal! For the full recipe, check out the details above. Use a non-stick skillet for easy searing. A cast-iron skillet is also great. Heat the skillet over medium-high heat before adding oil. This helps the tuna crust stay crispy. Aim for rare doneness; the center should stay pink. Sear each side for just 1-2 minutes. Marinate the tuna for at least 15-20 minutes. This allows the flavors to soak in well. Avoid marinating for too long, or the fish may get mushy. If you need to marinate longer, keep it under 30 minutes. Pair your sesame-crusted Ahi tuna with sides like avocado and cucumber. These fresh veggies balance the dish well. For sauces, try extra soy sauce or wasabi for a spicy kick. You can also serve it with a light salad for a refreshing touch. Enjoy it all together for a great meal! {{image_2}} You can change the seeds in your crust for more flavor. Try using pumpkin seeds or flaxseeds. Each will give a unique taste and crunch to your tuna. You can also switch up the marinade. Instead of soy sauce, use teriyaki for a sweeter touch. A bit of lime juice can add a nice zing too. You can grill the tuna for a smoky flavor. Brush the steaks with olive oil first. Just be careful not to overcook them. Pan-searing is quick and gives a nice crust. If you want a healthier option, try baking the tuna. Bake at 375°F for about 10 minutes. This keeps the fish moist and tender. For a fresh side, consider a mixed salad with greens and herbs. Add cherry tomatoes for sweetness. You can also serve the tuna with grains. Quinoa or brown rice works well. Both add a hearty base and absorb the flavors of the dish. For a light touch, serve with steamed broccoli or asparagus. These veggies make a great contrast to the rich tuna. Enjoy exploring these variations in your cooking! To store your sesame-crusted Ahi tuna, first, let it cool. Place it in an airtight container. This keeps it fresh and helps prevent drying. Store it in the fridge. Make sure to eat it within two days for the best taste. If you need to store it longer, freezing is a better option. When you reheat Ahi tuna, do it gently. I recommend using a skillet over low heat. This keeps the fish moist and tasty. You can also use a microwave, but use low power. Avoid cooking it too long, or it will dry out. Do not use high heat or the oven, as it will ruin the texture. To freeze cooked Ahi tuna, wrap it tightly in plastic wrap. Then, place it in a freezer-safe bag. This helps prevent freezer burn. It can last up to three months in the freezer. When ready to use it, thaw it in the fridge overnight. You can then slice it and add it to salads or bowls. Can I cook Ahi tuna from frozen? Yes, you can cook Ahi tuna from frozen. However, it’s best to thaw it first. Place the fish in the fridge overnight for safe thawing. For a quicker method, seal the tuna in a bag and submerge it in cold water for about an hour. This way, you keep the texture and flavor intact. What is the best way to know if tuna is done? To check if your tuna is done, use a fork to gently flake the fish. The center should remain pink for rare. If you prefer it cooked more, aim for a slight pink hue. Remember, overcooking can dry out the fish, so keep a close eye on it. Can I prepare the sesame-crusted tuna in advance? Yes, you can prepare the sesame-crusted tuna in advance. You can marinate the tuna for up to an hour before cooking. However, avoid coating the fish in sesame seeds until just before cooking. This keeps the coating fresh and crisp. How spicy is the dish with the suggested sauces? The dish is not very spicy with the suggested sauces. The soy sauce adds flavor without heat. If you want more spice, add wasabi or chili sauce on the side. Adjust to your taste for a better experience. Is Ahi tuna sustainable to eat? Yes, Ahi tuna can be sustainable to eat, but it depends on the source. Look for tuna that is certified by organizations like the Marine Stewardship Council. This ensures responsible fishing methods and helps protect fish populations. What are the health benefits of consuming tuna? Consuming tuna offers many health benefits. It’s high in protein, low in calories, and rich in omega-3 fatty acids. These fats support heart health and brain function. Plus, tuna provides vitamins and minerals like B12, selenium, and potassium, which are great for your overall health. This blog post covered all you need to know about making sesame-crusted Ahi tuna. We explored the ingredients, including fresh fish and useful substitutes. You learned step-by-step cooking methods and tips for perfect results. We also discussed variations and how to store your leftovers. Enjoying fresh ingredients is key for taste and health. With these insights, your cooking can be fun and flavorful. Now, you can create a dish that impresses everyone!

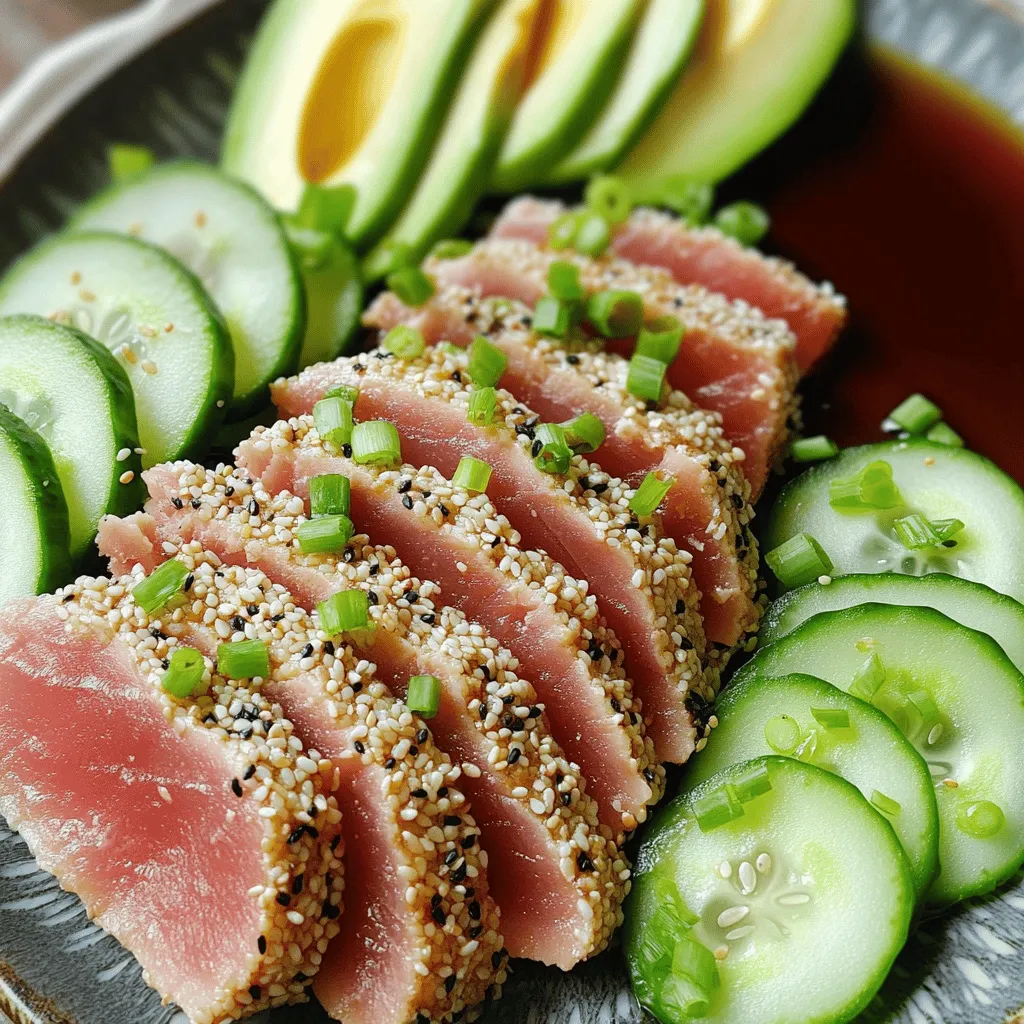
57. Sesame-Crusted Ahi Tuna Flavorful and Fresh Dish

Are you ready to dive into a dish that’s as vibrant as it is delicious? Our Sesame-Crusted Ahi Tuna combines

To make almond flour banana bread, you need the following items: - 3 ripe bananas, mashed - 2 cups almond flour - 1/4 cup honey or maple syrup - 3 large eggs - 1/4 cup melted coconut oil (or unsalted butter) - 1 teaspoon vanilla extract - 1 teaspoon baking soda - 1/2 teaspoon baking powder - 1/2 teaspoon salt - 1 teaspoon ground cinnamon - 1/2 cup chopped walnuts or pecans (optional) - 1/4 cup dark chocolate chips (optional for a sweeter touch) Feel free to customize your bread with extra ingredients! Some people love adding dried fruit or seeds. You can even swap the nuts for your favorite type. Almond flour is low in carbohydrates, which makes it a great choice for many diets. It is also gluten-free, so it works well for those with gluten sensitivities. Bananas are rich in potassium and vitamins. They add natural sweetness and moisture to the bread. The nuts also provide protein and healthy fats. This makes each slice not just yummy, but also good for you! 1. Preheat your oven to 350°F (175°C). This heat helps the bread rise. 2. Grease a 9x5 inch loaf pan with coconut oil or butter. This keeps the bread from sticking. 3. In a large bowl, mash 3 ripe bananas until smooth. 4. Add 1/4 cup honey or maple syrup to the bananas. This adds sweetness. 5. Crack 3 large eggs into the bowl. Mix well until everything blends. 6. Pour in 1/4 cup melted coconut oil and 1 teaspoon vanilla extract. Stir until smooth. 1. In a separate bowl, whisk together 2 cups almond flour, 1 teaspoon baking soda, 1/2 teaspoon baking powder, 1/2 teaspoon salt, and 1 teaspoon ground cinnamon. 2. Gradually add the dry mix to the wet mix. Stir gently until just combined. Do not over-mix! This keeps the bread light and fluffy. 3. If you want, fold in 1/2 cup chopped walnuts or pecans, and 1/4 cup dark chocolate chips for extra flavor. 1. Pour the batter into the greased loaf pan, smoothing the top with a spatula. 2. Bake in the preheated oven for 45-55 minutes. 3. Check for doneness by inserting a toothpick in the center. It should come out clean. 4. Once done, let the banana bread cool in the pan for 10 minutes. 5. Gently transfer it to a wire rack to cool completely. Enjoy your delicious creation! To make the best almond flour banana bread, you should adjust baking times for your oven. Every oven is different. If your oven runs hot, check the bread a few minutes early. The bread is done when a toothpick comes out clean. Using ripe bananas is key for sweetness. Look for bananas with brown spots. They have more flavor and will make your bread taste amazing. For a nice presentation, slice the banana bread and serve it warm. Add a drizzle of honey or a dollop of almond butter. These toppings add a special touch. Dusting the top with powdered sugar makes it look fancy. To store leftovers beautifully, wrap the banana bread in plastic wrap. This keeps it fresh. You can also use a bread box. It helps keep the bread moist for a few days. {{image_2}} You can easily customize your almond flour banana bread. Adding spices can change its flavor. Try nutmeg or ginger for a warm kick. You can also mix in nuts or chocolate chips. Walnuts or pecans add crunch. Dark chocolate chips make it sweeter. You can adjust these based on your taste. If you want a vegan version, swap eggs for flax eggs. Mix one tablespoon of flaxseed meal with three tablespoons of water. Let it sit for a few minutes until it thickens. For a dairy-free option, use coconut oil instead of butter. You can also reduce sugar. Try using less honey or maple syrup. This keeps the bread tasty but lighter on sugar. To keep your almond flour banana bread fresh, store it in an airtight container. This helps prevent it from drying out. If you want to keep it longer, slice it first. Place parchment paper between the slices to stop them from sticking together. You can also wrap the loaf tightly in plastic wrap, then put it in a container. This method helps keep it moist. For freezing, wrap the banana bread securely in plastic wrap or aluminum foil. Then, place it in a freezer-safe bag. This can keep it fresh for up to three months. When you’re ready to eat it, just take it out and let it thaw at room temperature. To warm up your banana bread without drying it out, preheat your oven to 350°F (175°C). Place the slices on a baking sheet. Cover them loosely with aluminum foil. Heat for about 10 to 15 minutes, or until warm. This method keeps the bread soft and tasty. You can also use a microwave. Just heat each slice for 10 to 15 seconds. Keep an eye on it to avoid overcooking. For a special touch, add a little butter or almond butter on top before reheating. This adds flavor and moisture. Enjoy your delicious banana bread warm! Can I substitute almond flour for regular flour? Yes, you can. Almond flour works great in many recipes. It adds a nutty flavor and keeps the bread moist. Use the same amount of almond flour as you would regular flour. However, almond flour may change the texture slightly. How ripe should my bananas be for the best flavor? Use very ripe bananas. They should have brown spots and feel soft. The riper the bananas, the sweeter and more flavorful your bread will be. They also add moisture to the batter. How do I know when my banana bread is done? Check the bread after 45 minutes. Insert a toothpick into the center. If it comes out clean, your bread is ready. If it has batter on it, bake for more time. What can I use instead of honey or maple syrup? You can use agave syrup or coconut sugar. Both add sweetness without altering the taste much. You might want to adjust the amount based on your sweetness level. In this post, we covered everything you need for making banana bread with almond flour. You learned about ingredients, health benefits, and step-by-step instructions. I shared tips to bake it perfectly and ideas for storage. You can even customize your bread with different flavors! Now, you have all the tools to create a delicious and unique treat. Enjoy baking and share it with friends and family!

56. Almond Flour Banana Bread Tasty and Simple Recipe

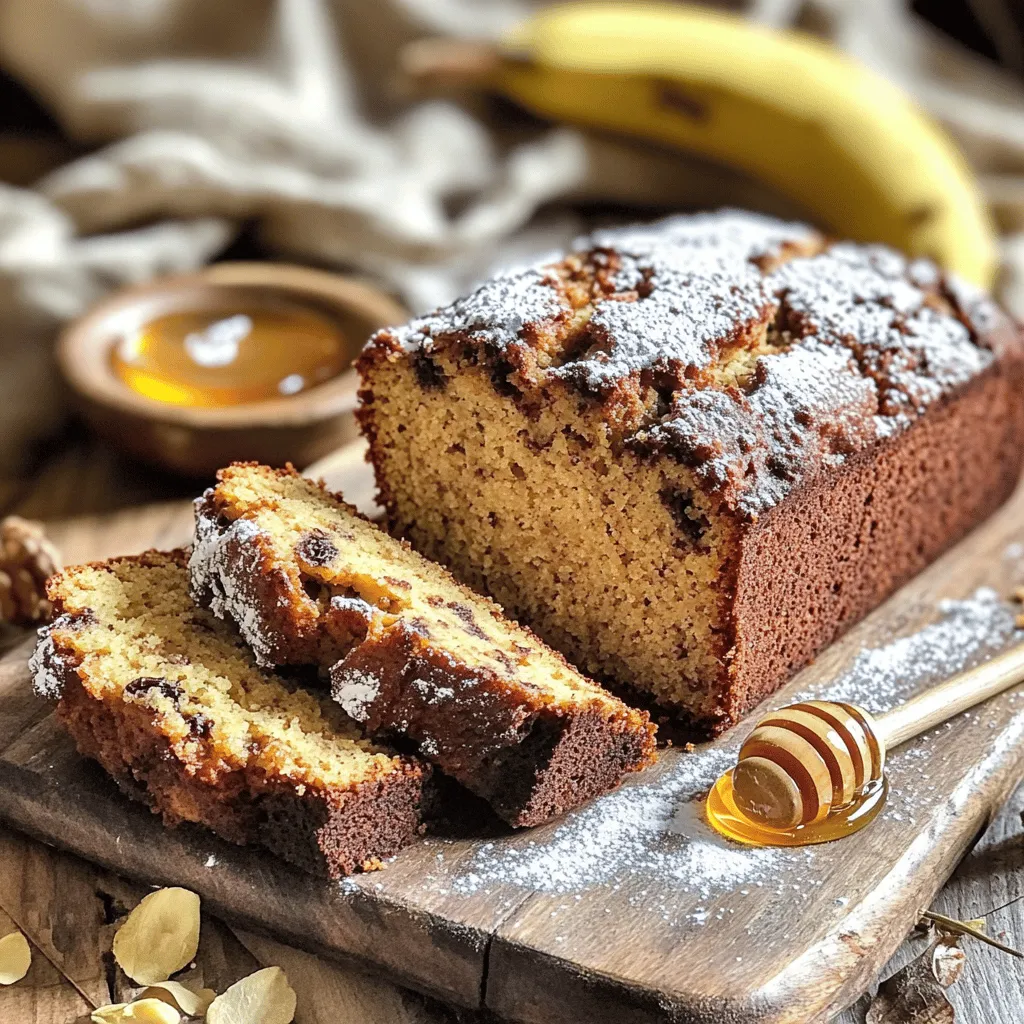
Are you ready to bake some deliciously satisfying Almond Flour Banana Bread? This simple recipe is perfect for any skill

- 1 cup sushi rice - 1 1/4 cups water - 1/2 pound sushi-grade tuna, diced - 2 tablespoons soy sauce - 1 tablespoon sesame oil - 1 tablespoon Sriracha (adjust to taste) - 1 teaspoon honey - 1 tablespoon green onions, sliced - 1 tablespoon seaweed salad - 1 avocado, sliced - 1/2 cucumber, thinly sliced - 1/4 cup edamame, shelled - Sesame seeds for garnish - Pickled ginger for serving Fresh ingredients make a huge difference in your poke bowl. Fresh sushi-grade tuna gives you the best flavor and texture. It should look bright and shiny. When using fresh ingredients, you enhance both taste and presentation. Fresh vegetables add crunch and color. They also provide nutrients. For the best experience, buy your ingredients on the same day you make your poke bowl. If you have allergies, you can still enjoy this dish. Here are some easy swaps: - Soy sauce: Use tamari for a gluten-free option. - Sesame oil: Try avocado oil or olive oil if you're allergic. - Sriracha: If you need a milder sauce, use sweet chili sauce instead. - Tuna: Substitute with cooked shrimp, crab, or tofu for a different taste. These substitutions help you enjoy a tasty poke bowl while keeping your dietary needs in check. Start by rinsing the sushi rice under cold water. Keep rinsing until the water runs clear. This step removes excess starch. Then, combine the rinsed rice and water in a medium saucepan. Bring it to a boil on high heat. Once boiling, lower the heat and cover it. Let it simmer for about 20 minutes. The rice should be tender and all the water should absorb. After cooking, fluff the rice with a fork and let it cool slightly. While the rice cooks, prepare the spicy tuna. Dice the sushi-grade tuna into small pieces. In a bowl, mix the tuna with soy sauce, sesame oil, Sriracha, and honey. Stir well to coat the tuna evenly. Let it marinate for around 10 minutes. This step adds flavor and makes the tuna tender. Now, it’s time to build your poke bowl. Divide the sushi rice into two bowls as your base. Top each bowl with the marinated tuna. Next, add sliced avocado, thin cucumber slices, and shelled edamame. Don’t forget the seaweed salad for extra flavor. For a final touch, sprinkle sliced green onions and sesame seeds on top. Add a dollop of pickled ginger on the side. If you like more heat, drizzle any leftover marinade over everything. Enjoy your spicy tuna poke bowl! For the full recipe, check the provided details. To cook sushi rice, rinse it well. This step removes excess starch. Use one cup of rice and 1.25 cups of water. Boil the water first, then lower the heat and cover. Cook it for about 20 minutes. When done, fluff it with a fork. Let it cool slightly before serving. This keeps it from getting too sticky. If you want more heat, add more Sriracha. Start with one tablespoon. Taste your mix after stirring. You can always add more, but you can't take it away. For less spice, reduce the Sriracha. Try using just a teaspoon. Balance the heat with a bit of honey if it's too spicy. This gives a sweet touch. To make prep easy, use a good knife. A sharp knife cuts the tuna and veggies neatly. A rice cooker is great for cooking sushi rice perfectly. You can also use a mixing bowl to marinate the tuna. A wooden spoon helps to mix without damaging the rice. Finally, use deep bowls for serving. This makes your poke bowl look amazing. Check out the Full Recipe for more details. {{image_2}} If you prefer a vegetarian option, try replacing the tuna with marinated tofu or tempeh. Both provide protein and absorb flavors well. Use soy sauce, sesame oil, and a splash of lime juice to marinate. Avocado can also serve as a creamy base for your poke bowl. Add a mix of colorful veggies like bell peppers or carrots for extra texture. You can elevate your spicy tuna poke bowl with more toppings. Consider adding mango for a sweet twist or pickled radish for crunch. You might also sprinkle some crispy onions or seaweed flakes for added flavor. Each topping brings a new taste and texture, making your bowl even more exciting. To enhance the flavor profile, try using different sauces. A drizzle of ponzu sauce can add a citrusy zing. Or, for a smoky kick, consider using chipotle sauce or smoked sesame oil. Fresh herbs like cilantro or mint can also brighten your dish. Each choice can change the bowl's taste, so feel free to mix and match your favorites. For the complete preparation, check the Full Recipe. To keep your spicy tuna poke bowl fresh, store it in an airtight container. Place the tuna, rice, and toppings in separate containers. This way, the flavors stay bright, and the ingredients remain crisp. You can keep the leftover bowls in the fridge for up to two days. If you need to store them longer, consider freezing the rice separately. Sushi rice can dry out quickly. After cooking, let it cool at room temperature. Once cooled, place it in a container with a lid. Keep it in the fridge for up to three days. To reheat, sprinkle a little water on the rice and microwave it briefly. This method helps keep the rice moist and tasty. - Sushi-grade tuna: Best used within two days of purchase. - Soy sauce: Lasts for months in the pantry, but refrigerate after opening. - Sriracha: Can stay good for up to a year in the fridge. - Avocado: Should be used within one to two days after cutting. - Cucumber: Fresh for about a week in the fridge. - Edamame: Can be frozen for up to six months. Following these storage tips will help maintain the quality and flavor of your spicy tuna poke bowl. For more details, check the Full Recipe. For poke bowls, sushi-grade tuna is the best choice. Look for yellowfin or ahi tuna. These types are fresh and safe to eat raw. Always check that it is labeled sushi-grade. This ensures quality and safety. You can also ask your fishmonger for advice. Freshness is key for flavor and texture. Yes, you can prepare parts of the poke bowl ahead of time. Cook the sushi rice and store it in the fridge. You can also marinate the tuna a few hours before serving. Keep the toppings, like avocado and cucumber, separate until you are ready to eat. This keeps them fresh and crunchy. To prevent mushy sushi rice, rinse it well before cooking. This removes excess starch. Use the right water-to-rice ratio, which is 1.25 cups of water for 1 cup of rice. Cook on low heat and avoid lifting the lid while it cooks. Once done, fluff the rice gently with a fork. This keeps it light and fluffy. Using fresh ingredients is key for great poke bowls. I shared how to prepare sushi rice, marinate tuna, and assemble the bowl. You learned tips for cooking rice, adjusting spice, and tools for quick prep. I also discussed variations like vegetarian options and spicy bowls. Lastly, I covered storage to keep your ingredients fresh. Now, you're ready to make your own poke bowls. Enjoy the process and get creative with flavors!

55. Spicy Tuna Poke Bowl Simple and Flavorful Meal

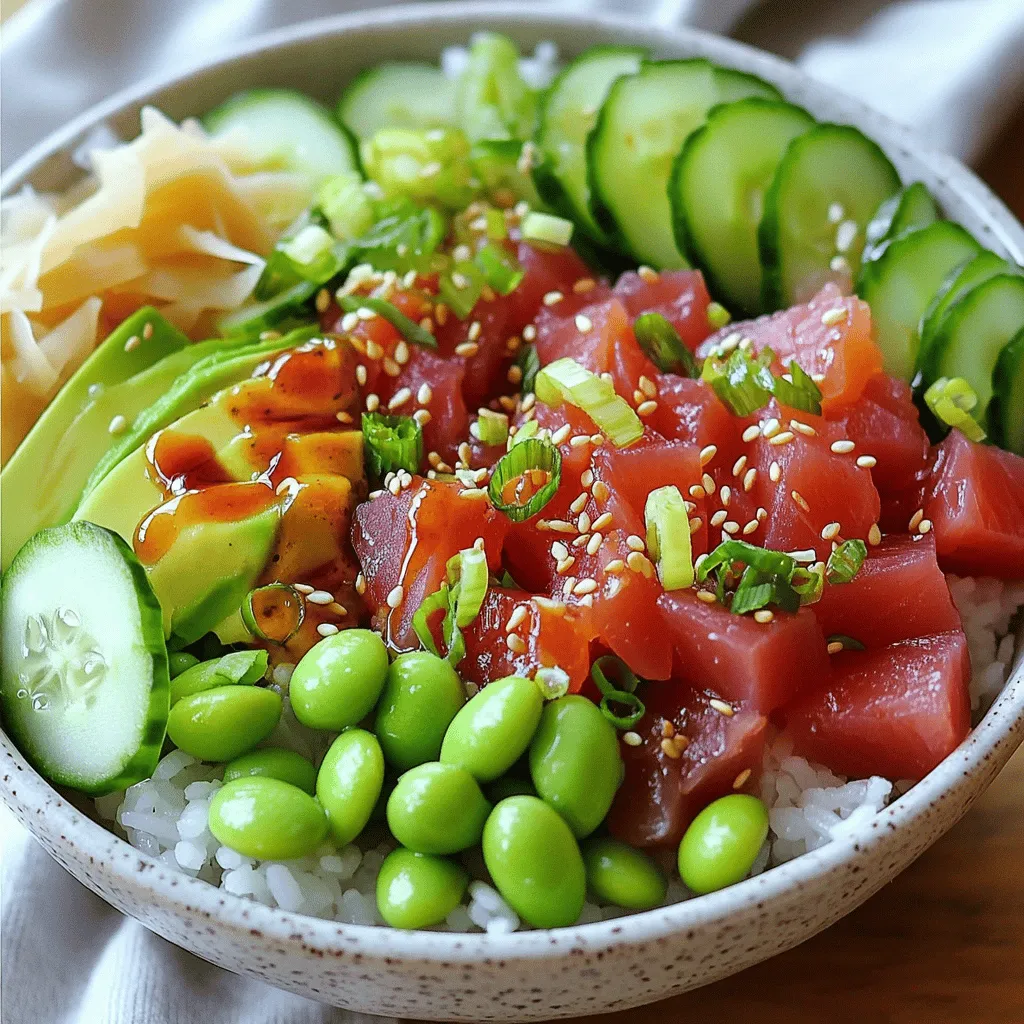
Looking for a simple and tasty meal? The Spicy Tuna Poke Bowl hits the spot! It blends fresh flavors and

To make a delicious butternut squash risotto, gather these items: - 1 medium butternut squash, peeled and diced - 1 tablespoon olive oil - 1 onion, finely chopped - 2 cloves garlic, minced - 1 1/2 cups arborio rice - 5 cups vegetable broth, warmed - 1/2 cup Parmesan cheese, grated (or nutritional yeast for a vegan option) - 2 tablespoons butter (or vegan butter) - Salt and pepper to taste - Fresh sage leaves for garnish You will need some tools to help make this dish: - Large saucepan - Baking sheet - Knife and cutting board - Ladle - Wooden spoon for stirring - Measuring cups and spoons You can easily swap ingredients to fit your needs: - For a vegan option, use nutritional yeast instead of Parmesan cheese. - Use vegetable broth for a vegetarian version. - If you want a creamier texture, try using coconut milk instead of butter. - Brown rice can work in place of arborio rice, but it will change the cooking time. For the full recipe, check out the details above! Start by peeling and dicing the butternut squash. This will make it easier to cook. Next, preheat your oven to 400°F (200°C). Spread the diced squash on a baking sheet. Drizzle it with olive oil and sprinkle salt and pepper. Roast the squash for 25-30 minutes. Flip it halfway through. The squash will be tender and slightly caramelized when done. While the squash roasts, heat a large saucepan over medium heat. Add a tablespoon of olive oil. Once hot, add the chopped onion. Sauté until it's soft and translucent, about 5 minutes. Then, add the minced garlic and cook for one more minute. This will make your kitchen smell great! Now, stir in the arborio rice. Toast the rice for about 2-3 minutes. Keep stirring until the grains are slightly translucent. Begin adding the warmed vegetable broth, one ladle at a time. Stir the rice often. Let it absorb the liquid before adding more. This process takes about 18-20 minutes. The rice should be al dente when it’s done. Once the rice is ready, fold in the roasted butternut squash. Add the grated Parmesan cheese and butter. Stir until the risotto is creamy. If it seems too thick, you can add more broth or water. Season with salt and pepper to taste. Serve hot, garnished with fresh sage leaves for a lovely finish. For the full recipe, check the section above. To get the right risotto texture, focus on the rice. Use arborio rice; it has a high starch content. This helps make the risotto creamy. Stir often while adding broth. The grains need to release their starch. Keep a close eye on the texture. It should be creamy but with a slight bite. Use a heavy-bottomed pot for even cooking. A wooden spoon works best for stirring. Measure your broth carefully and keep it warm. This helps the rice cook evenly. Always add the broth one ladle at a time. Patience is key for the best results. Don't rush the cooking process. Skipping the toasting step can lead to bland risotto. Avoid adding too much broth at once; it must absorb slowly. If the risotto seems too thick, add a splash of broth or water. Lastly, don’t forget to season well. Taste as you go to ensure great flavor. For the complete recipe, check out the [Full Recipe]. {{image_2}} You can make your butternut squash risotto even heartier by adding protein. Chicken or shrimp works great. For chicken, sauté pieces until golden, then stir them in near the end. For shrimp, cook them until pink and tender, and add them just before serving. This way, they stay juicy and add more flavor. If you want a vegan risotto, there are simple swaps. Use nutritional yeast instead of Parmesan cheese. It gives that cheesy taste but keeps it plant-based. You can also switch regular butter with vegan butter. This keeps the creaminess while ensuring everyone can enjoy it. To elevate your dish, add herbs and spices. Fresh sage pairs beautifully with butternut squash. You can also try thyme or rosemary for a different note. A pinch of nutmeg adds warmth and depth. Experiment with these to find your favorite combo. Each addition can turn this simple dish into something special. For the full recipe, check out the provided details! To store leftover butternut squash risotto, let it cool first. Place the risotto in an airtight container. This keeps the dish fresh and prevents odors. Store it in the fridge for up to three days. If you want to keep it longer, freezing is a great option. When reheating butternut squash risotto, add a splash of broth or water. This helps restore its creamy texture. Heat it gently on the stove over low heat. Stir often to make sure it warms evenly. You can also microwave it, but be careful not to overcook it. To freeze butternut squash risotto, place it in a freezer-safe container. Leave some space at the top for expansion. It can last up to three months in the freezer. When ready to eat, thaw it overnight in the fridge. Reheat it slowly to bring back its creamy goodness. For the best taste, enjoy it fresh when possible. For the full recipe, check out the complete guide. You can make risotto without stirring by using the oven. Preheat your oven to 350°F (175°C). Sauté your onions and garlic on the stove. Add the arborio rice next. Pour in the broth, cover the pot, and place it in the oven. Bake for about 20 minutes. This method allows the rice to cook evenly without constant stirring. Yes, you can use frozen butternut squash. It saves time and is very convenient. Just add it directly to your risotto. You may want to adjust cooking time since frozen squash is already cooked. If you thaw it first, it will blend nicely into the dish. You can use Carnaroli rice or Vialone Nano as substitutes for Arborio rice. Both types of rice have a high starch content, which helps create a creamy risotto. If you need a gluten-free option, use quinoa or farro. Just remember, these grains will change the texture and flavor slightly. For more details on making this delicious dish, check out the Full Recipe. In this article, we covered how to make Butternut Squash Risotto. I shared the ingredient list, necessary tools, and substitutes for diets. You learned the step-by-step process and tips for perfect texture. Variations included adding protein or making it vegan. I also discussed how to store leftovers and answered common questions. Now, you have everything you need to create this warm, tasty dish. Enjoy cooking and make it your own!

54. Butternut Squash Risotto Flavorful and Simple Dish

Are you ready for a dish that warms your heart and delights your taste buds? My Butternut Squash Risotto is

- 4 chicken thighs, bone-in and skin-on - 1/3 cup honey - 4 cloves garlic, minced - 2 tablespoons soy sauce (or tamari for gluten-free) - 1 tablespoon olive oil - 1 teaspoon fresh ginger, grated - Salt and pepper to taste - 1 tablespoon sesame seeds (for garnish) - 2 green onions, chopped (for garnish) When I make honey garlic chicken thighs, I always start with these key ingredients. The chicken thighs are juicy and flavorful. Bone-in and skin-on thighs give the best taste and texture. Honey adds a sweet touch. The garlic brings warmth, and soy sauce gives the dish depth. I also use olive oil to help the skin crisp up nicely. Fresh ginger adds a zing that pairs well with the honey. Don't forget salt and pepper; they help to enhance all the flavors. To finish, I like to sprinkle sesame seeds and chopped green onions on top. They add a nice crunch and color. This dish is simple, but the flavors pack a punch! For the complete recipe, check out the [Full Recipe]. First, grab a bowl. In it, whisk together these ingredients: - 1/3 cup honey - 4 cloves garlic, minced - 2 tablespoons soy sauce - 1 tablespoon olive oil - 1 teaspoon fresh ginger, grated - Salt and pepper to taste Make sure to mix well until smooth. Next, take your chicken thighs and coat them in the marinade. Place the chicken in a shallow dish. Cover it and let it marinate for at least 30 minutes. This step adds great flavor. Now, let’s get the oven ready. Preheat it to 400°F (200°C). After that, remove the chicken from the marinade. Place the thighs skin-side up in a baking dish. Bake for 25-30 minutes. You want the chicken to be cooked through and the skin crispy. While the chicken bakes, take the reserved marinade and pour it into a small saucepan. Bring it to a simmer over medium heat. Cook for about 5-7 minutes until it thickens slightly. Once the chicken is done, brush the thickened marinade over it. Return it to the oven for an extra 5-10 minutes. This will caramelize the glaze and make it shiny and tasty. Check out the Full Recipe for more details! To make the best marinade, adjust the honey and soy sauce to your taste. If you like it sweeter, add more honey. For a saltier flavor, increase the soy sauce. Let the chicken marinate for at least 30 minutes. For deeper flavor, you can marinate for up to 2 hours. This extra time allows the chicken to soak up all those tasty flavors. Getting crispy skin is easy if you use high heat. Preheat your oven to 400°F (200°C). Make sure to place the chicken thighs skin-side up in the baking dish. This helps the skin get nice and crispy while the chicken cooks. Avoid covering the chicken, as this will trap steam and keep the skin from crisping. Honey garlic chicken thighs pair well with steamed vegetables or rice. You can add a side salad for a fresh touch. For extra flair, offer garnishes like sesame seeds or chopped green onions. These add color and a nice crunch. You can also drizzle extra sauce over the chicken when serving. For the full recipe, please refer to [Full Recipe]. {{image_2}} If you want to make this dish gluten-free, just swap the soy sauce for tamari. Tamari tastes great and works well in this recipe. You can add some chili flakes to give your chicken a spicy kick. This small change can really make a big difference. For a fresh twist, try adding some citrus juice. Lemon or lime juice brightens up the dish and adds a nice tang. Grilling the chicken thighs gives them a smoky flavor that many people love. Just preheat your grill and cook the thighs until they are done. If you want a more tender option, a slow cooker works wonders. Cook the chicken on low for several hours, and it will be fall-apart good. For the full recipe, check out the Honey Garlic Chicken Thighs . Keep your honey garlic chicken thighs in an airtight container in the refrigerator. This will help keep them fresh and tasty. For the best flavor and quality, eat them within 3-4 days. After that, they may lose their delicious taste and texture. If you want to save some for later, freeze the cooked chicken in portions. This way, you can enjoy a quick meal anytime. When you’re ready to eat, just thaw the chicken overnight in the refrigerator. This slow thawing helps keep the meat juicy. To enjoy that crispy skin again, reheat the chicken in the oven. Set it to a low temperature to warm it through without drying it out. If you need a quicker option, you can use the microwave. However, be aware that this method may make the skin less crispy. You can serve Honey Garlic Chicken Thighs with several tasty sides. Here are some great ideas: - Steamed rice or jasmine rice - Roasted vegetables like broccoli or carrots - A fresh green salad with a light dressing - Mashed potatoes or sweet potatoes - Fried rice for a fun twist These sides add flavor and color to your meal. They also balance the sweet and savory notes of the chicken. You can prepare Honey Garlic Chicken Thighs in advance. Here’s how: - Mix the marinade and coat the chicken thighs. - Place the chicken in a dish and cover it. - Refrigerate for at least 30 minutes, or up to 2 hours for more flavor. You can also marinate the chicken overnight. Just remember to cook it within a day for the best taste. Yes, you can use boneless chicken thighs. The cooking time will change: - Boneless thighs cook faster than bone-in ones. - Bake for about 20-25 minutes at 400°F (200°C). The texture will also be different. Boneless thighs may be a bit juicier and easier to eat. Cooking frozen chicken thighs takes more time. Here’s what to do: - Preheat your oven to 400°F (200°C). - Place the frozen thighs in a baking dish. - Bake for 40-45 minutes, or until they reach 165°F (74°C). Always check the chicken for doneness. This ensures your meal is safe and tasty. If you want to speed up cooking, consider thawing in the fridge overnight first. For more details, check the Full Recipe. In this blog post, I shared a simple recipe for honey garlic chicken thighs. We covered key ingredients, step-by-step instructions, and useful tips for the best results. Remember, marinating adds flavor, and using high heat gives crispy skin. Feel free to explore variations and adjust to your taste. Proper storage helps maintain freshness, and reheating tips ensure a great meal every time. Enjoy making this dish for delicious family dinners or gatherings! Your kitchen can be a place for tasty creations.

53. Honey Garlic Chicken Thighs Quick and Easy Recipe

Looking for a simple, tasty meal? My Honey Garlic Chicken Thighs recipe is just what you need! With just a

For a delicious spinach artichoke dip, you will need the following ingredients: - 1 cup fresh spinach, chopped - 1 cup canned artichoke hearts, drained and chopped - 1 cup cream cheese, softened - 1/2 cup sour cream - 1/2 cup mayonnaise - 1 cup shredded mozzarella cheese - 1/2 cup grated Parmesan cheese - 2 cloves garlic, minced - 1 teaspoon onion powder - Salt and pepper to taste You can add some fun twists to your dip. Here are a few ideas: - 1/2 teaspoon crushed red pepper flakes for heat - Fresh herbs like parsley or basil for extra flavor - A squeeze of lemon juice for brightness - Chopped sun-dried tomatoes for a sweet touch To make this dip, gather these tools: - Mixing bowl - Baking dish - Spatula or spoon for mixing - Oven for baking - Knife and chopping board for prep This recipe is easy and full of flavor. You can find the Full Recipe above for detailed cooking steps! Making spinach artichoke dip is easy and fun. You will need a few simple steps. First, gather your ingredients. This dip takes just 10 minutes to prepare. The total time for making it is about 35 minutes. You can serve it warm or at room temperature. 1. Preheat your oven to 350°F (175°C). This step is key for a nice bake. 2. Grab a large mixing bowl. Add the softened cream cheese, sour cream, and mayonnaise. Mix them until you have a smooth blend. 3. Next, stir in the chopped spinach and artichoke hearts. Add the minced garlic and onion powder. If you like a bit of heat, mix in the crushed red pepper flakes. 4. Fold in the mozzarella and Parmesan cheeses. Keep a little mozzarella for later. Season with salt and pepper to your taste. 5. Now, transfer the mixture into a baking dish. Spread it out evenly. 1. Sprinkle the reserved mozzarella cheese on top of the dip. 2. Bake it in the preheated oven for 20 to 25 minutes. Look for the dip to be hot and bubbly, with a slightly golden top. 3. Once done, remove it from the oven. Let it cool for a few minutes before serving. This spinach artichoke dip is perfect for sharing. You can serve it with tortilla chips, pita bread, or fresh veggies. For a lovely touch, garnish with fresh parsley. For complete details, you can check the Full Recipe. Enjoy your dip! To make the best spinach artichoke dip, start with fresh spinach. Fresh spinach has a bright taste that makes the dip pop. Use high-quality cheeses for a richer flavor. I suggest using full-fat cream cheese for creaminess. Mix the ingredients well to avoid dry spots. Bake until bubbling and golden for the best texture. One common mistake is overcooking the dip. Baking too long can dry it out. Avoid using frozen spinach, as it can add more water. Drain your artichokes well to keep the dip from being soggy. Lastly, don't skip the salt and pepper. Proper seasoning is key to a tasty dip. You can make your dip even better with add-ins. Try adding chopped sun-dried tomatoes for a bit of sweetness. A squeeze of lemon juice brightens the flavor. For heat, add diced jalapeños or a dash of hot sauce. Fresh herbs like basil or dill can add a nice twist. Consider mixing in roasted garlic for a deeper taste. For the full recipe, check out the instructions above. Enjoy your delicious creation! {{image_2}} You can make this dip healthier without losing flavor. Here are some swaps: - Use Greek yogurt instead of sour cream. - Replace cream cheese with low-fat cream cheese. - Choose reduced-fat mayonnaise to cut calories. These changes keep the dip creamy and rich while being lighter. Want to shake things up? Try adding different flavors: - Mix in some sun-dried tomatoes for a tangy kick. - Add cooked, crumbled bacon for a smoky taste. - Toss in some fresh herbs like basil or dill for freshness. These additions can make your dip stand out at any gathering. You can easily make this dip vegan or gluten-free. Here’s how: - For vegan, swap cream cheese and sour cream with cashew cream or tofu. - Use vegan mayonnaise for added creaminess. - Ensure all cheeses are replaced with vegan options. For gluten-free, just serve it with gluten-free chips or veggies. Enjoy every bite without worry. You can find the full recipe for this delicious dip above. After you enjoy your spinach artichoke dip, let it cool down. Once it's cool, transfer it to an airtight container. This helps keep the flavors fresh. Store it in the fridge for up to three days. Be sure to label it to avoid any mix-ups. To reheat your dip, preheat the oven to 350°F (175°C). Place the dip in a baking dish. Cover it with foil to keep it moist. Heat for about 15-20 minutes, or until warm. You can also use a microwave. Heat it in short bursts, stirring in between. If you want to save some for later, freezing is a great option. First, let the dip cool completely. Then, place it in a freezer-safe container. Be sure to leave some space at the top since it expands when frozen. It will last for about two months. When ready to use, thaw it in the fridge overnight before reheating. For the full recipe, check out the Spinach Artichoke Delight Dip. You can serve Spinach Artichoke Dip with many tasty options. Tortilla chips are a classic choice. They add a nice crunch. You can also use pita bread or sliced vegetables. Carrots and bell peppers work great for dipping. For a fun twist, try serving it with toasted baguette slices. Each option enhances the dip's creamy flavor. Yes, you can make this dip ahead of time. Preparing it the day before works well. Just mix all the ingredients and store it in the fridge. When you're ready, bake it as directed. This method saves time on busy days or gatherings. Spinach Artichoke Dip is rich in flavor and nutrients. Here’s a quick look at its nutritional content per serving: - Calories: About 200 - Protein: 6 grams - Fat: 15 grams - Carbohydrates: 8 grams - Fiber: 1 gram - Calcium: Provides a good amount from cheese This dip contains healthy spinach and artichokes. They add vitamins and minerals. Enjoying it in moderation is key! For the full recipe, check the earlier section. This blog post guided you through making a delicious spinach artichoke dip. We covered the key ingredients, tools, and step-by-step instructions. Tips helped you catch common mistakes and make the dip even tastier. We explored variations for everyone, including healthy swaps and vegan options. Finally, we discussed how to store leftovers and answered common questions. With these pointers, you can impress friends and family with your dip. Enjoy creating and sharing this tasty treat!

52. Spinach Artichoke Dip Flavorful and Simple Recipe

Looking for a crowd-pleasing snack? This easy Spinach Artichoke Dip will wow your taste buds! With just a few simple

Here’s what you need for a tasty beef and broccoli stir-fry. Each ingredient plays a key role in flavor and texture. - 1 lb (450 g) flank steak, thinly sliced - 4 cups broccoli florets - 1 red bell pepper, sliced - 3 cloves garlic, minced - 2 tablespoons fresh ginger, grated - 3 tablespoons soy sauce - 1 tablespoon oyster sauce - 1 tablespoon cornstarch - 2 tablespoons sesame oil - 1 tablespoon vegetable oil - 1 tablespoon honey - Cooked jasmine rice, for serving - Sesame seeds and sliced green onions for garnish These ingredients combine to create a dish that is both savory and vibrant. The fresh ginger and garlic add depth, while soy and oyster sauce bring umami. I love using flank steak for its tenderness. The broccoli adds a nice crunch and bright color, making the dish visually appealing. For a complete guide on how to prepare this dish, check out the Full Recipe. First, we need to marinate the beef. Take the thinly sliced flank steak and mix it with: - 3 tablespoons soy sauce - 1 tablespoon oyster sauce - 1 tablespoon cornstarch - 1 tablespoon honey This mix makes the beef tender and flavorful. Let it sit for at least 15 minutes. This step is key for getting great taste. While the beef marinates, heat up 1 tablespoon of vegetable oil in a large skillet or wok. Use medium-high heat for the best results. Once hot, add the marinated beef in a single layer. Stir-fry for about 3-4 minutes until the beef turns brown and cooks through. When it’s done, remove the beef from the skillet and set it aside. Next, it’s time for the veggies! Boil some water in a pot. Blanch 4 cups of broccoli florets for about 2 minutes. This keeps them bright green and slightly tender. Drain the broccoli and set it aside. In the same skillet, add 2 tablespoons of sesame oil, 3 cloves of minced garlic, and 2 tablespoons of grated ginger. Stir-fry these for about 30 seconds until you can smell the amazing aroma. Now, toss in the sliced red bell pepper and the blanched broccoli. Stir-fry for another 2-3 minutes. This step coats the veggies in flavor and keeps them crunchy. Return the cooked beef to the skillet. Mix all the ingredients well and cook for another 2 minutes. This helps everything blend together. You can serve this delicious dish over bowls of warm jasmine rice. For a finishing touch, sprinkle sesame seeds and sliced green onions on top. This adds extra flavor and makes it look great too. For the complete recipe, check out the Full Recipe section. To make your beef and broccoli stir-fry stand out, choose the right cut of beef. I recommend flank steak for its tenderness and flavor. It cooks quickly and adds a nice chew. Marination is also key. Let the beef sit in the marinade for at least 15 minutes. This helps the flavors soak in and makes the beef taste amazing. The best method for stir-frying is using a hot skillet or wok. Start with medium-high heat to get a good sear on the beef. Stir-fry in small batches to avoid overcrowding. This keeps the meat juicy. For the veggies, blanch the broccoli first. This step keeps the crunch. Stir-fry the garlic and ginger shortly before adding the vegetables to keep them bright and fresh. Garnishing can elevate your dish. Use sesame seeds and sliced green onions for a pop of color. These small touches make the meal look fancy. For special occasions, serve the stir-fry over fluffy jasmine rice. You can even arrange the beef and broccoli neatly, making it a feast for the eyes. Try these tips to impress your guests! {{image_2}} You can change up the veggies in this dish. Try using snap peas, carrots, or bell peppers. Seasonal produce works great too. In spring, add asparagus. In fall, use Brussels sprouts. Just remember to cut your veggies into similar sizes. This helps them cook evenly. If you want a change from beef, use chicken, tofu, or shrimp. For chicken, use thin slices of breast or thigh. Tofu should be firm and cut into cubes. Shrimp cooks quickly, so reduce your cooking time. Each protein brings a new taste to this dish! To make this dish gluten-free, swap soy sauce for a gluten-free version. You can also use tamari. Check your oyster sauce too—some brands offer gluten-free options. Cornstarch is naturally gluten-free and helps thicken the sauce. Enjoy a tasty meal without worries! After you enjoy your Beef and Broccoli Stir-Fry, let it cool down first. This step helps keep your food safe and tasty. Aim for about 30 minutes at room temperature. Once it's cool, store it in airtight containers. Glass or BPA-free plastic containers work best. They keep your meal fresh and are easy to stack in the fridge. To reheat your leftovers, the best method is using a skillet. Heat it on medium and add a splash of water or broth. This keeps your beef and broccoli moist. Stir often for about 5 minutes until it’s hot. If you're in a hurry, you can also use a microwave. Heat on high for 1-2 minutes, stirring halfway through. Leftovers can last in the refrigerator for up to 3 days. If you want to keep them longer, consider freezing them. Just make sure to thaw them before reheating for the best taste. For more details, check out the Full Recipe. Yes, you can prepare this dish ahead. Marinate the beef in the sauce for up to 24 hours. This will enhance the flavor. Blanch the broccoli and store it in the fridge. You can also chop the garlic and ginger in advance. Keep everything in separate containers. When you’re ready to cook, just stir-fry it all together. This saves you time during a busy weeknight. This stir-fry pairs well with several sides. Cooked jasmine rice is a classic choice. It soaks up the sauce and complements the beef. You could also serve it with steamed rice or fried rice for a twist. A light salad or some spring rolls would add a fresh touch. Consider pickled vegetables for a crunchy contrast. All these sides enhance the meal. If you like heat, there are easy ways to spice it up. Add sliced fresh chili peppers when you stir-fry. You can use jalapeños or serranos for a nice kick. Another option is to mix in chili paste or sauce during cooking. Sriracha also works well. Adjust the amount to your taste. Remember, it’s always best to start small and add more if needed. Yes, this dish is quite healthy. It features lean beef and lots of broccoli. Broccoli is rich in vitamins and fiber. The stir-fry method uses less oil compared to frying. You can also control the amount of soy sauce, keeping sodium in check. This meal is balanced and provides protein, veggies, and healthy fats. Enjoy it guilt-free! For the full recipe, check out the details above. This beef and broccoli stir-fry shines with fresh veggies and tasty flavors. You learned about marinating, cooking, and serving for the best results. With simple tips, you can boost the taste and make it look nice. Swap proteins or veggies for fun variations. Store any leftovers right to enjoy later. Now, you’re ready to create a great meal that will impress everyone! Enjoy your cooking!

51. Beef and Broccoli Stir-Fry Tasty Quick Dinner

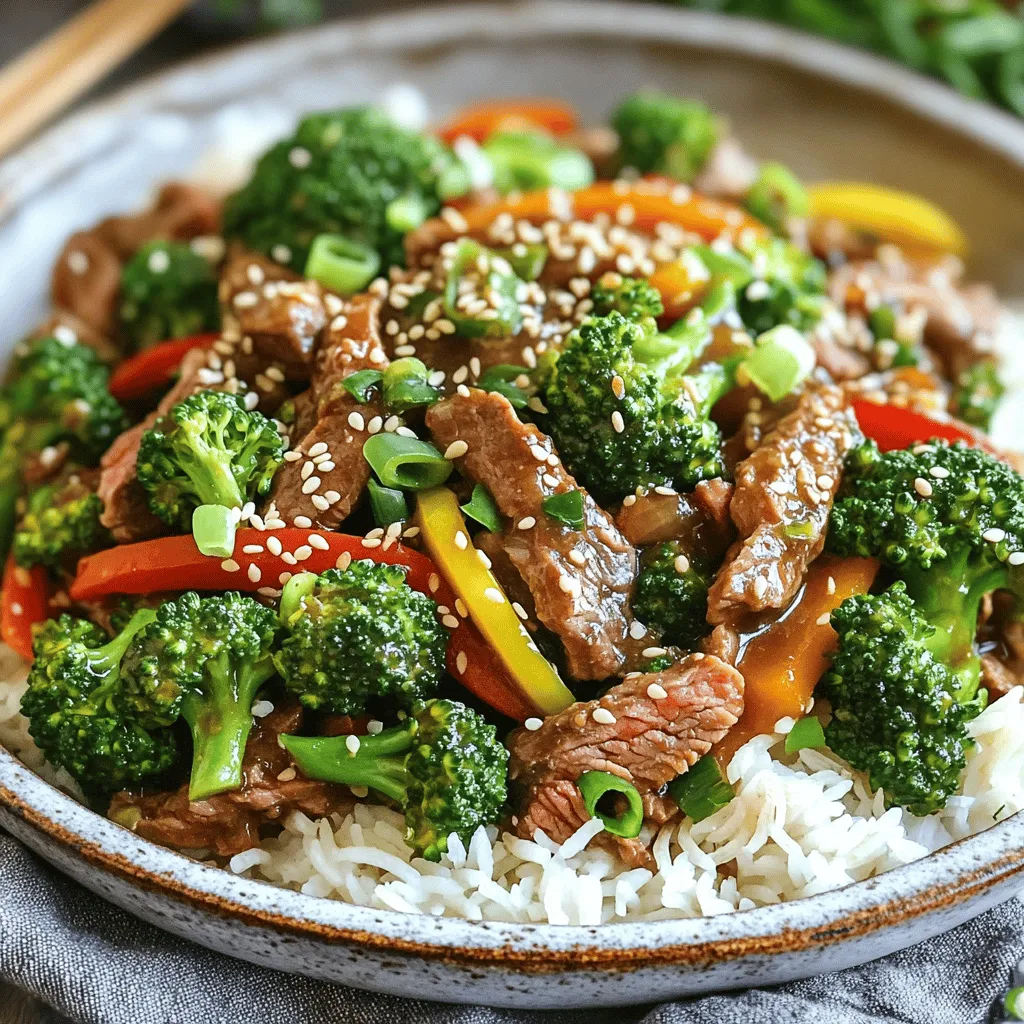
Looking for a quick and tasty dinner? Try my Beef and Broccoli Stir-Fry! This dish combines tender beef and crisp

To make a large batch of creamy tomato basil pasta, gather these key ingredients: - 150 oz (4.25 kg) pasta of choice (fettuccine or penne work well) - 3 tablespoons olive oil - 3 small onions, diced - 9 cloves garlic, minced - 3 cans (14 oz each) crushed tomatoes - 3 cups heavy cream or coconut cream - 3 teaspoons sugar - 3 teaspoons dried oregano - Salt and pepper to taste - 3 cups fresh basil leaves, chopped (plus extra for garnish) - 1.5 cups grated Parmesan cheese (optional for garnish) You can easily adapt this recipe to fit different diets. Here are some ideas: - Use gluten-free pasta for a gluten-free option. - Swap heavy cream with cashew cream or almond milk for a lighter version. - Omit the cheese or use nutritional yeast for a vegan choice. - Replace sugar with maple syrup or leave it out entirely for no added sugar. Choosing quality ingredients can elevate your dish. Here’s what I recommend: - Pasta: Barilla or De Cecco for reliable texture. - Olive oil: California Olive Ranch for a nice flavor. - Canned tomatoes: San Marzano for rich taste. - Cream: Organic Valley for heavy cream or Aroy-D for coconut cream. - Cheese: BelGioioso for high-quality Parmesan. These choices help ensure your creamy tomato basil pasta shines, even in a large batch. To start, bring a large pot of salted water to a boil. I recommend using a good amount of salt; it helps flavor the pasta. Add 12 ounces of your favorite pasta, like fettuccine or penne. Cook according to the package instructions until it's al dente, which means it should still have a slight bite. This usually takes about 8 to 10 minutes. Once cooked, drain the pasta and set it aside. Don’t forget to reserve half a cup of the pasta water. This water is starchy and will help make your sauce creamy later. Next, grab a large skillet. Heat one tablespoon of olive oil over medium heat. Add one small diced onion to the pan. Sauté it until it's soft and translucent, which takes about 5 minutes. Then, stir in three minced garlic cloves. Cook them for another minute or two, just until they smell amazing. Now, pour in a can of crushed tomatoes (14 ounces). This is where the magic begins! Bring the mixture to a simmer and add one teaspoon of sugar, one teaspoon of dried oregano, salt, and pepper to taste. Let it bubble gently for about 5 to 7 minutes, thickening up the sauce. Lower the heat and stir in one cup of heavy cream or coconut cream. This is what makes the sauce rich and creamy. Let it simmer for another 2 to 3 minutes without boiling. Now, it's time to bring the pasta and sauce together. Add the cooked pasta to the skillet, tossing it to coat well in the sauce. If the sauce feels too thick, use a bit of that reserved pasta water to loosen it up. Finally, stir in one cup of chopped fresh basil. Mix it until the basil is evenly spread. Taste your dish and adjust the seasoning if needed. Serve it up hot, and don’t forget to sprinkle some grated Parmesan cheese on top if you like. Enjoy this creamy tomato basil pasta! For the complete recipe, check out the Full Recipe section. To cook pasta perfectly, start with a large pot of water. Add salt, about 1 tablespoon per quart. Bring it to a rolling boil. Then, add your pasta and cook it for one minute less than the package says. This helps keep it firm. When you drain it, save some pasta water. This water can help adjust your sauce later. For a creamy sauce, keep the heat low once you add the cream. High heat can cause the cream to separate. Stir the cream gently into your sauce. If you want extra creaminess, mix in some reserved pasta water. This water has starch, which helps bind the sauce to the pasta. Always finish with fresh basil for a bright flavor. When cooking a big batch, use a large pot for boiling pasta. A wide skillet or Dutch oven is perfect for your sauce. A large slotted spoon helps mix everything without breaking the pasta. If you have it, a food processor can chop your onions and basil quickly. For serving, use a big serving bowl to show off your dish. You can check the Full Recipe for more details on these steps. {{image_2}} You can easily add protein to creamy tomato basil pasta. Chicken is a great choice. Cook bite-sized pieces of chicken in the skillet before adding the sauce. Shrimp is another tasty option. Sauté shrimp until pink, then mix them in with the pasta. Both options make the dish more filling and add flavor. For a vegetarian twist, use vegetable broth instead of chicken broth if you choose to add broth. To make it vegan, swap heavy cream with coconut cream or cashew cream. You can also add more veggies, like spinach or mushrooms, for a hearty meal. These changes keep the dish creamy and delicious while meeting dietary needs. Want to spice things up? Add red pepper flakes for heat. Fresh herbs like thyme or parsley can make it brighter. You can also add a splash of lemon juice for a zesty touch. Experiment with these flavors to find your favorites. This dish is flexible, so have fun with it! For the full recipe, check out the details above. To store your creamy tomato basil pasta, let it cool first. Place it in an airtight container. Make sure to cover it tightly. This keeps it fresh for up to three days in the fridge. If you want to keep it longer, consider freezing it instead. When you're ready to enjoy leftovers, reheating is key. The best way is to use a skillet. Heat it on medium-low and add a splash of water or broth. Stir gently until it warms through. This method helps keep the pasta creamy. You can also use a microwave. Just cover it loosely and heat in short bursts, stirring in between. If you want to freeze your creamy tomato basil pasta, it’s easy! Portion it into freezer-safe containers. Leave some space at the top for expansion. It will stay good for up to three months. When you're ready to eat, thaw it in the fridge overnight. Then, reheat as mentioned before for the best taste and texture. For the full recipe, check out the details above. Yes, you can use any pasta you like. Fettuccine and penne suit this recipe well. You can also try spaghetti, rotini, or even whole wheat pasta. Each type gives a unique texture. Just adjust the cooking time as needed. Absolutely! You can use gluten-free pasta. Many brands offer great taste and texture. Look for options made from rice, quinoa, or chickpeas. Just follow the package instructions for cooking time. You can prepare the sauce and cook the pasta separately. Store them in airtight containers. Keep the sauce cool in the fridge for up to three days. When ready to eat, reheat the sauce and mix in the pasta. This keeps everything fresh and tasty. You can also freeze the sauce for later use. Just thaw it overnight before reheating. Enjoy this easy large batch recipe at your convenience! For the full recipe, check out the details above. You now have a clear path to make a hearty pasta dish. We covered ingredients, cooking steps, tips, and variations. You learned how to tailor the recipe for different diets while ensuring great flavor. Remember to store and reheat leftovers properly for the best taste. Don't hesitate to experiment with different proteins and flavors to find your favorite mix. With these guidelines, you can create a winning meal for any occasion. Enjoy your cooking journey!

Creamy Tomato Basil Pasta Easy Large Batch Recipe

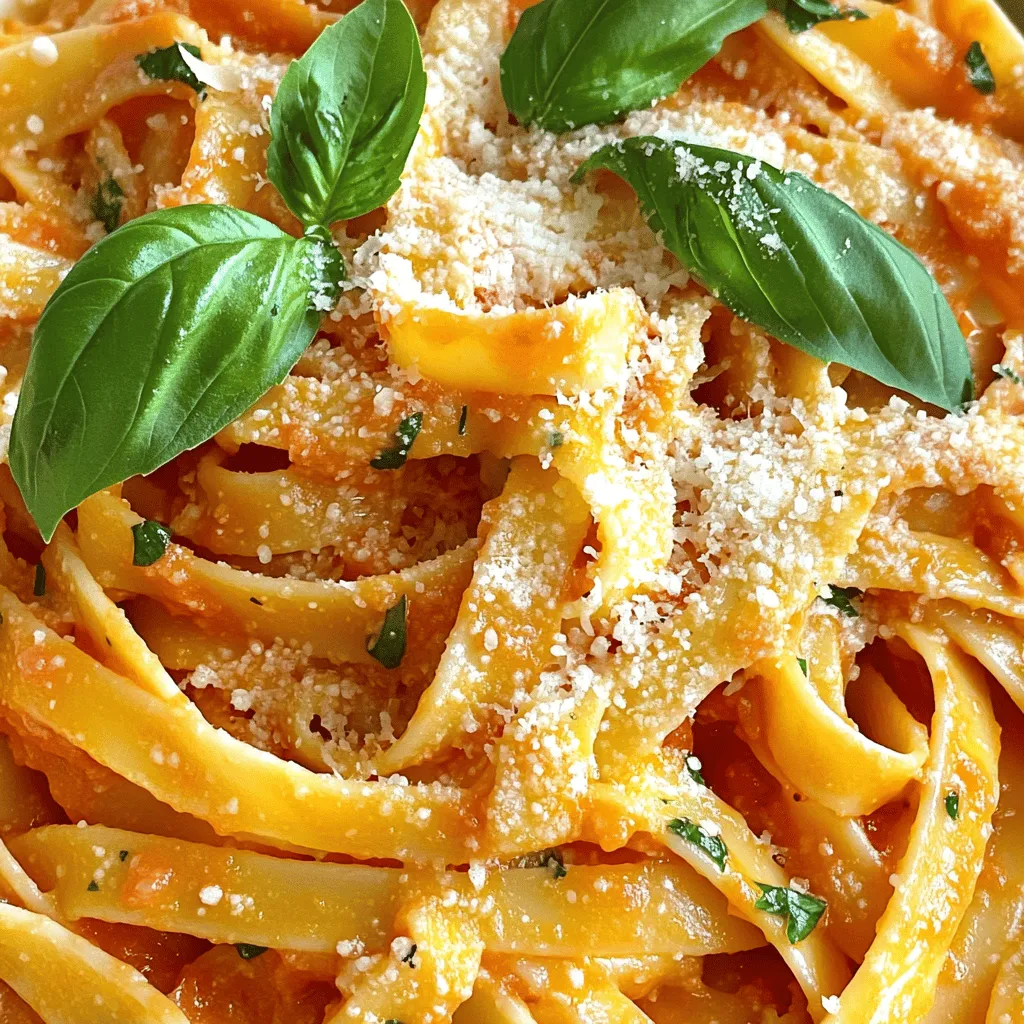
Looking for a quick, tasty meal that feeds a crowd? My Creamy Tomato Basil Pasta recipe is just the ticket!

- 1 medium cauliflower, cut into florets - 4 cloves garlic, minced - 1/2 cup grated Parmesan cheese - 3 tablespoons olive oil - 1 teaspoon Italian seasoning - 1/2 teaspoon red pepper flakes (optional) - Salt and pepper, to taste - Fresh parsley, chopped (for garnish) Garlic Parmesan Roasted Cauliflower is a dish you can whip up quickly. The main ingredients are simple yet full of flavor. Cauliflower is the star here, with its lovely texture. Garlic gives that savory kick, while Parmesan adds a rich, cheesy taste. You'll want to use fresh garlic for the best flavor. The seasoning mix brings a nice balance. Olive oil helps the cauliflower roast perfectly. You can add red pepper flakes for a little heat if you like. For garnishing, salt and pepper enhance the taste. Fresh parsley adds color and freshness. This dish is not just tasty; it looks great on your plate too. If you're ready, check out the Full Recipe to create this delightful side dish. - Preheat your oven to 425°F (220°C). - In a large bowl, combine the cauliflower florets, minced garlic, and olive oil. - Add Italian seasoning and red pepper flakes for a little heat, if you like. - Season with salt and pepper to taste. - Toss everything together until each floret is well coated. - Spread the cauliflower mixture evenly on a baking sheet. - Make sure they are in a single layer for even cooking. - Roast in the oven for about 20 minutes. - Stir the cauliflower halfway through to help it cook evenly. - After 20 minutes, take the baking sheet out. - Sprinkle the grated Parmesan cheese over the hot cauliflower. - Return it to the oven and roast for another 5 minutes. - This will melt the cheese and give it a nice, crispy top. Now you have a delicious side dish that is easy and full of flavor! For a full recipe, check out the details above. To get the best results, space out the cauliflower florets. This helps them cook evenly. If they are too close, they will steam instead of roast. Cooking times can change based on the size of the florets. Smaller pieces roast faster, while larger ones will take longer. Keep an eye on them, and adjust the time if needed. You can add more flavor with spices and herbs. Consider using smoked paprika or cumin for a different taste. Fresh herbs like thyme or rosemary can also work well. If you like a bit of heat, sprinkle in some red pepper flakes. This will balance the rich cheese and garlic. Garlic Parmesan roasted cauliflower goes great with many dishes. You can pair it with grilled chicken or fish for a complete meal. It also works well in salads, adding texture and flavor. For a fun twist, try serving it with a dipping sauce. A creamy ranch or a spicy aioli can enhance the dish and make it even more enjoyable. For the full recipe, check out the Garlic Parmesan Roasted Cauliflower. {{image_2}} You can switch up the cheese in this dish. If you want a stronger flavor, try Pecorino Romano. It has a nice sharp taste that pairs well with garlic. For a dairy-free option, use vegan cheese. There are many brands that mimic the taste of Parmesan. They often melt nicely too! Roasting other veggies with cauliflower is a fun idea. Carrots add sweetness, while bell peppers bring a pop of color. You can mix in broccoli or Brussels sprouts for variety. Just cut them to a similar size as the cauliflower. This way, they all cook evenly and taste great together. Want to change the flavor? Experiment with different spices! Add curry powder for a warm, earthy taste. Smoked paprika gives a nice depth and smokiness. You could even try a pinch of cumin for a unique twist. Don’t be afraid to mix and match seasonings to find what you love best! For the full recipe, check it out and get cooking! To keep your Garlic Parmesan Roasted Cauliflower fresh, store leftovers in an airtight container. Place it in the fridge within two hours of cooking. This helps prevent bacteria from growing. When you’re ready to eat, just take out the amount you want. You can enjoy it cold or reheat it in the oven for best taste. If you want to save this dish for later, you can freeze it. First, let the roasted cauliflower cool completely. Then, place it in a freezer-safe bag or container. Remove as much air as possible to avoid freezer burn. When you're ready to eat it, thaw it overnight in the fridge. Reheat in the oven at 350°F (175°C) for about 15-20 minutes until warm. In the fridge, Garlic Parmesan Roasted Cauliflower stays fresh for about 3 to 5 days. If you freeze it properly, it can last for up to 3 months. Always check for signs of spoilage before enjoying any leftovers. When in doubt, throw it out! You can serve Garlic Parmesan Roasted Cauliflower in many ways. This dish shines as a side. It goes great with chicken, fish, or steak. You can also enjoy it on its own. A sprinkle of fresh parsley adds a nice touch. For a fun twist, try it in a wrap or a salad. It pairs well with a drizzle of balsamic glaze. You can also serve it with a yogurt dip for extra flavor. This dish is versatile and can fit into many meals. Yes, you can prepare Garlic Parmesan Roasted Cauliflower ahead of time. You can cut the cauliflower and mix it with the seasonings a few hours before cooking. Just store it in the fridge until you're ready. When you are ready to cook, just spread it on a baking sheet and roast. If you want to reheat leftovers, use the oven. Preheat to 350°F (175°C) and heat for about 10 minutes. This will keep it crispy and tasty. Garlic Parmesan Roasted Cauliflower is quite healthy. Cauliflower is low in calories and high in fiber. It also has vitamins C and K, which are good for your body. Using olive oil adds healthy fats, and Parmesan gives protein. If you choose to skip the cheese, it remains a great vegan option. This dish is not just tasty; it is also a smart choice for meals. For the full recipe, refer to the recipe section. Garlic Parmesan roasted cauliflower is simple and tasty. We covered essential ingredients, from fresh cauliflower to Parmesan cheese. The step-by-step guide showed how to prep and roast for perfect flavor and texture. With tips on variations and serving ideas, you can customize this dish. Now, enjoy your delicious, healthy side dish. Experiment with new spices and enjoy it your way!

49. Garlic Parmesan Roasted Cauliflower Tasty Side Dish

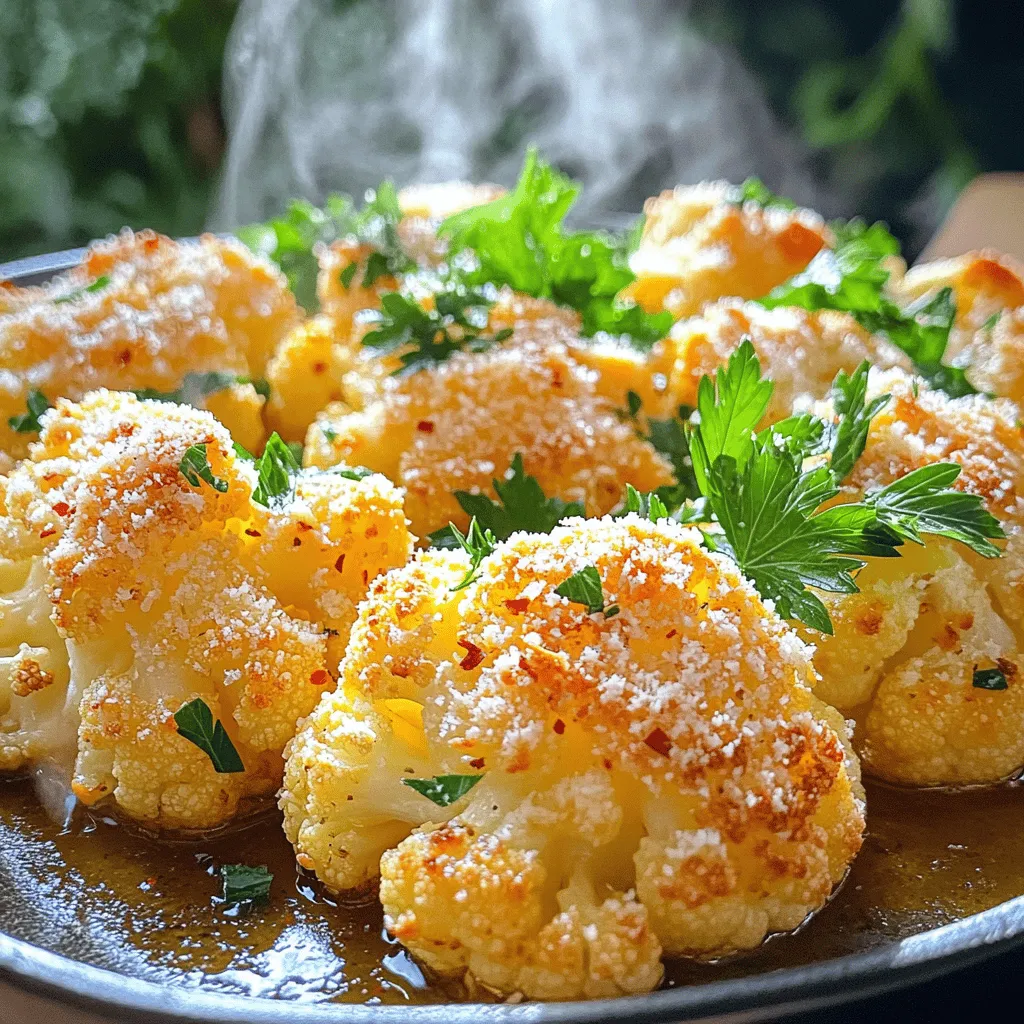
Looking for a scrumptious side dish that’s easy to make? Try my Garlic Parmesan Roasted Cauliflower! This dish combines tender

To make these tasty bites, gather these ingredients: - 1 medium head of cauliflower, cut into bite-sized florets - 1 cup all-purpose flour (or gluten-free flour) - 1 cup water - 1 teaspoon garlic powder - 1 teaspoon onion powder - 1 teaspoon smoked paprika - Salt and pepper to taste - 1 cup buffalo sauce - 2 tablespoons melted vegan butter (optional) - Optional: Celery sticks and blue cheese dressing for serving You can swap some ingredients if needed: - Use almond flour or oat flour instead of all-purpose flour for a gluten-free option. - For a spicier kick, add cayenne pepper to the batter. - If you don’t have buffalo sauce, try a barbecue sauce for a different flavor. You will need a few basic tools: - A large bowl for mixing the batter - A whisk for smooth batter consistency - A baking sheet lined with parchment paper - A spatula for flipping the bites - A separate bowl for mixing the buffalo sauce These ingredients and tools help make your buffalo cauliflower bites crispy and delicious. Check out the Full Recipe for detailed steps to create this snack! Start by preheating your oven to 450°F (230°C). This high heat helps the cauliflower get nice and crispy. While the oven warms, line your baking sheet with parchment paper. This makes clean-up easy and prevents sticking. In a large bowl, whisk together: - 1 cup all-purpose flour (or gluten-free flour) - 1 cup water - 1 teaspoon garlic powder - 1 teaspoon onion powder - 1 teaspoon smoked paprika - Salt and pepper to taste Mix until you have a smooth batter. This batter is key for coating the cauliflower and giving it flavor. Cut your cauliflower into bite-sized florets. Dip each floret into the batter. Make sure to coat them well. Shake off any extra batter before placing them on the baking sheet. Spread the florets out in a single layer. Bake them for 20-25 minutes. Flip them halfway through baking. This helps them cook evenly and become golden and crispy. In a separate bowl, mix the buffalo sauce with 2 tablespoons of melted vegan butter if you want. This step helps tone down the heat a bit. Once your cauliflower bites are done baking, take them out of the oven. Toss the hot bites in the buffalo sauce until they are evenly coated. Return the sauced bites to the oven. Bake them for another 10-15 minutes. This final bake allows the sauce to stick and the bites to crisp up even more. Once done, let them cool slightly before serving. You can pair them with celery sticks and blue cheese dressing for a tasty treat. For the full recipe, check out the details above! To get your buffalo cauliflower bites crispy, use a high oven temperature. I recommend 450°F (230°C). This heat helps the batter turn golden and crispy. Remember to flip the florets halfway through baking. This ensures even crispiness on all sides. For extra crunch, you can also try using panko breadcrumbs instead of regular flour. They add a great texture! Do you like it spicy or mild? You can adjust the heat in your buffalo sauce easily. Start with the basic buffalo sauce and add more hot sauce for extra heat. If you prefer it milder, mix in some melted butter or olive oil. This softens the sauce's kick. You can also try adding a touch of honey for a sweet balance. If you have leftovers, store them in an airtight container in the fridge. They stay fresh for up to three days. To reheat, place them in the oven at 350°F (175°C) for about 10 minutes. This helps restore some crispiness. Avoid the microwave, as it can make them soggy. Enjoy your tasty bites again without losing that crunch! {{image_2}} You can easily make buffalo cauliflower bites gluten-free. Just swap regular flour with gluten-free flour. This change keeps the bites crispy and tasty. If you want a vegan version, use plant-based butter. This twist makes it simple for everyone to enjoy these bites. You still get great flavor without any animal products. Feel free to get creative with sauces! Instead of buffalo sauce, try barbecue or teriyaki sauce. You can mix in honey or maple syrup for a sweet touch. If you love heat, add extra hot sauce to the buffalo mix. You can even use ranch dressing for a creamy dip. Each sauce gives a new taste to the same base recipe. Pair your bites with fresh veggies like carrots and celery. These add a nice crunch and balance the heat. A cool dip, like ranch or blue cheese dressing, works well too. You can serve these bites as a snack or a side dish. They are great for parties or game day. For a full meal, serve with a salad or grain bowl. Check out the Full Recipe for more ideas! Store leftover buffalo cauliflower bites in an airtight container. Place them in the fridge. They will stay fresh for about 3 to 4 days. If you want to keep them longer, freezing is a great option. To freeze the bites, first let them cool completely. Then, arrange them in a single layer on a baking sheet. Freeze them for about 1 to 2 hours. Once frozen, transfer the bites to a freezer bag or container. Make sure to remove as much air as you can. This helps prevent freezer burn. Properly stored, they can last up to 3 months in the freezer. When you're ready to eat the frozen bites, take them out of the freezer. Thaw them in the fridge overnight. For quicker thawing, you can leave them at room temperature for about 1 hour. To reheat, preheat your oven to 400°F (200°C). Place the bites on a baking sheet and heat them for about 10 to 15 minutes. This will make them crispy again. You can also use an air fryer for a quick and easy option. Just remember, the goal is to heat them through and regain that lovely crunch. For the full recipe, check out the earlier section. You can keep buffalo cauliflower bites in the fridge for up to five days. Store them in an airtight container. When you want to eat them, just reheat in the oven. This keeps them crispy and tasty. Yes, you can bake these bites! Baking gives them a healthier twist. Preheat your oven to 450°F (230°C) and follow the recipe. Baking makes them crispy without extra oil. Buffalo cauliflower bites pair well with many sides. Here are some ideas: - Celery sticks - Carrot sticks - Blue cheese dressing - Ranch dressing - Guacamole These options add crunch and flavor. They also balance the spicy bites. To add heat, mix more buffalo sauce into the batter. You can also try adding cayenne pepper or hot sauce. Adjust the spice level to your taste. Just remember to start small and taste as you go. For the full recipe, check the complete instructions above. You now know how to make tasty Buffalo Cauliflower Bites. We covered ingredients, cooking steps, and helpful tips for crispiness. You can even try different flavors and safe ways to store leftovers. These bites are easy to make, fun to eat, and great for gatherings. Enjoy making them your own and sharing with others. Dig in and savor each bite!

48 Buffalo Cauliflower Bites Crispy and Flavorful Snack

Craving a snack that’s both crispy and packed with flavor? You’re in the right place! My 48 Buffalo Cauliflower Bites

Older posts
Newer posts
← Previous Page1 … Page44 Page45 Page46 … Page79 Next →

dsad

© 2025 pureeatsnow • Built with GeneratePress

Our Policies

  • Copyright Policy
  • Cookie Policy
  • GDPR Policy
  • Privacy Policy
  • Disclaimer
  • Terms Of Use

More Information

  • Home
  • About
  • Contact
  • Appetizers
  • Dessert
  • Dinner
  • Drinks
©2025, pureeatsnow About Back To Top