
Tasty Mango Salsa with Tortilla Chips Recipe
Are you ready to add a burst of flavor to your next snack? This Tasty Mango Salsa with Tortilla Chips
Are you ready to add a burst of flavor to your next snack? This Tasty Mango Salsa with Tortilla Chips
![- 1 whole chicken (about 4-5 lbs) - 3 tablespoons olive oil - 2 teaspoons salt - 1 teaspoon black pepper - 1 tablespoon garlic powder - 1 tablespoon onion powder - 2 teaspoons dried thyme - 2 teaspoons dried rosemary - 1 teaspoon paprika - Juice of 1 lemon - 1 onion, quartered - 4 cloves garlic, smashed - Fresh herbs (like thyme and rosemary) for garnish For a great meal, you need a whole chicken. Aim for one that weighs about 4-5 lbs. This size cooks well and gives juicy meat. Next, gather your essential seasonings and herbs. Olive oil adds moisture and flavor. Salt and black pepper bring out the taste. Garlic powder and onion powder give depth. Dried thyme and rosemary add that lovely herbal note. Finally, a touch of paprika adds color and a slight kick. You can add optional ingredients to enhance flavor. Quarter an onion and smash some garlic cloves. They will stuff the chicken's cavity. This adds aroma and taste while cooking. Fresh herbs make a lovely garnish. They add color and a fresh touch to your dish. For the full recipe, check out the instructions to bring this meal to life. 1. Preheat your oven to 425°F (220°C). A hot oven helps the chicken cook evenly. 2. Rinse the chicken under cold water. Pat it dry with paper towels. This step is key for a crispy skin. 3. Place the chicken in a roasting pan. This helps collect the juices as it cooks. 4. In a small bowl, combine the olive oil, salt, pepper, garlic powder, onion powder, dried thyme, dried rosemary, and paprika. Mix these well to make a thick herb paste. 5. Rub the herb paste all over the chicken. Be sure to get it under the skin. This adds flavor throughout the meat. 6. Squeeze the juice of one lemon over the chicken. This gives a nice tangy flavor. 7. Stuff the cavity of the chicken with the quartered onion and smashed garlic cloves. This adds great aroma while cooking. 1. Place the chicken in the preheated oven. Roast it for about 1 hour and 20 minutes. The internal temperature should reach 165°F (75°C) for safe eating. 2. Baste the chicken with its juices twice during cooking. This keeps the meat moist and flavorful. 3. To check for doneness, insert a meat thermometer into the thickest part of the thigh. If it reads 165°F (75°C), the chicken is ready. 4. Once cooked, take the chicken out of the oven. Let it rest for 10-15 minutes before carving. This helps keep the juices inside the meat. 5. Before serving, garnish with fresh herbs for a beautiful touch. For the full recipe, check the details above. Enjoy your savory herb roasted chicken! To make your savory herb roasted chicken burst with flavor, focus on the herbs. Rub the herb mix all over the chicken. Getting it under the skin is key. This helps the chicken soak up all those tasty flavors while cooking. If fresh herbs are not handy, you can use dried herbs. They work well, too. Just remember, dried herbs are stronger. Use about one-third of the amount of fresh herbs. So, if a recipe calls for 3 teaspoons of fresh thyme, use just 1 teaspoon of the dried kind. Stuffing the chicken cavity with aromatics is another great trick. Use quartered onions, smashed garlic, or lemon wedges. This adds moisture and flavor. These ingredients will steam the chicken from inside. For the perfect meal, pair your roasted chicken with side dishes like roasted veggies, rice, or a fresh salad. Carrots and potatoes roasted alongside the chicken add taste and color. When serving, place the chicken on a large platter. Surround it with the roasted veggies. This makes your dish look inviting. Sprinkle fresh herbs on top for a lovely finish. It adds a pop of green and a hint of freshness. For more ideas, check out the Full Recipe for inspiration on creating a stunning meal! {{image_2}} You can mix things up with different herbs or spices. Try using fresh basil or cilantro. These herbs add a bright, fresh touch to your chicken. You can also swap in spices like cumin or coriander for a warm flavor. Citrus variations can change the taste of your meal. Instead of lemon, try orange or lime. Both add a sweet and tangy twist to your dish. A hint of grapefruit can also give your chicken a unique taste. Just squeeze the juice over the chicken before roasting. You can roast your chicken in different ways. An air fryer cooks quickly and gives you crispy skin. Set the air fryer to 375°F (190°C) and cook for about 50 minutes. Just make sure to check the temp! Another great option is a slow cooker. This method keeps your chicken moist and flavorful. Cook on low for 6-7 hours or on high for 3-4 hours. You can add veggies to the pot for a complete meal. Grilling is perfect for summer. It gives your chicken a smoky taste. Preheat your grill and cook the chicken over medium heat. Turn it every 10 minutes. It should take about 1 hour to cook through. For the full recipe, visit the [Full Recipe] link. After enjoying your savory herb roasted chicken, proper storage is key. First, let the chicken cool down to room temperature. Then, wrap it tightly in plastic wrap or foil. You can also place it in an airtight container. This helps keep moisture in and prevents it from drying out. For refrigeration, store the chicken in the fridge for up to four days. If you want to keep it longer, freezing works well. To freeze, cut the chicken into portions. Place each piece in a freezer-safe bag, removing as much air as possible. Label the bags with the date. When reheating your chicken, use the oven or a skillet for best results. Set your oven to 350°F (175°C). Heat the chicken for about 20 minutes, or until warm. This method helps retain its crispy skin and juicy meat. Roasted chicken lasts in the fridge for about four days. After that, it's best to toss it out. Signs of spoilage include a sour smell, slimy texture, or discoloration. If you see any of these signs, don't eat it. Always trust your senses when deciding if food is safe. For frozen chicken, you can keep it for up to six months. Just remember, the quality may decline over time. Always check for freezer burn, which looks like dry spots on the meat. This can affect flavor, but the chicken is still safe to eat. How to tell when the chicken is fully cooked? The chicken is done when it reaches an internal temperature of 165°F (75°C). You can check this with a meat thermometer. Insert it into the thickest part of the thigh. The juices should run clear, not pink. Can I use a smaller or larger chicken? Yes, you can use a different size chicken. Just adjust the cooking time. A smaller chicken cooks faster, while a larger one takes longer. Check the temperature to be sure it’s fully cooked. What are the best herbs for flavoring chicken? Great herbs for chicken include thyme, rosemary, and parsley. You can mix them for a rich taste. Fresh herbs add a vibrant flavor, while dried herbs still work well. Can I make this recipe ahead of time? Yes, you can prep the chicken a day before. Rub the herb mix on and cover it. Let it sit in the fridge overnight. This makes the flavors stronger. What are the best tools for roasting chicken? You need a roasting pan and a meat thermometer. A good knife helps carve the chicken easily. Using kitchen twine can help tie the legs for even cooking. You learned about the key ingredients and steps to roast a whole chicken perfectly. We covered tips to enhance flavor, serving ideas, and various cooking methods. Remember, choosing fresh herbs and keeping your chicken properly stored is crucial for taste. By following these tips, you can create a delicious meal. Enjoy the satisfaction of serving a perfect roast chicken, impressing family and friends alike. Happy cooking!](https://pureeatsnow.com/wp-content/uploads/2025/05/212cd723-ba40-472a-9280-64e11bc10ff5.webp)
Looking for a simple, delicious dinner? Savory Herb Roasted Chicken is your answer. This juicy chicken bursts with flavor from
![To make a delicious Chocolate Peanut Butter Smoothie, gather these simple ingredients: - 1 frozen banana - 1 tablespoon natural peanut butter - 2 tablespoons unsweetened cocoa powder - 1 cup almond milk (or any milk of choice) - 1 tablespoon honey or maple syrup (adjust for sweetness) - 1/2 teaspoon vanilla extract - A pinch of sea salt - Ice cubes (optional, for a thicker smoothie) Each ingredient plays a key role in flavor and texture. The frozen banana gives a creamy base. Natural peanut butter adds rich taste and protein. Unsweetened cocoa powder brings a deep chocolate flavor. Almond milk keeps it light and smooth. Honey or maple syrup sweetens the mix. Vanilla extract adds warmth, while sea salt enhances all the flavors. Ice cubes can make your smoothie thicker and colder, perfect for a hot day. For the full recipe, check the Chocolate Peanut Butter Bliss Smoothie section. It’s a quick and easy treat! 1. Cutting the frozen banana Start by cutting your frozen banana into smaller chunks. This helps it blend easier and faster. Use a sharp knife for smooth cuts. Aim for pieces about one inch long. 2. Adding ingredients to blender Now, place the banana chunks in your blender. Add one tablespoon of natural peanut butter. Then, add two tablespoons of unsweetened cocoa powder. Pour in one cup of almond milk or any milk you like. Next, add one tablespoon of honey or maple syrup. Don't forget half a teaspoon of vanilla extract and a pinch of sea salt. 3. Blending for desired consistency If you want a thicker drink, toss in a few ice cubes. Blend on high speed until the mix is smooth and creamy. Scrape the sides of the blender as needed. This ensures all ingredients blend well together. 4. Adjusting sweetness Once blended, taste your smoothie. If you want it sweeter, add more honey or maple syrup. Blend again for a few seconds to mix in the extra sweetness. 1. Pouring into a chilled glass After blending, pour your smoothie into a chilled glass. This keeps your drink cold and refreshing. 2. Garnishing options To make it look even better, add a sprinkle of cocoa powder or a drizzle of peanut butter on top. You can also add banana slices or chocolate shavings for a nice touch. Now you have a tasty and rich Chocolate Peanut Butter Smoothie to enjoy! For the full recipe, check the earlier section. To make your smoothie super creamy, start with a frozen banana. It adds thickness and chill. You can also use a high-speed blender. This makes blending easier and smoother. If your blender has speed settings, use the highest one. This helps blend everything well without chunks. For sweetness, I recommend honey or maple syrup. Start with one tablespoon. You can always add more if you like it sweeter. Balance is key! The chocolate and peanut butter flavors should shine through. If it tastes too strong, try adding a little more banana or milk. This brings harmony to the flavors. For the full recipe, check out the Chocolate Peanut Butter Bliss Smoothie. {{image_2}} You can change a few ingredients to suit your taste. If you want a different flavor, try using almond butter or cashew butter instead of peanut butter. Each nut butter adds its own twist. If you are dairy-free, swap almond milk for coconut milk or oat milk. Both options taste great and keep the smoothie rich. Add protein powder if you need a boost. This will make your smoothie filling and nutritious. I like to use chocolate or vanilla protein powder, but you can choose your favorite. Another fun twist is adding greens. Toss in a handful of spinach or kale. You won’t taste them, but they add vitamins. This makes the smoothie even healthier without losing the yummy chocolate flavor. For the complete recipe, check out the [Full Recipe]. If you have leftover smoothie, you can store it in the fridge. Pour it into a sealed jar or container. Make sure to use it within one day. The smoothie may separate, so shake it well before drinking. You can also freeze the leftover smoothie. Pour it into ice cube trays or freezer-safe bags. These cubes are great for smoothies later. Just blend them with some milk or yogurt for a quick treat. To keep bananas fresh, store them at room temperature. Avoid placing them in the fridge until they are ripe. If you want to slow down ripening, keep them away from other fruits. For nut butters, store them in a cool, dark place. You can also refrigerate them for longer shelf life. Make sure the lid is tight to keep air out. This helps maintain flavor and freshness for your peanut butter. How many calories are in a Chocolate Peanut Butter Smoothie? A standard serving has about 300 calories. The exact number can change with your choices. If you add more sweetener or use whole milk, the calories will rise. Can I make this smoothie nut-free? Yes! Just swap peanut butter for sun butter or soy nut butter. These options taste great and keep the creamy texture. What is the best time to drink a smoothie for health benefits? Drinking a smoothie in the morning gives a great energy boost. It's also good as a snack before or after a workout. How do I make this smoothie vegan? To make it vegan, use plant-based milk and maple syrup instead of honey. This keeps the flavor while making it dairy-free. How to make a Chocolate Peanut Butter Smoothie thicker? To thicken your smoothie, add ice cubes or use a frozen banana. You can also blend in a bit of Greek yogurt for extra creaminess. Can I use fresh bananas instead of frozen? Fresh bananas will work, but the smoothie might be less thick. If you use fresh bananas, consider adding more ice to reach your desired texture. This post covered everything about making a tasty Chocolate Peanut Butter Smoothie. We discussed key ingredients like frozen bananas and peanut butter, plus simple steps to blend it all together. I shared tips for achieving the perfect texture and sweetness. You learned about tasty variations and how to store any leftovers. Enjoy your smoothie journey! I hope you try out these ideas and find your favorite mix. Creativity is key in the kitchen, so keep experimenting!](https://pureeatsnow.com/wp-content/uploads/2025/05/5b6c27cb-1943-457b-9cdd-3bf9c8cb9508.webp)
Looking for a sweet yet healthy treat? You’ll love this Chocolate Peanut Butter Smoothie! It’s creamy, rich, and oh-so-simple to
![- 2 cups fresh strawberries, hulled and sliced - 1/4 cup granulated sugar - 2 cups whipped cream (store-bought or homemade) Fresh strawberries are the star of this dessert. Choose ripe strawberries for the best flavor. The granulated sugar enhances their sweetness and helps bring out their juices. The whipped cream adds a light, fluffy touch to each bite. - 1 cup all-purpose flour - 1/2 cup granulated sugar (for the cake) - 1 1/2 teaspoons baking powder - 1/2 teaspoon baking soda - 1/4 teaspoon salt Baking powder and baking soda help the cake rise. Use all-purpose flour for a tender texture. The additional sugar balances the flavors, making the cake sweet but not overpowering. - 1/2 cup unsalted butter, melted - 2 large eggs - 1/2 cup milk The unsalted butter adds richness to the cake. Eggs help bind the ingredients and give it structure. Milk adds moisture, making the cake soft and tasty. For the full recipe and detailed instructions, check out the [Full Recipe]. This recipe is perfect for anyone who loves a delightful and easy-to-make dessert! To start, you need to macerate the strawberries. This means mixing them with sugar. In a bowl, combine 2 cups of sliced strawberries with 1/4 cup of granulated sugar. Toss them well. Let them sit for about 30 minutes. This step is key! The sugar pulls out the juices. You will get a sweet syrup that makes the dessert tastier. Next, preheat your oven to 350°F (175°C). This ensures your cake bakes evenly. In a medium bowl, mix the dry ingredients. Combine 1 cup of all-purpose flour, 1/2 cup of sugar, 1 1/2 teaspoons of baking powder, 1/2 teaspoon of baking soda, and 1/4 teaspoon of salt. In another bowl, mix the wet ingredients: 1/2 cup of melted butter, 2 large eggs, 1/2 cup of milk, and 1 teaspoon of vanilla extract. Now, combine the wet and dry ingredients. Stir until just mixed. It’s okay if the batter is a bit lumpy. Pour this batter into a greased 8x8-inch baking dish. Bake for 25-30 minutes or until a toothpick comes out clean. Let the cake cool completely. Then, cut it into small cubes. Now for the fun part! Get your individual jars ready. Start layering the dessert. First, add a layer of cake cubes. Next, spoon in a layer of the macerated strawberries with some of their juices. After that, add a layer of whipped cream. Repeat these layers until the jar is full. Finish with a dollop of whipped cream and a few extra strawberry slices on top for garnish. Finally, cover the jars with lids or plastic wrap. Refrigerate them for at least one hour before serving. This chilling time lets all the flavors blend. Now you have lovely Strawberry Shortcake Cake Jars to enjoy. For the full recipe, check out the [Full Recipe] section! To make a moist cake, use fresh ingredients. Make sure your butter is softened but not melted. Mix the wet and dry ingredients gently. Overmixing makes the cake tough. Let your batter sit for just a minute before baking. This helps the flavors blend. When layering your cake jars, start with cake cubes. This gives a strong base. Add a layer of strawberries next, then whipped cream. Repeat the layers until you fill the jar. Finish with a dollop of whipped cream on top. Add a few strawberry slices for color. You can use store-bought or make your own whipped cream. Store-bought is quick and easy. Homemade whipped cream tastes fresh and creamy. If you make it, use heavy cream and sugar. Chill your bowl and beaters first. This helps it whip better. To whip cream to perfection, start on a low speed. Gradually increase to high speed. Stop when stiff peaks form. Be careful not to overwhip, or it will turn into butter. For garnishing, consider adding fresh mint leaves. A drizzle of honey adds sweetness and shine. Use clear jars so the layers show off. This makes your dessert look fancy. You can also serve these jars at parties. They’re easy to grab and eat. For gifts, tie a ribbon around the jar. This makes a lovely treat for friends. {{image_2}} You can change the fruit in your jars. Try blueberries, raspberries, or peaches. Each fruit adds a new taste. You can also mix fruits for a fun twist. For whipped cream, think about adding flavors. You can use almond extract or lemon zest. This change makes every bite unique and fun. If you need a gluten-free version, use almond or coconut flour. These flours work well in cake and taste great. For vegan options, swap eggs for flax eggs or applesauce. Use coconut cream instead of whipped cream. These swaps keep the dessert tasty and light. These jars make great gifts. Add a ribbon and a tag for a personal touch. For parties, set out several jars on a table. Guests love to pick their favorite flavors. You can stack jars on a tiered stand for a fun display. This adds a special touch to any gathering. These tips will help you customize your Strawberry Shortcake Cake Jars and make them your own. Check out the Full Recipe for more details! Strawberry Shortcake Cake Jars stay fresh in the fridge for up to four days. To keep them tasty, store the jars with their lids on. This keeps the layers moist and prevents them from drying out. If you have leftover whipped cream, keep it in a separate bowl. Add it just before serving for the best taste. You can freeze these cake jars! Just make sure to use freezer-safe jars. They can last for about one month in the freezer. To thaw, place the jars in the fridge overnight. This keeps the texture nice and creamy. When ready to serve, add a fresh dollop of whipped cream. Enjoy the taste of summer even in winter! For the complete recipe, check out the [Full Recipe]. To make these fun dessert jars, start by preparing your strawberries. Mix sliced strawberries with sugar and let them sit. This will make them juicy and sweet. Next, bake your cake. Whisk flour, sugar, baking powder, baking soda, and salt in one bowl. In another bowl, mix butter, eggs, milk, and vanilla. Combine both mixtures, pour into a greased dish, and bake at 350°F for 25-30 minutes. Once the cake cools, cut it into small cubes. Now, assemble the jars. Add layers of cake cubes, macerated strawberries, and whipped cream. Repeat these layers until your jars are full. Chill them for an hour before serving. For more details, check out the Full Recipe. Trouble-free tips for beginners: - Make sure to cool the cake completely before cutting. - Use a spoon to layer gently so it looks nice. - Feel free to adjust sugar levels based on your taste. Yes, you can use frozen strawberries. They work well, but there are pros and cons. Pros: - Frozen strawberries are often picked at peak ripeness. - They are available year-round, so you can enjoy this dessert anytime. Cons: - Frozen strawberries may be mushier once thawed. - They might not be as sweet, so you may need to add extra sugar. For the best strawberry shortcake cake jars, I recommend glass jars or plastic cups. Look for jars that have tight lids. This keeps the dessert fresh and prevents spills. Importance of sealability and size: - Sealed jars keep the flavors inside. - Choose a size that fits your portions. Typically, 8-ounce jars work great for this dessert. You can find pre-made jars at many local grocery stores. Check the bakery section for fresh options. Recommendations for quality brands: - Look for brands that focus on fresh ingredients. - Many artisanal bakeries offer gourmet versions. Online options like delivery services also carry delicious jars. In this blog post, we explored how to make delicious strawberry shortcake cake jars. We covered fresh ingredients, step-by-step instructions, and tips for perfecting your dessert. You learned about flavor variations and how to store your jars properly. Remember, using fresh strawberries and achieving the right cake texture makes a big difference. With practice, you can impress anyone with your cake jars. Enjoy crafting this tasty treat and experiment to find your favorite flavors. Happy baking!](https://pureeatsnow.com/wp-content/uploads/2025/05/a03fcd85-b5e2-4a82-9c9a-812b197277e5.webp)
Dive into the world of Strawberry Shortcake Cake Jars—a fun, sweet twist on a classic dessert! You’ll love how easy

Are you ready to indulge in a sweet treat that combines all your favorite flavors? Mini Pineapple Upside Down Cheesecakes

Are you tired of hard candy loaded with corn syrup? You’re not alone! In this easy homemade recipe, I’ll show
![- Pasta options: Use 8 oz of penne or fusilli for the best texture. - Ground beef choices: One pound of lean ground beef gives great flavor. - Key spices and seasonings: Italian seasoning, salt, and pepper bring out the taste. - Cheese variations: Try using mozzarella or cheddar for different flavors. - Additional vegetables: Spinach, bell peppers, or mushrooms add color and nutrients. - Alternative proteins: Ground turkey or chicken can replace beef for a lighter meal. For a full recipe with all steps, check out the [Full Recipe]. First, I boil a large pot of salted water. Once it bubbles, I add the pasta. I cook it until it's al dente, which means it's firm but not hard. This takes about 8 to 10 minutes, depending on the type. After cooking, I drain the pasta in a colander and set it aside. Next, I heat a splash of olive oil in a large skillet over medium heat. I chop one onion finely and mince three cloves of garlic. In the hot oil, I add the onion and garlic, stirring for about 3 to 5 minutes. I wait until the onion turns soft and clear. Now, I add one pound of ground beef to the skillet. I break it up with a spatula, cooking it for about 5 to 7 minutes. I make sure it browns evenly. If there's extra fat, I drain it to keep the dish light. To create the sauce, I lower the heat. I pour in one cup of heavy cream and one cup of beef broth. Then, I add one tablespoon of soy sauce, one teaspoon of Italian seasoning, salt, and pepper to taste. I stir everything well to mix together. I let the sauce simmer for about 5 minutes. This helps the flavors blend and the sauce thicken slightly. If it looks too thick, I can add a bit more beef broth to get the right consistency. Finally, I take the cooked pasta and add it to the skillet with the sauce. I toss it gently to coat every piece evenly. Then, I stir in half a cup of grated Parmesan cheese until it melts and becomes creamy. If I need to, I adjust the seasoning before serving. For the complete guide, check out the Full Recipe! To get your sauce just right, you can adjust the thickness with broth. If your sauce is too thick, add a bit more beef broth. Stir it in slowly until you reach the right creaminess. This small change can make a big difference. Balancing flavors is key for a great sauce. Use salt, pepper, and Italian seasoning to enhance the taste. Start with a little, then taste and adjust as you go. You want a sauce that sings with flavor but doesn't overpower the pasta. Choosing the right ground beef is crucial. I recommend lean ground beef, which has less fat. This helps keep your dish light and tasty. You can also use ground turkey or chicken if you want a lighter option. Preventing overcooking is important for juicy beef. Cook it just until it’s browned and no longer pink. This usually takes about 5 to 7 minutes. If you cook it too long, the beef can get tough, and we want it tender! For cooking, I suggest using a large skillet. It gives you enough space to brown the beef and mix the sauce well. A pot for boiling your pasta is also a must. Make sure it’s big enough to hold all the pasta you plan to cook. When it comes to utensils, use a spatula for mixing. A wooden spoon works well too. These tools help you combine everything smoothly. For serving, a large spoon or tongs can make plating easy and fun. For the complete recipe, check out the [Full Recipe]. {{image_2}} To make a vegetarian version of creamy ground beef pasta, you can easily swap out the ground beef for plant-based proteins. Some great options include lentils, mushrooms, or crumbled tofu. These alternatives give you a hearty texture that mimics beef well. You can also add more vegetables like bell peppers, zucchini, or spinach. This not only boosts nutrition but adds color and flavor to your dish. You can switch up the flavor profile of your creamy ground beef pasta by adding Italian-inspired ingredients. Consider mixing in sun-dried tomatoes, olives, or fresh basil for a Mediterranean twist. If you crave some heat, add red pepper flakes or diced jalapeños. This brings a spicy kick that can really liven up your meal. The creamy sauce can be made in various ways. Instead of heavy cream, you can use half-and-half or even whole milk for a lighter option. For those who want a dairy-free sauce, try coconut milk or a cashew cream. These options still yield a rich texture while catering to different dietary needs. Want to explore more? Check out the Full Recipe for creamy ground beef pasta! After you finish your creamy ground beef pasta, let it cool down at room temperature. This step is key to keeping it safe. Next, store it in an airtight container. I recommend using glass or plastic containers with tight lids. These help prevent spills and keep your pasta fresh. For best results, eat your leftovers within three days. The cream sauce can lose its texture if left too long. You can reheat your creamy pasta in three easy ways. Use an oven, stovetop, or microwave. If you choose the oven, heat it to 350°F (175°C). Place your pasta in an oven-safe dish and cover it with foil. This keeps it moist. On the stovetop, add a splash of beef broth to the pan. Stir often to keep it from sticking. For the microwave, use a microwave-safe bowl and cover it. Heat in short bursts, stirring in between. No matter which method you use, add a little cream or broth to keep it creamy. To freeze your creamy ground beef pasta, start with a cooled dish. Place it in a freezer-safe container. Make sure it’s sealed tight to avoid freezer burn. It’s best to eat it within two to three months. When you’re ready to enjoy it again, thaw it in the fridge overnight. Reheat it in the oven or stovetop as mentioned. This way, your pasta stays tasty and creamy. I recommend using penne or fusilli pasta. These shapes hold the sauce well. Penne has a tubular shape that traps sauce inside. Fusilli's twists catch every bit of flavor. Both options give you great bites of creamy goodness. Yes, you can make creamy ground beef pasta ahead. First, cook the pasta and beef as normal. Let it cool before storing it in an airtight container. You can keep it in the fridge for up to three days. When you are ready to enjoy it, reheat on the stove or in the microwave. Add a splash of beef broth to keep it creamy. For a healthier dish, consider these tips: - Use lean ground beef, like 90% lean. - Substitute heavy cream with half-and-half or a low-fat version. - Add more veggies, like spinach or bell peppers, for extra nutrients. - Swap pasta for whole grain or zucchini noodles. These changes reduce calories while keeping flavor. Enjoy your meal without the guilt! Check out the Full Recipe for more details. In this blog post, I shared how to make creamy ground beef pasta. We explored essential ingredients like pasta types, ground beef choices, and key spices. You learned how to cook and combine each part for a delicious dish. I also covered tips for perfecting your sauce and ways to customize it, including vegetarian options. Remember, cooking is a fun and creative journey. Enjoy the process, and don’t hesitate to experiment. Your creamy pasta masterpiece awaits!](https://pureeatsnow.com/wp-content/uploads/2025/05/f4f0567c-713a-45e2-96ea-719e3c302d39.webp)
Are you ready to whip up a dish that’s both creamy and comforting? My Creamy Ground Beef Pasta is your
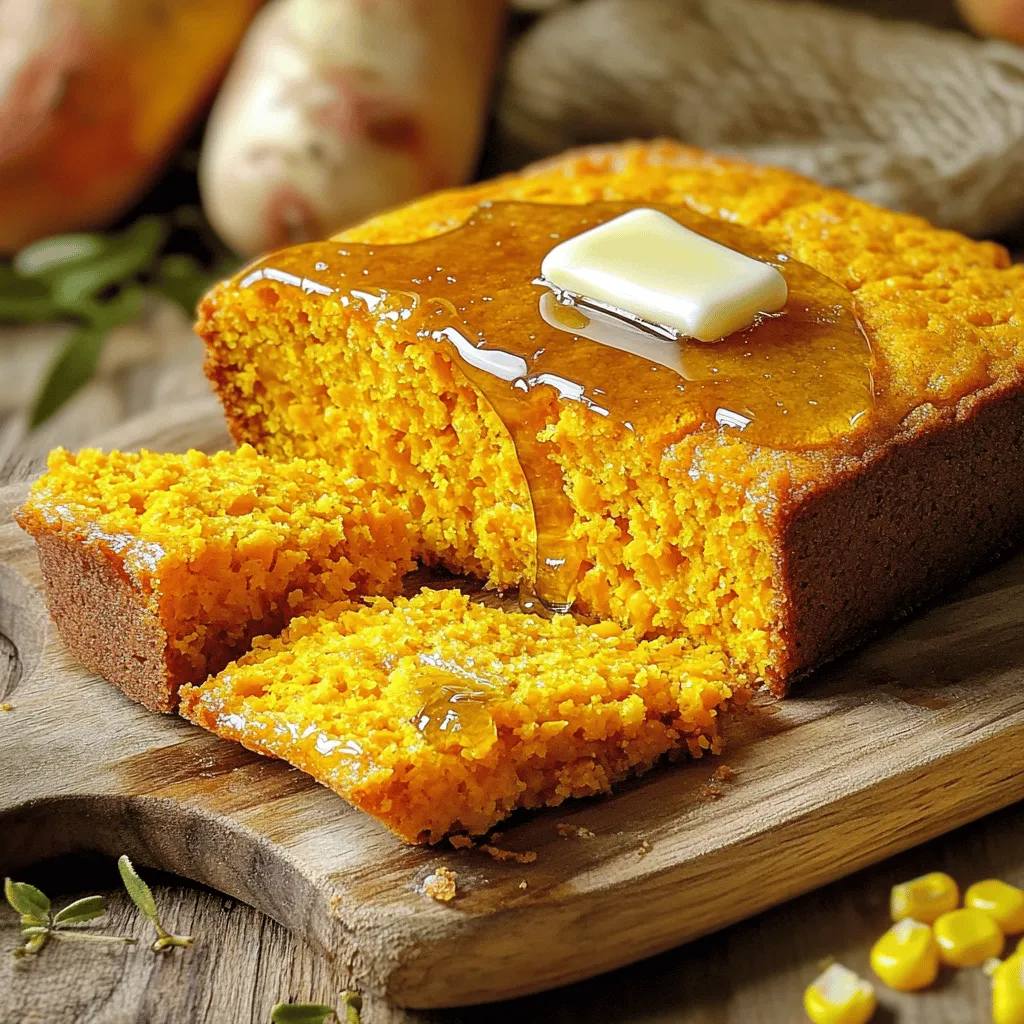
Are you ready to indulge in a warm slice of Honey Butter Sweet Potato Cornbread? This delightful recipe combines sweet
![To make a great Nigerian beef stew, you need key ingredients. Here’s what you will need: - 1.5 lbs beef (cut into cubes) - 1 large onion (chopped) - 2 red bell peppers (blended) - 1 green bell pepper (blended) - 2 medium tomatoes (blended) - 4 cloves garlic (minced) - 1 inch ginger (grated) - 1/4 cup vegetable oil - 2 tablespoons tomato paste - 2 teaspoons ground coriander - 1 teaspoon curry powder - 1 teaspoon thyme - 1-2 fresh chili peppers (to taste, chopped) - 4 cups beef broth - Salt to taste - Fresh parsley or cilantro for garnish Choosing quality beef is important. Look for cuts with good marbling. This fat gives flavor and keeps the meat tender. Fresh vegetables also make a big difference. Choose bright, firm peppers and ripe tomatoes for the best taste. You can add more flavors to your stew. Consider these optional ingredients: - Smoked paprika - Bay leaves - Regional spices like curry leaves or alligator pepper Using smoked paprika adds a deep, sweet flavor. Bay leaves bring a nice aroma to the stew. Try different spices. They can change the taste and make your stew unique. You will need some basic kitchen tools to cook the stew: - A large pot - A wooden spoon - A blender for the peppers and tomatoes - A cutting board and knife for chopping These items help you prepare and cook the stew efficiently. With the right tools, the process becomes easier and more enjoyable. For the complete recipe, check out [Full Recipe]. 1. Heat the Oil: Start by heating 1/4 cup of vegetable oil in a large pot over medium heat. This helps in cooking the onions evenly. 2. Sauté the Onions: Add the chopped onion to the oil. Cook for about 5 minutes, stirring often, until they turn translucent. This step builds a strong base flavor. 3. Add Garlic and Ginger: Next, stir in 4 minced garlic cloves and 1 inch of grated ginger. Cook these for about 2 minutes. You want the kitchen to smell fragrant. 4. Blend the Peppers and Tomatoes: Add the blended red and green bell peppers along with 2 blended tomatoes. Mix everything well. Cook for 10-15 minutes until the sauce thickens slightly. This step adds depth to your stew. 5. Incorporate Spices: Stir in 2 tablespoons of tomato paste, 1 teaspoon of curry powder, 2 teaspoons of ground coriander, and 1 teaspoon of thyme. Cook for 5 more minutes. This will deepen the flavor. 6. Brown the Beef: Toss in 1.5 lbs of beef cubes. Brown the meat on all sides, about 5-7 minutes. This step creates a rich flavor. 7. Add Broth: Pour in 4 cups of beef broth. Make sure the meat is fully submerged. Bring the stew to a boil, then lower the heat to simmer. 8. Simmer: Let the stew simmer for 1 to 1.5 hours. This slow cooking makes the beef tender and allows the flavors to mix well. - Sautéing Vegetables: Always sauté your onions and garlic well. This step builds a strong base. Not cooking them enough can lead to a flat taste. - Browning the Beef: Brown the beef properly. This step creates a Maillard reaction that adds a rich, savory flavor to your stew. - Checking Tenderness: The beef is done when it easily falls apart with a fork. If it’s still tough, let it cook longer. - Visual Cues: The stew should have a thick, rich sauce. It should not be watery. Look for a deep color and a glossy finish. For more specifics, check out the Full Recipe for Nigerian Beef Stew. When making Nigerian Beef Stew, some common mistakes can spoil the dish. One frequent error is not browning the beef well. This step adds a rich flavor. Ensure you brown the beef in batches, so it cooks evenly. Another mistake is under-seasoning. Season at different stages of cooking for the best taste. Don't forget to taste as you go. This helps you adjust the seasoning to your liking. To make cooking easier, prep your ingredients ahead of time. Chop your onions, blend the peppers, and measure out spices. Store them in the fridge for up to a day. The stew often tastes better after sitting for a while. Let it rest for a few hours or overnight in the fridge. This allows the flavors to meld beautifully. Nigerian Beef Stew pairs well with many sides. Serve it with fluffy rice or fried plantains for a complete meal. You can also offer some crusty bread to soak up the sauce. Traditionally, people often serve it in a big bowl for sharing. Garnish with fresh parsley or cilantro for a nice touch. Enjoy this rich dish with friends and family for a true cultural experience. For the full recipe, check out the full recipe section. {{image_2}} Nigerian Beef Stew can change based on where you are in Nigeria. Each region adds its own twist. For example, in the north, cooks may use goat meat instead of beef. You might find more spices in the east, such as uziza seeds. In the south, fresh seafood can replace the beef. Vegetables like carrots or green beans can also be added for more texture and flavor. You can make a tasty meat-free version of Nigerian Beef Stew. Use mushrooms or lentils for a hearty texture. Replace the beef broth with vegetable broth for depth. Adding extra bell peppers or zucchini brings great flavor. You can also mix in smoked paprika to add a rich taste, similar to beef. Do you like heat? Add more fresh chilies for a spicy kick. For milder stew, remove the seeds from the chilies. Try using bell peppers instead of hot peppers. The type of chili you choose matters too. Scotch bonnet peppers give a fiery flavor, while jalapeños are milder. Adjust the number of chilies based on your taste. If you're ready to give it a try, check out the Full Recipe for details! To store leftover Nigerian Beef Stew, let it cool first. Once cool, transfer it to an airtight container. Place the container in the fridge. The stew stays fresh for up to 3-4 days. Always remember, the longer it stays, the more flavor it loses. Freezing is a great way to save Nigerian Beef Stew for later. Divide it into portions and place them in freezer-safe containers. Make sure to leave space at the top for expansion. When you want to eat it, take a portion out and let it thaw overnight in the fridge. To reheat the stew, you can use the microwave or stovetop. For the microwave, place the stew in a bowl and cover it. Heat it in short bursts, stirring in between. On the stovetop, pour the stew into a pot. Heat it on low, stirring regularly. This keeps the flavors rich and the texture just right. Enjoy your meal! Cooking Nigerian Beef Stew takes about two hours. You’ll spend around 20 minutes prepping the ingredients. Then, the stew simmers for about 1 to 1.5 hours. This time allows the beef to become tender and the flavors to blend well. Yes, you can use different cuts of beef. The best cuts are chuck or brisket. These cuts have more fat, making the stew richer. You can also use sirloin for a leaner option, but it may be less tender. Always cut the beef into cubes for even cooking. Common accompaniments include rice, pounded yam, or fufu. These sides soak up the rich sauce. You can also serve it with plantains for a sweet touch. Many enjoy Nigerian Beef Stew with a side of salad for freshness. Each choice enhances the meal's flavor and offers balance. Nigerian Beef Stew combines rich flavors with easy steps. We covered key ingredients, cooking techniques, and common mistakes. I hope these tips help you create a delicious meal. Remember, the best stew often tastes better the next day. Whether you enjoy it spicy or mild, there are options for everyone. Trust me, you’ll impress your family and friends with this dish. Enjoy cooking this classic stew and exploring its many variations!](https://pureeatsnow.com/wp-content/uploads/2025/05/3d6d9f75-1ab7-49e1-b989-a5549650cfd5.webp)
Are you ready to dive into a dish bursting with flavor and rich in tradition? Nigerian Beef Stew is a
![- 250g fresh pasta (tagliatelle or fettuccine) - 300g mixed mushrooms (cremini, shiitake, and oyster), sliced - 1 cup ricotta cheese - 2 garlic cloves, minced - 1 small onion, finely chopped - 3 tablespoons olive oil - 1/2 cup vegetable broth - Salt and pepper to taste - Fresh basil leaves for garnish - Grated Parmesan cheese (optional) Gather these ingredients before you start cooking. Fresh pasta adds a special touch and cooks quickly, making it perfect for this dish. Mixed mushrooms give depth to the flavor. I love using cremini, shiitake, and oyster for their unique tastes and textures. Ricotta cheese makes the sauce creamy and rich. You can also add garlic and onion for more flavor. The olive oil helps to sauté the veggies, bringing out their natural sweetness. Vegetable broth is key in creating a flavorful sauce. Don't forget salt and pepper to enhance the overall dish. Fresh basil leaves add a burst of color and taste. If you like, sprinkle grated Parmesan on top for a savory finish. For the full recipe and instructions, check out the [Full Recipe]. Enjoy the cooking process! - Cook the pasta according to package instructions until al dente. - Reserve 1/2 cup of pasta water before draining. Cooking the pasta is simple. Bring a large pot of salted water to a boil. Once boiling, add the fresh pasta. Stir it gently to prevent sticking. Follow the time on the package for best results. Al dente means it should have a slight bite to it. This texture holds up well with the sauce. Don't forget to save that pasta water! It’s a secret weapon for creaminess. - Heat olive oil in a skillet over medium heat. - Add onion and sauté until translucent, about 2-3 minutes. Next, grab a large skillet. Add olive oil and let it heat up. Then, toss in the finely chopped onion. Sauté until the onion looks clear and soft. This usually takes 2-3 minutes. The aroma fills the kitchen and gets you excited for what’s next! - Stir in garlic and mushrooms, cooking until browned and moisture evaporates (5-7 min). - Add vegetable broth and simmer for 2 minutes. Now, add minced garlic and the sliced mushrooms. Stir them well. Cook until the mushrooms turn golden brown, and their moisture goes away. This step takes about 5-7 minutes. The flavor of the mushrooms starts to shine. Then, pour in the vegetable broth and let it simmer for 2 minutes. This melds the flavors beautifully. - Mix in cooked pasta and ricotta cheese. - Adjust creaminess with reserved pasta water as needed. Time to bring it all together! Add the cooked pasta to the skillet. Then, spoon in the creamy ricotta cheese. Toss everything gently. If it feels too thick, add a bit of the reserved pasta water. This helps reach your desired creaminess. It should feel velvety but not runny. - Season with salt and pepper. - Garnish with fresh basil and Parmesan before serving. Finally, season your dish with salt and pepper. Taste it and adjust if needed. Serve it hot, garnished with fresh basil leaves. If you like, sprinkle some grated Parmesan cheese on top. This adds a nice touch and extra flavor. Enjoy your Mushroom Ricotta Pasta! You can find the full recipe for this delightful dish if you want to revisit the steps later. - Adjust pasta cooking time for your preferred texture. I like mine al dente. - Use a mix of fresh herbs for an aromatic touch. Basil and thyme work well. - Use reserved pasta water to control the sauce thickness. This step can make your dish perfect. - Ensure to combine gently to preserve the pasta shape. You want those noodles intact. - Consider adding red pepper flakes for spice. They give a nice kick to the dish. - Incorporate spinach or kale for added nutrition. Leafy greens boost flavor and health. For the full details on the Mushroom Ricotta Pasta, check out the Full Recipe. {{image_2}} You can easily change some ingredients in this dish. If you want a lighter option, swap ricotta for cottage cheese. It still tastes great! You can also use chicken or vegetable broth instead of vegetable broth. This will add a different flavor to your sauce. Want to make it vegan? Just substitute the ricotta and cheese with plant-based options. This keeps the dish creamy and delicious. You can also use gluten-free pasta if you need a gluten-free version. This way, everyone can enjoy this meal. To make your mushroom ricotta pasta unique, try different mushrooms. You can use portobello or chanterelles for a fun twist. Add sun-dried tomatoes for a sweet and tangy flavor. If you want more depth in your sauce, add a splash of white wine. It enhances the taste and elevates the dish. For the complete recipe, check the Full Recipe section. Store any leftover Mushroom Ricotta Pasta carefully. First, cool the dish completely before storing. This helps keep the pasta fresh. Place it in an airtight container. Make sure to seal it well to avoid air exposure. Store it in the fridge for up to five days. When you’re ready to enjoy the pasta again, you have a few options. You can reheat it in a skillet over low heat. Add a splash of olive oil or vegetable broth to keep it moist. Stir often to ensure even heating. Alternatively, you can use a microwave. Heat in short intervals, stirring in between. This prevents hot spots and keeps the pasta from drying out. If you want to store the pasta for longer, freezing is a great option. Freeze it in portions to maintain quality. This way, you can reheat only what you need. When you're ready to eat, thaw the pasta in the refrigerator. This slow thaw keeps the texture nice. After thawing, reheat using the skillet method or the microwave. Enjoy your creamy dish whenever you like! For the full recipe, check out the details above. To make your Mushroom Ricotta Pasta creamy, add reserved pasta water gradually when mixing with ricotta. This starchy water helps create a smooth sauce. Start with a little, then mix well. If you need more creaminess, keep adding more water until you reach the desired texture. Yes, you can use dried pasta. Just make sure to adjust the cooking time based on the package instructions. Dried pasta may take a bit longer to cook, so check for doneness. Fresh pasta cooks quickly, so keep an eye on it. A mix of cremini, shiitake, and oyster mushrooms provides the best flavor. Each type adds a unique taste and texture. Cremini offers earthiness, shiitake gives a rich umami flavor, and oyster mushrooms add a delicate touch. Yes, Mushroom Ricotta Pasta is a vegetarian-friendly dish. It has no meat and uses ricotta as the main cheese. This dish is perfect for those who want a tasty meal without meat. Mushroom Ricotta Pasta can last 3-5 days in the refrigerator if stored properly. Make sure to keep it in an airtight container. When ready to eat, just reheat it gently on the stove or in the microwave. Making Mushroom Ricotta Pasta is simple and full of flavor. You start with fresh pasta and sautéed mushrooms. You mix in ricotta cheese for creaminess and finish with fresh basil. Don’t hesitate to try the tips for adjusting the sauce. Feel free to experiment with flavors or ingredients to match your taste. This dish is not only easy to share but also exciting to make. Enjoy your cooking journey!](https://pureeatsnow.com/wp-content/uploads/2025/05/5d25ed4b-7319-4fc9-bbed-1dfe2f987942.webp)
Craving comfort food that brings warmth and flavor? Look no further! This Mushroom Ricotta Pasta is your answer. Imagine fresh
