
Paneer Lemongrass Coconut Curry Simple and Flavorful Dish
Looking for a tasty dish that bursts with flavor? I’ve got just the thing: Paneer Lemongrass Coconut Curry! This dish
Looking for a tasty dish that bursts with flavor? I’ve got just the thing: Paneer Lemongrass Coconut Curry! This dish
![To make Garlic Butter Steak Tips with Cheesy Rigatoni, you need a few simple ingredients. Here is the list with detailed measurements: - 1 lb sirloin steak, cut into 1-inch cubes - 4 tablespoons unsalted butter - 4 cloves garlic, minced - 1 teaspoon fresh rosemary, chopped - 1 teaspoon fresh thyme, chopped - Salt and black pepper to taste - 8 oz rigatoni pasta - 1 cup heavy cream - 1 cup grated cheddar cheese - 1/2 cup grated Parmesan cheese - 1/4 cup fresh parsley, chopped (for garnish) You can also add optional ingredients for more flavor. Consider using: - Crushed red pepper for a little heat - Fresh oregano for added herbiness - A splash of Worcestershire sauce for depth Choosing fresh herbs makes a big difference. Fresh rosemary and thyme bring a wonderful aroma and taste. Enjoy the process of gathering your ingredients! This is the first step toward a delicious meal. For the complete recipe, check out the Full Recipe section. To start, cook the rigatoni in a large pot of boiling salted water. Follow the package instructions closely for the best results. This helps the pasta become tender but still firm. Aim for the perfect al dente texture. This means the pasta should have a slight bite to it, not too soft. Once cooked, drain the rigatoni and set it aside. Next, it's time to sear the steak tips. Use 1 pound of sirloin steak cut into 1-inch cubes. Season the steak with salt and black pepper. Heat 2 tablespoons of unsalted butter in a large skillet over medium-high heat. Add the seasoned steak to the skillet in a single layer. This is key for even cooking. Sear the steak tips for about 2-3 minutes on each side until they are nicely browned. You'll know they are done when they have a rich, golden crust. Once cooked, remove the steak from the skillet and set it aside. Now, let’s prepare the garlic butter sauce. In the same skillet, reduce the heat to medium. Add the remaining 2 tablespoons of butter, 4 cloves of minced garlic, 1 teaspoon of fresh rosemary, and 1 teaspoon of fresh thyme. Sauté for about 1-2 minutes. Watch for the garlic to become fragrant and slightly golden. This means it’s time to combine the steak with the garlic butter. Toss the cooked steak tips back into the skillet, coating them well in the sauce. Cook for an additional 2-3 minutes to let the flavors meld. Next, we will make the cheesy sauce. In a separate saucepan, heat 1 cup of heavy cream over medium heat. Once it is warmed, add 1 cup of grated cheddar cheese and ½ cup of grated Parmesan cheese. Stir until the cheese melts and blends smoothly with the cream. If the sauce is too thick, you can add a bit more cream. Season with a pinch of salt and black pepper to taste. Now, it’s time to mix everything together. Combine the cooked rigatoni with the cheesy sauce, stirring until all the pasta is well coated. For an appealing presentation, plate a generous serving of the cheesy rigatoni. Top it with the garlic butter steak tips. Finally, sprinkle some freshly chopped parsley on top for color and a touch of flavor. Enjoy your Garlic Butter Steak Tips with Cheesy Rigatoni! For the full recipe, check out the detailed instructions above. - For perfect steak doneness, aim for medium-rare. This means an internal temperature of 130-135°F. Use a meat thermometer for accuracy. - To keep the cheesy sauce creamy, stir in the cheese slowly. Remove it from heat as soon as the cheese melts to prevent clumping. - On busy weeknights, cook the rigatoni and steak tips ahead of time. Store them in the fridge. When ready, just heat them and mix with the sauce. - For extra flavor, try adding smoked paprika or oregano to the steak. Fresh herbs like basil or cilantro also work well. - To add some heat, sprinkle crushed red pepper flakes into the garlic butter sauce. You can also use jalapeños in the rigatoni. - Pair this dish with roasted Brussels sprouts or a simple green salad. These vegetables add freshness and balance to the rich flavors. For the full recipe, check out the [Full Recipe]. {{image_2}} If you want to change things up with Garlic Butter Steak Tips, consider these swaps: - Alternatives to sirloin steak: Try flank steak or ribeye for different flavors. Ground beef can work too for a quicker cook. - Options for gluten-free pasta: Use brown rice or quinoa pasta. Zucchini noodles are a great low-carb choice. - Cheese substitutions for lactose-intolerant individuals: Look for lactose-free cheese or use nutritional yeast for a cheesy flavor without dairy. You can make Garlic Butter Steak Tips in various ways. Here are a few: - Slow-cooker version of Garlic Butter Steak Tips: Brown the steak first, then add it to the slow cooker with garlic, butter, and herbs. Cook on low for 6-8 hours for tender steak. - Oven-baked rigatoni variation: After mixing the rigatoni with the cheesy sauce, transfer it to a baking dish. Top with extra cheese and bake at 350°F until golden and bubbly. - Grilling steak tips for added flavor: Marinate the steak cubes in garlic and herbs. Grill them over medium-high heat for an extra smoky taste. These variations keep your meals fresh and exciting. Each option offers a unique twist, making it easy to enjoy Garlic Butter Steak Tips with Cheesy Rigatoni in new ways. For the full recipe, check out the details above. To keep your Garlic Butter Steak Tips with Cheesy Rigatoni fresh, store leftovers in an airtight container. This helps maintain flavor and texture. You can refrigerate them for up to three days. When reheating, use low heat on the stove. Add a splash of milk or cream to keep it creamy. You can freeze Garlic Butter Steak Tips with Cheesy Rigatoni for up to three months. To freeze, let the dish cool completely before placing it in a freezer-safe container. To thaw, move it to the fridge overnight. Reheat it gently on the stove, adding a bit of cream for moisture. This will help keep the dish tasty when you serve it again. What type of steak is best for this recipe? I recommend using sirloin steak for this dish. It’s tender and has great flavor. You can also try ribeye if you want more fat for added richness. Both cuts sear well, making them perfect for these steak tips. Can I make this recipe ahead of time? Yes, you can prepare the cheesy rigatoni and garlic butter steak tips in advance. Just cook the rigatoni and steak, then mix them together with the sauce. Keep it in the fridge for up to two days. When you're ready to eat, warm it on the stove until heated through. How do I make this dish spicier? To add some heat, try these tips: - Include red pepper flakes in the garlic butter. - Use spicy cheese like pepper jack. - Add diced jalapeños or chili peppers to the rigatoni. These changes will give your dish a nice kick! Calories and nutritional breakdown per serving This dish has about 600 calories per serving. You get protein from the steak and cheese, carbs from the rigatoni, and healthy fats from the butter. It’s a hearty meal that fills you up! Tips for healthier substitutions If you want to make it lighter, swap heavy cream for milk or a plant-based cream. You can also use whole-grain rigatoni for extra fiber. Use less butter or a low-fat alternative to cut down on calories. Dietary considerations for high-protein meals This recipe is great for those who want a high-protein meal. Each serving contains around 40 grams of protein, thanks to the steak and cheese. It’s perfect for anyone on a protein-rich diet. Recommended side dishes to complement the meal Pair this dish with a simple green salad or steamed vegetables. A side of garlic bread also works nicely. These sides balance the richness of the steak and pasta. Best wines or beverages to pair For drinks, a red wine like Cabernet Sauvignon pairs well. If you prefer something non-alcoholic, try sparkling water with a slice of lemon. Both options enhance the flavors of the dish. How to create a full-course meal around this dish To make it a full meal, start with a light appetizer, like bruschetta. Follow with the garlic butter steak tips with cheesy rigatoni as the main course. For dessert, a light sorbet or fruit salad is refreshing and completes the dining experience. For the full recipe, check out the details above. In this post, we explored how to make Garlic Butter Steak Tips with Cheesy Rigatoni. We covered ingredients, cooking methods, and storage tips. You can swap ingredients for your taste or dietary needs. Consider grilling the steak or using a slow cooker for variety. Ultimately, this dish is satisfying and easy to customize. Enjoy creating a meal that fits your preferences while impressing your guests. Happy cooking!](https://pureeatsnow.com/wp-content/uploads/2025/05/75c6f0b9-c03c-4e26-917d-31d3cd27b42b.webp)
Imagine sinking your teeth into tender steak tips, drenched in rich garlic butter, paired perfectly with cheesy rigatoni. This dish
![This cake shines thanks to its simple and fresh ingredients. Here’s what you need: - 1 cup shelled unsalted pistachios, finely ground - 1 ½ cups all-purpose flour - 1 teaspoon baking powder - ½ teaspoon baking soda - ¼ teaspoon salt - ½ cup unsalted butter, softened - 1 cup granulated sugar - 3 large eggs - 1 teaspoon vanilla extract - ½ cup plain Greek yogurt - 1 tablespoon lemon zest - 1 tablespoon milk (as needed for consistency) These ingredients work together to create a moist and flavorful cake. The ground pistachios add a unique taste and a lovely green color. You can enhance your cake's taste with some optional ingredients. Consider these additions: - Chopped dark chocolate for a sweet twist - Cardamom for an exotic flavor - Orange zest for a citrusy note Adding these will give your cake a personal touch. Feel free to mix and match as you like. If you need to swap ingredients, here are some ideas: - Use almond flour instead of all-purpose flour for a nutty flavor. - Coconut oil can replace butter for a dairy-free option. - Try maple syrup instead of granulated sugar for a natural sweetener. Make sure to adjust baking time if you make substitutions. This way, your cake remains just as delicious. For the best results, measure your ingredients carefully. Each component plays a big role in the final taste and texture. If you want the full recipe, check out the [Full Recipe]. First, preheat your oven to 350°F (175°C). This step warms the oven for even baking. Grease a 9-inch round cake pan, then dust it with flour. You can also line it with parchment paper for easy removal. In a large bowl, cream together ½ cup of softened unsalted butter and 1 cup of granulated sugar. Use an electric mixer on medium speed for 2-3 minutes. This blends air into the mix, making the cake light. Next, add 3 large eggs one at a time. Mix well after each addition. Now, stir in 1 teaspoon of vanilla extract and 1 tablespoon of lemon zest. This adds a fresh flavor to the cake. In a separate medium bowl, whisk together 1 ½ cups of all-purpose flour, 1 teaspoon of baking powder, ½ teaspoon of baking soda, and ¼ teaspoon of salt. This mixes the dry ingredients evenly. Set the bowl aside for later use. Gradually mix the ground pistachios into your wet mixture. Alternate adding the dry flour mix and ½ cup of plain Greek yogurt to the batter. Start and end with the flour mixture. Mix each addition until just combined; be careful not to overmix. If the batter is too thick, add 1 tablespoon of milk at a time until it reaches a smooth, thick consistency. Pour the batter into the prepared pan, smoothing the top. Bake for 30-35 minutes. Check with a toothpick in the center; it should come out clean. Let the cake cool in the pan for about 10 minutes. Then, turn it onto a wire rack to cool completely. For the full recipe, refer to the earlier section. To get the best texture for your pistachio cake, focus on these steps: - Use finely ground pistachios: This helps them mix well into the batter. - Cream the butter and sugar well: Aim for a fluffy, light mixture. This adds air to your cake. - Don’t overmix: When adding dry ingredients, mix just until combined. Overmixing can make the cake tough. - Check doneness: Insert a toothpick into the center. If it comes out clean, your cake is ready! Baking can be tricky. Here’s how to avoid common errors: - Measure ingredients properly: Use a kitchen scale or measuring cups. Accurate measurements matter. - Preheat your oven: Always preheat your oven to 350°F (175°C) before baking. This ensures even cooking. - Use room temperature eggs: Cold eggs can make your batter lumpy. Let them sit out for a bit. - Don’t rush cooling: Let the cake cool in the pan for 10 minutes. This helps it firm up and makes it easier to remove. Presentation can make your cake shine. Here are some fun ideas: - Dust with powdered sugar: A light sprinkle adds a sweet touch. - Top with whipped cream: This gives a creamy contrast to the cake. - Add chopped pistachios: Sprinkle them on top for a crunchy finish. - Serve with Greek yogurt: A dollop adds creaminess and pairs nicely with the cake’s flavors. For the full recipe, check out the details above! {{image_2}} You can make a gluten-free version of this cake. Replace all-purpose flour with a gluten-free blend. Ensure the blend has a 1:1 ratio for best results. This swap keeps the flavor and texture the same. You can change the flavor of your pistachio cake easily. Adding chocolate is a great choice. Mix in ½ cup of cocoa powder with the flour. For a spicy twist, try cardamom. Use 1 teaspoon of ground cardamom in the mix. These flavors pair well with pistachios, creating a unique taste. You can present your pistachio cake in various ways. Make it a layered cake by baking two rounds. Stack them with frosting in between. This adds a lovely look and taste. Alternatively, bake it in a Bundt pan. This shape gives the cake a beautiful design. Just make sure to grease the pan well so it comes out easily. For the full recipe and more ideas, check the Full Recipe section. To keep your delightful pistachio cake fresh, wrap it tightly. Use plastic wrap or aluminum foil. This helps avoid drying out. Store it at room temperature if you plan to eat it within two days. For longer storage, use the fridge. If you want to store your pistachio cake for longer, refrigeration works well. Place the wrapped cake in the fridge. It stays fresh for about a week. For even longer storage, freeze it. Cut the cake into slices, wrap each slice well, and place them in a freezer bag. You can freeze it for up to three months. To reheat your pistachio cake, first, let it thaw if frozen. Preheat your oven to 350°F (175°C). Place the cake or slices on a baking sheet. Heat for about 10-15 minutes. This will warm it through without drying it out. Enjoy your tasty treat warm! You can easily make this cake dairy-free. Replace the Greek yogurt with a plant-based yogurt. Use coconut oil or a dairy-free butter spread instead of regular butter. For milk, use almond milk or oat milk. These swaps keep the cake moist and delicious. Yes, you can use shelled pistachios. However, make sure to grind them finely. A food processor works best for this. Ground pistachios blend well into the batter. They also add a nice texture to the cake. Pistachio cake pairs well with many sides. Consider serving it with whipped cream or a scoop of vanilla ice cream. Fresh berries also add a nice touch. For a bright flavor, top it with lemon zest or drizzle with honey. You can find the full recipe for more ideas. You now know all the key ingredients for a delightful pistachio cake. We covered step-by-step baking instructions and helpful tips to avoid mistakes. I shared ways to add flavor, make variations, and store your cake properly. Whether you want a gluten-free option or a layered dessert, there's a choice for you. Remember, baking is fun! Experiment and let your creativity shine. Enjoy your baking journey, and delight in sharing your delicious creation with others.](https://pureeatsnow.com/wp-content/uploads/2025/05/ef80aa78-cb9b-4aaa-a0bb-4c6f2e0eb94b.webp)
Are you ready to bake something extraordinary? The Delightful Pistachio Cake is simple and oh-so-tasty! This recipe combines the nutty
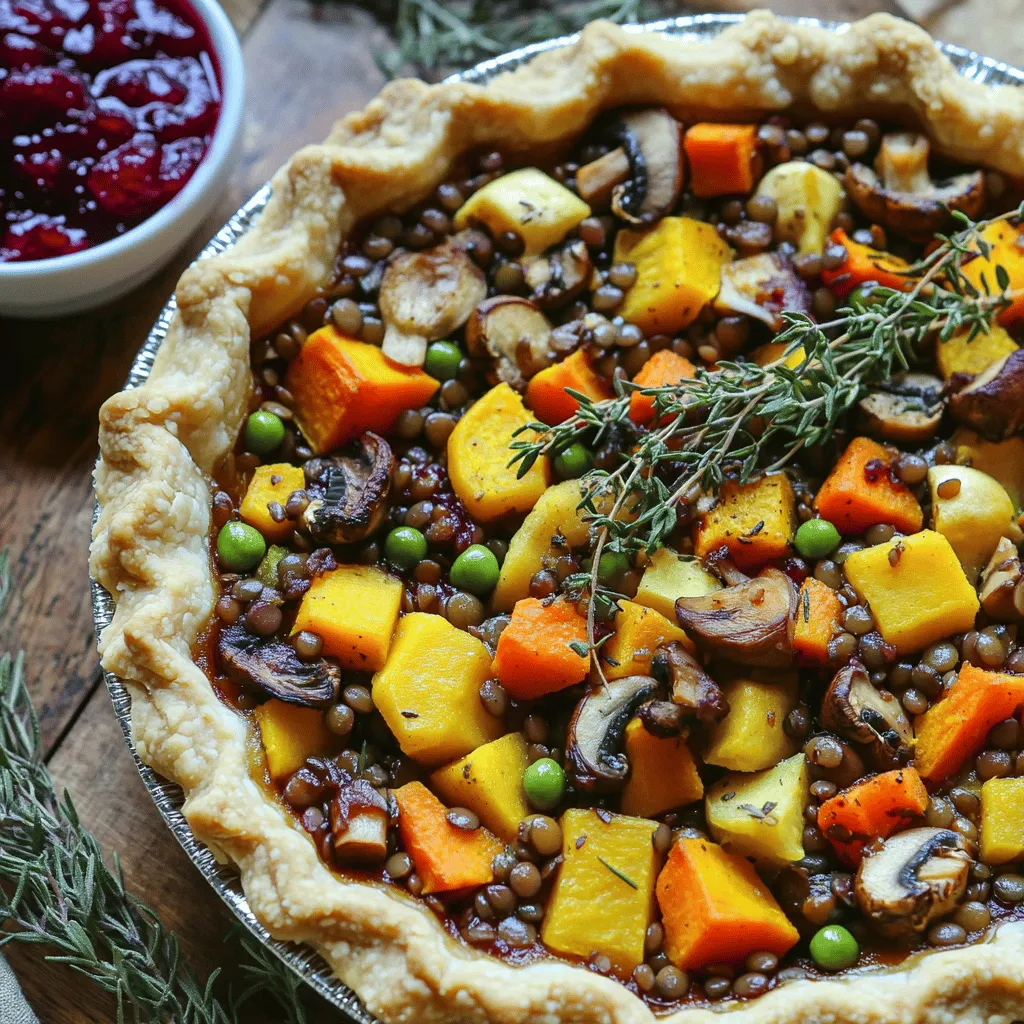
Get ready to impress your guests this holiday season with a Vegan Christmas Pie that’s both festive and flavorful! Packed
![- 2 cups all-purpose flour: This provides the base for soft, fluffy rolls. - 1 cup pumpkin puree: It brings moisture and a warm, earthy flavor. - 2 tablespoons fresh rosemary, finely chopped: This adds a bright, herbal note. - 2 tablespoons sugar: A touch of sweetness helps balance the flavors. - 1 teaspoon salt: It enhances all the other flavors in the rolls. - 1 tablespoon baking powder: This helps the rolls rise and become light. - 1/2 teaspoon baking soda: It works with the acidic pumpkin for a fluffy texture. - 1/2 cup milk (or a dairy-free alternative): Adds moisture and richness. - 1/4 cup olive oil: It keeps the rolls moist and adds flavor. - 1 large egg: This binds the ingredients and gives structure to the rolls. - Extra softened butter for brushing: It adds flavor and a nice finish to the rolls. - Gluten-free flour options: You can use a gluten-free blend for a safe choice. - Dairy-free milk substitutions: Almond milk or oat milk work well in this recipe. - Fresh vs. dried rosemary: Fresh rosemary gives a stronger flavor, but dried can work too. Use about one tablespoon of dried rosemary if that’s what you have. These ingredients come together to create a delicious, soft roll that combines the sweet, nutty taste of pumpkin with fragrant rosemary. You can find the full recipe in the article to guide you through making these delightful rolls. 1. Preheating the oven and preparing the baking sheet Start by preheating your oven to 375°F (190°C). This gives your rolls a nice rise. Line a baking sheet with parchment paper to prevent sticking. 2. Mixing dry ingredients for uniformity In a large bowl, combine 2 cups of all-purpose flour, 2 tablespoons of sugar, 1 teaspoon of salt, 1 tablespoon of baking powder, and 1/2 teaspoon of baking soda. Stir well to mix everything evenly. This step ensures your rolls are flavorful. 3. Combining wet ingredients for consistency In another bowl, whisk together 1 cup of pumpkin puree, 1/2 cup of milk, 1/4 cup of olive oil, and 1 large egg. Mix until smooth. This blend adds moisture and flavor to your rolls. 1. Shaping the dough into rolls Pour the wet mix into the dry mix. Add 2 tablespoons of finely chopped fresh rosemary. Gently stir until just combined. The dough should feel slightly sticky, which is fine. Lightly flour your work surface. Turn the dough out and divide it into 12 equal pieces. Shape each piece into a ball. 2. Placing dough on the baking sheet Place the dough balls on the lined baking sheet. Make sure to leave some space between each roll. This helps them rise without sticking together. 3. Baking times and signs of readiness Bake the rolls for about 15-20 minutes. They are ready when they turn golden brown. You can check if they are done by inserting a toothpick in the center. If it comes out clean, they are perfect! 1. Tips for brushing with butter For a lovely finish, brush the tops of each roll with softened butter right after baking. This adds shine and flavor. 2. Suggested garnishes for serving Serve your rolls warm. A sprinkle of fresh rosemary on top makes them look great. You can also offer honey butter on the side for extra taste. Place the rolls in a basket lined with a cloth for a nice touch. For the full recipe, check the details above. To make great dough, watch for signs of overmixing. If the dough looks smooth and shiny, you may have mixed too much. Aim for a soft, slightly lumpy texture. If your dough is too sticky, flour your hands and work surface. You can also add a little more flour, one tablespoon at a time. Just be careful not to add too much. When kneading, use a gentle push and fold method. Knead for about 5 to 7 minutes. This develops the gluten without toughening the rolls. To boost the pumpkin flavor, use fresh pumpkin puree. You can roast your own pumpkin for deeper taste. Add a pinch of nutmeg or cinnamon for spice. Rosemary pairs well with cheese. Try adding shredded cheddar or feta to the mix. Walnuts or pine nuts add crunch and flavor too. For serving, these rolls shine when warm. Pair them with honey butter or a creamy spread. You can also serve them alongside soups or salads for a hearty meal. For the full recipe, check out the details above. {{image_2}} You can make Rosemary Pumpkin Bread Rolls even more fun by mixing flavors. - Adding cheese for a savory twist: Try adding shredded cheese like cheddar or mozzarella. The cheese melts and adds a nice, gooey texture. It also gives a rich flavor that pairs well with the pumpkin and rosemary. - Sweetening with cinnamon or nutmeg: If you want a sweeter roll, add a teaspoon of cinnamon or nutmeg. These spices bring warmth and a cozy feel to each bite. They perfectly balance the mild pumpkin taste. - Experimenting with other herbs: Instead of rosemary, you could use thyme or sage. These herbs also work well with pumpkin. Each herb gives a unique flavor and aroma, so feel free to explore! Cooking can be flexible to fit your dietary needs. - Vegan alternatives for egg and milk: You can make these rolls vegan. Use a flax egg or applesauce instead of a regular egg. For the milk, almond milk or coconut milk works great. This way, everyone can enjoy these tasty rolls! - Low-carb adaptations: If you’re watching carbs, swap out all-purpose flour for almond flour or coconut flour. These options reduce carbs and give a different texture. You might need to adjust the liquid in the dough, so keep an eye on that. For the full recipe and more details, check out the [Full Recipe]. Experimenting with these variations can make each batch special and fun! To keep your Rosemary Pumpkin Bread Rolls fresh, store them in an airtight container. This helps them stay soft and tasty. You can also wrap them in plastic wrap. At room temperature, the rolls last about 2-3 days. If you see any signs of mold, throw them away. If you want to keep them longer, freezing is a great option. Wrap each roll in plastic wrap and then place them in a freezer bag. They can last up to 3 months in the freezer without losing flavor. When you're ready to enjoy them again, remove the rolls from the freezer. Let them thaw in the fridge overnight. To reheat, place them in a 350°F (175°C) oven for about 10 minutes. This helps restore their soft texture. You can also microwave them for 20-30 seconds if you're in a hurry. For more details, check out the Full Recipe. Can I make the dough ahead of time? Yes, you can make the dough ahead. Prepare it and chill it in the fridge. This step helps the flavors blend. When you’re ready, shape and bake the rolls. How do I know when the rolls are fully baked? The rolls turn golden brown when baked. Insert a toothpick in the center; it should come out clean. If the rolls are still doughy, bake a few more minutes. What dishes pair well with Rosemary Pumpkin Bread Rolls? These rolls are great with soups, salads, or roasted meats. They also shine when served with a warm dip or honey butter. You can pair them with a light salad for a fresh meal. Can I use canned pumpkin instead of fresh pumpkin puree? Yes, canned pumpkin works well. Make sure it’s pure pumpkin, not pumpkin pie filling. Canned pumpkin saves time and still gives great flavor in the rolls. For the full recipe, check the link. This article covered making delicious Rosemary Pumpkin Bread Rolls. We explored key ingredients, highlighted substitutions, and detailed each step for easy baking. You learned tips to perfect your dough and enhance flavor, along with creative variations to try. Storing your rolls is simple, and I provided solid answers to common questions. Baking these rolls offers a tasty twist for any meal. With this guide, you have the tools to impress your family and friends. Enjoy the process and the delightful results!](https://pureeatsnow.com/wp-content/uploads/2025/05/f0369d2d-e9dd-4e8a-a963-1684415a8325.webp)
Are you ready to impress with a comforting and tasty treat? These Rosemary Pumpkin Bread Rolls are soft, fluffy, and

If you’re craving a sweet treat that’s both easy and refreshing, these No-Bake Mini Lemon Cheesecakes are perfect for you!
![Seafood Components - 1 cup cooked shrimp, peeled and deveined - 1 cup calamari rings, cooked - 1 cup mussels, cooked and shelled I love using fresh seafood in this salad. The shrimp brings a sweet taste. Calamari adds a nice chewy texture, while mussels give a briny flavor. You can mix and match your seafood choices, but these three work great together. Vegetables and Extras - 1 cup cherry tomatoes, halved - 1 cucumber, diced - 1/4 red onion, thinly sliced - 1/4 cup black olives, sliced - 2 tablespoons capers, rinsed - 2 tablespoons fresh parsley, chopped The vegetables add color and crunch. Cherry tomatoes are juicy and sweet. Cucumber gives a cool bite, while red onion adds a mild sharpness. Black olives and capers provide a salty kick. Fresh parsley brightens the dish with its green flavor. Dressing Ingredients - 1 lemon, juiced - 3 tablespoons extra-virgin olive oil - Salt and pepper to taste The dressing is simple but powerful. Fresh lemon juice brings acidity. Extra-virgin olive oil adds richness. A pinch of salt and pepper ties it all together. This dressing enhances every bite of the salad. For the complete preparation, check the Full Recipe. Enjoy your fresh and flavorful Italian seafood salad! Combining Seafood Start by taking a large mixing bowl. Add the cooked shrimp, calamari rings, and mussels. These three seafood items bring great taste and texture. Make sure they are all well-cooked and ready to go. Adding Vegetables Next, it’s time to add color and crunch. Toss in the halved cherry tomatoes, diced cucumber, sliced red onion, black olives, and capers. Each vegetable adds a unique flavor. The mix will look vibrant and fresh. Dressing the Salad Now, let’s dress the salad. Squeeze the juice of one lemon over the seafood and veggies. Then, drizzle in three tablespoons of extra-virgin olive oil. These two ingredients brighten the dish. They make all the flavors pop. Final Tossing and Serving Gently toss everything together. Make sure all the ingredients get coated in the dressing. Now, sprinkle the chopped parsley, salt, and pepper over the top. Toss again to mix well. Let it sit for about 10 minutes. This waiting time helps the flavors blend. Serve your salad in bowls or on a large platter. You can garnish with extra parsley for a nice touch. Enjoy this fresh and flavorful Italian seafood salad with crusty bread for the full experience. For the complete recipe, check out [Full Recipe]. Cooking Seafood Perfectly To cook seafood right, you need timing. Overcooking makes it tough. For shrimp, cook until pink, about 2-3 minutes. For calamari, one minute is enough. Mussels can be steamed until they open, which takes about 5 minutes. This keeps them tender and tasty. Choosing Fresh Ingredients Fresh ingredients make your salad shine. Look for bright colors and firm textures. For seafood, choose bright, clear eyes on fish and a fresh smell. For veggies, select those with no soft spots. Fresh herbs add great flavor and aroma. Always wash your produce well before use. Marinating for Enhanced Flavors Marinating seafood is a game-changer. It helps blend flavors. Mix lemon juice, olive oil, salt, and pepper for a simple marinade. Let your seafood sit in this mix for 15-30 minutes. This step is key for a tasty salad. It adds depth and makes every bite pop. For a detailed guide on making this delightful dish, check out the Full Recipe. {{image_2}} Different Seafood Options You can switch up the seafood in this salad. Use any cooked seafood you love. Try scallops or crab instead of shrimp. You can mix and match according to your taste. Just remember to keep the seafood fresh and tasty. Vegetarian Alternative If you want a vegetarian version, skip the seafood. Use chickpeas or white beans for protein. Add artichoke hearts for a fun texture. You can also use marinated tofu as a substitute. This gives you a fresh and unique salad. Flavor Enhancements Boost flavors with herbs and spices. Fresh basil or dill can add a nice twist. You can also add red pepper flakes for some heat. A splash of balsamic vinegar can give a sweet tang. These small changes can make your salad pop. For the full recipe, check out the Italian Seafood Medley Salad. When you make Italian seafood salad, you want to keep it fresh. Here’s how to store it properly. Refrigerating Leftovers Store leftovers in an airtight container. This helps keep it fresh for about 2 days. Place the salad in the fridge right after serving. If you leave it out for more than 2 hours, throw it away. Keeping seafood safe is important. Freezing Options and Duration Freezing seafood salad isn't the best choice. The texture can change when thawed. If you must freeze it, use a freezer-safe container. It can last up to 1 month. When ready to eat, thaw it overnight in the fridge before serving. Reheating Tips If you choose to reheat your seafood, do it gently. Use a microwave-safe dish and cover it. Heat for short bursts, checking often. You want to warm it, not cook it again. After reheating, let it cool a bit before serving. For more detailed steps on how to make the salad, check the Full Recipe. To make a simpler version, use fewer seafood types. You can stick to shrimp and one other kind, like crab. Replace fresh herbs with dried ones. This keeps the flavors nice without fuss. Great sides include crusty bread or a fresh green salad. You can also serve it with lemon wedges on the side. These choices balance the seafood flavors nicely. The salad lasts up to two days in the fridge. Keep it in a covered container to stay fresh. Make sure to eat it within this time for the best taste. Yes, you can use frozen seafood. Just make sure to thaw it properly. Rinse the seafood under cold water before cooking. Fresh seafood gives a better texture, but frozen works too. To enhance the flavor, add more lemon juice or fresh herbs. You can also include a splash of white wine vinegar. A bit of garlic can add a nice kick too. For the full recipe, check out the detailed instructions above. Italian seafood salad mixes fresh seafood with crisp veggies and a tasty dressing. You can add your favorite seafood and even make it vegetarian. Remember to refrigerate leftovers properly to keep them fresh. Experimenting with flavors and ingredients keeps this dish exciting. Make it your own with these tips, and enjoy a refreshing meal that's simple and delicious. Happy cooking!](https://pureeatsnow.com/wp-content/uploads/2025/05/2a48796a-7174-4693-8fdc-363ced269390.webp)
If you’re searching for a fresh and tasty dish, Italian Seafood Salad is the answer! This delightful mix brings together

Looking for fun and healthy snacks your kids will love? I have just the solution: Creative Tortilla Recipes! With tasty
![To make Jolly Rancher Candy Apples, you will need the following key ingredients: - 4 medium-sized apples (Granny Smith or Red Delicious) - 2 cups granulated sugar - 1/2 cup light corn syrup - 1/2 cup water - 1 cup Jolly Rancher candies (various flavors, unwrapped) - 1 teaspoon vanilla extract - Wooden sticks (for skewering) These ingredients give the apples a sweet and tangy flavor. The Jolly Ranchers add color and fun! You can also add a few optional ingredients to make your apples unique: - Food coloring (optional, matching the Jolly Rancher colors) - Nuts or sprinkles, for added texture - Chocolate drizzle, for a rich taste Feel free to mix and match these extras. They can enhance the look and flavor of your apples. Gather the right tools to make this treat. You will need: - Medium-sized saucepan - Candy thermometer - Parchment paper - Rolling pin or meat mallet (for crushing the Jolly Ranchers) - Ziplock bag (for crushing candies) Having these tools ready will help you prepare your Jolly Rancher Candy Apples smoothly. Check the [Full Recipe] for more details and tips! First, wash the apples well under cold water. This step helps remove wax and dirt. After washing, dry each apple completely with a clean towel. Next, take a wooden stick and push it into the top of each apple. Insert it about two-thirds of the way down. This stick will act as your handle. Set the apples aside on a baking sheet lined with parchment paper. To make the candy coating, grab a medium-sized saucepan. In it, mix the granulated sugar, corn syrup, and water. Place the saucepan over medium heat. Stir the mixture gently until the sugar dissolves completely. Once clear, turn the heat up to medium-high. Let it boil without stirring. You want it to reach the hard crack stage, which is 300°F or 150°C. This usually takes about 10 to 15 minutes. Keep an eye on it; it can burn quickly! While the sugar mixture heats, take your Jolly Ranchers. Unwrap them and place them in a ziplock bag. Use a rolling pin or meat mallet to crush them into smaller pieces. This makes it easier for them to stick to the candy apple. When your sugar mixture reaches the right temperature, remove it from the heat. Stir in the vanilla extract, and if you want, add food coloring to match the Jolly Rancher colors. Now, dip each apple into the hot candy mixture. Make sure to coat it evenly. Be very careful, as this mixture is extremely hot! After coating, sprinkle the crushed Jolly Ranchers over the sticky surface. Spin the apple to cover it fully and let any extra candy drip off. Finally, place the coated apple back on the parchment-lined sheet to cool. It will take about 10 to 15 minutes for the candy to harden. Enjoy your Jolly Rancher Candy Apples as a bright and tasty treat! You can find the full recipe to guide you through these steps. To get that shiny candy coating, you need a hot sugar mix. Heat sugar, corn syrup, and water in a pan. Stir gently until the sugar dissolves. After that, raise the heat. Let it boil until it reaches 300°F. This is called the hard crack stage. If you don’t have a thermometer, drop a small amount in cold water. If it forms a hard ball, it's ready! Crush your Jolly Ranchers before you dip the apples. Use a ziplock bag and a rolling pin for easy crushing. This helps the pieces stick better. While the candy coating is still hot, sprinkle the crushed Jolly Ranchers on the apples. Turn the apple around to cover all sides. This way, each bite will burst with flavor! Hot sugar can burn you, so be very careful. Use oven mitts when handling the pan. Always keep kids away from the hot mixture. If you spill any, let it cool before cleaning up. When dipping, hold the apple by the stick. This keeps your hands safe and lets you dip with ease. {{image_2}} You can make your Jolly Rancher Candy Apples even more fun by mixing different flavors. Try using watermelons with green apple for a sweet and tart taste. Cherry combined with grape gives a fruity burst that kids will love. Or mix blue raspberry with lemon for a cool twist. Each combination brings out a new taste, making every bite exciting! Feel free to get creative with toppings! After dipping your apples in the candy coating, you can sprinkle crushed nuts, sprinkles, or mini chocolate chips on top. You can also drizzle melted chocolate for a smooth finish. Try adding shredded coconut or colorful edible glitter to make them pop. These toppings add texture and fun to your candy apples! Presentation can make your candy apples even more special. Use colorful plates or rustic wooden boards to display them. You can tie ribbons around the sticks for a festive look. Arrange them in a tall glass or a basket filled with hay for a country fair vibe. Use clear bags to wrap them as gifts. These ideas will make your candy apples stand out at any party! For more detailed steps, check out the Full Recipe. To keep your Jolly Rancher Candy Apples fresh, store them in a cool, dry place. Use a container with a lid to avoid dust and moisture. If you can't find a container, wrap each apple in plastic wrap. This helps keep them from sticking together. Never store them in the fridge, as this can make the candy coating sweat. Jolly Rancher Candy Apples last about 3 to 5 days if stored properly. After this, the candy may lose its crunch. If you see any signs of melting or moisture, it’s best to toss them. Keeping an eye on their condition helps ensure you enjoy these treats at their best. If your candy apples lose some shine or get sticky, you can refresh them. Place them in a cool room for a few hours. This helps the candy harden again. If you need to reheat them, use a hairdryer on a low setting. Hold it at a distance to avoid melting the apple itself. This quick fix can make them look great again! For the full recipe, check out my instructions above. You can find pre-made Jolly Rancher candy apples at many local candy shops. Some grocery stores also sell them during holidays. Check online, too! Websites like Etsy often have sellers who make these treats. Compare prices to find your best deal. Yes, you can use different types of apples. Granny Smith apples work well for a tart flavor. Red Delicious apples give a sweet taste. You can even try Honeycrisp or Fuji apples for a mix of sweet and tart. Choose apples based on your taste. To prevent the candy from cracking, let the coated apples cool slowly. Avoid placing them in the fridge, as sudden temperature changes can cause cracking. Make sure the candy mixture reaches the right temperature without burning it. Also, coat them evenly for a smooth finish. For the full recipe and steps, check the detailed section on Jolly Rancher Candy Apples! Making Jolly Rancher Candy Apples involves simple steps and fun ingredients. You learned the essential and optional ingredients, plus tools needed. I provided easy instructions for preparing apples, making the candy coating, and coating the apples. I shared tips for the best candy coating and safety measures. You explored various flavor combinations and creative ideas for presentation. Finally, I covered storage practices to keep your treats fresh. Enjoy making these tasty treats, and let your creativity shine!](https://pureeatsnow.com/wp-content/uploads/2025/05/be5f14c9-ee05-4c9a-a348-6384bdcb7ec2.webp)
Are you ready to add a burst of flavor to your treat table? Jolly Rancher Candy Apples are not only

Are you ready to save time and eat healthier? Meal prepping lunches can make your week easy. In this Beginner
