Skip to content
DisclaimerTerms Of UseGDPR PolicyCookie Policy

pureeatsnow

  • Home
  • Drinks
  • Appetizers
  • Dinner
  • Dessert
  • About
  • Contact
  • Privacy Policy
DisclaimerTerms Of UseGDPR PolicyCookie Policy

Rachel

- 4 chicken thighs, skin-on and bone-in - 2 tablespoons soy sauce - 2 tablespoons brown sugar - 1 tablespoon honey - 1 tablespoon ketchup - 1 tablespoon rice vinegar - 1 teaspoon fresh ginger, grated - 2 cloves garlic, minced - 1/2 teaspoon black pepper - 1/2 teaspoon paprika - 1/4 teaspoon cayenne pepper (optional, for heat) - 1 green onion, chopped (for garnish) - Sesame seeds (for garnish) - Each serving has about 300 calories. - The macronutrient breakdown includes protein, carbs, and fats. - Ingredients like ginger and garlic support health and add flavor. Baked Huli Huli Chicken brings a taste of Hawaii to your table. With just a few simple ingredients, you can create a dish that’s both sweet and savory. The chicken thighs stay juicy and tender thanks to their skin, while the marinade adds depth. This recipe is easy to follow and perfect for any home cook. For the full recipe, check out the details above. To start, gather your ingredients. In a medium bowl, whisk together: - 2 tablespoons soy sauce - 2 tablespoons brown sugar - 1 tablespoon honey - 1 tablespoon ketchup - 1 tablespoon rice vinegar - 1 teaspoon fresh ginger, grated - 2 cloves garlic, minced - 1/2 teaspoon black pepper - 1/2 teaspoon paprika - 1/4 teaspoon cayenne pepper (optional) Mix until everything blends well. The marinade gives the chicken its sweet and tangy flavor. Marinating is key. It helps the chicken soak up all those tasty flavors. Aim for at least 30 minutes but two hours is even better. Place your chicken thighs in a large resealable bag or a shallow dish. Pour the marinade over the chicken. Make sure each piece is well coated. Seal the bag or cover the dish tightly. Refrigerate it. This step is important because it helps the chicken absorb all the flavors. For best results, marinate for 30 minutes to two hours. This gives the chicken time to soak up the goodness. Don’t rush this step; it makes a big difference. Now, let’s bake! Preheat your oven to 375°F (190°C). While it heats, take the marinated chicken out of the fridge. Arrange the chicken thighs skin-side up in a baking dish. Pour any leftover marinade over the chicken. Bake in the preheated oven for about 35 to 40 minutes. You want the chicken to reach an internal temperature of 165°F (75°C). For a crispier skin, broil the chicken on high for the last 2-3 minutes. Keep a close eye on it to avoid burning. Following these steps will help you create a delicious Baked Huli Huli Chicken. For the complete recipe, check the Full Recipe. To make sure your chicken is juicy, follow these tips: - Use bone-in thighs: They cook evenly and stay moist. - Don’t skip the marinade: It adds flavor and moisture. - Let it rest: After baking, let the chicken rest for a few minutes. For crispy skin, do this: - Bake skin-side up: This helps the skin crisp up nicely. - Broil at the end: Broil for 2-3 minutes, but watch closely. Avoid over-marinating your chicken. If you leave it too long, the texture can change. Aim for 30 minutes to 2 hours. Don’t underestimate your bake time. Always check the internal temperature. The chicken should reach 165°F (75°C). Pair your Baked Huli Huli Chicken with: - Steamed rice - Grilled vegetables - A fresh green salad For drinks, I recommend: - Sweet iced tea - Pineapple juice Make your plate pop with color! Use green onions and sesame seeds as a garnish. This not only tastes good but looks great too. {{image_2}} You can easily switch up some ingredients in this recipe. If you want a different sweet taste, try using agave or maple syrup instead of brown sugar. Both options add a nice touch. You can also use chicken breast instead of thighs. Just remember, breasts cook faster, so check them early. To make your dish even better, think about adding tropical fruits. Pineapple chunks can give a sweet and tangy twist to your chicken. You can also spice things up by adding a pinch of cayenne pepper. This will give you some heat without being too overpowering. If you need gluten-free options, use tamari instead of soy sauce. This keeps the rich flavor intact while being safe for gluten-free diets. For those watching their sugar intake, you can reduce the amount of honey or choose a low-sugar sweetener. These easy swaps let everyone enjoy this baked Huli Huli chicken. For the full recipe, check the earlier section! To store leftovers, place the chicken in an airtight container. This keeps it fresh. Make sure to cool it down to room temperature first. In the fridge, Baked Huli Huli Chicken lasts up to four days. Always check for any signs of spoilage before eating. You can freeze Baked Huli Huli Chicken for later use. First, wrap each piece in plastic wrap. Then, place the wrapped chicken in a freezer bag. This helps prevent freezer burn. It can last up to three months in the freezer. For defrosting, place it in the fridge overnight. This keeps the chicken safe and tasty. To reheat without drying out the chicken, use the oven. Preheat it to 350°F (175°C). Place the chicken in a baking dish, and cover it with foil. Heat for about 20 minutes. Check if it's warmed through. For quicker reheating, use the microwave. Heat on medium power for 2 to 3 minutes, checking often. This way, your chicken stays juicy and delicious. You should marinate the chicken for at least 30 minutes. This gives the chicken time to soak up the flavors. If you have more time, try marinating for up to 2 hours. The longer you marinate, the tastier it gets! Yes, you can use chicken breast. However, chicken thighs have more fat, which adds flavor. Chicken breasts will cook faster than thighs. Check the internal temperature. It should reach 165°F (75°C) to be safe to eat. This chicken pairs well with many sides. Here are some great options: - Steamed rice - Grilled vegetables - Pineapple slices - Coleslaw - A fresh garden salad These sides balance the sweet and savory flavors of the chicken. Enjoy your meal! You now have a clear understanding of making Baked Huli Huli Chicken. We covered the key ingredients, step-by-step instructions, and tips to succeed. You can adapt this recipe based on your taste or dietary needs. Remember to focus on marinating time for the best flavor. Enjoy your dish with great sides and share it with friends. Cooking should be fun, so let your creativity shine. This dish will impress and satisfy at any meal.

Baked Huli Huli Chicken Flavorful and Easy Recipe

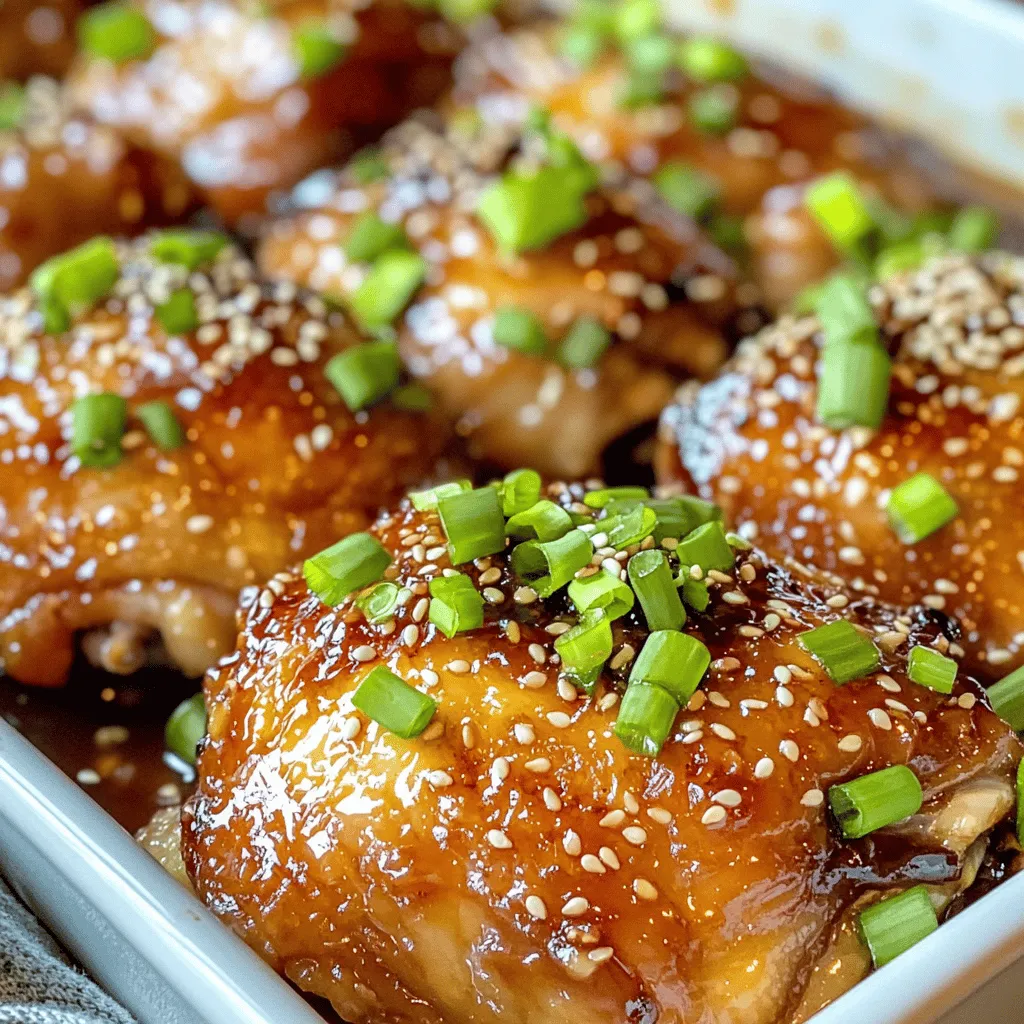
Are you ready to whip up a dish that’s both flavorful and easy? Baked Huli Huli Chicken is the answer!

- Chicken, flour, cornstarch, eggs - Sauces: soy sauce, orange juice, brown sugar - Additional flavors: rice vinegar, sesame oil, ginger, garlic To make Panda Express Orange Chicken, you need simple yet flavorful ingredients. Let's look at them in detail. Chicken: I prefer boneless chicken thighs. They stay juicy and tender when cooked. Flour and cornstarch: These create a crispy coating. The mix gives a great crunch. Eggs: Beaten eggs help the flour and cornstarch stick to the chicken pieces. Soy sauce: This adds saltiness and depth to the dish. Orange juice: Freshly squeezed juice brings bright, zesty flavor. Brown sugar: It provides sweetness and balances the tang from the orange juice. Rice vinegar: This adds a light tang that enhances the sauce. Sesame oil: A small amount adds a nutty flavor. Ginger and garlic: Freshly grated ginger and minced garlic bring aromatic undertones to the sauce. - Sliced green onions - Sesame seeds Garnishes make the dish look nice and add flavor. Sliced green onions: They add a fresh crunch and color. Sesame seeds: These give a nutty touch and enhance the overall appearance. With these ingredients, you can create a delicious and satisfying dish. For the full recipe, check out the details above. To start, you need to coat the chicken well. First, mix the flour and cornstarch in a medium bowl. This mix gives the chicken a nice crunch. Take your chicken pieces and dip them in the beaten eggs. Make sure each piece is fully coated. After the egg wash, roll the chicken in the flour-cornstarch mix. This step is key for a crispy texture. Next, it’s time to fry the chicken. Heat your vegetable oil in a large skillet or wok. The oil should be hot, about 350°F. Use a thermometer to check the temperature. Add the chicken pieces in small batches. Fry them until they are golden brown, which takes about 5 to 7 minutes. Make sure not to crowd the pan. This helps the chicken fry evenly and stay crispy. In a separate saucepan, mix the soy sauce, orange juice, brown sugar, rice vinegar, sesame oil, ginger, garlic, and red pepper flakes. Heat this mixture over medium heat. Stir it well to combine. As it heats, it will start to thicken. Keep stirring for about 5 minutes to get the right consistency. Be careful not to overcook it. After frying and making the sauce, it’s time to combine everything. In a large bowl, toss the crispy chicken pieces with the orange sauce. Make sure each piece is coated well. For a nice touch, transfer the Orange Chicken to a serving platter. Garnish it with sliced green onions and sesame seeds for a beautiful presentation. This dish looks as good as it tastes! For the full recipe, check out the details in our earlier section. To get that perfect crispiness, coat the chicken well. Use a mix of flour and cornstarch for a light, crunchy exterior. After dipping the chicken in egg, roll it in the coating mix. This helps the crust stick better. When frying, heat the oil to medium-high. If the oil isn't hot enough, the chicken will soak up too much oil. Fry the chicken in small batches to keep the temperature consistent. Overcrowding will lead to soggy chicken. Watch closely and fry until golden brown, about 5 to 7 minutes. Fresh ingredients make the dish taste great. Use fresh orange juice instead of bottled juice. It gives a brighter flavor. For an extra kick, add red pepper flakes to the sauce. This will give your Orange Chicken some heat and depth. Feel free to experiment with other fresh herbs or spices. Fresh ginger and garlic boost the flavor even more. Don't shy away from adding a bit of zest from the orange peel too; it brightens the dish! A good frying pan or wok is key. I recommend using a heavy-bottomed pan. This helps distribute heat evenly. Non-stick pans are also great for frying, as they keep the chicken from sticking. Using a thermometer is important. It helps you check the oil's heat. Aim for around 350°F (175°C) when frying. This temperature ensures the chicken cooks through without burning. These tips will help you make a delicious homemade Panda Express Orange Chicken. For the complete recipe, check out the Full Recipe link provided. {{image_2}} For a lighter take on the classic dish, try baking the Orange Chicken instead of frying it. Coat the chicken pieces in the flour and cornstarch mix, then place them on a baking sheet. Spray them lightly with cooking oil and bake at 400°F for about 20-25 minutes. This method reduces oil and fat while still giving you a crispy result. You can also switch up the protein. Instead of chicken, use tofu or shrimp. Tofu absorbs flavors well and offers a great vegetarian option. Shrimp cooks quickly and adds a nice twist. Just adjust cooking times based on the protein you choose. To spice up your Orange Chicken, consider adding different spices. A pinch of cinnamon or a dash of cumin can elevate the flavor profile. You can also experiment with other citrus fruits like lemon or lime for a fresh twist. Just substitute them in the sauce for a unique taste. Incorporating vegetables makes this dish more nutritious. Adding bell peppers, broccoli, or snap peas brings color and crunch. Simply sauté the veggies briefly before tossing them with the chicken and sauce. Pair your Orange Chicken with ideal side dishes like steamed rice or fried rice. Both absorb the sauce well and enhance the meal. You might also serve it with a simple cucumber salad for a refreshing contrast. Get creative with plating. Use a large, flat plate and arrange the chicken in a circular pattern. Add a sprinkle of sesame seeds and green onions on top for a pop of color. You can even place a small bowl of extra sauce on the side for dipping. For the full recipe, refer to the earlier sections to create your own delicious Panda Express Orange Chicken. To keep your Orange Chicken fresh, follow these tips: - Refrigerating leftovers: First, let the chicken cool. Then, place it in an airtight container. Store it in the fridge for up to three days. This keeps the flavors intact while minimizing waste. - Freezing Orange Chicken for future meals: If you want to save some for later, freeze it. Put the cooled chicken in a freezer-safe bag. Squeeze out excess air before sealing. It can last up to three months in the freezer. Just remember to label the bag with the date. To enjoy your Orange Chicken again, reheating is key. - Best methods to retain crispiness: The oven works best to keep the chicken crispy. Preheat the oven to 375°F (190°C). Spread the chicken on a baking sheet. Bake for about 10-15 minutes until heated through. - Time and temperature recommendations for reheating: If you're in a hurry, you can use the microwave. Heat it on medium power for 1-2 minutes. Stir halfway through to ensure even heating. However, the microwave may make the chicken less crispy compared to the oven. Following these storage and reheating tips will help you enjoy your Panda Express Orange Chicken just like the first time. For a delightful experience, check out the Full Recipe and impress your friends and family! Panda Express Orange Chicken packs a punch in flavor, but it's good to know the numbers. A typical serving size is about 5.5 ounces. This serving contains around 490 calories. You get about 24 grams of fat, 37 grams of carbs, and 21 grams of protein. Watching your intake? Keep in mind that this dish is higher in sugar and sodium. Yes! You can easily make this dish gluten-free. Replace the soy sauce with gluten-free tamari. Use gluten-free all-purpose flour instead of regular flour. Cornstarch is already gluten-free, so that's a plus! These swaps let you enjoy the same great taste without the gluten. Homemade Orange Chicken tastes fresher and has a crispier texture. When you make it yourself, you control the flavors. The sauce can be as sweet or tangy as you like. Plus, using fresh ingredients boosts the taste. While the restaurant version is great, the homemade one can feel more special and unique. You can find the Full Recipe for a step-by-step guide to this delicious dish. This blog post covered the key ingredients and steps to make Panda Express Orange Chicken. You learned about the right frying techniques and how to create a delicious sauce. Plus, I shared tips for crispiness and healthier variations. Remember, fresh ingredients make a big difference. You can even customize the dish to suit your taste. When storing leftovers, follow best practices to keep them tasty. Enjoy making this dish your own, and impress your friends and family with your cooking skills!

Panda Express Orange Chicken Flavorful Easy Recipe

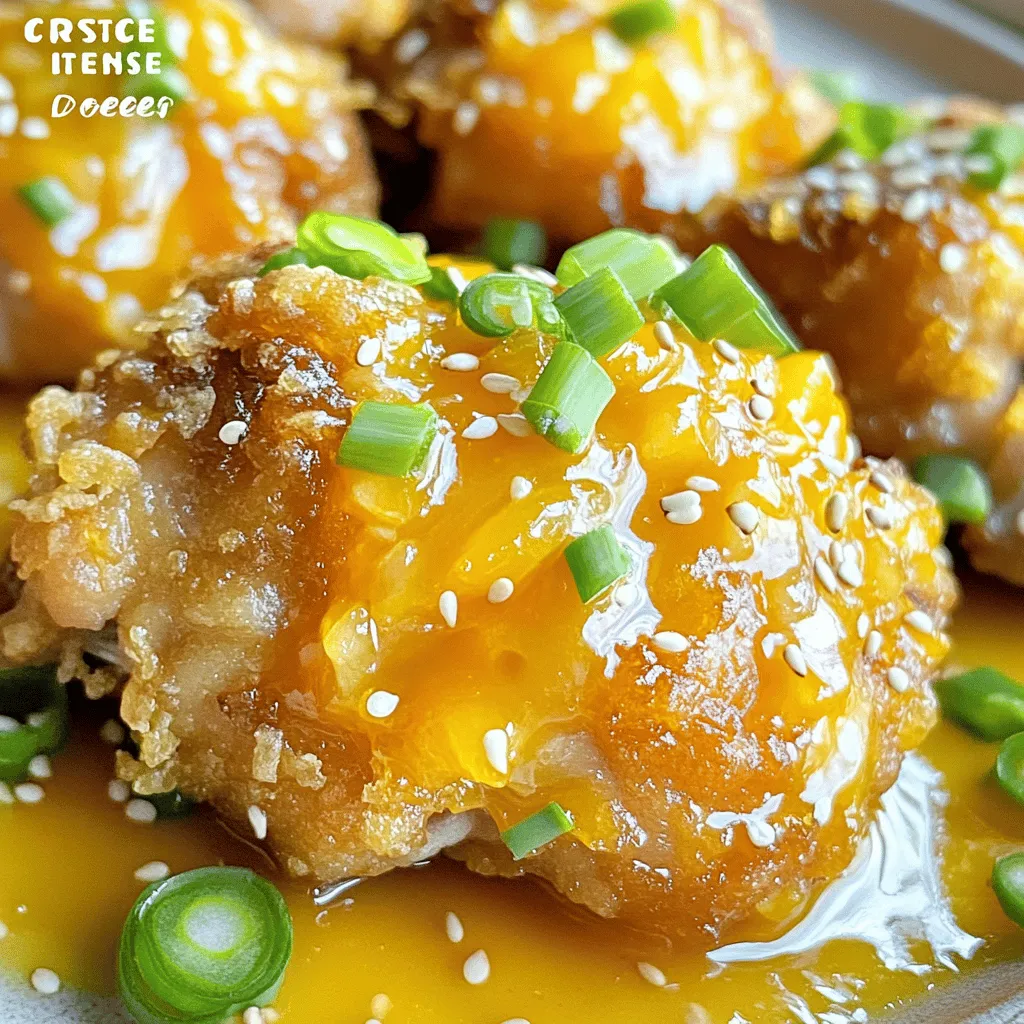
Are you craving the bold flavors of Panda Express Orange Chicken but want to make it at home? Look no

- 12 fresh jalapeño peppers - 8 oz cream cheese, softened - 1 cup shredded sharp cheddar cheese - 1/2 cup cooked bacon, crumbled (optional) - 1/4 cup green onions, finely chopped - 1 teaspoon garlic powder - 1 teaspoon smoked paprika - Salt and pepper to taste - 1 cup panko breadcrumbs - 1/4 cup grated Parmesan cheese - Cooking spray or olive oil for drizzling When making jalapeño poppers, fresh ingredients are key. Start with firm, bright green jalapeños. Their heat level will give your poppers the right kick. I love to mix cream cheese and cheddar cheese for a creamy, tangy filling. The cream cheese adds richness, while the cheddar gives a nice sharpness. Optional ingredients like crumbled bacon and green onions can add extra flavor. Bacon gives a smoky taste, while green onions add freshness. You can always adjust these based on your taste. For seasonings, garlic powder and smoked paprika bring depth. Salt and pepper are crucial for balancing flavors. The panko breadcrumbs add a great crunch. They make the poppers crispy on the outside. Gather all these ingredients before you start. Having everything ready helps the cooking process go smoothly. You can find the full recipe above to guide you through the steps. 1. Preheat the oven to 375°F (190°C). This step helps cook the poppers evenly. 2. Prepare your baking sheet by lining it with parchment paper. This keeps the poppers from sticking. 3. Cut the jalapeños in half lengthwise. Use a knife for this. 4. Remove the seeds and membranes. This step controls the heat. Use gloves if you want to protect your hands. 1. Combine the cheeses. In a bowl, mix the softened cream cheese and shredded cheddar cheese. 2. Add the seasonings. Include cooked bacon if you like. Add green onions, garlic powder, smoked paprika, salt, and pepper. 3. Mix well until the filling is smooth and creamy. This is the star of the dish. 1. Stuff the jalapeños. Spoon the cheese mixture into each jalapeño half. Pack it in slightly for a full flavor. 2. Coat with breadcrumbs. In a separate bowl, mix panko breadcrumbs and grated Parmesan cheese. Dip each stuffed jalapeño into this mixture. 3. Place them on the baking sheet. Make sure they are spaced out. 4. Spray the tops lightly with cooking spray or drizzle olive oil for extra crispiness. 5. Bake for 20-25 minutes. Check for tenderness and a golden top. This recipe is simple and leads to delicious, cheesy jalapeño poppers. For the full recipe, check out the complete instructions above. To make the best jalapeño poppers, I have a few key tips. First, ensure your poppers are crispy. After stuffing, coat them well with panko breadcrumbs. This step adds great crunch when baked. Lightly spray with cooking oil before baking. It helps achieve a golden finish. Next, always use gloves when handling jalapeños. The oils can irritate your skin. Gloves keep your hands safe and clean. If you accidentally touch your face, it can cause discomfort. So, protect yourself and enjoy cooking without worry. Presentation is important for jalapeño poppers. Arrange them on a colorful platter. You can garnish with chopped green onions for a fresh look. A drizzle of ranch or chipotle sauce adds flavor and flair. These small details make your dish stand out at any gathering. One common mistake is overstuffing the jalapeños. While it may seem tempting, too much filling can spill out. This can make a mess and alter the cooking time. Stick to a generous but controlled amount. Another mistake is incorrect baking time. Keep an eye on your poppers. Bake them for 20-25 minutes until they’re tender and golden. If they bake too long, they can dry out. Follow these tips, and you will have perfect jalapeño poppers every time. For the full recipe, check out the details above. {{image_2}} You can switch up the taste of jalapeño poppers by changing the cheese. Try blue cheese for a strong taste, or use pepper jack for an extra kick. Mixing cheeses can give you a unique flavor that surprises everyone. You can also add veggies into the stuffing. Diced bell peppers or spinach can boost the nutrition and color. They add a nice crunch too! If you're short on time, try the air fryer. It cooks the poppers faster and makes them crispy. Set your air fryer to 375°F (190°C) and cook for about 10-15 minutes. Keep an eye on them to avoid overcooking. Grilling jalapeño poppers adds a smoky flavor. Just place them on the grill after stuffing. Grill them for about 10 minutes, turning them halfway through. The charred taste makes them even better! Making jalapeño poppers vegetarian or vegan is easy. Just swap out the cream cheese for a plant-based version. You can also use cashew cheese for a rich taste. This way, everyone can enjoy the poppers without missing out on flavor. For the full recipe, refer back to the beginning. To keep your jalapeño poppers fresh, store them properly. Let the poppers cool down first. Place them in an airtight container. You can also wrap them in plastic wrap. Store them in the fridge for up to three days. This method helps keep the flavors intact. Freezing jalapeño poppers is easy! First, let them cool completely. Then, place them on a baking sheet. Make sure they are not touching. Freeze for about two hours. Once frozen, transfer them to a freezer bag. Remove as much air as you can. They can stay in the freezer for up to three months. This way, you can enjoy them later! To reheat your poppers, use the oven for best results. Preheat the oven to 375°F (190°C). Place the poppers on a baking sheet. Bake for about 15 minutes. This keeps them crispy. You can also use an air fryer. Set it to 350°F (175°C) and cook for 8-10 minutes. This method helps maintain their great taste and texture. For a quick option, you can use the microwave, but they may lose some crispiness. Enjoy your delicious jalapeño poppers again! For the full recipe, check the details above. To add more heat, keep some seeds in the jalapeños. The seeds hold heat. You can also mix in hot sauce or diced fresh peppers into the cheese filling. Try adding pepper jack cheese for a spicy kick. If you love smoky flavors, consider adding chipotle powder. This mix of heat and flavor makes each bite thrilling. Yes, you can prep jalapeño poppers ahead of time. Stuff the peppers and place them on a baking sheet. Cover and store in the fridge for up to 24 hours. When ready to cook, take them out of the fridge. You may need to add a few extra minutes to the bake time. This way, you can enjoy fresh poppers without the last-minute rush. Dipping sauces make poppers even better. A creamy ranch sauce cools the heat of the jalapeños. You might also enjoy a tangy blue cheese sauce. For a smoky flavor, try chipotle sauce. Salsa can add a fresh twist as well. Each sauce brings out different flavors and enhances the whole dish. Jalapeño poppers are a tasty treat that anyone can make. This guide covered the key ingredients, prep steps, and cooking techniques for perfect poppers. You learned tips to avoid common mistakes and found fun flavor variations. Remember, you can store leftovers or freeze them for later. Enjoy experimenting with recipes and serving them at your next gathering. With these skills, you’ll impress everyone with your cooking. Make these poppers to share great flavors and smiles. Happy cooking!

Best Jalapeño Poppers Flavorful and Easy Recipe Guide

Get ready to elevate your snack game with the best jalapeño poppers! This flavorful and easy recipe guide will take

For a rich and hearty gumbo, you need some key ingredients: - 1 lb boneless, skinless chicken thighs, diced: Chicken thighs provide great flavor and tenderness. - 1 lb smoked andouille sausage, sliced: This sausage adds a nice smoky taste to the dish. - 1 cup onion, diced: Onions bring sweetness and depth to the base. - 1 cup green bell pepper, diced: This adds crunch and freshness. - 1 cup celery, diced: Celery gives a slight earthiness. - 4 cloves garlic, minced: Garlic enhances the overall flavor. - 6 cups chicken broth: Broth is the heart of the gumbo, making it rich and savory. - 1 can (14.5 oz) diced tomatoes, with juices: Tomatoes add acidity and balance. - 1 tablespoon Cajun seasoning: This seasoning is essential for that classic Cajun flavor. - 1 bay leaf: The bay leaf adds a subtle aroma. - 2 tablespoons vegetable oil: Oil helps in cooking the roux. - 1/4 cup all-purpose flour: Flour is needed to make the roux. - 1 tablespoon Worcestershire sauce: This sauce adds depth and umami. - 2 cups okra, sliced (optional): Okra can thicken the gumbo and add texture. - 2 green onions, sliced (for garnish): Green onions brighten up the dish. - Cooked white rice (for serving): Rice is a must for serving with gumbo. - Salt and pepper to taste: These seasonings are key for balance. - Okra: This is often used in gumbo for its thickening properties. If you like a thicker gumbo, add it in. - Alternative garnishes: You can use fresh parsley, or even a squeeze of lemon to brighten the dish. To make your gumbo, the right tools are important. Here are some you should have: - Large heavy pot or Dutch oven: This is ideal for making the gumbo and cooking the roux. - Wooden spoon: Use this to stir the roux and prevent sticking. - Ladle: A ladle helps serve the gumbo easily. - Measuring cups and spoons: Accurate measurements help in achieving the right flavor. - Cutting board and knife: For chopping all those fresh veggies. Using the right ingredients and tools makes your gumbo taste great. For the full recipe, check out the detailed cooking instructions. A well-cooked roux is the heart of gumbo. It adds depth and richness. To make it perfect, heat vegetable oil in your pot. Then, add all-purpose flour. Stir it continuously. Cook until the roux turns a rich brown color. This takes about 10-15 minutes. Be patient; rushing this step will ruin your gumbo. Next, you need the holy trinity: onion, green bell pepper, and celery. These veggies form the base of your flavor. Add them to your roux after it’s cooked. Sauté for about 5 minutes until they soften. This step releases their natural sweetness and creates a great flavor foundation. Now it's time to add your main ingredients. First, stir in the diced chicken thighs and sliced sausage. Cook them until the chicken is no longer pink. This should take about 5 minutes. Then, pour in chicken broth and diced tomatoes with their juices. Make sure to stir well. This helps blend all the flavors together. Now, bring everything to a boil, then reduce the heat to a simmer. Cover the pot and let it cook for at least 45 minutes. The longer it simmers, the better the flavor will be. You can adjust the taste at this stage. If you want more heat, add more Cajun seasoning. If it needs salt, add it now. For the full recipe, check out the details above. Enjoy your cooking! - Overcooking or undercooking the roux: The roux is key to gumbo's flavor. If you burn it, your gumbo will taste bitter. If it's too light, it won't add depth. Stir it constantly until it turns a rich brown color. - Seasoning mishaps: Too little seasoning makes gumbo bland. Too much can overpower the dish. Always taste as you go. Adjust the seasoning in small amounts to get it just right. - How to deepen flavor with additional spices: Add a pinch of smoked paprika or cayenne pepper. These spices enhance the rich flavor of the gumbo. You can also try adding a bay leaf for extra aroma. - Modifying the gumbo for thicker or thinner consistency: For a thicker gumbo, let it simmer longer to reduce the liquid. If it’s too thick, add more chicken broth. Adjust until you reach your desired consistency. - Ideal accompaniments for Cajun Chicken and Sausage Gumbo: Serve the gumbo hot over white rice. The rice absorbs the broth and balances the flavors. You can also add a side of crusty bread for dipping. - Best pairings with sides and beverages: A simple green salad pairs well. For drinks, cold iced tea or a light beer complements the spices nicely. Enjoy your meal with family and friends for a true comfort experience. For the full recipe, you can check the detailed steps above. {{image_2}} You can swap out chicken and sausage for other proteins. Shrimp or crab adds a seafood twist. You can also use turkey sausage for a leaner option. For a lighter dish, consider tofu or tempeh. These give a great texture. If you follow a plant-based diet, try using jackfruit or lentils. These ingredients soak up flavors well. To add heat, try different peppers. Jalapeños add a nice kick. You can also use cayenne for more spice. For a smoky flavor, add chipotle peppers. Unique herbs like thyme or tarragon can make your gumbo special. Experiment with fresh herbs for a bright taste. Gumbo differs in Cajun and Creole cooking. Cajun gumbo often uses darker roux and more spices. Creole gumbo may include tomatoes and a lighter roux. Local ingredients can change your dish too. In the Southwest, add green chiles. In the North, you might find wild mushrooms or game meats. Each region brings its own flair. To keep your Cajun Chicken and Sausage Gumbo fresh, follow these steps. First, let the gumbo cool to room temperature. Store it in a sealed container. You can refrigerate it for up to three days. For longer storage, freeze it in airtight bags. This way, you can save it for up to three months. When you are ready to eat it again, reheat it gently. Use the stove or microwave. If using the stove, heat it over low heat. Stir often to keep the texture smooth. If using a microwave, heat it in short bursts. Stir in between to avoid hot spots. To make meal prep easy, chop your veggies ahead of time. Dice the onions, peppers, and celery and store them in the fridge. You can also slice the sausage and chicken. Keep them separate until you're ready to cook. For portioning, use small containers. Fill them with gumbo and rice. This helps you grab a quick meal later. You can also freeze single servings. Just remember to label each container with the date. Your Cajun Chicken and Sausage Gumbo will last in the fridge for about three days. If you freeze it, it can last for three months. Always check for signs of spoilage. If the gumbo smells off or has a strange color, throw it away. Avoid eating anything that looks or smells bad. Always prioritize safety when storing food. For the full recipe, refer to the [Full Recipe]. Cajun Chicken and Sausage Gumbo is a hearty stew from Louisiana. It blends flavors from French, African, and Spanish cooking. Over time, gumbo has become a symbol of Cajun culture. The dish often features a rich roux, which is a mix of flour and fat. This roux gives gumbo its deep, warm color and flavor. You’ll find many versions, but chicken and sausage are classic choices. Each family has its own recipe, making it a beloved comfort food. Yes, you can make gumbo without okra. If you can’t find okra, try using a mix of vegetables. You can add extra celery or bell peppers. Another option is to use a starch like corn or potatoes. These will add texture and flavor. Gumbo is flexible, so feel free to adjust based on what you have. To thicken gumbo, the roux must be cooked properly. A dark roux adds body and richness. If your gumbo is still too thin, use a cornstarch slurry. Mix equal parts cornstarch and cold water, then stir it in. You can also add more vegetables or let it simmer longer. This will help concentrate flavors and thicken the stew. Gumbo pairs well with several side dishes. Rice is the most popular choice, soaking up the savory broth. You can also serve it with crusty bread or cornbread. A fresh green salad adds a nice crunch. For something unique, try pickled vegetables for a tangy contrast. These sides enhance the gumbo experience. To store gumbo, let it cool to room temperature first. Place it in an airtight container in the fridge. It stays fresh for about three to four days. For longer storage, freeze it in portions. When reheating, do so slowly on the stove. Add a splash of broth or water to keep it moist. Avoid using a microwave, as it may change the texture. Enjoy your gumbo just like fresh! Cajun Chicken and Sausage Gumbo blends rich flavors and traditions. We explored key ingredients like chicken, sausage, and the holy trinity of veggies. I shared tips on cooking techniques, essential tools, and possible variations. You can even tweak your gumbo to fit your taste! Whether you stick to the classic recipe or try new spins, gumbo is versatile. Enjoy the process and savor each bite. Happy cooking!

Cajun Chicken and Sausage Gumbo Flavorful Comfort Dish

If you crave a dish that warms your heart and fills your belly, look no further than Cajun Chicken and

- 1 pound chicken tenders - 1 cup breadcrumbs (panko for extra crunch) - 1/2 cup grated Parmesan cheese - 3 cloves garlic, minced - 1 large lemon (zest and juice) - 1/4 cup fresh parsley, chopped For this dish, I love using chicken tenders. They cook fast and stay juicy. Panko breadcrumbs give a nice crunch. Mixing them with Parmesan cheese adds a cheesy flavor. Garlic enhances the taste, while lemon gives it a fresh zing. Fresh parsley adds color and a hint of earthiness. - 1 teaspoon paprika - Salt and pepper to taste I use paprika for a little warmth and color. Salt and pepper are key to bring out all the flavors. Seasoning is vital for making each bite taste great. - 1/2 cup all-purpose flour - 2 large eggs Setting up a dredging station is fun and simple. I start with all-purpose flour for the first coat. The eggs add moisture and help the breadcrumbs stick. This three-step process ensures a great crust on each tender. For the full recipe, check out the detailed steps in the main article. - Preheat the oven to 400°F (200°C). - Line a baking sheet with parchment paper for easy cleanup. - Pat the chicken tenders dry with paper towels. - Season the chicken with salt, pepper, and paprika. - Set up your dredging station with three shallow bowls. - Fill one bowl with all-purpose flour. - In the second bowl, beat the eggs and add lemon juice, salt, and pepper. - In the last bowl, mix breadcrumbs, Parmesan cheese, minced garlic, lemon zest, and parsley. - Coat each chicken tender in flour first, then dip in the egg mixture. - Finally, coat it in the breadcrumb mixture, pressing gently. - Arrange the coated chicken tenders on the prepared baking sheet. - Lightly spray the tops with olive oil to help them crisp. - Bake for 15-20 minutes until cooked through and golden brown. - Flip halfway through for even cooking. - Once done, let them rest for a few minutes before serving. - Drizzle with extra lemon juice and sprinkle with parsley for flair. For the complete cooking journey, check out the Full Recipe. To make your chicken tenders extra crunchy, use panko breadcrumbs. Panko is light and airy. It makes a big difference in texture. Soggy tenders can ruin your meal. To avoid this, ensure the chicken is dry before coating. Pat it with paper towels. Always spray the tops with olive oil before baking. This helps create a golden crust. Want to boost flavor? Add herbs like thyme or oregano. They pair well with lemon and garlic. You can also try spices like cumin or cayenne for a kick. For dipping sauces, think outside the box. A honey mustard or spicy mayo can add fun flavors. You can even make a yogurt dip with herbs for a fresh taste. Overcrowding the baking sheet leads to steaming, not baking. Give each tender space to breathe. This helps them crisp up. Another mistake is not preheating the oven. A hot oven ensures even cooking. Always check the temperature before putting in your chicken. Following these tips will make your tenders a hit! For the full recipe, check out the section above. {{image_2}} You can easily make this dish gluten-free. Just swap regular flour with almond flour. Almond flour gives a nice crunch and flavor. It works well with the lemon and garlic. You can also try different cheeses. Instead of Parmesan, use mozzarella or cheddar. Both will melt and add flavor. Want to spice things up? Add chili flakes to the breadcrumb mix. This gives a nice kick to the chicken. If you prefer a different taste, use lime instead of lemon. Lime adds a fresh twist to the dish. It pairs well with garlic and cheese. Serve your chicken tenders with tasty sides. They go great with a salad or steamed veggies. You can also serve them in wraps with some fresh greens. For a fun twist, make sliders with mini buns. These ideas make your meal even better. For the full recipe, check out the link! To keep your Lemon Garlic Parmesan Chicken Tenders fresh, use airtight containers. Glass or plastic containers work well. Make sure to let the chicken cool before sealing. Store them in the fridge. They stay good for up to three days. If you want to keep them longer, consider freezing. Reheating can affect your chicken tenders' taste and texture. The oven is best for keeping them crispy. Preheat your oven to 375°F (190°C). Bake for about 10-15 minutes. This method helps restore their crunch. If you use a microwave, place a paper towel over the chicken. This helps reduce sogginess. Heat in short bursts to avoid overcooking. To freeze your chicken tenders, let them cool completely. Place them in a single layer on a baking sheet. Freeze for about two hours. Once frozen, move them to a freezer bag. Remove as much air as possible. They can last up to three months in the freezer. To cook from frozen, bake them at 400°F (200°C) for about 20-25 minutes. Check that they are cooked through before serving. Bake your chicken tenders for about 15 to 20 minutes. Check for doneness by ensuring the chicken is no longer pink inside. The coating should be golden brown. Use a meat thermometer to check if the internal temperature reaches 165°F (74°C). Yes, you can use chicken breasts. If you do, slice them into strips about the same size as tenders. This helps them cook evenly. Adjust the baking time if needed. Chicken breasts may take a few more minutes to bake. A few popular dipping sauces fit well with chicken tenders. You can try ranch dressing for a classic touch. Honey mustard adds a sweet twist. BBQ sauce is another favorite. For a kick, try a spicy aioli or garlic dipping sauce. Pairing sauces brings out the chicken's flavor. You now have all the tips to make tasty Lemon Garlic Parmesan Chicken Tenders. Remember to prep your ingredients first, and use the right coatings for crunch. Avoid common mistakes for the best results. Explore variations to keep things exciting, from spice to cheese choices. Don’t forget how to store and reheat leftovers for later. Enjoy these tender bites with your favorite dips! I hope your cooking brings joy to your meals. Happy baking!

Lemon Garlic Parmesan Chicken Tenders Tasty Recipe

Looking for a quick and tasty dish? You’ve found it! My Lemon Garlic Parmesan Chicken Tenders are a delightful twist

To make this seafood delight salad, you need fresh and tasty ingredients. Here are the must-haves: - 200g shrimp, peeled and deveined - 200g calamari rings - 100g scallops - 1 small red bell pepper, diced - 1 small cucumber, diced - 1 ripe avocado, diced - 1 cup cherry tomatoes, halved - 2 tablespoons olive oil - 1 tablespoon lemon juice - 1 tablespoon fresh dill, chopped - Salt and pepper to taste - Mixed salad greens for serving Using fresh seafood gives the best flavor. You can find these at your local market. You can make this salad your own by adding different ingredients. Here are some ideas: - Fresh herbs like parsley or basil - A pinch of chili flakes for heat - A handful of olives for a salty touch - Nuts like almonds or walnuts for crunch - Feta cheese for a creamy finish Feel free to mix and match these options to suit your taste. Fresh seafood is not just delicious; it’s also good for you. Here are some health benefits: - Rich in omega-3 fatty acids, which support heart health - High in protein, helping to build and repair muscles - Low in calories, making it a great choice for weight management - Packed with vitamins and minerals, like vitamin B12 and selenium By choosing fresh seafood for your salad, you boost its nutritional value. Eating well never tasted so good! For the full recipe, check out Seafood Delight Salad. To make a great seafood salad, start with fresh seafood. Boil some water and add salt. Toss in the shrimp first. Cook them for about 2-3 minutes. Watch them turn pink; that’s your cue to remove them. Next, add the calamari rings. Cook those for 1-2 minutes until tender. Finally, add the scallops. Cook them for 4-5 minutes until they look opaque. Drain the seafood and let it cool before using. This keeps the flavors bright and fresh. In a large bowl, prepare your vegetables. Grab your diced red bell pepper, cucumber, avocado, and halved cherry tomatoes. Add them to the bowl. Mix them gently. Be careful not to mash the avocado. The goal is to keep the pieces intact for a great texture. This mix adds color and crunch to your salad. Once your seafood has cooled, it’s time to combine everything. Add the shrimp, calamari, and scallops to the bowl with the vegetables. This blend of flavors is key. Stir everything gently. Make sure all the ingredients are well mixed but not crushed. Each bite should have a bit of everything. This balance makes the salad exciting and tasty. To dress the salad, drizzle olive oil and lemon juice over the mix. These simple ingredients bring out the best flavors. Sprinkle fresh dill, salt, and pepper for extra taste. Toss everything gently again, ensuring the dressing coats all ingredients evenly. This gives your seafood salad a fresh and zesty kick. Serve it on mixed salad greens for a beautiful presentation. For the full recipe, check out the instructions above. When choosing seafood, look for clear eyes and bright skin. Fresh shrimp should smell like the sea, not fishy. Calamari should feel firm and springy. Scallops should be plump and glossy. If you can, buy seafood from a trusted source. Local markets often have the freshest options. Cooking times vary for each type of seafood. Here are some quick tips: - Shrimp: Cook for 2-3 minutes until pink. - Calamari: Cook for 1-2 minutes until tender. - Scallops: Cook for 4-5 minutes until opaque. Overcooking can make seafood tough, so watch closely. To boost flavor, serve your salad with fresh herbs. Dill and parsley add brightness. A squeeze of lemon juice enhances the taste too. Serve your salad on a bed of mixed greens for a nice contrast. For a crunchy addition, try adding toasted nuts or seeds. These tips will make your seafood salad truly shine. {{image_2}} You can change the shrimp salad in many ways. Try adding fresh herbs like basil or cilantro. These add a bright flavor. You can also mix in some diced mango for a sweet twist. For a crunch, add chopped nuts like almonds or walnuts. If you want more spice, add a dash of hot sauce or chili flakes. These small changes can make your salad unique. If you love crab, use it instead of shrimp. Simply replace the shrimp with an equal amount of crab meat. The flavor will be sweet and rich. You can also add a bit of Old Bay seasoning to bring out the crab's taste. This simple change makes a delicious crab salad that everyone will enjoy. Feel free to explore other seafood options. You can use cooked lobster or even smoked salmon. Both will add different tastes and textures. If you prefer a vegetarian option, try marinated artichokes or hearts of palm. These alternatives keep the dish exciting and cater to different diets. Always aim to use fresh seafood for the best results. To keep your seafood salad fresh, store it in an airtight container. This helps keep moisture in and air out. Place the container in the fridge right away. Avoid leaving it out for too long. If you plan to eat it later, try to separate the greens from the seafood mixture. This keeps the greens crisp and fresh. Seafood salad is best served cold, so reheating is not usually needed. If you must warm it, do so gently. Use a microwave on low power, or warm it in a pan over low heat. Stir often to avoid cooking the seafood further. Remember that overcooking will make the seafood rubbery. When stored properly, seafood salad lasts about 2-3 days in the fridge. Check for any off smells or changes in texture before eating. If the seafood looks or smells funny, it's best to throw it away. Always trust your senses when it comes to food safety. For the full recipe, check the Seafood Delight Salad section above. You can use chicken, tofu, or chickpeas. These options add protein and texture. They work well with the same veggies and dressing. You can also try smoked salmon for a different flavor. Each substitute brings its own unique taste. Yes, seafood salad is very healthy. It is high in protein and low in carbs. Seafood provides omega-3 fatty acids, which are good for your heart. Fresh veggies add vitamins and minerals. Use healthy fats like olive oil to boost nutrition even more. To add flavor, use fresh herbs like dill or cilantro. A splash of hot sauce can bring heat. Try adding citrus zest or minced garlic for depth. Marinating the seafood in lemon juice before mixing helps too. Experiment with spices until you find your favorite mix. Yes, you can prepare seafood salad ahead of time. Make it a few hours before serving for the best flavor. Just keep it chilled in the fridge. Avoid adding avocado until you are ready to serve. This keeps it fresh and prevents browning. For the full recipe, check out Seafood Delight Salad. In this blog post, we explored how to make a delicious seafood delight salad. We covered essential and optional ingredients and the health perks of using fresh seafood. You learned step-by-step instructions for preparing and mixing the salad. We shared tips on selecting fresh seafood and serving suggestions. Plus, we offered variations like shrimp or crab salad and storage tips for leftovers. Remember: enjoying this salad is easy and fun. Make it your own and savor the fresh flavors. Your seafood salad adventure awaits!

Seafood Salad Fresh and Flavorful Meal Recipe

Seafood salad is a fresh and tasty meal that’s easy to prepare. You’ll love how simple it is to mix

- 1 cup stone-ground grits - 4 cups chicken or vegetable broth - 1 cup whole milk - 2 cups shredded aged Gouda cheese - 1/2 cup sharp cheddar cheese, shredded - 3 tablespoons unsalted butter - 2 large eggs, beaten - 1 teaspoon garlic powder - 1 teaspoon onion powder - Salt and pepper to taste - 1/4 teaspoon smoked paprika (for garnish) - Fresh chives, chopped (for garnish) To make Baked Gouda Cheese Grits, gather these simple ingredients. Stone-ground grits form the base. Using chicken or vegetable broth gives them great flavor. Whole milk adds a creamy texture. Aged Gouda and sharp cheddar cheese create a rich taste. Butter and eggs help bind everything together. You can switch the Gouda cheese for other cheeses. Try Monterey Jack or Fontina for a different taste. If you need dairy-free options, use almond milk and vegan cheese. For gluten-free, ensure your grits are labeled gluten-free. Using kitchen scales gives you accuracy. If you prefer cups, remember that 1 cup of grits weighs about 170 grams. If you want to make more servings, double or triple the amounts. Just keep the ratio of liquids to grits the same. This recipe is flexible, so feel free to adjust it to your needs. For the full recipe, check the details above. To start, preheat your oven to 350°F (175°C). This temperature helps the grits bake evenly and develop that golden top we love. Next, grab a medium saucepan and add 4 cups of chicken or vegetable broth. Bring it to a boil over medium heat. Once it’s bubbling, slowly whisk in 1 cup of stone-ground grits. Stir constantly to avoid any lumps. After that, reduce the heat to low. Cook for about 20-25 minutes until the grits become thick and creamy. For creamy grits, it’s key to cook them slowly. Stirring helps keep them smooth and prevents sticking. When your grits are ready, remove them from the heat. Now, mix in 1 cup of whole milk, 3 tablespoons of unsalted butter, 1 teaspoon of garlic powder, and 1 teaspoon of onion powder. Don’t forget to add salt and pepper to taste! After everything is well combined, add 2 cups of shredded aged Gouda cheese and 1/2 cup of sharp cheddar cheese. Stir until the cheese melts and the mixture is smooth. Pour the grits mixture into a greased 2-quart baking dish. Spread it evenly. Now, it’s time to bake! Place it in the preheated oven for 25-30 minutes. You’ll know it’s done when the top is golden and slightly crispy. To check for doneness, insert a knife into the center. It should come out clean. Once baked, let it cool for a few minutes before serving. Enjoy the delightful, cheesy comfort of baked gouda cheese grits! For the full recipe, check out the details above. To make perfect grits, cook them slowly. Gradual cooking helps them become creamy. Start with boiling broth. Then, whisk in the stone-ground grits. Stir constantly to avoid lumps. If lumps form, use a whisk to break them up. Spices can boost the taste of your grits. I suggest garlic powder and onion powder for depth. Smoked paprika adds a nice touch too. For a crispy top, bake them until golden brown. This gives a lovely contrast to the creamy inside. Baked Gouda cheese grits shine with simple sides. Try serving them with roasted vegetables or a fresh salad. For a fun twist, add crispy bacon or sautéed shrimp on top. Presentation is key! Use a nice dish and sprinkle fresh chives for color. You can find the Full Recipe to guide you through this delicious process. {{image_2}} You can make baked gouda cheese grits even more delicious. Try using different cheeses. For a rich taste, mix in fontina or pepper jack. Each cheese brings its own flavor. You can also add cooked vegetables. Spinach, bell peppers, or mushrooms work well. They add color and nutrition to your dish. Want a kick? Add some jalapeños to your grits. This gives you a spicy twist. You can also mix in meats like bacon or sausage. This will bring a savory flavor that pairs well with the cheese. Just chop the meat and fold it into the grits before baking. If you prefer a vegetarian option, skip the meat. You can also make it vegan. Use plant-based cheese and swap the milk with almond or oat milk. For those watching carbs, try cauliflower grits instead of regular grits. They taste great and still give you that comforting feel. For the full recipe, check out the details above. To store leftover baked Gouda cheese grits, first let them cool to room temperature. Then, place them in an airtight container. You can keep them in the refrigerator for up to four days. A glass or plastic container works well for this. Make sure the lid is tight to keep moisture out. When reheating, you want to keep the creamy texture of the grits. The oven is the best method for this. Preheat the oven to 350°F (175°C). Place the grits in a baking dish, cover with foil, and heat for about 15-20 minutes. If you use a microwave, heat in short bursts. Stir in between to avoid hot spots. Freezing baked Gouda cheese grits is simple. Cut the dish into portions and wrap each piece tightly in plastic wrap. Place them in a freezer-safe bag or container. This way, they stay fresh for up to three months. When you're ready to eat, thaw them in the fridge overnight. Reheat them in the oven or microwave as mentioned before. Enjoy your delicious comfort food anytime! You can find the full recipe above. Baked gouda cheese grits can last for about 3 to 5 days in the fridge. Make sure to store them in an airtight container. This keeps them fresh and safe to eat. Yes, you can prepare baked gouda cheese grits ahead of time. Cook the grits and mix all ingredients. Place the mixture in a baking dish and cover it. Store it in the fridge for up to 24 hours. When ready to serve, just bake them as instructed. Baked gouda cheese grits pair well with many dishes. You might enjoy them with shrimp, sautéed greens, or fried chicken. They also go nicely with a fresh salad or roasted vegetables. For a special touch, top them with crispy bacon or herbs. For the full recipe, check out the details above! In this post, I shared how to make baked Gouda cheese grits. We discussed ingredients, with cheese options and dairy alternatives. I provided clear step-by-step instructions for preparation, cooking, and baking. Tips for perfecting grits and serving ideas were also included. Experiment with flavors and variations to make this dish your own. Enjoy sharing your tasty creation with friends and family!

Baked Gouda Cheese Grits Delicious Comfort Food

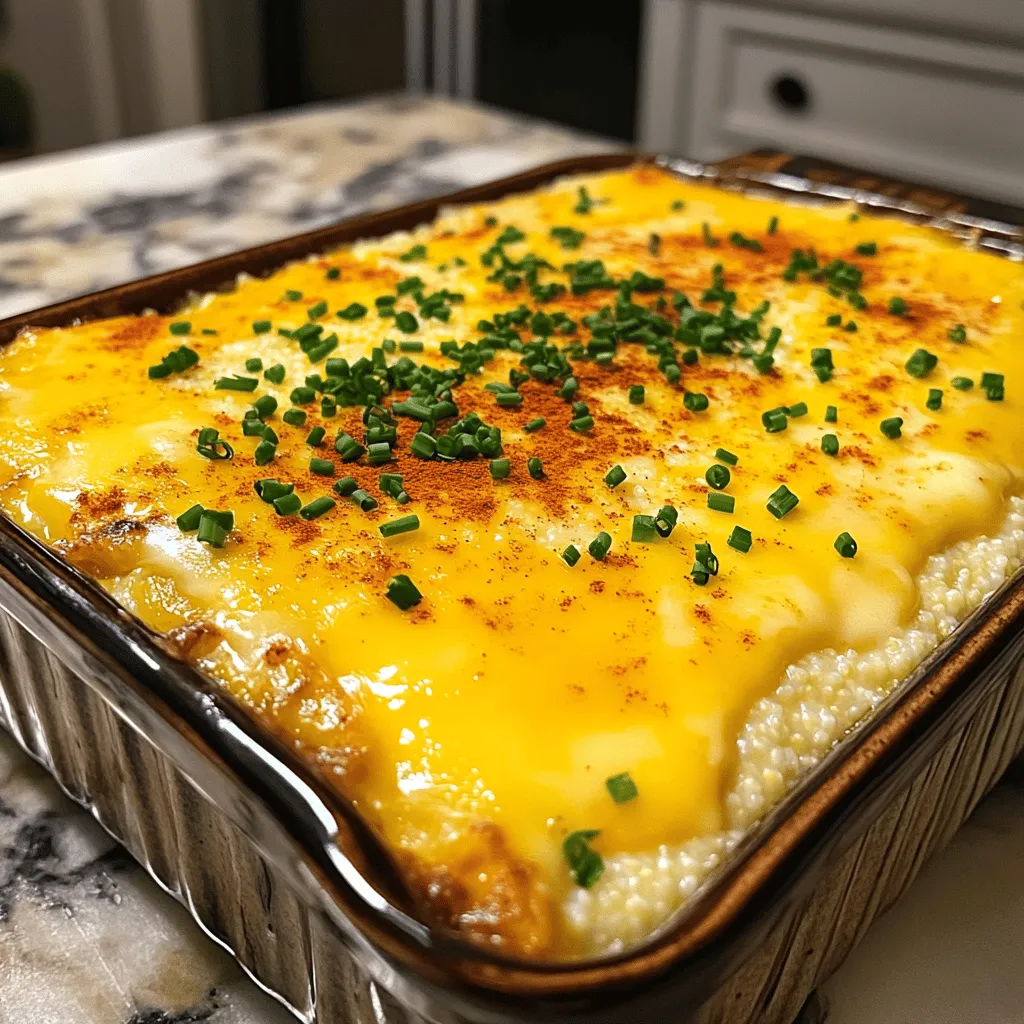
Craving comfort food? Try Baked Gouda Cheese Grits that warm your soul! This creamy, cheesy dish uses simple ingredients but

- 2 cups cooked chicken, shredded - 1 cup shredded mozzarella cheese - 1/2 cup cream cheese, softened - 2 cloves garlic, minced - 1 teaspoon garlic powder - 1 tablespoon fresh parsley, chopped - 4 large tortillas - 1 cup fresh spinach leaves - Salt and pepper to taste - 2 tablespoons olive oil Gathering the right ingredients is key to making great Cheesy Garlic Chicken Wraps. Start with cooked chicken; it adds protein and flavor. I prefer using rotisserie chicken for ease. Mozzarella cheese gives a stretchy, melty quality. Cream cheese adds a rich, creamy texture that makes each bite delightful. Don’t forget the garlic! Fresh minced garlic and garlic powder boost the flavor. Fresh parsley adds a pop of color and freshness. You’ll also need large tortillas to hold all this goodness. Fresh spinach leaves provide a nice crunch and color. Lastly, have salt and pepper on hand to season your mix. - Mixing bowl - Large skillet - Cooking spoon - Cutting board - Knife You will need a few simple tools. A mixing bowl is essential for combining everything. Use a large skillet to cook the mixture and get it all warm and melty. A cooking spoon helps stir things up well. A cutting board and knife make prepping easy and safe. - Calories per serving: About 400 - Macronutrients breakdown: - Protein: 30g - Fats: 20g - Carbs: 30g - Dietary considerations: Gluten-free tortillas can be used These wraps are tasty and filling. Each serving has about 400 calories. They are packed with protein from the chicken and cheese. This meal can fit well in many diets. You can swap regular tortillas for gluten-free options. For more details, check the Full Recipe. Enjoy cooking! To start, gather your ingredients. In a mixing bowl, combine the following: - 2 cups cooked chicken, shredded - 1 cup shredded mozzarella cheese - 1/2 cup cream cheese, softened - 2 cloves garlic, minced - 1 teaspoon garlic powder - 1 tablespoon fresh parsley, chopped - Salt and pepper to taste Mix these ingredients well until they blend into a creamy filling. This mix is where the magic begins. The chicken, cheeses, and garlic create a rich flavor that is hard to resist. Next, heat 2 tablespoons of olive oil in a large skillet over medium heat. Once the oil is hot, add your chicken mixture to the skillet. Cook for about 5–7 minutes, stirring often. You want the cheeses to melt and the mixture to heat through. The aroma will fill your kitchen and make your mouth water. After cooking, remove the skillet from the heat. Add 1 cup of fresh spinach leaves to the mixture. Stir gently until the spinach wilts. This adds a nice color and boosts the nutrition of your wraps. Now, it’s time to assemble your wraps. Lay out 4 large tortillas on a clean surface. Spoon an even amount of your cheesy chicken filling onto the center of each tortilla. To fold, take the sides of the tortilla and fold them over the filling. Then, roll it up tightly from the bottom. This keeps all the cheesy goodness inside. If you want a crispy touch, you can toast the wraps. Place them seam-side down in the skillet with a little oil. Toast for 2–3 minutes on each side until they turn golden brown. This step is optional, but I highly recommend it for added crunch and flavor. Let the wraps cool for a minute before slicing them in half. Serve warm, and enjoy this cheesy, garlicky delight. For the full recipe, check out the detailed instructions provided earlier in this article. To make your Cheesy Garlic Chicken Wraps truly creamy, use cream cheese. It adds a rich texture that blends well with mozzarella. Mix it with the chicken and garlic to bring out the flavors. Taste the filling as you mix. Adjust the salt and pepper to your liking. You can add a pinch more garlic powder if you love garlic. Fresh parsley adds a nice touch, so don’t skip it! These wraps pair well with dips like ranch or salsa. A fresh guacamole adds a nice kick too. For sides, consider a crisp salad or roasted vegetables. They add color and balance to your meal. Try serving your wraps with a side of sweet potato fries for a satisfying crunch. To reheat, place the wraps in the oven. Set it to 350°F (175°C) for about 10 minutes. This keeps them warm without making them soggy. If you prefer the skillet, heat it over medium heat. Cook the wraps for a few minutes on each side until they are hot. Store leftovers in an airtight container. Keep them in the fridge for up to three days to maintain quality. {{image_2}} You can change the protein in these wraps. Turkey works well if you want a lighter taste. Ground beef adds a hearty kick. If you prefer a vegetarian option, use beans instead. They add protein and fiber. You can also swap cheeses. Try cheddar for a sharper flavor, or pepper jack for some heat. Add spices or sauces to make your wraps pop. A dash of sriracha brings heat and flavor. Ranch dressing adds a creamy touch. You can also toss in extra veggies. Bell peppers, onions, or mushrooms will make your wraps colorful and tasty. Each addition changes the flavor profile, so have fun with it! If you want a low-carb meal, try lettuce wraps. They offer a crisp bite and are healthy. You can use large leaves, like romaine, to hold your filling. Cauliflower tortillas are another great alternative. They have a mild flavor and are gluten-free. Both options keep the wrap delicious while meeting dietary needs. For the best taste, keep each ingredient separate. Store cooked chicken, cheese, and veggies in airtight containers. This way, they stay fresh and tasty. You can refrigerate them for up to three days. Remember to check for any signs of spoilage before using. If you have leftover wraps, seal them tightly in plastic wrap or use a container. This keeps them from drying out. You can store these in the fridge for up to two days. If they start to smell or look off, it’s best to throw them away. To freeze Cheesy Garlic Chicken Wraps, wrap each one tightly in plastic wrap. Then, place them in a freezer-safe bag. They will stay good for about three months. When you’re ready to eat, thaw them in the fridge overnight. After thawing, reheat them in a skillet until warm. Enjoy your delicious meal later! For the full recipe, check out the section above. Cheesy Garlic Chicken Wraps can last for about 3 to 4 days in the fridge. Store them in an airtight container. This keeps them fresh and tasty. If they smell off or look strange, it’s best to discard them. Yes, you can make these wraps ahead of time. Prepare the filling and store it separately from the tortillas. This way, the wraps stay fresh. When you’re ready to eat, just assemble and enjoy. You can also wrap the finished product in foil for easy grab-and-go meals. The best way to reheat these wraps is in a skillet. Heat the skillet over medium heat, and add a little oil. Place the wrap in the skillet for about 2–3 minutes on each side. This method helps keep the wrap crispy and gooey inside. You can also use a microwave but it may make the wrap a bit soggy. Absolutely! You can use turkey or even beef if you like. For a vegetarian option, try black beans or chickpeas. Each choice brings a new flavor. Just adjust cooking times as needed to ensure everything is cooked well. In this blog post, we explored how to make Cheesy Garlic Chicken Wraps step by step. We covered ingredients, equipment, and helpful tips. You learned about different variations and how to store your wraps properly. My final thought: these wraps are easy to make and delicious. They are great for any meal! Try them out, and feel free to get creative with your ingredients! You can enjoy this tasty dish any night of the week.

Cheesy Garlic Chicken Wraps Flavorful and Satisfying Meal

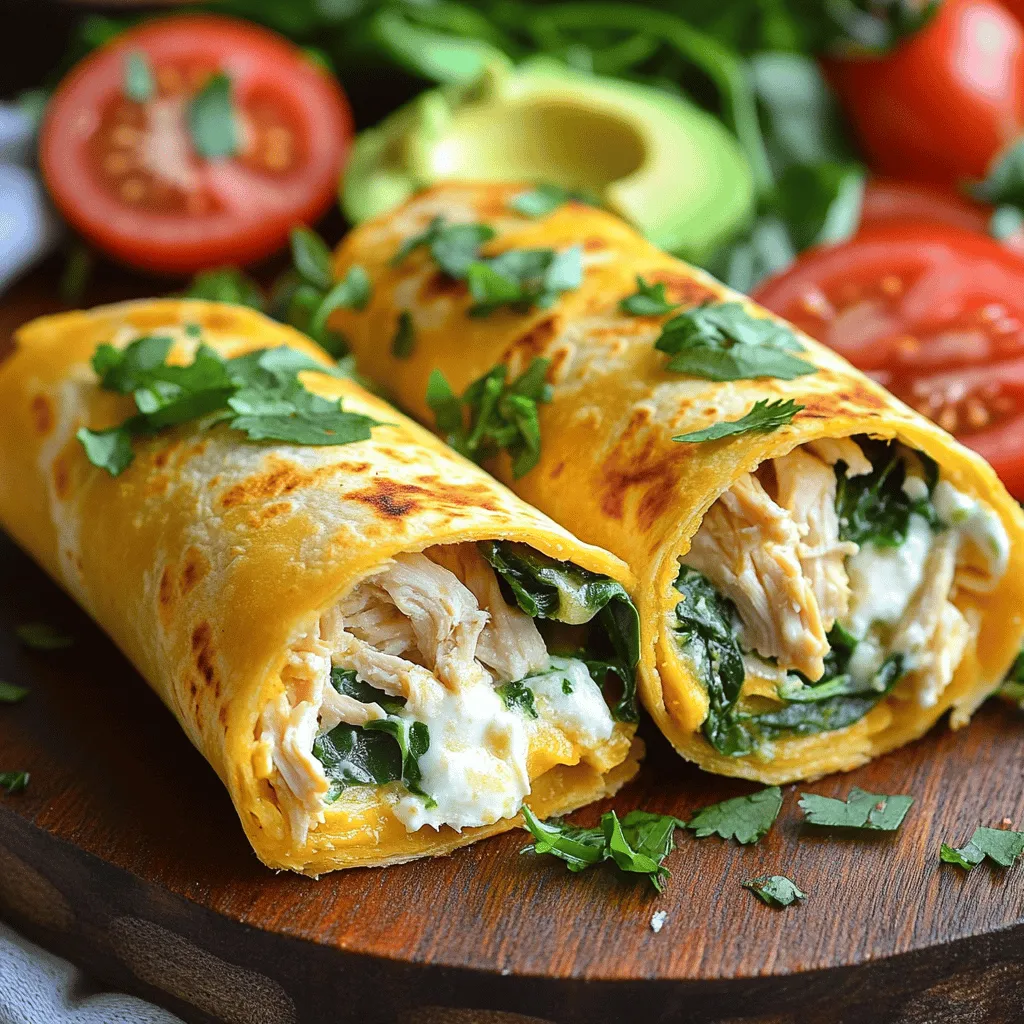
Craving a meal that’s both cheesy and filled with flavor? Look no further than my Cheesy Garlic Chicken Wraps! This

To make a great seafood pasta, you need some key items. Here’s what you need: - 8 oz spaghetti or linguine - 1 tablespoon olive oil - 3 cloves garlic, minced - 1 small onion, finely chopped - 1/2 teaspoon red pepper flakes (adjust to taste) - 1 cup cherry tomatoes, halved - 1 cup shrimp, peeled and deveined - 1 cup scallops, cleaned - 1 cup mussels, cleaned and debearded - 1 cup vegetable broth - 1 tablespoon lemon juice - Fresh parsley, chopped (for garnish) - Salt and pepper to taste - Grated Parmesan cheese (optional) These ingredients create a dish that bursts with flavor. The seafood brings a fresh taste, while garlic and onion add depth. You can add more flavors if you want. Here are some ideas: - A splash of white wine for acidity - Chopped fresh basil for a herbal note - Zucchini or bell peppers for extra veggies - A pinch of saffron for a rich color and taste These extras can take your seafood pasta to the next level. Feel free to mix and match based on your taste. Choosing fresh seafood is important for the best flavor. Here are some tips: - Look for clear eyes: Fresh fish should have bright, clear eyes. - Check the smell: Fresh seafood should not smell too fishy. A light ocean scent is good. - Feel for firmness: The flesh should be firm to the touch. If it feels mushy, it’s not fresh. - Ask your fishmonger: Don’t hesitate to ask for advice on what is fresh that day. When you choose fresh seafood, your pasta will taste much better. Always look for quality to impress your guests. For a complete guide to making this dish, check out the Full Recipe. First, boil water in a large pot. Add salt to the water; it should taste like the sea. Next, add 8 ounces of spaghetti or linguine. Cook according to the package directions until it is al dente. This means it should be firm but not hard. Drain the pasta, but save some of the water. Set the pasta aside while you prepare the sauce. In a big skillet, heat 1 tablespoon of olive oil over medium heat. Once the oil is hot, add 3 minced garlic cloves and 1 finely chopped small onion. Stir them together and cook for about 3 to 4 minutes. The onion should become soft and clear. This step adds a tasty base to your dish. After the onion is ready, add 1 cup of halved cherry tomatoes and 1/2 teaspoon of red pepper flakes. Cook this mixture for an extra 2 to 3 minutes. The tomatoes should soften and smell great. Now it's time to add the seafood. Add 1 cup of shrimp, 1 cup of scallops, and 1 cup of mussels to the skillet. Pour in 1 cup of vegetable broth and cover the skillet. Let it simmer for 5 to 7 minutes. You’ll know it’s done when the mussels open and the shrimp turns pink. After that, take off the lid and add the cooked pasta. Toss everything together well. If it seems dry, add a splash of the pasta water you saved. Finish it off by stirring in 1 tablespoon of lemon juice and seasoning with salt and pepper. This is where the dish becomes bright and fresh. For the full recipe, check the section above. To get great texture and flavor, cook pasta just right. Aim for "al dente," which means it should be firm but not hard. This helps the pasta hold its shape and adds a nice bite. Use plenty of salt in your pasta water. It makes a big difference! When you add the seafood, don’t overcook it. Shrimp should turn pink, and scallops should be opaque. Mussels need to open up. This ensures they stay tender and juicy. One mistake is cooking seafood too long. Overcooked seafood gets tough and chewy. Another mistake is not seasoning properly. Always taste your dish before serving. Adding salt, lemon, or herbs can really boost the flavor. Avoid using frozen seafood if you can. Fresh seafood tastes best and enhances the dish. Finally, don’t skip the pasta water. It helps bind the sauce and pasta together. Having the right tools can make cooking easy. Here’s what I recommend: - A large pot for boiling pasta - A colander for draining - A large skillet for sautéing - A wooden spoon for mixing - A zester for lemon juice - A sharp knife for chopping - A cutting board for prep These tools will help you create your Ocean's Bounty Seafood Pasta with ease. Get ready to impress with this simple and flavorful dish! {{image_2}} You can change a few ingredients to make this dish your own. Instead of spaghetti, you can use fettuccine or penne. They work well, too. If you want more veggies, add spinach or bell peppers. Swap the cherry tomatoes for sun-dried tomatoes for a richer flavor. To give it a different taste, use white wine instead of vegetable broth. These small swaps can make a big difference. Feel free to mix up the seafood! If you can’t find mussels, try clams or even squid. You might love using crab meat or lobster for an extra touch of luxury. For a heartier taste, add some smoked salmon. Each type of seafood offers a unique flavor. This keeps your dish exciting and fresh every time you make it. You can create a plant-based version of this dish. Use mushrooms to mimic the texture of seafood. Portobello mushrooms work well in this case. You can also use tofu or tempeh for added protein. For a seafood-like flavor, try seaweed or kelp. These options give you the taste of the ocean without using any seafood. Plus, they keep the dish light and healthy. For the full recipe, check out Ocean's Bounty Seafood Pasta. To store leftover seafood pasta, first let it cool. Place it in an airtight container. Make sure to cover it well. This will keep it fresh for up to three days. Always refrigerate it promptly to avoid spoilage. When you reheat seafood pasta, do it slowly. Use a skillet over low heat. Add a splash of water or broth to keep it moist. Stir often to heat evenly. You can also use the microwave. Heat it in short bursts, stirring in between. This way, it warms up without drying out. If you want to freeze seafood pasta, use freezer-safe containers. Leave some space at the top, as it will expand. It can last up to two months in the freezer. To enjoy it later, thaw it in the fridge overnight. Reheat it as described for best results. For a quick meal, consider freezing in single portions. This makes for easy, delicious dinners later! For the full recipe, check out Ocean's Bounty Seafood Pasta. The best seafood for pasta includes shrimp, scallops, and mussels. These options bring great flavor and texture. You can also use clams, crab, or squid for variety. I love mixing seafood depending on what I find fresh at the market. Yes, dried pasta works well in seafood dishes. It has a nice bite and can hold sauce better. Just cook it al dente as instructed on the package. This way, it will not get mushy when you mix it with the seafood. To create a creamy sauce, start with heavy cream or a mix of cream and broth. Add garlic and onion for flavor. You can also stir in some grated cheese, like Parmesan, for richness. Mix this with your seafood and pasta for a delicious dish. Seafood pasta pairs well with a crisp salad or garlic bread. A light green salad adds freshness. Garlic bread brings a nice crunch and complements the dish well. You can also serve it with a glass of white wine for a special touch. To make Ocean's Bounty Seafood Pasta gluten-free, use gluten-free pasta. Many good options are available, like rice or quinoa pasta. Just follow the cooking instructions on the package. Enjoy the same great flavors without gluten! You can find the Full Recipe for more details. In this guide, we explored essential ingredients, step-by-step instructions, and helpful tips for making seafood pasta. You learned how to select fresh seafood, cook pasta well, and avoid common mistakes. We discussed variations, storage methods, and answered key questions about seafood pasta. Remember, the right ingredients and techniques can turn a simple dish into something special. Enjoy your seafood pasta journey!

The Best Seafood Pasta Recipe Simple and Flavorful Dish

If you crave a delicious seafood pasta dish that’s both simple and flavorful, you’re in the right place! I’ll guide

- 1 ½ cups chocolate graham cracker crumbs - ½ cup unsalted butter, melted - 2 cups cream cheese, softened - 1 cup powdered sugar - 1 teaspoon vanilla extract - 1 ½ cups heavy whipping cream - 1 cup cherry pie filling - Dark chocolate shavings for garnish - Fresh cherries for garnish To make this cheesecake, you need a few key items. First, the chocolate graham cracker crumbs give the crust a deep, rich flavor. Melted unsalted butter helps bind the crumbs together. For the creamy filling, you’ll need softened cream cheese and sweet powdered sugar. Vanilla extract adds a lovely aroma. Whipping cream is vital for that light, airy texture. Cherry pie filling is what makes this dessert a true Black Forest treat. You can garnish with fresh cherries and dark chocolate shavings for a special touch. - Fresh cherries - Dark chocolate shavings - Alternative crust options You might want to add fresh cherries on top for a burst of flavor. Dark chocolate shavings will enhance the look and taste. If you want to try something different, consider using other crust options. You could use an Oreo crust for a twist. For the Full Recipe, refer to the detailed instructions provided earlier in this article. Enjoy making this delightful dessert! To start, mix the chocolate graham cracker crumbs with the melted butter. Use a medium bowl for this. Stir until all crumbs are moist. Next, press this mixture into the bottom of your springform pan. Make sure it is even and firm. Now, chill the crust in the fridge for about 15 minutes. This helps it set before adding the filling. In a large bowl, beat the cream cheese with an electric mixer. Keep mixing until it is smooth and creamy. Slowly add the powdered sugar and vanilla extract. Mix until everything combines well. Next, in a separate bowl, whip the heavy cream. You want stiff peaks to form. Gently fold this whipped cream into the cream cheese mixture until no streaks remain. This step adds lightness to your filling. Now, let's layer the cheesecake! Pour half of the cheesecake filling over the chilled crust. Spread it evenly. Then, spoon half of the cherry pie filling on top of the cream cheese layer. Pour the rest of the cheesecake filling on top and spread it again. Finally, add the remaining cherry pie filling on top. Make sure it is evenly distributed. Cover the cheesecake with plastic wrap and chill it in the fridge. Let it set for at least 4 hours, or overnight for the best results. To get a smooth texture in your cheesecake, start by beating the cream cheese. Use a hand mixer on medium speed. Beat it for about two minutes until it is creamy. This step is key. If it is not smooth, your cheesecake will have lumps. Next, fold in the whipped cream gently. Use a spatula and scoop from the bottom. This method keeps the air in the whipped cream. Do not stir too hard, or the cream will lose its fluffiness. Aim for a light and airy mix. You can enhance the flavor by adding extra vanilla or almond extract. Just one teaspoon will make a big difference. You can also switch up the toppings. Instead of cherry pie filling, try strawberries or blueberries. Fresh fruit gives a vibrant taste. For a great presentation, serve with fresh cherries on top. Dark chocolate shavings add a nice touch too. Use a clean knife to slice the cheesecake. For each cut, wipe the knife with a damp cloth. This keeps the slices neat. Pair your cheesecake with coffee or a glass of milk. These drinks complement the rich flavors well. For more details, check out the Full Recipe for Black Forest No-Bake Cheesecake. {{image_2}} - Chocolate Cherry Cheesecake: This version adds rich chocolate flavor. Use chocolate cream cheese for a deeper taste. Mix in a bit of melted dark chocolate to enhance the cocoa notes. Top with extra cherry filling for a bold look. - Vanilla Bean Peach No-Bake Cheesecake: Swap cherries for fresh peaches. Add vanilla bean paste to the cream cheese for a sweet, fragrant taste. This light option is perfect for summer gatherings. - Gluten-free options: You can make the crust gluten-free by using gluten-free chocolate graham crackers. This keeps the chocolatey taste while making it safe for those with gluten sensitivities. - Non-dairy alternatives: Use vegan cream cheese and coconut cream in place of regular cream cheese and heavy cream. This option is great for those who avoid dairy but still want a creamy dessert. - Using Graham cracker vs. Oreo crust: A classic graham cracker crust gives a nice crunch. For a richer taste, try an Oreo crust. Just crush the cookies and mix with melted butter for a sweet base. - Nut-based crust alternatives: For a healthier twist, use ground almonds or walnuts. Mix them with a bit of coconut oil and press into the pan. This adds a nutty flavor and keeps it gluten-free. For the complete details on making this dessert, check out the Full Recipe. To keep your Black Forest no-bake cheesecake fresh, store it in the fridge. Use an airtight container or cover it tightly with plastic wrap. This helps to keep out air and moisture. Always place it on a flat surface to avoid any spills. If you want to freeze it, slice the cheesecake first. Wrap each piece in plastic wrap and then in foil. This way, you can enjoy a piece anytime. To thaw, place it in the fridge overnight before serving. In the fridge, your cheesecake stays fresh for about 3 to 5 days. Always check for signs of spoilage before eating. If the cheesecake starts to smell sour or has an off taste, do not eat it. Look for any mold on the surface. If you see any, it’s best to toss it out. Keeping an eye on your cheesecake will help you enjoy it at its best! A no-bake cheesecake needs time to chill. I recommend chilling it for at least 4 hours. For the best results, leave it overnight. This allows the flavors to blend and the texture to firm up. Yes, you can switch up the fruit! Try using strawberries, blueberries, or raspberries. Each fruit adds a unique taste. You can also use pie fillings like peach or apple. Be creative and mix flavors you enjoy. Absolutely! Making this cheesecake a day or two before your event works great. Just store it in the fridge. This way, you save time and still have a tasty dessert ready to serve. You can find the full recipe for Black Forest No-Bake Cheesecake [here](#). This link gives you all the details you need to whip up this delightful dish. This blog posts outlines how to make a delicious no-bake cheesecake with cherry filling. We covered essential and optional ingredients, step-by-step instructions, and helpful tips. You learned about variations and how to store leftovers properly. Enjoying this dessert is easy and fun. With your creativity, you can try new flavors and toppings. This cheesecake will impress friends and family. Make it for your next gathering or treat yourself. Happy baking!

Black Forest No-Bake Cheesecake Easy Delight Recipe

Are you ready to dive into a dessert that’s both easy and delicious? This Black Forest No-Bake Cheesecake combines rich

Older posts
Newer posts
← Previous Page1 … Page51 Page52 Page53 … Page79 Next →

dsad

© 2025 pureeatsnow • Built with GeneratePress

Our Policies

  • Copyright Policy
  • Cookie Policy
  • GDPR Policy
  • Privacy Policy
  • Disclaimer
  • Terms Of Use

More Information

  • Home
  • About
  • Contact
  • Appetizers
  • Dessert
  • Dinner
  • Drinks
©2025, pureeatsnow About Back To Top