Skip to content
DisclaimerTerms Of UseGDPR PolicyCookie Policy

pureeatsnow

  • Home
  • Drinks
  • Appetizers
  • Dinner
  • Dessert
  • About
  • Contact
  • Privacy Policy
DisclaimerTerms Of UseGDPR PolicyCookie Policy

Rachel

To make a tasty Spaghetti Aglio e Olio, you need simple ingredients. Each one plays a key role in the flavor. Here’s what you’ll need: - 400g spaghetti - 6 cloves garlic, thinly sliced - 1/2 cup extra virgin olive oil - 1 teaspoon red pepper flakes - Zest and juice of 1 lemon - 1/4 cup fresh parsley, chopped - Salt to taste - Freshly grated Parmesan cheese (optional) These ingredients create a dish that’s rich in taste yet easy to prepare. The garlic and olive oil blend perfectly. The red pepper flakes add just the right amount of heat. Zesty lemon juice brightens the flavor. Fresh parsley gives it a vibrant look and taste. If you love cheese, sprinkle some Parmesan on top for a creamy touch. For the full recipe, follow the steps to enjoy this classic dish. You’ll impress your family and friends with a meal that feels gourmet but is quick to whip up! To start, bring a large pot of salted water to a rolling boil. The salt helps season the pasta as it cooks. Add 400g of spaghetti to the boiling water. Cook it until it is al dente, which usually takes around 8 to 10 minutes. This means it should still have a slight bite to it. Before you drain the pasta, reserve about a cup of the pasta water. This water is starchy and will help mix the sauce later. While the pasta cooks, grab a large skillet and heat 1/2 cup of extra virgin olive oil over medium heat. Once the oil is warm, add 6 cloves of thinly sliced garlic. Stir it often and cook for about 2 to 3 minutes. You want the garlic to turn golden and release a nice aroma. Be careful not to let it burn, as burnt garlic can taste bitter. Next, add 1 teaspoon of red pepper flakes to the skillet. This will give your dish a nice kick. Stir for about 30 seconds to let the flavors mix. Now, it's time to add the drained spaghetti to the skillet. Toss it well in the garlic oil mixture. If the pasta looks too dry, slowly add some of the reserved pasta water until it reaches the right consistency. Finally, remove the skillet from the heat. Mix in the zest and juice of 1 lemon for a fresh, zesty flavor. To finish, fold in 1/4 cup of chopped fresh parsley. This adds a touch of color and freshness. Season the dish with salt to taste, tossing everything together well. Enjoy your simple yet delicious Spaghetti Aglio e Olio with a zesty twist. If you want, you can sprinkle some freshly grated Parmesan cheese on top when serving. For the complete cooking process, refer to the Full Recipe. Choosing the right olive oil matters. Use extra virgin olive oil for the best flavor. It should be rich and fruity, enhancing the dish. Low-quality oil can ruin the taste. Be careful when cooking the garlic. You want it golden and fragrant, not burnt. Burnt garlic tastes bitter and unpleasant. Keep an eye on it as it cooks. Stir often to avoid burning. You can change the spice level with red pepper flakes. Start with one teaspoon and adjust to your taste. If you want less heat, use half a teaspoon. For more spice, add more flakes. Consider other spices if you like variety. Crushed black pepper or smoked paprika can add unique flavors. Try experimenting to find what you like best. Presentation is key for a great meal. Use fresh parsley to add color and flavor. Drizzle a bit more olive oil on top for shine. It makes the dish look inviting. Serve with lemon wedges on the side. They add a bright, zesty kick. Squeezing lemon over the pasta right before eating enhances the flavor. For the full recipe, check out the instructions above. Enjoy your Spaghetti Aglio e Olio! {{image_2}} You can add protein to make your spaghetti aglio e olio heartier. Shrimp works great. Just sauté the shrimp in olive oil first, then add the garlic. This adds a nice seafood flavor. Chicken is another option. Cook it in the same pan. Slice it thin and mix it in for a tasty bite. If you want a vegetarian option, try chickpeas. They add protein and a nice texture. Just drain and rinse a can of chickpeas. Toss them in with the spaghetti. You will get a filling meal that is still light. Herbs can change the flavor of your dish. Basil brings a sweet taste. Just chop it fresh and sprinkle it on top. Oregano adds a nice earthy note. Use dried oregano if you have it on hand. You can also mix different greens for freshness. Try arugula or spinach. Toss them in at the end for a bright touch. Want a richer sauce? You can add cream. Just pour in a small amount after you mix in the lemon juice. Stir well for a silky finish. If you prefer a vegan option, use coconut cream or cashew cream. These work well and keep the dish creamy without dairy. For complete details, check out the Full Recipe. To keep your spaghetti aglio e olio fresh, store leftovers in the fridge. Place the pasta in an airtight container. Make sure it cools first to prevent steam buildup. This helps avoid soggy pasta. Use it within three days for the best taste. When it’s time to eat, you can reheat your pasta. For the best texture, use the stovetop. Heat a bit of olive oil in a pan. Add your spaghetti and stir gently until warm. If you prefer the microwave, use a microwave-safe dish. Heat it in short bursts, stirring in between. This prevents the pasta from drying out. Freezing spaghetti aglio e olio is easy but has some steps. First, let it cool completely. Portion the pasta into freezer-safe bags. Remove as much air as possible before sealing. You can freeze it for up to a month. When you’re ready to eat, thaw it overnight in the fridge. Reheat it gently on the stovetop for the best results. Enjoy your dish as if it was just made! For the full recipe, refer to the earlier sections. Spaghetti Aglio e Olio is a classic Italian dish. It comes from Naples, Italy. The name means “spaghetti with garlic and oil.” The dish has few ingredients, making it simple yet tasty. Traditionally, it uses spaghetti, garlic, olive oil, and red pepper flakes. It highlights the flavor of each ingredient. This dish is perfect for a quick meal or late-night snack. If you want a garlic-free version, use sautéed shallots for flavor. Shallots have a milder taste but give a nice aroma. You can also try using leeks or onions. These options add depth without overpowering the dish. The essence of Aglio e Olio lies in the oil and spice, so keep that in mind. The best pasta for this dish is spaghetti. However, you can also use linguine or fettuccine. These noodles hold onto the garlic oil well. Whole wheat pasta is a healthier option, too. It adds a nutty flavor and more fiber to your meal. Yes, adding vegetables can enhance the dish! You can toss in cherry tomatoes for sweetness. Spinach or kale adds color and nutrition. Broccoli or zucchini can also work well. Just sauté them lightly in the olive oil before adding the pasta. Spaghetti Aglio e Olio can be a healthy choice. It contains good fats from olive oil and has no heavy sauces. Garlic has health benefits, like boosting the immune system. The dish is low in calories, especially when you control portion sizes. However, watch the amount of oil and cheese you use to keep it light. For the full recipe, check the section above. Spaghetti Aglio e Olio is simple yet delicious. We covered ingredients, cooking steps, and variations. Remember to choose good olive oil and watch the garlic. You can add shrimp, veggies, or even cream to change it up. Proper storage keeps leftovers tasty, and reheating can be quick and easy. Enjoy making this meal, and share it with friends or family. You'll impress them with your skills and flavors.

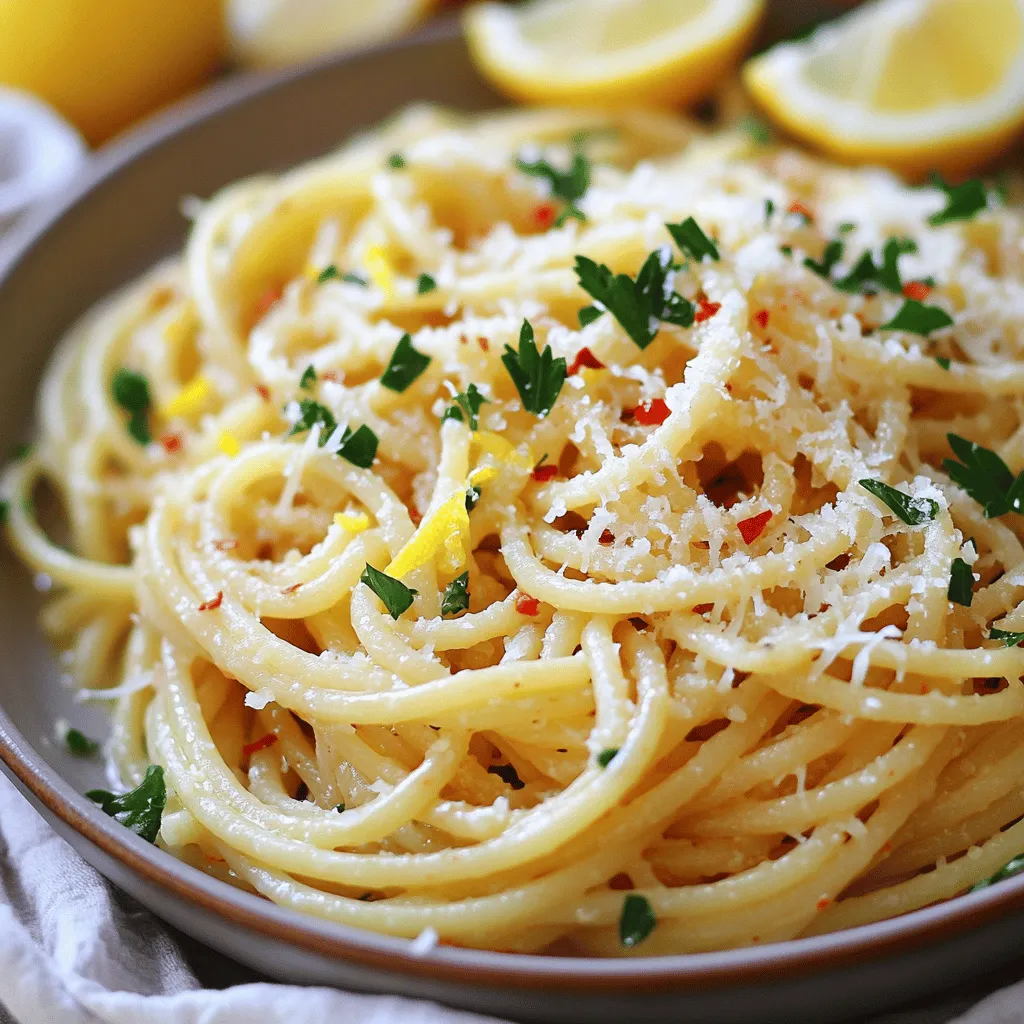
Spaghetti Aglio e Olio Tasty and Simple Recipe

Are you craving a quick and tasty dinner? Look no further than Spaghetti Aglio e Olio! This classic Italian dish

For a tasty Garlic Herb Roasted Chicken, gather these ingredients: - 1 whole chicken (about 4-5 pounds) - 1/4 cup olive oil - 6 cloves garlic, minced - 2 tablespoons fresh rosemary, chopped - 2 tablespoons fresh thyme, chopped - 1 tablespoon fresh parsley, chopped - 1 lemon, zested and halved - Salt and pepper to taste - 1 medium onion, quartered - 4 medium carrots, peeled and cut into large chunks - 3 medium potatoes, cut into quarters These ingredients create a flavorful dish that impresses everyone. Using fresh herbs gives the best flavor. Fresh herbs have bright tastes that wake up the chicken. They also add a nice look to your dish. Dried herbs work too, but use less. About one-third of the amount is good. Dried herbs do not have the same fresh taste. If you can, always choose fresh when making this recipe. For this recipe, a whole chicken weighing 4-5 pounds is ideal. This size cooks well and serves about six people. You can choose organic or free-range chicken for better taste. These chickens often have more flavor and better texture. A good chicken makes all the difference in your meal. First, you need to prep the chicken. Start by rinsing the whole chicken under cold water. Pat it dry with paper towels. This step helps the skin get crispy. Next, season the inside of the chicken cavity with salt and pepper. This adds flavor from the inside out. Now, let’s make the herb marinade. In a small bowl, mix together olive oil, minced garlic, chopped rosemary, thyme, parsley, and lemon zest. Add salt and pepper to taste. This mix will give your chicken a great herbal flavor. Rub half of this marinade under the chicken's skin and all over the outside. Squeeze the lemon halves into the cavity. Then, place them inside the chicken along with quartered onion. This adds moisture and flavor. It’s time to roast! Preheat your oven to 425°F (220°C). In a large roasting pan, arrange the carrot and potato chunks. Drizzle them with the remaining herb marinade and toss to coat. Place the marinated chicken on top of the veggies. Roast for about 1 hour and 15 minutes. Make sure the chicken reaches an internal temperature of 165°F (75°C). The juices should run clear when you pierce it. Once cooked, remove the chicken from the oven. Let it rest for 10-15 minutes before carving. This resting time helps the juices settle back into the meat. For the full recipe, check out the detailed instructions above. To get that perfect crispy skin, you must dry the chicken well. Use paper towels to pat it dry. This step helps the skin crisp up in the oven. Next, make sure to rub the herb mix under the skin and all over the outside. The oil in the marinade helps the skin brown nicely. High heat is your friend here, so roast at 425°F (220°C). This temperature cooks the chicken fast and gives it a great texture. When picking herbs, fresh is best! Fresh herbs pack more flavor than dried ones. Look for bright leaves without brown spots. Rosemary, thyme, and parsley work well in this recipe. You can even mix in some oregano for extra taste. If you can’t find fresh herbs, dried ones are fine, but use less. About one-third the amount will do. Resting the chicken is key to juicy meat. After roasting, let it sit for 10-15 minutes. This step lets the juices redistribute. If you cut it too soon, the juices will run out, leaving it dry. Cover it loosely with foil to keep it warm while it rests. This little trick makes a big difference in taste and texture. For the full recipe, check out the details above. {{image_2}} You can change up your dish by adding different vegetables. Try using bell peppers, zucchini, or Brussels sprouts. These vegetables roast well and add great flavor. Just cut them into similar sizes for even cooking. Toss them with olive oil and any leftover herb marinade. This adds color and nutrition to your meal. While rosemary, thyme, and parsley are classic choices, feel free to get creative! You can use basil, oregano, or even dill. Each herb brings a unique taste to the chicken. For a spicy kick, add crushed red pepper flakes or smoked paprika. Mixing these herbs can make your dish stand out. You don’t have to stick to just roasting. A slow cooker is great for tender chicken. Rub the chicken with your herb mix, place it in the cooker, and let it work its magic. Cooking on the grill gives a smoky flavor. Just be sure to monitor the temperature for safe cooking. Each method gives a different but delicious outcome. After you enjoy your Garlic Herb Roasted Chicken, store leftovers safely. Let the chicken cool to room temperature first. Then, wrap it tightly in plastic wrap or aluminum foil. You can also use an airtight container. This keeps the chicken fresh and prevents it from drying out. Store it in the fridge for up to four days. When you reheat your chicken, aim to keep it moist. Preheat your oven to 350°F (175°C). Place the chicken in a baking dish and add a splash of chicken broth or water. Cover the dish with foil to trap steam. Heat for about 20-30 minutes, checking often. This method helps keep your chicken juicy and flavorful. If you have more leftovers than you can eat, freezing is a great option. Cut the chicken into pieces for easier storage. Wrap each piece tightly in plastic wrap, then place them in a freezer bag. Remember to remove as much air as possible. Label the bag with the date. You can freeze the chicken for up to three months. When ready to eat, thaw it overnight in the fridge before reheating. Be sure to check out the Full Recipe for more tips! The best way to check if the chicken is done is to use a meat thermometer. Insert it into the thickest part of the thigh. The chicken is safe to eat when it reaches 165°F (75°C). You can also cut into the chicken. If the juices run clear, it is cooked. Always let the chicken rest for about 10-15 minutes. This helps keep it juicy. Yes, you can use other meats. Bone-in chicken thighs or breasts work well. You can try a whole turkey or a duck for a special meal. If using a different meat, adjust the cooking time. Always ensure it reaches the safe cooking temperature. To make this dish in an air fryer, follow the same steps for seasoning the chicken. Preheat your air fryer to 360°F (182°C). Place the chicken in the basket, breast side down. Cook for about 45 minutes, flipping halfway. Ensure it reaches the safe temperature of 165°F (75°C). For detailed steps, check the Full Recipe. In this post, we explored how to make a delicious garlic herb roasted chicken. We covered key ingredients, step-by-step instructions, and useful tips for the perfect dish. Remember to use fresh herbs for better taste and select the right chicken size. Don’t forget to rest your chicken to keep it juicy and flavorful. Try different herbs and cooking methods for new flavors. For leftovers, store them properly to enjoy later without losing moisture. Check out the full recipe to get started on your own amazing dinner. Enjoy your cooking journey!

Garlic Herb Roasted Chicken Simple and Tasty Recipe

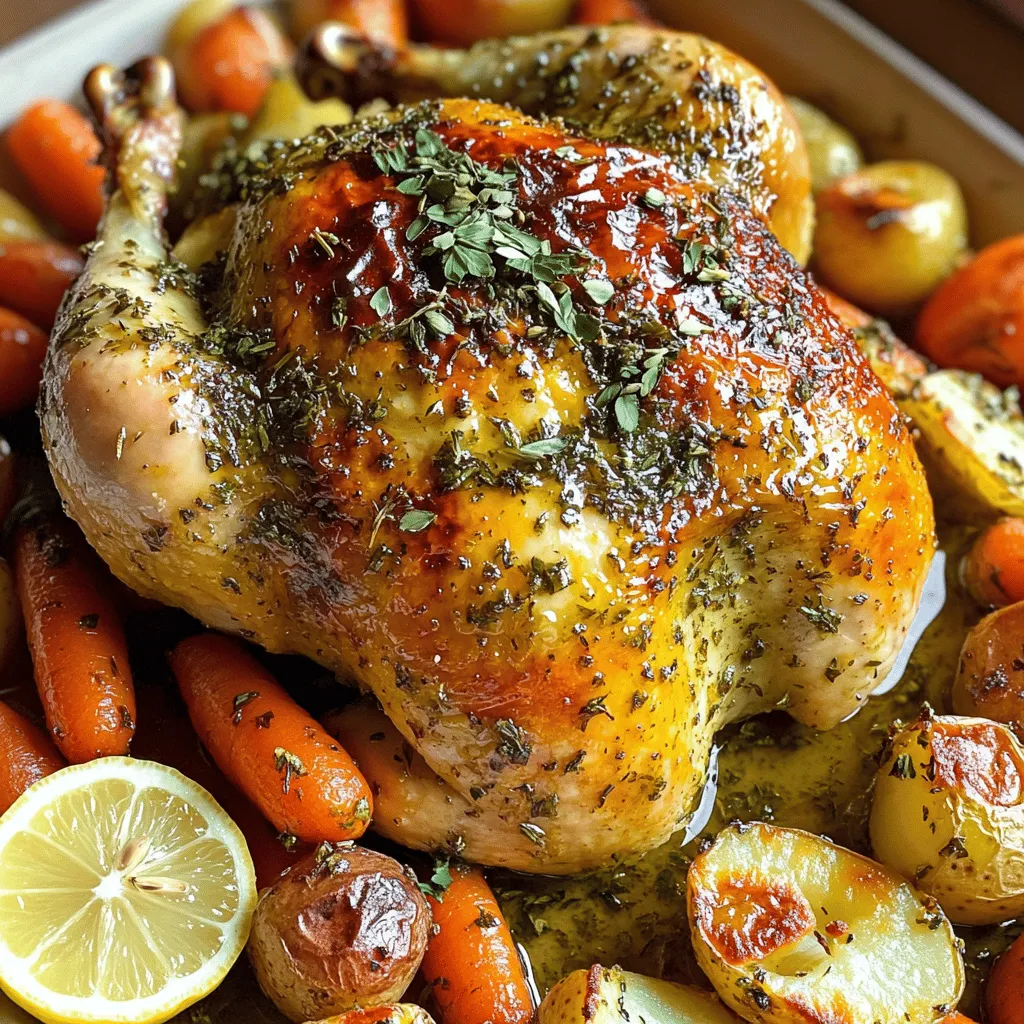
Welcome to my simple and tasty recipe for Garlic Herb Roasted Chicken! If you want a meal that’s both easy

To make a delicious sweet potato casserole with marshmallows, gather these items: - 4 medium sweet potatoes, peeled and cubed - 1/2 cup brown sugar - 1/4 cup maple syrup - 1/4 cup unsalted butter, melted - 1/2 cup milk (or almond milk for a dairy-free option) - 1 teaspoon vanilla extract - 1/2 teaspoon ground cinnamon - 1/4 teaspoon nutmeg - 1 teaspoon salt - 1 1/2 cups mini marshmallows - 1/2 cup pecans, chopped (optional) You can make your casserole even more special with these additions: - Chopped apples for a fruity twist - Dried cranberries for a touch of tartness - A sprinkle of ginger for extra warmth - Coconut flakes for a tropical vibe This sweet potato casserole is not just tasty, but it also packs some nutrition. Here’s what you get per serving (based on 10 servings): - Calories: 230 - Total Fat: 8g - Saturated Fat: 4g - Cholesterol: 20mg - Sodium: 150mg - Total Carbohydrates: 38g - Dietary Fiber: 3g - Sugars: 14g - Protein: 2g For the full recipe, check out the [Full Recipe]. Start by peeling and cubing four medium sweet potatoes. Make sure to cut them into small pieces. This helps them cook faster. Next, bring water to a boil in a large pot. Carefully add the sweet potatoes to the boiling water. Cook them for about 15 minutes. They should be tender and easy to mash. After cooking, drain the sweet potatoes. Place them in a large bowl and mash until smooth. Now, we need to mix the sweet potatoes with other tasty ingredients. Add 1/2 cup of brown sugar and 1/4 cup of maple syrup to the bowl. Pour in 1/4 cup of melted unsalted butter and 1/2 cup of milk. You can use almond milk if you want a dairy-free option. Add 1 teaspoon of vanilla extract, 1/2 teaspoon of ground cinnamon, and 1/4 teaspoon of nutmeg for flavor. Don't forget to sprinkle in 1 teaspoon of salt. Mix everything together until it's smooth and well combined. Next, it's time to bake! Preheat your oven to 350°F (175°C). Grease a 9x13-inch baking dish to prevent sticking. Pour the sweet potato mixture into the dish and spread it evenly. Now, grab 1 1/2 cups of mini marshmallows. Scatter them on top of the sweet potato layer. If you like, add 1/2 cup of chopped pecans for a nice crunch. Place the dish in the oven and bake for 25-30 minutes. Watch for the marshmallows to turn golden brown and slightly toasted. Once done, take it out and let it cool for about 5 minutes. For the full recipe, check out the Sweet Potato Delight Casserole. Enjoy your tasty treat! When picking sweet potatoes, look for firm ones. They should have smooth skin without spots. A good sweet potato feels heavy for its size. Choose medium-sized ones for this recipe. These will cook evenly and taste sweet. To get a creamy texture, mash the sweet potatoes well. Use a potato masher or fork for this. Make sure there are no lumps. Adding milk helps make it smooth. If you like it rich, add more butter. The right texture makes a big difference. Serve this casserole warm for the best taste. You can drizzle extra maple syrup on top. A sprinkle of cinnamon adds flavor and looks nice. For a crunch, add chopped pecans. Each bite should be sweet and delightful. For the full recipe, check the link. {{image_2}} You can make this casserole dairy-free easily. Just swap regular milk for almond milk. Almond milk gives a nice flavor without the dairy. You can also use coconut milk for a tropical twist. It adds creaminess while keeping it light. Toppings can change the whole dish. Try adding crushed graham crackers for a sweet crunch. You can also use toasted coconut flakes for a fun texture. If you like nuts, sprinkle some chopped walnuts or pecans on top. Each topping brings a new taste. Want to add some flair? Mix in a bit of orange zest for a citrus twist. You can also add a pinch of cayenne pepper for heat. Just a little can give a nice kick. Each of these flavors makes your casserole stand out. For the full recipe, check out the Sweet Potato Delight Casserole. Enjoy creating your own version! After you enjoy your sweet potato casserole, let it cool to room temperature. Then, cover it tightly with plastic wrap or aluminum foil. You can also transfer it to an airtight container. Store it in the fridge for up to four days. Keeping it sealed helps maintain its delicious taste and texture. If you want to save some for later, freezing works well. First, let the casserole cool completely. Then, cut it into smaller portions. Wrap each portion in plastic wrap, then place it in a freezer-safe bag. Label the bag with the date. You can freeze it for up to three months. This way, you can enjoy this treat whenever you want! To reheat your casserole, take it out of the fridge or freezer. If frozen, let it thaw in the fridge overnight. Preheat your oven to 350°F (175°C). Place the casserole in an oven-safe dish. If it seems dry, add a splash of milk. Cover it with foil to keep it moist. Bake for 20-30 minutes or until heated through. You can also use a microwave for a quick option, heating in 30-second intervals until warm. Enjoy the delightful flavors again! Yes, you can make this casserole ahead of time. To do this, follow the recipe steps up to baking. Then, cover the dish and store it in the fridge for up to 24 hours. When ready to bake, take it out and let it sit at room temperature for about 30 minutes. Then, bake it as directed. This keeps the flavors fresh and makes meal prep easy. If you want to skip marshmallows, try using pecans or walnuts. They add a nice crunch. You can also use crushed graham crackers for a sweet, crunchy topping. Another option is to mix in a bit of coconut for a tropical twist. These swaps still give you a tasty and fun dish. Sweet Potato Casserole can be healthy if you choose the right ingredients. Sweet potatoes are full of vitamins and fiber. However, the added sugar and butter can add calories. To make it healthier, use less sugar or swap butter for coconut oil. You can also add more nuts or oats for extra nutrition. Enjoy this dish in moderation for a balanced meal. This blog post covered how to make a delicious sweet potato casserole. We discussed key ingredients, optional variations, and detailed step-by-step instructions. You learned tips for choosing sweet potatoes and perfecting the dish's texture. We also explored storage methods and answered common questions. Remember, you can adapt this recipe to suit your taste. Feel free to experiment with toppings and flavors. Enjoy making this comforting dish!

Sweet Potato Casserole with Marshmallows Delight

If you’re looking for a warm and sweet dish to brighten your table, you’ve found it! Sweet Potato Casserole with

- 1 ½ cups chocolate cookie crumbs - ½ cup unsalted butter, melted - 16 oz cream cheese, softened - 1 cup powdered sugar - 1 cup heavy cream - 1 cup semi-sweet chocolate chips, melted - 1 teaspoon vanilla extract - Pinch of salt - Cocoa powder or chocolate shavings for garnish You can swap the chocolate cookie crumbs for graham cracker crumbs if you prefer. This change still offers a nice flavor. For those needing dairy-free options, use almond or cashew cream cheese. Coconut cream works well as a heavy cream substitute. If you like dark chocolate, feel free to use it instead of semi-sweet chocolate. It adds a rich taste. This recipe has a lot of flexibility. You can mix and match as you wish! Feel free to explore the [Full Recipe] for more details. To start, you need to mix the chocolate cookie crumbs with melted butter. In a bowl, combine 1 ½ cups of chocolate cookie crumbs with ½ cup of melted butter. Stir until the crumbs are fully coated. This step is key for a tasty base. Next, press the mixture firmly into the bottom of a 9-inch springform pan. Make sure it is even and compact. Once done, place it in the fridge while you make the filling. This helps the crust set well. In a large bowl, beat 16 oz of softened cream cheese until it is smooth. This should take about 2-3 minutes. Gradually add in 1 cup of powdered sugar. Keep mixing until everything is well blended. In another bowl, whip 1 cup of heavy cream. Whip until stiff peaks form. This gives the cheesecake its light texture. Gently fold the whipped cream into the cream cheese mixture in two batches. Mix until fluffy and well combined. Now, pour in 1 cup of melted semi-sweet chocolate, 1 teaspoon of vanilla extract, and a pinch of salt. Fold these into the cream cheese mixture. This will create a rich and creamy chocolate filling. Pour the filling over the chilled crust. Use a spatula to spread it evenly. Make sure to smooth the top for a nice finish. Cover the cheesecake with plastic wrap and place it in the fridge. Let it chill for at least 4 hours, but overnight is best. This waiting time allows the cheesecake to set properly. After it's set, carefully remove it from the springform pan. For a final touch, dust the top with cocoa powder or sprinkle some chocolate shavings. This adds a beautiful finish to your no-bake chocolate cheesecake. For the full recipe, check out the complete guide! To make your cheesecake smooth, start with room temperature cream cheese. Cold cream cheese can form lumps, making your filling uneven. Beat the cream cheese for about 2-3 minutes until it's creamy. This helps it blend well with the sugar. After that, whip the heavy cream until it forms stiff peaks. Gently fold the whipped cream into the cream cheese mixture. This keeps your filling light and fluffy. For a simple touch, use cocoa powder to dust the top. It adds a nice contrast to the rich chocolate. If you want to go a step further, sprinkle chocolate shavings for a decorative flair. You can also add fresh fruits like raspberries or strawberries. They add color and a fresh taste that brightens the dessert. If your filling is too runny, check if you whipped the cream enough. It should hold stiff peaks. You can also add a bit more cream cheese to thicken it. Cracks can happen if the cheesecake cools too quickly. To avoid this, let it chill slowly in the fridge. Cover it well to keep moisture in. This way, your cheesecake stays smooth and beautiful. For the complete recipe, check out the Full Recipe section. {{image_2}} You can easily add new flavors to your cheesecake. For a mocha twist, mix in espresso powder. It gives a rich taste that pairs well with chocolate. You can also swap the chocolate types. Use dark chocolate for a bolder flavor or white chocolate for a sweet touch. Each choice changes the taste, making it fun to experiment. The crust can also change. Instead of chocolate cookie crumbs, try nuts like pecans or almonds for a crunchy base. These nut-based crusts add a unique flavor. If you need a gluten-free option, use gluten-free cookie crumbs or almond flour. Both options keep the cheesecake tasty and enjoyable. When serving, think about sauces. A drizzle of raspberry or caramel sauce can elevate each slice. It adds color and a sweet contrast. You can serve the cheesecake in individual cups for fun, or go classic with a cake slice. Both styles look great and taste amazing. To keep your no-bake chocolate cheesecake fresh, use these simple methods: - Refrigerating leftovers: Store any leftovers in an airtight container. Place it in the fridge. This helps keep it creamy and tasty. - Freezing options: You can freeze the cheesecake if you want to save some for later. Wrap it tightly in plastic wrap and then place it in a freezer bag. It can last up to three months in the freezer. How long does the cheesecake last? In the fridge, it stays fresh for about five days. If you see any signs of spoilage, it is best to toss it. Look for changes in color or texture. If it smells off, don’t eat it. If you freeze your cheesecake, you need to defrost it properly. Take it out and place it in the fridge overnight to thaw. This keeps the texture smooth and nice. When serving, try adding fresh berries or a drizzle of chocolate sauce. It makes the cheesecake even more delightful! Yes, you can freeze No-Bake Chocolate Cheesecake. To freeze it, wrap it well in plastic wrap and then in aluminum foil. This keeps it fresh. You can freeze it for up to three months. When you're ready to eat, move it to the fridge for about six hours to thaw. This way, it stays creamy and tasty. To make your cheesecake firmer, you can try a few tips. First, use more cream cheese in your recipe. You can add an extra 4 oz to help with firmness. Second, make sure your cream cheese is at room temperature before mixing. This helps it blend better. Lastly, let it chill for longer. Aim for at least six hours or overnight for the best results. A springform pan is not a must, but it helps. If you don’t have one, you can use a regular pie dish. Just be careful when serving. You can also line the dish with parchment paper. This makes it easier to remove the cheesecake later. The key is to ensure the crust holds together well. This blog post outlined how to make a delicious no-bake chocolate cheesecake. We covered the key ingredients, step-by-step instructions, and tips for success and variations. You learned practical ways to store it and answers to common questions. In conclusion, making this cheesecake is easy and rewarding. Don't hesitate to try it with your favorite twists! Enjoying your creation will be the best reward.

No-Bake Chocolate Cheesecake Simple and Delicious Treat

If you love chocolate, you’ll adore this No-Bake Chocolate Cheesecake! It’s a quick and simple dessert that melts in your

To make creamy tomato basil pasta, gather these items: - 300g pasta (any shape you like) - 2 tablespoons olive oil - 4 cloves garlic, minced - 1 can (400g) crushed tomatoes - 1 teaspoon sugar - 1 teaspoon dried oregano - 1/2 teaspoon red pepper flakes (optional for heat) - 200ml heavy cream - 1/2 cup freshly grated Parmesan cheese - Salt and pepper to taste - 1/2 cup fresh basil leaves, roughly chopped - Extra basil leaves for garnish These ingredients blend to create a rich and creamy flavor. Each item plays a role in making the dish delicious. The pasta offers a nice base, while the tomatoes and cream make it creamy. Garlic and basil add depth and freshness. You can customize this recipe easily. For gluten-free options, use gluten-free pasta. It cooks well and tastes great. If you need a dairy-free version, swap heavy cream with coconut cream or cashew cream. Both add a creamy texture without dairy. You can try different cheeses too, like nutritional yeast for a vegan twist. These substitutions keep the spirit of the dish while making it fit your needs. Enjoy your cooking! To cook your pasta well, start with a large pot. Fill it with water and add a good amount of salt. Bring the water to a rolling boil. Once boiling, add your pasta. Cook it according to the package instructions until it is al dente. This means it should be firm but not hard. Don't forget this crucial step: reserve one cup of pasta water before draining the rest. This water is starchy and will help the sauce stick to the pasta later. In a large skillet, heat two tablespoons of olive oil over medium heat. Add four minced garlic cloves and sauté for about one minute. You want the garlic to smell nice but not burn. Next, pour in one can of crushed tomatoes. Stir this mix well. Now, add one teaspoon of sugar, one teaspoon of dried oregano, and half a teaspoon of red pepper flakes if you like some heat. Let the sauce simmer for about ten minutes. This helps all the flavors come together. Lower the heat and stir in 200 milliliters of heavy cream. Cook for an extra five minutes to thicken the sauce. If it gets too thick, use your reserved pasta water. Gradually add it until you get the right consistency. Finally, mix in half a cup of freshly grated Parmesan cheese until it melts completely. Once your sauce is ready, it’s time to bring everything together. Add the drained pasta to the skillet with the sauce. Toss the pasta well to coat every noodle. This step is key for flavor! Now, season with salt and pepper to your taste. To finish, stir in half a cup of roughly chopped fresh basil. This adds a bright and fresh flavor that makes the dish pop. Enjoy your creamy tomato basil pasta, and don't forget to check the Full Recipe for more details! To make your sauce creamy, adjust the amount of heavy cream. If you want it richer, add more cream. If you prefer a lighter sauce, use less. You can mix in a little pasta water to change the texture. This helps coat the pasta better. For flavor, add spices like black pepper or a pinch of nutmeg. Fresh herbs like thyme or parsley bring more taste. You can also try a splash of lemon juice for brightness. Each addition enhances the overall flavor of the dish. Cook your pasta until it is al dente. This usually takes about 8 to 10 minutes. Check the package for exact timing. Remember to reserve at least one cup of pasta water before you drain it. This water helps adjust your sauce later. When cooking garlic, keep a close eye on it. Sauté it for just one minute on medium heat. If it burns, it can ruin the sauce's taste. If you smell a strong aroma, it's time to add the tomatoes. Pair your creamy tomato basil pasta with garlic bread. A fresh salad also complements the dish well. For drinks, a light white wine or sparkling water works nicely. To make your dish look appealing, serve it in shallow bowls. Garnish with extra basil leaves and a sprinkle of Parmesan cheese. This adds color and makes the meal feel special. You can find the Full Recipe for more details. {{image_2}} You can add protein to your creamy tomato basil pasta to make it heartier. Chicken, shrimp, or tofu work great. - Chicken: Cook bite-sized pieces in the skillet before adding the garlic. Ensure the chicken is cooked through, about 7-10 minutes. - Shrimp: Add shrimp after the garlic. They cook quickly, usually in 3-5 minutes. - Tofu: Use firm tofu. Cube it and brown it in the skillet before adding garlic. This takes about 5-7 minutes. Adjust cooking times as needed. Make sure all proteins are cooked well to keep your meal safe and tasty. Adding veggies boosts nutrition and flavor. Try these ideas: - Spinach: Toss in fresh spinach at the end. It wilts quickly. - Zucchini: Sauté diced zucchini with the garlic. It adds a nice crunch. - Bell peppers: Chop and add them early in the process. They add sweetness. Incorporate seasonal produce for the best flavor. Fresh tomatoes or asparagus are great in spring, while squash shines in fall. You can easily customize the flavors in your creamy tomato basil pasta. Here are some fun ideas: - Cheese: Swap Parmesan for other cheeses like mozzarella or feta. Each cheese brings a unique taste. - Lemon zest: Add zest at the end for a bright flavor. It lifts the dish. - Balsamic vinegar: A splash can add a nice tang. Use it sparingly, as it can quickly overpower. Explore these variations to create your perfect dish. For the full recipe, check out the complete instructions above. To keep your creamy tomato basil pasta fresh, store it in an airtight container. Place it in the fridge if you plan to eat it within three days. For longer storage, you can freeze it. Use freezer-safe containers or bags, and make sure to remove as much air as possible. This helps prevent freezer burn. When you’re ready to enjoy it, thaw it overnight in the fridge. When reheating, gently warm it in a skillet over low heat. Add a splash of water or cream to help restore its creamy texture. Stir often to avoid sticking. If using a microwave, heat it in short intervals, stirring in between. This method keeps the dish creamy and tasty. Creamy tomato basil pasta stays safe to eat for about three days in the fridge. In the freezer, it can last up to three months. Always check for signs of spoilage. If you see any mold or the pasta smells off, it’s time to toss it. When reheating, if the texture seems grainy or the sauce separates, it’s best to discard it. Always prioritize food safety to enjoy your meal to the fullest. Yes, you can use fresh tomatoes. Fresh tomatoes offer a bright flavor. They have a different texture than canned tomatoes. If you use fresh, look for ripe varieties like Roma or vine tomatoes. You will need about 6-8 fresh tomatoes for this recipe. First, blanch them to remove the skins. Then, chop and cook them down until they break apart. This will help create a nice sauce. To make this dish vegan, swap heavy cream for plant-based cream. Coconut cream or cashew cream works well. For cheese, use nutritional yeast or a vegan cheese substitute. Both options add a nice flavor. Be sure to check the labels to avoid dairy. This way, you keep the creamy texture without animal products. Absolutely! This recipe is perfect for meal prep. Cook the pasta and sauce separately. Store them in airtight containers in the fridge. The pasta will stay fresh for about 3-5 days. The sauce can last up to a week. When ready to eat, reheat the sauce and mix it with the pasta. Add a little pasta water to keep it creamy. To add heat, try red pepper flakes or cayenne pepper. Start with a small amount and adjust to your taste. You can also add sliced fresh chili peppers for more flavor. Another option is to use spicy sausage or chicken, if you prefer. This gives a nice kick and extra depth to the dish. Any pasta shape works, but some are better than others. I recommend using penne, fusilli, or fettuccine. These shapes hold the sauce well. They create a nice balance of creamy sauce and pasta. You can also use gluten-free pasta if needed. Just follow the package instructions for cooking times. For the full recipe, refer back to the main section. This guide provided key ingredients, cooking steps, and tips for a creamy pasta dish. I shared ways to adjust flavors, use alternative ingredients, and enhance presentation. Remember, cooking is about creativity. Don't hesitate to experiment with proteins or vegetables. Proper storage helps keep your leftovers fresh. Push your cooking skills further by trying new flavors. Enjoy making this dish, and don't forget to share your delicious results! Happy cooking!

Creamy Tomato Basil Pasta Simple Delightful Recipe

Craving a pasta dish that’s both creamy and bursting with flavor? You’re in the right place! In this blog post,

- 4 boneless, skinless chicken thighs - 2 cups broccoli florets - 1 red bell pepper, sliced - 1 cup baby carrots - 4 cloves garlic, minced - 1 lemon, juiced and zested - 3 tablespoons olive oil - 1 teaspoon dried oregano - 1 teaspoon paprika - Salt and pepper to taste - Fresh parsley, chopped (for garnish) - You can swap chicken thighs for chicken breasts. Breasts cook faster and are leaner. - For veggies, use zucchini, green beans, or asparagus. Mix and match for fun! - To make it gluten-free, ensure your seasoning has no gluten. For dairy-free, skip any cheese. - Fresh ingredients taste brighter and have more flavor. They also cook evenly. - Frozen can save time but may alter texture. Thaw them before cooking to help. - Adjust cooking time: frozen veggies often need a few extra minutes to cook through. - Preheating the oven First, set your oven to 400°F (200°C). This heat helps cook the chicken and veggies evenly. Preheating ensures that your dish cooks quickly and stays juicy. - Marinating the chicken Grab a large mixing bowl. Combine lemon juice, zest, minced garlic, olive oil, oregano, paprika, salt, and pepper. Stir until mixed. Add the chicken thighs. Make sure they are fully coated with the marinade. Let them sit for at least 15 minutes. For better flavor, marinate them in the fridge for up to 2 hours. - Assembling the chicken and veggies on the baking sheet Take a large baking sheet and arrange the marinated chicken thighs in the center. Surround them with broccoli florets, sliced red bell pepper, and baby carrots. Pour any leftover marinade over the veggies. Toss the vegetables gently to coat them well. - Baking time and temperature Place the baking sheet in your preheated oven. Bake for 25 to 30 minutes. The chicken should be golden brown, and the veggies tender. - Internal temperature for chicken To ensure the chicken is safe to eat, check its internal temperature. It should reach 165°F (75°C). Use a meat thermometer for accuracy. - Texture and tenderness for vegetables The veggies should be tender but not mushy. A fork easily pierces them when they are done. If they are still hard, bake for a few more minutes. This dish is not just simple; it bursts with flavor and is perfect for any meal. For the full recipe, refer to the section above. Enjoy your cooking! To boost the taste of your One-Pan Lemon Garlic Chicken and Veggies, try adding herbs and spices. Fresh herbs, like thyme or rosemary, can bring a lovely aroma. You can also add a pinch of red pepper flakes for heat. If you want to switch things up, consider alternative marinades. A mix of soy sauce, honey, and ginger can give a sweet and savory twist. Using the right baking sheet is key. A heavy-duty, rimmed baking sheet works best. It helps to cook the chicken evenly. For better results, I suggest checking your oven with an oven thermometer. This tool ensures your oven runs at the correct temperature. When it comes to sides, serve the chicken with rice or quinoa. They soak up the tasty juices well. You might also enjoy a fresh green salad on the side. For presentation, you can serve directly on the baking sheet for a rustic look or transfer to a large platter. Drizzle extra lemon juice on top for brightness. Adding lemon slices can make the dish pop with color. {{image_2}} You can easily adapt this recipe. Try using fish or tofu instead of chicken. Both options soak up the lemon garlic flavor well. For fish, use salmon or cod. For tofu, choose firm tofu and press it to remove excess moisture. You can also switch up the veggies based on the season. In spring, use asparagus and snap peas. In fall, try butternut squash and Brussels sprouts. Each change brings new tastes and textures. You can make this dish on the stovetop too. Heat a large skillet over medium-high heat. Sear the chicken thighs for 5-7 minutes on each side. Then add the veggies and cover to steam. This method gives you a nice char on the chicken. If you prefer a slow cooker, this dish works well too. Place the marinated chicken and veggies in the slow cooker. Cook on low for 6-8 hours or on high for 3-4 hours. The chicken will be tender and flavorful. For meal prep, pack the chicken and veggies in separate containers. This makes it easy to grab and go during the week. You can also serve this dish family-style. Transfer everything to a large platter. This presentation invites everyone to dig in. Drizzle with extra lemon juice for a fresh touch. You can add lemon slices for a pop of color. Each serving is not only tasty but also looks beautiful on the table. To keep your One-Pan Lemon Garlic Chicken and Veggies fresh, store leftovers in an airtight container. This helps avoid moisture loss and keeps flavors intact. Your dish stays fresh for about 3-4 days in the fridge. Always check for any off smells or changes in texture before eating. You can freeze this dish, but I recommend freezing the chicken and veggies separately. Cooked chicken freezes well for up to 4 months. Raw chicken can also freeze for up to a year. For freezing veggies, blanch them first to keep the color and texture. When ready to eat, thaw the dish overnight in the fridge. Reheat in the oven or on the stovetop until hot. Leftovers can lead to new meals! You can make chicken tacos by shredding the chicken and adding it to tortillas with your favorite toppings. Another idea is to toss the veggies and chicken into a salad for a fresh lunch. You can also use the remaining ingredients to create a stir-fry. Just add rice or noodles for a quick meal. Making this dish takes about 45 minutes in total. You will spend 15 minutes prepping. The cooking time in the oven is about 25 to 30 minutes. This simple timing makes it easy for busy nights. Yes, you can use boneless chicken breasts. However, the flavor and texture will change. Chicken thighs are juicier and more tender. They soak up the lemon and garlic flavor better. Breasts can dry out if cooked too long. If you prefer chicken breasts, check them after 20 minutes of baking. Many vegetables pair nicely with lemon garlic chicken. Here are some great options: - Zucchini - Asparagus - Green beans - Cauliflower - Sweet potatoes Feel free to mix and match based on what you like. You can also use frozen veggies if fresh ones are not available. Just adjust cooking times as needed. For the best flavor, aim for vibrant, fresh veggies. For the full recipe, check the [Full Recipe]. This blog post covered all you need for making One-Pan Lemon Garlic Chicken. We discussed key ingredients, swaps, and tips about fresh versus frozen foods. You learned step-by-step instructions, cooking methods, and storage tips for your leftovers. Remember, adding your favorite herbs can make the dish even better. Try out variations or alternative cooking methods to keep things fresh. This recipe is a great way to prepare meals quickly and tastefully. Enjoy your cooking while making it your own!

One-Pan Lemon Garlic Chicken and Veggies Delight

Looking for a quick and tasty meal? One-Pan Lemon Garlic Chicken and Veggies Delight is your answer! This simple recipe

- Broccoli florets - Bell pepper (any color) - Carrot - Zucchini - Snap peas - Garlic - Ginger - Soy sauce (or tamari) - Sesame oil - Honey or maple syrup - Cornstarch and water for thickening - Sesame seeds - Chopped green onions - Cooked rice or noodles for serving Gathering fresh, colorful vegetables is key to a great stir-fry. I love using broccoli florets for their crunch, bell peppers for sweetness, and carrots for color. Zucchini adds a nice texture, while snap peas bring a bright, fresh taste. For the best flavor, I use garlic and ginger. They add depth and warmth to the dish. Soy sauce or tamari gives a salty finish. Sesame oil lends a nutty taste, while honey or maple syrup balances the flavors. Cornstarch mixed with water helps thicken the sauce, making it stick to the veggies. Finally, don't forget garnishes! Sesame seeds and chopped green onions make every bite pop. Serve your stir-fry over rice or noodles. This vibrant mix of ingredients makes a quick and easy vegetable stir-fry that is both healthy and delicious. For the full recipe, check out the details above. Whisk together 3 tablespoons of soy sauce, 2 tablespoons of sesame oil, 1 tablespoon of honey or maple syrup, and 1 tablespoon of cornstarch mixed with 2 tablespoons of water. This sauce adds flavor and thickens the dish. Heat 2 tablespoons of sesame oil in a skillet or wok over medium-high heat. You want the oil hot but not smoking. Add 2 cloves of minced garlic and 1 inch of grated ginger to the pan. Stir and cook for 30 seconds until fragrant. Next, add 1 cup of broccoli florets and 1 sliced bell pepper. Stir-fry these for 3 to 4 minutes until they start to soften. Incorporate 1 julienned carrot, 1 sliced zucchini, and 1 cup of snap peas. Keep cooking for another 3 to 5 minutes. The veggies should be tender but still crisp. Now, pour the prepared sauce over the vegetables. Stir quickly to coat everything evenly. Cook for 2 minutes. The sauce will thicken and cling to the veggies. Remove the stir-fry from heat. Serve it over cooked rice or noodles. Garnish with sesame seeds and chopped green onions for extra flavor. For the full recipe, check the details above. To make your stir-fry fast, prep your veggies first. Start by washing them well. Next, use a sharp knife to julienne or chop. For julienne, cut the carrot into thin strips. Do the same with zucchini. For bell peppers, slice them into thin strips. Keep your broccoli in small florets. This makes cooking quick and even. Stir-frying needs high heat to cook fast. Use a wok or a large skillet. Heat your oil before adding veggies. This helps them cook well without steaming. Keep the vegetables moving. Stir constantly to avoid burning. Cook in small batches if your pan is crowded. This way, everything gets that beautiful, crisp texture. Don't forget to boost the taste! Besides soy sauce, try adding some hoisin sauce or chili paste. You can also add fresh herbs like basil or cilantro for a burst of flavor. A squeeze of lime adds a nice zing too. Experiment with these spices to find what you love best. Remember, the right mix makes your meal shine. Want the full recipe? Check out the [Full Recipe]. {{image_2}} You can make your vegetable stir-fry even better by adding protein. Here are some options: - Chicken: Use thin slices of chicken breast for a quick cook. - Shrimp: Add peeled shrimp for a great seafood flavor. - Tofu: Use firm tofu for a plant-based protein that soaks up flavors well. Each option adds texture and makes the meal heartier. Feel free to mix and match your veggies! Here are some ideas: - Seasonal: Use fresh vegetables from local farms like asparagus in spring. - Favorites: Add mushrooms, spinach, or bell peppers for vibrant colors. - Freezer Finds: Use frozen mixed veggies when fresh options are not available. Experiment with your favorites to keep the dish exciting. Making your stir-fry gluten-free is easy. Here are some tips: - Soy Sauce: Use tamari instead of regular soy sauce. - Thickener: Ensure your cornstarch is certified gluten-free. - Serving Options: Serve with rice or gluten-free noodles. These small changes help everyone enjoy your dish without worry. To keep your leftover stir-fry fresh, store it in an airtight container. Place it in the fridge within two hours of cooking. This helps it stay safe and tasty. Eat leftovers within three to four days for the best flavor. When reheating, you want to keep the texture nice. The best way is to use a skillet. Heat a little oil over medium heat. Add the stir-fry and stir it gently until hot. You can also use the microwave but do it in short bursts. Stir between each burst to heat evenly. Yes, you can freeze vegetable stir-fry! Place it in a freezer-safe container. Make sure to leave some space for expansion. It can last up to three months in the freezer. When ready to eat, thaw it in the fridge overnight. Reheat it in a skillet for the best results. For the full recipe, check the earlier sections. I recommend using oils with high smoke points. Good choices include canola oil, peanut oil, and sesame oil. These oils can handle high heat without burning. They also add great flavor. Sesame oil gives a nice, nutty taste that enhances your dish. You can make a vegetable stir-fry in about 20 minutes. It takes 10 minutes to prep your veggies and another 10 to cook. This quick cook time is perfect for busy nights. You can easily whip up a healthy meal in no time. Yes, you can make this stir-fry in advance. Cook it and let it cool. Store it in an airtight container in the fridge for up to three days. When you are ready to eat, just reheat it in a pan. This saves time during your busy week. You can serve vegetable stir-fry over rice or noodles. Both options soak up the sauce well. You can also enjoy it with a side of dumplings or spring rolls for extra flavor. Choose your favorite for a complete meal. Yes, vegetable stir-fry is very healthy. It is packed with vitamins and minerals from fresh veggies. You control the oil and sauce, keeping it light. Plus, it is low in calories and high in fiber. Eating this dish can help you feel good and energized. For the full recipe, check out the Quick and Easy Vegetable Stir-Fry. This blog post outlined a simple, tasty vegetable stir-fry. We explored fresh veggies like broccoli and bell peppers, plus flavors from garlic and ginger. The step-by-step guide shows how to cook quickly and easily. Tips helped with veggie prep and cooking techniques. We also discussed protein options, storage, and common FAQs. Stir-fry makes a healthy meal that’s fun to customize. Enjoy creating your perfect dish!

Quick and Easy Vegetable Stir-Fry for Healthy Meals

Looking for a quick and tasty meal packed with nutrients? This Quick and Easy Vegetable Stir-Fry is your solution! With

- 2 ripe avocados - 4 slices of whole-grain or sourdough bread - 4 large eggs - 1 tablespoon white vinegar - 1 tablespoon lemon juice - Salt and pepper to taste - Crushed red pepper flakes (optional) - Fresh herbs (like cilantro or parsley) for garnish - Olive oil for drizzling To make the perfect avocado toast with poached egg, start with fresh ingredients. Ripe avocados are key. They should be soft but not mushy. Whole-grain or sourdough bread gives a nice crunch. Eggs are the star of this dish. They add protein and flavor. Using white vinegar in the poaching water helps the egg whites stay together. It makes for a neat, pretty poached egg. Lemon juice adds brightness to the avocado. Salt and pepper enhance the taste. If you like a bit of spice, crushed red pepper flakes are great. Fresh herbs add color and a fresh taste. A drizzle of olive oil ties everything together. - Calories per serving: About 300 calories - Macronutrient breakdown: 15g protein, 20g fat, 30g carbs This dish is not only tasty but also healthy. Each serving is packed with nutrients. It offers a good balance of protein, healthy fats, and carbs. - Medium saucepan - Slotted spoon - Fork and bowl for mashing - Toaster or oven Gathering the right tools makes cooking easier. A medium saucepan helps you poach the eggs perfectly. A slotted spoon is essential for lifting the eggs out of the water. Use a fork to mash the avocados in a bowl. Finally, a toaster or oven will crisp up your bread just right. For the full recipe, you can check the detailed instructions. Enjoy your cooking! To toast bread perfectly, use a toaster or a hot skillet. Aim for a golden brown color. This adds a nice crunch to your dish. An oven or grill can work too. For the oven, set it to 350°F and toast for about 10 minutes. Flip halfway to get even browning. On a grill, use low heat and watch closely to avoid burning. For a perfect poached egg, use fresh eggs. Crack the egg into a small bowl first. This helps keep the yolk intact. Bring water to a gentle simmer and add one tablespoon of white vinegar. The vinegar helps the egg hold its shape. Slide the egg into the simmering water carefully. Cook for 3-4 minutes for a runny yolk. Avoid letting the water boil hard, as this can break the egg. If you want a firmer yolk, cook it a minute longer. Now, let’s spread the avocado mixture. First, scoop out ripe avocados into a bowl. Add one tablespoon of lemon juice, salt, and pepper. Mash until creamy but still a bit chunky. Spread a generous layer of the avocado on each slice of toasted bread. Next, gently place the poached egg on top. Drizzle olive oil over everything. If you like spice, sprinkle crushed red pepper flakes. Don’t forget to garnish with fresh herbs for a pop of color and flavor. Enjoy your delicious creation! To create a perfect poached egg, control the water temperature. Use gentle simmering water, not boiling. Boiling can break apart the egg. Aim for about 180°F (82°C) for the best results. Timing is key for how you like your yolk. For a runny yolk, cook for 3-4 minutes. If you want a firmer yolk, let it cook for 5-6 minutes. Always watch your eggs closely. Spices and seasonings can boost the taste of your avocado toast. Try adding salt, pepper, or crushed red pepper flakes. A sprinkle of smoked paprika brings a lovely depth. Fresh herbs like cilantro or parsley also brighten the dish. Fresh ingredients matter, too. Choose ripe avocados for creaminess. Quality bread enhances texture. Sourdough gives a nice chew, while whole-grain is hearty and healthy. You can enjoy avocado toast any time of day. It's great for breakfast, lunch, or a snack. Serve it with coffee or a fresh juice for a refreshing start. Pair your toast with a light salad or some fresh fruit. A simple side can balance the meal. Don't forget to check out the Full Recipe for more ideas! {{image_2}} You can make avocado toast your own with many toppings. For a protein boost, try adding smoked salmon or crispy bacon. Both add great flavor and texture. If you prefer vegetarian or vegan options, consider using chickpeas or cherry tomatoes. These options keep the dish fresh and vibrant. Want to spice things up? A Mediterranean twist works great. Add feta cheese and olives for a salty kick. If you like heat, try a spicy version with jalapeños and a drizzle of sriracha. These flavors mix well with creamy avocado. The bread you choose can change your toast. For gluten-free options, use rice cakes or gluten-free bread. They still give a nice crunch. If you want artisan choices, try sourdough or whole-grain bread. These options add extra flavor and texture to your meal. To store leftover avocado toast, wrap it tightly in plastic wrap. Use an airtight container for best results. Keep the toast in the fridge for up to one day. The bread will soften, but this method helps keep the avocado fresh. Avoid stacking layers of toast; it can cause sogginess. To prevent browning, add lemon juice to your avocados. The acid slows down the browning process. Store unused avocados in the fridge. You can also cover them with plastic wrap. This helps keep air from getting to the flesh. If you only use half an avocado, leave the pit in. It helps reduce browning as well. To reheat your avocado toast, use the oven or a toaster. Heat it at a low temperature to avoid burning. You can also microwave it for a few seconds. But be careful, as this can make the toast chewy. Adding a fresh poached egg on top right before serving will help restore some moisture and flavor. You can poach eggs without vinegar by using a gentle simmer. The key is to create a whirlpool in the water before adding the egg. This helps the egg white wrap around the yolk. You can also use a silicone poaching cup. It holds the egg in place without the need for vinegar. Whole-grain and sourdough bread are popular choices. Whole-grain bread offers fiber and nutrients. Sourdough has a tangy flavor and a chewy crust. However, white bread is softer but less nutritious. Choose what you enjoy! You can prep the components ahead. Toast the bread and store it in a sealed bag. Mash the avocado and add lemon juice to slow browning. Keep it in an airtight container. Poach the eggs just before serving for the best taste. For the detailed recipe, check out Avocado Toast with Poached Egg. In this article, we covered how to make delicious avocado toast with poached eggs. You learned about the key ingredients, the tools needed, and step-by-step instructions. We also shared helpful tips for perfecting your poached eggs, enhancing flavors, and exploring fun variations. Avocado toast is not just tasty; it’s versatile and healthy, too. Now you can impress others with your skills. Enjoy making and sharing your avocado toast creations!

Avocado Toast with Poached Egg Simple and Fresh Dish

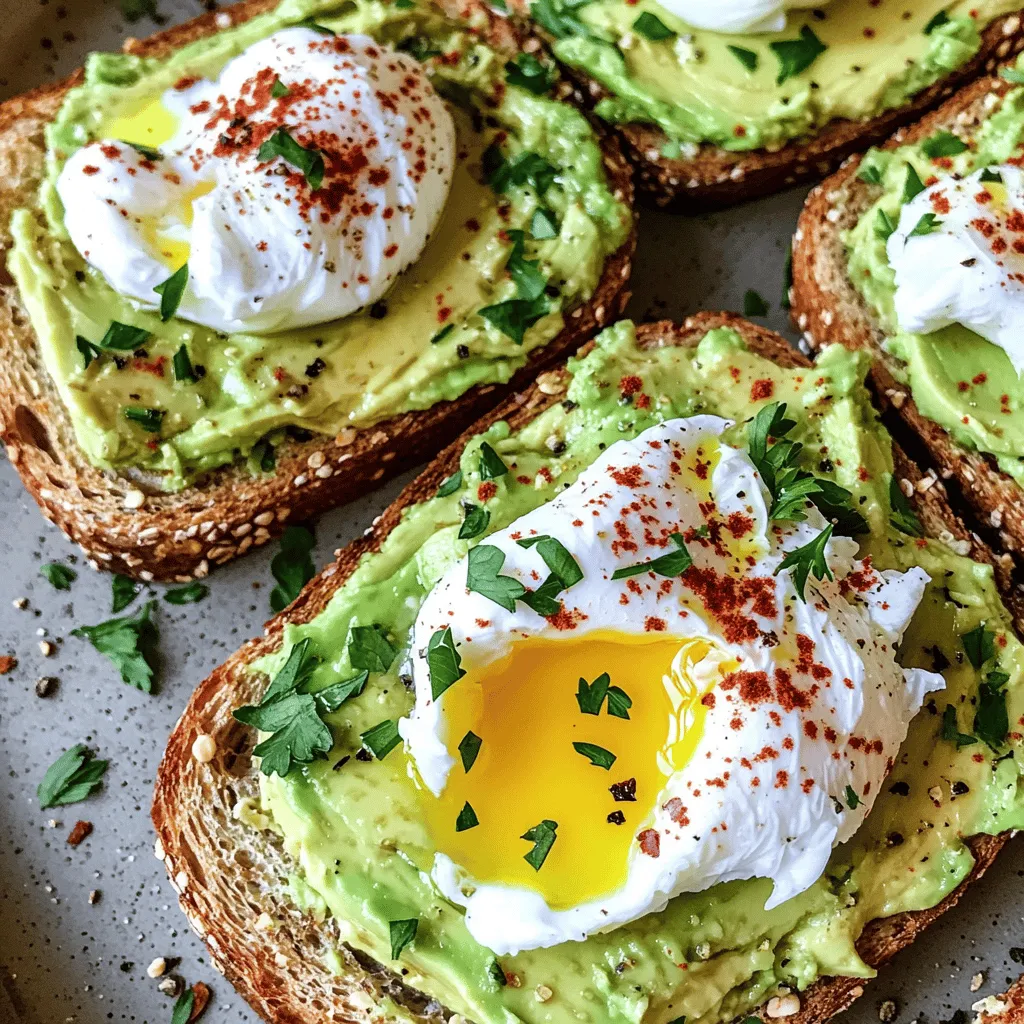
Are you ready to elevate your breakfast game? In this post, I’ll guide you through making a delightful Avocado Toast

- Zucchini - Breadcrumbs - Parmesan Cheese - Eggs The star of this recipe is zucchini. These green veggies are packed with vitamins and have a great texture. You’ll need two medium zucchinis, cut into fry-shaped sticks. This shape helps them cook evenly and get crispy. For the coating, use breadcrumbs. You can choose plain or seasoned ones, depending on your taste. They add a nice crunch and fun flavor. Grated Parmesan cheese brings in a salty, nutty taste. It melts and binds to the zucchini, making each bite delicious. Finally, two large eggs help the breadcrumbs stick to the zucchini. - Garlic Powder - Onion Powder - Smoked Paprika - Salt and Pepper Seasonings are key to great flavor. Garlic powder gives a robust taste without being too strong. Onion powder adds sweetness and depth. Smoked paprika brings a slight smokiness, which makes these fries stand out. Don’t forget salt and pepper to enhance all the flavors! - Olive Oil Spray - Baking Sheet - Parchment Paper For cooking, you need a few essentials. Olive oil spray helps the fries crisp up nicely in the oven. A baking sheet is where the magic happens, so make sure to use one that’s sturdy. Lastly, parchment paper makes cleanup a breeze and prevents sticking. Check out the Full Recipe for a detailed guide on making these crispy baked zucchini fries! - Preheat your oven to 425°F. - Line a baking sheet with parchment paper. This helps the fries not stick. - In a shallow bowl, mix together the breadcrumbs, cheese, garlic powder, onion powder, smoked paprika, salt, and pepper. This mix gives great flavor. - In a different bowl, crack the eggs and whisk them until smooth. - Take each zucchini fry and dip it into the egg mix. Let the extra egg drip off. - Next, coat the fry in the breadcrumb mix. Press down gently so it sticks well. - Place the coated fries on the prepared baking sheet. - Arrange the fries in a single layer on the baking sheet. - Spray them lightly with olive oil. This oil helps them crisp up. - Bake for 20 to 25 minutes. Turn them halfway through for even cooking. Check for a golden brown color. - Once done, take them out and let them cool for a bit before serving. Follow these steps for crispy baked zucchini fries. You can find the full recipe above. Enjoy! To get the best crunch from your zucchini fries, use olive oil spray. This helps them crisp up beautifully in the oven. A light coat of oil is key. Don’t skip this step! After baking, consider broiling them for a minute or two. This adds even more crunch. Just keep an eye on them so they don’t burn. Pair your zucchini fries with tasty dipping sauces. Marinara sauce is a classic choice. A creamy ranch dip also works great. For a fun touch, serve them in a small basket or on a colorful plate. Garnish with fresh parsley or a sprinkle of extra Parmesan cheese to make it look fancy. You can switch up the cheese to change the taste. Try using shredded mozzarella or even feta for a twist. Adding herbs like oregano or spices such as chili powder can make your fries pop with flavor. Experiment with what you love! For the full recipe, check out the Crispy Baked Zucchini Fries section above. Enjoy your cooking! {{image_2}} If you want a gluten-free snack, use gluten-free breadcrumbs. This simple swap keeps the taste while making it safe for those with gluten allergies. Just choose a brand you like. You can find them in most grocery stores. Love some heat? Add cayenne pepper or chili powder to your breadcrumb mix. Start with a small amount, like 1/4 teaspoon. You can adjust it based on how spicy you want your fries. The heat will make them a fun treat! For cheesy flavor, mix in shredded mozzarella or cheddar cheese with your breadcrumbs. About 1/4 cup works well. This addition makes the fries rich and tasty. You can enjoy them as a side or a snack. Explore these variations when making your crispy baked zucchini fries. Check the [Full Recipe] for more details! To keep your crispy baked zucchini fries fresh, store them in an airtight container. This keeps them from getting soggy. Place a paper towel at the bottom of the container to absorb moisture. This method helps maintain their crunch. They can stay fresh in the fridge for about three days. When reheating, the oven is the best choice. Preheat it to 375°F (190°C). Place the fries on a baking sheet and heat them for about 10 minutes. This method helps restore their crispness. The microwave works too, but it makes them soft. If you use the microwave, heat them for a minute or two. Check often to avoid overcooking. You can freeze uncooked zucchini fries. First, coat them as usual but don’t bake them. Lay them flat on a baking sheet and freeze until solid. Then, transfer them to a freezer bag. They can last for up to three months. When ready to bake, cook them straight from the freezer. Just add a few extra minutes to the baking time. This way, you can enjoy a healthy snack anytime! Yes, you can prepare these zucchini fries ahead. First, cut the zucchinis into fry-shaped sticks. Then, coat them in the egg and breadcrumb mixture. Place the coated fries on a baking sheet. Cover the sheet with plastic wrap and store it in the fridge for up to 24 hours. When you’re ready to bake, just spray them with olive oil and pop them in the oven. This makes it easy for busy days! To make vegan zucchini fries, replace the two large eggs. You can use a flax egg or a chia egg. To make a flax egg, mix one tablespoon of ground flaxseed with three tablespoons of water. Let it sit for about five minutes until it thickens. For a chia egg, do the same with chia seeds. Both options work well for binding. This way, you enjoy crispy zucchini fries without eggs! Many sauces go great with zucchini fries. Some popular choices are marinara sauce, ranch dressing, and garlic aioli. You can also try spicy sriracha mayo or a tangy yogurt dip. Each sauce brings its unique flavor. So, feel free to mix and match to find your favorite! For the full recipe, check out the Crispy Baked Zucchini Fries section. These zucchini fries are easy to make with simple ingredients. You learned how to combine fresh zucchini with tasty seasonings. Baking them creates a crispy texture that everyone enjoys. Use the tips to enhance crunchiness and try different flavors. Store leftovers properly or freeze uncooked fries for later. Experiment with sauces for a perfect dip. I hope you enjoy making and sharing these delicious treats!

Crispy Baked Zucchini Fries Healthy Snack Option

Looking for a tasty snack that’s also healthy? Say hello to crispy baked zucchini fries! These tasty little sticks are

- 4 large russet potatoes, cut into fries - 1 cup chickpeas, drained and rinsed - 1 cup vegan cheese shreds (e.g., cheddar-style) - 1 tablespoon nutritional yeast - ½ teaspoon garlic powder - ½ teaspoon smoked paprika - ½ cup vegan ranch dressing - 2 green onions, chopped - Pickles, sliced, for topping To make Vegan Animal Fries, start with fresh russet potatoes. They give the best texture and flavor. I love to cut them into thin fries for that perfect crunch. Next, chickpeas add protein and a nice bite. They soak up flavor well, making them a great choice. For that cheesy taste, choose your favorite vegan cheese shreds. They melt beautifully on the fries. To enhance the flavor, I use nutritional yeast. It has a nutty taste that works well. Garlic powder gives it a savory kick, while smoked paprika adds depth with its warm notes. When serving, don't skip the toppings! Vegan ranch dressing brings creaminess to the dish. Chopped green onions add freshness. Lastly, sliced pickles give a tangy crunch. These ingredients together create a tasty dish that feels indulgent without any animal products. If you want the full recipe, check out the details above. Preheating the Oven First, set your oven to 425°F (220°C). This high heat helps create crispy fries. Tossing in Olive Oil and Seasoning Next, take 4 large russet potatoes. Cut them into fries. In a bowl, mix the fries with 1 tablespoon of olive oil, salt, and pepper. Make sure they are well coated. Baking Duration Spread the fries on a baking sheet. Bake them for 30-35 minutes. Flip them halfway through for even cooking. Tips for Crispiness For crispiness, give the fries space on the sheet. Overcrowding can make them soggy. Seasoning the Chickpeas While the fries bake, take 1 cup of chickpeas. Drain and rinse them. In a bowl, mix the chickpeas with 1 tablespoon of nutritional yeast, 1 tablespoon of soy sauce, ½ teaspoon of garlic powder, smoked paprika, salt, and pepper. Roasting Instructions Spread the seasoned chickpeas on another baking sheet. Roast them in the oven for about 20 minutes. Shake the pan halfway through for even roasting. Layering the Ingredients When the fries and chickpeas are done, take them out. On a serving plate, layer the fries first. Then sprinkle the roasted chickpeas and 1 cup of vegan cheese shreds on top. Melting the Cheese If you like, place the assembled fries back in the oven for 5 minutes. This melts the cheese slightly and brings everything together. Drizzling with Dressing Once done, take the fries out of the oven. Drizzle ½ cup of vegan ranch dressing over the top. Adding Toppings Finish by adding chopped green onions and sliced pickles for extra flavor. Enjoy your flavorful Vegan Animal Fries! For the full recipe, check the complete instructions above. Types of Potatoes for Perfect Fries I love using russet potatoes for fries. They’re starchy and create a great texture. Their skin adds flavor and crunch. Red potatoes work too but have less starch. Yukon Golds offer a nice buttery taste. Choose what you enjoy most! How to Cut Fries Uniformly Cutting fries evenly helps them cook well. Aim for 1/4-inch thick pieces. Use a sharp knife for clean cuts. A mandoline slicer also works if you have one. This ensures your fries will all cook at the same time. Alternative Vegan Cheese Options If you can't find vegan cheese, try cashew cream. Blend soaked cashews with lemon juice and nutritional yeast. It gives a creamy texture. You can also use nutritional yeast alone for a cheesy flavor. Sprinkle it generously over the fries. Other Topping Ideas Feeling adventurous? Add avocado slices or guacamole. They add creaminess and healthy fats. You can toss in roasted bell peppers or jalapeños for a kick. Fresh herbs like cilantro or parsley also brighten the dish. Air Fryer vs. Oven Using an air fryer makes cooking fast and easy. It crisps fries without much oil. Set it to 400°F and cook for about 20 minutes. If you prefer the oven, bake them at 425°F for a crunchy finish. Both methods give tasty results! How to Make it Gluten-Free To make these fries gluten-free, check your soy sauce. Use tamari as a gluten-free option. Most other ingredients are already gluten-free. Just ensure your vegan ranch dressing is also gluten-free. This way, everyone can enjoy these tasty fries! For the full recipe, check out the Vegan Animal Fries recipe above! {{image_2}} To add a kick to your fries, try some hot sauce or fresh jalapeños. Both options bring heat that pairs well with the creamy ranch dressing. If you love cheese, use spicy vegan cheese. It melts beautifully and adds flavor. These small changes turn your dish into a spicy delight. Want to make your fries even better? Add creamy avocado or guacamole on top. The smooth texture balances the crispy fries. You can also toss in other veggies like roasted corn or sautéed bell peppers. They add color and nutrition. Your dish will be a feast for both the eyes and the taste buds. Change your toppings with the seasons! In the fall, try adding roasted pumpkin or caramelized onions. They bring warmth and sweetness. For summer, grilled vegetables like zucchini or eggplant are great choices. They add a smoky flavor that sings of summer. With these variations, every season can inspire a new dish. For the full recipe, check out Vegan Animal Fries . To keep your Vegan Animal Fries fresh, store them in an airtight container. Place a paper towel at the bottom of the container. This helps absorb extra moisture. Let the fries cool before sealing them. Placing warm food in a container can cause sogginess. How long do they last? In the fridge, they stay good for about 3 days. If you want to keep them longer, consider freezing them. Frozen fries can last for up to 2 months. Just remember to store them in a freezer-safe bag or container. When it comes to reheating, I recommend using an oven for the best results. Preheat your oven to 400°F (200°C). Spread the fries on a baking sheet and heat for about 10-15 minutes. This keeps them crispy. If you're in a hurry, you can use a microwave. However, it may make them a bit soggy. To maintain crispiness, place the fries on a microwave-safe plate lined with a paper towel. Heat them in short bursts, checking often. These simple steps will help you enjoy your Vegan Animal Fries even after they've cooled! Yes, you can use frozen fries. They save time and work well in this recipe. Just follow the cooking time on the package. If you want extra crispiness, bake them longer. If you need a substitute for chickpeas, try black beans or lentils. Both options add protein and flavor. You can also use tofu for a different texture. To make oil-free fries, toss the cut potatoes in a bit of water instead of oil. You can also use vegetable broth for added flavor. Just make sure to keep an eye on them while they bake. Yes, vegan ranch dressings are simple to make. Use dairy-free yogurt, lemon juice, garlic powder, and herbs. Blend them together for a creamy dip. To keep fries crispy, serve them right away. Avoid stacking them on top of each other. If you must wait, keep them in a warm oven. This helps maintain that perfect crunch. This blog post covered making delicious vegan animal fries. We started with the key ingredients like russet potatoes and chickpeas, then enhanced the flavor with nutritional yeast and spices. We walked through step-by-step instructions for preparation and baking. You learned tips for perfect fries, variations to try, and how to store leftovers. In closing, you have many options for tasty vegan fries. Enjoy creating your unique versions with friends and family!

Vegan Animal Fries Packed with Flavorful Goodness

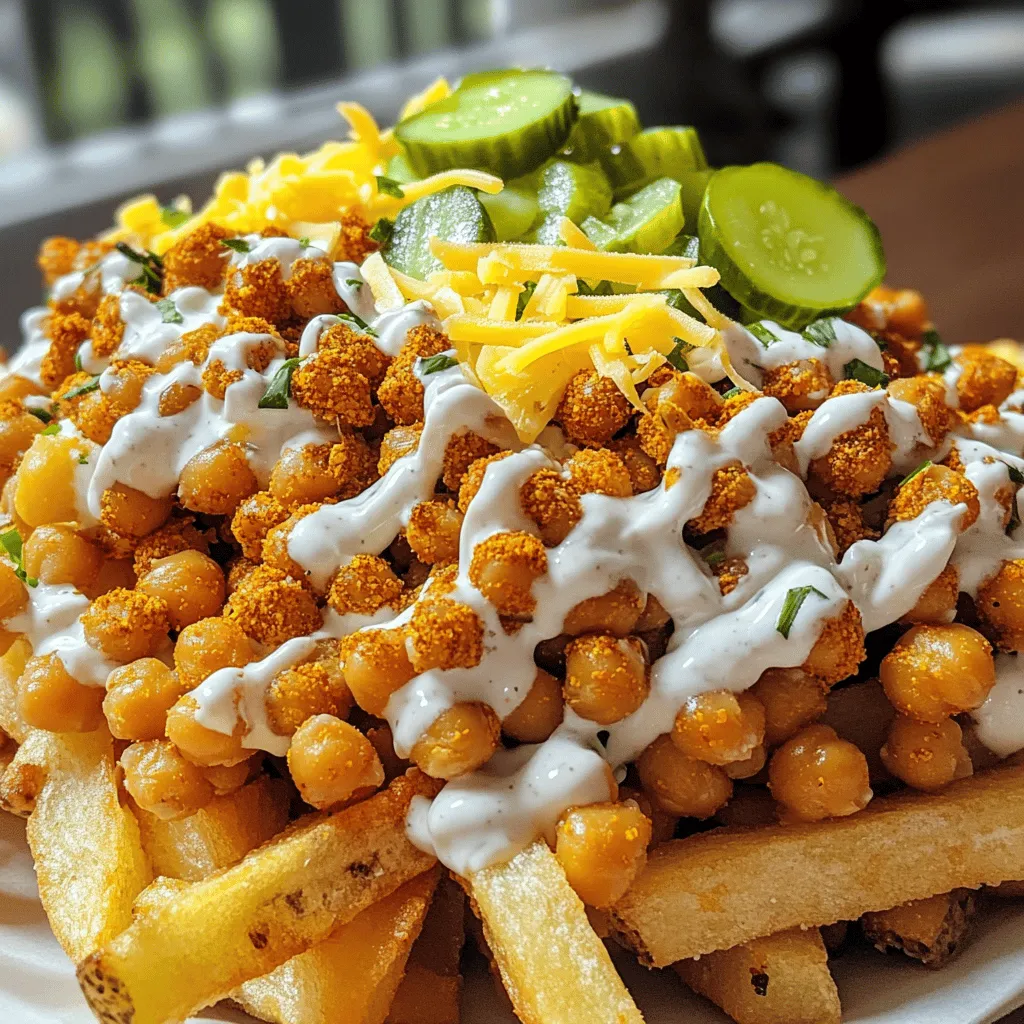
Are you ready to dive into a dish that’s both fun and tasty? Vegan Animal Fries are here to fulfill

Older posts
Newer posts
← Previous Page1 … Page54 Page55 Page56 … Page78 Next →

dsad

© 2025 pureeatsnow • Built with GeneratePress

Our Policies

  • Copyright Policy
  • Cookie Policy
  • GDPR Policy
  • Privacy Policy
  • Disclaimer
  • Terms Of Use

More Information

  • Home
  • About
  • Contact
  • Appetizers
  • Dessert
  • Dinner
  • Drinks
©2025, pureeatsnow About Back To Top