Skip to content
DisclaimerTerms Of UseGDPR PolicyCookie Policy

pureeatsnow

  • Home
  • Drinks
  • Appetizers
  • Dinner
  • Dessert
  • About
  • Contact
  • Privacy Policy
DisclaimerTerms Of UseGDPR PolicyCookie Policy

Rachel

To make Moose Munch Caramel Popcorn, you will need the following: - 12 cups popped popcorn (about 1 cup unpopped kernels) - 1 cup unsalted butter (2 sticks) - 2 cups packed brown sugar - 1/2 cup light corn syrup - 1 teaspoon vanilla extract - 1/2 teaspoon baking soda - 1 1/2 cups mixed nuts (almonds, pecans, cashews) - 1/2 cup chocolate chips (optional) - Sea salt to taste Gather these ingredients before you start. Popped popcorn is the base of this sweet treat. You can pop your own kernels or buy pre-popped popcorn. Unsalted butter gives the caramel a nice rich flavor. Brown sugar and corn syrup work together to create that gooey caramel we love. Vanilla extract adds a warm, sweet touch. Baking soda helps aerate the caramel, making it light and crunchy. Mixed nuts bring a delightful crunch and flavor. If you want, add chocolate chips for a sweet twist. Finally, sprinkle sea salt for that perfect sweet and salty balance. With these ingredients, you're ready to create a snack that everyone will love! Don’t forget to check the Full Recipe to make your Moose Munch Caramel Popcorn. First, you need to set your oven to 250°F (120°C). This low heat will help the caramel popcorn crisp up nicely. Next, prepare a large baking sheet. Line it with parchment paper to keep the popcorn from sticking. Now, let’s pop the popcorn. You can use an air popper or the stovetop method. If you use the stovetop, heat some oil in a pot. Add popcorn kernels and cover. Once you hear the popping slow down, remove it from the heat. After popping, make sure to sift through the popcorn. Remove any unpopped kernels. You want only the fluffy, popped pieces! To make the caramel sauce, take a medium saucepan. Melt one cup of unsalted butter over medium heat. Once the butter melts, add two cups of packed brown sugar and half a cup of light corn syrup. Stir well to combine. Now, let this mixture come to a boil. Do not stir during this time! Let it boil for about 4 to 5 minutes until it turns a beautiful caramel color. This step is key for the right flavor and texture. After boiling, remove the saucepan from the heat. Carefully stir in one teaspoon of vanilla extract and half a teaspoon of baking soda. Watch out because it may bubble up. Next, it’s time to coat the popcorn. Pour the warm caramel sauce over the popped popcorn. Use a spatula to gently toss the popcorn. Make sure every piece gets a nice coat of caramel. Now, add one and a half cups of mixed nuts. Toss them in with the popcorn to mix well. Spread the popcorn mixture evenly on your prepared baking sheet. This helps it bake evenly. Now you are ready to bake! Place the sheet in the preheated oven. Bake for one hour, stirring every 15 minutes. This stirring helps the caramel coat the popcorn evenly and prevents burning. Once done, take it out and let it cool completely. If you like, drizzle melted chocolate chips over it and sprinkle with sea salt before breaking it into clusters. Enjoy your Moose Munch Caramel Popcorn! For the full recipe, check out the detailed instructions above. To make great caramel, timing is key. Boil your sugar mixture for 4 to 5 minutes. Watch closely for a rich, golden color. This means you have the right texture. If the caramel gets too dark, it can taste burnt. To avoid this, use a thermometer. The perfect temperature is around 240°F. When pouring the caramel over the popcorn, be quick. Use a spatula to fold the popcorn gently. This helps ensure each piece gets a nice coat. If you mix too hard, you might break the popcorn. Take your time and be gentle to keep everything whole. You can serve Moose Munch in fun ways. Try using clear bags tied with ribbons for gifts. Or, fill a big bowl for parties. For a special touch, drizzle melted chocolate on top. This adds a sweet twist and looks great. You can also sprinkle sea salt for a nice contrast. Enjoy your tasty treat! {{image_2}} You can make Moose Munch without nuts. This is great for those with allergies. Instead of mixed nuts, try seeds like pumpkin or sunflower. These add crunch and flavor. You can also use other popcorn additives. Think about adding toasted coconut or pretzel pieces. These swaps keep the snack fun and safe. Want to change up the taste? Consider seasonal flavors. Pumpkin spice is a hit in fall. You can mix in chocolate peanut butter for a rich twist. Try combining dark and white chocolate for extra fun. You can even mix in candies like M&Ms or Reese's Pieces. Each choice adds a new layer of flavor. You can lighten up this treat, too. Swap unsalted butter for coconut oil or a plant-based butter. Use a sugar substitute to cut calories. For a gluten-free version, make sure your popcorn is certified gluten-free. You can also skip the nuts and use puffed rice for crunch. These changes keep the joy of Moose Munch while making it a bit healthier. For the full recipe, check out the section above! To keep your Moose Munch caramel popcorn fresh, use airtight containers. Glass jars or plastic bins work well. These containers protect the popcorn from air and moisture. Store it in a cool, dry place. A pantry or cupboard is great. This keeps it crunchy and tasty. Moose Munch caramel popcorn stays fresh for about one week. After that, the flavor may fade. If your popcorn loses its crunch, don't worry! You can re-crisp it easily. Preheat your oven to 250°F (120°C) again. Spread the popcorn on a baking sheet. Heat it in the oven for about 10 minutes. This method helps restore the texture. Be sure to keep an eye on it. You want it warm, not burnt. To avoid moisture, always seal your container tightly. If you notice any soft spots, re-crisping will help. Enjoy your delicious Moose Munch caramel popcorn fresh every time! Moose Munch Caramel Popcorn can last about one week when stored correctly. To keep it fresh, place it in an airtight container. Make sure the container is dry to avoid moisture. If you want to keep it longer, you can freeze it for up to three months. Just remember to let it thaw at room temperature before eating. Yes, you can make Moose Munch Caramel Popcorn ahead of time. It’s a great snack for parties or gifts. Just make sure to store it in an airtight container. This helps keep the popcorn crisp and fresh. If you want to make it even earlier, you can pop the corn and store it separately from the caramel until you are ready to mix them. For gifts, you can use clear cellophane bags or decorative boxes. Fill the bags with the popcorn and tie them with a ribbon. This looks nice and keeps it fresh. You can also use mason jars for a fun touch. If you want to add a personal note, attach a tag with the recipe or a sweet message. Moose Munch makes a great gift for friends and family! You now know how to make Moose Munch Caramel Popcorn from scratch. We discussed the key ingredients and followed simple steps to create that delicious caramel goodness. Remember, the right cooking time is vital for perfect caramel. You can enjoy many variations, from nut-free options to healthier swaps. Store your popcorn well to keep it fresh. You can even package it nicely for gifts or special occasions. Enjoy your tasty treat and share it with friends!

Moose Munch Caramel Popcorn Irresistible Snack Recipe

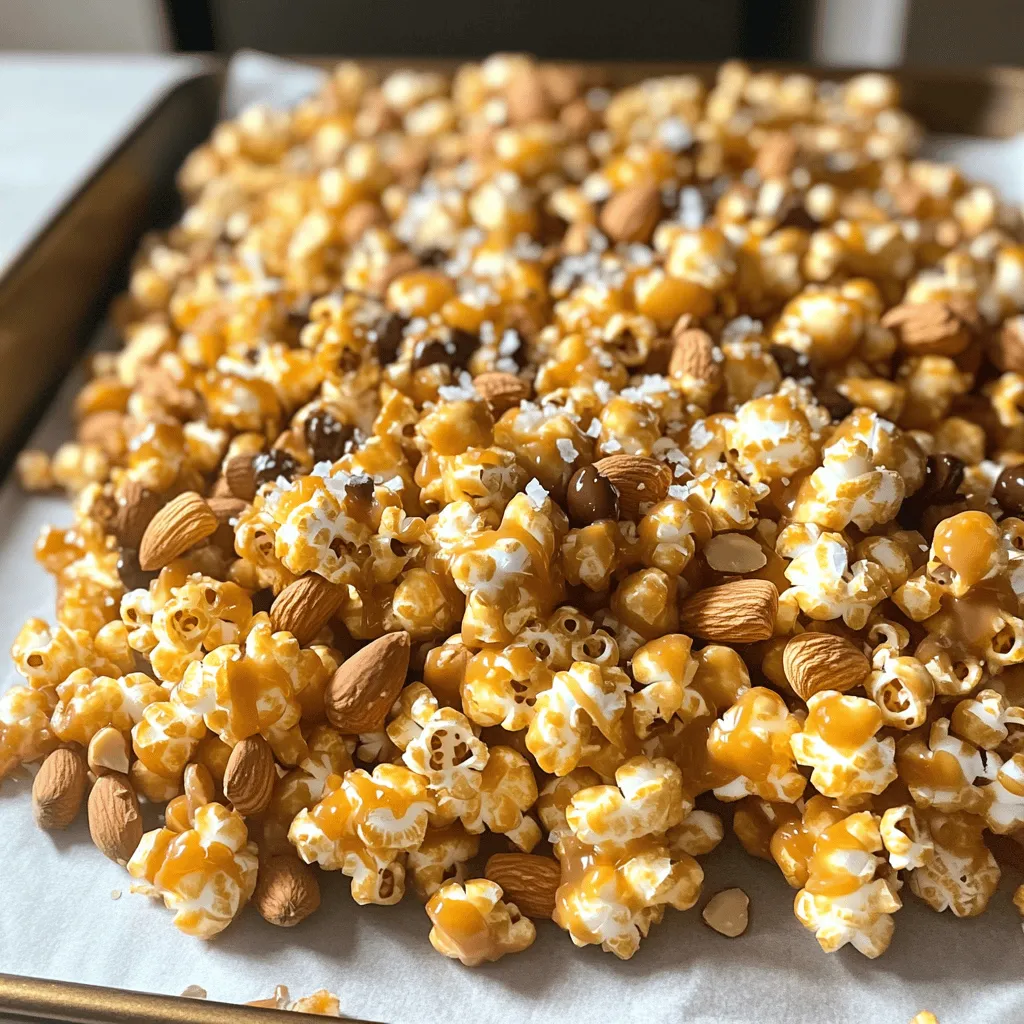
Get ready to treat your taste buds! Today, I’m sharing my easy Moose Munch Caramel Popcorn recipe. This crunchy, sweet

To make Peanut Butter Banana Overnight Oats, you need a few key items. These ingredients give the dish its creamy and tasty flavor. Here’s what you will need: - 1 cup rolled oats - 1 ½ cups almond milk (or any milk of your choice) - 2 tablespoons peanut butter - 1 ripe banana, mashed - 1 tablespoon chia seeds - ½ teaspoon vanilla extract - Pinch of salt These ingredients work together to create a smooth and rich texture. The oats soak up the milk, making them soft and tasty. Sweetness is a personal choice. You can add some optional sweeteners if you like. Here are two good options: - 1 tablespoon honey - 1 tablespoon maple syrup Adding honey or maple syrup gives a lovely sweet touch. Adjust the amount to fit your taste. Toppings can make your oats look and taste even better. Here are some fun ideas to try: - Sliced banana - Crushed peanuts - A sprinkle of cinnamon These toppings add texture and extra flavor. They also make your dish pop with color. You can mix and match these toppings based on what you love. For the full recipe, check out Peanut Butter Banana Bliss Overnight Oats. To start, gather your ingredients. You need rolled oats, almond milk, peanut butter, a ripe banana, chia seeds, vanilla extract, and a pinch of salt. You can also add honey or maple syrup for sweetness. Measure out 1 cup of oats and 1.5 cups of almond milk. In a medium-sized mixing bowl, combine all your ingredients. Add the rolled oats, almond milk, mashed banana, and peanut butter. If you want it sweeter, add honey or maple syrup. Toss in the chia seeds, vanilla extract, and salt. Mix everything well. Ensure the peanut butter spreads evenly. After mixing, divide the mixture into two jars. Seal them tightly. Place the jars in the fridge overnight. This lets the oats soak up the milk. In the morning, stir the oats. If they are too thick, add a splash of milk. Top with sliced banana, crushed peanuts, and a sprinkle of cinnamon. For the full recipe, check the earlier section. To make the best overnight oats, use a good mix of ingredients. Start with rolled oats. They soak up liquid well and soften nicely. Combine the oats with your choice of milk. Almond milk works great, but any milk will do. Mix in peanut butter and mashed banana for flavor. Stir until everything is well blended. This helps the oats soak up all the yummy tastes. When picking oats, always choose rolled oats. They are less processed than instant oats. Instant oats can become mushy, while rolled oats stay chewy. Steel-cut oats are healthy but take longer to soften. If you want quick oats, rolled oats are your best bet. They give you the right texture for overnight oats. To boost flavor, use ripe bananas. They add natural sweetness and creaminess. You can also add a pinch of salt to bring out the taste. Want more crunch? Top your oats with crushed peanuts or chia seeds. A sprinkle of cinnamon adds warmth too. For a sweet touch, drizzle honey or maple syrup on top. For the full recipe, check out the Peanut Butter Banana Bliss Overnight Oats. {{image_2}} If you want a nut-free option, swap peanut butter for sunflower seed butter. This keeps the creamy texture and taste you love. You can also use pumpkin seed butter for a unique twist. Both options are tasty and safe for those with nut allergies. Feel free to mix in other fruits! Berries, like strawberries or blueberries, add a burst of color and flavor. You can also try diced apples or pears for a crunchy bite. For a tropical touch, add shredded coconut or pineapple. A sprinkle of cocoa powder gives a chocolatey twist, too! To make your oats vegan, simply use maple syrup instead of honey. Almond milk is already a great choice for vegan diets. You can also add flaxseed meal for a boost of omega-3s. This keeps your oats delicious while meeting your dietary needs. Check out the Full Recipe for more tips on making your perfect peanut butter banana overnight oats! To keep your peanut butter banana overnight oats fresh, use airtight containers. Mason jars work great. Fill them with your prepared oats and seal them well. This helps prevent any odors from your fridge mixing in. You can store your overnight oats in the fridge for up to five days. This means you can make a batch on Sunday and enjoy it all week. If you see any changes in color or smell, it's best to toss them out. Always trust your senses! You can eat your overnight oats cold right from the fridge. They taste amazing that way! If you prefer them warm, simply heat them in the microwave for about 30 seconds. Stir well after heating. If they are too thick, add a splash of milk to make them creamy again. Yes, you can swap peanut butter for other nut butters. Almond butter, cashew butter, or sunflower seed butter work well. Each nut butter gives a unique taste and texture. Choose one that you enjoy or have on hand. This makes the recipe fun and flexible. Overnight oats stay fresh in the fridge for up to five days. Just make sure to keep them in a sealed jar. This lets you prepare meals ahead of time. It’s a great way to save time on busy mornings. Absolutely! You can make several jars at once. Just multiply the ingredients by the number of servings you want. Store them in individual jars for easy grab-and-go options. This helps you enjoy delicious breakfasts all week. For the full recipe, check out the Peanut Butter Banana Bliss Overnight Oats. Overnight oats are easy and fun to make. We covered the key ingredients, from main oats to tasty toppings. You learned how to mix, store, and even add your favorite flavors. Remember, there are many ways to change the recipe to fit your taste. Follow best practices for perfect results. Keep oats in the fridge for convenience. Enjoy your tasty and healthy breakfast regularly!

Peanut Butter Banana Overnight Oats Easy Delight

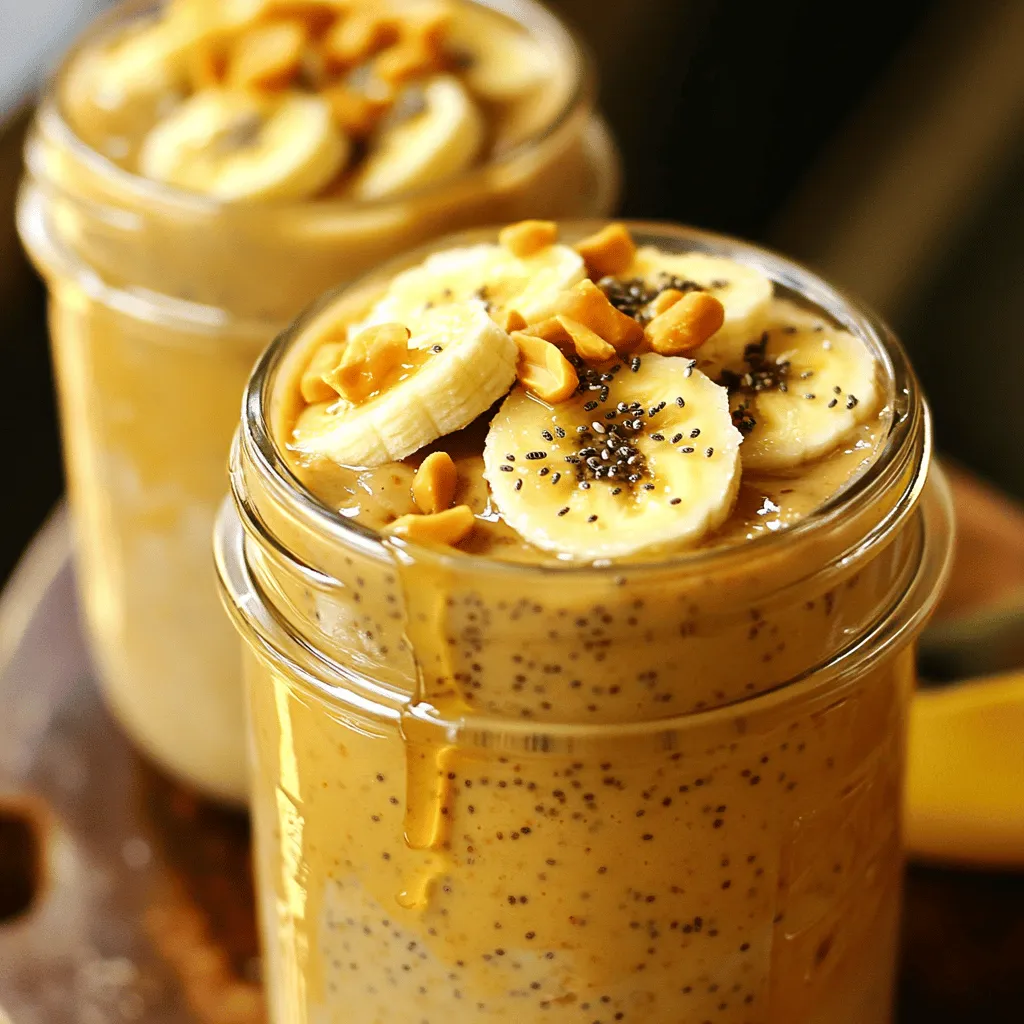
Ready to kickstart your mornings with a simple yet delicious recipe? Peanut Butter Banana Overnight Oats are the answer! This

To make Coconut Cream Pie Bars, gather the following main ingredients: - 1 ½ cups graham cracker crumbs - ½ cup unsweetened shredded coconut - ⅓ cup granulated sugar - ½ cup unsalted butter, melted - 1 cup heavy cream - 1 can (14 oz) sweetened condensed milk - ½ cup coconut milk - 3 large egg yolks - 2 tablespoons cornstarch - 1 teaspoon vanilla extract - 1 cup whipped cream (for topping) - Extra shredded coconut and lime zest for garnish These ingredients create a rich and creamy dessert that everyone loves. Want to boost the flavor? Here are some fun add-ins: - A dash of lime juice for tanginess - A few drops of coconut extract for extra coconut flavor - Chopped nuts like macadamia or pecans for crunch These options give you room to be creative and adjust to your taste. If you need to adjust the recipe, here are some easy swaps: - Use gluten-free graham crackers for a gluten-free option. - Swap heavy cream with coconut cream for a dairy-free treat. - If you can’t find sweetened condensed milk, make your own with coconut milk and sugar. These substitutions let everyone enjoy this tasty dessert without worry. For the full recipe, check out the provided link. To start, preheat your oven to 350°F (175°C). Grab a mixing bowl and add: - 1 ½ cups graham cracker crumbs - ½ cup unsweetened shredded coconut - ⅓ cup granulated sugar - ½ cup unsalted butter, melted Mix these ingredients well. You want them to be combined into a sandy texture. Next, press this mixture firmly into a greased 8x8-inch baking pan. Make sure it forms an even layer. Bake this crust for about 10 minutes. When it’s done, let it cool completely. This crust will give your bars great flavor and a nice crunch. Now, let’s make the coconut filling. In a medium saucepan over medium heat, combine: - 1 cup heavy cream - 1 can (14 oz) sweetened condensed milk - ½ cup coconut milk - 3 large egg yolks - 2 tablespoons cornstarch - 1 teaspoon vanilla extract Whisk these ingredients together well. Keep stirring continuously as it cooks. You want to watch for it to thicken and start to bubble. This should take about 5-7 minutes. When it reaches the right thickness, take it off the heat. Pour the thickened coconut filling over your cooled crust. Spread it evenly with a spatula. Now, it’s time to chill! Cover the pan and place it in the fridge for at least 4 hours, or until it sets. This step is key to getting that perfect texture. After chilling, your bars will be ready to cut into squares. Top each piece with whipped cream and a sprinkle of extra shredded coconut for a beautiful finish. Enjoy your delicious Coconut Cream Pie Bars! For the full recipe, see above. To make a great crust, use fresh graham cracker crumbs. You can crush them in a bag or use a food processor. Mix the crumbs with unsweetened shredded coconut and sugar. This adds flavor and texture. Make sure to press the mixture down firmly in the pan. A well-packed crust holds together better. Bake it for ten minutes, but don’t let it get too brown. A light golden color is perfect. For a creamy filling, you will need to whisk the mixture well while cooking. Combine heavy cream, sweetened condensed milk, coconut milk, egg yolks, and cornstarch in a saucepan. Heat it over medium heat. Stir constantly until it thickens. This helps prevent lumps. Remove it from heat as soon as it starts to simmer. Let it cool slightly before pouring it on the crust. This will keep the layers separate and distinct. One common mistake is not cooling the crust before adding the filling. This can cause the filling to melt into the crust. Another mistake is not chilling the bars long enough. They need at least four hours in the fridge to set properly. Avoid overcooking the filling; it should be thick, not dry. Lastly, don’t forget to taste your filling before pouring it. Adjust sweetness if necessary. For the full recipe, check out the detailed instructions. {{image_2}} You can change the flavor of these bars for fun. Adding chocolate is a great choice. Just mix in half a cup of cocoa powder into your filling. This gives a rich chocolate flavor. You can also add lime for a zesty twist. Just use lime juice and zest instead of some of the coconut milk. This brings a bright and fresh taste to your bars. The crust can change to fit your taste. If you love chocolate, try using Oreo crumbs. Just replace the graham cracker crumbs with crushed Oreos. If you want a nutty flavor, use almond flour mixed with melted butter. This will give a crunchy and rich crust. You can also use gluten-free options if needed. These bars are great with drinks. A cold glass of lemonade pairs well with the sweet filling. You can also serve them with coffee for a nice contrast. Top your bars with whipped cream for extra creaminess. Adding fresh fruit like berries can bring color and flavor. A sprinkle of toasted coconut on top adds texture and taste too. For the full recipe, check out the complete guide to making these delicious Coconut Cream Pie Bars! To keep your Coconut Cream Pie Bars fresh, store them in the fridge. Use an airtight container to prevent them from drying out. They will stay good for up to five days. If you have leftovers, make sure to separate layers with parchment paper. This keeps the bars from sticking together. You can freeze these bars for later. First, cut them into squares. Wrap each piece in plastic wrap, then place them in a freezer-safe bag. This helps avoid freezer burn. They can last up to three months in the freezer. To enjoy them later, let them thaw in the fridge overnight. Reheating is not usually needed for these bars. They taste best cold. If you prefer them warm, place them in the oven at a low temperature for a few minutes. Watch closely to avoid melting the filling. Enjoy your Coconut Cream Pie Bars at your desired temperature! Coconut Cream Pie Bars stay fresh for about 4 to 5 days in the fridge. Keep them in an airtight container. This helps keep the bars moist and tasty. After that, the filling may start to lose its creamy texture. So, eat them while they're fresh! Yes, you can make Coconut Cream Pie Bars a day or two ahead of time. This dessert actually tastes better after chilling. Just be sure to let them set in the fridge for at least 4 hours. This will help the filling firm up nicely. You can serve them cold, which adds to the refreshing taste! If you need a substitute for sweetened condensed milk, try using coconut cream mixed with sugar. A ratio of 1 cup of coconut cream to 1/3 cup of sugar works well. You can also use homemade versions or other milk alternatives. Just keep in mind, these options may change the texture a bit. For the best results, you can follow the Full Recipe to see how it all comes together. Coconut Cream Pie Bars are easy to make and delicious. We covered the main ingredients, optional add-ins, and dietary swaps. You learned how to prep the crust and create a creamy filling. Tips helped you avoid common mistakes. Exploring flavor variations keeps it exciting, while storage tips ensure leftovers last. Remember, these bars are simple and fun to customize. You can enjoy them any way you like!

Coconut Cream Pie Bars Delicious and Easy Recipe

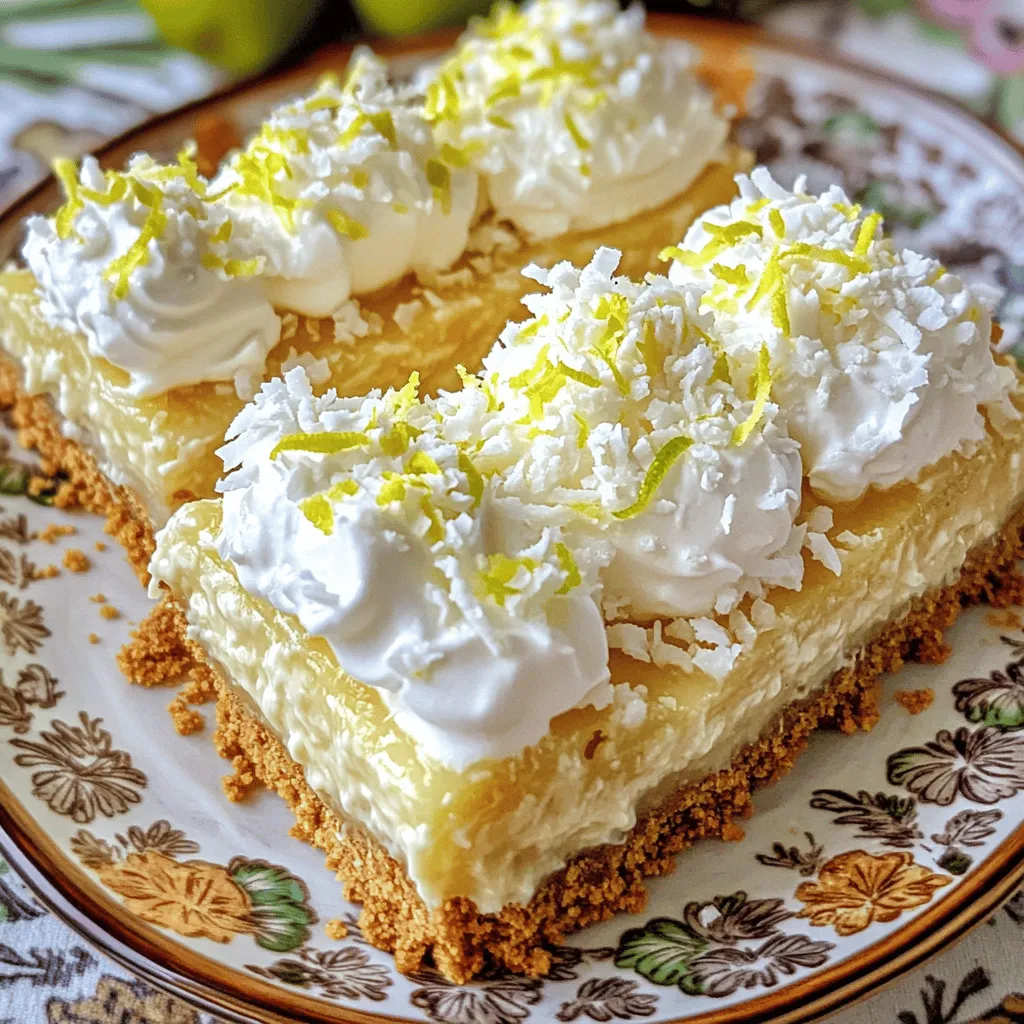
If you love coconut, you’re in for a treat! My Coconut Cream Pie Bars are easy to make and full

To make Chocolate Chip Cookie Dough Dip, you need these simple ingredients: - 1 cup all-purpose flour - ½ cup brown sugar, packed - ½ cup granulated sugar - 1 cup cream cheese, softened - ½ cup butter, softened - 1 teaspoon vanilla extract - ½ cup mini chocolate chips - ¼ teaspoon salt - Assorted dippers (e.g., graham crackers, apple slices, pretzels) Each ingredient plays a key role. The flour gives the dip its cookie dough base. The cream cheese and butter create a creamy texture. The sugars add sweetness and depth. Vanilla extract brings a warm flavor that ties it all together. Mini chocolate chips offer bursts of chocolate goodness in every bite. I love using assorted dippers to make this dessert fun. You can use graham crackers for crunch or apple slices for a refreshing bite. Pretzels add a nice salty touch that balances the sweetness. This dip is easy to make and perfect for sharing. You can find the full recipe further in the article. - Step 1: Combine Cream Cheese and Butter Start by taking your soft cream cheese and butter. Place them in a medium bowl. Beat them together with an electric mixer. Mix until the texture is creamy and smooth. - Step 2: Add Sugars and Mix Next, add both types of sugar: brown and granulated. Mix them in slowly. Keep blending until the mixture is fluffy and well combined. - Step 3: Incorporate All-Purpose Flour Now, sift the all-purpose flour into your bowl. Mix it in on low speed. This helps to keep the dip smooth and avoids any lumps. - Step 4: Mix in Vanilla and Salt Add in the vanilla extract and salt. Stir until everything is mixed well. This adds great flavor to your dip. - Step 5: Fold in Chocolate Chips Take your mini chocolate chips and fold them into the dip. Use a spatula or wooden spoon for this. Make sure the chips are evenly spread throughout. - Step 6: Transfer and Chill Finally, transfer your dip into a serving bowl. Smooth out the top with a spoon. Cover it with plastic wrap and chill for at least 30 minutes. This helps the flavors blend and makes it firmer. Make sure to check out the Full Recipe if you need more details. Best Dippers to Use I love using assorted dippers to enhance the experience. Here are my favorites: - Graham crackers - Apple slices - Pretzels - Vanilla wafers - Fresh strawberries Each dipper offers a different taste and texture, making each bite exciting. Presentation Tips for Serving Make your dip look great! Use a decorative bowl for serving. Surround the bowl with colorful dippers. This creates an inviting spread. For a special touch, sprinkle a few extra chocolate chips on top. It adds charm and visual appeal. How to Make it Extra Creamy For a super creamy dip, make sure your cream cheese and butter are very soft. You can microwave them for a few seconds if needed. Mix them well. This step helps to create that smooth texture everyone loves. What to Avoid When Mixing Do not rush the mixing process. If you mix on high speed too soon, you might create air bubbles. This can lead to a dip that is not as smooth. Start mixing slowly and then gradually increase speed. How to Prevent Lumps To avoid lumps, sift the flour before adding it. This helps break up any clumps. Also, mix on low speed when adding flour. This keeps the dip nice and smooth. If lumps do form, just keep mixing until they disappear. {{image_2}} Gluten-Free Options You can make this dip gluten-free. Simply swap all-purpose flour for gluten-free flour. Many brands work well. Just make sure to follow the same measurement. This keeps the flavor without the gluten. Vegan Chocolate Chip Cookie Dough Dip For a vegan version, replace cream cheese and butter with plant-based options. Use vegan cream cheese and coconut oil. You can also use maple syrup instead of granulated sugar. This makes the dip both tasty and vegan-friendly. Adding Peanut Butter Peanut butter adds a rich taste. Stir in half a cup of your favorite peanut butter when mixing the dip. It gives a nice twist and a nutty flavor. You can even use crunchy peanut butter for some texture. Experimenting with Different Mix-Ins Feel free to get creative with mix-ins. Try adding chopped nuts like walnuts or pecans for crunch. Shredded coconut can also add a fun tropical twist. These additions make each bite exciting and unique. For the full recipe, check out the Chocolate Chip Cookie Dough Dip details above! - Refrigeration Tips: Keep any leftover dip in an airtight container. This helps to maintain its creamy texture. Store in the fridge for up to five days. Remember to take it out about 15 minutes before serving to soften it slightly. - Freezing Instructions: If you want to save some for later, you can freeze the dip. Place it in a freezer-safe container. Make sure to leave some space for expansion. It can stay good for up to three months. When ready to enjoy, thaw it in the fridge overnight. - How Long It Lasts in the Fridge: The dip stays fresh for about five days when refrigerated properly. After this time, the texture may change, and the taste might not be as good. - Signs of Spoilage: Look for any off smells or changes in color. If you see any mold, it’s best to toss it. Also, if the dip has separated or feels watery, it’s time to say goodbye. Can I eat raw flour in this recipe? No, raw flour can carry bacteria like E. coli. It's safer to heat-treat the flour. To do this, spread the flour on a baking sheet and bake it at 350°F for about 5 minutes. This step makes it safe to eat. What can I use as a substitute for cream cheese? You can use Greek yogurt or mascarpone cheese. Both options give a creamy texture. They also add a nice flavor. If you want a dairy-free option, try coconut cream. It has a rich taste and works well in this dip. How do I make the dip less sweet? To reduce the sweetness, cut back on sugar. You can use only ¼ cup of brown sugar. Adding a pinch of salt can help balance the sweetness too. Another idea is to mix in unsweetened cocoa powder for a chocolatey twist. Can I prepare this dip in advance? Yes, you can make this dip ahead of time. Just store it in the fridge for up to three days. Cover it with plastic wrap to keep it fresh. Chilling helps the flavors blend well and makes it even tastier. What do others think about this recipe? Many people love this dip! They rave about its creamy texture and sweet chocolate flavor. It is a hit at parties and gatherings. Reviewers say it’s a fun treat for kids and adults alike. Popular adjustments people have made Some users add nuts for crunch. Others use mini marshmallows for extra sweetness. A few creative cooks mix in peanut butter for a nutty flavor. These tweaks make the dip unique while keeping it delicious. For the full recipe, check out our detailed instructions above! This blog post shared a fun chocolate chip cookie dough dip recipe. You learned easy steps to mix simple ingredients. I offered tips for presentation and serving, ensuring you impress your guests. We discussed variations, so you can make it healthier or explore new flavors. Feel free to store leftovers for later enjoyment. Dive into the world of dips and personalize your experience. This recipe is a tasty treat that anyone can enjoy.

Chocolate Chip Cookie Dough Dip Irresistible Dessert Delight

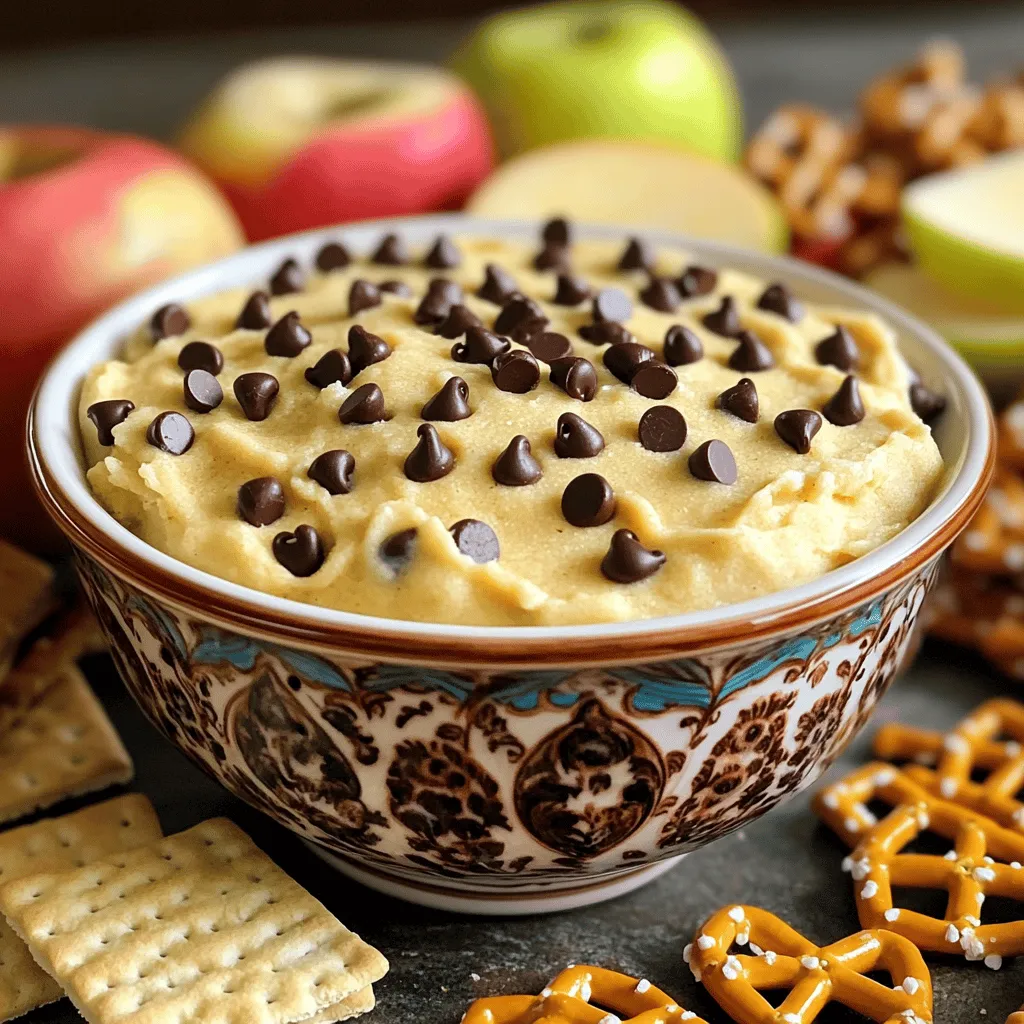
Craving something sweet and fun? You’ve got to try this Chocolate Chip Cookie Dough Dip! It’s rich, creamy, and perfect

To make these lemon blueberry muffins, you need a few key ingredients. Here’s the complete list of ingredients: - 1 ½ cups all-purpose flour - ½ cup granulated sugar - 2 teaspoons baking powder - ½ teaspoon baking soda - ½ teaspoon salt - 1 large egg - ½ cup buttermilk (or milk + 1 tablespoon vinegar) - ⅓ cup vegetable oil - 1 tablespoon freshly grated lemon zest - 1 tablespoon lemon juice - 1 cup fresh blueberries (or frozen, no need to thaw) - Optional: 2 tablespoons powdered sugar for dusting Each ingredient plays a big role in making these muffins tasty. The flour gives structure, while sugar adds sweetness. Baking powder and baking soda help the muffins rise. Salt brings out the flavors. The egg binds everything together. Buttermilk makes the muffins moist, while the vegetable oil adds richness. Lemon zest and juice give a bright flavor that pairs perfectly with blueberries. You can use fresh or frozen blueberries. If you choose frozen, there’s no need to thaw them. If you want to add a little sweetness on top, you can dust with powdered sugar. For the full recipe, check out the instructions to see how these ingredients come together in your kitchen. Set your oven to 375°F (190°C). Line a 12-cup muffin tin with paper liners or spray it with non-stick cooking spray. This step keeps your muffins from sticking and makes cleanup easier. In a large bowl, combine 1 ½ cups of all-purpose flour, ½ cup of granulated sugar, 2 teaspoons of baking powder, ½ teaspoon of baking soda, and ½ teaspoon of salt. Whisk them together well. This mix gives your muffins structure and sweetness. In a separate bowl, beat 1 large egg. Then mix in ½ cup of buttermilk, ⅓ cup of vegetable oil, 1 tablespoon of freshly grated lemon zest, and 1 tablespoon of lemon juice. This mixture adds moisture and bright flavor to your muffins. Pour the wet ingredients into the dry ones. Gently fold them together until just combined. It’s okay if there are a few lumps. Over-mixing will make your muffins tough, so be gentle. Gently fold in 1 cup of fresh blueberries. Make sure to do this carefully so the berries don’t break. You want those bursts of flavor in every bite! Using a spoon or ice cream scoop, fill each muffin cup about ¾ full with the batter. Bake in your preheated oven for 18-20 minutes. Check for doneness by inserting a toothpick into the center. If it comes out clean, your muffins are ready. Let them cool in the tin for 5 minutes before moving them to a wire rack. For an extra touch, dust with powdered sugar before serving. Enjoy your delicious Lemon Burst Blueberry Bliss Muffins! For the complete recipe, check out the Full Recipe. To get fluffy muffins, avoid over-mixing the batter. When you combine the wet and dry ingredients, mix gently. It is fine to have lumps! Over-mixing makes the muffins dense. Aim for a light hand when folding in the blueberries as well. This keeps them whole and juicy. You can enhance the lemon flavor by adding more lemon zest or juice. For a stronger blueberry taste, use more berries. Fresh blueberries work best, but frozen ones are fine too. Just remember, if you use frozen, do not thaw them. This keeps the muffins from becoming soggy. Baking at the right temperature is key for even muffins. Preheat your oven to 375°F (190°C). Make sure to use an oven thermometer for accuracy. Place the muffin tin in the center of the oven. This helps the heat circulate evenly for perfect baking. Check the muffins around 18 minutes. If a toothpick comes out clean, they are ready! For the complete recipe, refer to the [Full Recipe]. {{image_2}} You can make your lemon blueberry muffins even more exciting. Here are some fun add-ins: - Other Fruits: Try raspberries, strawberries, or blackberries. Each fruit brings a new flavor. - Nuts: Walnuts or pecans add a nice crunch. Chop them up and fold them in gently. - Spices: A pinch of cinnamon or nutmeg can enhance the flavor. Just don’t add too much! If you need a gluten-free version, swap the all-purpose flour. Use a gluten-free flour blend instead. Look for one that has xanthan gum. This helps mimic the texture of regular flour. You can enjoy these muffins without worry! To make these muffins vegan, you can replace a few ingredients. Use flax eggs instead of a regular egg. Mix one tablespoon of ground flaxseed with three tablespoons of water. Let it sit for five minutes to thicken. For the buttermilk, combine plant-based milk with a splash of vinegar. This will create a dairy-free version that tastes just as good. These variations make the recipe flexible and fun. You can try different combinations each time you bake! For the full recipe, check out the complete guide. To keep your muffins fresh, store them in an airtight container. This helps prevent them from drying out. Place a paper towel at the bottom of the container. This towel absorbs moisture, keeping the muffins soft. You can store them at room temperature for up to two days. If you want to keep them longer, you can refrigerate them for up to a week. Freezing muffins is easy and keeps them fresh for later. Let the muffins cool completely before freezing. Wrap each muffin in plastic wrap. Then, place them in a freezer bag. Make sure to label the bag with the date. You can freeze them for up to three months. When you're ready to enjoy them, just thaw them in the fridge overnight or at room temperature for a few hours. Reheating muffins is simple. You can use the microwave or the oven. For the microwave, place a muffin on a plate. Heat it for 15 to 20 seconds. Check if it's warm. If not, heat for a few more seconds. For the oven, preheat it to 350°F (175°C). Place the muffins on a baking sheet. Heat for about 5 to 10 minutes. This will give the muffins a nice, warm texture. Enjoy your Lemon Burst Blueberry Bliss Muffins! For the Full Recipe, check earlier sections. Yes, you can use frozen blueberries in your muffins. There’s no need to thaw them first. Just add them straight to the batter. Keep in mind that frozen blueberries may tint your batter a bit blue, but they will still taste great. You might want to reduce the baking time slightly, as frozen berries can cool the batter. Muffins stay fresh for about 2 to 3 days at room temperature. Store them in an airtight container to keep them moist. For longer storage, you can refrigerate them for up to a week. If you want to save them for later, muffins freeze well for up to 3 months. Wrap them tightly in plastic wrap and place them in a freezer bag. If you don't have buttermilk, you can easily make a substitute. Here are some options: - Use regular milk with 1 tablespoon of vinegar or lemon juice. - Use plain yogurt thinned with a bit of water. - Use sour cream mixed with water. These substitutes will give you a similar tangy flavor and moisture in your muffins. For the full recipe, check out the Lemon Burst Blueberry Bliss Muffins 🫐. You now have a simple guide to make delicious lemon blueberry muffins. We covered all the key ingredients, steps, and helpful tips. Remember to avoid over-mixing to keep them fluffy. You can also explore fun variations to suit your taste. Whether you store them for later or share with friends, these muffins are sure to please. Follow these steps, and enjoy the burst of flavor with every bite! Happy baking!

Lemon Blueberry Muffins Delightful and Easy Recipe

Are you ready to bake something delightful? These Lemon Blueberry Muffins are easy to make and bursting with flavor. I’ll

- 250g fettuccine or your pasta of choice - 2 tablespoons olive oil - 2 chicken breasts, cut into bite-sized pieces - 4 cloves garlic, minced - 1 cup heavy cream - 1 cup chicken broth - 1/2 cup grated Parmesan cheese - 1 teaspoon Italian seasoning - Salt and pepper to taste - Fresh parsley, chopped (for garnish) You need these ingredients for a tasty Creamy Garlic Chicken Pasta. Each one brings its own flavor. The fettuccine is perfect for holding the creamy sauce. You can use any pasta you like. I often switch it up with penne or spaghetti. Olive oil adds a nice richness. It helps cook the chicken well. The chicken breasts provide protein and flavor. Garlic is key for that bold taste. Don’t skip it! Heavy cream gives the dish its creamy texture. Chicken broth adds depth and makes the sauce more flavorful. Parmesan cheese makes it rich and savory. Italian seasoning brings extra flavor. Salt and pepper enhance everything. Garnish with parsley for a fresh touch. It looks pretty and adds a bit of brightness. - Different types of pasta - Alternative proteins (shrimp, tofu) - Additional spices and herbs Feel free to get creative! You can try different pasta shapes or sizes. If you prefer shrimp or tofu, those work well too. Add your favorite spices or herbs to change the flavor. For example, a pinch of red pepper flakes can add heat. This recipe is flexible, so make it your own! Start by boiling a large pot of salted water. It should bubble and roll. Add 250g of fettuccine or your pasta of choice. Cook it for about 8-10 minutes. Check the package for exact timing. You want the pasta to be al dente, which means it should be firm but not hard. This gives the best texture. To test, bite a piece. If it has a slight resistance, it's ready. Save a cup of pasta water before draining. This water helps adjust the sauce later. Use a large skillet for this step. Heat 2 tablespoons of olive oil over medium heat. Once hot, add the chicken pieces. Make sure they are cut into bite-sized pieces for even cooking. Season with salt and pepper for great flavor. Cook for about 5-7 minutes, until they turn golden brown and are no longer pink inside. This browning adds depth to the dish. Remove the chicken and set it aside. It's important not to crowd the pan. Crowding leads to steaming, not browning. In the same skillet, add 4 minced garlic cloves. Sauté them for about 1 minute. Watch closely; you don’t want them to burn. Burnt garlic can taste bitter. Pour in 1 cup of chicken broth. Use a wooden spoon to scrape the bottom of the pan. This step is called deglazing. It lifts the tasty bits stuck to the pan. Let the broth simmer for a few minutes to reduce slightly. Lower the heat and stir in 1 cup of heavy cream, 1 teaspoon of Italian seasoning, and 1/2 cup of grated Parmesan cheese. Stir until smooth, allowing it to thicken. If the sauce is too thick, add a bit of the reserved pasta water. This helps adjust the sauce to your liking. Return the chicken to the skillet, mixing gently. Now add the cooked pasta. Toss everything together carefully so the pasta doesn’t break. If needed, season with more salt and pepper to taste. To get the right thickness, start with heavy cream. This adds a rich, smooth texture. If your sauce is too thick, add reserved pasta water. This will help you reach the perfect creaminess. For flavor, use Italian seasoning, salt, and pepper. You can also add a squeeze of lemon for brightness. Serve your creamy garlic chicken pasta with a fresh salad. A simple green salad pairs well. You can also offer garlic bread on the side. For a beautiful serving, use a large bowl. Top each serving with chopped parsley and extra Parmesan. This adds color and makes the dish appealing. Use a large skillet for sautéing. A non-stick skillet works best for the sauce. This prevents the chicken from sticking. A wooden spoon is great for mixing. You may also want to have measuring cups and spoons ready. These tools help you get the right amounts for your dish. {{image_2}} For a gluten-free dish, choose gluten-free pasta. Brands like brown rice or quinoa pasta work well. You can also use spiralized veggies as a low-carb choice. Zucchini noodles or spaghetti squash are great options. When cooking, just adjust the cooking time as these alternatives may cook faster. To modify the recipe, use a gluten-free flour blend in the sauce. This will help thicken it without gluten. You can also add nutritional yeast for a cheesy flavor without dairy. Adding vegetables can boost flavor and nutrition. Spinach wilts down nicely and adds color. Mushrooms provide a rich, earthy taste. Simply sauté them with the garlic for extra depth. You can also experiment with different cheeses. Try adding goat cheese for tanginess or mozzarella for a creamy stretch. Mixing in a bit of blue cheese creates a bold flavor that elevates the dish. For a dairy-free version, use coconut cream instead of heavy cream. It gives a rich texture while keeping it plant-based. Almond milk or oat milk can also work, but they may not be as thick. If you want to swap the chicken, consider shrimp or tofu. Both options absorb the sauce's flavor well. Shrimp cooks quickly, while tofu can add a hearty texture if pressed and cubed. For the full recipe, check out the complete guide to Creamy Garlic Chicken Pasta. To keep your creamy garlic chicken pasta fresh, follow these tips: - Refrigeration: Store leftovers in an airtight container. It stays good in the fridge for up to 3 days. - Freezing: If you want to freeze, place pasta in a freezer-safe container. It can last up to 3 months. Reheating can change the texture. Here’s how to avoid that: - Avoiding Dryness: Add a splash of chicken broth or cream when reheating. This keeps it moist. - Recommended Methods: Use the stovetop or microwave. For the stovetop, heat on low and stir frequently. For the microwave, cover with a damp paper towel. Knowing how long your dish lasts is key: - Safe Consumption Timeframe: Eat refrigerated pasta within 3 days for the best taste. - Signs of Spoilage: Check for off smells, discoloration, or a slimy texture. If you see these signs, throw it out. For the full recipe, check out the Creamy Garlic Chicken Pasta section! If you want a lighter dish, you have options. You can use half-and-half for a creamy texture. Another choice is whole milk with a bit of butter. For a dairy-free option, use coconut cream or almond milk. Each option will change the taste a bit, but they work well in this recipe. Yes, you can prepare this dish ahead. Cook the pasta and chicken, then store them separately. Make the sauce and cool it before storing. Keep everything in the fridge for up to two days. When you're ready, just heat and combine. This saves time on busy nights. Yes, it is great for meal prep. Store the pasta and sauce in airtight containers. Refrigerate for up to four days. For best results, reheat in a pan over low heat. Add a splash of chicken broth to keep it creamy. This way, you enjoy fresh, delicious meals all week. This blog post covered the main ingredients for Creamy Garlic Chicken Pasta, plus cooking steps and tips. You learned how to sauté chicken and make a creamy sauce without burning garlic. Customization ideas let you switch flavors or adapt for diets. Remember to store leftovers properly and reheat carefully. This dish is versatile and can impress at any meal. Enjoy making it your own and share it with others!

Creamy Garlic Chicken Pasta Quick and Savory Dish

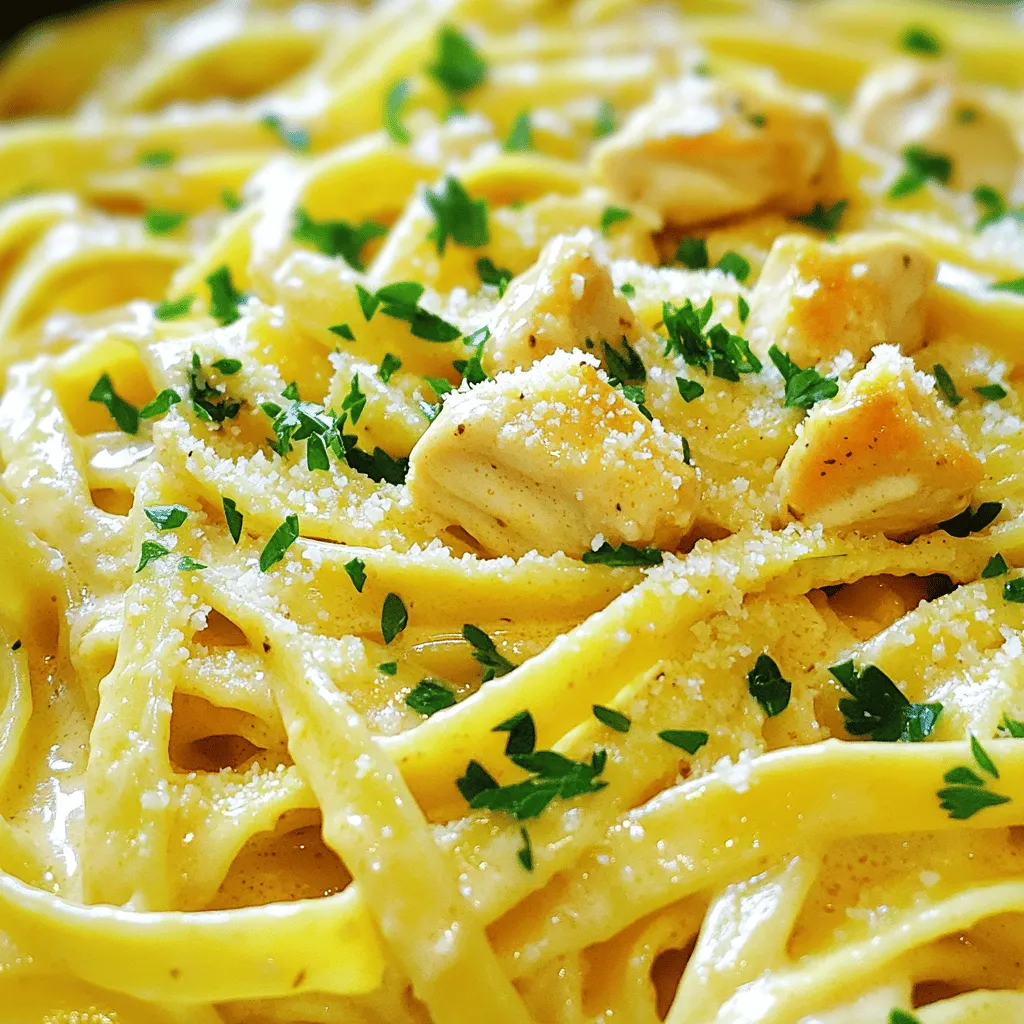
Are you ready for a dinner that’s both quick and satisfying? Creamy Garlic Chicken Pasta combines tender chicken, rich sauce,

To make a delightful seafood pasta salad, gather these fresh ingredients: - Seafood options: - 1 cup cooked shrimp, peeled and deveined - 1 cup cooked calamari rings - Pasta type and quantity: - 8 oz fusilli pasta (or any pasta of choice) - Fresh vegetables and herbs: - 1 cup cherry tomatoes, halved - 1/2 cup black olives, sliced - 1/4 cup red onion, finely chopped - 1/4 cup fresh parsley, chopped - Dressing components: - 1/4 cup mayonnaise - 2 tablespoons lemon juice - 1 tablespoon olive oil - 1 teaspoon Dijon mustard - Salt and pepper to taste These ingredients come together to create a refreshing and light dish. You can easily customize the seafood to your liking. Try adding crab or even scallops for a different twist. Fresh herbs like basil or cilantro can also elevate the flavors. This seafood pasta salad is perfect for warm days or gatherings. Check out the Full Recipe for more detailed steps to assemble this dish! Start by boiling water in a large pot. Add a good amount of salt. This helps the pasta taste better. Next, add your fusilli pasta. Cook it according to the package instructions. Aim for al dente, which means it should be firm but not hard. To check, taste a piece before draining. After cooking, drain the pasta and rinse it under cold water. This cools it down and stops the cooking process. If your shrimp and calamari are not cooked yet, sauté them in a skillet. Heat a splash of olive oil over medium heat. Cook the shrimp for 3-5 minutes until they turn pink. For calamari, cook until it is opaque and tender. Be careful not to overcook, as it can become rubbery. Once done, set the seafood aside to cool. In a small bowl, mix mayonnaise, lemon juice, olive oil, and Dijon mustard. Use a whisk to blend everything until smooth. This dressing adds creaminess and a zesty flavor to your salad. For extra flavor, taste and add salt and pepper as needed. In a large mixing bowl, combine the cooked pasta, shrimp, calamari, cherry tomatoes, black olives, red onion, and parsley. Pour the dressing over the top. Gently toss everything together. Make sure each piece is coated well with the dressing. Finally, cover the salad and chill it in the refrigerator for at least 30 minutes. Chilling helps the flavors mix and makes it taste better. For the Full Recipe, check out the instructions above. Enjoy the process of creating this seafood pasta salad! To make your seafood pasta salad shine, focus on the right balance. Aim for equal parts seafood and pasta. This keeps each bite flavorful. If you want extra crunch, add chopped bell peppers or celery. Both add a refreshing bite that complements the seafood well. You can play with the dressing to fit your taste. For a healthier option, swap mayonnaise for Greek yogurt. It adds creaminess with less fat. Consider flavor profiles too. You can spice things up with chili flakes or fresh herbs like basil or dill for a garden-fresh taste. This adds depth and makes the salad more interesting. For more details, check the Full Recipe to see how these tips come together in the dish. {{image_2}} You can use many seafood options for your salad. Shrimp and calamari are popular, but don't stop there. Try using tuna or crab for a different taste. Both add a nice flavor and texture. If you want a vegetarian option, consider chickpeas or tofu. They provide protein and absorb flavors well. Sometimes you may want to switch up your pasta. Gluten-free pasta options are great for those with allergies. You can find rice, corn, or quinoa pasta in stores. These choices work well in this salad. Another option is whole grain pasta. It adds fiber and a nutty taste. Lastly, try vegetable-based pasta made from zucchini or spinach for a fresh twist. These alternatives can make your salad unique and healthy. To keep your seafood pasta salad fresh, store it properly. First, place the salad in an airtight container. This keeps moisture out and helps maintain flavor. Always refrigerate the salad right after serving. The cool temperature slows down spoilage. The shelf life of your pasta salad is about three days in the fridge. After that, the seafood may not taste good. If you see any signs of spoilage, like an off smell or discoloration, throw it away. Should you reheat seafood pasta salad? Most people enjoy it cold. However, if you prefer it warm, you can do so. Just be careful not to overheat it. To refresh the salad after storage, add a splash of lemon juice and a drizzle of olive oil. This brightens the flavors. Toss gently to mix. You can also add fresh herbs for a pop of taste. For the full recipe, refer to the earlier section. Yes, you can use frozen seafood. Just make sure to thaw it properly. The best way to thaw seafood is to place it in the fridge overnight. If you're short on time, you can also run it under cold water for about 30 minutes. After thawing, pat it dry with a paper towel. This helps to remove excess moisture. To add some heat, consider using red pepper flakes. You can mix them into the dressing or sprinkle them on top. Another great option is to add diced jalapeños or a splash of hot sauce. If you like a smoky flavor, try adding chipotle powder to the dressing. These options can give your salad a fun kick! Serve the salad in a large bowl for sharing. You can garnish it with extra parsley and lemon wedges for a fresh look. A colorful platter always catches the eye! If you want to impress, serve it in individual bowls with a sprig of parsley on top. This makes it easy for guests to enjoy their own portion. To keep pasta from sticking, add salt to the boiling water. This helps the pasta cook evenly. Cook the pasta until it is al dente. After draining, rinse it under cold water to stop cooking. Toss the pasta with a little olive oil right after draining. This adds flavor and keeps it from clumping together. This blog outlined how to create a delicious seafood pasta salad. We discussed the best ingredients, cooking methods, and tips to enhance flavor and texture. Remember to balance seafood and pasta for the best dish. Experiment with variations and don’t shy away from making it your own. With proper storage and reheating tips, you can enjoy this meal for days. Dive in and savor every bite of your creation!

Seafood Pasta Salad Refreshing and Light Dish

Looking for a light and tasty dish to brighten up your meals? This Seafood Pasta Salad is just what you

To make Southern Bananas Foster, gather these ingredients: - 4 ripe bananas, peeled and halved lengthwise - 1/2 cup unsalted butter - 1 cup packed brown sugar - 1 teaspoon vanilla extract You can add spices for more depth. Consider using: - 1/2 teaspoon ground cinnamon - 1/4 teaspoon nutmeg Fresh mint leaves make a nice garnish too. This dessert shines with creamy accompaniments. Serve it with: - 4 scoops of vanilla ice cream - 1/2 cup chopped pecans for crunch For the best experience, let the warm sauce melt the ice cream a bit. The mix of flavors creates a delightful treat. Don’t forget to check out the Full Recipe for all the details! First, grab a large skillet. Place it on the stove over medium heat. Add 1/2 cup of unsalted butter. Let it melt completely. Once the butter melts, add 1 cup of packed brown sugar. Stir the mixture well. You want it to dissolve into a smooth syrup. This takes just a few moments. Next, mix in 1 teaspoon of vanilla extract, 1/2 teaspoon of ground cinnamon, and 1/4 teaspoon of nutmeg. Let this bubble for about 2 minutes. The aromas will be amazing! Now, it’s time for the bananas. Take 4 ripe bananas and peel them. Cut them in half lengthwise. Carefully place the banana halves cut-side down into the syrup. Cook them for about 2-3 minutes. Use a spoon to gently pour the syrup over the bananas. This helps them absorb the flavor. After that, flip the bananas over. Sprinkle in 1/2 cup of chopped pecans. Cook for another 2 minutes. The bananas should become warm and slightly caramelized. You are almost done! Remove the skillet from the heat. Let it cool slightly. Now, take 4 scoops of vanilla ice cream and place them in bowls. Ladle the warm banana mixture over the ice cream. The heat will melt the ice cream a bit. It creates a perfect blend of flavors. To make it look fancy, add fresh mint leaves on top. This adds a nice pop of color and flavor. Enjoy your delightful Southern Bananas Foster! For the complete recipe, refer to the Full Recipe section. Choosing the best bananas is key to a great dessert. Look for bananas that are ripe but not overripe. A perfect banana has a bright yellow color with a few brown spots. These spots tell you the banana is sweet and ready to use. Avoid bananas that are green or too brown. They can change the taste and texture of your dish. When making Southern Bananas Foster, a few mistakes can lead to less tasty results. First, don’t cook the bananas too long. They should be warm and soft but not mushy. Second, make sure to stir the sugar and butter well. This helps create a smooth syrup. Lastly, don’t skip the pecans. They add a nice crunch and flavor that balance the sweetness. How you serve Southern Bananas Foster can make it even more special. Use individual bowls for each serving. Place a scoop of ice cream in the center. Then, ladle the warm banana mixture over the ice cream. This creates a nice melting effect. For extra flair, add crushed pecans on top. A sprig of fresh mint can also brighten the dish. It makes the dessert look inviting and fresh. {{image_2}} If you want to switch up the nuts in your Southern Bananas Foster, try walnuts or almonds. Walnuts add a rich, nutty flavor that pairs well with the sweetness of the bananas. Almonds, on the other hand, give a nice crunch and a hint of sweetness. Just chop them up and use the same amount as the pecans. You can also toast the nuts before adding them for an extra layer of flavor. You can easily make this dessert without alcohol. Instead of rum, use a splash of orange juice or vanilla extract. This swap keeps the flavor rich but makes it family-friendly. If you want to try a different liqueur, consider using banana liqueur for an even fruitier twist. Just replace the rum with the same amount of banana liqueur in the recipe. For gluten-free options, all ingredients in this recipe are already gluten-free. Make sure the liqueur you choose is also gluten-free. If you want a vegan version, swap the butter for a plant-based alternative. You can use coconut oil or vegan butter. Instead of ice cream, serve with a scoop of dairy-free ice cream. These changes keep the dessert delicious while meeting your dietary needs. For the full recipe, check out the details above. To keep your Southern Bananas Foster fresh, proper storage is key. First, let the banana syrup cool down. Use an airtight container to store it. Pour the syrup over the bananas if you plan to eat it soon. For ice cream, keep it in its original container or move it to a sealed container. This helps prevent freezer burn. When you want to enjoy your leftovers, reheating them correctly is important. Start by warming the banana syrup in a skillet over low heat. Stir it gently until it becomes smooth again. Avoid high heat, as it can change the flavor. For the ice cream, take it out of the freezer and let it sit at room temperature for a few minutes. This makes it easier to scoop. How long can you keep your stored Bananas Foster? If stored properly, the banana syrup can last up to three days in the fridge. The bananas may start to lose their texture after this. Ice cream can last for about two weeks if kept in the freezer. Always check for any signs of spoilage before eating. Bananas Foster started in New Orleans in the 1950s. A chef named Paul Blangé created it. He made it for a friend, Owen Brennan, who owned a popular restaurant. The dish quickly became famous. It blends bananas, butter, brown sugar, and rum. This dessert reflects the rich culture of Southern cuisine. It combines French and American flavors, making it a unique treat. Today, Bananas Foster remains a favorite for many people. You can prepare some parts of Bananas Foster ahead. You can slice the bananas and mix the butter and sugar. However, it’s best to cook the bananas just before serving. This keeps them soft and warm. If you make it too early, the bananas can get mushy. The caramel sauce may lose its shine. So, prepare the base, but cook when you’re ready to enjoy. If you want a non-alcoholic version, you can use apple juice. It adds a sweet and fruity taste. Another option is to use vanilla extract with a splash of water. This keeps the flavor rich without the alcohol. You can also try coconut water for a tropical feel. Each substitute gives a different twist to the dish. Experiment and find what you like best. In this blog post, we explored how to make a delicious Bananas Foster. We covered ingredients, cooking steps, tips for the best results, and fun variations. You learned about serving suggestions and how to store leftovers. Remember, the right bananas and careful cooking can make all the difference. Enjoy experimenting with flavors and sharing this treat with friends! You now have the tools to impress anyone with this classic dessert. Happy cooking!

Southern Bananas Foster Delightful Dessert Recipe

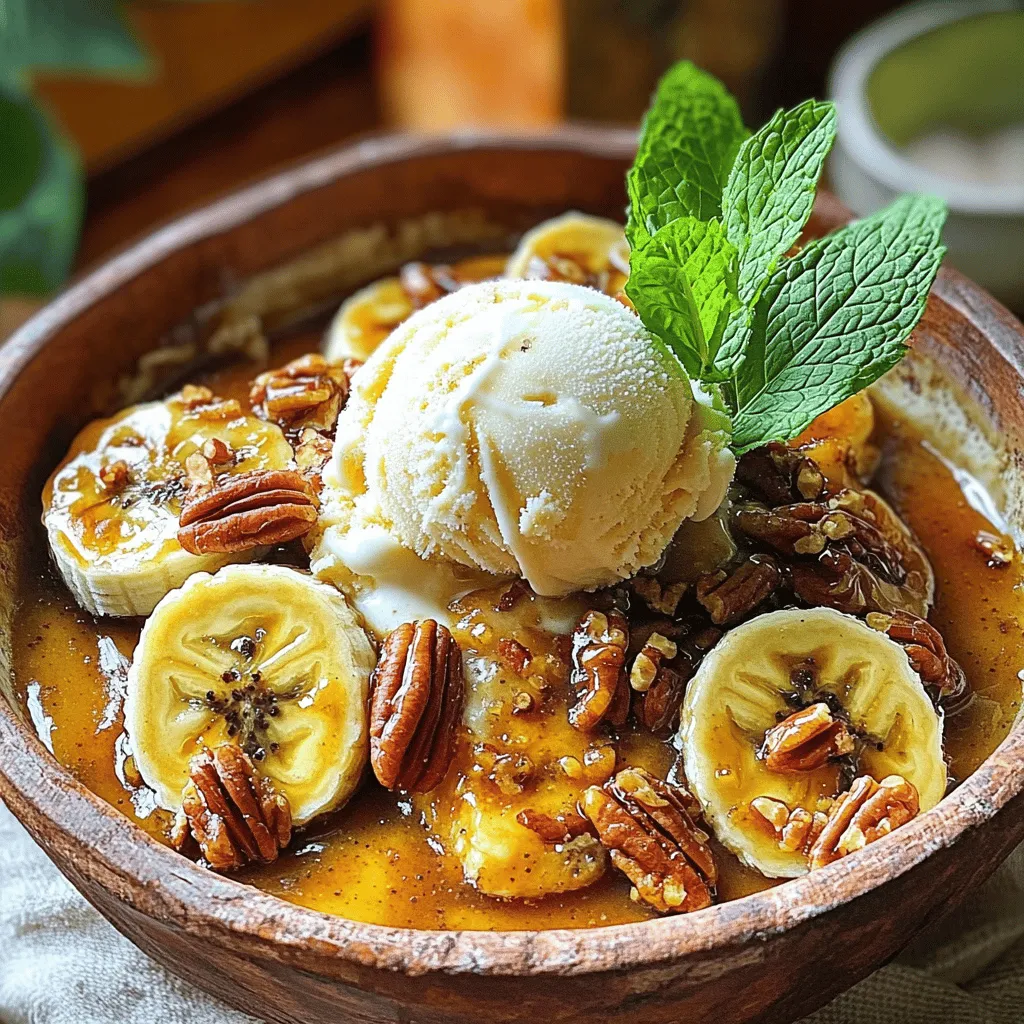
If you’re craving a delightful dessert that’s rich, warm, and easy to make, look no further than Southern Bananas Foster!

- 250 grams paneer, cubed - 2 tablespoons butter - 1 tablespoon oil - 1 medium onion, finely chopped - 2 tomatoes, pureed - 1 tablespoon ginger-garlic paste - ½ cup heavy cream To make butter paneer, you need some key ingredients. Paneer is the star of the dish. It gives the dish its creamy texture and rich flavor. Next, you need fresh tomatoes. They create a smooth sauce that is both tangy and sweet. Onions add depth to the dish when sautéed. Heavy cream makes everything rich and velvety. - 1 teaspoon cumin seeds - 1 teaspoon red chili powder (adjust for spice) - 1 teaspoon garam masala - 1 tablespoon kasuri methi (dried fenugreek leaves) Spices bring life to butter paneer. Cumin seeds add a warm, earthy note. Red chili powder gives it a kick. You can adjust the spice level based on your taste. Garam masala adds warmth and complexity. Kasuri methi adds a fragrant touch that enhances the dish. - 1 teaspoon sugar - Salt to taste - Fresh cilantro for garnish Adding a bit of sugar balances the acidity of the tomatoes. Salt brings out all the flavors. Fresh cilantro is perfect for garnish. It adds color and a fresh taste to the dish. Butter and oil are also essential for cooking. They help create a rich base for the sauce. You can find the full recipe for this mouthwatering dish [here](#). To start, you need to cube the paneer. Cut it into small, even squares. This helps it cook evenly. For a firmer texture, pan-fry the cubes in a non-stick pan. Heat the pan on medium. Add a little oil. Cook the paneer until it turns golden brown on all sides. This step adds flavor and makes it crispy. Once done, set the paneer aside. Now, let’s prepare the base. In the same pan, add two tablespoons of butter and one tablespoon of oil. Heat it over medium heat. Once the butter melts, drop in one teaspoon of cumin seeds. Let them sizzle for a few moments. You will smell the rich aroma. This is the base for your sauce. Next, we sauté the onions. Add one finely chopped onion to the pan. Cook until they turn golden brown. This takes about five minutes. Then, add one tablespoon of ginger-garlic paste. Stir it for one minute. The smell will be amazing! Now, pour in the pureed tomatoes. Use two tomatoes for this. Add one teaspoon of red chili powder and salt to taste. Cook this mixture until the oil separates from the tomatoes. This will take about five to seven minutes. It's time to mix in the cream and spices. Stir in half a cup of heavy cream. Add one teaspoon of sugar and one teaspoon of garam masala. Mix everything well. Let it simmer for three to five minutes. The sauce will thicken and become creamy. Finally, gently fold in the fried paneer cubes. Add one tablespoon of kasuri methi for extra flavor. Cook for another two to three minutes. This ensures the paneer is heated through and coated in sauce. Your delicious Butter Paneer (Paneer Makhani) is now ready to enjoy! For the complete recipe, check out the [Full Recipe]. To make Butter Paneer really tasty, you can play with spice levels. If you like it spicy, add more red chili powder. If you prefer it mild, cut back on the chili. Using fresh spices is key for a better taste. Fresh spices give a burst of flavor. Dried spices are good too, but they often lose some of their punch. A creamy sauce is what makes this dish special. To get that creaminess, use heavy cream as shown in the full recipe. Stir it in gently to avoid breaking the cream. Be careful not to overcook the paneer. Overcooked paneer can turn rubbery. Just fold the paneer into the sauce and warm it for a few minutes. Garnishing your Butter Paneer can elevate its look. Fresh cilantro adds a pop of color and freshness. You can also use a drizzle of cream on top for a fancy touch. Serve it with naan or steamed rice for a complete meal. The warm bread or rice soaks up the sauce perfectly, making every bite a delight. {{image_2}} You can make Butter Paneer even more exciting by adding vegetables. Try adding bell peppers, peas, or spinach. These veggies add color and nutrition to your dish. For a creamy vegan version, swap the heavy cream for cashew cream or coconut milk. This keeps the richness while making it plant-based. Butter Paneer varies across India. Some regions use more spices, while others keep it simple. In Punjab, you may find a richer, creamier sauce. Modern cooks might experiment with new flavors or cooking methods. Each version brings a unique taste to your table. Why not try Butter Paneer pasta? Mix your buttery sauce with cooked pasta for a fun twist. You can also make Butter Paneer pizza. Spread the sauce on pizza dough, top with paneer, and bake until golden. These dishes let you enjoy Butter Paneer in new ways. For the full recipe, check out the [Full Recipe]. To store Butter Paneer (Paneer Makhani) properly, follow these steps: - Cool it down: Allow the dish to cool to room temperature. - Choose containers: Use airtight containers to keep it fresh. - Keep it separate: If serving with rice or naan, store them separately. Reheating Butter Paneer can be tricky, but here’s how to do it right: - Avoid losing creaminess: Reheat on low heat to maintain the sauce's texture. - Microwaving tips: Use a microwave-safe dish and cover it loosely. Heat in short bursts, stirring in between. - Stovetop method: Warm it gently in a pan. Add a splash of cream if it thickens too much. Freezing Paneer Makhani is possible, but it requires care: - Prepare for freezing: Cool the dish completely before freezing. - Use freezer-safe containers: Ensure they are airtight to prevent freezer burn. - Texture tips: To avoid texture loss, consider freezing the sauce and paneer separately. Thaw in the fridge before reheating. For the full recipe, check my earlier sections! Butter Paneer, or Paneer Makhani, is a rich Indian dish. It features soft paneer in a creamy tomato sauce. The dish has roots in North India and is loved worldwide. This recipe mixes butter, cream, and spices for a delightful taste. The history of Paneer Makhani dates back to the 1950s. It originated in Delhi at the Moti Mahal restaurant. The chefs aimed to create a dish for everyone to enjoy. Yes, you can prepare Butter Paneer in advance. Cook the dish and let it cool. Store it in an airtight container in the fridge. It stays fresh for up to three days. When you're ready to eat, reheat it gently on the stove. Add a splash of cream to keep it creamy. For best results, avoid the microwave as it may change the texture. Butter Paneer pairs well with many dishes. Here are some great options: - Naan bread - Steamed basmati rice - Jeera rice (cumin rice) - Roti - Pulao (spiced rice) - Salad for freshness These sides will balance the rich flavors of the dish. To spice up your Butter Paneer, adjust the red chili powder. Start with a little and taste as you go. You can also add chopped green chilies for more heat. Another option is to include a pinch of cayenne pepper. If you like, add a dash of hot sauce before serving. Just be careful not to overpower the creamy sauce! Butter Paneer, or Paneer Makhani, shines with its rich blend of tomatoes, spices, and cream. You'll love how the spices mix to create depth in each bite. Remember, you can customize this dish easily by adding veggies or trying a vegan twist. Store your Butter Paneer well and reheat it right to keep its creamy goodness. With these tips and instructions, you can impress anyone at your table. Now, go ahead and enjoy making this delightful dish!

Butter Paneer (Paneer Makhani) Irresistible Creamy Dish

Butter Paneer, or Paneer Makhani, is a creamy delight that you won’t forget. With its rich taste and smooth texture,

- 4 slices of sourdough bread - 2 tablespoons unsalted butter - 1 cup shredded mozzarella cheese - ½ cup pizza sauce - ¼ cup sliced pepperoni - ¼ cup diced bell peppers - ¼ cup sliced olives - 1 teaspoon Italian seasoning - Fresh basil leaves for garnish To make a great pizza grilled cheese, gather these ingredients. Sourdough bread gives a nice crunch and flavor. Butter adds a rich taste that makes each bite delightful. Mozzarella cheese melts perfectly, creating a gooey center. Pizza sauce brings that classic flavor we love. Pepperoni adds a savory kick, while bell peppers and olives add color and texture. Italian seasoning enhances the overall taste, bringing it all together. Fresh basil leaves not only look nice but add a burst of flavor. With this list, you are ready to create your own pizza grilled cheese masterpiece. For the full recipe, refer to the section above. - Preheat the skillet: First, turn on your skillet to medium heat. This step is key. A hot skillet gives the bread a nice crisp. - Butter the bread: Next, take your unsalted butter. Spread one tablespoon on one side of each sourdough slice. This will help the bread brown perfectly. - Layering the ingredients: Take two slices of bread, buttered side down. Sprinkle half the mozzarella cheese evenly on top. Then, add about 2 tablespoons of pizza sauce over the cheese. - Creating the sandwich: On top of the sauce, add your toppings. Place pepperoni, diced bell peppers, and olives. Finish with the rest of the mozzarella cheese. Finally, add the other two slices of bread on top, buttered side facing out. - Cooking time and technique: Place the sandwiches in the hot skillet. Cook for 3-4 minutes. Check for a golden brown color before you flip. - Tips for flipping the sandwich: Use a spatula to gently flip the sandwich. Press down slightly while it cooks for another 3-4 minutes. This helps melt the cheese inside. Using these steps, you will create a delicious pizza grilled cheese. For the complete process, check the Full Recipe. Enjoy your cooking! When making pizza grilled cheese, mozzarella is the best choice. It melts well and stretches nicely. You can also use provolone or fontina. Both have great flavors and melt well, too. - Mozzarella: Creamy and stretchy. It creates that classic pizza feel. - Provolone: A bit sharper. It adds a nice twist to your grilled cheese. - Fontina: Rich and buttery. It brings a deep flavor to the mix. Cooking pizza grilled cheese requires the right skillet temperature. Medium heat is ideal. It allows the bread to brown without burning. - Skillet Temperature: Preheat your skillet for 3-5 minutes. This helps achieve even cooking. - Perfect Crisp: Use enough butter on the bread. This creates a golden crust. Press down gently with a spatula. This helps the cheese melt evenly. You can serve pizza grilled cheese with a side of pizza sauce. This makes a great dip! You can also add a small salad for a fresh touch. - Dips: Try garlic butter or ranch dressing. Both add flavor and fun. - Garnishes: Fresh basil leaves brighten the dish. A sprinkle of Parmesan cheese also enhances the flavor. For the full experience and recipe details, check out the [Full Recipe]. Enjoy your cooking! {{image_2}} You can make your pizza grilled cheese your own in many ways. Adding vegetables or proteins makes it more filling. Some great options are: - Spinach - Mushrooms - Cooked chicken - Bacon You can also swap out different breads. Sourdough is tasty, but try: - Whole wheat - Ciabatta - Gluten-free bread Each type of bread will change the flavor and texture. Think about different pizza toppings to try! You can add: - Pineapple for sweetness - Jalapeños for heat - Feta cheese for a tangy twist Don't forget international variations! Try using: - Naan for an Indian twist - Tortillas for a quesadilla-style sandwich These options bring fun flavors and textures to the table. If you need gluten-free options, use gluten-free bread. Make sure to check labels on your pizza sauce and cheese. For vegan modifications, swap the mozzarella for vegan cheese. Use olive oil instead of butter. You can also skip the pepperoni and add: - Avocado - Sun-dried tomatoes These changes keep the flavor while meeting your diet needs. For the full recipe, check the section above! To keep your pizza grilled cheese fresh, you need to cool it first. Let the sandwiches sit at room temperature for about 30 minutes. This helps prevent moisture buildup. Once cooled, wrap each sandwich in plastic wrap or foil. You can also place them in an airtight container. This method keeps them from drying out or getting soggy. When it's time to enjoy your leftovers, you want them warm and crispy. The best way to reheat grilled cheese is in a skillet. Heat a non-stick skillet over medium heat. Add a little butter for extra flavor. Place the sandwich in the skillet and cover it with a lid. Cook for about 3-5 minutes on each side. This method helps maintain the crispiness and avoids sogginess. If you are in a rush, you can use the microwave. Place the sandwich on a plate and cover it with a damp paper towel. Heat it for 30 seconds, then check if it’s warm. If not, heat in short bursts until heated through. However, this method may not keep the bread crispy. For the best results, stick with the skillet method. Enjoy your pizza grilled cheese fresh or reheated! For the full recipe, check out the complete instructions. You can prepare the components ahead. Keep the sauce and toppings separate. Spread the butter on the bread slices in advance. When ready to eat, assemble the sandwiches. Cooking them fresh gives the best taste and texture. A simple, smooth sauce works best. You can use store-bought for speed. If you want to make your own, blend canned tomatoes with garlic and herbs. This way, you control the flavor. Use whole-grain bread instead of sourdough. You can reduce cheese or swap it for a lower-fat option. Add more veggies like spinach or mushrooms for extra nutrients. This keeps the taste without too many calories. Yes! Try whole wheat, rye, or even gluten-free bread. Each type gives a different taste and texture. Just make sure it can hold the filling well. Cut the sandwiches diagonally for nice pieces. This makes them easier to eat and looks nice on a plate. Serve with a small bowl of extra pizza sauce for dipping. It adds a fun touch to your meal. In this blog post, we explored how to make a delicious Pizza Grilled Cheese. You learned about the key ingredients, step-by-step instructions, and useful tips for cooking. Customizing your sandwich offers endless possibilities, from different toppings to dietary adjustments. Storing leftovers and reheating them can keep your meal fresh and tasty. Keep these ideas in mind as you create this fun dish at home. With just a few simple ingredients, you can enjoy a flavor-packed treat anytime. Happy cooking!

Pizza Grilled Cheese Savory and Simple Delight

If you’re craving a quick yet delicious meal, you’ve hit the jackpot with Pizza Grilled Cheese! This dish combines crispy

Older posts
Newer posts
← Previous Page1 … Page56 Page57 Page58 … Page78 Next →

dsad

© 2025 pureeatsnow • Built with GeneratePress

Our Policies

  • Copyright Policy
  • Cookie Policy
  • GDPR Policy
  • Privacy Policy
  • Disclaimer
  • Terms Of Use

More Information

  • Home
  • About
  • Contact
  • Appetizers
  • Dessert
  • Dinner
  • Drinks
©2025, pureeatsnow About Back To Top