Skip to content
DisclaimerTerms Of UseGDPR PolicyCookie Policy

pureeatsnow

  • Home
  • Drinks
  • Appetizers
  • Dinner
  • Dessert
  • About
  • Contact
  • Privacy Policy
DisclaimerTerms Of UseGDPR PolicyCookie Policy

Rachel

To make the Biscoff Fluff Dip, you need these simple ingredients: - 1 cup creamy Biscoff spread - 1 cup whipped cream cheese (softened) - 1 cup whipped topping (like Cool Whip) - 1/4 cup powdered sugar - 1 teaspoon vanilla extract - Crushed Biscoff cookies for garnish - Fresh fruit, pretzels, and graham crackers for dipping Each ingredient adds a special touch to the dip. The Biscoff spread gives it that sweet, cookie-like flavor. Cream cheese adds richness, while whipped topping makes it fluffy. The powdered sugar sweetens it just right. Vanilla extract enhances all the flavors. Crushed cookies on top look great and add crunch. Fresh fruit, pretzels, and graham crackers are perfect for dipping. These ingredients work together to create a creamy and irresistible treat. You can easily adjust any ingredient to fit your taste. Feel free to play with the ratios for your ideal dip. Enjoy the fun of making this delightful snack! For the full recipe, check out the instructions. - Step 1: Mixing Biscoff Spread and Cream Cheese Start by taking a medium bowl. Add 1 cup of creamy Biscoff spread and 1 cup of softened cream cheese. Use an electric mixer on medium speed. Blend them until smooth and creamy. This mix forms the base of your dip. - Step 2: Incorporating Vanilla Extract and Powdered Sugar Next, add 1 teaspoon of vanilla extract and 1/4 cup of powdered sugar. Keep mixing until everything is well combined. Scrape down the sides of the bowl as needed. This step adds sweet flavor and depth to the dip. - Step 3: Folding in Whipped Topping Now, take 1 cup of whipped topping, like Cool Whip. Gently fold it into the mixture using a spatula. Be careful not to deflate the fluff. Continue folding until the dip is light and fluffy. This creates the creamy texture we all love. - Step 4: Garnishing and Serving Transfer your Biscoff fluff dip to a serving bowl. Sprinkle crushed Biscoff cookies on top for garnish. This adds a nice crunch and extra flavor. Serve with fresh fruit, pretzels, and graham crackers for dipping. Enjoy your delicious treat! For the complete recipe, check out the [Full Recipe]. - Use room temperature cream cheese: This makes mixing easier. Cold cream cheese will clump. Let it sit out for about 30 minutes before you start. - Fold, don’t stir, to maintain fluffiness: Use a spatula to gently fold in the whipped topping. Stirring will make the dip dense. You want it light and airy. - How to adjust sweetness if desired: If you want a less sweet dip, cut back on the powdered sugar. Taste as you mix. You can always add more if you need it sweeter. These simple tips will help you create the perfect Biscoff Fluff Dip. Enjoy making it and sharing it! For the complete recipe, check out the Full Recipe. {{image_2}} You can make Biscoff fluff dip even more fun with some flavor twists. Here are a few ideas: - Adding chocolate or caramel swirls: Drizzle melted chocolate or caramel into the dip before serving. This adds a rich layer of flavor. You can use a toothpick to create fun swirls. - Incorporating spices like cinnamon or nutmeg: A sprinkle of cinnamon or nutmeg can warm up the dip. Just a pinch goes a long way. Mix it in when you add the powdered sugar for a cozy taste. - Experimenting with different types of cookies: Instead of just Biscoff cookies, why not try different ones? Use chocolate chip, ginger snaps, or even graham crackers. Each cookie adds its own unique flavor and texture. These variations keep your Biscoff fluff dip exciting. You can easily mix and match to find your favorite combo. Don't forget to check out the full recipe for the base dip before you start experimenting! To keep your Biscoff fluff dip fresh, store it in the fridge. Use an airtight container to seal in the flavor. It’s best to eat it within three to five days. This helps keep the dip creamy and tasty. If you want to keep it longer, consider freezing it. To freeze, place the dip in a freezer-safe container. Leave some space at the top because it may expand. You can freeze it for up to a month. When you’re ready to enjoy it again, thaw the dip in the fridge overnight. Avoid thawing at room temperature. This keeps the texture smooth. After thawing, stir it gently to restore its fluffiness. Follow these tips to ensure your Biscoff fluff dip stays as delightful as when you first made it. For the complete recipe, check out the Full Recipe section. Yes, you can use homemade whipped topping. It adds a personal touch. Just whip heavy cream until soft peaks form. This method keeps the dip light and fluffy. If you don’t have Biscoff spread, you can use cookie butter. Nutella is another great choice. Both options give a yummy flavor. You can also try almond or peanut butter for a nutty twist. This dip stays fresh in the fridge for about three days. Store it in an airtight container. This helps keep it tasty and creamy. Remember to stir before serving again. The dip is not safe for nut allergies if you use Biscoff spread. Biscoff cookies are free from nuts, but the spread may not be. Always check labels for any hidden nuts. If unsure, use a nut-free spread instead. In this post, we explored how to make a delicious Biscoff Fluff Dip. We covered ingredients, step-by-step instructions, tips for perfection, and fun variations. Storing this treat correctly helps keep it fresh for longer. Enjoy experimenting with flavors and sharing this delightful dip at your next gathering. It’s simple to make and sure to impress your guests!

Biscoff Fluff Dip Creamy and Irresistible Treat

Are you ready to dive into a creamy dream? This Biscoff Fluff Dip is a delicious, fluffy treat that’s perfect

- 8 ounces rice noodles - 1 pound shrimp, peeled and deveined - 1 clove garlic, minced For this Easy Pad Thai with Shrimp, the essential ingredients bring the dish to life. Rice noodles form the base, giving it that chewy texture we love. Fresh shrimp adds protein and a sweet flavor. Garlic enhances the taste, creating a nice aroma. - 3 tablespoons fish sauce - 1 tablespoon tamarind paste - 2 tablespoons brown sugar - 1 lime, juiced The sauce is key to a great Pad Thai. Fish sauce adds a salty umami flavor. Tamarind paste brings a tangy note that balances sweetness. Brown sugar adds depth, while lime juice brightens the dish. Together, they create a wonderful flavor blend. - 1 cup bean sprouts - 3 green onions, chopped - Chopped peanuts for garnish - Fresh cilantro for garnish - Red pepper flakes (optional) You can customize your Pad Thai with optional ingredients. Bean sprouts give a nice crunch and freshness. Green onions add a mild onion flavor. Peanuts and cilantro make great garnishes, adding texture and color. If you like heat, a sprinkle of red pepper flakes works well. For more details, check the Full Recipe. First, cook the rice noodles. Follow the package instructions for the best results. Once cooked, drain them. Rinse the noodles under cold water. This stops the cooking process and keeps them from getting mushy. Set the noodles aside. They will soak up all the flavors later. Next, let’s sauté the garlic and shrimp. In a large skillet, heat the vegetable oil over medium-high heat. Add the minced garlic. Sauté for about 30 seconds until it smells amazing. Now, add the shrimp to the skillet. Cook them for 2-3 minutes. They should turn pink and be cooked through. Remove the shrimp and set them aside. Now, scramble the eggs in the same skillet. Pour in the beaten eggs and cook until fully set. Push the eggs to one side of the skillet. Add the cooked rice noodles back into the skillet, along with the shrimp, bean sprouts, and chopped green onions. Stir everything together. To make the sauce, whisk the fish sauce, tamarind paste, brown sugar, and lime juice in a small bowl. Pour this sauce over the noodle mixture. Toss everything to coat evenly. Cook for another 2-3 minutes to heat it all through. If you like it spicy, add red pepper flakes to taste. Finally, serve the Pad Thai on plates. Top it with chopped peanuts and fresh cilantro. Enjoy your easy Pad Thai with shrimp! For the complete guide, check the Full Recipe. To keep your noodles just right, cook them until they are al dente. This means they should be a bit firm in the middle. After cooking, rinse the noodles with cold water. This stops the cooking. It also helps the noodles stay separate. If you skip this step, the noodles might clump together. You can adjust the sauce to make your Pad Thai taste perfect. Start with fish sauce, tamarind paste, brown sugar, and lime juice. Taste the sauce before adding it to the noodles. If you like it sweeter, add more sugar. If you want it tangier, squeeze in more lime juice. This way, you can make the dish match your taste. Using a wok instead of a skillet can give you better results. A wok heats up faster and has more space to toss the ingredients. This helps everything cook evenly. If you don’t have a wok, a large skillet will work too. Just make sure to keep the heat high and stir often. This keeps the shrimp and noodles from sticking. For the full recipe, check out Easy Shrimp Pad Thai. {{image_2}} You can easily make a vegetarian Pad Thai. Just swap the shrimp for tofu or extra veggies. Tofu adds protein and absorbs flavors well. Use firm tofu for the best texture. Add bell peppers, carrots, or broccoli for more color and crunch. This change keeps the dish fresh and tasty. For a gluten-free Pad Thai, choose the right noodles. Look for rice noodles that are labeled gluten-free. Some brands also offer brown rice noodles. These options give you the same great taste without gluten. Always check the package to ensure they fit your diet. Want more heat? You can add chili peppers or chili sauce to your Pad Thai. Fresh Thai bird chilies pack a punch. If you like it milder, use fewer peppers or leave them out. Red pepper flakes are another option, perfect for sprinkling on top. Adjust the spice to match your taste! To keep your Pad Thai fresh, store it in an airtight container. Make sure it cools to room temperature before sealing. This helps prevent moisture buildup. Refrigerated Pad Thai is best eaten within three days. When you're ready to enjoy it again, just take it out and reheat. If you want to save some for later, freezing Pad Thai works well. Place it in a freezer-safe container or bag. Remove as much air as possible to avoid freezer burn. You can freeze it for up to three months. When you're ready to eat, thaw it in the fridge overnight before reheating. Reheat your Pad Thai on the stove for the best taste. Add a splash of water or oil to keep it moist. Heat it over medium-low until warmed through. You can also use the microwave, but be sure to stir it halfway through to heat evenly. Enjoy your delicious meal again without losing quality! For the full recipe, check the section above. Making Easy Pad Thai with Shrimp takes about 30 minutes. You need 15 minutes to prep and 15 minutes to cook. This quick meal gives you a tasty dish in no time. Yes, you can use frozen shrimp. Just thaw them first. Place the shrimp in cold water for 15 minutes. This helps them cook evenly. Pat them dry before adding to your dish. This way, they won’t release extra water. If you don't have tamarind paste, use lime juice and brown sugar. Mix one tablespoon of lime juice with one tablespoon of brown sugar. This combo gives you a nice balance of sweet and tangy flavors. You can also try lemon juice if you want a different taste. You learned the essential ingredients for an easy Pad Thai with shrimp. I shared step-by-step instructions to guide you through cooking. Tips helped you perfect the dish, while variations showed you how to customize it. You can store leftovers and reheat them properly. Enjoy making this dish your own! With these steps, you'll create delicious Pad Thai every time. Keep experimenting and have fun in the kitchen!

Easy Pad Thai with Shrimp Quick and Flavorful Meal

If you’re craving a quick, flavorful meal, you’ve come to the right place. My Easy Pad Thai with Shrimp is

For Garlic Parmesan Chicken Meatloaves, you need these main items: - 1 lb ground chicken - 1 cup breadcrumbs - 1/2 cup grated Parmesan cheese - 3 cloves garlic, minced - 1/4 cup fresh parsley, chopped - 1 large egg - 1/4 cup milk - 1 teaspoon onion powder - 1 teaspoon Italian seasoning - Salt and pepper to taste - 1/2 cup marinara sauce (for topping) These ingredients create a tasty, moist meatloaf. The ground chicken keeps it light. Breadcrumbs help hold it all together. Parmesan adds a rich flavor. Garlic gives it a nice kick. You can mix in other flavors too, such as: - Chopped bell peppers - Shredded carrots - Spinach - Hot sauce for a kick These optional ingredients can change the taste and texture. For example, bell peppers add sweetness. Spinach adds color and nutrients. This way, you can customize the meatloaf to your liking. Each serving of Garlic Parmesan Chicken Meatloaves has: - Calories: 250 - Protein: 25g - Carbohydrates: 15g - Fat: 10g This dish is packed with protein while staying low in carbs. It is a great option for a healthy meal. You can enjoy it without feeling guilty. For the full recipe, check the notes above. First, you need to set your oven. Preheat it to 375°F (190°C). This step is key for even cooking. Next, grab a muffin tin. Lightly grease each cup to keep the meatloaves from sticking. If you don’t have a muffin tin, you can use a baking dish. Now, let’s make the meatloaf mix. In a large bowl, add the ground chicken. Then, pour in the breadcrumbs and grated Parmesan cheese. Next, add the minced garlic and chopped parsley. Crack in the egg and pour in the milk. Sprinkle onion powder, Italian seasoning, salt, and pepper on top. Use your hands to mix everything well. Be gentle, though. Overmixing can make the meatloaf tough. Once mixed, it's time to form the meatloaves. Scoop the mixture into the greased muffin tin. Fill each cup about three-quarters full. If you're using a baking dish, shape the mix into mini loaves. Now, let’s add some sauce. Top each meatloaf with a spoonful of marinara sauce. This adds flavor and keeps them moist. Place the muffin tin in the oven and bake for 20-25 minutes. The meatloaves should reach an internal temperature of 165°F (74°C). After baking, let them cool before removing them from the tin. Enjoy your Garlic Parmesan Chicken Meatloaves! For the full recipe, refer to the earlier section. To keep your meatloaf moist, do not overmix the ingredients. Combine them gently until just mixed. Adding milk and egg also helps with moisture. These ingredients bind the meatloaf and add richness. If your mixture feels dry, add a splash more milk. You can also include finely chopped vegetables, like onions or bell peppers, to boost moisture. To make your meatloaf pop, use fresh garlic. The aroma and taste of fresh garlic make a big difference. Fresh parsley adds brightness and color. You can also experiment with spices. Try smoked paprika or cayenne for heat. Adding Worcestershire sauce can deepen the flavor. A pinch of sugar in your marinara sauce can balance acidity and sweetness. Ovens can vary in heat, so check your meatloaf early. If using a convection oven, reduce the cooking time by 5-10 minutes. Always use a meat thermometer to check for doneness. The meatloaf should reach 165°F (74°C) inside. If you see the tops browning too fast, cover with foil to prevent burning. For best results, rotate your pan halfway through cooking. This ensures even baking. {{image_2}} You can boost the nutrition of your meatloaves by adding veggies. Chopped spinach, carrots, or bell peppers mix well. Just make sure to finely chop them. You can also use other proteins. Ground turkey or beef can work great too. Each choice gives a new taste to the dish. If you want a different cheese taste, try using mozzarella or feta. Mozzarella adds a lovely stretch, while feta gives a tangy flavor. You can even mix cheeses for a unique blend. This change can make each bite exciting and fun. For a low-carb version, swap breadcrumbs for almond flour or crushed pork rinds. Both options keep the meatloaf moist and tasty. If you need it gluten-free, always check the labels on your ingredients. These small swaps let everyone enjoy this dish without worry. For the full recipe, check out the detailed steps above. To keep your Garlic Parmesan Chicken Meatloaves fresh, store them in an airtight container. Place a piece of parchment paper between layers if you stack them. This prevents sticking and helps maintain texture. Refrigerate your leftovers for up to four days. Always let them cool completely before storing. This helps avoid moisture buildup. If you want to save some meatloaves for later, freezing is a great option. First, let the cooked meatloaves cool down. Then, wrap each one in plastic wrap. After that, place them in a freezer bag. Remove as much air as you can. You can freeze them for up to three months. Label the bag with the date to keep track. When you're ready to enjoy your meatloaves again, reheating is easy. For the best result, use the oven. Preheat it to 350°F (175°C). Place the meatloaves on a baking sheet. Cover them with aluminum foil to keep them moist. Heat for about 15-20 minutes. If you prefer, you can also microwave them. Just be careful not to overheat, as this can make them dry. Enjoy your leftovers as if they were fresh! For the complete recipe, check out the Full Recipe. Yes, you can make Garlic Parmesan Chicken Meatloaves ahead of time. Mix the ingredients and shape them into loaves. Then, cover them and store in the fridge for up to a day. You can also freeze them. Just freeze them before baking. When you're ready, bake from frozen, adding a few extra minutes to the cooking time. Some great side dishes for meatloaves are mashed potatoes, green beans, or a fresh salad. You can also serve them on a bed of sautéed spinach. Roasted vegetables add color and taste. These sides balance the meatloaf's rich flavors and make the meal more satisfying. The best way to check is by using a meat thermometer. The meatloaf needs to reach an internal temperature of 165°F (74°C). If you don’t have a thermometer, you can cut into the meatloaf. The juices should run clear, and the inside should not be pink. Always let them rest for a few minutes after baking. This helps keep them juicy. This blog post covered all you need for making great meatloaf. We discussed main and optional ingredients to boost flavor. I shared tips to keep your meatloaf moist and tasty. You learned about variations to fit your diet and how to store leftovers properly. Remember, you can make this dish unique every time. Enjoy your cooking and serve up a meal that everyone will love!

Garlic Parmesan Chicken Meatloaves Simple and Tasty

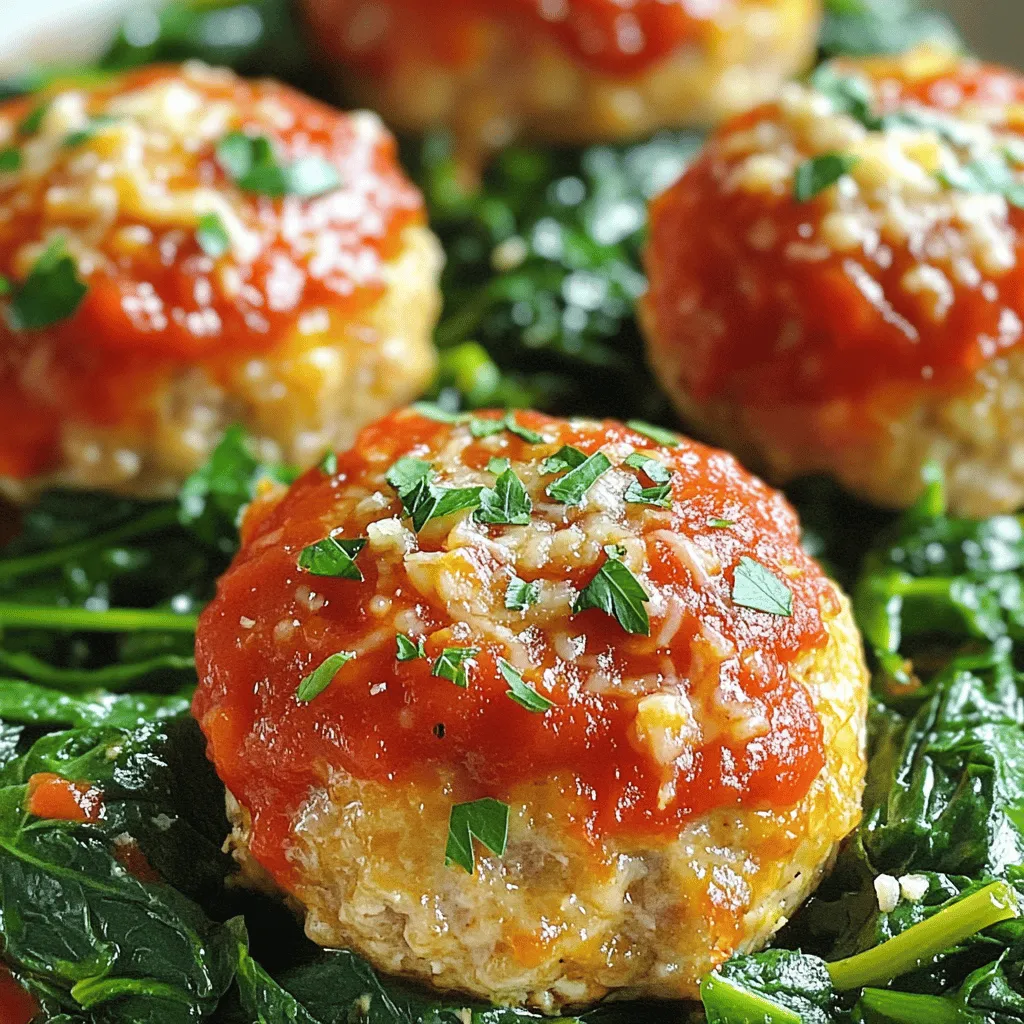
Looking for a dinner recipe that’s both simple and tasty? You’ll love my Garlic Parmesan Chicken Meatloaves! These moist and

- 1 cup all-purpose flour, heat-treated - ½ cup brown sugar, packed - ½ cup granulated sugar - ½ cup unsalted butter, softened - 1 teaspoon vanilla extract - 1 cup cream cheese, softened - ½ cup mini chocolate chips - ¼ teaspoon sea salt - You can use alternative sweeteners like agave or honey. - For a vegan dip, swap cream cheese with a plant-based version. - Always spoon flour into your measuring cup, then level it off. This keeps it light. - Sugar should also be packed down lightly, especially brown sugar. - Room temperature ingredients mix better, so let butter and cream cheese sit out. Each step ensures a smooth dip full of flavor. When you follow these tips, your dip will be perfect! Feel free to explore [Full Recipe] for more details. First, we need to prepare the flour. Place 1 cup of all-purpose flour in a microwave-safe bowl. Heat it for 1 minute. This step kills any bacteria in the flour. After microwaving, let the flour cool. This is key for our dip's safety and taste. Next, let’s cream our sugars with butter. In a large mixing bowl, add ½ cup of unsalted butter, ½ cup of packed brown sugar, and ½ cup of granulated sugar. Beat them together until the mix is light and fluffy. This process adds air and helps create a smooth dip. Now, it's time to add more flavor. Add 1 cup of softened cream cheese and 1 teaspoon of vanilla extract to the sugar mixture. Keep beating until everything is smooth and well blended. This will give our dip a rich and creamy texture. Gradually add the cooled flour to this mixture. Mix slowly until all the flour is fully incorporated. This step ensures a consistent texture without lumps. To make it even better, gently fold in ½ cup of mini chocolate chips and ¼ teaspoon of sea salt. Make sure to distribute them evenly throughout the dip. The chocolate chips add sweetness, while the sea salt enhances the flavor. Finally, transfer your dip to a serving bowl. Smooth out the top with a spatula. For a fun touch, sprinkle a few extra mini chocolate chips on top. This will make your dip look inviting and delicious. For the full recipe, check out the details above. Enjoy! To make the best chocolate chip cookie dough dip, focus on the texture. You want it to be smooth and creamy. Start by mixing the softened butter with the sugars well. This step is key. If it’s not mixed enough, the dip can feel grainy. Once you add the cream cheese, keep mixing until it’s silky. For flavor twists, think about adding nuts or spices. Chopped walnuts or pecans can add crunch. A dash of cinnamon or a pinch of sea salt can boost the flavor too. You can even try different extracts like almond for a unique twist. What goes best with the dip? Try graham crackers, pretzels, or apple slices. They will give a nice contrast in flavors. I love to serve the dip on a big platter. Arrange the dippers around the bowl for a fun look. For a finishing touch, add mint leaves to brighten it up. Avoid overmixing the ingredients. If you mix too much, the dip can become heavy. Just mix until everything is combined. Also, be sure to heat-treat the flour. This step is very important. It kills any bacteria, making the dip safe to eat. If you skip this, you might risk food safety issues. {{image_2}} You can get creative with this dip. One fun twist is the peanut butter chocolate chip dip. Just mix in a cup of creamy peanut butter when you combine the sugars and butter. It makes the dip rich and nutty. Another great option is the brownie batter dip. To do this, replace the all-purpose flour with cocoa powder. You’ll get a lovely chocolate flavor. Both options are a hit at parties. Seasonal dips add fun to any gathering. For a holiday-themed dip, consider adding peppermint extract. This gives a fresh twist perfect for winter events. You can also create fruit-infused versions. Try folding in mashed strawberries or crushed pineapple. This will brighten the dip and add a fruity taste that everyone will love. For those with dietary needs, there are great options. You can make a gluten-free version by using almond flour or oat flour instead of all-purpose flour. This keeps the dip safe for those avoiding gluten. If you're looking for dairy-free adaptations, use dairy-free cream cheese and margarine. This way, everyone can enjoy this tasty treat. For the Full Recipe, check out the steps to create this delightful dip. Store your Chocolate Chip Cookie Dough Dip in the fridge. Place it in an airtight container. This keeps it fresh and tasty. If you want to save it for later, you can freeze it. Scoop the dip into a freezer-safe container. Make sure to leave space for expansion as it freezes. Use glass or plastic containers with tight lids. These containers keep air out and help the dip stay fresh. It’s a good idea to label your container. Write the date on the label so you know when you made it. This way, you can track how long it lasts. The dip lasts about five days in the fridge. Check for signs of spoilage. If it smells sour or looks strange, it’s best to toss it. You want to enjoy this dip at its best, so always check before eating! No, you should not eat raw flour. Raw flour can carry bacteria. To keep you safe, we heat-treat the flour. This means we microwave it for one minute. This kills any harmful bacteria. After heating, let the flour cool before mixing it in the dip. This makes the dip safe to enjoy. Yes, you can make this dip ahead of time. It keeps well in the fridge for up to three days. Just cover it tightly. When you're ready to serve, take it out and give it a stir. You can even make it the night before a party. This way, you save time and can enjoy more with your friends. You can find pre-made dips in many grocery stores. Look in the snack aisle or refrigerated section. Some brands offer it ready-made. But homemade is often fresher and tastier. Making your own dip lets you control the flavors and ingredients. Plus, it’s fun to create! This dip has some common allergens. It includes flour, butter, and cream cheese. If you have allergies, you can make swaps. Use gluten-free flour for a gluten-free option. For dairy-free, try vegan butter and cream cheese. Always check labels to avoid allergens. This way, everyone can enjoy the dip! In this blog post, we explored crafting the perfect Chocolate Chip Cookie Dough Dip. From key ingredients to optional suggestions, I covered how to measure and mix for the best results. You learned tips for texture and common mistakes to avoid. Remember, variations can keep your dip exciting for any occasion. Lastly, proper storage will ensure your dip stays fresh. Enjoy experimenting with flavors and impressing your guests with this fun treat!

Chocolate Chip Cookie Dough Dip Irresistible Delight

Get ready for a sweet treat that will make your taste buds dance! This Chocolate Chip Cookie Dough Dip is

- 1 lb large shrimp, peeled and deveined - 4 tablespoons unsalted butter, melted - 5 cloves garlic, minced - 1 cup grated Parmesan cheese - 1 teaspoon red pepper flakes (optional) - 1 teaspoon lemon zest - 2 tablespoons fresh parsley, chopped - Salt and pepper to taste - Lemon wedges for serving For this dish, the measurements matter. Using 1 pound of large shrimp ensures each piece cooks evenly. The 4 tablespoons of melted butter create a rich base for flavor. Five cloves of garlic add a strong, tasty punch. The 1 cup of grated Parmesan cheese gives a creamy texture and a lovely crust. If you like spice, add 1 teaspoon of red pepper flakes. The lemon zest brightens the dish and balances the richness. Finally, fresh parsley adds color and freshness on top. Fresh ingredients make a big difference in flavor. Fresh shrimp taste sweeter and are more tender. Fresh garlic has a sharp bite that dried garlic cannot match. Grated Parmesan should be freshly grated for the best melt and flavor. Using fresh parsley adds a pop of color, making the dish look appealing. When you use fresh ingredients, each bite tastes better. This dish is easy to make, and using fresh items enhances your cooking experience. For the full recipe, check out the details above. To start, gather your ingredients. You need: - 1 lb large shrimp, peeled and deveined - 4 tablespoons unsalted butter, melted - 5 cloves garlic, minced - 1 cup grated Parmesan cheese - 1 teaspoon red pepper flakes (optional) - 1 teaspoon lemon zest - 2 tablespoons fresh parsley, chopped - Salt and pepper to taste - Lemon wedges for serving Next, preheat your oven to 400°F (200°C). This step warms the oven for roasting. In a large bowl, mix the melted butter, minced garlic, red pepper flakes, lemon zest, salt, and pepper. Combine everything well. You want a smooth garlic butter mix. Then, add the shrimp to the bowl. Toss the shrimp in the garlic butter until they are well coated. This ensures each shrimp is packed with flavor. Once coated, move the shrimp to a baking dish or a lined baking sheet. Spread them out in a single layer for even cooking. Now it’s time for the cheese! Sprinkle the grated Parmesan cheese over the shrimp. Make sure every shrimp gets a good layer of cheese. This will create a tasty and crispy crust. Put the dish in the preheated oven. Roast the shrimp for 8 to 10 minutes. You’ll know they are done when the shrimp are pink and the cheese is golden and bubbly. Keep an eye on them to avoid overcooking. After roasting, take the dish out and garnish with fresh parsley. This adds a nice touch of color and flavor. Serve your garlic Parmesan roasted shrimp with lemon wedges. The lemon adds a zesty kick that brightens the dish. You can pair this meal with rice or a fresh salad for a complete meal. This dish is perfect for gatherings or a cozy dinner. Enjoy every bite! When picking shrimp, look for fresh ones. They should smell like the sea, not fishy. Choose shrimp that are firm and have a shiny look. If you see black spots, skip those. Buy shrimp that are already peeled and deveined. This saves time and effort. If you want to freeze shrimp, do so right away. Fresh shrimp can last up to two days in the fridge. Garlic is key in this dish. Use fresh garlic for the best taste. You can add red pepper flakes for a little heat. If you like lemon, don’t skip the lemon zest. It brightens the dish. You can also try adding herbs like thyme or oregano. Just sprinkle a little for extra flavor. Remember to season with salt and pepper to taste. This boosts the overall flavor. For that cheesy crust, use good quality Parmesan. Grate it fresh for the best results. Sprinkle the cheese evenly over the shrimp. Make sure each shrimp gets a nice layer. This way, they will all be cheesy and tasty. Bake until the cheese is bubbly and golden. This takes about 8-10 minutes in a hot oven. Don't overcook, or the shrimp can become tough. For a special touch, broil the shrimp for the last minute. This gives a nice crisp finish. Enjoy your Garlic Parmesan Roasted Shrimp! For the full recipe, check the complete list of steps above. {{image_2}} You can switch up the cheese for new flavors. Try using mozzarella for a stretchy texture. Gruyère adds a nutty taste that pairs well with shrimp. You can even mix cheeses for a rich layer of flavor. Just remember to use a cheese that melts well. This will give your dish a lovely gooey topping. If you want to change the protein, shrimp is not your only choice. Chicken breast works great in this dish. Cut it into bite-sized pieces and follow the same steps. Fish, like salmon or cod, can also be delicious. Cooking times may vary, so keep an eye on it. Just make sure your protein is cooked all the way through. Adding veggies can make this dish even better. Broccoli florets or asparagus spears roast well with shrimp. Toss them in the garlic butter mix too. Bell peppers or cherry tomatoes also add color and taste. They balance the richness of the cheese. Make sure to adjust cooking time if you add them in. Enjoy the extra flavor and nutrition they bring! For more details on making this dish, check the Full Recipe. Store leftover garlic parmesan roasted shrimp in an airtight container. Make sure to let them cool first. Place the container in the fridge. They will stay fresh for up to three days. This way, you can enjoy your dish later without losing flavor. To reheat your shrimp, use an oven or a skillet. Preheat the oven to 350°F (175°C). Place the shrimp on a baking tray. Heat for about 5-7 minutes. If you use a skillet, add a bit of butter. Warm on low heat to avoid overcooking. This keeps the shrimp juicy and tasty. You can freeze garlic parmesan roasted shrimp for later meals. First, let them cool completely. Place the shrimp in a freezer-safe bag. Remove as much air as possible. Seal the bag tightly. They can stay in the freezer for up to three months. When ready to eat, thaw them in the fridge overnight before reheating. This helps maintain their flavor and texture. For the full recipe, check out the details above. You should cook garlic parmesan shrimp for 8 to 10 minutes. The shrimp should turn pink and firm. The cheese should be golden and bubbly. Keep an eye on them to avoid overcooking. Overcooked shrimp can become tough. If you follow the time, they will be perfect. Yes, you can prepare garlic parmesan shrimp ahead of time. You can mix the shrimp with the garlic butter and cheese. Cover the dish and refrigerate it. Just bake it when you are ready. This makes it easy for gatherings or busy nights. Just remember to adjust the cooking time if the shrimp are cold. Garlic parmesan roasted shrimp pairs well with many sides. Here are some tasty options: - Rice: A fluffy rice dish complements the shrimp well. - Pasta: Tossing shrimp with pasta makes a filling meal. - Salad: A fresh salad adds a nice crunch. - Bread: Serve with crusty bread to soak up the sauce. You can find the full recipe in the earlier section. Enjoy your cooking! This blog post shared key details about making garlic parmesan shrimp. We covered vital ingredients, cooking steps, and serving ideas. Fresh ingredients elevate the dish, so choose wisely. Tips on shrimp selection, spices, and cheese crusts ensure great flavor. We explored variations, including cheese swaps and veggie add-ins. Lastly, we looked at storage and reheating to save any leftovers. Enjoy making and sharing this easy dish. You’ll impress friends and family with your tasty results!

Garlic Parmesan Roasted Shrimp Flavorful and Easy Dish

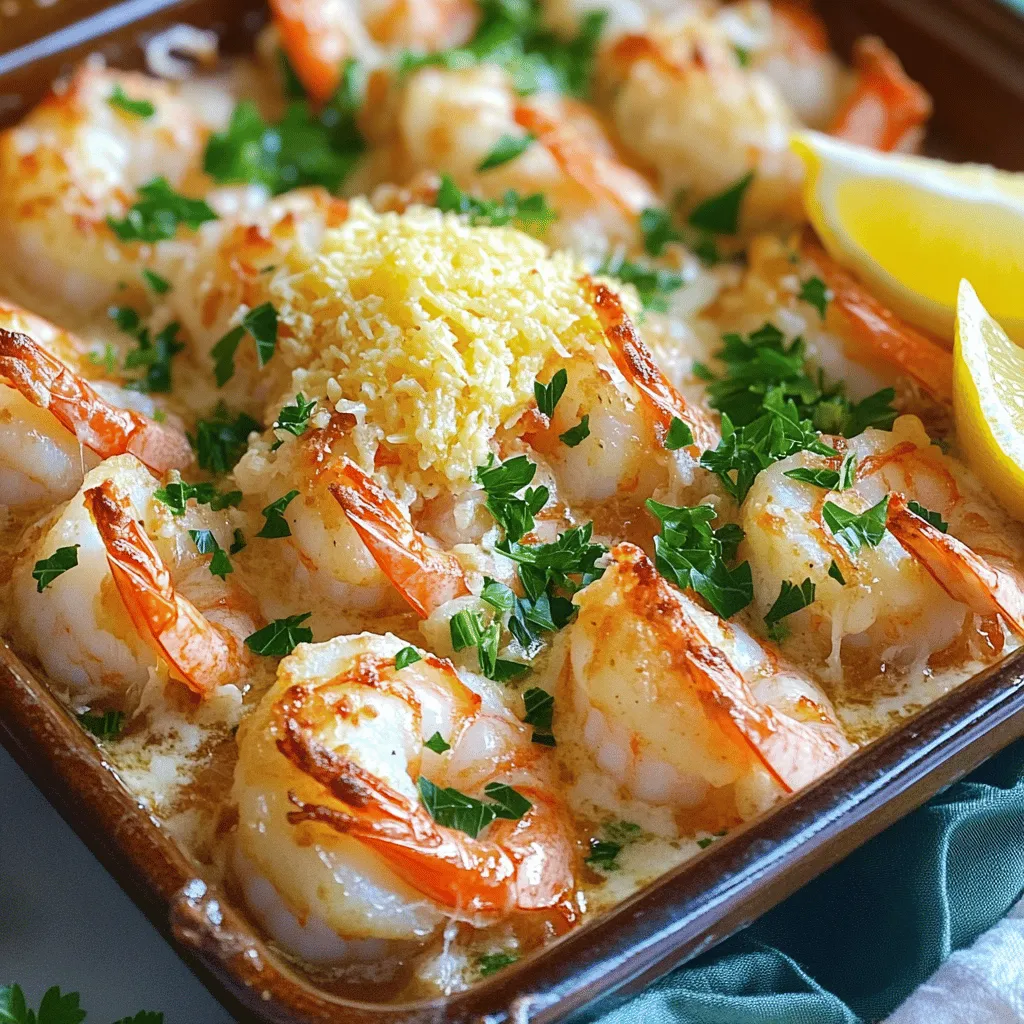
Garlic Parmesan Roasted Shrimp is a dish you must try! This meal is tasty, easy, and quick. I’ll show you

- 1 pound large shrimp, peeled and deveined - 1 pound sea scallops, patted dry - 3 tablespoons olive oil - 4 cloves garlic, minced - 1 cup cherry tomatoes, halved - 1 cup baby spinach - 1 teaspoon dried Italian herbs (basil, oregano, thyme) - 1/2 teaspoon red pepper flakes (optional) - Fresh basil leaves for garnish - Zest of 1 lemon When I cook Tuscan shrimp and scallops, I like to keep my ingredients fresh and simple. The mix of shrimp and scallops creates a lovely seafood base. The olive oil adds richness while the garlic gives a nice punch. I use cherry tomatoes for their sweetness. They burst when cooked, adding flavor to the dish. Baby spinach brings color and nutrition. The dried Italian herbs tie all the flavors together. If you enjoy a little heat, add red pepper flakes for a kick. For garnish, fresh basil leaves and lemon zest brighten the dish. They add aroma and a fresh taste. This balance of ingredients makes the dish both vibrant and satisfying. You can check the [Full Recipe] for more details on how to prepare this delightful meal! Searing the shrimp Start by heating 2 tablespoons of olive oil in a large skillet over medium-high heat. Once the oil is hot, add the shrimp. Make sure to place them in a single layer. Season the shrimp with salt and pepper. Cook them for about 2-3 minutes on each side. They should turn pink and opaque. After cooking, remove the shrimp from the skillet and set them aside. Searing the scallops Next, add 1 tablespoon of olive oil to the same skillet. Place the scallops in the pan and sear them for about 2-3 minutes on each side. Look for a nice golden brown color. Once done, take the scallops out and set them aside with the shrimp. Sautéing garlic In the same skillet, add minced garlic. Sauté it for about 30 seconds. You want it to become fragrant but not brown. Adding tomatoes and spinach Now, stir in the cherry tomatoes. Cook them for about 2-3 minutes until they start to soften. Then, add the baby spinach, dried Italian herbs, and red pepper flakes. Stir until the spinach wilts. Mixing in the heavy cream Pour in the heavy cream and lemon zest. Bring the mixture to a gentle simmer. Let it cook for about 2 minutes. This helps the sauce thicken slightly. Tossing in shrimp and scallops Finally, return the shrimp and scallops to the skillet. Gently toss them in the creamy sauce. Heat everything through for another 2 minutes. Taste and adjust the seasoning with salt and pepper as needed. You can find the complete steps in the Full Recipe. Choosing the right pan A good pan makes a big difference. I like using a heavy skillet or cast iron. These pans hold heat well. They help achieve a nice, golden crust on the seafood. Not overcrowding the seafood Keep the shrimp and scallops in a single layer. Overcrowding causes steaming, not searing. If your pan is too small, cook in batches. This keeps the seafood tender and juicy. Balancing creaminess with lemon zest The heavy cream gives a rich taste. But the lemon zest brightens it up. It adds freshness and a nice zing. Don’t skip this step; it’s key for balance. Tips for spice levels If you like heat, add more red pepper flakes. Start with a little and taste as you go. It's easier to add heat than to take it away. Pairing with pasta or crusty bread Serve the dish over pasta for a hearty meal. You can also pair it with crusty bread. This helps soak up the creamy sauce. Suggested side dishes I love serving this with a simple green salad. Roasted vegetables also make a great side. They add color and extra nutrients to your plate. {{image_2}} You can switch out shrimp and scallops for other proteins. Chicken breast works great for this dish. Just cut it into bite-sized pieces and cook until golden. Tofu is also a nice choice for a vegetarian twist. It absorbs flavors well. You can sauté it until crispy for added texture. If you want more seafood, try using mussels or clams instead. They add a briny touch that enhances the dish. To make this dish lighter, consider reducing the cream. You can replace it with a mix of low-fat milk and a bit of cornstarch. This keeps the sauce rich without all the calories. Adding more vegetables is a great way to boost nutrition. Spinach, zucchini, or bell peppers work well. This not only makes the dish healthier but also adds color and texture. You can enhance the flavor by adding fresh herbs. Basil and parsley add brightness. If you want a bolder taste, try rosemary or thyme. A splash of white wine can also elevate the dish. It adds depth and a slight tang. Just add it after sautéing the garlic, letting it reduce before adding cream. These small tweaks can truly make your Tuscan shrimp and scallops shine! For the full recipe, check out the [Full Recipe]. To keep your Tuscan shrimp and scallops fresh, store leftovers in an airtight container. Place the container in the fridge right after your meal. This helps prevent bacteria growth. When reheating, use a skillet on low heat. This method warms the dish evenly without overcooking the seafood. Stir gently to keep the shrimp and scallops tender. Yes, you can freeze Tuscan shrimp and scallops. However, it's best to freeze them before cooking. Place the uncooked seafood in a freezer bag. Remove as much air as possible to avoid freezer burn. When you're ready to eat, thaw them in the fridge overnight. To reheat, cook them in a skillet over medium heat. This will bring back their flavor and texture nicely. In the fridge, cooked Tuscan shrimp and scallops last about three days. If they smell off or look slimy, it’s time to toss them. Always trust your senses. If in doubt, throw it out. Proper storage keeps your dish safe and delicious for your next meal. Yes, you can skip heavy cream. Alternatives include: - Coconut milk for a dairy-free option. - Greek yogurt for a tangy twist. - Unsweetened almond milk thickened with cornstarch. These options will change the taste, but they work well. To add heat, consider these tips: - Use more red pepper flakes. - Add diced jalapeños or serrano peppers. - Incorporate a dash of hot sauce. Start with a little, then taste and adjust as needed. Delicious side dishes include: - Garlic bread to soak up the sauce. - A fresh green salad for a light touch. - Pasta or rice for a filling meal. These sides balance the rich flavors. Yes, you can use frozen seafood. Here are best practices: - Thaw overnight in the fridge. - Pat them dry before cooking. - Cook them a bit longer if they are still cold. This ensures they cook evenly and taste great. For the full recipe, check out the detailed instructions. In this blog post, we explored a delicious recipe for Tuscan shrimp and scallops. We covered key ingredients, step-by-step instructions, and tips for perfecting your dish. I shared ideas for variations, storage info, and answers to common questions. Cooking can be fun and easy! Don’t be afraid to try new flavors and make it your own. Enjoy your meal and impress your friends with your amazing seafood dish!

Tuscan Shrimp and Scallops Flavorful Seafood Dish

Dive into the rich flavors of my Tuscan Shrimp and Scallops dish! With juicy shrimp and tender scallops, this seafood

Here’s what you need to make this savory sweet potato, chickpea, and red lentil soup: - 1 large sweet potato, peeled and diced - 1 cup canned chickpeas, drained and rinsed - 1 cup red lentils, rinsed - 1 medium onion, chopped - 2 garlic cloves, minced - 1 teaspoon fresh ginger, grated - 1 teaspoon ground cumin - 1 teaspoon ground coriander - 1/2 teaspoon turmeric powder - 4 cups vegetable broth - 1 can (14 oz) coconut milk - 2 cups spinach, roughly chopped - Salt and pepper to taste - 2 tablespoons olive oil This mix of ingredients creates a rich and hearty soup. Sweet potatoes add natural sweetness. Chickpeas provide protein and fiber. Red lentils add a creamy texture while cooking. Aromatics like onion, garlic, and ginger give depth and warmth. The spices of cumin, coriander, and turmeric bring a lovely earthy flavor. Vegetable broth and coconut milk create a comforting base. Fresh spinach adds color and nutrients, while olive oil helps sauté the base. Make sure to gather all your ingredients before you start. This helps the cooking process go smoothly. For the full recipe, check the details above. Enjoy making your soup! 1. In a large pot, heat the olive oil over medium heat. 2. Add the chopped onion and sauté for about 5 minutes until it turns soft. 3. Stir in the minced garlic and grated ginger. Sauté for 2 minutes until fragrant. 4. Next, add the diced sweet potato to the pot. Cook for 5 minutes, stirring often. 5. Sprinkle in the ground cumin, ground coriander, and turmeric. Mix well to coat the sweet potatoes. 1. Add the drained chickpeas and rinsed red lentils to the pot. 2. Pour in the vegetable broth and bring the mixture to a boil. 3. Once it boils, lower the heat and cover the pot. Let it simmer for 20 to 25 minutes. 4. Check that the lentils and sweet potatoes are soft. 1. Pour in the coconut milk, stirring to blend it into the soup. 2. Let the soup simmer for 5 more minutes. 3. Stir in the chopped spinach and cook for 2 minutes until it wilts. 4. Season with salt and pepper to taste. Remove from heat and let cool slightly. 5. Serve hot and garnish with fresh cilantro. For the full recipe, you can refer to the complete instructions above. Enjoy your savory sweet potato, chickpea, and red lentil soup! To get a nice texture in your soup, cook the red lentils for about 20 minutes. They break down well, adding creaminess. Sweet potatoes need around 20-25 minutes to become tender. Cut them into small cubes for even cooking. For a creamier soup, blend a portion of it before serving. You can use an immersion blender or a regular blender. Just scoop out some soup, blend it, and stir it back in. This adds a smooth, velvety touch without losing all the chunky goodness. If you want to boost the flavor, try adding spices like smoked paprika or cayenne pepper. These add depth and a little heat. Fresh herbs like thyme or rosemary also bring great flavor. Using homemade vegetable broth makes a big difference. It enhances the taste of your soup. If you're short on time, store-bought broth works too. Just look for low-sodium options to control salt levels. For the full recipe, check out the Sweet Potato, Chickpea, and Red Lentil Bliss . {{image_2}} You can change the legumes or greens in this soup. Instead of chickpeas, try black beans or white beans. If you prefer a different green, kale or Swiss chard works well. Want to add protein? You can toss in cooked chicken or tofu for a heartier meal. This soup is already vegan and gluten-free. For spice lovers, add more ground cumin or a pinch of cayenne. For a milder flavor, reduce the spices. You can also leave out the ginger if you want a softer taste. Each tweak lets you enjoy this soup your way. For the full recipe, check out Sweet Potato, Chickpea, and Red Lentil Bliss. To keep your soup fresh, store it in airtight containers. Let the soup cool down first. You can refrigerate it for up to five days. For longer storage, freeze it. Use freezer-safe containers or bags. Leave some space at the top of the container, as the soup will expand when frozen. You can also divide it into smaller portions for easy meals later. When you’re ready to enjoy the soup again, reheat it gently. You can use a pot on the stove. Heat it over medium heat, stirring often. This helps keep the texture nice. You can also use a microwave. Heat it in short bursts, stirring in between. The soup lasts about five days in the fridge and about three months in the freezer. Always check for signs of spoilage before eating. Enjoy your savory sweet potato, chickpea, and red lentil soup any time! For the full recipe, check out the recipe section above. You can enjoy this soup with many tasty sides. Here are some great ideas: - Crusty bread: A slice of warm, crusty bread goes well with the soup. - Salad: A fresh green salad adds crunch and color. Try a simple cucumber and tomato salad. - Rice or quinoa: Serve the soup over rice or quinoa for a filling meal. - Yogurt: A dollop of plain yogurt adds creaminess and balances the flavors. - Herbs: Fresh herbs like parsley or cilantro can brighten up each bowl. Yes, you can make this soup using both methods! Here’s how: - Slow cooker: Just add all the ingredients to the slow cooker. Cook on low for 6-8 hours or on high for 3-4 hours. - Instant Pot: Use the sauté function for the onions, garlic, and ginger. Then add the other ingredients. Set it to cook for 10 minutes on high pressure. Let it release naturally for 10 minutes. Adjust the liquid as needed, but the recipe works well in either method. You can easily adjust the spice level! Here are some tips: - For more heat: Add red pepper flakes or a dash of hot sauce. - For less heat: Skip the spices or use sweet spices like cinnamon. - Taste as you go: Start with small amounts and increase to your liking. This way, you can make the soup perfect for everyone at your table! In this blog post, we explored a warming sweet potato, chickpea, and red lentil soup. We covered key ingredients like sweet potatoes, chickpeas, and warming spices. I provided steps for cooking and tips for texture and flavor. You learned how to modify the recipe to fit your needs. Now, you can enjoy a healthy, tasty soup that’s easy to make. Experiment with your favorite ingredients and storage methods. Happy cooking!

Savory Sweet Potato, Chickpea, and Red Lentil Soup

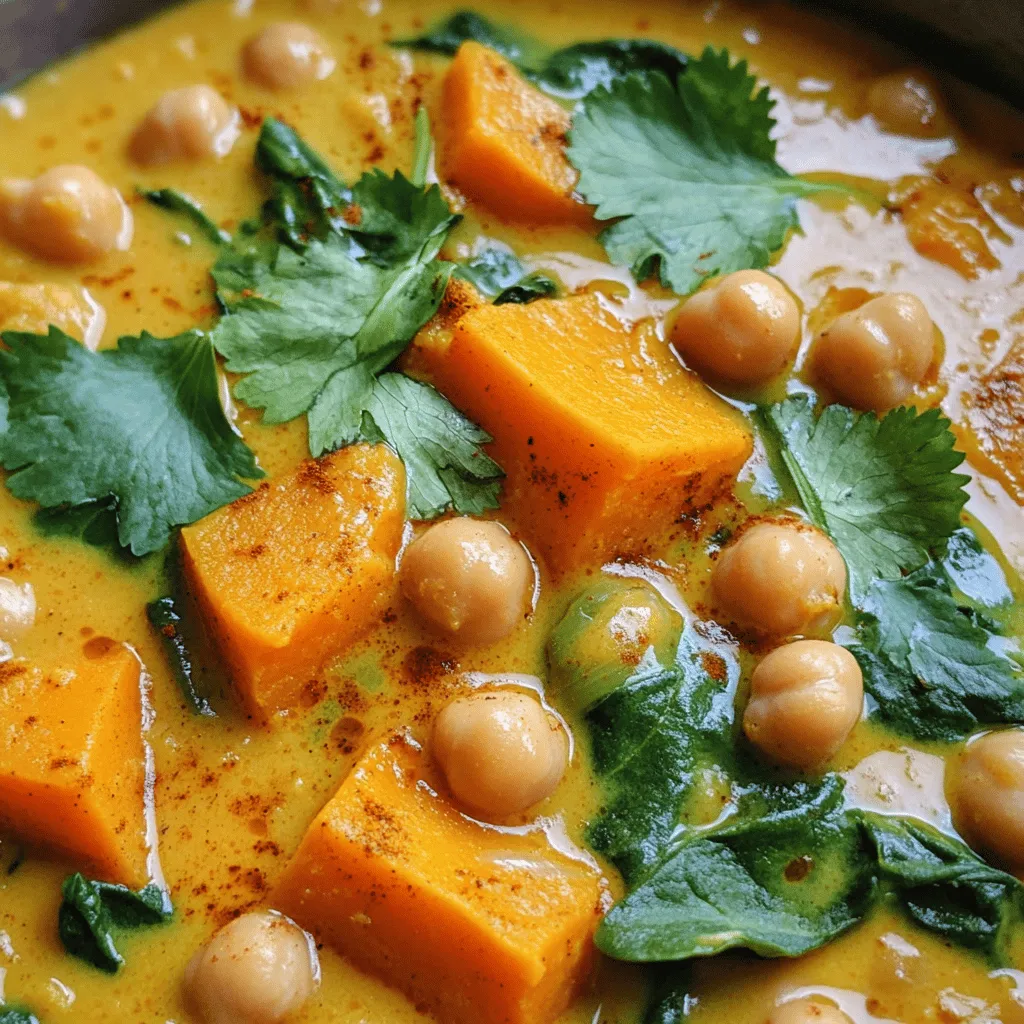
Warm up your kitchen with my Savory Sweet Potato, Chickpea, and Red Lentil Soup! This soup is packed with nutrients

- 12 oz (340g) penne pasta - 12 oz (340g) smoked sausage, sliced - 1 medium onion, diced - 1 cup cherry tomatoes, halved - 3 cloves garlic, minced - 1 red bell pepper, chopped - 4 cups chicken broth - Fresh spinach - 1 teaspoon Italian seasoning - ½ teaspoon red pepper flakes (optional) - Salt and pepper to taste - ½ cup grated Parmesan cheese - Fresh parsley for garnish - 2 tablespoons olive oil Gather these ingredients before you start cooking. This will make your process easier. The penne pasta gives a nice bite. Smoked sausage adds a rich flavor. Fresh veggies like onion, tomatoes, and spinach make this dish bright and healthy. I often use chicken broth for depth, but vegetable broth works too. Italian seasoning blends well with the sausage. If you like heat, add red pepper flakes. Don’t forget the Parmesan cheese; it adds creaminess and taste. The olive oil helps cook the veggies and adds flavor. You can find the full recipe in the article. Enjoy the process of cooking! - Sautéing Onion and Sausage Start by heating the olive oil in a large pot over medium heat. Add the diced onion and sliced smoked sausage. Sauté them for about 5 to 7 minutes. You want the onion to turn translucent and the sausage to brown a bit. This step builds a great base of flavor. - Cooking Garlic and Red Bell Pepper Next, stir in the minced garlic and chopped red bell pepper. Cook for another 2 to 3 minutes. The garlic will release a nice aroma. You want the red bell pepper to soften just a little. - Adding Cherry Tomatoes After that, toss in the halved cherry tomatoes. Let them cook for about 2 minutes. This will help the tomatoes release their juices and add extra flavor to the dish. - Incorporating Chicken Broth and Pasta Now, pour in the chicken broth and bring it to a boil. Once it boils, add the penne pasta and Italian seasoning. Stir everything well to mix it up. - Simmering the Pasta Reduce the heat to low and cover the pot. Let it simmer for about 12 to 15 minutes. Stir it occasionally to prevent sticking. The pasta should be al dente and soak up most of the broth. - Mixing in Spinach and Cheese Once the pasta is cooked, stir in the fresh spinach and grated Parmesan cheese. Keep mixing until the spinach wilts and the cheese melts. Season with salt and pepper to taste. For the complete cooking instructions, check the Full Recipe. Ensuring Perfect Pasta Texture For great pasta, cook the penne until it is al dente. This means it should have a slight bite but not be hard. Stir the pasta often while it simmers. This helps it cook evenly and prevents sticking. Adjusting Seasoning to Taste Taste your dish as it cooks. You can add more salt, pepper, or Italian seasoning if needed. If you want some heat, sprinkle in more red pepper flakes. Everyone's taste is different, so adjust to what you like. Pairing with Salad or Garlic Bread Serve your pasta with a fresh salad or warm garlic bread. A crisp side salad adds color and crunch. Garlic bread is perfect for soaking up the sauce. Both options balance the meal nicely. Presentation Tips for Attractive Serving Make your dish look great by using bowls. Garnish with fresh parsley and a sprinkle of Parmesan cheese. This adds color and makes your meal more inviting. Remember, we eat with our eyes first! Recommended Cookware Use a large pot for this recipe. A heavy-bottomed pot works well. It helps heat evenly and prevents burning. A wooden spoon is great for stirring. Essential Utensils Have a cutting board and a sharp knife ready. These help with chopping veggies and sausage. A measuring cup for the broth and a grater for the cheese are also useful. Simple tools make cooking easier. For the full recipe, check out the One Pot Smoked Sausage Pasta ! {{image_2}} Alternative Sausages or Proteins You can use different sausages like turkey or chicken. These options are leaner but still tasty. If you want a meatless meal, try using plant-based sausage. It adds flavor and keeps the dish hearty. Adding Different Vegetables Feel free to mix in vegetables you like. Spinach is a great choice, but you can also add zucchini, mushrooms, or peas. These veggies boost nutrition and make the dish colorful. Gluten-Free Pasta Options If you need gluten-free pasta, there are many choices. Look for pasta made from rice or lentils. These gluten-free options work well in this recipe without losing taste or texture. Vegetarian Adaptations To make this meal vegetarian, skip the sausage. You can add beans or extra veggies instead. Chickpeas or lentils provide protein and make the dish filling. Extra Spices for More Heat Want a kick? Add more red pepper flakes or some cayenne pepper. You can also try smoked paprika for a deeper flavor. These spices make the dish more exciting. Incorporating Different Cheeses While Parmesan is tasty, you can change it up! Try mozzarella for a gooey texture or feta for a tangy bite. Mixing cheeses creates layers of flavor in your pasta. For the complete recipe, check out the [Full Recipe]. How to Store Leftovers After you finish your meal, let the pasta cool down. Place it in a bowl or container. Cover it tightly with a lid or plastic wrap. This helps keep the pasta fresh. It can last in the fridge for up to three days. Best Containers for Storage I recommend using airtight containers. Glass containers are great because they are safe for both the fridge and microwave. If you use plastic, make sure it is BPA-free. This keeps your food safe and tasty. Stovetop vs. Microwave You can reheat the pasta on the stovetop for the best flavor. Just add a splash of broth or water to keep it moist. Heat it over medium heat until warm. If you’re in a hurry, the microwave works too. Heat in short bursts, stirring in between. Tips for Maintaining Texture To keep the pasta from getting dry, add a bit of liquid when reheating. Stir well to mix the flavors. This will help your pasta stay creamy and delicious. How to Freeze One Pot Smoked Sausage Pasta To freeze, let the pasta cool completely. Portion it into airtight containers or freezer bags. Make sure to remove as much air as possible. This prevents freezer burn and keeps the taste fresh. Thawing Instructions When you’re ready to eat, take the pasta out of the freezer. You can thaw it in the fridge overnight. For a quicker method, use the microwave on the defrost setting. After thawing, reheat as mentioned above for the best results. Yes, you can make One Pot Smoked Sausage Pasta ahead of time. To prep, cook it as usual, then let it cool. Store it in an airtight container in the fridge for up to three days. When ready to eat, heat it on the stove or in the microwave. Add a splash of broth to keep it moist. This way, you enjoy a quick meal even on busy days! Absolutely! You can swap penne for other pasta types. Here are some great options: - Rotini: This corkscrew shape holds sauce well. - Fusilli: Its twists add a fun texture. - Macaroni: A classic choice for a creamy feel. - Gluten-free pasta: If you need a gluten-free option, use your favorite brand. This dish pairs well with several sides. Here are some tasty ideas: - Garlic bread: Perfect for dipping into the sauce. - A fresh salad: A light, crisp salad balances the meal. - Roasted vegetables: They add color and nutrients. - Sautéed greens: Spinach or kale complements the pasta nicely. To add heat, try these tips: - Use more red pepper flakes: Start with a teaspoon, then adjust to taste. - Add diced jalapeños or serrano peppers: They give a fresh kick. - Mix in hot sauce: A few dashes can spice up the dish. - Use spicy sausage: Look for varieties like andouille for more flavor. For the complete cooking process, check the Full Recipe. This blog post covered a simple and tasty one-pot smoked sausage pasta. We explored the main and additional ingredients, seasoning, and garnish. I shared step-by-step instructions for preparing and cooking the dish. Tips for perfecting your pasta and serving suggestions added to your culinary toolkit. You can also personalize this dish with variations and enjoy it for days with our storage tips. Overall, this recipe is easy and satisfying. You can impress your family and friends with minimal effort. Enjoy creating this delightful meal!

One Pot Smoked Sausage Pasta Quick and Easy Meal

Are you looking for a quick and easy dinner? Look no further! This one pot smoked sausage pasta dish brings

To make a delightful Garlic Parmesan Pasta, gather these simple ingredients: - 12 oz spaghetti or fettuccine - 4 tablespoons unsalted butter - 4 cloves garlic, minced - 1 teaspoon red pepper flakes (adjust to taste) - 1 cup freshly grated Parmesan cheese - 1 cup heavy cream - Salt and pepper to taste - 1/4 cup fresh parsley, chopped (for garnish) - Zest of 1 lemon (for a fresh twist) Each ingredient plays a key role in creating rich flavors. The pasta serves as the base, while butter adds creaminess. Garlic gives a punchy taste, and red pepper flakes add warmth. Parmesan cheese makes the dish rich and savory, while heavy cream smooths it out. Salt and pepper enhance all the flavors. Fresh parsley and lemon zest brighten the dish, making it more appealing. For the full recipe, check out the detailed steps to create this dish perfectly! To start, bring a large pot of water to a boil. Add a good amount of salt. This helps flavor the pasta. Next, add 12 oz of spaghetti or fettuccine. Cook it until it is al dente, which means it should be firm but not hard. Follow the package instructions for timing. After cooking, save 1 cup of the pasta water. This water is starchy and helps the sauce blend later. Drain the pasta but don’t rinse it. Rinsing washes away the flavor. Now, heat a large skillet over medium heat. Add 4 tablespoons of unsalted butter and let it melt. Once melted, add 4 cloves of minced garlic and 1 teaspoon of red pepper flakes. Sauté for about 1 to 2 minutes. You want the garlic to smell great, not brown. Browning can make it bitter. Keep an eye on it. Stir gently and enjoy the aroma as it fills your kitchen. Lower the heat and pour in 1 cup of heavy cream. Stir well and let it simmer for about 3 to 4 minutes. This thickens the sauce a bit. Next, gradually add 1 cup of freshly grated Parmesan cheese. Stir until it melts completely. If the sauce gets too thick, use some of that reserved pasta water. Add it slowly, mixing well until you reach the right creamy texture. Add the drained pasta to the skillet. Toss it well to coat every strand in that rich garlic Parmesan sauce. This step is crucial for flavor. Season with salt, pepper, and a little lemon zest to brighten the dish. Taste it and adjust the seasoning as needed. You want a perfect balance. When ready to serve, remove the skillet from the heat. You can garnish with fresh chopped parsley and more Parmesan cheese if you like. For a fun twist, add some lemon zest for freshness. This dish pairs well with a crisp green salad or a light white wine. Enjoy your delicious Garlic Parmesan Pasta! For the full recipe, check out the detailed instructions above. To make the best Garlic Parmesan Pasta, focus on two key areas: garlic and flavor. Preventing garlic from burning: Burnt garlic can ruin your dish. To avoid this, cook it over medium heat. Stir it often and watch it closely. Once it turns fragrant, it’s ready. This usually takes about 1-2 minutes. Enhancing flavor with additional ingredients: You can add a few simple items to boost flavor. Try mixing in fresh herbs like basil or thyme. You can also add spinach for a pop of color and nutrition. Lemon zest adds brightness to the dish, too. Caloric breakdown per serving: Each serving of Garlic Parmesan Pasta has about 600 calories. This includes the pasta, butter, cream, and cheese. It’s rich, but oh so good! Healthier ingredient swaps: If you want a lighter meal, swap heavy cream for half-and-half or milk. Choose whole-grain pasta for extra fiber. You can also use nutritional yeast instead of cheese for a dairy-free option. For more details, see the Full Recipe for Garlic Parmesan Pasta. {{image_2}} You can easily add spinach and mushrooms to your Garlic Parmesan Pasta. Spinach gives color and nutrients. Mushrooms add a rich, earthy taste. Here’s how to do it: - How to incorporate greens: Start by washing fresh spinach. Add it to the skillet just after sautéing garlic. Cook until it wilts, then mix in the pasta. This adds a fresh touch and great flavor. - Cooking methods for mushrooms: Slice your mushrooms thin. Sauté them in the same skillet before adding garlic. Cook until they are golden brown. This brings out their flavor and gives a nice texture. Adding protein can make your meal heartier. Grilled chicken or shrimp works great. Here’s how to add them: - Adding grilled chicken or shrimp: Cook the protein separately. Season it with salt and pepper. After mixing the pasta and sauce, add the cooked chicken or shrimp. Toss everything to combine well. - Vegetarian protein sources: For a meat-free option, use chickpeas or tofu. Cook them until golden. Mix them in with the pasta for extra protein. Both options are tasty and filling. If you need to avoid gluten, there are great options available. You can still enjoy this dish with a few changes: - Gluten-free pasta options: Look for gluten-free spaghetti or fettuccine. Many brands use rice or quinoa. Cook them as you would regular pasta for the best results. - Modifications for dietary needs: If you want a lighter dish, use cauliflower or zucchini noodles. Spiralize zucchini for a fun twist. This also makes the dish lower in carbs. For the full recipe, check out the main article! To keep your Garlic Parmesan Pasta fresh, use airtight containers. Glass or plastic containers work well. Store the pasta in the fridge for up to three days. If you want to keep it longer, freeze it. In the freezer, it can last for about two months. Just remember, the sauce may change texture when frozen. For reheating, the best way is to use a skillet. Heat it over low heat and add a splash of water or cream. This helps to keep the pasta moist. Stir often to avoid sticking. If you use a microwave, cover the dish with a damp paper towel. This will prevent the sauce from drying out. Always check that it’s warm all the way through before serving. I love using spaghetti or fettuccine for Garlic Parmesan Pasta. These types hold sauce well. Spaghetti gives a nice twirl, while fettuccine offers a flat surface for the sauce. Both are great choices for this dish. Yes, you can prep Garlic Parmesan Pasta ahead of time. Cook the pasta and store it in the fridge. You can also prepare the sauce and keep it separate. When you’re ready to eat, just reheat and combine. This saves time on busy nights. To add heat, use red pepper flakes. Start with a teaspoon and adjust to your taste. You can also add fresh chopped chili. This gives the dish a nice kick without overpowering the garlic flavor. If you want a lighter option, use whole milk or a non-dairy milk. You can also use Greek yogurt for creaminess. Blend it well to keep the sauce smooth. These substitutes work well and still taste great. Check the pasta a minute before the package time ends. It should be firm but not hard when bitten. Look for a slight white dot in the center. This means it’s just right for your dish. In this blog post, I shared how to make Garlic Parmesan Pasta from scratch. We covered all the important ingredients, cooking tips, and serving options. You learned to cook pasta perfectly and create a creamy sauce. Remember, you can customize flavors with extras like greens or proteins. Storing and reheating leftovers is easy too. Enjoy this dish for its rich taste and quick prep. With practice, you'll master it and delight everyone at your table. Happy cooking!

Garlic Parmesan Pasta Simple and Tasty Recipe

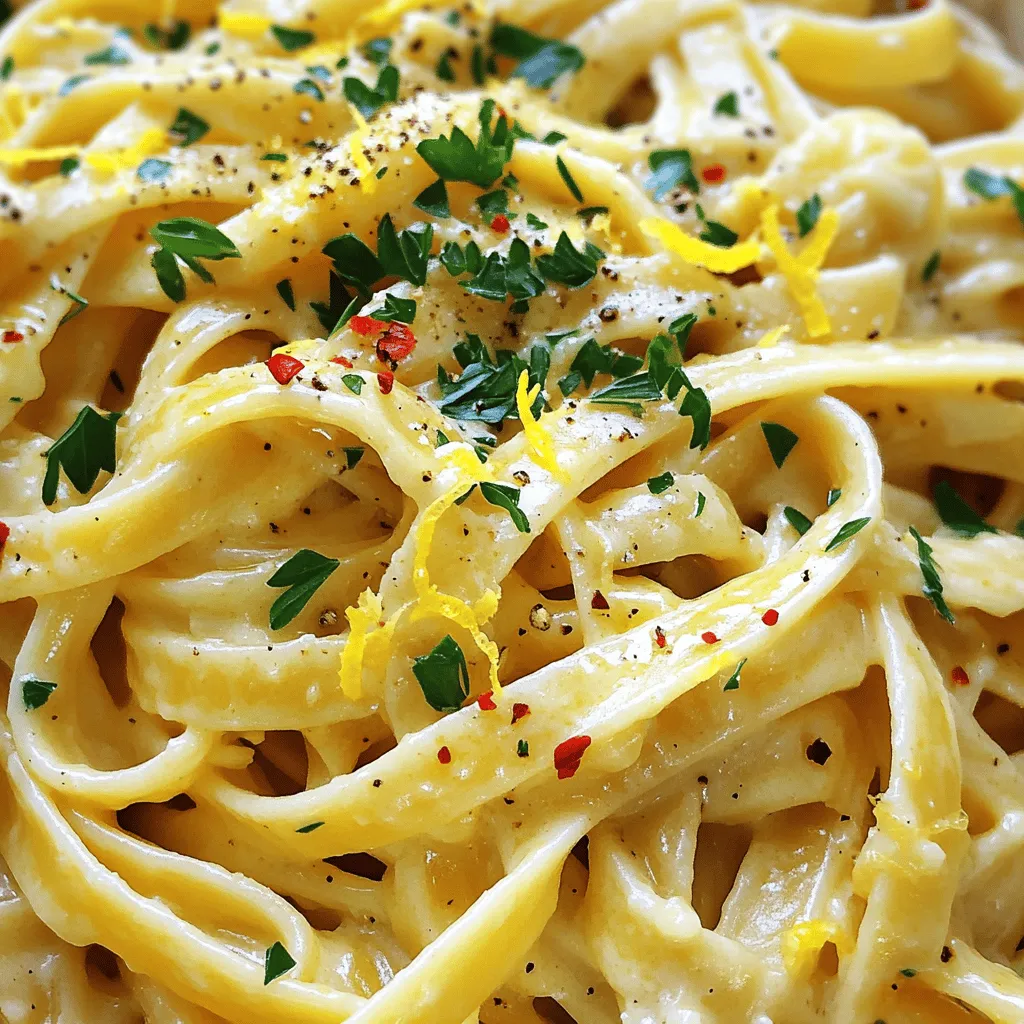
If you crave a simple yet delicious meal, Garlic Parmesan Pasta is your answer. This creamy dish is quick and

- Salmon fillets - Unsalted butter - Honey - Fresh lime juice - Minced garlic - Lime zest - Salt and black pepper - Fresh parsley - Lime wedges To make honey-lime garlic butter baked salmon, gather these simple ingredients. Use fresh salmon fillets for the best taste. Unsalted butter gives you control over the salt. Honey adds a sweet touch, while fresh lime juice provides tanginess. Minced garlic brings in a savory flavor, and lime zest enhances the citrus notes. Salt and black pepper are key for seasoning. Finally, fresh parsley adds a pop of color and flavor, and lime wedges serve as a refreshing side. - Butter alternatives: Try olive oil or coconut oil. - Honey alternatives: Maple syrup or agave syrup work well. - Low-sodium seasoning options: Use herbs or lemon juice for flavor without salt. If you need to swap an ingredient, it’s easy. Olive oil is a great choice if you want a dairy-free option. Maple syrup can replace honey if you prefer a different sweetness. For low-sodium seasoning, fresh herbs like dill or basil can add great taste. - Baking dish - Mixing bowl - Measuring cups and spoons - Whisk or fork Having the right tools makes cooking easy. A baking dish helps cook the salmon evenly. A mixing bowl is essential for combining your sauce. Use measuring cups and spoons for accuracy. A whisk or fork will help mix the ingredients smoothly. With these tools, you're ready to create a delicious meal. For the full recipe, check out the instructions above. 1. Preheat the oven to 375°F (190°C). This step ensures even cooking. 2. In a small mixing bowl, combine the melted butter, honey, lime juice, minced garlic, and lime zest. Mix well until fully blended. This creates a rich sauce. 1. Season the salmon fillets with salt and black pepper on both sides. This enhances the flavor. 2. Place the salmon fillets in a baking dish lined with parchment paper or lightly greased with cooking spray. This prevents sticking. 3. Pour the honey-lime garlic butter mixture evenly over the salmon fillets, making sure they are well coated. This step adds flavor and moisture. 4. Bake in the preheated oven for 15-20 minutes, or until the salmon flakes easily with a fork. Cooking time may vary depending on the thickness of the fillets. Keep an eye on it to avoid overcooking. 1. Once done, remove the salmon from the oven and let it rest for a couple of minutes before serving. This allows the juices to redistribute. 2. Garnish with fresh chopped parsley and serve with lime wedges on the side for a fresh burst of flavor. For the full recipe, check the details above. To get that perfect flakiness, you want to watch the time closely. Salmon cooks fast, so keep an eye on it. For thicker fillets, add a few extra minutes. A good rule is 15 to 20 minutes at 375°F. Always use a fork to check for flakiness to know it’s ready. Garnishing makes your dish pop! I like to use fresh parsley for a splash of color. Lime wedges on the side add brightness and flavor. Serve with a green salad or some rice. This brings balance to the meal and makes it look great. Want some heat? Add red pepper flakes to the honey-lime sauce for a kick. Fresh herbs like cilantro or dill can change the flavor too. They add freshness and make each bite unique. Experiment and find what you love! {{image_2}} You can change the taste of your honey-lime garlic butter baked salmon. Try using different citrus fruits. Orange or grapefruit juice can add a nice twist. These fruits bring a unique zing. If you want more sweetness, use maple syrup or agave. These options can enhance the flavor without overpowering it. You have choices when it comes to cooking. Baking is easy and keeps the salmon moist. Grilling adds a smoky flavor, which many people love. You can also try skillet cooking. This method gives a nice sear and keeps the fish tender. Each method has its own charm, so choose what you enjoy best. Don't hesitate to add vegetables to your dish. You can make it a one-pan meal. Think about using asparagus, bell peppers, or zucchini. They cook well with salmon and add color. Also, feel free to switch up the fish. Other fish like trout or tilapia can work great too. Each type will bring a different taste to your meal. Try these variations to keep your meals exciting. For the full recipe, check out the link! To keep your honey-lime garlic butter baked salmon fresh, you should refrigerate it. Place the salmon in an airtight container. This helps maintain flavor and moisture. You can store it in the fridge for up to three days. If you have extra sauce, keep it in a separate container. This will add flavor when you reheat the salmon. You can reheat your salmon in the microwave or the oven. If you choose the microwave, use a microwave-safe dish. Heat it in short bursts of 30 seconds to avoid overcooking. For the oven, preheat it to 350°F (175°C). Place the salmon on a baking sheet and cover it with foil. This keeps it moist and helps it heat evenly. Tips for maintaining texture: Always check the salmon after reheating. It should be warm, not dry. A few drops of lime juice can add freshness back to the fish. You can freeze cooked salmon for up to three months. Make sure it cools to room temperature first. Wrap each piece tightly in plastic wrap, then place it in a freezer bag. This prevents freezer burn. Thawing guidance for optimal results: To thaw, place the salmon in the fridge overnight. This method keeps the texture nice. You can also use a cold water bath if you're in a hurry. Just make sure to cook it right after thawing. You should bake salmon at 375°F for 15-20 minutes. The time may change based on how thick your fillets are. Always keep an eye on your salmon as it cooks. It should flake easily with a fork when done. Yes, you can use frozen salmon fillets. Just be sure to thaw them first. Place them in the fridge overnight or run them under cold water. This helps cook them evenly and gives you the best flavor. Some great sides include: - Steamed broccoli - Garlic mashed potatoes - Quinoa salad - Roasted asparagus These sides add color and flavor, making your meal more complete. Check for doneness by using a fork. When your salmon flakes easily, it’s ready. You can also use a meat thermometer. The internal temperature should reach 145°F for safe eating. Yes, this recipe is great for meal prep. You can store leftovers in airtight containers. Keep them in the fridge for 3-4 days. This way, you can enjoy tasty salmon all week long. For the full recipe, check above. This guide helps you create tasty honey-lime garlic butter salmon. You learned about ingredients, tools, and easy steps. You now have tips to enhance flavor and store leftovers. Salmon is a versatile dish that suits many tastes and diets. Whether you grill, bake, or try new flavors, you can make this meal shine. Enjoy the process and the final dish. Your kitchen adventure begins now!

Honey-Lime Garlic Butter Baked Salmon Tasty Delight

Are you ready to elevate your dinner game? This Honey-Lime Garlic Butter Baked Salmon is the perfect blend of sweet

Older posts
Newer posts
← Previous Page1 … Page57 Page58 Page59 … Page77 Next →

dsad

© 2025 pureeatsnow • Built with GeneratePress

Our Policies

  • Copyright Policy
  • Cookie Policy
  • GDPR Policy
  • Privacy Policy
  • Disclaimer
  • Terms Of Use

More Information

  • Home
  • About
  • Contact
  • Appetizers
  • Dessert
  • Dinner
  • Drinks
©2025, pureeatsnow About Back To Top