Skip to content
DisclaimerTerms Of UseGDPR PolicyCookie Policy

pureeatsnow

  • Home
  • Drinks
  • Appetizers
  • Dinner
  • Dessert
  • About
  • Contact
  • Privacy Policy
DisclaimerTerms Of UseGDPR PolicyCookie Policy

Rachel

To make these hot pockets, you will need: - 1 batch of homemade or store-bought vegan meatballs (or 1 cup lentils, cooked and mashed) - 1 cup vegan mozzarella cheese, shredded - 1 cup marinara sauce - 2 cups all-purpose flour - 1 teaspoon baking powder - ½ teaspoon salt - ¾ cup plant-based milk (almond or soy) - 2 tablespoons olive oil - 1 teaspoon Italian seasoning - Fresh basil leaves for garnish (optional) These ingredients come together to create a warm and tasty meal. The dough gives a soft bite, while the filling brings a burst of flavor. I love using brands that focus on quality and taste. For vegan meatballs, I recommend Beyond Meat or Gardein. Both options offer great flavor and texture. For mozzarella, Daiya and Miyoko's Creamery provide creamy, meltable cheese that works perfectly in this recipe. These brands are widely available, making them easy to find. While the main ingredients shine, you can add even more flair. Consider including: - Chopped garlic for a stronger flavor - Red pepper flakes for a kick of heat - Fresh spinach for added nutrients and color - Nutritional yeast for a cheesy taste without the dairy These optional ingredients can transform your hot pockets into a unique dish. Feel free to mix and match to find your favorite flavor combinations. For the complete cooking steps, check out the Full Recipe. Start by mixing your flour, baking powder, and salt in a large bowl. Make sure to combine them well. Next, slowly add in the plant-based milk and olive oil. Stir until a soft dough forms. Once it’s mixed, lightly flour a clean surface. Knead your dough for about five minutes. You want it to be smooth and elastic. After kneading, cover the dough with a kitchen towel. Let it rest for 15 minutes to relax the gluten. After the dough has rested, divide it into four or six equal pieces. Roll each piece into a circle, about six inches wide. This will be the base for your hot pockets. On one half of each circle, place a few vegan meatballs, a spoonful of marinara sauce, and a sprinkle of vegan mozzarella cheese. Make sure not to overfill them. Fold the other half over the filling. Use a fork to crimp the edges and seal them tight. Preheat your oven to 375°F (190°C) while you shape the hot pockets. Line a baking sheet with parchment paper. Place the filled hot pockets on the sheet. Bake for 20 to 25 minutes, or until they turn golden brown. When they are done, take them out and let them cool slightly. Serve warm with extra marinara sauce for dipping. If you like, garnish with fresh basil leaves for a pop of color and flavor. This dish is perfect for sharing or enjoying on your own. Check out the Full Recipe for more details! To make soft and flaky dough, use fresh flour. Mix it well with baking powder and salt. Gradually add plant-based milk and olive oil. This step helps create a smooth texture. Knead the dough on a floured surface for about five minutes. Let the dough rest for at least 15 minutes. Resting allows the gluten to relax, giving you a better dough. To prevent filling from leaking, don’t overfill each pocket. A spoonful of marinara and a few meatballs work best. Make sure to seal the edges tightly. Using a fork to crimp the edges creates a strong seal. If you notice any gaps, press the edges more firmly. This helps keep all the goodness inside. Adding seasonings can make a big difference. Italian seasoning adds a nice depth to the filling. You can also sprinkle a little garlic powder for extra flavor. Consider using fresh herbs like basil or parsley. These give a fresh taste and aroma. Feel free to experiment with your favorite spices. A pinch of red pepper flakes adds a kick if you like some heat. {{image_2}} To make gluten-free hot pockets, use a gluten-free flour blend. You can find these at most grocery stores. Mix the gluten-free flour with the baking powder and salt. Substitute plant-based milk with a similar amount of water or plant yogurt. This will help keep the dough moist and tasty. Knead the dough like regular dough but be gentle. Gluten-free dough can be more fragile, so handle it with care. If you want to change up the protein in your hot pockets, try different options. You can use cooked lentils, chickpeas, or even tempeh. For a fun twist, use jackfruit for a pulled texture. If you miss meat, try store-bought vegan meat crumbles. They are easy to find and cook quickly. Each option offers a unique taste and texture, making your hot pockets exciting. You can easily modify the recipe to fit your taste. Adding spices like cumin or smoked paprika can bring a new flavor. For a spicy kick, mix in some red pepper flakes or jalapeños. If you love veggies, consider adding sautéed mushrooms, spinach, or bell peppers to the filling. You can also change the cheese to a different vegan variety. This allows you to create a hot pocket that suits your cravings perfectly. For the full recipe, refer back to the main section. To keep your leftover hot pockets fresh, let them cool first. Place them in an airtight container. This helps keep them from drying out. You can also wrap each hot pocket in plastic wrap. Store them in the fridge for up to three days. If you want to save them for later, freezing is a great option. Wrap each cooled hot pocket in foil or plastic wrap. Place them in a freezer-safe bag. They will last up to three months in the freezer. Just remember to label the bag with the date. To reheat, you have a few options. The oven is the best method for crispiness. Preheat your oven to 350°F (175°C). Place the hot pockets on a baking sheet and heat for about 15-20 minutes. For a quicker method, use the microwave. Heat for 1-2 minutes, but the crust may not be as crisp. Enjoy your hot pockets warm and delicious! For the full recipe, check out the Vegan Meatball Mozzarella Hot Pockets. You can use many options for vegan meatballs. Some popular choices are chickpeas, lentils, or mushrooms. Store-bought brands like Beyond Meat or Gardein work well too. You can also make your own using beans, breadcrumbs, and spices. This way, you control the flavor and texture. Yes, store-bought dough is a great time-saver. Look for pizza or biscuit dough in the refrigerated section. Just make sure it’s vegan. This will help you skip the mixing and kneading steps. Using it will still give you tasty hot pockets. You can easily prepare these hot pockets in advance. Make the dough and filling, then assemble them. Place the hot pockets in the fridge for a day or two. You can also freeze them for up to three months. Just bake them straight from the freezer when you’re ready to eat. For more details, check the Full Recipe. You learned about making vegan meatball mozzarella hot pockets. We covered key ingredients, brands, and optional flavors. I shared easy steps for dough, shaping, and baking. You now have tips for texture and flavor, plus variations for different diets. Making hot pockets at home gives you control over taste and ingredients. Enjoy the process, get creative, and share your tasty results!

Vegan Meatball Mozzarella Hot Pockets Delight

If you’re craving a tasty snack that’s quick and delightful, you’re in the right place! Today, I’ll show you how

- 1 can refrigerated crescent roll dough - 8 oz cream cheese, softened - 1/4 cup granulated sugar - 1 teaspoon vanilla extract - 1 egg yolk - 1 tablespoon lemon juice - 1/2 cup powdered sugar - 1 tablespoon milk (for drizzle) - Fresh berries (for garnish, optional) I love using canned crescent roll dough for these danishes. It saves time and effort. The cream cheese filling is rich and creamy. You mix cream cheese with sugar, vanilla, egg yolk, and lemon juice. This blend gives the danishes a lovely taste. The lemon juice adds brightness to the filling. You can adjust the sugar to match your taste. The powdered sugar and milk make a nice drizzle. It adds sweetness and looks great on top. Fresh berries on the side are a fun, colorful touch. - Lemon zest or orange zest - Chocolate chips - Nuts (e.g., chopped pecans or almonds) If you want to mix things up, try some optional ingredients. Lemon or orange zest can add a nice twist. Chocolate chips make it extra special for chocolate lovers. Nuts give a crunchy texture that contrasts well with the soft filling. You can get creative and find what you like best! - Preheat oven to 375°F (190°C). - Line a baking sheet with parchment paper. - Beat cream cheese mixture until smooth. To start, preheat your oven to 375°F (190°C). This will help the danishes bake evenly. Next, line a baking sheet with parchment paper. This step keeps the danishes from sticking and makes cleanup easy. In a medium bowl, beat the softened cream cheese with the sugar, vanilla, egg yolk, and lemon juice. Mix until it is creamy and smooth. - Unroll and separate crescent roll dough into triangles. - Spoon cream cheese mixture onto triangle centers. - Roll and seal the dough around the filling. Now, let’s assemble! Carefully unroll the crescent roll dough. You will see that it separates into triangles. Place 1-2 tablespoons of the cream cheese mixture in the center of each triangle. Starting from the wide end, roll the dough toward the pointed end. Make sure to pinch the edges well so the filling does not leak out. - Place on baking sheet and bake for 12-15 minutes. - Cool slightly before drizzling icing. Place your formed danishes on the lined baking sheet. Make sure to space them apart. Bake in the preheated oven for 12-15 minutes. You want them to turn golden brown. Once baked, let them cool for a few minutes. Then, mix the powdered sugar with milk to make a drizzle. Drizzle this icing over each danish for a sweet touch. Enjoy! - Use softened cream cheese for a smoother filling. - Avoid overfilling to prevent leakage during baking. - Pinch edges securely for best results. To make the perfect crescent cheese danish, you need to follow a few simple tips. First, using softened cream cheese helps create a creamy filling. Soft cream cheese blends easily with sugar and flavorings. This way, your filling stays smooth and tasty. Next, be careful with how much filling you use. If you add too much, the filling may leak out while baking. A tablespoon or two should be just right. This keeps your danishes looking neat and beautiful. Finally, make sure to pinch the edges tightly. This step keeps the filling locked inside. It also gives your pastries a lovely shape that looks great on your table. - Pair with fresh berries or a side of fruit. - Serve warm for best flavor. When it comes to serving these danishes, think about adding fresh berries. Strawberries, blueberries, or raspberries make great choices. They add color and flavor that everyone will love. You can also serve them with a side of fruit salad for a fresh touch. For the best taste, serve your danishes warm. The warm pastry and creamy filling create a delightful experience. You can drizzle the icing right before serving. This will make them even more tempting! {{image_2}} You can easily change up the flavors in your crescent cheese danishes. Here are three tasty ideas: - Lemon Cream Cheese Danishes: Add lemon zest and replace the lemon juice with more zest. This gives a bright and refreshing taste. - Chocolate Crescent Danishes: Mix in chocolate chips into the cream cheese filling. This makes a rich and sweet treat that chocolate lovers will adore. - Nutty Cream Cheese Danishes: Add chopped nuts like pecans or almonds to the filling. This adds a nice crunch and depth of flavor. Crescent cheese danishes can fit many diets. Here are a few options: - Gluten-free crescent rolls: Use gluten-free dough to make these danishes suitable for those with gluten allergies. Many brands offer gluten-free options that taste great. - Vegan cream cheese alternatives: Swap regular cream cheese for a vegan version. Use plant-based cream cheese made from nuts or soy for a dairy-free treat. Feel free to get creative with these variations. They keep your danishes fun and exciting! To keep your crescent cheese danishes fresh, store them in an airtight container in the fridge. This helps maintain their flavor and texture. Enjoy them within 2-3 days for the best taste. After that, they may lose their charm. When you want to enjoy your danishes again, reheat them in the oven or microwave. For the oven, set it to 350°F (175°C) and bake for about 5-8 minutes. This keeps the pastry crispy and warm. If you use a microwave, heat them in short bursts of 15-20 seconds, checking often. Enjoy every bite of your delightful treat! Yes, you can prepare the filling in advance. This way, when you are ready to bake, you only need to assemble and bake. It saves time and makes serving easy. Store the filling tightly covered in the fridge. Look for a golden brown color and a slight puffing of the dough. This shows they are light and flaky. A good rule is to bake them for 12 to 15 minutes. Yes, they can be frozen before or after baking. Just ensure proper storage. Use an airtight container or freezer bag. When you are ready to eat, thaw them in the fridge and reheat. You can add fruits, jams, or spices to customize the filling. Try blueberries, strawberries, or even some cinnamon. This makes each danish unique and fun to eat. Serve warm with a dusting of powdered sugar and fresh berries, as mentioned in the Full Recipe. This adds a nice touch and makes the danishes look pretty. Enjoy with a cup of coffee or tea! To sum up, we explored how to make delicious Crescent Cheese Danishes with simple steps. We talked about key ingredients, preparation, baking tips, serving ideas, and variations to suit different tastes. Remember, you can make them your own with fruit, chocolate, or nuts. These danishes are perfect for any occasion. Enjoy these treats fresh and warm for the best flavor! Happy baking!

Crescent Cheese Danishes Delightful and Easy Treat

If you’re looking for a quick and tasty treat, Crescent Cheese Danishes are the answer! With just a few simple

To make Maple Pecan Granola Bars, you need some simple and healthy ingredients. Here’s what you will need: - 2 cups rolled oats - 1 cup pecans, chopped - 1/2 cup honey or maple syrup - 1/4 cup coconut oil, melted - 1/2 teaspoon vanilla extract - 1/4 teaspoon salt - 1/2 cup dried cranberries or raisins - 1/4 cup mini chocolate chips (optional) These ingredients come together to create a tasty snack. The rolled oats provide fiber. Chopped pecans add crunch and healthy fats. Honey or maple syrup gives sweetness. Coconut oil makes the bars rich and tasty. Vanilla adds flavor, while salt balances the sweetness. Dried cranberries or raisins add a fruity touch. If you like chocolate, mini chocolate chips can make it even better! For the full recipe and steps, you can check out [Full Recipe]. First, preheat your oven to 350°F (175°C). While it heats, grab an 8x8 inch (20x20 cm) baking dish. Line it with parchment paper. Let the edges hang over the sides for easy removal later. In a large mixing bowl, add 2 cups of rolled oats, 1 cup of chopped pecans, and 1/4 teaspoon of salt. Mix them together well. This step ensures every bite has a great flavor. In another bowl, whisk together 1/2 cup of honey or maple syrup, 1/4 cup of melted coconut oil, and 1/2 teaspoon of vanilla extract. Mix until it looks smooth and well-combined. This mix adds sweetness and moisture. Pour the wet mixture over the dry ingredients. Stir until all the oats and nuts are coated. Now, fold in 1/2 cup of dried cranberries or raisins. You can add 1/4 cup of mini chocolate chips if you like a sweet twist. Scoop the mixture into your prepared baking dish. Press it down firmly to create an even layer. Use a spatula or your moistened hands to pack it tight. This helps the bars hold their shape when baked. Place the dish in the oven and bake for 20-25 minutes. Look for a golden brown edge. Once done, take it out and let it cool in the pan for about 10 minutes. After that, use the parchment paper to lift it out. Let it cool on a wire rack for about 30 minutes before cutting into bars. Enjoy your tasty snack! For the complete recipe, check out [Full Recipe]. To get that perfect crunch, bake your bars until golden. The edges should be crisp, while the center stays chewy. Press the mixture firmly into the baking dish. This helps the bars hold together well. Add different nuts like almonds or walnuts for a unique taste. You can also mix in seeds like chia or pumpkin seeds for extra crunch. Want something sweeter? Use maple syrup instead of honey. Toss in some coconut flakes for a tropical twist. These bars make great snacks anytime. Pair them with yogurt for breakfast or enjoy them with a piece of fruit. Slice them into small squares for a fun treat at parties. Presentation matters! Serve on a wooden board, topped with whole pecans and a drizzle of maple syrup for flair. For a quick grab-and-go option, wrap each bar in parchment paper. Check out the Full Recipe for more details! {{image_2}} You can swap pecans for other nuts. Almonds, walnuts, or cashews work well. Each nut adds a unique taste and texture. For a nut-free option, use seeds like sunflower or pumpkin. These seeds pack in protein and crunch. Try mixing different nuts for a fun flavor twist! If you want to change the sweetener, you have options. Use agave syrup or brown rice syrup. Both bring a sweet touch and a hint of flavor. You can also use mashed bananas for a natural sweetener. This adds moisture and a fruity flavor, making your bars more unique! Adding extras can make your granola bars even better. Try mixing in dark chocolate chips or coconut flakes. Dried fruits like apricots or cherries add sweetness and chewiness. You can even add spices like cinnamon or nutmeg for warmth. These simple changes can elevate the taste and keep things interesting. For the full recipe, check out the Maple Pecan Granola Bars section above! To keep your maple pecan granola bars fresh, store them in an airtight container. This step helps maintain their taste and texture. If you plan to eat them soon, keep them at room temperature. For longer storage, the fridge works well too. These granola bars last about one week at room temperature. If you refrigerate them, they can stay fresh for up to two weeks. You can also freeze them for up to three months. Just wrap each bar tightly in plastic wrap. Place them in a freezer bag or container to prevent freezer burn. For on-the-go snacks, wrap each granola bar in parchment paper. This keeps them fresh and makes them easy to grab. You can also use small containers or snack bags for easy packing. This way, your snacks stay ready for any adventure. For the full recipe, check out the section above. Yes, you can use quick oats instead of rolled oats. Quick oats will make your bars softer. They absorb moisture faster than rolled oats. If you prefer a chewier texture, stick with rolled oats. To make these granola bars vegan, replace honey with maple syrup. Use coconut oil as the fat source. This keeps the bars sweet and sticky. You won’t lose any flavor or texture, and they stay delicious! The best way to cut granola bars is to let them cool first. After they cool in the pan for ten minutes, lift them out using the parchment paper. Use a sharp knife to cut them into bars. Clean the knife between cuts for neat edges. Absolutely! You can swap pecans for almonds, walnuts, or sunflower seeds. Use what you like or what you have at home. Each nut adds its own flavor. Just make sure to chop them if they are large. To keep your granola bars crunchy, bake them until they are golden brown. Press the mixture down firmly when you put it in the pan. Store them in an airtight container to protect them from humidity. Enjoy your crunchy snack! For the full recipe, check the section above. In this article, we explored how to make tasty and healthy granola bars. You learned about the essential ingredients, step-by-step instructions, and useful tips. We discussed variations for flavor and the best ways to store your bars. Remember, making granola bars is fun and allows you to customize them to your taste. Enjoy your homemade snacks, and feel free to experiment with different ingredients! Your tasty granola bars await!

Maple Pecan Granola Bars Easy Healthy Snack Recipe

Looking for a quick and healthy snack? These Maple Pecan Granola Bars are your answer! With just a few simple

To make spicy chickpea tacos, gather these main ingredients: - 1 can (15 oz) chickpeas, drained and rinsed - 1 tablespoon olive oil - 1 teaspoon smoked paprika - 1 teaspoon cumin - 1/2 teaspoon cayenne pepper (adjust to taste) - Salt and pepper to taste - 1 tablespoon lime juice - 8 small corn tortillas These ingredients create a tasty, balanced base for your tacos. Chickpeas provide protein and fiber, while spices add warmth and depth. You can enhance your tacos with these tasty garnishes: - 1 avocado, sliced - 1/2 cup diced tomatoes - 1/4 cup fresh cilantro, chopped - 1/4 cup red onion, finely chopped - 1/2 cup Greek yogurt or vegan alternative (for garnish) These toppings add great color and flavor. You can mix and match to suit your taste! To prepare your spicy chickpea tacos, you’ll need: - A mixing bowl for combining ingredients - A baking sheet for roasting - A dry skillet for warming tortillas Using the right tools helps make cooking easier and more fun. For the full recipe, check the section above! Start by draining and rinsing the chickpeas. This removes extra salt and makes them cleaner. In a bowl, mix the chickpeas with olive oil, smoked paprika, cumin, cayenne pepper, salt, and pepper. Make sure every chickpea gets coated. This step adds flavor and spice. Set your bowl aside while you prepare to roast them. Preheat your oven to 400°F (200°C). Spread the seasoned chickpeas on a baking sheet. Make sure they are in a single layer. This helps them roast evenly. Roast for 20-25 minutes. Shake the pan halfway through cooking to ensure crispiness. You want them golden brown and crunchy. When they are done, drizzle lime juice over them for a zesty finish. While the chickpeas roast, get your taco toppings ready. Dice tomatoes, chop cilantro, and finely slice red onion. In a dry skillet over medium heat, warm the corn tortillas for about 30 seconds on each side. This makes them soft and easy to fold. Once the chickpeas are crispy, it’s time to assemble your tacos. Place a generous amount of roasted chickpeas on each tortilla. Top with sliced avocado, diced tomatoes, red onion, and cilantro. Finally, add a dollop of Greek yogurt or a vegan alternative for creaminess. Enjoy your delicious creation! For the full recipe, check out the [Full Recipe]. To make your spicy chickpea tacos pop, adjust the spices. Start with smoked paprika and cumin. These spices add warmth and depth. If you like heat, add more cayenne pepper. Taste as you go. This way, you will find the right balance. You can also add garlic powder or onion powder for more flavor. Always remember, less is more. You can always add more spice, but you cannot take it away! Warm tortillas make a huge difference. Use a dry skillet over medium heat for the best results. Heat each tortilla for about 30 seconds on each side. They should be soft and warm. If you want a smoky flavor, heat them over an open flame for a few seconds. Just be careful not to burn them. Soft tortillas hold the fillings better and make each bite delicious. Presentation matters in cooking. Serve your tacos on a colorful platter. Add lime wedges for squeezing over the top. This adds a fresh, zesty kick. Top with extra cilantro for color and flavor. You can even stack the tacos or arrange them in a line. Make each taco a little work of art. A beautiful plate makes the meal even more enjoyable. For the full recipe, check the complete instructions above. {{image_2}} Chickpeas are great, but you can switch things up. Try black beans for a different taste. You can also use lentils; they add a nice texture. If you prefer meat, ground turkey or chicken works well, too. Each option brings its own flavor. Toppings make tacos fun! Add crunchy lettuce or spicy jalapeños for a kick. You can use diced bell peppers or corn for sweetness. If you love sauces, try salsa, hot sauce, or a creamy chipotle sauce. Mix and match to find your favorite combo. Making the tacos vegan is easy. Just skip the Greek yogurt or use a plant-based option. For gluten-free tacos, choose corn tortillas like in the recipe. These simple swaps keep the flavors while fitting your needs. Enjoy delicious tacos without worry! For the full recipe, visit [Full Recipe]. To keep your Spicy Chickpea Tacos fresh, you should store them properly. First, place the leftover tacos in an airtight container. This helps prevent them from drying out. You can also store the chickpeas and toppings separately. This way, the tortillas stay soft. Use them within two days for the best taste. When you want to enjoy your tacos again, reheating is key. Start by warming the chickpeas in a pan over medium heat. Stir them until they are hot. For the tortillas, heat them in a dry skillet for about 30 seconds. This will bring back their soft texture. Avoid using the microwave, as it can make the tortillas chewy. If you have leftover chickpeas, store them in the fridge. They can last up to four days in an airtight container. You can also freeze them. Chickpeas can stay fresh for about three months in the freezer. Just thaw them in the fridge before using. This way, you’ll have a tasty ingredient ready for your next meal. You can serve many sides with these tacos. A fresh salad pairs well. Try a simple green salad with lime dressing. You could also serve corn on the cob for a sweet touch. For dipping, make a zesty salsa or guacamole. Chips and salsa make a fun crunch, too. Yes, you can prep many parts ahead. Cook the chickpeas and store them in the fridge. You can also chop the veggies and store them in sealed containers. Just warm the tortillas before serving. Assembling right before you eat keeps everything fresh and tasty. To add more heat, increase the cayenne pepper. You can also add diced jalapeños for a fresh kick. A splash of hot sauce on top gives extra flavor. Just be careful not to overpower the chickpeas. Taste as you go to find your perfect heat level. Chickpeas are packed with protein and fiber. They help keep you full and satisfied. They are also rich in vitamins and minerals. These include folate, iron, and magnesium. Eating chickpeas can support heart health and aid digestion, making them a great choice for any meal. For the full recipe, check out my Spicy Chickpea Tacos recipe above. In this blog post, we explored how to make tasty spicy chickpea tacos. We covered essential ingredients, cooking steps, and helpful tips for great flavor. I shared ideas for tasty toppings and ways to modify recipes for different diets. You can also learn how to store leftovers and reheat them properly. These tacos are simple to make and full of flavor. Enjoy experimenting with spices and toppings to make them your own!

Spicy Chickpea Tacos Flavorful and Quick Recipe

Looking for a quick, tasty meal? You’ve got to try my Spicy Chickpea Tacos. Packed with flavor and easy to

When you make creamy spinach artichoke dip, you need to gather some key ingredients. Here’s what you will need: - 1 cup fresh spinach, chopped - 1 cup canned artichoke hearts, drained and chopped - 1 cup cream cheese, softened - 1/2 cup sour cream - 1/2 cup mayonnaise - 1 cup grated Parmesan cheese - 1 cup shredded mozzarella cheese - 2 cloves garlic, minced - 1/2 teaspoon onion powder - 1/2 teaspoon red pepper flakes (optional) - Salt and pepper to taste - Tortilla chips or bread slices for serving Fresh spinach and artichoke hearts give this dip its bright flavor. The creamy components, like cream cheese, sour cream, and mayonnaise, create that rich texture we love. For seasonings, I use garlic, onion powder, and red pepper flakes to bring out the taste. You can skip the red pepper flakes if you prefer a milder dip. When serving, tortilla chips or toasted baguette slices work best. You can also add some veggie sticks for a fresh touch. Check out the Full Recipe for more details on how to combine these ingredients for a delicious dip! 1. Preheat your oven to 350°F (175°C). This step warms the oven for even cooking. 2. Grab a mixing bowl. Combine the softened cream cheese, sour cream, and mayonnaise. Mix until creamy and smooth. 3. Next, stir in the chopped spinach and artichoke hearts. Add the minced garlic, onion powder, and red pepper flakes if you like some heat. 4. Mix in half of the Parmesan cheese. Make sure every bit is well blended. 5. Season the mixture with salt and pepper to taste. This is key for great flavor. 6. Transfer the dip into a baking dish. Spread it evenly across the dish. 7. Top with the rest of the Parmesan cheese and sprinkle the mozzarella cheese on top. 8. Bake in the preheated oven for about 25-30 minutes. Wait until the dip bubbles and turns golden brown. 9. Once done, let it cool slightly before serving. This dip pairs well with tortilla chips or bread. For the complete recipe, check out the Full Recipe. Enjoy your delicious Creamy Spinach Artichoke Dip! To make your dip creamy, start with room temperature cream cheese. Cold cream cheese can clump and make it hard to blend. You want a smooth, lump-free mix. - Soften the cream cheese for at least 30 minutes before mixing. - Use a hand mixer or food processor to blend the base. This helps combine all ingredients well. To keep your dip from drying out, add sour cream and mayonnaise. They provide moisture and a rich taste. - Bake it until just bubbly. Overbaking can lead to dryness. - If it looks too thick, stir in a bit of milk or cream before baking. When serving, choose dippers that complement the dip. Tortilla chips are classic, but toasted baguette slices and fresh veggie sticks work too. - Arrange your dippers in a fun way around the dip for a colorful display. - Serve the dip warm for the best taste. For an extra touch, sprinkle some red pepper flakes on top before serving. This adds a pop of color and a hint of heat. Enjoy your creamy spinach artichoke dip with friends and family! For the full recipe, refer to the section above. {{image_2}} You can change up the cheese in this dip for fun flavors. Use sharp cheddar for a kick or creamy goat cheese for a tangy twist. Mixing in some blue cheese adds a bold taste that many will love. You can also add different herbs and spices. Try adding fresh basil or dill for a fresh touch. If you want heat, sprinkle in some cayenne or smoked paprika. Each choice gives the dip a new flavor that keeps it exciting. If you want to lighten this dish, make some easy swaps. Use low-fat cream cheese or Greek yogurt instead of sour cream and mayonnaise. This keeps the dip creamy but cuts down on calories. You can also add more veggies for extra nutrition. Chopped bell peppers or mushrooms work great. You can even mix in some kale for added health benefits. These changes make the dip tasty and a bit better for you without losing flavor. You can store any leftover dip in an airtight container. Keep it in the fridge. It stays fresh for up to three days. To reheat, place it in a microwave-safe bowl. Heat on medium power for one to two minutes. Stir every thirty seconds for even warming. You can also bake it again. Place it in the oven at 350°F (175°C) for about 10 minutes. This helps keep the texture creamy. You can freeze this dip for later use. First, let it cool completely. Then, transfer it to a freezer-safe container. Make sure to seal it tightly. It can last in the freezer for up to three months. To thaw, move it to the fridge overnight. You can also use the microwave for quicker thawing. Just be careful not to overheat. After thawing, stir well before reheating. This keeps the flavors fresh and delicious. For the best taste, always try to eat it soon after thawing. You can serve this dip with many tasty options. Here are some ideas: - Tortilla chips - Sliced baguette - Fresh vegetable sticks like carrots and celery - Pita chips - Crackers Each of these pairs well with the creamy dip. They add crunch and flavor, making your appetizer more fun. Yes, you can make this dip ahead of time! Prepare the dip and store it in the fridge. Cover it tightly with plastic wrap. You can keep it for about two days. When ready to bake, just take it out and let it sit for 15 minutes. Then, bake as directed in the Full Recipe. To add some heat, try these options: - Mix in more red pepper flakes. - Add a few dashes of hot sauce. - Stir in diced jalapeños. These ideas will give your dip a nice kick. Adjust the spice level to suit your taste! In this blog post, we explored how to make a delicious Creamy Spinach Artichoke Dip. You learned about the best ingredients, step-by-step preparation, and tips to achieve the perfect creamy texture. We also covered variations and storage best practices. Now you can impress your guests with tasty dips. Enjoy experimenting with new flavors and serving ideas. Your next gathering will be a hit!

Creamy Spinach Artichoke Dip Irresistible Recipe

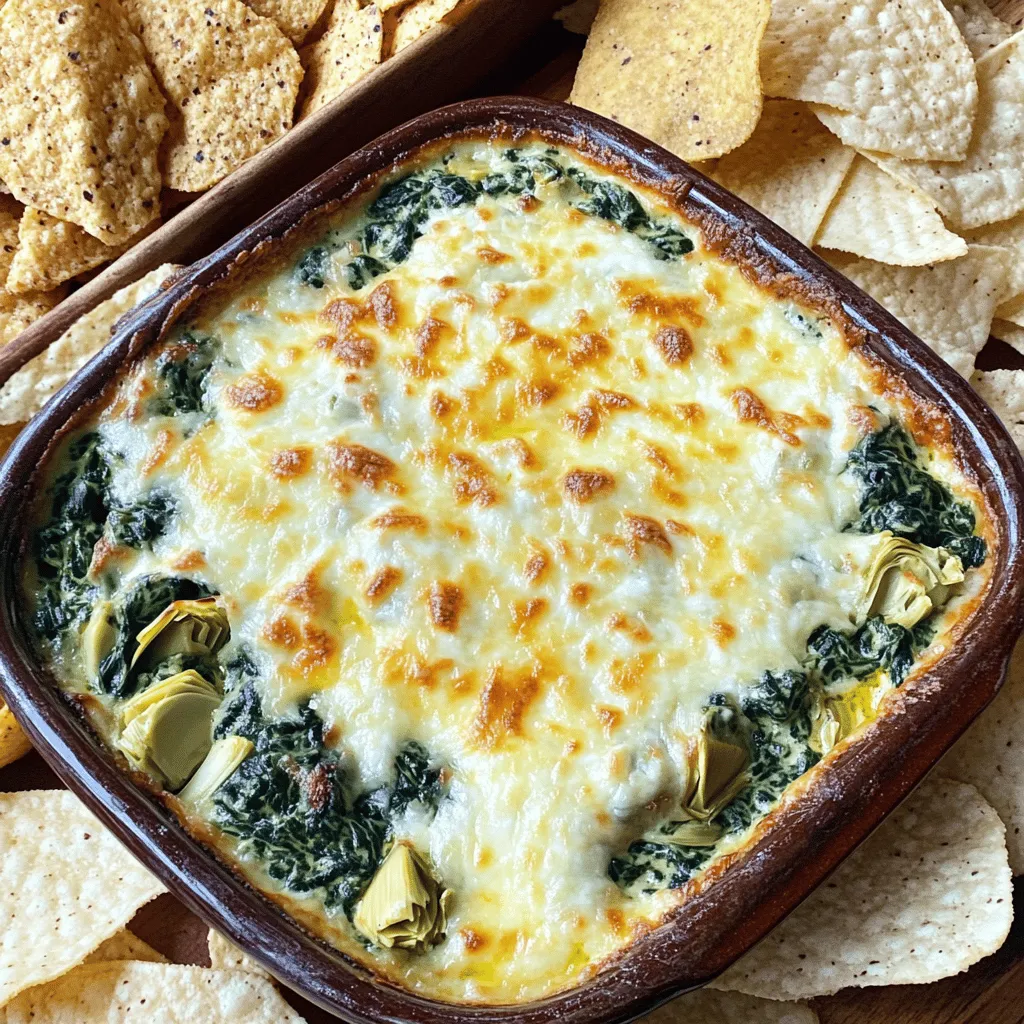
Get ready to indulge in a creamy delight! My Creamy Spinach Artichoke Dip recipe is not just easy to make;

To make Chocolate Kataifi Bars, you need the following main ingredients: - 200g kataifi (shredded phyllo dough) - 100g unsalted butter, melted - 150g dark chocolate, chopped - 100g condensed milk - 50g chopped nuts (walnuts or pistachios) - 1 teaspoon vanilla extract - A pinch of salt These ingredients work together to create a rich and crunchy treat. The kataifi dough gives a unique texture, while the chocolate filling adds sweetness. You can add some tasty toppings to enhance the bars: - 50g shredded coconut (optional for topping) Shredded coconut adds a nice chewiness and extra flavor. You can skip it if you prefer a simpler taste. Gather these kitchen tools for an easy cooking experience: - A large mixing bowl - A square baking pan (8x8 inches) - A spatula for mixing - A microwave-safe bowl for melting chocolate - A knife for cutting the bars These tools make the process smooth and enjoyable. Preparing your workspace helps you stay organized while making these delicious bars. Start by preheating your oven to 180°C (350°F). Grease an 8x8-inch baking pan. You can also use parchment paper for easy removal later. Next, take a large bowl. Add 200g of kataifi and pour in 100g of melted unsalted butter. Mix well until the kataifi is coated. Press half of this mixture evenly into the bottom of the pan. This forms your base layer. In another bowl, place 150g of chopped dark chocolate. Microwave it in 30-second bursts. Stir after each burst until it melts. Then, mix in 100g of condensed milk, 1 teaspoon of vanilla extract, and a pinch of salt. Stir until it is smooth. Fold in 50g of chopped nuts. Pour the chocolate mixture over the kataifi base in the pan. Spread it out evenly. Top with the remaining kataifi mixture, pressing it down gently. If you like, sprinkle 50g of shredded coconut on top. Bake for about 25 minutes. The top should be golden brown and the chocolate set. Once done, cool for 15 minutes before cutting into bars. Enjoy your delicious creation! For the full recipe, check out the details above. To get the right texture for your Chocolate Kataifi Bars, keep a few things in mind. First, make sure the kataifi is fully coated with melted butter. This helps it crisp up nicely. Next, press the layers down firmly but not too hard. You want them to hold together without losing air. Lastly, watch the baking time. Bake until the top turns golden brown for the best crunch. Avoid these common mistakes to ensure your bars turn out great. One big mistake is not melting the chocolate enough. Be patient, and check it often in the microwave. Another mistake is overmixing the chocolate filling. Mix just until smooth. Also, don’t skip the salt! A pinch of salt brings out the chocolate's flavor. Lastly, let the bars cool before cutting. This helps them set properly. Serve your Chocolate Kataifi Bars warm or at room temperature. They pair well with a scoop of vanilla ice cream. You can also sprinkle some extra chopped nuts on top for a fun crunch. For a special touch, drizzle melted chocolate over each bar. These bars make a great dessert for parties or just a cozy night in. For the full recipe, check the earlier section! {{image_2}} You can change the taste of your chocolate filling by using flavored chocolate. Look for options like orange, mint, or raspberry. These flavors add a fun twist. Just melt and mix them as you would with dark chocolate. I love how these flavors play with the kataifi! Nuts add crunch and flavor. While walnuts and pistachios are great, you can try others. Almonds, hazelnuts, or even peanuts work well. Each nut gives a unique taste and texture. Chop them finely and mix them into the chocolate for a surprise in every bite. Want to make your bars even more exciting? Add toppings! Crushed cookies, pretzels, or seeds can provide that extra crunch. You can also sprinkle more nuts or coconut on top before baking. Each topping brings its own flavor and makes the bars more fun to eat. Explore these ideas and make the recipe your own! For the full recipe, check the earlier section. To keep your Chocolate Kataifi Bars fresh, store them in an airtight container. Place parchment paper between layers to prevent sticking. You can keep them at room temperature for up to three days. If your kitchen is warm, place them in the fridge. Cold bars may taste even better! To reheat, simply place the bars in the microwave. Heat them for about 10-15 seconds. This warms them without making them too soft. You can also reheat them in the oven. Set your oven to 150°C (300°F) and bake for 5-10 minutes. This method keeps the texture crispy. To freeze your Chocolate Kataifi Bars, wrap them tightly in plastic wrap. Then, place them in a freezer bag or container. They can last up to three months in the freezer. When you're ready to enjoy, let them thaw in the fridge overnight. You can reheat them afterward for the best taste. Kataifi comes from the Middle East and Greece. It is a type of shredded pastry. People often use it in sweet and savory dishes. The name "kataifi" means "to wrap" in Arabic. This pastry is similar to other phyllo dough but is thinner and more delicate. It is perfect for layering with fillings like nuts and chocolate. Yes, you can use various chocolates in this recipe. Dark chocolate gives a rich taste. Milk chocolate makes it sweeter and creamier. White chocolate adds a nice touch too. Choose the type you enjoy most. Feel free to mix different chocolates for a unique flavor! You can find Chocolate Kataifi Bars at specialty bakeries. Some grocery stores also carry them in the dessert section. If you want to try making them, check the ingredients list. You can also find kataifi dough in Middle Eastern or Mediterranean markets. For a fun twist, make your own at home using the Full Recipe. Chocolate Kataifi Bars can last about a week if stored properly. Keep them in an airtight container at room temperature. If you want them to last longer, you can refrigerate them. Just allow them to come to room temperature before serving for the best taste and texture. Yes, you can make Chocolate Kataifi Bars gluten-free! Look for gluten-free kataifi dough at specialty stores. Check the labels to ensure no gluten is present. You can also use gluten-free flour in the recipe if needed. Enjoy this treat without worry! You now know how to make delicious Chocolate Kataifi Bars. We covered the key ingredients, essential tools, and simple steps. I shared tips to help you avoid common mistakes. You also learned ways to store your tasty bars and some fun variations to try. Enjoy making these bars with your own twist. I hope they become a favorite in your kitchen. Happy baking!

Chocolate Kataifi Bars Delightful and Easy Recipe

Are you ready to treat yourself to a sweet delight? In this blog post, I’ll guide you through making Chocolate

- 2 cups raw almonds - 1 cup honey - 1 cup granulated sugar - 2 large egg whites - 1 teaspoon vanilla extract - Zest of 1 lemon - Edible rice paper (for lining) - 1/4 teaspoon salt Soft Italian torrone is a treat that combines simple yet rich flavors. The main stars of this dessert are the raw almonds, honey, and granulated sugar. Each ingredient plays a key role in creating that soft, chewy texture we crave. Raw almonds give torrone its delightful crunch. Toasting them adds warmth and depth. Honey and sugar provide sweetness and help bind the ingredients together. We also need egg whites, which add lightness. Beating them to stiff peaks creates a fluffy mixture. Vanilla extract adds a hint of warmth, while lemon zest brightens the flavor. Edible rice paper is important for lining the pan. It keeps the torrone from sticking. Finally, a pinch of salt balances the sweetness and enhances the flavors. For the full details on making this sweet delight, check out the Full Recipe. Each ingredient works together to create a classic Italian dessert that is hard to resist! Toasting the almonds First, preheat your oven to 350°F (175°C). Spread 2 cups of raw almonds on a baking sheet. Toast them for about 10-12 minutes. Watch for them to turn golden brown. Once done, let them cool and chop them coarsely. Making the sugar syrup Next, grab a medium saucepan. Mix 1 cup of honey and 1 cup of granulated sugar in the pan. Cook over medium heat. Stir until the sugar dissolves. Use a candy thermometer to check the heat. You want it to reach about 250°F (121°C). Whipping the egg whites While the syrup cooks, take a large bowl. Beat 2 large egg whites with an electric mixer. You want to whip until stiff peaks form. When peaks form, add 1 teaspoon of vanilla extract and 1/4 teaspoon of salt. Keep beating for another minute to blend well. Combining the syrup with egg whites Once the syrup is hot enough, slowly pour it into the whipped egg whites. Do this while you keep mixing. It’s important to beat the mixture for about 5-10 minutes. The goal is to make it thick and glossy. Folding in the almonds and zest Now, gently fold in the chopped almonds and the zest of one lemon. Make sure everything combines evenly without deflating the mixture. Transferring to the pan Prepare a square or rectangular baking dish, about 9x9 inches. Line it with edible rice paper. Pour the torrone mixture into this dish. Spread it evenly. Cover the top with another layer of rice paper. Cooling time Let the torrone cool completely at room temperature. This will take about 6-8 hours, or overnight for best results. After cooling, it will set perfectly. You can find the complete process in the Full Recipe. Enjoy making this delicious treat! How to check syrup temperature To check the syrup temperature, use a candy thermometer. Place it in the syrup while it cooks. The target temperature is 250°F (121°C). This is crucial for getting the right texture. If the syrup is too cool, the torrone won't set well. If it's too hot, it can become too hard. Tips for beating egg whites to stiff peaks Start with clean, dry bowls and beaters. Make sure no yolk gets in the egg whites. Begin at low speed to break them up, then increase to high speed. Beat until the mixture becomes foamy. Once frothy, add salt and vanilla. Keep beating until you see stiff peaks. This means the mixture stands up without falling. Best ways to cut and serve Cut the torrone after it has fully set. Use a sharp knife to make clean cuts. You can cut it into squares or rectangles. For a fun twist, try cutting into fun shapes with cookie cutters. Serve it on a platter for a beautiful display. Pairing ideas with beverages Torrone pairs well with coffee or hot chocolate. The sweetness balances the richness of these drinks. You can also serve it with dessert wine for an elegant touch. For a lighter option, enjoy it with green tea. Each pairing enhances the flavor and makes for a delightful experience. For the full recipe, check out the detailed steps and enjoy making this treat! {{image_2}} You can make soft Italian torrone even more exciting by adding flavors. Chocolate can create a rich twist. Melt dark or milk chocolate and fold it into the mixture before setting. For a fresh taste, add citrus flavors like orange or lime zest. This adds brightness and a fun zing. Using different nuts can also change the taste. While almonds are traditional, try pistachios, hazelnuts, or walnuts. Each nut brings its own flavor and crunch. You can mix nuts, too, for a more complex taste. Soft torrone varies by region in Italy. In Sicily, you may find torrone made with pistachios. In other areas, they use figs or candied fruits. Each region adds a unique spin that reflects local tastes. Notable brands of torrone include Sperlari and Martelli. These brands have long histories and offer many flavors. If you want to explore, buy some from these brands to taste the differences. Each bite tells a story of its origin. For a delightful experience, try making the Full Recipe yourself and taste the magic of homemade torrone! To keep your soft Italian torrone fresh, store it in an airtight container. This method prevents air from making it hard or stale. You can also wrap it in wax paper before placing it in the container. The best temperature for storage is cool and dry. Avoid direct sunlight or heat. A pantry or a cupboard works well. Do not refrigerate, as this can alter its texture. Homemade torrone lasts about two to three weeks when stored properly. If you notice any changes in texture or smell, it's time to toss it. Signs that torrone has gone bad include a hard texture, an off smell, or visible mold. Always trust your senses when checking for freshness. [Full Recipe] What is soft Italian Torrone? Soft Italian Torrone is a chewy, sweet treat made from sugar, almonds, and egg whites. It often contains honey and flavors like vanilla or lemon zest. This candy is popular in Italy, especially during holidays. How is soft Italian Torrone different from hard Torrone? Soft Torrone is chewy and soft, while hard Torrone is crunchy and firm. The texture comes from how long the sugar syrup cooks and how much air is whipped into the egg whites. Soft Torrone melts in your mouth, while hard Torrone requires a bite. Can I make torrone without egg whites? Yes, you can make Torrone without egg whites. However, the texture will change. The egg whites help create a light, fluffy candy. Without them, the Torrone will be denser and not as soft. Where can I buy authentic soft Italian Torrone? You can buy authentic soft Italian Torrone at Italian markets, specialty candy shops, or online. Look for brands that source their ingredients from Italy for the best flavor. What is the best way to cut soft torrone? The best way to cut soft Torrone is to use a sharp knife. I recommend warming the knife slightly under hot water. This helps to create clean cuts without sticking. Can I substitute ingredients in the torrone recipe? Yes, you can substitute some ingredients. For example, you can use different nuts like hazelnuts or walnuts. You can also use agave syrup instead of honey for a different flavor. How to tell when the torrone is set? You can tell when the Torrone is set by gently pressing it. If it feels firm and holds its shape, it’s ready. It should also look glossy and slightly opaque. For the full recipe, check out the detailed instructions mentioned earlier. In this guide, we explored how to make soft Italian Torrone. We covered the key ingredients, like raw almonds and honey, and detailed each step, from toasting the nuts to cooling the final product. I shared tips on perfecting your recipe and various fun variations. Remember, store your Torrone properly to keep it fresh. With these insights, you can enjoy making your own delicious treats. Now, it's time to get cooking and impress your friends and family with your new skills!

Soft Italian Torrone Irresistible Sweet Delight

Are you ready to indulge in a sweet treat from Italy? Soft Italian Torrone is a delightful mix of almonds,

- 1 ½ cups graham cracker crumbs - ½ cup unsalted butter, melted - ¼ cup granulated sugar - 16 oz cream cheese, softened - 1 cup granulated sugar - 3 large eggs - Zest of 2 lemons - ½ cup fresh lemon juice - 1 teaspoon vanilla extract - 3 large egg yolks - ½ cup granulated sugar - ⅓ cup fresh lemon juice - Zest of 1 lemon - 2 tablespoons unsalted butter - 3 large egg whites - ¼ teaspoon cream of tartar - ½ cup granulated sugar - 1 teaspoon vanilla extract Gather these ingredients to make your Triple Lemon Meringue Cheesecake. Each item plays a key role in creating that delightful tangy flavor and creamy texture. The crust gives a nice crunch, while the filling adds rich creaminess. The lemon curd brings a bright, zesty touch, and the meringue tops it off with a sweet cloud-like finish. You can find the full recipe for step-by-step guidance. Enjoy the process of mixing and creating this tasty treat! - Mix 1 ½ cups graham cracker crumbs, ½ cup melted unsalted butter, and ¼ cup sugar in a bowl. - Press this mixture into the bottom of a 9-inch springform pan. - Bake the crust at 350°F (175°C) for 10 minutes. Let it cool completely before adding the filling. - In a large bowl, beat 16 oz of softened cream cheese with 1 cup of sugar until smooth. This takes about 2-3 minutes. - Add 3 large eggs, one at a time, mixing well after each. - Stir in the zest of 2 lemons, ½ cup of fresh lemon juice, and 1 teaspoon of vanilla extract. - Pour this creamy filling over the cooled crust and spread it evenly. Bake for 50-60 minutes until the center is just set. You want a slight jiggle. - In a medium saucepan, whisk together 3 large egg yolks, ½ cup sugar, ⅓ cup lemon juice, and the zest of 1 lemon. - Cook over medium heat, stirring constantly for about 10 minutes, until it thickens and coats the back of a spoon. - Remove from heat and stir in 2 tablespoons of unsalted butter until it melts. Let the lemon curd cool before spreading it over the cheesecake. - In a mixing bowl, beat 3 large egg whites with ¼ teaspoon of cream of tartar on high speed until soft peaks form. - Gradually add ½ cup of sugar, continuing to beat until stiff peaks appear. Mix in 1 teaspoon of vanilla. - Spoon the meringue over the lemon curd, making peaks and swirls with a spatula. - Bake at 350°F (175°C) for 10-12 minutes until the meringue is lightly golden. This Triple Lemon Meringue Cheesecake is a delight. The layers of flavor create a perfect treat. For the full recipe, check the details provided earlier. To get the best texture, use room temperature ingredients. This means letting your cream cheese and eggs sit out for about 30 minutes. Cold items mix poorly, and you could end up with lumps. Cracks in your cheesecake can ruin its look. To prevent this, avoid overmixing your batter. Bake your cheesecake slowly and let it cool in the oven. Keep the door slightly open for about an hour after baking. This gentle cooling helps avoid sudden temperature changes. Lemon curd adds a bright flavor. You can mix in other citrus for a twist. Try lime or orange for a fun change. Just keep the same amount of juice. You might want your curd sweeter or tangier. Adjust the sugar to fit your taste. Start with a little less sugar and add more if needed. The key to good meringue is beating egg whites until stiff peaks form. Start at a low speed, then increase it. This helps air get in slowly and makes a fluffier meringue. If you want to change things up, try different toppings. You can use whipped cream or fresh fruit. These alternatives can give your cheesecake a new look and taste. For the full recipe, check out the detailed instructions above and enjoy making this delightful treat! {{image_2}} You can make your cheesecake unique by adding flavor extracts. Try almond or coconut for a twist. You can also use fruits to boost taste. Fresh berries or tropical fruits add color and zest. If you need a gluten-free option, substitute graham crackers with ground nuts. Almond flour or gluten-free cookies work well. For a crust, use dates and nuts. This gives a sweet and crunchy base. Making mini cheesecakes is a fun option. Use a muffin tin for individual servings. Just adjust the baking time to about 20-25 minutes. Check for a slight jiggle in the center. This way, everyone can enjoy their own slice. To keep your cheesecake fresh, store it in the fridge. Use an airtight container to prevent drying out. It stays tasty for up to five days. Enjoy each slice chilled for the best flavor. You can freeze this cheesecake for later. Wrap it tightly in plastic wrap, then place it in a freezer-safe container. It will last for up to three months. To thaw, move it to the fridge overnight. This way, it stays creamy and delicious. Serve this cheesecake chilled for a refreshing treat. You can slice it into wedges. For a lovely touch, garnish with lemon slices or a sprinkle of lemon zest. Whipped cream can also add a nice flair. Each bite will be a delight! Making this cheesecake takes about five hours. You need 30 minutes for prep, 50 to 60 minutes for baking, and chilling time of at least four hours. It’s best to chill it overnight for perfect texture. Using bottled lemon juice can change the taste. Fresh juice has a bright flavor that bottled juice lacks. It also adds a better texture to the cheesecake. You can use several plant-based options. Silken tofu works well for creaminess. You can also use unsweetened applesauce or mashed bananas. Remember to adjust other ingredients for the best texture. To avoid cracks, bake at a low temperature. If cracks appear, you can hide them with meringue. This will add a nice look and taste. You can also cover with lemon curd for extra flavor. Many bakeries offer this cheesecake. Look for local shops that specialize in desserts. You can also find it online through specialty dessert websites. Always check reviews for quality. You can leave it out for about two hours. After that, it’s best to refrigerate it. Keeping it chilled helps prevent any food safety issues. Always check the temperature before serving for safety. You learned how to make a Triple Lemon Meringue Cheesecake step by step. We covered crust, filling, lemon curd, and meringue. Each part adds flavor and fun. Remember to keep ingredients at room temperature for best texture. As you try different flavors or variations, have fun! Use tips to store and serve it well. Enjoy impressing friends and family with your delicious cheesecake creation!

Triple Lemon Meringue Cheesecake Delightfully Tangy Treat

If you love tangy desserts, my Triple Lemon Meringue Cheesecake is a must-try! It combines zesty lemon flavor with a

To make a tasty Pumpkin Pie Dump Cake, you need these simple ingredients: - 1 can (15 oz) pumpkin puree - 1 can (12 oz) evaporated milk - 1 cup granulated sugar - 3 large eggs - 1 teaspoon vanilla extract - 2 teaspoons pumpkin pie spice - 1 box (15.25 oz) yellow cake mix - 1/2 cup unsalted butter, melted - 1 cup chopped pecans (optional) - Whipped cream, for serving (optional) This recipe blends sweet pumpkin with rich spices. The yellow cake mix adds a nice texture. You can play with the toppings. I often add whipped cream and pecans for extra flavor. The pumpkin puree brings moisture. Evaporated milk makes it creamy. Vanilla and spices give it warmth. Gather these ingredients, and you are ready to bake! Check out the Full Recipe for all the details on how to create this delightful dessert. 1. First, preheat your oven to 350°F (175°C). 2. Grease a 9x13 inch baking dish with cooking spray or butter. 3. In a large mixing bowl, combine the wet ingredients. 4. Whisk together the pumpkin puree, evaporated milk, granulated sugar, eggs, vanilla extract, and pumpkin pie spice. 5. Mix until the mixture is smooth and well combined. 1. Pour the pumpkin mixture into the prepared baking dish. 2. Spread it evenly across the bottom of the dish. 3. Take the box of yellow cake mix and sprinkle it evenly over the pumpkin layer. 4. Make sure to cover the pumpkin completely without mixing. 5. Drizzle the melted butter over the cake mix. 6. If you like, sprinkle chopped pecans over the buttered cake mix. 1. Place the dish in the preheated oven and bake for 50-60 minutes. 2. Check for doneness by inserting a toothpick in the center. 3. The toothpick should come out clean when it's done. 4. The top will look golden brown, but it might be a bit tousled. 5. Once baked, remove from the oven and let it cool for about 10-15 minutes before serving. This method creates a simple and tasty dessert. For the full recipe, check out the details above! To ensure even baking, I recommend spreading the pumpkin mixture evenly in the dish. Use a spatula to smooth it out. This helps the cake cook uniformly. Keep an eye on the baking time. Ovens can vary, so check your cake a bit early. For the perfect texture, let the cake cool for 10-15 minutes after baking. This helps the layers set and makes it easier to slice. If you want a more moist cake, add an extra egg or a splash of milk to the pumpkin mixture. Get creative when serving your Pumpkin Pie Dump Cake. You can cut it into squares and serve it warm with a scoop of ice cream. This adds a nice contrast to the warm cake. For a beautiful presentation, top each slice with whipped cream. A sprinkle of pumpkin pie spice or some chopped pecans also makes it look fancy. You can even drizzle caramel sauce over the top for a sweet touch. Try these ideas to make your dessert not just tasty but also fun to eat! {{image_2}} You can make this cake your own by changing the flavors. Adding different spices gives new tastes. For example, try a pinch of nutmeg or some ground ginger. You can also add a splash of almond extract for a sweet twist. If you love chocolate, consider a chocolate pumpkin dump cake. Just mix in some chocolate chips with the pumpkin mixture. You can use dark chocolate for a richer flavor. It creates a fun blend of chocolate and pumpkin. This fun twist makes it a dessert everyone will love. If you need a gluten-free option, use a gluten-free cake mix. Many brands offer great choices that taste just as good. Just check the label to ensure it meets your needs. For a dairy-free option, swap the evaporated milk for almond or coconut milk. You can also use dairy-free butter instead of regular butter. These swaps keep the taste rich and creamy without dairy. Enjoy a delicious dessert that fits your diet! For the full recipe, check out the complete guide to Pumpkin Spice Dream Dump Cake. To keep your Pumpkin Pie Dump Cake fresh, store it in the fridge. Use an airtight container or cover it tightly with plastic wrap. This way, it will stay moist and tasty for up to four days. If you want to save some for later, you can freeze it! Cut the cake into portions and wrap them in plastic wrap. Place the wrapped pieces into a freezer bag, squeezing out all the air. This method prevents freezer burn. You can freeze the cake for up to three months. Warming up your leftovers is easy. Preheat your oven to 350°F (175°C). Place the cake in an oven-safe dish. Cover it with foil to keep it from drying out. Heat it for about 15-20 minutes, or until it’s warm throughout. If you prefer, you can also use the microwave. Just heat a slice for about 30 seconds. Check to see if it’s warm enough. If not, heat for another 10 seconds. Enjoy your cake warm, and consider adding whipped cream on top for extra delight! Yes, you can make this recipe ahead of time. You can prepare the pumpkin mixture and layer it with the cake mix. Cover it tightly and store it in the fridge for up to one day. When ready to bake, just add the melted butter on top and pop it in the oven. This makes it easy for busy days. If you don’t have pumpkin puree, you can use mashed sweet potatoes or butternut squash. Both options work well and give a similar flavor. Make sure to use the same amount as the recipe calls for. You can also use canned pie filling, but check if it has added spices. Pumpkin Pie Dump Cake lasts about 3 to 5 days in the fridge. Store it in an airtight container to keep it fresh. If you want to enjoy it longer, you can freeze it. Just make sure to wrap it well. Yes, you can make this recipe dairy-free! Use coconut milk or almond milk instead of evaporated milk. For the butter, substitute it with coconut oil or a dairy-free spread. These swaps will keep the cake delicious and creamy. This blog post covered how to make a tasty Pumpkin Pie Dump Cake. We explored key ingredients like pumpkin puree and cake mix. I shared easy step-by-step instructions for baking and tips for a perfect texture. You also learned about fun variations and how to store leftovers. Now, enjoy this warm dessert at home. Feel free to get creative with toppings and flavors. Your family will love it! Happy baking!

Pumpkin Pie Dump Cake Simple and Tasty Dessert

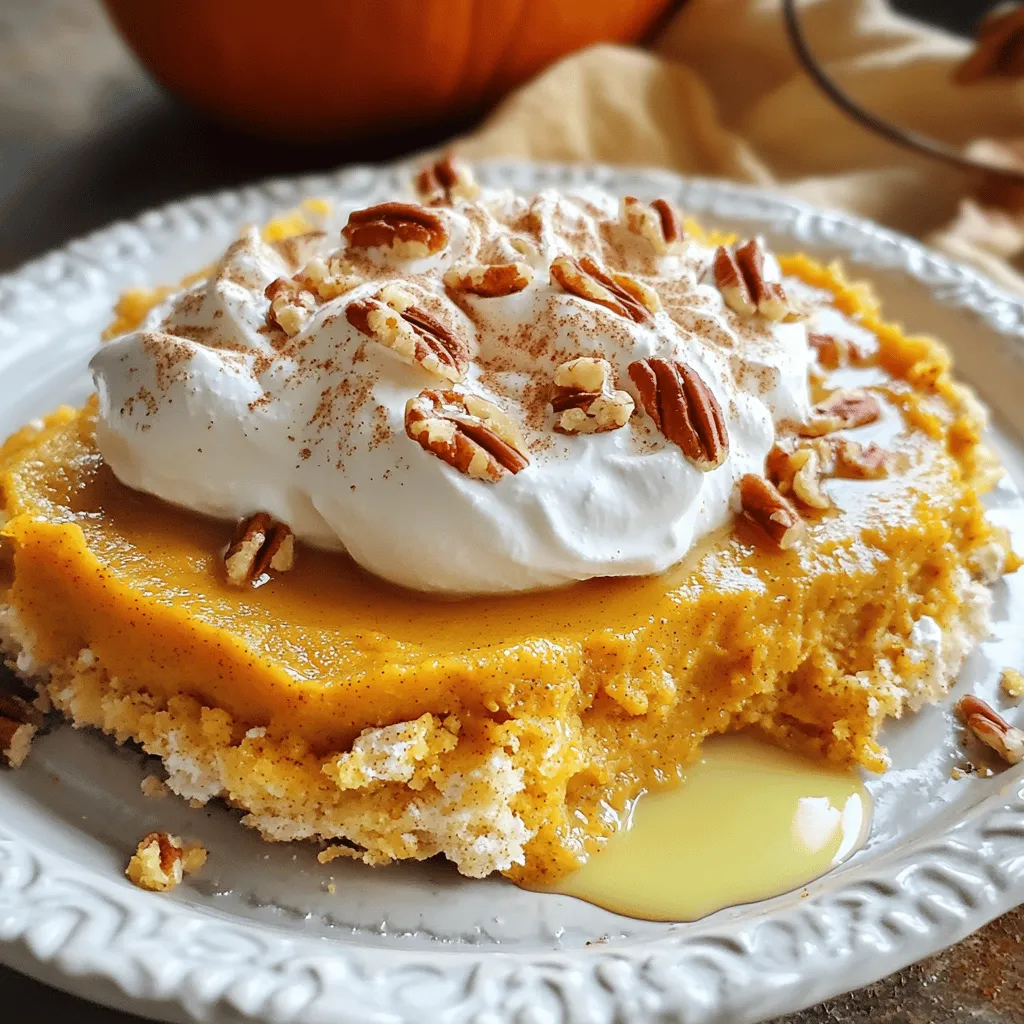
Craving an easy fall dessert? Look no further than this Pumpkin Pie Dump Cake! With just a few simple ingredients,

To make coconut curry shrimp, you need the following ingredients: - 1 lb large shrimp, peeled and deveined - 1 can (14 oz) coconut milk - 2 tablespoons red curry paste - 1 tablespoon fish sauce - 1 tablespoon brown sugar - 1 tablespoon olive oil - 1 small onion, finely chopped - 3 cloves garlic, minced - 1 inch ginger, grated - 1 bell pepper, sliced (red or yellow) - 1 cup snap peas or green beans - Fresh cilantro, for garnish - Cooked jasmine rice, for serving Each ingredient plays a key role in building flavor. For example, the shrimp adds protein, while coconut milk provides creaminess. You can swap fish sauce for soy sauce if you want a vegetarian option. Red curry paste brings heat and depth. Each serving of coconut curry shrimp contains about: - Calories: 350 - Protein: 25g - Fat: 20g - Carbohydrates: 25g - Fiber: 4g The shrimp offers lean protein, and coconut milk contains healthy fats. Bell peppers and snap peas add fiber and vitamins. This dish is both tasty and nutritious. Eating shrimp can help support heart health, while coconut milk may provide energy. Making coconut curry shrimp is easy and fun. You will sauté, simmer, and serve. Here are the tools you need: - Large skillet - Wooden spoon - Measuring spoons - Knife and cutting board - Serving bowls 1. First, heat the olive oil in your skillet over medium heat. This takes about 2 minutes. 2. Add the chopped onion. Sauté it for 3-4 minutes until it looks clear. 3. Next, stir in minced garlic and grated ginger. Cook this mix for 1 minute. 4. Add red curry paste and cook it for 1-2 minutes. This helps the flavors shine. 5. Now, pour in the coconut milk. Stir well to mix everything together. 6. Add fish sauce and brown sugar. Mix until you see no lumps. 7. Bring the sauce to a gentle simmer. Add the bell pepper and snap peas. Cook for about 5 minutes. 8. Finally, gently add the shrimp. Cook for 3-5 minutes. They are done when they turn pink. Check the sauce and adjust if needed. You can add more fish sauce or sugar for taste. For a great meal, serve the coconut curry shrimp over fluffy jasmine rice. Garnish with fresh cilantro. If you want, add a lime wedge on the side for extra zing. For the complete recipe, check the Full Recipe section. To avoid overcooking shrimp, watch the color closely. Shrimp cook fast. When they turn pink and opaque, they are done. Usually, it takes about 3 to 5 minutes. If you cook too long, they become tough. For ideal heat levels when sautéing, use medium heat. This allows the onion and garlic to cook evenly without burning. If the heat is too high, your shrimp may cook too fast. Keep it steady to get the best flavor. Pair your coconut curry shrimp with fluffy jasmine rice. The rice absorbs the sauce well. You could also try it with steamed broccoli or sautéed spinach. These greens add color and nutrients. For presentation, serve shrimp in a bowl over rice. Sprinkle fresh cilantro on top. Add a lime wedge to brighten the dish. This small touch makes your meal look beautiful and delicious. For the full recipe, check out the details provided earlier. {{image_2}} You can easily swap shrimp for other proteins. Tofu works great for a vegan option. Chicken is another tasty choice. Just make sure to adjust your cooking time. For veggies, think beyond bell peppers. Try zucchini, carrots, or even broccoli. Each will add a unique taste. Do you like heat? You can adjust the spice in this curry. For a milder dish, use less red curry paste. If you want it spicier, add more. You can also toss in some chili flakes or fresh chopped chili. Start slow. You can always add more, but it's hard to take heat away once it's in! Check out the full recipe for more details and tips! To store leftovers, place them in an airtight container. This keeps the dish fresh. You can refrigerate it for up to three days. If you want to keep it longer, freeze the shrimp curry. It can last for about two months in the freezer. Reheat the curry in a skillet over low heat. This method helps maintain its flavor. Stir often to heat evenly. You can also use the microwave, but be careful. Microwaving may change the texture of the shrimp. They can become tough if overheated. For best results, add a splash of coconut milk while reheating. This keeps the dish creamy. Enjoy your Coconut Curry Shrimp with jasmine rice for a delightful meal! You can find the full recipe above. Can I make Coconut Curry Shrimp ahead of time? Yes, you can prepare Coconut Curry Shrimp ahead of time. Cook the dish, then store it in an airtight container. Keep it in the fridge for up to two days. When ready to serve, gently reheat it on the stove. The flavors will blend even more with time. What can I use instead of coconut milk? If you want a substitute for coconut milk, use almond milk or soy milk. Both options work well, but they may change the flavor slightly. You can also mix unsweetened yogurt with water for a creamier texture. What drink pairs well with Coconut Curry Shrimp? A light, crisp white wine, like Sauvignon Blanc, pairs well with Coconut Curry Shrimp. If you prefer non-alcoholic options, try a coconut water or iced green tea. Both drinks will enhance the dish without overpowering it. Can I serve this dish with rice noodles instead of jasmine rice? Yes, rice noodles are a great option. They soak up the curry sauce nicely. Just cook the noodles according to the package instructions, then serve them under the shrimp and sauce. This adds a delicious twist to the meal! Is this dish gluten-free? Yes, Coconut Curry Shrimp is gluten-free. The ingredients in this recipe do not contain gluten. However, always check labels, especially for sauces, to ensure they meet dietary needs. How can I make it dairy-free? This dish is already dairy-free since it uses coconut milk. Just make sure to use dairy-free alternatives for any sides or garnishes. Fresh herbs and lime add great flavor without dairy. This blog post covered how to make Coconut Curry Shrimp. We explored key ingredients, cooking steps, and helpful tips. You learned about ingredient swaps, spice levels, and storage options. Remember, small changes can elevate your dish. Cooking should be fun and tasty, so experiment with flavors. Enjoy your delicious meal and impress others.

Coconut Curry Shrimp Flavorful and Simple Delight

Are you ready to dive into a dish that bursts with flavor and is easy to make? In this post,

Older posts
Newer posts
← Previous Page1 … Page58 Page59 Page60 … Page77 Next →

dsad

© 2025 pureeatsnow • Built with GeneratePress

Our Policies

  • Copyright Policy
  • Cookie Policy
  • GDPR Policy
  • Privacy Policy
  • Disclaimer
  • Terms Of Use

More Information

  • Home
  • About
  • Contact
  • Appetizers
  • Dessert
  • Dinner
  • Drinks
©2025, pureeatsnow About Back To Top