Skip to content
DisclaimerTerms Of UseGDPR PolicyCookie Policy

pureeatsnow

  • Home
  • Drinks
  • Appetizers
  • Dinner
  • Dessert
  • About
  • Contact
  • Privacy Policy
DisclaimerTerms Of UseGDPR PolicyCookie Policy

Rachel

To make the best French toast, you need a few key ingredients. Here’s what you will need: - 4 thick slices of brioche bread - 2 large eggs - 1 cup milk (whole or almond) - 1 teaspoon vanilla extract - 1 tablespoon ground cinnamon - 1 tablespoon sugar (optional) - 1 tablespoon unsalted butter - Maple syrup for serving - Fresh berries for garnish (optional) These ingredients work together to create a soft, rich, and flavorful dish. You can add a few extra ingredients to enhance the flavor of your French toast: - Nutmeg for warmth - Orange zest for brightness - Whipped cream for a creamy touch - Chocolate chips for sweetness These optional ingredients can make your dish more exciting and personal. The bread you choose makes a big difference. For the best French toast, consider using: - Brioche for its richness - Challah for its soft texture - Sourdough for a tangy taste - French bread for a classic touch Each type of bread gives a unique flavor and texture. Experiment to find your favorite! For the full recipe, check out the Fluffy Cinnamon Swirl French Toast. To make Fluffy Cinnamon Swirl French Toast, you need to gather all your ingredients first. Here’s what you'll need: - 4 thick slices of brioche bread - 2 large eggs - 1 cup milk (whole or almond) - 1 teaspoon vanilla extract - 1 tablespoon ground cinnamon - 1 tablespoon sugar (optional) - 1 tablespoon unsalted butter - Maple syrup for serving - Fresh berries for garnish (optional) Start by whisking the eggs and milk together in a bowl. Add the vanilla extract, cinnamon, and sugar if you want a touch of sweetness. Mix it well until it’s smooth and combined. This step is key to getting a great flavor in your French toast. Now, let’s get cooking! Heat a non-stick skillet or griddle over medium heat. Add the butter and let it melt, coating the pan. This helps the bread cook evenly. Next, dip each brioche slice into the egg mixture. Make sure both sides soak well, but don’t let them get too soggy. If they are too wet, they won’t cook right. Place the soaked bread in the hot skillet. Cook each slice for about 3-4 minutes on each side. Look for a golden brown color and a slight crispiness. This is what makes it fluffy and delicious. Repeat this with the remaining bread, adding more butter as needed. Once your French toast is done, serve it hot. Drizzle some maple syrup over the top for sweetness. You can also add fresh berries for a pop of color and taste. They complement the warm cinnamon flavor perfectly. For extra fun, you can serve it with whipped cream or a dusting of powdered sugar. You’ll want to savor every bite of this dish! For more details, check the Full Recipe. To make the best French toast, start with thick slices of brioche. This bread gives a soft and sweet base. Always use fresh eggs. The eggs help bind the mixture and add flavor. For the milk, whole or almond works great. It adds creaminess and richness. Whisk the egg mixture well. This helps combine the flavors. Soak the bread for just a bit. If you soak it too long, it may fall apart. Cook on medium heat. If the heat is too high, the outside will burn. You want a nice golden brown color. One common mistake is using thin bread. Thin bread can get too soggy. Avoid adding too much sugar to the egg mixture. It may caramelize too fast and burn. Do not skip the butter in the pan. Butter adds flavor and helps with browning. Also, don't flip the bread too soon. Wait until you see a crust forming. To get great flavor, add a touch of vanilla extract. It enhances the sweetness. Ground cinnamon is key for a warm taste. For texture, let the cooked toast rest for a minute. This helps it firm up. Serve it hot with maple syrup. Fresh berries on top add color and taste. These tips will help you make perfect French toast. Check out the Full Recipe for more details. {{image_2}} You can have fun with French toast! Here are some cool ideas to try. - Stuffed French Toast: Spread cream cheese or Nutella between two slices of bread. Dip and cook as usual for a sweet surprise. - Savory French Toast: Use cheese and herbs. Add a pinch of salt and pepper. This makes a fun twist for lunch or brunch. - French Toast Casserole: Layer bread slices in a dish. Pour the egg mixture over and bake. It’s perfect for serving a crowd. You can enjoy French toast without the guilt. Here are some healthier swaps: - Whole Grain Bread: Use whole grain or sprouted bread for more fiber. - Egg Whites: Swap whole eggs for egg whites. This cuts cholesterol but keeps protein. - Milk Alternatives: Use almond milk or oat milk instead of whole milk. This lowers calories and adds flavor. Many cultures have their own take on French toast. Let’s explore a few: - Churros: In Spain, they serve churros with chocolate. You can dip your French toast in chocolate sauce for a tasty treat. - Korean French Toast: In Korea, they add sweet red beans and serve it with syrup. It’s a fun mix of flavors. - Mexican Torrejas: This version uses cinnamon and sugar. It often has a hint of orange zest. These variations make French toast exciting. Each style brings new flavors to your plate! For the full recipe, check out the Fluffy Cinnamon Swirl French Toast. To store leftover French toast, let it cool first. Place the slices in an airtight container. You can keep them in the fridge for up to three days. Make sure to separate layers with parchment paper to prevent sticking. For the best taste, reheat French toast in a skillet. Heat it over medium-low heat for about 2-3 minutes on each side. This keeps it crisp and warm. You can also use a toaster oven for a quick fix. Just toast it until it warms up nicely. Freezing is a great option for French toast. First, let the cooked slices cool completely. Then, wrap each slice in plastic wrap. Place them in a freezer bag or airtight container. You can freeze them for up to three months. To eat, simply reheat from frozen in the skillet or oven. This keeps your breakfast quick and tasty! I love using brioche bread for French toast. Its soft texture and rich flavor make it perfect. Challah is also a great choice. Both breads soak up the egg mixture well. You want a bread that is thick and sturdy. This helps it hold the shape and not fall apart. You can make French toast without eggs by using a simple mixture. Combine 1 cup of milk with 1 tablespoon of cornstarch. Whisk them well until smooth. You can also add some ground flaxseed mixed with water. Use 1 tablespoon of flaxseed with 3 tablespoons of water. Let it sit for a few minutes to thicken. This mixture works great for soaking your bread. Yes, you can prepare French toast ahead of time. You can soak the bread in the egg mixture, then cover it and store it in the fridge. This lets the flavors blend well. Cook it in the morning for a quick breakfast. If you want, you can also make it in batches. Just cool the cooked French toast and store it in the fridge. You can reheat it in the toaster or oven. For the best taste, serve it fresh. For the full recipe, check out my Fluffy Cinnamon Swirl French Toast. French toast is a fun and tasty dish. We covered key ingredients, cooking steps, and tips for the best flavor. You learned about great bread choices and some easy variations to try. Remember to avoid common mistakes to make it even better. Lastly, storing and reheating can keep your French toast fresh for longer. Enjoy making your perfect French toast, and don’t be afraid to be creative!

Best French Toast Recipe for Delicious Breakfast Treat

Are you ready to elevate your breakfast game? My best French toast recipe is here to transform your mornings into

- 1 cup cornmeal (finely ground) - 4 cups water - 1 cup coconut milk - 1/4 teaspoon salt This recipe uses finely ground cornmeal. The cornmeal gives the porridge a nice texture. You need four cups of water to cook the cornmeal well. Coconut milk adds a creamy richness that makes every bite enjoyable. A bit of salt enhances all the flavors. - 1/4 cup brown sugar (adjust to taste) - 1 teaspoon vanilla extract - 1/2 teaspoon ground nutmeg - 1/2 teaspoon ground cinnamon Brown sugar adds sweetness, but feel free to adjust it. The vanilla extract gives a lovely aroma. Nutmeg and cinnamon bring in warm, comforting flavors. These spices make your porridge taste like a treat. - Fresh fruit (bananas, mangoes) - Nuts (almonds) Fresh fruit adds brightness and a burst of flavor. You can choose bananas or mangoes, or both! Nuts like almonds add crunch and protein. Toppings let you personalize your porridge and make it even more delicious. For the Full Recipe, check the detailed instructions to create this delightful dish! - Bring 3 cups of water to a boil. - Mix cornmeal with 1 cup of cold water until smooth. Start by boiling the water in a large pot. It should be bubbling before you add the cornmeal. In another bowl, mix the cornmeal with cold water. This step is key. It helps keep the porridge smooth. If you skip this, you might get lumps in your porridge. - Whisk cornmeal mixture into boiling water. - Reduce heat and cook for 15 minutes. Once the water boils, you need to act fast. Whisk the cornmeal mixture into the pot slowly. Stir continuously. This helps blend everything well. Lower the heat after mixing. Let it cook for about 15 minutes. Stir often to keep it from sticking to the pot. - Incorporate coconut milk, salt, and brown sugar. - Add vanilla extract, nutmeg, and cinnamon. - Let it thicken further if desired. After cooking, it’s time to add flavor. Pour in the coconut milk, salt, and brown sugar. Stir until everything blends well. Next, add the vanilla extract, nutmeg, and cinnamon. These spices make the porridge rich in taste. If you want it thicker, let it sit for a few more minutes. Serve it warm and enjoy with your favorite toppings like fresh fruit or nuts. For the full recipe, check out the previous section. To get that perfect creamy texture, whisking continuously is key. As you stir, you break up any lumps. This keeps your porridge smooth and silky. If you find it's too thick, add more water or coconut milk. This will help you reach the consistency you want. Just remember, a little at a time goes a long way! Now, let’s talk about flavor. You can experiment with spices to make it your own. A pinch of ginger or a dash of allspice can add a warm kick. You can also customize the sweetness level. If you like it sweeter, add more brown sugar. For a lighter touch, try honey or maple syrup instead. When serving, think about how it looks. Use deep bowls for your porridge. This gives it an appealing look and makes it feel special. Create a small well in the center for your toppings. Fresh fruit or nuts add color and crunch. Drizzle a bit of extra coconut milk on top for a beautiful finish. It makes your breakfast not just tasty, but also a feast for the eyes! {{image_2}} You can change the milk in this recipe to fit your taste. Almond milk or oat milk work well if you want a lighter option. These alternatives can give your porridge a different flavor and texture. If you use almond milk, it adds a nutty taste. Oat milk makes it creamier, which many people love. You might need to adjust the water to keep the right thickness. Sweetness is personal. You can use honey or maple syrup instead of brown sugar. These natural sweeteners add unique flavors. If you prefer less sugar, feel free to cut back. You can also add more sugar if you like it sweeter. Just remember to taste as you go. This way, you get the perfect balance for your porridge. Toppings can make your porridge exciting. Fresh fruits like bananas and mangoes add sweetness and color. You can also use nuts like almonds for a crunchy texture. Seasonal fruits are great, too. Try berries in the summer or apples in the fall. Mix and match to find your favorite combination. The added crunch and flavor will elevate your meal. For the full recipe, check out the detailed instructions above. To store leftover porridge, let it cool down first. Once cool, place it in an airtight container. Keep it in the fridge. This way, it stays fresh for later. When you want to eat it again, take it out. For reheating, add a splash of water or coconut milk. Heat it in a saucepan over low heat. Stir until it warms up and gets creamy again. You can also use a microwave. Just cover it loosely, heat for a minute, and stir. Yes, you can freeze Creamy Jamaican Cornmeal Porridge! Pour it into a freezer-safe container. Leave some space at the top for expansion. Seal it well to avoid freezer burn. When you're ready to eat, take it out and let it thaw in the fridge overnight. For reheating, use the same method as before. Add a bit of liquid to restore its creamy texture. In the fridge, the porridge lasts for about three to four days. Always check it before eating. Look for changes in smell or texture. If it smells sour or is very thick, it is time to toss it out. Ensuring food safety is key to enjoying your meal! Creamy Jamaican cornmeal porridge is a warm, comforting dish. It has roots in Jamaican culture, often enjoyed for breakfast. This porridge is made mainly from cornmeal, coconut milk, and spices. It is creamy, smooth, and slightly sweet. Many families have their own recipes passed down through generations. The dish symbolizes comfort and home in Jamaican households. Yes, you can easily make this dish dairy-free. Coconut milk is a perfect base for the porridge. If you want to avoid coconut milk, try almond milk or oat milk. Both options will give you a creamy texture. Just remember to adjust the sweetness, as these milks can change the flavor slightly. Making this porridge vegan is simple. Use plant-based milk, such as almond or soy milk. For sweeteners, you can use maple syrup or agave instead of brown sugar. These swaps keep the dish vegan and still delicious. You can enjoy the same creamy texture and rich flavor without any animal products. You can serve creamy Jamaican cornmeal porridge with various toppings. Fresh fruit like bananas, mangoes, or berries adds color and flavor. Nuts such as almonds or walnuts add crunch. A sprinkle of cinnamon or nutmeg on top enhances the taste. These accompaniments make the dish even more enjoyable. Yes, this porridge is a healthy choice for breakfast. Cornmeal is high in fiber, which aids digestion. Coconut milk adds healthy fats that keep you full longer. You can control the sugar to fit your dietary needs. The fresh fruit and nuts provide vitamins and minerals. Enjoying this dish gives you energy and nutrients to start your day. For more details, check the Full Recipe. In this article, I covered how to make Creamy Jamaican Cornmeal Porridge from scratch. You learned about the key ingredients, preparation steps, and cooking tips for a rich and tasty dish. I shared ways to customize the flavors and textures, along with storage and serving advice. This porridge is a delightful breakfast that suits many tastes. With a few tweaks, you can make it your own. Enjoy experimenting with it as you share it with family and friends!

Creamy Jamaican Cornmeal Porridge Simple and Smooth

Are you ready to try a dish that warms the heart and satisfies the soul? Creamy Jamaican Cornmeal Porridge is

To make this vanilla mousse, you need the following: - 2 cups heavy cream - 1 cup whole milk - 1/2 cup granulated sugar - 2 teaspoons pure vanilla extract - 3 large egg whites - 1/4 teaspoon cream of tartar - A pinch of salt - Fresh berries and mint leaves for garnish (optional) - Heavy cream: This gives the mousse its rich and creamy texture. Use cold cream for best results. - Whole milk: It adds creaminess without being too heavy. Do not substitute with low-fat milk. - Granulated sugar: This sweetens the mousse. Avoid brown sugar, as it alters the flavor. - Pure vanilla extract: It enhances the vanilla flavor. Avoid imitation vanilla for a more authentic taste. - Egg whites: They provide the light, airy structure. Ensure they are at room temperature for better whipping. - Cream of tartar: This stabilizes the egg whites. You can skip it, but the texture may suffer. For the best flavor and texture, I recommend these brands: - Heavy Cream: Organic Valley or Land O'Lakes - Whole Milk: Horizon Organic or local dairy brands - Granulated Sugar: Domino or C&H - Pure Vanilla Extract: McCormick or Nielsen-Massey Using high-quality ingredients will make a big difference in your mousse. For a full recipe, check out the Dreamy Vanilla Cloud Mousse. 1. Start by gathering all your ingredients. You need heavy cream, whole milk, sugar, vanilla extract, egg whites, cream of tartar, and salt. This makes the process easier. 2. In a large mixing bowl, mix the heavy cream, whole milk, sugar, and vanilla extract. Use an electric mixer on medium-high speed. Whip until soft peaks form, which takes about 3-4 minutes. 3. Next, take a clean bowl for the egg whites. Add the egg whites and cream of tartar. Whip them until stiff peaks form, which takes around 5-6 minutes. 4. Now, it’s time to fold! Start by adding a scoop of the whipped cream to the egg whites. This step lightens the egg whites. Gently fold in the rest of the whipped cream in thirds. Be careful not to deflate the mixture. 5. After everything is combined, spoon the mousse mixture into serving glasses or bowls. This is where the fun begins! 6. Place the mousse in the refrigerator. Let it chill for at least 2 hours. For the best flavor and texture, chill it overnight. - Chill your tools: It helps if your mixing bowls and beaters are cold. This keeps the cream and egg whites from warming up too fast. - Use fresh eggs: Fresh eggs whip better. They create a fluffier mousse. - Don’t overwhip: Stop whipping once you see stiff peaks. Overwhipping can make the cream grainy. - Start slow: When folding, use a spatula to cut through the middle of the mixture. Then scoop from the bottom and fold over the top. - Turn the bowl: Rotate the bowl as you fold. This mixes everything evenly. - Be gentle: The goal is to keep the air in the mousse. So, avoid stirring too hard. This dreamy vanilla cloud mousse is a treat that makes any occasion special. Enjoy the process as you create this rich and creamy delight! For the complete recipe, refer to the full recipe section. To get that light, fluffy texture in your vanilla mousse, follow these steps: - Chill all tools: Start with cold mixing bowls and beaters. Cold helps the cream whip better. - Whip cream to soft peaks: Whip the heavy cream until it forms soft peaks. This keeps it airy. - Gently fold: When mixing whipped cream and egg whites, fold gently. Use a spatula and a folding motion to keep the air in. Avoid these common pitfalls to ensure your mousse turns out perfect: - Overmixing: Don’t mix the cream and egg whites too much. This will deflate your mousse. - Warm ingredients: Make sure your cream and milk are cold. Warm ingredients can lead to a runny mousse. - Skipping the chill time: Refrigerate your mousse for at least two hours. This helps it set properly. Serve your vanilla mousse cold for the best taste. Here are some storage tips: - Store in the fridge: Keep your mousse in the refrigerator if you have leftovers. It stays fresh and creamy. - Use airtight containers: Use a sealed container to prevent any odors from the fridge affecting the mousse. - Enjoy within a few days: For the best flavor and texture, eat the mousse within three days. For the complete recipe, refer to the Full Recipe section. {{image_2}} To add a twist to the classic vanilla mousse, you can make a chocolate vanilla mousse. Just mix in melted chocolate. Use about 4 ounces of dark chocolate. Melt it and let it cool slightly before adding it to the whipped cream. This gives a rich, sweet flavor. It pairs great with the vanilla. You can also enjoy a dairy-free or vegan version. Use coconut cream instead of heavy cream. Chill a can of coconut milk overnight and scoop out the cream. Beat it just like you would heavy cream. Replace the egg whites with aquafaba, the liquid from canned chickpeas. It whips up nicely and adds air. This way, you get a creamy mousse without dairy. You can infuse the mousse with fun flavors. For a citrus twist, add the zest of an orange or lemon. Mix it in with the cream. For a coffee flavor, stir in some espresso powder. Use about a tablespoon. Both options make the mousse unique and tasty. You can explore many flavor combinations to match your taste. For more ideas and tips, check out the Full Recipe. To keep your vanilla mousse fresh, store it in the fridge. Use airtight containers to avoid any smells from other foods. You can also cover the mousse with plastic wrap. Make sure it touches the surface of the mousse to keep air out. This helps to maintain its creamy texture and rich flavor. Vanilla mousse lasts about 3 to 4 days in the fridge. Check for any signs of spoilage, like off smells or changes in texture. If you want to store it longer, you can freeze the mousse. However, freezing can change its texture. To freeze, place the mousse in a freezer-safe container. It can last up to 2 months in the freezer. When you plan to enjoy it again, move it to the fridge to thaw overnight. You don’t need to reheat vanilla mousse. If it seems too firm after being in the fridge, give it a gentle stir. This can help restore its creamy feel. If it’s frozen, let it thaw completely in the fridge before serving. You can also top it with a little whipped cream to freshen it up. Enjoy the light and fluffy texture as if it was just made! For the full recipe, check out the complete guide above. Mousse is light and airy. It gets its fluffiness from whipped cream and egg whites. Panna cotta is smooth and creamy. It has a gel-like texture from gelatin. Both desserts are delicious but have different textures. Mousse feels light, while panna cotta feels rich and dense. You can serve mousse chilled or at room temp. Panna cotta should always be chilled. You can use whipped topping, but I do not recommend it. Whipped topping lacks the rich flavor of heavy cream. It also does not whip up as well. Heavy cream creates a better texture. If you want that airy feel, stick with heavy cream. The taste and texture will be worth it in the end. If your mousse is runny, check a few things. First, make sure you whipped the cream and egg whites well. They need to form stiff peaks. If they are too soft, the mousse will not hold. Next, ensure you folded the mixtures gently. Overmixing can deflate the air and cause runniness. If this happens, you can add a bit of gelatin to help it set. Just dissolve the gelatin in water and mix it in gently. Follow the Full Recipe for best results. To sum up, we covered all you need for a great vanilla mousse. You learned about key ingredients and their best brands. I shared step-by-step instructions and helpful tips for perfect texture. We explored variations, including dairy-free options and creative flavors. Lastly, I detailed storage methods and answered common questions. With this knowledge, you can create delicious mousse that impresses. Enjoy your cooking adventure and the tasty results!

Vanilla Mousse Rich and Creamy Delight Recipe

Indulging in a rich and creamy vanilla mousse is one of life’s simple pleasures. This recipe will show you how

- 8 oz linguine pasta - 2 chicken breasts, diced - 4 tablespoons cowboy butter The main players in this dish are quite simple. First, we need linguine pasta. It cooks up nice and holds the sauce well. Next, we use chicken breasts. Diced chicken cooks fast and adds protein. Finally, the cowboy butter brings rich flavor. - 1 cup cherry tomatoes, halved - 1 cup corn (fresh or canned) - 1 red bell pepper, diced For bright flavors, we add cherry tomatoes. They burst with sweetness. Corn adds a nice crunch. A red bell pepper gives color and a hint of sweetness. - 2 cloves garlic, minced - 1 teaspoon smoked paprika - 1 teaspoon cumin Garlic is a must for depth. Smoked paprika gives a warm, smoky taste. Cumin adds earthiness to balance the dish. These spices make the meal more exciting. This Cowboy Butter Chicken Linguine is a quick meal. You can make it in about 30 minutes. Check out the Full Recipe for more details on preparing this tasty dish. To make cowboy butter, start with softened butter. In a bowl, mix together: - 1 cup unsalted butter - 2 tablespoons fresh lemon juice - 2 tablespoons chopped fresh parsley - 1 tablespoon minced garlic - 1 teaspoon chili powder - 1 teaspoon onion powder - Salt and pepper, to taste Stir until everything is well combined. This buttery mix adds great flavor to your dish. You can use it right away or store it in the fridge. Just place it in a sealed container. It will keep for about a week. Next, you’ll cook the linguine. Fill a large pot with water and add salt. Bring the water to a boil. Add 8 oz of linguine pasta and cook it until it is al dente. This usually takes about 8-10 minutes. Remember to stir the pasta occasionally to prevent sticking. Once cooked, drain the pasta but save a little pasta water. This water helps to loosen the sauce later. Now it’s time for the chicken. In a large skillet, melt 4 tablespoons of cowboy butter over medium heat. Once the butter is melted, add 2 diced chicken breasts. Season the chicken with: - Salt - Pepper - 1 teaspoon smoked paprika - 1 teaspoon cumin Cook the chicken until it is golden brown and cooked through. This should take about 5-7 minutes. After the chicken is done, add your veggies: 1 cup of halved cherry tomatoes, 1 cup of corn (fresh or canned), and 1 diced red bell pepper. Add 2 minced garlic cloves, too. Sauté everything for another 3-4 minutes until the veggies are tender. Now, it's time to bring it all together. Add the cooked linguine to the skillet with the chicken and veggies. Toss everything well to combine. If the mixture seems dry, add a splash of the reserved pasta water. This will help create a nice sauce that coats the pasta. Once it’s all mixed, serve the dish hot. You can sprinkle fresh parsley on top for a burst of color and flavor. For the full recipe, check out the details above! To make cowboy butter even better, try adding different flavors. You can mix in fresh herbs like basil or dill. A dash of hot sauce can add some kick. Play with spices too, like adding a bit of cayenne for heat. You can also make cowboy butter ahead of time. Just store it in the fridge for up to a week. When ready to use, let it sit out to soften. This way, you save time on busy days. Always use salted water when cooking pasta. It helps the pasta taste better. Use about one tablespoon of salt for every gallon of water. This simple trick makes a big difference. If you're short on time, you can cook pasta in a microwave. Just add water and pasta to a large bowl. Cover it and microwave in two-minute intervals, stirring until it’s al dente. Cowboy Butter Chicken Linguine pairs well with side salads. A fresh green salad adds crunch and balance. Another great option is garlic bread for a tasty dip. For a beautiful presentation, serve the pasta in a large bowl. Garnish with chopped parsley and lemon wedges. This makes your dish look fresh and inviting. Enjoy your meal! {{image_2}} You can change the protein in Cowboy Butter Chicken Linguine. Try shrimp or firm tofu for a twist. Both options give a different flavor and texture. If you want to go meatless, chickpeas are a great choice. They add protein and soak up the sauce well. Adding seasonal vegetables makes the dish even better. Consider using zucchini, spinach, or asparagus in spring. In summer, fresh peppers and corn shine. In fall, add butternut squash or kale for warmth. You can mix and match to suit your taste and what you have on hand. If you need gluten-free options, use gluten-free pasta. There are many good brands available today. For a vegan version, swap the chicken for mushrooms or lentils. You can also make a vegan cowboy butter. Use plant-based butter and skip the chicken. This way, you still enjoy the flavors without animal products. For the full recipe, check out the Cowboy Butter Chicken Linguine section above. To keep Cowboy Butter Chicken Linguine fresh, store it properly. First, let it cool to room temperature. Then, place it in airtight containers. This keeps moisture in and air out. Use shallow containers for quick cooling. Label each container with the date. This way, you know when to eat it. When you want to enjoy leftovers, reheating is key. You can use a microwave or stovetop. For the microwave, place the pasta in a bowl. Cover it with a damp paper towel to keep it moist. Heat in short bursts, stirring often. If you use the stovetop, add a splash of water or broth. Heat in a pan over low heat, stirring gently. Both methods work well! Can you freeze Cowboy Butter Chicken Linguine? Yes, it freezes well! Just place it in a freezer-safe container. Leave some space at the top for expansion. When you are ready to eat, move it to the fridge to thaw overnight. For reheating, use the microwave or stovetop. Ensure it heats all the way through for safety. Cowboy butter is a tasty blend of softened butter with spices and herbs. It adds flavor and richness to dishes. You can use it on meats, vegetables, or pasta. The mix often includes garlic, lemon juice, and chili powder, which makes it very versatile. You’ll find it enhances many meals, bringing a kick to the ordinary. Yes, you can prepare Cowboy Butter Chicken Linguine ahead of time. Make the cowboy butter in advance and store it in the fridge. Cook the chicken and veggies, then mix them with the pasta when you're ready to serve. This saves time and keeps your meal fresh. Just reheat everything on the stove, adding a little water if needed. To spice up this dish, add more chili powder or diced jalapeños. You could also mix in hot sauce for extra heat. If you love a smoky flavor, try smoked paprika. Adjust the spice level to match your taste. Remember, you can always add more heat, but you can't take it away! Pair this dish with a crisp green salad or garlic bread. A light white wine, like Sauvignon Blanc, complements the flavors well. You can also serve grilled vegetables for a colorful side. These options will enhance your meal and make it even more enjoyable. The Cowboy Butter Chicken Linguine combines rich flavors with simple steps. You learned about the key ingredients, from tender chicken to tasty vegetables. We covered how to make cowboy butter and tips for perfect pasta. You can also explore variations and storage tips to enjoy this dish later. This meal offers fun options for everyone. Whether you prefer swaps or dietary changes, you can make it your own. Enjoy creating this delicious dish!

Cowboy Butter Chicken Linguine Tasty and Quick Meal

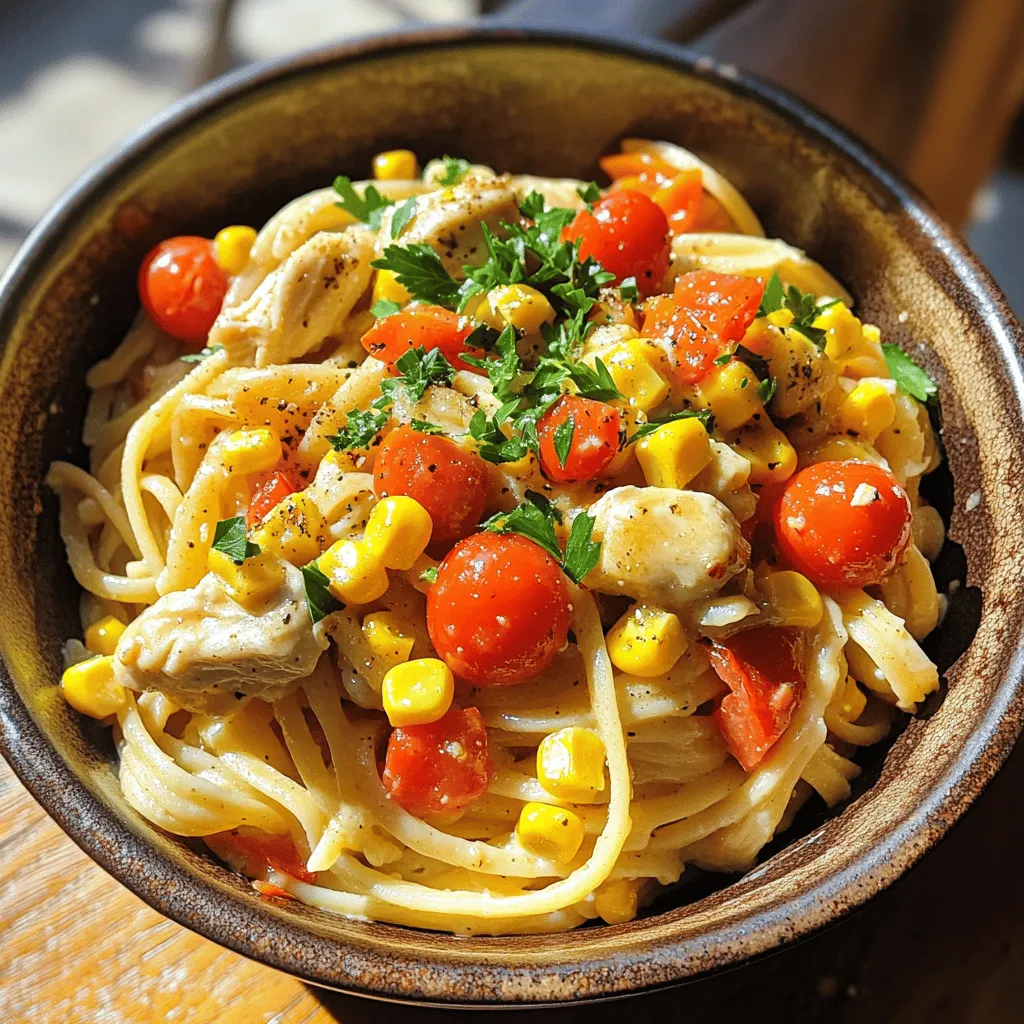
Looking for a meal that’s both tasty and quick? Look no further than Cowboy Butter Chicken Linguine! This dish combines

- 1 cup red lentils, rinsed - 2 cups pumpkin, peeled and diced - 1 medium onion, finely chopped - 2 cloves garlic, minced - 1 inch ginger, grated - 1 can (14 oz) coconut milk - 2 cups vegetable broth - 1 tablespoon curry powder - 1 teaspoon turmeric - 1 teaspoon cumin - 1 teaspoon coriander - 2 tablespoons vegetable oil - Salt and pepper, to taste - Fresh cilantro, for garnish When measuring ingredients, be precise for the best taste. Rinse your lentils well. This helps remove dust or impurities. Make sure to peel and dice the pumpkin into small pieces for even cooking. Chop the onion finely to release its sweetness. Mince the garlic and grate the ginger to unleash their flavors. For the spices, level off your measuring spoons to ensure accuracy. You can swap red lentils with green or brown lentils, but cooking time may vary. For pumpkin, butternut squash works great. Use any onion type, but yellow onions add a nice sweetness. If you don’t have coconut milk, almond milk can be a lighter option. For a little heat, add a pinch of cayenne or red pepper flakes. You can also use fresh herbs instead of cilantro, like parsley or mint. These swaps keep the dish tasty and fun. Check out the Full Recipe for more details. First, gather all your ingredients. This makes cooking easier. You will need: - 1 cup red lentils, rinsed - 2 cups pumpkin, peeled and diced - 1 medium onion, finely chopped - 2 cloves garlic, minced - 1 inch ginger, grated - 1 can (14 oz) coconut milk - 2 cups vegetable broth - 1 tablespoon curry powder - 1 teaspoon turmeric - 1 teaspoon cumin - 1 teaspoon coriander - 2 tablespoons vegetable oil - Salt and pepper, to taste - Fresh cilantro, for garnish Make sure the pumpkin is cut into small pieces. This helps it cook faster. Rinse the lentils in cold water until the water runs clear. This removes dust and helps them cook evenly. In a large pot, heat the vegetable oil over medium heat. Add the chopped onion. Cook it until it turns translucent, about 5 minutes. Stir often to avoid burning. Next, add the minced garlic and grated ginger. Stir for about 1 minute. You want to bring out their flavors. The kitchen will smell amazing! Now, sprinkle in the curry powder, turmeric, cumin, and coriander. Stir well so the spices coat the onions. Cook this mixture for 1-2 minutes. This step releases the spices' full flavors. Add the diced pumpkin and rinsed lentils to the pot. Stir everything together. Pour in the coconut milk and vegetable broth. Bring the mixture to a gentle boil. Once boiling, reduce the heat to low. Cover the pot and let it simmer. Cook for about 25-30 minutes. This allows the pumpkin to become tender and the lentils to cook through. Stir occasionally to prevent sticking. When it's done, check the seasoning. Add salt and pepper to taste. If the curry seems too thick, adjust it with more vegetable broth or water. Serve hot, garnished with fresh cilantro on top. For the complete cooking process, refer to the Full Recipe. To make your pumpkin lentil curry shine, add a squeeze of fresh lime juice. This brightens the dish and balances the flavors. You can also toss in a pinch of brown sugar to enhance the sweetness of the pumpkin. For more texture, try adding nuts like cashews or almonds. They bring a nice crunch to every bite. When cooking lentils, rinse them well before use. This removes any dust or debris. To avoid mushy lentils, watch the cooking time closely. Red lentils cook quickly, usually in about 25 minutes. If you want firmer lentils, you can soak them for a few hours before cooking. This helps them keep their shape better. Garnishing your curry elevates its look and taste. Fresh cilantro adds a pop of color and flavor. You can also sprinkle some roasted pumpkin seeds on top for extra crunch. For a complete meal, serve the curry with warm naan bread or fluffy rice. These pairings soak up the rich flavors of the curry. For the full recipe, check out the detailed instructions above! {{image_2}} You can add protein to your pumpkin lentil curry in many ways. Chickpeas are a great choice. They add texture and a nice taste. Simply add one can of drained chickpeas during cooking. Paneer is another option. This Indian cheese adds creaminess and richness. Cube the paneer and add it when you mix the other ingredients. You can change the spice level to fit your taste. If you like heat, add red pepper flakes or fresh chili peppers. Start with a small amount. You can always add more if you want it spicier. For a milder curry, remove the chili or use less curry powder. Feel free to swap out veggies in your curry. Sweet potatoes work well and add sweetness. Carrots are another great choice. They bring color and crunch. Try adding spinach or kale for extra greens. These veggies not only taste good but also boost nutrition. You can mix and match based on what you have at home. After you enjoy the Pumpkin Lentil Curry, store leftovers in an airtight container. Make sure to let it cool down first. Place it in the fridge for up to four days. If you want to keep it longer, freezing is a great option. When you are ready to eat the leftovers, you can reheat them on the stove or in the microwave. For the stove, pour the curry in a pot and heat over medium-low heat. Stir it often to avoid sticking. If using a microwave, place the curry in a microwave-safe bowl. Heat it in short intervals, stirring in between, until it's hot. To freeze your Pumpkin Lentil Curry, use freezer-safe containers. Leave some space at the top for expansion. You can freeze it for up to three months. When you want to eat it, thaw it in the fridge overnight. After thawing, reheat it on the stove or microwave as needed. For best flavor, try to consume it within a month after thawing. To make Pumpkin Lentil Curry vegan, use vegetable broth instead of chicken broth. The recipe already uses coconut milk, which is vegan. All the spices and vegetables are plant-based, so you can enjoy this dish without any animal products. Yes, you can use different lentils! Red lentils work best because they cook quickly and become soft. If you choose green or brown lentils, they will take longer to cook and may not break down as much. Just adjust the cooking time and liquid for the type you use. Pumpkin Lentil Curry pairs well with rice or quinoa. You can also serve it with naan bread or pita for dipping. A fresh salad adds a nice crunch. You may want to try some yogurt on the side too. It helps balance the spices. For more details, check the Full Recipe. You now have all the tools to make a great Pumpkin Lentil Curry. We covered ingredients, preparation, cooking tips, and even storage. Remember, you can adjust the recipe to fit your taste. Add protein, change spices, or swap veggies. Each choice can make your dish unique. Finally, enjoy sharing this flavorful curry with friends and family. Cooking should be fun, and this dish makes it easy!

Pumpkin Lentil Curry Flavorful and Nutritious Meal

Are you ready to dive into a warm bowl of Pumpkin Lentil Curry? This dish is not just tasty; it’s

- 1 cup cream cheese, softened - 1/2 cup powdered sugar - 1 teaspoon vanilla extract To make Twix dip, start with the main ingredients. Softened cream cheese is key. It creates a rich and smooth base. The powdered sugar adds sweetness. Vanilla extract gives a nice flavor boost. - 1/2 cup caramel sauce - 1 cup cool whip (or whipped cream) - 1/2 cup crushed Twix bars (plus extra for topping) You can add caramel sauce for extra sweetness. Cool whip makes the dip light and fluffy. Crushed Twix bars add crunch and more chocolate taste. Feel free to mix in these optional add-ins for a fun twist. - Sliced apples - Graham crackers For dipping, I love using sliced apples. They provide a fresh taste. Graham crackers are also great and add a nice crunch. Both options pair well with the sweet dip. Try these suggestions to make your dip even more enjoyable! For the complete recipe, check out the Full Recipe. 1. Start with a mixing bowl and add 1 cup of softened cream cheese. 2. Use a handheld mixer to beat the cream cheese until it is smooth and creamy. This step is key for a great texture. 3. Gradually add 1/2 cup of powdered sugar into the bowl. Keep mixing until it is fully blended. You want it sweet but not too sweet! 1. Next, stir in 1 teaspoon of vanilla extract. This adds a warm flavor to your dip. 2. Now, gently fold in 1 cup of cool whip. This makes the dip light and fluffy. 3. Carefully drizzle in 1/2 cup of caramel sauce while folding in 1/2 cup of crushed Twix bars. Make sure to mix gently so the Twix chunks stay whole. 1. Transfer the dip to a serving bowl. Make sure to use a nice bowl to impress your guests. 2. Top it off with some extra crushed Twix bars for a crunch. This adds a nice touch to the dip. 3. Serve with sliced apples or graham crackers. The sweet dip pairs well with these crunchy options. For the complete recipe, check out the [Full Recipe]. To avoid lumps in cream cheese, start with soft cream cheese. Let it sit out for 15 minutes. This helps it mix well. When you beat it, use a handheld mixer. Start on low speed, then increase to medium. This way, you keep it smooth. For fluffiness, folding is key. Use a rubber spatula to gently mix. When adding cool whip, fold it in slowly. You want to keep air in the mix. This makes your dip light and airy. To boost the taste, try adding spices. A pinch of cinnamon adds warmth. A dash of nutmeg provides a nice twist. You can also add a splash of almond extract for a unique flavor. If you want a sweeter dip, use alternative sweeteners. Stevia or monk fruit can lower calories. These options keep the flavor rich without the sugar. For creative serving ideas, think outside the bowl. Use a small cast iron skillet for a rustic look. You can also use a colorful platter. Arrange sliced apples and graham crackers around the dip for a fun display. To make it visually appealing, sprinkle extra crushed Twix bars on top. A drizzle of caramel sauce adds a glossy finish. You can even add a few apple slices on the side for color. {{image_2}} To make a chocolate Twix dip, you can add cocoa powder. Just mix in two tablespoons of cocoa with your cream cheese. This gives the dip a rich, chocolatey taste. You can also use chocolate whipped cream instead of regular whipped cream. This adds extra chocolate flavor and makes it even more delicious. If you love nuts, try making a nutty Twix dip. You can add chopped nuts like peanuts or almonds. You can also mix in peanut butter for a creamy texture. This adds a nice crunch and a nutty taste. For a twist, try using nut-based whipped toppings instead of cool whip. This gives a different flavor and texture, making it unique. For those seeking healthier options, consider low-fat cream cheese. It tastes great and cuts down on calories. You can also use Greek yogurt instead of cool whip. This adds protein and makes the dip creamy. Both options keep the dip tasty while being a bit healthier. These variations make the dip fun and exciting for any gathering. You can find the full recipe above to get started! To keep your Twix dip fresh, use an airtight container. Glass or plastic containers work well. Seal the container tightly to avoid air exposure. This dip stays fresh in the fridge for up to 3 days. After that, the texture may change. You can freeze Twix dip, but it may alter the texture. Use a freezer-safe container and leave some space at the top. This allows for expansion as it freezes. The dip can stay good in the freezer for about 1 month. To thaw, place it in the fridge overnight. This helps preserve its creamy texture. To reheat Twix dip, use the microwave for short intervals. Heat it for about 15 seconds at a time. Stir in between to keep it creamy. Avoid overheating, as this can cause separation. If separation occurs, mix it well to recombine. Enjoy your dip warm or cold! Twix dip lasts for about 3 to 5 days in the fridge. Make sure to store it in an airtight container. This keeps it fresh and tasty for your next snack or gathering. If you notice any change in smell or texture, it's best to toss it out. Yes, you can make Twix dip ahead of time. Prepare it a day before your event and store it in the fridge. This allows the flavors to blend well. Just remember to cover it tightly with plastic wrap or in a sealed container to keep it fresh. You can dip many tasty treats in Twix dip! Here are some fun options: - Graham crackers - Pretzels - Sliced bananas - Marshmallows - Strawberries - Cookies Feel free to mix and match! Each option adds a special twist to your sweet treat. If you want the full recipe, check out the Twix Dip Delight recipe. This blog post covered how to make a delicious Twix dip. You learned about key ingredients like cream cheese and powdered sugar. I shared tips on mixing, serving, and storing your dip. You can make variations to suit your taste. Remember to try different add-ins and serving ideas. Enjoy making this treat for friends and family. It’s sure to be a hit!

Twix Dip Irresistible Sweet Treat for Any Occasion

Looking for a sweet treat that wows at any gathering? Meet Twix Dip! This creamy, delicious dip combines cream cheese,

When making crab salad, the first choice you face is the crab meat. You can use lump or backfin crab meat. Lump crab meat has larger pieces and a sweeter taste. Backfin crab meat is smaller bits and has a firmer texture. Both options work well, but I prefer lump for its tenderness. Next, you need a ripe avocado. A ripe avocado adds creaminess and richness to the dish. Look for avocados that yield slightly to pressure. Avoid any that feel too soft or have dark spots. Finally, fresh herbs and spices bring the dish to life. Fresh cilantro adds a bright note, while lime juice gives a zesty kick. You can also add jalapeño for heat and red onion for a crunch. Choosing the right tomatoes is key for flavor. I like cherry tomatoes for their sweetness and vibrant color. Halve them for easy mixing. You want tomatoes that are firm and bright, without any blemishes. For corn kernels, you can use fresh or canned corn. Fresh corn gives a sweet crunch that brightens the salad. If fresh corn isn’t in season, use canned corn. Just make sure to drain and rinse it well to avoid excess salt. For the full recipe, check out the [Full Recipe]. To make a great crab salad, start with fresh crab meat. If you have lump or backfin crab, both work well. Rinse the crab meat gently under cold water to remove any bits of shell. Drain it well. Pat it dry with a paper towel. This keeps the salad from getting watery. Next, you’ll need to chop your veggies. Dice the avocado into small cubes, about half an inch. This size works well with the crab. Halve the cherry tomatoes and chop the red onion finely. If you like heat, mince the jalapeño, but remember to remove the seeds first. This step helps to control the spice level. Now, it’s time to mix everything. In a large bowl, add the crab meat, diced avocado, cherry tomatoes, corn, red onion, and jalapeño. Use a large spoon to mix these ingredients gently. You want to keep the crab meat intact. It adds to the salad's nice texture. Next, we prepare the dressing. In a small bowl, whisk the lime juice, olive oil, salt, and pepper. This dressing is key to flavor. Pour it over the salad and fold it in carefully. This way, the crab stays whole and delicious. Let your salad sit for about 10 minutes. This resting time helps the flavors blend together. Take a moment to taste it. Adjust the seasoning if needed. You might want more lime juice, salt, or pepper. Finally, serve the crab salad cold or at room temperature. Top it with fresh cilantro leaves for a nice touch. Enjoy your fresh and flavorful crab salad delight! For the full recipe, check out the details provided earlier. Where can you buy fresh crab? Look for local fish markets or seafood shops. They often have fresh crab meat. You can also find it at some grocery stores. Check the labels for quality and freshness. What are the signs of fresh crab meat? Fresh crab meat should smell like the sea, not fishy. It should be firm and moist. Look for bright white or light pink color. Avoid any meat that looks gray or brown. What are the best practices for chilling? Chill the crab salad in the fridge for at least 30 minutes before serving. This helps the flavors mix. Use a covered bowl to keep it cool. Always serve it cold for the best taste. How can you avoid browning of avocado? To keep avocado fresh, add lime juice right after cutting. This helps slow down browning. You can also leave the pit in the bowl. It helps keep the remaining avocado green longer. What are the ideal accompaniments for crab salad? Serve the crab salad with crispy crackers or toasted bread. You can also pair it with fresh greens. A side of mixed greens makes a colorful plate. What are some creative serving ideas? Try serving the salad in lettuce cups for a fun twist. You can also use small bowls for individual servings. Garnish with herbs like cilantro for a bright look. For the full recipe, check out the details above! {{image_2}} To add more flavor, try a crab and avocado twist. You can mix in diced mango for sweetness. Fresh herbs like mint or basil give a bright taste. A squeeze of lemon juice brightens the dish too. You can also add nuts for crunch, like almonds or walnuts. This twist makes the salad even more special. Crab Louie salad is a classic. The main difference is the use of a tangy dressing. This salad often includes hard-boiled eggs and asparagus. You can also find it served on a bed of lettuce. The key ingredients are crab, dressing, and fresh veggies. Crab Louie has a unique taste that stands apart from other crab salads. For a kick, try adding spicy elements. You can use jalapeños, serrano, or even habanero peppers. Each pepper brings a different level of heat. You can also incorporate hot sauce for an extra punch. Just a few drops can elevate the flavor. Adjust the amount based on your taste. This adds excitement and flavor to the crab salad. To keep your crab salad fresh, always refrigerate it right after serving. Use an airtight container to prevent air from spoiling the salad. Glass containers work well, but plastic ones are fine too. Make sure the lid is tight. This keeps the flavors intact and stops odors from mixing. Crab salad stays fresh in the fridge for about 2 to 3 days. After that, the taste and texture change. Look for signs that the salad has spoiled, like a sour smell or a change in color. If you see any mold, toss it out immediately. Always trust your senses! You can freeze crab salad, but it changes in texture. If you want to freeze it, do so right after making it. Pack it tightly in a freezer-safe container. When you’re ready to eat it, thaw it in the fridge overnight. Never refreeze thawed crab salad; it won’t taste good. For the best flavor, enjoy it fresh! Yes, you can use canned crab meat. Canned crab is convenient and often less expensive. It saves time and effort in cooking. However, fresh crab meat has a better taste and texture. Canned crab may also have added preservatives. When using canned, choose high-quality brands for the best flavor. If you don’t have lime juice, you can use lemon juice instead. It gives a nice tang and works well in salads. You can also try vinegar, like apple cider or white wine vinegar. Both options add acidity that brightens the salad. Just remember to adjust the amount to suit your taste. To adjust the spice level, you have options. If you want more heat, add more jalapeño or use a spicier pepper, like serrano. If you prefer less spice, remove the seeds from the jalapeño. You can also skip the jalapeño entirely. For a milder flavor, add a pinch of smoked paprika instead. This adds depth without adding heat. In this blog, we explored making a delicious crab salad. First, we looked at key ingredients like fresh crab meat and ripe avocados. Then, I shared step-by-step instructions for preparing and mixing the salad carefully. We discussed helpful tips for selecting quality crab and keeping it fresh. I also introduced variations like crab and avocado twists and spicy options. Finally, we went over how to store the salad properly. Crafting this dish is simple, and with fresh ingredients, it can shine at any meal. Enjoy creating your perfect crab salad!

Crab Salad Delight Fresh and Flavorful Recipe

Crab Salad Delight combines fresh ingredients for a meal that’s both light and satisfying. I’ll share my must-have ingredients, tips

- 1 cup green or brown lentils - 2 tablespoons olive oil - 1 medium onion - 2 cloves garlic - 2 medium carrots - 1 medium bell pepper - 1 medium potato - 2 medium tomatoes - Herbs and spices When you make Hungarian lentil vegetable stew, choose lentils that are firm and fresh. Green or brown lentils work best because they hold their shape. Olive oil adds a nice richness to the dish. Onions and garlic form the base of your stew. Chop them finely to release their flavors. Carrots and bell peppers add sweetness and color. A potato makes the stew hearty, while fresh tomatoes bring brightness. For herbs and spices, smoked paprika, thyme, and caraway seeds give the stew a unique taste. You can adjust the amount based on your preference. - Additional vegetables (e.g., spinach, zucchini) - Toppings (e.g., sour cream, yogurt) Feel free to mix in other vegetables like spinach or zucchini. They add nutrients and flavor. You can also top the stew with sour cream or yogurt for creaminess. - Large pot - Cutting board and knife - Measuring cups and spoons To make this stew, you need a large pot. It helps cook all the ingredients evenly. A cutting board and knife are essential for prepping your vegetables. Measuring cups and spoons ensure you add the right amounts of each ingredient. For the full recipe, check out the details provided earlier. Enjoy creating this comforting dish! - Rinse and prepare the lentils. Start by placing your lentils in a strainer. Rinse them under cold water for about a minute. This helps remove dirt and any debris. After rinsing, set them aside to drain. - Chop vegetables. Next, grab your knife and cutting board. Chop the onion, garlic, carrots, bell pepper, potatoes, and tomatoes. Make sure to keep your pieces even. This will help them cook evenly in the stew. - Heat olive oil and sauté onions. In a large pot, heat the olive oil over medium heat. Once hot, add the chopped onion. Cook it for about five minutes, stirring until it turns soft and clear. - Add garlic, carrots, and bell peppers. After the onions are ready, stir in the minced garlic. Cook for one more minute. Then, add the diced carrots and bell pepper. Stir these for another five minutes until they start to soften. - Incorporate potatoes and tomatoes. Now, it’s time to add the cubed potatoes and chopped tomatoes to the pot. Mix everything well to combine the flavors. - Add lentils and broth. Pour in the rinsed lentils and the vegetable broth. Stir the pot to mix the ingredients. Bring this mixture to a boil over high heat. - Cover and simmer. Once boiling, reduce the heat to low. Cover the pot and let it simmer. Cook for about 30 to 35 minutes until the lentils are tender and the stew thickens. - Adjust seasoning. After simmering, taste your stew. Add salt and pepper as needed. If you want, you can add more spices to enhance the flavor. Enjoy serving this hearty dish! For the full recipe, you can check the details above. Choosing the right spices Spices bring life to your stew. I love using smoked paprika for a warm taste. Caraway seeds add a unique flavor that fits well. You can also try dried thyme for a fresh note. Each spice adds depth and makes the dish special. Adding acidity A splash of acidity brightens the stew. You can use a bit of lemon juice or vinegar right before serving. This small step makes the flavors pop. It helps balance the earthiness of the lentils and vegetables. How to avoid mushy lentils To keep lentils firm, avoid overcooking. Check them at the 30-minute mark. If they are tender but still hold shape, that's perfect. If you want softer lentils, let them cook a bit longer. Thinning the stew if too thick If your stew turns out too thick, don’t worry! Just stir in a little vegetable broth or water. This will help achieve your desired consistency. Add it slowly until it looks just right. Best sides to pair with the stew This stew pairs well with crusty bread. A side salad adds freshness and crunch. You can also serve it with rice or quinoa for extra heartiness. Presentation tips To make your stew look appealing, use a nice bowl. Garnish with chopped parsley for color. A drizzle of olive oil on top adds shine. This simple touch makes your dish pop on the table. {{image_2}} You can easily make this stew vegetarian or vegan. Simply skip any meat products. Use vegetable broth instead of chicken broth for a rich flavor. You can boost protein with extra lentils or add beans. Chickpeas work great here too. They add a nice texture and flavor. For more protein, consider adding nuts or seeds. Toasted sunflower seeds sprinkle nicely on top. This stew is open to fun spices from around the world. You might try a pinch of curry powder for an Indian touch. Adding cumin can give it a warm, earthy flavor. If you like heat, toss in some chili flakes. Don't forget to think about vegetables from your area. Use zucchini in summer or root vegetables in winter. These swaps can make the dish feel fresh and new. Seasonal ingredients can change the stew's taste with each season. In spring, add fresh peas or asparagus. In fall, consider sweet potatoes or pumpkin. These ingredients add color and flavor. Cold-weather versions can be heartier. Use more lentils and less broth for a thicker stew. For warm weather, keep it lighter. Add more broth and fresh herbs for a bright taste. Try the Full Recipe for a delicious meal. After enjoying your Hungarian Lentil Vegetable Stew, let it cool down first. Place it in airtight containers. This helps keep it fresh. Refrigerate the stew within two hours of cooking. It will stay tasty for about 3 to 5 days. For easy reheating, use smaller containers. This makes it simple to heat just what you need. Label your containers with the date. This way, you’ll know when to eat them. To freeze the stew, first, let it cool completely. Use freezer-safe containers or bags. Leave some space at the top of the container for expansion. Seal them tightly to avoid freezer burn. When you’re ready to eat, move the stew to the fridge for a day. This allows it to thaw slowly. If you need it fast, you can also thaw it in the microwave. Reheat it on the stove over low heat. Stir occasionally until hot. Refrigerated leftovers last about 3 to 5 days. After this time, check for signs of spoilage. Look for any off smells or strange colors. If you see any, it's best to throw it out. Frozen stew can last for up to 3 months. However, for the best flavor, eat it within 1 to 2 months. Keep an eye on your frozen stew. Enjoy the full recipe for more deliciousness! What is the best type of lentils to use for this stew? I recommend green or brown lentils for this stew. They hold their shape well during cooking. Red lentils can become mushy, which may change the stew's texture. How can I make this recipe spicier? To add heat, try adding cayenne pepper or chopped jalapeños. Start with a small amount. You can always add more as you taste. Can I replace the vegetable broth with something else? Yes, you can use chicken broth if you want a different flavor. Water can work in a pinch, but it may lack depth. What can I use instead of caraway seeds? If you don’t have caraway seeds, try cumin or fennel seeds. They give a similar warm flavor. Is this stew healthy? Yes! This stew is packed with fiber and protein from lentils, plus vitamins from the veggies. It’s a great choice for a balanced meal. How many calories does a serving contain? A serving of this hearty stew has around 250 calories. This makes it a filling yet light option for lunch or dinner. You can find the full recipe to enjoy this dish at home. This blog post covered how to make a tasty lentil vegetable stew. We talked about the main and optional ingredients, the tools you need, and each step to prepare and cook. I shared tips to enhance flavor, perfect texture, and serve it well. For those wanting variety, I suggested different styles based on seasons or dietary needs. By following this guide, you can create a healthy, delicious meal that fits your taste. Enjoy your cooking adventure!

Hungarian Lentil Vegetable Stew Hearty and Nutritious Dish

If you’re looking for a warming dish that fills you up and keeps you healthy, look no further than my

- Cod fillets: Cod is a mild fish that flakes easily. It pairs well with many flavors. - Mayonnaise: This ingredient keeps the fish moist and adds creaminess. It helps the spices stick to the cod. - Spices and seasonings: Use garlic powder, smoked paprika, salt, and pepper to enhance the dish. Each spice adds a layer of flavor, making every bite delicious. - Panko breadcrumbs: These breadcrumbs give a nice crunch to the dish. They create a golden crust when baked. - Fresh parsley: This herb adds color and freshness. It brightens the dish and makes it look appealing. - Side dishes: I recommend serving the cod with steamed vegetables or a crisp salad. These sides balance the richness of the fish. - Beverage pairings: A chilled white wine or sparkling water goes well with the cod. These drinks complement the flavors without overpowering them. For the complete cooking process, check out the Full Recipe. Start by setting your oven to 400°F (200°C). This high heat helps the cod cook quickly and evenly. While the oven heats, grab a baking dish and line it with parchment paper. This makes cleanup easy and helps prevent sticking. You want a nice, smooth surface for the fish. In a medium bowl, add the mayonnaise, Dijon mustard, lemon juice, garlic powder, smoked paprika, salt, and black pepper. Use a whisk or spoon to mix everything together. Make sure it’s smooth and creamy. The mayo will keep the fish moist, while the spices add great flavor. This combo is key for a tasty cod dish. Now it’s time to coat the cod fillets. Place the fillets in your baking dish, making sure they are spaced out. Take a generous amount of the mayo mixture and spread it over each fillet. Cover them well; this adds flavor and keeps the fish juicy. After coating, sprinkle panko breadcrumbs on top. This adds a nice crunch when baked. Bake the cod in your preheated oven for 15 to 20 minutes. Check for doneness by gently flaking the fish with a fork. It should be opaque and flake easily. If the topping is golden brown, you know it’s ready. When done, let it cool for a few minutes. This helps the flavors settle before you serve. Enjoy this delightful meal with lemon wedges for a fresh twist. For the full recipe, check the earlier section. To make your baked cod shine, try using different spices or herbs. You can switch smoked paprika for regular paprika for a milder taste. Adding a pinch of cayenne pepper gives it a nice kick. Fresh herbs like dill or chives can also add a bright flavor. Experimenting helps you find what you love best. Knowing when your cod is done is key. Cooked cod should flake easily with a fork. The flesh should be opaque and no longer translucent. If you have a meat thermometer, aim for an internal temperature of 145°F (63°C). This tells you that the fish is safe to eat and perfectly moist. How you plate your cod can make a big difference. Serve the cod on a colorful platter with lemon wedges on the side. A sprinkle of fresh parsley adds a pop of color and freshness. You can also arrange it with steamed vegetables or a simple salad for a nice touch. This makes your meal not just tasty, but beautiful too. For the full recipe, check it out [Full Recipe]. {{image_2}} You can swap mayonnaise for Greek yogurt. Greek yogurt gives a creamy texture and adds protein. It also cuts down on calories. Use the same amount of yogurt as mayo in the recipe. This change makes the dish lighter and still tasty. Feel free to experiment with different mustards or spices. You might try honey mustard for sweetness. Spicy brown mustard adds a kick. You can also mix in herbs like dill or basil to brighten the flavor. Each option brings a unique twist to the baked cod. Adding veggies makes this a one-pan meal. You can toss in zucchini, bell peppers, or spinach. Simply place the veggies around the cod in the baking dish. They will cook alongside the fish, soaking up all the delicious flavors. This not only adds color but also boosts nutrition. You can find the full recipe for these variations in the original section. To store leftover baked cod in the refrigerator, first, let it cool. Place the cod in an airtight container. This keeps it fresh and prevents odors from mixing. Make sure to eat it within three days for the best taste. You can also cover it tightly with plastic wrap or aluminum foil. For long-term storage, freezing baked cod with mayo is an excellent option. Wrap each fillet in plastic wrap or foil. Then, place them in a freezer-safe bag or container. This helps prevent freezer burn. You can freeze cod for up to three months. When you’re ready to eat it, just thaw it in the fridge overnight. Reheating baked cod without drying it out is key. The best way is to use the oven. Preheat the oven to 350°F (175°C). Place the cod on a baking sheet. Cover it with foil to keep moisture in. Heat for about 10 to 15 minutes. Check if it’s warm throughout. You want it to be hot but not overcooked. Enjoy your meal again! Yes, you can use frozen cod fillets. When using frozen cod, make sure to thaw them first. The best way to thaw is overnight in the fridge. If you're short on time, you can run cold water over the fillets for about 30 minutes. Pat them dry with paper towels before using. This step helps the mayo mixture stick better. Remember, frozen cod may release more moisture during cooking, so baking time may vary slightly. You can prepare the mayo mixture ahead of time. Just mix all the ingredients in a bowl and store it in the fridge. Keep it in an airtight container to keep it fresh. I recommend using it within 24 hours for the best flavor. This way, all you need to do is coat the cod before baking. It makes dinner prep quick and easy, especially on busy nights. The best way to know if cod is fully cooked is by checking its internal temperature. Cod should reach 145°F (63°C) to be safe to eat. You can use a food thermometer to check. The fish should also be opaque and flake easily with a fork. If it looks shiny or translucent, it needs more time. Following these tips ensures you enjoy a perfectly cooked meal. For the full recipe, visit our main article. This article guided you through making delicious baked cod. We covered essential ingredients like cod fillets, mayonnaise, and spices. You learned tips for perfect cooking and presentation, plus side dishes and drinks to serve. Experiment with flavors and toppings to suit your taste. Remember to store leftovers properly for later enjoyment. With these steps, you can create a tasty and satisfying meal every time. Enjoy your cooking journey and impress those around you with your baked cod!

Flavorful Baked Cod with Mayo Easy Dinner Recipe

Are you ready to try a dinner that’s both simple and delicious? My Flavorful Baked Cod with Mayo will be

The key to great chocolate muffins is the right mix of ingredients. Here’s what you need: - 1 ½ cups all-purpose flour - ½ cup unsweetened cocoa powder - 1 cup granulated sugar - 2 teaspoons baking powder - ½ teaspoon baking soda - ¼ teaspoon salt - ½ cup unsalted butter, melted - 2 large eggs - 1 teaspoon vanilla extract - 1 cup buttermilk (or 1 cup milk with 1 tablespoon vinegar added) - 1 cup semi-sweet chocolate chips - ½ cup dark chocolate chips (optional) Each ingredient plays a role in creating that perfect muffin. The flour gives structure, while cocoa adds rich flavor. Sugar brings sweetness, and baking powder helps the muffins rise. Butter adds moisture, and eggs give a nice texture. Vanilla enhances the chocolate taste, and buttermilk makes them soft and fluffy. The chocolate chips? They are the stars of the show. Semi-sweet brings balance, while dark chocolate adds extra depth. If you want a chocolate experience, don’t skip the dark chocolate chips. For the full recipe, check out the Decadent Double Chocolate Muffins 🧁. Happy baking! 1. Preheat the oven and prepare muffin tin Set your oven to 350°F (175°C). Line a muffin tin with paper liners or spray it with non-stick spray. 2. Mix dry ingredients thoroughly In a large bowl, whisk together: - 1 ½ cups all-purpose flour - ½ cup unsweetened cocoa powder - 1 cup granulated sugar - 2 teaspoons baking powder - ½ teaspoon baking soda - ¼ teaspoon salt This mix ensures even flavor in your muffins. 3. Combine wet ingredients until smooth In a separate bowl, mix: - ½ cup unsalted butter, melted - 2 large eggs - 1 teaspoon vanilla extract Stir these until they are smooth and creamy. 4. Gradually mix wet and dry ingredients Pour the wet mixture into the dry ingredients. Stir gently until just combined. Don’t worry about lumps; they are okay! 5. Fold in chocolate chips Add: - 1 cup semi-sweet chocolate chips - ½ cup dark chocolate chips (optional) Gently fold them into the batter. This adds rich flavor. 6. Fill muffin cups with batter Divide the batter evenly among the muffin cups. Fill each about ¾ full. This helps them bake evenly. 7. Baking time and cooling instructions Bake for 18-20 minutes. Check with a toothpick; it should come out clean. Cool in the pan for 5 minutes, then move them to a wire rack. Enjoy warm for the best taste! For a complete recipe, check the Full Recipe. To make the best chocolate muffins, pay attention to a few key steps. - Avoiding overmixing the batter: When you mix your wet and dry ingredients, stop when you see a few lumps. Overmixing can make your muffins tough. - Recommended baking time and temperature adjustments: Bake your muffins at 350°F (175°C) for 18-20 minutes. If your oven runs hot, check them a minute early. - How to tell when muffins are done: Insert a toothpick into the center. If it comes out clean or with a few moist crumbs, your muffins are ready. Make your muffins look as good as they taste! - Dusting with powdered sugar: Once your muffins cool, sprinkle some powdered sugar on top. It adds a nice touch. - Drizzling with melted chocolate: For extra flair, drizzle melted chocolate over each muffin. This will make them even more tempting. - Serving warm vs. cooled: Warm muffins are soft and gooey. If you prefer them cooled, they are still delicious, just a bit firmer. {{image_2}} You can easily adjust chocolate muffins to fit special diets. For a gluten-free option, swap regular flour with a gluten-free blend. Look for a blend that has xanthan gum. This helps mimic the texture of wheat flour. For vegan chocolate muffins, replace eggs with flaxseed meal. Mix one tablespoon of flaxseed meal with three tablespoons of water. Let it sit until it thickens. Then, use plant-based milk instead of buttermilk. Almond or oat milk works well for this. These changes keep the flavor rich and the texture moist. You can make chocolate muffins your own by adding different flavors. Try folding in nuts like walnuts or pecans. They add crunch and a nice contrast to the soft muffin. Fresh or frozen berries, like raspberries or blueberries, can brighten the flavor too. They give a fruity twist that pairs well with chocolate. Another fun idea is to swap semi-sweet chocolate chips for milk or dark chocolate chips. If you love rich flavors, dark chocolate chips enhance the taste. For a sweeter muffin, use milk chocolate chips. You can mix and match to find your favorite blend. For the full recipe, check the section above. To keep your chocolate muffins fresh, you have two main options: room temperature or refrigerator storage. - Room Temperature: Store muffins in an airtight container. They stay fresh for about 2-3 days. This method keeps them soft and moist. - Refrigerator Storage: You can refrigerate muffins, but this might make them dry. If you do, use a sealed container. They can last up to a week this way. To keep muffins fresh longer, consider wrapping them in plastic wrap. You can also use aluminum foil for extra protection. Adding a slice of bread in the container helps maintain moisture. The bread absorbs any excess air, keeping muffins soft. Freezing chocolate muffins is a great way to enjoy them later. Here’s how to do it properly: - How to Freeze Muffins: Allow muffins to cool completely. Then, wrap each muffin tightly in plastic wrap. Place the wrapped muffins in a freezer bag or container. This method keeps them fresh for about 2-3 months. - Reheating Frozen Muffins: To reheat, remove muffins from the freezer. Unwrap them and place them on a microwave-safe plate. Heat for about 20-30 seconds for a warm treat. You can also bake them at 350°F (175°C) for about 10-15 minutes. This will bring back that fresh-baked taste. With these tips, you can enjoy your decadent chocolate muffins anytime! For the full recipe, check out the detailed instructions in the article. Can I use regular milk instead of buttermilk? Yes, you can use regular milk. Just add one tablespoon of vinegar to it. Let it sit for five minutes. This will mimic buttermilk's tangy taste. How long do chocolate muffins last? Chocolate muffins last about three to five days at room temperature. Store them in an airtight container. For longer freshness, keep them in the fridge for up to a week. What causes chocolate muffins to be dense? Dense muffins often come from overmixing the batter. Mixing too much adds extra air and makes them heavy. Also, too much flour can lead to dense muffins. Use the right measurements! Can I substitute other types of flour? Yes, you can use whole wheat flour or almond flour. These changes may alter the texture. Start with a little less flour to see how it affects the recipe. How can I make chocolate muffins lower in sugar? You can reduce the sugar by one-third. Try using applesauce or mashed bananas for sweetness. These swaps add moisture and flavor while cutting sugar. For the full recipe, check out the details above! We covered all you need for perfect chocolate muffins. You learned the key ingredients, easy steps, and helpful tips. You can adapt these muffins to meet dietary needs or personal tastes. Don’t forget how to store them for lasting freshness. Enjoying your baking journey is as important as the final product. Remember, practice makes perfect, so dive in and bake these delightful treats often!

Chocolate Muffins Irresistible and Easy to Make

Get ready to bake the most delicious chocolate muffins you’ve ever tasted! In this easy guide, I will share my

Older posts
Newer posts
← Previous Page1 … Page59 Page60 Page61 … Page77 Next →

dsad

© 2025 pureeatsnow • Built with GeneratePress

Our Policies

  • Copyright Policy
  • Cookie Policy
  • GDPR Policy
  • Privacy Policy
  • Disclaimer
  • Terms Of Use

More Information

  • Home
  • About
  • Contact
  • Appetizers
  • Dessert
  • Dinner
  • Drinks
©2025, pureeatsnow About Back To Top