Skip to content
DisclaimerTerms Of UseGDPR PolicyCookie Policy

pureeatsnow

  • Home
  • Drinks
  • Appetizers
  • Dinner
  • Dessert
  • About
  • Contact
  • Privacy Policy
DisclaimerTerms Of UseGDPR PolicyCookie Policy

Rachel

- 8 ounces fettuccine pasta - 2 tablespoons olive oil - 2 salmon fillets (about 6 ounces each) - 4 cloves garlic, minced - 1 cup heavy cream - 1/2 cup freshly grated Parmesan cheese - 1 cup spinach leaves - Zest of 1 lemon - Juice of 1/2 lemon - Salt and pepper to taste - Fresh parsley, chopped (for garnish) When I make creamy garlic salmon pasta, I love using fresh ingredients. Fresh salmon, garlic, and spinach truly elevate the dish. The fettuccine pasta gives it a nice texture. - Large pot - Skillet - Cooking utensils (spatula, measuring cups, etc.) Using the right tools makes cooking easier and more fun. A large pot helps boil the pasta perfectly. A non-stick skillet is great for searing the salmon and making the sauce. - Calories per serving: About 600 - Macros breakdown: 35g protein, 50g carbs, 30g fats This dish is rich in protein from the salmon and creamy sauce. The spinach adds some vitamins, too. It's a hearty meal that satisfies without being too heavy. If you want more details on the nutrition, check the [Full Recipe]. To cook pasta well, use a large pot filled with salted water. Bring the water to a boil. Add the fettuccine and stir to prevent sticking. Cook until the pasta is al dente, which means firm but not hard. This usually takes about 8 to 10 minutes. Once done, drain the pasta but save about 1 cup of the pasta water. This helps later with the sauce. For salmon, medium heat works best. Heat olive oil in a skillet. Season the salmon fillets with salt and pepper. Place them in the skillet and cook for about 4 to 5 minutes on each side. You want the salmon to flake easily with a fork. When it’s done, remove it from the skillet. Let it cool a bit, then flake it into bite-sized pieces. Sautéing garlic is key to a great sauce. Add minced garlic to the same skillet and cook for about 1 minute until it smells good. Then, pour in the heavy cream. Bring it to a gentle simmer. Mix in the Parmesan cheese, lemon zest, and juice. Stir until the sauce is smooth. This creamy sauce adds richness to your pasta. Now, it’s time to bring it all together. Add the cooked fettuccine to the skillet with the garlic cream sauce. Then, add the spinach and flaked salmon. Gently toss everything together. If the sauce is too thick, add a bit of the reserved pasta water until you reach your favorite consistency. Taste and adjust with more salt and pepper if needed. Check out the Full Recipe for a complete guide! Using fresh ingredients makes a big difference. Fresh salmon has a better taste than frozen. Choose bright, vibrant spinach. The garlic should smell strong and earthy. For seasoning, salt and pepper are key. I also like to add lemon juice for a zesty kick. It brightens the dish and enhances the flavors. Try using freshly grated Parmesan cheese. It melts better and gives a rich flavor. You can also add a pinch of red pepper flakes for some heat. This adds depth without making it too spicy. Cooking salmon safely is important. Start with medium heat to avoid burning. Look for a golden-brown crust. The fish should flake easily with a fork. If it is still raw in the middle, cook it a bit longer. When cooking pasta, time is everything. Follow the package instructions for al dente pasta. This means it should be firm to the bite. Overcooked pasta becomes mushy and loses its taste. To avoid this, set a timer when it’s boiling. Plating your creamy garlic salmon pasta is fun. Use a large bowl to show off the dish. Twirl the pasta to create a nice shape. Place the flaked salmon on top for a nice look. Garnishing with parsley adds color and freshness. Use fresh parsley and chop it finely. Sprinkle it over the dish just before serving. This small touch makes a big difference in how it looks and tastes. For the full recipe, check out the detailed steps at [Full Recipe]. {{image_2}} You can swap salmon for other proteins. Chicken or shrimp works well. Both add a nice twist. For a vegetarian version, use mushrooms or zucchini. They give a great texture and flavor. You can change the cheese in the sauce. Try mozzarella for a milder taste or feta for a bit of tang. To add extra flavor, sprinkle in some red pepper flakes or a dash of smoked paprika. This can really spice things up. If you need gluten-free options, use rice noodles or quinoa pasta. These will change the taste a bit, but they work great. Remember to adjust cooking times. Rice noodles cook fast, while whole wheat pasta may take longer. Keep an eye on them so they don’t turn mushy. To keep your creamy garlic salmon pasta fresh, use airtight containers. Glass or BPA-free plastic containers work best. Make sure to let the pasta cool down before sealing. This prevents moisture build-up, which can lead to soggy pasta. Store the containers in the fridge. It will stay good for about 3 days. When reheating, aim to keep the pasta creamy. Use low heat to avoid drying it out. You can add a splash of water or extra cream to help. If using a microwave, cover it to trap steam. Heat in short bursts, stirring in between. If you prefer the oven, place it in a covered dish at 350°F. Bake for about 15 minutes, checking to ensure it warms evenly. Yes, you can freeze creamy garlic salmon pasta! Just make sure it has cooled completely. Place it in a freezer-safe container, leaving some space for expansion. It can last up to 3 months in the freezer. To thaw, move it to the fridge for a night. If you're in a hurry, you can use the microwave on low. Once thawed, reheat as described above for the best taste. For creamy garlic salmon pasta, I recommend using fresh salmon. Fresh salmon has a rich flavor and a nice texture. If you can’t find fresh salmon, frozen salmon works too. Just make sure to thaw it properly before cooking. This way, you get the best taste and quality in your dish. Yes, you can make this dish without cream. If you want a lighter version, use Greek yogurt or coconut milk. Both options keep the dish creamy while reducing fat. You can also use vegetable broth for a lighter sauce. Just remember to adjust the seasoning to match your taste. Cooking salmon usually takes 8 to 12 minutes. The time depends on the thickness of the fillets. A thicker piece takes longer to cook. You can check if it’s done by using a fork. If it flakes easily, it’s ready to eat. Keep an eye on it to avoid overcooking. Yes, you can prepare creamy garlic salmon pasta in advance. Cook the pasta and salmon, then store them in separate containers. Keep the sauce in another container. When you’re ready to eat, just heat everything up. This method helps keep the flavors fresh. It’s perfect for meal prep! This dish pairs well with a crisp salad or garlic bread. A light green salad with lemon vinaigrette complements the pasta nicely. For wine, try a chilled white wine like Sauvignon Blanc. The bright flavors match the salmon well, enhancing your meal. This blog post covered how to make creamy garlic salmon pasta, detailing required ingredients and equipment. I shared easy, step-by-step instructions to help you cook pasta, sear salmon, and whip up a delicious garlic cream sauce. I also offered tips for flavor, presentation, and variations for personal tastes. In closing, this dish is not just tasty but also adaptable. Enjoy making it your own, and don't forget to savor every bite!

Creamy Garlic Salmon Pasta Flavorful and Simple Recipe

Are you ready to impress your taste buds with a dish that’s both creamy and packed with flavor? This Creamy

Making Easy Blueberry Cheesecake Cookies is simple and fun. Here’s what you need: - 1 cup all-purpose flour - 1/2 teaspoon baking soda - 1/4 teaspoon salt - 1/2 cup unsalted butter, softened - 1/2 cup cream cheese, softened - 1/3 cup granulated sugar - 1/3 cup brown sugar, packed - 1 teaspoon vanilla extract - 1/2 cup fresh blueberries - 1/4 teaspoon lemon zest - 1/4 cup powdered sugar (for dusting, optional) These ingredients work together to create a soft, creamy cookie that bursts with blueberry flavor. The cream cheese adds richness, while the blueberries give a fresh twist. When you mix them, you create a cookie that feels like a dessert and tastes like a dream. Using fresh blueberries is key. They add moisture and sweetness. You can also try using lemon zest. It brightens the cookies and enhances the blueberry taste. If you want a little extra sweetness, the powdered sugar dusting is a nice touch. It makes the cookies look pretty too! For the full recipe, check out the detailed steps later. Happy baking! First, preheat your oven to 350°F (175°C). This step is key for even baking. While the oven warms up, line a baking sheet with parchment paper. This prevents sticking and makes cleanup easy. Next, grab a small bowl and mix together the flour, baking soda, and salt. This dry mixture adds structure to your cookies. Set it aside for now. In a large bowl, cream together the softened butter and cream cheese. Add the granulated sugar, brown sugar, and vanilla extract. Beat the mixture until it feels creamy and smooth. This creates a rich base for your cookies. Now, add the dry mixture to the wet ingredients. Stir gently until just combined. Be careful not to overmix; this helps keep your cookies soft. Next, fold in the fresh blueberries and lemon zest. Use a spatula to do this, and handle the berries gently. You want to keep them whole for bursts of flavor in every bite. Using a tablespoon, scoop out the dough and place it on the prepared baking sheet. Make sure to leave space between each scoop. This space allows the cookies to spread while baking. Bake the cookies for 10 to 12 minutes. You want the edges to turn lightly golden, while the centers might look soft. This is okay! After baking, let the cookies cool on the sheet for about 5 minutes. Then, transfer them to a wire rack to cool completely. If you like, dust the cookies with powdered sugar for a sweet finish. For the full recipe, check the earlier section! To make the best blueberry cheesecake cookies, pay close attention to baking time and temperature. Preheat your oven to 350°F (175°C). Bake the cookies for 10-12 minutes. The edges should be lightly golden. The centers can look soft but will firm up as they cool. To check if your cookies are done, look for golden edges. Use a toothpick to test the center. If it comes out clean or with a few crumbs, your cookies are ready. If you need a cream cheese alternative, use mascarpone cheese or Greek yogurt. Both will keep the rich flavor of your cookies. For a lighter option, you can swap granulated sugar for coconut sugar or honey. These options add a unique taste and help lower the glycemic index. For a beautiful finish, dust your cookies with powdered sugar after they cool. This adds a sweet touch and makes them look fancy. Serve these cookies with a scoop of vanilla ice cream or fresh whipped cream. They pair well with a cup of tea or coffee for a delightful dessert experience. For the full recipe, check out the Blueberry Cheesecake Cookies section. {{image_2}} You can make your blueberry cheesecake cookies even more fun. Adding spices like cinnamon or nutmeg adds warmth. A pinch of these spices can elevate the sweet flavor. You can also try other fruits. Raspberries or strawberries work great in this recipe. They pair well with the cream cheese and blueberries. Some people need special diets. If you want a gluten-free version, use gluten-free flour. It works just like regular flour. For a vegan option, swap out the cream cheese for a plant-based cream cheese. You can also use coconut oil instead of butter. These changes keep the cookies tasty for everyone. You can change these cookies for the season. For holidays, add spices like ginger or cloves. This will give your cookies a festive touch. In summer, try adding lemon zest or even some coconut flakes. These flavors make the cookies bright and refreshing. For the full recipe, check the details above. Enjoy playing with these variations to make your cookies unique! To keep your blueberry cheesecake cookies fresh, store them in an airtight container. This will help prevent them from drying out. Place a piece of parchment paper between layers if you stack them. Keep the container at room temperature, away from direct sunlight. If you want to save some cookies for later, freezing is a great option. First, let the cookies cool completely. Then, place them in a single layer on a baking sheet. Freeze for about an hour. After they are firm, transfer them to a freezer bag. Make sure to remove as much air as possible. To enjoy later, thaw the cookies in the fridge overnight. These cookies stay fresh for about five days at room temperature. If you freeze them, they can last up to three months. Just remember to label your bags with the date. This way, you can enjoy your delicious blueberry cheesecake cookies whenever you like! For the full recipe, check out the [Full Recipe]. How do I know when the cookies are done? You will know the cookies are done when the edges turn light golden brown. The centers may look soft. This is normal. Remove them from the oven and let them cool. Can I use frozen blueberries? Yes, you can use frozen blueberries. Just make sure to thaw and drain them first. This prevents excess moisture in the cookies. Gently fold them into the dough to keep them whole. What can I serve with these cookies? These cookies pair well with vanilla ice cream or whipped cream. A cup of tea or coffee also makes a nice match. You can also serve them with fresh fruit for a lovely touch. Can I make the dough ahead of time? Yes, you can prepare the dough ahead of time. Store it in the fridge for up to 2 days. You can also freeze the dough for up to a month. Just thaw it in the fridge before baking. For the full recipe, check the main article. These easy blueberry cheesecake cookies are a treat everyone can enjoy. We covered the key ingredients, detailed step-by-step instructions, and shared tips for baking success. You learned about variations, storage, and frequently asked questions. In short, with a few simple steps, you can create delicious cookies. Experiment with different flavors and share them with friends. Enjoy the fun of baking and the joy these cookies bring.

Easy Blueberry Cheesecake Cookies Delightful Dessert

Craving a sweet treat that’s simple to make? These Easy Blueberry Cheesecake Cookies are your answer! With just a handful

- 1 pound breakfast sausage - 8 large eggs - 2 cups milk - 1 cup diced bell peppers - 1 cup diced onion - 1 teaspoon garlic powder - 1 teaspoon onion powder - Salt and pepper to taste - 2 cups shredded cheddar cheese - 1 loaf whole wheat bread, cubed - Fresh parsley for garnish For my Easy Sausage and Egg Casserole, I focus on simple, fresh ingredients. The main star is the breakfast sausage. You can choose mild or spicy, based on your taste. Next, I use eight large eggs to create a fluffy texture. The milk adds creaminess and keeps it moist. Vegetables bring color and flavor. I use one cup of diced bell peppers and one cup of diced onion. They add crunch and sweetness. Garlic powder and onion powder give it depth. Don’t forget salt and pepper to enhance all the flavors. For extra richness, I add shredded cheddar cheese. Two cups melt beautifully, making every bite cheesy and delicious. The bread acts as a base and soaks up the egg mixture. I usually cube a whole loaf of wheat bread, which adds fiber. Lastly, a sprinkle of fresh parsley brightens up the dish. It’s not just for looks; it adds a fresh taste as well. This combination makes a hearty meal for any time of day. You can find the Full Recipe for more detailed instructions on how to bring this dish together! - Preheat the oven to 350°F (175°C). - Grease a 9x13 inch casserole dish with cooking spray or butter. - Heat a skillet over medium heat. - Add 1 pound of breakfast sausage. - Cook until it is browned and fully cooked. - Break it into smaller pieces with a spatula. - If needed, drain the excess fat from the skillet. - In a large bowl, whisk together 8 large eggs and 2 cups of milk. - Add 1 teaspoon of garlic powder, 1 teaspoon of onion powder, salt, and pepper to taste. - Mix until all ingredients are well combined. - Now, add the cooked sausage, 2 cups of shredded cheddar cheese, 1 cup of diced bell peppers, and 1 cup of diced onion. - Stir everything together until well mixed. - Gently fold in 1 loaf of cubed whole wheat bread. - Make sure all the bread pieces are coated with the egg mixture. - Pour the mixture into the greased casserole dish. - Spread it out evenly. - Bake for 30-35 minutes until the eggs are set and the top is golden brown. For the full recipe, check out the details and enjoy this easy dish! Serve the casserole warm, cutting it into neat squares. Add some extra cheese or fresh herbs on top for a nice touch. To brighten your plate, pair it with fresh fruit. Slices of orange or berries work great and add color. For sausage, you can use either mild or spicy to fit your taste. I often choose spicy for a kick. Adjust seasonings based on what you prefer. A bit more garlic or pepper can enhance the flavor. Know when your casserole is fully baked by looking for a golden top. The eggs should be set but not overcooked. After baking, let it cool for 5-10 minutes before slicing. This makes it easier to serve. Enjoy your meal! For the full recipe, check out the complete guide. {{image_2}} You can easily change the cheese in this dish. Try mozzarella or pepper jack. Each cheese gives a new taste. For a gluten-free option, swap the bread. Use gluten-free bread instead of whole wheat. It works well and keeps the dish tasty. Want some heat? Add jalapeños or a splash of hot sauce to the mix. This adds a nice kick! You can also use fresh herbs. Thyme or basil can brighten the flavor. Just chop them and mix them in. To make this dish lighter, use low-fat milk instead of whole milk. It still tastes great! If you want to cut fat, use turkey sausage or a veggie option. Both are flavorful and healthy. These changes help you enjoy this meal without guilt. For the full recipe, check out the details above. After you enjoy your Easy Sausage and Egg Casserole, store any leftovers in the fridge. Place them in an airtight container. This keeps the casserole fresh and tasty. Leftovers can last up to four days in the fridge. If you want to save some for later, freezing is a great option. Cut the casserole into squares. Wrap each square tightly in plastic wrap. Then, place them in a freezer-safe bag. This way, they stay fresh for up to three months. When you’re ready to eat your leftovers, reheating is easy. For the oven, preheat it to 350°F (175°C). Place the casserole in a baking dish. Cover it with foil to keep it moist. Heat for about 20-25 minutes. If you're in a hurry, use the microwave. Place a square on a microwave-safe plate. Heat it for 1-2 minutes. Check if it’s hot in the middle. If not, heat for another 30 seconds. Enjoy your warm and delicious casserole! Yes, you can make this casserole ahead of time. To do this, prepare it the night before. After mixing all the ingredients, cover the dish and place it in the fridge. This helps the bread soak up the egg mixture well. You can bake it in the morning. Just add a few extra minutes to the baking time if it’s cold from the fridge. To check if your casserole is done, look for a few signs. First, the top should be golden brown. Second, the edges should pull away from the dish. Finally, give it a gentle shake. If it wobbles slightly in the middle, it may need more time. You want the eggs to be firm, not runny. Absolutely! There are many ways to make this casserole your own. You can change the sausage type to turkey or a plant-based option. Add different veggies like spinach or mushrooms for more flavor. You can also swap the cheddar cheese for mozzarella or feta. Get creative and make it your own! For more ideas, check the Full Recipe. This casserole recipe is a tasty, easy option for any meal. You learned about key ingredients like sausage, eggs, and cheese. I explained step-by-step instructions to make it simple. Use my tips to serve and store it well. Feel free to customize the dish to fit your taste. Now you have the tools to make a delicious breakfast casserole. Enjoy sharing it with friends and family!

Easy Sausage and Egg Casserole Quick Family Recipe

Looking for a quick, tasty meal your whole family will love? This Easy Sausage and Egg Casserole is your answer!

For Garlic Butter Baked Scallops, you will need: - 1 pound sea scallops, cleaned and patted dry - 4 tablespoons unsalted butter, melted - 4 cloves garlic, minced - 1 tablespoon fresh lemon juice - 1 teaspoon fresh parsley, finely chopped - 1/2 teaspoon paprika - Salt and pepper to taste - Lemon wedges for garnish When choosing scallops, look for fresh ones that smell like the ocean. They should be firm and glossy. For the butter, use unsalted to control the saltiness. Fresh garlic gives the best flavor, so avoid pre-minced options. Fresh lemon juice adds brightness. You can chop the parsley finely for a more even mix. For paprika, use sweet or smoked, based on your taste. If you can’t find sea scallops, bay scallops work too. They are smaller but still tasty. For butter, you can use olive oil for a lighter option. If you want a kick, add a pinch of red pepper flakes with the garlic. You can swap parsley with thyme or basil for a different flavor. To make garlic butter baked scallops, start by gathering your ingredients. You need: - 1 pound sea scallops, cleaned and patted dry - 4 tablespoons unsalted butter, melted - 4 cloves garlic, minced - 1 tablespoon fresh lemon juice - 1 teaspoon fresh parsley, finely chopped - 1/2 teaspoon paprika - Salt and pepper to taste - Lemon wedges for garnish First, preheat your oven to 400°F (200°C). Next, lightly grease a baking dish to prevent sticking. In a small bowl, mix the melted butter, minced garlic, lemon juice, paprika, and parsley. This mix will be the garlic butter sauce that makes the dish so tasty. Once your prep is done, arrange the scallops in a single layer in the greased dish. Season them with salt and pepper. Pour your garlic butter mixture over the scallops. Make sure each one is well coated. Now, it's time to bake. Place the dish in your preheated oven and bake for 12-15 minutes. The scallops should turn opaque and feel firm yet tender when poked. Once done, remove them from the oven and let them rest for a minute. Garnish with extra parsley and serve with lemon wedges for some extra zing. To get the best results, use fresh scallops whenever possible. Frozen scallops can work, but they may not have the same flavor and texture. Make sure to pat them dry before cooking. This helps them sear nicely and prevents excess moisture. Another tip is to avoid overcooking. Scallops cook fast. When they are opaque and firm, they are ready. You want them tender, not rubbery. If you follow these steps, you’ll end up with a dish that’s full of flavor and sure to impress. For the full recipe, check the earlier section. One mistake is using wet scallops. Always make sure they are dry. Wet scallops do not brown well. Another error is overcooking them. Scallops cook quickly and should turn opaque. Set a timer for 12 minutes. Check them to avoid a rubbery texture. To boost flavor, try adding herbs like thyme or basil. A dash of white wine can add depth, too. You can also mix in some crushed red pepper for heat. Just a pinch transforms the dish. Lemon zest is another great addition for freshness. Use a baking dish that fits your scallops snugly. A good quality knife helps with chopping garlic and herbs. A mixing bowl is useful for combining the garlic butter. A timer is key to perfect baking. Finally, a spatula will help you serve the scallops easily. For the complete experience, check out the Full Recipe to get all the details you need! {{image_2}} You can add cheese to make these scallops even richer. I love using Gruyère or Parmesan. After you pour the garlic butter over the scallops, sprinkle cheese on top. Bake them like usual. The cheese will melt and create a creamy crust. It adds a nice touch to the dish. For a kick, try adding spice. Mix in a pinch of red pepper flakes or cayenne pepper into the garlic butter. This will give the dish heat and flavor. If you enjoy spicy food, this variation will delight your taste buds. Herbs can add freshness to your scallops. Basil, thyme, or rosemary work great. Add finely chopped herbs to the garlic butter. You can also sprinkle them on top before baking. This makes the dish smell amazing and enhances the taste. Feel free to explore these options. Each variation brings a new twist to the classic garlic butter baked scallops. For the full recipe, check the detailed instructions above. After you enjoy your garlic butter baked scallops, store any leftovers in a container. Use an airtight container to keep them fresh. Place them in the fridge. They will last for up to two days. Make sure to let them cool first. This helps prevent moisture build-up. To reheat the scallops, use your oven for the best results. Preheat your oven to 350°F (175°C). Place the scallops in a baking dish. Cover them with foil to keep them moist. Heat for about 10 minutes. Check if they are warm all the way through. You can also use a microwave. Heat them in short bursts to avoid overcooking. If you want to store scallops for longer, freezing is a great option. Place the scallops in a single layer on a baking sheet. Freeze them for about one hour until firm. Then, transfer the scallops to a freezer bag. Remove as much air as possible before sealing. They can stay in the freezer for up to three months. When ready to use, thaw them in the fridge overnight before cooking. You will still want to follow the Full Recipe for best results. You should bake scallops for about 12-15 minutes. They cook quickly and become firm when done. Check for a nice opaque color. When they look white and slightly golden, they are ready to eat. Yes, you can use frozen scallops. Just make sure to thaw them first. Pat them dry to remove extra water. This helps the garlic butter stick better during baking. Some great side dishes include: - Garlic bread - Steamed asparagus - Lemon rice - Fresh salad - Roasted vegetables These sides balance the rich flavor of scallops nicely. Sea scallops are best for this dish. They have a sweet taste and tender texture. Look for fresh, plump scallops at your market. If using frozen, ensure they are high quality. You can prepare the garlic butter and clean the scallops ahead. Store them separately in the fridge. Bake them just before serving for the best taste. Fresh scallops should smell like the ocean. They should feel firm and moist. Avoid scallops with a strong fishy smell or dry texture. Yes, adding cheese can enhance the flavor. Try mixing some parmesan cheese into the garlic butter. Sprinkle it on top before baking for a cheesy crust. A crisp white wine is perfect. Try serving Sauvignon Blanc or Chardonnay. These wines complement the scallops’ flavor without overpowering it. We covered key ingredients and their quality, plus step-by-step instructions for perfect scallops. I shared tips to avoid common mistakes and enhance flavors. You now know various scallop variations and how to store and reheat them safely. Cooking delicious scallops is simple and fun. With these tools and ideas, you can impress anyone at your next meal. Enjoy your cooking journey and share your tasty results!

Garlic Butter Baked Scallops Tasty and Easy Delight

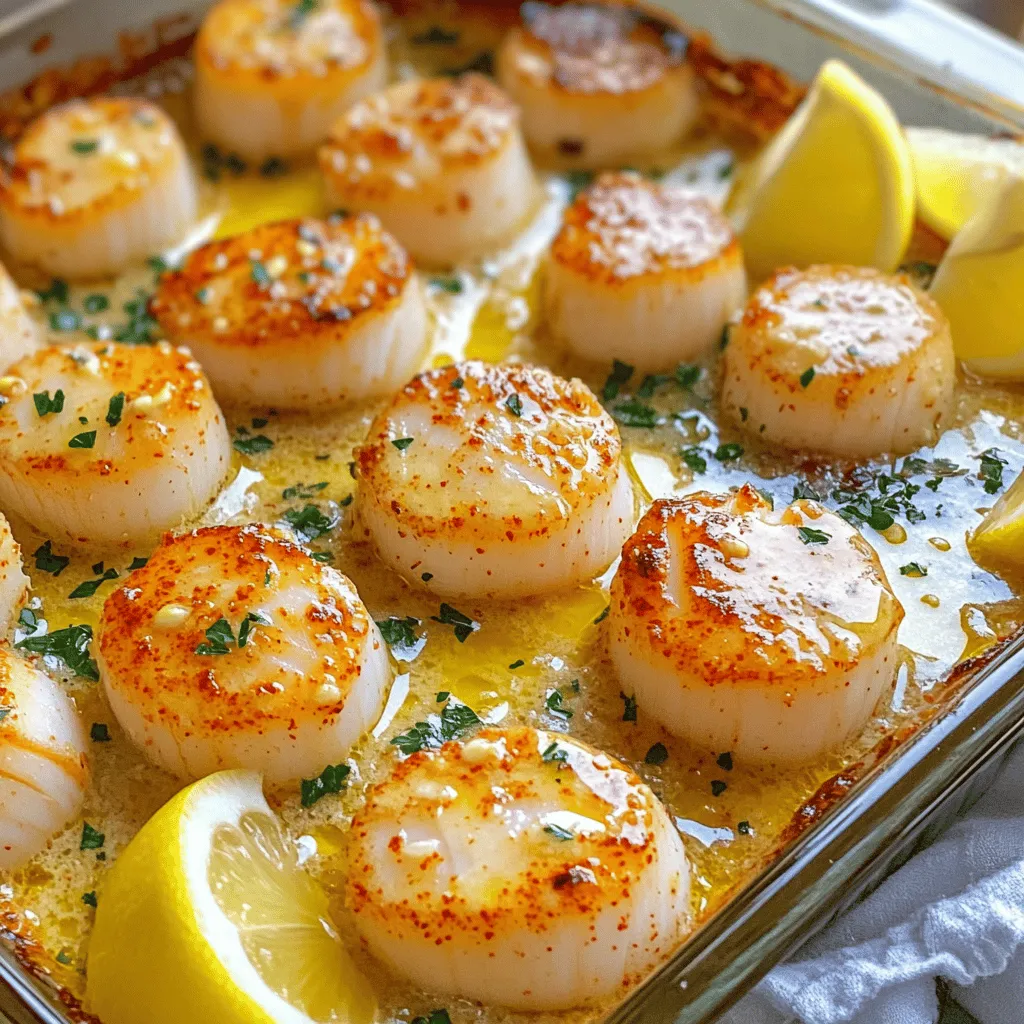
If you love seafood, you’re in for a treat with these garlic butter baked scallops! This dish is not only

- 1 whole fresh pineapple, peeled and cored - 1/4 cup honey - 2 tablespoons brown sugar - 1 teaspoon cinnamon - 1 tablespoon fresh lime juice - Pinch of salt - Fresh mint leaves for garnish To make roasted pineapple with honey glaze, you need fresh and simple ingredients. Start with a whole fresh pineapple. Look for one that feels heavy and smells sweet. The honey adds natural sweetness. Brown sugar helps create that lovely caramel crust. Cinnamon gives warmth, while lime juice adds a zesty kick. A pinch of salt brings out all the flavors. Finally, fresh mint leaves make a great garnish. You can find the full recipe details further down. This treat is easy to make and is perfect for any meal or snack. Enjoy the process of gathering these ingredients, and remember to choose the best quality. This will make your roasted pineapple taste even better! - Preheat your oven to 400°F (200°C). - Cut the pineapple into thick slices or wedges. Start by heating your oven. This step is key for caramelizing the sugars in the pineapple. While the oven warms, grab your fresh pineapple. Use a sharp knife to slice away the skin, then remove the core. Cut the fruit into thick, even slices. This helps cook them evenly. - Whisk together honey, brown sugar, cinnamon, lime juice, and salt. Next, we make the honey glaze. In a small bowl, combine honey, brown sugar, cinnamon, lime juice, and salt. Use a whisk to blend these ingredients well. You want a smooth mixture that will coat the pineapple slices nicely. The glaze adds a sweet and zesty flavor to the fruit. - Brush honey mixture on pineapple slices. - Roast for 20-25 minutes, flipping halfway. Now, it’s time to roast! Place the pineapple slices on a baking sheet lined with parchment paper. Use a brush to apply the honey glaze generously over each slice. Make sure to coat both sides for full flavor. Place the baking sheet in the oven. Roast the pineapple for about 20-25 minutes. Flip the slices halfway through cooking. This ensures they caramelize well on both sides. Check for tenderness and a beautiful golden color when done. For the full recipe, follow along with the details above! To choose a ripe pineapple, look for a golden color. The top leaves should be green and fresh. A ripe pineapple also gives a little when you press on it. Freshness is key to flavor. A fresh pineapple tastes sweet and juicy. If it feels hard, it may be unripe. If it smells sour, it is overripe. Always choose a pineapple that is firm and fragrant. Adjusting sweetness levels can help fit your taste. If you want a sweeter glaze, add more honey or sugar. For a less sweet option, cut back on those ingredients. You can also swap honey with maple syrup for a unique flavor. Agave nectar is another good choice if you want a vegan option. Just remember that different sweeteners may change the taste. Roasted pineapple pairs well with many dishes. You can serve it as a dessert or with main courses like grilled chicken. It also works great in salads. For a fun twist, try using it in tacos or on pizza. When it comes to presentation, slice the pineapple into fun shapes. Garnish with fresh mint leaves for color. You can even drizzle extra honey on top to impress your guests. For the full recipe, check out the details above! {{image_2}} You can make roasted pineapple even better. Try adding ginger or vanilla extract to the honey glaze. Ginger gives a warm spice, while vanilla adds a sweet, rich note. Both flavors mix well with the pineapple's natural sweetness. You can also use other spices. Nutmeg or allspice can bring unique flavors. A sprinkle of cardamom can add an exotic twist. Experiment with these spices to find your favorite mix. Grilling pineapple changes the flavor and texture. Grilling gives it a smoky taste that pairs well with the sweetness. If you prefer, you can roast it in the oven, which is easy and quick. Using a stovetop skillet is another option. Heat the skillet over medium heat and add the pineapple slices. Cook until caramelized on both sides. This method is just as tasty and adds a lovely char. If you want a vegan dish, replace honey with maple syrup or agave nectar. Both options keep it sweet and plant-based. They will still give you that sticky glaze. For low-sugar options, you can cut back on honey and brown sugar. Use a sugar substitute or reduce the amount of glaze. The pineapple's natural sweetness is strong enough to shine through. For the full recipe, check out the detailed instructions above! Store leftover roasted pineapple in an airtight container. This keeps it fresh for 3 to 5 days. Make sure the pineapple has cooled down before sealing. Keeping it covered helps avoid drying out. If you see any moisture in the container, use a paper towel to absorb it. This prevents sogginess and keeps the flavor strong. To freeze roasted pineapple, let it cool completely. Cut it into small pieces for easy use later. Place the pieces in a freezer-safe bag or container. Remove as much air as possible to prevent freezer burn. You can store them for up to 3 months. When you’re ready to use them, just thaw in the fridge overnight. Reheat roasted pineapple in the oven for the best results. Set your oven to 350°F (175°C) and warm for about 10 minutes. If you want to avoid sogginess, do not cover it while reheating. You can also use a skillet on low heat for quick warming. Just be careful not to overheat it, as it can lose its nice texture. To cut a pineapple, start by slicing off the top and bottom. This helps the fruit stand firm. Next, stand it upright. Use a sharp knife to cut down the sides. Remove the tough, spiky skin. Make sure to cut deep enough to get rid of the eyes. Once peeled, slice the fruit lengthwise into quarters, then remove the core. Finally, cut the quarters into thick slices or wedges. This method keeps your hands safe and gives you nice pieces. Yes, you can use canned pineapple. However, it will taste different. Canned pineapple often has added sugar and a softer texture. When you roast it, it may not caramelize like fresh pineapple. Fresh pineapple gives a bright, juicy flavor that shines when roasted. If you choose canned, look for ones packed in juice, not syrup, for a better taste. The roasted pineapple is done when it shows signs of caramelization. Look for a golden-brown color. The edges may even char slightly. The pineapple should feel tender when you poke it with a fork. If it has a sweet smell wafting through your kitchen, it’s likely just right! Trust your senses; they are your best guide. Roasted pineapple goes well with many dishes. You can serve it with grilled meat or fish. It also tastes great on top of yogurt or ice cream. Try it in salads for a sweet twist. You might also enjoy it with pancakes or waffles for breakfast. For a fun drink, blend it into a smoothie. The options are endless and delicious! Roasting pineapple creates a sweet and tasty treat. We covered selecting ripe fruit, making a honey glaze, and roasting it perfectly. You can play with flavors and even adjust for dietary needs. Remember to store leftovers properly to keep them fresh. Enjoy your roasted pineapple as a snack or with other dishes. This simple yet delicious recipe will impress your family and friends. Try it today and savor the flavors!

Roasted Pineapple with Honey Glaze Sweet Delight

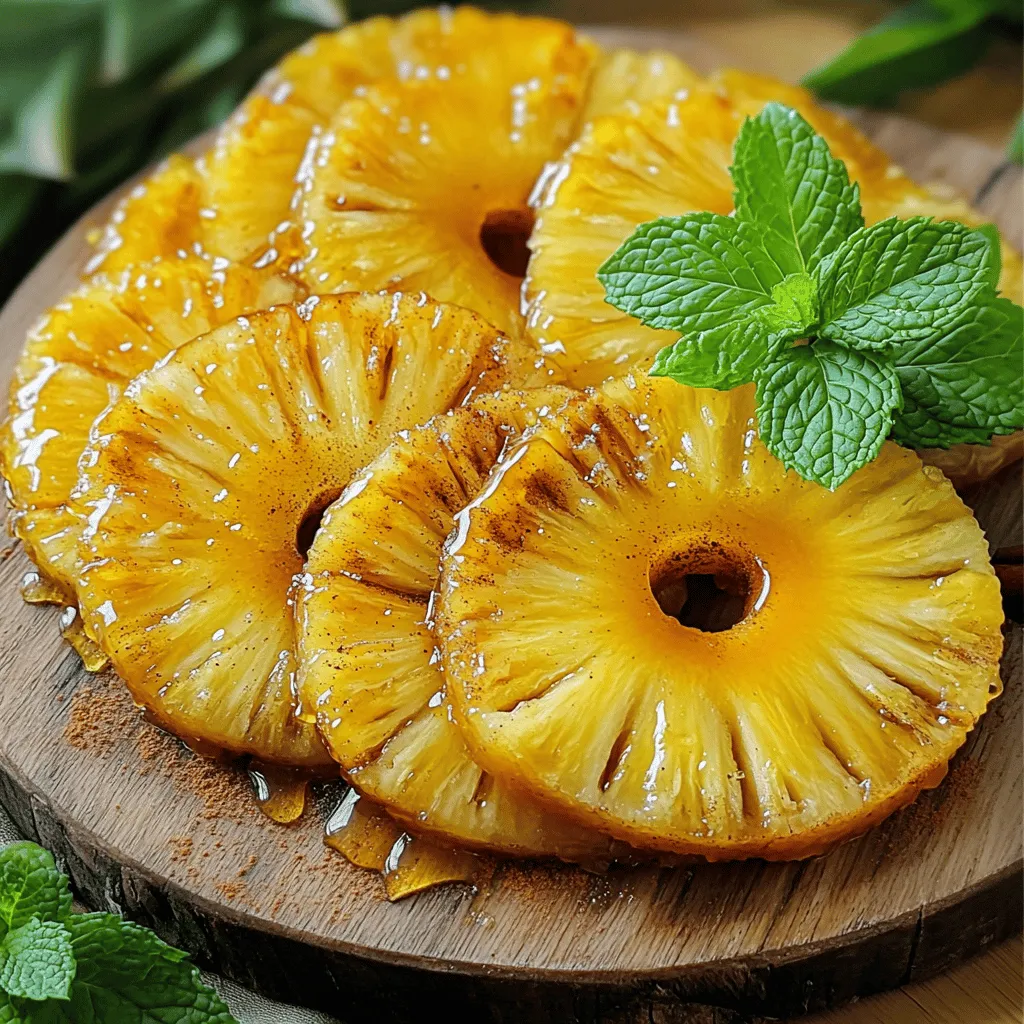
Welcome to my kitchen, where we are about to turn a simple pineapple into a sweet treat! Today, I’ll show

For this dish, you need a few key ingredients. They create a rich and tasty meal. Here’s what you will need: - 1 lb chicken thighs, boneless and skinless, cut into chunks - 1 cup long-grain rice, rinsed - 1 medium onion, diced - 2 cloves garlic, minced - 1 green bell pepper, diced - 1 celery stalk, diced - 1 teaspoon smoked paprika - 1 teaspoon dried thyme - 1/2 teaspoon cayenne pepper (adjust to taste) - 4 cups chicken broth - 1 can (15 oz) diced tomatoes, undrained - 1 bay leaf - 2 tablespoons olive oil - Salt and pepper to taste - Chopped green onions for garnish These ingredients work well together. Each one adds a special flavor to the dish. You can boost the taste with some add-ins. Here are some ideas: - 1 cup of cooked sausage for a meaty kick - 1 cup of corn for sweetness - 1 tablespoon of Worcestershire sauce for depth - 1 teaspoon of hot sauce for heat - Fresh herbs like parsley or cilantro for freshness Feel free to mix and match these options. They can make this dish even more exciting. To cook this meal, you'll need a few tools. Here’s what I recommend: - A large pot or Dutch oven for even cooking - A wooden spoon for stirring - A sharp knife for cutting - A cutting board for prep work These tools will help you make this dish with ease. Enjoy the process, and let the flavors shine! You can find the full recipe above to guide you through cooking this delicious one-pot meal. Start by gathering your ingredients. This helps keep everything organized. You need the chicken, rice, and fresh veggies. Dice the onion, bell pepper, and celery. Mince the garlic to bring out its flavor. Rinse the rice under cold water. This removes excess starch and helps keep it fluffy. In a large pot, heat olive oil over medium heat. Add the onion, garlic, bell pepper, and celery. Cook them for about 5-7 minutes. You want the veggies soft but not brown. Season your chicken with salt, pepper, smoked paprika, thyme, and cayenne. Add the chicken to the pot. Brown it for about 5-6 minutes. Next, stir in the rinsed rice. Pour in the diced tomatoes with their juice and chicken broth. Toss in the bay leaf for flavor. Bring this mix to a boil. Reduce the heat to low and cover the pot. Let it simmer for 20-25 minutes. The rice will soak up the liquid and flavors. When the cooking time is up, remove the bay leaf. Fluff the rice gently with a fork. Taste it and adjust the seasoning if needed. Serve it hot, garnished with chopped green onions. This adds color and freshness to your dish. Enjoy your One Pot Chicken and Dirty Rice meal! For the complete guide, check the Full Recipe. One mistake is not seasoning the chicken well. Always coat the chicken well with salt and spices. Another error is rushing the cooking time. Let the rice simmer on low heat for the best results. If you lift the lid too often, the steam escapes. Keep the lid on to keep the moisture in. Lastly, don’t skip the bay leaf. It adds a nice depth of flavor. To make it milder, skip the cayenne pepper or reduce the amount. You can also use sweet paprika instead of smoked paprika. If you want more heat, add extra cayenne or mix in some hot sauce. Taste the dish before serving. This way, you can adjust the spice to suit your taste. Rinse the rice before cooking. This removes excess starch and prevents it from becoming gummy. Use the right water-to-rice ratio. For long-grain rice, a ratio of 2:1 works well. Once the rice is done cooking, let it rest for a few minutes. Then, fluff it gently with a fork. This helps the grains separate and stay fluffy. For the full recipe, check out the One Pot Chicken and Dirty Rice section above. {{image_2}} You can switch up the protein in this dish. Try using shrimp, sausage, or turkey. Each option brings its own taste. For shrimp, add them in the last few minutes of cooking. This way, they stay tender. If you choose sausage, slice it up and brown it first. This adds a nice depth to your meal. You can make this dish vegetarian by using vegetable broth instead of chicken broth. For protein, add beans or lentils. These options pack a protein punch and keep you full. Use mushrooms for a meaty texture. Sauté them with the veggies for rich flavor. If you're going vegan, skip the chicken and use tofu instead. Cut it into cubes and add it to the pot with the rice. Feel free to get creative! Swap the long-grain rice for brown rice or quinoa. Both add extra nutrients. You can also add different veggies. Try carrots, peas, or even spinach. Each will change the flavor profile. For a kick, mix in some hot sauce or diced jalapeños. If you want a smoky flavor, try adding smoked sausage or chipotle peppers in adobo sauce. These swaps can make your one pot dish unique and fun! Check the Full Recipe for more ideas. To keep your One Pot Chicken and Dirty Rice fresh, let it cool first. Once cool, transfer it to an airtight container. Store it in the fridge for up to three days. Make sure to label the container with the date. This way, you know when to eat it. When you're ready to enjoy your leftovers, reheat them gently. I recommend using the stove for the best texture. Add a splash of chicken broth or water to the pot. Heat it over low heat, stirring often. This helps keep the rice moist and tasty. If you're in a hurry, the microwave works too. Just cover the bowl and heat in short bursts. Freezing is a great option for meal prep. Place cooled One Pot Chicken and Dirty Rice in freezer-safe bags or containers. Remove as much air as you can. Label the bags with the date. It can last up to three months in the freezer. When you're ready to eat, thaw it in the fridge overnight. Then, reheat as mentioned above for a delicious meal. It takes about 35 minutes to make One Pot Chicken and Dirty Rice. You spend 10 minutes prepping the ingredients and 25 minutes cooking. This dish is quick and perfect for busy nights. You will enjoy a full meal in less than an hour! Yes, you can use brown rice instead of white rice. However, cooking time will change. Brown rice takes longer to cook, about 40 to 45 minutes. You should also add more liquid, about 1 additional cup of chicken broth. Keep an eye on it to ensure it cooks well. Many sides complement One Pot Chicken and Dirty Rice. Here are some tasty options: - A simple green salad adds freshness. - Garlic bread gives a nice crunch. - Steamed vegetables like broccoli or green beans are healthy choices. - Coleslaw can add a creamy texture. These sides will enhance your meal and make it even better! One Pot Chicken and Dirty Rice is a simple yet tasty meal. We covered key ingredients and helpful tools. Step-by-step, you learned how to prepare and cook it. I shared tips to avoid mistakes and adjust spice levels. We also explored fun variations and proper storage methods. This dish is easy to make and perfect for any table. Enjoy your cooking adventures with these ideas and let your flavors shine!

One Pot Chicken and Dirty Rice Flavorful Meal Idea

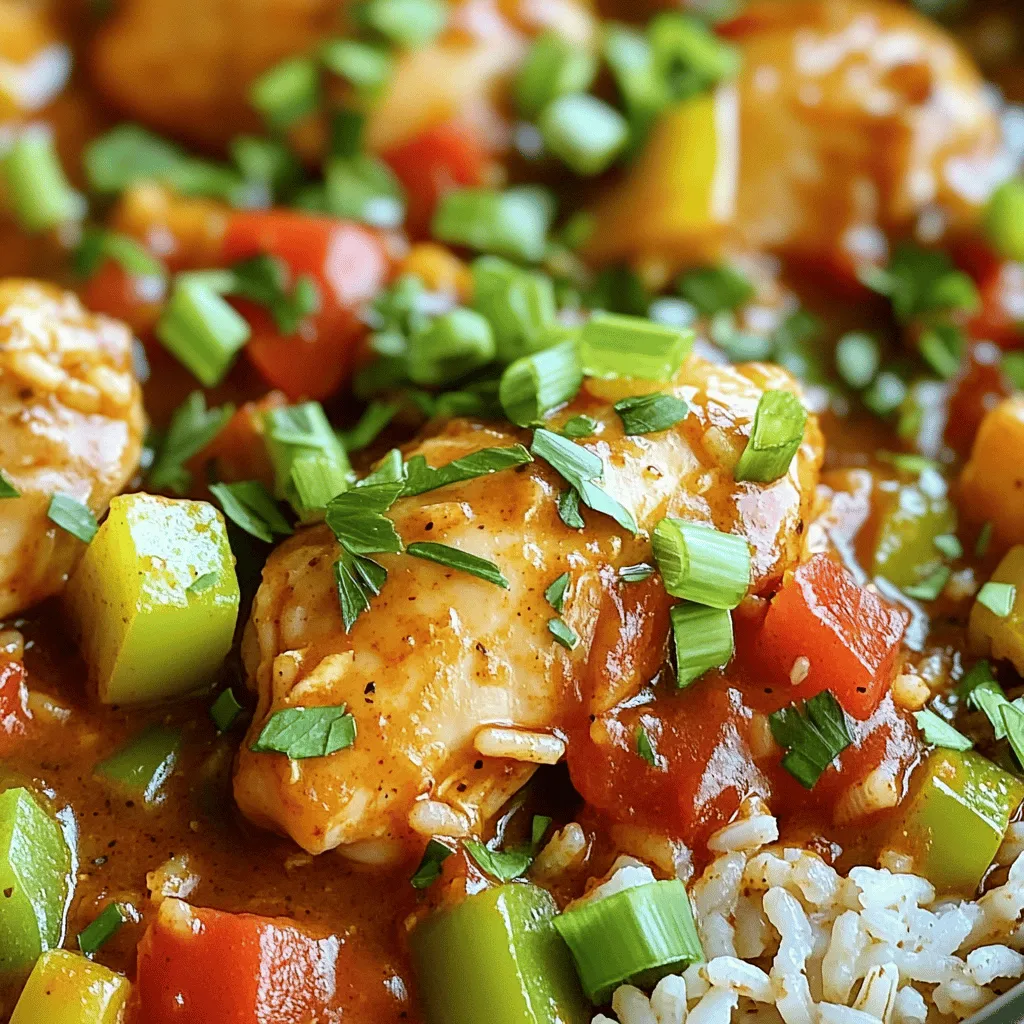
Looking for a dinner idea that’s both simple and packed with flavor? One Pot Chicken and Dirty Rice is your

For the perfect Surf & Turf Tomahawk Steak, you need: - 1 tomahawk steak (2-3 inches thick) - 1 pound large shrimp, peeled and deveined These two stars shine on your plate. The tomahawk steak offers rich, beefy flavor. The shrimp adds a sweet, light touch. To bring out the best flavors, gather these: - 2 tablespoons olive oil - 2 teaspoons sea salt - 1 teaspoon freshly ground black pepper - 4 cloves garlic, minced - 2 tablespoons fresh rosemary, chopped - 1 tablespoon fresh thyme, chopped - 1 tablespoon Cajun seasoning - 2 tablespoons butter These ingredients create a mouth-watering blend. The rosemary and thyme give a fresh note. The Cajun seasoning adds a warm kick. Pair your steak and shrimp with these: - Lemon wedges for serving Lemon brightens the dish and adds a tangy zest. You can also serve on a wooden board for a rustic look. This setup makes your meal inviting and fun! Start by taking the tomahawk steak out of the fridge. Let it sit for 30 minutes. This helps it cook evenly. While it rests, gather your seasoning. Use olive oil, sea salt, black pepper, garlic, rosemary, and thyme. Rub the steak with olive oil. Then, sprinkle sea salt and black pepper on both sides. Finally, add minced garlic, chopped rosemary, and thyme. This adds great flavor. Preheat your grill to high heat. Place the seasoned steak on the hot grill. Sear it for 4-5 minutes on each side. This makes a nice char. For medium-rare, aim for an internal temperature of 130°F (54°C). Use a meat thermometer for accuracy. Adjust the time if you want it cooked more or less. Once done, take it off the grill. While the steak cooks, prepare the shrimp. Toss the peeled and deveined shrimp in Cajun seasoning. Make sure each shrimp is well-coated. In a large skillet, melt some butter over medium heat. Add the shrimp to the skillet. Cook for about 2-3 minutes on each side. Look for them to turn pink and opaque. This shows they are ready. After cooking, let the steak rest for 10 minutes. This helps the juices settle. Slice the steak against the grain and serve it with the sautéed shrimp. You can drizzle the leftover butter from the skillet over the meat. Pair with lemon wedges for a fresh touch. For the full recipe, check out the detailed instructions above. To get the best tomahawk steak, check the temperature often. Use a meat thermometer for accuracy. Aim for 130°F (54°C) for medium-rare. Letting the steak rest is key. This step helps the juices settle. If you skip it, the steak will lose flavor. Rest your steak for about 10 minutes before slicing. Grilling gives the steak a great char. I suggest using a high heat on your grill. For a smoky taste, add some wood chips. You can also use a cast-iron skillet. Heat it well before adding the steak. This method creates a nice crust. Remember to sear both sides for 4-5 minutes. Make your dish look amazing. Slice the tomahawk steak against the grain. This helps with tenderness. Arrange the slices on a large platter. Top with the sautéed shrimp for color. A wooden cutting board serves well for a rustic touch. Don’t forget to squeeze some lemon over it all. Fresh herbs can add a nice green pop. Check the [Full Recipe] for more tips! {{image_2}} You can mix up the seafood in your surf and turf. Shrimp are great, but try lobster or scallops too. They add rich flavors. For lobster, grill it with butter for a sweet taste. Scallops cook quickly and offer a nice sear. Pairing different seafood can change your meal. Each brings its own flavor and texture. Seasonings make a big difference. While garlic and herbs shine, you can explore other flavors too. Consider a spice blend like smoked paprika or chili powder for some heat. A coffee rub can add depth, while lemon zest gives a fresh twist. Always taste as you go. This helps you find what you love best. Great sides enhance your meal. Think creamy mashed potatoes or crispy roasted veggies. A fresh salad with citrus dressing adds brightness. Don’t forget about garlic bread; it’s perfect for soaking up juices. For a fun twist, try a corn salsa. It adds sweetness and crunch. Choose sides that balance the rich steak and seafood. After enjoying your Surf & Turf Tomahawk Steak, you may have leftovers. To store the leftover steak and shrimp, first, let them cool to room temperature. Then, wrap the steak tightly in plastic wrap or place it in an airtight container. For the shrimp, you can also use an airtight container. This keeps both fresh and prevents odors from other foods. Store them in the fridge for up to three days. To reheat leftover steak and shrimp, I suggest using the oven or skillet. For the oven, preheat it to 250°F (121°C). Place the steak on a baking sheet and heat until warm, about 20-30 minutes. This method keeps the meat juicy. For the shrimp, heat a skillet over medium heat. Add a little butter and cook for 2-3 minutes, stirring gently. This method revives their flavor. If you want to keep leftovers longer, you can freeze them. Wrap the steak in plastic wrap and then in foil. This prevents freezer burn. Place the shrimp in a freezer bag, removing as much air as possible. Label both with the date. You can freeze for up to three months. When ready to eat, thaw in the fridge overnight. Reheat as described for the best results. Enjoy your meal again! For the full recipe, check out the details above. Surf and turf is a dish that combines meat and seafood. It usually pairs steak with shellfish. This dish gives you the best of both worlds. The rich flavor of beef meets the delicate taste of seafood. You can create a balanced meal that excites your palate. Surf and turf is popular in fine dining and home cooking alike. It offers a chance to impress guests with a beautiful meal. To select a great tomahawk steak, look for high marbling. Marbling means fat streaks in the meat, which adds flavor. A good cut should be about 2-3 inches thick. Check the color, too. Bright red meat shows freshness. The bone should be long and curved, giving it a dramatic look. Ask your butcher for recommendations. They can help you find a top-quality steak for your surf and turf meal. Yes, you can cook a surf and turf tomahawk steak in the oven. Start by searing the steak in a hot skillet to get a nice crust. Then, transfer the skillet to a preheated oven. Cook at 400°F until it reaches your desired doneness. For the shrimp, sauté them in a separate pan on the stove. This method gives you a juicy steak with a crispy exterior. Follow the full recipe for the best results. In this article, we explored how to make Surf & Turf Tomahawk Steak. We covered main ingredients, cooking steps, and tips for perfection. You learned how to pair seafood, season your steak, and serve it well. Achieving the right temperature and presentation matters. Remember to store leftovers properly and reheating them right ensures good taste. Enjoy your cooking journey with Surf & Turf—you’ll impress everyone at the table!

Surf & Turf Tomahawk Steak Sizzles with Flavor

Are you ready to elevate your dinner game? The Surf & Turf Tomahawk Steak is a showstopper, bursting with flavor.

To make this tasty soup, you'll need: - 1 pound Italian sausage (mild or spicy, your choice) - 1 medium onion, diced - 2 cloves garlic, minced - 3 carrots, chopped - 2 celery stalks, chopped - 4 cups chicken broth - 1 can (14.5 oz) diced tomatoes with herbs - 1 cup mini ditalini pasta - 1 cup heavy cream - 2 cups baby spinach - 1 teaspoon Italian seasoning - Salt and pepper to taste - Fresh parsley, chopped (for garnish) - Grated Parmesan cheese (for serving) Some basics to have in your kitchen include: - Chicken broth - Diced tomatoes - Heavy cream - Italian seasoning - Salt and pepper These items help build the soup's rich flavor. Fresh ingredients make this soup shine. I suggest: - Fresh parsley for garnish - Baby spinach for color and nutrients - Onion, garlic, carrots, and celery for a great base Using fresh veggies enhances taste and texture. For the full recipe, check out the detailed instructions. Enjoy crafting your Creamy Italian Sausage Ditalini Soup! Start by cooking the Italian sausage. In a large pot, heat it over medium heat. Use a wooden spoon to break it up. Cook for about 5-7 minutes. You want it browned and fully cooked. Once done, remove the sausage and set it aside. Keep the drippings in the pot. This adds great flavor to the soup. Next, add the diced onion, minced garlic, chopped carrots, and chopped celery to the pot. Sauté these for about 5-6 minutes. You want the vegetables softened and aromatic. This step builds the base flavor for your soup. The sweet onions and garlic will make your kitchen smell amazing. Now, stir in the chicken broth and the can of diced tomatoes. Be sure to scrape up any bits stuck to the bottom. This adds even more flavor. Bring the mixture to a simmer. Add the mini ditalini pasta and cook according to the package instructions, usually about 7-8 minutes. Stir occasionally to keep the pasta from sticking. Once the pasta is al dente, reduce the heat to low. Stir in the heavy cream, baby spinach, and the cooked sausage. Cook for another 2-3 minutes. You want the spinach to wilt and everything to heat through. Season with salt and pepper to taste. Adjust to your liking. Serve hot and enjoy your creamy Italian sausage ditalini soup. For the full recipe, check the beginning of this article. When I make Creamy Italian Sausage Ditalini Soup, I focus on quality. Fresh ingredients make a big difference. Here are some tips for choosing the best: - Sausage: Select high-quality Italian sausage. Look for brands with no fillers or preservatives. - Veggies: Choose vibrant, firm produce. Fresh onions, carrots, and celery add great flavor. - Tomatoes: Canned tomatoes with herbs save time. They pack a punch of flavor. - Pasta: Mini ditalini pasta cooks quickly. It absorbs the soup’s rich taste well. - Cream: Use heavy cream for richness. It makes the soup creamy and smooth. To achieve that perfect creamy texture, follow these steps: - Sautéing: Cook the sausage until browned. This adds depth to the soup. - Heat Control: After adding cream, keep the heat low. This prevents the cream from curdling. - Stirring: Mix gently when adding spinach and sausage. This keeps everything combined without breaking down the pasta. - Simmering: Allow the soup to simmer after adding cream. This melds the flavors beautifully. Serving your soup well makes it even better. Here are my favorite ways: - Garnish: Top with fresh parsley and grated Parmesan. It adds a pop of color and flavor. - Bread Pairing: Serve with crusty bread. It’s perfect for dipping in the soup. - Extra Spice: A pinch of red pepper flakes can add a nice kick if you like heat. - Side Salad: A simple green salad pairs well. It balances the meal and adds freshness. For the full recipe, check the details above. Enjoy your cooking! {{image_2}} You can easily adapt this soup for different diets. If you're gluten-free, swap the ditalini pasta for gluten-free pasta. For a lighter version, use ground turkey or chicken instead of sausage. If you want a vegan option, try using plant-based sausage and replace the heavy cream with coconut milk. You can also add more veggies like zucchini or bell peppers. These swaps keep the soup tasty and friendly for different diets. Enhancing flavors is simple with herbs and spices. Fresh basil or oregano can add a bright taste. Crushed red pepper flakes give it a spicy kick if you like heat. A dash of lemon juice adds freshness and balance. You can also use fresh thyme or rosemary for a fragrant note. Experimenting with these flavors makes the soup your own and can elevate the overall taste. Get creative with add-ins to make the soup special. You can mix in cooked beans for added protein and texture. Adding diced potatoes can make the soup heartier. For a rich flavor, stir in a spoonful of pesto or sun-dried tomatoes. If you love cheese, try adding cream cheese or ricotta for extra creaminess. These twists keep the dish fun and exciting, turning a classic recipe into something new each time. You can find the full recipe above for all the details. After enjoying your creamy Italian sausage ditalini soup, let it cool. Pour the soup into a clean container. Seal it tightly with a lid or cover it with plastic wrap. Store the soup in the fridge for up to three days. This way, you keep the flavors fresh and tasty. To freeze the soup, first cool it completely. Use freezer-safe bags or containers to store it. Leave some space at the top of the container, as soup expands when frozen. Label each bag with the date. You can freeze the soup for up to three months. This makes meal prep easy and quick. When ready to enjoy your soup again, thaw it in the fridge overnight. If you need it faster, place the bag in cold water for about 30 minutes. Heat the soup gently on the stove over low heat. Stir often to avoid sticking. Add a splash of cream if it feels too thick. Enjoy your delicious soup just like the first time! For the full recipe, check the link above. Yes, you can make this soup ahead of time. It tastes even better the next day. Just let it cool before storing it in an airtight container. Keep it in the fridge for up to three days. When you're ready to eat, reheat it on the stove over low heat until warm. If you want a lighter option, try using half-and-half or whole milk. For a dairy-free choice, coconut milk works well. You can also blend silken tofu with a bit of broth as a creamy base. Each option will change the flavor slightly, so choose what fits your taste. To thicken the soup, add more pasta or a bit of cornstarch mixed with water. You can also reduce the soup by simmering it longer. If you want it thinner, add more chicken broth or water until it reaches your desired consistency. Enjoy experimenting with it! For the full recipe, check out the ingredients and steps above. This article covered how to make Creamy Italian Sausage Ditalini Soup. You learned about key ingredients, cooking steps, and tips for the best flavors. I shared variations for dietary needs and easy storage tips. Remember, choosing fresh ingredients and following the right techniques will lead to a great meal. Try adding your favorite spices for a twist. Enjoy making this soup with your unique touch!

Creamy Italian Sausage Ditalini Soup Hearty and Tasty

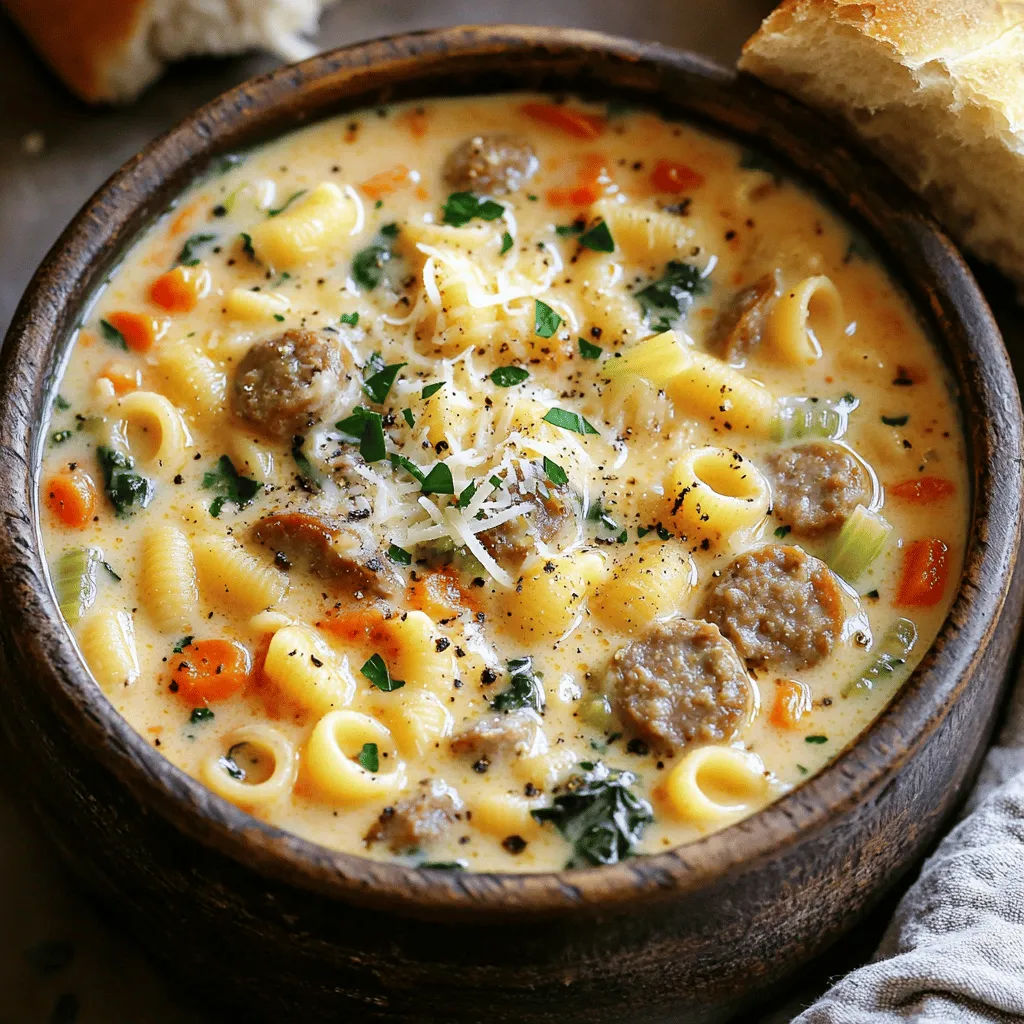
Are you ready to warm up your kitchen with a delicious soup that bursts with flavor? My Creamy Italian Sausage

To make a great pajeon, you need simple, fresh ingredients. Here’s what you need: - 1 cup all-purpose flour - 1 cup water - 1/2 teaspoon salt - 1 cup scallions (green onions), chopped, both white and green parts These ingredients form the base of your pancake. The flour gives it structure. The water makes the batter smooth. The salt adds flavor, while scallions bring a fresh taste. You can add extra ingredients to create unique flavors. Try these options: - 1/2 cup carrots, shredded, for sweetness and color - 1/4 cup kimchi, chopped, for a spicy kick These ingredients make your pajeon even more delicious. Carrots add a nice crunch, while kimchi brings heat and depth. Garnishing and dipping sauces can elevate your pajeon. Here are my favorites: - Sesame seeds, for garnish (optional) - Soy sauce, for dipping Sprinkling sesame seeds on top makes your pajeon look great. Soy sauce is a classic dip that enhances the flavor. Enjoy your crispy pajeon with these tasty touches! For the full recipe, check out the link. Start by mixing the flour, water, and salt in a bowl. You want a smooth batter. Use a whisk for the best results. Then, fold in the chopped scallions and any optional ingredients like carrots or kimchi. Mix until everything is well combined. This creates a tasty batter that holds all the flavors. Heat a non-stick frying pan over medium heat. Add a tablespoon of vegetable oil and swirl it around. Once the oil is hot, pour in half of your batter. Spread it out to form a pancake about half an inch thick. Cook for about 3 to 4 minutes until the bottom is golden brown. Use a spatula to flip it over. Cook for another 3 to 4 minutes. Transfer the pancake to a plate lined with paper towels. Repeat this with the rest of your batter, adding more oil as needed. Slice the pancakes into wedges. Serve them warm with soy sauce for dipping. For a nice touch, sprinkle sesame seeds on top. You can also serve them on a colorful platter to make them look even better. This makes your meal not just tasty, but beautiful too. Enjoy your Pajeon hot for the best flavor! For the full recipe, check out the details above. To make your pajeon crispy, avoid too much batter. A thin layer fries better. Use a non-stick pan and heat it well before adding oil. Let the oil shimmer before pouring in the batter. This helps to get a nice golden crust. Flip the pancake carefully to keep it intact. If the edges are not crispy, cook it a bit longer. One common mistake is adding too much water. This makes the batter runny and affects the texture. Always measure your flour and water correctly. Another mistake is not heating the pan enough. If the pan is cold, your pajeon won’t fry well. Lastly, avoid overcrowding the pan. Cooking one pancake at a time gives it room to crisp up nicely. You can customize your pajeon easily. Add ingredients like mushrooms or zucchini for extra flavor. For a spicy kick, toss in chopped chili peppers or kimchi. If you prefer a sweeter taste, add carrots. You can also try different dipping sauces, like spicy gochujang or garlic soy sauce. Get creative and make this dish your own! For the complete process, refer to the Full Recipe. {{image_2}} For a tasty twist, try adding seafood to your pajeon. You can use shrimp or squid for great flavor. Just chop them into small pieces. Add about half a cup of seafood to the batter. Mix it well with the scallions. This seafood pajeon has a lovely ocean taste that pairs well with soy sauce. If you prefer a meatless option, you can load your pajeon with vegetables. Bell peppers, zucchini, and mushrooms work well. Use one cup of your favorite veggies, chopped small. Add them to the batter with scallions. This version is colorful and full of nutrients. It’s perfect for anyone who loves vibrant food. You can change your pajeon with the seasons. In spring, add fresh asparagus. In summer, use corn or tomatoes. In autumn, try pumpkin or sweet potatoes. In winter, root vegetables like carrots and parsnips shine. Just remember to chop them small and mix them into the batter. Each season brings a new flavor and fun twist to this dish. Explore these variations for a fun cooking experience. If you want the full recipe, check out the Crispy Pajeon. Enjoy your delicious creations! After enjoying your Pajeon, cool it to room temperature. Place the leftovers in an airtight container. The pancakes will stay fresh in the fridge for up to three days. If you have more than you can eat, freezing is a great option. To reheat, use a skillet for the best results. Heat the skillet over medium heat. Add a little oil to the pan. Place the pancake in the pan and warm it for about three to four minutes on each side. This will help restore its crispiness. You can also use an oven. Preheat it to 350°F (175°C) and bake the pancakes for about 10 minutes. To freeze your Pajeon, place cooled pancakes in a single layer on a baking sheet. Make sure they do not touch. Freeze them for about an hour. Once frozen, transfer the pancakes to a freezer bag. They can be stored for up to three months. When you’re ready to eat, just reheat them as mentioned before. This way, you can enjoy your delicious Pajeon anytime! Pajeon is often served with soy sauce. This sauce adds flavor and balance. You can also add sesame oil for a nutty taste. Some like to dip it in a mix of vinegar and soy sauce. This gives a tangy twist. Serve it alongside pickled vegetables for extra crunch. Pajeon pairs well with Korean drinks like makgeolli. The drink enhances the pancake experience. Yes, you can make Pajeon gluten-free. Use rice flour or a gluten-free flour mix. These options work well in the batter. Mix them with water and salt just like regular flour. The texture may vary, but it will still taste great. You might need to adjust the water amount for the right consistency. Experiment and find what you like best. To make Pajeon more nutritious, add more vegetables. Carrots, zucchini, or bell peppers work well. These add color and vitamins. You can also use whole wheat flour for extra fiber. Consider adding protein like shrimp or tofu for a filling meal. This way, you turn a simple pancake into a hearty dish. Enjoy your Pajeon with a side salad for more nutrients. Check out the Full Recipe for more details. Pajeon is a tasty Korean pancake that you can make at home. We covered the key ingredients, how to prepare the batter, and cooking tips for perfect crispiness. You learned about variations, from seafood to vegetarian options, and how to store leftovers properly. Remember, making Pajeon is fun and flexible. Experiment with new flavors and enjoy this dish with friends or family. Happy cooking!

Pajeon: Korean Scallion Pancake Delight Recipe

Are you ready to dive into the tasty world of Pajeon? This Korean scallion pancake is a mix of crisp

To make a great seafood pasta salad, you need these key ingredients: - 8 oz. fusilli pasta - 1 cup cooked shrimp, peeled and deveined - 1 cup cooked calamari, sliced - 1 cup cherry tomatoes, halved - 1/2 cup cucumber, diced - 1/4 cup red onion, finely chopped - 1/4 cup black olives, sliced - 1/4 cup fresh parsley, chopped These ingredients mix well together. The fusilli pasta holds the dressing nicely. Shrimp and calamari bring a lovely taste of the sea. Fresh veggies add crunch and color. For the dressing, gather these items: - 1/3 cup olive oil - 3 tablespoons lemon juice - 1 teaspoon Dijon mustard - Salt and pepper to taste This dressing makes the salad bright and zesty. Lemon juice adds a fresh kick. Dijon mustard gives it depth. Adjust salt and pepper to match your taste. Feel free to customize your salad with these options: - Extra seafood like crab or scallops - Additional vegetables like bell peppers or corn - Fresh herbs such as basil or dill Adding more seafood or veggies can change the flavor. You can make it your own by mixing in what you love. Explore different herbs for unique tastes. For the complete recipe, check out the Full Recipe section. To cook fusilli pasta, bring a pot of salted water to a boil. Add the pasta and cook it for about 8 to 10 minutes. You want it to be al dente, which means it's firm but not hard. Once done, drain the pasta in a colander. Rinse it under cold water to stop the cooking. This step cools the pasta and helps keep it from sticking together. Set the pasta aside while you prepare the other ingredients. For the shrimp, if they are not cooked yet, boil them for about 3–5 minutes until pink. Once cooked, peel and devein them. For the calamari, slice it into rings if it isn't already. Cook it in boiling water for about 2 minutes, then drain. For the vegetables, chop the cherry tomatoes, cucumber, and red onion into bite-sized pieces. Use a sharp knife for efficient chopping. You want each piece to be small enough to mix well in the salad. In a large mixing bowl, add the cooled pasta, shrimp, calamari, and chopped vegetables. Make sure everything is evenly distributed. In a separate bowl, whisk together olive oil, lemon juice, Dijon mustard, salt, and pepper. Pour this dressing over the pasta and seafood mixture. Gently toss everything together until it is well coated. Use a spatula to lift from the bottom to the top. This method helps mix without breaking the seafood. Cover the bowl with plastic wrap and refrigerate for at least 30 minutes. This allows the flavors to meld. Before serving, give it a final toss and adjust the seasoning if needed. For the full recipe, refer to the section above. To make a great salad dressing, start with olive oil and lemon juice. Use a 2:1 ratio of oil to lemon for balance. Add Dijon mustard for a nice bite. Whisk the mix until it comes together. Taste it. Adjust with salt and pepper as needed. You can also add a bit of honey for sweetness or garlic for zing. For a stunning display, serve the salad in a large glass bowl. It highlights the colorful layers of seafood and veggies. Garnish with fresh parsley and lemon wedges for added flair. Chill the salad before serving. This enhances the flavors and gives a refreshing feel. Make this salad your own. Swap shrimp for crab or add tuna for variety. You can also mix in extra veggies like bell peppers or avocado. Adjust the seasoning to suit your taste. If you like more heat, sprinkle in some red pepper flakes. For a fresh twist, add fresh herbs like basil or dill. For the full recipe, check out the Seaside Delight Seafood Pasta Salad! {{image_2}} You can swap seafood to match your taste. Tuna and crab work well in this salad. They bring a nice, rich flavor. If you prefer no seafood, use chickpeas or grilled vegetables as substitutes. This keeps the dish fresh and exciting. Fusilli is great, but you can use other pasta shapes. Penne or rotini are good choices too. You might even try whole wheat pasta for more fiber. If gluten is a concern, choose gluten-free pasta. It will still taste amazing! To boost flavor, add fresh herbs like basil or dill. They add a lovely aroma and taste. If you like heat, a dash of hot sauce or a touch of garlic will spice things up. These small changes can make a big difference in flavor. Check out the Full Recipe for more ideas on making your seafood pasta salad shine! Store any leftover seafood pasta salad in an airtight container. Place it in the fridge right away. This keeps the salad fresh for up to three days. For best taste, eat it within two days. To keep it crunchy, you can store the dressing separately. Just add it when you're ready to eat. You usually do not want to reheat cold salads, especially seafood. Reheating can change the texture and taste. If you must, use a microwave on low power for a short time. This warms it without ruining the salad's fresh feel. I recommend enjoying it cold for the best experience. I do not suggest freezing seafood pasta salad. Freezing can make seafood rubbery and pasta mushy. If you want to freeze it, separate the components. Freeze the seafood and veggies in one bag and the pasta in another. This way, you can mix them fresh when you are ready to eat. Seafood pasta salad can last about 3 to 4 days in the fridge. To keep it fresh, store it in an airtight container. After a few days, the seafood may lose its texture and flavor. Always check for any signs of spoilage before eating. Yes, you can make this salad ahead of time. I recommend making it 1 day in advance. This gives the flavors time to meld. Just cover it well and chill it in the fridge. Before serving, stir it again to mix the dressing and ingredients. If you need a substitute for Dijon mustard, try using yellow mustard or honey mustard. These options will change the taste slightly but will work well in the dressing. For a milder flavor, you can also use mayonnaise mixed with a splash of vinegar. The seafood pasta salad is not gluten-free due to the fusilli pasta. However, you can easily switch to gluten-free pasta. Many brands offer gluten-free fusilli, so you can enjoy this dish without worry. Just check the package for gluten-free labels. This seafood pasta salad combines fusilli, shrimp, calamari, and fresh veggies for a tasty dish. With simple steps, you can create a flavorful dressing and customize ingredients to suit your taste. Remember to store leftovers properly to enjoy them later. You can make this salad ahead of time for convenience. Experimenting with various seafood and pasta types can add fun twists. Whether for a picnic or a family meal, this salad is a great choice. Enjoy making it your own!

Savory Seafood Pasta Salad Fresh and Flavorful Dish

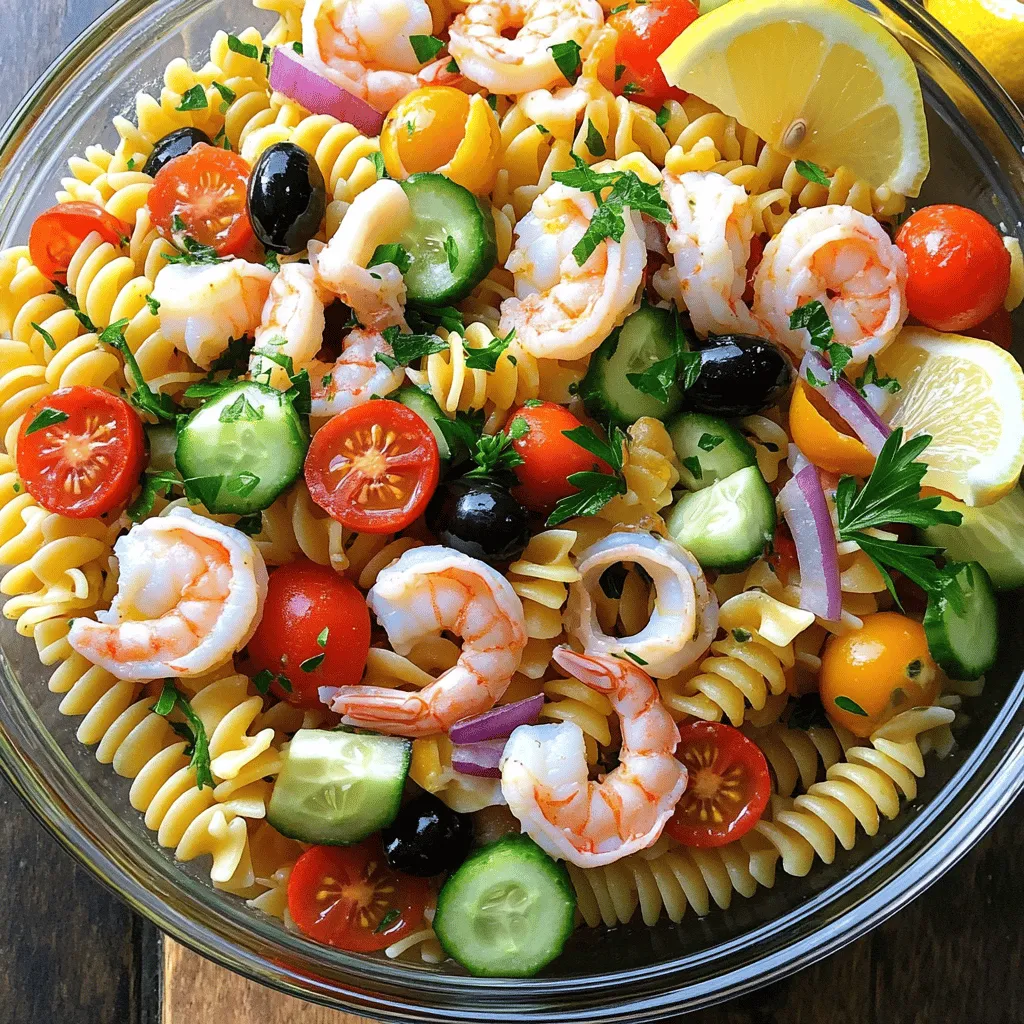
Dive into the delicious world of Seafood Pasta Salad, where fresh flavors and vibrant colors come together. This dish is

Older posts
Newer posts
← Previous Page1 … Page60 Page61 Page62 … Page77 Next →

dsad

© 2025 pureeatsnow • Built with GeneratePress

Our Policies

  • Copyright Policy
  • Cookie Policy
  • GDPR Policy
  • Privacy Policy
  • Disclaimer
  • Terms Of Use

More Information

  • Home
  • About
  • Contact
  • Appetizers
  • Dessert
  • Dinner
  • Drinks
©2025, pureeatsnow About Back To Top