Skip to content
DisclaimerTerms Of UseGDPR PolicyCookie Policy

pureeatsnow

  • Home
  • Drinks
  • Appetizers
  • Dinner
  • Dessert
  • About
  • Contact
  • Privacy Policy
DisclaimerTerms Of UseGDPR PolicyCookie Policy

Rachel

- 1 cup dry green or brown lentils - 2 teaspoons ground cumin - 1 teaspoon smoked paprika - 1 teaspoon dried thyme - Salt and pepper to taste - 1 medium onion, diced - 2 cloves garlic, minced - 2 carrots, diced - 2 stalks celery, diced - 1 bell pepper, diced - 1 can (14 oz) diced tomatoes with juices - 4 cups vegetable broth - 2 tablespoons olive oil - Fresh parsley, chopped When I make my easy lentil stew, I always start with my dry ingredients. I love using green or brown lentils. They add a great texture and are packed with nutrients. I mix in cumin, smoked paprika, and thyme. These spices give the stew a warm flavor. I add salt and pepper to make it just right. Next, I chop fresh vegetables. I use a medium onion, two cloves of garlic, and a few carrots. Celery adds crunch, and a bell pepper gives it color. You can pick any bell pepper you like! All these fresh veggies make the stew healthy and tasty. For liquid, I use diced tomatoes and vegetable broth. The tomatoes add a nice sweetness. The broth brings everything together. I also add olive oil to help sauté the veggies and enhance the flavor. To finish, I sprinkle fresh parsley on top as a garnish. It looks pretty and adds a nice touch. You can find the full recipe [here](#). First, heat the olive oil in a large pot over medium heat. Add the diced onion and sauté until it turns translucent. This should take about five minutes. Next, stir in the minced garlic and cook for one more minute. Once you smell the garlic, add the diced carrots, celery, and bell pepper. Cook these for another five to seven minutes. The goal is to make the veggies soft and sweet. Now, it's time to mix in the rinsed lentils. Add the diced tomatoes with their juices, vegetable broth, and spices like cumin, smoked paprika, and thyme. Stir well to combine all the ingredients. This is where the magic starts. The colors and smells will awaken your senses and make you excited for dinner! Increase the heat to bring the mixture to a boil. Once it boils, reduce the heat to low and cover the pot. Let the stew simmer for about 30 to 35 minutes. This will make the lentils tender and the flavors blend beautifully. You can check the lentils by tasting them. They should be soft but not mushy. After cooking, season the stew with salt and pepper to your taste. This step is essential to enhance the flavors. When ready to serve, ladle the stew into bowls and garnish with freshly chopped parsley. This adds a nice touch of color and freshness to your meal. Enjoy your healthy and comforting lentil stew. For the full recipe, check out the details above. - Rinse lentils properly before use. This removes dirt and debris. - Adjust cooking time for desired lentil texture. For softer lentils, cook longer. - Add herbs like bay leaves or oregano for extra flavor. These herbs deepen the taste. - Consider using homemade vegetable broth for a richer taste. It makes a big difference. - Serve with crusty bread or over rice. This adds heartiness to your meal. - Use a vibrant bowl to showcase the stew’s colors. A bright bowl makes the dish pop. For the full recipe, check out the details in the main article. {{image_2}} You can make your lentil stew heartier. Adding diced potatoes or sweet potatoes boosts texture and flavor. These veggies soak up the stew's spices, giving you a warm and filling meal. You can also add cooked sausage or chicken for extra protein. This option makes the stew rich and satisfying. If you want to keep your stew plant-based, focus on the lentils and veggies. They provide great taste and nutrition. For a deeper flavor, substitute vegetable broth for water. This change enhances the overall taste without losing the vegan aspect. Feel free to spice things up! You can experiment with curry powder or chili for a zesty bite. This twist adds warmth and excitement to your meal. Also, consider incorporating seasonal vegetables for added freshness. Using fresh produce can elevate the dish and make it even more appealing. For the full recipe, check out the [Full Recipe]. To store your lentil stew in the fridge, let it cool first. Use a clean, airtight container. This keeps the stew fresh and prevents odors. You can store it for up to five days. Just be sure to label the container with the date. This way, you know when to enjoy it again. If you want to freeze the stew, portion it into smaller containers. This makes it easy to reheat later. Make sure to leave some space at the top of each container. This allows for expansion when the stew freezes. When you're ready to eat, thaw the stew in the fridge overnight. Reheat it on the stove over low heat. Stir often for the best flavor and texture. Preparing ingredients in advance can save you time during busy days. Chop the veggies and store them in the fridge. You can also rinse the lentils and keep them ready to go. This makes it easy to whip up the stew in no time. For serving ideas, pair the stew with crusty bread or a simple salad. You can also use it as a filling for wraps or bowls throughout the week. Lentil stew lasts about 5 to 7 days in the fridge. To store it, place it in an airtight container. Make sure to cool the stew to room temperature before you seal it. This helps keep it fresh longer. Yes, you can use different types of lentils. Red lentils cook faster and become mushy. Black lentils hold their shape well and add a nice twist. Green lentils offer a firm texture and earthy flavor. Feel free to mix and match based on your taste. Lentil stew pairs well with many sides. Try serving it with crusty bread or a fresh salad. You can also enjoy it with rice or quinoa for a heartier meal. A glass of red wine or sparkling water complements it nicely. You can adjust the spice level to your liking. For mild stew, keep the spices light. If you love heat, add red pepper flakes or chopped jalapeños. You can also stir in hot sauce just before serving for an extra kick. Lentil stew is very healthy. Lentils are full of protein, fiber, and vitamins. They help keep you full and satisfied. The veggies add nutrients and flavor. This stew is a great choice for a balanced meal, promoting overall health. In this blog post, we explored a tasty lentil stew. We started with the key ingredients, like dry lentils and fresh veggies. Then, I shared simple steps for cooking and serving this hearty dish. You can adjust seasonings and even add proteins for variety. Remember, this stew stores well in the fridge or freezer. Enjoy experimenting with flavors and sharing this healthy meal with others!

Easy Lentil Stew Flavorful and Healthy Comfort Meal

Looking for a warm, tasty meal that’s simple to make? This Easy Lentil Stew is your answer! Packed with protein

- 1 pound ground beef - 1 cup shredded cheddar cheese - 1/2 cup shredded mozzarella cheese - 1/4 cup grated Parmesan cheese - 1 tablespoon garlic powder - 1 teaspoon onion powder - 1/2 teaspoon black pepper - 1 teaspoon salt - 1 package of refrigerated biscuit dough (8 pieces) - 1/4 cup fresh parsley, chopped (for garnish) - 2 tablespoons melted butter - Extra grated Parmesan for topping When you gather your ingredients, you'll start a tasty journey. Ground beef serves as the star of the show. It brings a rich flavor that pairs perfectly with melty cheese. I love using a mix of cheddar and mozzarella. Cheddar gives a sharp taste, while mozzarella adds creaminess. The touch of Parmesan cheese brings a savory note that makes these bombs truly special. Next, we have the seasonings. Garlic powder is a must. It adds depth and that familiar garlic flavor we all adore. Onion powder gives warmth, while salt and pepper enhance everything. These simple seasonings work together to create a flavor explosion in every bite. You can’t forget the biscuit dough. This is what holds everything together. It gives a nice, soft texture that complements the hearty filling. The melted butter brushed on top adds a golden touch and extra flavor. Finally, fresh parsley is our finishing touch. It brightens up the dish and adds a pop of color. When you gather the ingredients for Garlic Parmesan Cheeseburger Bombs, you're ready for a delicious meal. Check out the Full Recipe for how to put it all together! Set your oven to 375°F (190°C). This step is key. A hot oven helps the bombs cook evenly. In a large bowl, mix the ground beef with the cheeses and seasonings. Combine the ground beef, cheddar cheese, mozzarella cheese, grated Parmesan cheese, garlic powder, onion powder, black pepper, and salt. Stir until everything blends well. This mixture is what makes our bombs delicious. Open the package of biscuit dough and separate each biscuit. Flatten each biscuit with your hands. You want to create a small circle. This shape holds the tasty filling best. Take about 2 tablespoons of the beef and cheese mixture. Place it in the center of each flattened biscuit. Fold the dough edges over the filling. Pinch the seams tightly to seal them. This ensures no filling leaks out while baking. Place each stuffed biscuit seam side down on a greased baking tray. Give them some space. This helps them cook evenly and get nice and golden. In a small bowl, mix the melted butter with a bit of garlic powder if you like. Brush this garlic butter on top of each cheeseburger bomb. Sprinkle extra grated Parmesan cheese for added flavor. Bake in the preheated oven for 15-20 minutes. Check until they turn golden brown and are cooked through. The smell alone will make you hungry! After baking, let them cool for a few minutes. Finally, garnish with freshly chopped parsley before serving. Enjoy the explosion of flavors in every bite! For the complete recipe, check out the Full Recipe section. To make your Garlic Parmesan Cheeseburger Bombs even better, try new seasonings. Add smoked paprika for a smoky taste. You can use chili powder for some heat. A dash of cumin brings a warm, earthy flavor. Don’t be afraid to mix and match! Each addition can change the whole dish. You can even add fresh herbs like thyme or basil for a fresh kick. Getting the biscuit dough just right is key. Make sure to flatten the dough evenly. If it’s too thick, it won’t cook well. Check the baking time, too; every oven varies. If your bombs are golden brown, they’re ready! You want a soft inside and a crispy outside. Letting them cool slightly helps keep that texture. These bombs are great on their own, but sides can make them even better. Try serving them with crispy fries or a fresh salad. A side of ranch or garlic aioli is perfect for dipping. You can also serve them with pickles for a tangy bite. Each side adds a new layer to your meal experience. Enjoy exploring different pairings! {{image_2}} You can switch up the cheese in these bombs. If you like a stronger flavor, try gouda or pepper jack. For a creamier taste, use cream cheese or ricotta. You can mix different cheeses too. This gives you a chance to create your favorite blend. Not a fan of beef? No problem! You can use ground turkey or chicken instead. These meats keep the dish light while still packing flavor. If you want a plant-based option, try using lentils or a meat substitute. They work great with the cheese and spices. Want to boost nutrition? Add some veggies! Chopped onions or bell peppers can add crunch and flavor. You could also try mushrooms or spinach for a unique twist. Just sauté them first to bring out their taste. This way, your bombs become a tasty and healthy treat. When you have extra Garlic Parmesan Cheeseburger Bombs, store them in the fridge. Place them in an airtight container. This keeps them fresh for about 3 to 4 days. If you want to keep them longer, freezing is a great option. Just make sure they cool down first. This way, they won’t create steam and become soggy. To freeze Garlic Parmesan Cheeseburger Bombs, prepare them as usual. Once they are baked and cooled, wrap each bomb in plastic wrap. Then place them in a freezer-safe bag or container. They can stay in the freezer for up to 2 months. When you're ready to eat, just thaw them in the fridge overnight. To reheat your Garlic Parmesan Cheeseburger Bombs while keeping them crispy, use an oven or toaster oven. Preheat it to 350°F (175°C). Place the bombs on a baking sheet and heat for about 10 to 15 minutes. This method keeps the outside crunchy and the inside warm. Enjoy them just like when they were fresh! Yes, you can use frozen biscuit dough! Just let it thaw first. Frozen dough works well for this recipe. It will still puff up nice and golden, just like fresh dough. If you want to save time, frozen dough is a great choice. These bombs will take about 15 to 20 minutes to bake. However, oven times can vary. Keep an eye on them until they turn a lovely golden brown. The filling should be cooked through, and the dough should be fluffy. Absolutely! You can mix the filling a day ahead. Just store it in the fridge. When you’re ready to bake, let it warm up a bit. This helps the flavors blend and makes it easier to fill your dough. If you need a substitute for Parmesan, try using Pecorino Romano or nutritional yeast. Both can add a nice flavor. If you're dairy-free, nutritional yeast works well for a cheesy taste. You can also skip cheese entirely if you prefer! In this post, we covered how to make Garlic Parmesan Cheeseburger Bombs. We explored the main ingredients, easy step-by-step instructions, and helpful tips. You can customize the recipe with different cheeses or meats. Storing and reheating the bombs is simple for leftovers. These tasty treats offer a fun meal option for any crowd. Enjoy creating your version, and share them with family and friends. Your kitchen awaits these savory delights!

Garlic Parmesan Cheeseburger Bombs Flavor Explosion

Get ready for a flavor explosion! Garlic Parmesan Cheeseburger Bombs bring the ultimate comfort food to your table. With juicy

To make tasty chickpea salad melts, you need a few key items. Here’s what you should gather: - 1 can (15 oz) chickpeas, drained and rinsed - 2 tablespoons tahini - 1 tablespoon lemon juice - 1 tablespoon olive oil - 1 teaspoon Dijon mustard - 1 small red onion, finely chopped - 1/2 cucumber, diced - 1/4 cup fresh parsley, chopped - Salt and pepper to taste - 4 slices whole-grain bread - 1/2 cup shredded mozzarella cheese (or vegan cheese) These items create a base for your melts, giving them a fresh and hearty flavor. You can make your chickpea salad melts even more special. Here are some optional ingredients: - Sliced avocado for creaminess - Cherry tomatoes, diced for sweetness - Bell peppers, chopped for crunch - Spices like cumin or paprika for extra flavor Feel free to mix and match these items to suit your taste! Chickpea salad melts can fit many diets. Here are some variations: - Vegan: Use vegan cheese and ensure your tahini is pure. - Gluten-Free: Swap whole-grain bread for gluten-free bread. - Low-Carb: Serve the chickpea salad in lettuce wraps instead of bread. These options help everyone enjoy this delicious dish. For the full recipe, check out the detailed steps! To start, grab a medium mixing bowl. You will need one can of chickpeas. Drain and rinse the chickpeas well. Then, mash them with a fork. Aim for a chunky texture, not a puree. This gives your salad a nice bite. Next, add two tablespoons of tahini to the bowl. Tahini adds creaminess and flavor. Then squeeze in one tablespoon of lemon juice. The lemon juice brightens the dish. Add one tablespoon of olive oil for richness. Also, mix in one teaspoon of Dijon mustard for a tangy kick. Now, chop one small red onion finely. Dice half a cucumber, and chop a quarter cup of fresh parsley. Add all these to the chickpea mixture. Season with salt and pepper to taste. Stir everything until well combined. This mixture is the heart of your salad melts. Preheat your oven to 375°F (190°C). While it heats, prepare four slices of whole-grain bread. Place them on a baking sheet. Generously spoon the chickpea salad mixture onto each slice. Spread it out evenly for the best melt. Now, grab half a cup of shredded mozzarella cheese. You can use vegan cheese if you like. Top each chickpea salad melt with the cheese. This will create a gooey finish when baked. With your oven heated, place the baking sheet inside. Bake the melts for about 10 to 12 minutes. Keep an eye on them. You want the cheese to be bubbly and slightly golden. Once done, remove the baking sheet from the oven. Let the melts cool for a minute. Serve them hot on a wooden cutting board. Garnish with fresh parsley and add lemon wedges on the side. This adds a nice touch to your presentation. For the full recipe, be sure to check it out! To get the best flavor in your chickpea salad melts, focus on the right ingredients. I find that using fresh herbs really brightens the dish. Fresh parsley adds a nice pop. Also, balance the creamy tahini with the tangy lemon juice. This balance makes each bite taste fresh and lively. Don't forget to season well with salt and pepper. A pinch of each can elevate the overall flavor. Having the right tools makes cooking more fun. Use a sturdy mixing bowl to mash the chickpeas easily. A fork works well for this. A good knife helps chop your red onion and cucumber finely. For spreading, a spatula or spoon works best. You will also need a baking sheet for the final baking step. If you have parchment paper, it can help with cleanup. Avoid over-mashing the chickpeas. You want a chunky texture, not a paste. If you skip the salt and pepper, your melts can taste bland. Keep an eye on the baking time. Overbaking can lead to tough bread and burnt cheese. Lastly, don’t forget to let them cool slightly before serving. This helps the flavors settle and makes them easier to eat. For the full recipe, check out the recipe section above. {{image_2}} You can switch up the cheese in your chickpea salad melts. Mozzarella gives a nice stretch, but you can try cheddar for a sharp taste. For a creamier melt, use gouda. If you love blue cheese, crumble some on top for a tangy kick. Each cheese brings its own flavor, making your melts unique! Are you vegan or gluten-free? No problem! Use vegan cheese to keep it dairy-free. You can use gluten-free bread or lettuce wraps instead of whole-grain bread. Both options taste great and fit your diet. This way, everyone can enjoy this tasty meal without worry. Want to add more flavor? Try mixing in some chopped sun-dried tomatoes, olives, or roasted red peppers. These ingredients add color and a burst of taste. A sprinkle of smoked paprika or curry powder can give your melts a warm twist. Fresh herbs like dill or cilantro also brighten the dish. Get creative and make each melt your own! For the full recipe, check out the Chickpea Salad Melts section. To keep your Chickpea Salad Melts fresh, let them cool first. Place leftovers in an airtight container. Store them in the fridge for up to three days. Make sure to seal the container tightly to prevent drying. When you're ready to enjoy your leftovers, preheat the oven to 350°F (175°C). Place the melts on a baking sheet. Heat them for about 10 minutes or until warm. This method helps keep the bread crispy and the cheese gooey. Avoid the microwave as it can make the bread soggy. If you want to freeze your melts, prepare them without cheese. Assemble the chickpea salad on the bread. Wrap each melt tightly in plastic wrap and place them in a freezer bag. They can last for up to two months in the freezer. When you’re ready to eat, bake them straight from the freezer. Add cheese before baking to ensure it melts perfectly. For the full recipe, check out the instructions above. To make chickpea salad melts, start by mashing chickpeas. Use a fork and leave them chunky. Next, mix in tahini, lemon juice, olive oil, and Dijon mustard. Stir until everything blends well. Add finely chopped red onion, diced cucumber, and parsley. Season with salt and pepper. Preheat your oven to 375°F (190°C). Lay slices of whole-grain bread on a baking sheet. Spoon the chickpea mixture onto each slice. Top with shredded mozzarella cheese. Bake for 10-12 minutes until the cheese bubbles. For a full recipe, check the section above. Yes, canned chickpeas work great for this recipe. They save time and effort. Just drain and rinse them before using. This helps remove excess sodium and makes them tastier. Canned chickpeas are soft and mash easily. They can help you whip up these melts quickly. Chickpea salad melts taste best when served hot. Pair them with a fresh salad or soup. A side of crispy baked fries adds crunch. You can also serve them on a wooden cutting board. Garnish with extra parsley and lemon wedges. This adds color and a bright flavor. Enjoy your meal with friends or family! In this blog post, we explored how to make tasty chickpea salad melts. We covered essential and optional ingredients for your dish. You learned to assemble, bake, and customize for your diet needs. I also shared tips to enhance flavor and avoid common mistakes. Remember, these melts are easy to store and reheat. You can create different variations, making this dish fun. Enjoy your cooking adventure and make those yummy melts your own!

Chickpea Salad Melts Healthy and Tasty Sandwiches

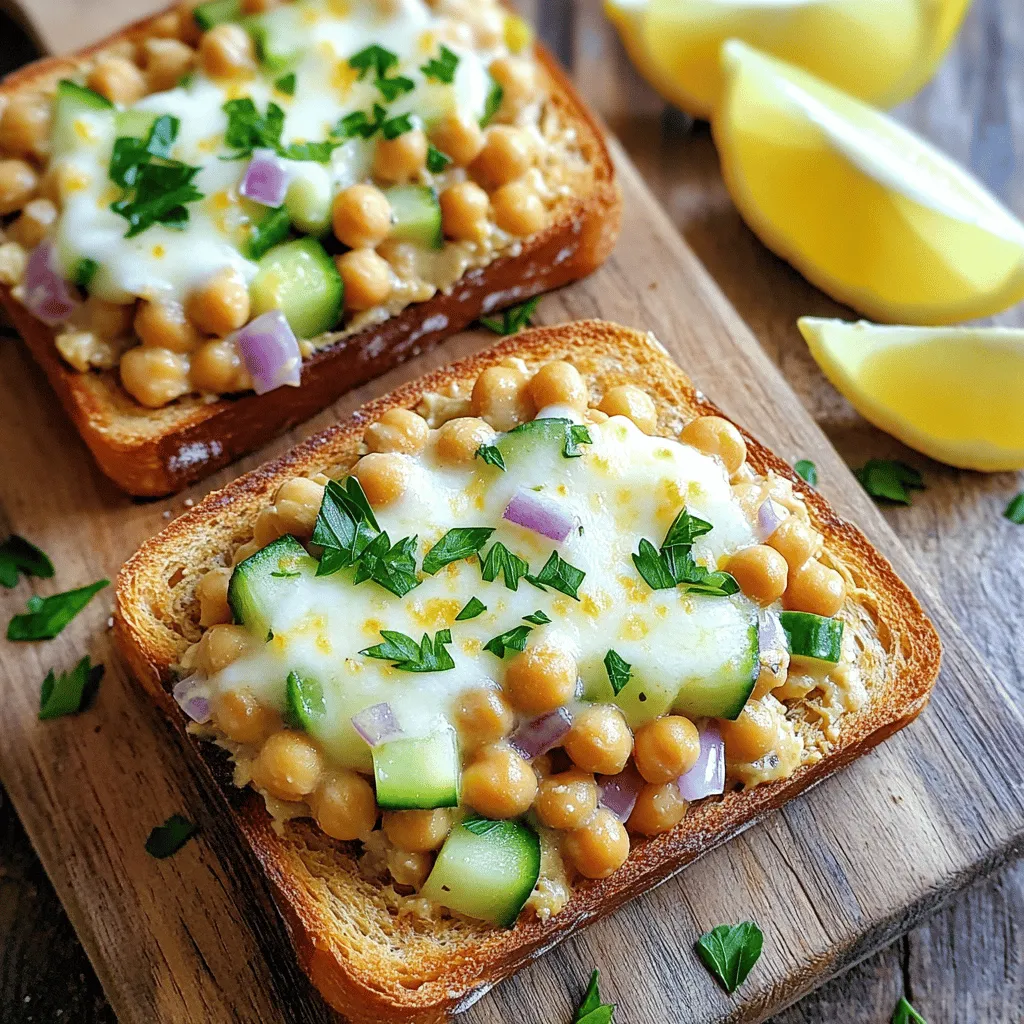
Looking for a tasty yet healthy sandwich? Try my Chickpea Salad Melts! These delightful creations blend the nutty flavors of

To make a cozy Crockpot Pierogi Casserole, you need simple ingredients that pack flavor. Here’s what you will need: - 16 oz frozen potato and cheese pierogies - 1 medium onion, diced - 2 cups shredded sharp cheddar cheese - 1 cup sour cream - 2 cups vegetable broth - 1 teaspoon garlic powder - 1 teaspoon onion powder - 1 teaspoon paprika - Salt and pepper to taste - 3 tablespoons butter, cut into small pieces - Fresh chives or parsley for garnish (optional) These ingredients create a warm and satisfying dish. The frozen pierogies serve as the star of the show. They offer a rich potato filling with gooey cheese. The onion adds a nice crunch and sweetness. Sharp cheddar cheese gives it that extra kick. Sour cream adds creaminess while the broth keeps everything moist. Spices, like garlic powder, onion powder, and paprika, boost the flavor. Salt and pepper help round it out perfectly. Finally, the butter on top helps create a golden crust as it cooks. You can always customize the dish. Try adding your favorite herbs or extra cheese. This recipe makes a great meal for family or friends. The best part? You can find the full recipe above. Enjoy making this simple, cozy comfort food! Start by lightly greasing the inside of your crockpot. Use cooking spray or a bit of oil. This step helps prevent sticking. You want to make serving easy later. A well-greased pot means less fuss when it’s time to serve. Now, let’s layer the ingredients. First, take half of the frozen pierogies. Spread them evenly on the bottom of the crockpot. Next, add half of the diced onion. Then, sprinkle half of the shredded cheddar cheese on top. These layers create a great base full of flavor. In a bowl, mix the sour cream with the vegetable broth. Add the garlic powder, onion powder, and paprika. Don’t forget to season with salt and pepper. Stir until everything is well combined. This sauce adds creaminess and depth to the dish. Pour half of this mixture over the first layer in the crockpot. Make sure it spreads evenly. Cover the crockpot and choose your cooking time. If you set it to low, let it cook for 5-6 hours. For a quicker option, use the high setting for 3-4 hours. The pierogies should be heated through. The cheese should melt and get bubbly. Timing is key to getting the perfect texture. Enjoy the simple cozy comfort of this Crockpot Pierogi Casserole. For the full recipe, check out the details earlier in this article. To keep the casserole from sticking, always grease your crockpot well. You can use cooking spray or a little oil. Layer the ingredients evenly. This helps the heat spread out. Stir gently once during cooking, if you can. This mixes the flavors and keeps it from burning. Want to mix things up? Try adding some spices! A pinch of cayenne pepper gives it a kick. You can also add fresh garlic for more flavor. Consider mixing in cooked bacon or sausage for a heartier meal. Fresh herbs like thyme or dill can add brightness too. Pair your casserole with a light salad. A crisp green salad balances the richness of the dish. You can also serve it with crusty bread for dipping. For drinks, a chilled lemonade or a light beer works well. Enjoy your cozy meal with family and friends! {{image_2}} If you want a vegetarian dish, you have some tasty choices. You can use different fillings for the pierogies. Look for ones stuffed with mushrooms or spinach. These add great flavor. You can also swap out the broth for vegetable broth. This keeps it veggie-friendly. For an extra kick, try adding chopped bell peppers or zucchini. They give a fresh taste and color. Want to make this dish heartier? Add some meat! Cooked sausage or diced chicken works well. You can mix the meat into the layers with the pierogies. For more flavor, sprinkle some bacon bits on top before cooking. Cheese lovers can rejoice too! Use extra cheese or mix in different types, like mozzarella or pepper jack. This makes the dish rich and creamy. If you need a gluten-free option, it's simple! Look for gluten-free pierogies at the store. You can also make your own with gluten-free flour. Use the same filling as the regular pierogies. Make sure to read all labels on the broth and spices. Some may contain gluten. Following these steps lets everyone enjoy this cozy dish. To store your leftovers, let the casserole cool down first. Once it's cool, transfer it to an airtight container. This keeps it fresh and tasty. If you plan to eat it within a few days, refrigerate it. Make sure to eat it within three to four days for the best flavor. If you want to save some for later, freezing is a great option. First, let the casserole cool completely. Then, cut it into serving sizes. Wrap each piece tightly in plastic wrap, then place them in a freezer-safe bag. This method prevents freezer burn. When you're ready to eat, thaw it in the fridge overnight. Reheat it in the oven at 350°F until it's warm all the way through. In the fridge, this casserole lasts about three to four days. If you freeze it properly, it can last up to three months. Just remember, the sooner you eat it, the better it tastes! Yes, you can use fresh pierogies. Fresh pierogies have a different texture. They cook faster than frozen ones. If you use fresh pierogies, cut the cooking time by about one hour. You want them heated through, and the cheese melted. Make sure to watch closely, as they can become too soft. Absolutely! You can prep this dish ahead of time. Layer the ingredients in the crockpot the night before. Cover it and store it in the fridge. When you are ready to cook, just set the crockpot to your desired time. This makes it easy for busy days. If you need a substitute for sour cream, try plain yogurt or cottage cheese. Both options give a creamy texture. You can also use dairy-free yogurt if you want a vegan option. For a lower-fat choice, use Greek yogurt. Each of these will keep your dish tasty and creamy. For the full recipe, check out the previous section. This blog post shared a simple and tasty crockpot recipe for potato and cheese pierogies. We covered ingredients, step-by-step cooking, and tips for better results. You can easily make this dish special with simple add-ins or swaps. Remember to refrigerate leftovers and follow storage tips for freshness. Cooking doesn't have to be hard. With just a few ingredients and steps, you can create a comforting meal. Enjoy experimenting and make this dish your own!

Crockpot Pierogi Casserole Simple Cozy Comfort Dish

Welcome to the warm and cozy world of Crockpot Pierogi Casserole! This simple dish combines frozen potato and cheese pierogies

To make Coconut Panna Cotta, you need a few key ingredients. Each one plays an important role in creating that creamy, smooth texture and delightful flavor. Here’s what you need: - 1 cup coconut milk - 1 cup heavy cream - 1/2 cup sugar - 2 teaspoons powdered gelatin - 3 tablespoons cold water - 1 teaspoon vanilla extract - Pinch of salt Coconut milk adds a rich, tropical flavor. Heavy cream brings a nice creaminess. Sugar sweetens the dish just right. Powdered gelatin helps it set. Cold water activates the gelatin. Vanilla extract adds depth, and salt balances the sweetness. While the panna cotta is delicious on its own, you can enhance it with garnishes. These add color and flavor. Here are two great options: - Fresh mango slices - Toasted coconut flakes Fresh mango slices give a burst of freshness. Toasted coconut flakes add a crunchy texture. You can mix and match these garnishes for a fun touch. For the complete recipe, check out the Full Recipe section. Enjoy your cooking adventure! To start, you need to bloom the gelatin. Take a small bowl and sprinkle the powdered gelatin over the cold water. Let it sit for about 5-10 minutes. This step helps the gelatin dissolve evenly later on. Next, grab a medium saucepan. Combine the coconut milk, heavy cream, and sugar in it. Heat over medium heat, stirring often. You want the mixture warm but not boiling. This step is key to making sure the sugar dissolves well. Now, remove the saucepan from the heat. Add the bloomed gelatin to your warm coconut mixture. Stir until everything is dissolved. Then, mix in the vanilla extract and a pinch of salt. Both add great flavor. Finally, pour the mixture into individual glasses or molds. Put them in the refrigerator to set for at least 4 hours or until firm. This process makes a smooth, creamy dessert that is sure to impress. You can find the detailed steps in the Full Recipe. To get the best texture for your Coconut Panna Cotta, blooming the gelatin is key. Begin by sprinkling the powdered gelatin over cold water. Let it sit for 5 to 10 minutes. This step helps the gelatin dissolve well later. If you skip this, your panna cotta may not set properly. When cooling your mixture, avoid letting it boil. Boiling can cause curdling. Instead, heat until warm and then mix in the bloomed gelatin. This keeps the cream smooth and creamy. Presentation matters! You can serve Coconut Panna Cotta in clear glasses. This way, everyone can see the lovely layers. You can also use molds for a fun shape. Top it with fresh mango slices or toasted coconut flakes for extra flair. Pair your panna cotta with fruit sauces like raspberry or passionfruit. These add a nice contrast to the creamy base. You can also serve it with a drizzle of honey for a sweet touch. If you have leftovers, store them in the fridge. Use an airtight container to keep them fresh. Coconut Panna Cotta lasts for about 3 days. When you want to serve it again, just take it out of the fridge. You can enjoy it cold or let it sit for a few minutes at room temperature. If it seems too firm, you can gently warm it in a bowl over hot water. This will help soften it up without ruining the texture. For the full recipe, check out the guidelines above! {{image_2}} You can easily change the taste of your panna cotta. Adding extracts like almond or pure coconut creates a new flavor. A few drops can make a big difference. You can also try infusing spices. For example, cardamom adds warmth and depth. Simply add a pinch when you heat the coconut milk. Taste and adjust to your liking. If you want a dairy-free version, swap heavy cream for coconut cream. This keeps the creamy texture while being plant-based. You can also use other dairy-free creams. Look for options made from nuts or oats. This way, everyone can enjoy this dessert without worry. Seasonal fruits and flavors can make your panna cotta special. In summer, add fresh berries for a burst of taste. In fall, consider pumpkin or apple spice. These small changes keep the dish exciting. Use whatever fruits are ripe and ready. Each season offers a chance to create something new and delicious. Panna cotta means "cooked cream" in Italian. This dessert comes from Northern Italy. It dates back to the 1960s. Many chefs in Italy made panna cotta to use cream. They mixed it with sugar and gelatin. The dish grew in popularity over time. Now, it is loved around the world. People enjoy panna cotta for its smooth texture and sweet taste. Coconut panna cotta lasts about 3 to 5 days in the fridge. Store it in an airtight container. This keeps it fresh longer. If you use molds, cover them well with plastic wrap. This will prevent the panna cotta from picking up smells. Always check for signs of spoilage before eating. Yes, you can use agar-agar in place of gelatin. Agar-agar is plant-based, making it a great option. Use about 1 tablespoon of agar-agar for every 2 teaspoons of gelatin. Dissolve it in boiling water first. Then mix it into your coconut mixture. This will help achieve the right texture. Just remember, agar-agar sets faster than gelatin. So, keep an eye on your panna cotta as it cools. - Ingredients list - 1 cup coconut milk - 1 cup heavy cream - 1/2 cup sugar - 2 teaspoons powdered gelatin - 3 tablespoons cold water - 1 teaspoon vanilla extract - Pinch of salt - Fresh mango slices or toasted coconut flakes for garnish - Step-by-step summary 1. First, sprinkle gelatin over cold water. Let it bloom for 5-10 minutes. 2. Next, warm coconut milk, heavy cream, and sugar in a saucepan. Stir until sugar dissolves. 3. Remove from heat and stir in bloomed gelatin until it dissolves. 4. Add vanilla extract and salt, mixing until combined. 5. Pour into serving glasses or molds and chill for at least 4 hours. 6. If using molds, run a knife along the edge before inverting. Serve in glasses as is. 7. Top with fresh mango slices or toasted coconut before serving. - Serving information and prep time This recipe serves 4. You need about 15 minutes for prep and 4 hours for setting. Coconut Panna Cotta is a simple yet delicious treat. We explored the key ingredients, like coconut milk and heavy cream. I shared step-by-step instructions to help you create the perfect texture. Remember to bloom your gelatin properly. We also discussed fun variations and serving tips to make it special. In the end, enjoy experimenting with flavors and garnishes. This easy dessert can impress anyone. Whether you keep it classic or add your twist, Coconut Panna Cotta is sure to delight.

Coconut Panna Cotta Simple and Delicious Dessert

Looking for a simple yet delightful dessert? You’ve found it! This Coconut Panna Cotta recipe is creamy, sweet, and bursting

To make oven-baked crispy Parmesan chicken tenders, you need simple and fresh ingredients. Here’s what you will need: - 1 pound chicken tenderloins - 1 cup breadcrumbs (preferably panko) - ½ cup grated Parmesan cheese - 1 teaspoon garlic powder - 1 teaspoon onion powder - ½ teaspoon smoked paprika - ½ teaspoon dried oregano - Salt and pepper to taste - 2 large eggs - 1 tablespoon Dijon mustard - Cooking spray or olive oil for spraying Using quality ingredients is key. Fresh chicken will give you the best flavor and texture. Panko breadcrumbs help achieve that perfect crunch. They are lighter and crispier than regular breadcrumbs. Parmesan cheese adds a rich, nutty flavor. The spices and herbs enhance the taste, making the dish delightful. I always recommend having all ingredients ready before starting. This makes the cooking process smooth and fun. You can easily adjust spices to match your taste. For example, if you love garlic, add more garlic powder. Once you gather your ingredients, you are set to create a delicious dish. For the complete process, check out the Full Recipe. 1. Preheat the oven and prepare the baking sheet. Set your oven to 400°F (200°C). Line a baking sheet with parchment paper. Lightly grease it with cooking spray or olive oil. 2. Mix the breadcrumb coating. In a medium bowl, combine: - 1 cup breadcrumbs (preferably panko) - ½ cup grated Parmesan cheese - 1 teaspoon garlic powder - 1 teaspoon onion powder - ½ teaspoon smoked paprika - ½ teaspoon dried oregano - Salt and pepper to taste Stir well until everything blends together. 3. Whisk the egg mixture. In another bowl, whisk together: - 2 large eggs - 1 tablespoon Dijon mustard Mix until smooth and combined. 4. Coat the chicken tenderloins. Dip each chicken tenderloin into the egg mixture. Let the excess egg drip off. Then, coat it in the breadcrumb mix. Press gently to help the crumbs stick. Place the coated tenders on the baking sheet. 1. Place the chicken in the oven. Once all the tenders are coated, spray the tops with cooking spray or drizzle olive oil. This helps them brown nicely. 2. Cooking time and flipping tips. Bake the chicken for about 15-20 minutes. Flip them halfway through to ensure even crispiness. 3. Check for doneness. The chicken should be cooked through and the coating golden and crispy. You can cut one to check if it’s done. For the full recipe, look back above! Enjoy making these delicious oven-baked crispy Parmesan chicken tenders. For crispy chicken tenders, use Panko breadcrumbs. They are lighter and crunchier than regular breadcrumbs. This texture creates a great crunch that everyone loves. When using cooking spray, hold it about 6 inches above the chicken. This distance helps to coat evenly without using too much. A light spray on top enhances browning and crispiness. Flipping the chicken tenders halfway through baking is key. Use tongs for easy handling. This step ensures both sides get that golden color and crunch. To boost flavor, add spices and herbs. Italian seasoning works well in this recipe. Just a teaspoon can add depth to your dish. You can also marinate or brine the chicken before cooking. A simple brine of salt and water for 30 minutes makes a big difference. It keeps the chicken tender and moist. For more flavor, consider adding garlic or lemon juice to your marinade. These ingredients brighten the taste and pair well with the Parmesan. For the full recipe, check out the complete instructions above. {{image_2}} You can switch things up with different coatings. For a gluten-free option, try almond flour or crushed cornflakes. These alternatives give a nice crunch and suit those with gluten allergies. If you want to change the cheese, go for cheddar or mozzarella. Each cheese brings its own flavor, making your chicken tenders unique. Pair your chicken tenders with tasty sides. I love serving them with crispy fries or a fresh salad. You can also add some roasted vegetables for color and nutrition. When it comes to dipping sauces, the options are endless! Marinara sauce offers a classic touch, while ranch dressing is always a favorite. Honey mustard adds a sweet twist, perfect for a fun meal. Check out the Full Recipe for more ideas! After you enjoy your Oven-Baked Crispy Parmesan Chicken Tenders, store leftovers properly. First, let them cool to room temperature. Then, place them in an airtight container. Store the container in the fridge. These tenders will stay fresh for about 3 days. If you want to keep them longer, freezing works well. Wrap each tender in plastic wrap. Then, put them in a freezer-safe bag. Label the bag with the date. They can last up to 3 months in the freezer. When it's time to eat your leftovers, reheating is key. The oven is best for keeping them crispy. Preheat your oven to 375°F (190°C). Place the tenders on a baking sheet. Heat them for about 10-15 minutes, until hot and crisp. You can also use the microwave, but the tenders may lose their crunch. If you choose the microwave, heat them for 1-2 minutes. Check often to avoid overcooking. Enjoy your crispy chicken tenders again! For the full recipe, refer back to the beginning of the article. How long do I bake chicken tenders at 400°F? Bake chicken tenders for about 15 to 20 minutes at 400°F. Make sure they are golden brown and cooked through. Flip them halfway for even cooking and crispiness. Can I use chicken breasts instead of tenderloins? Yes, you can use chicken breasts. Just cut them into strips. This will give you a similar shape and texture to tenderloins. What should I do if the coating isn't crispy? If the coating isn’t crispy, you might need more cooking spray. Use it before and after baking. Make sure you press the breadcrumbs onto the chicken well. Are oven-baked chicken tenders healthier than fried? Yes, oven-baked chicken tenders are healthier. They use less oil, which lowers fat and calories. This makes them a great option for a lighter meal. Can I prepare the chicken tenders in advance? You can prep the chicken tenders ahead of time. Coat them and store them in the fridge for a few hours. Just bake them when you're ready to eat! For the full recipe, check it out. In this blog post, I shared a simple recipe for oven-baked chicken tenders. We covered the key ingredients, clear instructions, and useful tips for crispiness. Options for variations and storage were also addressed. As you try this recipe, remember that using panko and spices makes a big difference. Feel free to get creative with your sides and dips. These tenders are a great dish for any meal, easy to make, and delicious. Enjoy!

Oven-Baked Crispy Parmesan Chicken Tenders Delight

Get ready to enjoy a delicious dinner with my Oven-Baked Crispy Parmesan Chicken Tenders! This easy recipe pairs juicy chicken

- 1 cup all-purpose flour - 1 tablespoon baking powder - 1 tablespoon sugar - 1/2 teaspoon salt - 1 cup milk - 1 large egg - 2 tablespoons melted butter - 1/2 teaspoon vanilla extract - 8 mini sausage patties - 4 slices of American cheese, halved - Maple syrup for drizzling To make Mini McGriddle Bites, you start with simple, essential ingredients. The flour, baking powder, and sugar give the base a sweet, fluffy texture. Salt helps to enhance the flavors. Milk adds moisture, making the bites soft. Next, you need a few more items to complete the dish. The egg binds everything together. Melted butter brings richness, while vanilla extract adds a nice touch of flavor. The mini sausage patties give your bites a savory punch. American cheese melts beautifully, creating a creamy layer. Finally, don't forget the maple syrup. It adds a sweet drizzle that makes each bite a delight. You can find the Full Recipe above to guide you through the steps. To make the batter, start by whisking together the dry ingredients. In a large bowl, combine 1 cup of all-purpose flour, 1 tablespoon of baking powder, 1 tablespoon of sugar, and 1/2 teaspoon of salt. Mix these well to ensure even flavor. Next, in another bowl, mix the wet ingredients. Combine 1 cup of milk, 1 large egg, 2 tablespoons of melted butter, and 1/2 teaspoon of vanilla extract. Stir until everything is smooth and well combined. Gradually pour the wet mix into the dry mix. Stir gently until you see a few lumps. Do not overmix, as it can make the bites tough. Heat a skillet over medium heat. Place the mini sausage patties in the skillet. Cook them for about 3 to 4 minutes on each side until they are browned and cooked through. Once done, drain the cooked patties on paper towels. This will help remove extra grease, making your bites less greasy and more delicious. Now, grease a griddle or large skillet with a little butter or cooking spray. Heat it to medium-low. Pour about 2 tablespoons of pancake batter onto the griddle for each bite. Place one sausage patty on top of each pancake. After about 2 to 3 minutes, when bubbles form on the pancakes, place half a slice of cheese on top of each sausage. Pour a little more batter over the cheese, about 1 tablespoon. Carefully flip each mini McGriddle. Cook for another 2 to 3 minutes until they turn golden brown and the cheese melts. Remove the bites from the heat and drizzle warm maple syrup on top before serving. Enjoy your tasty breakfast delight! For detailed cooking instructions, check out the Full Recipe. To get the best Mini McGriddle Bites, avoid overmixing the batter. When you mix, stop as soon as you see no dry flour. A few lumps are fine. This keeps the bites fluffy and light. Choosing the right skillet or griddle is key. Use a non-stick surface for easy flipping. Heat it to medium-low. This way, the bites cook evenly without burning. Toppings can make your McGriddle Bites special. Try whipped cream and berries for a sweet twist. For a savory option, add avocado or hot sauce. Maple syrup is a must for drizzling. Pair your bites with beverages, too! Fresh orange juice or milk works well. For fun, serve with a coffee or a warm chai tea. These drinks complement the flavors perfectly. If you want the Full Recipe, check the section above for all the steps! {{image_2}} You can change up your Mini McGriddle Bites with simple swaps. Try using different cheeses for a new flavor. Cheddar, pepper jack, or gouda can bring a tasty twist. Each cheese melts differently, adding unique creaminess. Next, think about the sausage. You can swap mini sausage patties for turkey or chicken sausage. These options give a lighter taste. You can also try plant-based sausage for a fun vegetarian choice. Each swap can change the whole vibe of your bites. The batter for Mini McGriddle Bites can be sweet or savory. To make it sweet, try adding fruits like mashed bananas or blueberries. These fruits add natural sweetness and moisture. You might also sprinkle in some cinnamon for warmth and spice. For a savory version, add herbs like chives or thyme to the batter. These herbs bring fresh notes to each bite. You can also experiment with toppings. Instead of syrup, try avocado or a spicy sauce. These options can make your breakfast feel like a gourmet meal. For those who want to dive deeper, check the Full Recipe for all the steps and details. To keep your Mini McGriddle Bites fresh, follow these tips: - Refrigerating: Place leftover bites in an airtight container. They will stay fresh in the fridge for up to three days. Make sure to cool them before sealing to prevent condensation. - Freezing: If you want to enjoy them later, freeze them! Lay the bites on a baking sheet first. This prevents sticking. Once frozen, transfer them to a freezer bag. They can last up to a month in the freezer. Reheating your Mini McGriddle Bites will keep them tasty. Here’s how: - Microwave: Place a few bites on a plate. Cover with a damp paper towel. Heat for about 30 seconds to one minute. Check to ensure they are warm throughout. - Oven: Preheat your oven to 350°F (175°C). Put the bites on a baking sheet. Heat for about 10 minutes. This method keeps them crispy. By following these storage and reheating tips, you can enjoy your Mini McGriddle Bites again and again! You can make Mini McGriddle Bites healthier by swapping out some ingredients. Here are a few ideas: - Use whole wheat flour instead of all-purpose flour. This adds fiber and nutrients. - Reduce the sugar in the batter. You can cut it in half or use a sugar substitute. - Choose turkey sausage instead of pork sausage. This lowers the fat content. - Add fruits like mashed bananas or applesauce to the batter. This adds natural sweetness and flavor. These changes help keep the bites tasty while making them a bit better for you. Yes, you can prepare Mini McGriddle Bites ahead of time. Here’s how: - Make the batter and cook the bites. After cooking, let them cool. - Store them in an airtight container in the fridge for up to three days. - To reheat, just pop them in the microwave for about 30 seconds. You can also warm them in a skillet for a few minutes. This way, you can enjoy a quick breakfast without any fuss. For the Full Recipe, please visit the original source. This will give you all the detailed steps to make Mini McGriddle Bites exactly how you want them. Enjoy the cooking adventure! Mini McGriddle Bites are easy to make with simple ingredients. We covered the essential ingredients, step-by-step cooking, and tips for perfect results. I also shared fun variations and storage ideas. These bites are perfect for a quick meal or snack. Feel free to experiment with flavors or adjust the recipe for your taste. Now, you can enjoy this tasty treat anytime!

Mini McGriddle Bites Perfect for Breakfast Delight

Are you ready to elevate your breakfast game? Mini McGriddle Bites are your new morning obsession! These tasty treats combine

To make a lovely strawberry cheesecake, gather these key ingredients: - 1 ½ cups digestive biscuits, crushed - ½ cup unsalted butter, melted - 16 oz (450 g) cream cheese, softened - 1 cup granulated sugar - 2 teaspoons vanilla extract - 3 large eggs - 1 cup sour cream - 1 ½ cups fresh strawberries, pureed - 2 tablespoons cornstarch - Fresh strawberries for garnish These ingredients work together to create a rich, creamy dessert with a delightful strawberry flavor. The digestive biscuits give a crunchy base, while the cream cheese brings a smooth texture. You can add some optional ingredients to make this cheesecake your own: - Lemon zest for a citrus kick - Chocolate chips for a sweeter twist - A splash of almond extract for nutty notes These additions can enhance the flavor and make your cheesecake unique. If you have allergies or dietary restrictions, consider these substitutions: - Use gluten-free cookies instead of digestive biscuits for a gluten-free crust. - Swap cream cheese for a vegan cream cheese alternative to make it dairy-free. - Replace eggs with flaxseed meal mixed with water for a vegan option. These substitutes allow you to enjoy the cheesecake while keeping it safe for your needs. You can find the Full Recipe to see how these ingredients come together in this delicious treat. To make the crust, start with 1 ½ cups of crushed digestive biscuits. You can use a food processor or a plastic bag and a rolling pin. Then, mix the crushed biscuits with ½ cup of melted unsalted butter in a medium bowl. Stir until the mixture looks like wet sand. Next, press this mix into the bottom of a 9-inch springform pan. Make sure it’s compact and even. Bake the crust in a preheated oven at 325°F (163°C) for 10 minutes. After baking, take it out and let it cool completely. Now, let’s make the cream cheese filling. In a large mixing bowl, beat 16 oz (450 g) of softened cream cheese until it’s smooth. Use an electric mixer for best results. Gradually add 1 cup of granulated sugar, mixing well after each addition. Then, add 2 teaspoons of vanilla extract and mix. Next, add 3 large eggs, one at a time. Mix just enough to combine. Now, stir in 1 cup of sour cream and 1 ½ cups of pureed fresh strawberries. Finally, add 2 tablespoons of cornstarch to thicken the filling. Mix until everything is well combined. Pour the cream cheese filling over the cooled crust in the springform pan. Spread it evenly to ensure a nice bake. Bake in the oven for 50-60 minutes. The center should be set but still slightly jiggly. Once done, turn off the oven and leave the cheesecake inside with the door slightly open for 1 hour. This helps prevent cracks. After an hour, remove it from the oven and let it cool completely at room temperature. Then, refrigerate for at least 4 hours or overnight for the best flavor. When ready to serve, carefully remove the sides of the springform pan, and garnish with fresh strawberries. You can find the Full Recipe for more details. To get a creamy texture in your strawberry cheesecake, start with room-temperature cream cheese. Cold cream cheese will clump. Beat it well to make it smooth. Adding sour cream helps too. It gives a rich flavor and creamy feel. Mix your ingredients gently. Overmixing can add air, which makes the cheesecake crack. One big mistake is opening the oven door too soon. This can cause the cheesecake to sink. Let it bake fully and cool slowly in the oven. Another mistake is using too much sugar. This can make it overly sweet. Stick to the recipe for the best balance. Always let your cheesecake chill in the fridge. This helps it firm up and enhances the flavor. When serving, cut neat slices for a pretty look. Use a hot knife to get clean cuts. Drizzle extra strawberry puree on top for a pop of color. Fresh strawberries make a lovely garnish too. You can also add a dollop of whipped cream for extra creaminess. For a fun twist, serve slices with a scoop of vanilla ice cream on the side. Check out the Full Recipe for more tips! {{image_2}} You can skip baking by making a no-bake version. This dessert stays cool and creamy. For the crust, use crushed cookies and melted butter, just like the baked recipe. For the filling, mix cream cheese, sugar, and pureed strawberries. Add whipped cream for a light texture. Spread this mixture over the crust and chill until firm. This no-bake option is perfect for hot days. If you prefer a vegan version, use cashews instead of cream cheese. Soak cashews in water for a few hours, then blend them until smooth. Combine with maple syrup, vanilla, and pureed strawberries for a creamy filling. Use dates and nuts for the crust. Press this mixture into a pan and chill. This option is just as delightful and plant-based! You can customize your cheesecake easily. Try adding blueberries or raspberries for a mix of flavors. Swirl some chocolate sauce through the filling for a unique twist. You can also use lemon zest for a tangy kick. These additions make each cheesecake different and fun. Get creative and find your favorite mix! For the full recipe, check out the Heavenly Strawberry Cheesecake section. Enjoy! After you make your cheesecake, let it cool completely. Wrap it well in plastic wrap. This keeps it moist and fresh. Store it in the fridge for up to five days. If you want to slice it first, use a sharp knife. Clean the knife between cuts for neat slices. You can also place it in an airtight container. If you have leftovers, you can freeze them. First, let the cheesecake cool completely. Then, wrap it tightly in plastic wrap. After that, place it in a freezer-safe bag or container. It can stay in the freezer for up to three months. To thaw, place it in the fridge overnight before serving. The shelf life of your strawberry cheesecake is about five days in the fridge. The flavors taste best after chilling for at least four hours. For the best taste, serve it cold. I love to add fresh strawberries on top right before serving. This adds color and flavor. Check out the Full Recipe for tips on making your cheesecake shine! You can check if your cheesecake is done by looking for a slight jiggle in the center. The edges should be set, and the middle should still move a little when you shake the pan. This soft center will firm up as it cools. After baking, turn off the oven and let it sit inside for one hour with the door slightly open. This helps prevent cracks. Yes, you can use frozen strawberries! Just make sure to thaw them first. Drain any extra juice to avoid a watery filling. Puree the strawberries as you would with fresh ones. The flavor will still be great, though fresh strawberries often taste better. To prevent cracks, avoid overmixing your batter. Mix just until the ingredients blend together. Also, ensure your cream cheese is at room temperature. Another tip is to bake at a lower temperature and use a water bath. This method keeps the cheesecake moist and helps it cook evenly. For best results, follow my full recipe for more tips! This strawberry cheesecake is rich, creamy, and full of fresh flavor. It has a crunchy crust and a smooth filling. The sweet strawberries make it special. You can serve it for any occasion. - 1 ½ cups digestive biscuits, crushed - ½ cup unsalted butter, melted - 16 oz (450 g) cream cheese, softened - 1 cup granulated sugar - 2 teaspoons vanilla extract - 3 large eggs - 1 cup sour cream - 1 ½ cups fresh strawberries, pureed - 2 tablespoons cornstarch - Fresh strawberries for garnish 1. Preheat your oven to 325°F (163°C). 2. Make the crust: In a medium bowl, mix the crushed digestive biscuits and melted butter. Press this into the bottom of a 9-inch springform pan. Bake for 10 minutes and let it cool. 3. Prepare the filling: In a large bowl, beat the softened cream cheese with an electric mixer. Mix until creamy and smooth. 4. Add sugar: Gradually add the sugar. Mix well after each addition. Then, add the vanilla extract. 5. Incorporate eggs: Add the eggs one at a time. Mix until just blended. Do not overmix. 6. Stir in sour cream: Mix in the sour cream and pureed strawberries. Add the cornstarch and mix until combined. 7. Combine: Pour the cream cheese mixture over the cooled crust. Spread it evenly. 8. Bake: Place in the preheated oven for 50-60 minutes. The center should be set but slightly jiggly. 9. Cool down: Turn off the oven. Leave the cheesecake inside with the door slightly open for 1 hour. 10. Finish: Let it cool completely at room temperature. Refrigerate for at least 4 hours or overnight. 11. Serve: Remove the sides of the springform pan. Top with fresh strawberries before serving. With this full recipe, you can create a dessert that everyone will love. Enjoy making it! You learned about making strawberry cheesecake, from key ingredients to storage tips. Using simple steps, you can create a creamy and delicious treat. Remember to avoid common mistakes and try fun variations to make it your own. With these guidelines, your cheesecake will impress everyone. Keep your leftovers safe and enjoy each bite later. Now, go ahead and bake that perfect strawberry cheesecake!

Strawberry Cheesecake Delightfully Easy to Make

If you love dessert, you’ll adore this Strawberry Cheesecake! It’s simple to make and perfect for any occasion. I’ll guide

When making Peanut Butter Chocolate Chip Energy Bites, you need simple, tasty ingredients. Here’s what you'll need: - 1 cup rolled oats - 1/2 cup natural peanut butter - 1/3 cup honey or maple syrup - 1/2 cup mini chocolate chips - 1/4 cup ground flaxseed - 1/2 teaspoon vanilla extract - A pinch of salt - Optional add-ins: 1/4 cup chopped nuts or dried fruit These ingredients work together to create a snack that is both filling and fun. The oats provide fiber, while the peanut butter gives you protein. Honey adds sweetness, and chocolate chips make it special. Flaxseed boosts nutrition with healthy fats. You can also add nuts or dried fruit for more texture. This recipe is a great way to use ingredients you may already have. It’s quick to prepare and perfect for busy days. For the full recipe, check out the instructions I provided earlier. Enjoy the process of making these energy bites! - Mixing dry ingredients Start by getting a large bowl. Add 1 cup of rolled oats, 1/4 cup of ground flaxseed, and a pinch of salt. Stir them well. This step makes sure the dry parts mix evenly. - Combining wet ingredients In another bowl, mix together 1/2 cup of natural peanut butter, 1/3 cup of honey or maple syrup, and 1/2 teaspoon of vanilla extract. Stir it until the mixture is smooth and creamy. - Combining wet and dry mixtures Pour the wet mixture into the dry ingredients. Mix them together until everything is well combined. You want a thick, sticky dough. - Folding in chocolate chips and optional ingredients Gently fold in 1/2 cup of mini chocolate chips. If you want to add extra flavor, mix in the optional 1/4 cup of chopped nuts or dried fruit. This adds texture and makes each bite fun. - Rolling energy bites into balls Take about a tablespoon of the mixture. Roll it between your hands to form a ball. Repeat this until you use up all the dough. You should get about 12 to 15 energy bites. - Chilling in the refrigerator Place the energy bites on a parchment-lined baking sheet. Put them in the fridge for at least 30 minutes. This makes them firm and easy to eat. After chilling, store them in an airtight container in the fridge for up to one week. This simple snack is quick to make and packed with energy. For the full recipe, check out the details above. Enjoy your tasty bites! - Ensure ingredients are at room temperature: Room temperature ingredients mix better. This helps create a smooth and even texture in your energy bites. Set peanut butter and honey out for about 30 minutes before you start. - Use different nut butters for flavor variations: Try almond, cashew, or sunflower seed butter. Each nut butter adds a unique taste. This keeps your energy bites fresh and exciting. - How to adjust sweetness: If you prefer a sweeter bite, add a bit more honey or maple syrup. You can also use mashed banana or applesauce as a natural sweetener. Just remember to adjust the dry ingredients to keep the balance. - Pair with yogurt or fruit: Energy bites go great with Greek yogurt. You can also serve them with fresh fruit like berries or sliced bananas. This adds flavor and nutrients. - Perfect for meal prep or on-the-go snacks: Make a batch at the start of the week. They store well, so you can grab a few when you’re busy. These bites give you energy without fuss. - Caloric content per serving: Each energy bite has about 100 calories. This makes them a good choice for a snack. They give you a boost without overloading on calories. - Nutritional benefits of main ingredients: Rolled oats provide fiber for better digestion. Peanut butter adds protein and healthy fats. Chocolate chips bring joy while offering a little energy kick. Ground flaxseed offers omega-3s, which are great for heart health. {{image_2}} You can easily change the flavor of your energy bites. A simple way is to add cocoa powder. Just mix in a couple of tablespoons to get a rich chocolate taste. If you want to explore nut butters, try almond or cashew butter. They bring unique flavors and textures to the bites. Swapping ingredients can make these bites even better. Use agave syrup instead of honey for a different sweetness. It’s a great way to keep it vegan too. You can also switch up the chocolate chips. Try dark chocolate or even white chocolate for a new twist. Why not have fun with themes? For holidays, add spices like cinnamon or nutmeg. They create a warm, festive flavor. In summer, use dried fruits like cranberries or apricots for a fruity burst. Each season offers great choices to keep your energy bites exciting and fresh. To keep your Peanut Butter Chocolate Chip Energy Bites fresh, choose airtight containers. Glass jars or plastic containers with tight lids work well. Make sure to store them in the refrigerator. The ideal temperature for your fridge is around 32°F to 40°F (0°C to 4°C). This keeps them firm and tasty. You can also freeze these energy bites for longer storage. To freeze, place the bites in a single layer on a baking sheet. Once they are frozen solid, transfer them to an airtight container. You can also use freezer bags. When you want to enjoy them, simply take out the desired amount and thaw them at room temperature. They keep well in the freezer for up to three months. Keep an eye on your energy bites. Look for changes in texture or color. If they smell off or taste stale, it's best to throw them away. Fresh energy bites have a pleasant nutty and sweet aroma. If they lose that charm, they might be past their prime. Peanut Butter Chocolate Chip Energy Bites last up to one week in the fridge. Store them in an airtight container. If you want them to last longer, freeze them. They can stay fresh for three months in the freezer. Remember to label the container with the date. Yes, you can use a different sweetener. Maple syrup is a great choice. Agave syrup also works well. You can even try coconut sugar if you like. Each sweetener adds a unique taste, so feel free to experiment. You can use almond butter or sunflower seed butter instead of peanut butter. These options provide a similar texture and taste. Make sure to choose a natural version without added sugars. This keeps your energy bites healthy and tasty. Yes, these energy bites are gluten-free. Rolled oats are naturally gluten-free. Just check that your oats are certified gluten-free to avoid any cross-contamination. Enjoy these bites without worry if you follow a gluten-free diet. Yes, you can add protein powder to the recipe. It boosts the protein content and keeps you full longer. Just add a scoop when you mix the wet and dry ingredients. This simple change makes your energy bites even better. For the full recipe, check the previous section. These energy bites are easy to make and fun to eat. You mix simple, healthy ingredients like oats, peanut butter, and honey. Customize them with your favorite add-ins and flavors. Store them in the fridge or freezer for quick snacks. Overall, they offer great nutrition and taste. Enjoy these bites as a meal prep option or an on-the-go treat. Try different variations to keep things fresh. You'll love how simple it is to boost your energy with these tasty snacks.

Peanut Butter Chocolate Chip Energy Bites Simple Snack

Craving a quick, tasty snack? Let me introduce you to Peanut Butter Chocolate Chip Energy Bites. These little treats are

To make your own strawberry ice cream, you need five key ingredients: - 2 cups fresh strawberries, hulled and sliced - 1 cup granulated sugar, divided - 1 cup whole milk - 2 cups heavy cream - 1 teaspoon vanilla extract These ingredients work together to create a creamy and fruity delight. The strawberries bring a bright flavor, while the sugar adds sweetness. Whole milk and heavy cream give it that rich, smooth texture we love in ice cream. Vanilla enhances all the flavors, making each bite special. You can make your ice cream even more fun with these optional add-ins: - Chocolate chips - Fresh mint leaves - Nuts or seeds for crunch These extras add texture and new flavors. Chocolate chips mix great with strawberries. Mint leaves give a fresh twist, while nuts add a nice crunch. To make homemade strawberry ice cream, you will need a few simple tools: - Ice cream maker - Mixing bowls - Fork or potato masher - Airtight container An ice cream maker is key for getting that soft and creamy texture. Mixing bowls help combine your ingredients easily. A fork or potato masher will help break down the strawberries. Finally, an airtight container is perfect for storing your ice cream once it's ready. For the complete process, check out the Full Recipe. - Macerating the strawberries Start by placing the sliced strawberries in a medium bowl. Add half a cup of sugar and mix gently. Let them sit for 30 minutes. This helps release the sweet juices and boosts the flavor. - Mashing for texture After 30 minutes, grab a fork or a potato masher. Lightly mash the strawberries. Leave some chunks for a fun texture. Set them aside for later. - Combining milk, cream, and sugar In a large mixing bowl, whisk together the rest of the sugar, whole milk, heavy cream, vanilla extract, and a pinch of salt. Make sure the sugar dissolves completely. This mix is the base of your ice cream. - Incorporating the strawberries Add the macerated strawberries and their juice to the cream mixture. Stir well to blend everything evenly. The strawberries will give your ice cream a beautiful pink hue and sweet taste. - Operating the ice cream maker Pour the mixture into your ice cream maker. Follow the manufacturer’s instructions to churn. Typically, it takes about 20 to 25 minutes. You want it to turn creamy and soft. - Storing the ice cream Once churned, move the ice cream to an airtight container. Freeze it for at least 2 to 4 hours. This will help it firm up. Before serving, let it sit at room temperature for a few minutes to soften. This makes scooping easier. For the full recipe, check out Strawberry Fields Forever Ice Cream. Freezing time is key to a creamy ice cream. After churning, let your ice cream sit in the freezer for at least 2 to 4 hours. This step helps it firm up nicely. The consistency while churning also matters. Aim for a soft-serve texture. If you churn too long, it can become too hard once frozen. Ripening your strawberries before using them boosts their sweetness. Leave them on the counter for a day or two. The extra time helps them develop great flavor. You can add extracts, too. A splash of almond or lemon extract can give your ice cream a new twist. If your ice cream is too hard to scoop, it may need more time at room temperature. Just let it sit for a few minutes before trying again. Ice crystals can form if you don’t churn enough or if the ice cream freezes too fast. Make sure your ice cream maker is cold before you start. This helps avoid icy bits in your treat. For the full recipe, check the section above. Enjoy your homemade strawberry ice cream! {{image_2}} You can easily make vegan strawberry ice cream. Start by substituting dairy with plant-based milk. Almond or coconut milk works great. These milks add a nice creaminess without using dairy. Use agave or maple syrup as sweeteners. Both options are natural and tasty. They add a unique flavor to your ice cream. If you want a dairy-free version, there are good alternatives. You can use oat milk or cashew milk instead of whole milk. They are rich and creamy. For heavy cream, try using coconut cream. It gives a smooth texture. You can also blend in nut butters. Almond or cashew butter adds creaminess and flavor. Mixing flavors can make your ice cream even more fun. Try a strawberry banana swirl. Just blend ripe bananas with the strawberries. The banana adds a sweet and creamy taste. Another great combo is strawberry lemonade ice cream. Mix in lemon juice and zest for a tangy twist. This brightens the flavor and makes it refreshing. Check the Full Recipe to explore more ways to enjoy homemade strawberry ice cream! To keep your homemade strawberry ice cream fresh, use an airtight container. This will stop air from getting in and causing freezer burn. I recommend using a glass or plastic container that seals tightly. Make sure to fill it close to the top to limit air space. Freezer burn can ruin the taste and texture of your ice cream. To prevent this, cover the surface with plastic wrap before sealing the lid. This helps to block air and keep it creamy. For the best flavor, eat your ice cream within two weeks. It will stay fresh for about a month if stored well. After that, the taste and smoothness may fade. If you need to refreeze your ice cream, do it quickly. Take it out only when you are ready to serve. If it melts too much, it can form ice crystals. This can make it less creamy and enjoyable. Sometimes, ice cream can freeze too hard. To make it easier to scoop, let it sit at room temperature for about five minutes. This will soften it just enough for a smooth scoop. When serving, use a warm ice cream scoop. Run it under hot water for a few seconds. This trick helps to get that perfect scoop with ease. Enjoy your homemade strawberry ice cream! Making homemade strawberry ice cream takes about 4 hours and 50 minutes in total. You need around 50 minutes for prep work. Start by preparing your strawberries and mixing your ingredients. Then, churn the mixture in an ice cream maker for about 20 to 25 minutes. After that, you must freeze it for 2 to 4 hours to let it firm up. That’s when it becomes creamy and delicious! Yes, you can make strawberry ice cream without an ice cream maker! Here are two easy methods: - Freezer method: Pour your mixture into a shallow dish. Stir it every 30 minutes for about 3 to 4 hours. This helps break up ice crystals and keeps it creamy. - Bag method: Place your mixture in a smaller zip-top bag. Seal it tightly, then place it in a larger bag filled with ice and salt. Shake for about 10 to 15 minutes. Your ice cream will form in the smaller bag! If your ice cream turns out too icy, here are some tips: - Mix it well: If possible, let it soften, then mix it again. This can break up ice crystals. - Add more cream: Use more heavy cream next time. More fat helps create a smoother texture. - Sugar balance: Make sure you use enough sugar. Sugar lowers the freezing point, helping to keep your ice cream creamy. For the full recipe, check out Strawberry Fields Forever Ice Cream and enjoy this simple treat! Making homemade strawberry ice cream is fun and rewarding. You need fresh strawberries, sugar, milk, and cream. Optional add-ins like chocolate chips or nuts add more flavor. Use an ice cream maker to churn your mix. Remember to store it in an airtight container. Final thoughts: Enjoying your own ice cream is a treat. Follow the tips for the best texture and flavor. Experiment with variations to find your favorite. With a little practice, you can master homemade strawberry ice cream. Enjoy every scoop!

Homemade Strawberry Ice Cream Enjoyable and Simple Treat

Ready to cool off with a delicious treat? Making homemade strawberry ice cream is easy and fun! With fresh strawberries,

Older posts
Newer posts
← Previous Page1 … Page61 Page62 Page63 … Page77 Next →

dsad

© 2025 pureeatsnow • Built with GeneratePress

Our Policies

  • Copyright Policy
  • Cookie Policy
  • GDPR Policy
  • Privacy Policy
  • Disclaimer
  • Terms Of Use

More Information

  • Home
  • About
  • Contact
  • Appetizers
  • Dessert
  • Dinner
  • Drinks
©2025, pureeatsnow About Back To Top