Skip to content
DisclaimerTerms Of UseGDPR PolicyCookie Policy

pureeatsnow

  • Home
  • Drinks
  • Appetizers
  • Dinner
  • Dessert
  • About
  • Contact
  • Privacy Policy
DisclaimerTerms Of UseGDPR PolicyCookie Policy

Rachel

- Black beans: 2 cans, rinsed and drained - Corn: 1 cup (fresh, frozen, or canned) - Onion: 1 medium, diced - Garlic: 2 cloves, minced - Spices: 1 teaspoon cumin and 1 teaspoon smoked paprika - Seasoning: Salt and pepper to taste - Tortillas: 8 small corn tortillas - Toppings: 1 avocado (sliced), 1 cup diced tomatoes, fresh cilantro, lime wedges When I plan cheap meals, I focus on simple and affordable ingredients. Black beans are a great choice. They are high in protein and fiber. You can buy them canned or dried. Canned beans save time. Just rinse and drain them before cooking. Corn adds sweetness and texture. You can use fresh, frozen, or canned corn. All options work well. Make sure to drain the canned corn if you choose that. Onion and garlic enhance the flavor. Dice the onion and mince the garlic. This step is quick and easy. Spices like cumin and smoked paprika add depth. They create a warm and smoky taste. Don’t forget salt and pepper. These seasonings are key to bringing out the flavors. Use them according to your taste. Tortillas are the base for these tacos. Small corn tortillas are perfect. They hold the filling well and add flavor. Finally, toppings like avocado, tomatoes, cilantro, and lime make your tacos shine. Sliced avocado adds creaminess. Fresh tomatoes give a burst of freshness. Cilantro adds a pop of color and flavor. Lime is great for squeezing over the top. This recipe is not only budget-friendly but also customizable. You can adjust the toppings to your liking. For the full recipe, check the Budget-Friendly Black Bean Tacos section. First, you need to sauté the onion and garlic. Heat a tablespoon of oil in a large skillet over medium heat. Add the diced onion. Cook it for about five minutes until it turns soft and clear. Next, stir in the minced garlic and cook for another minute. This makes the kitchen smell great! Now, it's time to add the black beans and corn. Pour in two cans of rinsed black beans and one cup of corn. Add one teaspoon of cumin and one teaspoon of smoked paprika. Season with salt and pepper to taste. Cook this mixture for five to seven minutes. Stir often until everything is warm. While your filling cooks, it's time to warm the corn tortillas. Take another skillet and set it on medium heat. Place each tortilla in the skillet and warm it for about 30 seconds on each side. This will make them soft and easy to fold. Now comes the fun part: assembling the tacos! Start with a warm tortilla. Scoop some of the black bean mixture onto the center. Next, layer on sliced avocado and diced tomatoes. Finish with a sprinkle of fresh cilantro. Serve your tacos with lime wedges on the side. Squeeze some lime juice over the top for an extra burst of flavor. You can find the full recipe for these budget-friendly black bean tacos above. Enjoy! Finding cheap ingredients is key. Look for local markets or discount stores. They often have great deals. Buy in bulk when you can. Items like rice, beans, and pasta last long. This saves money and reduces trips to the store. Enhancing flavors does not have to cost much. Use simple spices like garlic, cumin, and paprika. They add depth without breaking the bank. Fresh herbs like cilantro brighten your dishes. For serving, add lime wedges for a zesty kick. Meal prep can save you time and money. Cook a big batch of filling on a Sunday. Store leftovers in the fridge. This way, you can make tacos or burritos quickly during the week. Planning meals ahead keeps you on budget. For a tasty and affordable dish, try the Full Recipe for Budget-Friendly Black Bean Tacos. You will enjoy delicious food without spending much! {{image_2}} You can switch up the protein in these tacos easily. - Using lentils or chickpeas: Both lentils and chickpeas work well. They add protein and fiber. Just cook them like the beans. Mix them with the corn and spices for a great taste. - Adding shredded chicken: If you have leftover chicken, shred it. Add it to the taco filling for more flavor and protein. This can make the meal more filling. Toppings can change the flavor of your tacos. Here are some great options: - Salsa, cheese, or sour cream alternatives: If you want a kick, add salsa. You can use yogurt instead of sour cream. Grated cheese is also a nice touch. - Fresh herbs and spices variations: Fresh cilantro adds a bright taste. You can also use green onions or parsley. A sprinkle of chili flakes can add heat. If you want to switch the tortillas, try these ideas: - Using lettuce wraps or whole wheat tortillas: Lettuce wraps are healthy and low-carb. They add crunch and freshness. Whole wheat tortillas are more filling and add fiber. They are a great choice for a hearty taco. Explore these variations to make budget-friendly black bean tacos even better. With simple changes, you can keep meals fun and tasty. For the full recipe, check the section above. To store leftover filling and tortillas, use airtight containers. Place the filling in one container. Keep the tortillas in another. Make sure to let the filling cool before sealing. This keeps moisture from building up. Leftovers stay fresh for three to four days in the fridge. For reheating, I suggest using a skillet. Heat the filling over medium heat until warm. Stir occasionally to avoid burning. Warm the tortillas in the skillet for 30 seconds on each side. This helps them stay soft and tasty. If you want to freeze the filling, let it cool completely. Then, place it in freezer-safe bags or containers. Remove as much air as possible before sealing. Label the bags with the date. The filling can last up to three months in the freezer. When you’re ready to use it, thaw it in the fridge overnight. You can also use the microwave for quick thawing. Reheat the filling in a skillet until hot. This will keep the flavors fresh and delicious. For more details on this recipe, check out the Full Recipe. The total cost is about $10. You can make four servings with this amount. Each taco costs around $2. This makes it a great meal option when you are on a budget. Prices may vary by location, so check your local store for deals. Leftovers can last in the fridge for up to three days. Store the filling in an airtight container. Keep the tortillas separate to prevent them from getting soggy. Reheat the filling on the stove or in the microwave. Yes, you can make these tacos gluten-free. Just choose corn tortillas, as they do not contain gluten. Check labels on canned items like beans and corn to ensure they are gluten-free. This way, you can enjoy the dish without worry. Black beans are versatile and budget-friendly. Here are some ideas: - Black Bean Soup: Blend cooked black beans with broth, spices, and veggies. - Black Bean Salad: Mix black beans with corn, diced peppers, and a simple dressing. - Black Bean Burritos: Fill tortillas with black beans, rice, and veggies. - Black Bean Quesadillas: Add black beans and cheese between tortillas, then cook until crispy. These meals are delicious and easy to make! Try them for variety and to keep costs low. For the full recipe of black bean tacos, refer back to the earlier section. These tacos are a fun, healthy, and budget-friendly choice. We covered the key ingredients, easy steps to make them, and great tips to save money. You can customize the recipe with different proteins and toppings. Storing leftovers is simple, too! Enjoy making these tasty tacos, and get creative with your meals! Cook with fresh ingredients and share with friends. Happy cooking!

Cheap Meals to Make When You Are Broke Easily

Feeling the pinch and need to eat well on a budget? You’re not alone! I’ve got you covered with easy,

For my Fiery Chicken Ramen with Creamy Garlic Sauce, I focus on fresh and bold flavors. Here’s what you need: - 2 boneless, skinless chicken thighs - 2 cups chicken broth - 2 packs of ramen noodles - 1 tablespoon chili paste (adjust for spice level) - 2 green onions, sliced - 1 teaspoon garlic powder - 1 tablespoon ginger, grated - 1 tablespoon soy sauce - 1 tablespoon sesame oil - 1 tablespoon vegetable oil - ½ cup heavy cream - Salt and pepper to taste - Sesame seeds for garnish These ingredients create a tasty base for the dish. The chicken thighs are juicy and absorb all the flavors well. The ramen noodles add that perfect chewy texture, while the chili paste gives it that fiery kick. Feel free to make this dish your own! Here are some optional ingredients you can add: - Soft-boiled eggs for extra protein - Spinach or bok choy for added greens - Mushrooms for an earthy flavor - Extra chili flakes for heat These ingredients can change the taste and make it unique. You can play around with what you like best. Using great ingredients makes a big difference. Here are my favorite brands: - Chicken Broth: Swanson or Pacific Foods for rich flavor. - Ramen Noodles: Nissin or Maruchan for quick cooking. - Chili Paste: Sambal Oelek or Sriracha for the right spice level. - Heavy Cream: Organic Valley for smooth texture. Choosing these brands ensures quality. Always check labels for freshness and flavor. Enjoy making this dish! If you want the full recipe, head to the top. To start, gather your chicken thighs. Mix soy sauce, chili paste, garlic powder, and grated ginger in a bowl. Place the chicken in the bowl, covering it well. Let it marinate for at least 30 minutes. This step lets the flavors soak in, making the chicken tasty. Heat vegetable oil in a large pot over medium-high heat. When the oil is hot, add the marinated chicken. Sear each side until golden brown, about 5 minutes per side. Once cooked, remove the chicken and set it aside. This step gives the chicken a nice crust. In the same pot, pour in the chicken broth. Bring it to a simmer. While the broth heats, shred the cooked chicken using two forks. This adds texture to your dish. Once the broth is simmering, add ramen noodles. Cook according to the package's instructions, usually 3-4 minutes. In a small pan, heat sesame oil over low heat. Add heavy cream and stir in the remaining chili paste. Simmer this mixture for about 2 minutes. This step creates a rich, creamy sauce that complements the ramen well. Add the shredded chicken back into the pot with noodles and broth. Warm it through for one more minute. Season with salt and pepper to taste. Serve the ramen in bowls. Top with sliced green onions, a drizzle of creamy garlic sauce, and a sprinkle of sesame seeds. Enjoy your Fiery Chicken Ramen with Creamy Garlic Sauce, a true delight! For the full recipe, refer back to the ingredients and instructions provided. To get perfectly cooked ramen, start with good noodles. Fresh ramen noodles cook faster and taste better. Boil water in a pot, then add the noodles. Cook them for 3-4 minutes, but check the package for specific times. You want them firm but not hard. Once done, drain them and rinse with cold water. This stops the cooking process and keeps them from getting sticky. If you like heat, add more chili paste. Start with one tablespoon, then taste. If it's not spicy enough, mix in more. You can also add fresh chili or hot sauce for extra kick. For less spice, use less chili paste or skip it entirely. Remember, you can always add more later, but you can’t take it away. Fresh herbs make a big difference. Try adding sliced green onions on top for crunch. You can also add cilantro or basil for unique flavors. Other great toppings are soft-boiled eggs or seaweed. Sesame seeds add a nice touch, too. Each topping adds texture and taste, making your ramen even better. For the full recipe, check the detailed steps above! {{image_2}} You can easily make this dish vegetarian or vegan. Use tofu instead of chicken. Firm tofu holds up well in the broth. Just press it to remove excess water. Marinate it with soy sauce and chili paste for flavor. Cook it the same way you would the chicken. For the broth, swap chicken broth with vegetable broth. This keeps the taste rich and savory. If you want to mix it up, try different proteins. Shrimp cooks quickly and adds a nice touch. Simply sauté it for a few minutes until it turns pink. You can also use thinly sliced beef or pork. Just adjust the cooking time so it’s tender. For a lighter option, shredded rotisserie chicken works great too. It saves time and still packs flavor. You can add extra flavor to your ramen. Try mushrooms, bok choy, or spinach for greens. These add texture and nutrients. You could also toss in some corn or bean sprouts for crunch. For a spicy kick, add sliced jalapeños or a drizzle of hot sauce. Top it off with a soft-boiled egg for richness. These add-ins make your ramen exciting and personal. To keep your Fiery Chicken Ramen fresh, store leftovers in an airtight container. Make sure the ramen and broth are in separate containers. This way, the noodles won’t get soggy. Refrigerate them right after the meal. Use the leftovers within three days for the best taste. When you’re ready to eat the ramen again, heat the broth in a pot over medium heat. Add the noodles and chicken to warm them up. Stir gently to mix everything well. If the broth is too thick, add a splash of water or broth. This will bring back the creamy texture. If you want to freeze the ramen, it’s best to freeze the broth and chicken separately from the noodles. This helps keep the noodles from getting mushy. Use freezer-safe containers or bags. Label them with the date. You can freeze them for up to three months. When ready to eat, thaw overnight in the fridge before reheating. For the complete recipe, refer to the Full Recipe section. You can change the spice by adding or reducing chili paste. Start with a small amount. Taste the broth as you go. If it’s not spicy enough, add more. You can also use milder chili sauce or skip it altogether. Each cook can find their perfect heat! Yes, you can use store-bought ramen noodles. They save time and still taste great. Look for fresh or dried noodles, depending on what you like. Just follow the cooking time on the package. This helps you get the right texture! Many Asian restaurants serve Fiery Chicken Ramen. Look for places that focus on ramen or Asian cuisine. Some chain restaurants also have spicy ramen on their menu. You can check online reviews to find the best local spots. Yes, you can make this dish in advance. Cook the chicken and broth, then store them separately. Keep the noodles in a sealed bag or container. When you’re ready to eat, just reheat everything and assemble your ramen. It’s a great meal prep option! To make the creamy garlic sauce less rich, try using half-and-half instead of heavy cream. You can also add more chicken broth for a lighter feel. Another option is to mix in a bit of lemon juice. This adds brightness and cuts the richness! For the full recipe, check out the detailed steps above! This guide covers everything to make Fiery Chicken Ramen. You learned about key and optional ingredients, and we explored suggested brands. I provided step-by-step instructions for marinating, cooking, and assembling your dish. We also discussed tips for perfect ramen and variations for different diets. Now you have storage info for leftovers and answers to common questions. Enjoy trying these ideas in your kitchen. Cooking can be fun and rewarding!

Fiery Chicken Ramen with Creamy Garlic Sauce Delight

Are you ready to spice up your dinner routine? This Fiery Chicken Ramen with Creamy Garlic Sauce will tantalize your

- 1 lb large shrimp, peeled and deveined - 4 tablespoons unsalted butter - 4 garlic cloves, minced - 1 cup heavy cream - 1/2 cup chicken broth - 1 teaspoon paprika - 1/2 teaspoon red pepper flakes (optional) - Salt and pepper to taste - 1/4 cup fresh parsley, chopped (for garnish) - 1 tablespoon lemon juice Each ingredient plays a key role in making this dish rich and tasty. The shrimp brings a sweet and tender bite. Garlic adds a bold flavor that shines through the cream. Heavy cream makes the sauce smooth and rich. Butter adds a velvety touch and helps the garlic cook perfectly. When choosing fresh shrimp, look for a firm texture and a mild scent. The shells should be shiny, and the color should be consistent. If you can, buy shrimp that are labeled “wild-caught” for the best flavor. If you don’t have heavy cream, you can use half-and-half or whole milk. Just know that the sauce won’t be as thick. You can also try coconut cream for a dairy-free option. 1. Melt the butter: Start with a large skillet. Set the heat to medium. Add 4 tablespoons of unsalted butter. Wait for it to melt, which takes about 1 minute. 2. Sauté garlic: Add 4 minced garlic cloves to the melted butter. Cook for 1-2 minutes until you smell the garlic. Do not let it burn; it can turn bitter. 3. Cook shrimp: Next, add 1 pound of peeled and deveined shrimp. Season with salt, pepper, and 1 teaspoon of paprika. If you like some heat, add 1/2 teaspoon of red pepper flakes. Cook the shrimp for 2-3 minutes on each side. They should turn pink and opaque. Once done, take them out and set them aside. 4. Simmer chicken broth: In the same skillet, pour in 1/2 cup of chicken broth. Let it simmer for about 2 minutes. This adds flavor to the dish. 5. Make the sauce: Lower the heat. Add 1 cup of heavy cream to the skillet. Stir it well for about 3-4 minutes until it thickens slightly. 6. Finish the sauce: Stir in 1 tablespoon of lemon juice. Taste and adjust the seasoning if needed. 7. Combine shrimp and sauce: Return the shrimp to the skillet. Toss them in the creamy sauce for 1-2 minutes to heat through. Sautéing garlic correctly is key. It adds depth to the dish. If you burn it, you ruin the flavor. When cooking shrimp, watch for their color. They should be pink and firm, not rubbery. You can serve creamy garlic shrimp in many ways. Here are some ideas: - With pasta: Serve it over fettuccine or spaghetti. The sauce clings well to pasta. - With rice: A nice bowl of fluffy rice complements the dish perfectly. - On a bed of veggies: For a lighter option, serve it on sautéed spinach or zucchini noodles. For plating, use a large, shallow bowl. Place the shrimp on top of the pasta or rice. Drizzle some sauce over the dish. Add a sprinkle of chopped parsley for a pop of color. Lemon wedges on the side add freshness. This dish is perfect for date nights, family dinners, or even casual gatherings. It looks fancy but is easy to make. For the full recipe, check out the Easy Creamy Garlic Shrimp. - How to achieve the creamiest sauce: Start by using heavy cream. It gives the sauce a rich texture. Make sure to let it simmer gently. This helps thicken it nicely. Stir often to keep it smooth. - Adjusting spice levels for personal preference: Spice can vary by taste. Add red pepper flakes for heat. Start with a little, then taste. You can always add more if you like it spicier. - Common mistakes to avoid while cooking shrimp: Do not overcook the shrimp. They turn rubbery if cooked too long. Cook them just until they are pink and opaque. Also, don't burn the garlic; keep an eye on it while sautéing. - Recommended cookware for optimal results: A large skillet works best for this dish. It allows even cooking and easy stirring. A non-stick skillet is great for preventing sticking. - List of kitchen tools that make preparation easier: Use a sharp knife for mincing garlic. A measuring cup helps for the cream and broth. Tongs are useful for flipping shrimp without breaking them. {{image_2}} You can easily change this dish to suit your taste. For a lighter version, swap heavy cream with half-and-half. This will cut the fat but keep the creaminess. To add some color and nutrition, toss in some fresh veggies like spinach or asparagus. You can add them to the skillet before the shrimp, cooking them just until tender. If you crave heat, try using different peppers. Jalapeños or crushed red pepper flakes give a spicy kick. This dish can take on flavors from around the world. For a zesty twist, try lemon-garlic herb shrimp. Just add lemon zest and fresh herbs like basil or thyme. You can also include spices from other cuisines. For example, add curry powder for an Indian flair or smoked paprika for a Spanish touch. These small changes elevate the dish and introduce exciting flavors. Each variation keeps the core elements but creates a whole new experience. For more ideas, check the Full Recipe to explore all the possibilities. To keep your creamy garlic shrimp fresh, store it in an airtight container. This helps prevent the shrimp from drying out. Place it in the fridge within two hours of cooking. Proper storage keeps your dish tasty and safe to eat. Creamy garlic shrimp lasts about three days in the fridge. After that, the shrimp may lose quality and flavor. When reheating, use low heat to keep the creaminess intact. A skillet works best for this. Start by adding a splash of chicken broth or cream to the pan. This helps the sauce regain its smooth texture. Stir gently to heat it through. Avoid high heat, as it can overcook the shrimp. Shrimp cooks quickly, so keep an eye on it. Heat until warmed, usually about 3-5 minutes. Enjoy your leftovers just as much as the first time! For the full recipe, check the earlier section. Can I use frozen shrimp for this recipe? Yes, you can use frozen shrimp. Just thaw them first. Place them in cold water for about 15-20 minutes. Pat them dry before cooking. This helps achieve a nice sear. What can I substitute for heavy cream? You can use half-and-half or coconut cream. Both give a creamy texture. If you want a lighter option, use Greek yogurt mixed with milk. This keeps the dish rich without being too heavy. How can I make this dish gluten-free? This recipe is already gluten-free! Just ensure all your ingredients, like chicken broth, are gluten-free. Always check labels to avoid hidden gluten sources. How to know when shrimp is done cooking? Shrimp is done when it turns pink and opaque. It should curl into a C shape. Overcooked shrimp becomes rubbery, so keep an eye on them. Can I prepare this recipe in advance? You can prep some parts in advance! Cook the shrimp and sauce, then store them separately. Reheat before serving for the best taste. What wines pair well with creamy garlic shrimp? White wines work best. Try Chardonnay or Sauvignon Blanc. They complement the creaminess and garlic well. A light rosé can also be a great choice. For the full recipe, check out Easy Creamy Garlic Shrimp. In this blog post, we explored how to make creamy garlic shrimp. We discussed key ingredients, cooking steps, and serving suggestions. You learned tips for selecting fresh shrimp and making the dish your own with variations. Remember, cooking shrimp should be quick. Aim for perfect timing to maintain its flavor. With these techniques, you can impress anyone with this dish. Enjoy your delicious meal!

Easy Creamy Garlic Shrimp Flavorful and Simple Dish

If you love a quick, tasty meal, you’re in the right place! This Easy Creamy Garlic Shrimp dish combines juicy
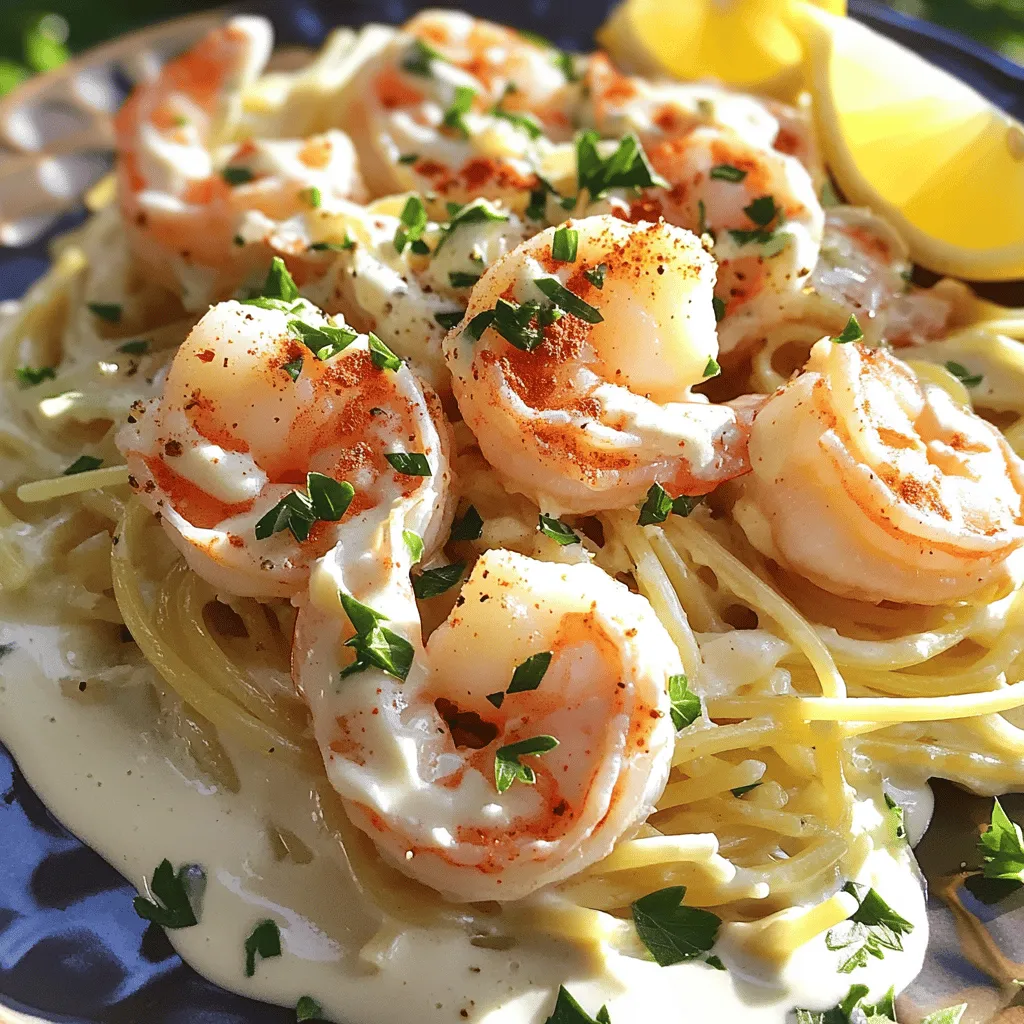
- 1 lb large shrimp, peeled and deveined - 2 cups fresh spinach, chopped - 1 cup canned artichoke hearts, drained and chopped For Tuscan shrimp, you need fresh and vibrant ingredients. Large shrimp add a satisfying bite. Fresh spinach brings color and nutrition. Canned artichokes offer a tasty, tangy touch. Together, they create a delightful mix. - 1 small onion, finely diced - 3 cloves garlic, minced - 1 teaspoon Italian seasoning Aromatics make a dish shine. Start with a small onion, diced finely. It adds sweetness and depth. Next, garlic gives warmth and flavor. Use three cloves, minced small. Italian seasoning pulls it all together with herbs. - 1 cup heavy cream - 1 cup grated Parmesan cheese - 2 tablespoons olive oil Creaminess comes from heavy cream. It makes the sauce rich and smooth. Grated Parmesan cheese adds a salty, nutty finish. Use one cup for the best taste. Olive oil, two tablespoons, helps sauté and blends flavors. For the full recipe, check the detailed instructions to master this dish! - Sauté aromatics: In a large skillet, heat 2 tablespoons of olive oil over medium heat. Add 1 small finely diced onion. Cook for 3-4 minutes until the onion is soft and clear. - Add garlic: Stir in 3 minced garlic cloves. Cook for 1-2 minutes until it smells great. - Add shrimp to the skillet: Increase the heat to medium-high. Add 1 pound of large shrimp that are peeled and deveined. - Seasoning process: Sprinkle with salt, pepper, and 1 teaspoon of Italian seasoning. Cook for 3-4 minutes until the shrimp turn pink and opaque. Remove the shrimp from the skillet and set aside. - Pour in heavy cream: In the same skillet, lower the heat back to medium. Pour in 1 cup of heavy cream. - Incorporating Parmesan cheese: Add 1 cup of grated Parmesan cheese. Stir until the cheese melts and the sauce becomes creamy. - Mixing in spinach and artichokes: Add 2 cups of chopped fresh spinach and 1 cup of drained, chopped canned artichokes. Cook for 2-3 minutes until the spinach wilts. - Combining shrimp with the sauce: Return the cooked shrimp to the skillet. Stir well to coat the shrimp with the sauce. Cook for an additional 2 minutes to heat everything through. You can find the full recipe for Tuscan shrimp with spinach and artichokes to follow these steps exactly. Enjoy your cooking! To cook shrimp just right, look for signs of doneness. They should turn pink and opaque. This usually takes about 3-4 minutes. Undercooking is better than overcooking. Overcooked shrimp can become rubbery. If they curl tightly, they are likely overcooked. Always check your shrimp closely to avoid this mistake. You can boost the flavor with extra spices and herbs. Try adding a pinch of red pepper flakes for heat. Fresh herbs like parsley or thyme also work well. For a creamier sauce, consider adding more heavy cream. You can also mix in a bit of cream cheese for extra richness. These simple tweaks can elevate your dish to a new level. For a stunning presentation, serve your Tuscan shrimp over a bed of creamy risotto or pasta. This adds a lovely base and makes the dish more filling. Garnish with fresh basil leaves to add color and freshness. A sprinkle of extra Parmesan cheese on top creates an elegant touch. This small detail impresses guests and makes your meal feel gourmet. {{image_2}} Shrimp alternatives If you can't find shrimp, use chicken or tofu. Both options work well with the sauce. They absorb flavor and keep the dish tasty. Dairy-free options For a dairy-free dish, swap heavy cream with coconut milk. Use nutritional yeast instead of Parmesan cheese. This keeps the meal creamy without dairy. Vegetables to incorporate You can add bell peppers or sun-dried tomatoes. Both add color and flavor. They also boost nutrition and make your dish more filling. Different cheeses for variation Instead of Parmesan, try feta or goat cheese. Both give a tangy taste. They can change the flavor profile of the dish completely. Gluten-free adaptations To make this dish gluten-free, ensure your seasonings are gluten-free. Serve it over rice or gluten-free pasta. This keeps the meal safe for those with gluten allergies. Low-calorie modifications For a lighter version, reduce the amount of cream. You can replace it with chicken broth. This cuts calories while keeping the flavor. Check out the [Full Recipe] for detailed cooking instructions and serving suggestions. Tuscan shrimp with spinach artichokes lasts about 3 days in the fridge. Make sure to store it in an airtight container. This keeps the shrimp fresh and prevents any strong odors from mixing in your fridge. To freeze leftovers, first let the dish cool completely. Then, portion it into freezer-safe bags or containers. Remove as much air as possible to avoid freezer burn. For thawing, move it to the fridge overnight. When ready to eat, reheat in a skillet on low heat until warmed through. Stir often to keep the sauce creamy and avoid sticking. To cook shrimp well, you need to keep a close eye on them. Start by heating your pan over medium heat. When you add the shrimp, they should sizzle. Cook them for about 3-4 minutes. The shrimp should turn pink and opaque. If they cook too long, they get tough and rubbery. Always remove them from heat as soon as they're done. This method helps keep them tender and juicy. Yes, you can use frozen shrimp! Just make sure to thaw them first. You can do this by placing them in cold water for about 15 minutes. After that, pat them dry with a towel. This helps to remove excess moisture. When you cook frozen shrimp, follow the same cooking time. They will taste great in your Tuscan shrimp dish. Tuscan shrimp pairs well with many sides. Here are some ideas: - Creamy risotto - Fresh pasta - Garlic bread - Steamed vegetables - A crisp green salad These sides complement the shrimp's rich flavors. They also make your meal more complete. Enjoy your meal with your favorite drink to enhance the experience! This blog covered how to make a delicious Tuscan shrimp dish. We started with main ingredients like shrimp, spinach, and artichokes. We then sautéed aromatics and cooked the shrimp with a creamy sauce. I shared tips for cooking shrimp, enhancing flavors, and presenting the dish nicely. This meal is great for everyone, whether you need dairy-free or gluten-free options. Remember, simple changes can make a big difference. Enjoy making and sharing this easy recipe for your family or friends.

Tuscan Shrimp with Spinach Artichokes Savory Delight

Are you ready to savor a delicious dish that brings the taste of Tuscany to your kitchen? In this blog

To make French Onion Soup Burgers, gather these essential items: - 1 lb ground beef (80/20) - 1 medium onion, thinly sliced - 1 tablespoon olive oil - 2 cups beef broth - 1 teaspoon sugar - 1 teaspoon thyme (dried) - 4 slices of Gruyère cheese - 4 burger buns (preferably brioche) - 1/4 cup mayonnaise - 1 tablespoon Dijon mustard - Salt and pepper to taste - Fresh parsley for garnish (optional) If you don’t have Gruyère cheese, you can use Swiss or provolone. For a lighter option, try ground turkey instead of beef. You can swap the brioche buns for whole wheat or gluten-free buns if needed. I recommend choosing high-quality ground beef with 20% fat for juiciness. Look for low-sodium beef broth to control salt levels. For cheese, Emmental is a great alternative to Gruyère. When picking a bun, look for fresh brioche from a local bakery for the best taste. If you want to explore more about this dish, check out the Full Recipe. Caramelizing the onions perfectly To start, I heat olive oil in a large skillet over medium heat. I add thinly sliced onions and sprinkle them with sugar. Sugar helps the onions caramelize. I cook them for about 20 minutes. I stir often until they turn golden brown and soft. This step brings out their sweet flavor, making it key for our burgers. Cooking the ground beef to the right doneness Next, I heat a separate skillet over medium-high heat. I take 1 pound of ground beef and season it with salt and pepper. I form the beef into four patties. I cook each patty for 4 to 5 minutes on one side. Then, I flip them to cook for another 4 to 5 minutes. For the last minute, I place a slice of Gruyère cheese on top of each patty. Covering the skillet helps the cheese melt nicely. Preparing the broth for the ultimate flavor infusion While the beef cooks, I prepare the broth. In a saucepan, I bring 2 cups of beef broth and 1 teaspoon of dried thyme to a simmer. Once the onions are caramelized, I add them to the broth. I let them simmer together for a few minutes. This step enriches the broth with onion flavor, making it a perfect addition. Layering ingredients for maximum flavor Now, it’s time to build the burgers. I spread mayonnaise on the bottom half of each brioche bun. On the top half, I add a bit of Dijon mustard. Next, I place the cheesy burger patty on the bottom bun. I ladle some of the onion and broth mixture over the cheese. This adds flavor and moisture. Tips for balancing taste and texture To balance taste, the creamy mayonnaise works well with the tangy mustard. The rich beef and onions add depth. I make sure each bite has a mix of flavors. This combo makes each bite satisfying and delicious. How to avoid soggy buns To prevent soggy buns, I use just enough broth to soak the onions without drowning the bun. I also serve the burger with a small bowl of extra broth on the side. This way, you can dip the burger without making it too soggy. For the full recipe, check out [Full Recipe]. To make great French Onion Soup Burgers, you need to master a few key skills. First, let's talk about caramelizing onions. - Best Practices for Caramelizing Onions: Start with medium heat. Use a heavy skillet, as it helps cook the onions evenly. Add a bit of sugar to speed up caramelization. Stir the onions often. This step can take about 20 minutes. You want them to turn golden brown. The richer the color, the better the flavor. - Recommended Cooking Temperatures for Beef: For juicy burgers, cook the beef over medium-high heat. Aim for 160°F for medium doneness. Use a meat thermometer to check. This will help keep the meat tender and safe to eat. - Tips for Melting Cheese Evenly: When you add cheese to the patty, cover the skillet. This traps heat and helps the cheese melt faster. Gruyère cheese melts beautifully. It adds that rich, creamy flavor to your burger. Now, let’s think about what to serve with these tasty burgers. - Ideal Side Dishes to Pair with the Burgers: Fresh salad adds a nice crunch. You can also serve crispy fries for a classic touch. Another great option is roasted vegetables. They add color and nutrients to your meal. - Beverage Pairings that Complement French Onion Soup Flavors: A nice glass of red wine goes well with these burgers. Try a light Merlot or a fruity Pinot Noir. If you prefer non-alcoholic drinks, a sparkling water with lemon is refreshing and pairs nicely too. These tips ensure you enjoy every bite of your French Onion Soup Burgers, making them a flavorful and satisfying meal. For the full recipe, check out the complete ingredients and steps. {{image_2}} You can play with French onion soup burgers in fun ways. For a vegetarian option, swap the beef for black beans or lentils. This keeps the taste rich without meat. Use the same spices and toppings to make it feel hearty. Choosing different cheeses adds new flavors. While Gruyère is classic, try sharp cheddar or creamy goat cheese. Each cheese brings its own twist to the burger. Bun types can change the game too. Instead of brioche, use pretzel buns for a salty crunch. You can also try whole grain or gluten-free buns. Each choice gives a unique bite. Adding herbs and spices boosts the taste. Try fresh rosemary or basil for a fragrant touch. A sprinkle of smoked paprika can give a nice kick. You can also mix in other ingredients. Mushrooms add a savory depth that pairs well with onions. For a crispy element, add bacon bits. They give a salty crunch that contrasts with the soft burger. Each twist makes your French onion soup burgers a new experience. Explore these options to find your favorite combination. For the full recipe, check the details above. You can store leftovers in the fridge for up to three days. To keep them fresh, place the burgers in an airtight container. This helps prevent them from drying out. When you reheat them, use a skillet or microwave. A skillet works best to keep the texture nice. Heat on medium-low for about five minutes. This way, the burger stays juicy and the cheese melts nicely. To freeze cooked burgers, wrap them tightly in plastic wrap. Then, put them in a freezer bag or container. This protects them from freezer burn. You can freeze them for up to three months. When you want to eat them, take them out and thaw in the fridge overnight. For reheating, use a skillet on medium heat. Cook for about 10 minutes, flipping halfway through. This keeps the flavor and texture just right. Check out the Full Recipe for more details on making these tasty burgers. What’s the best way to reheat French Onion Soup Burgers? Reheat your burgers in the oven for best results. Set your oven to 350°F (175°C). Place the burgers on a baking sheet. Cover them with foil to keep them moist. Heat for about 10-15 minutes. Check to see if they are warm throughout. This method helps keep the buns crisp. Can I prepare the ingredients ahead of time? Yes, you can prep ahead! Slice the onions and store them in the fridge. You can also form the burger patties and keep them covered. Make the broth and onion mixture a day before. This can save you time on cooking day. How can I make this recipe gluten-free? To make it gluten-free, use gluten-free burger buns. Check that your broth is gluten-free as well. Most beef broths are safe, but it’s good to read the label. You can also skip the bun and serve the burger on lettuce. What can I substitute for Gruyère cheese? If you can’t find Gruyère cheese, try Swiss cheese. It melts well and has a similar flavor. You could also use provolone or mozzarella for a milder taste. Each will give your burger a nice cheesy touch. How can I adjust the recipe for a larger batch? To make more burgers, simply multiply the ingredient amounts. For every pound of beef, use one medium onion and four slices of cheese. Make sure your skillet can handle the extra patties. Cook them in batches if needed to ensure even cooking. You now have all the tools to make French Onion Soup Burgers. We covered key ingredients and their best brands. You learned how to caramelize onions and cook beef perfectly. Assembling these burgers with balance is crucial for great taste. Don't forget the creative twists and side dish pairings! With these tips and storage info, you can enjoy this dish anytime. So, gather your ingredients and start cooking. Enjoy every bite, and share your delicious burgers with friends!

French Onion Soup Burgers Flavorful and Satisfying Meal

Imagine biting into a burger that captures the rich, savory essence of classic French onion soup. That’s exactly what French

- 1 lb large shrimp - 2 tablespoons olive oil - 1 cup cooked quinoa - 1 ripe avocado - 1 cup corn - Garlic powder, paprika, cumin - Salt and pepper - Red onion, cherry tomatoes, lime, cilantro The main ingredients for this grilled shrimp bowl are simple yet fresh. You need large shrimp, which are the stars of the dish. Olive oil adds a nice richness. Quinoa serves as a hearty base. Avocado provides creaminess, while corn adds sweetness. The seasonings elevate the flavor. Garlic powder, paprika, and cumin create a warm, smoky taste. You can adjust salt and pepper as you like. Red onion and cherry tomatoes add crunch and color. Fresh lime juice brightens the dish, and cilantro gives it a fresh finish. For the full recipe, check out the details. You’ll love how easy and tasty this shrimp bowl is! To start, you need to make a marinade for the shrimp. In a bowl, mix together: - 1 lb large shrimp, peeled and deveined - 2 tablespoons olive oil - 1 teaspoon garlic powder - 1 teaspoon paprika - ½ teaspoon cumin - Salt and pepper to taste Toss the shrimp in the marinade until they are well coated. Let them sit for at least 15 minutes. This gives the shrimp time to soak in all those tasty flavors. While the shrimp marinates, you can make the avocado corn salsa. In a separate bowl, combine: - 1 cup corn (fresh or frozen) - 1 ripe avocado, diced - 1 small red onion, finely chopped - 1 cup cherry tomatoes, halved - 1 lime, juiced Gently toss all the ingredients together. Be careful not to mash the avocado. If you're new to handling avocados, cut it in half, remove the pit, and scoop the flesh out. It helps to use a sharp knife to cut it into small pieces before you scoop. Now, let’s get to grilling. Preheat your grill or grill pan over medium-high heat. Skewer the marinated shrimp for easy grilling. Cook them for 2-3 minutes on each side. Look for the shrimp to turn pink and opaque. This shows they are done. Remove them from the grill and set aside. Now it’s time to build your delicious bowl. Start with a base of cooked quinoa in each serving bowl. Add the grilled shrimp on top of the quinoa. Spoon a generous portion of your avocado corn salsa over the shrimp. Sprinkle with fresh cilantro for extra flavor. Serve it while the shrimp is still warm. Enjoy the burst of flavors and the colorful look of your grilled shrimp bowl! For the full recipe, check the section above. To boost the taste, try adding more spices. A pinch of cayenne pepper gives heat. If you want a sweet twist, add honey to your marinade. You can also switch up the marinade. A mix of lime juice, soy sauce, and ginger can create a fresh flavor. Using skewers is a smart way to grill shrimp. Soak wooden skewers in water for 30 minutes before grilling. This prevents them from burning. When grilling, space the shrimp evenly. This helps them cook well. Avoid overcooking by watching the color. Once they turn pink and opaque, they’re done. Serve your shrimp bowl in deep, colorful dishes. This highlights the bright colors of the salsa. Add lime wedges on the side. They add a zesty touch and look great. For a final touch, sprinkle fresh cilantro on top. It adds flavor and makes the dish pop. {{image_2}} You can swap shrimp for chicken or tofu. Chicken thighs work well in this dish. Just cut them into bite-sized pieces and marinate as you would the shrimp. If you want a vegan option, try firm tofu. Press the tofu to remove extra water, then cut it into cubes. Marinate and grill until golden. Both options add great flavor and texture to your bowl. Corn salsa is so versatile! You can add different ingredients to change the flavor. Try diced bell peppers for crunch or black beans for protein. You can also add jalapeños for heat or a bit of honey for sweetness. Just remember to balance the flavors. A little spice can really wake up the dish, while sweetness can cool it down. Pair your grilled shrimp bowl with sides for a complete meal. You might serve it with a fresh green salad or some fluffy rice. A light, citrusy drink complements the flavors well. Think lemonade or iced tea with mint. These pairs enhance your meal and make it even more enjoyable. Don't forget to check the Full Recipe for more ideas! To keep your grilled shrimp bowl fresh, follow these steps: - Let the bowl cool to room temperature. - Place leftovers in an airtight container. - Store in the fridge for up to three days. Use glass or plastic containers with tight lids. They keep the shrimp and salsa safe and tasty. Avoid metal containers, as they can react with the ingredients. When you're ready to eat leftovers, reheat them with care. Here are some tips: - Use a microwave or stovetop for reheating. - Heat shrimp for 30 seconds at a time in the microwave. - For stovetop, place shrimp in a pan over low heat. Always check if the shrimp is warm but not dry. Overcooked shrimp can become tough. If you have leftover salsa, add it fresh after reheating the shrimp. This keeps it bright and flavorful. Enjoy your delicious meal again! Yes, you can marinate shrimp overnight. This helps the shrimp soak up more flavor. The longer they sit, the better they taste. However, be careful. Marinating too long can change the texture. Shrimp can become mushy if left too long in acidic marinades. Look for two key signs. First, the shrimp will turn pink. Second, they will be opaque, not translucent. If you press the shrimp, they should feel firm, not soft. Cooked shrimp curls into a "C" shape. If they curl into an "O," they may be overcooked. You can add heat in several ways. Try adding chopped jalapeños or red pepper flakes to the shrimp marinade. For the salsa, mix in diced serrano peppers. You can also use spicy sauces, like sriracha or hot sauce, for extra kick. Start with a small amount and taste as you go. Fresh corn is great, but it's not a must. Frozen corn works well too. It’s often picked at peak ripeness, so it can taste sweet. Just thaw it before adding to the salsa. Both fresh and frozen corn add a nice crunch and sweetness to the dish. You now have a tasty guide to create a grilled shrimp bowl. Use fresh shrimp, quinoa, and vibrant salsas for great flavor. Remember to adjust seasonings to match your taste. Enjoy experimenting with proteins and sides. Store your extras properly, so nothing goes to waste. This dish is easy to customize, making it great for all eaters. Now, gather your ingredients and start grilling! Your next meal will be fun and full of flavor.

Grilled Shrimp Bowl with Avocado Corn Salsa Delight

Are you ready to elevate your dinner game? The Grilled Shrimp Bowl with Avocado Corn Salsa is a vibrant, tasty

- 8 oz thick wheat noodles (or Shanghai noodles) - 1 cup shredded cabbage - 1 carrot, julienned - 1 bell pepper (red or yellow), thinly sliced - 1/2 cup bean sprouts - 4 green onions, chopped - 2 cloves garlic, minced - 1 tablespoon ginger, minced - 2 tablespoons soy sauce - 1 tablespoon oyster sauce (or mushroom sauce for a vegetarian option) - 1 tablespoon sesame oil - 1 tablespoon vegetable oil - Salt and pepper to taste To make a great plate of Shanghai fried noodles, start with thick wheat noodles. These noodles hold up well and soak in flavors. You can find them in most grocery stores or Asian markets. Fresh veggies add color and crunch. Cabbage, carrots, bell peppers, and bean sprouts work best. Green onions and garlic give a strong flavor. Ginger adds warmth and depth. - Various proteins: chicken, shrimp, or tofu - Additional seasonings: sesame oil, vegetable oil, salt and pepper For added protein, you can use chicken, shrimp, or tofu. Each option changes the taste and texture. Adding sesame oil enhances the nutty flavor. Use salt and pepper to fit your taste. You can find the full recipe to see how to combine these ingredients for a delightful dish! To start, bring a large pot of water to a boil. You want the water bubbling hard. Add the thick wheat noodles to the pot. Cook them according to the package instructions until they are al dente. This usually takes about 6 to 8 minutes. Once cooked, drain the noodles in a colander. Toss them with a splash of vegetable oil to prevent them from sticking together. Next, heat a large wok or skillet over medium-high heat. Pour in the vegetable oil and let it heat up. Add the minced garlic and ginger, stirring quickly for about 30 seconds. This step makes your kitchen smell amazing! Then, toss in the shredded cabbage, julienned carrot, and sliced bell pepper. Stir-fry these veggies for about 3 to 4 minutes. You want them to be tender but still a bit crisp. Now it's time to bring everything together. If you are using a protein like chicken, shrimp, or tofu, add it now to warm through. Then, add the cooked noodles to the wok. Drizzle in the soy sauce, oyster sauce, and sesame oil. Toss everything together for about 2 to 3 minutes. Make sure every noodle is coated well with the sauce. Finally, add the bean sprouts and chopped green onions, stirring gently. Season with salt and pepper to taste, and cook for another 1 to 2 minutes. Your dish is almost ready! For the full recipe, check out the link. To keep your noodles from getting soggy, cook them just right. Boil them until they are al dente. This means they should still have a little bite. After boiling, rinse them under cold water. This step cools them down and stops the cooking. Toss them with a bit of vegetable oil. This helps to keep them from sticking. For veggies, you want a nice crunch. Stir-fry them quickly over high heat. This keeps them tender yet crisp. Add your vegetables in order of cooking time. Start with cabbage, then carrots, and finish with bell peppers. This way, each veggie cooks just right. Using the right tools is key for great stir-frying. A wok is best for making Shanghai Fried Noodles. It heats evenly and allows for easy tossing. If you don’t have a wok, a large skillet works too. Just make sure it has high sides. High heat is vital during stir-frying. It cooks food fast and locks in flavors. Preheat your wok or skillet before adding oil. This helps create that perfect sear on your ingredients. Presentation can make your dish shine. Garnish your noodles with extra green onions. A sprinkle of sesame seeds adds a nice touch too. For serving, use a large platter. This allows the colors to pop. Consider using chopsticks for an authentic feel. It makes the meal fun and interactive. Place the dish in the center of your table. This invites everyone to dig in and enjoy! {{image_2}} You can easily adapt this dish to be vegetarian or vegan. Simply swap out the oyster sauce for mushroom sauce. This change keeps the rich flavor while making it plant-based. You can also use tofu as your protein. This adds a nice texture and absorbs all the tasty sauces. For a boost of flavor, try adding more vegetables, like mushrooms or bell peppers. They bring great taste and color to your dish. Fried noodles vary around the world. In Hong Kong, you might find a sweeter version with soy sauce and hoisin sauce. In Indonesia, they often add spicy sambal. Each region uses local ingredients, making it unique. You can experiment with these flavors. Try adding local spices to give your noodles a twist. If you want to change up the protein, you have great options. Chicken brings a mild taste, while shrimp adds a sweet flavor. Tofu is an excellent choice for vegans. Each protein needs a different cooking time. Chicken takes longer, while shrimp cooks fast. Make sure to adjust your cooking time so everything is perfectly done. You want your protein to be juicy and your noodles to be hot. To keep your Shanghai Fried Noodles fresh, follow these steps: - Cool Down: Let the noodles cool to room temperature before storing. This helps prevent sogginess. - Use Airtight Containers: Store noodles in airtight containers to keep them fresh. Glass or plastic containers work well. - Label and Date: If you make a large batch, label the container with the date. This helps you track freshness. When reheating your fried noodles, aim for that perfect texture: - Stovetop Method: Heat a non-stick pan over medium heat. Add a splash of water or oil to keep the noodles moist. Stir frequently until heated through. - Microwave Method: Place noodles in a microwave-safe dish. Add a tablespoon of water, cover, and heat in short bursts. Stir in between to avoid hot spots. Avoid reheating in the oven. It can dry out the noodles and change their texture. You can freeze Shanghai Fried Noodles, but there are some tips to follow: - Cool Before Freezing: Allow the noodles to cool completely. This helps keep their texture. - Use Freezer Bags: Place the noodles in freezer bags. Squeeze out as much air as possible to prevent freezer burn. - Mark the Bags: Write the date on each bag. Frozen noodles are best used within three months. To defrost, place the bag in the fridge overnight. Reheat as described above for the best results. Shanghai Fried Noodles is a popular dish from Shanghai, China. It features thick wheat noodles that are stir-fried with fresh vegetables. Common ingredients include cabbage, carrots, and bell peppers. People often add proteins like chicken, shrimp, or tofu. The dish gets its flavor from soy sauce and sesame oil. The origins of this dish trace back to street food, where it became a favorite for its rich taste and quick preparation. To keep your noodles from sticking together, rinse them after cooking. Use cold water to cool them down quickly. Toss them gently with a splash of vegetable oil. This will coat the noodles and help keep them separate. Another tip is to cook the noodles just until tender, not overcooking them. Stir-frying them immediately after cooking also helps maintain their texture. For the best Shanghai Fried Noodles, try local Chinese restaurants known for authentic cuisine. Many Asian markets also have food stalls that serve great versions of this dish. In Shanghai, look for street vendors specializing in noodles. They often serve fresh, flavorful meals at good prices. Checking online reviews can also help you find top spots in your area. Homemade Shanghai Fried Noodles can last for up to three days in the fridge. Store them in an airtight container to keep them fresh. When reheating, add a splash of water to help restore moisture. If you want to keep them longer, you can freeze them for up to a month. Make sure to cool the noodles completely before freezing. Shanghai fried noodles are a delightful dish filled with rich flavors. We explored the key ingredients, from thick noodles to fresh vegetables and sauces. You learned how to cook and combine your noodles, ensuring they stay tasty and crunchy. I shared tips for perfecting your dish, packing it for later, and making variations to suit your taste. With these insights, you can now create your own amazing Shanghai fried noodles at home. Enjoy experimenting with flavors and sharing them with others!

Savory Shanghai Fried Noodles Perfectly Stir-Fried Dish

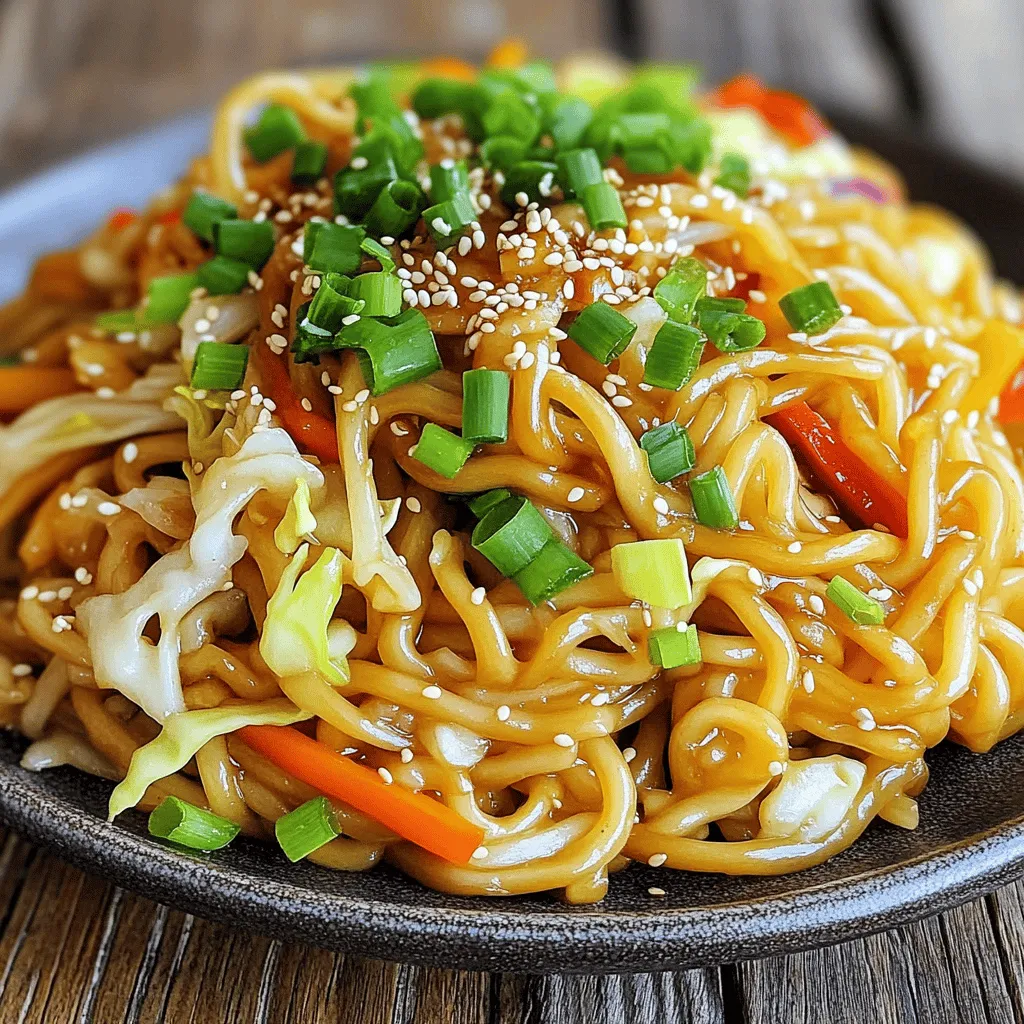
Ready to dive into the world of savory Shanghai Fried Noodles? This dish combines thick, chewy noodles with fresh vegetables

To start making your homemade fruit snacks, choose fresh fruits you love. I like to mix berries, mango, and apples. You can use: - 2 cups mixed fruit (like strawberries, mangoes, and apples, chopped) - 1 cup 100% fruit juice (orange, apple, or grape) This mix brings great flavor and color to your snacks. Fresh fruits will help you make tasty treats that everyone will enjoy. Sweeteners can enhance the taste of your fruit snacks. Depending on your fruit's natural sweetness, you can add: - 2 tablespoons honey (or) - 2 tablespoons maple syrup (optional) Adjust the amount based on how sweet your fruits are. I often taste the fruit puree and add sweetener as needed. This way, you control how sweet your snacks will be. To make your fruit snacks chewy and fun, you need a gelling agent. You can use: - 3 tablespoons gelatin powder (or) - 3 tablespoons agar-agar for a vegetarian option Gelatin gives a classic texture, while agar-agar works well for plant-based diets. Choose based on your needs and preferences. This base is key to achieving the perfect fruit snack consistency. For the full recipe, check the Fruity Bliss Chews section above. Start by gathering your fruits. I love using strawberries, mangoes, and apples. Chop them into small pieces for easy blending. Place the chopped fruit into a blender. Pour in your chosen fruit juice. Blend until it turns into a smooth puree. Taste the puree. If you want it sweeter, add honey or maple syrup. Blend again to mix. Next, take a small saucepan and add 1/4 cup of fruit juice. Sprinkle the gelatin over the juice and let it sit. This step is called blooming. Wait for about 5 minutes. After that, gently heat the mixture on low heat. Stir it until the gelatin fully dissolves. Make sure it does not boil. Once the gelatin is ready, pour in the fruit puree. Stir well to combine everything. Add lemon juice and a pinch of salt for extra flavor. Remove the saucepan from heat. Carefully pour the mixture into silicone molds or a lined baking dish. Allow it to sit at room temperature for about 30 minutes. Then, transfer it to the refrigerator. Chill for at least 2 hours until it sets completely. When set, pop the fruit snacks out of the molds or cut them into squares. Enjoy your fruity bliss chews! To get the best texture, use ripe fruit. Ripe fruit has more natural juice. Blend your fruit until smooth. This helps create a nice chew. If you want a firmer snack, add a bit more gelatin. Just sprinkle it in while mixing. You can also try using agar-agar for a vegan option. It gives a great texture too. Taste your fruit puree before adding sweeteners. Some fruits are sweeter than others. If you want it sweeter, add honey or maple syrup. Start with just a little, then blend. You can always add more if needed. Keep in mind, the sweetness can change after chilling. So, taste again after it sets. Make your fruit snacks look fun! Use bright molds in fun shapes. Arrange them on a colorful plate. You can add fresh mint leaves for a nice touch. This makes them look pretty and fresh. If you cut them into squares, stack them high for a fun display. Enjoy them at parties or in lunchboxes! For the full recipe, check the section above. {{image_2}} You can mix different fruits to create unique flavors. Try berries like blueberries and raspberries. Apples and peaches also work well together. For a tropical twist, mix mangoes and pineapples. Always choose ripe fruit for the best taste. You want the fruit to be sweet and juicy. If you use tart fruit, adjust the sweetener to balance the flavor. You can substitute honey or maple syrup with other sweeteners. Agave syrup is a good choice and adds a nice taste. Stevia is another option if you want to cut sugar. Each sweetener has a different flavor, so taste as you go. Start with a small amount, then add more if needed. It’s all about finding the right sweetness for your palate. For a vegan option, use agar-agar instead of gelatin. Agar-agar is made from seaweed and is a great plant-based thickener. Make sure to follow the package instructions for the best results. You can also skip honey and use maple syrup or agave. This way, everyone can enjoy these tasty treats. With these tips, you can make homemade fruit snacks that fit any diet. For the full recipe, check out the Fruity Bliss Chews section. To keep your homemade fruit snacks fresh, store them in an airtight container. This helps to lock in flavor and moisture. You can use glass jars or plastic containers. Place a layer of parchment paper between layers if stacking them. This keeps them from sticking together. Homemade fruit snacks can last up to one week in the fridge. Their freshness depends on the ingredients you use. If you notice any changes in smell or texture, it’s best to discard them. Always check for signs of spoilage before enjoying your snacks. If you want to enjoy your fruit snacks later, freezing is a great option. Place the snacks in a single layer on a baking sheet. Freeze them for about one hour. After that, transfer them to a freezer bag. Remove as much air as possible before sealing. They can last up to three months in the freezer. When you're ready to eat them, just thaw in the fridge overnight. Enjoy your fruity bliss from the freezer! Homemade fruit snacks can last up to one week. Store them in an airtight container. Keep them in the fridge to maintain freshness. If you want them to last longer, freeze them. They can stay good in the freezer for up to three months. Yes, you can use frozen fruits in this recipe. Just thaw them before blending. This makes it easy to enjoy fruit snacks any time of the year. Frozen fruits can still give you great flavor and texture. Homemade fruit snacks are healthier than store-bought ones. You control the ingredients and sugar levels. They are rich in vitamins, fiber, and antioxidants. Plus, they contain no artificial flavors or colors. This makes them a smart choice for kids and adults alike. In this blog post, we explored how to make delicious homemade fruit snacks. We covered key ingredients like fresh fruits, sweeteners, and gelatin options. I shared step-by-step instructions for preparing puree, blooming gelatin, and setting the mixture. You gained tips for the perfect texture and fun presentation ideas. Homemade fruit snacks are flexible, with variations to suit different tastes and diets. Store them well for lasting freshness. Making these snacks is easy and rewarding. Enjoy healthier treats made just for you!

Homemade Fruit Snacks Tasty and Easy Recipe Guide

Do you love fruit snacks but want a healthier option? I’ve got you covered! In this guide, I’ll show you

- 1 cup cornmeal - 1 cup all-purpose flour - 1/4 cup granulated sugar - 1 tablespoon baking powder - 1/2 teaspoon salt - 1 cup buttermilk - 1/3 cup vegetable oil - 2 large eggs - 1 cup sweet corn (fresh or frozen) - 1/2 teaspoon cayenne pepper (optional) - 1/2 cup unsalted butter, softened - 1/4 cup honey - 1/4 teaspoon cinnamon These ingredients come together to create the best Southern-style honey butter cornbread poppers. Cornmeal gives them a nice texture. All-purpose flour adds fluffiness. Granulated sugar brings sweetness, while baking powder helps them rise. Salt enhances all the flavors. Buttermilk makes the poppers moist. Vegetable oil keeps them tender. Eggs bind everything together. Sweet corn adds a burst of flavor. Cayenne pepper adds a slight kick, but you can skip it if you prefer mild poppers. Don't forget the honey butter! Softened butter, honey, and cinnamon mix to create the perfect topping. You can find the full recipe linked above for detailed instructions. This blend of ingredients makes every bite a delightful treat! - Preheat the oven to 400°F (200°C). - Grease a mini muffin tin with cooking spray or butter. - In a large mixing bowl, combine the cornmeal, flour, sugar, baking powder, salt, and cayenne pepper (if you want a kick). - In a separate bowl, whisk the buttermilk, vegetable oil, and eggs together until smooth. - Pour the wet mix into the dry mix. Stir gently until just combined. Do not overmix. Fold in the sweet corn gently. - Spoon the cornbread batter into the mini muffin tin. Fill each cup about two-thirds full. - Bake in the preheated oven for 12 to 15 minutes. Check for a golden brown top. A toothpick should come out clean. - While the poppers bake, prepare the honey butter. Mix softened butter with honey and cinnamon in a small bowl until smooth. For the full recipe, check the details above. Enjoy these tasty treats warm with your homemade honey butter! Do not overmix your batter. Overmixing can make your poppers tough. Mix just until the dry and wet ingredients come together. Each oven is different. Check your poppers a few minutes early. You want them golden brown on top. A toothpick should come out clean when they are ready. For a beautiful presentation, use a rustic wooden platter. Drizzle some extra honey on top of the poppers. Add a sprig of fresh rosemary or thyme for color. These poppers pair well with a simple salad or spicy chili. For drinks, sweet tea or lemonade makes a great match. You can change up your honey butter. Try adding vanilla or a pinch of sea salt. For a fun twist, mix in some orange zest or cinnamon. Store any leftover honey butter in an airtight container. It keeps well in the fridge for up to two weeks. When ready to use, let it soften at room temperature. Enjoy your Southern-Style Honey Butter Cornbread Poppers with this delightful honey butter! For the full recipe, check the previous section. {{image_2}} You can change the taste of your Southern-style honey butter cornbread poppers with some fun additions. Adding spices can make a big difference. For a spicy kick, try mixing in jalapeño. If you want more depth, garlic is a great choice. You can also switch up the corn. Use sweet corn for a classic flavor or creamed corn for a rich, moist texture. Both can enhance your poppers in unique ways. If you want to make gluten-free cornbread poppers, swap out regular flour for a gluten-free blend. This works well and keeps the flavor intact. For those who follow a vegan diet, you can replace eggs with flaxseed meal mixed with water. Use plant-based milk and oil to keep the recipe dairy-free. These changes let everyone enjoy the poppers, no matter their diet. You can serve these cornbread poppers in different ways. Make mini versions for appetizers or larger ones for a meal. For a fun twist, create sweet versions with extra honey or savory ones with herbs and cheese. Both styles can fit any occasion. You can find the full recipe to adapt to your liking. To keep your cornbread poppers fresh, store them in an airtight container. This method locks in moisture and flavor. You can also wrap them in plastic wrap. In the fridge, they last about 3 to 5 days. If you want to keep them longer, try freezing. They can stay good in the freezer for up to 3 months. When you are ready to enjoy your poppers again, reheating is key. For the best results, use the oven. Preheat it to 350°F (175°C). Place the poppers on a baking sheet and cover them with foil. This helps keep them soft. Heat for about 10 minutes. If you are in a hurry, the microwave works too. Heat them in short bursts of 15 to 20 seconds. This keeps the texture nice. Avoid overheating, as it can dry them out. Freezing is a great way to save time. If you want to freeze the batter, pour it into your muffin tin. Cover it with plastic wrap and freeze. When you are ready to bake, thaw it in the fridge overnight. For baked poppers, let them cool completely. Then, place them in a freezer-safe bag. To thaw, leave them in the fridge for a few hours or overnight. Bake as usual for a fresh taste. For both methods, check the poppers after baking to ensure they are heated through. Enjoy your Southern-style honey butter cornbread poppers anytime! Can I use regular milk instead of buttermilk? Yes, you can use regular milk. Buttermilk adds a nice tang and moisture. If you use regular milk, try adding a bit of vinegar or lemon juice to mimic buttermilk's taste. Just mix one tablespoon of vinegar with one cup of milk. Let it sit for five minutes. This will help keep your cornbread poppers tender. How do I know when cornbread poppers are done baking? You can check by inserting a toothpick into the center. If it comes out clean, they are ready. The tops should be golden brown. If the poppers look golden but the toothpick is wet, bake them a few more minutes. What goes well with honey butter cornbread poppers? These poppers pair great with chili, barbecue, or a fresh salad. You can also serve them with soups. The sweet honey butter adds a nice contrast to savory dishes. I love to serve them with a side of spicy jam for extra flavor. Can I serve these poppers at a picnic or potluck? Yes! They are perfect for picnics and potlucks. They are easy to grab and eat. Plus, everyone loves them. Just make sure to pack extra honey butter for dipping. You can also serve them warm or at room temperature. How do I store cornbread poppers for maximum freshness? Store them in an airtight container. They will stay fresh for about three days at room temperature. You can also keep them in the fridge for up to a week. If you want to freeze them, wrap each popper in plastic wrap first. What’s the best way to reheat cornbread poppers? Reheat in the oven for the best texture. Set your oven to 350°F (175°C) and place the poppers on a baking sheet. Heat for about 10 minutes. If you use a microwave, heat them for about 15 seconds. This will warm them but may make them a bit softer. You now have a complete guide to making honey butter cornbread poppers. We covered the ingredients, step-by-step instructions, and helpful tips. You learned about variations to suit your taste and storage methods to keep them fresh. Remember, you can mix flavors or change serving sizes. These poppers are great for any meal or snack. Your friends and family will love them, and you now know how to make it all happen. Enjoy your baking journey and share these tasty treats with others!

Southern-Style Honey Butter Cornbread Poppers Delight

If you’re craving a warm, sweet treat that bursts with Southern charm, you’ve found it! My Southern-Style Honey Butter Cornbread

- 1 lb (450g) beef sirloin, thinly sliced - 8 oz (225g) mushrooms, sliced - 1 cup beef broth - 1 cup sour cream - 1 tablespoon Worcestershire sauce - 1 teaspoon paprika - Salt and pepper to taste - 2 tablespoons olive oil - 2 tablespoons all-purpose flour - 1 large onion, finely chopped - 3 cloves garlic, minced - 8 oz (225g) egg noodles (or pasta of your choice) - Fresh parsley, chopped (for garnish) When I make Beef Stroganoff, I focus on simple, quality ingredients. The beef sirloin is my go-to because it cooks quickly and stays tender. I slice it thinly to help it cook fast. Mushrooms add a nice earthy flavor, and I prefer using cremini or button mushrooms. The beef broth keeps the dish rich and adds depth. Sour cream gives it that creamy texture we love in comfort food. Worcestershire sauce and paprika provide a hint of spice. Finally, I add salt and pepper to enhance all the flavors. For cooking, I use olive oil to sear the beef and sauté the onions and garlic. The flour helps thicken the sauce nicely. I always cook egg noodles, but you can use any pasta you like. Fresh parsley adds a pop of color and freshness. This recipe is easy and quick, and it results in a comforting meal everyone loves. Check out the Full Recipe for all the steps! Start by boiling a large pot of salted water. Add the egg noodles and cook them until they are al dente. This usually takes about 7 to 9 minutes, but check the package instructions. Once cooked, drain the noodles and set them aside. In a large skillet, heat 2 tablespoons of olive oil over medium-high heat. Add the thinly sliced beef in batches to avoid overcrowding. Sear the beef until it turns a nice golden brown, which should take about 2 to 3 minutes on each side. After browning, remove the beef from the skillet and set it aside. Using the same skillet, add the remaining tablespoon of olive oil. Toss in the finely chopped onion and cook it until it becomes translucent, about 4 to 5 minutes. Then, add the minced garlic and sauté for another minute until it becomes fragrant. This step builds a great base for your sauce. Now, add the sliced mushrooms to the skillet. Sauté them until they release their moisture and turn golden brown, which will take about 5 to 7 minutes. This adds a rich flavor to the dish. Sprinkle 1 teaspoon of paprika over the mushrooms and onions. Pour in 1 cup of beef broth and 1 tablespoon of Worcestershire sauce. Bring this mixture to a gentle simmer. Let it bubble for a few minutes so the flavors can blend together. In a small bowl, mix 1 cup of sour cream with 2 tablespoons of flour until it is smooth. Gradually add this mixture to the skillet while stirring constantly. This helps to avoid lumps. Allow the sauce to thicken for about 3 to 4 minutes over low heat. Return the seared beef to the skillet, along with any juices that have collected. Gently mix everything until the beef is well coated in the creamy sauce. Season with salt and pepper to taste. To serve, plate the cooked egg noodles first. Then, spoon the beef stroganoff mixture on top of the noodles. Finish with a sprinkle of freshly chopped parsley for a pop of color. Enjoy your meal! For the full recipe, check out the details above. - Use tender beef cuts for best flavor and texture. - Avoid overcooking beef to maintain tenderness. Choosing the right cut of beef is key. I recommend using sirloin. It's tender and flavorful. Slice it thinly to help it cook quickly and evenly. Overcooked beef can turn tough. Keep an eye on it while cooking. - Stir constantly when adding sour cream mixture to avoid lumps. - Adjust seasoning as desired for personal preference. When you add the sour cream to your dish, mix it in slowly. This keeps the sauce smooth and creamy. Taste your dish as you go. Add more salt or pepper if you want a stronger flavor. Everyone has different tastes, so make it yours! - Use fresh herbs for garnish to enhance visual appeal. To make your Beef Stroganoff look extra special, add a sprinkle of fresh parsley on top. It adds color and freshness. A simple garnish makes a big difference in how your dish looks. Enjoy your cooking! {{image_2}} You can make Beef Stroganoff lighter. Substitute Greek yogurt for sour cream. This swap cuts fat but keeps creaminess. Another option is using cauliflower noodles. They are low in carbs and add a fun twist. You don't have to stick with beef. Try chicken for a lighter dish. For a vegetarian option, use mushrooms. Both choices bring unique flavors. You can also experiment with different beef cuts. Flank steak or tenderloin can change the taste and texture. Want to take your Beef Stroganoff to the next level? A splash of white wine adds depth. It brightens the flavors and makes the dish sing. You can also include more veggies. Bell peppers or peas can add color and nutrients. They make your meal even more satisfying. For the complete recipe, check out the Full Recipe. Store leftovers in an airtight container for up to 3 days. This keeps the beef and sauce fresh. When you’re ready to eat, just open the container and enjoy! You can freeze Beef Stroganoff in a sealed container for up to 2 months. Make sure it is cooled before freezing. When you want to eat it, take it out and let it thaw overnight in the fridge. Reheat gently on the stove. Add a splash of beef broth to keep it creamy. Heat it slowly to avoid burning. It will taste just as good as when you first made it! For the Full Recipe, check out the instructions above. To thicken the sauce, use flour or cornstarch. Mix a small amount with water to create a slurry. Stir this mixture into the sauce while it simmers. This will give you a nice, thick sauce that coats the beef and noodles perfectly. Yes, you can make Beef Stroganoff a day in advance. Just store it in the fridge. When you are ready to serve, heat it gently on the stove. This method allows the flavors to blend well, making it taste even better. You can pair Beef Stroganoff with rice, mashed potatoes, or a fresh salad. These sides balance the rich flavors of the dish. They also add texture and color to your plate. Tender cuts like sirloin or filet mignon work best for this dish. These cuts are soft and cook quickly. They absorb the sauce's flavors well, ensuring a delicious bite every time. Yes, it freezes well. Store it in a sealed container for up to two months. However, some cream sauces may separate when reheated. To fix this, stir well and add a little broth while reheating. To sum up, we explored a simple and tasty beef stroganoff recipe. You learned about the key ingredients, step-by-step instructions, and helpful tips to make your dish shine. Remember, using tender beef and adjusting spices makes all the difference. Don’t hesitate to try variations or healthier swaps. Store leftovers correctly to enjoy this dish later. With these insights, you can create a comforting meal any day. Happy cooking!

Beef Stroganoff Delicious and Easy Comfort Meal

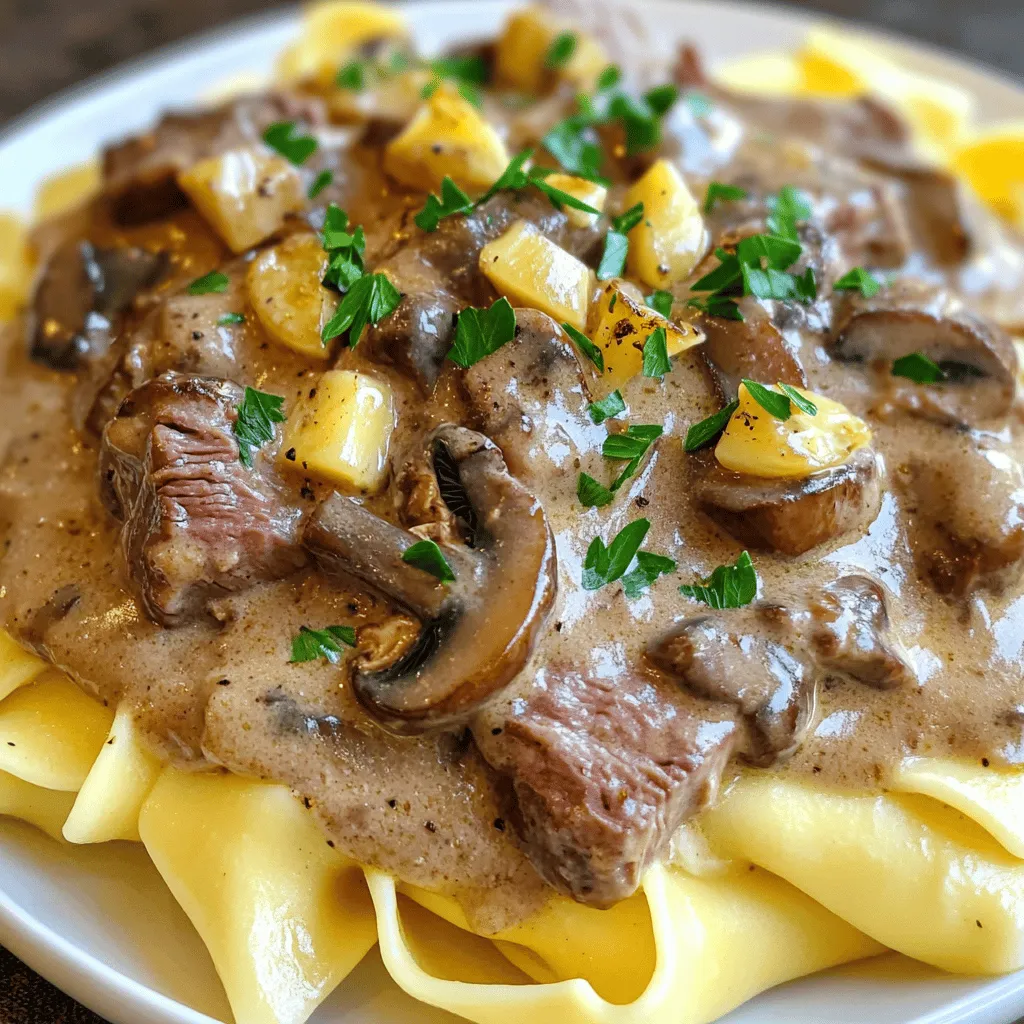
If you crave a warm and hearty meal, Beef Stroganoff is your answer. This classic dish offers tender beef, rich

Older posts
Newer posts
← Previous Page1 … Page69 Page70 Page71 … Page77 Next →

dsad

© 2025 pureeatsnow • Built with GeneratePress

Our Policies

  • Copyright Policy
  • Cookie Policy
  • GDPR Policy
  • Privacy Policy
  • Disclaimer
  • Terms Of Use

More Information

  • Home
  • About
  • Contact
  • Appetizers
  • Dessert
  • Dinner
  • Drinks
©2025, pureeatsnow About Back To Top