Skip to content
DisclaimerTerms Of UseGDPR PolicyCookie Policy

pureeatsnow

  • Home
  • Drinks
  • Appetizers
  • Dinner
  • Dessert
  • About
  • Contact
  • Privacy Policy
DisclaimerTerms Of UseGDPR PolicyCookie Policy

Rachel

- 1 pound large shrimp, peeled and deveined - 4 tablespoons unsalted butter - 4 cloves garlic, minced - 1 teaspoon paprika - Zest and juice of 1 large lemon - 1 teaspoon salt - 1/2 teaspoon black pepper - 1/4 teaspoon red pepper flakes (optional for heat) - 1/2 cup chicken or vegetable broth - Fresh parsley, chopped (for garnish) The star of this dish is the shrimp. Large, fresh shrimp cook quickly and soak up flavors well. Peel and devein them for the best taste and texture. Butter brings rich flavor. It melts and mixes with garlic, making a base for the sauce. This sauce will coat your shrimp and make each bite heavenly. Garlic adds a strong, savory taste with a hint of sweetness when cooked. Use fresh garlic for the best results. Lemon zest and juice brighten the dish. The zest gives a fragrant aroma, while the juice adds a tangy kick. Paprika adds color and a mild, smoky flavor. It enhances the overall taste without being too spicy. If you can’t find large shrimp, use medium shrimp instead. They will still taste great. For butter, you can use olive oil for a lighter option. It still adds flavor without the creaminess. If you want a vegan version, use mushrooms instead of shrimp. They absorb the flavors well and provide a nice texture. For chicken or vegetable broth, you can use water with a pinch of salt. This will work in a pinch but may lack some depth. Red pepper flakes are optional. If you don’t want heat, skip them. If you want more, try cayenne pepper. First, I turn on the Instant Pot and select the 'Sauté' mode. I add 4 tablespoons of unsalted butter and let it melt. Once the butter is melted, I add 4 cloves of minced garlic. I stir the garlic for about one minute until it smells great. I must be careful not to burn it. The garlic will add a wonderful flavor to the dish. Next, I grab a bowl and add 1 pound of large shrimp, peeled and deveined. I sprinkle in 1 teaspoon of paprika, 1 teaspoon of salt, 1/2 teaspoon of black pepper, and 1/4 teaspoon of red pepper flakes if I want some heat. I toss the shrimp until each piece is evenly coated with the spices. This step makes the shrimp super tasty. Now, I cancel the 'Sauté' mode. I add the seasoned shrimp to the pot. Then, I pour in the zest and juice of 1 large lemon. I also add 1/2 cup of chicken or vegetable broth. I stir everything together to mix well. Next, I close the lid and make sure the valve is on 'Sealing.' I select 'Pressure Cook' and set the timer for just 2 minutes. Once the timer goes off, I carefully switch the valve to 'Venting' for a quick release. I watch out for the steam as I do this. After I open the pot, I give everything a gentle stir. If needed, I adjust the seasoning with more salt or lemon juice. Finally, I garnish with fresh parsley before serving. Enjoy this quick and tasty meal! When cooking shrimp, freshness is key. Always choose shrimp that smell like the ocean. Look for a firm texture and a translucent color. Avoid shrimp that appear dull or have a strong fishy smell. - Peeling and Deveining: Use fresh shrimp, peeled and deveined. This saves time and gives you a clean dish. - Cooking Time: Shrimp cook fast. In the Instant Pot, just two minutes is perfect. Overcooking makes shrimp tough. To boost flavor, use fresh garlic and lemon. They add brightness to your dish. Don't skip the zest; it packs a punch. - Butter: Use unsalted butter for better control over salt levels. It enriches the sauce. - Spices: Paprika adds depth. You can also add herbs like thyme or dill for extra flavor. Many cooks make the same mistakes with shrimp. Here are a few to watch out for: - Overcrowding the Pot: If you add too many shrimp, they won't cook evenly. Cook in batches if needed. - Not Seasoning: Shrimp need seasoning. Toss them well in spices before cooking. - Ignoring Quick Release: After cooking, use quick release to keep shrimp tender. Letting them sit can make them chewy. By following these tips, you will create a dish that’s bursting with flavor and perfectly cooked shrimp every time. {{image_2}} You can make Lemon Garlic Butter Shrimp in many ways. If you don’t have an Instant Pot, try a skillet. Heat butter and garlic over medium heat. Add the shrimp and cook for about three minutes on each side. You can also grill the shrimp for a smoky flavor. Just toss them in the marinade and skewer them for easy grilling. If you're looking for swaps, I have some great ideas. Use olive oil instead of butter for a dairy-free meal. You can also swap shrimp for chicken or tofu if you prefer. For a gluten-free option, make sure your broth is gluten-free. You can also add vegetables like bell peppers or zucchini for extra nutrition. Don’t be afraid to get creative with flavors. Try adding a splash of white wine for depth. You could also mix in some fresh herbs like basil or dill. If you want a spicy kick, increase the red pepper flakes. For a hint of sweetness, add a teaspoon of honey or maple syrup. Each tweak can bring new life to this dish! Storing leftover shrimp is easy. First, let the shrimp cool down. Next, transfer them to an airtight container. This helps keep the shrimp fresh. Make sure to add any leftover sauce too. Store the container in the fridge. It can last for up to three days. For best taste, eat it sooner. Reheating shrimp can be tricky. You want to avoid overcooking. For best results, use the microwave. Place the shrimp in a microwave-safe dish. Cover it with a damp paper towel. Heat in short bursts. Start with 30 seconds, then check. If needed, heat for another 30 seconds. Stir between heating sessions. This will keep the shrimp moist. Freezing shrimp is a great option for long-term storage. Start by letting the shrimp cool completely. Then, place them in a freezer-safe bag. Remove as much air as you can before sealing. Label the bag with the date. The shrimp can last for up to three months in the freezer. To use frozen shrimp, thaw them in the fridge overnight. This keeps the texture nice when you cook them again. Yes, you can use frozen shrimp. Just make sure to thaw them first. Place the shrimp in cold water for about 15 minutes. Drain them well before seasoning. Using frozen shrimp may add a minute to the cooking time, but your dish will still turn out great. Shrimp are cooked when they turn pink and opaque. They curl into a C shape as they cook. If they curl into an O shape, they may be overcooked. Each shrimp should be firm to the touch. Keep an eye on them to avoid rubbery texture. I love serving this dish over fluffy rice. It soaks up the tasty sauce. Crusty bread works well too, perfect for dipping. A fresh salad or steamed veggies can add a nice touch. Lemon wedges and chopped parsley make great garnishes. We covered the key ingredients and substitutes to create delicious Lemon Garlic Butter Shrimp. You learned step-by-step instructions, from making the garlic butter to cooking the shrimp in an Instant Pot. I shared tips for best practices, common mistakes, and variations to keep things fresh. Finally, I detailed storage methods and answered your FAQs. Enjoy cooking and feel free to experiment with flavors. Your shrimp dishes will shine, and I hope you savor every bite!

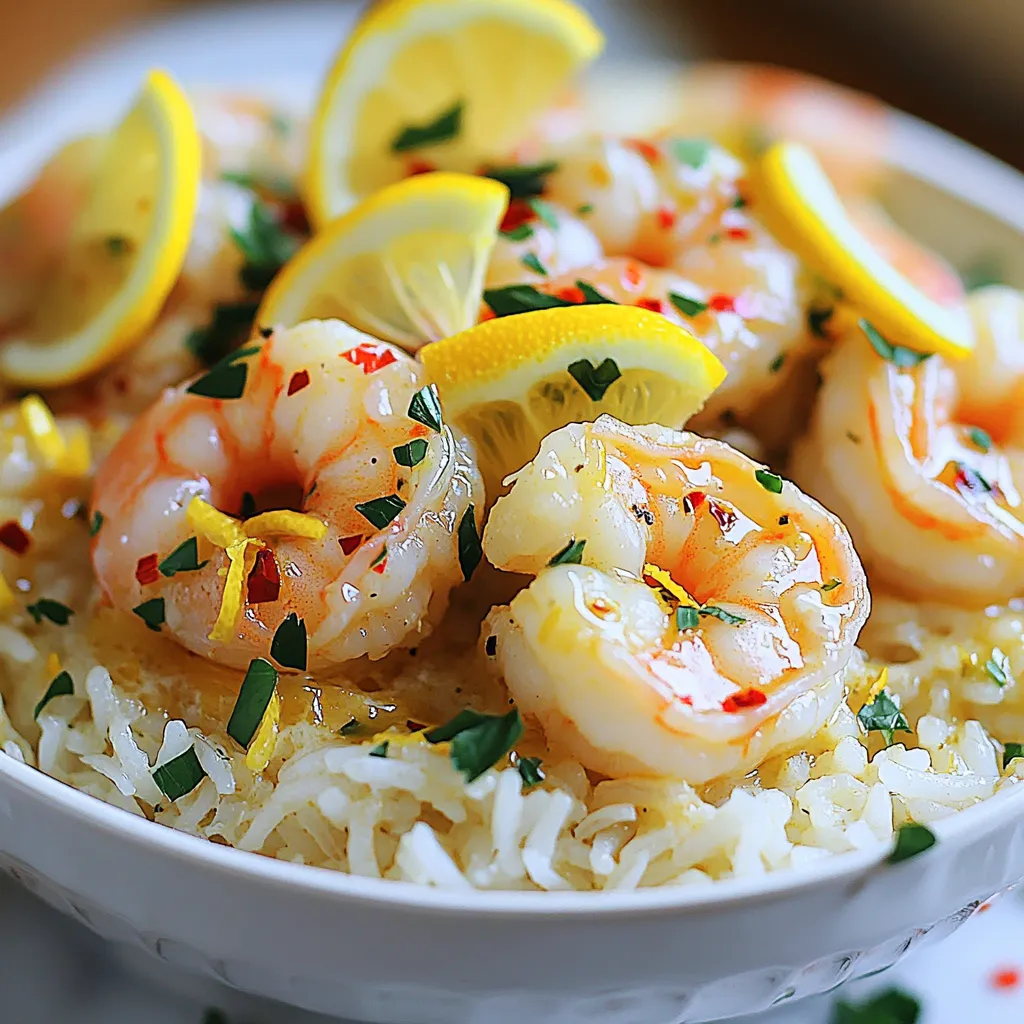
Instant Pot Lemon Garlic Butter Shrimp Savory Delight

If you crave a dish that’s quick, tasty, and packed with flavor, you’re in for a treat! This Instant Pot

To make this delightful treat, gather these main ingredients: - 1 cup vanilla protein powder - 1/2 cup almond flour - 1/4 cup coconut flour - 1/4 cup natural peanut butter - 1/4 cup maple syrup or agave syrup - 1/2 cup almond milk (unsweetened) - 1 teaspoon vanilla extract - 1/2 cup mini chocolate chips - 1/2 cup Greek yogurt - Pinch of salt These ingredients create a creamy and flavorful base. The mix of flours gives a nice texture. The recipe is packed with protein-boosting elements. The key players are: - Vanilla protein powder: This adds protein and a nice flavor. - Greek yogurt: It enhances creaminess and adds more protein. These components make this treat a satisfying snack. You can enjoy it without the guilt! To make your blizzard even better, consider these optional toppings: - Additional mini chocolate chips for extra sweetness. - Crushed nuts for a nice crunch. - A drizzle of peanut butter for added richness. These toppings can take your High-Protein Chocolate Chip Cookie Dough Blizzard to the next level. Feel free to mix and match! First, grab a big mixing bowl. Add 1 cup of vanilla protein powder. Next, mix in 1/2 cup of almond flour and 1/4 cup of coconut flour. Don't forget a pinch of salt! Stir these dry ingredients well. You want an even blend for a great flavor. Now, it’s time to add the wet stuff. Pour in 1/4 cup of natural peanut butter. Then add 1/4 cup of maple syrup and 1/2 cup of unsweetened almond milk. Finally, add 1 teaspoon of vanilla extract. Mix it all until you get a thick, sticky dough. It should feel like cookie dough! Once your dough is ready, fold in 1/2 cup of mini chocolate chips and 1/2 cup of Greek yogurt. This makes it creamy and adds protein. After mixing, place the dough in the fridge for 30 minutes. This helps it firm up, making it easier to scoop. While it chills, prepare a blender. If needed, add a splash of almond milk. Blend until smooth. After chilling, scoop the cookie dough into a bowl. Pour the blended mix over the dough. You can blend everything again for a smoother mix or stir gently for some texture. Serve it right away or freeze it to make it thicker. Enjoy your high-protein treat! To get a great cookie dough flavor, use good quality vanilla protein powder. This makes a big difference. I like to add a pinch of salt to enhance the sweetness. Mixing in natural peanut butter adds a rich, nutty taste. If you want more sweetness, add a dash of maple syrup. Greek yogurt is my secret weapon for creaminess. It adds protein and makes the mix smooth. When you fold it in, be gentle. This keeps the texture thick and chewy. If you want an even creamier treat, blend the yogurt longer. You will love how it enhances the flavor! For a fun presentation, serve this blizzard in a tall glass. Top it off with extra mini chocolate chips. A sprinkle of crushed nuts adds crunch and color. You can even drizzle some peanut butter on top. This makes your dessert look extra special and inviting. Enjoy! {{image_2}} If you want a nut-free cookie dough blizzard, you can use sun butter instead of peanut butter. Sun butter is made from sunflower seeds and gives a nice creamy flavor. You can also swap almond flour for oat flour. Oat flour is made from ground oats and is perfect for those with nut allergies. Want to change the taste? You can use chocolate protein powder instead of vanilla. This adds a rich chocolate flavor to your blizzard. You can also try different nut butters or seed butters. Almond butter or cashew butter can work well too. Each choice gives a unique twist to the classic recipe. Adding superfoods can boost nutrition and flavor. Try mixing in chia seeds or flaxseeds for healthy omega-3 fats. You can also add a tablespoon of cocoa powder for extra antioxidants and a chocolate kick. If you want more fiber, consider adding oats or pumpkin seeds. These small changes make your cookie dough blizzard even better! To keep your High-Protein Chocolate Chip Cookie Dough Blizzard fresh, store it in an airtight container. This helps maintain flavor and texture. Make sure the container is tightly sealed to prevent air from drying it out. Place it in the refrigerator. It can last for about 3 to 5 days. If you notice any change in smell or texture, it’s best to toss it. If you want to save some for later, freezing is a great option. First, scoop the cookie dough into small balls. Next, place them on a baking sheet lined with parchment paper. Freeze them for about 1 to 2 hours. Once they are firm, transfer the balls to a freezer bag. Squeeze out any extra air and seal the bag tightly. Label the bag with the date. This way, they can stay fresh for about 2 to 3 months. When you're ready to enjoy your frozen cookie dough, take it out of the freezer. Let it thaw in the refrigerator for a few hours or overnight. If you want to eat it right away, you can microwave it for 15 to 30 seconds. Just be careful not to overheat. After thawing, if you prefer a creamier texture, mix in a bit more almond milk or Greek yogurt. This will help restore its smoothness. Enjoy your treat! To make this High-Protein Chocolate Chip Cookie Dough Blizzard vegan, you need to swap a few ingredients. Use plant-based protein powder instead of whey. Choose almond butter or sunflower seed butter in place of peanut butter. Replace Greek yogurt with dairy-free yogurt. You can also use maple syrup or agave syrup. Make sure the chocolate chips are dairy-free too. This blizzard is packed with nutrients. Each serving has about 250 calories. It contains around 15 grams of protein, 10 grams of fat, and 25 grams of carbs. The protein powder and Greek yogurt boost protein levels. The almond and coconut flours add healthy fats and fiber. This dessert is great for a tasty treat that fuels your body. Yes, you can change the protein powder. If you want whey, that works well. If you prefer plant-based options, try pea or hemp protein. Each type gives a different taste and texture. Just be mindful of the flavor. Make sure it blends well with the other ingredients in the blizzard. This blog post laid out a fun and easy recipe for a High-Protein Blizzard. We looked at key ingredients, showed you how to mix them, and shared clever tips to enhance flavor and texture. You learned about different variations, storage methods, and answered common questions to make this treat your own. Cooking should be simple and enjoyable. With this knowledge, you can create a healthy snack your whole family will love. Now, it’s time to get creative and make this recipe yours!

High-Protein Chocolate Chip Cookie Dough Delight

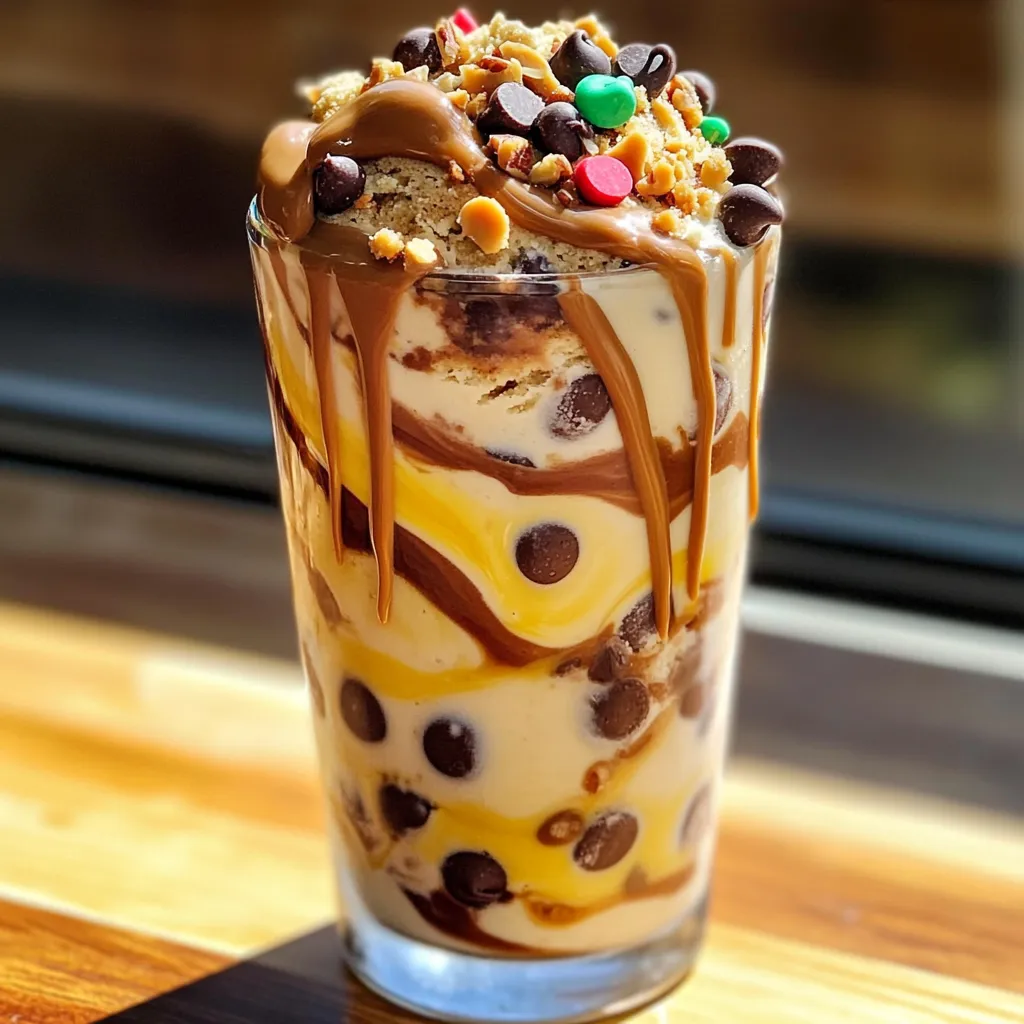
Craving something sweet that packs a protein punch? You’ve come to the right place! My High-Protein Chocolate Chip Cookie Dough

- 1 cup almond flour - 1 cup medjool dates, pitted - 1/2 cup unsweetened cocoa powder - 1/3 cup almond butter - 1/4 cup pure maple syrup - Zest of 1 large orange - 2 tablespoons fresh orange juice - 1/2 teaspoon vanilla extract - 1/4 teaspoon sea salt - 1/2 cup dark chocolate chips (dairy-free if desired) - Extra orange zest for garnish These ingredients create a rich and tasty treat. Almond flour gives a nutty base. Medjool dates add sweetness and stickiness. Cocoa powder provides that deep chocolate flavor we love. Almond butter adds creaminess, and maple syrup brings in natural sweetness. The zest and juice from the orange give brightness to these bars. It makes the chocolate flavor pop. Vanilla extract rounds out the taste, while sea salt enhances all the flavors. Dark chocolate chips melt to create a smooth topping. You can use dairy-free chocolate chips if you prefer. Don't skip the extra orange zest for garnish. It adds a lovely look and taste to your bars. Each ingredient plays a key role in making these no-bake chocolate orange truffle bars a delightful treat! How to process the base mixture Start by placing the almond flour, medjool dates, unsweetened cocoa powder, almond butter, pure maple syrup, orange zest, fresh orange juice, vanilla extract, and sea salt into a food processor. Blend everything until it's well mixed and sticky. You want a thick dough that holds together. Preparing the baking dish Next, line an 8x8 inch baking dish with parchment paper. Make sure the paper hangs over the sides. This helps you lift the bars out easily later. Tips for microwave melting Take your dark chocolate chips and place them in a microwave-safe bowl. Heat the chocolate in 30-second bursts. Stir the chocolate in between each round. This helps it melt evenly and avoids burning. Ensuring smooth consistency Keep melting and stirring until the chocolate is completely smooth. You want a nice, glossy texture for the topping. Spreading the chocolate Once the truffle base is firm, take it out of the fridge. Pour the melted chocolate over the truffle layer. Use a spatula to spread the chocolate evenly. Adding garnish Sprinkle extra orange zest on top. This adds a pop of color and boosts the orange flavor. Now, place the dish back in the fridge to set for about 30 minutes. To get the best texture and flavor in your no-bake chocolate orange truffle bars, focus on sweetness and zest. You can adjust the sweetness by adding more or less maple syrup. Taste it before you chill. If you want more orange flavor, add a bit more zest or juice. When mixing, make sure to blend the ingredients well in your food processor. A well-mixed base helps the bars hold together. Don’t rush this step; blend until sticky but not too smooth. Serving these bars can be fun and creative. Try cutting them into squares or rectangles for easy serving. You can arrange them on a pretty plate and garnish with fresh orange slices and mint. This adds color and a fresh look. Pair these bars with a cold glass of almond milk or a warm cup of tea. The chocolate and orange flavors mix well with both drinks. One mistake is over-processing the mixture. If you blend too long, it can turn too smooth. You want a sticky texture, not a paste. Another mistake is not chilling the bars long enough. They need time in the fridge to firm up. Aim for at least 30 minutes for the base and another 30 minutes after adding chocolate. If you skip this step, the bars may fall apart when you cut them. {{image_2}} You can switch up the nut butter in this recipe. If you like, use peanut butter or cashew butter. Each option adds a unique taste. For sweeteners, try agave syrup or honey instead of maple syrup. These can make your bars sweeter or change the flavor profile. Want to take your truffle bars to the next level? Add a dash of cinnamon for warmth. You can also mix in chopped nuts or dried fruits for extra texture. Walnuts or almonds work well. Dried cranberries or apricots can add a nice chew. This recipe is easy to make vegan-friendly. Just use a dairy-free chocolate for the top. If you need gluten-free options, almond flour is already gluten-free. Always check labels to ensure all ingredients fit your needs. To keep your No-Bake Chocolate Orange Truffle Bars fresh, use airtight containers. Glass or plastic containers work well. Line them with parchment paper to prevent sticking. You can store the bars in the fridge for easy access. If you want to keep them longer, consider freezing them. Just make sure to wrap each bar in plastic wrap before placing them in the freezer. This helps keep them from getting freezer burn. These truffle bars are tasty for about one week in the fridge. If you freeze them, they can last for up to three months. To know if they have spoiled, check for changes in color or smell. If they feel dry or crumbly, it’s best to toss them. Always trust your senses. Fresh bars should smell sweet and look vibrant. The truffle bars need to chill for about one hour. First, chill for 30 minutes after pressing the base into the dish. Then, after adding the chocolate, chill for another 30 minutes. This helps the bars set well and makes them easy to cut. Yes, you can make these truffle bars in advance. They stay fresh in the fridge for about one week. Just keep them in an airtight container. If you want to keep them longer, freeze the bars. They can last up to three months in the freezer. You can use any nut flour as a substitute for almond flour. Some good options include hazelnut flour or cashew flour. If you need a nut-free option, try using oat flour or sunflower seed flour. Each will give a different flavor. Yes, you can make these truffle bars without chocolate. Instead of melting chocolate, use a layer of nut butter or a fruit spread on top. You can also add extra orange zest for more flavor. This way, you still get a tasty treat without the chocolate. This blog post covered how to make delicious truffle bars. We explored each ingredient, from almond flour to dark chocolate chips. I shared step-by-step instructions for mixing, melting chocolate, and assembling the bars. You learned tips for perfecting texture and flavor, along with serving suggestions. I also included storage info and variations to keep it fresh. Remember, baking is fun! Experiment with flavors and share these tasty treats. Enjoy your homemade bars and impress your friends!

No-Bake Chocolate Orange Truffle Bars Delight Recipe

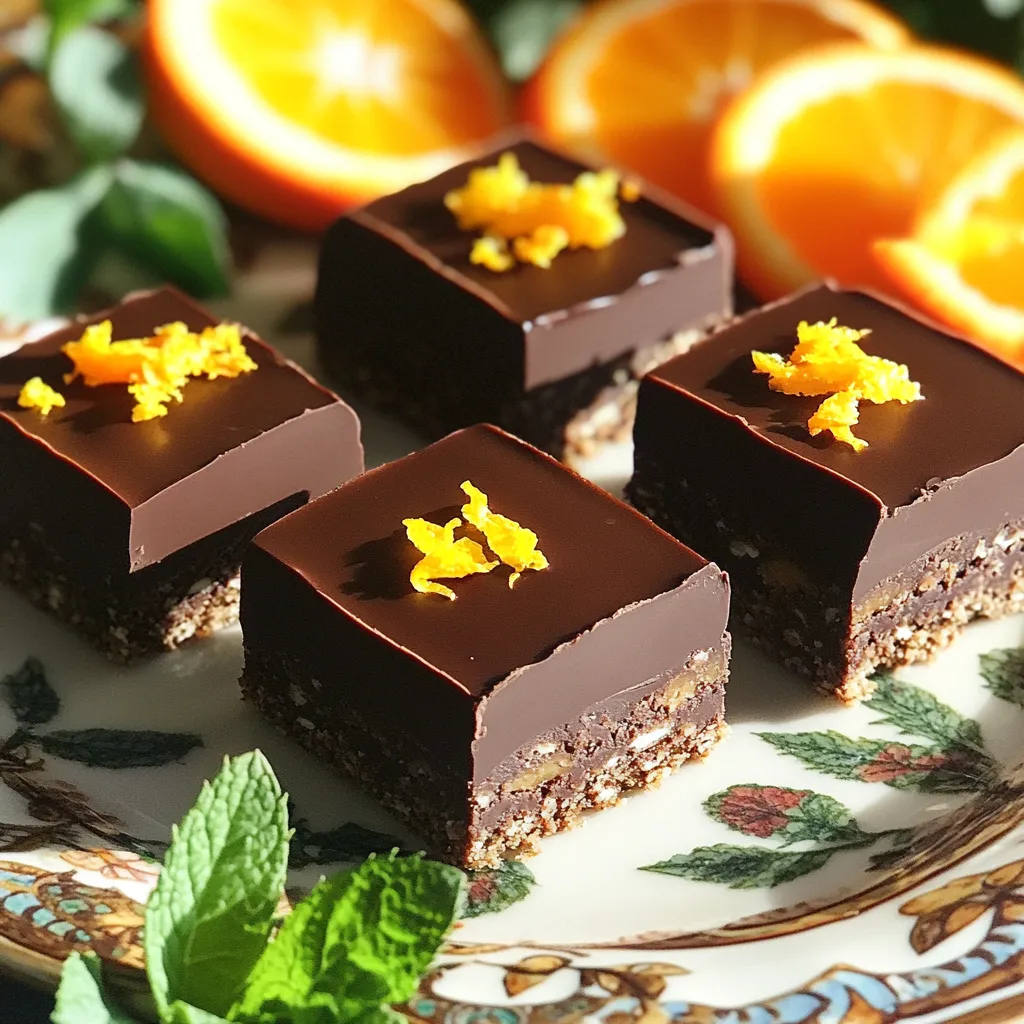
Get ready to indulge in a sweet treat that’s easy to make! My No-Bake Chocolate Orange Truffle Bars combine rich

To make a delicious Strawberry Oatmeal Smoothie Bowl, you need simple, fresh ingredients. Here’s what you will need: - 1 cup fresh strawberries, hulled and sliced - 1/2 cup rolled oats - 1 ripe banana, sliced - 1/2 cup almond milk (or any milk of choice) - 1 tablespoon honey or maple syrup (optional) - 1 tablespoon chia seeds - 1/2 teaspoon vanilla extract - Toppings: additional sliced strawberries, granola, shredded coconut, and nuts Each ingredient adds a special taste and texture. Fresh strawberries give a sweet and tangy flavor. Rolled oats add heartiness and fiber, making this bowl filling. The ripe banana brings creaminess and natural sweetness. Almond milk keeps the mix smooth and light. Honey or maple syrup can add extra sweetness if you like. Chia seeds boost nutrition and help thicken the smoothie. Vanilla extract adds a nice aroma and flavor. For toppings, you can choose what you love. More strawberries give freshness. Granola adds crunch. Shredded coconut brings a tropical feel, and nuts add protein and texture. You can mix and match toppings to make it your own. Blending the Smoothie Base Start by placing all your ingredients into a blender. Use 1 cup of fresh strawberries, 1/2 cup of rolled oats, 1 ripe banana, and 1/2 cup of almond milk. If you want it sweeter, add 1 tablespoon of honey or maple syrup. Then, toss in 1 tablespoon of chia seeds and 1/2 teaspoon of vanilla extract. Blend everything on high until smooth and creamy. Achieving Desired Consistency Check your smoothie. If it feels thick, add a bit more almond milk. Blend again until you get a nice, pourable texture. You want it creamy but not too runny. Pouring into a Bowl and Adding Toppings Once you have the right mix, pour the smoothie into a bowl. Now comes the fun part! Arrange your toppings. Add sliced strawberries, granola, shredded coconut, and nuts. You can also drizzle some honey or syrup on top for extra sweetness. Enjoy your fresh and healthy treat right away! Optimizing Sweetness Levels You can adjust the sweetness of your smoothie bowl. If you like it sweeter, add more honey or maple syrup. Start with a small amount, taste, and add more if needed. You can also use ripe bananas to boost natural sweetness. Using Alternative Milk Options Almond milk is great, but you can use any milk you prefer. Try oat milk for a creamier texture or coconut milk for a tropical twist. Just keep it unsweetened to control the sugar levels. Enhancing Texture with Toppings Toppings make your smoothie bowl fun and tasty. Use sliced strawberries for freshness. Granola adds crunch, while shredded coconut gives a nice chew. Nuts like almonds or walnuts add healthy fats and protein. Mix and match to find your favorite combination. Meal Prep Options for Busy Days You can make the smoothie base ahead of time. Blend the strawberries, oats, banana, milk, chia seeds, and vanilla. Store it in the fridge for up to two days. When you’re ready, just pour it into a bowl and add your toppings. Serving the Smoothie Bowl at Gatherings This smoothie bowl is perfect for sharing. Make a big batch for brunch or a party. Set up a topping bar so guests can choose what they like. It’s fun, interactive, and everyone can customize their bowl. {{image_2}} You can change your Strawberry Oatmeal Smoothie Bowl in fun ways. Here are three ideas: - Berry Medley Smoothie Bowl: Mix in blueberries and raspberries with your strawberries. This gives a nice burst of flavor and color. You can use the same base recipe and just swap out the fruits. - Tropical Fruit Smoothie Bowl: Add pineapple and mango for a sunny twist. This will give your bowl a tropical vibe. Blend these fruits with the strawberries for a creamy treat. - Nut Butter Infusion: Stir in a spoonful of almond or peanut butter. This adds a rich taste and a bit of protein. It makes your bowl even more filling and tasty. You can easily make this smoothie bowl fit different diets. - Vegan and Dairy-Free Options: Use almond milk or coconut milk as your base. Skip the honey and use maple syrup for sweetness. This way, everyone can enjoy this bowl. - Gluten-Free Modifications: Make sure you choose gluten-free oats. Most rolled oats are safe, but check the label. This helps your smoothie bowl stay gluten-free and delicious. You may want to save some of your smoothie bowl for later. If so, refrigerate it. Store leftover smoothie in an airtight container. It will stay fresh for up to one day. If you see any browning, it’s still okay to eat. Just give it a good stir. You can also freeze the smoothie base. Pour it into ice cube trays. Once frozen, pop the cubes into a bag. You can use them later in other smoothies or bowls. What can you do with leftover smoothie? You can make smoothie popsicles. Just pour the leftover smoothie into molds. Freeze for a few hours until solid. Another idea is to use it in oatmeal. Just heat some oatmeal and stir in the leftover smoothie. This adds flavor and nutrition. You can also blend it into a new smoothie with fresh fruits. Get creative and enjoy! Yes, you can make this smoothie bowl ahead of time. Blend the ingredients and store the base in the fridge. Use an airtight container for best results. It stays fresh for up to 24 hours. Just remember to give it a good stir before serving. If you need a substitute for rolled oats, try quick oats or oat flour. You can also use blended nuts or seeds for a nutty flavor. Just keep in mind that the texture may change. Each option brings its unique taste and health benefits. To adjust the recipe for more servings, simply multiply each ingredient by the number of servings you want. If you want to serve four, just use four times each amount. This method keeps the flavor and texture consistent. Blend in batches if your blender is small. Yes, frozen strawberries work well in this recipe. They can make your smoothie bowl extra cold and creamy. Use them directly from the freezer, no need to thaw. You might need to blend a bit longer to achieve the right texture. In this blog post, we explored a tasty smoothie bowl recipe with fresh strawberries, oats, and banana. We discussed steps for blending the base, adding toppings, and customizing the sweetness. I shared tips for meal prep and serving ideas, plus variations for different tastes. Remember, you can store leftovers easily in the fridge or freezer. Smoothie bowls are fun and simple to make, and they fit many diets. I hope you try this recipe and enjoy it as much as I do!

Strawberry Oatmeal Smoothie Bowl Fresh and Healthy Treat

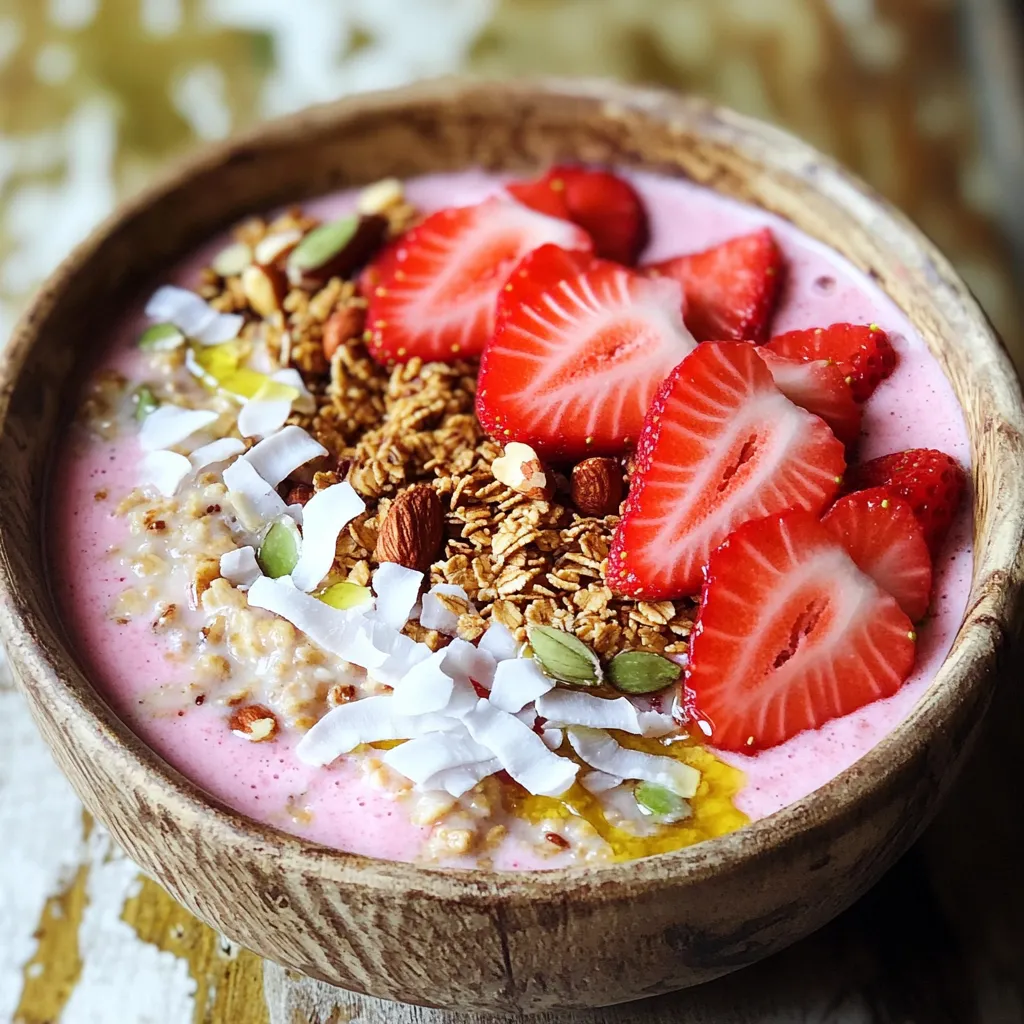
Are you ready to enjoy a delicious and healthy treat? The Strawberry Oatmeal Smoothie Bowl is your new go-to breakfast.

For teriyaki glazed salmon skewers, you need: - 1 lb (450g) salmon fillet, skinless and boneless, cut into 1-inch cubes - 1/4 cup soy sauce (low-sodium if preferred) - 2 tablespoons honey - 1 tablespoon sesame oil - 1 garlic clove, minced - 1 teaspoon fresh ginger, grated - 1 tablespoon rice vinegar Salmon is the star of this dish. Choose good-quality salmon for the best taste. The marinade adds a sweet and savory layer that makes this dish special. To add color and crunch, include these veggies: - 1 bell pepper (red or yellow), cut into 1-inch pieces - 1 small zucchini, sliced into rounds - 1 small red onion, cut into chunks These vegetables not only look great but also soak up the marinade flavors. They balance the richness of the salmon. The marinade is key for flavor. Here’s what makes it shine: - Soy sauce provides umami. - Honey adds sweetness. - Sesame oil gives a nutty taste. - Garlic and ginger add depth. - Rice vinegar brings acidity. Mix these ingredients well. They will coat the salmon and veggies beautifully. Letting them sit in the marinade lets the flavors blend. This step is crucial for a tasty meal. To start, you need to make the teriyaki marinade. Grab a medium bowl and add these simple ingredients: - 1/4 cup soy sauce - 2 tablespoons honey - 1 tablespoon sesame oil - 1 minced garlic clove - 1 teaspoon grated fresh ginger - 1 tablespoon rice vinegar Whisk everything together until it blends well. This is where the magic begins! The soy sauce gives saltiness, while honey adds sweetness. The sesame oil brings a nutty taste, and garlic plus ginger gives a fresh kick. Next, let’s marinate the salmon. Cut your salmon fillet into 1-inch cubes. Place those cubes in the bowl with the marinade. Make sure every piece gets coated. Cover the bowl and refrigerate it for at least 30 minutes. This step is key; it allows the flavors to soak into the salmon. You’ll taste the difference! Now, it’s time to assemble the skewers. Preheat your grill to medium-high heat. Take wooden or metal skewers. If you use wooden ones, soak them in water for 30 minutes first. This helps prevent burning. Thread the salmon cubes onto the skewers, alternating with colorful pieces of bell pepper, zucchini, and red onion. This not only makes the skewers look great but also adds more flavor. Once your skewers are ready, remove them from the marinade. Discard any leftover marinade. Place the skewers on the preheated grill. Grill them for about 3-4 minutes on each side. You want the salmon to be opaque and flaky. This should take about 8-10 minutes in total. After grilling, let the skewers rest for a minute. This helps the juices settle. Enjoy your tasty teriyaki glazed salmon skewers! When marinating salmon, timing is key. I recommend marinating for 30 minutes. This allows the salmon to soak up the flavors of the teriyaki sauce. You can use a glass or ceramic bowl to avoid any reactions with the marinade. Always cover the bowl with plastic wrap to keep the salmon fresh. If you have more time, marinate for up to two hours for even deeper flavor. Grilling gives salmon a smoky flavor that baking cannot match. On the grill, you get delicious char and crispy edges. If you choose to bake, set the oven at 400°F. Place the skewers on a baking sheet lined with foil. Bake for about 12-15 minutes. This method is great if you want a hands-off approach. However, I love the grill for its quick cooking time and fun outdoor vibe. Presentation matters! After grilling, let the skewers rest for a minute. This keeps the salmon moist. Serve the skewers on a large platter. Sprinkle sesame seeds and chopped green onions on top for color. Pair them with steamed rice or a fresh salad for a complete meal. The vibrant colors of the bell peppers and zucchini make the dish eye-catching. Enjoy your beautiful creation! {{image_2}} If you want a change from salmon, try chicken or shrimp. Both proteins work well with teriyaki flavors. For chicken, use boneless thighs cut into cubes. For shrimp, use large, peeled shrimp. Marinate them just like the salmon. Adjust the cooking time based on the protein you choose. To make these skewers vegetarian, use firm tofu. Cut the tofu into cubes and press it to remove excess water. You can also add vegetables like mushrooms, bell peppers, and zucchini. Marinate the tofu the same way. Grill the skewers until the tofu is golden and the veggies are tender. You can switch up the teriyaki marinade for new flavors. Try adding orange juice for a citrus kick. Pineapple juice gives a sweet touch. For a spicy twist, add sriracha or red pepper flakes. Experiment with different herbs like cilantro or basil for a fresh note. This way, you can create many tasty versions of your skewers. To store leftover teriyaki glazed salmon skewers, let them cool first. Place the skewers in an airtight container. This keeps the salmon fresh. You can keep them in the fridge for up to three days. If you have extra marinade, save it for later use. When you want to eat the leftovers, reheating is key. The best way is to use a grill or stovetop. Heat the skewers on medium heat for about five minutes. This helps keep the salmon moist. You can also use a microwave, but be careful. Heat in short bursts to avoid drying out the fish. If you want to save skewers for later, freezing works well. Wrap each skewer tightly in plastic wrap. Then, place them in a freezer bag. Make sure to remove as much air as possible. You can freeze them for up to three months. To eat, thaw in the fridge overnight and reheat. Enjoy the same great flavors! You should marinate the salmon for at least 30 minutes. This time allows the fish to soak up all the rich flavors of the teriyaki marinade. If you have more time, you can marinate it for up to 2 hours. Just remember, longer is better for taste! Yes, you can use frozen salmon. Just be sure to fully thaw it before marinating. Thawing allows the marinade to penetrate better. Place the frozen salmon in the fridge overnight or run it under cold water until thawed. Pat it dry, then cut it into cubes for skewering. If you need a honey substitute, try maple syrup or agave nectar. Both will add sweetness and flavor to your marinade. You can also use brown sugar, but dissolve it in a bit of warm water first. This will help it mix well with the other ingredients. Teriyaki glazed salmon skewers are easy and fun to make. You learned about the key ingredients, marinades, and cooking tips. Preparing these skewers lets you choose flavors you love. You can also switch proteins or make them vegetarian. Proper storage helps keep leftovers fresh. With this guide, you can confidently impress friends and family. Enjoy your delicious skewers!

Teriyaki Glazed Salmon Skewers Flavorful Grilling Idea

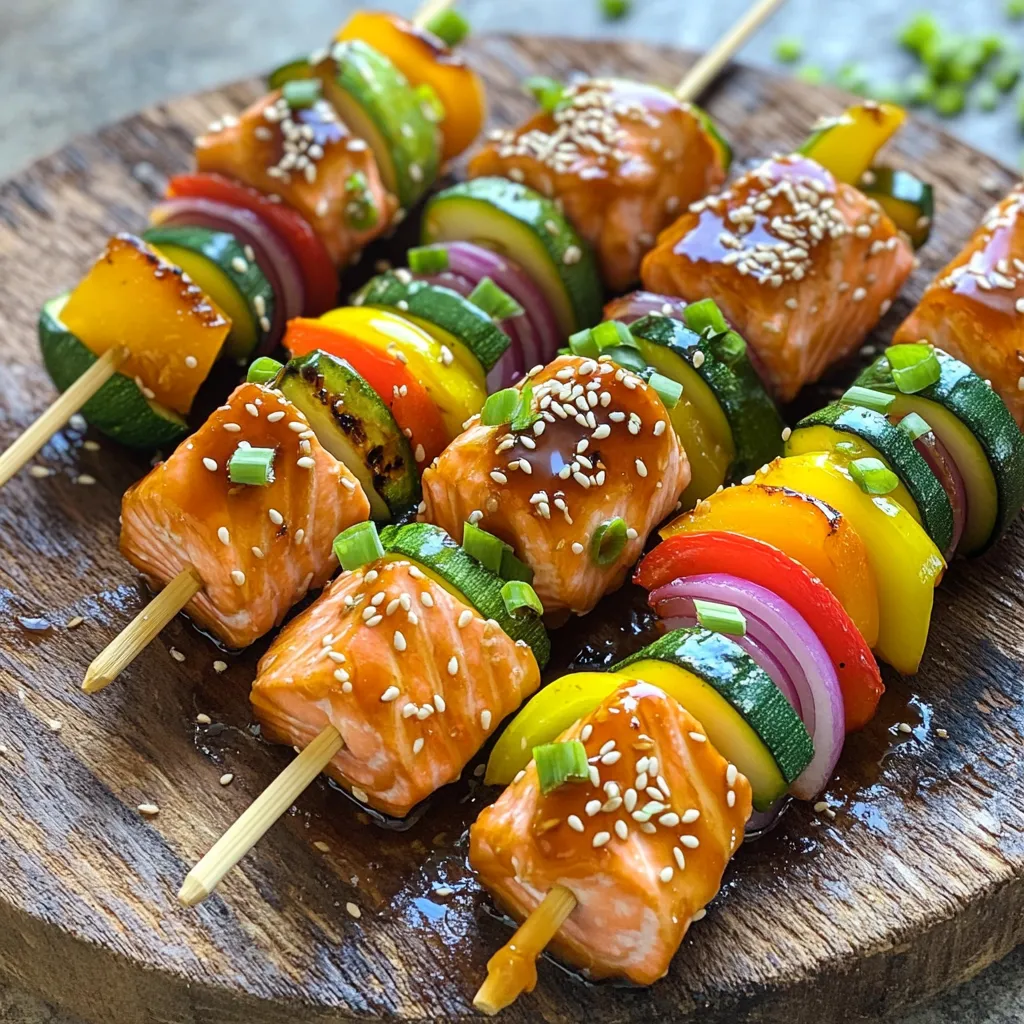
Are you ready to elevate your grilling game? Teriyaki glazed salmon skewers are a delicious way to enjoy outdoor cooking.

When making Pumpkin Spice Snickerdoodle Cookies, you need some key ingredients that bring the flavor and texture. Here’s a detailed list of what you’ll need: - 1 cup unsalted butter, softened - 1 cup granulated sugar - 1/2 cup brown sugar, packed - 2 large eggs - 1 cup pumpkin puree (canned or fresh) - 3 cups all-purpose flour - 2 teaspoons cream of tartar - 1 teaspoon baking soda - 1 teaspoon baking powder - 2 teaspoons pumpkin pie spice - 1/2 teaspoon salt - 1/4 cup granulated sugar (for rolling) - 1 tablespoon cinnamon (for rolling) Each ingredient plays a role in creating the perfect cookie. The butter adds richness, while the sugars provide sweetness. Eggs and pumpkin puree keep the cookies moist. The flour forms the base, and the cream of tartar works with baking soda to give the cookies a nice rise. Pumpkin pie spice adds that warm, cozy flavor we all love. Finally, the cinnamon-sugar mixture for rolling gives each cookie a delightful finish. Remember, using quality ingredients makes a big difference in taste. Happy baking! - Preheat your oven to 350°F (175°C). - Line two baking sheets with parchment paper. This helps prevent sticking. - In a large bowl, cream 1 cup of softened unsalted butter with 1 cup of granulated sugar and 1/2 cup of brown sugar. Mix until light and fluffy. - Add 2 large eggs one at a time. Mix well after each egg. Then, add 1 cup of pumpkin puree. Blend until it is fully mixed in. - In a separate bowl, whisk together 3 cups of all-purpose flour, 2 teaspoons of cream of tartar, 1 teaspoon of baking soda, 1 teaspoon of baking powder, 2 teaspoons of pumpkin pie spice, and 1/2 teaspoon of salt. - Gradually mix the dry ingredients into the wet mixture. Be careful not to overmix; just combine until the dough is formed. - In a small bowl, mix 1/4 cup of granulated sugar with 1 tablespoon of cinnamon for rolling. - Scoop tablespoon-sized balls of dough and roll them in the cinnamon-sugar mixture. Make sure they are well coated. - Place the dough balls on the prepared baking sheets, leaving about 2 inches between each. Slightly flatten each ball. - Bake in the preheated oven for 10-12 minutes. The edges should be set, and the cookies should be lightly golden. They may look a bit underbaked in the middle but will firm up as they cool. - Let the cookies cool on the baking sheets for 5 minutes before moving them to a wire rack. This helps them finish setting. To get the best texture in your cookies, avoid overmixing the dough. When you mix too much, the cookies can become tough. Mix until just combined for a soft bite. After scooping the dough, flatten each ball slightly. This helps them bake evenly and gives you that classic snickerdoodle shape. Using fresh pumpkin puree will boost the flavor of your cookies. It adds a rich, natural taste. If you want even more pumpkin flavor, consider adding more pumpkin pie spice. This spice brings warmth and depth to each bite. A little extra spice can really elevate your cookies. Check for doneness by looking at the edges. They should be set and lightly golden. The centers may look a bit underbaked, but they will firm up as they cool. For cooling, let the cookies sit on the baking sheets for five minutes. This helps them hold their shape before moving them to a wire rack. {{image_2}} You can switch up the flavors in your pumpkin spice snickerdoodles! Here are some fun ideas: - Adding chocolate chips: Mix in semi-sweet or dark chocolate chips for a rich flavor. The chocolate goes well with the warm spices. - Using different spices: Try adding nutmeg, allspice, or even ginger. Each spice gives a different twist to the cookie. Making your cookies fit your diet is easy! Here are some ideas: - Gluten-free options: Substitute all-purpose flour with a gluten-free flour blend. Ensure it has a binding agent like xanthan gum. - Vegan substitutions: Replace the eggs with flax eggs. Mix one tablespoon of ground flaxseed with three tablespoons of water. Let it sit until it thickens. You can use vegan butter too for a dairy-free version. To keep your Pumpkin Spice Snickerdoodle Cookies fresh, store them at room temperature. Use an airtight container to prevent them from drying out. If you live in a humid area, refrigeration may help. But remember, cold can change the texture. Freezing cookie dough: You can freeze the dough before baking. Scoop the dough into balls and place them on a baking sheet. Freeze them for about an hour. Then, transfer the frozen balls into an airtight bag. They can last up to three months. Freezing baked cookies: If you have leftover cookies, you can freeze them too. Place the cooled cookies in a single layer in an airtight container. Separate layers with parchment paper. These cookies freeze well for up to three months. Just thaw them at room temperature when you want a treat! Can I use canned pumpkin? Yes, you can use canned pumpkin. It saves time and offers great flavor. Make sure to choose pure pumpkin puree, not pumpkin pie filling. This keeps your cookies tasty and balanced. How do I prevent cookies from spreading? To stop cookies from spreading, chill the dough before baking. You can also use more flour. Make sure to measure correctly. A little extra flour can help keep them thick. Can I make these cookies ahead of time? Absolutely! You can prepare the dough and chill it. Then, scoop and roll the dough into balls. Store them in the fridge for up to 24 hours. Or, freeze them for later baking. Can I add nuts or dried fruits? Yes, you can add nuts like pecans or walnuts. You can also mix in dried fruits like raisins or cranberries. Just keep the amounts small so the cookies bake evenly. How do I adjust the recipe for smaller batches? To make fewer cookies, cut the recipe in half. Use half of each ingredient. This simple math gives you about a dozen cookies, perfect for a small treat. My cookies are too flat, what went wrong? Flat cookies often mean too much sugar or not enough flour. Check your measurements. Make sure your butter is softened but not melted. If all else fails, chill the dough before baking. How can I make my cookies softer? For softer cookies, use a bit less flour. You can also bake them for a minute less. Be careful not to overbake; they should look a bit soft in the center. Let them cool on the pan to keep them soft. This blog post covered a simple recipe for pumpkin cookies. We explored ingredients and step-by-step instructions. Tips helped ensure the right texture and flavor. Variations allowed for personal touches, like adding chocolate chips or modifying for diets. Storage info ensures your cookies stay fresh. Now, you can bake tasty pumpkin cookies with ease. Enjoy the process and share with friends. Savor every bite of your hard work. Happy baking!

Pumpkin Spice Snickerdoodle Cookies Sweet Treat Recipe

Get ready to delight your taste buds with Pumpkin Spice Snickerdoodle Cookies! This fun recipe combines the warm flavors of

Here’s what you need to make creamy roasted garlic soup: - 2 heads of garlic - 2 tablespoons olive oil - 1 medium onion, diced - 2 medium potatoes, peeled and diced - 4 cups vegetable broth - 1 cup heavy cream or coconut cream - Salt and pepper to taste - 1 teaspoon fresh thyme, chopped - Chives or parsley for garnish Each ingredient plays a key role in creating rich flavors. The garlic, when roasted, becomes sweet and soft. This gives the soup a deep, warm flavor. Olive oil adds a lovely richness. The onion and potatoes help create a creamy texture. Vegetable broth serves as a flavorful base. Heavy cream or coconut cream makes it silky smooth. You can adjust the salt and pepper to fit your taste. Fresh thyme adds a hint of earthiness. Garnishing with chives or parsley makes the soup look and taste fresh. Gather these ingredients before starting. It helps to have everything ready. You will enjoy the cooking process more when you have your ingredients prepared. - Preheat your oven to 400°F (200°C). - Cut the tops off the heads of garlic. This exposes the cloves. - Drizzle 1 tablespoon of olive oil over the garlic. - Wrap the garlic in aluminum foil to keep it moist. - Roast the garlic in the oven for about 30-35 minutes. The cloves will be soft and caramelized. - In a large pot, heat the remaining tablespoon of olive oil over medium heat. - Add the diced onion to the pot. Sauté for about 5 minutes until it turns translucent. - Next, add the diced potatoes to the pot. Stir well and cook for another 5 minutes. This helps the potatoes soften a bit. - Squeeze the roasted garlic cloves out of their skins. Add them to the pot. - Pour in the vegetable broth and add the thyme. - Bring the mixture to a boil, then reduce the heat to a simmer. - Cover the pot and let it simmer for about 15-20 minutes. Cook until the potatoes are tender. - Use an immersion blender to puree the soup until smooth. If you don't have one, carefully transfer the soup to a regular blender in batches. - Stir in the heavy cream or coconut cream and heat through. - Season with salt and pepper to taste. - Serve the soup hot. Garnish with chopped chives or parsley for a pop of color and flavor. To make this soup shine, use fresh garlic. Look for firm heads with tight skin. Avoid any with soft spots or green shoots. Fresh thyme adds a nice touch. You can use dried thyme if fresh is not available. Just remember to use less; dried herbs are stronger. A smooth soup feels nice in your mouth. Use an immersion blender for easy mixing. If you use a regular blender, do it in batches. Be careful with hot liquids; they can splash. Blend until it is silky and creamy, with no lumps. For a dairy-free option, swap heavy cream for coconut cream. This keeps the soup rich and smooth. You can also add a squeeze of lemon for brightness. If you want more depth, try adding a splash of soy sauce or tamari. This will enhance the flavors without using dairy. {{image_2}} You can add spices or other veggies to boost the flavor of your soup. For heat, try adding a pinch of red pepper flakes or smoked paprika. These spices add warmth and depth. If you want to sneak in more veggies, consider adding carrots or celery. They will blend well and add some sweetness. You can also include fresh herbs like basil or dill for a fresh twist. Just chop them and stir them in before serving. If you want a dairy-free or vegan option, use coconut cream instead of heavy cream. It gives the soup a rich, creamy texture without dairy. You can also try cashew cream, made from blended soaked cashews and water. This adds a nice nutty flavor and smoothness. If you prefer a lighter soup, use almond milk or oat milk. Just remember to adjust the seasoning since these milks are milder. To make your meal complete, pair the soup with crunchy bread or a fresh salad. A light green salad with vinaigrette balances the creaminess of the soup. For bread, try sourdough or a baguette, perfect for dipping. You can also serve it with a simple cheese platter. A few slices of cheese will add a salty note to the meal. Enjoy these pairings to enhance your creamy roasted garlic soup experience. Store any leftover soup in the fridge. Use airtight containers for best results. Make sure to cool the soup first before sealing it. This keeps the soup fresh and tasty. For freezing, portion the soup into smaller containers. Leave some space at the top. This allows the soup to expand without spilling. You can freeze it for up to three months. To reheat, use the stove for even warming. Pour the soup into a pot over medium heat. Stir often until it’s hot. You can also use a microwave. Heat in short bursts, stirring in between. This helps avoid hot spots and keeps the soup smooth. Yes, you can use regular cream. It will add richness to the soup. Coconut cream makes it dairy-free. The flavor will be slightly different. Coconut cream gives a hint of sweetness. Regular cream adds a more classic taste. Both options create a creamy texture. Choose what suits your diet and taste. The soup lasts about 4 to 5 days in the fridge. Store it in an airtight container. Look for signs of spoilage before eating. If it smells off or has mold, throw it out. Reheat it gently to enjoy its best flavor. Yes, this soup is great for meal prep. You can make it ahead of time. It freezes well too, so you can store it. Portion it into containers and freeze. Thaw it overnight in the fridge before reheating. This way, you have quick meals ready to go. In this blog post, we explored how to make a delicious garlic soup. We listed the simple ingredients you need and shared step-by-step instructions. You learned about tips for flavor, texture, and dietary needs. We also discussed variations, from spices to cream alternatives, and provided storage tips for leftovers. Now, you can enjoy making this soup your own. It’s easy, tasty, and perfect for sharing. Happy cooking!

Creamy Roasted Garlic Soup Flavorful and Easy Recipe

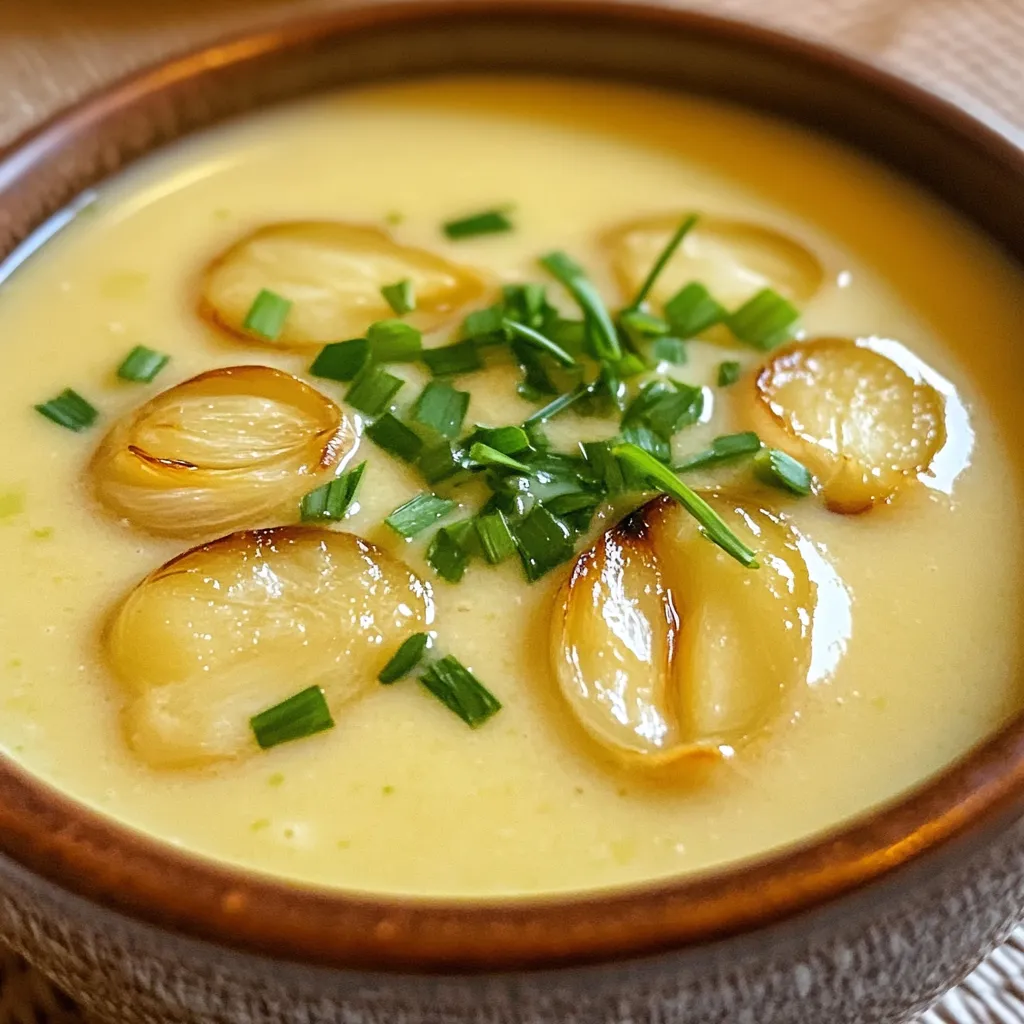
If you’re searching for a warm, comforting dish, you’ll love this creamy roasted garlic soup! It’s packed with rich flavors

To make Air Fryer Garlic Parmesan Brussels Sprouts, gather these simple items: - 1 lb Brussels sprouts, halved - 2 tablespoons olive oil - 4 cloves garlic, minced - 1/4 cup grated Parmesan cheese - 1 teaspoon garlic powder - 1/2 teaspoon salt - 1/4 teaspoon black pepper - 1 tablespoon balsamic glaze (optional) - Fresh parsley, chopped (for garnish) You can swap some ingredients if needed. Here are a few ideas: - Use avocado oil instead of olive oil for a different flavor. - Nutritional yeast can replace Parmesan cheese for a vegan option. - If you lack fresh garlic, garlic powder works well too. Choosing fresh Brussels sprouts is key to a great dish. Here’s how to pick the best: - Look for bright green sprouts without yellow leaves. - Choose firm sprouts that feel heavy for their size. - Avoid any that have brown spots or feel soft. - Smaller sprouts are usually sweeter and more tender. First, gather your ingredients. You will need 1 pound of Brussels sprouts, 2 tablespoons of olive oil, and 4 cloves of minced garlic. You also need garlic powder, salt, black pepper, and grated Parmesan cheese. This mix gives your sprouts great flavor. Next, rinse the Brussels sprouts under cold water. Pat them dry with a clean towel. This helps them crisp up. Now, cut each sprout in half. Place the halved Brussels sprouts in a large mixing bowl. Add the olive oil and toss well. Make sure each sprout is coated. Then, add the minced garlic, garlic powder, salt, and black pepper. Mix again. You want every sprout to be full of flavor. Preheat your air fryer to 375°F (190°C). This step is key for even cooking. Once ready, transfer the seasoned Brussels sprouts to the air fryer basket. Spread them out in a single layer. This ensures they cook properly. Air fry for about 12-15 minutes. Halfway through, shake the basket. This helps them brown evenly. In the last minute of cooking, sprinkle the grated Parmesan cheese over the sprouts. Let it melt slightly. Once cooked, take the Brussels sprouts out of the air fryer. Place them in a serving dish. If you like, drizzle with balsamic glaze for a touch of sweetness. Finally, chop some fresh parsley and sprinkle it on top. This adds a nice color and fresh flavor. Enjoy your Air Fryer Garlic Parmesan Brussels Sprouts! To make your Brussels sprouts super crispy, follow these steps: - Cut them in half. This increases the surface area for browning. - Use enough oil. Two tablespoons of olive oil helps with crisping. - Don't overcrowd the basket. Spread them out so hot air flows freely. - Shake the basket. Halfway through cooking, shake to ensure even crispiness. This will give you that delightful crunch we all love. You can easily change the flavor of your Brussels sprouts. Here are some ideas: - Add crushed red pepper. This gives a spicy kick. - Include bacon bits. They add smokiness and richness. - Use lemon zest. This adds a bright, fresh flavor. For extra fun, try a mix of these toppings. Keeping your air fryer clean is key for great results: - Clean after each use. This prevents old food from affecting taste. - Remove the basket and tray. Wash these with warm, soapy water. - Check the heating element. Wipe it down gently with a damp cloth. These simple steps help keep your air fryer in top shape for delicious meals! {{image_2}} You can mix up the flavors in your Air Fryer Garlic Parmesan Brussels Sprouts. Try adding different spices. Here are a few ideas: - Smoked paprika for a smoky taste. - Cayenne pepper to add some heat. - Lemon zest for a fresh, bright flavor. - Italian herbs like oregano and thyme for a Mediterranean twist. Experiment with these seasonings to find your perfect blend. You can easily make this dish vegan. Just swap the Parmesan cheese for a plant-based cheese. Nutritional yeast is a great option. It adds a cheesy flavor without dairy. You can also use a mix of nuts for a crunchy topping. This way, you keep the delicious taste while staying plant-based. Brussels sprouts are tasty, but you can use other veggies too. Try using cauliflower or broccoli. Cut them into similar sizes to ensure even cooking. You can also mix in carrots or bell peppers for color. Each vegetable brings its own flavor and texture, making your dish unique. Enjoy experimenting with your favorites! To keep your Brussels sprouts fresh, place them in an airtight container. Make sure they cool down first. Store them in the fridge for up to four days. This way, they stay tasty and ready for a quick meal. When you want to eat your leftovers, reheat them in the air fryer. Set it to 350°F (175°C) for about 5 minutes. This keeps them crispy. You can also use a microwave, but they may lose some crunch. If you want to save them for later, freezing is a good option. First, blanch the Brussels sprouts in boiling water for 2-3 minutes. Then, cool them in ice water. Drain and pack them in freezer bags. They last up to three months in the freezer. When ready to eat, cook straight from frozen in your air fryer for a quick side dish. You should air fry Brussels sprouts for about 12 to 15 minutes. Start by preheating your air fryer to 375°F. Place the halved Brussels sprouts in the basket. Shake the basket halfway through to ensure even cooking. They should turn golden brown and crispy when done. Yes, you can use frozen Brussels sprouts. Just remember to thaw and drain them first. This helps avoid excess moisture. If you skip this step, the sprouts may become soggy and won't crisp well. Adjust the cooking time to about 15 to 18 minutes for frozen sprouts. Air Fryer garlic Parmesan Brussels sprouts pair well with many dishes. Consider serving them alongside grilled chicken or fish. They also go great with quinoa or a fresh salad. If you want a hearty meal, serve them with steak or pork chops. Don't forget to add your favorite dipping sauce for extra flavor! Brussels sprouts can be simple and fun to cook. We covered the needed ingredients, how to cook them, and many tips to make them perfect. Don't forget about flavor swaps and how to store leftovers. With these steps, you can create a dish everyone will enjoy. Now it's your turn to try these ideas and share your favorites. Enjoy your cooking!

Air Fryer Garlic Parmesan Brussels Sprouts Delight

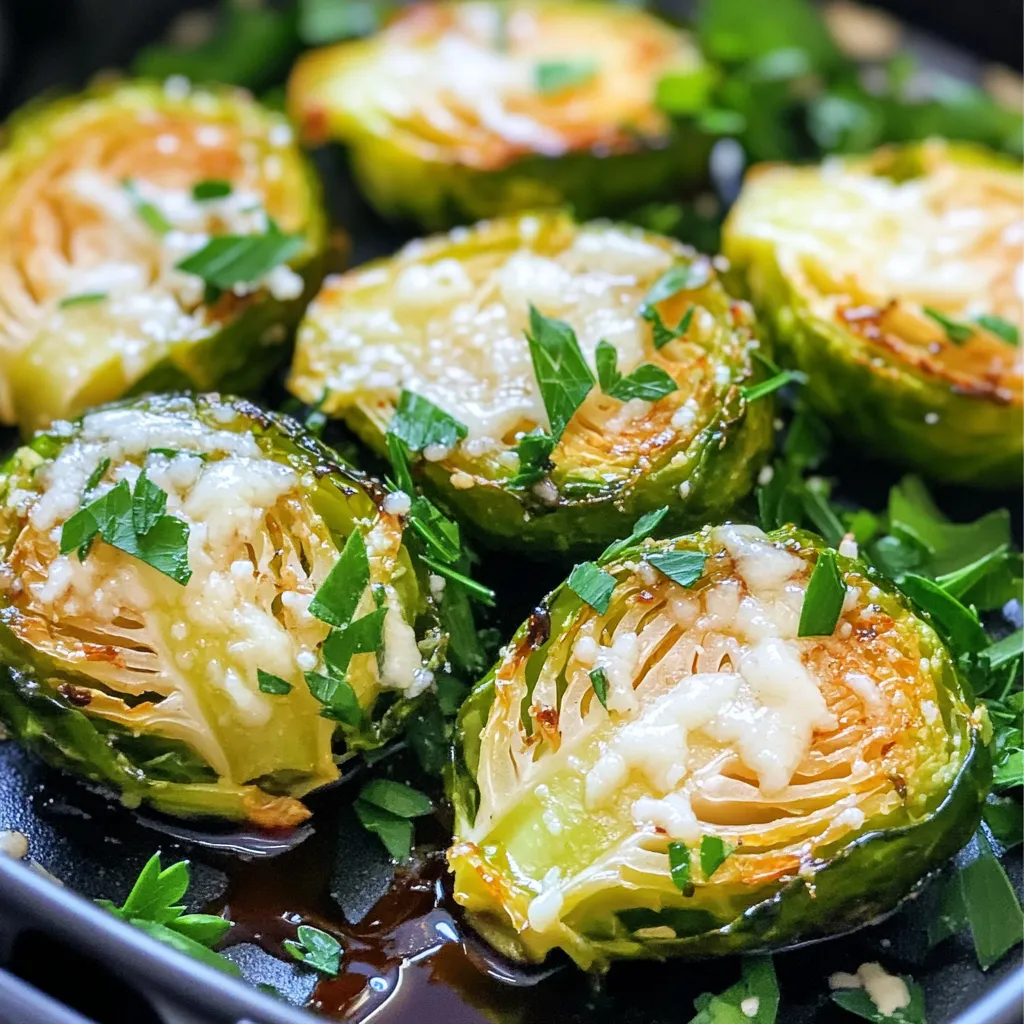
If you think Brussels sprouts can’t be fun, think again! In this blog, I’ll show you how to make Air

- 2 cups rolled oats - 1 cup whole wheat flour - 1/2 cup brown sugar, packed - 1/4 cup honey or maple syrup - 1/2 cup unsweetened applesauce - 1 teaspoon vanilla extract - 1/2 teaspoon baking soda - 1/2 teaspoon salt - 1 teaspoon ground cinnamon - 1 cup fresh or frozen blueberries - 1/4 cup chopped walnuts or almonds (optional) You can swap whole wheat flour for almond flour. This change gives a nutty taste. For sweetness, use agave syrup instead of honey or maple syrup. Applesauce can also be replaced with mashed bananas for a different flavor. If you’re nut-free, skip the walnuts or almonds. Instead, add seeds like sunflower seeds for crunch. Each bar has around 150 calories. It contains about 3 grams of protein and 5 grams of fat. You also get 25 grams of carbs and 2 grams of fiber. With blueberries, these bars are rich in antioxidants too. They offer a healthy start to your day! Start by preheating your oven to 350°F (175°C). Grease a 9x9-inch baking dish. You can also line it with parchment paper. This makes it easy to lift out the bars later. In a large bowl, mix 2 cups of rolled oats, 1 cup of whole wheat flour, and 1/2 cup of brown sugar. Add 1/2 teaspoon of baking soda, 1/2 teaspoon of salt, and 1 teaspoon of ground cinnamon. Stir well to combine all the dry ingredients. This step is key for even flavor. In a separate bowl, whisk together 1/4 cup of honey or maple syrup, 1/2 cup of unsweetened applesauce, and 1 teaspoon of vanilla extract. Mix until everything is well blended. This blend adds sweetness and moisture to your bars. Pour the wet mixture into the dry ingredients. Stir until it is fully combined. The mixture will be thick. Next, gently fold in 1 cup of blueberries and 1/4 cup of chopped walnuts or almonds if you want. This adds a delightful crunch and fruity flavor. Spoon the mixture into the prepared baking dish. Spread it evenly and press down firmly. Bake for 25-30 minutes. Check for doneness by looking for golden edges and a set center. Let it cool for 10 minutes before transferring it to a wire rack. This cooling step helps the bars firm up. After they cool, slice them into squares or rectangles and enjoy! Mixing is key for great blueberry oatmeal breakfast bars. Start with dry ingredients. Combine rolled oats, whole wheat flour, brown sugar, baking soda, salt, and cinnamon in a large bowl. Use a whisk to mix them well. This helps the flavors blend better. When you add wet ingredients, it should be smooth and easy to mix. Texture matters for these bars. For a chewy bite, do not overmix. When you fold in the blueberries, do it gently. You want them to stay whole and not break apart. Press the mixture firmly into the baking dish. This helps the bars hold their shape while baking. Bake until golden brown around the edges for the best result. These bars are great on their own. But, you can make them even better! Try serving them with a dollop of yogurt or a drizzle of honey. They pair well with fresh fruit, like sliced bananas or strawberries. For a crunchy twist, add a sprinkle of nuts on top. Enjoy them as a snack or breakfast on the go! {{image_2}} You can change the flavor of these bars easily. Swap blueberries for other fruits. Use strawberries, raspberries, or bananas. Each fruit brings a new taste. Experiment with dried fruits too. Try cranberries or apricots for a different twist. You can also mix fruits for a fun flavor punch! Making these bars vegan is simple. Replace honey with maple syrup. Use oat flour instead of whole wheat flour for gluten-free bars. Just make sure your oats are certified gluten-free. This way, everyone can enjoy them. You won’t lose flavor or texture by making these swaps. Add-ins can make these bars even better! Try mixing in seeds like chia or flax. They boost nutrition and add crunch. If you love chocolate, you can add chocolate chips. Consider adding spices like nutmeg for warmth. Each choice makes your bars unique and tasty! To keep your blueberry oatmeal breakfast bars fresh, store them in an airtight container. Place parchment paper between layers to prevent sticking. Keep the container in a cool, dry place. These bars stay tasty for up to five days at room temperature. If you want to save some bars for later, freezing works great. First, wrap each bar in plastic wrap. Then, place the wrapped bars in a freezer-safe bag or container. They can last in the freezer for up to three months. When you are ready to eat one, just thaw it overnight in the fridge. To enjoy the best flavor, eat the bars within five days. They may still be safe after that, but freshness may drop. If you notice any changes in smell or texture, it’s best to discard them. Always check for signs of spoilage, especially if they’ve been stored for a while. Yes, you can use quick oats. Quick oats will make the bars softer. They absorb liquid faster, so the texture changes a bit. If using quick oats, check the baking time. You may need to bake them for a shorter time. To make the bars healthier, try these tips: - Use less brown sugar or replace it with a natural sweetener. - Add more fruit, like mashed bananas or chopped apples. - Swap half of the flour for almond flour or oat flour. - Include seeds, like chia or flaxseed, for extra fiber. These changes will boost nutrition and keep the bars tasty. The best way to reheat the bars is in the oven. Preheat the oven to 350°F (175°C). Place the bars on a baking sheet. Heat for about 10 minutes. This keeps them warm and soft. You can also use a microwave. Heat a bar on a plate for 20-30 seconds. Enjoy your warm, delicious bars! This blog post covered the key ingredients and their substitutions. I shared steps for mixing and baking. You learned tips for texture and serving ideas. I also offered variations to customize your bars. Lastly, I explained how to store leftovers for freshness. In conclusion, these baking guidelines make creating delicious bars easy. With simple swaps and smart storage, you can enjoy them longer. Now, it's your turn to bake and delight in every bite!

Blueberry Oatmeal Breakfast Bars Tasty and Wholesome Snack

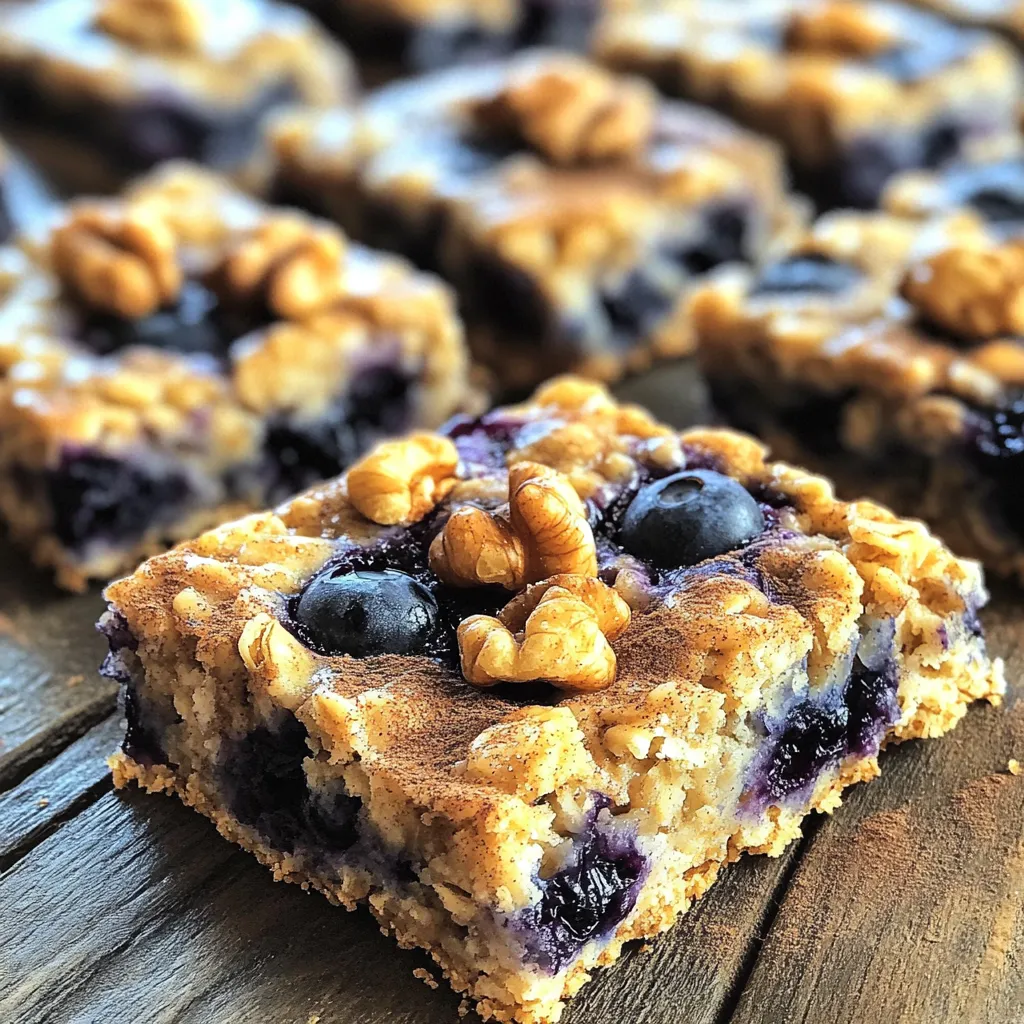
Are you looking for a delicious and nutritious snack for breakfast? Blueberry Oatmeal Breakfast Bars are your answer! These bars

- 1 lb ground chicken - 1/2 cup pesto sauce - 1/2 cup grated Parmesan cheese - 1/2 cup breadcrumbs - 1 large egg - 3 cloves garlic, minced - 1 teaspoon Italian seasoning - Salt and pepper to taste - Olive oil for cooking Using great ingredients makes a big difference. I always choose fresh herbs for my pesto. Look for high-quality Parmesan cheese that is aged and flavorful. Fresh garlic adds a nice kick too. For the breadcrumbs, use plain or Italian-style. If you can find homemade ones, that’s even better. Ground chicken should be fresh and lean. Ingredient quality is key to making tasty meatballs. Fresh ingredients shine through in every bite. Good pesto sauce gives a rich taste. Aged Parmesan cheese adds depth and a savory kick. Fresh garlic enhances the overall flavor. Choosing quality items means your meatballs will be moist and delicious. When you invest in your ingredients, you create meals that impress. To make Pesto Parmesan Chicken Meatballs, start by gathering your ingredients. You will need ground chicken, pesto sauce, grated Parmesan cheese, breadcrumbs, an egg, minced garlic, Italian seasoning, salt, and pepper. In a large mixing bowl, combine these ingredients. Use your hands to mix them well. Be careful not to overmix. This can make the meatballs tough. Once mixed, you’re ready to shape your meatballs into perfect bites. Preheat your oven to 400°F (200°C). This temperature helps the meatballs bake evenly. While the oven heats, start shaping the mixture into meatballs. Aim for about 1 to 1.5 inches in diameter. Place them on a baking sheet lined with parchment paper. Drizzle a little olive oil over the meatballs. This will help them get crispy while baking. Bake them for 20-25 minutes, or until they turn golden brown and are fully cooked. When shaping meatballs, wet your hands slightly. This keeps the mixture from sticking to your hands. Try to keep the size uniform. This ensures they cook evenly. Gently roll the mixture into balls without pressing too hard. You want them light and fluffy. If you like, you can also use a small scoop for consistent sizes. Making perfect meatballs is easy with these simple tips. One of the biggest mistakes is overmixing the meat. This makes the meatballs tough. Use your hands gently to blend the ingredients. Another mistake is not measuring the ingredients. Accurate measurements ensure perfect flavor and texture. Lastly, don’t forget to season well with salt and pepper. It boosts the taste of your meatballs. To keep your meatballs moist, use fresh ground chicken. The fat in the chicken adds flavor and moisture. Adding pesto sauce helps too, as it provides moisture and herbs. Always shape the meatballs gently, avoiding any hard packing. Bake them on parchment paper with a drizzle of olive oil. This helps create a crispy outer layer while keeping the inside juicy. Serve your meatballs on a bed of zucchini noodles or pasta. This adds a nice touch and complements the flavors. Drizzle extra pesto on top for added taste. A sprinkle of fresh basil and Parmesan cheese enhances the look and flavor. For a side dish, consider a simple salad or roasted vegetables. These keep the meal light and fresh. {{image_2}} You can make Pesto Parmesan Chicken Meatballs lighter and healthier. Here are some simple swaps: - Ground chicken: Use ground turkey for less fat. - Breadcrumbs: Try whole wheat or almond flour for a gluten-free option. - Parmesan cheese: Substitute with nutritional yeast for a vegan twist. - Pesto sauce: Make your own with spinach for added nutrients. These swaps help keep the flavor while making the meatballs healthier. To elevate the taste of your meatballs, consider these additions: - Cheese: Mix in mozzarella for a gooey center. - Herbs: Fresh basil or parsley adds a bright flavor. - Spices: A pinch of red pepper flakes gives a nice kick. - Vegetables: Finely chopped spinach or bell peppers can add moisture and nutrition. These enhancements create a more complex flavor profile and make each bite exciting. You can cook these meatballs in various ways for unique results: - Oven-baking: This method keeps them juicy and allows for easy cooking in batches. - Pan-frying: Sear them in olive oil for a crispy crust and rich flavor. - Grilling: Place them on skewers for a smoky taste and fun presentation. Each cooking method brings out different flavors and textures, so feel free to experiment! To keep your Pesto Parmesan Chicken Meatballs fresh, store them in an airtight container. Place parchment paper between layers to prevent sticking. They will stay good for up to three days in the fridge. Make sure to let them cool completely before sealing the container. This helps keep the moisture locked in and avoids sogginess. If you want to save some for later, freezing is a great option. Arrange the cooked meatballs on a baking sheet. Make sure they are not touching each other. Freeze them for about one hour until firm. Once frozen, transfer them to a freezer bag. They can last up to three months in the freezer. Label the bag with the date. This way, you know when to use them. When you’re ready to enjoy your meatballs again, reheating them right is key. For best results, heat them in the oven at 350°F (175°C). Place them on a baking sheet for about 10-15 minutes. This helps retain their crispiness. You can also microwave them, but they may lose some texture. To avoid this, cover them with a damp paper towel while heating. Enjoy them warm and tasty! Yes, you can use turkey. Ground turkey makes a great swap for ground chicken. It will still taste good with the pesto and Parmesan. Just be sure to check the cooking time. Turkey may need a bit longer to cook through. These meatballs can last up to three days in the fridge. Store them in an airtight container. Make sure they cool down before putting them away. This keeps them fresh and tasty for your next meal. You have many choices! Serve these meatballs over pasta or zucchini noodles. They also pair well with a fresh salad or garlic bread. A drizzle of extra pesto on top adds flavor and looks great too. In this blog post, we explored the key ingredients for making tasty meatballs. I emphasized the need for high-quality ingredients and shared expert tips on preparation and cooking. We covered common mistakes to avoid and offered delicious variations to try. Remember, proper storage and reheating methods keep leftovers fresh. Choose the right ingredients and techniques, and you’ll create perfect meatballs every time. Enjoy your cooking journey, and don’t hesitate to experiment with flavors and methods!

Pesto Parmesan Chicken Meatballs Savory Flavor Boost

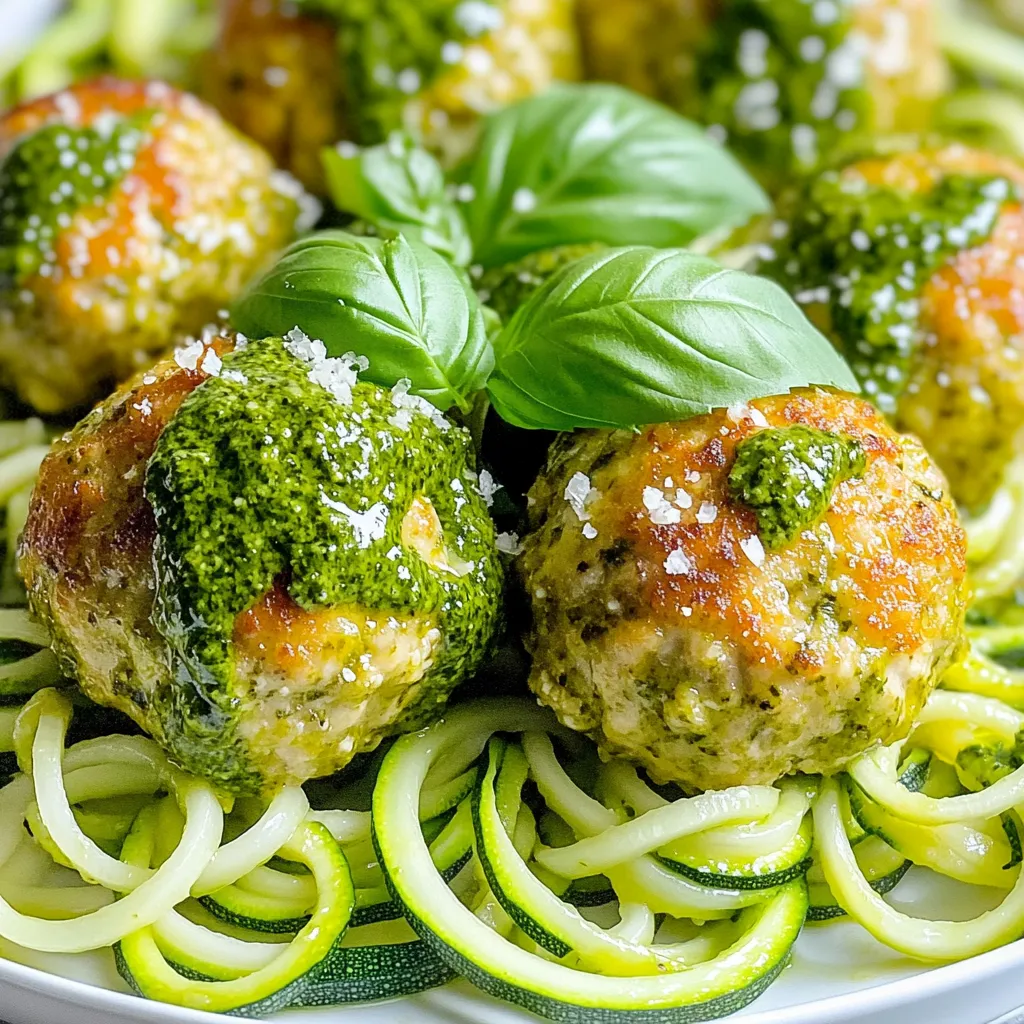
Looking to spice up your dinner menu? Pesto Parmesan Chicken Meatballs are here to impress! They’re tasty, easy to make,

Older posts
Newer posts
← Previous Page1 … Page7 Page8 Page9 … Page132 Next →

dsad

© 2025 pureeatsnow • Built with GeneratePress

Our Policies

  • Copyright Policy
  • Cookie Policy
  • GDPR Policy
  • Privacy Policy
  • Disclaimer
  • Terms Of Use

More Information

  • Home
  • About
  • Contact
  • Appetizers
  • Dessert
  • Dinner
  • Drinks
©2025, pureeatsnow About Back To Top