Skip to content
DisclaimerTerms Of UseGDPR PolicyCookie Policy

pureeatsnow

  • Home
  • Drinks
  • Appetizers
  • Dinner
  • Dessert
  • About
  • Contact
  • Privacy Policy
DisclaimerTerms Of UseGDPR PolicyCookie Policy

Rachel

To make delicious Crock Pot Birria Tacos, you need the right ingredients. Here is what you will need: - 2 pounds beef chuck roast, trimmed and cut into large chunks - 2 cups beef broth - 4 dried guajillo chilies, stems and seeds removed - 2 dried ancho chilies, stems and seeds removed - 1 onion, quartered - 4 cloves garlic, minced - 12 corn tortillas - 2 cups shredded mozzarella or Chihuahua cheese These main ingredients create a rich, tasty filling for your tacos. The beef chuck roast cooks perfectly in the Crock Pot. It becomes tender and flavorful over time. Spices bring the dish to life. You will need these: - 2 teaspoons ground cumin - 1 teaspoon dried oregano - 1 teaspoon smoked paprika - ½ teaspoon ground cinnamon - Salt and pepper to taste These spices add depth to the meat. The cumin and oregano give it a warm flavor, while the smoked paprika adds a hint of smokiness. The cinnamon brings a unique twist. Garnishes make your tacos look and taste better. Consider these options: - 1/4 cup fresh cilantro, chopped (for garnish) - Lime wedges (for serving) - Sliced radishes (for garnish) Fresh cilantro adds a bright touch. Lime wedges give a zesty kick. Sliced radishes add crunch and color. Feel free to mix and match these garnishes for your perfect taco! For the full recipe, check out the details above. To start, you need to prepare the chilis. Take your dried guajillo and ancho chilis and place them in a dry skillet. Heat the skillet over medium heat. Toast the chilis for about 2-3 minutes until they smell nice. This step brings out their flavor. After that, put them in a bowl and cover them with hot water. Let them soak for about 15 minutes until they become soft. Once they are soft, drain them and set them aside for later. Next, you will make the birria sauce. Grab a blender and add the soaked chilis. Then, pour in the beef broth. Add the quartered onion and minced garlic. Now, sprinkle in the ground cumin, oregano, smoked paprika, and ground cinnamon. Don’t forget a pinch of salt and pepper to taste. Blend all these ingredients until the mixture is smooth. This sauce is full of rich flavors that will make your tacos amazing. Now it’s time to cook the beef. Place the beef chunks in the bottom of your Crock Pot. Pour the blended sauce over the beef, making sure every piece is coated. Cover the Crock Pot and cook on low for 8 hours or on high for 4 hours. You want the beef to be fork-tender. Once it's done, take the beef out of the pot. Use two forks to shred the beef into small pieces. Return the shredded beef to the pot and mix it with the sauce. Now your filling is ready for delicious tacos! To get the best flavor in your birria, use fresh ingredients. Fresh herbs and spices make a big difference. Toast the dried guajillo and ancho chilies before soaking. This step brings out their rich, smoky taste. Blend them well with the broth and spices to create a smooth sauce. Make sure to coat the beef evenly before cooking. This helps the meat soak up all the flavors. Crispy tacos are a must! To achieve this, warm the tortillas in a non-stick skillet first. This softens them and makes them easier to fold. After adding the filling, fold the tortillas and spray them lightly with cooking oil. Cook them in the skillet until golden brown. Flip them carefully to avoid spilling the filling. Keep an eye on the cooking time. Two to three minutes per side often gives the best crunch. Different meats can change the cooking time. For beef, cook on low for eight hours or high for four hours. If you use lamb, it may need a bit longer. Pork can also work well; however, it should cook for about six hours on low. Always check if the meat is fork-tender; this means it’s ready to shred. For best taste, stick with cuts that have some fat. Fat adds flavor and moisture. For a full recipe, check out the complete steps to create these delicious Crock Pot Birria Tacos. {{image_2}} You can make birria tacos without meat. Use jackfruit or mushrooms as the base. These options soak up flavors well. For the sauce, stick with the same spices and chilies. Blend them just like the original recipe. Cook the jackfruit or mushrooms until tender. This keeps the same rich taste while being plant-based. Beef is not the only choice for birria. You can try lamb or goat meat. Both give a unique twist to the dish. If you use chicken, adjust the cooking time. Chicken cooks faster, so aim for 4 hours on low. Each meat option adds its own flavor, so feel free to experiment. While corn tortillas are classic, you can switch things up. Try flour tortillas for a softer bite. If you want something different, use sweet potato or cauliflower tortillas. These options are fun and gluten-free. Each tortilla type changes the taco’s texture, making each bite exciting. To store leftover birria, let it cool first. Place the birria in an airtight container. It will stay fresh in the fridge for up to three days. Make sure to keep the broth separate if you want to enjoy it later. You can freeze birria too! Divide it into portions. Use freezer-safe bags or containers. Remove as much air as possible to prevent freezer burn. It can last up to three months in the freezer. Remember to label the bags with the date. When ready to eat, thaw the birria in the fridge overnight. To reheat, warm it on the stove over low heat. Stir occasionally to prevent sticking. If you froze the broth, add it back for extra flavor and moisture. Enjoy it hot with your crispy tacos! For the full recipe, check out the steps above. Birria tacos are a tasty Mexican dish. They feature slow-cooked meat, often beef, with rich flavors. The meat cooks in a spicy broth made from dried chilies and spices. When served, the tacos are crispy and often dipped in the broth. They are usually topped with cheese, onions, and cilantro. Many enjoy them with lime wedges for extra zest. Yes, you can use other methods. A pressure cooker works well for faster cooking. It can cut the cooking time in half. You can also use a stovetop pot. Just simmer the meat on low heat for about 3-4 hours. The goal is to make the meat tender and flavorful. Just ensure you keep the broth rich and thick. To spice up your tacos, add more dried chilies. Guajillo and ancho chilies are great options. You can also include chipotle peppers for a smoky heat. Adjust the amount based on your taste. Adding a pinch of cayenne pepper or hot sauce can also boost the heat. Just be careful not to overpower the rich flavors. In this blog post, we explored how to make delicious Crock Pot Birria Tacos. We discussed key ingredients, step-by-step instructions, and tips for the best flavor. We also covered variations, storage tips, and frequently asked questions about birria tacos. These tacos are rich in taste and fun to make. With the right ingredients and methods, you’ll enjoy tasty meals. Now, it's time to gather your ingredients and start cooking! You won't regret it.

Crock Pot Birria Tacos Flavorful and Easy Recipe

Are you ready to dive into a world of flavor with Crock Pot Birria Tacos? This easy recipe brings you

To make a tasty Chicken Katsu Bowl, you need the following: - 2 boneless, skinless chicken breasts - 1 cup panko breadcrumbs - 1/2 cup all-purpose flour - 2 large eggs - 1 tablespoon soy sauce - 2 cups cooked sushi rice - 1/4 cup tonkatsu sauce - 1/4 cup mayonnaise (optional, for drizzling) - 1 green onion, sliced (for garnish) - 1 cup shredded cabbage - 1 small carrot, julienned - Salt and pepper to taste - Oil for frying These ingredients create a crunchy and flavorful experience. The panko breadcrumbs give the dish its signature crispiness. Chicken breasts are easy to cook and pair well with the rice and veggies. You can change your Katsu Bowl to fit your taste. Consider adding: - Pickled ginger for a tangy kick - Avocado slices for creaminess - Edamame for extra protein - Sesame seeds for crunch These extras can boost flavor and texture. Feel free to mix and match based on what you like. To make your meal even better, serve it with these sides: - Miso soup for warmth - Steamed broccoli for color - Japanese pickles for a nice contrast These sides complement the Katsu Bowl well. They add balance and more taste to your meal. You can find the full recipe [Full Recipe] to guide you through this delicious dish. Enjoy cooking! Start with your chicken breasts. Place them between two pieces of plastic wrap. Use a meat mallet to pound them gently until they are about 1/2 inch thick. This helps the chicken cook evenly. Season both sides with salt and pepper. Make sure to cover all areas for flavor. Now it’s time for the breading. Gather three shallow bowls. In the first bowl, add all-purpose flour. In the second bowl, beat two eggs and mix in a tablespoon of soy sauce. This adds extra flavor. In the last bowl, add panko breadcrumbs. This will give your katsu that beautiful crunch. Heat about 1/2 inch of oil in a large frying pan over medium heat. Wait until the oil shimmers. Carefully place the breaded chicken into the hot oil. Fry for about 4-5 minutes on each side. You want it golden brown. Use a meat thermometer to check that the inside reaches 165°F (75°C). After frying, move the chicken to a paper towel-lined plate to drain excess oil. Let it rest for a few minutes, then slice it into strips. With these steps, your katsu will be fresh and crunchy. Now, let’s put it all together in a bowl. Follow the [Full Recipe] to complete your delicious meal! To get that perfect crunch, start with panko breadcrumbs. They are lighter and crispier than regular breadcrumbs. Make sure to press the breadcrumbs gently onto the chicken. This helps them stick better while frying. Also, use enough oil in your pan. The oil should cover half the chicken. This allows for even cooking and a golden crust. You can add flavor in simple ways. Try marinating the chicken in soy sauce for about 30 minutes. This gives it a tasty base. Also, mix some spices into your flour. A pinch of garlic powder or paprika can add a nice kick. Don't forget the tonkatsu sauce! It adds sweetness and tang. Drizzling mayonnaise on top can give it a creamier texture too. Avoid using too much flour on the chicken. It can make your katsu heavy instead of light. Also, don’t rush the frying process. Frying too quickly can burn the outside while leaving the inside raw. Remember to check the temperature of the chicken. It should reach 165°F (75°C) for safety. Finally, let the cooked chicken rest before slicing. This keeps it juicy and flavorful. For the full details on making this dish, check out the Full Recipe! {{image_2}} Pork katsu bowls use tender pork instead of chicken. They offer a rich, savory taste. For this dish, you can use pork loin or pork chops. The steps are similar to chicken katsu. First, season and bread the pork like the chicken. Fry it until golden brown, then slice it. Serve it over sushi rice with fresh veggies. The tonkatsu sauce adds a sweet and tangy kick. Tofu katsu bowls are perfect for those who prefer plant-based meals. Start with firm tofu for a great texture. Press the tofu to remove excess moisture. Then slice it into thick pieces. Coat the tofu in flour, dip in egg or a plant-based substitute, and cover with panko. Fry until crispy and serve it over rice. You can add a drizzle of tonkatsu sauce to enhance the flavor. This dish is not only tasty but also healthy. Katsu bowls vary across Japan, showing local tastes. In some areas, people use different meats like beef or shrimp. Others might add unique toppings like kimchi or pickled vegetables. Some regions even serve katsu with curry sauce instead of tonkatsu sauce. Each variation brings new flavors and textures. Try different styles to find your favorite! Each bowl tells a story of its origin. For those who want to explore, the crunchy chicken katsu bowl is a classic and a great start. Check out the Full Recipe for more details. After enjoying your crunchy chicken katsu bowl, store leftovers in an airtight container. This helps keep the chicken crispy and the rice fresh. If you have extra katsu, separate it from the rice and veggies. This way, they won’t get soggy. You can keep leftovers in the fridge for up to three days. To reheat your katsu bowl, use an oven or an air fryer. Preheat the oven to 350°F (175°C). Place the chicken on a baking sheet. Heat it for about 10 minutes. This keeps it crispy. You can also use an air fryer at 350°F (175°C) for about 5-7 minutes. Avoid the microwave, as it makes the chicken soft. The cooked chicken katsu lasts about three days in the fridge. Sushi rice is best eaten within two days. Cabbage and carrots can stay fresh for about a week if stored properly. Always check for any signs of spoilage before using. Keeping track of your food helps reduce waste and ensures you enjoy fresh meals. Katsu comes from Japan and is short for "katsuretsu." It means cutlet. The dish gained popularity in the late 19th century. It has roots in European cooking, especially the French dish "cotoletta." Katsu features breaded and fried meat, often pork or chicken. Over time, it evolved into a beloved comfort food in Japan. Yes, you can make Katsu bowls gluten-free. Use gluten-free panko breadcrumbs and flour. Many brands offer these options. Ensure that other ingredients like soy sauce are also gluten-free. This way, you can enjoy a crunchy and tasty Katsu bowl without gluten. Tonkatsu sauce is the classic choice for Katsu bowls. It has a rich, sweet, and tangy taste. You can also try curry sauce for a unique flavor twist. Some people enjoy drizzling spicy mayo for extra kick. Each sauce adds a different layer to your Katsu experience. To adjust the recipe for meal prep, cook larger batches of Katsu and rice. Store them separately to keep them fresh. You can slice the Katsu and store it in airtight containers. Reheat the chicken in an oven to keep it crispy. This makes for easy, delicious meals throughout the week. For the full recipe, check out the Crunchy Chicken Katsu Bowl section. In this blog post, we explored the delicious Crunchy Chicken Katsu Bowl. We covered main and optional ingredients and even suggested tasty side dishes. The step-by-step guide helped you prepare and cook the katsu perfectly. We shared tips for achieving that crunchy texture and avoiding common mistakes. Plus, we looked at tasty variations and how to store any leftovers. Katsu bowls are fun and easy to make. With these insights, you'll impress your friends and family. Happy cooking!

Japanese Katsu Bowls Fresh and Crunchy Delight

Are you ready to find your new favorite meal? Japanese Katsu bowls are fresh, crunchy, and packed with flavor. In

To make mini crème brûlée cheesecakes, you will need these key ingredients: - 1 cup graham cracker crumbs - 2 tablespoons granulated sugar - 4 tablespoons unsalted butter, melted - 16 ounces cream cheese, softened - 1 cup granulated sugar - 2 large eggs - 1 teaspoon vanilla extract - 1/2 cup heavy cream - 1/4 cup brown sugar (for topping) These ingredients come together to create a rich and creamy cheesecake with a delightful crunchy top. You can add a touch of freshness with these optional garnishes: - Fresh berries - Mint leaves These garnishes not only look great but also enhance the flavor. To make these cheesecakes, gather the following equipment: - Muffin tin - Mixing bowls - Kitchen torch Having the right tools will help ensure your cheesecakes turn out perfect. You can find the full recipe in the provided link. 1. Preheat the oven to 325°F (160°C). This step helps ensure even baking. 2. Combine and form the graham cracker crust. In a medium bowl, mix the graham cracker crumbs, granulated sugar, and melted butter. Stir until it feels crumbly. 3. Press the mixture into muffin cups. Line a muffin tin with paper liners or grease it. Use about 1 tablespoon of the mixture for each muffin cup. Press it firmly to form a crust. 4. Bake the crust. Place the muffin tin in the oven and bake for 5-7 minutes. Look for a slight golden color. Remove from the oven and let it cool slightly. 1. Beat and combine cream cheese with sugar. In a large bowl, use a mixer to beat the softened cream cheese until smooth. Gradually add granulated sugar, mixing well. 2. Mix in eggs, vanilla extract, and heavy cream. Add the eggs one at a time, mixing after each. Then, add the vanilla extract and heavy cream. Mix until it is completely smooth with no lumps. 1. Fill the muffin cups. Pour the cheesecake filling over the cooled crusts. Fill each cup about 3/4 full to allow for rising. 2. Bake the cheesecakes. Place the muffin tin back in the oven. Bake for about 20-25 minutes. The centers should be set but still slightly jiggly. 3. Let cool to room temperature. Remove the tin from the oven and let it rest until cool. 4. Chill the cheesecakes. Once cooled, refrigerate the cheesecakes for at least 2 hours. For the best results, chill them overnight. Now you are ready to enjoy these delightful mini crème brûlée cheesecakes! For the full recipe, follow along with the steps above. To get a great texture, start by softening your cream cheese. This step makes it easier to mix. You can leave it out for about 30 minutes before using it. When mixing, use a hand or stand mixer. Mix the cream cheese first until it’s smooth. Then add your sugar slowly. This helps avoid lumps. Always scrape the sides of the bowl to ensure even mixing. You have two main options for caramelizing the top of your mini cheesecakes. A kitchen torch gives you precise control. Hold it close to the sugar and move it around. This method creates a nice, crispy top. If you don’t have a torch, you can use the broiler method. Place the cheesecakes in the oven on high for a few seconds. Watch closely to prevent burning. Keep the oven door slightly open to monitor closely. The best way to serve these cheesecakes is chilled. They taste fantastic when cold. A good rule is to let them chill for at least two hours. Pair your mini cheesecakes with coffee or tea. The flavors work well together. If you want extra flair, add fresh berries or mint leaves on top. These add color and a fresh taste. For a fun twist, consider serving with dessert wine. It enhances the sweetness nicely. For the complete recipe, check out the [Full Recipe]. {{image_2}} You can easily change the taste of your mini crème brûlée cheesecakes by adding different flavors. Try mixing in chocolate or fruit purees. Chocolate gives a rich taste, while fruit purees add freshness. You can also infuse your cheesecakes with almond or lemon flavors. A splash of almond extract brings a nutty warmth. A bit of lemon zest gives a bright, zesty kick. These simple changes keep your dessert fun and exciting. Switching crusts can change the whole vibe of your dessert. Instead of the usual graham cracker crust, try using cookies like Oreos or vanilla wafers. These add a unique twist and bring their own flavors. If you're looking for gluten-free options, you can use almond flour or gluten-free cookies. These options make your cheesecakes friendly for everyone. Your presentation can also have fun variations. You can use tart pans instead of muffin tins. This gives a beautiful shape and makes serving easy. Another great idea is to layer your cheesecakes with fruit compote. This adds color and enhances flavor. The mix of creamy cheesecake and fruity compote is delicious. For the full recipe, check out the details above. You can store mini crème brûlée cheesecakes in the fridge for up to five days. To keep them fresh, wrap each cheesecake tightly in plastic wrap. This helps prevent them from absorbing other smells in the fridge. If you have leftovers, a sealed container works well too. You can freeze the cheesecakes either before or after you brûlée them. If you choose to freeze them after, make sure they are fully chilled first. To thaw, move them to the fridge for a few hours or overnight. Never thaw at room temperature. Serve them cold or let them sit for a short while at room temp for best taste. These cheesecakes are safe to eat for up to a week when stored properly. Check for signs of spoilage, like an off smell or discoloration. If they look or smell bad, it’s best to toss them. Enjoy your mini crème brûlée cheesecakes while they are fresh for the best flavor! For the full recipe, check out the detailed guide. Yes, you can make these mini cheesecakes ahead of time. They taste great after chilling. You can keep them in the fridge for up to three days. This makes them perfect for parties or special occasions. Just remember to brûlée the tops right before serving for the best texture. If you lack a kitchen torch, don’t worry! You can use your oven's broiler instead. Just sprinkle brown sugar on top of the cheesecakes and place them under the broiler. Watch them closely, as they can burn quickly. It takes just a few seconds to get that nice, crispy layer. Absolutely! You can adjust the sugar in this recipe. Use less granulated sugar if you prefer a less sweet dessert. You can also substitute with natural sweeteners like honey or maple syrup. Just remember, it may change the texture and flavor a bit. This blog covers how to make mini crème brûlée cheesecakes, from ingredients to storage. You learned about the key ingredients like cream cheese and graham crackers. I shared step-by-step instructions and tips to ensure perfect texture and toppings. You can customize these treats with different flavors and crusts. Storing them properly keeps them fresh and tasty. Now, you can impress your friends and family with a delicious dessert. Enjoy creating and tweaking your own version of this delightful cheesecake!

Mini Crème Brûlée Cheesecakes Delightful Dessert Treat

Are you ready to indulge in a dessert that’s both creamy and crunchy? In this post, I’ll share my recipe

- 1 pound large sea scallops, patted dry - 2 tablespoons olive oil - 2 tablespoons unsalted butter - 1 garlic clove, minced - 1 teaspoon fresh thyme leaves - Zest of 1 lemon - Salt and freshly ground black pepper to taste - Fresh parsley, chopped (for garnish) - Lemon wedges - Recommended side dishes The main ingredients are simple but important. Scallops are the star of this dish. Their sweet and delicate flavor shines through. Drying the scallops helps them get that nice crisp. Olive oil and butter add richness and depth. Garlic gives a warm, inviting aroma. For seasoning, fresh thyme and lemon zest brighten the dish. Salt and pepper add basic flavor. Don't skip the parsley; it adds color and freshness. When serving, lemon wedges give a zesty kick. You can pair scallops with a side salad, rice, or veggies. These sides enhance the meal without overpowering the scallops. Check the Full Recipe for more tips on preparation. Start by drying your scallops well. This is key for getting them crispy. Wet scallops will steam instead of sear. Use a paper towel to pat them dry. Next, season them. Sprinkle salt and black pepper on both sides. This simple step enhances their natural flavor. You can also add a pinch of your favorite spice for extra kick. Now, heat a large skillet. Pour in the olive oil and let it warm over medium-high heat. You want it to shimmer, which takes about 2-3 minutes. Carefully place the scallops in the hot skillet. Don’t overcrowd the pan; give them space. This helps achieve a nice golden crust. Let them sear for 2-3 minutes without moving them. Once they look golden, it’s time to flip. Use tongs to gently turn them over. Add the butter, minced garlic, and fresh thyme to the pan. This adds great flavor! Cook for another 2 minutes while basting the scallops with the melted butter. When done, take the scallops out and put them on a plate lined with paper towels. This absorbs extra oil and keeps them crispy. To serve, focus on presentation. Arrange the scallops neatly on a plate. A sprinkle of lemon zest adds color and flavor. Finish with fresh parsley for a pop of green. Don’t forget the lemon wedges! They give a nice zing when served. For the full recipe, you can check the earlier section. Enjoy your crispy pan-seared scallops! To get that golden crust on your scallops, follow these key factors: - Dry the scallops: Moisture is the enemy of crispiness. Use a paper towel to pat them dry. - Use high heat: A hot skillet helps sear the scallops quickly. This locks in the juices. Don't overcrowd the pan. When scallops sit too close, they steam instead of sear. Cook them in batches if needed. Each one deserves its space for a perfect crust. Want to add some flair? Try these herbs and spices: - Fresh thyme: It pairs well with scallops and adds a nice earthy note. - Garlic: Minced garlic gives a punch of flavor as it cooks in butter. You can also whip up a quick sauce. Melt extra butter and mix in some lemon juice. This adds richness and brightness to your dish. Be careful not to overcook your scallops. They need just 2-3 minutes per side. If you cook them too long, they turn rubbery. Seasoning matters too. Use enough salt and pepper. This enhances the natural taste of the scallops and makes each bite pop. {{image_2}} If you can't find scallops, try these options: - Shrimp: They cook fast and have a similar texture. - Fish fillets: Use firm fish like cod or halibut. Changing herbs and seasonings can also add a twist. For example: - Use basil or dill instead of thyme for a fresh flavor. - Add a pinch of chili flakes for heat. You can prepare scallops in different ways. Oven-baked scallops: Preheat your oven to 400°F. Place seasoned scallops in a baking dish. Drizzle with olive oil and bake for about 10 minutes. This method gives a tender and juicy bite. Grilled scallops: Skewer the scallops to keep them from falling through the grill. Brush with oil and grill for 2-3 minutes on each side. Grilling adds a smoky flavor that is hard to resist. Pairing your scallops with a sauce elevates the dish. Creamy garlic sauce: Sauté garlic in butter, then stir in cream and parmesan. This rich sauce coats the scallops beautifully. Lemon-dill sauce: Mix lemon juice, fresh dill, and olive oil for a light, zesty sauce. It brings out the sweetness of the scallops. For the full recipe, check out the crispy pan-seared scallops. To keep your crispy pan-seared scallops fresh, place them in an airtight container. This helps seal in their taste and texture. If you have a little space, add a paper towel to absorb moisture. Store them in the fridge for up to two days. Avoid stacking them; this can ruin their crispiness. If you want to freeze scallops, ensure they are fully cooled. Then, place them in a freezer-safe bag. Remove as much air as possible before sealing. These scallops can last in the freezer for about three months. Remember, proper storage helps maintain their flavor. When reheating scallops, you want to keep them crispy. The best method is to use a skillet. Heat it over medium heat and add a little olive oil. Cook the scallops for just a minute on each side. This helps them regain that lovely crunch. You can also use an oven. Preheat it to 350°F (175°C). Spread the scallops on a baking sheet. Heat them for about 5-7 minutes. This method works well but may not keep them as crispy as the skillet. When serving leftover scallops, check their texture first. If they seem a bit soft, try to crisp them up again. You can add a squeeze of fresh lemon juice to enhance the flavor. Pair them with a light salad or a fresh vegetable side. This adds freshness and balances the dish. Enjoying scallops after storage can be just as delightful as fresh ones if done right. For the full recipe, check out the Crispy Pan-Seared Scallops section above. You can tell when scallops are done by their color and texture. They should be opaque and firm to the touch. The outside will have a nice golden crust. If they feel soft or mushy, they need more time. Cook them for about 2-3 minutes on each side. Always trust your senses. If they smell sweet and fresh, they are likely good. Yes, you can use frozen scallops! Just make sure to thaw them first. Place them in the fridge overnight for best results. If you’re in a hurry, you can run them under cold water for 30 minutes. After thawing, pat them dry with a paper towel. This step helps them sear better. They can become soggy if not dried. Crispy pan-seared scallops pair well with many sides. Here are a few great ideas: - Garlic mashed potatoes: Creamy and flavorful, they balance the scallops well. - Sautéed asparagus: This adds a nice crunch and bright color. - Quinoa salad: A fresh option that adds texture and nutrition. - Lemon risotto: The creaminess complements the scallops perfectly. Feel free to explore these recipes for a complete meal! For the full recipe, check out the detailed instructions above. In this post, I shared how to cook perfect crispy scallops. We covered key ingredients, tips for crispiness, and how to serve them well. I've also included ways to store leftovers and reheat them without losing texture. Remember, avoid overcooking and use fresh herbs for the best flavor. With these tips, you’ll impress anyone at your table. Now, go enjoy making your delicious scallop dish!

Crispy Pan-Seared Scallops Flavorful and Quick Dish

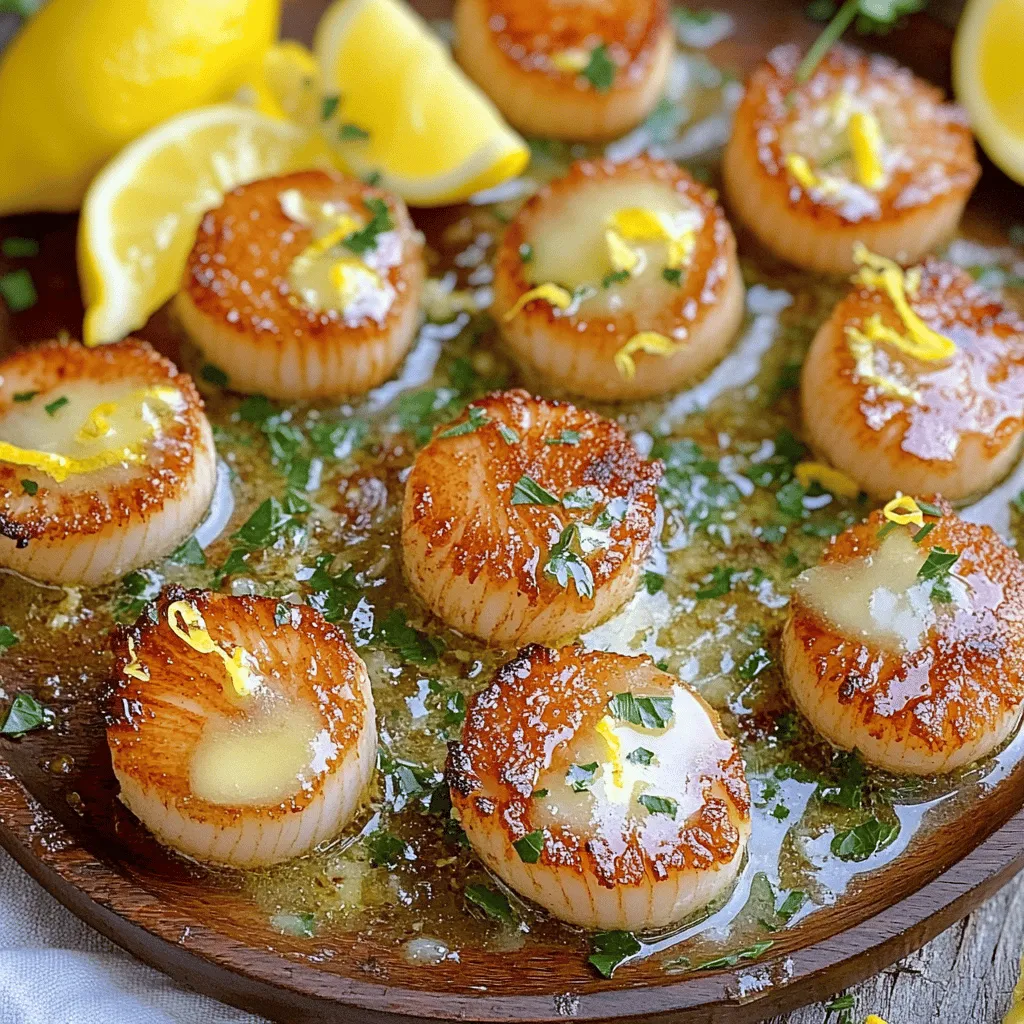
Ready to impress with a quick, flavorful dish? Let’s dive into making crispy pan-seared scallops! This rich yet simple recipe

To create the perfect Bang Bang Shrimp, gather these key ingredients: - 1 pound large shrimp, peeled and deveined - 1 cup buttermilk - 1 cup all-purpose flour - 1/2 cup cornstarch - 1 teaspoon paprika - 1/2 teaspoon garlic powder - 1/2 teaspoon salt - 1/4 teaspoon black pepper - Oil for frying - 1/2 cup mayonnaise - 2 tablespoons sweet chili sauce - 1 tablespoon Sriracha (adjust to taste) - 1 teaspoon lime juice - Green onions, sliced (for garnish) - Sesame seeds (for garnish) These ingredients make the shrimp crispy and delicious. The buttermilk adds flavor and tenderness. The blend of spices gives a warm kick to every bite. To make your dish pop, consider these optional garnishes and additions: - Fresh cilantro for a herbaceous touch - Lime wedges for extra zest - Chopped peanuts for crunch These extras can enhance the dish's flavor and texture. They also make for a beautiful presentation. If you have dietary restrictions, here are some substitutions: - Use almond milk or oat milk instead of buttermilk for a dairy-free option. - Gluten-free all-purpose flour works well in place of regular flour. - Swap mayonnaise with vegan mayonnaise for a plant-based version. These swaps keep the essence of Bang Bang Shrimp while catering to different diets. You can enjoy this dish without worry! For the full recipe, check out Bang Bang Shrimp Delight. Start by soaking your shrimp in buttermilk. Use about 1 cup for 1 pound of shrimp. Let them soak for at least 30 minutes. This step makes the shrimp tender and adds flavor. After soaking, drain the shrimp well. The excess buttermilk should drip off before you move to the next step. In another bowl, combine your dry ingredients. You will need 1 cup of flour, 1/2 cup of cornstarch, 1 teaspoon of paprika, 1/2 teaspoon of garlic powder, 1/2 teaspoon of salt, and 1/4 teaspoon of black pepper. Whisk these together until they mix well. This mixture will give your shrimp a crispy coating. Heat oil in a large skillet over medium-high heat. Aim for about 350°F or 175°C. You can test if the oil is ready by dropping a small piece of batter into it. If it sizzles, you’re set. Take each shrimp and dredge it in the flour mixture. Make sure each shrimp is fully coated. Carefully place the shrimp in the hot oil. Fry them for about 2-3 minutes per side until golden brown. After frying, place the shrimp on a paper towel-lined plate. This helps remove extra oil. Once your shrimp are crispy, you can dip them in the Bang Bang sauce. For the full recipe, check out the details above. To get that perfect crispiness, you need to pay attention to two main things: the oil temperature and the batter. First, heat your oil to about 350°F (175°C). You can test this by dropping a little batter in the oil; if it sizzles, you’re ready. Next, use a mix of flour and cornstarch for the batter. This combo makes the shrimp extra crispy. Coat each shrimp well, but don’t overload them. Fry them in batches to keep the oil hot and maintain that crunch. Bang Bang sauce is key to this dish. Start with a base of mayonnaise. It gives creaminess and richness. Then, add sweet chili sauce for a touch of sweetness. To kick it up, include Sriracha for heat. You can also mix in some lime juice for freshness. If you want more tang, try adding a splash of vinegar. Adjust the spice level to your liking. Taste as you go and find what makes your flavor buds dance. One common mistake is not soaking the shrimp long enough. Soaking them in buttermilk for at least 30 minutes is essential. This step helps the shrimp stay juicy. Another mistake is crowding the pan while frying. Overcrowding cools the oil and leads to soggy shrimp. Always fry in small batches to ensure they cook evenly and stay crispy. Lastly, don’t skip the garnishes! Green onions and sesame seeds add flavor and make your dish look great. Enjoy your Bang Bang shrimp! {{image_2}} To make Bang Bang shrimp spicier, add more Sriracha. You can also use crushed red pepper flakes. Mix these into the sauce for a heat boost. Adjust the spice to your taste. A little goes a long way, so start small. You can even switch the sweet chili sauce for a spicy version. This will give your dish a fiery kick! If you want a healthier version, try air frying or baking the shrimp. Air frying gives you that crunch with less oil. Preheat your air fryer to 400°F. Cook the shrimp in a single layer for about 8-10 minutes. Shake the basket halfway through for even cooking. For baking, spread the shrimp on a lined baking sheet. Bake at 425°F for 12-15 minutes. Both methods keep the flavor but cut down on fat. You can create a vegan version of Bang Bang shrimp too! Use plant-based shrimp alternatives made from soy or pea protein. Soak these in vegan buttermilk, made from almond milk and vinegar. Coat them in the same flour mixture from the original recipe. Fry or bake as you prefer. The sauce remains the same, so it’s still rich and creamy. You won’t miss the shrimp at all! For the full recipe, check out the details above. After enjoying your Bang Bang shrimp, you might have some leftovers. To keep them fresh, first let them cool to room temperature. Then, place them in an airtight container. This helps prevent moisture loss and keeps shrimp tasty. Store them in the fridge for up to three days. To bring back the crispiness, use the oven or air fryer. Preheat your oven to 350°F (175°C). Spread the shrimp on a baking sheet. Heat for about 10 minutes, or until they are hot and crispy again. If using an air fryer, set it to 350°F (175°C) and cook for 5-7 minutes. Avoid the microwave, as it can make the shrimp soggy. Freezing Bang Bang shrimp is a great option for longer storage. First, let the shrimp cool completely. Then, arrange them in a single layer on a baking sheet and freeze until solid. Once frozen, transfer them to a freezer-safe bag or container. They can last for up to three months. When ready to eat, thaw in the fridge overnight and reheat as mentioned above. For a complete guide, check out the Full Recipe. Bang Bang Shrimp first appeared in the United States. It became popular due to its mix of crispy shrimp and spicy sauce. The dish likely comes from Asian flavors, especially Thai cuisine. Many restaurants now serve it, making it a favorite for many seafood lovers. The sweet and spicy sauce adds a lot of flavor to the crispy shrimp. You can find this dish in many casual dining spots and seafood restaurants. Yes, you can make Bang Bang Shrimp in advance, but with some steps. You can prepare the shrimp and the sauce ahead of time. Just store them separately in the fridge. When you are ready to eat, fry the shrimp fresh for the best taste. This keeps them crispy. If you reheat them, they might lose their crunch. So, frying them right before serving is best. Bang Bang Shrimp pairs well with many sides. Here are some tasty options: - Steamed rice - Coconut rice - Asian slaw - Garlic noodles - Fresh salad - Crispy fries These sides complement the shrimp's flavors. You can also serve some extra Bang Bang sauce for dipping. This adds more fun to your meal! For a full recipe, check out Bang Bang Shrimp Delight. Bang Bang Shrimp is a fun dish to make. We covered key ingredients, including safe substitutes. You learned step-by-step guides to prepare, batter, and fry shrimp. I shared tips on getting that perfect crisp and boosting flavor. We explored tasty variations, from spicy options to vegan choices. Plus, I provided storage advice to keep leftovers fresh. Now you have all the tools to create your own delicious Bang Bang Shrimp. Enjoy your cooking adventure!

Bang Bang Shrimp Flavorful and Easy Recipe Guide

If you’re craving a tasty treat that’s quick to make, you’ve landed in the right place! Bang Bang Shrimp is

- 1 cup all-purpose flour - 1/2 teaspoon baking soda - 1/4 teaspoon salt - 1/2 cup unsalted butter, softened - 1/2 cup brown sugar, packed - 1/4 cup granulated sugar - 1 teaspoon vanilla extract - 1 large egg - 1 cup graham cracker crumbs - 1 cup semi-sweet chocolate chips - 1 cup mini marshmallows These ingredients create a chewy and sweet cookie that reminds you of classic s'mores. The all-purpose flour gives the cookie structure. Baking soda helps it rise, while salt enhances all the flavors. Softened butter adds richness and moisture. Brown sugar brings a deep, caramel flavor, while granulated sugar adds sweetness. The egg and vanilla extract bind everything together and add flavor. Graham cracker crumbs give that crunchy, toasted taste of s'mores. Semi-sweet chocolate chips melt into gooey pockets. Lastly, mini marshmallows provide that classic s'mores touch with their soft, fluffy texture. - Gluten-free flour options: You can use a gluten-free all-purpose flour blend. Look for one with xanthan gum for better texture. - Alternative sweeteners: Try coconut sugar or agave syrup for a different flavor twist. - Vegan substitutes: Replace butter with coconut oil and the egg with flaxseed meal mixed with water. These substitutions still keep the cookies tasty while catering to different diets. Feel free to mix and match to find your favorite version. For the full recipe, refer to the section above. 1. Preparing the oven and baking sheet Start by preheating your oven to 350°F (175°C). Line a baking sheet with parchment paper. This helps the cookies not stick and makes cleanup easy. 2. Mixing dry ingredients In a medium bowl, whisk together 1 cup of all-purpose flour, 1/2 teaspoon baking soda, and 1/4 teaspoon salt. This mix will give your cookies a nice rise. 3. Creaming the butter and sugars In a large bowl, cream together 1/2 cup softened unsalted butter, 1/2 cup brown sugar, and 1/4 cup granulated sugar. Beat until it’s light and fluffy. This step is key for soft cookies. 1. Incorporating the wet ingredients Add 1 teaspoon of vanilla extract and 1 large egg to the butter mix. Beat until well combined. This adds flavor and moisture to the dough. 2. Adding dry ingredients to the mixture Gradually mix the dry ingredients into the wet mixture. Be careful not to overmix. A few lumps are okay. This keeps the cookies tender. 3. Fold in chocolate chips and marshmallows Gently fold in 1 cup of semi-sweet chocolate chips and 1 cup of mini marshmallows. This is where the fun happens! Make sure they spread evenly through the dough. 1. Shaping the cookie dough Use a cookie scoop or a tablespoon to drop rounded balls of dough onto the baking sheet. Leave about 2 inches between each cookie for spreading. 2. Baking times and temperature Bake the cookies in your preheated oven for 10-12 minutes. The edges should be lightly golden, but the centers should stay soft. This balance gives you that chewy texture. 3. Cooling tips for perfect consistency Once baked, remove the cookies from the oven. Let them cool on the baking sheet for 5 minutes before moving them to a wire rack. This helps them firm up while keeping the centers soft. Enjoy your S'mores Cookies! For the complete process, check out the Full Recipe. To get soft centers in your cookies, do not overbake them. Remove them when the edges look golden. The centers will firm up as they cool. For crispy edges, use a little more butter in the dough. This adds richness and helps the edges crisp up nicely. I always use a cookie scoop for uniform size. This ensures even baking and makes them look great. For cookie storage, place your cookies in an airtight container. This keeps them fresh and soft. If you want to save cookie dough, freeze it. Use a cookie scoop to shape the dough, then freeze it on a baking sheet until solid. Once firm, transfer the dough balls to a zip-top bag. When you're ready to bake, no need to thaw. Just add a few extra minutes to the baking time. To reheat cookies, pop them in the microwave for about 10 seconds. This brings back their gooey goodness. Serve S'mores Cookies on a rustic wooden board. This adds charm and makes them inviting. Sprinkle some extra graham cracker crumbs over the top for a fun touch. You can also place a small dish of chocolate sauce and roasted marshmallows next to the cookies. This makes a great dip or topping. Pair these cookies with milk, hot cocoa, or even coffee for a delightful treat. For a twist, serve with a scoop of vanilla ice cream on the side. {{image_2}} You can make S'mores Cookies even more fun by adding different flavors. Try using various types of chocolate. Dark chocolate gives a rich taste. White chocolate adds a sweet twist. You can even mix chocolates for a unique flavor. Think about adding nuts or dried fruits to the dough. Chopped walnuts or pecans can add a nice crunch. Dried cherries or cranberries bring a burst of fruity flavor. Both options add texture and make the cookies special. Using spices can also change the taste. A pinch of cinnamon gives warmth. Mint extract offers a refreshing kick. These simple swaps can take your cookies to a new level. You can create themed S'mores Cookies for holidays. During Halloween, add orange sprinkles or candy corn. For Christmas, use red and green chocolate chips. These small changes make your cookies festive and fun. If you need to follow special diets, you can customize the recipe. For a low-carb version, use almond flour instead of all-purpose flour. Sugar substitutes like erythritol work well too. This way, everyone can enjoy S'mores Cookies without worry. You can also change the recipe to make S'mores Cookie Bars. Just press the dough into a baking pan instead of scooping cookies. This way, you get a chewy bar that’s easy to cut and share. When baking cookie bars, the time may differ. Bake for about 20-25 minutes at the same temperature. Keep an eye on them. You want the edges to be golden but the center to stay soft. Let them cool in the pan before cutting into squares. For the full recipe, check out the S'mores Cookies section above. To keep your cookies fresh, use a tight container. Glass jars work well. Plastic containers can also keep air out. Layer parchment paper between cookies to avoid sticking. Store cookies at room temperature for best taste. To freeze baked cookies, wait until they cool. Place cookies in a single layer on a tray. Freeze them for about two hours. Once firm, transfer cookies to a freezer bag. This helps keep them fresh. To freeze cookie dough, scoop dough balls onto a tray. Freeze until solid, then place in a freezer bag. Label the bag with the date. S'mores cookies last about one week at room temperature. You can extend their life by freezing them. Look for signs of staleness like hard edges or dry texture. If they smell off or taste stale, it’s best to toss them. Enjoy these treats while they are fresh! S'mores cookies are a fun twist on the classic campfire treat. They mix graham crackers, chocolate, and marshmallows into a cookie. The origin comes from the traditional s'mores, enjoyed around a fire. These cookies bring that flavor to your kitchen. They are soft, chewy, and full of gooey chocolate. Yes, you can! Making s'mores cookies ahead of time is great for events. Prepare the dough and chill it in the fridge. You can then bake them fresh when needed. This way, you have warm cookies ready for guests. Just remember to bake them within a week for the best taste. To make s'mores cookies gluten-free, swap all-purpose flour for gluten-free flour. Almond flour or coconut flour work well too. You may need to adjust the liquid, as these flours absorb differently. Check the package instructions for any specific tips on amounts. This way, you can enjoy these cookies without gluten. You can enhance s'mores cookies with many fun toppings. Try adding crushed graham crackers on top for crunch. Drizzling chocolate sauce adds richness. You can also sprinkle sea salt for a sweet-salty mix. Some people love adding peanut butter or nuts for extra flavor. Flat cookies often come from too much butter or not enough flour. Make sure to measure your ingredients carefully. Also, check if your baking soda is fresh. Chilling the dough before baking helps too. This gives cookies a thicker shape and keeps them chewy. This blog post covered everything you need for perfect S'mores Cookies. We discussed the essential ingredients, useful substitutions, and step-by-step instructions for baking. I shared tips for soft centers and crispy edges, plus storage advice. You can even try different flavors and create themed cookies. In short, these cookies are fun and delicious. Whether you bake them for yourself or share them, enjoy the sweet treats! Happy baking!

S’mores Cookies Delightful and Chewy Treat Recipe

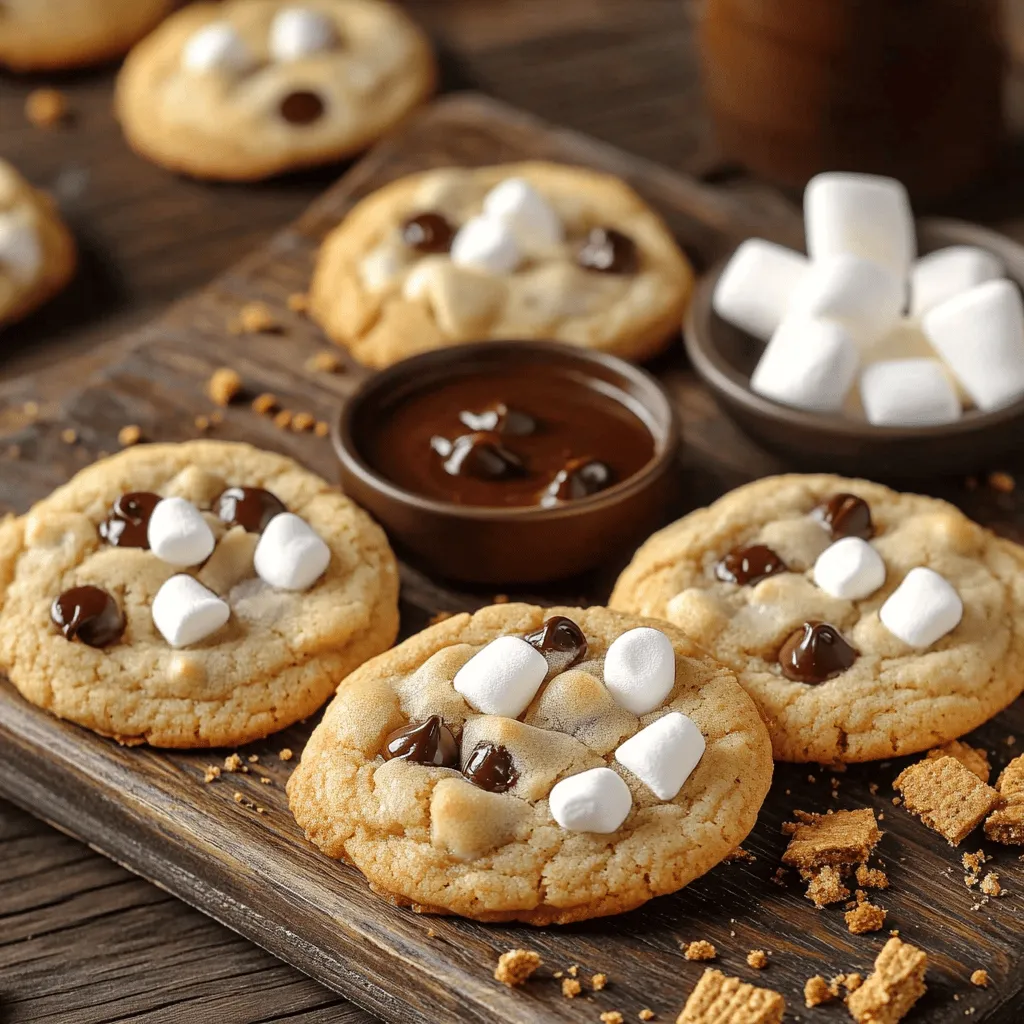
If you love the classic campfire treat, you’ll adore these S’mores Cookies! Bursting with gooey marshmallows, rich chocolate, and buttery

To make a tasty Southwest chicken soup, gather these ingredients: - 1 pound boneless, skinless chicken breasts (diced) - 1 tablespoon olive oil - 1 medium onion (diced) - 2 cloves garlic (minced) - 1 red bell pepper (diced) - 1 yellow bell pepper (diced) - 1 can (15 oz) black beans (rinsed and drained) - 1 can (15 oz) corn (drained) - 1 can (14.5 oz) diced tomatoes (with juice) - 4 cups chicken broth - 2 tablespoons taco seasoning - 1 teaspoon cumin - ½ teaspoon smoked paprika - Salt and pepper to taste - Fresh cilantro (for garnish) - Avocado slices (for topping) - Lime wedges (for serving) Using fresh ingredients can enhance flavor. Fresh chicken adds tenderness. Fresh peppers bring crunch. Fresh garlic gives a strong taste. However, canned ingredients save time. Canned beans and corn are quick and easy. Canned tomatoes are full of flavor and ready to use. You can mix both fresh and canned. This way, you enjoy the best of both worlds. For this soup, I recommend using taco seasoning. It adds great flavor. Cumin gives a warm, earthy taste. Smoked paprika adds a nice depth. Adjust the amount of seasoning to your taste. If you like spice, add more taco seasoning. You can also add chili powder for extra heat. These spices make the soup truly special. For garnish, fresh cilantro brightens each bowl. Avocado adds creaminess, while lime juice gives a zesty kick. This combination makes every spoonful delightful. You can find the full recipe with exact measurements and steps for preparation. First, gather all your ingredients for the soup. It makes cooking easier. You will need: - 1 pound boneless, skinless chicken breasts (diced) - 1 tablespoon olive oil - 1 medium onion (diced) - 2 cloves garlic (minced) - 1 red bell pepper (diced) - 1 yellow bell pepper (diced) - 1 can (15 oz) black beans (rinsed and drained) - 1 can (15 oz) corn (drained) - 1 can (14.5 oz) diced tomatoes (with juice) - 4 cups chicken broth - 2 tablespoons taco seasoning - 1 teaspoon cumin - ½ teaspoon smoked paprika - Salt and pepper to taste - Fresh cilantro (for garnish) - Avocado slices (for topping) - Lime wedges (for serving) Make sure to dice the chicken and chop the veggies small. This helps them cook evenly. Now, let’s cook! Heat a large pot over medium heat. Add the olive oil and let it warm. Once hot, add the diced chicken. Cook until it turns brown, about 5 to 7 minutes. Remove the chicken and set it aside. In the same pot, add the onion and garlic. Cook for about 3 to 4 minutes. You want the onion to turn soft and clear. Next, add the red and yellow bell peppers. Sauté them for another 3 to 4 minutes. This step adds great flavor. Return the chicken to the pot. Stir in the black beans, corn, diced tomatoes, chicken broth, taco seasoning, cumin, smoked paprika, salt, and pepper. Bring this mixture to a boil. Then, reduce the heat and cover the pot. Let it simmer for 20 to 25 minutes. This allows the flavors to mix well. After cooking, taste the soup. If it needs more spice, add extra taco seasoning. Serve the soup hot. Top each bowl with fresh cilantro and avocado slices. Don’t forget to squeeze lime juice over each serving. It adds a nice, fresh zing! For the complete recipe, check out the Full Recipe. Enjoy your savory Southwest chicken soup! To get the best flavor from your Southwest Chicken Soup, start with fresh ingredients. Fresh veggies like onions, peppers, and garlic give more taste than dried ones. Use good quality chicken broth for a richer base. Adding lime juice at the end brightens the flavors. Fresh cilantro on top adds a nice touch too. For extra depth, try toasting your spices before adding them. This step brings out their natural oils and enhances the taste. You can make this soup in different ways. The stovetop is quick and easy, but a slow cooker is great for a deeper flavor. If you have an Instant Pot, it cooks fast and keeps the chicken tender. - Stovetop: Cook on medium heat for about 25 minutes. - Slow Cooker: Cook on low for 6-8 hours or high for 3-4 hours. - Instant Pot: Cook on high pressure for 10 minutes, then let it release naturally. Here are some mistakes to watch for: - Overcooking the Chicken: This can make it dry. Cook just until it’s no longer pink. - Not Seasoning Enough: Taste as you go. Adjust salt, pepper, and spices to your liking. - Skipping the Garnish: Fresh herbs and lime juice really enhance the soup. Don’t skip them! - Cooking Too Fast: Letting it simmer helps the flavors blend well. Don’t rush it! For the complete recipe, check out the Full Recipe. {{image_2}} You can easily adjust this recipe for special diets. To make it gluten-free, use gluten-free chicken broth and check the taco seasoning for gluten. For a vegetarian option, skip the chicken and add more beans, like pinto or kidney beans. You can also use veggie broth instead of chicken broth. This keeps the soup full of flavor and nutrition. If you like heat, add diced jalapeños or a splash of hot sauce. You can also mix in chipotle peppers for a smoky kick. For richness, try adding cream or coconut milk. This creates a nice, creamy texture. You can also top the soup with shredded cheese or sour cream for extra flavor. Feel free to swap out ingredients based on what you have. Use ground turkey, beef, or even tofu for protein. Other veggies like zucchini or carrots work well, too. You can also add quinoa or rice for extra heartiness. This soup is versatile, so get creative! For the full recipe, check out the Spicy Southwest Chicken Soup. To store your leftover Southwest Chicken Soup, follow these easy steps. First, let the soup cool down to room temperature. This helps prevent condensation inside the container. Next, use an airtight container for storage. This keeps the soup fresh and prevents odors. You can store the soup in the fridge for up to three days. Make sure to label it with the date. This helps you keep track of how long it has been stored. Freezing soup is a great way to save it for later. To freeze your Southwest Chicken Soup, first, let it cool completely. Then, pour the soup into freezer-safe bags or containers. Leave some space at the top, as liquids expand when frozen. You can freeze the soup for up to three months. When you are ready to eat, just thaw it overnight in the fridge. This keeps the soup safe and tasty. To reheat your soup, use a pot on the stove or a microwave. If using the stove, pour the soup into a pot and heat over medium heat. Stir often to prevent it from sticking. Heat until it is hot throughout. If using a microwave, transfer the soup to a microwave-safe bowl. Heat in 1-minute intervals, stirring in between, until hot. Add a splash of chicken broth or water if the soup is too thick. Enjoy your warm and hearty meal! You can find the full recipe for this delicious soup above. Southwest Chicken Soup comes from the American Southwest. It mixes many cultures, like Mexican and Native American cuisines. This soup shows off bold flavors, fresh veggies, and spices. You will often find black beans, corn, and tomatoes in this dish. Each bite reflects the rich, warm climate of the region. Yes, you can make this soup in advance. In fact, it often tastes better the next day! The flavors blend well when it sits. You can store it in the fridge for up to three days. Just let it cool before putting it in a container. Southwest Chicken Soup lasts about three to four days in the fridge. Make sure to keep it in an airtight container. If you see any signs of spoilage, throw it out. Always trust your senses! Absolutely, you can customize the spice level! If you want it spicier, add more taco seasoning or fresh jalapeños. For a milder taste, use less seasoning or remove the spices altogether. You can also offer lime wedges for a fresh kick. Adjust it to fit your taste! You’ve learned how to make a delicious Southwest Chicken Soup. We covered the best ingredients, preparation steps, and cooking methods. I shared tips for maximizing flavor and avoiding common mistakes. You also saw how to customize your soup for different diets and preferences. Finally, we discussed the best ways to store, freeze, and reheat your soup. With this knowledge, you can confidently create a tasty meal everyone will enjoy. Try your own twists and make it your special dish!

Savory Southwest Chicken Soup Simple and Tasty Recipe

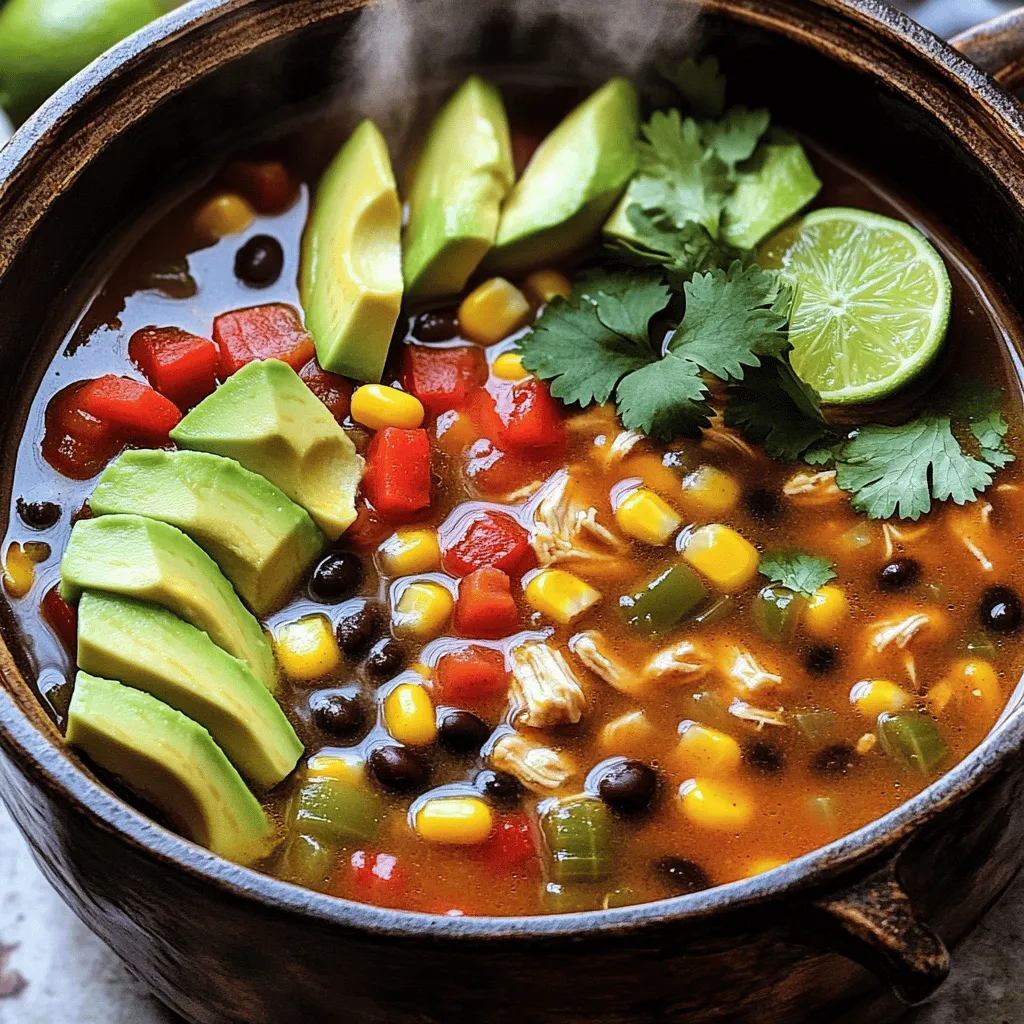
Are you craving a warm and hearty dish to spice up your dinner? Look no further! My Savory Southwest Chicken

- 4 boneless, skinless chicken breasts - 2 tablespoons olive oil - 1 bell pepper (red or yellow), sliced - 1 zucchini, sliced - 1 cup cherry tomatoes, halved - 1 cup broccoli florets The chicken breasts are the star of this dish. They stay juicy and tender when cooked right. The olive oil helps them to brown nicely and adds flavor. Fresh vegetables like bell pepper, zucchini, cherry tomatoes, and broccoli not only add color but also taste. They roast beautifully alongside the chicken, soaking up the lemon garlic goodness. - 4 cloves garlic, minced - 1 lemon, juiced and zested - 1 teaspoon dried oregano - 1 teaspoon paprika - Salt and pepper to taste Garlic is a key player in this recipe. It brings a rich flavor that pairs well with chicken. The lemon juice and zest add a bright, fresh taste. Dried oregano and paprika give depth and warmth. Salt and pepper round out the seasoning, making every bite pop. - Fresh parsley - Additional lemon wedges Garnishes add a nice touch to your dish. Fresh parsley brings a burst of color and flavor. Lemon wedges allow you to squeeze more zest on top, enhancing the taste. For the full recipe, check out the detailed instructions. First, marinate the chicken. You need to mix olive oil, minced garlic, lemon juice, lemon zest, oregano, paprika, salt, and pepper in a small bowl. This mix is your flavor bomb! Place the chicken breasts in a large bowl and pour half of the marinade over them. Toss the chicken to coat it well. Let the chicken sit for at least 15 minutes to soak up all that flavor. Next, set up the oven. Preheat it to 400°F (200°C). This high heat helps the chicken cook well and keeps it juicy. Now, chop and arrange your veggies. Slice the bell pepper and zucchini. Halve the cherry tomatoes and cut the broccoli into florets. Spread these colorful veggies on a large baking sheet. Make sure they are arranged nicely. Drizzle the remaining marinade over the vegetables and toss gently to coat each piece. It's time to bake! Push the veggies to the sides of the baking sheet. Place the marinated chicken in the center. Bake in your preheated oven for 25 to 30 minutes. While it cooks, the chicken will absorb great flavors from the veggies. Check for doneness by using a meat thermometer. The chicken should reach 165°F (75°C) to be safe to eat. Once cooked, take the pan out and let it rest for 5 minutes. This step keeps your chicken juicy and tasty. Marinating chicken is key to great flavor. I suggest marinating for at least 15 minutes. This time allows the chicken to soak up the lemon and garlic notes. For more flavor, you can marinate overnight in the fridge. A longer marination time helps the chicken become tender and juicy. You can also add fresh herbs like thyme or rosemary to mix things up. To achieve the perfect roast, start by preheating your oven to 400°F (200°C). This high heat creates a nice golden brown on the chicken. Using a meat thermometer is essential. Aim for an internal temperature of 165°F (75°C). This ensures your chicken is safe to eat and stays moist. Remember to let the chicken rest for five minutes after cooking. This helps the juices settle back into the meat. For side dishes, I love serving this with a simple green salad or rice. The lightness of the salad pairs well with the rich flavors of the chicken. You can also serve it with crusty bread to soak up the juices. As for sauces, a drizzle of extra lemon juice can brighten the dish. A garlic aioli is another great pairing for dipping. Check out the Full Recipe for more options! {{image_2}} You can swap out veggies based on what you have. Try seasonal options like asparagus in spring or root veggies in winter. These swaps add different flavors and textures. How to adjust cooking times: - Keep cooking times in mind. Softer vegetables, like zucchini, cook faster. - Harder vegetables, like carrots, need more time. - Check for tenderness about halfway through baking. Herbs and spices can change the taste a lot. Try adding thyme or rosemary for a fresh twist. A pinch of red pepper flakes can bring heat, too. Experimenting with marinades: - Use yogurt or mustard for a tangy kick. - Soy sauce and ginger can give an Asian flair. - Let your imagination run wild with flavors. For those who need a change, chicken isn't your only option. Try turkey or fish for a lighter meal. Vegetarian options: - Swap chicken with tofu or tempeh. - You can use chickpeas for protein. - Make sure to cook until golden for best taste. For the full recipe, check out the detailed steps above. To store leftovers, let the dish cool down first. Place the chicken and veggies in an airtight container. This method keeps them fresh for later meals. You can enjoy your One-Pan Lemon Garlic Chicken and Veggies for up to three days in the fridge. When reheating, use your oven or a microwave. If using the oven, set it to 350°F (175°C). Heat until warm, about 15 minutes. If using a microwave, cover the dish loosely and heat in one-minute intervals. Stir between each interval for even warming. You can freeze your cooked One-Pan Lemon Garlic Chicken and Veggies. To do this, let the food cool completely. Then, transfer it to a freezer-safe container. This dish can last up to two months in the freezer. When you're ready to eat, thaw it in the fridge overnight. After thawing, reheat in the oven or microwave. Make sure the chicken reaches 165°F (75°C) to ensure it's safe to eat. The shelf life of this dish varies based on storage. In the fridge, it lasts about three days. In the freezer, it can last up to two months. Always check for any signs of spoilage before eating. Enjoy your meals confidently, knowing they are stored properly! The total cooking time is about 45 minutes. Here is a quick breakdown: - Prep time: 15 minutes - Cook time: 25-30 minutes This recipe is simple. You can have a tasty meal ready in no time. Yes, you can prepare this dish ahead of time. Here are some meal prep tips: - Marinate the chicken and store it in the fridge for up to 24 hours. - Chop the veggies and keep them in a sealed container. - When you’re ready to cook, just combine everything and bake. This makes weeknight dinners easy and quick! I recommend these side dishes: - A fresh green salad with a light vinaigrette. - Rice or quinoa to soak up the juices. - Crusty bread for a nice crunch. These sides enhance the meal and add variety. To keep your chicken juicy, follow these tips: - Marinate the chicken for at least 15 minutes. This adds flavor and moisture. - Bake it at the correct temperature, around 400°F (200°C). - Use a meat thermometer. Cook until the internal temperature reaches 165°F (75°C). These steps help keep your chicken tender and delicious! For the full recipe, check out the details above. In this blog post, we explored the easy steps to make One-Pan Lemon Garlic Chicken and Veggies. We covered the main ingredients, key seasonings, and optional garnishes that enhance flavor. You learned how to prepare the chicken and vegetables for baking. Tips and tricks improved your cooking technique and meal presentation. Variations let you customize this dish to your taste. Cooking should be fun and tasty. Try new ingredients and enjoy your meals more!

One-Pan Lemon Garlic Chicken and Veggies Delight

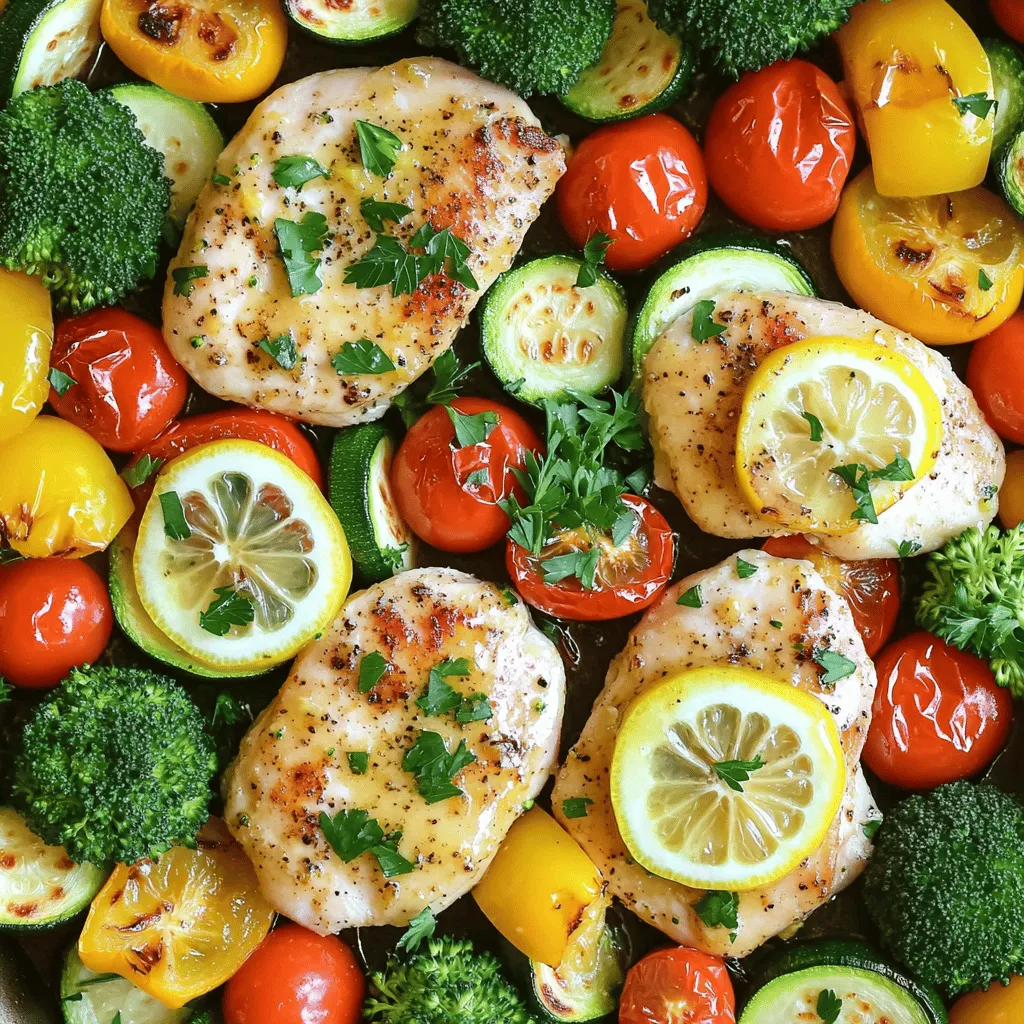
Looking for a quick and tasty meal? My One-Pan Lemon Garlic Chicken and Veggies Delight is just what you need!

- 4 whole wheat tortillas - 1 cup shredded cheese (cheddar or Monterey Jack) - 1/2 cup bell peppers, sliced (red, green, or yellow) - 1/2 cup zucchini, sliced - 1/2 cup corn (fresh or frozen) - 1/4 cup red onion, finely chopped I love using whole wheat tortillas for a healthier twist. They add a nice flavor and texture. You can pick any cheese you like, but cheddar and Monterey Jack work best. Bell peppers, zucchini, corn, and red onion make a great mix. They add color and crunch to your quesadilla. - 1 teaspoon cumin - 1 teaspoon chili powder - Salt and pepper to taste - Fresh cilantro, chopped (for garnish) - Salsa and sour cream (for serving) Spices bring the dish alive. Cumin and chili powder add warmth. Adjust salt and pepper to fit your taste. You can garnish with fresh cilantro for a pop of color. Serve with salsa and sour cream for an extra kick. For the full recipe, check out the Easy Veggie Quesadillas section. 1. Start by heating olive oil in a large skillet over medium heat. 2. Add finely chopped red onion and sliced bell peppers. Sauté for about 3-4 minutes until they soften. 3. Next, add sliced zucchini and corn to the pan. Sprinkle in cumin, chili powder, salt, and pepper. 4. Cook this mixture for another 3-4 minutes. You want the veggies to be tender and colorful. 1. In the same skillet, place one whole wheat tortilla over medium heat. 2. Sprinkle half of your shredded cheese evenly over one half of the tortilla. 3. Add a generous spoonful of the veggie mixture on top of the cheese. 4. Sprinkle the remaining cheese over the veggie layer for extra flavor. 5. Fold the tortilla in half, covering the filling. Cook for about 2-3 minutes until golden and crispy. 6. Carefully flip the quesadilla and cook for another 2-3 minutes on the other side. 1. Transfer the quesadilla to a cutting board. Let it cool for a minute before slicing into wedges. 2. Serve warm and garnish with fresh cilantro. 3. Add salsa and sour cream on the side for dipping. These sides will enhance the flavors of your quesadillas. For the full recipe, check out the complete guide. To make the best quesadillas, use whole wheat tortillas. They add flavor and nutrition. Make sure your skillet is hot before you start cooking. This helps to get that nice golden color. When you cook the quesadilla, flip it carefully to keep the filling inside. For a crispy texture, use a little olive oil in the pan. This adds flavor and helps them crisp up. Cooking on medium heat allows the cheese to melt well. If you want extra crunch, try cooking them a bit longer on each side. Just watch them closely to avoid burning. If you want a vegan version, there are great cheese alternatives. Look for plant-based cheeses made from nuts or soy. These melt nicely and taste great too. You can also skip the cheese entirely and use avocado for creaminess. For vegetables, feel free to mix things up. Spinach, mushrooms, or even broccoli can work well. Use what you have on hand. This makes your quesadillas fun and unique. You can find the full recipe in the article to explore all the tasty options! {{image_2}} Mixing cheeses can add great depth to your quesadilla. I love using a blend of cheddar and Monterey Jack. The sharpness of cheddar pairs well with the creaminess of Monterey Jack. You can also try a smoky cheese for a unique twist. If you want a vegan option, there are many plant-based cheeses available. Look for ones that melt well. They can give you that gooey texture you crave without the dairy. You can take your quesadillas up a notch by adding spices or herbs. A pinch of smoked paprika can add a nice kick. Fresh herbs like cilantro or oregano can brighten the dish. If you want more protein, consider adding beans or grilled chicken. Black beans are a great choice and add fiber. You can mix and match to suit your taste. Each variation will create a new and exciting flavor profile. To keep your leftover quesadillas fresh, follow these steps: - Refrigeration tips: Place the quesadillas in an airtight container. This helps keep them moist and tasty. You can store them in the fridge for up to 3 days. If you wrap them in plastic wrap, it helps prevent drying out. - Freezing for easy meals: If you want to save them longer, you can freeze your quesadillas. Wrap each one in foil or freezer paper. Then, place them in a freezer-safe bag. They can last for up to 2 months in the freezer. Just remember to label them! To enjoy your quesadillas again, reheating is key. Here are the best methods: - Best methods for maintaining crispiness: The skillet is the best choice. Heat a skillet over medium heat. Add the quesadilla and cook for about 2-3 minutes on each side. This method keeps the outside crispy and the inside warm. - Microwave vs. skillet reheating: You can use a microwave if you're in a hurry. Just place the quesadilla on a microwave-safe plate. Heat it for 30 seconds to 1 minute. However, the microwave may make the quesadilla soft, not crispy. For the best taste, I recommend using the skillet! Try these simple tips to keep your easy veggie quesadillas fresh and delicious! For the full recipe, check out the main article. Making Easy Veggie Quesadillas takes about 20 minutes. You spend 10 minutes prepping the ingredients. Then, you cook them in 10 minutes. It’s a quick meal idea that fits into any busy day. Yes, you can make these quesadillas ahead of time. Store them in the fridge for up to 3 days. To reheat, use a skillet on low heat for the best results. This keeps them crispy and tasty. I love serving these quesadillas with salsa and sour cream. They add great flavor. You can also try guacamole or a fresh salad on the side. These dips enhance the meal and make it even more delicious. Yes, there are many gluten-free tortilla options. Look for brands made from corn or rice. These will work well for your veggie quesadillas. They taste great and keep the dish gluten-free. Enjoy your meal with confidence! For the full recipe, check out the Easy Veggie Quesadillas section. Easy Veggie Quesadillas are simple and tasty. We covered the main ingredients, including whole wheat tortillas and fresh veggies. The spices add great flavor while you cook your quesadillas. I shared tips to help you achieve the perfect texture and suggested easy swaps for ingredients. You can store and reheat leftover quesadillas with ease. Enjoy these delicious meals with your favorite dips and sides. Cooking can be fun and rewarding, so get creative with your quesadillas!

Easy Veggie Quesadillas Tasty and Quick Meal Idea

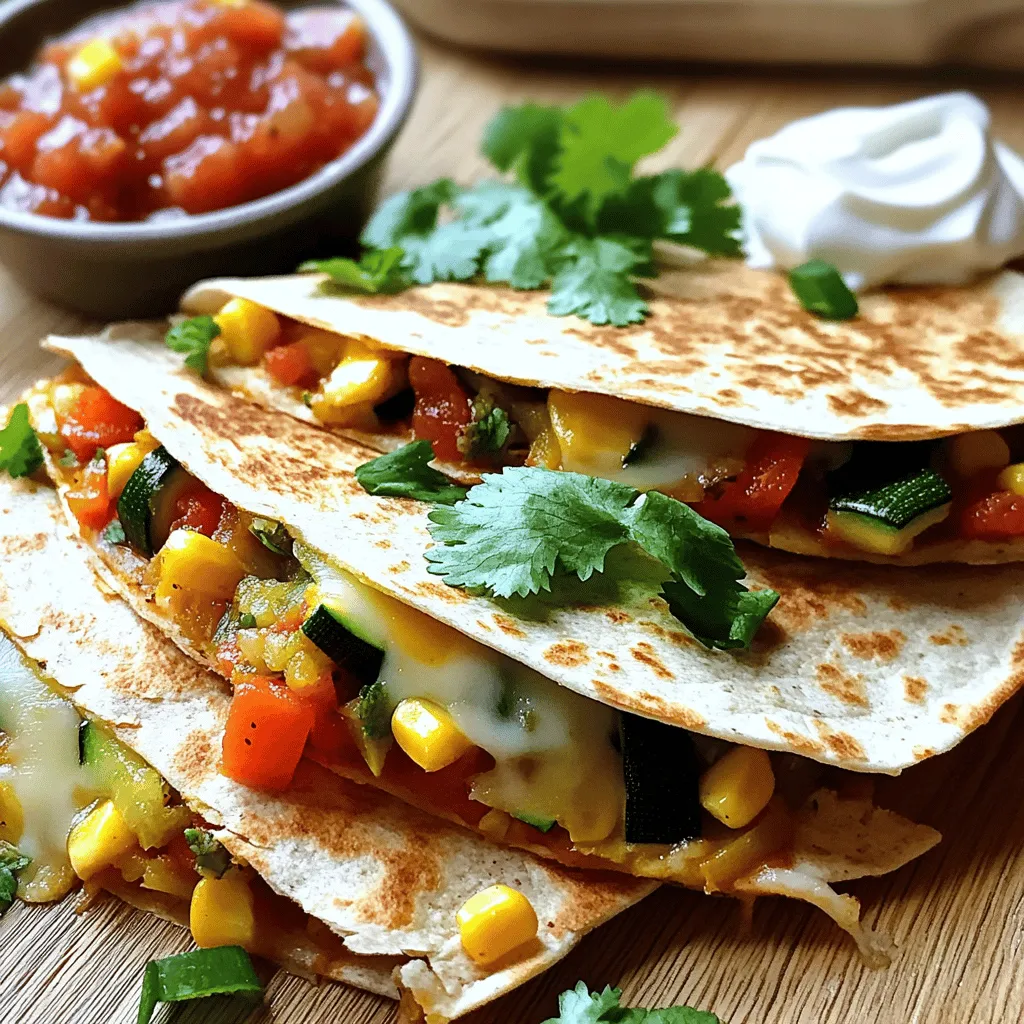
Looking for a quick and tasty meal? Easy veggie quesadillas are your answer! These simple, cheesy delights pack a punch

- 3 ripe bananas, mashed - 1/2 cup unsalted butter, softened - 3/4 cup brown sugar, packed - 1/4 cup granulated sugar - 2 large eggs - 1 teaspoon vanilla extract - 1 teaspoon baking soda - 1/2 teaspoon salt - 1 1/2 cups all-purpose flour - 1 cup semi-sweet chocolate chips - 1/2 teaspoon cinnamon (optional) - 1/2 cup chopped walnuts (optional) For the best chocolate chip banana bread, use ripe bananas. They add natural sweetness and moisture. You want them soft and freckled. The butter should be softened for easy mixing. This helps make the batter fluffy. Brown sugar gives a deep flavor. Granulated sugar adds sweetness. Eggs bind the mix and help it rise. Vanilla extract gives a warm taste. Baking soda makes the bread rise, while salt balances the flavors. All-purpose flour makes a nice texture. Chocolate chips add that sweet, melty touch. If you like, add cinnamon for warmth. Chopped walnuts add crunch and flavor, but they are optional. Find the full recipe to start baking this delicious treat! 1. Preheat your oven to 350°F (175°C). Grease a 9x5 inch loaf pan or line it with parchment paper. This helps the bread come out easily after baking. 2. In a large mixing bowl, cream together 1/2 cup of softened butter, 3/4 cup of brown sugar, and 1/4 cup of granulated sugar. Mix until the mixture is light and fluffy. This step creates a nice texture. 3. Add the 3 ripe bananas that you mashed. Mix this well with the butter and sugar. Then, beat in 2 large eggs one at a time, followed by 1 teaspoon of vanilla extract. This helps bring all the flavors together. 1. In another bowl, whisk together 1 teaspoon of baking soda, 1/2 teaspoon of salt, and 1 1/2 cups of all-purpose flour. If you like, you can add 1/2 teaspoon of cinnamon for a warm flavor. 1. Gradually fold the dry ingredients into the wet mixture. Stir gently until just combined. Be careful not to overmix, as this can make the bread tough. 2. Now, add 1 cup of semi-sweet chocolate chips and 1/2 cup of chopped walnuts if you want some crunch. Gently fold these in. 3. Pour the batter into the prepared loaf pan. Smooth the top with a spatula. 4. Bake it in the oven for 60 to 70 minutes. Check with a toothpick. If it comes out clean, your bread is done. For the full recipe, just follow these steps, and you will have a tasty treat ready to enjoy! To make the best chocolate chip banana bread, use overripe bananas. They add natural sweetness and moisture. Look for bananas with brown spots. This means they are just right for baking. Avoid overmixing your batter. Mix until the ingredients are just combined. Overmixing makes the bread tough. You want it soft and tender. When serving, slice the banana bread and place it on a wooden cutting board. Drizzle some melted chocolate on top. This adds a rich touch and looks great. Add fresh banana slices to the top for an inviting look. A sprinkle of chopped walnuts gives it a nice crunch. Enjoy your chocolate chip banana bread warm or toasted. For a treat, spread a little butter on each slice. {{image_2}} You can make this banana bread even better with simple swaps. For a healthier option, try replacing butter with applesauce. This swap cuts down on fat and adds moisture. You can also play with the chocolate. Use dark chocolate chips or even white chocolate for a sweet twist. If you like nuts, swap walnuts for pecans or skip them altogether. Each change gives your bread a new taste. To make your banana bread special, add spices. A hint of nutmeg or cloves can transform the flavors. You might also enjoy a splash of vanilla essence for warmth. Want to add more fruit? Toss in some berries or dried fruits. These add texture and a pop of flavor. You can get creative with what you have on hand. For more ideas, check the Full Recipe! To keep your chocolate chip banana bread fresh, wrap it tightly. Use plastic wrap or aluminum foil. Store it at room temperature for up to three days. If you want it to last longer, freeze it. Slice the bread first to make thawing easier. Wrap each slice in plastic wrap. Then, place the slices in a freezer bag. This way, you can grab one or two slices whenever you want! To reheat your banana bread, use an oven or microwave. For the oven, preheat it to 350°F (175°C). Place your slice on a baking sheet. Heat it for about 10 minutes. This warms the bread and keeps it moist. If you use a microwave, warm each slice for 15-20 seconds. Be careful not to overheat. This can make the bread dry. Enjoy your warm banana bread with a spread of butter or nut butter! To ripen bananas fast, here are some simple methods: - Place bananas in a brown paper bag: This traps ethylene gas, speeding up the ripening. - Add an apple or tomato: These fruits also release ethylene gas, helping bananas ripen. - Use an oven: Wrap bananas in foil and bake at 300°F (150°C) for 15-20 minutes. Let them cool before unwrapping. When choosing ripe bananas, look for: - Yellow skin with a few brown spots. This shows they are sweet and ready to use. - Avoid green bananas, as they are not yet ripe. Yes, you can make this chocolate chip banana bread vegan! Here are some easy swaps: - Replace eggs with flaxseed meal: Mix 1 tablespoon of flaxseed meal with 2.5 tablespoons of water. Let it sit for 5 minutes until it thickens. - Use vegan butter or coconut oil: These can replace the unsalted butter in the recipe. To keep the flavor and texture, use: - Mashed avocado or applesauce instead of butter. This adds moisture and richness without dairy. You can store chocolate chip banana bread for about: - 3 days at room temperature: Keep it in an airtight container. - 1 week in the fridge: This helps preserve freshness. Signs that banana bread has gone bad include: - Mold growth: If you see any green or gray spots, throw it away. - Off smell: A sour or strange smell indicates spoilage. This blog post covered the essentials for making delicious chocolate chip banana bread. We detailed the required ingredients and gave you clear steps from preparation to baking. I shared tips to perfect your bread and highlighted fun variations. You can store your bread for freshness and even reheat it with ease. Banana bread is not just tasty; it brings joy to the kitchen. With a few simple changes, you can make it your own. Enjoy your baking journey!

Chocolate Chip Banana Bread Simple and Tasty Recipe

Are you ready to whip up a delicious treat that’s simple and satisfying? My Chocolate Chip Banana Bread recipe checks

Older posts
Newer posts
← Previous Page1 … Page92 Page93 Page94 … Page104 Next →

dsad

© 2025 pureeatsnow • Built with GeneratePress

Our Policies

  • Copyright Policy
  • Cookie Policy
  • GDPR Policy
  • Privacy Policy
  • Disclaimer
  • Terms Of Use

More Information

  • Home
  • About
  • Contact
  • Appetizers
  • Dessert
  • Dinner
  • Drinks
©2025, pureeatsnow About Back To Top