Skip to content
DisclaimerTerms Of UseGDPR PolicyCookie Policy

pureeatsnow

  • Home
  • Drinks
  • Appetizers
  • Dinner
  • Dessert
  • About
  • Contact
  • Privacy Policy
DisclaimerTerms Of UseGDPR PolicyCookie Policy

Rachel

- 1 pound large shrimp, peeled and deveined - 4 tablespoons unsalted butter - 5 cloves garlic, minced - 1 teaspoon red pepper flakes (adjust to taste) - Juice and zest of 1 lemon - Salt and black pepper to taste - 2 tablespoons fresh parsley, chopped - Cooked rice - Crusty bread When I make this dish, I love its bright flavors. The large shrimp are the star here. Make sure they are peeled and deveined for quick cooking. The unsalted butter adds richness. I use five cloves of minced garlic for a tasty kick. Red pepper flakes bring some heat, but you can adjust that to your liking. For seasonings, fresh lemon juice and zest brighten the dish. Salt and black pepper are key to enhancing flavors. Finally, I add fresh parsley for a pop of color and freshness. You can serve this garlic butter shrimp over cooked rice. A slice of crusty bread is perfect for soaking up the rich sauce. For the full recipe, check out the details above. - Melt butter in skillet. - Sauté garlic and red pepper flakes. Start by grabbing a large skillet. Place it over medium heat and add the butter. Let it melt until it starts to bubble. This step is crucial. You want to bring out the rich flavor of the butter. Next, add the minced garlic and red pepper flakes. Sauté them for about one minute. Keep an eye on the garlic; it can burn fast. - Add shrimp and cook until pink. - Flip shrimp and season. Now, it's time to add the shrimp. Place them in a single layer in the skillet. Cook them for about two to three minutes. You’ll see them starting to turn pink. This is a good sign they are cooking well. Flip the shrimp to the other side and season with salt and black pepper. This adds flavor and makes every bite taste great. - Squeeze lemon juice. - Add parsley and serve. Once the shrimp are fully pink, it's time to finish. Squeeze fresh lemon juice over the shrimp. This adds a bright, tangy flavor. Don’t forget to add the lemon zest for an extra kick. Finally, stir in the fresh parsley. It gives a pop of color and freshness. Serve the garlic butter shrimp over cooked rice or with crusty bread. Enjoy your meal! For the full recipe, click here. - Ensure shrimp are evenly sized. This way, they cook at the same rate. - Avoid overcooking shrimp. They should be pink and firm, not rubbery. - Adjust red pepper flakes to taste. More will make it spicier. - Experiment with additional herbs like thyme or basil. They add freshness. - Serve in a beautiful dish. It makes the meal more appealing. - Garnish with lemon slices and parsley. This adds color and brightness. If you want the complete process, check out the Full Recipe. {{image_2}} You can change a few ingredients to make this dish fit your taste. Try these swaps: - Use olive oil instead of butter. This option is lighter and still tasty. - Substitute shrimp with scallops. They cook fast and have a sweet flavor. These changes keep the dish simple yet fun. They also help you use what you have at home. Want to kick up the flavor? Add some colorful ingredients: - Include cherry tomatoes. They add a nice pop of color and sweetness. - Add spinach for color and nutrition. It cooks quickly and boosts health. These extras make your meal vibrant and tasty. You can also mix and match for new ideas. How you serve this dish can change its vibe. Here are some fun ideas: - Serve over pasta instead of rice. The garlic butter sauce clings well to noodles. - Create tacos with tortillas. Just fill them with shrimp and toppings. These serving options can make your meal feel new each time you cook it. Try out different ways to enjoy your garlic butter shrimp! For the full recipe, check the details above. After enjoying your meal, store any leftovers in an airtight container. This keeps the shrimp fresh and tasty. I recommend eating them within 1-2 days. The flavors stay vibrant during that time. If you want to save your garlic butter shrimp for later, freeze them in a freezer-safe container. Make sure the shrimp cool down first. When you're ready to eat, thaw the shrimp overnight in the fridge. Reheat gently to keep them juicy. You can reheat the shrimp using a microwave or on the stovetop. If using the microwave, place the shrimp in a bowl. Add a splash of water or broth to keep them moist. If using the stovetop, warm them gently on low heat. This helps avoid overcooking. Total time is approximately 30 minutes. You can enjoy this meal in no time. Yes, but thaw them fully before cooking. This helps them cook evenly and taste great. Rice, bread, or pasta are great options. They soak up the garlic butter sauce well. Yes, but best to consume within a couple of days for freshness. The flavors are best when fresh. In this post, we explored a simple garlic butter shrimp recipe that everyone can enjoy. We covered the key ingredients, cooking steps, and serving ideas. You'll impress friends with this dish, whether over rice or in tacos. Remember to adjust flavor to your taste and present it nicely for a standout meal. You can store leftovers easily and enjoy them later, too. Now, grab your shrimp and get cooking!

30-Minute Garlic Butter Shrimp Quick and Easy Meal

Looking for a quick and tasty dinner? You’ve come to the right place! This 30-Minute Garlic Butter Shrimp recipe is

Sweet potatoes are the star of this dish. They give it a lovely, sweet flavor. For this recipe, you need four large sweet potatoes. Peel and cut them into cubes. This helps them cook evenly. Maple syrup adds a rich sweetness to the casserole. Use 1/3 cup of pure maple syrup for the best taste. You also need 1/4 cup of unsalted butter, melted. The butter gives a creamy texture. It helps blend all the flavors nicely. To spice things up, you will need a few simple ingredients. Add 2 teaspoons of vanilla extract for warmth. A little cinnamon (1/2 teaspoon) and nutmeg (1/4 teaspoon) will bring out the sweet potato's natural flavor. Don’t forget to add salt to taste; it balances the sweetness. If you want to get creative, consider some fun add-ins. I like to sprinkle 1 cup of roughly chopped pecans on top. They add a nice crunch. You can also add 1/2 cup of mini marshmallows if you like a sweeter touch. They’ll give your casserole a lovely, toasted finish. For the full recipe, you can check the detailed instructions. Start by peeling and cutting 4 large sweet potatoes into cubes. Boil them in salted water for 15 to 20 minutes. You want them fork-tender. Once cooked, drain and let them cool for a few minutes. In a big bowl, mash the sweet potatoes until they are smooth. Now, add 1/3 cup of maple syrup, 1/4 cup of melted unsalted butter, and 2 teaspoons of vanilla extract. Sprinkle in 1/2 teaspoon of cinnamon, 1/4 teaspoon of nutmeg, and some salt to taste. Mix everything well until the flavors blend. Spread the sweet potato mixture evenly in a greased casserole dish. In a small bowl, combine 1 cup of chopped pecans with 2 tablespoons of maple syrup. This adds sweetness. Sprinkle this mix over the sweet potatoes. If you like, add 1/2 cup of mini marshmallows on top for extra sweetness. Preheat your oven to 375°F (190°C). Bake the casserole for 25 to 30 minutes. You want it heated through and the marshmallows golden brown. Once done, take it out and let it cool for a few minutes before serving. Enjoy this delicious dish, perfect for any gathering! For more details, check the Full Recipe. When picking sweet potatoes, look for firm ones. They should feel heavy for their size. Avoid any with soft spots or blemishes. The skin should be smooth and tight. Choose medium to large potatoes for even cooking. Spices bring life to your casserole. Cinnamon and nutmeg are my favorites. They add warmth and depth, making your dish special. You can add a pinch of allspice or ginger for more zing. Just remember, a little goes a long way. Presentation matters! Serve your casserole warm in the dish. Garnish with extra pecans for crunch. A drizzle of maple syrup adds shine and sweetness. You can also sprinkle some chopped parsley for a pop of color. These small touches make your dish more inviting. For the full recipe, check out the details provided earlier. {{image_2}} To make a nut-free version, simply leave out the pecans. You can replace them with sunflower seeds or pumpkin seeds for crunch. These seeds add a nice texture without the nut allergens. For a vegan version, swap the butter with coconut oil or a vegan butter. Use maple syrup to sweeten your dish. Instead of mini marshmallows, look for vegan marshmallows, or skip them altogether. This keeps the dish rich and flavorful while meeting vegan needs. You can add cranberries or diced apples for extra flavor. These fruits add a sweet and tart note that pairs well with sweet potatoes. Adding a bit of orange zest can also brighten up the dish. Try mixing in spices like ginger for a warm kick. Each twist can take this casserole to a new level. For the full recipe, check the details above. Store your Maple Pecan Sweet Potato Casserole in an airtight container. Let it cool to room temp before sealing. This helps keep the flavors fresh. Place it in the fridge if you plan to eat it within a few days. It will last for about 3 to 5 days in the fridge. If you want to keep it longer, freezing is a great option. To reheat, take the casserole out of the fridge. Preheat your oven to 350°F (175°C). Cover the dish with aluminum foil to prevent it from drying out. Heat for about 20-25 minutes. Check if it's warm all the way through. If you want the top crispy, remove the foil for the last 5 minutes. You can also use a microwave for quick reheating, but the oven gives better results. To freeze, portion the casserole into smaller containers. This makes it easy to thaw only what you need. Wrap the containers tightly with plastic wrap, then aluminum foil. Label with the date and type of dish. You can freeze it for up to 3 months. When ready to eat, thaw overnight in the fridge. Reheat as described above. Enjoy your tasty dish! Yes, you can use canned sweet potatoes. They are soft and ready to use. Just drain them well before mashing. Canned sweet potatoes save time, but fresh ones offer better flavor. The casserole lasts about 3 to 5 days in the fridge. Store it in an airtight container. Make sure it cools down before putting it away. Reheat it gently to keep the texture nice. You can use other nuts like walnuts or almonds. If you prefer no nuts, try sunflower seeds. These options keep the crunch and taste great. Yes, you can prepare this dish ahead. Make the sweet potato mix and store it in the fridge. Just add the pecans before baking. You can bake it the next day for a warm treat. For the complete recipe, check the Full Recipe section above. It has all the steps you need to make this tasty dish! This article covered how to make a tasty Maple Pecan Sweet Potato Casserole. We looked at key ingredients like sweet potatoes, maple syrup, and spices. I also shared simple steps to prepare, mix, and bake your dish. Plus, I included tips on storage and fun variations. In the end, this casserole is easy to make and delicious for any gathering. Trust me, you’ll want to try it! You'll impress your guests and enjoy every bite.

Maple Pecan Sweet Potato Casserole Flavorful Delight

Are you ready to impress your family with a warm, delicious dish? This Maple Pecan Sweet Potato Casserole is a

- 4 medium zucchinis, spiralized into noodles - 1 bell pepper (any color), thinly sliced - 1 cup cherry tomatoes, halved - 1 cup broccoli florets - 1 small yellow onion, thinly sliced - 2 cloves garlic, minced - 1 cup asparagus, cut into 1-inch pieces - 3 tablespoons olive oil - 1 teaspoon dried Italian herbs (oregano, basil, thyme) - Salt and pepper to taste - Fresh basil, for garnish - Grated Parmesan cheese (optional, for serving) Zucchini Noodle Primavera is vibrant and fresh. You need basic veggies and herbs. Spiralized zucchini forms the noodles, making this dish light and fun. Start with medium zucchinis. They turn into lovely noodles with a spiralizer. Choose any bell pepper to add color and crunch. Cherry tomatoes bring sweetness. They burst with flavor when cooked. Broccoli florets add a nice green touch. Onions and garlic create a fragrant base. They bring depth to the dish. Asparagus adds a lovely texture and flavor. Use olive oil for cooking. It gives the dish richness. Dried Italian herbs tie everything together. You can adjust salt and pepper to your taste. Fresh basil makes a great garnish. For a savory finish, add grated Parmesan cheese. This dish is perfect for those who love vibrant, veggie-filled meals. Check the [Full Recipe] for all the details and cooking steps! - Spiralizing the zucchinis To make zucchini noodles, use a spiralizer. Cut the ends off each zucchini. Secure the zucchini in the spiralizer and twist to create noodles. Aim for long, thin strands. You can also use a vegetable peeler if you don’t have a spiralizer. - Preparing and slicing the vegetables Slice the bell pepper, onion, and asparagus. Halve the cherry tomatoes. Make sure the pieces are similar in size. This helps them cook evenly. Set all the veggies aside for easy access when cooking. - Sautéing the onions and garlic Heat two tablespoons of olive oil in a large skillet over medium heat. Add the sliced onions and minced garlic. Cook for about two to three minutes. Stir them often until the onions turn soft and clear. This step builds a great flavor base. - Adding other vegetables and cooking times Next, add the bell pepper, broccoli, and asparagus to the skillet. Stir well and cook for about five minutes. You want them to be tender but still a bit crisp. Finally, mix in the cherry tomatoes and dried herbs. Cook for an extra two minutes until the tomatoes soften. - Cooking zucchini noodles and mixing with sautéed vegetables In another pan, heat the last tablespoon of olive oil. Add the spiralized zucchini noodles and season with salt and pepper. Cook for two to three minutes, tossing gently. You want them slightly tender but still firm. - Final seasoning adjustments Combine the sautéed vegetables with the zucchini noodles in the large skillet. Toss everything together for one to two minutes. Make sure the dish is hot and well mixed. Taste it and adjust salt and pepper as needed for the best flavor. This simple method makes Zucchini Noodle Primavera fresh and full of flavor. For the complete recipe, you can refer to the Full Recipe section. Enjoy your cooking! To make the best zucchini noodle primavera, keep your noodles al dente. This means cooking them just until they are tender but still firm. Overcooking can make them mushy, which spoils the dish. Aim for about 2-3 minutes in the pan. Enhance flavors with fresh herbs. Basil, oregano, and thyme work wonders. You can even add a squeeze of lemon for brightness. Fresh herbs bring life to your dish and make it pop. One common mistake is overcooking the zucchini noodles. This makes them lose their structure and taste. Always monitor the cooking time closely. Another mistake is choosing the wrong vegetables. Use vibrant, fresh vegetables like bell peppers, cherry tomatoes, and broccoli. They add color and flavor. Avoid wilted or overripe veggies. Zucchini noodle primavera pairs well with grilled chicken or shrimp. These proteins add heartiness to your meal. You can serve it with crusty bread, too. Garnish your dish with fresh basil and a sprinkle of grated Parmesan cheese. These toppings add visual appeal and extra flavor. A splash of olive oil can also elevate the presentation. For the Full Recipe, follow the steps and enjoy this fresh dish. {{image_2}} You can add grilled chicken or shrimp to your Zucchini Noodle Primavera for extra protein. Simply grill your choice of meat, slice it, and toss it with the noodles. Chicken breast gives a nice flavor, while shrimp adds a sweet touch. If you're looking for a vegan dish, try adding chickpeas or tofu. Both options give a great texture and protein boost. While olive oil is a classic choice, you can explore other sauces. For a punch of flavor, try pesto or marinara. If you prefer a creamy sauce, blend cashews with garlic and lemon for a vegan option. Creamy sauces can make the dish rich, while lighter options keep it fresh. Find the right balance that suits your taste. You can switch up the vegetables based on the season. In summer, add fresh corn or zucchini. In fall, try butternut squash or kale for a cozy feel. For holiday themes, consider adding roasted red peppers or seasonal herbs. This keeps your dish exciting and new with each season. For the full recipe, check the [Full Recipe]. To keep Zucchini Noodle Primavera fresh, store leftovers in an airtight container. Place the container in the fridge. This method helps maintain the dish's flavor. Try to eat the leftovers within three days for the best taste. When reheating, the best method is using a skillet. Heat it on medium and add a splash of olive oil. This helps keep the noodles from sticking. Stir and cook for about five minutes. Avoid the microwave, as it can make the noodles mushy. To freeze Zucchini Noodle Primavera, let it cool first. Then, portion it into freezer-safe bags. Squeeze out as much air as you can before sealing. It can stay fresh for up to three months. When ready to eat, thaw it in the fridge overnight. Reheat in a skillet for the best results. For the full recipe, check the earlier section. Zucchini noodles, or zoodles, are long strands made from zucchini. You can create them using a spiralizer or a vegetable peeler. They serve as a low-carb, gluten-free pasta alternative. Benefits of using zucchini noodles in recipes: - Low in calories: Zucchini has fewer calories than traditional pasta. - High in nutrients: Zucchini is rich in vitamins A and C. - Versatile: They soak up flavors well and fit many dishes. - Easy to prepare: Zucchini cooks quickly and can be eaten raw. Yes, you can prepare Zucchini Noodle Primavera ahead of time. Meal prepping saves you time during busy days. Tips for meal prepping this dish: - Cook the vegetables: Sauté and store them in the fridge. - Spiralize zucchini: Do this a day earlier and keep it in an airtight container. - Combine before serving: Mix the noodles and veggies just before eating. Soggy zucchini noodles can ruin your dish. Keeping them firm is key. Common techniques to maintain quality: - Salt the noodles: Lightly salt and let them sit for 10 minutes. Rinse and pat dry. - Quick cooking: Cook them for only 2-3 minutes to keep them firm. - Avoid excess moisture: Drain any liquid from cooked vegetables before mixing. For the full recipe, check out the Zesty Zucchini Noodle Primavera. Enjoy making this fresh and tasty dish! Zucchini Noodle Primavera is a simple, tasty dish. We covered ingredients, prep, and cooking steps. You learned tips to enhance flavor and avoid common mistakes. Remember, keeping the noodles al dente is key. Feel free to try different vegetables and proteins for variety. This dish is great for meal prep and leftovers. Enjoy your healthy, colorful meal. You’ll impress your friends and family with this recipe!

Zucchini Noodle Primavera Flavorful and Fresh Dish

Are you ready to enjoy a vibrant, fresh dish that bursts with flavor? My Zucchini Noodle Primavera is the perfect

To make Instant Pot creamy chicken pasta, you need some key items. Here is what you will need: - 2 tablespoons olive oil - 1 pound boneless, skinless chicken breasts, cut into bite-sized pieces - 1 teaspoon garlic powder - 1 teaspoon onion powder - 1/2 teaspoon paprika - Salt and pepper to taste - 1 cup chicken broth - 1 cup heavy cream (or coconut milk for a dairy-free option) - 8 ounces pasta (penne or fusilli work well) - 1 cup spinach, roughly chopped - 1/2 cup grated Parmesan cheese (or nutritional yeast for a dairy-free option) - Fresh basil, for garnish These ingredients come together to create a rich and creamy dish. You can add your twist to the dish with these optional ingredients: - Cherry tomatoes, halved - Mushrooms, sliced - Bell peppers, diced - Artichoke hearts, drained - Red pepper flakes for heat These extras can make your meal more colorful and tasty. If you lack some ingredients or want to change things up, try these substitutions: - Use vegetable broth instead of chicken broth for a vegetarian option. - Swap heavy cream for Greek yogurt for a lighter sauce. - Try whole wheat pasta for added fiber. These swaps keep the dish delicious while accommodating different diets. For the complete recipe, check the [Full Recipe]. Start by setting your Instant Pot to 'Sauté' mode. Add two tablespoons of olive oil. Let the oil heat for a minute or so. Next, add one pound of chicken pieces to the pot. Sprinkle in one teaspoon of garlic powder, one teaspoon of onion powder, and half a teaspoon of paprika. Season with salt and pepper to taste. Sauté the chicken for about 4-5 minutes. You want it to turn light brown. This step adds flavor and color to your dish. Now, it's time to add the liquid. Pour in one cup of chicken broth, scraping the bottom of the pot. You want to lift those tasty bits stuck to the pot. Then, stir in eight ounces of pasta. Penne or fusilli works best here. Add one cup of heavy cream as well. Make sure the pasta is fully submerged in the liquid. Close the lid and set the vent to 'Sealing'. Cancel 'Sauté' mode and choose 'Manual' or 'Pressure Cook'. Set the timer for 6 minutes. When the timer goes off, do a quick release of the pressure. Carefully turn the valve to 'Venting'. Once you open the lid, stir in one cup of chopped spinach and half a cup of grated Parmesan cheese. The spinach will wilt, and the cheese will melt into a creamy sauce. Taste your dish and adjust the seasoning if needed. Serve your creamy chicken pasta right away, garnished with fresh basil for that perfect touch. Enjoy this flavorful delight! For the full recipe, check out the link. Using an Instant Pot can seem tricky, but it’s simple once you learn. Always ensure the seal on the lid is tight. This helps build pressure quickly. Avoid overfilling the pot. Leave space for steam to escape. Use the right liquid amount. For this creamy chicken pasta, one cup of broth works best. Always release pressure carefully to avoid steam burns. To boost the taste of your creamy chicken pasta, consider some easy tricks. Start with fresh herbs like basil or parsley. They add color and taste. You can also try adding a squeeze of lemon juice. This brightens up the dish. For a spicy kick, add red pepper flakes while cooking. Try using homemade chicken broth for a richer flavor. Cooking in an Instant Pot saves time, but timing is key. For this recipe, cook the chicken for about 4-5 minutes on 'Sauté' mode. After adding the pasta and cream, set the timer for 6 minutes on high pressure. This ensures the pasta is tender but not mushy. If you're unsure, it's better to undercook slightly. You can always cook it a bit more if needed. Try these tips for a delicious meal! For the complete cooking process, check the Full Recipe. {{image_2}} You can easily make your creamy chicken pasta gluten-free. Use gluten-free pasta instead of regular pasta. Many brands offer great options like brown rice or chickpea pasta. They cook similarly in the Instant Pot. Ensure your chicken broth is also gluten-free. This simple swap keeps the dish tasty and safe for those with gluten allergies. If you want a vegetarian version, swap the chicken for veggies. Try using mushrooms, zucchini, or bell peppers. Sauté them in the olive oil first, just like you would with chicken. You can also add canned chickpeas for protein. Use vegetable broth instead of chicken broth. This keeps the dish hearty and full of flavor while making it plant-based. You can add your favorite flavors to this dish. For a spicy kick, add red pepper flakes or diced jalapeños. If you want a fresh taste, try adding lemon juice or zest. Herbs like thyme or oregano can also boost the flavor. For a smoky touch, use smoked paprika instead of regular paprika. These easy changes make the dish feel new each time you cook it. For the full recipe, check out the complete instructions and tips to create this delightful meal. After you enjoy your meal, let the pasta cool. Store it in an airtight container. It will stay fresh in the fridge for up to three days. Make sure to label your container with the date. This helps you keep track of freshness. If you can, reheat only the amount you plan to eat. You can freeze the leftover creamy chicken pasta too! First, let it cool completely. Then, place it in a freezer-safe bag. Squeeze out as much air as you can. This helps prevent freezer burn. The pasta can last for about three months in the freezer. When you are ready to eat, thaw it in the fridge overnight. To reheat, you can use the microwave or stove. If using the microwave, place the pasta in a bowl. Add a splash of water to keep it moist. Heat it for about two minutes, stirring halfway. On the stove, warm it in a pan over low heat. Stir often to avoid sticking. Check the temperature and enjoy your creamy chicken pasta again! For the complete recipe, check out the Full Recipe. You can tell the chicken is done when it reaches 165°F. Use a meat thermometer for this. The chicken should look white and no longer pink. Cut into a piece to check the inside. If it is juicy and white, it is ready to eat. Yes, you can use many types of pasta. Penne and fusilli are great choices. You can also try spaghetti or rotini. Just make sure to follow the cooking time for the type you pick. Adjust the liquid if needed. This dish pairs well with many sides. A fresh green salad keeps it light. Garlic bread is a tasty option too. You could also serve steamed veggies for a healthy choice. If you like, add some fruit for a sweet finish. For the full recipe, check out the Instant Pot Creamy Chicken Pasta. This blog covered all you need for creamy chicken pasta. We explored key ingredients, step-by-step cooking, and useful tips. I shared variations and smart storage ideas too. Keep these tips in mind as you cook. You'll make a dish that's tasty and satisfying. Enjoy your homemade meal and feel proud of what you create!

Instant Pot Creamy Chicken Pasta Flavorful Delight

Get ready to whip up an amazing dish in your Instant Pot! My Instant Pot Creamy Chicken Pasta is a

- 1 block firm tofu, drained and cubed - 2 cups mixed vegetables (bell peppers, broccoli, carrots, and snap peas) - 2 tablespoons soy sauce - 1 tablespoon sesame oil - 2 cloves garlic, minced - 1-inch piece ginger, minced - 2 teaspoons cornstarch - 2 tablespoons vegetable oil (for frying) These ingredients form the base of the dish. Firm tofu gives the stir-fry its protein. Mixed vegetables add color and nutrients. Soy sauce and sesame oil bring depth and flavor to each bite. Garlic and ginger add a wonderful aroma and taste. - 1 tablespoon sesame seeds (optional for garnish) - Fresh basil or cilantro leaves (for garnish) You can use garnishes to enhance your dish. Sesame seeds add crunch. Fresh herbs like basil or cilantro brighten the meal. You can also swap the tofu for chicken or shrimp if you prefer. Different sauces can change the flavor too. Explore what you like best! For the full recipe, check out the complete instructions to create this tasty dish. Pressing Tofu for Best Texture Start by pressing the tofu. This step helps remove excess water. Wrap the tofu in paper towels. Place a light weight on top. Let it sit for about 15 minutes. This process makes the tofu firmer and helps it fry better. Coating with Soy Sauce and Cornstarch After pressing, cut the tofu into cubes. In a bowl, combine the tofu with soy sauce and cornstarch. Toss gently to coat each piece evenly. The soy sauce adds flavor, and the cornstarch helps create a crispy texture when frying. Frying Tofu until Golden Heat sesame oil and vegetable oil in a large skillet over medium-high heat. Once hot, add the tofu cubes in a single layer. Fry them for about 8-10 minutes. Turn them carefully until they are golden and crispy on all sides. Once done, remove the tofu and set it aside. Stir-Frying Garlic, Ginger, and Vegetables In the same skillet, add more oil if needed. Then, add minced garlic and ginger. Stir-fry for about 30 seconds until fragrant. Next, add your mixed vegetables to the skillet. Stir occasionally for 3-5 minutes until they are bright and slightly tender. Reintroducing Tofu to the Vegetable Mix Return the crispy tofu to the skillet. Stir gently to combine with the vegetables. This step ensures that all the flavors mix well. Cook for an additional 2 minutes. This helps everything heat through nicely. Final Cooking Tips Make sure to taste as you go. Adjust the seasonings if needed. Serve your stir-fry hot. Garnish with sesame seeds and fresh herbs for extra flavor and a beautiful look. For the complete recipe, check out the Full Recipe section. Achieving Crispiness Tofu can be soft without the right prep. Press it to remove moisture. I like to use paper towels and a light weight. This makes your tofu crispy. Coat it with soy sauce and cornstarch. This adds flavor and helps with crispiness. Fry it in hot oil. Make sure to turn it often for even cooking. Using Different Cooking Methods You can bake or fry tofu. Frying gives it a golden crust. Baking is healthier and easier. To bake, coat it and place on a baking sheet. Bake at 400°F for about 25 minutes. Flip halfway for even browning. Recommended Seasonings Flavor is key in a stir-fry. Soy sauce adds umami. I love garlic and ginger for a fresh taste. You can also try chili flakes or sesame seeds. These can make your dish pop! Balancing Sauces for Taste Use a mix of soy sauce and sesame oil. This gives depth to your dish. If you want it sweeter, add a bit of honey or maple syrup. Taste as you cook. Adjust the sauce to your liking. Meal Prep Ideas Meal prep saves time. Chop veggies ahead of time. Store them in the fridge. You can also press tofu in advance. This way, you can whip up your stir-fry in just 15 minutes! Cooking Tips for Speed Cut all ingredients into small pieces. This helps them cook faster. Heat your pan before adding oil. A hot pan cooks food quickly and evenly. Stir-frying is fast, so keep things moving in the pan. Enjoy your quick veggie stir-fry with tofu from the Full Recipe! {{image_2}} Alternative Vegetables You can swap out the mixed vegetables for others you like. Try zucchini, mushrooms, or green beans. Each veggie brings its own taste and texture. You can mix and match for fun flavors. Use what you have in the fridge for a quick meal. Different Protein Options If you want to change the protein, consider chickpeas or tempeh. Both options bring protein and texture. You can even use cooked chicken or shrimp if you like. Each protein adds a unique twist to your stir-fry. Adding Spices or Sauces Want more flavor? Add spices like cumin or chili powder. You can also mix in sauces like teriyaki or hoisin. These additions can transform the dish. Experiment with flavors to suit your taste buds. Making it Spicy or Sweet To make it spicy, add red pepper flakes or sriracha. If you prefer sweet, drizzle honey or maple syrup. Adjust the heat or sweetness to fit your mood. This way, your stir-fry can change with your cravings. Gluten-Free Substitutions Swap soy sauce for tamari to make it gluten-free. You can also use coconut aminos. These options keep the flavor while meeting dietary needs. Always check labels for hidden gluten in sauces. Vegan Alternatives The recipe is already vegan with tofu. If you want a different vegan protein, use seitan. This gives a meaty texture without animal products. Enjoy the dish while sticking to your diet. For the full recipe, check the details above. Enjoy your cooking adventure! To keep your Quick Veggie Stir-Fry with Tofu fresh, store it in an airtight container. This helps lock in flavors and moisture. You can keep leftovers in the fridge for up to three days. If you want to enjoy it later, make sure it is cooled before sealing the container. This helps prevent condensation, which can make it soggy. You can freeze this stir-fry, but the texture may change. To freeze, place the cooled dish in a freezer-safe container. It lasts about one month in the freezer. For best results, freeze the tofu and vegetables separately. This keeps the veggies from becoming mushy. When you’re ready to eat, thaw the stir-fry in the fridge overnight. To reheat, use a skillet over medium heat. Stir until heated through. You can also use a microwave, but stir halfway to ensure even heating. Enjoy your tasty meal anytime! To make tofu crispy, start by pressing the tofu to remove water. This step is key. Wrap the tofu in paper towels and add a weight on top for 15 minutes. Next, cut the tofu into cubes. Coat the cubes with soy sauce and cornstarch. The cornstarch helps create a crispy crust. When cooking, use high heat with oil. Heat sesame oil and vegetable oil in a pan. Add the tofu in a single layer. Fry until golden and crispy, about 8-10 minutes. This method gives you a nice, crunchy texture. Yes, you can swap vegetables based on what you have. Try using zucchini, asparagus, or mushrooms. You can also add leafy greens like spinach or kale. Just ensure the vegetables you choose cook well together. Cut them into similar sizes for even cooking. To store stir-fry leftovers, let them cool first. Place them in an airtight container. This keeps the dish fresh. Store it in the fridge for up to three days. For longer storage, freeze the stir-fry. Use freezer-safe bags or containers. When ready to eat, thaw in the fridge overnight and reheat on the stove. This keeps the flavors intact. We covered how to make a tasty tofu stir-fry, focusing on main ingredients like tofu, mixed vegetables, and seasonings. I shared step-by-step instructions to prepare and cook your dish perfectly. You learned tips to enhance flavor and achieve the right texture. Remember, variations can make your stir-fry unique, whether you swap ingredients or adjust flavors. Lastly, I provided storage tips for your leftovers. Enjoy making your stir-fry, and have fun experimenting in the kitchen!

Quick Veggie Stir-Fry with Tofu for a Fresh Meal

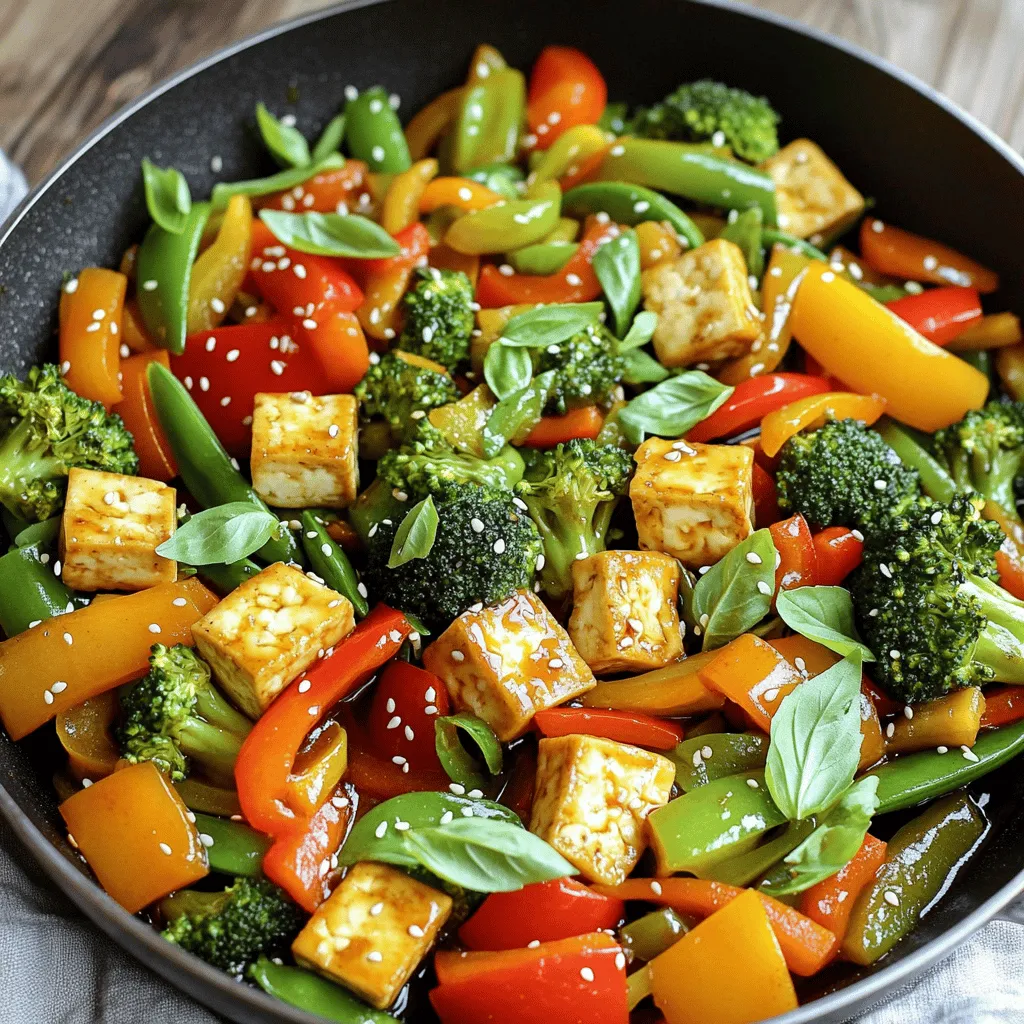
Looking for a fast and tasty meal? This Quick Veggie Stir-Fry with Tofu fits the bill! In just a few

To make these no-bake chocolate peanut butter bars, gather these simple items: - 1 cup creamy peanut butter - 1/2 cup maple syrup - 2 cups rolled oats - 1/2 cup cocoa powder - 1/2 teaspoon vanilla extract - 1/4 teaspoon salt - 1/2 cup dark chocolate chips (dairy-free if desired) - 2 tablespoons coconut oil If you need to change a few ingredients, here are some great swaps: - Use almond butter instead of peanut butter for a different flavor. - Swap maple syrup with agave syrup for a vegan option. - Try quick oats if you want a softer texture. - Use unsweetened carob powder if you want a caffeine-free chocolate taste. - Replace dark chocolate chips with white chocolate for a sweeter treat. These bars are rich and satisfying. Each square has about: - Calories: 180 - Protein: 5g - Fat: 10g - Carbohydrates: 18g - Fiber: 3g - Sugar: 6g These values may change based on your ingredient choices. For the full recipe, check the details above. To start, gather all your ingredients. You will need creamy peanut butter, maple syrup, oats, cocoa powder, vanilla extract, salt, dark chocolate chips, and coconut oil. Measure each item carefully for the best results. This ensures each bar has the right taste and texture. In a large bowl, add the peanut butter and maple syrup first. Stir them together until they are smooth. This step is key for a creamy base. Next, add your oats, cocoa powder, vanilla extract, and salt. Mix everything together well. You want a thick mixture that holds its shape. Once mixed, grease an 8x8-inch dish or line it with parchment paper. This makes it easy to lift out the bars later. Now, transfer the mixture into the dish and press it down firmly. Use a spatula or your hands to create an even layer. In a small saucepan, melt the dark chocolate chips and coconut oil over low heat. Stir often until it’s smooth and glossy. This step adds a rich flavor to your bars. Once melted, pour the chocolate over the pressed peanut butter mixture. Use a spatula to spread it evenly over the top. Place the dish in the fridge for about 2-3 hours. This helps the bars set up nicely. After they are firm, cut them into squares. Now you have a delightful treat ready to enjoy! For the full recipe, check the earlier section. To get the best texture, use creamy peanut butter. Chunky peanut butter can make the bars crumbly. The oats should be rolled oats, not instant. They help to bind the mixture. After mixing, the mixture should be thick and sticky. If it feels too dry, add a bit more maple syrup. Press the mixture firmly into the dish. This helps the bars hold together well when cut. These bars shine when served cold. After chilling, cut them into squares. You can drizzle more melted chocolate on top for flair. A sprinkle of sea salt adds a nice touch. For fun, place them in cute boxes. They make great gifts for friends and family. You can also pair these bars with fresh fruit or a scoop of ice cream. One common mistake is not pressing the mixture firmly enough. If you don’t, the bars may fall apart. Another mistake is using the wrong type of chocolate. Always choose good quality chocolate chips for the best taste. Make sure to melt chocolate slowly. If you heat it too fast, it can burn. Lastly, don’t skip on chilling time. They need time to set properly. For the full recipe, check out the [Full Recipe]. {{image_2}} You can change the taste of your no-bake chocolate peanut butter bars easily. Try adding different flavors. For a fruity twist, mix in dried cherries or cranberries. They add a nice chew and sweetness. You could also add a pinch of cinnamon for warmth. If you love coconut, sprinkle shredded coconut on top before the chocolate sets. This will give your bars a tropical feel. Making these bars fit your diet is simple. To make them vegan, swap the honey for maple syrup. Use dairy-free chocolate chips to keep it vegan. For a gluten-free option, ensure you use certified gluten-free oats. This way, everyone can enjoy these tasty treats without worry. Want to make your bars even better? Add a layer of crunch by mixing in chopped nuts like almonds or walnuts. This will give your bars a great texture. For a richer taste, try adding a spoonful of nut butter on top of the chocolate layer. This adds depth and flavor. You can also drizzle extra melted chocolate on top before serving for a fancy touch. For the full recipe, check the details above. To store your no-bake chocolate peanut butter bars, wrap them tightly. Use plastic wrap or foil to keep air out. Place them in an airtight container. This will keep them fresh and tasty. Store them in the refrigerator for the best results. The cool air helps keep them firm and prevents melting. You can freeze these bars if you want to save some for later. First, cut them into squares. Then, wrap each piece in plastic wrap. Place the wrapped pieces in a freezer bag or container. Be sure to label the bag with the date. They will last well in the freezer for about three months. When you want one, just take it out and let it thaw in the fridge. When stored in the fridge, the bars last for about one week. They stay fresh and delicious if kept sealed. If frozen, they will taste great for up to three months. After that, they may lose some flavor and texture. Enjoy these tasty treats anytime! For the full recipe, check the earlier section. Yes, you can use other nut butters. Almond butter or cashew butter work well. These options add their own flavor. Just make sure they are creamy and smooth. This keeps the texture nice. The bars will still taste great, even with a different nut butter. The bars are set when they feel firm to the touch. After chilling in the fridge, check their texture. If they hold their shape and don't feel sticky, they are ready. Usually, it takes about 2-3 hours for them to set fully. If you are unsure, wait a bit longer for peace of mind. Yes, honey can replace maple syrup in this recipe. The bars will still be sweet and tasty. Keep in mind that honey may change the flavor slightly. It will still work well, so don’t worry if you have honey on hand. Enjoy the sweet swap! This blog post covered all you need for no-bake bars. We explored ingredients, proper prep, and mixing methods. You learned tips for perfect texture and serving ideas, plus variations for different diets. We also discussed storage and answered common questions. Now, you can create delicious no-bake bars with ease. Remember to have fun and experiment with flavors. Enjoy your tasty treats!

No-Bake Chocolate Peanut Butter Bars Delightful Treat

Craving a sweet treat that requires zero baking? You’re in luck! My No-Bake Chocolate Peanut Butter Bars are the perfect

To make a rich Cajun Meatball Stew, you need a mix of fresh ingredients. Here’s the breakdown: - 1 pound ground beef - 1/2 pound ground pork (optional, can replace with more beef) - 1/2 cup breadcrumbs - 1/4 cup finely chopped parsley - 1 egg - 2 garlic cloves, minced - 1 teaspoon Cajun seasoning - 1/2 teaspoon salt - 1/4 teaspoon black pepper - 1 tablespoon olive oil - 1 onion, diced - 1 green bell pepper, diced - 2 celery stalks, diced - 3 cups low-sodium chicken broth - 1 can (14.5 oz) diced tomatoes - 1 tablespoon Worcestershire sauce - 1 teaspoon dried thyme - 1/2 teaspoon cayenne pepper (adjust for heat preference) - 2 cups okra, sliced (fresh or frozen) - 1/4 cup chopped green onions for garnish For those wanting to customize, feel free to switch the pork for more beef. You can also add extra spices to adjust the heat. When sourcing ingredients, look for fresh produce. Visit local markets for vegetables like okra. Fresh herbs, like parsley, can elevate the flavor. Always check the meat for quality. Good meat makes a big difference in taste. For a complete look at how to put this all together, check out the Full Recipe. To make the best meatballs, start by mixing these ingredients in a large bowl: - 1 pound ground beef - 1/2 pound ground pork (optional) - 1/2 cup breadcrumbs - 1/4 cup finely chopped parsley - 1 egg - 2 minced garlic cloves - 1 teaspoon Cajun seasoning - 1/2 teaspoon salt - 1/4 teaspoon black pepper Mix well until all ingredients blend together. When shaping the meatballs, aim for about 1 inch in size. This size cooks evenly and fits well in the stew. Roll them between your hands to form smooth balls. Set them aside on a plate. Next, get a large pot or Dutch oven ready. Heat 1 tablespoon of olive oil over medium heat. Add the diced onion, diced green bell pepper, and diced celery. Sauté these veggies for about 5 minutes, or until they soften. Now, it’s time to brown the meatballs. Carefully add them to the pot. Brown them on all sides for 5-7 minutes. This step adds great flavor to the stew. Once the meatballs are browned, it's time to add the liquids and spices. Pour in 3 cups of low-sodium chicken broth and a can of diced tomatoes (with juice). Also add 1 tablespoon of Worcestershire sauce, 1 teaspoon of dried thyme, and 1/2 teaspoon of cayenne pepper. Bring everything to a boil. Then, reduce the heat and cover the pot. Let the stew simmer for 20-25 minutes. This allows the flavors to mix well. After that, stir in 2 cups of sliced okra. Continue to simmer for another 10 minutes until the okra is tender. Taste the stew and adjust the seasoning if needed. For the full recipe, check the link for complete details. Enjoy your hearty and flavorful Cajun meatball stew! To make your Cajun Meatball Stew shine, add a bit more spice. You can increase the Cajun seasoning for a bolder kick. Try adding a dash of smoked paprika for depth or fresh herbs like thyme or basil for brightness. For meatball texture, ensure you mix your ingredients well but don't overwork the meat. This keeps your meatballs tender. Form them gently and aim for uniform size. It helps them cook evenly. One common error is cooking the meatballs too quickly. If you rush, they might not brown well. Take your time and brown them on all sides before adding broth. This step builds flavor. Another mistake is not tasting the stew as it cooks. Always check the seasoning, especially before serving. If it tastes flat, add more salt or spices. For the best results, use a heavy pot or Dutch oven. This helps with even heat distribution. A sturdy wooden spoon is great for stirring without scratching your pot. Consider using a meatball scoop. It makes forming uniform meatballs quick and easy. A sharp knife and cutting board are also key for chopping veggies efficiently. For an added touch, have a ladle handy for serving. It makes dishing out your hearty stew a breeze. For the full recipe, check out the detailed instructions. {{image_2}} You can change the ground meat in the stew. Try ground turkey or chicken instead of beef and pork. If you want, use only ground beef for a classic taste. For a leaner option, you can also use ground lamb. Adjust the spice levels to fit your taste. If you like it mild, skip the cayenne pepper. You can also add a splash of hot sauce for a gentle kick. For more flavor, consider adding smoked paprika or a dash of hot pepper flakes. To make this dish gluten-free, use gluten-free breadcrumbs. You can also use gluten-free pasta if you want to add more carbs. For a dairy-free version, skip any cheese garnishes. If you prefer vegan or vegetarian options, swap the meat for lentils or chickpeas. You can also use a mix of diced mushrooms and walnuts for a hearty texture. Ensure that the broth is vegetable-based to keep it vegan. Incorporate local ingredients for a special touch. Use andouille sausage for a more authentic Cajun flavor. You can also add diced bell peppers in different colors for a fun look. For creative side dishes, serve the stew with cornbread or rice. A fresh green salad can balance the richness of the stew. You can also pair it with crusty bread for dipping. For the full recipe, check out Cajun Meatball Stew. Store any leftover Cajun Meatball Stew in an airtight container. This keeps the stew fresh. It is best to cool the stew to room temperature before storing. You can keep it in the fridge for up to 3 days. To freeze Cajun Meatball Stew, first let it cool completely. Then, transfer it to freezer-safe containers. Label the containers with the date for easy tracking. You can freeze it for up to 3 months. When you’re ready to enjoy it, thaw the stew in the fridge overnight. For reheating, warm it on the stove over medium heat. Stir occasionally until hot. You can also use a microwave, but stir every minute for even heating. Check out the Full Recipe for more tips! To boost the flavor of your meatballs, use extra spices. Try adding smoked paprika or onion powder. Fresh herbs like thyme or basil can add depth. You can also mix in some grated Parmesan cheese. This adds richness and a salty kick. For a touch of heat, consider adding more cayenne pepper or crushed red pepper flakes. Each of these will enhance your meatballs. Yes, you can make Cajun Meatball Stew ahead of time. Cook the stew and let it cool. Then, store it in the fridge for up to three days. When you're ready to eat, reheat it on the stove. You can also freeze it for up to three months. Thaw it in the fridge overnight before reheating. This will keep the flavors fresh and delicious. Cajun Meatball Stew pairs well with several tasty sides. Consider serving it over rice or with crusty bread. A simple green salad can add a nice crunch. You might also enjoy cornbread for a traditional touch. For a heartier meal, serve it with mashed potatoes. These sides will complement the stew and make your meal complete. For the full recipe of Cajun Meatball Stew, visit [Full Recipe]. Cajun Meatball Stew is a flavorful dish packed with unique ingredients. In this post, we covered key ingredients, detailed cooking steps, and helpful tips to enhance flavor. Remember to pay attention to common mistakes and use the right tools for best results. Consider variations and dietary needs for your own twist. Proper storage ensures you enjoy leftovers at their best. Dive in, try the recipe, and you'll impress your friends and family with your cooking skills!

Cajun Meatball Stew Hearty and Flavorful Dish

Are you ready to warm your soul with a dish that packs a punch? Cajun Meatball Stew is a hearty

- 1 large refrigerated pizza dough - 1/2 cup Nutella - 4 oz cream cheese, softened - 1/4 cup powdered sugar - 1 tsp vanilla extract - 1 egg, beaten (for egg wash) - 1/4 cup chopped hazelnuts (optional, for topping) - Powdered sugar for dusting What kind of dough should you use? I recommend using a large, refrigerated pizza dough. It rolls out well and gives a nice texture. If you want a lighter bite, try crescent roll dough. What about cream cheese? You can swap it for mascarpone or ricotta if you prefer. They both give a smooth taste, too. How does Nutella compare to other spreads? Nutella has a rich chocolate and hazelnut flavor. You can use other chocolate spreads, but they might taste different. Brands like Justin’s or Nutiva are good options. You can find the full recipe at the end of this section. 1. Preparing the oven and baking sheet Start by preheating your oven to 375°F (190°C). This temperature is perfect for a golden finish. Line a baking sheet with parchment paper. This helps prevent sticking. 2. Rolling out the dough to the correct thickness Lightly flour your work surface. Take the refrigerated pizza dough and roll it out into a rectangle. Aim for about 1/4 inch thick. This thickness is ideal for soft, tasty rolls. 1. Combining cream cheese, powdered sugar, and vanilla In a small bowl, mix 4 oz of softened cream cheese with 1/4 cup of powdered sugar and 1 tsp of vanilla extract. Stir until the mix is smooth and creamy. This mixture adds richness to your rolls. 2. Spreading cream cheese and Nutella on the dough Spread the cream cheese mix evenly over the rolled-out dough. Leave a small border at the edges. Then, spread 1/2 cup of Nutella over the cream cheese layer. Make sure to cover all the cream cheese for balanced flavor. 1. How to roll the dough properly Starting from one long edge, tightly roll the dough into a log. Press the edge to seal it. A tight roll helps keep the filling inside while baking. 2. Egg wash application tips Beat 1 egg in a small bowl to create an egg wash. Brush this egg wash over the tops of the rolls. This will give them a nice, shiny finish. 3. Baking time and temperature guidelines Place the rolls cut-side up on your prepared baking sheet. Bake them for 15-20 minutes. Look for a golden brown color and puffed appearance. Enjoy the wonderful aroma filling your kitchen! For the complete steps, check the Full Recipe. To make the softest Nutella rolls, use fresh refrigerated pizza dough. Let it sit at room temperature for about 15 minutes before rolling. This makes it easier to work with. Another tip is to roll the dough gently. You want to keep air in the dough for fluffiness. For an even spread of Nutella, start at the center and work your way out. Use a spatula or the back of a spoon. This helps avoid clumps and ensures every bite is delicious. Watch for over-rolling the dough. If you roll it too thin, the rolls can become dry. Aim for about 1/4 inch thick. When rolling, keep the filling towards the center. This helps prevent it from leaking out during baking. To avoid filling leakage, seal the edges of the dough tightly. Use a little water to moisten the edge before pressing. This keeps all the tasty filling inside while baking. Serve these rolls warm for the best taste. The chocolate will be melty and delicious. If you serve them cold, they still taste great but lose some of that warm gooeyness. Pair these rolls with coffee for a nice morning treat. They also go well with ice cream for dessert. A scoop of vanilla ice cream on the side adds a nice touch. {{image_2}} You can switch up the flavors in these Nutella rolls. Try different chocolate spreads like almond or hazelnut spreads. Each will give a unique taste. You can also use flavored cream cheese. Options like strawberry or pumpkin spice can add a fun twist. If you need a gluten-free option, look for gluten-free pizza dough. Many stores offer good choices that taste great. For a vegan version, use vegan cream cheese and a plant-based dough. This way, everyone can enjoy these tasty rolls. Add fun toppings to make your rolls even better. Fresh fruit like strawberries or bananas can brighten the dish. A drizzle of caramel or chocolate syrup can make it feel fancy. To dust with powdered sugar, use a fine sieve. This gives a nice, even look to your rolls. For the full recipe, check out the Nutella Cream Cheese Delight Rolls. To keep your Nutella rolls fresh, store them in an airtight container. This helps prevent them from drying out. Place the container in the fridge. They will stay good for about three days. To reheat, preheat your oven to 350°F (175°C). Place the rolls on a baking sheet. Heat them for about 5 to 10 minutes. This will bring back their warm, gooey goodness. You can freeze Nutella rolls before or after baking. If you freeze them before baking, just slice the rolls and place them on a baking sheet. Freeze until solid, then transfer them to a freezer-safe bag. They will last for about two months. To bake, take them out and let them thaw in the fridge overnight. Bake as usual. If you freeze them after baking, let them cool first. Wrap each roll in plastic wrap, then in foil. This will keep them fresh. To thaw, just leave them in the fridge overnight. Reheat in the oven for a warm treat. Enjoy your delicious Nutella rolls! For the full recipe, check the detailed instructions. You can add your own twist to these Nutella rolls. Here are some ideas: - Add fruit: Try sliced bananas or strawberries for a fresh taste. - Use flavored cream cheese: Mix in a fruit-flavored cream cheese for extra flavor. - Mix in spices: A dash of cinnamon or nutmeg can spice up the rolls. - Create a chocolate swirl: Mix Nutella with peanut butter for a new flavor. - Glaze: Drizzle a simple glaze of milk and powdered sugar on top after baking. Yes, you can use homemade dough. Here are some pros and cons: - Pros: You control the ingredients and can make it to your taste. It can taste fresher and fluffier. - Cons: Making dough takes more time and effort. It can be tricky to get the right texture for rolls. You can explore many fillings beyond Nutella and cream cheese. Here are a few ideas: - Peanut butter: Swap Nutella for peanut butter for a nutty flavor. - Fruit preserves: Use your favorite jams or jellies for a fruity twist. - Chocolate chips: Add chocolate chips for extra chocolatey goodness. - Nut mixtures: A mix of nuts and chocolate can give a crunchy texture. - Cinnamon sugar: Spread a mix of sugar and cinnamon for a sweet treat. For more detailed steps, check out the Full Recipe. In this blog post, we explored a simple recipe for delicious Nutella rolls. We covered each ingredient, preparation steps, and tips to achieve the perfect texture. You learned how to avoid common mistakes and get creative with flavors. Keep these tips in mind for tasty results every time. Experimenting with ingredients makes cooking fun. Enjoy sharing this treat with friends and family. Your efforts will surely impress everyone!

Nutella Rolls with Cream Cheese Easy and Tasty Treat

Looking for a quick and delicious treat that will impress everyone? Try making Nutella Rolls with Cream Cheese! These rolls

- 8 oz fettuccine pasta - 1 lb large shrimp, peeled and deveined - 2 tablespoons olive oil - 3 cloves garlic, minced - 1 cup heavy cream - 1 cup grated Parmesan cheese - 1 teaspoon lemon zest - 1 tablespoon freshly squeezed lemon juice - 1 teaspoon paprika - Salt and pepper to taste - Fresh parsley, chopped (for garnish) Gathering the right ingredients is key to making this creamy shrimp pasta shine. Start with fettuccine pasta, as it holds the sauce well. Large shrimp work best because they are meaty and cook quickly. Use fresh garlic for a strong aroma and flavor. Heavy cream creates that rich, velvety sauce, while grated Parmesan adds a savory touch. For extra zest, lemon zest and lemon juice brighten the dish. Paprika brings a mild warmth that complements the shrimp. Don't forget to season with salt and pepper for balance. Finally, fresh parsley not only adds color but also a hint of freshness to each bite. Check out the Full Recipe for a complete guide to making this delightful dish! Start by boiling a large pot of salted water. Add the fettuccine and cook according to the package instructions. This usually takes about 8 to 10 minutes. Once the pasta is al dente, drain it. Remember to save a cup of the pasta water for later. In a large skillet, heat 2 tablespoons of olive oil over medium heat. When the oil is hot, add 1 pound of large shrimp. Cook the shrimp for about 2 to 3 minutes on each side. The shrimp should turn pink and opaque. Once cooked, remove the shrimp from the skillet and set it aside. In the same skillet, add 3 cloves of minced garlic. Sauté the garlic for about 1 minute until it smells good. Next, pour in 1 cup of heavy cream. Let this simmer gently. Gradually whisk in 1 cup of grated Parmesan cheese. This will make the sauce creamy and rich. Now, return the cooked shrimp to the skillet. Add the drained fettuccine next. Toss everything together gently to coat the pasta and shrimp in the creamy sauce. If the sauce seems too thick, add a bit of the reserved pasta water to adjust the consistency. Cook the pasta and shrimp together for just another minute. This allows the flavors to blend well. Now, plate the creamy shrimp pasta. Finally, garnish with fresh chopped parsley for a touch of color and flavor. Enjoy this delightful dish! For the full recipe, check out the details above. To cook shrimp well, aim for a duration of 2-3 minutes per side. This short time is key to tender shrimp. Look for shrimp that turn pink and opaque. When they curl into a C shape, they are ready to eat. You can adjust the sauce's thickness using reserved pasta water. Start with a tablespoon and add more if needed. This helps the sauce cling to the pasta. When whisking in cheese, do it slowly. This way, it melts smoothly into the sauce. To boost flavor, consider adding spices like red pepper flakes or fresh basil. These add a nice kick. If you want a cheese alternative, try nutritional yeast or a dairy-free cheese. These can provide a unique twist to the dish. For the full recipe, check out the detailed instructions to make this creamy shrimp pasta. {{image_2}} You can change the pasta for this dish. Try whole grain or gluten-free pasta. Both options work well. Whole grain adds more fiber. Gluten-free pasta is great for those with allergies. Look for brands that offer good texture. Adding veggies makes your dish colorful and healthy. Spinach is a great choice. It wilts nicely in the sauce. Cherry tomatoes add sweetness and a pop of color. You can also use bell peppers for crunch. Just sauté them with garlic for extra flavor. Want to switch up the protein? Chicken works well in this dish. Cook it the same way as the shrimp. Scallops are another tasty option. They cook quickly and add a rich flavor. For a plant-based choice, try tofu or chickpeas. Both absorb flavors well and make the dish filling. To store leftovers, place the creamy shrimp pasta in an airtight container. Make sure it cools down first. This helps keep it fresh. Store it in the fridge for up to three days. If you see any signs of spoilage, like a bad smell or mold, throw it away. Freezing creamy shrimp pasta is a good option if you want it for later. First, let it cool down completely. Then, place it in a freezer-safe container or bag. Remove as much air as possible to prevent freezer burn. You can freeze it for up to two months. To use it, thaw it in the fridge overnight before reheating. When reheating creamy shrimp pasta, do it gently. You can use the stove or microwave. If using the stove, add a splash of water or cream to keep it moist. Heat over low to medium heat, stirring often. If using the microwave, heat in short bursts of 30 seconds. Stir in between to avoid hot spots. This way, you keep the taste and texture nice and creamy. For the full recipe, check out the section above! I recommend using large shrimp for this dish. They have a nice bite and cook well. Fresh shrimp is always the best choice for flavor. If fresh shrimp is not available, frozen shrimp works too. Just ensure they are peeled and deveined. If you use frozen shrimp, thaw them in the fridge overnight. This keeps them firm and tasty. Yes, you can make creamy shrimp pasta dairy-free! Use coconut cream or cashew cream instead of heavy cream. Nutritional yeast can replace Parmesan cheese for a cheesy flavor. There are many brands of dairy-free cheese that melt well too. Just check the labels to ensure they fit your needs. Creamy shrimp pasta stays good in the fridge for about three days. Store it in an airtight container to keep it fresh. When reheating, add a splash of water or broth to help it stay creamy. Make sure it heats through to a safe temperature. Absolutely! If you like a kick, add red pepper flakes or cayenne pepper. Start with a small amount and adjust to your taste. You can also add a dash of hot sauce for extra flavor. Fresh herbs like cilantro can add a nice twist too. This blog post shared a simple and tasty creamy shrimp pasta recipe. You learned about essential ingredients, step-by-step cooking instructions, and tips for perfect shrimp. You can customize this dish with various pasta, veggies, or proteins. Remember to store leftovers properly for later enjoyment. Cooking can be both fun and rewarding, especially with straightforward recipes. Enjoy creating your creamy shrimp pasta!

Creamy Shrimp Pasta Delightful and Easy Dish

Welcome to a simple yet delightful journey of flavor with creamy shrimp pasta! This dish packs a punch with fresh

To make hot honey chicken bowls, you need a few key items: - 1 lb chicken breast, cut into bite-sized pieces - 1 cup jasmine rice - 2 cups chicken broth (or water) - 1 tablespoon olive oil - 2 tablespoons hot honey (store-bought or homemade) - 1 tablespoon soy sauce - 1 tablespoon apple cider vinegar - 1 teaspoon garlic powder - 1 teaspoon ginger, minced - 1/2 teaspoon black pepper - 1/2 teaspoon salt Adding vegetables makes this meal colorful and healthy. You'll want: - 1 cup broccoli florets - 1 bell pepper, sliced (red or yellow) - 1/2 cup green onions, chopped - Sesame seeds for garnish Seasonings enhance the dish's flavor. You will use: - Garlic powder, ginger, salt, and pepper - Optional garnishes: You can use lime wedges or extra green onions for a fresh touch. These ingredients come together to create a vibrant and tasty meal. For the full recipe, check the instructions provided. To start, grab a medium saucepan. Combine 1 cup of jasmine rice with 2 cups of chicken broth or water. Turn the heat to high and bring it to a boil. Once it bubbles, lower the heat. Cover the pan and let it simmer for 15-20 minutes. The rice will soak up the liquid and become tender. When it's done, fluff it with a fork for a nice texture. In a large mixing bowl, take 1 lb of chicken breast cut into bite-sized pieces. Add 1 teaspoon of garlic powder, 1 teaspoon of minced ginger, 1/2 teaspoon of black pepper, and 1/2 teaspoon of salt. Toss the chicken well to coat it evenly with the seasonings. This mix gives the chicken great flavor. Now it’s time to cook the chicken. Heat 1 tablespoon of olive oil in a skillet over medium-high heat. Once the oil is hot, add the seasoned chicken. Cook it for 5-7 minutes until it turns golden brown and is fully cooked. Next, add 1 cup of broccoli florets and 1 sliced bell pepper. Stir them into the chicken and cook for another 3-4 minutes. This step keeps the veggies crisp and bright. While everything cooks, make the sauce. In a small bowl, whisk together 2 tablespoons of hot honey, 1 tablespoon of soy sauce, and 1 tablespoon of apple cider vinegar. Pour this sauce over the chicken and vegetables. Mix well to coat everything. Cook for an extra 2 minutes until the sauce thickens a bit. Now, divide the fluffy jasmine rice into bowls. Top each bowl with the hot honey chicken and veggie mix. Enjoy this flavorful meal idea! For the full recipe, check out the link. To make your hot honey chicken bowls even better, try these tips: - Adjust the Heat: If you like spice, add more hot honey. For less heat, reduce the amount. - Mixing Flavors: Use hot honey as a glaze for grilled meats or drizzled over roasted veggies. It adds a sweet kick. Perfect cooking makes a big difference: - Searing Chicken: Heat your skillet well before adding chicken. This helps it brown nicely. Cook it in batches if your pan is small to avoid steaming. - Crisp Vegetables: Add vegetables toward the end of cooking. This keeps them bright and crunchy. Stir them gently, so they don’t get mushy. Make your bowls shine with these ideas: - Pairing Sides: Serve with a light salad or crispy spring rolls. They balance the meal well. - Presentation Ideas: Use colorful bowls to show off the bright veggies. Add a lime wedge for a zesty touch. This makes each bowl look fresh and inviting. For the full recipe, check out the detailed steps to make these delicious bowls. {{image_2}} You can switch the chicken for tofu or shrimp. Tofu offers a nice texture and absorbs flavors well. Shrimp cooks quickly and adds a seafood twist. You can also use different cuts of chicken. Thighs provide more flavor and stay juicy. Breasts are leaner but can dry out if overcooked. Instead of jasmine rice, try quinoa, brown rice, or noodles. Quinoa is high in protein and gluten-free. Brown rice adds a nutty flavor and is more wholesome. Noodles can bring a different texture and soak up the sauce. If you need gluten-free options, use rice noodles or cauliflower rice. You can make homemade hot honey easily. Just mix honey with your favorite hot sauce. Adjust the heat to your liking for a personalized touch. Other flavor varieties include garlic-infused honey or chili honey. These options can add depth to your dish and make it unique. For more flavor ideas, check out the Full Recipe. Store leftover hot honey chicken bowls in the fridge. Use airtight containers. This helps keep the meal fresh for up to three days. Make sure to cool the food to room temperature before sealing. Label the containers with dates to track freshness. You can freeze cooked chicken and vegetables separately. Place them in freezer-safe bags or containers. Remove as much air as possible before sealing. For best taste, use within three months. To thaw, move the chicken and veggies to the fridge for overnight. This keeps the texture nice. For reheating, you can use the microwave or stovetop. If using the microwave, heat in short bursts. Stir in between to prevent hot spots. For stovetop, warm in a skillet over low heat. Add a splash of water or broth to keep it moist. This retains the great flavor and texture of the dish. To make homemade hot honey, you need just two ingredients: honey and red pepper flakes. Here’s how: - Ingredients: - 1 cup honey - 2 tablespoons red pepper flakes 1. Combine: In a small saucepan, mix honey and red pepper flakes. 2. Heat: Warm over low heat for about 5 minutes. Stir gently. 3. Cool: Let it cool before using. Store in a jar. This sweet and spicy blend enhances your hot honey chicken bowls perfectly. Yes, you can easily adjust the spice level in your hot honey chicken bowls. Here’s how: - Increase heat: Add more hot honey or use extra red pepper flakes. - Decrease heat: Use less hot honey or add a bit of regular honey. Tasting as you go helps find the right balance for your taste buds. These chicken bowls pair well with many sides. A few ideas include: - Steamed vegetables: Carrots or snap peas add color and crunch. - Salad: A fresh green salad gives a nice contrast. - Noodles: Rice noodles or soba can soak up the sauce well. These sides help balance out the heat and add variety to your meal. Yes, you can prep parts of the hot honey chicken bowls ahead of time. Here are some tips: - Cook rice: Make the jasmine rice in advance. Store it in the fridge. - Prep chicken: Season the chicken and store it in the fridge. - Chop veggies: Clean and cut the vegetables ahead of time for easy cooking. When ready to serve, just cook everything together quickly for a delicious meal. For the full recipe, check the earlier sections! This blog post covered how to make delicious hot honey chicken bowls. We looked at main ingredients like chicken breast and jasmine rice, plus tasty vegetables and spices. I shared step-by-step cooking tips, from preparing the rice to cooking the chicken. You can also try variations with different proteins or grains. Final thoughts: Experimenting with flavors can make this dish your own. Enjoy cooking!

Hot Honey Chicken Bowls Flavorful Meal Idea

Looking for a meal that’s both flavorful and satisfying? Hot honey chicken bowls are your answer! This dish combines juicy

Older posts
Newer posts
← Previous Page1 … Page93 Page94 Page95 … Page104 Next →

dsad

© 2025 pureeatsnow • Built with GeneratePress

Our Policies

  • Copyright Policy
  • Cookie Policy
  • GDPR Policy
  • Privacy Policy
  • Disclaimer
  • Terms Of Use

More Information

  • Home
  • About
  • Contact
  • Appetizers
  • Dessert
  • Dinner
  • Drinks
©2025, pureeatsnow About Back To Top