
Lemon Ricotta Cookies Delightful and Easy Recipe
If you want a treat that’s both easy and delicious, you’ve come to the right place! Lemon ricotta cookies are
If you want a treat that’s both easy and delicious, you’ve come to the right place! Lemon ricotta cookies are
![To make a great shrimp fried rice, you need key ingredients. Here’s what you’ll need: - 2 cups cooked jasmine rice: Use day-old rice for the best texture. Fresh rice can be too sticky. - 200g shrimp: Choose medium or large shrimp. They should be peeled and deveined for easy cooking. - 1 cup coconut milk: This adds creaminess and a hint of sweetness. - 1/2 cup sweet corn: You can use fresh or frozen corn. - 1/2 bell pepper: Select red or yellow for color and flavor. Dice it into small pieces. - 2 green onions: Chop these for a fresh taste and garnish. - 3 cloves garlic: Mince them to pack in flavor. - 2 tablespoons soy sauce: Use tamari if you need a gluten-free option. - 1 tablespoon lime juice: Freshly squeezed lime juice brightens up the dish. - 1 tablespoon sesame oil: This gives a nice, nutty flavor. You can use vegetable oil if needed. - Salt and pepper: Use these to taste for added flavor. - Fresh cilantro: This is for garnish and adds a fresh touch. - Lime wedges: Serve these on the side for an extra zing. These ingredients create a balance of flavors and textures. Each one plays a part in making this shrimp fried rice a quick and easy meal. For the full recipe, refer to the earlier section. To make shrimp fried rice, start by cooking your jasmine rice. I recommend using day-old rice. It has a better texture and won't turn mushy. Rinse 2 cups of rice under cold water until it runs clear. Cook it according to your rice cooker or package instructions. Once done, let it cool. Next, prep your shrimp and vegetables. Use 200 grams of shrimp, peeled and deveined. If you like, you can use frozen shrimp. Just thaw them before cooking. Chop 1/2 a bell pepper into small pieces. You can pick red or yellow for a pop of color. Also, get 1/2 cup of sweet corn, fresh or frozen. Mince 3 cloves of garlic and chop 2 green onions. Now, heat 1 tablespoon of sesame oil in a large skillet or wok over medium-high heat. Add the minced garlic and sauté for about 30 seconds. You want it fragrant, not burnt. Next, increase the heat to high and add the shrimp. Cook them for 2-3 minutes until they turn pink. Once cooked, remove the shrimp from the pan and set them aside. In the same skillet, add the diced bell pepper and sweet corn. Sauté for 2-3 minutes until softened. Then, add the cooked jasmine rice to the skillet. Break up any clumps as you stir. Pour in 1 cup of coconut milk and 2 tablespoons of soy sauce. Stir well to combine everything. Let it heat through. This step helps the rice absorb the lovely coconut flavor. After a few minutes, return the cooked shrimp to the skillet. Add 1 tablespoon of lime juice, mixing everything evenly. Cook for an additional 2 minutes. Season with salt and pepper to your taste. Remove the skillet from heat and stir in the chopped green onions. These add a fresh crunch. Serve your shrimp fried rice hot. For a finishing touch, garnish with fresh cilantro and lime wedges on the side. Enjoy this quick and easy meal that's bursting with flavor. For the complete recipe, check out the [Full Recipe]. Using day-old rice is key. Fresh rice is often too moist. It clumps together and does not fry well. Day-old rice has dried out a bit, making it perfect for stir-frying. When you use it, the grains stay separate. This helps achieve that nice, fluffy texture we want in fried rice. For sautéing shrimp, timing is everything. Heat your oil until hot but not smoking. Add the shrimp in a single layer. Cook them for about 2-3 minutes until they turn pink. Don't crowd the pan; this helps them cook evenly. Once they’re done, remove them quickly to avoid overcooking. Fresh ingredients always shine in this dish. Use fresh shrimp if you can. They add a sweet, ocean flavor. Fresh veggies, like bell peppers and green onions, also boost taste. If you use frozen veggies, make sure to thaw them first. This prevents excess water in your dish. For seasoning, soy sauce is a must. It adds umami depth. You can also try adding a pinch of red pepper flakes for heat. Fresh lime juice brightens the flavor, making it zesty. Don't forget to taste as you go. Adjust salt and pepper to your liking. For the full recipe, check out the Coconut Lime Shrimp Fried Rice . {{image_2}} You can change the shrimp in this recipe. Chicken is a great choice. Use cooked chicken breast or thighs, cut into small pieces. Tofu is also a good option if you want a plant-based meal. Choose firm tofu, and cut it into cubes. Just sauté it until golden before adding other ingredients. You can even use beef or pork if you like. This recipe works well with any protein you choose. If you need gluten-free options, just swap soy sauce for tamari. Tamari is a gluten-free version that tastes great. For a vegan meal, skip the shrimp and use tofu or a mix of colorful veggies. You can add mushrooms, carrots, or peas for extra flavor and nutrition. Make sure to adjust cooking times for any new ingredients you add. This way, everyone can enjoy a tasty plate of fried rice! Check out the Full Recipe for more ideas. To store your shrimp fried rice, wait until it cools down. Place it in an airtight container. This helps keep it fresh. You can store it in the fridge for up to three days. If you want to keep it longer, consider freezing it. For freezing, use a freezer-safe bag or container. Make sure to remove as much air as you can. This will help prevent freezer burn. When you're ready to eat your shrimp fried rice, you need to reheat it well. The best method is using a skillet. Heat a little oil over medium heat, then add the rice. Stir it often to avoid sticking. If the rice seems dry, add a splash of water or broth. You can also use a microwave. Just place it in a bowl, cover it, and heat in short bursts. Stir in between until it's hot. This way, your meal will taste fresh and delicious, just like when you made it. For the full recipe, check out the earlier section. I suggest using jasmine rice for fried rice. It has a nice texture and flavor. Day-old rice works best. It is drier, so it fries better. Fresh rice can be too sticky. If you don’t have jasmine, you can use long-grain rice. Just avoid short-grain rice as it gets gummy. Yes, you can make this shrimp fried rice ahead of time. Cook it, cool it, and store it in the fridge. It stays fresh for about three days. When you are ready to eat, just reheat it in the pan. Adding a splash of water helps keep it moist. To make it spicier, add red pepper flakes or Sriracha sauce. You can also use jalapeños for a fresh kick. If you want it milder, reduce or skip spicy ingredients. Adding more coconut milk can also tone down the heat. Taste as you go to find your perfect level. For a complete cooking experience, check out the Full Recipe. This blog post covered how to make delicious shrimp fried rice from scratch. You learned about the right ingredients, like jasmine rice and shrimp. I explained step-by-step cooking, from sautéing garlic to adding final touches. Tips helped you achieve great texture and flavor. I also shared variations for different diets and proteins, plus storage advice for leftovers. In conclusion, making shrimp fried rice is fun and easy. With fresh ingredients and simple steps, you can enjoy a tasty dish at home.](https://pureeatsnow.com/wp-content/uploads/2025/04/574be4e2-dafe-45f8-8bbe-dde6de448acf.webp)
Craving a tasty, quick meal? You’re in the right place! This savory shrimp fried rice recipe is simple to whip
![- 2 cans (21 oz each) apple pie filling - 1 cup caramel sauce (store-bought or homemade) - 1 box yellow cake mix (15.25 oz) - ½ cup unsalted butter (1 stick), melted - 1 teaspoon ground cinnamon - 1 cup chopped nuts (walnuts or pecans, optional) - Optional toppings: Vanilla ice cream or whipped cream for serving To make a great Caramel Apple Dump Cake, start with these simple ingredients. Each one adds a special touch to the final dessert. First, apple pie filling provides a sweet and tart base. You can use any brand you like, but homemade will add a personal touch. Next, caramel sauce brings a rich, gooey flavor. You can buy it or make your own. The yellow cake mix is key. It gives the cake its fluffy texture. The melted butter adds moisture and helps create a nice crust. Ground cinnamon adds warmth and spice, making the dish more inviting. If you want, add chopped nuts for crunch. Walnuts or pecans work well. They add a nice contrast to the soft cake. Lastly, don't forget the optional toppings. Vanilla ice cream or whipped cream makes each bite even better. It adds creaminess that pairs perfectly with the warm cake. For the full recipe, check the previous section. This mix of ingredients makes a delightful treat everyone will love! - Preheat your oven to 350°F (175°C). - Grease a 9x13 inch baking dish with cooking spray or butter. - Spread two cans of apple pie filling evenly in the bottom of the baking dish. - Drizzle one cup of caramel sauce over the apple pie filling. This adds a sweet touch. - In a bowl, mix one box of yellow cake mix with one teaspoon of ground cinnamon. - Evenly sprinkle the cake mix over the caramel and apple layers. Do not stir. - Pour half a cup of melted butter over the cake mix. Make sure to cover all areas. - If you like, sprinkle one cup of chopped nuts on top for extra crunch. - Bake in the oven for 45-55 minutes. Look for a golden brown top and bubbling edges. - Let the dump cake cool for about 10-15 minutes before serving. This makes it easier to serve. - Serve warm, and consider adding vanilla ice cream or whipped cream for a delightful treat. For the full recipe, check [Full Recipe]. - To get the best taste, spread the apple pie filling evenly in the dish. This helps every bite be sweet and rich. - After baking, let the cake cool for about 10-15 minutes. This cooling time helps the cake set up and makes serving easier. - If you want to change things up, try using a spice cake mix instead of yellow cake mix. It adds a nice twist! - For a different flavor, you can use cherry or peach pie filling instead of apple. Adjust the sweetness to your taste based on the fruit you choose. - When you serve the cake, drizzle extra caramel sauce on top. Sprinkle cinnamon for a warm touch. - Pair the warm cake with a scoop of vanilla ice cream or whipped cream. The cold creaminess contrasts nicely with the warm cake. {{image_2}} To make your caramel apple dump cake extra special, try adding spices like nutmeg or clove. These spices bring warmth and depth to the flavor. Just a pinch can elevate the taste. You can also switch up the fruit fillings. Instead of just apple pie filling, consider using cherry or peach. Each fruit adds its own sweet twist. If you need a gluten-free option, look for a gluten-free cake mix. This simple swap lets everyone enjoy the treat. For those with nut allergies, skip the nuts entirely. You can still have a tasty dessert without them. This way, you can cater to all your guests' needs. Seasonal variations are fun to explore. In the fall, add pumpkin or spice flavors for a cozy touch. These flavors make the cake perfect for autumn gatherings. In the summer, use fresh fruits like berries or peaches. Fresh fruits add a bright, juicy taste. Each season brings a new way to enjoy this delightful dessert. To keep your caramel apple dump cake fresh, store it in the fridge. First, let it cool completely. Then, cover it tightly with plastic wrap or aluminum foil. This will prevent it from drying out. You can also use an airtight container for better results. The cake will stay good for about three to four days. After this time, the texture may change, and it might not taste as great. When you’re ready to enjoy leftovers, reheating is key. You want to keep the cake soft and gooey. The best way to reheat it is in the oven. Preheat your oven to 350°F (175°C). Place a slice of cake in a baking dish. Cover it with foil to prevent it from getting too dry. Heat for about 15 to 20 minutes. You can also use a microwave if you’re in a hurry. Heat a slice for about 30 seconds. Check if it's warm enough. If not, add a few more seconds. Enjoy it warm, ideally with a scoop of vanilla ice cream on top! Can I make this recipe ahead of time? Yes, you can prepare the caramel apple dump cake ahead. Make it up to a day before. Store it in the fridge after baking. When you're ready to serve, just reheat it in the oven. This keeps all the flavors fresh and delicious. What can I use if I don’t have caramel sauce? If you lack caramel sauce, try using dulce de leche or butterscotch sauce. You can also make a simple caramel at home with sugar and butter. Just melt the sugar until it turns golden, then stir in butter for a quick fix. What to do if it’s too soggy? If your dump cake turns out soggy, check the baking time. It might need a bit more heat. Bake it longer until the top is golden and firm. You can also let it cool longer, as this helps it set. How to fix burnt edges? If the edges are burnt, cover them with foil while baking. This shields them from direct heat. If they are already burnt, you can trim the edges off. Just serve the good parts in a bowl, and no one will know! How many servings does this recipe make? This recipe makes about 8-10 servings. It's great for family dinners or small gatherings. You can easily share it with friends or family! Tips for scaling the recipe for larger gatherings To scale the recipe, double the ingredients for a larger dish. Use a 12x18 inch pan for bigger crowds. Adjust the baking time slightly to ensure it cooks through evenly. This way, everyone gets to enjoy this tasty treat! This dessert comes together with simple ingredients and easy steps. You mix apple pie filling, caramel, and cake mix for a tasty treat. Remember, cooking tips help ensure the best results, while variations boost flavor and cater to different diets. Store your leftovers well, and follow reheating tips for that perfect bite. I hope you enjoy making and sharing this caramel apple dump cake with friends and family. It’s sure to impress!](https://pureeatsnow.com/wp-content/uploads/2025/04/cff5879c-2097-4693-baf3-f20a8b838de9.webp)
Craving a sweet, simple dessert? Let me introduce you to my Caramel Apple Dump Cake. This delightful treat combines warm
. Marinating the chicken is key for a tasty and tender dish. The buttermilk adds moisture and flavor. The Dijon mustard, garlic powder, and spices bring depth. Soak the chicken in this mix for at least one hour. I recommend overnight for the best flavor. This step makes each bite juicy and full of taste. To create a crunchy outside, you must prepare the coating. Grab a bowl and mix together the panko breadcrumbs, grated Parmesan cheese, and chopped parsley. The panko gives a great crunch, while the cheese adds rich flavor. Parsley brings a fresh touch. Make sure to mix well so each bite is flavorful. For the perfect bake, preheat your oven to 400°F (200°C). This temperature ensures the chicken cooks evenly. Line a baking sheet with parchment paper for easy cleanup. Once the chicken is coated, drizzle with olive oil and melted butter. Bake for 25-30 minutes until golden brown. Check that the chicken reaches an internal temperature of 165°F (74°C). This step guarantees a safe and delicious meal. The right marinating time makes a big difference. I suggest marinating the chicken breasts for at least one hour. If you can, marinate overnight. This allows the flavors to soak in deeply. When you coat the chicken, press down on the breadcrumbs. This helps them stick better. A good coat makes the chicken crisp and tasty. Fresh herbs bring bright flavors. I love using parsley in this dish. It adds a pop of color and taste. High-quality olive oil also matters. It helps the chicken brown nicely and keeps it juicy. Always choose extra virgin olive oil for the best flavor. Dry chicken is a common issue. To prevent this, don’t overcook the chicken. Use a meat thermometer to check. Aim for 165°F (74°C) inside. This ensures it is safe and juicy. Cooking on a lined baking sheet helps heat spread evenly. This way, every bite stays moist and delicious. {{image_2}} You can easily boost the flavor of this dish. Try adding spices like cayenne for heat or Italian herbs for a fresh twist. You can also experiment with different cheese types in the coating. Opt for sharp cheddar or creamy mozzarella to add depth. Each variation gives a unique taste, making the chicken exciting every time. If you need a change, consider using yogurt instead of buttermilk. This swap keeps the chicken moist and adds a nice tang. You can also try using crushed crackers or cornflakes instead of panko breadcrumbs. These alternatives still give that satisfying crunch. Adjusting ingredients can help fit your pantry and dietary needs. To make a well-rounded meal, pair the chicken with sides like roasted vegetables or a fresh salad. Steamed broccoli or green beans add color and nutrition. Serve with mashed potatoes or rice for a hearty touch. A squeeze of lemon over the chicken brightens the flavors and adds freshness. For more ideas, check out the Full Recipe for complete meal suggestions. To keep your chicken fresh, let it cool first. Place it in an airtight container. Store it in the fridge for up to three days. If you want to keep it longer, consider freezing it. When you reheat, keep the chicken moist. Preheat your oven to 350°F (175°C). Place the chicken on a baking sheet. Cover it with foil to lock in moisture. Heat for about 15-20 minutes. You can also use a microwave, but it may dry out the chicken. To freeze, wrap the chicken tightly in plastic wrap. Then place it in a freezer bag. Label it with the date. It can last up to three months in the freezer. When you’re ready to eat, thaw it in the fridge overnight. Avoid thawing at room temperature to keep it safe. Yes, you can use chicken thighs. They have a richer flavor and more fat. This makes them juicier than breasts. However, thighs take longer to cook. Aim for about 35-40 minutes at 400°F. Always check the internal temperature for safety. To know if the chicken is done, use a meat thermometer. The safe internal temperature is 165°F (74°C). Insert the thermometer into the thickest part of the chicken. If it reads 165°F, your chicken is safe to eat. You can pair this chicken with many sides. Here are a few tasty ideas: - Steamed broccoli - Garlic mashed potatoes - A fresh garden salad - Roasted carrots - Creamy coleslaw For sauces, try a light lemon butter sauce or a zesty herb sauce. These will elevate the dish even more. This recipe showcases how to make tender, tasty chicken breasts with easy steps. Start by marinating the chicken for flavor, then coat it for crunch. Follow my tips to avoid mistakes and achieve the best texture. Feel free to add variations to match your taste or sides. Remember to store leftovers properly for later enjoyment. Now you can create a meal that impresses and delights. Enjoy the process and savor each bite!](https://pureeatsnow.com/wp-content/uploads/2025/04/d273ab5f-00d7-4a87-97e9-4eee78f87392.webp)
Are you ready for a delicious meal that will impress everyone at your table? These Melt In Your Mouth Chicken
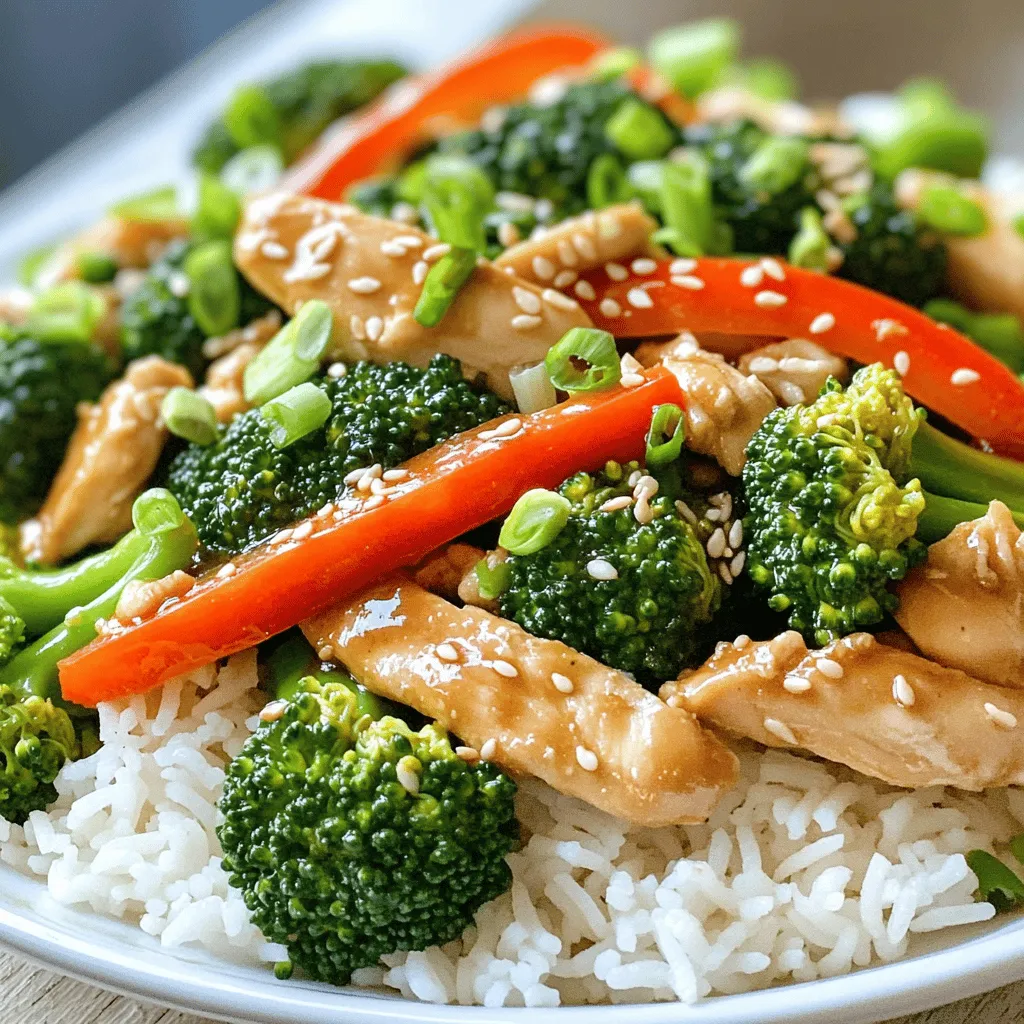
Welcome to my kitchen! Today, I’m excited to share my Chinese Chicken & Broccoli Stir-Fry. This dish is packed with
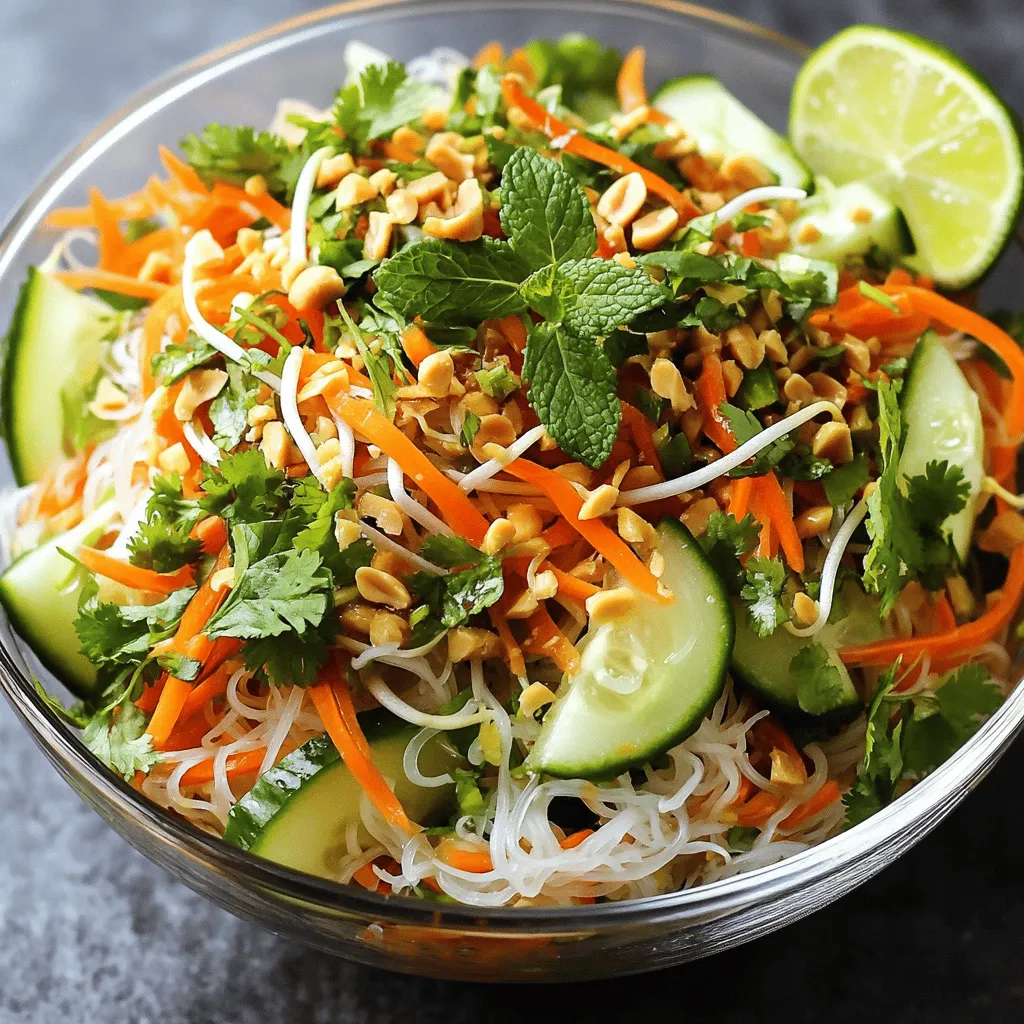
Are you ready to whip up a dish that’s as fresh as it is simple? This Quick Vietnamese Noodle Salad
![- 400g fettuccine pasta - 2 large chicken breasts, diced - 2 tablespoons Cajun seasoning - 1 red bell pepper, sliced - 1 yellow bell pepper, sliced - 1 small onion, diced - 3 cloves garlic, minced - 300ml chicken broth - 200ml heavy cream - 1 cup cherry tomatoes, halved - Salt and pepper to taste - Fresh parsley, chopped (for garnish) - Grated Parmesan cheese (optional) Gathering the right ingredients is key for this dish. Start with fettuccine pasta, which gives a nice base. Next, use chicken breasts for a juicy protein. Cajun seasoning adds the punchy flavor that makes this dish special. For veggies, red and yellow bell peppers bring color and sweetness. Onion and garlic deepen the flavor. They also make the kitchen smell amazing as they cook. Finally, you’ll need chicken broth for richness, heavy cream for creaminess, and cherry tomatoes for a burst of flavor. Don’t forget salt and pepper to taste. Fresh parsley and Parmesan cheese add the finishing touch. Check out the Full Recipe for all the details you need! First, bring a large pot of salted water to a boil. Use about 1 tablespoon of salt for every 4 quarts of water. Once boiling, add the fettuccine pasta. Cook it according to the package instructions until it reaches an al dente texture. This usually takes around 8-10 minutes. Remember to reserve 1 cup of pasta water before draining. Set the pasta aside for later. Next, take your diced chicken breasts and place them in a large bowl. Add 2 tablespoons of Cajun seasoning. Toss the chicken until it is well coated in the seasoning. This step adds a lot of flavor! Now, heat a tablespoon of olive oil in a large skillet over medium-high heat. Add the seasoned chicken to the skillet. Sauté the chicken for about 5-7 minutes until it is golden brown and cooked through. Remove the chicken and set it aside. In the same skillet, add a diced onion, sliced red and yellow bell peppers, and 3 cloves of minced garlic. Cook these for 3-4 minutes until the vegetables soften. Pour in 300ml of chicken broth, scraping any browned bits from the pan. Let it simmer for 2-3 minutes. Then, stir in 200ml of heavy cream and a cup of halved cherry tomatoes. Allow this to simmer for another 2-3 minutes. Return the cooked chicken to the skillet. Stir everything together until well mixed. If the sauce seems thick, add some reserved pasta water. Adjust the amount until you like the consistency. Finally, mix in the cooked fettuccine, tossing gently to coat the pasta with the creamy sauce. Season with salt and pepper to taste. This recipe makes a delicious meal that you can enjoy in about 30 minutes. For the full recipe, check out the detailed instructions above. To keep your pasta firm, cook it al dente. This means it should be soft but still have a little bite. Follow the package instructions but check a minute early. Taste the pasta before draining. For chicken, seasoning is key. Coat the diced chicken evenly with Cajun seasoning. This adds flavor right from the start. Don't skip this step; it makes a big difference. Cook the chicken until it's golden brown for the best taste. Serve the pasta in large bowls. This makes it look inviting and fancy. Sprinkle fresh parsley on top for a pop of color. A wedge of lemon on the side adds a nice touch. Consider using a large spoon to mix the pasta with the sauce before serving. This helps the sauce cling to the noodles. Want more flavor? You can always add extra spices. A pinch of cayenne pepper can add heat. For a fresh twist, try squeezing lemon juice over the dish before serving. This brightens the flavors and adds a nice zing. If you love more bite, consider adding diced jalapeños or crushed red pepper flakes. These optional flavor boosters can make your dish even more exciting. Enjoy experimenting! {{image_2}} You can switch up the protein in Cajun Chicken Pasta. Shrimp makes a great substitute. Just sauté shrimp until pink and tender. You can also use andouille sausage for a smoky flavor. If you want a meat-free dish, try chickpeas or tofu. Both add protein and soak up flavors well. While fettuccine is a classic choice, you can use other pasta types. Penne or linguine work nicely too. For gluten-free options, choose rice or corn pasta. These alternatives cook similarly and taste great with the sauce. You can adjust the sauce to fit your needs. For a dairy-free version, use coconut milk instead of heavy cream. It adds a nice creaminess without dairy. You can also boost flavor by adding more vegetables. Spinach or zucchini can be great additions. For extra spice, toss in some cayenne pepper or red pepper flakes. To explore the full recipe, visit [Full Recipe]. To store leftovers, place them in an airtight container. Make sure to let the pasta cool first. You can keep it in the fridge for about 3 to 4 days. For reheating, the best method is to use the stove. Add a splash of chicken broth to keep it moist. Stir gently over medium heat until warmed through. Avoid using the microwave, as it can make the pasta rubbery. Yes, you can freeze Cajun Chicken Pasta. To freeze, let it cool completely. Then, transfer it to freezer bags or containers. It can last for up to 3 months in the freezer. When you want to eat it, thaw it overnight in the fridge. Reheat it slowly on the stove, adding a little broth to help it stay creamy. For the full recipe, please refer to the previous sections. Cajun Chicken Pasta is a creamy, spicy dish. It combines tender chicken, fettuccine, and colorful veggies. Cajun seasoning gives it a bold flavor. This dish is perfect for a quick dinner. You can make it in just 30 minutes! To add more heat, try these tips: - Use extra Cajun seasoning. - Add diced jalapeños or crushed red pepper flakes. - Stir in some hot sauce while cooking. These changes will make your dish pack a kick! Yes, you can prepare Cajun Chicken Pasta ahead of time. Cook the pasta and chicken, then store them separately. Keep the sauce in the fridge as well. This way, you maintain freshness. When ready to eat, just reheat everything together. For side dishes, consider: - A simple green salad with vinaigrette. - Garlic bread for dipping. - Roasted vegetables for added nutrition. As for drinks, a cold iced tea or a light white wine works well. These choices complement the flavors nicely! Cajun chicken pasta is a tasty dish that brings fun flavors to your table. We covered the key ingredients, cooking steps, and helpful tips to make the perfect meal. You can swap proteins and pasta types for your liking. Don't forget to store and reheat leftovers correctly. With these ideas, you can enjoy this dish anytime. Try it out, get creative, and make it your own! Enjoy your cooking journey!](https://pureeatsnow.com/wp-content/uploads/2025/04/7d8d2a6a-6c14-4c26-a410-aa39091e9456.webp)
Looking for a quick and tasty dinner? Cajun Chicken Pasta packs bold flavors and vibrant colors into a simple dish.

Who doesn’t love the cozy goodness of hot chocolate? Now, imagine enjoying that in cookie form! In this post, I’ll
![To make this cozy dish, you will need the following ingredients: - 1 pound ground beef (or Italian sausage) - 1 medium onion, chopped - 3 cloves garlic, minced - 1 (28-ounce) can crushed tomatoes - 4 cups beef broth - 2 teaspoons dried oregano - 2 teaspoons dried basil - 1 teaspoon red pepper flakes (optional) - 8 ounces uncooked lasagna noodles, broken into pieces - 1 cup ricotta cheese - 1 cup shredded mozzarella cheese - 1/2 cup grated Parmesan cheese - Salt and pepper to taste - Fresh basil leaves for garnish You can easily swap ingredients based on your taste. Here are some ideas: - Use ground turkey or chicken instead of beef for a lighter option. - Swap crushed tomatoes for diced tomatoes for extra texture. - Try vegetable broth instead of beef broth for a vegetarian touch. - If you don't have ricotta, cottage cheese works well too. - Add spinach or zucchini for a healthy boost. Measuring your ingredients helps ensure a balanced flavor. Here are some easy tips: - Use a kitchen scale for ground meat to get an exact pound. - Measure dry herbs with a spoon for better accuracy. - For liquids, use a clear measuring cup to see the exact amount. - Break lasagna noodles into even pieces for uniform cooking. - Keep a measuring spoon handy for salt and pepper adjustments. With these ingredients and tips, you're ready to create a warm bowl of Easy Lasagna Soup. For the complete recipe, check out the Full Recipe link. Start by gathering all your ingredients. You will need: - 1 pound ground beef (or Italian sausage) - 1 medium onion, chopped - 3 cloves garlic, minced - 1 (28-ounce) can crushed tomatoes - 4 cups beef broth - 2 teaspoons dried oregano - 2 teaspoons dried basil - 1 teaspoon red pepper flakes (optional) - 8 ounces uncooked lasagna noodles, broken into pieces - 1 cup ricotta cheese - 1 cup shredded mozzarella cheese - 1/2 cup grated Parmesan cheese - Salt and pepper to taste - Fresh basil leaves for garnish Next, chop your onion and mince the garlic. You want fresh flavors for this soup. 1. In a large stock pot, heat a drizzle of olive oil over medium heat. Add the chopped onion. Sauté until it turns transparent, about 3-4 minutes. 2. Add the minced garlic. Cook for an additional minute until it smells good. 3. Add the ground beef. Break it apart with a spoon. Cook until it turns brown and is no longer pink. Drain excess fat if you need to. 4. Stir in the crushed tomatoes, beef broth, oregano, basil, and red pepper flakes. Bring the mix to a boil. 5. Once boiling, reduce the heat to a simmer. Add the broken lasagna noodles. Cook according to the package directions, about 10-12 minutes, until the noodles are tender. 6. Stir in the ricotta cheese until it melts and mixes well. Season with salt and pepper to taste. 7. Ladle the soup into bowls. Top each bowl with shredded mozzarella and grated Parmesan cheese. 8. Garnish with fresh basil leaves before serving. Serve the soup in rustic bowls. This adds a cozy feel. For a cheesy finish, sprinkle extra cheese on top. Pair your soup with crusty bread on a charcuterie board. This makes for a fun dipper along with your soup. Enjoy the warmth and comfort of this dish! You can find the full recipe in the earlier section. When making lasagna soup, avoid overcooking the noodles. This can make them mushy. Instead, cook them just until tender. You want a nice bite, not a soggy mess. Also, be careful not to skip the seasoning. Adding salt and pepper enhances the flavors. Finally, don't forget to drain excess fat from the meat. This keeps your soup from being greasy. To boost the flavor, use fresh herbs instead of dried ones. Fresh basil and oregano make a big difference. You can also add a splash of red wine for depth. If you want heat, increase the red pepper flakes. You can even add diced jalapeños for a spicy kick. A squeeze of lemon juice at the end adds brightness too. A large stock pot is essential for making this soup. It gives you enough space to stir all the ingredients. A wooden spoon works well for mixing. You’ll also need a sharp knife for chopping. A measuring cup and spoons help with accuracy. Finally, use a ladle for serving. This makes it easy to dish out the soup. For the full recipe, check out the Easy Lasagna Soup. {{image_2}} You can make a tasty vegetarian version of Easy Lasagna Soup. Simply swap the ground beef for a mix of chopped mushrooms and zucchini. These veggies add a nice texture. Use vegetable broth instead of beef broth for a rich flavor. Add extra herbs like thyme and parsley for depth. You can also include spinach or kale for some green goodness. This way, you keep all the comfort while making it meat-free. If you want to try different meats, Italian sausage is a great option. It adds a spicy kick. Ground turkey or chicken works well too if you prefer leaner meat. For broth, chicken broth is a nice change. If you’re feeling adventurous, use a homemade bone broth for added richness. Each choice gives the soup a unique taste, so feel free to mix it up! Cheese is key in this soup! Besides ricotta, you can try goat cheese for a tangy twist. Cream cheese adds a smoothness that blends beautifully. For something extra, mix in some feta or blue cheese. Each cheese brings its own flavor to the bowl. Don't forget to top with mozzarella and Parmesan for that classic finish! For the full recipe, check out the Easy Lasagna Soup details. Storing leftover lasagna soup is simple. First, let the soup cool to room temperature. Then, pour the soup into an airtight container. This keeps it fresh and prevents spills. You can store it in the fridge for up to three days. If you want to keep it longer, freezing is a great option. To reheat your soup, use a pot on the stove for the best flavor. Heat it on low, stirring often. This helps maintain the texture and warmth. You can also use the microwave. Place the soup in a microwave-safe bowl. Cover it with a lid or paper towel to prevent splatters. Heat it in one-minute intervals, stirring in between. To freeze lasagna soup, consider portioning it into smaller containers. This makes it easy to thaw only what you need. Ensure the soup is completely cooled before freezing. It will last in the freezer for about three months. When ready to eat, thaw overnight in the fridge. Reheat on the stove for the best results. This Easy Lasagna Soup is not only tasty but also flexible for storage. For the full recipe, check out the [Full Recipe]. Easy Lasagna Soup can last about 3 to 4 days in the fridge. Make sure to store it in a tight container. This keeps it fresh and tasty. When ready to eat, just heat it up on the stove or in the microwave. I love to enjoy it for lunch the next day! Yes, you can make Easy Lasagna Soup in a slow cooker! Just brown the meat and onions first. Then, add all the other ingredients to your slow cooker. Set it on low for 6 to 8 hours. The flavors blend well, and the noodles cook perfectly. It’s a great way to save time! To thicken lasagna soup, you can add more noodles or a little cornstarch. If you like, mix 1 tablespoon of cornstarch with 2 tablespoons of water. Stir this mixture into the soup while it simmers. You can also add more cheese for a creamy texture. This makes every bowl rich and hearty! For the full recipe, check out the Easy Lasagna Soup section. In this blog post, we explored the full journey of making Easy Lasagna Soup. We covered ingredient lists, preparation steps, and helpful tips to avoid common mistakes. You learned how to enhance flavors and discover variations, like vegetarian options. Proper storage and reheating techniques were also shared. The key to great lasagna soup is to enjoy the process. Experiment with flavors and make it your own! Happy cooking!](https://pureeatsnow.com/wp-content/uploads/2025/04/2127e993-ede0-463d-9646-4ff5e9737f53.webp)
Craving comfort food that warms your heart? I’ve got the perfect recipe for you! Easy Lasagna Soup packs all the
![To make Sweet Pineapple Chicken & Rice, gather these ingredients. They are simple and fresh. - Chicken and Rice Components - 2 cups jasmine rice - 1 lb chicken breast, diced - Vegetables and Fruits - 1 cup fresh pineapple, diced - 1 red bell pepper, sliced - 1 cup snow peas - Sauces and Seasonings - 3 tablespoons soy sauce - 2 tablespoons honey - 1 tablespoon sesame oil - 1 teaspoon grated ginger - 2 cloves garlic, minced - 1 tablespoon cornstarch mixed with 2 tablespoons water (slurry) - Salt and pepper to taste - Chopped green onions for garnish - Sesame seeds for garnish These ingredients blend well to create a tasty dish. The sweetness of the pineapple pairs nicely with the savory chicken. The rice acts as a perfect base to soak up all the flavors. When you prepare this dish, you’ll enjoy how the colors pop and the aromas fill your kitchen. This recipe is quick and fun, making it a great choice for any night. For the full recipe, check out the details provided earlier. 1. Rinse and Cook Jasmine Rice Start by rinsing 2 cups of jasmine rice under cold water. This helps remove extra starch, making it fluffy. Cook the rice according to the package instructions. 2. Set Rice Aside Once the rice is cooked, set it aside in a warm place. It will be the base for your sweet pineapple chicken. 1. Preparing the Chicken Take 1 pound of diced chicken breast. Season it with salt and pepper. This simple step adds flavor right from the start. 2. Browning the Chicken In a large pan, heat 1 tablespoon of sesame oil over medium heat. When the oil is hot, add the chicken. Cook it for about 5 to 7 minutes. You want it browned and cooked through. 1. Incorporating Garlic and Ginger After the chicken is browned, add 2 cloves of minced garlic and 1 teaspoon of grated ginger. Stir for about 1 minute until you smell the lovely aroma. 2. Sautéing Vegetables Toss in 1 sliced red bell pepper and 1 cup of snow peas. Sauté these for 3 to 4 minutes. You want the veggies to be tender but still crisp. 3. Mixing Sauce Ingredients with Chicken In a bowl, whisk together 3 tablespoons of soy sauce, 2 tablespoons of honey, and a cornstarch slurry. Pour this over the chicken and veggies. Add 1 cup of diced fresh pineapple. Stir well and cook for 2 to 3 minutes until the sauce thickens. Now, your sweet pineapple chicken is ready to serve over the fluffy jasmine rice. Enjoy your meal! If you want the full recipe, check out the Full Recipe link. Ensuring Chicken is Cooked Thoroughly To keep your chicken safe to eat, cook it until it reaches an internal temperature of 165°F. Use a meat thermometer to check. This step helps avoid any foodborne illness. Cut into a piece of chicken; it should be white and not pink. Achieving the Right Sauce Consistency Your sauce should be thick yet pourable. To achieve this, use cornstarch mixed with water. Add it to the pan towards the end of cooking. Stir until the sauce coats the chicken and veggies nicely. If it’s too thick, add a splash of water or extra soy sauce. Recommended Toppings Chopped green onions and sesame seeds add great texture and flavor. Sprinkle them on just before serving. You can also add crushed nuts for a nice crunch. They bring out the sweet and savory notes. Ideal Serving Platter Serve your pineapple chicken on a large, colorful platter. A white dish makes the vibrant colors pop. This makes the meal look appealing. You can also serve it in individual bowls for a cozy touch. Optional Flavor Boosters If you love spice, add a pinch of red pepper flakes. This gives your dish a nice kick. Fresh herbs like cilantro can also brighten the flavors. Just fold them in right before serving. Spice Level Adjustments Adjust the spice by using mild or hot sauce. A dash of chili sauce can add heat without overpowering sweetness. Taste as you go to find your perfect balance. This ensures everyone at the table enjoys the meal. For a full recipe, check out the Tropical Sweet Pineapple Chicken & Rice . {{image_2}} Gluten-Free Options You can easily make this dish gluten-free. Instead of soy sauce, use tamari. Tamari tastes similar but has no gluten. You can also check the labels of any store-bought sauces to make sure they are gluten-free. Vegan Substitutes To create a vegan version, swap the chicken for tofu or tempeh. Use firm tofu for a good texture. Make sure to press it to remove extra moisture. You can also replace honey with maple syrup or agave for sweetness. Alternative Proteins If you want to change the protein, consider shrimp or pork. Both pair well with the sweet pineapple and rice. For a plant-based option, chickpeas or lentils can also work nicely, adding fiber and protein. Seasonal Vegetables Feel free to use whatever seasonal veggies you have on hand. Broccoli, zucchini, or even carrots can add great flavor. Just remember to adjust cooking time to keep them crisp and fresh. Adding Tropical Fruits For a more tropical twist, add mango or kiwi. These fruits will enhance the sweetness and add a nice tang. Just toss them in during the last few minutes of cooking for a fresh burst of flavor. Different Sauces for a Twist You can experiment with sauces beyond soy sauce. Try teriyaki or sweet chili sauce for a different taste. Each sauce will give the dish a unique kick that can surprise your taste buds. Refrigeration Guidelines After you enjoy your sweet pineapple chicken and rice, store leftovers in an airtight container. This helps keep the flavors fresh. Place the container in the fridge within two hours of cooking. It will stay good for up to four days. Freezing Options You can freeze this dish if you want to save it for later. Just use a freezer-safe container. It is best to freeze it within two days of cooking. This meal can last up to three months in the freezer. When ready to eat, thaw it in the fridge overnight. Best Practices for Keeping Chicken Tender When you reheat your chicken, do it slowly. Use the microwave or a skillet on low heat. This keeps the chicken juicy and tender. For best results, add a splash of water to the pan. Cover it with a lid to trap the steam. Avoiding Soggy Rice To avoid soggy rice, reheat it separately. You can use a microwave or a saucepan. Add a little water to the rice and cover it. This helps to keep the rice fluffy and warm without getting mushy. How Long It Lasts in the Fridge In the fridge, sweet pineapple chicken and rice lasts about four days. After that, it may not taste fresh. Always check it before eating. Signs of Spoilage Look for signs of spoilage before you eat leftovers. If the chicken smells sour or looks discolored, throw it away. If the rice has changed color or texture, it’s best to discard it. Safety comes first in the kitchen! To make this dish, follow these basic steps: 1. Rinse jasmine rice until the water is clear. Cook it and set it aside. 2. Heat sesame oil in a large pan. Add diced chicken, salt, and pepper. Cook until browned. 3. Add minced garlic and grated ginger. Stir for about one minute. 4. Toss in sliced red bell pepper and snow peas. Sauté until tender-crisp. 5. Mix soy sauce, honey, and cornstarch slurry in a bowl. Pour over chicken and veggies. 6. Add diced pineapple. Stir well and cook until the sauce thickens. 7. Serve over jasmine rice, garnished with green onions and sesame seeds. For the complete method, check the [Full Recipe]. Yes, you can use frozen chicken. Thaw it in the fridge overnight for best results. You can also submerge the sealed chicken in cold water for about 1-2 hours. When cooking, ensure it reaches an internal temperature of 165°F (75°C). Adjust cooking time if needed, as frozen chicken takes longer to cook. This recipe is great for meal prep. Portion out the chicken and rice in separate containers. Let everything cool before sealing. Store in the fridge for up to four days. You can also freeze it for longer storage. When ready to eat, reheat in the microwave or on the stovetop. You can serve this dish with various sides. Some great options include: - Steamed broccoli - Mixed green salad - Roasted vegetables - Crispy spring rolls These sides complement the sweet and savory flavors of the dish. Enjoy your meal! To make Sweet Pineapple Chicken and Rice, we covered all the key steps and ingredients. We explored how to prepare the rice, cook the chicken, and mix in the right veggies and sauces. I also shared tips for perfecting your dish and variations for dietary needs. Proper storage instructions keep your leftovers fresh. Remember, this meal can adapt to fit your tastes. So, try new flavors and enjoy! Cooking should be fun, and your meals should bring joy.](https://pureeatsnow.com/wp-content/uploads/2025/04/1980ba24-10ed-4c05-88c7-9bf076f6616a.webp)
Craving a dinner that’s both sweet and savory? This Sweet Pineapple Chicken & Rice is your answer! It’s easy to
