Skip to content
DisclaimerTerms Of UseGDPR PolicyCookie Policy

pureeatsnow

  • Home
  • Drinks
  • Appetizers
  • Dinner
  • Dessert
  • About
  • Contact
  • Privacy Policy
DisclaimerTerms Of UseGDPR PolicyCookie Policy

Rachel

To make Honey Garlic Chicken Thighs, gather these key ingredients: - 4 bone-in chicken thighs, skin on - 1/4 cup honey - 1/4 cup soy sauce (low sodium preferred) - 4 cloves garlic, minced - 1 tablespoon fresh ginger, grated - 2 tablespoons olive oil - 1 teaspoon sesame oil - Salt and pepper to taste - 1 tablespoon rice vinegar These ingredients work together to create a rich and tasty marinade. The bone-in chicken thighs add moisture and flavor. Honey gives sweetness, while soy sauce brings saltiness. For extra flair, consider these garnishes: - 2 green onions, sliced (for garnish) - Sesame seeds (for garnish) You can pair your Honey Garlic Chicken Thighs with sides like rice or steamed vegetables. Rice soaks up the sauce well and balances the meal. Vegetables add color and nutrients. Check the Full Recipe for more details! To make the honey garlic marinade, start by mixing these ingredients in a bowl: - 1/4 cup honey - 1/4 cup soy sauce - 4 cloves garlic, minced - 1 tablespoon fresh ginger, grated - 2 tablespoons olive oil - 1 teaspoon sesame oil - 1 tablespoon rice vinegar - Salt and pepper to taste Whisk until everything blends well. This marinade adds rich flavor to the chicken. Marinating the chicken is key. I recommend marinating for at least 30 minutes. If you have time, aim for 2 hours. This helps the chicken soak up the flavors deeply. Next, preheat your oven to 400°F (200°C). This step is vital for getting that crispy skin we all love. While the oven heats, take the marinated chicken thighs out of the fridge. Place them, skin-side up, on a lined baking sheet. Make sure to keep the marinade for later. Bake the chicken for 25 to 30 minutes. You want the internal temperature to reach 165°F (75°C). This is the safe cooking point for chicken. Look for crispy, caramelized skin. If the skin isn’t as crispy as you want, you can broil the chicken for a few minutes at the end. While the chicken bakes, pour the reserved marinade into a saucepan. Bring it to a simmer over medium heat. Cook it for about 10 minutes until it thickens a bit. This thickened sauce will enhance the flavors when you brush it over the chicken. Once the chicken is done, take it out of the oven. Brush the thickened marinade over the top for extra flavor. To make your dish look great, garnish with sliced green onions and a sprinkle of sesame seeds. Enjoy your honey garlic chicken thighs! For the full recipe, refer to the earlier section. To get the best flavor, marinate your chicken thighs for at least 30 minutes. If you have time, let them sit for up to 2 hours. This extra time allows the honey, garlic, and ginger to soak in. If you want to store leftover marinade, keep it in an airtight container. You can use it within three days. Always keep it in the fridge. This way, you can use it for other dishes too. You can grill or bake your chicken thighs. Grilling will give them a smoky flavor while baking makes them crispy. If you choose to bake, preheat your oven to 400°F (200°C). For a great caramelized finish, brush the thickened marinade on the chicken during the last few minutes of cooking. This adds shine and a rich flavor. Remember to check the internal temperature. It should reach 165°F (75°C) for safe eating. {{image_2}} For oven-baking, follow the same marinade steps. Preheat your oven to 400°F (200°C). Place the marinated chicken thighs on a baking sheet with the skin side up. Bake for 25-30 minutes. Check that the chicken reaches 165°F (75°C) inside. This method gives a nice crispy skin and a sweet glaze. Using a slow cooker is easy. First, prepare the marinade as before. Place the chicken thighs in the slow cooker and pour the marinade over them. Cook on low for 6-8 hours or on high for 3-4 hours. The chicken becomes tender and full of flavor. You can serve it with rice or veggies. For a quick meal, use an Instant Pot. Start by mixing the marinade. Place the chicken in the pot and cover it with the sauce. Cook on high pressure for 10 minutes and allow a natural release for 5 minutes. This method saves time and keeps the chicken juicy. You can also thicken the sauce afterward on the sauté setting for added flavor. For the full recipe, check the details above. To store leftovers safely, let the chicken cool first. Place it in an airtight container. Make sure to cover it tightly. Proper storage helps keep it fresh. You can store it in the fridge for about 3 to 4 days. For best taste, consume it within this time. For freezing, let the chicken cool completely. Wrap each piece in plastic wrap. Then, place them in a freezer bag. Remove as much air as possible before sealing. This helps prevent freezer burn. You can freeze the chicken for up to 3 months. To reheat, thaw it overnight in the fridge. Then, heat it in the oven or microwave until hot. Honey garlic chicken thighs can last about 3 to 4 days in the fridge. Always check for any off smells or changes in texture before eating. Properly stored, they remain safe and tasty. For the best flavor, eat them sooner rather than later. Enjoy this savory dish while it's fresh! You can use several sweeteners in place of honey. Maple syrup works well and gives a nice flavor. Agave nectar is another good option. If you want a low-calorie choice, try stevia or monk fruit sweetener. Just remember, each sweetener has its own taste, so pick one you enjoy. Yes, you can use boneless chicken thighs. They will cook faster than bone-in thighs. I recommend reducing the baking time by about five to ten minutes. Make sure to check the chicken’s doneness. Aim for an internal temperature of 165°F (75°C). To check if the chicken is done, use a meat thermometer. Insert it into the thickest part of the thigh. If it reads 165°F (75°C), the chicken is safe to eat. You can also cut into the thickest part. The juices should run clear, not pink. If they are still pink, cook it a little longer. This recipe serves four people. The prep time is just 10 minutes, and the total cooking time is about 50 minutes. Here’s how it breaks down: - Marination Time: At least 30 minutes, but 2 hours is best. - Baking Time: 25-30 minutes in a 400°F (200°C) oven. This timing helps create juicy, flavorful chicken with crispy skin. Always check the chicken’s internal temperature. It should reach 165°F (75°C) to ensure it is safe to eat. Each serving of honey garlic chicken thighs contains: - Calories: Approximately 350 - Protein: 24g - Fat: 22g - Carbohydrates: 15g - Sugars: 10g This dish is protein-rich and has a nice balance of healthy fats and carbs. The honey adds natural sweetness while the soy sauce gives it a savory kick. Here are some great tips from home cooks who have tried this recipe: - Marinate Longer: Many suggest marinating the chicken overnight for deeper flavor. - Use Fresh Garlic: Fresh garlic increases the dish's aroma and taste, making it more vibrant. - Crispier Skin: For even crispier skin, broil the chicken for the last 2-3 minutes of baking. - Serve with Rice: A few cooks recommend serving these thighs with rice or steamed veggies for a complete meal. These tips enhance the dish and make it more enjoyable. Feel free to add your spin! Honey garlic chicken thighs offer a tasty dish that’s easy to make. You learned about key ingredients like bone-in chicken, honey, soy sauce, and garlic. We discussed marinating for flavor and cooking methods that keep the chicken juicy. You can experiment with variations like slow cooking or using an Instant Pot. Remember to store leftovers properly to enjoy them later. With the tips and recipes provided, you can create a delicious dinner that impresses everyone. Enjoy the cooking journey!

Honey Garlic Chicken Thighs Savory and Simple Recipe

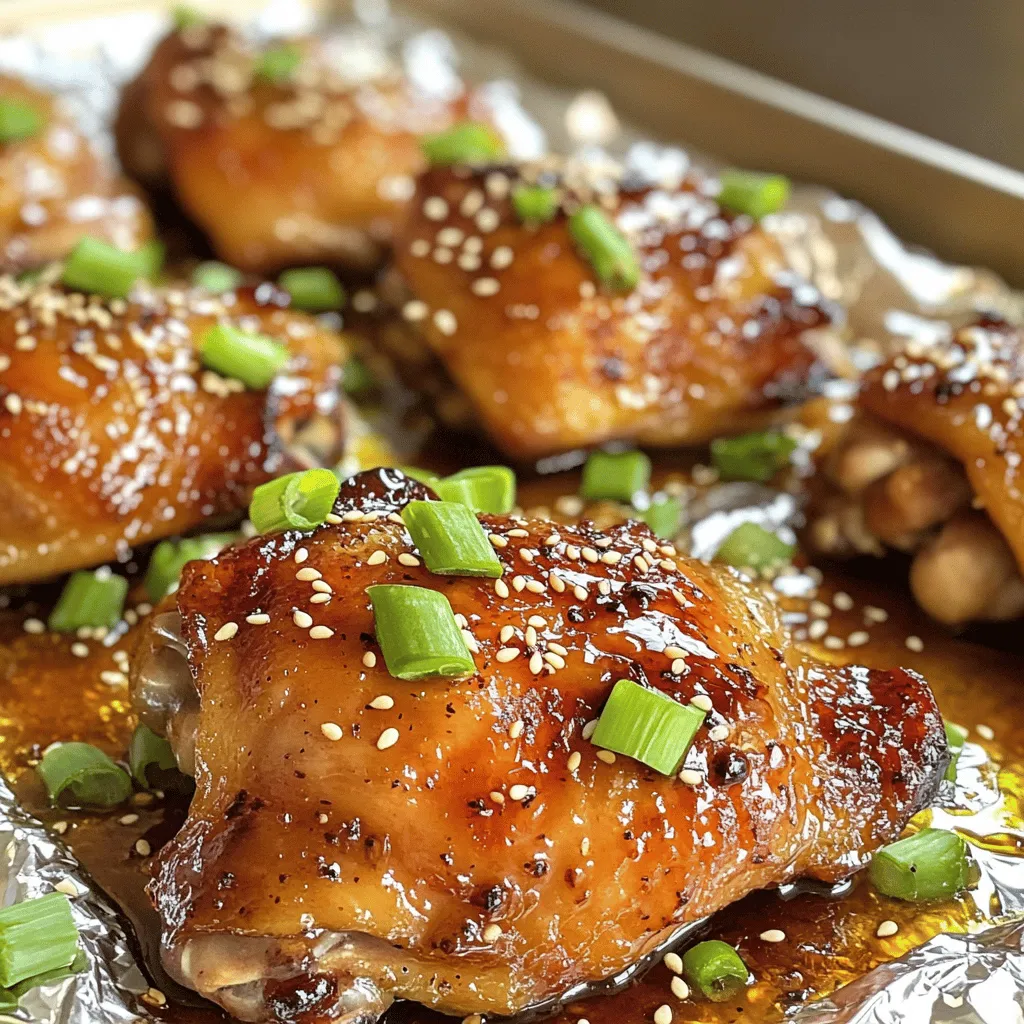
Ready to indulge in a dish that’s simple and bursting with flavor? My Honey Garlic Chicken Thighs recipe combines juicy,

- 1 cup orzo pasta - 1 ½ cups cherry tomatoes, halved - 1 cucumber, diced - ½ red onion, finely chopped - ½ cup Kalamata olives, pitted and chopped - 1 cup feta cheese, crumbled - ¼ cup fresh parsley, chopped - 2 tablespoons fresh dill, chopped - 4 tablespoons olive oil - 2 tablespoons lemon juice - Salt and pepper to taste Orzo pasta is small and cooks fast. It gives a nice texture to the salad. Cherry tomatoes add a burst of flavor and color. They are rich in vitamins A and C. Cucumbers bring a crunch and are hydrating. They help keep you cool in warm weather. Kalamata olives add a salty kick. They contain healthy fats that are good for your heart. Feta cheese adds creaminess and a tangy taste. It is a good source of protein. Fresh parsley and dill add bright flavor and aroma. They also provide vitamins and minerals. You can swap orzo pasta with quinoa for a gluten-free option. Instead of cherry tomatoes, use diced bell peppers for a different taste. If you don't like cucumbers, try zucchini instead. For a vegan version, skip the feta or use a plant-based alternative. You can replace Kalamata olives with green olives if you prefer. Use apple cider vinegar instead of lemon juice for a tangy twist. For the full recipe, check out the Mediterranean Orzo Delight. First, bring a pot of salted water to a boil. Add 1 cup of orzo pasta. Cook it according to the package instructions, usually about 8 to 10 minutes. Stir the pasta occasionally to prevent sticking. Once cooked, drain the orzo in a colander. Rinse it under cold water to stop the cooking. This step helps keep the pasta firm. Set the orzo aside while you prepare the vegetables. Grab a large mixing bowl. Add 1 ½ cups of halved cherry tomatoes. Next, dice 1 cucumber and add it to the bowl. Chop ½ of a red onion finely, and mix it in too. Then, take ½ cup of Kalamata olives, pit them, and chop them. Toss these olives into the bowl with the other vegetables. This mix adds flavor and crunch to your salad. Now, add the cooled orzo pasta to the bowl of vegetables. Crumble 1 cup of feta cheese on top. Don't forget to add ¼ cup of fresh parsley and 2 tablespoons of fresh dill. For the dressing, take a small bowl and whisk together 4 tablespoons of olive oil and 2 tablespoons of lemon juice. Season with salt and pepper to taste. Pour this dressing over the salad and gently toss everything together. Taste the salad and adjust the seasoning if needed. Let it sit for about 15 minutes at room temperature. This time allows the flavors to blend well. Enjoy your bright and tasty Greek Orzo Salad! You can find the full recipe for more details. To make this Greek Orzo Salad even tastier, use fresh herbs. Fresh parsley and dill bring a bright taste. The best olive oil adds richness. A good quality olive oil can change the dish. For a zesty kick, adjust the lemon juice. More lemon juice brightens the salad. Taste and tweak until it's perfect for you! Serve this salad as a main dish or a side. It pairs well with grilled chicken or fish. You can also enjoy it with pita bread and hummus. For a picnic, pack it in a container. It stays fresh and tasty, making it a great travel meal. Try serving it chilled or at room temperature. One common mistake is overcooking the orzo. Cook it just until tender, then rinse it. This keeps the pasta from getting mushy. Another mistake is not letting the salad rest. Allowing it to sit helps the flavors blend. Lastly, don’t skip the salt and pepper. They enhance the taste and bring out the best in every ingredient. For the complete recipe, check out the Mediterranean Orzo Delight . {{image_2}} You can easily make this Greek Orzo Salad a vegetarian delight. Swap feta cheese for a plant-based option. Try using a creamy almond or cashew cheese. You can also add more veggies. Roasted bell peppers or artichoke hearts make it colorful and tasty. For crunch, toss in some sunflower seeds or pumpkin seeds. These changes keep it fresh and exciting. If you want to add protein, there are many options. Grilled chicken is a classic choice. You can also use shrimp or salmon for a seafood twist. For a vegetarian option, chickpeas or black beans work great. These protein additions boost the salad’s nutrition. They also make it a filling meal. Seasonal ingredients can change the flavor of your salad. In spring, add fresh peas or asparagus. In summer, use sweet corn or zucchini. Fall brings great options like roasted butternut squash. In winter, try adding roasted root vegetables. Each season brings new tastes to explore. This keeps your Greek Orzo Salad fresh and fun all year long. To keep your Greek Orzo Salad fresh, place it in an airtight container. Make sure the lid is on tight. Store the salad in the fridge. It can last for up to three days. If you add dressing, the salad may get soggy faster. If you plan to save some, store the dressing separately. This keeps the salad crisp and tasty. You typically don’t need to reheat this salad. It tastes great cold. If you prefer it warm, heat it gently in a pan. Use low heat to avoid cooking the ingredients too much. Stir often to ensure even heating. Be careful not to overcook the orzo; it should remain firm. Freezing Greek Orzo Salad is not recommended. The texture of the orzo and veggies may change. However, you can freeze the dressing separately. Use a small container and label it. When ready, let the dressing thaw in the fridge overnight. Mix it back into the salad when you’re ready to enjoy. For the best taste, try to eat the salad fresh. For the full recipe, check out the Mediterranean Orzo Delight. To make this Greek Orzo Salad gluten-free, use gluten-free orzo pasta. Many stores offer it now. Check labels to ensure no gluten is in the ingredients. You can also swap orzo for quinoa or rice. Both options keep the salad light and fresh. Yes, you can prepare Greek Orzo Salad in advance. It tastes great after sitting for a bit. Make the salad a few hours ahead or the night before. Just keep it in the fridge. This allows the flavors to mix well. Remember to toss it again before serving. This salad pairs well with many dishes. You can serve it with grilled chicken or fish. The bright flavors complement the meat. It also works nicely with pita bread and hummus. For a vegetarian option, try it with stuffed peppers. Each bite brings a burst of flavor! For the full recipe, check out the Mediterranean Orzo Delight. This blog post provided a clear guide to making Greek Orzo Salad. You learned about key ingredients and their benefits. I shared step-by-step cooking instructions to keep things simple. Tips and variations helped add your own twist. Remember, cooking is about experimenting and having fun. Follow my tips to avoid common mistakes. Enjoy making this fresh, tasty salad your way. Explore new flavors and make it your own!

Greek Orzo Salad Fresh and Flavorful Meal Idea

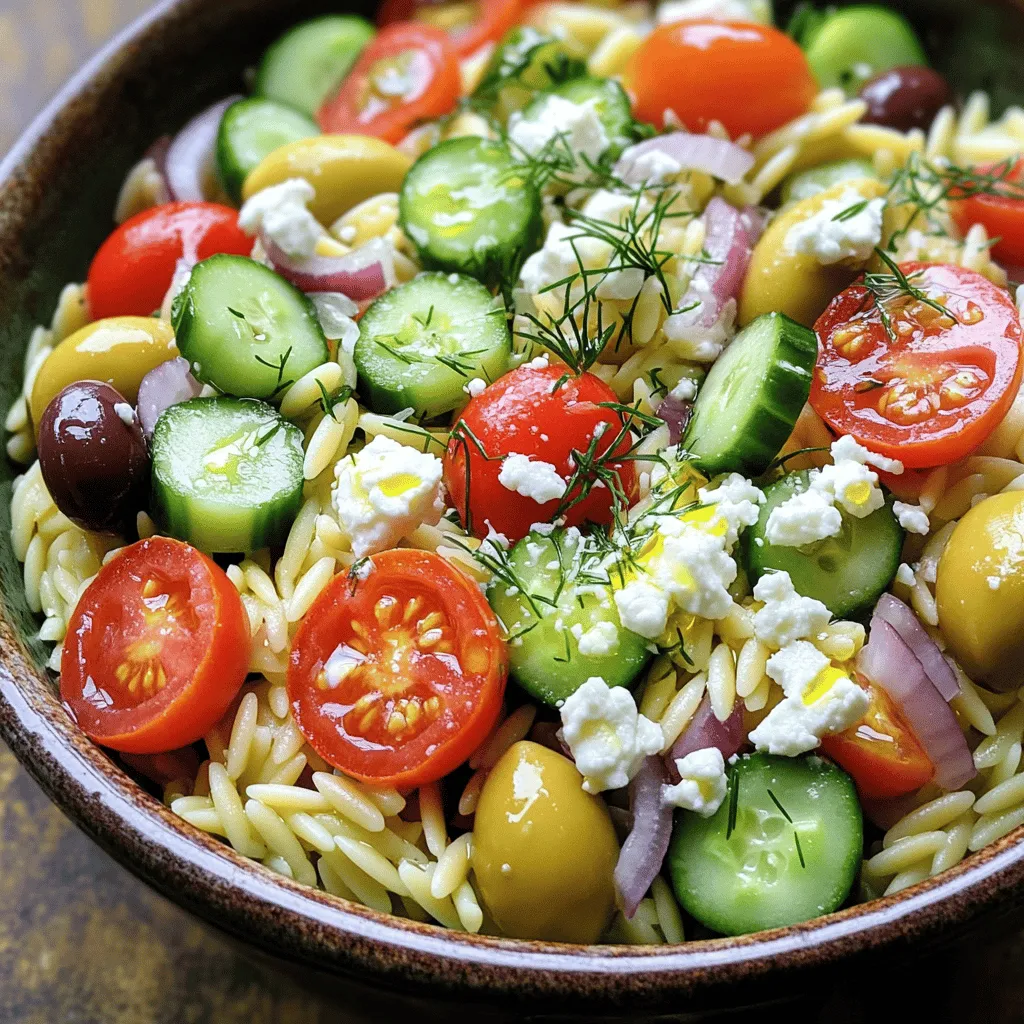
Looking for a fresh and tasty meal idea? Greek Orzo Salad has you covered! This colorful dish boasts vibrant veggies,

To make fudgy black bean brownies, you need these simple ingredients: - 1 can (15 oz) black beans, rinsed and drained - 2 large eggs - 1/3 cup unsweetened cocoa powder - 1/4 cup honey or maple syrup - 2 tablespoons coconut oil, melted - 1/2 teaspoon vanilla extract - 1/2 teaspoon baking powder - 1/4 teaspoon salt - 1/2 cup chocolate chips (dark or semi-sweet) These ingredients work together to create a rich and gooey dessert. The black beans add moisture and make the brownies fudgy. The cocoa powder gives them a deep chocolate flavor. If you lack any of these items, don't worry! Here are some swaps you can use: - Use apple sauce instead of eggs for a vegan option. - Swap honey with agave syrup if you prefer. - For a nut-free option, replace coconut oil with vegetable oil. These substitutes keep the brownies tasty and rich. You can still enjoy deliciousness no matter what you have at home. Black beans add more than just flavor to your brownies. They provide several health benefits: - High in fiber, which helps digestion. - Packed with protein, making them filling. - Rich in antioxidants, which fight free radicals. Using black beans makes these treats a better choice for a sweet snack. You get indulgence and nutrition in each bite. For the full recipe, refer to the detailed instructions above. Start by preheating your oven to 350°F (175°C). Grease a 9x9 inch baking pan or line it with parchment paper. This makes it easy to lift out the brownies later. Next, gather your main ingredients: black beans, eggs, cocoa powder, honey or maple syrup, coconut oil, vanilla extract, baking powder, salt, and chocolate chips. In a food processor, combine the black beans, eggs, cocoa powder, honey or maple syrup, melted coconut oil, vanilla extract, baking powder, and salt. Blend this mix until it's smooth and creamy. Make sure to scrape down the sides to catch any bits that stick. This step ensures your batter is evenly mixed. When the batter is smooth, fold in the chocolate chips with a spatula. This adds a delicious touch to your brownies. Pour the brownie batter into your prepared pan. Use the spatula to spread it out evenly. This helps the brownies bake uniformly. Place the pan in the preheated oven and bake for 20 to 25 minutes. To check if they are done, insert a toothpick into the center. It should come out mostly clean, with a few moist crumbs. After baking, let the brownies cool in the pan for about 10 minutes. Then, transfer them to a wire rack to cool completely. This step helps them set and makes slicing easier. For serving, cut the brownies into squares. You can dust them with cocoa powder or add extra chocolate chips on top for a nice look. Serve them warm with whipped cream or a scoop of dairy-free ice cream. This makes for a rich and decadent treat that everyone will love. For the full recipe, check the earlier section. To get that rich, fudgy texture, use ripe black beans. They should be soft and smooth. Blend them well in a food processor. This helps make the batter creamy. The right balance of cocoa powder and sweetener is key. Use good-quality cocoa for a deep flavor. Don't overbake the brownies. Pull them out when a toothpick shows a few moist crumbs. This ensures a gooey center. A common mistake is not rinsing the beans. Rinsing removes extra salt and starch. This can make your brownies too salty or gummy. Another pitfall is using too much cocoa powder. Stick to the 1/3 cup measure for best results. Don’t skip the baking powder, as it helps the brownies rise slightly. Lastly, avoid opening the oven too soon. This can cause them to sink. You can add a few tasty extras for more flavor. Try mixing in nuts like walnuts or pecans for crunch. A pinch of sea salt on top can enhance sweetness. For a twist, add a splash of espresso to boost the chocolate flavor. You can even fold in some peanut butter for a nutty taste. Experiment with flavors to find your favorite mix! Don't hesitate to check the Full Recipe for details. {{image_2}} You can easily make these brownies vegan. Replace the eggs with 1/4 cup of unsweetened applesauce. This keeps the texture moist and delicious. To ensure gluten-free brownies, use certified gluten-free oats or a gluten-free flour blend instead of regular flour. This way, everyone can enjoy these treats without worry. Feel free to get creative with flavors! A few drops of peppermint extract can add a minty twist. For a nutty taste, mix in 1/2 cup of peanut butter instead of coconut oil. You can even swirl in some extra peanut butter on top before baking for a nice look and taste. If you like some crunch, add nuts or seeds. Chopped walnuts or pecans work great. You can also toss in some dark chocolate chunks for extra melty goodness. For a fun twist, sprinkle some sea salt on top before baking. This will enhance the rich taste of the brownies. To see the full recipe, check out the details above. To keep your fudgy black bean brownies fresh, store them in an airtight container. You can place parchment paper between layers to prevent sticking. These brownies stay good for about five days at room temperature. If you want to keep them longer, consider refrigerating them. They can last up to a week in the fridge. Freezing is a great way to save your brownies. Cut them into squares before freezing. Wrap each piece in plastic wrap. Then, place the wrapped brownies in a freezer bag. This method keeps them fresh for up to three months. When you want to eat them, just thaw them in the fridge overnight. To enjoy your brownies warm, preheat your oven to 350°F (175°C). Place the brownies on a baking sheet and cover them with foil. Heat for about 10 minutes until warm. You can also microwave individual squares for about 20-30 seconds. This makes them soft and gooey again, just like when they were fresh. Check the [Full Recipe] for more details on making these delicious brownies! Yes, you can use other beans. Pinto beans are a good choice. They have a similar texture. Kidney beans also work well in this recipe. Each type will change the flavor a bit. I suggest using black beans for the best taste. Fudgy black bean brownies last about 3 to 4 days. Store them in an airtight container. You can keep them at room temperature. If you want them to last longer, refrigerate them. They stay fresh for up to a week in the fridge. You can use flax eggs or applesauce. To make a flax egg, mix 1 tablespoon of ground flaxseed with 2.5 tablespoons of water. Let it sit for 5 minutes. For applesauce, use 1/4 cup per egg. Both options keep the brownies moist and tasty. You learned how to make fudgy black bean brownies. We discussed the main ingredients and their benefits, plus how to prepare and bake them. I shared tips for a perfect texture and common mistakes to avoid. You can also try fun variations and know how to store leftovers. These brownies are tasty and good for you. Give them a try, and enjoy a guilt-free treat!

Fudgy Black Bean Brownies Rich and Decadent Treat

Looking for a delicious treat that’s also good for you? Try my Fudgy Black Bean Brownies! These rich and decadent

- 1 lb boneless, skinless chicken thighs - Fresh vegetables: bell peppers, green onions, garlic, ginger - Seasonings and sauces: soy sauce, hoisin sauce, rice vinegar, sesame oil - Toppings: roasted unsalted peanuts, lettuce leaves I love using boneless, skinless chicken thighs in this dish. They stay juicy and tender. Fresh vegetables like bell peppers add a nice crunch and color. Green onions give it a fresh bite, while garlic and ginger add depth and warmth. For seasoning, I use soy sauce and hoisin sauce. Soy sauce gives a salty umami flavor, while hoisin adds sweetness. Rice vinegar brings acidity, and sesame oil adds a nutty taste. Toppings are important too. Roasted unsalted peanuts give a great crunch and flavor. Finally, lettuce leaves wrap it all up. Butter lettuce or romaine works well. You can find the full recipe for these delicious wraps above. First, I heat peanut oil in my skillet over medium-high heat. This oil adds a lovely flavor. Next, I add diced chicken thighs. They need seasoning with salt and pepper. I cook the chicken for about 6-8 minutes. I stir it often until it's brown and cooked all the way through. Once the chicken is ready, I toss in minced garlic, ginger, and diced bell peppers. I sauté these for about 3-4 minutes. We want the peppers to be tender but still bright. In a small bowl, I mix soy sauce, hoisin sauce, rice vinegar, sesame oil, and crushed red pepper flakes. This mixture is key to creating that Kung Pao flavor. I pour the sauce over the chicken and veggies, stirring well to coat everything. I let it cook for an extra 2 minutes to heat through. Now, I stir in roasted peanuts and chopped green onions. This adds crunch and freshness to the dish. To serve, I spoon a generous amount of the chicken mixture into the lettuce leaves. I love to fold them up and enjoy! For a great presentation, I arrange the wraps on a platter and add extra green onions on top. You can find the Full Recipe for more details. To get the best chicken texture, start with boneless, skinless thighs. They stay juicy and tender. Cut the chicken into small, even pieces. This helps them cook evenly. Heat your skillet or wok until it’s hot. Then add peanut oil. This oil adds great flavor and prevents sticking. Season the chicken with salt and pepper before you add it to the skillet. Cook for 6-8 minutes, stirring often. Watch for a golden-brown color. When sautéing vegetables, use high heat. This keeps them crisp. Start with garlic and ginger. They add lots of flavor. After a minute, add bell peppers. Sauté them for 3-4 minutes. You want them tender but still slightly crunchy. This adds great texture to your wraps. For a great presentation, arrange the filled lettuce wraps on a large platter. This makes it easy for guests to grab one. Use a colorful mix of bell peppers to brighten up the dish. Garnish with chopped green onions on top. A sprinkle of crushed red pepper adds a nice touch. Adding lime wedges on the side brings a fresh zest. Your guests can squeeze lime juice right before they bite into the wraps. This simple step enhances the flavor. It makes the dish look and taste even better. For the full recipe, check out the delicious Kung Pao Chicken Lettuce Wraps. {{image_2}} You can change up the protein in Kung Pao Chicken Lettuce Wraps. If you want a lighter dish, try tofu. Tofu will soak up all the flavors. You can also use shrimp for a seafood twist. Shrimp cooks quickly and adds a nice taste. For veggies, the options are endless. You can use mushrooms for a meaty texture. Zucchini adds a fresh crunch. Carrots give a sweet flavor. Mix and match based on what you have at home. Spice levels can be adjusted easily. If you like heat, add more crushed red pepper flakes. For a milder dish, cut back on the flakes or skip them. You can also add some diced jalapeños for a fresh kick. Want to make it vegan? Swap chicken for mushrooms or tofu. Use soy sauce made without gluten to keep it gluten-free. This way, you can enjoy the dish without worry. For the full experience, you can follow the Full Recipe and explore more ideas! To keep your Kung Pao Chicken Lettuce Wraps fresh, follow these simple steps. First, store the chicken mixture in an airtight container. This helps keep the flavors intact and prevents drying out. You can also place the lettuce leaves separately in a zip-top bag. This avoids wilting. You can keep the chicken mixture in the fridge for up to four days. However, the lettuce is best used within two days. The longer you wait, the less crisp it will be. When it's time to enjoy your leftovers, reheat the chicken mixture carefully. The best method is to use a skillet over medium heat. Stir it often to make sure it warms evenly. You can also use a microwave. Just heat it in short bursts of 30 seconds, stirring in between. To keep your lettuce fresh, add it to the plate last. If you reheat the chicken before serving, the warmth will help the flavors pop. But be sure not to warm the lettuce. This will keep it crisp and ready for wrapping! What type of lettuce is best for wraps? I love using butter lettuce or romaine lettuce for wraps. These types hold their shape well. They also provide a nice crunch. Butter lettuce has a soft texture, while romaine is sturdy. Both add freshness to your Kung Pao Chicken Lettuce Wraps. Can you make Kung Pao Chicken Lettuce Wraps ahead of time? Yes, you can prepare the filling in advance. Cook the chicken and veggies, then cool them down. Store the filling in a sealed container in the fridge. When ready to eat, just spoon it into the lettuce leaves. This saves time and keeps your meal fresh. Overview of calories and macros Each serving of Kung Pao Chicken Lettuce Wraps has about 300 calories. The dish offers healthy protein and fats. You get a good mix of carbs from the veggies too. Healthier options for ingredients To make it lighter, use less oil or leaner chicken. You can swap hoisin sauce for a low-sodium version. Adding more veggies boosts fiber and vitamins. This makes the dish even healthier. Suggestions for sides or accompaniments Kung Pao Chicken Lettuce Wraps pair well with steamed rice or quinoa. You can also serve them with a light soup. This adds more texture and flavor to your meal. Pairing with dipping sauces A sweet chili sauce or soy sauce works great as a dip. You might also enjoy a peanut sauce for extra richness. These sauces enhance the flavor and make the meal more enjoyable. For the full recipe, check out the detailed guide! You learned how to make Kung Pao Chicken Lettuce Wraps step by step. We covered the key ingredients, from chicken to fresh veggies. You now know cooking tips, presentation ideas, and how to store leftovers. You can even adapt the recipe to fit your taste or diet. Enjoy your cooking! These wraps are fun, tasty, and perfect for any meal. Try them today and impress yourself and others with your skills.

Kung Pao Chicken Lettuce Wraps Flavorful and Fresh Meal

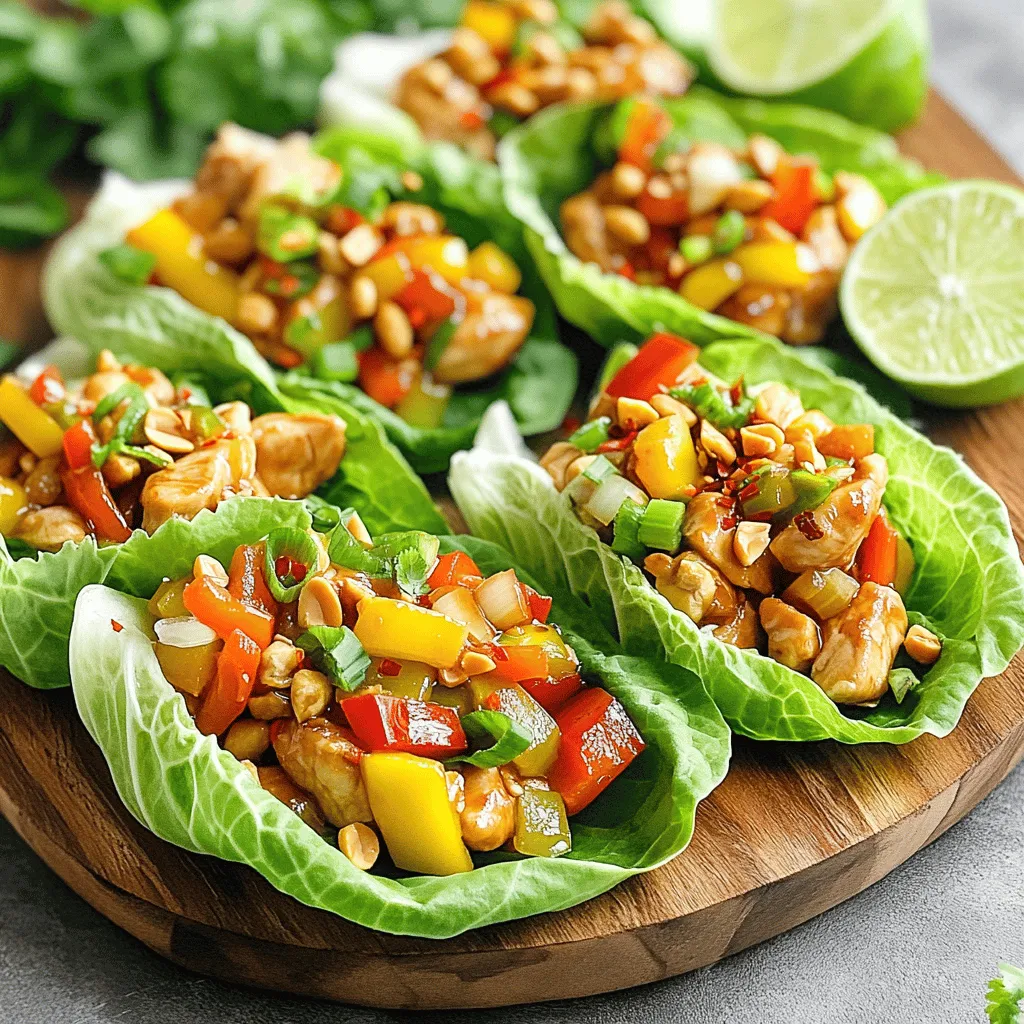
Are you ready to spice things up in your kitchen? Kung Pao Chicken Lettuce Wraps deliver big flavors while keeping

To make chocolate covered banana bites, you need just a few key items: - 2 ripe bananas - 1 cup dark chocolate chips - 1 tablespoon coconut oil - Sea salt for sprinkling These main ingredients create a sweet, creamy, and crunchy treat. The ripe bananas give a soft texture, while the dark chocolate adds rich flavor. You can elevate your banana bites with these optional ingredients: - 1/4 cup crushed nuts (such as almonds or hazelnuts) - 1/4 cup shredded coconut Adding crushed nuts gives a nice crunch, while shredded coconut brings a tropical twist. Both add flavor and fun texture. Choosing the right bananas is key. Look for bananas that are: - Yellow with a few brown spots - Firm but slightly soft to touch These bananas are sweet and perfect for this recipe. Avoid green bananas as they won't have the right taste. Ripe bananas also blend well with chocolate, making each bite delicious. Start by peeling the ripe bananas. Use a sharp knife to slice them into rounds. Aim for 1/2-inch thick slices. This size helps the chocolate coat well. Lay the banana slices on a plate as you work. Set them aside for now. Grab a microwave-safe bowl for the chocolate. Add 1 cup of dark chocolate chips and 1 tablespoon of coconut oil. The oil helps the chocolate melt smoothly. Microwave the bowl in 30-second bursts. Stir the chocolate in between each burst. Keep going until it is fully melted and creamy. Line a baking sheet with parchment paper. This keeps the banana bites from sticking. Take a banana slice and dip it into the melted chocolate. Make sure the slice is fully covered. Use a fork to lift it out. Let any extra chocolate drip back into the bowl. Place the chocolate-coated slice on the baking sheet. While the chocolate is still wet, sprinkle some sea salt on top. You can also add crushed nuts or shredded coconut if you like. Repeat this for all the banana slices. Once finished, put the baking sheet in the freezer. Let the bites freeze for about 1 hour. This helps the chocolate set firmly. After freezing, store your chocolate-covered banana bites in an airtight container. Enjoy them as a cool treat anytime! Check out the Full Recipe for more details. To get a smooth and even chocolate coat, start with good chocolate. I like using dark chocolate chips for their rich flavor. Melt the chocolate slowly in a microwave. Heat it in 30-second bursts, mixing well each time. This helps prevent overheating. Dip each banana slice fully in the chocolate, using a fork to lift it out. Let the extra chocolate drip off before placing it on the prepared baking sheet. After coating your banana bites, freeze them right away. This sets the chocolate quickly and keeps it from melting. Place the baking sheet in the freezer for about one hour. Once set, transfer the bites to an airtight container. Store them in the freezer for a cool treat anytime you want. They can stay fresh for a few weeks. These banana bites are great as a snack or dessert. You can serve them plain or add toppings. Try crushed nuts for a crunchy texture. Shredded coconut adds a tropical feel. You can even drizzle some melted chocolate on top for extra flair. For parties, arrange them on a nice plate to impress your guests. If you want the full recipe, check out the earlier section! {{image_2}} You can change the chocolate type in this recipe. Each type gives a new taste. Dark chocolate has a rich flavor. Milk chocolate is sweeter and creamier. White chocolate is sweet and smooth. You can even mix chocolates! Try half dark and half milk for a tasty blend. Each bite will surprise your taste buds. Adding spices can make your banana bites extra special. A pinch of cinnamon adds warmth and sweetness. You can also use vanilla extract for a nice twist. Just mix a little into the melted chocolate. This will give a cozy flavor to the bites. Don't be shy; experiment with your favorite spices! You can make your banana bites fun with toppings! After coating in chocolate, add colorful sprinkles. They make the bites look cheerful. You can also use dried fruits like raisins or cranberries. These add a chewy texture and a fruity taste. Get creative! You can even mix and match all these options for unique treats. Check out the Full Recipe for details on making these delightful bites. To keep your chocolate covered banana bites fresh, store them in an airtight container. This helps prevent freezer burn. Be sure to place parchment paper between layers. This will stop them from sticking together. You can also wrap each piece in plastic wrap for extra protection. Chocolate covered banana bites can last up to three months in the freezer. After that, their taste and texture may change. I recommend labeling your container with the date. This way, you will know when to enjoy them at their best. When you are ready to eat, take the bites out of the freezer. Let them thaw for about 10-15 minutes at room temperature. This will make them softer and tastier. If you want a colder snack, you can eat them straight from the freezer too. Just remember, they will be a bit harder! Enjoy your chocolate covered banana bites! You can find the full recipe above. Yes, you can! Try strawberries, apples, or pineapple. Each fruit brings its own flavor. For example, strawberries taste sweet and fresh. Apples add a nice crunch. Pineapple gives a tropical twist. Just make sure the fruit is firm. This helps keep the coating intact. If you choose softer fruits, they may not hold up well. To prevent cracks, let the chocolate cool slightly before dipping. Dip the fruit while the chocolate is still warm and smooth. Also, let the coated bites set in the freezer for just the right time. If you freeze them too long, the chocolate can crack. Once set, store them in a container that won't squash the bites. Chocolate covered banana bites can be a healthy treat! Bananas provide potassium and fiber. Dark chocolate has antioxidants and less sugar than milk chocolate. Just keep an eye on portion sizes. Adding nuts boosts protein and healthy fats. If you use less chocolate or dark chocolate, the bites stay healthier. Enjoy them in moderation for a tasty snack! In this post, we explored how to make chocolate-covered banana bites. We started with key ingredients, including main and optional ones, then moved to step-by-step instructions, from preparing bananas to melting chocolate. I shared tips for achieving the perfect coating and best practices for storage. We also looked at variations and storage methods to keep your treats fresh. Enjoy these bites as a fun and tasty snack. They are easy to make and customizable. Try them today!

Chocolate Covered Banana Bites Delightful and Easy Treat

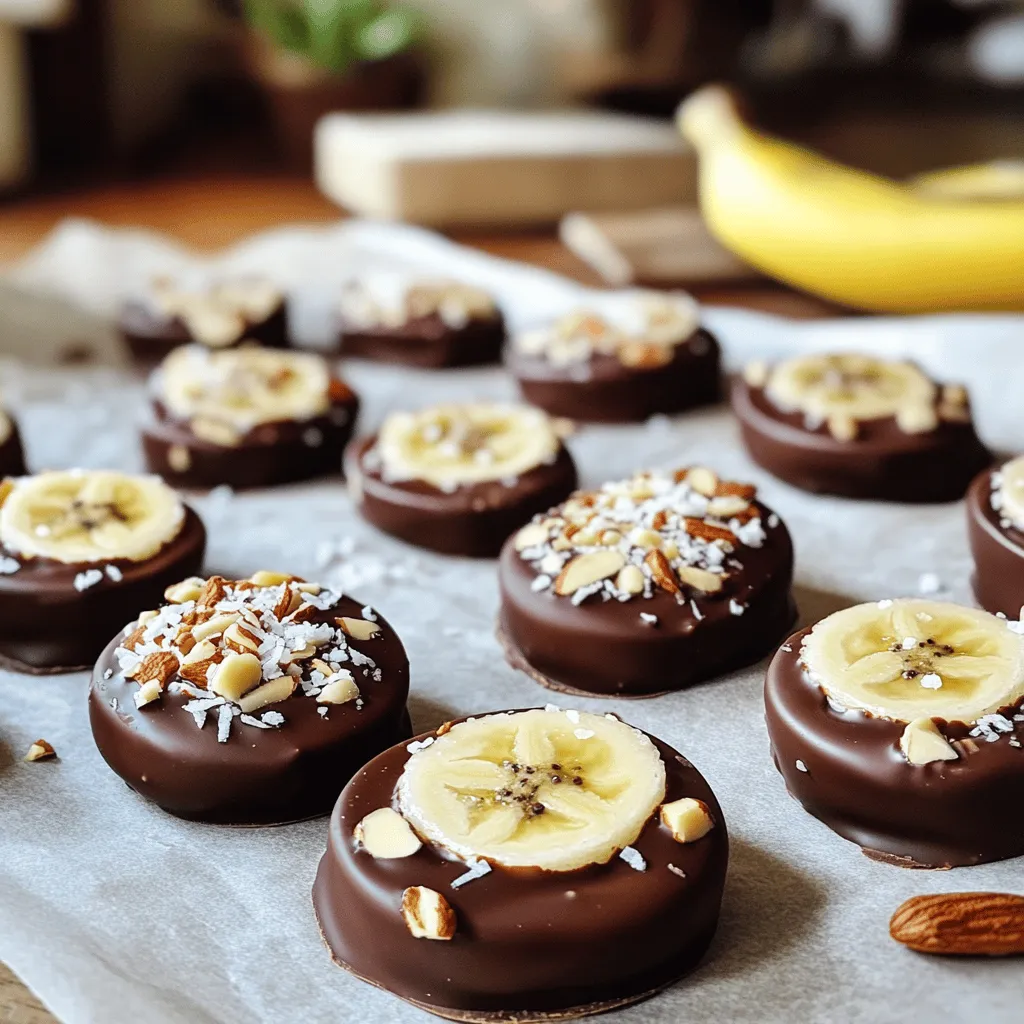
Looking for a fun and sweet treat? Chocolate Covered Banana Bites are an easy way to satisfy your cravings! In

To make Triple Chocolate Chip Cookies, gather these ingredients: - 1 cup unsalted butter, softened - 1 cup brown sugar, packed - 1/2 cup granulated sugar - 2 large eggs - 1 teaspoon vanilla extract - 2 cups all-purpose flour - 1/2 teaspoon baking soda - 1/2 teaspoon salt - 1 cup semi-sweet chocolate chips - 1 cup milk chocolate chips - 1/2 cup white chocolate chips These ingredients work together to create a rich and gooey treat. Butter adds moisture and flavor. The sugars create sweetness and help with texture. Eggs bind the dough and add richness. The combination of three chocolates gives every bite a unique taste. You can tweak some ingredients if needed. Here are some easy swaps: - Butter: Use coconut oil for a dairy-free option. - Brown Sugar: Substitute with coconut sugar for a lower glycemic index. - Eggs: Use flaxseed meal mixed with water (1 tablespoon flaxseed + 2.5 tablespoons water) for a vegan option. - Flour: Almond flour or oat flour can replace all-purpose flour, but adjust the amount used. These substitutions can change the flavor and texture but can still create tasty cookies. Using quality ingredients makes a big difference. Here are some tips: - Butter: Always use unsalted butter for better control of salt levels. - Sugar: Use fresh, packed brown sugar for a moister cookie. - Chocolate Chips: Choose high-quality chocolate chips for the best flavor. Avoid chips with too many fillers. - Flour: Sift your flour to remove lumps and ensure an even mix. Keeping these tips in mind will help you create the best Triple Chocolate Chip Cookies. For the complete recipe, check out the Full Recipe. Start by gathering your ingredients. You will need: - 1 cup unsalted butter, softened - 1 cup brown sugar, packed - 1/2 cup granulated sugar - 2 large eggs - 1 teaspoon vanilla extract - 2 cups all-purpose flour - 1/2 teaspoon baking soda - 1/2 teaspoon salt - 1 cup semi-sweet chocolate chips - 1 cup milk chocolate chips - 1/2 cup white chocolate chips First, preheat your oven to 350°F (175°C). Line a baking sheet with parchment paper. In a large bowl, beat the softened butter, brown sugar, and granulated sugar. Mix until the blend is creamy. Next, add the eggs one at a time. Mix well after each egg. Stir in the vanilla extract. In a separate bowl, whisk the flour, baking soda, and salt. Gradually add this mix to the wet ingredients. Mix until just combined. Now, gently fold in all three types of chocolate chips. Make sure they spread evenly in the dough. Using a spoon or cookie scoop, drop rounded tablespoons of dough onto your baking sheet. Keep space between each cookie to allow for spreading. Bake them in your preheated oven for 10-12 minutes. Look for lightly golden edges, while the centers should still look soft. This ensures a chewy texture. After baking, let the cookies cool on the sheet for 5 minutes. Then, transfer them to a wire rack to cool completely. For a nice presentation, arrange the cookies on a decorative plate. You can dust them lightly with cocoa powder. For an extra treat, drizzle melted chocolate on top. Enjoy these delightful cookies fresh or share them with friends! To get the best texture in your cookies, start with room temperature butter. It helps create a creamy mix with the sugars. This step adds air and makes your cookies soft. Mix until light and fluffy. Don’t overmix the dough after adding flour. You want to keep it tender. One common mistake is not measuring flour correctly. Too much flour makes cookies dry. Use the spoon and level method for accuracy. Another mistake is baking at the wrong temperature. Always preheat your oven to 350°F. This ensures even baking. Avoid opening the oven door too often, as it can change the heat. Using high-quality chocolate makes a big difference. I love using gourmet chocolate chips. They add a rich taste to your cookies. You can also add a pinch of sea salt on top before baking. This enhances the chocolate flavor. If you want something special, mix in chopped nuts or a splash of espresso powder. These additions take your cookies to the next level. For the full recipe, check out the section above. {{image_2}} You can make these Triple Chocolate Chip Cookies even more exciting. Try adding nuts like walnuts or pecans for a crunchy bite. Dried fruit like cranberries or cherries adds sweetness and a chewy texture. For a hint of spice, mix in some cinnamon or espresso powder. These small changes can make your cookies more unique and tasty. For a gluten-free version, swap all-purpose flour with a gluten-free blend. Many brands work well in cookies. If you're going vegan, replace the butter with coconut oil and use flax eggs instead of regular eggs. Just mix one tablespoon of ground flaxseed with three tablespoons of water for each egg. This will keep your cookies soft and chewy while meeting dietary needs. You can play with the size of your cookies based on your mood. For big cookies, scoop larger balls of dough. These will bake into thick, gooey delights. If you prefer smaller treats, use a teaspoon for mini cookies. They are perfect for sharing or snacking. You can also shape them into fun forms like hearts or stars for special occasions. Enjoying your cookies shapes the whole experience! To keep your triple chocolate chip cookies fresh, store them in an airtight container. This will keep them soft and chewy. You can use a cookie jar or a plastic container. If you add a slice of bread, it helps keep them moist longer. Place the container in a cool, dry place. Avoid direct sunlight or heat sources. Freezing cookies is easy and keeps them tasty. First, let your cookies cool completely. Next, arrange them in a single layer on a baking sheet. Freeze them for about two hours until they are solid. Once frozen, transfer the cookies to a freezer-safe bag. Label the bag with the date. You can freeze them for up to three months. If you want warm cookies, reheating is simple. Preheat your oven to 350°F (175°C). Place the cookies on a baking sheet. Heat for about 5 minutes. You can also use the microwave. Place a cookie on a plate and heat it for 10-15 seconds. Enjoy your warm, gooey treat! For more details, check the Full Recipe. To make your cookies chewy, you need to adjust a few things. First, use more brown sugar than white sugar. Brown sugar adds moisture and gives a chewy texture. Second, do not overmix your dough. Mix until just combined for the best results. Finally, bake the cookies until the edges are golden but the centers look soft. This way, they stay chewy inside. Yes, you can replace butter with another fat. Common substitutes include coconut oil or vegetable oil. Keep in mind that these fats can change the flavor and texture a bit. If you use coconut oil, choose refined for a milder taste. However, butter gives the best flavor and texture in cookies, so it is often the best choice. Triple Chocolate Chip Cookies can last about one week if stored properly. Place them in an airtight container to keep them fresh. If you want to keep them longer, you can freeze them. They will stay good in the freezer for up to three months. Just make sure to wrap them well to avoid freezer burn. For the full recipe, check the earlier section. In this post, we explored cookies from start to finish. We covered the ingredient list, substitutions, and tips on quality. You learned step-by-step instructions for mixing, baking, and serving. We shared tips for texture, common mistakes, and ways to boost flavors. You also found out about variations for different diets and cookie shapes. Lastly, we discussed storage methods to keep your cookies fresh. Remember, the joy of baking is in the details. Happy baking!

Triple Chocolate Chip Cookies Irresistible Treat

If you’re a chocolate lover, you’ve found your new favorite treat! These Triple Chocolate Chip Cookies are rich, gooey, and

In this recipe, we create a delicious Garlic Herb Butter Roasted Chicken. This dish is simple, tasty, and perfect for family meals. The garlic herb butter adds a rich flavor to the chicken, making it juicy and tender. - 1 whole chicken (about 4-5 lbs) - 1/2 cup unsalted butter, softened - 5 cloves garlic, minced - 2 tablespoons fresh rosemary, chopped - 2 tablespoons fresh thyme, chopped - 1 tablespoon fresh parsley, chopped - Zest of 1 lemon - 1 lemon, quartered - Salt and pepper to taste - 1 onion, quartered - 4 medium carrots, cut into chunks - 4 potatoes, diced Each ingredient plays a key role. The whole chicken brings the main flavor. Unsalted butter makes the skin crisp and rich. Fresh herbs provide a fragrant touch, while garlic and lemon brighten the dish. This mix of flavors will impress everyone. Enjoy making this dish as it fills your home with inviting scents! Prepping the chicken Start with a whole chicken. Rinse it under cold water. Pat it dry with paper towels. This helps the skin crisp up. Next, gently loosen the skin over the breast and thighs. Use your fingers to create pockets. This is where the garlic herb butter will go. Making the garlic herb butter In a bowl, mix 1/2 cup of softened unsalted butter. Add 5 minced garlic cloves. Then, stir in 2 tablespoons of chopped rosemary, 2 tablespoons of chopped thyme, and 1 tablespoon of chopped parsley. Don’t forget the zest of one lemon. Season with salt and pepper. Mix well until you have a smooth garlic herb butter. Seasoning the chicken Take half of the garlic herb butter. Spread it under the skin, directly onto the meat. Make sure to cover both the breast and thighs. Rub the remaining butter all over the chicken's outside. Season the inside of the cavity with salt and pepper. Stuff it with quartered lemon and onion for flavor. Roasting the chicken Preheat your oven to 425°F (220°C). Place the chicken in the center of a roasting pan. Cut 4 medium carrots into chunks and dice 4 potatoes. Scatter these around the chicken in the pan. Drizzle a little olive oil over the vegetables and season them with salt and pepper. Basting tips Roast the chicken for about 1 hour and 15 minutes. Halfway through, baste the chicken with the pan juices. This keeps the meat moist and adds great flavor. Checking doneness Use a meat thermometer to check the chicken. The internal temperature should reach 165°F (75°C). The skin should also look golden brown. Once done, take the chicken out of the oven. Let it rest for 10-15 minutes before carving. This step helps keep the juices in the meat. By following these steps, you ensure a flavorful and juicy Garlic Herb Butter Roasted Chicken. For the complete recipe, check out the Full Recipe section. How to achieve crispy skin To get a crispy skin, dry the chicken well. Pat it with paper towels. Make sure to season the skin with salt. This helps draw out moisture. High heat also helps, so roast at 425°F (220°C). Adjusting for different oven types Ovens can cook differently. If your oven runs hot, check the chicken early. If it’s cooler, add a bit more time. Use a meat thermometer to check doneness. The internal temperature should reach 165°F (75°C). Flavor boosting techniques Add more flavor by using extra herbs. Try marinating the chicken overnight. You can also add spices like paprika or cumin. This gives the chicken a nice kick. Plating ideas Slice the chicken and serve it on a large cutting board. Place roasted vegetables next to it. Garnish with fresh herbs for color. A drizzle of pan juices adds shine and flavor. Pairing with sides Roasted chicken pairs well with many sides. Try mashed potatoes or a fresh salad. Green beans or roasted Brussels sprouts work great too. For a fun twist, serve with garlic bread. {{image_2}} You can change the flavor of your garlic herb butter roasted chicken easily. Try adding different herbs like basil, oregano, or sage. Each herb brings a new taste that can excite your meal. Using compound butter is another great idea. You can mix in sun-dried tomatoes or olives for a bold twist. This adds depth and richness to your chicken. Citrus alternatives can also enhance the dish. If you don’t have lemon, use orange or lime. These fruits give a fresh, zesty note that pairs wonderfully with the herbs. If you're looking for gluten-free options, you're in luck! This recipe is naturally gluten-free. Just be sure to check any store-bought ingredients for hidden gluten. For those on a low-carb diet, you can skip the potatoes. Instead, add more veggies like zucchini or cauliflower. This keeps the meal light while still being delicious. Explore these variations to make the recipe fit your taste or diet. You can find the full recipe linked above for all the details. After you enjoy your Garlic Herb Butter Roasted Chicken, store the leftovers properly. - Refrigeration tips: Place leftover chicken in an airtight container. Keep it in the fridge for up to four days. Make sure it cools down before you seal it. This helps keep it fresh and safe to eat. - Freezing guidelines: If you want to keep it longer, freeze the chicken. Wrap it tightly in plastic wrap, then in foil. You can also use a freezer bag. Mark the date on the bag. Frozen chicken lasts for about three months. When you're ready to enjoy your leftovers, reheating them right is key. - Best methods for reheating: The oven works best for reheating chicken. Preheat your oven to 350°F (175°C). Place the chicken in a baking dish, cover it with foil, and heat for about 20 minutes or until warm. You can also use a microwave, but it may not keep the skin crispy. - Ensuring moisture retention: To keep the chicken juicy, add a little broth or water to the dish when you reheat it. Covering it with foil also helps trap the moisture inside. Enjoy your meal! How long to cook a whole chicken per pound? You should cook a whole chicken for about 20 minutes per pound. So, a 4-5 pound chicken takes about 1 hour and 15 minutes to cook. Always check the internal temperature. It should reach 165°F (75°C) for safe eating. Can I use frozen chicken? Yes, you can use frozen chicken. However, you must thaw it first. Thaw it in the fridge overnight or use cold water. This ensures even cooking and safety. What to do if the chicken is undercooked? If your chicken is undercooked, put it back in the oven. Cook it until it reaches 165°F (75°C). Use a meat thermometer to check the thickest part of the chicken. What can I substitute for fresh herbs? If you don’t have fresh herbs, use dried ones. Use 1 teaspoon of dried herbs for each tablespoon of fresh herbs. Dried herbs have a stronger flavor, so you need less. Can I use margarine instead of butter? You can use margarine instead of butter. However, butter gives a richer taste and better texture. If you want the best flavor, stick with unsalted butter. For the full recipe, check out the Garlic Herb Butter Roasted Chicken section. In this post, we covered how to roast a whole chicken. We explored key ingredients, including fresh herbs and garlic butter. You learned step-by-step prep and cooking instructions for perfect results. I shared cooking tips for crispy skin and serving ideas. We also discussed variations and dietary options. Lastly, we addressed common questions about cooking and storing leftovers. Follow these methods for a delicious meal every time. Enjoy your cooking adventure and the tasty rewards!

Garlic Herb Butter Roasted Chicken Simple Delight

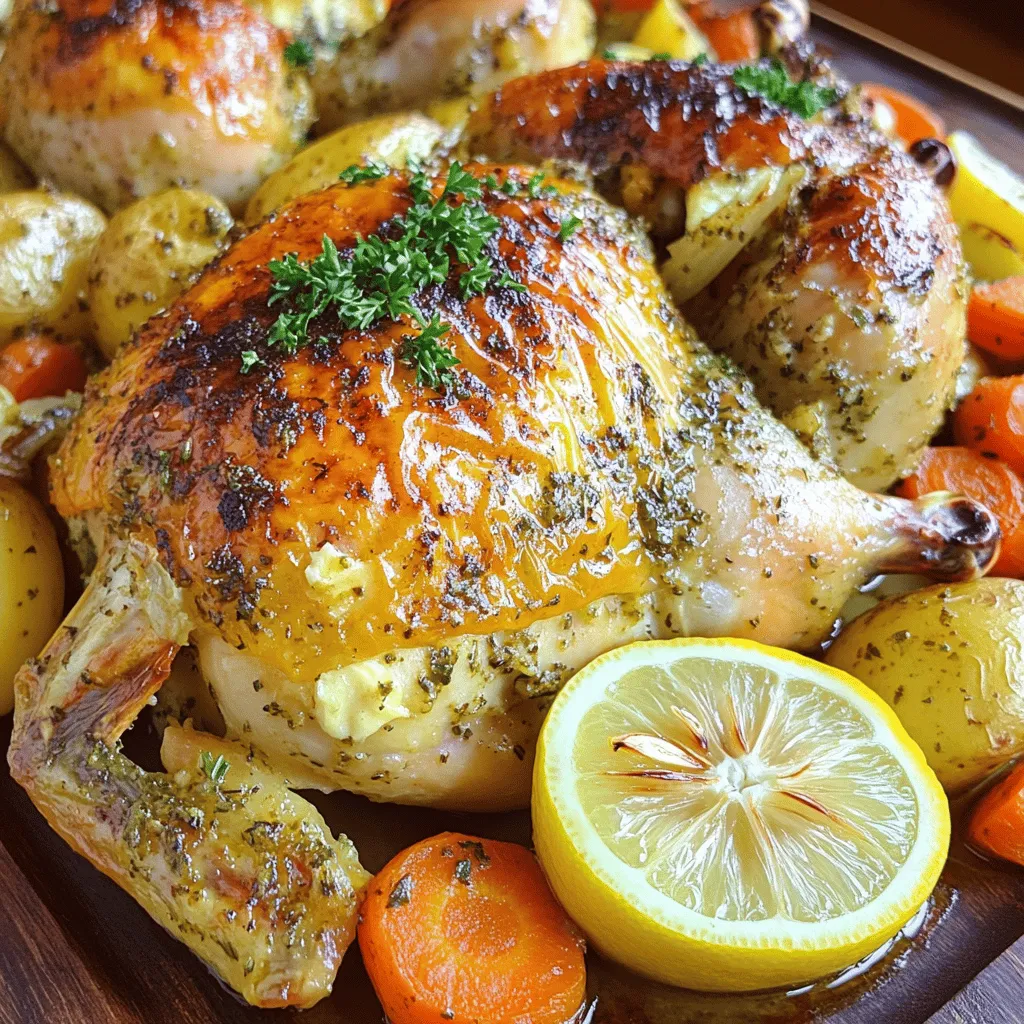
Are you ready to impress at your next dinner? Garlic Herb Butter Roasted Chicken is simple yet delightful. With fresh

To make these tasty tacos, gather these fresh ingredients: - 1 lb boneless, skinless chicken breasts - 1/4 cup fresh lime juice - 1/4 cup fresh cilantro, chopped - 2 cloves garlic, minced - 1 teaspoon cumin - 1 teaspoon chili powder - Salt and pepper to taste - 8 small corn tortillas - 1 cup shredded red cabbage - 1 avocado, sliced - 1/2 cup salsa Using fresh ingredients makes a big difference in flavor. Fresh lime juice gives a bright taste to the chicken. Fresh cilantro adds a nice herb kick. Dried herbs can work, but they lack the same zest. When you can, always choose fresh over dried. The taste will shine through in every bite. You can swap out some ingredients if needed. If you can't find chicken, use grilled shrimp or tofu. Lime juice can be replaced with lemon juice for a different twist. If you want a crunch, try using shredded lettuce instead of cabbage. For a creamier texture, you can add sour cream or Greek yogurt instead of avocado. These changes can keep your tacos fun and fresh while still being tasty! For the full recipe, check the earlier section. Start by mixing lime juice, chopped cilantro, minced garlic, cumin, chili powder, salt, and pepper in a bowl. This mix becomes your tasty marinade. Place the chicken breasts in the marinade. Make sure every part is well coated. Cover the bowl and put it in the fridge for at least 30 minutes. If you have time, let it sit for up to 2 hours. This helps the chicken soak in all that great flavor. Preheat your grill or skillet over medium-high heat. Once hot, add the marinated chicken. Cook it for about 6-7 minutes on each side. You want it to reach an internal temperature of 165°F (75°C). This ensures the chicken is safe to eat. After cooking, let it rest for a few minutes. This step helps keep the juices inside. Then, slice the chicken into thin strips. Warm up the corn tortillas on the grill or in a dry skillet. Heat them for about 30 seconds on each side. This makes them soft and tasty. Next, take a tortilla and add a handful of shredded cabbage. On top of that, place the sliced chicken. Add some avocado slices and a drizzle of salsa. If you like, sprinkle more chopped cilantro on top. Your tacos are now ready to enjoy! For the full recipe, check out the details above. A good marinade makes chicken juicy and full of flavor. Use fresh lime juice for a bright taste. I like to mix lime juice, chopped cilantro, minced garlic, cumin, and chili powder. This blend adds zest. Let the chicken soak for at least 30 minutes, but two hours is better. This gives the flavors time to sink in. Always cover the bowl while marinating to keep it fresh. Grilling the chicken right is key. Preheat your grill or skillet to medium-high heat. This helps to sear the chicken and lock in juices. Cook the chicken for about 6-7 minutes on each side. Use a meat thermometer to check for doneness. The chicken should reach 165°F (75°C). After cooking, let it rest for a few minutes. This helps keep it tender and juicy. Toppings can take your tacos to the next level. I love using shredded red cabbage for crunch. Add sliced avocado for creaminess. Salsa adds a nice kick. You can also sprinkle extra chopped cilantro on top. This adds freshness and color. Feel free to mix and match your favorite toppings to suit your taste. Experiment and find what you love best! For the full recipe, check out the [Full Recipe]. {{image_2}} For a tasty twist, try vegetarian cilantro lime tacos. Replace the chicken with grilled vegetables. Bell peppers, zucchini, and corn work well. Just marinate them in the same lime and cilantro mix. This keeps all the fresh flavors but changes the protein. You can also add black beans for extra protein. This version is colorful and packed with nutrients. If you like heat, make spicy cilantro lime chicken tacos. Add more chili powder to the marinade. You can also mix in some diced jalapeños. This gives your tacos a nice kick. Make sure to adjust the salsa too. A spicy salsa will balance the heat and add more flavor. This version is sure to please spice lovers. These tacos pair well with simple sides. Consider serving them with rice or beans. A fresh salad is a great option too. You could also offer chips and guacamole for crunch. For a refreshing drink, try limeade or iced tea. These sides make your meal feel more complete and fun. To see the full recipe for the cilantro lime chicken tacos, click here. To store leftover tacos, place them in an airtight container. Keep the chicken, tortillas, and toppings separate. This helps keep everything fresh. Store the container in the fridge for up to 3 days. If you mix everything together, the tortillas may get soggy. When you want to eat your leftover tacos, reheat the chicken first. You can use a skillet over medium heat. Heat it for about 5 minutes or until warm. For tortillas, warm them in a dry skillet for about 30 seconds on each side. This keeps them soft and tasty. You can freeze the cilantro lime chicken for later use. First, let it cool completely. Place the chicken in a freezer-safe bag or container. Remove as much air as possible before sealing. You can freeze it for up to 3 months. When you're ready to eat, thaw it overnight in the fridge. Then, reheat as mentioned above for a quick meal. For the best taste, try to use it within a month. Feel free to check the Full Recipe for more details on making these tasty tacos! You can use many options instead of chicken. Try firm tofu for a plant-based choice. Grilled shrimp or fish also works great. If you prefer beef, thinly sliced flank steak is tasty too. Just remember to adjust cooking times for different proteins. Yes, you can prepare these tacos ahead of time. Marinate the chicken and store it in the fridge. You can also cut the toppings and store them separately. Just warm up the chicken and tortillas when you are ready to eat. Toppings can really enhance your tacos. I love using sliced avocado for creaminess. Shredded cabbage adds crunch and color. Fresh cilantro brings a bright flavor. Salsas, like pico de gallo or mango salsa, add a burst of taste. Consider lime wedges for an extra zing. To make these tacos gluten-free, choose corn tortillas instead of flour ones. Check the labels on all your ingredients, especially salsa and spices. Most of them are gluten-free, but it’s good to be sure. Enjoy your meal without worry! For the full recipe, check out the details I provided earlier. Cilantro lime chicken tacos are easy and delicious. We covered key ingredients, cooking steps, and helpful tips. You can even try vegetarian options or add more spice. Storing leftovers is simple too, with clear reheating advice. Remember, these tacos can be enjoyed any way you like. Use fresh ingredients for the best flavor and get creative with toppings. Enjoy your taco night!

Cilantro Lime Chicken Tacos Flavorful and Fresh Meal

Craving a bright and tasty meal? Look no further than Cilantro Lime Chicken Tacos! These tacos burst with fresh flavors

To make the best cranberry orange scones, you need a few key ingredients. Each one plays a big role in the flavor and texture. Here’s what you’ll need: - 2 cups all-purpose flour - 1/2 cup granulated sugar - 1 tablespoon baking powder - 1/2 teaspoon salt - 1/2 cup unsalted butter, cold and cubed - 1/2 cup dried cranberries - Zest of 1 large orange - 1/2 cup heavy cream - 1 large egg - 1 teaspoon vanilla extract - 1/2 cup powdered sugar (for glaze) - 1-2 tablespoons orange juice (for glaze) Importance of Each Ingredient: - All-purpose flour gives structure to the scones. It helps them rise and hold their shape. - Granulated sugar adds sweetness. It also helps to tenderize the scones. - Baking powder is the leavening agent. It makes the scones light and fluffy. - Salt enhances the flavors in the dough. It balances the sweetness. - Unsalted butter adds richness and flavor. Cold butter creates flaky layers. - Dried cranberries bring a tart, fruity taste. They create a nice contrast with the sweet orange. - Orange zest adds bright citrus notes. It makes the scones fragrant and fresh. - Heavy cream keeps the dough moist. It helps bind the ingredients together. - Egg provides structure and richness. It helps the scones rise. - Vanilla extract adds warmth and depth. It complements the orange and cranberry flavors. - Powdered sugar is used for the glaze. It adds sweetness and a nice finish. - Orange juice in the glaze enhances the orange flavor. It gives the glaze a smooth consistency. If you need to make some swaps, here are some options: - Gluten-free flour can replace all-purpose flour. It will change the texture a bit but works well. - Dairy-free options like coconut cream can replace heavy cream. You can also use vegan butter instead of unsalted butter. - Fresh cranberries can be used if you want a tart kick. Just chop them into smaller pieces. - Honey or maple syrup can replace granulated sugar for a healthier sweetener. Remember, it may change texture slightly. To enhance the flavor, consider adding spices like cinnamon or nutmeg. They add warmth and a cozy feel to the scones. You can also mix in nuts or chocolate chips for a fun twist. Check out the Full Recipe for more details on making these delicious scones! 1. First, preheat your oven to 400°F (200°C) and line a baking sheet with parchment paper. 2. In a large mixing bowl, whisk together the following dry ingredients: - 2 cups all-purpose flour - 1/2 cup granulated sugar - 1 tablespoon baking powder - 1/2 teaspoon salt 3. Next, add 1/2 cup of cold, cubed unsalted butter to the bowl. 4. Use your fingers or a pastry cutter to mix the butter into the flour. It should look like coarse crumbs. 5. Now, stir in 1/2 cup of dried cranberries and the zest of 1 large orange. Make sure they are evenly distributed. 6. In a separate bowl, whisk together the wet ingredients: - 1/2 cup heavy cream - 1 large egg - 1 teaspoon vanilla extract 7. Pour the wet mix into the dry mix. Stir gently until just combined. The dough will be slightly sticky. 1. Turn the dough onto a lightly floured surface. Pat it into a circle about 1 inch thick. 2. Cut the dough into 8 wedges. Place them on the baking sheet with about 2 inches of space between each. 3. Bake the scones in your preheated oven for 15-20 minutes. They are ready when golden brown and a toothpick comes out clean. 1. While the scones cool, mix 1/2 cup powdered sugar with 1-2 tablespoons of orange juice until smooth. 2. After the scones cool, drizzle the glaze over the top. 3. Let them sit for a moment before serving. This allows the glaze to set and adds a nice finish. For a detailed guide with all the ingredients, check the Full Recipe. Enjoy your baking! - Overmixing the dough: This is a big problem. If you mix too much, your scones can turn tough. Mix just until the wet and dry ingredients come together. - Not properly measuring ingredients: Accurate measurements are key. Use a kitchen scale or measuring cups correctly. This ensures that your scones rise and taste great. - Techniques for achieving a tender, flaky texture: Use cold butter. This helps create those flaky layers. When you cut in the butter, aim for pea-sized pieces. This will bring air into the dough. - How to avoid drying out the scones: Don't bake them too long. Keep an eye on the oven. When they are golden brown, take them out. Underbaking slightly results in a moist center. - Pairing scones with beverages: These scones go great with tea or coffee. The tartness of cranberries pairs well with warm drinks. - Presentation ideas for special occasions: Serve your scones warm on a nice platter. You can add a small bowl of extra glaze for dipping. A sprinkle of orange zest on top adds a pop of color. For detailed steps, check the Full Recipe. {{image_2}} You can change up your cranberry orange scones to suit your taste. Here are some ideas: - Chocolate Chips: Add a half cup of chocolate chips for a sweet twist. The rich flavor pairs well with the tartness of cranberries. - Nuts: Mix in chopped nuts like walnuts or pecans. Nuts add a nice crunch and depth of flavor. - Seasonal Spices: During fall, you can add a pinch of cinnamon or nutmeg to the dough. These spices bring warmth and richness. - Citrus Variations: Try using lemon or lime zest instead of orange. This will give your scones a different, refreshing zing. You can also adapt the recipe to fit special diets. Here’s how: - Vegan Option: Replace the heavy cream with almond milk and the egg with a flax egg. To make a flax egg, mix one tablespoon of ground flaxseed with three tablespoons of water. Let it sit for a few minutes until it thickens. - Low-Sugar Option: Use a sugar substitute like stevia or monk fruit sweetener. This keeps the scones sweet without added sugars. - Nut Allergies: If you or someone you know has nut allergies, skip the nuts altogether. You can add extra dried fruit instead for texture. These variations let you enjoy cranberry orange scones in different ways. Check the Full Recipe for all the details and measurements! To keep your scones fresh, store them properly. If your scones are unglazed, place them in an airtight container at room temperature. They will stay fresh for up to two days. If they are glazed, wait for the glaze to set. Then, store them in the same way. For longer storage, you can freeze leftover scones. Wrap each scone tightly in plastic wrap, then place them in a freezer bag. They can last up to three months in the freezer. When it comes to reheating, the goal is to keep scones moist. The best method is to use the oven. Preheat it to 350°F (175°C). Place the scones on a baking sheet and cover them with foil. Heat them for about 10 minutes. This method keeps scones flaky and warm. You can also serve leftover scones in other ways. Try toasting them with butter. A bit of cream cheese or jam adds a nice touch too. Pair them with a cup of tea or coffee for a lovely treat! You can find the full recipe above for more details. Cranberry orange scones stay fresh for about two days at room temperature. Store them in an airtight container to keep them soft. If you want them to last longer, freeze them. They freeze well for up to three months. When ready to enjoy, just thaw and reheat. This way, you can savor those flaky layers any time! Yes, you can make the dough ahead of time! Prepare the dough and shape it into a circle. Wrap it tightly in plastic wrap. You can keep it in the fridge for up to 24 hours. When you're ready to bake, just cut the wedges and pop them in the oven. This saves time for busy mornings or special brunch events. If you don't have heavy cream, you can use milk mixed with butter. Combine 3/4 cup of milk with 1/4 cup of melted butter. This mix gives a similar richness. You can also try using coconut milk or almond milk for a dairy-free option. Just keep in mind that these options may change the flavor slightly. Absolutely! You can replace eggs with unsweetened applesauce or mashed banana. Use 1/4 cup of either as a substitute for one egg. This keeps the scones moist while adding a hint of sweetness. You can also use ground flaxseed mixed with water. Just mix one tablespoon of flaxseed with three tablespoons of water, let it sit, and then add it to the dough. Cranberry orange scones combine flavor and texture for a delightful treat. We covered ingredients, substitutions, and step-by-step baking instructions. Avoid common mistakes to ensure the best texture. I shared variations and storage tips for your convenience. Enjoying these scones with tea or coffee creates a perfect moment. Baking can be fun and rewarding, so I hope you try this recipe. With the right ingredients and techniques, you can master scone-making and impress yourself and others.

Cranberry Orange Scones Perfectly Flaky Delight

Are you ready to create a perfectly flaky delight with these Cranberry Orange Scones? Let me guide you through each

To make Sweet and Spicy Thai Noodle Salad, gather these fresh ingredients: - 8 oz rice noodles - 1 cup shredded carrots - 1 red bell pepper, thinly sliced - 1 cucumber, julienned - 1 cup bean sprouts - 1/2 cup chopped fresh cilantro - 1/4 cup chopped peanuts (for garnish) - 1 lime, juiced - 2 tablespoons soy sauce - 1 tablespoon honey or agave syrup - 1 tablespoon sriracha or your preferred hot sauce - 1 teaspoon sesame oil When sourcing ingredients, freshness is key. Here are some tips to help you find the best: - Visit local markets: Farmers' markets often have fresh produce. - Check for color: Look for bright colors in vegetables. They are usually fresher. - Smell the herbs: Fresh herbs should have a strong aroma. - Ask questions: Don’t hesitate to ask vendors about their sourcing practices. If you have dietary restrictions, here are some easy swaps: - Rice noodles: Use zucchini noodles for a low-carb option. - Soy sauce: Opt for tamari to make it gluten-free. - Honey: Substitute with maple syrup for a vegan choice. - Peanuts: Use sunflower seeds if you have a nut allergy. These swaps keep the salad tasty while meeting your needs. For the full recipe, check out the details above. To cook rice noodles, start by boiling water in a large pot. Add the noodles to the boiling water. Cook them according to the package instructions, usually about 4 to 6 minutes. Stir the noodles gently to prevent sticking. When they become soft, drain and rinse them under cold water. This stops the cooking and cools them down. Set the noodles aside while you prepare the salad. Now it’s time to mix the fresh vegetables. Gather your shredded carrots, thinly sliced red bell pepper, julienned cucumber, bean sprouts, and chopped cilantro. In a large bowl, combine all these colorful veggies. Make sure to mix them well for an even blend. This adds great texture and flavor to your salad. Fresh vegetables will give the salad a nice crunch. Next, we will whisk the dressing. In a small bowl, combine lime juice, soy sauce, honey or agave syrup, sriracha, and sesame oil. Use a whisk to mix everything until smooth. Taste and adjust the heat if needed. Pour this dressing over the cooked rice noodles and the mixed vegetables. Toss everything gently to coat well. Let the salad sit for about 10 minutes. This helps the flavors mix better. Before serving, toss again and add chopped peanuts for a tasty crunch. For the full recipe, be sure to check the earlier section. To boost the taste of your Sweet and Spicy Thai Noodle Salad, try adding more spices. You can use crushed red pepper for extra heat. Garlic powder adds depth without overwhelming the dish. A sprinkle of fresh ginger gives a zesty kick. Feel free to mix and match spices to suit your taste. Getting the perfect noodle texture is key. Rice noodles should be soft but not mushy. Make sure to rinse them in cold water after cooking. This stops the cooking process and keeps them firm. If they stick together, gently toss them with a bit of sesame oil. This keeps the noodles from clumping. A beautiful salad is all about how you serve it. Use a large, shallow bowl to show off the colors. Garnish with fresh cilantro and a lime wedge for a pop of color. You can also sprinkle chopped peanuts on top for crunch. Serve individual portions on plates for a nice touch. This adds a gourmet feel to your meal. For the full recipe, refer to the earlier section. {{image_2}} To make a vegetarian or vegan version of Sweet and Spicy Thai Noodle Salad, focus on the ingredients. The base of rice noodles is already plant-based. Use soy sauce or tamari to keep it vegan. For added protein, you can mix in tofu or edamame. Both options will provide a nice texture and boost nutrition. If you want an extra kick, add some crushed red pepper flakes. This salad is very adaptable to meet your dietary needs. If you need a gluten-free option, rice noodles are a great choice since they do not contain gluten. Make sure to use gluten-free soy sauce or coconut aminos for the dressing. This switch keeps the flavor but ensures it’s safe for those avoiding gluten. Always check labels on all packaged ingredients. You can also use zucchini noodles for a fun twist. They add a fresh taste and keep the dish light. For a heartier meal, consider adding proteins. Grilled chicken or shrimp pairs well with this salad. Cook them simply with salt and pepper to let the salad's flavors shine. You could also use cooked chickpeas or tofu for a plant-based protein. Adding protein turns this dish into a full meal. Just remember to adjust the amount of dressing based on your added ingredients. This ensures every bite bursts with flavor. For full details on making this salad, check out the Full Recipe. To keep your Sweet and Spicy Thai Noodle Salad fresh, store it in an airtight container. Make sure to separate the dressing if you have leftovers. This helps keep the noodles and veggies crisp. You can mix the dressing in later when you're ready to eat. You can store this salad in the fridge for up to three days. After that, the noodles may get mushy, and the veggies lose crunch. If you notice any off smells or changes in color, it’s best to toss it out. Reheating this salad is not recommended. It tastes best cold. If you want to warm it up a bit, do so gently in the microwave. Heat it for just a few seconds to avoid cooking the noodles. Remember to add fresh ingredients or more dressing for extra flavor! For the full recipe, check out the Sweet and Spicy Thai Noodle Salad. If you don't have rice noodles, you can try other types. Good options include soba noodles, udon, or even zucchini noodles. These substitutes offer a nice texture too. Just cook them as per the package directions. Remember, the key is to keep the salad light and fresh. This salad has a nice kick from the sriracha. If you want less heat, use less sriracha. You can also swap it for a milder sauce. For more spice, add extra sriracha or chili flakes. Taste as you mix to find your perfect balance! You can make this salad ahead of time! Just prepare the noodles and veggies. Keep the dressing separate until you're ready to serve. This way, your salad stays fresh and crunchy. If you make it too early, the noodles may soak up the dressing and lose their texture. For the full recipe, check out the details! This blog post covered how to create a tasty Sweet and Spicy Thai Noodle Salad. You learned about key ingredients, cooking instructions, and helpful tips for flavor and texture. I shared ideas for variations and proper storage, ensuring you enjoy this dish for days. Remember, experimenting with fresh ingredients and spices makes each salad unique. Enjoy cooking and let your flavor creativity shine!

Sweet and Spicy Thai Noodle Salad Fresh Flavor Boost

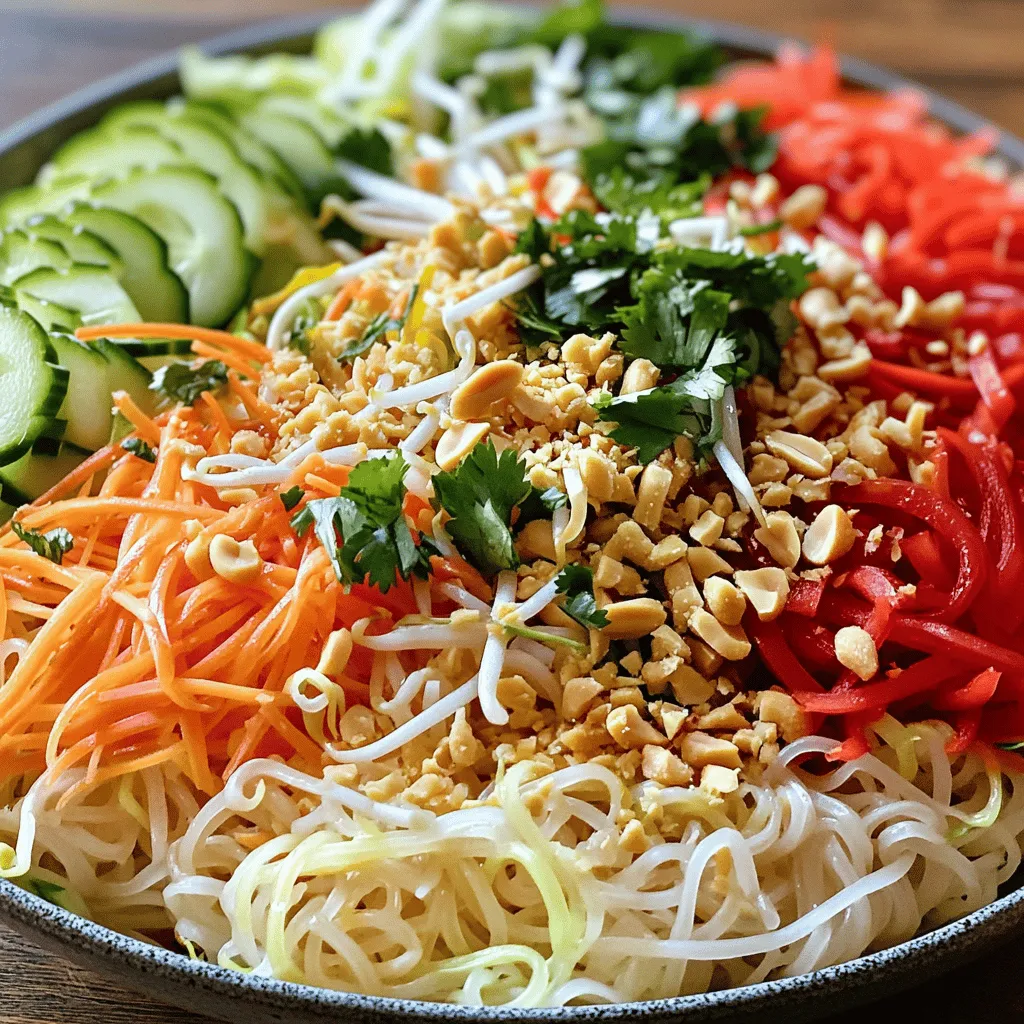
If you’re searching for a fresh dish that’s packed with flavor, look no further! My Sweet and Spicy Thai Noodle

Older posts
Newer posts
← Previous Page1 Page2 Page3 … Page75 Next →

dsad

© 2025 pureeatsnow • Built with GeneratePress

Our Policies

  • Copyright Policy
  • Cookie Policy
  • GDPR Policy
  • Privacy Policy
  • Disclaimer
  • Terms Of Use

More Information

  • Home
  • About
  • Contact
  • Appetizers
  • Dessert
  • Dinner
  • Drinks
©2025, pureeatsnow About Back To Top