Skip to content
DisclaimerTerms Of UseGDPR PolicyCookie Policy

pureeatsnow

  • Home
  • Drinks
  • Appetizers
  • Dinner
  • Dessert
  • About
  • Contact
  • Privacy Policy
DisclaimerTerms Of UseGDPR PolicyCookie Policy

Rachel

- 1 ½ cups graham cracker crumbs - ½ cup unsalted butter, melted - ¼ cup granulated sugar - 16 oz cream cheese, softened - ½ cup granulated sugar - 2 large eggs - 2 tablespoons all-purpose flour - Zest of 1 lemon - ¼ cup fresh lemon juice - 1 cup fresh raspberries (plus extra for garnish) - 1 teaspoon vanilla extract - 8x8 inch baking dish - Mixing bowls - Electric mixer or whisk - Parchment paper To make these delightful raspberry lemon cheesecake bars, you start with the crust. Combine graham cracker crumbs, melted butter, and sugar in a bowl. This mix should feel like wet sand. Press it firmly into an 8x8 inch baking dish. Bake it for about 10 minutes to set the base. Next, for the cheesecake filling, you need softened cream cheese. This makes mixing easier. In a large bowl, beat the cream cheese and granulated sugar until smooth. Add two large eggs, one at a time, mixing well each time. Now, add flour, lemon zest, fresh lemon juice, and vanilla extract. These flavors brighten the filling. Finally, fold in fresh raspberries gently to keep them whole. For equipment, you'll need a few basics. An 8x8 inch baking dish is key for the perfect size. Mixing bowls help keep your space tidy. An electric mixer or a whisk speeds up mixing. Parchment paper helps with easy removal later. For the full recipe, check above. Enjoy making this treat! - Preheat your oven to 350°F (175°C). - Combine graham cracker crumbs, melted butter, and sugar. - Press into the baking dish and bake for 10 minutes. - Beat cream cheese and sugar until smooth. - Add eggs, flour, lemon zest, lemon juice, and vanilla extract. - Fold in raspberries gently. - Pour over the pre-baked crust and bake for 25-30 minutes. - Allow to cool in the oven. - Refrigerate for at least 4 hours. - Lift out using parchment paper and slice into squares. For the full recipe, you can check the detailed instructions above. Enjoy your sweet creation! - Be sure cream cheese is softened for easier mixing. Cold cream cheese is hard to blend. It can leave lumps in your batter. - Avoid overmixing after adding eggs. This keeps your cheesecake light and fluffy. Overmixing can make it dense and heavy. - Garnish with fresh raspberries and mint leaves. This makes your bars look bright and fresh. - Dust with powdered sugar for a finishing touch. It adds a sweet look that catches the eye. - Pair with whipped cream or ice cream. The creamy textures complement the tangy cheesecake. - Serve with a light fruit sauce or compote. It adds extra flavor and makes each bite special. For the full recipe, check out my detailed instructions above. Enjoy these delightful treats! {{image_2}} You can change the flavors of these bars easily. For a twist, use different berries. Blueberries or strawberries work great. You might also try adding white chocolate. Mint can add a fresh taste too. These options let you make it your own. If you need a gluten-free treat, no worries! Just swap in gluten-free graham cracker crumbs. This small change keeps the crust tasty and safe for everyone. You won’t lose flavor or texture with this switch. Want a vegan version? Use silken tofu or a vegan cream cheese alternative. This still gives you that creamy texture. Follow the same steps in the Full Recipe to create your bars. You’ll enjoy the same delicious flavors without the dairy. To keep your raspberry lemon cheesecake bars fresh, store them in an airtight container. They will stay good in the fridge for up to 5 days. This way, you can enjoy a sweet treat anytime you crave it. If you want to save some for later, freeze the uncut bars. They can last for up to 2 months in the freezer. When you're ready to serve, simply thaw them in the fridge overnight. This keeps the texture just right for a delicious bite. Before serving your cheesecake bars after storage, make sure they are properly chilled. Chilling helps bring out the flavors and makes each bite feel refreshing and delightful. The edges will be set while the center will still have a slight jiggle. This means the cheesecake will be creamy and not overbaked. If you see the edges firming up but the middle looks soft, that’s perfect! Let them cool in the oven, and it will finish setting up. Yes, they can be made a day in advance and chilled. This allows the flavors to blend nicely. Just store them in the fridge covered. They taste even better the next day! Frozen raspberries or other berries can be used as alternatives. Blueberries, strawberries, or blackberries work well too. Just remember that frozen berries might release more juice, so adjust the baking time if needed. You now have a simple way to create delicious raspberry cheesecake bars. We covered all the key ingredients, equipment, and steps needed to make this treat. Remember to keep the cream cheese soft for the best mix and don’t overmix after adding the eggs. Feel free to customize flavors or adapt to gluten-free and vegan diets. Follow these tips, and your bars will impress everyone. Enjoy your delicious creation!

Raspberry Lemon Cheesecake Bars Delightful Sweet Treat

Are you ready to indulge in a sweet treat that combines creamy cheesecake and zesty lemon? These Raspberry Lemon Cheesecake

To create the best banana pudding, you need fresh and simple ingredients. Here’s what you will need: - 4 ripe bananas, sliced - 1 box (12 oz) vanilla wafers - 2 cups whole milk - 1 cup heavy cream Ripe bananas are key. They should have brown spots. This means they are sweet and soft. Vanilla wafers add a crunchy texture. Whole milk and heavy cream make the pudding rich and smooth. For sweetness, you can choose between two great options: - 1/2 cup granulated sugar - 1/2 cup packed brown sugar Granulated sugar gives a classic taste. Brown sugar adds a hint of caramel flavor. You can use one or mix both for a deeper taste. To give your pudding the right texture, you will need: - 1/4 cup cornstarch - 1 tablespoon pure vanilla extract Cornstarch helps the pudding thicken nicely. It creates a creamy consistency that holds well. Pure vanilla extract enhances the flavor, making each spoonful delightful. Using these ingredients, you can create a banana pudding that is tasty and satisfying. For the full recipe, check out the details above. First, gather your ingredients. You need whole milk, heavy cream, granulated sugar, brown sugar, cornstarch, salt, and vanilla extract. In a large saucepan, combine these ingredients. Whisk them together well. Next, cook the mixture over medium heat. Stir constantly until it thickens. This should take about 5 to 7 minutes. Look for small bubbles to form. Once it boils, cook for an extra 1 to 2 minutes. Remove the pan from heat and stir in the vanilla extract. Let the pudding cool for about 10 minutes. Now, it's time to layer. Start by taking your serving dish or cups. Place a layer of vanilla wafers at the bottom. Next, add a layer of sliced bananas. Pour a generous layer of pudding over the bananas. Repeat the layering process. Add more wafers, bananas, and pudding until you run out of ingredients. Make sure to end with a layer of pudding on top. This creates a beautiful finish for your dessert. After you finish layering, cover the dish with plastic wrap. Place it in the refrigerator for at least 4 hours. For best results, let it chill overnight. This helps the layers meld and the pudding set properly. When you’re ready to serve, top your pudding with whipped cream. Add extra banana slices and a sprinkle of crushed vanilla wafers for a nice touch. Serve it in clear dishes to show off those lovely layers. Enjoy every spoonful of this banana pudding delight! For a detailed guide, refer to the Full Recipe. Stirring is key to making smooth pudding. You must stir constantly while cooking. This helps prevent lumps. If lumps form, use a whisk to break them up. You want a creamy texture that makes every bite delightful. Spices add depth to your pudding. A pinch of cinnamon or nutmeg can make a big difference. You can also add a splash of almond or coconut extract for a twist. Using fresh bananas is very important too. Ripe bananas are sweeter and more flavorful, which boosts the taste of your dessert. Use clear dishes to showcase your layers. This makes your pudding visually appealing. You can also garnish it for extra flair. Top with whipped cream, banana slices, or crushed vanilla wafers. These simple touches can elevate the look and make it irresistible. For a full guide on making this dish, check out the Full Recipe. {{image_2}} Want to make banana pudding even better? Try adding cocoa powder or chocolate wafers. The rich chocolate flavor pairs well with bananas. For a simple twist, mix in two tablespoons of cocoa powder with the dry ingredients. You can also layer chocolate wafers instead of vanilla wafers. This variation gives a fun and bold taste that chocolate lovers will enjoy. You can make a delicious vegan banana pudding too! Use plant-based milk like almond or coconut. Replace heavy cream with coconut cream for a creamy texture. For sweeteners, maple syrup or agave nectar works great. This version keeps all the flavor without dairy. It’s perfect for those who avoid animal products or want a lighter dessert. For a dramatic look, layer banana pudding in a trifle dish. Start with a layer of vanilla wafers, followed by banana slices and pudding. Repeat these layers until you fill the dish. Top it off with whipped cream and extra banana slices. This tall dessert looks stunning and tastes great. It’s perfect for parties or special occasions. For the full recipe, check out the Banana Bliss Pudding. To keep your banana pudding fresh, use airtight containers. Glass or plastic containers work well. Make sure to seal them tightly. This prevents air from getting in and keeps the pudding creamy. If you used individual cups, cover them with plastic wrap. This will keep the flavors locked in, so you enjoy every spoonful later. Banana pudding can stay good in the fridge for about 3 to 4 days. It’s best to eat it sooner rather than later. The bananas can brown, and the texture may change if it sits too long. If you notice any changes in smell or taste, it's best to toss it. Always check before you dig in! If you want to save banana pudding for later, you can freeze it. First, place the pudding in a freezer-safe container. Leave some space at the top, as it will expand when frozen. Cover it tightly with a lid or plastic wrap. To defrost, move it to the fridge for several hours or overnight. When ready to eat, stir gently to bring back its creamy texture. Just be aware that the bananas may not look as fresh after freezing, but the flavor will still be delightful! To thicken your banana pudding, adjust the cornstarch amount. Use an extra tablespoon if needed. Cook the mixture longer, stirring constantly, until it thickens nicely. This helps it set better. Remember, the pudding will continue to thicken as it cools. So, don't be afraid to let it cook a little more. Yes, you can! Try adding fruits like strawberries, blueberries, or peaches. They add a fun twist and different flavors. Just make sure to slice them thinly, like you do with bananas. This keeps the layers nice and even. You can mix and match to find your favorite blend of fruits. Serve banana pudding chilled for the best taste. It’s great straight from the fridge. Use clear dishes to show off those lovely layers. Top it with whipped cream, banana slices, and crushed vanilla wafers. This adds a nice crunch and looks beautiful. Enjoy every spoonful of this delightful treat! For more details, check the Full Recipe. We covered the key steps to make delicious banana pudding. Start with ripe bananas, vanilla wafers, and rich cream. You can sweeten it with sugar or brown sugar. Remember to whisk and cook your mixture until thick. Don’t forget to layer your pudding right! Try variations like chocolate or vegan options for fun. Store leftovers in the right containers and enjoy them within a week. With these tips, you can make a tasty treat everyone will love. Enjoy your banana pudding adventure!

Best Banana Pudding Delight to Savor Every Spoonful

Are you ready to indulge in the ultimate comfort food? This Best Banana Pudding Delight to Savor Every Spoonful is

For this easy strawberry shortcake, you need fresh strawberries. Use 2 cups of strawberries, hulled and sliced. Choose ripe berries for the best flavor. Rinse them gently and remove the stems. Mixing the strawberries with sugar adds sweetness. Let them sit to release their juices. This step is key for a juicy filling. You will need baking essentials for the shortcake biscuits. Gather 2 cups of all-purpose flour, 1 tablespoon of baking powder, and 1/2 teaspoon of salt. These ingredients create the perfect biscuit base. You also need 1/4 cup of cold, cubed unsalted butter. This butter makes the biscuits tender and flaky. Dairy products add creaminess to the dessert. You will need 1 cup of heavy whipping cream. This is for both the biscuits and the whipped cream. You also need 1 teaspoon of vanilla extract for flavor. For the whipped cream, add 2 tablespoons of powdered sugar. This sugar sweetens the cream and helps it hold its shape. Check out the Full Recipe for more details. To start, you need fresh strawberries. Wash them and remove the green tops. Slice the strawberries into small pieces. Next, place them into a medium bowl. Add 1/4 cup of granulated sugar. Toss the strawberries gently until they are coated. Let them sit for 15 to 20 minutes. This helps them release their sweet juices. Now, let's make the shortcake biscuits. First, preheat your oven to 425°F (220°C). Line a baking sheet with parchment paper. In a large bowl, mix 2 cups of all-purpose flour, 1 tablespoon of baking powder, and 1/2 teaspoon of salt. Add 1/4 cup of cold, cubed unsalted butter. Use your fingers or a pastry cutter to blend until it looks like coarse crumbs. Then, pour in 1 cup of heavy whipping cream and 1 teaspoon of vanilla extract. Stir gently until the dough forms. It should be slightly sticky but not wet. Turn the dough onto a floured surface. Pat it down to about 1 inch thick. Use a round cutter to cut out biscuits. Each biscuit should be about 2-3 inches wide. Place them on the prepared baking sheet. Bake for 12 to 15 minutes, or until the tops are golden brown. Once done, let them cool on a wire rack. While the biscuits cool, let's whip the cream for topping. In a mixing bowl, add another cup of heavy cream and 2 tablespoons of powdered sugar. Whip until soft peaks form. Now, it’s time to assemble your shortcakes. Slice each biscuit in half. Spoon a generous amount of the strawberry mixture onto the bottom half. Add a dollop of whipped cream on top. Finally, place the top half of the biscuit on the cream. Serve your strawberry shortcake right away for the best taste. Enjoy this easy and delightful dessert! For the full recipe, check out the detailed instructions above. When making strawberry shortcake, avoid a few common mistakes. First, don’t skip macerating the strawberries. This step helps them release their sweet juices. Second, mix the dough just enough. Overmixing leads to tough biscuits. Lastly, watch the baking time closely. Biscuits should be golden-brown, not dark. To make great whipped cream, start with cold heavy cream. Use a clean bowl and beaters. This will help the cream whip faster. Beat the cream until soft peaks form. Adding powdered sugar helps sweeten it, but don’t overbeat. If you do, it can turn into butter, and that’s not what we want! For a lovely presentation, serve the shortcakes on a nice platter. Dust them lightly with powdered sugar for a sweet touch. Add fresh mint leaves for color and freshness. You can also arrange the strawberries around the shortcakes. This creates a beautiful, inviting dessert that looks as good as it tastes. Check out the Full Recipe for more details on making this delicious treat! {{image_2}} While strawberries steal the show, you can try other fruits. Ripe peaches, sweet blueberries, or tart raspberries work great. Just slice them and mix with a bit of sugar. Let them sit for 15 minutes like with the strawberries. This draws out their juiciness. You can also mix fruits, like strawberries and blueberries, for a colorful twist. Each fruit adds its own flavor and fun texture. If you need a gluten-free option, no problem! Use gluten-free flour blends. These blends work like regular flour in most recipes. I suggest looking for one that has xanthan gum included. This helps with texture. Just follow the same steps in the recipe. You can still enjoy delicious shortcake without gluten! Whipped cream can be more than just sweet! To add flavor, use different extracts. Try almond or mint extract for a fun twist. You can also add a hint of cocoa powder for chocolate whipped cream. Just mix any flavor you choose into the cream as you whip it. This adds a unique taste to your shortcake. It makes each bite special and exciting. For more ideas, check out the Full Recipe to explore all the delicious possibilities! To store leftover shortcake, place it in an airtight container. Make sure to keep the strawberries and whipped cream separate. This way, your shortcake stays fresh. Store the container in the fridge for up to three days. If you mix the shortcake too early, it may get soggy. You can freeze shortcake if you want to save it for later. Wrap each biscuit tightly in plastic wrap. Then, place the wrapped biscuits in a freezer-safe bag. They can last in the freezer for up to three months. When you are ready to eat, thaw them in the fridge overnight. To keep the shortcake fresh, avoid stacking the biscuits. Instead, place them flat in the container. Keep the whipped cream in a separate bowl with a lid. For the strawberries, make sure they are dry before storing. Excess moisture can lead to spoilage. If you follow these tips, your shortcake will stay tasty for longer. For the full recipe, check out the earlier section! Yes, you can make the shortcake ahead of time. Bake the biscuits a day early. Store them in an airtight container. This keeps them fresh. When you are ready to serve, slice and assemble. Just add the strawberries and whipped cream. This way, your dessert is quick to finish. If you need a substitute for heavy cream, here are some options: - Half-and-half: Use equal parts half-and-half and milk. - Coconut cream: Chill a can of coconut milk. Scoop the cream from the top. - Greek yogurt: Mix yogurt with a bit of milk for a creamy texture. These alternatives work well but may change the flavor a bit. Yes, you can create a healthier version of this dessert. Here are some ideas: - Use whole wheat flour instead of all-purpose flour. - Reduce the sugar in the strawberries. - Swap heavy cream for Greek yogurt or a lighter cream. These changes can make your strawberry shortcake lighter without losing its taste. For the full recipe, check the earlier section. This blog post covered how to make strawberry shortcake. We discussed fresh strawberries, essential baking items, and necessary dairy products. I shared clear steps for preparing strawberries, making biscuits, and assembling the dessert. You learned tips to avoid common mistakes and how to whip cream well. We explored fun variations and smart storage methods. In the end, strawberry shortcake is simple and delicious. Enjoy creating this sweet treat!

Easy Strawberry Shortcake Delicious and Simple Dessert

Are you ready to whip up a delightful dessert? My Easy Strawberry Shortcake combines fresh strawberries, fluffy biscuits, and creamy

- 12 oz spaghetti - 2 chicken breasts, diced - 1 cup cherry tomatoes, halved - 1 bell pepper, sliced (any color) - 1 small zucchini, diced - 4 cloves garlic, minced - 1 teaspoon red pepper flakes (adjust to taste) - 1 teaspoon Italian seasoning - 1/4 cup fresh basil, chopped (plus extra for garnish) - 1/2 cup grated Parmesan cheese (plus more for serving) - 2 tablespoons olive oil - Salt and pepper to taste Measuring ingredients correctly is key for this recipe. If you use too much or too little, it can change the taste or texture. Use measuring cups and spoons for dry and wet ingredients. When prepping, wash all veggies well. Cut them into uniform sizes for even cooking. Chop garlic finely to release its flavor. Always keep your workspace clean and organized. This makes cooking more fun and less stressful. Start by boiling a large pot of salted water. The salt adds flavor to the pasta. Once the water boils, add 12 oz of spaghetti. Cook it for about 8-10 minutes. Check the pasta for doneness. You want it to be firm but not hard. This is called al dente. Drain the spaghetti and save 1/2 cup of the pasta water. This water helps to make the sauce creamy. For the chicken, use 2 diced chicken breasts. Season them well with salt, pepper, and 1 teaspoon of Italian seasoning. Heat 2 tablespoons of olive oil in a large skillet over medium heat. Add the chicken and cook for 5-7 minutes. Make sure it cooks evenly. The chicken should be golden brown and fully cooked. Once done, remove it from the skillet. Next, it’s time for the vegetables. In the same skillet, add a bit more olive oil if needed. Start with 4 cloves of minced garlic and cook for about 1 minute. Then add 1 sliced bell pepper and 1 diced zucchini. Cook them for 4-5 minutes. You want the veggies to be tender but still have some crunch. This gives your dish a nice texture and flavor. Now for the fun part! Return the chicken to the skillet. Add 1 cup of halved cherry tomatoes and 1 teaspoon of red pepper flakes. Cook this for another 2-3 minutes. You want the tomatoes to soften a bit. Then, add the cooked spaghetti and the reserved pasta water. Toss everything together gently. Stir in 1/4 cup of chopped fresh basil and half of the 1/2 cup of Parmesan cheese. Adjust the seasoning with salt and pepper before serving. Enjoy this savory chicken spaghetti, and don’t forget to check the [Full Recipe] for more details! You can adjust spice levels easily. If you like heat, add more red pepper flakes. For a milder taste, use less. Taste your dish as you cook. This ensures the flavor suits you. Adding fresh herbs boosts flavor, too. Consider using thyme or oregano for depth. Fresh parsley can brighten the dish. You can mix and match herbs to find your favorite combo. Want to save time? Prep your ingredients ahead of time. Chop veggies and dice chicken the day before. This makes cooking faster and more fun. Try a one-pan cooking method. It cuts down on dishes. You can cook the chicken and veggies in the same skillet. This saves time and keeps flavors strong. Garnish your chicken spaghetti for a pretty dish. Fresh basil on top adds color and flavor. A sprinkle of Parmesan cheese makes it look fancy. Serve in bowls for a cozy meal. You can also plate it like in a restaurant. A side salad or garlic bread makes it feel special. Explore more ideas with the [Full Recipe] to impress your guests! {{image_2}} You can change the protein in chicken spaghetti. Shrimp, ground turkey, or tofu all work well. Each option brings its own taste. For shrimp, add a bit of lemon juice. It pairs nicely with garlic. Ground turkey has a mild flavor. Use more spices to boost its taste. Tofu is great for a vegetarian twist. Marinate it in soy sauce for extra flavor. To make a vegetarian-friendly chicken spaghetti, skip the chicken. You can use more veggies instead. Consider adding mushrooms, spinach, or bell peppers. Each adds a unique taste. Mix in some chickpeas for protein. They also give a nice texture. Toss everything together just as you would with chicken. This keeps the dish hearty and satisfying. For gluten-free chicken spaghetti, swap regular pasta for gluten-free options. Brown rice pasta or chickpea pasta are great choices. They offer a nice texture and flavor. Keep an eye on cooking times. Gluten-free pasta often cooks faster. Stir often to prevent sticking. Always check the package for specific instructions. This way, you ensure a tasty dish every time. For complete cooking instructions, check the Full Recipe. To keep your chicken spaghetti fresh, follow these steps. First, let it cool down to room temperature. This prevents moisture buildup in the container. Once cooled, place the spaghetti in an airtight container. Glass or plastic containers work well for this. Make sure to store it in the fridge for up to three days. This keeps the flavors intact and safe to eat. When you want to enjoy leftovers, reheating correctly is key. The best way is to use the stove. Place the spaghetti in a skillet over low heat. Add a splash of water or broth to help it steam. Stir often to keep it from sticking. If you prefer the microwave, use a microwave-safe bowl. Cover it with a lid or wrap to trap steam. Heat in short bursts, stirring in between. This helps retain the flavor and moisture. If you have more than you can eat, freezing is a great option. Start by letting the chicken spaghetti cool completely. Then, portion it into freezer-safe bags or containers. Remove as much air as possible to avoid freezer burn. Label the bags with the date. You can freeze it for up to three months. When you're ready to eat, thaw it in the fridge overnight. Reheat it as mentioned above to enjoy your meal. Yes, you can make chicken spaghetti ahead of time. Meal prepping saves time and effort. After cooking, let it cool completely. Store it in an airtight container in the fridge. It will stay fresh for about three days. If you want it for longer, freeze it. Just be sure to use a freezer-safe container. When ready to eat, reheat it slowly on the stove or in the microwave. If you need a substitute for Parmesan cheese, options are available. Nutritional yeast adds a cheesy flavor and is dairy-free. Grated Pecorino Romano is a good option if you want something similar. For a vegan choice, try cashew cheese. It blends well and gives a creamy touch to your dish. To add some heat to your chicken spaghetti, try these tips. First, increase the red pepper flakes. Start with a bit more and taste it as you go. You can also add fresh chopped jalapeños or serrano peppers. Another option is to mix in some hot sauce. Each of these will give a nice kick. Chicken spaghetti goes well with many side dishes. A fresh garden salad adds crunch and color. Garlic bread is a classic choice that complements the dish. Steamed broccoli or green beans can brighten your plate. For a simple option, serve it with a side of fruit. Yes, chicken spaghetti is great for kids. To make it more kid-friendly, cut back on spices. You can also use mild cheese instead of Parmesan. If your kids like veggies, chop them small. This helps them blend in. Make sure the chicken pieces are tender and easy to chew. We explored a delicious chicken spaghetti recipe from start to finish. I shared key ingredients like chicken, veggies, and seasonings that make this dish shine. Accurate measuring and prep tips ensure your success. You learned step-by-step cooking methods and ways to enhance flavor. Variations let you customize your meal for any diet. Plus, I covered storage, reheating, and meal prepping. Cooking chicken spaghetti is simple and rewarding. Get creative with ingredients and enjoy!

Savory Chicken Spaghetti Simple to Prepare Dish

Are you ready to whip up a delicious meal with ease? My Savory Chicken Spaghetti is a simple dish that

To make a delicious peanut butter toast, you need simple, healthy ingredients. Here’s what you should gather: - Whole grain or sourdough bread - Peanut butter varieties (creamy or crunchy) - Fresh fruits (bananas and berries) - Healthy toppings (honey, chia seeds, dark chocolate chips, sea salt) These ingredients make your peanut butter toast both tasty and nutritious. Whole grain or sourdough bread gives a nice base. Peanut butter adds protein and flavor. Fresh fruits like bananas and berries not only taste great but also provide important vitamins. Honey or maple syrup adds sweetness. Chia seeds give a healthy crunch, while dark chocolate chips can make it feel like a treat. A pinch of sea salt balances the sweetness. Feel free to mix and match your favorite toppings and fruits. For the full recipe, check out Peanut Butter Bliss Toast. 1. Toasting the bread to achieve the perfect crispness Start by toasting your bread. I prefer whole grain or sourdough for a great taste. Toast it until it turns golden brown, which takes about 5 minutes in a toaster or skillet. You want it crispy but not burnt. 2. Slicing bananas for an attractive presentation While your bread toasts, grab a medium banana. Slice it into thin rounds. Aim for even slices to make your toast look nice. 3. Spreading peanut butter evenly on toast When the bread is ready, take about 1.5 tablespoons of peanut butter. Spread it evenly on each slice. Use creamy or crunchy peanut butter based on your preference. 1. Layering banana slices post-peanut butter Now, take your sliced bananas and place them on top of the peanut butter. Overlap them a bit for a pretty design. 2. Drizzling with honey or maple syrup Next, drizzle honey or maple syrup over the banana slices. This adds a touch of sweetness that pairs well with peanut butter. 3. Adding chia seeds and optional chocolate chips Sprinkle chia seeds on top for added crunch and health benefits. If you want, add dark chocolate chips for a sweet twist. They melt slightly and taste amazing. This peanut butter toast is not just easy to make; it is full of flavor and nutrition. For the full recipe, check the details above. Enjoy your delicious creation! - Choosing the right bread for the best toast: Whole grain or sourdough bread works best. Whole grain adds fiber, while sourdough offers a tangy taste. Both give a nice crunch when toasted. - Balancing flavors with sweet and salty toppings: Use honey or maple syrup to sweeten. The sweet flavor pairs well with the salty peanut butter. A pinch of sea salt can enhance the taste. - Serving suggestions for a visually appealing plate: Arrange banana slices in a fan shape on the toast. Add fresh berries around the plate for color. A beautiful plate makes your meal more inviting. - Adding seeds or nuts for extra crunch and nutrition: Sprinkle chia seeds on top. They add a nice crunch and boost nutrients. You can also add crushed nuts for extra texture. - Opting for natural sweeteners over refined sugar: Choose honey or maple syrup instead of white sugar. They provide sweetness and come with added benefits. This makes your toast healthier and more delicious. For the full recipe, check out Peanut Butter Bliss Toast. {{image_2}} You can change up your peanut butter toast in fun ways. Try different nut butters like almond or cashew. Each nut butter gives a new taste and texture. You might love the smoothness of almond or the rich flavor of cashew. You can also mix in alternative toppings. Instead of banana, try yogurt or granola. Both add creaminess and crunch. Coconut flakes provide a tropical twist. These toppings make your toast interesting and delicious! If you need gluten-free options, look for gluten-free bread. Many brands offer great choices that taste just as good. This way, everyone can enjoy peanut butter bliss! For a vegan touch, replace honey with maple syrup or agave. You can also skip honey altogether. Use fresh fruits or nut butters as toppings for a sweet flavor without animal products. By making these simple adjustments, you can create a toast that fits any diet or preference. Enjoy experimenting with flavors and toppings! Don't forget to check the full recipe for more ideas! If you have leftover toast, it’s best to eat it fresh. Toast can lose its crunch. If you must store it, keep it in an airtight container. This helps keep the bread from getting too soft. You can also refrigerate it, but it may lose its tasty texture. For toppings like peanut butter, bananas, and honey, you can store them separately. Keep peanut butter in a cool, dark place. If you slice a banana, use it right away. If you have leftover banana slices, cover them with lemon juice. This step helps prevent browning. Meal prepping makes breakfast easy. You can prepare some ingredients ahead of time. Toast bread in batches and store it in the fridge. Just pop it in the toaster when you’re ready to eat. You can slice bananas in advance too. Just remember to add lemon juice to keep them fresh. You can also pre-measure chia seeds or chocolate chips. This way, you can quickly assemble your peanut butter toast. It saves time and makes mornings stress-free. For the full recipe, check out Peanut Butter Bliss Toast. How do I prevent my toast from getting soggy? To keep your toast crisp, toast it just before serving. Use thick slices of bread. You can also spread peanut butter while the toast is warm. This helps make a nice barrier against moisture. Can I use frozen bananas on my toast? Yes, you can use frozen bananas. Just thaw them first. They will be soft but still tasty. They can add a creamy texture to your toast. What are the health benefits of peanut butter? Peanut butter offers many health perks. It is high in protein, which helps build muscle. It contains healthy fats that support heart health. Plus, it's rich in vitamins and minerals like vitamin E and magnesium. What can I substitute if I’m allergic to peanut butter? If you have a peanut allergy, use sun butter or almond butter. These options have a similar texture and taste. They provide healthy fats and protein as well. How to make a healthier version of peanut butter toast? To make it healthier, choose whole grain bread. Use natural peanut butter without added sugar. You can add fresh fruit or seeds for extra nutrients. This boosts both flavor and health benefits. Can I make peanut butter toast in advance? You can prepare the toppings in advance. However, it's best to toast the bread fresh. This keeps it crunchy and delicious. Store the toppings in the fridge until you are ready to eat. This blog post shared a simple and tasty peanut butter toast recipe. We explored the best ingredients, preparation steps, and clever tips for great results. You can adapt flavors and make it fit your diet with ease. Remember to store leftovers well and prep ingredients for quick meals. Enjoy your delicious toast and make it your own! Keeping it fun and nutritious leads to better meals that everyone loves. Happy toasting!

Peanut Butter Toast Nutritious and Simple Recipe

Peanut butter toast is a quick and tasty meal choice. With just a few ingredients, you can create a nutritious

To make Cheesy Beef and Bowtie Pasta, gather these items: - 12 oz bowtie pasta - 1 lb ground beef - 1 onion, finely chopped - 2 cloves garlic, minced - 1 can (14.5 oz) diced tomatoes, drained - 1 cup beef broth - 1 cup shredded cheddar cheese - 1 cup shredded mozzarella cheese - 1 tsp Italian seasoning - 1 tsp paprika - Salt and pepper to taste - 2 tablespoons olive oil - Fresh basil leaves for garnish (optional) You can easily swap out ingredients for what you have on hand. Try ground turkey or chicken for a leaner option. For a veggie twist, use cooked lentils or mushrooms instead of meat. If you want more flavor, add red pepper flakes for heat or fresh herbs like thyme. Use vegetable broth instead of beef broth for a lighter taste. You can also mix different cheeses, like gouda or pepper jack, for a unique twist. When choosing your ingredients, freshness matters. Look for bright, firm tomatoes without blemishes. For pasta, select a brand that is not too soft, as it needs to hold its shape. Use high-quality beef with a good fat ratio for the best flavor. When picking cheese, go for blocks rather than pre-shredded. Block cheese melts better and tastes fresher. Always check the expiration dates on your broth and cheese for the best quality. To start, you need to cook the bowtie pasta. Bring a large pot of salted water to a boil. Add 12 oz of bowtie pasta. Cook according to the package instructions until it is al dente. Drain and set it aside. Next, grab a large skillet. Heat 2 tablespoons of olive oil over medium heat. Add 1 finely chopped onion. Sauté it until it turns translucent, which takes about 3-4 minutes. Then, add 2 cloves of minced garlic. Cook this for another minute. You want the garlic to be fragrant. Now, increase the heat to medium-high. Add 1 lb of ground beef. Use a spatula to break it up as it cooks. Aim for about 5-7 minutes until it turns brown. If there is extra fat, drain it off. It's time to add flavor! Stir in 1 can of drained diced tomatoes, 1 cup of beef broth, 1 tsp of Italian seasoning, and 1 tsp of paprika. Season with salt and pepper to taste. Bring this mix to a simmer. Let it cook for 5 minutes so the flavors mix well. Next, add the cooked bowtie pasta to the skillet. Stir everything together until well combined. Reduce the heat to low and add half of the cheddar and mozzarella cheeses. Stir until the cheese melts and creates a creamy sauce. Remove the skillet from heat. Sprinkle the remaining cheese on top. Cover it to allow the cheese to melt for a few minutes. If you want, add fresh basil leaves for garnish before serving. 1. Boiling Pasta: Look for bubbles in the water and ensure the pasta is tender but firm. 2. Sautéing Onion and Garlic: The onion should be clear, and the garlic should smell nice. 3. Browning Beef: The meat should be a nice brown color with no pink left. 4. Simmering Mixture: Watch for small bubbles indicating it’s cooking. 5. Melting Cheese: Look for a gooey, creamy texture. - Cooking the pasta: About 10-12 minutes. - Sautéing onion: About 3-4 minutes. - Cooking garlic: 1 minute. - Browning beef: 5-7 minutes. - Simmering sauce: 5 minutes. - Melting cheese: 2-3 minutes after removing from heat. Follow these steps for a delicious Cheesy Beef and Bowtie Pasta. For the full recipe, check the detailed instructions above. When making Cheesy Beef and Bowtie Pasta, avoid overcooking the pasta. Cook it until it is al dente. This helps keep the pasta firm. Drain it well to prevent a soggy dish. Another mistake is not seasoning enough. Add salt and pepper during cooking. Taste as you go to balance flavors. Also, don’t skip the cheese melting step. This makes the dish creamy and rich. To boost flavor, try adding a splash of Worcestershire sauce. This adds depth to the beef. You can also mix in some chopped bell peppers or mushrooms for extra veggies. If you like heat, sprinkle in some red pepper flakes. For texture, consider toasting the pasta in the skillet before adding liquid. This gives it a nutty taste. Serve your Cheesy Beef and Bowtie Pasta in a big bowl. Top it with extra cheese and fresh basil leaves for color. Pair it with a simple green salad for freshness. A side of garlic bread complements the dish well. For drinks, a light red wine works great. If you want a non-alcoholic option, try sparkling water with lemon. Enjoy your delicious meal! For the full recipe, check out the instructions above. {{image_2}} You can switch the ground beef for ground turkey or sausage. Ground turkey gives a lighter taste. Sausage adds a nice kick. I recommend Italian sausage for extra flavor. Both options cook the same way as ground beef. Just make sure to brown them well before adding the other ingredients. If you want a vegetarian twist, use mushrooms or lentils. Mushrooms provide a nice, meaty texture. Lentils are packed with protein and fiber. You can sauté chopped mushrooms with the onions. For lentils, add cooked lentils instead of meat. This change will still give you a hearty meal. To make this dish gluten-free, use gluten-free pasta. There are many great options available now. For a vegan version, skip the cheese and beef. Instead, use a plant-based ground meat. Nutritional yeast can add a cheesy flavor without dairy. You can also use cashew cheese for a creamy texture. These swaps keep the dish tasty and satisfying. You can find the Full Recipe to guide you through all these variations! To store your Cheesy Beef and Bowtie Pasta, first let it cool down. Place it in an airtight container. This keeps it fresh. You can keep it in the fridge for up to 3 days. If you want to enjoy it later, freezing is a great option. When reheating, use the microwave or stovetop. If using a microwave, cover the bowl with a damp paper towel. This helps keep it moist. Stir it halfway through to heat evenly. If using the stovetop, add a splash of beef broth or water. This helps prevent it from drying out. To freeze, portion out the pasta into freezer-safe bags. Squeeze out as much air as you can. Label the bags with the date. You can freeze it for up to 3 months. When you’re ready to eat, thaw it in the fridge overnight. Reheat it gently to bring back that cheesy goodness. For the full recipe, check out the details above! You can use plant-based meat or lentils instead of ground beef. Just sauté the onions and garlic as usual. Then add your meat substitute. Cook it until heated through. Use the same spices and broth for flavor. Add your cooked bowtie pasta and cheese last. This creates a tasty, meat-free dish. Yes, you can! Cook the pasta and meat mixture as directed. Let it cool and store it in an airtight container. Keep it in the fridge for up to three days. When ready to eat, reheat it on the stove or in the microwave. Add a splash of broth or water to keep it moist. You can serve a simple green salad or garlic bread. A side of steamed vegetables adds color and nutrition. For a heartier meal, pair it with roasted vegetables. A glass of red wine will also complement the flavors nicely. Try different options to find what you love! Check out the Full Recipe for detailed cooking steps and tips! You learned the key ingredients for Cheesy Beef and Bowtie Pasta. We explored substitutions and the best ways to select quality items. The step-by-step cooking guide made it easy. I provided tips to avoid mistakes and enhance your dish. In closing, this recipe offers great flavor. You can customize it for dietary needs. Enjoy cooking and sharing this meal with others. Your kitchen will be full of smiles and delicious scents.

Cheesy Beef and Bowtie Pasta Flavorful Dinner Delight

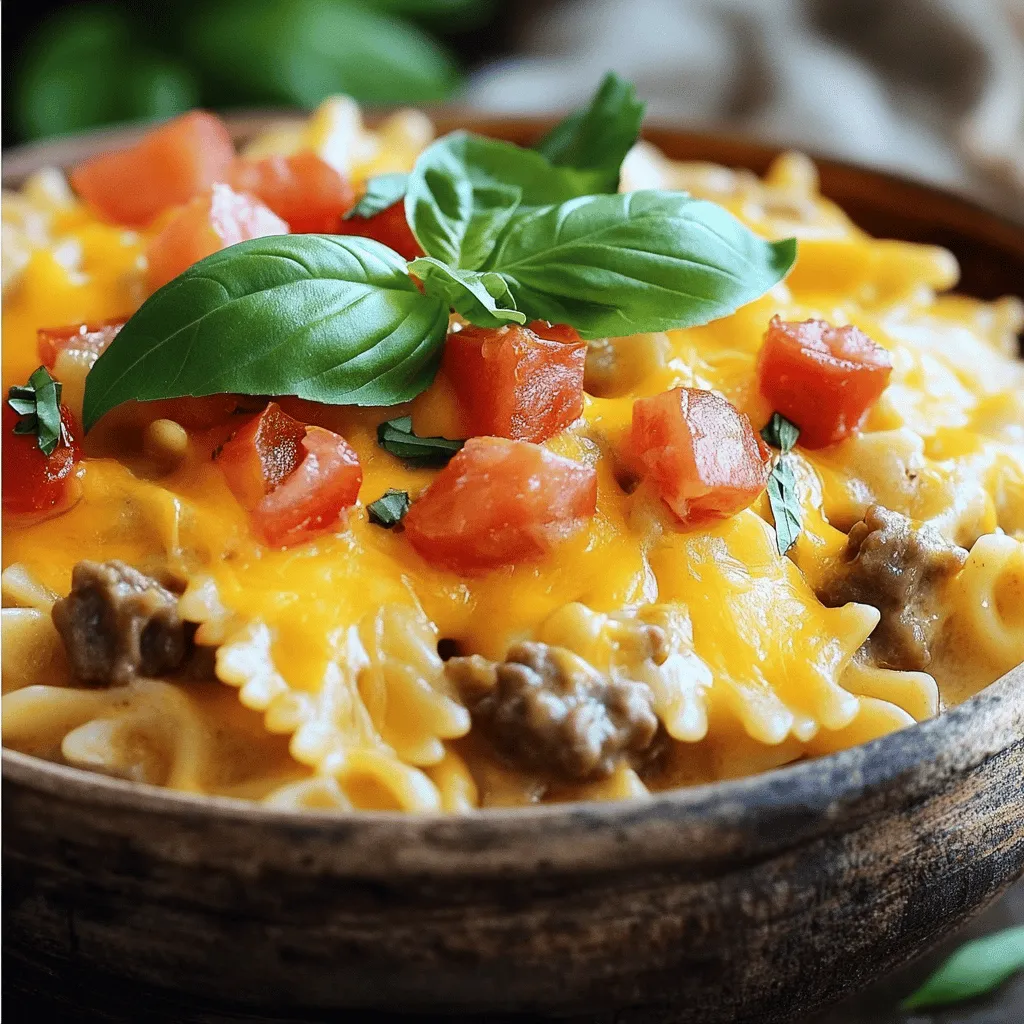
Looking for a delicious dinner that dazzles? You’ve found it with my Cheesy Beef and Bowtie Pasta! This dish is

To make these tasty meatballs, you need some key items: - 1 pound ground beef - 1/2 cup breadcrumbs - 1/4 cup grated Parmesan cheese - 1 large egg - 1 teaspoon garlic powder - 1 teaspoon onion powder - Salt and black pepper to taste - 3 cups beef broth - 1 medium onion, sliced - 1 cup sliced mushrooms - 1 tablespoon Worcestershire sauce - 1 tablespoon soy sauce - 2 tablespoons cornstarch mixed with 3 tablespoons water (for thickening) - Fresh parsley, chopped (for garnish) These ingredients work together to create a rich flavor and a soft texture. You can add a few special touches to personalize your dish: - Chopped bell peppers - Fresh herbs like thyme or rosemary - Different types of cheese, such as mozzarella or cheddar - A splash of red wine for depth - Spices like paprika or cayenne for heat Feel free to mix and match these options. Customizing makes your dish unique! Gather the right tools before you start cooking: - Large mixing bowl - Baking sheet or plate - Slow cooker - Whisk for mixing sauces - Measuring cups and spoons Having everything ready will make cooking smooth and fun. Enjoy the process! To start, gather all your ingredients. In a large bowl, mix together: - 1 pound ground beef - 1/2 cup breadcrumbs - 1/4 cup grated Parmesan cheese - 1 large egg - 1 teaspoon garlic powder - 1 teaspoon onion powder - Salt and black pepper to taste Use your hands to mix the ingredients gently. Don’t overwork the meat. Shape the mixture into meatballs about 1.5 inches wide, like golf balls. Place them on a baking sheet. This keeps them from sticking together. Now, it’s time to set up the slow cooker. Start by adding sliced onions and mushrooms to the bottom. This creates a tasty bed for the meatballs. Next, gently place the meatballs on top of the onions and mushrooms. In a separate bowl, whisk together: - 3 cups beef broth - 1 tablespoon Worcestershire sauce - 1 tablespoon soy sauce Pour this mixture over your meatballs. Make sure they are well covered. Cover the slow cooker with its lid. Set it to cook on low for 6 to 8 hours, or on high for 3 to 4 hours. The meatballs should be tender and fully cooked. About 30 minutes before serving, remove a cup of broth. Mix this with 2 tablespoons of cornstarch and 3 tablespoons of water. Stir this back into the slow cooker to thicken the sauce. Before serving, taste the sauce and adjust the seasoning if needed. Enjoy your flavorful slow cooker Salisbury steak meatballs! You can find the full recipe above. To shape meatballs, I recommend using clean hands. Take a scoop of the meat mixture and roll it gently into a ball. Aim for about 1.5 inches in size, like a golf ball. This size cooks evenly and stays juicy. If you find the mixture sticky, wet your hands slightly. This helps prevent sticking and makes it easier to shape. To keep your meatballs tender, don’t overmix the meat mixture. Just combine the ingredients until they hold together. Cooking on low heat in the slow cooker also helps. It allows the meatballs to cook slowly, keeping them moist. Adding sliced onions and mushrooms at the bottom creates a flavorful base. Lastly, don’t skip the broth; it adds moisture and enhances the taste. For a delightful meal, serve your Salisbury steak meatballs over creamy mashed potatoes or egg noodles. The thickened sauce from the slow cooker complements these sides wonderfully. You can also add steamed veggies on the side for a colorful plate. Garnish with fresh parsley for a pop of color and flavor. This creates a beautiful and tasty presentation that your family will love. For the full recipe, check out [Full Recipe]. {{image_2}} You can switch up the flavors in your Salisbury steak meatballs. Try adding different herbs like thyme or rosemary for extra taste. You can also add some heat with a pinch of red pepper flakes. For a richer flavor, mix in some sautéed garlic and shallots. If you like a bit of sweetness, add a splash of balsamic vinegar. These small changes can make your dish stand out. If you want a healthier version, consider using ground turkey or chicken instead of beef. You can also swap out breadcrumbs for oats or crushed whole-grain crackers. For a lower-sodium option, use low-sodium beef broth. Replace heavy cream with Greek yogurt for a creamy sauce that adds protein. These swaps keep the dish tasty while making it lighter. For a vegetarian or vegan twist, use plant-based meatballs made from lentils or mushrooms. You can also make your own by combining black beans, quinoa, and spices. Use vegetable broth instead of beef broth to keep it vegan. For creaminess, try coconut milk or silken tofu in the sauce. These options let everyone enjoy Salisbury steak meatballs, no matter their diet! For the full recipe, check out the details above and get cooking! To keep your leftover meatballs fresh, let them cool first. Place them in an airtight container. Store them in the fridge for up to 3 days. If you want to keep them longer, freezing is a great option. For meal prep, freeze the meatballs in a single layer on a baking sheet. Once frozen, transfer them to a freezer bag. Be sure to label the bag with the date. You can freeze them for up to 3 months. To reheat, simply place the meatballs in a pan over low heat. Add a splash of beef broth to keep them moist. Cover the pan and heat until warm. You can also use the microwave for quick reheating. Just cover with a damp paper towel and heat in 30-second intervals. Enjoy your delicious Slow Cooker Salisbury Steak Meatballs! Slow cooker Salisbury steak meatballs last about three to four days in the fridge. Make sure you store them in an airtight container. If you want to keep them longer, freeze them. Frozen meatballs can last for up to three months. Just thaw them in the fridge before reheating. Yes, you can make Salisbury steak meatballs without breadcrumbs. You can use oats, crushed crackers, or even ground nuts as a substitute. These options will help bind the meat together just like breadcrumbs do. If you want a gluten-free option, consider using ground almonds or gluten-free breadcrumbs. If you don't have beef broth, you can use chicken broth or vegetable broth. Both options will add flavor to your meatballs. For a richer taste, you can mix water with soy sauce or Worcestershire sauce. This will give your dish a nice umami flavor that is similar to beef broth. For the full recipe, check the detailed instructions. Enjoy your cooking! In this blog post, we covered how to make slow cooker Salisbury steak meatballs. We talked about the main and optional ingredients, and the tools you need. Then, I shared simple steps to prepare, cook, and assemble your meal. I also provided tips for shaping meatballs and cooking them just right. Finally, we explored variations, storage tips, and answers to common questions. With these insights, you can whip up a tasty dish that fits your needs. Enjoy your cooking!

Slow Cooker Salisbury Steak Meatballs Recipe Delight

Are you ready for a hearty and delicious meal that will please the whole family? My Slow Cooker Salisbury Steak

- 4 bone-in pork chops - Salt and pepper to taste - 1 teaspoon garlic powder - 1 teaspoon paprika - 2 tablespoons olive oil - 1 medium onion, sliced - 2 cloves garlic, minced - 1 cup chicken broth - 1 tablespoon Worcestershire sauce - 1 cup heavy cream - 1 tablespoon Dijon mustard - Fresh parsley, chopped (for garnish)

Smothered Pork Chops Flavorful and Easy Recipe

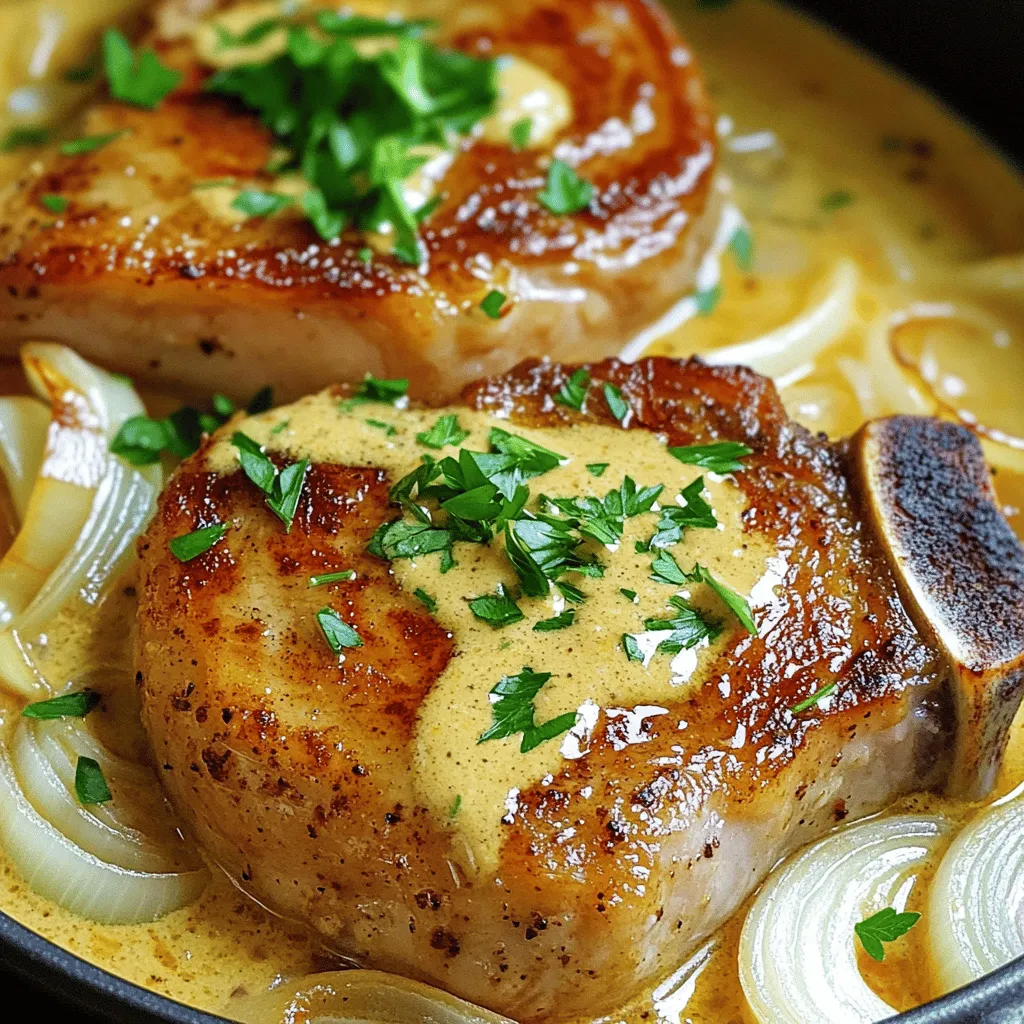
If you’re craving a warm, hearty meal that’s both tasty and easy, look no further! Smothered Pork Chops are the

- 4 boneless pork chops (about 1 inch thick) - 4 cloves garlic, minced - 1 tablespoon olive oil - 1 tablespoon unsalted butter - 1 teaspoon dried thyme - 1 teaspoon smoked paprika - 1 teaspoon lemon zest - ½ teaspoon red pepper flakes (adjust to taste) - Salt and pepper to taste - Fresh parsley, chopped (for garnish)

Savory Pork Chops with Garlic Sauce Recipe Guide

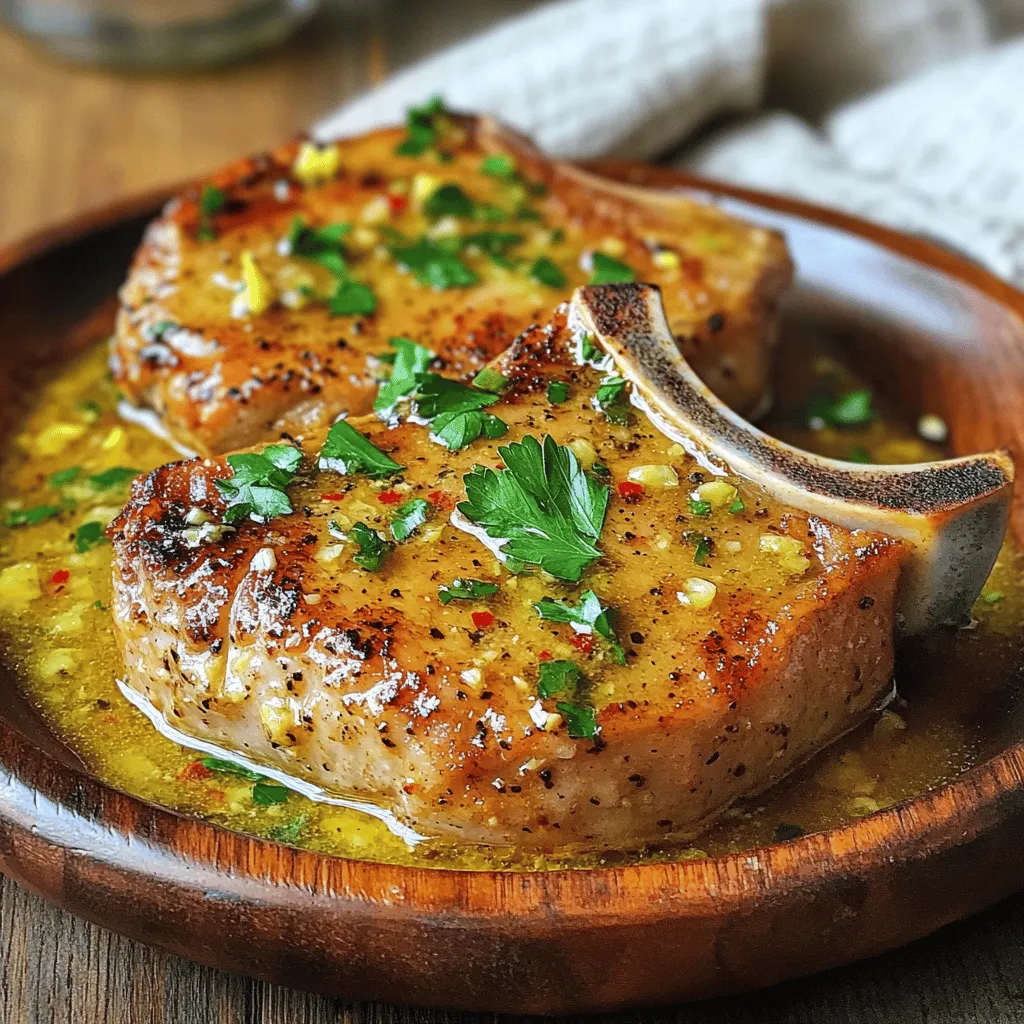
Are you ready to elevate dinner with a mouthwatering dish? In this guide, I’ll show you how to make savory

- 2 to 2.5 lbs beef tenderloin roast - 4 tablespoons unsalted butter, softened - 3 cloves garlic, minced - 2 tablespoons fresh rosemary, finely chopped - 2 tablespoons fresh thyme, finely chopped - 1 tablespoon fresh parsley, finely chopped - 1 teaspoon salt - 1 teaspoon black pepper - 1 tablespoon Dijon mustard - 2 tablespoons olive oil

Herb Butter Beef Tenderloin Roast Perfectly Done

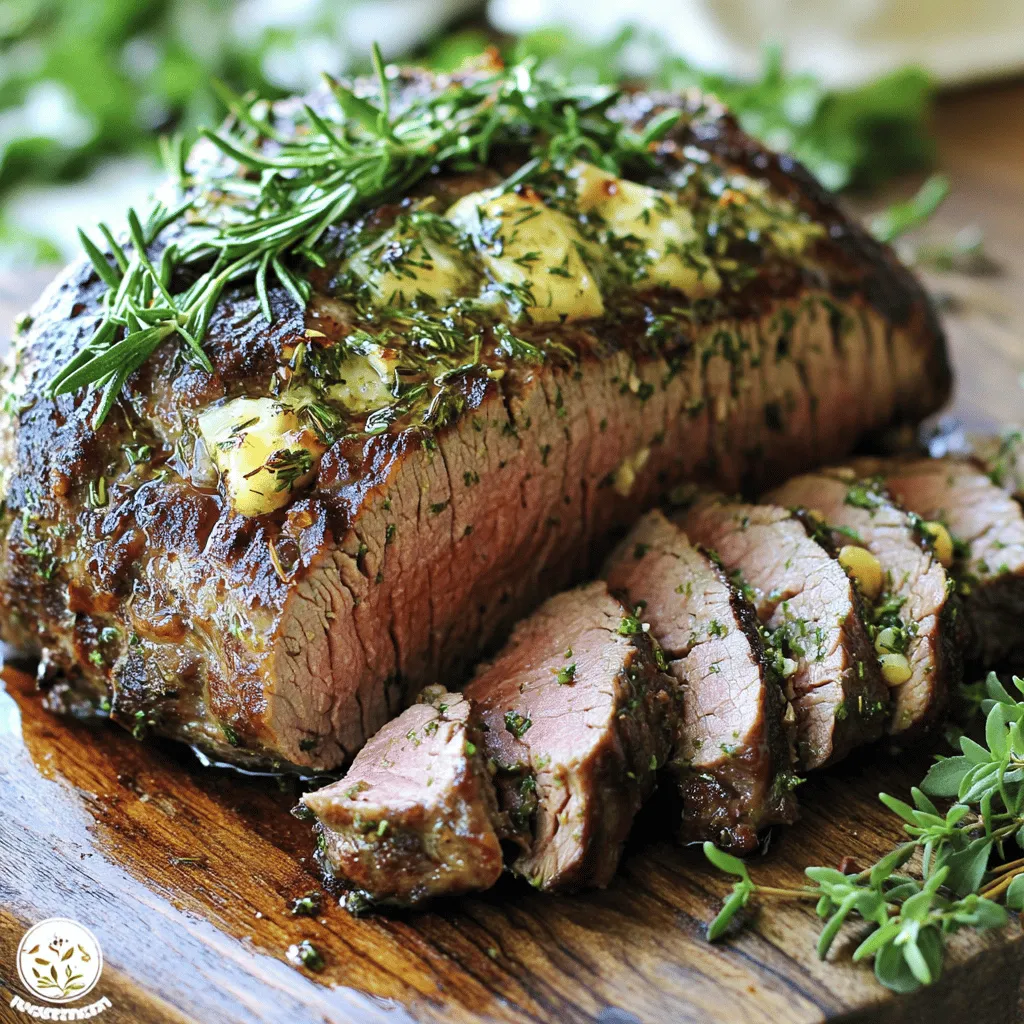
If you want to impress your family or friends, this Herb Butter Beef Tenderloin Roast is your answer. With juicy

Older posts
Newer posts
← Previous Page1 … Page22 Page23 Page24 Page25 Next →

dsad

© 2025 pureeatsnow • Built with GeneratePress

Our Policies

  • Copyright Policy
  • Cookie Policy
  • GDPR Policy
  • Privacy Policy
  • Disclaimer
  • Terms Of Use

More Information

  • Home
  • About
  • Contact
  • Appetizers
  • Dessert
  • Dinner
  • Drinks
©2025, pureeatsnow About Back To Top