Skip to content
DisclaimerTerms Of UseGDPR PolicyCookie Policy

pureeatsnow

  • Home
  • Drinks
  • Appetizers
  • Dinner
  • Dessert
  • About
  • Contact
  • Privacy Policy
DisclaimerTerms Of UseGDPR PolicyCookie Policy

Rachel

- 12 chocolate graham crackers - 1 cup heavy cream - 8 oz cream cheese, softened - 1 cup powdered sugar - 1 cup milk - 1 package (3.4 oz) instant chocolate pudding mix - 1 cup semi-sweet chocolate chips - 1 cup Cool Whip or whipped topping - Shaved chocolate or chocolate curls for garnish To make a great chocolate lasagna, gather these ingredients first. The chocolate graham crackers create a rich base. The heavy cream and cream cheese add a creamy layer. The powdered sugar sweetens the mix. The milk is essential for the chocolate pudding. Instant pudding makes it easy and quick. The chocolate chips and Cool Whip give a nice finish. Finally, shaved chocolate adds a touch of elegance. - Different flavored pudding mixes - Alternative toppings like berries or nuts - Coconut flakes for added texture You can customize your chocolate lasagna with these options. Flavored pudding mixes can surprise your taste buds. Berries or nuts add a fresh twist. Coconut flakes give a fun texture. Use these ideas to make the dessert unique! For the complete recipe, check the Full Recipe. To start, grab a large mixing bowl. Beat the softened cream cheese until it is smooth. This step is key to avoid lumps. After that, gradually add the powdered sugar. Mix everything until it blends well. Next, take a separate bowl to whip the heavy cream. Beat it until it forms stiff peaks. This gives the dessert a fluffy texture. Once done, gently fold the whipped cream into the cream cheese mixture. Be careful not to deflate the whipped cream. Now, it’s time to build your lasagna. First, lay four chocolate graham crackers at the bottom of a 9x13 inch dish. Spread half of the cream cheese mixture evenly over the crackers. Next, add another layer of four chocolate graham crackers. Pour half of the chocolate pudding over this layer, smoothing it out. Now, top with the remaining cream cheese mixture. Place the last layer of four chocolate graham crackers on top. Finally, pour the last of the chocolate pudding over this layer, creating an even surface. Spread the Cool Whip evenly across the final pudding layer. Sprinkle the semi-sweet chocolate chips on top for extra flavor. Cover the dish with plastic wrap. Chill the lasagna in the refrigerator for at least four hours. For the best results, let it sit overnight. Before you serve, garnish with shaved chocolate or chocolate curls. This makes it look fancy and delicious! For the complete guide, check the Full Recipe. To get a smooth cream cheese layer, you must soften the cream cheese first. Take it out of the fridge and let it sit for about 30 minutes. This makes it easy to mix. For whipped cream, beat the heavy cream until it forms stiff peaks. Use a chilled bowl for better results. Gently fold this whipped cream into the cream cheese mixture. This helps keep it light and fluffy. You can flavor the whipped topping by adding a splash of vanilla or a pinch of salt. This small change can boost the taste. For garnish, I recommend using semi-sweet chocolate chips or dark chocolate curls. These add a rich touch to your dessert. You can prep chocolate lasagna a day in advance. This gives the flavors time to blend. Once you assemble it, cover the dish tightly with plastic wrap. Store it in the fridge until you are ready to serve. For the best taste, eat it within four days. {{image_2}} You can easily switch the flavors in chocolate lasagna. One great option is peanut butter chocolate lasagna. Just add peanut butter to the cream cheese layer. Mix in half a cup of creamy peanut butter for a nutty twist. This adds a rich taste that pairs well with chocolate. Another tasty choice is mint chocolate lasagna. Use mint chocolate pudding instead of regular chocolate pudding. You can also add a few drops of mint extract to the cream cheese layer. This gives a refreshing kick that makes each bite exciting. Changing up the toppings can make your chocolate lasagna unique. You can use different chocolates for your garnish. Try dark chocolate shavings or white chocolate curls for a beautiful contrast. Each type adds its special flavor and look. You can also add fresh fruit or whipped topping alternatives. Berries like strawberries or raspberries add a fresh burst. They bring a nice color and balance the rich chocolate. You can use coconut whipped cream for a dairy-free option. Each of these garnishes adds a fun touch to your dessert. For the full recipe, check out the Chocolate Heaven Lasagna . - Store chocolate lasagna in the refrigerator. - Use an airtight container to keep it fresh. When you make this dessert, you want it to last. The fridge is the best spot. Place it in an airtight container. This helps keep the flavors rich and the texture nice. If you do not have a container, cover it tightly with plastic wrap. - To freeze, wrap it in plastic wrap. - Place it in a freezer-safe container for extra protection. - Thaw it in the fridge overnight before serving. For longer storage, you can freeze chocolate lasagna. Wrap it tightly in plastic wrap. Then, place it in a freezer-safe container. It will stay good for about two months. When you are ready to eat it, move it to the fridge to thaw. This keeps it creamy and tasty. Chocolate lasagna is a fun dessert. It has layers of creamy and sweet goodness. The main ingredients include: - 12 chocolate graham crackers - 1 cup heavy cream - 8 oz cream cheese, softened - 1 cup powdered sugar - 1 cup milk - 1 package (3.4 oz) instant chocolate pudding mix - 1 cup semi-sweet chocolate chips - 1 cup Cool Whip or whipped topping - Shaved chocolate or chocolate curls for garnish These ingredients create a rich and delightful treat. You mix the cream cheese with sugar and heavy cream. Then, you layer this mixture with pudding and crackers. Yes, you can switch the graham crackers. If you can’t find chocolate graham crackers, try regular ones. You can even use flavored ones, like honey or cinnamon. These changes will add a new twist to your dessert. Chocolate lasagna stays fresh in the fridge for about 3 to 5 days. Keep it covered with plastic wrap or in an airtight container. This helps keep it moist and tasty. After a few days, the texture may change, but it will still taste good. Yes, you can use low-fat ingredients. Try low-fat cream cheese and Cool Whip. You can also use skim milk instead of whole milk. However, using low-fat options may change the taste and texture. The dessert might be less creamy, but it will still be delicious! You can create a delicious chocolate lasagna with simple ingredients and easy steps. We covered the main and optional ingredients, the step-by-step instructions, and even some tips for the best texture and flavor. You can also explore variations and effective storage methods for this treat. Enjoy this dessert at your next gathering, and don't hesitate to try new flavors. Happy baking!

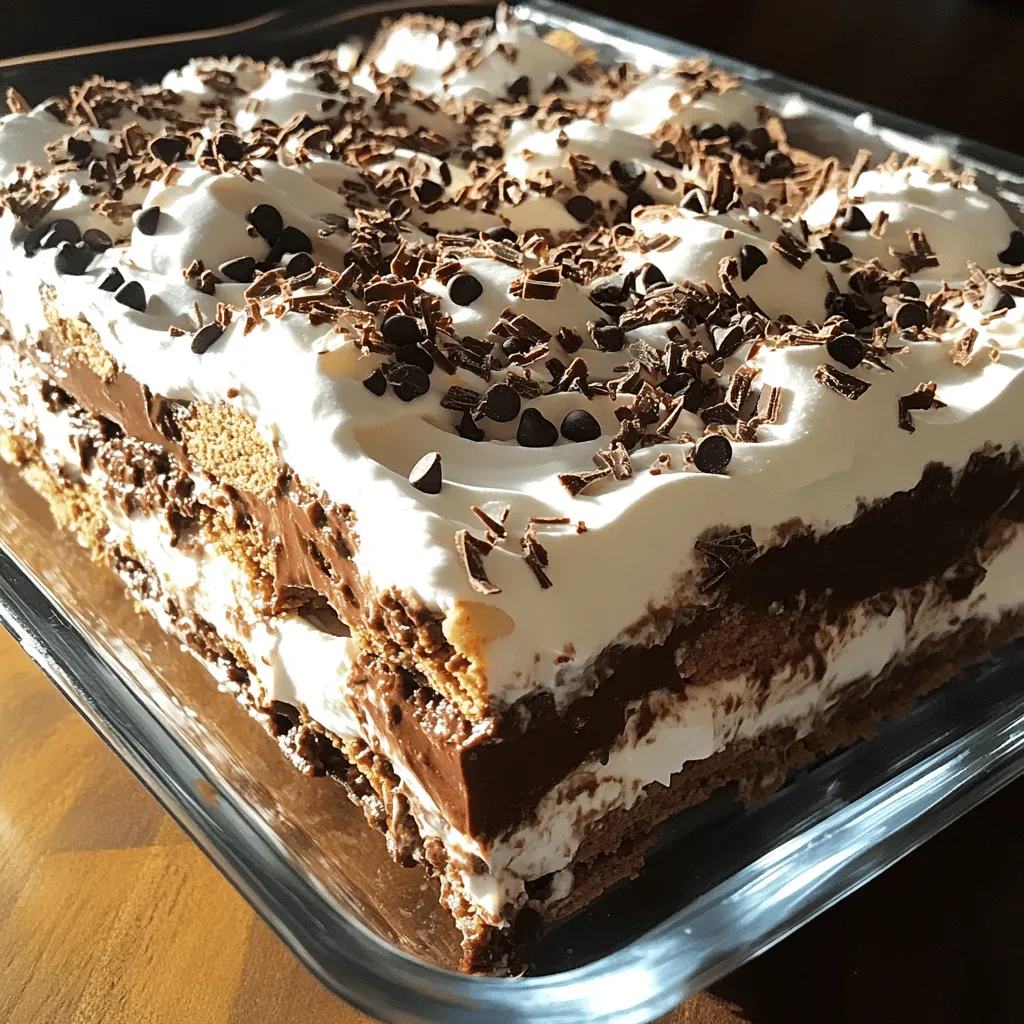
Chocolate Lasagna Delightfully Decadent Dessert Recipe

Are you ready to dive into a dessert that is both easy to make and utterly indulgent? Chocolate Lasagna is

To make soft and chewy snickerdoodle cookies, you need these key items: - 1 cup unsalted butter, softened - 1 ½ cups granulated sugar - 2 large eggs - 1 teaspoon vanilla extract - 3 cups all-purpose flour - 2 teaspoons cream of tartar - 1 teaspoon baking soda - ½ teaspoon salt These ingredients work together to create a rich and fluffy cookie. The cream of tartar gives the cookies their unique taste and chewy texture. For a sweet finish, you will need: - ½ cup granulated sugar (for rolling) - 2 teaspoons ground cinnamon (for rolling) This cinnamon-sugar mix adds a delightful layer of flavor and a charming look. It makes each bite a little extra special. You can adjust the recipe based on your needs. Here are some easy swaps: - Use coconut oil instead of butter for a dairy-free version. - Replace granulated sugar with brown sugar for a deeper flavor. - If you don’t have cream of tartar, use lemon juice or vinegar, but the taste may change slightly. These substitutions can help make the recipe fit your dietary choices while keeping the cookies delicious. For the full recipe, refer to the guidelines above. Start by getting your kitchen ready. Preheat your oven to 350°F (175°C). This step is key for even baking. Line two baking sheets with parchment paper. This helps your cookies not stick. Make sure all your ingredients are measured and within reach. This makes the process smooth and fun. In a large bowl, cream together the softened butter and 1 ½ cups of sugar. Mix until it becomes light and fluffy. This usually takes about 2-3 minutes. Next, add the eggs, one at a time. Mix well after each addition. Stir in the vanilla extract until everything combines nicely. This mixture adds a rich flavor to your cookies. In another bowl, whisk together the all-purpose flour, cream of tartar, baking soda, and salt. This step is important for the cookie's structure. Gradually add this dry mix to the wet mixture. Stir until just combined. Be careful not to overmix. Overmixing can make your cookies tough. Scoop out about 2 tablespoons of dough. Roll them into balls. Then, roll each ball in the cinnamon-sugar mixture until well coated. Place the dough balls on your prepared baking sheets. Leave about 2 inches of space between them. This space is key because the cookies will spread while baking. Bake in the preheated oven for 10-12 minutes. Look for the edges to set while the centers stay soft. They may look slightly underbaked, which is perfect for that chewy texture! Once baked, remove the cookies from the oven. Let them cool on the baking sheets for about 5 minutes. This helps them firm up. Then, transfer them to wire racks to cool completely. For best results, enjoy them warm! If you want to impress your guests, serve them stacked on a decorative plate. A light dusting of extra cinnamon sugar adds a nice touch. For a classic treat, pair your cookies with a glass of cold milk. You can find the full recipe for these delightful cookies [here](#). To get that soft and chewy texture, start with room temperature butter. Softened butter mixes better with sugar, trapping air for a light cookie. Don't overmix the dough. Mix until just combined for the best texture. When baking, take them out while they still look a bit underbaked. They will continue to cook on the tray and stay chewy. One common mistake is not measuring flour correctly. Use the spoon and level method. Scoop flour with a spoon into your measuring cup and level it off with a knife. Avoid packing the flour down, as this can make the cookies dry. Another mistake is rolling the dough balls too small. Make them about two tablespoons for that perfect size. Always use dry measuring cups for flour and sugar. Liquid cups are not accurate for dry ingredients. For sticky ingredients like butter, use a scale if you can. This ensures you use the right amount. If you don’t have a scale, remember that one cup of softened butter equals two sticks. Use the Full Recipe to get the measurements just right! {{image_2}} You can add a fun twist to snickerdoodles by mixing in nuts. Chopped pecans or walnuts work great. To make these, simply fold in one cup of your choice of nuts into the cookie dough. This gives your cookies a nice crunch and extra flavor. The nuts will toast slightly while baking, enhancing their taste. Why not mix two favorites? Adding chocolate chips to snickerdoodles creates a delicious hybrid cookie. Use half a cup of chocolate chips and fold them into the dough. The rich chocolate will balance well with the sweet cinnamon. This adds a special touch that chocolate lovers will adore. You can brighten up your snickerdoodles with citrus zest or flavored extracts. Try adding the zest of one orange or lemon to the dough. This adds a fresh twist to the classic recipe. Alternatively, you can swap out the vanilla extract for almond or coconut extract. Each option brings its own unique flavor and makes your cookies stand out. For the complete recipe, check the Full Recipe section. To keep your baked snickerdoodle cookies fresh, use an airtight container. Place parchment paper between layers of cookies. This helps them stay soft and prevents sticking. Store them at room temperature. They will last for about a week. If you want to keep them longer, consider freezing. Freezing your snickerdoodle cookies is easy and smart. First, let the cookies cool completely. Then, wrap each cookie in plastic wrap. Place the wrapped cookies in a freezer bag or airtight container. Label the bag with the date. The cookies will stay fresh for up to three months. When you crave a cookie, just take one out and let it thaw at room temperature. To reheat your cookies, preheat the oven to 350°F (175°C). Place the cookies on a baking sheet. Heat them for about 5 minutes. This warms them up and restores their soft texture. For a quick fix, you can use a microwave. Just heat one cookie for about 10-15 seconds. Be careful, as they can get too hot! Enjoy your soft and chewy snickerdoodle cookies anytime. For the full recipe, check above. The key to a chewy snickerdoodle cookie is the right balance of ingredients. Using more butter and less flour helps create that soft texture. Cream of tartar also plays a role. It gives the cookies their signature tang and keeps them soft. When you take the cookies out of the oven, they should look slightly underbaked. This ensures a chewy center. Yes, you can use brown sugar in snickerdoodle cookies. Brown sugar adds moisture, which makes cookies soft. It also gives a slight caramel flavor that pairs well with cinnamon. If you want a mix of textures, try half brown sugar and half granulated sugar. Homemade snickerdoodle cookies can last about one week when stored properly. Keep them in an airtight container at room temperature. If you want them to last longer, you can freeze them. They will stay fresh in the freezer for up to three months. Cream of tartar is essential for classic snickerdoodle cookies. It activates the baking soda and helps achieve that soft texture. Without it, the cookies may not rise well and could end up flat. If you're in a pinch, you can substitute with baking powder, but the flavor will change. To make snickerdoodle cookies soft, follow a few simple tips. First, use room temperature butter for better mixing. Second, don’t overmix your dough; mix just until combined. Third, bake them until the edges are set but the centers are still soft. Finally, let them cool on the baking sheet for a bit before transferring them. These steps help ensure a soft and chewy cookie every time. For the full recipe, check out the section above. Soft and chewy snickerdoodles are a treat anyone can enjoy. We covered key ingredients, step-by-step baking, and helpful tips. Don’t forget about fun twists like nutty or chocolate chip versions. With proper storage, you can keep cookies fresh and delicious. Always remember that small changes can make a big difference in texture and taste. Enjoy baking and share your tasty results!

Soft and Chewy Snickerdoodle Cookies Perfectly Delicious

Are you ready to bake the ultimate treat? Soft and chewy snickerdoodle cookies are a crowd-pleaser! With a hint of

To make a tasty Street Corn Chicken Rice Bowl, you will need: - 1 cup jasmine rice - 2 cups chicken broth - 2 chicken breasts, grilled and sliced - 1 cup corn (fresh, frozen, or canned) - 1 red bell pepper, diced - 1 avocado, diced - 1 cup cherry tomatoes, halved - 1/2 cup crumbled cotija cheese - 1/4 cup fresh cilantro, chopped - 1 tablespoon lime juice - 1 teaspoon chili powder - 1 teaspoon smoked paprika - Salt and pepper to taste - Olive oil for grilling You can swap ingredients if you want to change things up. For the rice, you could use brown rice for more fiber. Quinoa is a great gluten-free option too. If you can’t find cotija cheese, feta works well. You can use lime juice or lemon juice, depending on what you have. For the corn, fresh corn is best, but canned corn is just fine. Using fresh ingredients makes a big difference. Fresh corn brings sweetness and crunch. Ripe avocado adds creaminess. The red bell pepper gives color and a sweet taste. Fresh cilantro adds a pop of flavor and a nice smell. When you use fresh produce, your Street Corn Chicken Rice Bowl will taste amazing. You want your meal to be fun and full of flavor, so go for the freshest options you can find! For the full recipe, check out the section below. To make perfect jasmine rice, start by rinsing 1 cup of rice under cold water. This removes excess starch and helps keep the rice fluffy. In a medium saucepan, combine the rinsed rice and 2 cups of chicken broth. Bring this mixture to a boil over medium heat. Once it boils, reduce the heat to low. Cover the pot and let it simmer for 15 minutes. After cooking, remove the pot from heat but keep it covered for another 5 minutes. Fluff the rice with a fork and set it aside. For juicy chicken breasts, start with 2 chicken breasts. Brush them with olive oil and season with salt, pepper, chili powder, and smoked paprika. This adds great flavor. Preheat your grill to medium-high heat. Place the breasts on the grill and cook for about 6-7 minutes on each side. You want them cooked through and no longer pink inside. Use a meat thermometer to ensure they reach 165°F. Once done, remove them from the grill and let them rest for a few minutes before slicing them into strips. Now let’s make the corn topping. Heat a skillet over medium heat and add a drizzle of olive oil. Add 1 cup of corn and 1 diced red bell pepper to the pan. Sauté this mixture for about 5-6 minutes until the corn is tender and slightly charred. Season with salt and pepper to taste. To put your bowl together, start with a generous layer of the cooked rice at the bottom. Then, add the sliced grilled chicken on top. Next, add the sautéed corn and bell pepper mixture. You can also add 1 diced avocado, 1 cup of halved cherry tomatoes, and 1/2 cup of crumbled cotija cheese for extra flavor. Finish your bowl by drizzling lime juice over the top and garnishing with 1/4 cup of chopped cilantro. Enjoy your Street Corn Chicken Rice Bowl while it's warm! To make your chicken burst with flavor, start with good seasoning. Use olive oil, salt, and pepper. Add chili powder and smoked paprika for a smoky kick. Let the chicken marinate for at least 15 minutes. This step helps the spices soak in. When grilling, make sure the grill is hot. This keeps the chicken juicy and gets nice grill marks. Grill each side for 6-7 minutes. Always check that the chicken is fully cooked. It should reach an internal temp of 165°F. Cooking rice well is key for a great bowl. Use jasmine rice for a fragrant touch. Rinse the rice before cooking to remove extra starch. This helps it stay fluffy. Combine the rice with chicken broth instead of water. This adds flavor and richness. Bring it to a boil, then cover and lower the heat. Cook for 15 minutes. After it's done, fluff the rice with a fork. This keeps it light and airy. A beautiful bowl makes the meal more fun. Start with a base of rice in the bowl. Layer the grilled chicken on top. Next, add your sautéed corn and bell pepper mix. This adds color and texture. Then, sprinkle diced avocado and halved cherry tomatoes for freshness. Finish with crumbled cotija cheese and chopped cilantro. A lime drizzle on top adds a zesty touch. Arrange ingredients so each color shines. Serve warm for the best experience. For the full recipe, check the details above! {{image_2}} You can easily make this dish vegetarian. Swap the chicken for grilled portobello mushrooms or marinated tempeh. Both options add a rich, earthy flavor. Use the same spices for a tasty kick. Grilled zucchini also works well, adding a nice texture. If you want a different protein, shrimp is a great choice. Cook it quickly on the grill for a light and tasty option. Tofu is another excellent swap. Press the tofu to remove water, then marinate it in lime juice and spices. Grill or sauté it until golden. Get creative with your toppings! Add black beans for protein and fiber. Pickled red onions give a nice zing. You can also sprinkle some crushed tortilla chips for crunch. Fresh herbs like basil or mint can add an unexpected twist. Try different cheeses too, like feta or Monterey Jack, for varied flavors. You can find the Full Recipe to explore more options. Enjoy customizing your Street Corn Chicken Rice Bowl! After making your Street Corn Chicken Rice Bowl, store leftovers in airtight containers. This keeps the food fresh and tasty. Make sure to separate the rice, chicken, and toppings. This way, flavors stay bright. Use the leftovers within three days for the best taste. To reheat, use the microwave or a skillet. If you use the microwave, heat in short bursts. Stir between each burst to ensure even heating. For a skillet, add a splash of chicken broth to keep moisture. This helps the rice and chicken stay soft and flavorful. You can freeze the rice and chicken for later use. Store them in freezer-safe bags or containers. Make sure to remove as much air as possible. When you're ready to eat, thaw the rice and chicken in the fridge overnight. Reheat them fully before serving. This keeps the taste fresh and delicious. For a complete guide, check the Full Recipe. You can pair your bowl with a fresh salad. A simple green salad adds crunch. Chips and salsa also work well for extra flavor. If you want a drink, try a cold limeade or iced tea. These will balance the meal's richness and make it fun. To add heat, sprinkle some cayenne pepper or red pepper flakes. You can also mix in a spicy sauce, like hot sauce or sriracha. If you like fresh flavors, consider adding diced jalapeños or a spicy salsa. Adjust the spice to fit your taste. Yes, you can make parts of the bowl ahead. Cook the rice and chicken in advance. Store them in airtight containers in the fridge. The corn topping can also be prepped and stored. Assemble the bowls right before serving for the best taste. For the full recipe, check out the details above. To make the Street Corn Chicken Rice Bowl, start with jasmine rice. Cook it in chicken broth for flavor. Grill two chicken breasts and slice them. Sauté corn and red bell pepper until tender. Assemble your bowl with rice, chicken, corn mixture, and fresh toppings. Drizzle with lime juice and top with cilantro. This dish blends textures and flavors, making it a fun meal. This Street Corn Chicken Rice Bowl packs a punch. Each serving has about: - Calories: 540 - Protein: 32g - Carbohydrates: 56g - Fat: 20g - Fiber: 7g The chicken and corn offer great protein and fiber. The veggies add vitamins and minerals. Enjoy this dish, knowing it’s balanced and nutritious. Pair this bowl with refreshing drinks. Here are some ideas: - Lemonade: Its sweetness balances the spices. - Iced Tea: A light herbal tea complements the meal. - Sparkling Water: Add lime for a zesty touch. These drinks enhance the flavors and keep you refreshed. Enjoy your tasty meal with a perfect drink! This blog post covered all you need for a delicious Street Corn Chicken Rice Bowl. We listed all the ingredients and gave you good swaps if needed. Fresh produce enhances the flavors. I shared step-by-step cooking tips for rice and chicken, plus how to make a tasty corn topping. For variation, I discussed vegetarian options and other proteins. Storing and reheating leftovers helps you enjoy the dish again. In my final thoughts, this bowl is fun to make and customize. Enjoy your cooking adventure!

Street Corn Chicken Rice Bowl Flavorful and Fun Meal

Are you ready to spice up your dinner routine? The Street Corn Chicken Rice Bowl is a tasty and fun

To make egg roll soup, you need the following ingredients: - 1 tablespoon vegetable oil - 1/2 pound ground pork (or chicken) - 1 cup shredded carrots - 1 cup chopped green cabbage - 3 green onions, sliced - 2 cloves garlic, minced - 1 tablespoon ginger, minced - 4 cups chicken broth - 2 tablespoons soy sauce (low sodium) - 1 tablespoon sesame oil - 1 teaspoon rice vinegar - 1/4 teaspoon crushed red pepper flakes (optional) - Salt and pepper to taste - Hard-boiled eggs, sliced (for garnish) - Sesame seeds (for garnish) You can swap some ingredients if needed. Use ground turkey or beef instead of pork. If you want a vegetarian version, try using firm tofu. For a gluten-free option, use tamari instead of soy sauce. You can also replace chicken broth with vegetable broth for a lighter taste. Always choose the freshest veggies. Look for bright colors and firm textures. For cabbage, avoid any that feel wilted or soft. When picking green onions, choose ones with bright green tops. Fresh garlic should be firm and dry. Check meat for a bright color and no off smell. Your soup will taste better with fresh ingredients! Before you start cooking, gather all your ingredients. This makes the process easy. Here’s what you need: - 1 tablespoon vegetable oil - 1/2 pound ground pork (or chicken) - 1 cup shredded carrots - 1 cup chopped green cabbage - 3 green onions, sliced - 2 cloves garlic, minced - 1 tablespoon ginger, minced - 4 cups chicken broth - 2 tablespoons soy sauce (low sodium) - 1 tablespoon sesame oil - 1 teaspoon rice vinegar - 1/4 teaspoon crushed red pepper flakes (optional) - Salt and pepper to taste - Hard-boiled eggs, sliced (for garnish) - Sesame seeds (for garnish) Chop the veggies and mince the garlic and ginger. This saves time later. Make sure to measure everything. It helps the soup taste just right. Now, let’s cook! Start by heating the vegetable oil in a large pot over medium-high heat. Add the ground pork (or chicken) and break it up into small pieces. Cook it for about 4-5 minutes until it’s browned. Next, add the minced garlic and ginger. Stir for about one minute. You want the kitchen to smell great. Then, toss in the shredded carrots, chopped cabbage, and sliced green onions. Cook for another 3-4 minutes until the veggies start to soften. Pour in the chicken broth, soy sauce, sesame oil, rice vinegar, and crushed red pepper flakes (if you like spice). Stir well and bring the mixture to a gentle boil. After this, reduce the heat. Let it simmer for about 10-15 minutes. This allows all the flavors to meld together. Taste your soup. Add salt and pepper as needed. You want it to be full of flavor. To serve, ladle the soup into bowls. Top each bowl with slices of hard-boiled egg and a sprinkle of sesame seeds. This adds a nice touch. Enjoy your warm, tasty bowl of Egg Roll Soup! You can find the Full Recipe for more details. To boost flavor, use fresh garlic and ginger. They add a nice zing. Low-sodium soy sauce keeps it savory without too much salt. Adding sesame oil gives a nutty taste. If you like spice, crushed red pepper flakes add a kick. Always taste your soup before serving. Adjust with salt and pepper for the best flavor. A common mistake is overcooking the vegetables. You want them tender, not mushy. Another error is not browning the meat well. This step adds rich flavor to the broth. Avoid adding too much broth at once. Start with four cups, then adjust. Don’t forget to taste! It helps catch any missing seasoning. Textures are key to a great soup. Use crunchy toppings like sliced green onions and sesame seeds. They add a nice bite. Hard-boiled eggs on top also bring creaminess. If you like more crunch, try adding fried wonton strips. They make your soup fun to eat. For a thicker broth, cook it down a bit longer. For the full recipe, check out the details above! {{image_2}} You can easily make egg roll soup vegetarian or vegan. Swap the ground pork or chicken for tofu or tempeh. Use vegetable broth instead of chicken broth. Add more veggies like bell peppers or mushrooms for texture and flavor. You can also add edamame for protein. This way, you keep the dish hearty and satisfying. If you love heat, spice up your soup! Add more crushed red pepper flakes or a splash of hot sauce. You can also include sliced jalapeños for an extra kick. Just remember to taste as you go. This helps you find your perfect heat level. Want to make this dish a bit healthier? Use lean ground turkey instead of pork. You can also swap out the sesame oil for a lighter oil, like olive oil. If you want to cut down on sodium, use low-sodium soy sauce and broth. For a low-carb option, try zucchini noodles instead of traditional noodles. These swaps keep the soup tasty while making it healthier. For the full recipe, click here. After enjoying your Egg Roll Soup, you may have some left. Store leftovers in an airtight container. This keeps the soup fresh for up to three days in the fridge. Make sure to let the soup cool down first. This helps avoid excess moisture in the container. If you have hard-boiled eggs in the soup, store them separately to keep them fresh. To reheat your soup, place it in a pot over medium heat. Stir often to make sure it heats evenly. If the soup seems thicker, add a splash of chicken broth or water. This keeps the soup from getting too salty. You can also use a microwave. Heat in short bursts, stirring in between. This method helps avoid hot spots and keeps the flavor intact. You can freeze Egg Roll Soup for later meals. Use a freezer-safe container and leave some space at the top. This allows for expansion when freezing. The soup can last for about three months in the freezer. When you’re ready to eat it, thaw it overnight in the fridge. Reheat gently on the stove for the best taste. If you freeze with eggs, add fresh ones when you reheat for the best texture. Egg Roll Soup is a warm, tasty dish inspired by classic egg rolls. It has all the great flavors of an egg roll in a comforting broth. You’ll find ground meat, veggies, and spices cooked in chicken broth. Each bite is rich and satisfying, perfect for cold nights. Yes, you can make Egg Roll Soup ahead of time. This soup keeps well in the fridge for up to three days. Just let it cool and store it in an airtight container. When you are ready to eat, reheat it on the stove. You can enjoy Egg Roll Soup with many sides. Here are some ideas: - Steamed rice - Crispy wontons - A fresh salad - Spring rolls These sides complement the soup and add extra flavor. To make Egg Roll Soup gluten-free, swap soy sauce for a gluten-free version. You can find many brands that offer this option. Also, check that your chicken broth is gluten-free. By making these small changes, you can enjoy the soup without worry. You can find the Full Recipe for homemade Egg Roll Soup above. This recipe guides you step-by-step to create this delicious dish in under 30 minutes. Enjoy your cooking! Egg roll soup is simple and fun to make. We covered every detail, from fresh ingredients to cooking tips. You learned how to enhance flavors and avoid common mistakes. Variations like vegan and spicy options offer something for everyone. Proper storage keeps leftovers tasty, and I shared answers to your FAQs. Now you have the tools for a delicious egg roll soup. Enjoy creating your own unique bowl!

Egg Roll Soup Flavorful and Easy Weeknight Dinner

If you’re looking for a quick, tasty dinner, Egg Roll Soup is your answer! This warm bowl combines all the

- 4 large russet potatoes - 1/4 cup olive oil - Seasonings: garlic powder, onion powder, smoked paprika, dried oregano, dried thyme, cayenne pepper - Salt and pepper to taste - Fresh parsley for garnish - Optional: 1/4 cup grated Parmesan cheese When you start with the right ingredients, you set yourself up for success. I love using russet potatoes because they are starchy and become so crispy. The olive oil adds great flavor and helps the wedges brown nicely. The seasonings bring out the taste. Garlic and onion powders make the wedges flavorful. Smoked paprika gives them a nice smoky touch, while herbs like oregano and thyme add freshness. - Alternatives for russet potatoes: You can use Yukon Gold or sweet potatoes. - Oil options: Try avocado oil or vegetable oil if you prefer. - Different herbs and spices for variation: Experiment with rosemary, basil, or chili powder for new flavors. Feel free to mix and match these ingredients based on what you have at home. Cooking should be fun and flexible! For the full recipe, you can find it detailed in the main article. First, I wash and scrub the potatoes well. Use cold water to remove dirt and grime. I like to use a brush to get them really clean. Keeping the skin on adds flavor and texture. Next, cut the potatoes into wedges. Aim for pieces that are about 1 inch wide. This size cooks evenly and gives that nice crispy edge. In a large bowl, I mix the olive oil with seasonings. I add garlic powder, onion powder, smoked paprika, dried oregano, and dried thyme. If you want some heat, toss in cayenne pepper. Add salt and pepper to taste. Stir it well until everything is combined. This mixture helps give each wedge the best flavor. When baking, spread the wedges in a single layer on the sheet. This step is key for crispiness. If they are too close together, they will steam instead of crisp up. I flip the wedges halfway through baking. This way, both sides get golden and crunchy. Bake until they are a nice brown color, about 30 to 35 minutes. Enjoy your crispy potato wedges! Check out the [Full Recipe] for more details. To get crispy potato wedges, oven settings matter. I recommend preheating your oven to 425°F (220°C). This high heat helps the edges brown and crisp up nicely. Use a light, non-stick baking sheet. A heavy-duty sheet can trap moisture. Parchment paper can also help keep them from sticking. Make sure to spread the wedges out in a single layer. Overcrowding leads to steaming, not crisping. For a flavor boost, try adding extra herbs. Fresh rosemary or dill can add a nice touch. You can also mix in a teaspoon of Italian seasoning for a different twist. Want some heat? Add more cayenne pepper or try crushed red pepper flakes. A squeeze of lemon or lime juice can give a zesty kick too. Just be careful not to overdo it. Presentation is key for a snack like this. Serve your crispy potato wedges hot. Pair them with a tasty dipping sauce such as ranch, garlic aioli, or even a spicy ketchup. For a rustic touch, use a wooden platter or a cute metal basket. You can sprinkle fresh parsley on top for color. Make it look nice, and everyone will dig in! {{image_2}} You can switch up your crispy potato wedges in fun ways. For a spicy kick, add jalapeños. Slice fresh jalapeños and mix them in with your oil blend. They will bring heat and flavor. If you love herbs, try using fresh rosemary or thyme. Chop them finely and toss them with the wedges. Fresh herbs will add a bright taste that enhances the potatoes. These potato wedges fit many diets. They are naturally vegan and gluten-free. You can enjoy them without worry if you follow these diets. For a healthier option, you can bake instead of frying. Baking uses less oil and still gives a great crunch. You can also try air-frying for a quick method that keeps them crispy. Feel free to explore the Full Recipe, as it offers a great base to start from! To keep your crispy potato wedges fresh, choose the right container. Use an airtight container. This helps prevent moisture from making them soggy. You can also use a resealable plastic bag. Remove as much air as possible before sealing for best results. Store your wedges in the fridge. They will stay good for up to three days. When it comes to reheating, the oven is your best friend. It helps keep the wedge's crispiness intact. Preheat your oven to 400°F (200°C). Spread the wedges on a baking sheet. Bake them for about 10-15 minutes. Flip them halfway through to ensure even heating. The microwave is faster but can make the wedges soft. If you use the microwave, place the wedges on a plate. Heat them for 1-2 minutes, but know they won’t be as crispy. To refresh that crispy texture when reheating, consider using a toaster oven. It works well too! Enjoy your tasty snack again! To get crispy potato wedges, avoid common mistakes. Make sure to cut the wedges evenly. Thick wedges take longer to cook and may stay soft. Rinse the cut potatoes in cold water to remove excess starch. This helps with crispiness. Also, do not skip the oil. The oil helps the wedges brown and crisp up. Spread the wedges out on the baking sheet. If they touch each other, they will steam instead of crisp. Bake them at a high temperature, around 425°F (220°C). Flip them halfway through baking for an even crunch. Yes, you can pre-cut potatoes for your wedges. Store them in cold water to keep them fresh. This prevents browning. Change the water every few hours if you prep them early. You can also cover the bowl with plastic wrap. Keep them in the fridge until you are ready to cook. This method keeps them crisp and fresh for cooking later. Crispy potato wedges taste great with many dipping sauces. Here are some popular options: - Ranch dressing - Garlic aioli - Ketchup - Spicy mayo - BBQ sauce You can easily make ranch by mixing sour cream, mayo, and herbs. For garlic aioli, blend mayo with minced garlic and lemon juice. These sauces add flavor and fun to your snack! In this post, we covered how to make crispy potato wedges from scratch. You learned about key ingredients and their possible substitutes. I also shared tips for perfecting your wedges, including baking techniques for the ultimate crispiness. Remember, you can get creative with flavors and presentation. Whether you go spicy or classic, these wedges are sure to impress. Store any leftovers correctly and enjoy the same great taste when you reheat. Happy cooking!

Crispy Potato Wedges Simple and Flavorful Snack

Are you craving a tasty snack that’s easy to make? Crispy potato wedges are the perfect choice! They are simple

- 1 large French baguette - 1 cup pitted kalamata olives, chopped - 1 cup green olives, chopped - 2 cups shredded mozzarella cheese - 1 cup cream cheese, softened - 1 tablespoon garlic powder - 1 teaspoon onion powder - 2 tablespoons fresh parsley, finely chopped - 2 tablespoons fresh basil, finely chopped The first step to making this olive cheese bread is gathering your ingredients. You need a large French baguette. This bread gives a nice, crisp base. Next, chop up one cup each of kalamata and green olives. These olives bring great flavor. Now, let’s talk about the cheese. You will need two cups of shredded mozzarella and one cup of cream cheese. The mozzarella melts beautifully, while the cream cheese adds creaminess. You also need some spices: one tablespoon of garlic powder and one teaspoon of onion powder. These add a lovely depth to your dish. Finally, fresh herbs give this recipe a pop of color and taste. You will need two tablespoons of finely chopped parsley and two tablespoons of finely chopped basil. These herbs brighten up the dish and make it look nice. This recipe is simple and fun. You can find the full recipe in the article. Enjoy making your olive cheese bread! - Preheat the oven to 375°F (190°C). - Slice the French baguette in half lengthwise and place on a baking sheet. - Combine olives, herbs, cheeses, and spices in a large bowl. - Mix until fully combined for even flavor distribution. - Spread mixture onto the cut sides of the baguette. - Drizzle with olive oil and bake for 15-20 minutes. Making Olive Cheese Bread is simple and fun. First, you prepare the oven and bread. Preheating ensures your bread bakes evenly. When you slice the baguette, cut it in half; this helps it hold the filling well. Next, the filling is the star. Mixing olives and cheese creates a delicious blend. I love using kalamata and green olives for great flavor. Fresh herbs, like parsley and basil, add brightness. This step is key for a tasty bite. You want all the ingredients to blend well. Finally, the baking transforms your mix into a melty delight. Spread the filling generously. This way, every bite is full of flavor. The drizzle of olive oil adds richness. After 15-20 minutes in the oven, your Olive Cheese Bread will be golden and bubbling. Enjoy the smell that fills your kitchen! For the full recipe, refer to the earlier section. - Serve on a rustic wooden board or decorative platter. - Garnish with extra fresh herbs for visual appeal. I love to present this dish in a fun way. Using a wooden board makes it feel special. Place the bread slices neatly, and sprinkle fresh herbs on top. It adds a pop of color and makes your appetizer stand out. - Add red pepper flakes for heat. - Consider different cheese varieties for bold flavor changes. If you enjoy a little spice, sprinkle some red pepper flakes into the mixture. It adds a nice kick. You might also try different cheeses. Gouda or cheddar can change the flavor profile and make it richer. - Overstuffing the bread can lead to a messy bake. - Not preheating the oven can result in uneven cooking. Be careful not to overstuff the bread. Too much filling can cause it to spill out when baking. Also, always preheat your oven. This step is crucial for even cooking. It ensures the cheese melts perfectly and the bread gets that nice golden color. {{image_2}} You can switch up the cheese for fun. Substitute mozzarella with gouda or cheddar for a richer taste. Gouda adds a creamy, nutty flavor, while cheddar gives a sharp bite. If you want something tangy, add feta cheese. Feta brings a nice contrast to the olives. The type of olives you use can change the entire dish. For a milder taste, stick with green olives only. They add a subtle, fruity flavor. If you want more depth, try a mix of olives. Kalamata and green together create a nice balance and variety. Herbs add freshness to your Olive Cheese Bread. Try using oregano or thyme for different herbal notes. Both herbs give a warm and earthy flavor. You can also add fresh chives for a unique twist. Chives add a mild onion flavor that brightens the dish. After enjoying your Olive Cheese Bread, store any leftovers in an airtight container in the fridge. This keeps the bread fresh for up to 3 days. When you're ready to enjoy it again, reheat in the oven. This method brings back the nice, crispy texture. You can freeze baked slices of Olive Cheese Bread for up to 2 months. Just wrap them well in plastic wrap or foil. To reheat, bake from frozen at 375°F until heated through. This way, you can enjoy a tasty treat anytime. To keep your Olive Cheese Bread fresh, try to consume it within a few days of baking. It’s best to allow the bread to cool completely before storing. This prevents sogginess and keeps the texture nice and crisp. Yes, prepare ahead and bake just before serving. This lets the flavors meld and saves you time. Use a gluten-free baguette substitute. This way, everyone can enjoy this tasty treat. Yes, jarred olives work just as well; drain them well before use. Fresh or jarred, both add great flavor. Pair it with a light salad or charcuterie board for a complete meal. This adds variety and balance to your table. Yes, you can grill it on medium heat wrapped in foil for added smokiness. Grilling gives it a nice char and fun twist. This recipe showcases how to make delicious Olive Cheese Bread. You learned the key ingredients, simple steps, and tips for amazing flavor. Remember to mix your cheeses, olives, and herbs well for the best taste. Avoid overstuffing the bread and preheat your oven for even baking. With easy variations and storage tips, you can enjoy this dish fresh or reheated. Try it with different cheeses or spices to find your favorite. Enjoy creating and sharing this tasty treat with friends and family.

Olive Cheese Bread Appetizer Tempting and Easy Recipe

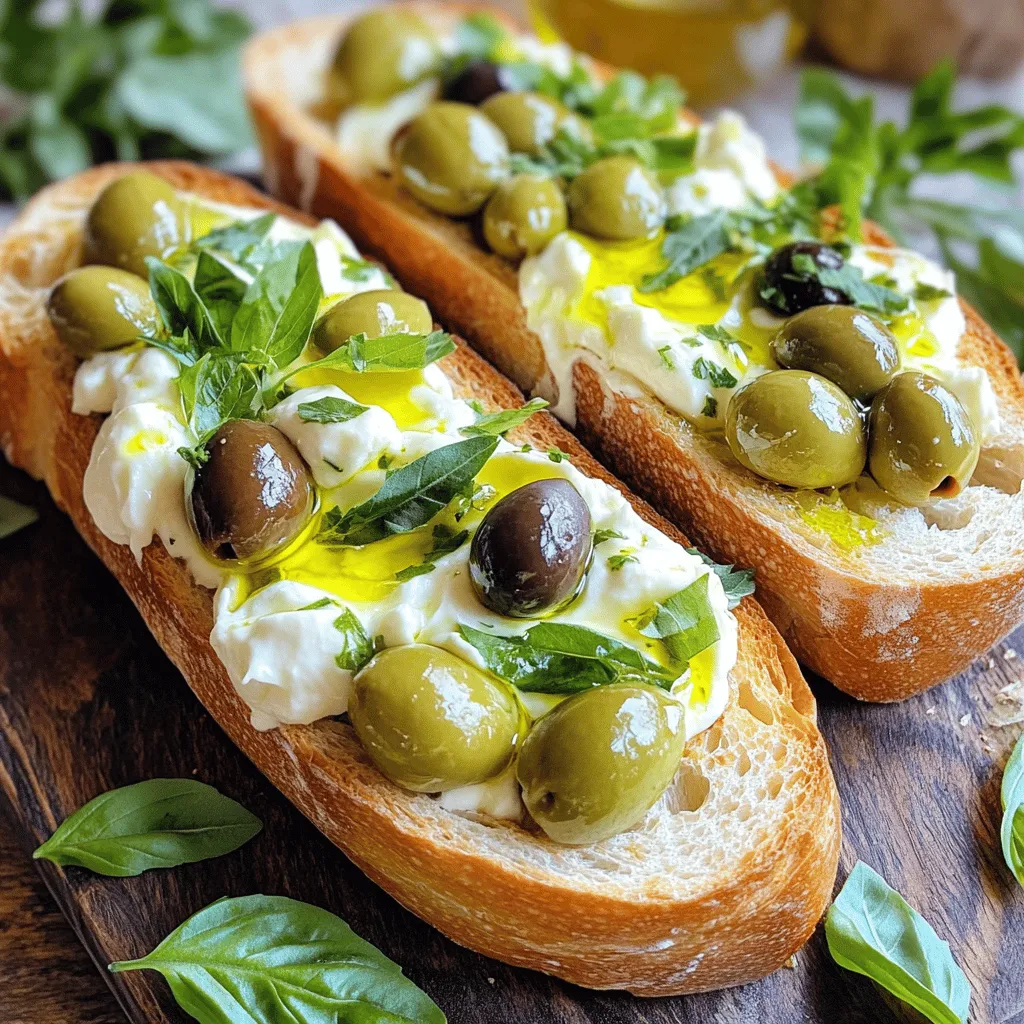
Looking for a quick and tasty appetizer? This Olive Cheese Bread recipe combines rich flavors and easy steps. With just

To make a rich and creamy soup, you will need the following ingredients: - 6 medium russet potatoes, peeled and diced - 1 medium onion, chopped - 3 cloves garlic, minced - 4 cups vegetable broth - 2 cups shredded sharp cheddar cheese - 1 cup heavy cream or coconut cream - 1 teaspoon dried thyme - 1 teaspoon smoked paprika - Salt and pepper to taste - Optional toppings: green onions, bacon bits These simple items create a comforting dish that warms the soul. The russet potatoes serve as the base, offering a smooth texture when cooked. The onion and garlic add a burst of flavor, while the vegetable broth keeps everything moist and savory. The sharp cheddar cheese brings the cheesy goodness that we all crave. You can choose heavy cream for a richer taste or coconut cream for a tasty dairy-free option. Feel free to play with your toppings! Green onions give a fresh crunch, and bacon bits add a savory touch. You can find the Full Recipe for more details on how to bring this soup to life. Enjoy each spoonful of this creamy comfort dish! Start by dicing six medium russet potatoes. Make sure they are about equal in size. This helps them cook evenly. Next, chop one medium onion and mince three cloves of garlic. The onion adds sweetness, and the garlic boosts flavor. Layer the diced potatoes, chopped onion, and minced garlic in your slow cooker. This forms the base of your soup. Now, pour four cups of vegetable broth over the vegetables. This broth gives your soup great flavor. Add one teaspoon of dried thyme and one teaspoon of smoked paprika. These spices add depth to your dish. Season with salt and pepper to taste, then stir everything well. Cover your slow cooker and set it to cook. For a low setting, aim for six to seven hours. If you choose the high setting, it will take about three to four hours. You want the potatoes to be tender when done. When the cooking time is up, use a potato masher to mash the potatoes slightly. This creates a creamy texture. Leave some chunks for extra heartiness. Next, stir in two cups of shredded sharp cheddar cheese and one cup of heavy cream or coconut cream. This adds richness and creaminess to your soup. Mix until the cheese melts completely. Taste your soup and adjust the seasoning if needed. Let it sit for an extra 10-15 minutes on low to thicken. Stir occasionally for the best results. For the full recipe, you can refer back to the ingredients list. Enjoy your creamy comfort dish! To get the best texture in your soup, mash the potatoes just right. Use a potato masher to break them down a bit. You want some chunks for a nice feel. If your soup is too thin, add more potatoes or let it cook longer. If you want it thicker, try adding less broth next time. For extra flavor, think about adding spices. A dash of cayenne pepper can give it a kick. You can also try some fresh herbs like parsley or chives. Fresh herbs add bright flavors, while dried herbs give a deep taste. Both options work well, depending on what you have. When serving your soup, make it look pretty! Top each bowl with chopped green onions for color. If you like bacon, sprinkle some bits on top for a tasty crunch. You can also add extra cheese for a cheesy finish. Serve with a warm piece of bread for a cozy meal. {{image_2}} You can still enjoy a creamy soup without dairy. First, consider using coconut cream. It adds rich flavor and keeps the soup thick. Just replace the heavy cream with one cup of coconut cream. This change keeps your soup delicious while being dairy-free. Next, look for vegan cheese alternatives. Many brands offer great options that melt well. Choose a cheese that fits your taste. This makes your soup creamy and rich without dairy. Want to make your soup heartier? Adding protein is a great way! You can incorporate cooked bacon or sausage for a savory kick. Just sprinkle some cooked bacon bits on top before serving. This adds a nice crunch and flavor. If you prefer a vegetarian option, try adding beans. White beans or chickpeas work well. They add protein and fiber while keeping the soup smooth. You can mix them in during the last hour of cooking for the best results. Using seasonal vegetables is a fun way to change up your soup. In spring, try adding fresh peas or asparagus for a pop of color and taste. In fall, use sweet potatoes or pumpkin for a sweet, warming flavor. For toppings, adjust them based on the season. In winter, add crispy bacon or shredded cheese. In summer, fresh herbs like basil or chives brighten up the dish. Each season brings new flavors to explore! For a detailed recipe, check out the Full Recipe. To store leftovers, let the soup cool first. Transfer it to an airtight container. Make sure the lid seals tightly. The soup stays fresh in the fridge for about 3 to 4 days. Always label the container with the date. This way, you can keep track of how long it has been stored. To maintain freshness, avoid letting the soup sit out for too long. Cool it quickly and store it right away. When reheating, warm only what you will eat. This helps prevent spoilage. You can freeze this soup for later. To freeze, let it cool completely. Use freezer-safe containers or bags. Leave some space at the top for expansion. This soup can last in the freezer for 2 to 3 months. To reheat, thaw the soup in the fridge overnight. Heat it slowly on the stove. Stir often to ensure it heats evenly. If the soup looks thick, add a splash of broth or cream to loosen it up. To prevent freezer burn, make sure the container is airtight. Wrap the container in plastic wrap for extra protection. How long does the soup last? In the fridge, it lasts about 3 to 4 days. In the freezer, it can last 2 to 3 months. Look for signs of spoilage before eating. If you see any mold or off smells, throw it out. If the soup separates or changes color, it may not be safe to eat. Always trust your senses. If in doubt, it's best to discard the soup. For the full recipe, check out the Creamy Cheddar Potato Bliss Soup. To thicken your soup, I suggest mashing some potatoes. This adds body and creaminess. You can also add more cheese or cream during cooking. If you want a thicker texture, try stirring in a cornstarch slurry. Mix one tablespoon of cornstarch with two tablespoons of cold water. Add this mix to the soup and let it cook for a bit longer. It will help to create a rich, thick finish. Yes, you can use different types of cheese! Creamy cheeses like Gouda or Fontina add a nice touch. If you want a sharper flavor, try using aged cheddar or pepper jack. Mixing cheeses can create fun and unique flavors. Just remember to adjust the amount based on how strong you want the taste. When using the high setting, your soup will take about 3 to 4 hours to cook. The potatoes should be soft and tender when ready. If you prefer, you can cook it on low for 6 to 7 hours. This gives a richer flavor as the ingredients meld together nicely over time. Absolutely! You can make this soup a day or two ahead. Just store it in an airtight container in the fridge. When you’re ready to eat, just reheat it on the stove or in the microwave. If you want to keep it longer, you can freeze it. Make sure to leave some space in the container for expansion. This way, you can enjoy your cheesy potato soup anytime! For the full recipe, check out the details. You learned how to make Slow Cooker Cheesy Potato Soup from start to finish. We covered essential ingredients, step-by-step instructions, tips, and variations. Remember, you can adjust the consistency and flavors to suit your taste. Don't shy away from adding your favorite toppings or trying new cheese types. This simple recipe will warm you up and impress your friends. Enjoy making this hearty soup anytime!

Slow Cooker Cheesy Potato Soup Creamy Comfort Dish

Are you ready to warm your soul with a bowl of creamy goodness? Slow Cooker Cheesy Potato Soup is the

- 1 cup strawberries, hulled and sliced - 1 cup blueberries, fresh - 1 cup raspberries, fresh Fresh fruits bring color and taste. Strawberries add sweetness. Blueberries give a pop of flavor. Raspberries add a tart touch. Using all three makes the trifle beautiful and tasty. - 1 pound vanilla cake, cubed - 2 cups vanilla pudding, store-bought or homemade - 1 cup whipped cream, preferably homemade Vanilla cake forms the base of the trifle. It soaks up the flavors well. Pudding adds creaminess and richness. Whipped cream adds a light touch. These main components create a delightful mix. - 1 teaspoon vanilla extract - 1 tablespoon powdered sugar, optional for sweetening whipped cream - Fresh mint leaves for garnish Vanilla extract boosts the flavor of the pudding. Powdered sugar can sweeten the whipped cream. Fresh mint leaves add a nice look and fresh taste. These enhancements can make your trifle extra special. You can find the full recipe above to create this delicious dessert! Start by rinsing your fruits well. Use cold water to wash the strawberries, blueberries, and raspberries. For the strawberries, hull them and slice them into thin pieces. This helps them mix well in the trifle. Keep the blueberries and raspberries whole, as they add a fun burst of flavor and color. If you choose store-bought pudding, just follow the package directions. It’s quick and easy! For homemade pudding, whisk together 2 cups of milk, 1/3 cup sugar, 1/4 cup cornstarch, and 1 teaspoon vanilla extract in a pot. Cook this mix over medium heat until it thickens. Then, let it cool to room temperature. For the whipped cream, you can use a hand mixer or a stand mixer. Start whipping the cream in a mixing bowl until soft peaks form. This takes about 2 to 4 minutes. To sweeten, add some powdered sugar and a touch of vanilla extract. Mix until well combined. Now it’s time to layer your trifle! Start with a layer of cubed vanilla cake at the bottom. Then, add a layer of vanilla pudding on top of the cake. Next, add a layer of mixed berries: strawberries, blueberries, and raspberries. Finally, top that with whipped cream. Repeat these layers until you run out of ingredients. Finish with a thick layer of whipped cream and a handful of berries on top for a beautiful look. Cover the assembled trifle with plastic wrap. Place it in the fridge for at least 2 hours. This chilling time helps the flavors blend. It also allows the trifle to set properly, making it easier to serve. Before serving, add fresh mint leaves on top for a bright touch. This adds a nice contrast and fresh flavor. You can also serve the trifle in individual cups for a fun presentation. Each cup showcases the lovely layers beautifully. Additionally, add a berry on top of each cup for that perfect finishing touch. For more details, check the Full Recipe. To make the perfect trifle, layering is key. Start with a strong base. Use cubed cake that is not too moist; this helps keep the layers stable. If using store-bought cake, let it sit out for a bit. This way, it dries just enough to avoid sogginess. When you layer, use a spoon to spread the pudding evenly over the cake. This keeps the layers distinct. Don’t rush; take your time building each layer. A good trifle has a nice balance of cake, pudding, and fruit. Want to mix it up? You can swap out fruits. Try peaches or blackberries instead of berries. You can also use bananas for a creamier texture. For pudding flavor, consider chocolate or lemon. Chocolate pairs well with strawberries, while lemon brightens up any fruit mix. This gives your trifle a fresh twist that everyone will love. You can serve your trifle in two ways. Use a large glass dish for a classic look. It shows off the colorful layers beautifully. If you want something more modern, try individual cups. This makes serving easy and looks fancy. No matter how you serve it, don’t forget the final touch. A sprinkle of mint or a few whole berries on top adds color and a fresh vibe. {{image_2}} If you want to make a gluten-free trifle, you can switch out the vanilla cake. Use a gluten-free cake mix or bake a gluten-free vanilla cake from scratch. This way, you can enjoy the same great taste without the gluten. For the pudding, look for gluten-free options. Many store-bought brands offer gluten-free vanilla pudding. Always check the label to be sure! For a dairy-free version, you can make whipped cream using coconut cream. Chill a can of coconut milk overnight, then scoop out the thick part. Whip it like regular cream. You can also use almond or soy-based whipped cream. When it comes to pudding, choose plant-based options. Many brands now have dairy-free vanilla pudding made from almond or soy milk. This keeps the dessert creamy without dairy. You can easily adapt this trifle for different holidays. For fall, add slices of apples or pears with cinnamon. For winter, try pomegranate seeds for a pop of color. You can also change how you decorate. For the Fourth of July, use red and blue fruits like strawberries and blueberries. Top it with whipped cream and sprinkle some stars made from fruit or chocolate. This makes your trifle festive and fun for any celebration! For the complete recipe, check the [Full Recipe]. To keep your trifle fresh, always refrigerate it. Cover it tightly with plastic wrap. This way, it stays moist and cool. The layers will look great for up to three days. Avoid pressing down on the layers when covering. This keeps them intact. If you have leftover ingredients, store them separately. Place the cake, pudding, and whipped cream in airtight containers. This helps maintain their texture and taste. Use these in the next three days for the best flavor. Combine them again to create a new trifle! If you need to reassemble, start with fresh layers. Use the same order: cake, pudding, berries, then cream. This ensures a good blend of flavor and texture. Serve right after reassembly for the best taste. Enjoy your delicious creation! For the full recipe, check out the detailed steps above. Yes, you can use frozen fruits. They are easy to find and store. Frozen fruits can save time. However, they may release more juice, which can make the trifle soggy. If you choose frozen, let them thaw and pat them dry. This helps reduce excess juice. You can store the trifle in the fridge for up to three days. Be sure to cover it well. The layers will stay fresh longer this way. After three days, the cake may become too soft. It’s best to enjoy it fresh. Yes, you can prepare components ahead of time. Make the pudding and whipped cream a day before. Store them in airtight containers in the fridge. You can also cube the cake a day ahead. Just keep it covered to avoid drying out. If you don’t want vanilla pudding, you can use chocolate pudding. You can also try lemon curd for a zesty twist. Store-bought options work well, too. For a homemade version, mix together milk, sugar, and cornstarch on the stove. Yes, you can easily make a vegan trifle. Use vegan cake instead of regular cake. For pudding, use a plant-based milk and cornstarch. Make sure the whipped cream is coconut cream or a soy-based alternative. This way, everyone can enjoy it. To keep your trifle layers crunchy, use day-old cake. Fresh cake can soak up too much liquid. You can also layer your cake with a sprinkle of powdered sugar. This will create a barrier between the cake and the juice from the fruits. This blog post covered the delightful vanilla trifle, including fresh fruits, vanilla cake, and whipped cream. You learned step-by-step how to prepare each ingredient and assemble the trifle for the best flavor and presentation. Remember to get creative with flavors, and personalize your trifle with seasonal fruits or tasty variations. Whether you serve it at a party or as a dessert at home, this trifle will surely impress. Enjoy making and sharing this treat with loved ones!

Red, White and Blueberry Trifle Delightful Layered Dessert

Get ready to impress at your next gathering with a stunning Red, White, and Blueberry Trifle! This delightful layered dessert

- 1 cup graham cracker crumbs - 4 tablespoons unsalted butter, melted - 2 tablespoons granulated sugar - 8 oz cream cheese, softened - 1/2 cup powdered sugar - 1 teaspoon vanilla extract - 1/2 cup heavy cream, whipped to soft peaks - Fresh berries for topping - Optional: melted chocolate for drizzling Making no-bake cheesecake bites is fun and easy. You need some simple ingredients. Start with graham cracker crumbs. They give a nice crunch. Melt some unsalted butter to mix in. This helps to bind the crust. Add granulated sugar for a touch of sweetness. Next, you focus on the creamy filling. Softened cream cheese is key. It mixes well and gets smooth. Add powdered sugar to sweeten it up. A little vanilla extract gives great flavor. Don't forget the whipped cream! It makes the filling light and fluffy. Top your cheesecake bites with fresh berries. Strawberries, blueberries, or raspberries work well. If you want more sweetness, drizzle melted chocolate on top. This adds extra flair and flavor. You can find the full recipe in the article. Enjoy creating these delightful bites! To make the crust, you start with graham cracker crumbs. In a mixing bowl, combine: - 1 cup graham cracker crumbs - 4 tablespoons unsalted butter, melted - 2 tablespoons granulated sugar Mix these ingredients until they look like wet sand. This means the crumbs are well coated. Next, press the mixture firmly into mini muffin tins or silicone molds. Use the back of a spoon to compact it. This step forms a solid base for your bites. Now, it’s time to create the creamy filling. In a separate bowl, beat: - 8 oz cream cheese, softened Use an electric mixer to achieve a smooth texture. Add: - 1/2 cup powdered sugar - 1 teaspoon vanilla extract Mix until everything is well combined. Then, gently fold in: - 1/2 cup heavy cream, whipped to soft peaks Be careful not to deflate the whipped cream. This keeps your filling light and fluffy. Spoon the creamy cheesecake filling into the prepared crusts in the muffin tins. Fill them almost to the top. After this, cover the tins with plastic wrap. Refrigerate for at least 2 hours or until the cheesecake bites are set. Once they are firm, pop them out of the molds and place them on a serving platter. Top each cheesecake bite with fresh berries. You can also drizzle them with melted chocolate if you want to add more flavor. This step makes your bites even more special. For the full recipe, you can find all the details mentioned above. To get the best texture for your cheesecake bites, start with the cream cheese. It must be soft. If it’s cold, your filling will be lumpy. Leave it out for at least 30 minutes before you use it. Next, fold in the whipped cream gently. This keeps it airy. Use a spatula and scoop from the bottom of the bowl. Lift it up to mix. This way, you don’t lose the volume. When it comes to serving, presentation matters. Place the cheesecake bites on a nice platter. Add some fresh berries on top. They add color and flavor. You can also drizzle melted chocolate for a special touch. Choose fruits that contrast well. Strawberries and blueberries are great choices. They not only taste good but look appealing too. You can even mix and match for a fun look. One big mistake is overmixing the filling. It can make your bites dense. Mix just until combined. Another mistake is not refrigerating long enough. The bites need time to set. Let them chill for at least two hours. If you skip this step, they will fall apart when you serve them. Refer to the Full Recipe for all the steps and details! {{image_2}} You can change the taste of your cheesecake bites easily. Want a fresh twist? Just add lemon juice. It brings a zesty kick that brightens each bite. Mix in two tablespoons of fresh lemon juice, and you have a delightful citrus treat. Do you love chocolate? You can easily add that flavor too. Just fold in some melted chocolate. For a rich taste, use one-third cup of melted dark chocolate. If you crave something nutty, add peanut butter. Mix in one-third cup of creamy peanut butter to the filling for a nutty profile. Toppings can make your cheesecake bites extra special. Fresh fruits like strawberries, blueberries, or raspberries add color and sweetness. I love using a mix of these berries for a beautiful look. For a touch of decadence, drizzle melted chocolate on top. You can also try caramel or berry sauces. Just warm the sauces slightly before drizzling. This extra step makes your bites look fancy and taste even better. You might have guests with special diets. No worries! You can adjust the recipe easily. For a gluten-free option, use gluten-free graham crackers. They work just as well for the crust. If you need a dairy-free version, swap cream cheese for a dairy-free cream cheese alternative. Use coconut cream in place of heavy cream for a rich texture. These changes keep your cheesecake bites tasty for everyone! To keep your no-bake cheesecake bites fresh, use airtight containers. I recommend using a glass or plastic container with a tight lid. This helps maintain the creamy texture. Store them in the fridge for up to 5 days. You want to enjoy them while they taste their best! If you want to save some for later, freezing is a great option. First, place the cheesecake bites in a single layer on a baking sheet. Freeze them for about 2 hours until firm. Then, transfer them to a freezer-safe container. This prevents them from sticking together. They can stay frozen for up to 2 months. To thaw them, move the bites from the freezer to the fridge. Let them thaw overnight before serving. This keeps the texture nice and smooth. Enjoy these sweet treats whenever you want! For the complete process, check the Full Recipe. Yes, you can make these cheesecake bites ahead of time. I suggest making them a day before you plan to serve. This gives them enough time to chill and set. Make sure to cover them well with plastic wrap to keep them fresh. The flavors blend nicely overnight, making them even tastier. No-Bake Cheesecake Bites can last about 4 to 5 days in the fridge. Store them in an airtight container. Always check for any change in smell or texture. If they look dry or have an off smell, it’s best to toss them. Freshness is key for the best taste! Absolutely! Using a store-bought crust can save time. Just choose a graham cracker crust for the best flavor. You might need to adjust the amount of filling if the crust is larger. Store-bought crusts are convenient and still allow for a tasty treat. In summary, making no-bake cheesecake bites is simple and fun. You start by mixing the crust and pressing it into muffin tins. Next, whip up the creamy filling and assemble everything. Remember to chill them well for the best taste. Finally, feel free to customize with flavors and toppings. These bites are great for sharing. With good storage, they can last longer and still taste fresh. Enjoy creating and tasting these treats!

No-Bake Cheesecake Bites Sweet and Simple Treat

Craving a sweet treat without the hassle of baking? You’re in the right place! These No-Bake Cheesecake Bites are simple

To make a perfect red velvet cake, you need the right ingredients. Here’s what you will need: - 2 ½ cups all-purpose flour - 1 ½ cups granulated sugar - 1 teaspoon baking soda - 1 teaspoon salt - 1 teaspoon cocoa powder - 1 ½ cups vegetable oil - 1 cup buttermilk, at room temperature - 2 large eggs, at room temperature - 2 tablespoons red food coloring - 1 teaspoon vanilla extract - 1 teaspoon white vinegar These ingredients work together to create the soft and moist texture of the cake. The buttermilk adds richness, while the cocoa powder gives a subtle chocolate taste. Frosting makes the cake even better. You can choose to buy store-bought cream cheese frosting or make your own. Here are the key components for creamy frosting: - 8 oz cream cheese, softened - ½ cup unsalted butter, softened - 4 cups powdered sugar - 1 teaspoon vanilla extract For a twist, consider adding some lemon zest or a pinch of salt to enhance the flavor. This frosting is smooth and rich, perfect for topping your red velvet cake. If you want to see a full recipe, check out the details above! 1. Preheat your oven and prepare cake pans: Start by preheating your oven to 350°F (175°C). Grease and flour two 9-inch round cake pans. This will help the cake come out easily after baking. 2. Combine dry ingredients in a mixing bowl: In a large mixing bowl, whisk together the following dry ingredients: - 2 ½ cups all-purpose flour - 1 teaspoon baking soda - 1 teaspoon salt - 1 teaspoon cocoa powder - 1 ½ cups granulated sugar Make sure these ingredients are mixed well. This ensures your cake will rise and have a great texture. 3. How to properly mix wet and dry ingredients: In another bowl, mix the wet ingredients: - 1 ½ cups vegetable oil - 1 cup buttermilk (at room temperature) - 2 large eggs (at room temperature) - 2 tablespoons red food coloring - 1 teaspoon vanilla extract - 1 teaspoon white vinegar Whisk these together until smooth. Slowly add this mix to your dry ingredients. 4. Importance of folding vs. mixing: When you combine the wet and dry ingredients, use a spatula or wooden spoon to gently fold them together. This method keeps your batter light and airy. Don’t overmix, as it can make the cake dense. 5. Ideal temperature and baking duration: Once mixed, divide the batter between the prepared pans. Bake in your preheated oven for 25-30 minutes. Check if they are done by inserting a toothpick in the center. It should come out clean. 6. Cooling techniques for perfect texture: After baking, let the cakes cool in the pans for about 10 minutes. Then, carefully transfer them to a wire rack. Let them cool completely before frosting. This step is crucial for a smooth texture when you frost the cake. This guide will help you create a stunning red velvet cake that everyone will love. For the full recipe, refer to the recipe section. To make a moist and flavorful red velvet cake, follow these tips: - Use buttermilk. It adds moisture and a slight tang. - Choose vegetable oil. It keeps the cake tender and light. The combination of buttermilk and oil creates the perfect cake texture. Buttermilk helps the cake rise well while adding a rich flavor. Oil prevents it from being dry and crumbly. Sometimes, cakes don’t turn out as planned. Here are some common problems and solutions: - Overmixing: This can make your cake tough. Mix just until combined. - Underbaking: A wet center means the cake is not done. Always do the toothpick test. To avoid a dry cake, measure your flour properly. Spoon flour into the measuring cup and level it off with a knife. For sinking tops, don’t open the oven door while baking. Applying cream cheese frosting can be tricky. Here’s how to do it right: - Start with a cool cake. This helps the frosting stay put. - Use a spatula to spread the frosting evenly. For an elegant finish, try these decoration techniques: - Add swirls with the spatula or a piping bag. - Sprinkle cocoa powder or red velvet crumbs on top. These tips help you create a beautiful and tasty red velvet cake. For a full recipe, check the link above. {{image_2}} You can have fun with red velvet cake. One great twist is to make red velvet cupcakes. To adapt the recipe, use the same ingredients but pour the batter into cupcake liners. Bake for about 20 minutes. These cupcakes are cute and perfect for parties. Another unique dessert option is red velvet cheesecake. Start with a red velvet cake base, then top it with a creamy cheesecake layer. Mix cream cheese, sugar, and eggs for the filling. Pour it over the baked red velvet layer and bake again. This dessert is rich and delicious. You can change the flavors for holidays. Think about adding spices like cinnamon and nutmeg for fall. For winter, mix in peppermint extract for a fresh taste. These flavors make the cake festive and fun. Color-themed variations are also a hit. For a spring celebration, add some lemon zest to brighten the flavor. You could also use pastel colors for frosting to match the season. These small changes make the cake perfect for any event. Making red velvet cake gluten-free is easy. Just substitute gluten-free flour for regular flour in the recipe. This keeps the cake light and fluffy. For a vegan version, swap the eggs and dairy. Use flaxseed meal mixed with water as an egg substitute. For the buttermilk, try almond milk with a splash of vinegar. These simple swaps help everyone enjoy this delicious cake. You can find the full recipe for the classic red velvet cake above. Enjoy experimenting with these variations! To keep your red velvet cake fresh, follow these simple steps: - Short-term storage: Place the cake in an airtight container. You can also cover it tightly with plastic wrap. This keeps moisture in and prevents drying out. Store it at room temperature if you plan to eat it within three days. - Long-term storage: For longer storage, wrap the cake layers with plastic wrap and then aluminum foil. This method protects the cake from freezer burn. You can store it in the freezer for up to three months. If you want to freeze your red velvet cake layers, here’s how: 1. Cool completely: Always let your cake layers cool fully before freezing. This prevents condensation from forming. 2. Wrap tightly: Wrap each layer in plastic wrap. Then, add an extra layer of foil. This protects your cake from freezer odors. 3. Label the layers: Write the date on the foil. This way, you can track how long they’ve been in the freezer. When you’re ready to enjoy your cake, use these thawing techniques: - Thaw in the fridge: Move the wrapped cake to the fridge for several hours or overnight. This keeps the cake moist and fresh. - Room temperature: If you’re in a hurry, you can unwrap the cake and let it sit at room temperature for about an hour. How long does red velvet cake last in the fridge? - It can last up to five days if stored properly in an airtight container. What are the signs of spoilage to watch for? - Mold: If you see any mold, throw the cake away. - Off smell: A sour or strange smell means it’s time to discard the cake. - Dry texture: If the cake feels dry, it may not taste good. Following these storage tips helps you enjoy your red velvet cake at its best! For the full recipe, check out the detailed instructions provided earlier. Red velvet cake has a rich history. It likely started in the 1800s. Many say it comes from the South. It became popular in the 1920s. A hotel in New York helped spread its fame. The cake’s name refers to its soft, velvety texture. The red color adds to its charm. Cocoa powder gives it a hint of chocolate. This cake is often linked to special occasions, especially Valentine’s Day. You can use natural options to color your cake. Beet juice is a great choice. It gives a nice red hue. You might also try pomegranate juice. Keep in mind that the color may be lighter. Cocoa powder can deepen the shade too. These options add flavor along with color. Expect a more earthy taste with these substitutes. Yes, you can make red velvet cake ahead of time. Bake the cakes one day before. Cool them completely and wrap them tightly. Store in the fridge overnight. Frost the cake on the day you serve it. This keeps the cake fresh and moist. You can also freeze layers for later use. Just remember to thaw them before frosting. You can find great red velvet cake at local bakeries. Look for ones that use fresh ingredients. Check online reviews for quality. Some bakeries offer delivery. You can also order from well-known online stores. When choosing a cake, check for a rich color and moist texture. A good frosting should be smooth and creamy. The luxurious red velvet cake comes together quickly. It takes about 30 minutes to prep. The total time is roughly 1 hour and 30 minutes. This recipe makes 12 delicious slices. You can find the full recipe above. Enjoy baking this beautiful dessert! Red velvet cake is a delightful treat made from simple ingredients. You learned about essential components, steps for baking, and tips for the best results. I shared creative variations and storage methods so your cake stays fresh. Remember, practice makes perfect in the kitchen. With each attempt, you get closer to mastering this beloved dessert. Whether for a special occasion or a simple indulgence, this cake will impress anyone. Enjoy your baking journey and savor every bite of your delicious creation.

Red Velvet Cake Irresistible Dessert Recipe Guide

Are you ready to impress your friends and family with a stunning dessert? This Red Velvet Cake Irresistible Dessert Recipe

Older posts
Newer posts
← Previous Page1 … Page39 Page40 Page41 … Page44 Next →

dsad

© 2025 pureeatsnow • Built with GeneratePress

Our Policies

  • Copyright Policy
  • Cookie Policy
  • GDPR Policy
  • Privacy Policy
  • Disclaimer
  • Terms Of Use

More Information

  • Home
  • About
  • Contact
  • Appetizers
  • Dessert
  • Dinner
  • Drinks
©2025, pureeatsnow About Back To Top