Skip to content
DisclaimerTerms Of UseGDPR PolicyCookie Policy

pureeatsnow

  • Home
  • Drinks
  • Appetizers
  • Dinner
  • Dessert
  • About
  • Contact
  • Privacy Policy
DisclaimerTerms Of UseGDPR PolicyCookie Policy

Rachel

To make a delicious peanut butter toast, you need simple, healthy ingredients. Here’s what you should gather: - Whole grain or sourdough bread - Peanut butter varieties (creamy or crunchy) - Fresh fruits (bananas and berries) - Healthy toppings (honey, chia seeds, dark chocolate chips, sea salt) These ingredients make your peanut butter toast both tasty and nutritious. Whole grain or sourdough bread gives a nice base. Peanut butter adds protein and flavor. Fresh fruits like bananas and berries not only taste great but also provide important vitamins. Honey or maple syrup adds sweetness. Chia seeds give a healthy crunch, while dark chocolate chips can make it feel like a treat. A pinch of sea salt balances the sweetness. Feel free to mix and match your favorite toppings and fruits. For the full recipe, check out Peanut Butter Bliss Toast. 1. Toasting the bread to achieve the perfect crispness Start by toasting your bread. I prefer whole grain or sourdough for a great taste. Toast it until it turns golden brown, which takes about 5 minutes in a toaster or skillet. You want it crispy but not burnt. 2. Slicing bananas for an attractive presentation While your bread toasts, grab a medium banana. Slice it into thin rounds. Aim for even slices to make your toast look nice. 3. Spreading peanut butter evenly on toast When the bread is ready, take about 1.5 tablespoons of peanut butter. Spread it evenly on each slice. Use creamy or crunchy peanut butter based on your preference. 1. Layering banana slices post-peanut butter Now, take your sliced bananas and place them on top of the peanut butter. Overlap them a bit for a pretty design. 2. Drizzling with honey or maple syrup Next, drizzle honey or maple syrup over the banana slices. This adds a touch of sweetness that pairs well with peanut butter. 3. Adding chia seeds and optional chocolate chips Sprinkle chia seeds on top for added crunch and health benefits. If you want, add dark chocolate chips for a sweet twist. They melt slightly and taste amazing. This peanut butter toast is not just easy to make; it is full of flavor and nutrition. For the full recipe, check the details above. Enjoy your delicious creation! - Choosing the right bread for the best toast: Whole grain or sourdough bread works best. Whole grain adds fiber, while sourdough offers a tangy taste. Both give a nice crunch when toasted. - Balancing flavors with sweet and salty toppings: Use honey or maple syrup to sweeten. The sweet flavor pairs well with the salty peanut butter. A pinch of sea salt can enhance the taste. - Serving suggestions for a visually appealing plate: Arrange banana slices in a fan shape on the toast. Add fresh berries around the plate for color. A beautiful plate makes your meal more inviting. - Adding seeds or nuts for extra crunch and nutrition: Sprinkle chia seeds on top. They add a nice crunch and boost nutrients. You can also add crushed nuts for extra texture. - Opting for natural sweeteners over refined sugar: Choose honey or maple syrup instead of white sugar. They provide sweetness and come with added benefits. This makes your toast healthier and more delicious. For the full recipe, check out Peanut Butter Bliss Toast. {{image_2}} You can change up your peanut butter toast in fun ways. Try different nut butters like almond or cashew. Each nut butter gives a new taste and texture. You might love the smoothness of almond or the rich flavor of cashew. You can also mix in alternative toppings. Instead of banana, try yogurt or granola. Both add creaminess and crunch. Coconut flakes provide a tropical twist. These toppings make your toast interesting and delicious! If you need gluten-free options, look for gluten-free bread. Many brands offer great choices that taste just as good. This way, everyone can enjoy peanut butter bliss! For a vegan touch, replace honey with maple syrup or agave. You can also skip honey altogether. Use fresh fruits or nut butters as toppings for a sweet flavor without animal products. By making these simple adjustments, you can create a toast that fits any diet or preference. Enjoy experimenting with flavors and toppings! Don't forget to check the full recipe for more ideas! If you have leftover toast, it’s best to eat it fresh. Toast can lose its crunch. If you must store it, keep it in an airtight container. This helps keep the bread from getting too soft. You can also refrigerate it, but it may lose its tasty texture. For toppings like peanut butter, bananas, and honey, you can store them separately. Keep peanut butter in a cool, dark place. If you slice a banana, use it right away. If you have leftover banana slices, cover them with lemon juice. This step helps prevent browning. Meal prepping makes breakfast easy. You can prepare some ingredients ahead of time. Toast bread in batches and store it in the fridge. Just pop it in the toaster when you’re ready to eat. You can slice bananas in advance too. Just remember to add lemon juice to keep them fresh. You can also pre-measure chia seeds or chocolate chips. This way, you can quickly assemble your peanut butter toast. It saves time and makes mornings stress-free. For the full recipe, check out Peanut Butter Bliss Toast. How do I prevent my toast from getting soggy? To keep your toast crisp, toast it just before serving. Use thick slices of bread. You can also spread peanut butter while the toast is warm. This helps make a nice barrier against moisture. Can I use frozen bananas on my toast? Yes, you can use frozen bananas. Just thaw them first. They will be soft but still tasty. They can add a creamy texture to your toast. What are the health benefits of peanut butter? Peanut butter offers many health perks. It is high in protein, which helps build muscle. It contains healthy fats that support heart health. Plus, it's rich in vitamins and minerals like vitamin E and magnesium. What can I substitute if I’m allergic to peanut butter? If you have a peanut allergy, use sun butter or almond butter. These options have a similar texture and taste. They provide healthy fats and protein as well. How to make a healthier version of peanut butter toast? To make it healthier, choose whole grain bread. Use natural peanut butter without added sugar. You can add fresh fruit or seeds for extra nutrients. This boosts both flavor and health benefits. Can I make peanut butter toast in advance? You can prepare the toppings in advance. However, it's best to toast the bread fresh. This keeps it crunchy and delicious. Store the toppings in the fridge until you are ready to eat. This blog post shared a simple and tasty peanut butter toast recipe. We explored the best ingredients, preparation steps, and clever tips for great results. You can adapt flavors and make it fit your diet with ease. Remember to store leftovers well and prep ingredients for quick meals. Enjoy your delicious toast and make it your own! Keeping it fun and nutritious leads to better meals that everyone loves. Happy toasting!

Peanut Butter Toast Nutritious and Simple Recipe

Peanut butter toast is a quick and tasty meal choice. With just a few ingredients, you can create a nutritious

To make Cheesy Beef and Bowtie Pasta, gather these items: - 12 oz bowtie pasta - 1 lb ground beef - 1 onion, finely chopped - 2 cloves garlic, minced - 1 can (14.5 oz) diced tomatoes, drained - 1 cup beef broth - 1 cup shredded cheddar cheese - 1 cup shredded mozzarella cheese - 1 tsp Italian seasoning - 1 tsp paprika - Salt and pepper to taste - 2 tablespoons olive oil - Fresh basil leaves for garnish (optional) You can easily swap out ingredients for what you have on hand. Try ground turkey or chicken for a leaner option. For a veggie twist, use cooked lentils or mushrooms instead of meat. If you want more flavor, add red pepper flakes for heat or fresh herbs like thyme. Use vegetable broth instead of beef broth for a lighter taste. You can also mix different cheeses, like gouda or pepper jack, for a unique twist. When choosing your ingredients, freshness matters. Look for bright, firm tomatoes without blemishes. For pasta, select a brand that is not too soft, as it needs to hold its shape. Use high-quality beef with a good fat ratio for the best flavor. When picking cheese, go for blocks rather than pre-shredded. Block cheese melts better and tastes fresher. Always check the expiration dates on your broth and cheese for the best quality. To start, you need to cook the bowtie pasta. Bring a large pot of salted water to a boil. Add 12 oz of bowtie pasta. Cook according to the package instructions until it is al dente. Drain and set it aside. Next, grab a large skillet. Heat 2 tablespoons of olive oil over medium heat. Add 1 finely chopped onion. Sauté it until it turns translucent, which takes about 3-4 minutes. Then, add 2 cloves of minced garlic. Cook this for another minute. You want the garlic to be fragrant. Now, increase the heat to medium-high. Add 1 lb of ground beef. Use a spatula to break it up as it cooks. Aim for about 5-7 minutes until it turns brown. If there is extra fat, drain it off. It's time to add flavor! Stir in 1 can of drained diced tomatoes, 1 cup of beef broth, 1 tsp of Italian seasoning, and 1 tsp of paprika. Season with salt and pepper to taste. Bring this mix to a simmer. Let it cook for 5 minutes so the flavors mix well. Next, add the cooked bowtie pasta to the skillet. Stir everything together until well combined. Reduce the heat to low and add half of the cheddar and mozzarella cheeses. Stir until the cheese melts and creates a creamy sauce. Remove the skillet from heat. Sprinkle the remaining cheese on top. Cover it to allow the cheese to melt for a few minutes. If you want, add fresh basil leaves for garnish before serving. 1. Boiling Pasta: Look for bubbles in the water and ensure the pasta is tender but firm. 2. Sautéing Onion and Garlic: The onion should be clear, and the garlic should smell nice. 3. Browning Beef: The meat should be a nice brown color with no pink left. 4. Simmering Mixture: Watch for small bubbles indicating it’s cooking. 5. Melting Cheese: Look for a gooey, creamy texture. - Cooking the pasta: About 10-12 minutes. - Sautéing onion: About 3-4 minutes. - Cooking garlic: 1 minute. - Browning beef: 5-7 minutes. - Simmering sauce: 5 minutes. - Melting cheese: 2-3 minutes after removing from heat. Follow these steps for a delicious Cheesy Beef and Bowtie Pasta. For the full recipe, check the detailed instructions above. When making Cheesy Beef and Bowtie Pasta, avoid overcooking the pasta. Cook it until it is al dente. This helps keep the pasta firm. Drain it well to prevent a soggy dish. Another mistake is not seasoning enough. Add salt and pepper during cooking. Taste as you go to balance flavors. Also, don’t skip the cheese melting step. This makes the dish creamy and rich. To boost flavor, try adding a splash of Worcestershire sauce. This adds depth to the beef. You can also mix in some chopped bell peppers or mushrooms for extra veggies. If you like heat, sprinkle in some red pepper flakes. For texture, consider toasting the pasta in the skillet before adding liquid. This gives it a nutty taste. Serve your Cheesy Beef and Bowtie Pasta in a big bowl. Top it with extra cheese and fresh basil leaves for color. Pair it with a simple green salad for freshness. A side of garlic bread complements the dish well. For drinks, a light red wine works great. If you want a non-alcoholic option, try sparkling water with lemon. Enjoy your delicious meal! For the full recipe, check out the instructions above. {{image_2}} You can switch the ground beef for ground turkey or sausage. Ground turkey gives a lighter taste. Sausage adds a nice kick. I recommend Italian sausage for extra flavor. Both options cook the same way as ground beef. Just make sure to brown them well before adding the other ingredients. If you want a vegetarian twist, use mushrooms or lentils. Mushrooms provide a nice, meaty texture. Lentils are packed with protein and fiber. You can sauté chopped mushrooms with the onions. For lentils, add cooked lentils instead of meat. This change will still give you a hearty meal. To make this dish gluten-free, use gluten-free pasta. There are many great options available now. For a vegan version, skip the cheese and beef. Instead, use a plant-based ground meat. Nutritional yeast can add a cheesy flavor without dairy. You can also use cashew cheese for a creamy texture. These swaps keep the dish tasty and satisfying. You can find the Full Recipe to guide you through all these variations! To store your Cheesy Beef and Bowtie Pasta, first let it cool down. Place it in an airtight container. This keeps it fresh. You can keep it in the fridge for up to 3 days. If you want to enjoy it later, freezing is a great option. When reheating, use the microwave or stovetop. If using a microwave, cover the bowl with a damp paper towel. This helps keep it moist. Stir it halfway through to heat evenly. If using the stovetop, add a splash of beef broth or water. This helps prevent it from drying out. To freeze, portion out the pasta into freezer-safe bags. Squeeze out as much air as you can. Label the bags with the date. You can freeze it for up to 3 months. When you’re ready to eat, thaw it in the fridge overnight. Reheat it gently to bring back that cheesy goodness. For the full recipe, check out the details above! You can use plant-based meat or lentils instead of ground beef. Just sauté the onions and garlic as usual. Then add your meat substitute. Cook it until heated through. Use the same spices and broth for flavor. Add your cooked bowtie pasta and cheese last. This creates a tasty, meat-free dish. Yes, you can! Cook the pasta and meat mixture as directed. Let it cool and store it in an airtight container. Keep it in the fridge for up to three days. When ready to eat, reheat it on the stove or in the microwave. Add a splash of broth or water to keep it moist. You can serve a simple green salad or garlic bread. A side of steamed vegetables adds color and nutrition. For a heartier meal, pair it with roasted vegetables. A glass of red wine will also complement the flavors nicely. Try different options to find what you love! Check out the Full Recipe for detailed cooking steps and tips! You learned the key ingredients for Cheesy Beef and Bowtie Pasta. We explored substitutions and the best ways to select quality items. The step-by-step cooking guide made it easy. I provided tips to avoid mistakes and enhance your dish. In closing, this recipe offers great flavor. You can customize it for dietary needs. Enjoy cooking and sharing this meal with others. Your kitchen will be full of smiles and delicious scents.

Cheesy Beef and Bowtie Pasta Flavorful Dinner Delight

Looking for a delicious dinner that dazzles? You’ve found it with my Cheesy Beef and Bowtie Pasta! This dish is

To make these tasty meatballs, you need some key items: - 1 pound ground beef - 1/2 cup breadcrumbs - 1/4 cup grated Parmesan cheese - 1 large egg - 1 teaspoon garlic powder - 1 teaspoon onion powder - Salt and black pepper to taste - 3 cups beef broth - 1 medium onion, sliced - 1 cup sliced mushrooms - 1 tablespoon Worcestershire sauce - 1 tablespoon soy sauce - 2 tablespoons cornstarch mixed with 3 tablespoons water (for thickening) - Fresh parsley, chopped (for garnish) These ingredients work together to create a rich flavor and a soft texture. You can add a few special touches to personalize your dish: - Chopped bell peppers - Fresh herbs like thyme or rosemary - Different types of cheese, such as mozzarella or cheddar - A splash of red wine for depth - Spices like paprika or cayenne for heat Feel free to mix and match these options. Customizing makes your dish unique! Gather the right tools before you start cooking: - Large mixing bowl - Baking sheet or plate - Slow cooker - Whisk for mixing sauces - Measuring cups and spoons Having everything ready will make cooking smooth and fun. Enjoy the process! To start, gather all your ingredients. In a large bowl, mix together: - 1 pound ground beef - 1/2 cup breadcrumbs - 1/4 cup grated Parmesan cheese - 1 large egg - 1 teaspoon garlic powder - 1 teaspoon onion powder - Salt and black pepper to taste Use your hands to mix the ingredients gently. Don’t overwork the meat. Shape the mixture into meatballs about 1.5 inches wide, like golf balls. Place them on a baking sheet. This keeps them from sticking together. Now, it’s time to set up the slow cooker. Start by adding sliced onions and mushrooms to the bottom. This creates a tasty bed for the meatballs. Next, gently place the meatballs on top of the onions and mushrooms. In a separate bowl, whisk together: - 3 cups beef broth - 1 tablespoon Worcestershire sauce - 1 tablespoon soy sauce Pour this mixture over your meatballs. Make sure they are well covered. Cover the slow cooker with its lid. Set it to cook on low for 6 to 8 hours, or on high for 3 to 4 hours. The meatballs should be tender and fully cooked. About 30 minutes before serving, remove a cup of broth. Mix this with 2 tablespoons of cornstarch and 3 tablespoons of water. Stir this back into the slow cooker to thicken the sauce. Before serving, taste the sauce and adjust the seasoning if needed. Enjoy your flavorful slow cooker Salisbury steak meatballs! You can find the full recipe above. To shape meatballs, I recommend using clean hands. Take a scoop of the meat mixture and roll it gently into a ball. Aim for about 1.5 inches in size, like a golf ball. This size cooks evenly and stays juicy. If you find the mixture sticky, wet your hands slightly. This helps prevent sticking and makes it easier to shape. To keep your meatballs tender, don’t overmix the meat mixture. Just combine the ingredients until they hold together. Cooking on low heat in the slow cooker also helps. It allows the meatballs to cook slowly, keeping them moist. Adding sliced onions and mushrooms at the bottom creates a flavorful base. Lastly, don’t skip the broth; it adds moisture and enhances the taste. For a delightful meal, serve your Salisbury steak meatballs over creamy mashed potatoes or egg noodles. The thickened sauce from the slow cooker complements these sides wonderfully. You can also add steamed veggies on the side for a colorful plate. Garnish with fresh parsley for a pop of color and flavor. This creates a beautiful and tasty presentation that your family will love. For the full recipe, check out [Full Recipe]. {{image_2}} You can switch up the flavors in your Salisbury steak meatballs. Try adding different herbs like thyme or rosemary for extra taste. You can also add some heat with a pinch of red pepper flakes. For a richer flavor, mix in some sautéed garlic and shallots. If you like a bit of sweetness, add a splash of balsamic vinegar. These small changes can make your dish stand out. If you want a healthier version, consider using ground turkey or chicken instead of beef. You can also swap out breadcrumbs for oats or crushed whole-grain crackers. For a lower-sodium option, use low-sodium beef broth. Replace heavy cream with Greek yogurt for a creamy sauce that adds protein. These swaps keep the dish tasty while making it lighter. For a vegetarian or vegan twist, use plant-based meatballs made from lentils or mushrooms. You can also make your own by combining black beans, quinoa, and spices. Use vegetable broth instead of beef broth to keep it vegan. For creaminess, try coconut milk or silken tofu in the sauce. These options let everyone enjoy Salisbury steak meatballs, no matter their diet! For the full recipe, check out the details above and get cooking! To keep your leftover meatballs fresh, let them cool first. Place them in an airtight container. Store them in the fridge for up to 3 days. If you want to keep them longer, freezing is a great option. For meal prep, freeze the meatballs in a single layer on a baking sheet. Once frozen, transfer them to a freezer bag. Be sure to label the bag with the date. You can freeze them for up to 3 months. To reheat, simply place the meatballs in a pan over low heat. Add a splash of beef broth to keep them moist. Cover the pan and heat until warm. You can also use the microwave for quick reheating. Just cover with a damp paper towel and heat in 30-second intervals. Enjoy your delicious Slow Cooker Salisbury Steak Meatballs! Slow cooker Salisbury steak meatballs last about three to four days in the fridge. Make sure you store them in an airtight container. If you want to keep them longer, freeze them. Frozen meatballs can last for up to three months. Just thaw them in the fridge before reheating. Yes, you can make Salisbury steak meatballs without breadcrumbs. You can use oats, crushed crackers, or even ground nuts as a substitute. These options will help bind the meat together just like breadcrumbs do. If you want a gluten-free option, consider using ground almonds or gluten-free breadcrumbs. If you don't have beef broth, you can use chicken broth or vegetable broth. Both options will add flavor to your meatballs. For a richer taste, you can mix water with soy sauce or Worcestershire sauce. This will give your dish a nice umami flavor that is similar to beef broth. For the full recipe, check the detailed instructions. Enjoy your cooking! In this blog post, we covered how to make slow cooker Salisbury steak meatballs. We talked about the main and optional ingredients, and the tools you need. Then, I shared simple steps to prepare, cook, and assemble your meal. I also provided tips for shaping meatballs and cooking them just right. Finally, we explored variations, storage tips, and answers to common questions. With these insights, you can whip up a tasty dish that fits your needs. Enjoy your cooking!

Slow Cooker Salisbury Steak Meatballs Recipe Delight

Are you ready for a hearty and delicious meal that will please the whole family? My Slow Cooker Salisbury Steak

- 4 bone-in pork chops - Salt and pepper to taste - 1 teaspoon garlic powder - 1 teaspoon paprika - 2 tablespoons olive oil - 1 medium onion, sliced - 2 cloves garlic, minced - 1 cup chicken broth - 1 tablespoon Worcestershire sauce - 1 cup heavy cream - 1 tablespoon Dijon mustard - Fresh parsley, chopped (for garnish)

Smothered Pork Chops Flavorful and Easy Recipe

If you’re craving a warm, hearty meal that’s both tasty and easy, look no further! Smothered Pork Chops are the

- 4 boneless pork chops (about 1 inch thick) - 4 cloves garlic, minced - 1 tablespoon olive oil - 1 tablespoon unsalted butter - 1 teaspoon dried thyme - 1 teaspoon smoked paprika - 1 teaspoon lemon zest - ½ teaspoon red pepper flakes (adjust to taste) - Salt and pepper to taste - Fresh parsley, chopped (for garnish)

Savory Pork Chops with Garlic Sauce Recipe Guide

Are you ready to elevate dinner with a mouthwatering dish? In this guide, I’ll show you how to make savory

- 2 to 2.5 lbs beef tenderloin roast - 4 tablespoons unsalted butter, softened - 3 cloves garlic, minced - 2 tablespoons fresh rosemary, finely chopped - 2 tablespoons fresh thyme, finely chopped - 1 tablespoon fresh parsley, finely chopped - 1 teaspoon salt - 1 teaspoon black pepper - 1 tablespoon Dijon mustard - 2 tablespoons olive oil

Herb Butter Beef Tenderloin Roast Perfectly Done

If you want to impress your family or friends, this Herb Butter Beef Tenderloin Roast is your answer. With juicy

- 4 boneless, skinless chicken breasts - 1 cup finely chopped mushrooms (cremini or button) - 1/2 cup fresh spinach, chopped

Healthy Mushroom Stuffed Chicken Breast Recipe Delight

Looking for a delicious and healthy meal? This Healthy Mushroom Stuffed Chicken Breast recipe is perfect for you! Packed with

- 1 pound pizza dough - 1 cup marinara sauce - 2 cups shredded mozzarella cheese - 1 cup sliced pepperoni

Easy Stromboli Dinner Simple and Tasty Recipe

Craving a tasty, crowd-pleasing dish? You won’t want to miss this Easy Stromboli Dinner recipe! This simple guide helps you

- 3 to 4 pounds beef chuck roast - 4 large yellow onions, thinly sliced - 4 cloves garlic, minced

Savory French Onion Pot Roast Flavorful Family Meal

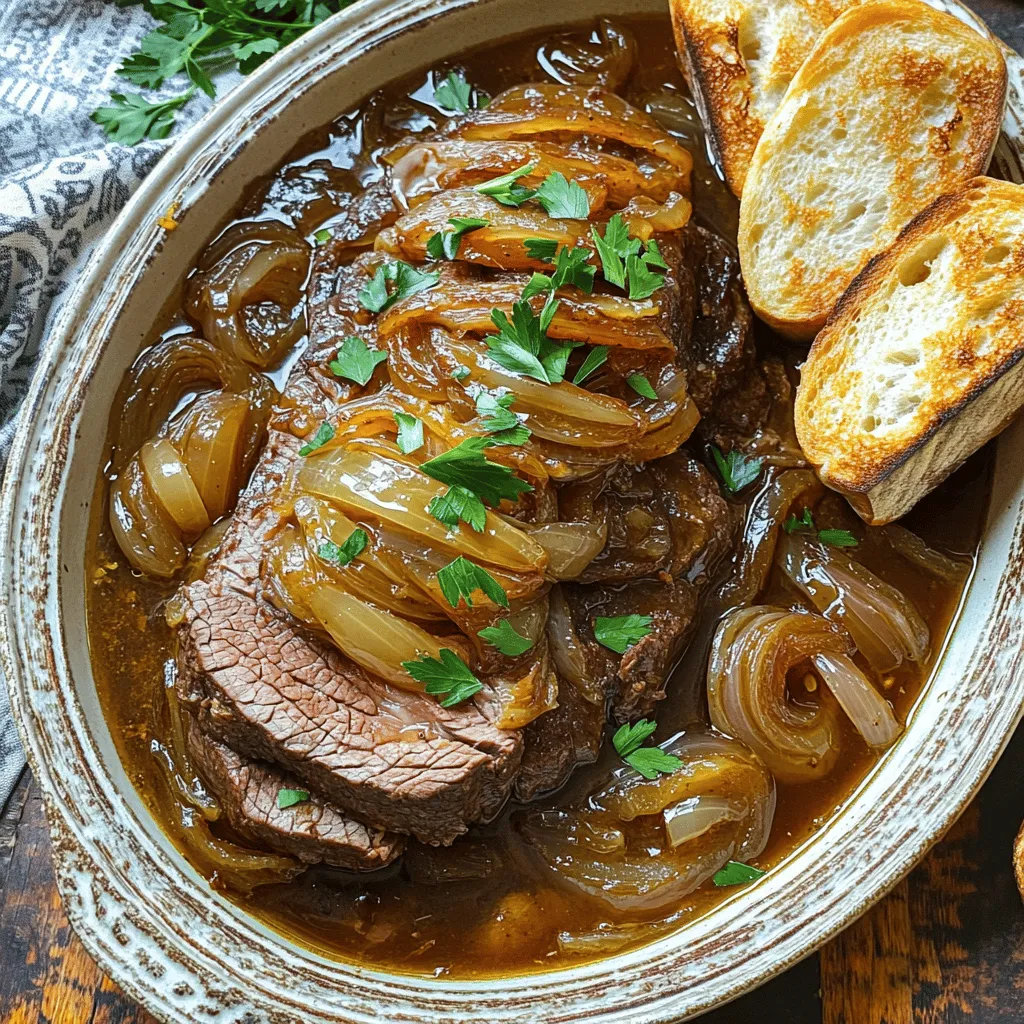
Looking for a heartwarming meal that brings the family together? My Savory French Onion Pot Roast is packed with flavors

- 4 lobster tails - 1/2 cup unsalted butter (1 stick) - 4 cloves garlic, minced - 2 tablespoons fresh parsley, finely chopped - 1 tablespoon fresh thyme leaves, chopped - 1 teaspoon lemon zest - 1 tablespoon lemon juice - 1 teaspoon paprika - Salt and pepper to taste - Lemon wedges, for serving

Lobster Tails with Garlic Herb Butter Sauce Delight

Are you ready to impress your guests with a seafood delight? In my latest recipe, we’ll discover how to make

Older posts
Newer posts
← Previous Page1 … Page40 Page41 Page42 Page43 Next →

dsad

© 2025 pureeatsnow • Built with GeneratePress

Our Policies

  • Copyright Policy
  • Cookie Policy
  • GDPR Policy
  • Privacy Policy
  • Disclaimer
  • Terms Of Use

More Information

  • Home
  • About
  • Contact
  • Appetizers
  • Dessert
  • Dinner
  • Drinks
©2025, pureeatsnow About Back To Top