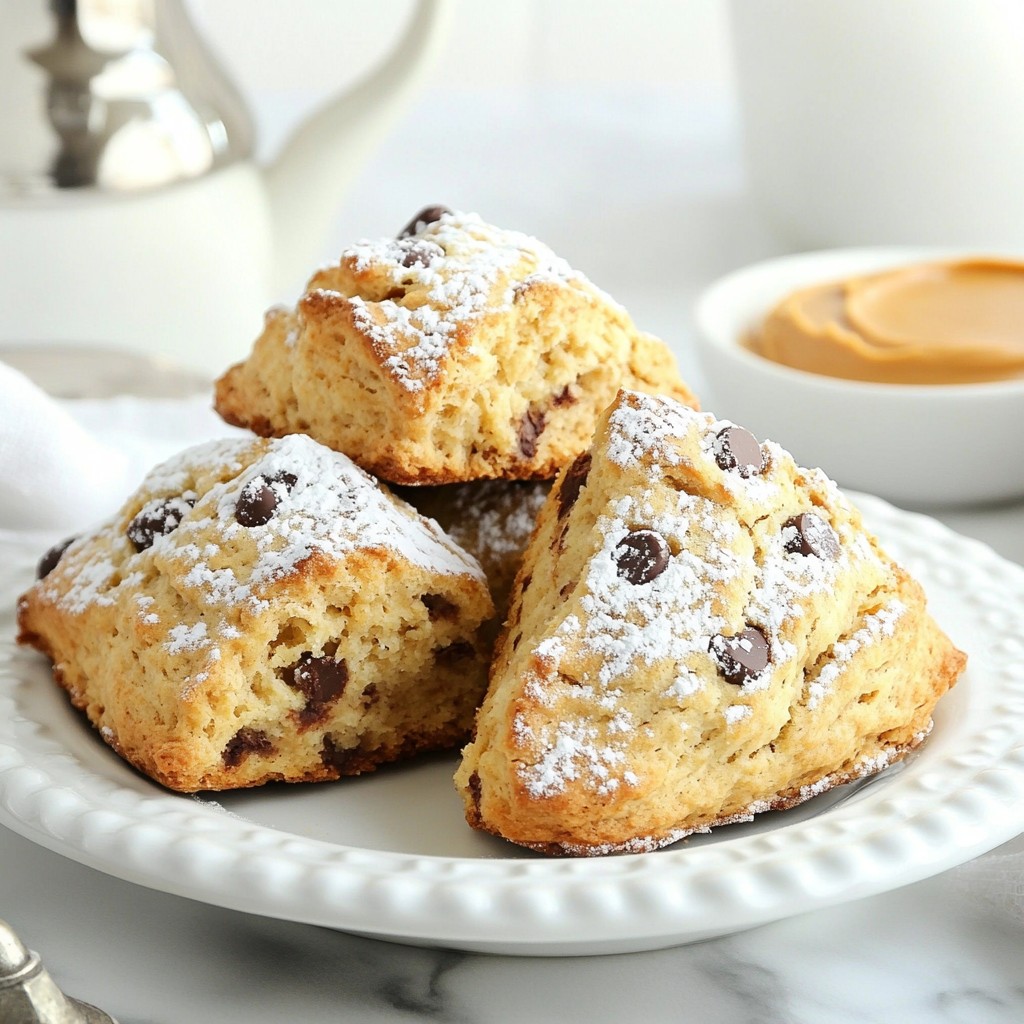
If you love sweet treats, you’ll adore these Chocolate Chip Peanut Butter Scones. They're easy to make and packed with flavor! Imagine warm scones fresh from the oven, oozing with chocolate and rich peanut butter goodness. In this post, I’ll share the simple ingredients, step-by-step instructions, and tips to get perfect results every time. Get ready to impress your family and friends with this tasty treat!
Why I Love This Recipe
- Delicious Flavor Combination: The rich, nutty taste of peanut butter perfectly complements the sweet chocolate chips, creating a delightful treat for any time of day.
- Easy to Make: This scone recipe is simple and quick to whip up, making it perfect for both baking novices and seasoned pros.
- Perfect Texture: The scones are tender and flaky, with a satisfying crunch from the chocolate chips, making each bite a joy.
- Versatile Treat: Enjoy these scones as a breakfast option, an afternoon snack, or a delightful dessert with coffee or tea.
Ingredients
Detailed List of Ingredients
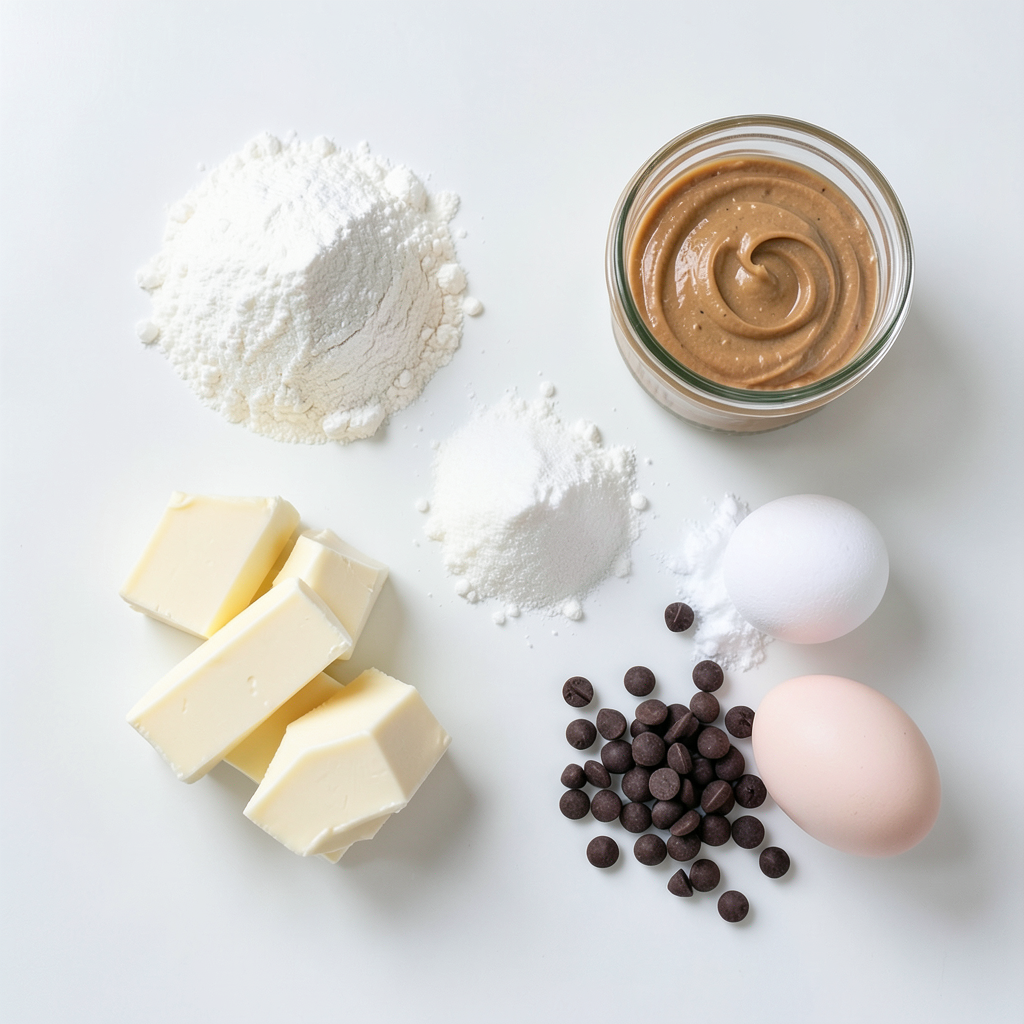
- 2 cups all-purpose flour
- 1/2 cup granulated sugar
- 1 tablespoon baking powder
- 1/2 teaspoon salt
- 1/2 cup unsalted butter, cold and cubed
- 1/2 cup creamy peanut butter
- 3/4 cup whole milk
- 1 teaspoon vanilla extract
- 1/2 cup chocolate chips
- 1 egg (for egg wash)
When making these scones, you can try whole wheat flour instead of all-purpose flour. This will give the scones a nuttier taste and more fiber. If you want a richer flavor, use brown sugar in place of granulated sugar.
For the chocolate chips, choose high-quality ones. Look for brands that use real cocoa butter and have a higher cocoa percentage. This will make your scones taste better. If you love peanut butter, use natural peanut butter without added sugar. This adds a lovely nutty flavor without extra sweetness.
Tips on Choosing High-Quality Chocolate Chips and Peanut Butter
- Look for chocolate chips with a cocoa content of 60% or higher.
- Choose creamy peanut butter that is free of added sugars or oils.
- If you prefer crunchy peanut butter, that works too! It will add texture.
These details ensure you create the best chocolate chip peanut butter scones. Enjoy the process and the tasty results!
Step-by-Step Instructions
Prepping the Oven and Ingredients
First, I set my oven to 400°F (200°C). This is the perfect temperature for baking. Next, I line my baking sheet with parchment paper. This helps prevent sticking and makes for easy cleanup.
Using cold butter is key for scones. Cold butter keeps the scones flaky and tender. I take my unsalted butter straight from the fridge. I cut it into small cubes. This makes it easier to mix into the flour.
Mixing the Dry Ingredients
In a large mixing bowl, I whisk together the flour, sugar, baking powder, and salt. I make sure they are well combined. This helps the scones rise evenly. I use a whisk to break up any lumps. A smooth mix is what we need.
Preparing the Peanut Butter Mixture
In another bowl, I combine the creamy peanut butter, whole milk, and vanilla extract. I stir until the mixture is smooth. This creates a rich flavor for the scones. It's important to mix well so everything combines nicely.
Forming the Scones
When the dough is ready, I turn it out onto a floured surface. I shape it into a disk about 1 inch thick. Then, I cut the disk into wedges, like a pizza. You can also use a biscuit cutter for round shapes. I handle the dough gently to keep it light and airy.
Baking the Scones
I place the scones on the prepared baking sheet. Then, I beat an egg and brush it over the tops. This gives the scones a shiny finish. I bake them for 15-18 minutes. I know they are done when they turn golden brown. The smell is also a great clue!
Tips & Tricks
Perfecting the Scone Texture
To get the perfect scone, don’t overmix the dough. Overmixing makes them tough. Mix just until you see no dry flour. If your dough feels too dry, add a bit more milk. If it’s too wet, sprinkle in a little flour.
Enhancing Flavor
You can add fun mix-ins to the dough. Try adding chopped nuts or dried fruits. They will give your scones a nice twist. You can also use crunchy peanut butter instead of creamy. This adds more texture and flavor.
Serving Suggestions
When serving, get creative! Place the scones on a rustic wooden board. Dust them with powdered sugar for a fancy look. You can also serve them with extra peanut butter or chocolate spread on the side. For drinks, pair these scones with a warm cup of tea or a nice coffee.
Pro Tips
- Use Cold Butter: Ensure your butter is very cold before mixing. This helps create flaky layers in the scones.
- Don’t Overmix: Mix the dough until just combined to avoid tough scones. Some lumps are okay!
- Customize Your Chocolate: Experiment with different types of chocolate chips, like dark or white chocolate, for unique flavor combinations.
- Serve Warm: For the best experience, serve your scones warm out of the oven with a spread of butter or jam.
Variations
Chocolate Chip Substitutes
You can use different types of chocolate in these scones. Dark chocolate adds a rich taste. White chocolate gives a sweet and creamy flavor. Milk chocolate is a classic choice that most people love. Each type of chocolate changes the taste of the scone a little. Feel free to mix them up or try your favorite!
Flavor Combinations
You can get creative with flavors! Adding mashed banana gives a nice sweetness. A sprinkle of cinnamon can make them warm and cozy. You could even try adding some chopped nuts for crunch. These changes can make your scones unique and fun. Experiment with what you like best!
Gluten-Free Options
If you need gluten-free scones, use a gluten-free flour blend. Look for one that works for baking. You can also try almond flour or oat flour. Just note that the texture may change a bit. You might need to adjust the liquid to get the right dough. Enjoy baking your gluten-free treats!
Storage Info
How to Store Scones
To keep your chocolate chip peanut butter scones fresh, use airtight containers. A sealed container helps prevent them from drying out. You can also wrap them in plastic wrap or aluminum foil. Store the scones at room temperature for up to three days. For longer freshness, consider refrigerating them. Just remember to let them return to room temperature before serving for the best taste.
Reheating Scones
When reheating scones, you want to avoid drying them out. Preheat your oven to 350°F (175°C). Place the scones on a baking sheet and cover them with foil. Heat for about 10 minutes. You can also use a microwave. Just wrap each scone in a damp paper towel and heat for about 15-20 seconds. This keeps them soft and warm.
Freezing Instructions
Freezing is a great option if you want to save scones for later. You can freeze them before or after baking. For freezing before baking, shape the dough into wedges or rounds. Place them on a baking sheet and freeze until solid. Then, transfer the frozen scones to an airtight container. You can bake them straight from the freezer; just add a few extra minutes to the baking time. If you freeze them after baking, let them cool completely first. Wrap each scone in plastic wrap, then place them in a freezer-safe bag. They will last up to three months in the freezer.
FAQs
Can I substitute other types of flour?
Yes, you can use other flours. For a gluten-free option, try almond flour or a gluten-free blend. Whole wheat flour also works well. It adds a nutty taste and more fiber. Just remember, these flours may change the texture. You might need to add a bit more liquid to your dough. Always keep an eye on the dough's consistency.
How long will the scones stay fresh?
These scones are best enjoyed fresh. They will stay good for about 2 to 3 days. Store them in an airtight container at room temperature. If you want to keep them longer, consider freezing them. They can last up to a month in the freezer. Just make sure they are fully cooled before you pack them away.
Can I make these scones ahead of time?
Yes, you can make these scones ahead of time. Prepare the dough and shape the scones. Then, cover them and store them in the fridge for up to 24 hours. When ready to bake, just take them out and brush with egg wash. If you want to freeze them, do so before baking. Thaw them in the fridge overnight and bake as usual.
In this blog post, we covered everything you need for perfect scones. You learned about ingredient choices and their substitutes, steps to mix and bake, plus tips to enhance texture and flavor. Remember, the right technique and quality ingredients can make a huge difference. If you follow these steps, you’ll make delicious scones every time. Experiment with flavors and enjoy them fresh. Baking should be fun, rewarding, and tasty. Trust in your skills and enjoy each bite!