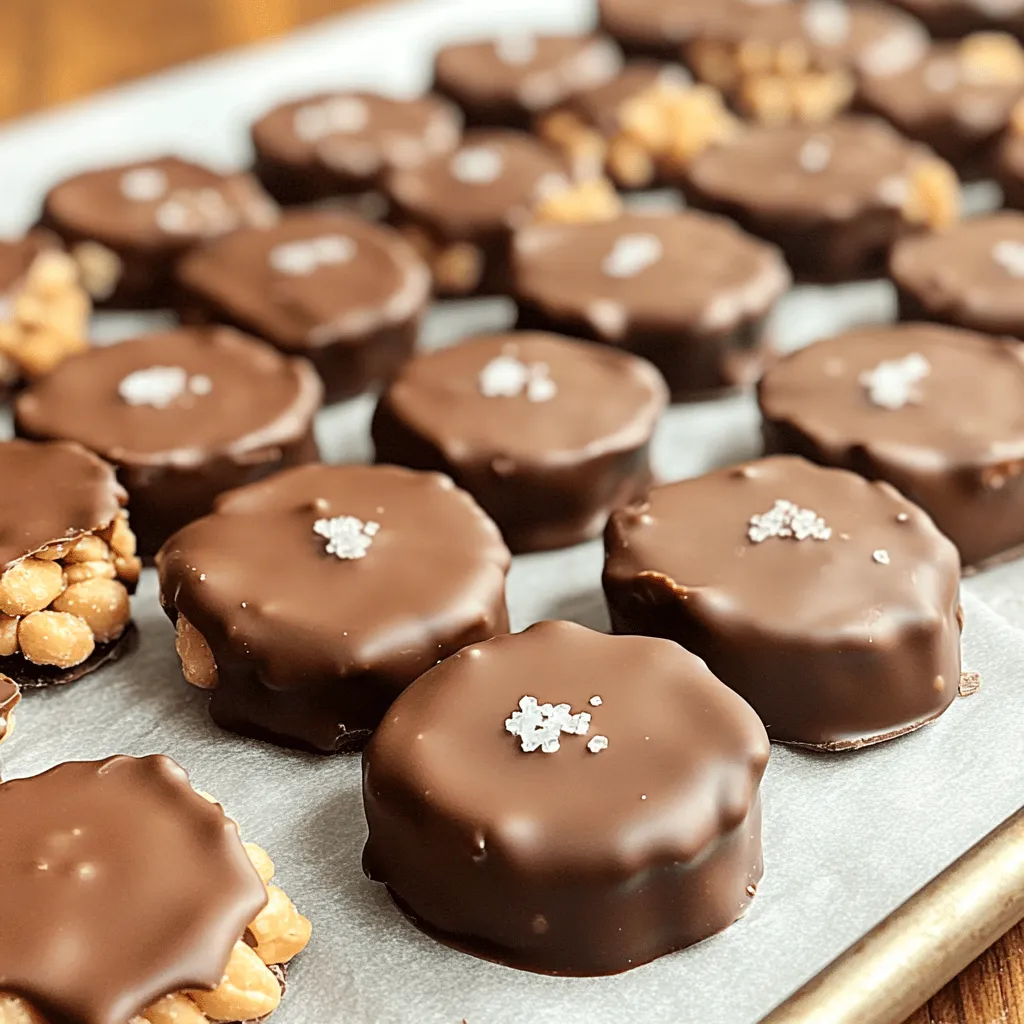
Are you ready to indulge in a sweet treat that combines rich chocolate and crunchy peanuts? Chocolate covered peanut clusters are an easy, fun, and delicious snack that you can make at home! In this guide, I’ll walk you through each step, from selecting the right ingredients to storing your tasty creations. Let’s dive into this irresistible delight and satisfy your sweet tooth!
Ingredients
Detailed Ingredients List
To make these chocolate-covered peanut clusters, gather the following ingredients:
– 2 cups unsalted roasted peanuts
– 1 cup semi-sweet chocolate chips
– 1/2 cup milk chocolate chips
– 1 teaspoon coconut oil (optional)
– Sea salt, for sprinkling (optional)
The unsalted peanuts give a nice crunch. The semi-sweet and milk chocolate chips create a rich flavor. The coconut oil helps the chocolate melt smoothly. If you want a touch of salt, sea salt adds a great finish.
Optional Ingredients
You can add optional ingredients to enhance your clusters:
– Coconut oil helps with melting.
– Sea salt gives a nice contrast to the sweet chocolate.
These extras can elevate the taste and texture of your treat.
Ingredient Substitutions
If you don’t have some ingredients, here are some swaps:
– Use salted peanuts if you prefer a saltier kick.
– You can replace semi-sweet chocolate with dark chocolate for a richer taste.
– If you like, use white chocolate instead of milk chocolate for a sweeter flavor.
These substitutions can help you tailor the recipe to your taste.
Step-by-Step Instructions
Preparation of Baking Sheet
Start by getting your baking sheet ready. Line it with parchment paper. This helps the clusters not stick. Make sure to smooth out any wrinkles in the paper. Set it aside while you prepare the chocolate.
Melting the Chocolate
Next, grab a heatproof bowl. Combine the semi-sweet and milk chocolate chips in it. If you want a smoother mix, add the coconut oil. Now, melt the chocolate. You can do this over a double boiler or in the microwave. If using a microwave, heat it for 30 seconds at a time. Stir the chocolate in between. Keep going until it is fully melted and smooth.
Coating the Peanuts
After melting, let the chocolate cool for a minute. Then, add the roasted peanuts to the bowl. Stir gently to coat each peanut with chocolate. Make sure every peanut gets a good layer of chocolate. This step is key for tasty clusters.
Forming the Clusters
Using a spoon or a cookie scoop, drop clusters onto the prepared baking sheet. Space them about an inch apart. This gives them room to set. You can make them as big or small as you like. Just keep in mind that bigger clusters may take longer to harden.
Chilling and Setting the Clusters
Once you form all the clusters, sprinkle a bit of sea salt on top if you like. Then, place the baking sheet in the fridge. Let the clusters chill for about 30 minutes. This allows the chocolate to fully harden. After they set, gently remove the clusters from the parchment paper. Store them in an airtight container. Enjoy your sweet treat!
Tips & Tricks
Ensuring Smooth Chocolate
To get smooth chocolate, use a double boiler. Place water in a pot and heat. Set a bowl on top with your chocolate chips. Stir as it melts. If you use a microwave, heat for 30 seconds at a time. Stir in between so it melts evenly. Adding coconut oil helps. This makes the chocolate creamy and easy to work with.
Achieving Even Coating
Once your chocolate is smooth, add the peanuts. Stir gently but thoroughly. Make sure every peanut gets coated. If you drop the clusters too quickly, the chocolate may not cover them well. Use a spoon or cookie scoop for even sizes. This helps them look great and taste even better.
Best Practices for Storage
Store your clusters in an airtight container. This keeps them fresh and tasty. Place wax paper between layers if you stack them. They will stay good for about a week at room temperature. If you want to keep them longer, freeze them. They can last for up to three months in the freezer.

Variations
Using Dark or White Chocolate
You can switch from semi-sweet to dark chocolate. Dark chocolate has a rich, bold taste. It also offers more health benefits. It can lower your blood pressure and improve heart health. If you prefer white chocolate, use it for a sweeter touch. White chocolate adds a creamy flavor. Just melt it the same way as the other chocolates.
Adding Different Nuts
Peanuts are great, but you can mix in other nuts too. Almonds, cashews, or walnuts add new textures and flavors. Use a mix of nuts for fun. Each nut brings its own taste. This makes your clusters unique and exciting. Just chop them a bit before adding to the chocolate.
Incorporating Dried Fruits or Seeds
Dried fruits can add sweetness and chewiness. Think raisins, cranberries, or chopped apricots. They pair well with the chocolate and nuts. You can also add seeds like pumpkin or sunflower. They add a crunchy bite. Just sprinkle them in when you mix the peanuts with the chocolate. This creates a colorful and tasty cluster.
Storage Information
Best Storage Practices
To keep your chocolate covered peanut clusters fresh, use an airtight container. Choose one that seals well. Place a piece of parchment paper between layers if stacking them. This keeps the clusters from sticking. Store them in a cool, dry place away from sunlight. Avoid the fridge if you can. The chocolate may get cloudy and lose its shine.
How Long They Last
When stored properly, chocolate covered peanut clusters last about two weeks at room temperature. If you keep them in the fridge, they can last up to three weeks. However, they taste best when fresh. If you notice any change in smell or texture, it’s best to toss them out.
Freezing Chocolate Covered Peanut Clusters
You can freeze chocolate covered peanut clusters for longer storage. Make sure they are fully set before freezing. Place them in a single layer on a baking sheet. Once frozen, transfer them to a freezer-safe container. They will last up to three months in the freezer. To enjoy, simply thaw them in the fridge overnight before serving.
FAQs
How do I make chocolate-covered peanut clusters?
To make chocolate-covered peanut clusters, you need just a few steps. First, line a baking sheet with parchment paper. Next, mix semi-sweet and milk chocolate chips in a heatproof bowl. If you want, add coconut oil for a smooth melt. Melt the chocolate using a double boiler or microwave. Stir every 30 seconds in the microwave until smooth. After melting, let the chocolate cool for a minute. Stir in the roasted peanuts until they are coated. Scoop clusters onto the baking sheet, spacing them apart. Optionally, sprinkle sea salt on top. Chill in the fridge for 30 minutes until set.
Can I use different types of chocolate?
Yes, you can use different types of chocolate. Dark chocolate adds a rich flavor. Milk chocolate offers a sweet taste. White chocolate gives a creamy finish. Mix and match to find your favorite blend. Each type brings its own unique flavor to the clusters.
Are chocolate-covered peanut clusters healthy?
Chocolate-covered peanut clusters can be a treat with some health benefits. Peanuts provide protein and healthy fats. However, chocolate adds sugar and fat. For a healthier option, use dark chocolate. It has less sugar and more antioxidants. Enjoy these clusters in moderation for a balanced treat.
Where can I buy pre-made chocolate-covered peanut clusters?
You can find pre-made chocolate-covered peanut clusters at many grocery stores. Check the candy or snack aisle. You may also find them at specialty candy shops. Online retailers often sell them too. Look for brands that use high-quality ingredients for the best taste.
What is the best way to store chocolate-covered peanut clusters?
To store chocolate-covered peanut clusters, keep them in an airtight container. Place them in a cool, dry place away from sunlight. They can last up to two weeks at room temperature. For longer storage, put them in the fridge. Avoid freezing if possible, as it can change the texture.
You now have a clear guide for making chocolate-covered peanut clusters. We covered ingredients, step-by-step instructions, and helpful tips. Plus, I shared fun variations to customize your treat. Remember to store them well for lasting freshness. Enjoy making your sweet snacks!


