Get ready to indulge in the sweet, nutty goodness of Chocolate Hazelnut Thumbprint Cookies! These delightful treats are not only delicious but also easy to make. Whether you're a beginner or a baking pro, I’ll guide you step by step to create the perfect cookies. From choosing ingredients to mastering the baking process, I promise you’ll impress everyone with this delightful recipe. Let’s dive in and bake something special!
Why I Love This Recipe
- Delicious Flavor Combination: The rich chocolate hazelnut spread paired with the buttery cookie creates a perfect balance of sweet and nutty flavors.
- Easy to Make: This recipe requires simple ingredients and straightforward steps, making it accessible for bakers of all skill levels.
- Perfect for Any Occasion: These cookies are great for holiday gatherings, special celebrations, or just a cozy evening at home.
- Customizable: You can easily modify the recipe by adding different nuts or drizzling additional chocolate on top for a unique twist.
Ingredients
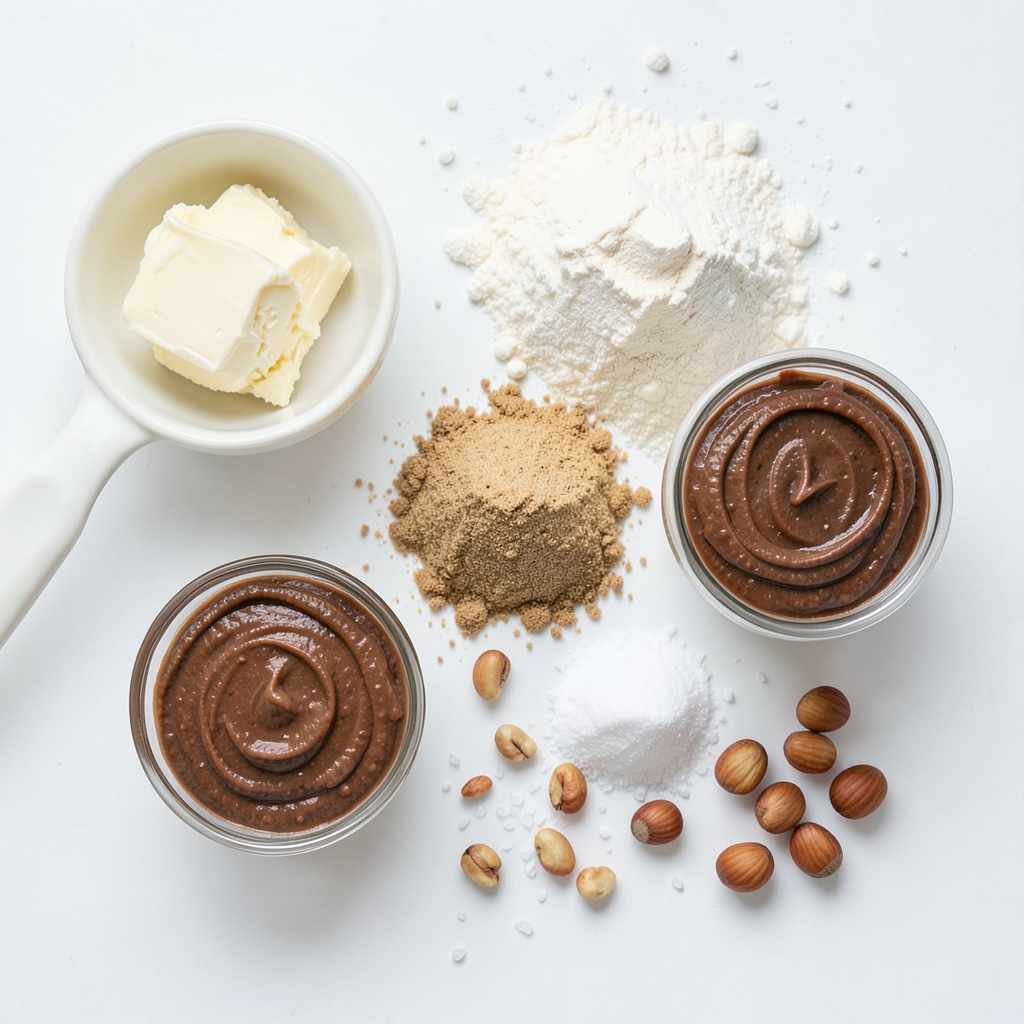
List of Ingredients
- 1 cup unsalted butter, softened
- 3/4 cup granulated sugar
- 1/4 cup light brown sugar, packed
- 1 teaspoon vanilla extract
- 2 cups all-purpose flour
- 1/2 cup ground hazelnuts (finely chopped)
- 1/2 teaspoon baking powder
- 1/4 teaspoon salt
- 1/2 cup chocolate hazelnut spread (such as Nutella)
- 1/4 cup chopped hazelnuts (for topping)
Equipment Needed
- Mixing bowls
- Electric mixer or whisk
- Baking sheet
- Parchment paper
- Measuring cups and spoons
- Round measuring spoon or your thumb
Optional Ingredients
- Sea salt for finishing
These ingredients create a perfect balance of sweet and nutty. The butter makes the cookies soft, while the sugars add just the right amount of sweetness. Ground hazelnuts give a lovely texture and flavor.
Using parchment paper on your baking sheet helps cookies bake evenly. If you want a touch of salty flavor, sprinkle sea salt on top right before baking. This adds a nice contrast to the sweet chocolate hazelnut spread.
Feel free to get creative! You can change up the toppings or add different flavors. Enjoy creating these delicious treats!
Step-by-Step Instructions
Preparation Steps
Start by gathering all your ingredients. You will need:
- 1 cup unsalted butter, softened
- 3/4 cup granulated sugar
- 1/4 cup light brown sugar, packed
- 1 teaspoon vanilla extract
- 2 cups all-purpose flour
- 1/2 cup ground hazelnuts
- 1/2 teaspoon baking powder
- 1/4 teaspoon salt
- 1/2 cup chocolate hazelnut spread
- 1/4 cup chopped hazelnuts
- Optional: Sea salt for finishing
First, preheat your oven to 350°F (175°C). Line a baking sheet with parchment paper. In a large mixing bowl, cream the softened butter with both sugars until fluffy, about 3-4 minutes. This step adds air to the dough, making your cookies light. Next, mix in the vanilla extract.
In another bowl, whisk the flour, ground hazelnuts, baking powder, and salt together. Gradually add this dry mix to the wet ingredients. Stir until just combined. Do not overmix, as this can make the cookies tough.
Now, scoop about one tablespoon of dough and roll it into a ball. Place these balls on the prepared baking sheet with space of about 2 inches between them. Use your thumb or a round measuring spoon to create a small indent in the center of each cookie.
Baking Process
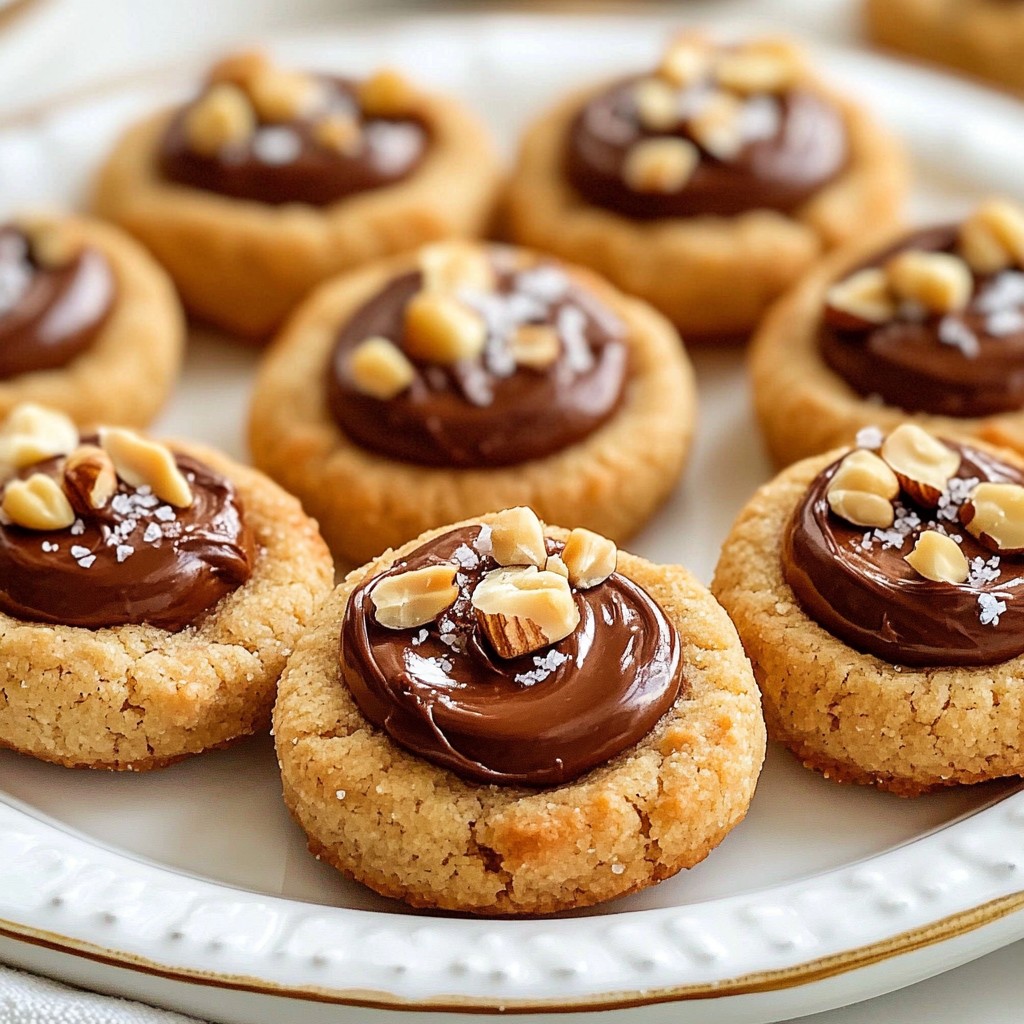
Fill each thumbprint with about one teaspoon of chocolate hazelnut spread. This spread adds a creamy, rich flavor. Sprinkle the chopped hazelnuts around the edges for extra crunch. For a gourmet touch, you can lightly sprinkle sea salt on top.
Bake the cookies in your preheated oven for 12-15 minutes. Watch for the edges to turn golden brown. This indicates they are done.
Cooling and Serving Tips
Once baked, remove the cookies from the oven. Allow them to cool on the baking sheet for 5 minutes. This helps them firm up. After that, transfer the cookies to a wire rack to cool completely.
For serving, arrange the cookies on a decorative platter. Drizzle extra chocolate hazelnut spread on top for an eye-catching finish. Optionally, you can garnish with whole hazelnuts. This adds a nice visual touch and enhances the flavor.
Tips & Tricks
Achieving the Perfect Texture
To get the best texture, use softened butter. This helps create a fluffy dough. When mixing, stop as soon as you see no dry flour. Overmixing makes cookies tough. The dough should be soft but not sticky. For a nice bite, use finely chopped hazelnuts. They add crunch without being too coarse.
Common Mistakes to Avoid
One common mistake is not measuring flour correctly. Too much flour makes cookies dry. Use a spoon to scoop flour into your measuring cup, then level it off. Another mistake is pressing too hard when making the thumbprint. A gentle press creates the right indent. Finally, don’t skip the cooling step. Allow cookies to cool on the baking sheet before moving them. This helps them set and keeps them from breaking.
Enhancing Flavor with Variations
You can easily change the flavor of your cookies. Try adding orange zest for a fresh twist. A little almond extract works well too. For a richer taste, mix in cocoa powder. If you love spices, add cinnamon or nutmeg. You can also switch the chocolate hazelnut spread for other flavors like caramel or peanut butter. The options are endless!
Pro Tips
- Chill the Dough: For easier handling, chill the dough in the refrigerator for 30 minutes before rolling into balls. This helps prevent the cookies from spreading too much while baking.
- Use Fresh Ingredients: Always use fresh hazelnuts and high-quality chocolate hazelnut spread for the best flavor. Stale or low-quality ingredients can affect the overall taste of your cookies.
- Experiment with Fillings: While chocolate hazelnut spread is delicious, feel free to experiment with different fillings like fruit preserves or caramel for a unique twist on these cookies.
- Store Properly: Keep your cookies in an airtight container at room temperature for up to a week. To keep them fresh longer, you can freeze them for up to three months.
Variations
Nut-Free Alternative
If you want nut-free cookies, swap ground hazelnuts with ground oats. Use 1/2 cup of finely ground oats. This keeps the texture similar while ensuring no nuts are in the mix. You can also use sunflower seed butter instead of chocolate hazelnut spread. This keeps your cookies creamy and delicious.
Flavor Infusions
Add fun flavors to your cookies! For a hint of coffee, mix in 1 teaspoon of espresso powder with the dry ingredients. If you love spice, add 1/2 teaspoon of cinnamon for warmth. You can also try orange zest for a bright and zesty twist. Just mix in a tablespoon of zest before baking.
Different Fillings Options
While chocolate hazelnut spread is classic, feel free to explore other fillings. Use raspberry jam for a fruity kick. Almond butter offers a creamy and nutty taste. Or, try cream cheese frosting for a sweet surprise. The options are endless, so get creative and find your favorite!
Storage Information
How to Store Leftover Cookies
To keep your cookies fresh, place them in an airtight container. This method helps prevent them from drying out. You can layer them with parchment paper if you stack them. Store the container in a cool, dry place. They will stay soft and tasty for about a week.
Freezing Instructions
If you want to save cookies for later, freezing is a great option. First, let the cookies cool completely. Then, place them in a single layer on a baking sheet. Freeze them for about an hour. Once they are firm, transfer the cookies to a freezer-safe bag. They can last up to three months in the freezer.
Shelf Life Tips
To enjoy the best flavor, eat these cookies within a week if stored at room temp. If frozen, consume them within three months for optimal taste. Always check for any signs of freezer burn. If your cookies look or smell off, it’s best to discard them.
FAQs
What is the best way to make a thumbprint?
The best way to make a thumbprint is to use your thumb. After rolling the dough into balls, press your thumb gently in the center of each ball. Aim for a deep enough indent to hold the filling. If your thumb sticks, lightly flour it. This will help create a neat shape.
Can I use other types of nuts?
Yes, you can use other nuts. Almonds, walnuts, or pecans work well. Just grind the nuts finely, like hazelnuts. This keeps the texture smooth and tasty. You can also swap the topping nuts for variety. Each nut adds a unique flavor to your cookies.
How can I make these cookies gluten-free?
To make these cookies gluten-free, replace all-purpose flour with gluten-free flour. Look for a blend that mimics regular flour. You can also use almond flour or coconut flour. Each option changes the flavor a bit. Just make sure to check the baking powder for gluten-free labeling.
In this blog post, we explored key ingredients and equipment needed for perfect cookies. We discussed step-by-step instructions from prep to serving. I shared essential tips for great texture and avoiding mistakes. You can also try fun variations such as nut-free options and flavor infusions. Lastly, I covered how to store your cookies and answer common questions. Remember, baking should be fun! Enjoy making your cookies and share them with friends. Your creations will surely impress everyone!